
MR6000 - Car stereo VDO DAYTON - Free user manual and instructions
Find the device manual for free MR6000 VDO DAYTON in PDF.
User questions about MR6000 VDO DAYTON
0 question about this device. Answer the ones you know or ask your own.
Ask a new question about this device
Download the instructions for your Car stereo in PDF format for free! Find your manual MR6000 - VDO DAYTON and take your electronic device back in hand. On this page are published all the documents necessary for the use of your device. MR6000 by VDO DAYTON.
USER MANUAL MR6000 VDO DAYTON
Owner's manual and mounting instruction
Only use this system when it is safe to do so. It is more important to keep your eyes on the road and your hands on the wheel.
Due to constantly changing traffic conditions, we unfortunately cannot guarantee 100% precision under all circumstances.
Attention!
Operating instructions
Illustrations
Installation Instruction
Guarantee and service Page 343
Thank you for choosing a VDO Dayton MR 6000. These operating instructions should be read carefully to enable the utilisation of the diverse MR 6000 functions. After reading, the instructions should kept close at hand (e.g. in the glove compartment).
The functions of the components TV 6000 (TV tuner) and MW 6000 (6 compartment CD changer) which are available as accessories, are described in these operating instructions. Information on installation and connection can be found in the installation instructions for these components.
Operation of the optional navigation system is described in the operating and installation instructions for navigation computer.
Contents
- PRECAUTIONS 9
WARNING 9
USER INFORMATION 9
- DESIGNATION 10
Button designation 10
JOYSTICK operation 11
- OPERATING MODE DISPLAY 12
Joint display of all operating modes 12
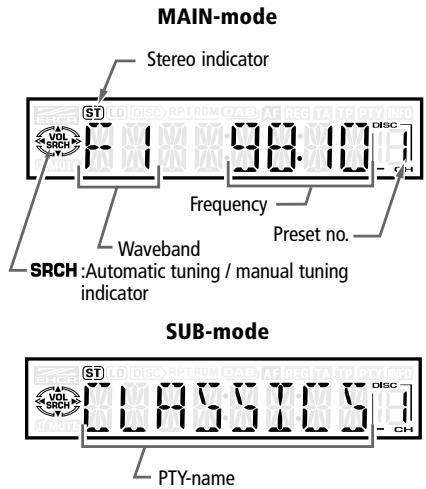
RADIO mode display 12
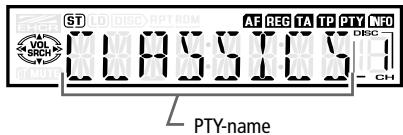
RDS mode display 13
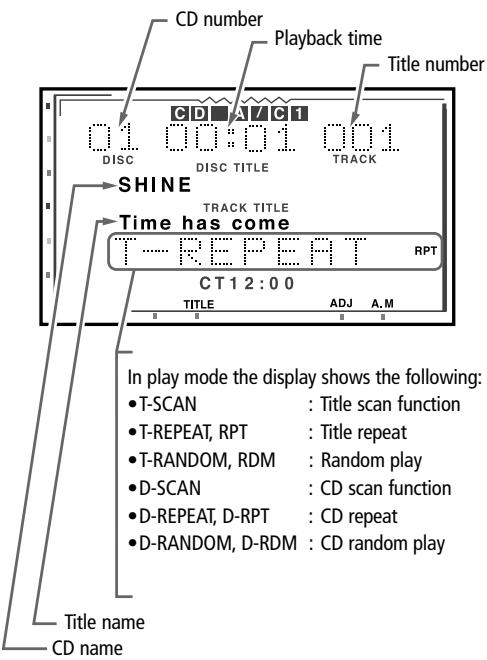
CD changer mode display 13
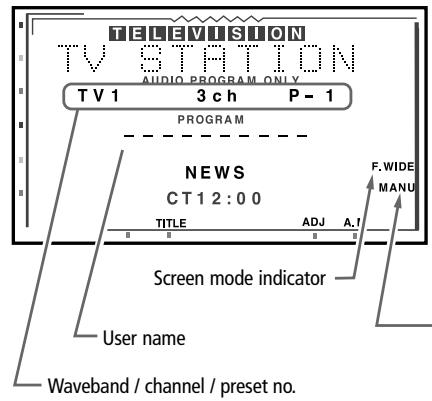
TV mode display 14
- REMOVABLE OPERATING PANEL 15
Removing the operating panel 15
Installing the operating panel 15
- HANDLING PRECAUTIONS 16
LCD screen / general 16
Cleaning 16
- OPERATION 17
Basic operation 17
Switching on / off 17
Selecting operating mode 17
Adjusting volume 17
Switching the display mode 17
Mode display 18
Opening and rotating the display 18
Switching the monitor on / off 18
Mute function 18
Sound processor 19
Sound programming 19
Adjusting bass and treble 20
Adjusting balance and fader 20
Loudness 20
CT function (time) 20
Radio operation 21
Listening to radio 21
Tuning 21
Automatic search 21
Manual tuning 21
Recalling a preset 22
Manual storage 22
Automatic storage 22
Preset scan 22
RDS operation 23
RDS (Radio Data System) 23
AF function 23
REG function (regional programme) 23
Manual tuning of a regional programme in the same station network 23
TA function (traffic announcement) 24
Automatic storage function for TP station 24
PTY 24
PTY tuning 24
PTY search 25
PTY preset memory 25
Programme type selection mode for extended unit 26
Emergency announcement 26
Changing the PTY display language 26
Volume adjusting for TA, emergency announcement (ALARM) and PTY 26
CD changer operation 27
CD changer functions 27
Play pause 27
Display of CD titles 27
Selecting a CD 27
Title selection 27
Fast forward / rewind 28
TOP function 28
Scan play - SCN 28
CD scan play - S-SCN 28
Repeat - RPT 28
CD repeat - D-RPT 28
Random play - RDM 28
CD random play - D-RDM 28
Television operation 29
Television functions 29
Television 29
Video play 29
Tuning 29
Automatic search 29
Manual tuning 29
Recalling a preset 30
Manual storage 30
Automatic storage - AS 30
Preset scan - SCAN 30
Switching the video system between NTSC and PAL 30
Entering the TV receiver range 30
Entering the TV diversity 31
Adjusting brightness, colour and hue 31
Switching the TV picture format 31
Navigation system & reversing camera..... 32
Setting the unit to navigation system 32
Switching between navigation and audio / video display 32
Using the navigation system 32
Reverse monitoring via reversing camera .... 32
Setting the unit to reversing camera 32
Other functions 33
Continuous button illumination 33
Entering titles 33
Display of title list 33
Setting for mobile radio interruption 34
Setting the vehicle loudspeaker output for the mobile telephone 34
- FAULT FINDING 35
- FAULT DISPLAYS 37
- TECHNICAL DATA 38
1. PRECAUTIONS
WARNING
For safety reasons, the driver should not watch television or operate the controls whilst driving. Please note that it is illegal in certain countries to watch or operate the television whilst driving.
The volume should be set so that outside noises (e.g. emergency vehicles) remain audible.
- If it is very cold in the vehicle and the CD player is operated immediately after switching on the heater, the formation of condensation on the CD or on the optical components of the CD player is possible, which may prevent correct playing of the CD. If condensation has formed on the CD, it should be removed using a soft cloth. If condensation has formed on the optical components, do not use the CD player for approximately one hour. The condensation evaporates during this time and normal operation is then possible.
- Strong vibration can be caused by driving on bad road surfaces, which may cause individual points on the CD to be jumped over.
-
This unit is equipped with a precision mechanism. In the event of a fault, never open the housing, disassemble the unit or lubricate the rotating components.
-
Television reception
When receiving television stations, the signal strength varies due to the movement of the vehicle. It is therefore possible that, in certain cases, no clear pictures are received.
- Television signals are propagated "quasi-optically". Reception can thus be impaired by buildings, hills or other obstacles.
- External factors such as power lines for electric trains, high voltage lines and signalling devices can interfere with the picture or cause noise.
- If the reception is bad, a station with good reception should be selected.
USER INFORMATION:
CHANGES OR MODIFICATIONS, WHICH ARE NOT APPROVED BY THE MANUFACTURER OF THIS PRODUCT WILL INVALIDATE THE WARRANTY.
Button designation
Note:
- Please refer to the illustration on page 3 (fold out) when reading this section.
Retracted display
/ FUNC (switch on / off / function) button
2 VOL / (volume) and SEARCH / buttons
3 II (play / pause) button
4 Display
AS/SCN(AutoStore/scanfunction) button
Release button for removable operating panel
AF/RPT (alternative frequency/repeat) button
3 PTY/RDM (programme type/random play) button
9 SOUND (sound processor) button
10 INFO / TA (traffic announcement) button
1 OPEN (extend LCD display) button
DISP (switch display mode)
Preset buttons (1 to 6)
14 MUTE (mute function) button
15 BAND (waveband) button
Extended display
16 LCD colour display
17 AUDIO (audio mode) button
18 ADJ (adjust) button
19 TITLE (title) button
20 WIDE (screen mode) button
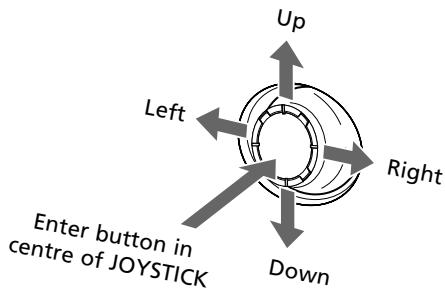
JOYSTICK (multifunction control)
2 Infrared sensor
Note:
- Many settings are performed via JOYSTICK ②. Therefore, it is essential that this section is read to understand its operation.
Selection of menu items
To select, i.e. mark menu items, press the JOystICK upwards or downwards.
- Settings for selected menu items
Settings for a menu item can be performed after it has been marked. For this purpose, press the JOYSTICK to the right or left. Press the button in the centre of the JOYSTICK to enter the setting.
- If "Push NEXT" appears on the display:
- Press the button in the centre of the JOYSTICK to select the menu item and to call up its settings on the display.
- Press the JOYSTICK upwards or downwards to mark the desired settings. Then press the button in the centre of the JOYSTICK to enter the setting.
Return to previous operating mode
Press the JOYSTICK to the right or left to select "MENU" and then press the button in the centre of the JOYSTICK.
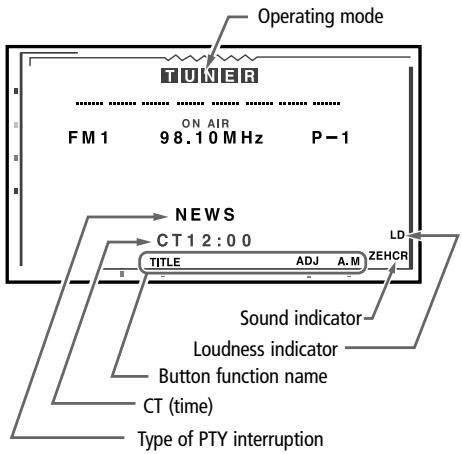
3. OPERATING MODE DISPLAY
The LCD screen and the front display of the MR 6000 utilise the following symbols etc. to indicate operating mode and selected functions.
Joint display of all operating modes
LCD COLOUR SCREEN
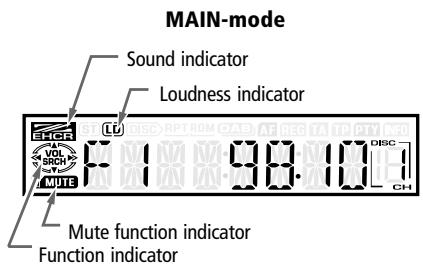
FRONT DISPLAY
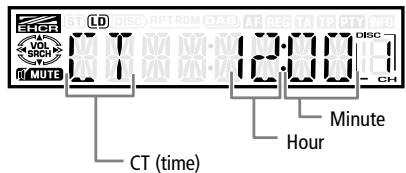
Time mode
RADIO mode display
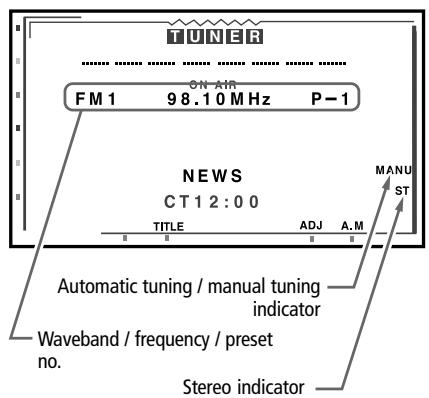
LCD COLOUR SCREEN
FRONT DISPLAY
LCD COLOUR SCREEN
FRONT DISPLAY

CD changer mode display
LCD COLOUR SCREEN
FRONT DISPLAY
MAIN mode
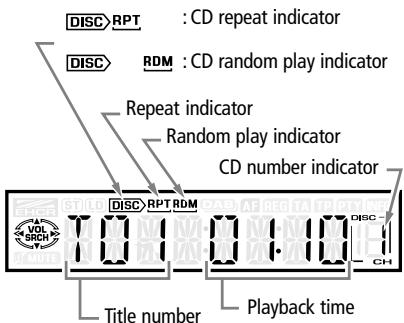
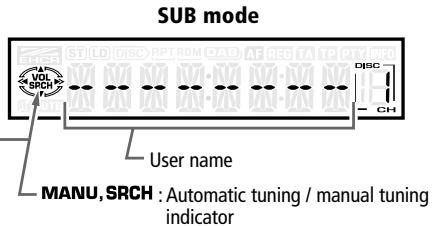
SUB mode

LCD COLOUR SCREEN
FRONT DISPLAY

4. REMOVALE OPERATING PANEL
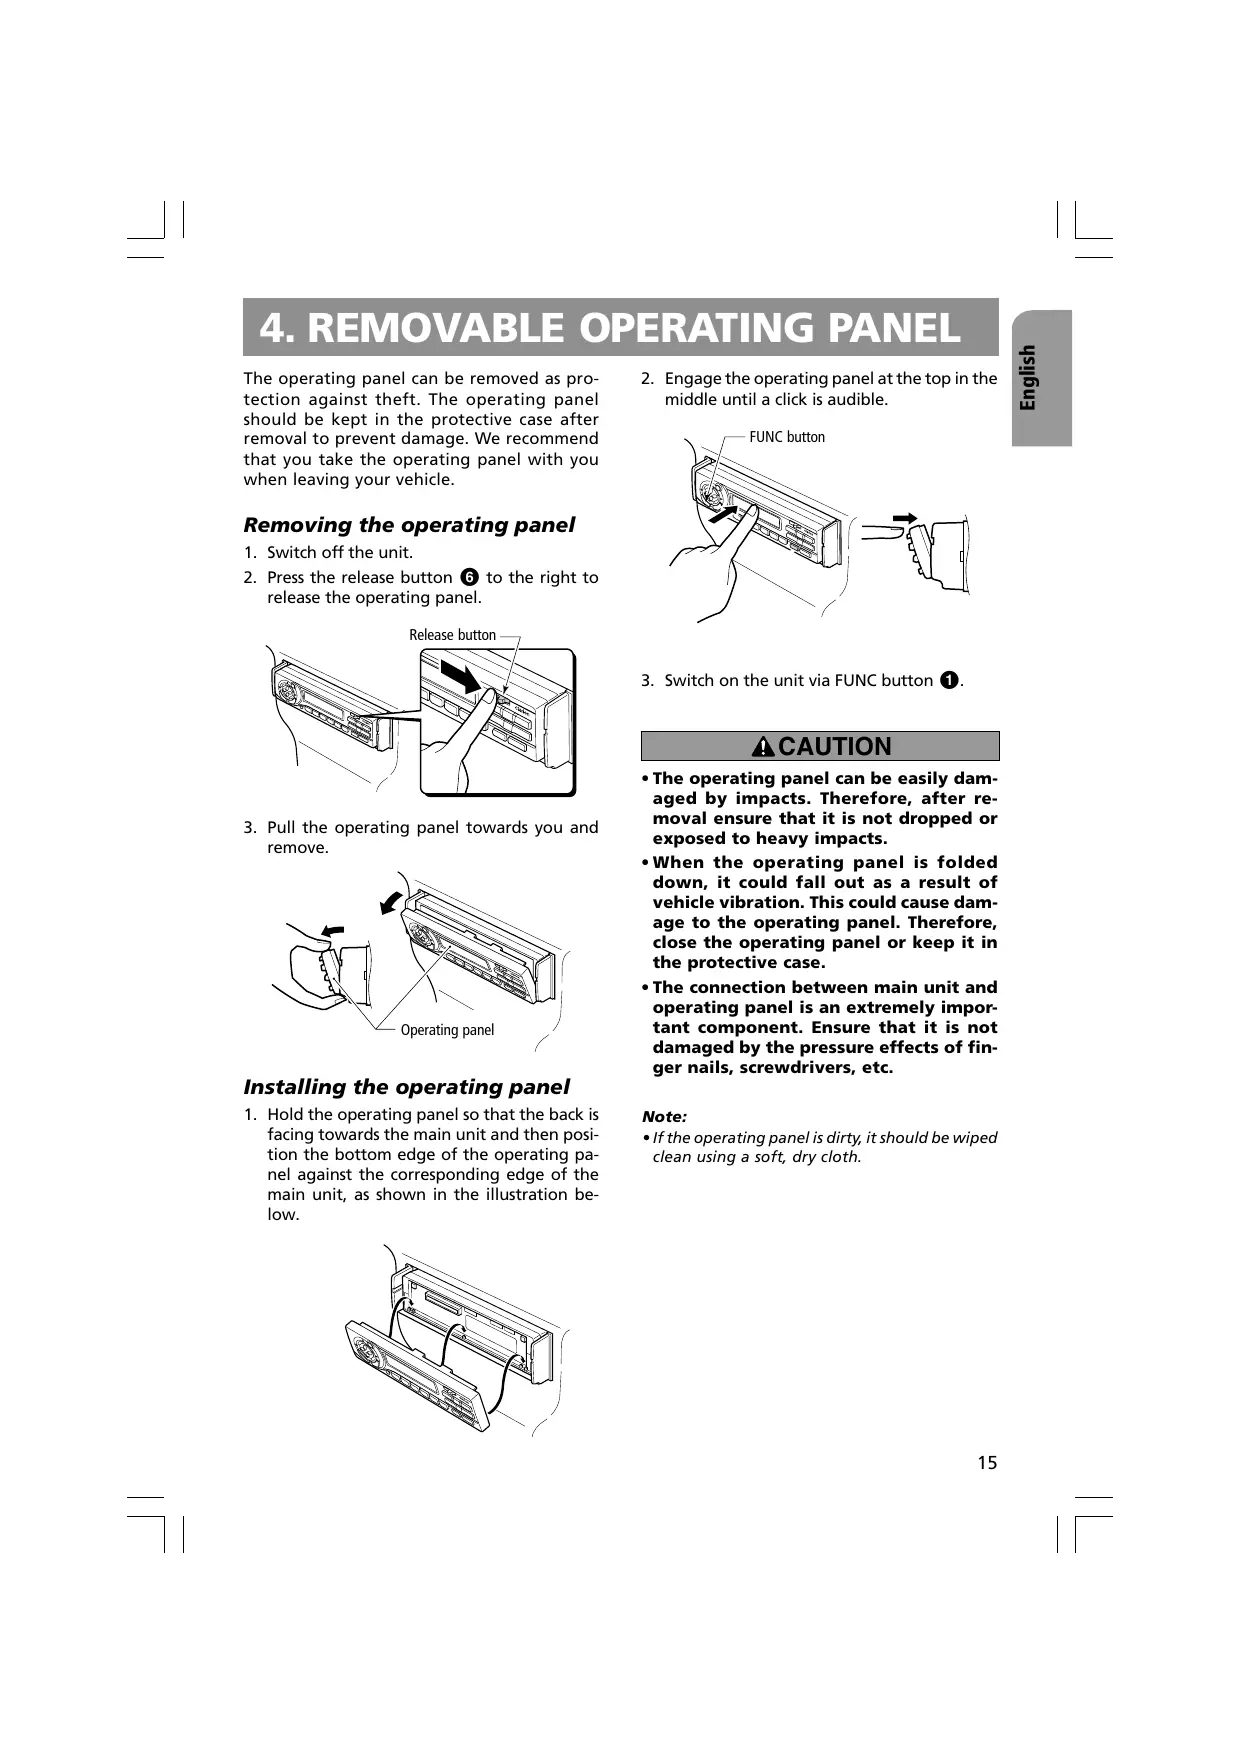
The operating panel can be removed as protection against theft. The operating panel should be kept in the protective case after removal to prevent damage. We recommend that you take the operating panel with you when leaving your vehicle.
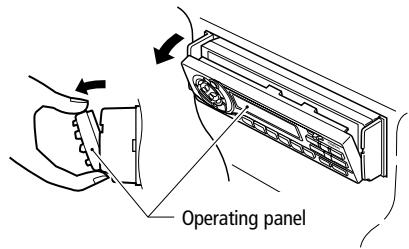
Removing the operating panel
- Switch off the unit.
- Press the release button 6 to the right to release the operating panel.
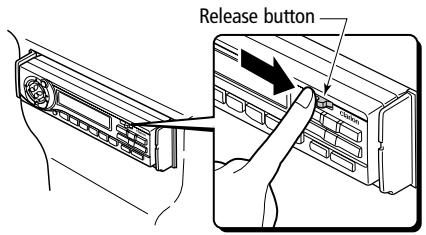
- Pull the operating panel towards you and remove.
Installing the operating panel
- Hold the operating panel so that the back is facing towards the main unit and then position the bottom edge of the operating panel against the corresponding edge of the main unit, as shown in the illustration below.
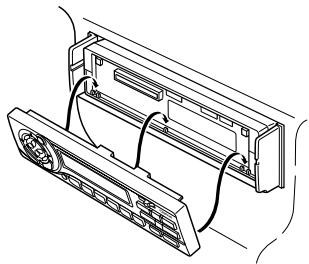
- Engage the operating panel at the top in the middle until a click is audible.
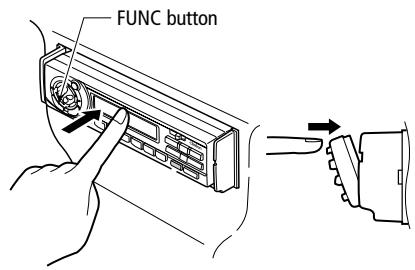
- Switch on the unit via FUNC button 1.
CAUTION
- The operating panel can be easily damaged by impacts. Therefore, after removal ensure that it is not dropped or exposed to heavy impacts.
- When the operating panel is folded down, it could fall out as a result of vehicle vibration. This could cause damage to the operating panel. Therefore, close the operating panel or keep it in the protective case.
- The connection between main unit and operating panel is an extremely important component. Ensure that it is not damaged by the pressure effects of finger nails, screwdrivers, etc.
Note:
- If the operating panel is dirty, it should be wiped clean using a soft, dry cloth.
5. HANDLING PRECAUTIONS
LCD screen / general
The following precautionary measures should be observed in order to prolong the service life:
- If the vehicle is parked in the open for long periods, the LCD screen should be stored in the main unit.
The LCD screen should be operated within a temperature range of 0 to 60^ . - Ensure that no liquids from drinks, umbrellas etc. come into contact with the unit. These could damage the internal circuits.
- The unit must not be disassembled or modified in any way. This could cause damage.
- Do not pull out the LCD screen and use as a storage area. The LCD screen must also not be exposed to impacts, as this can cause breakages, deformation or other forms of damage.
- Ensure that the screen cannot be burned by cigarettes. This could damage or deform the housing.
- If a fault occurs, the unit should be examined by the dealer who supplied it.
-
When the screen is in the inclined position, do not insert any objects into the gap between the LCD screen and the main unit or reach into the gap.
-
When the screen is in the inclined position, do not place any objects on the display.
- Under extremely cold conditions, the movement of the screen may be slow or the screen may be dark. These are however not faults. These effects are eliminated when the temperature increases.
- Small black and shiny points on the LCD screen are inherent to LCD products.
- The LCD screen may switch off temporarily during opening or closing, when the motor is switched off or if it is cold. This is however not a fault. If this occurs, repeat the operation.
Cleaning
- Cleaning the housing
Carefully wipe off the dirt using a soft, dry cloth.
If the unit is extremely dirty, carefully wipe off the dirt using a soft cloth soaked in a neutral cleaning agent which has been diluted with water. Then wipe over using a dry cloth.
Never use benzene, thinners, vehicle cleaner etc., as these substances can damage the housing or cause the paint to flake. Staining may also be caused if the housing is in contact with rubber or plastic products over a long time period.
- Cleaning the LCD screen
Dust accumulates on the LCD screen and it should therefore be wiped regularly with a soft cloth.
The screen surface is susceptible to scratching and contact with hard objects should therefore be avoided.
6. OPERATION
Basic operation
Note: Please refer to the diagrams on page 3 (fold out) when reading this section.
Note:
- Switch on the unit when the engine is running.
- Do not use the unit for long time periods with the engine switched off. It may no longer be possible to start the engine if the battery has been overloaded. The service life of the battery will also be shortened.
Switching on / off
- Switch on the unit via FUNC button ①.
- The illumination and the display of the unit are activated. The unit automatically stores the last operating mode to be set and automatically sets this operating mode on the display.
- Press and hold the FUNC button for at least 1 second to switch off the unit.
Note:
- System check
After installation and completion of all wiring connections, an automatic system check is performed before the system can be operated for the first time. After connection to the vehicle power supply, the displays "SYSTEM" and "PUSH PWR" appear alternately on the monitor.
Press the FUNC button 1.
The system now performs a system check. As soon as "COMPLETE" appears, press the FUNC button again.
Selecting operating mode
- Press the FUNC button ① to change the operating mode.
- Each time the FUNC button is pressed, the operating mode is changed in the following sequence:
Radio operation CD changer Television operation Radio operation ...
Adjusting volume
Move the VOL button 2 in the direction of the arrow (upwards) or (downwards) to adjust the volume.
: Increases the volume
: Decreases the volume
- The volume level shown on the display covers a range from 0 (minimum) to 33 (maximum).
CAUTION
The volume should be set so that outside noises (e.g. emergency vehicles) remain audible.
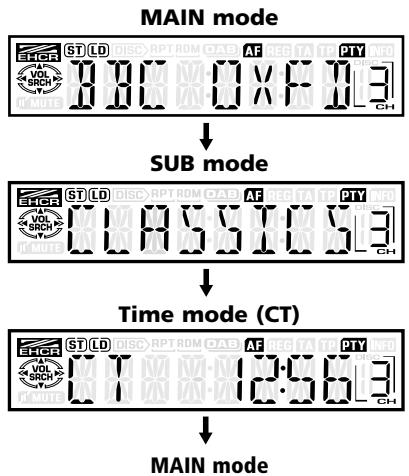
Switching the display mode
Retracted unit:
Actuate the DISP button to set the desired display mode. Each time the DISP button is actuated, the display mode is changed in the following sequence:
Note:
-
Once the desired display mode is set, this becomes the standard mode. When a function setting is performed, e.g. for volume, the unit switches temporarily to the mode for the function. The unit switches back to the desired mode a few seconds after setting.
-
If a name has been entered, this appears in SUB mode. If no name has been entered, the display shows "--------". The procedure for entering data is explained under "Entering titles" in the section "Other functions".
- Special characters in CD and TV names or station abbreviations in RDS are not shown on the front display. In this case, the corresponding positions remain empty.
- If no RDS time data is received, "CT --:" appears on the display.
Mode display
Extended unit:
Press the TITLE button to recall the title list. Station designations, etc. can be found in the title list stored under preset buttons 1 to 6.
- The programme names of the presets are displayed in RDS operating mode.
- For further information see "Display of title list".
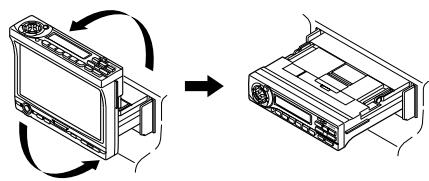
Opening and rotating the display
Note:
- Do not place any objects on the open display.
- Do not allow any objects to fall onto the moving part.
-
The display must not be exposed to impacts.
-
Press the OPEN button to extend the LCD colour display.
-
The LCD colour display is retracted again if left in the horizontal position for at least 10 seconds.
-
Fold the LCD colour display upwards and set to the optimal viewing angle.
The display is activated as soon as the LCD colour display is in the vertical position. Simultaneously, the display 4 on the unit front is switched off.
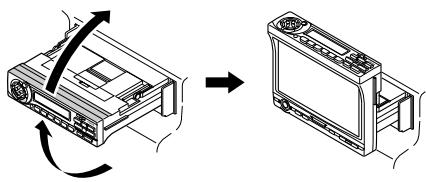
CAUTION
Only rotate the display when it is fully open. When setting the display angle, ensure that you do not trap your fingers in the operating panel or in the instrument panel of the vehicle.
- Turn the unit horizontally to the detent position to retract the LCD colour display.
Switching the monitor on / off
Each time the DISP button 12 is actuated, the monitor is switched on or off.
- If a button is pressed during operational readiness, the screen is switched on.
Mute function
The loudspeakers are alternately switched between mute and on by pressing the MUTE button 16.
If mute function is active, "MUTE" appears on the display.
Sound processor
The unit is equipped with a sound processor with 3 pre-programmed tone types (sounds). Set the sound as desired.
- The initial factory setting is "Z-EHCR OFF".
If a tone type is selected (1-3), "Z-EHCR" illuminates on the display.
"Z-EHCR 1" (tone type 1):
Setting for increasing bass.
"Z-EHCR 2" (tone type 2):
Setting for increasing treble.
"Z-EHCR 3" (tone type 3):
Setting for increasing bass and treble.
"Z-EHCR OFF" (sound processor off):
Neither bass nor treble are increased via the Z enhancer.
Retracted unit:
Each time the SOUND button 9 is actuated, the tone type is changed in the following sequence:
"Z-EHCR 1" -> "Z-EHCR 2" -> "Z-EHCR 3" -> "Z-EHCR OFF" -> "Z-EHCR 1"...
Extended LCD screen:
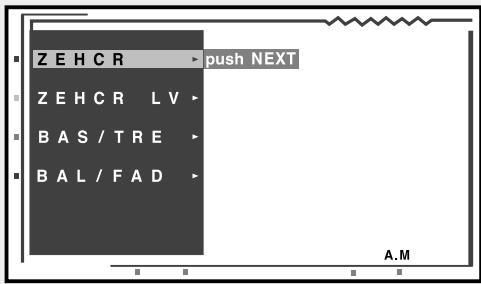
- Press the AUDIO button to switch to AUDIO operating mode.
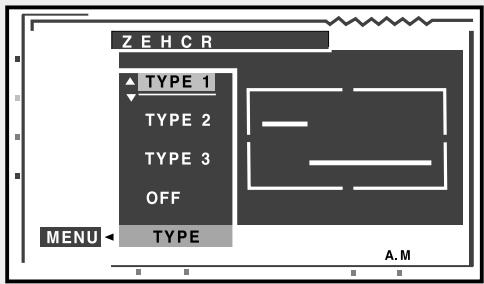
- Press the JOYSTICK ③ upwards or downwards and select "Z-EHCR". Press the enter button in the centre of the JOYSTICK to recall the sound processor menu.
- Press the JOYSTICK upwards or downwards to select between the following tone types.
"TYPE 1" (tone type 1)
"TYPE 2" (tone type 2)
"TYPE 3" (tone type 3)
"OFF" (sound processor off),
and then press the enter button in the centre of the JOYSTICK to select the relevant tone type.
-
After setting, press the JOYSTICK to the right or left to recall "MENU". Subsequently, press the enter button in the centre of the JOYSTICK to switch to AUDIO operating mode.
-
Press the AUDIO button to switch from AUDIO operating mode to STANDARD display.
Sound programming
Note:
-
This function is only available with the unit extended.
-
Press the AUDIO button to switch to AUDIO operating mode.
- Press the JOYSTICK ③ upwards or downwards to select "Z-EH LVL". Press the enter button in the centre of the JOYSTICK to recall the sound processor menu.
-
Press the JOYSTICK upwards or downwards to select the level "Z-EN LVL" for the tone type.
-
If tone type 1 is set, the bass can be set within a range of ±2.
- If tone type 2 is set, the treble can be set within a range of ±2.
-
If tone type 3 is set, the bass and treble can be set within a range of ±2.
-
After setting, press the JOYSTICK to the right or left to access "MENU". Subsequently, press the enter button in the centre of the JOYSTICK to switch to AUDIO operating mode.
Adjusting bass and treble
Note:
This function is only available with the unit extended.
- This function is only available when the sound processor is switched off ("Z-EHCR off").
- Press the AUDIO button to switch to AUDIO operating mode.
- Press the JOYSTICK ③ upwards or downwards to select "BAS/TRE". Press the enter button in the centre of the JOYSTICK to recall the setting menu BASS/TREBLE.
- Press the JOYSTICK to the right or left to recall either the bass ("BASS") or treble ("TRE-BLE") level.
- Press the JOYSTICK upwards or downwards to set the level (setting level: -6 to 6).
- After setting, press the JOYSTICK to the right or left to access "MENU". Subsequently, press the enter button in the centre of the JOY-STICK to switch to AUDIO operating mode.
Adjusting balance and fader
Note:
-
This function is only available with the unit extended.
-
Press the AUDIO button to switch to AUDIO operating mode.
- Press the JOYSTICK ③ upwards or downwards to select "BAL/FAD". Press the enter button in the centre of the JOYSTICK to recall the setting menu BAL/FAD.
- Press the JOYSTICK to the right or left to set either the balance of volume between the right and left level channels ("BALANCE") or between front and rear channels ("FADER").
- Press the JOYSTICK upwards or downwards to accept the setting.
Setting range for balance: L13 to R13 Setting range for fader: Front 12 / Rear 12
- After setting, press the JOYSTICK to the right or left to access "MENU". Subsequently, press the enter button in the centre of the JOYSTICK to switch to AUDIO operating mode.
Loudness
The loudness function increases treble and bass in order to create a natural tone. Loudness should be switched on when listening to music at low volume.
This function is only available with the unit extended.
- Press the AUDIO button ① for at least 1 second to activate the loudness function. "LD" illuminates on the display.
- Press the AUDIO button again for at least 1 second to switch off the loudness function. "LD" extinguishes on the display.
CT function (time)
The CT function receives CT data from an RDS station and the time is displayed. Actuate the DISP button in order to set the CT display.
- If no CT data is received, "CT ----" appears on the display.
Note:
- CT data is not transmitted in certain countries and by certain stations. CT data cannot be correctly displayed in certain regions.
Listening to radio
- Actuate the FUNC button 1 and set radio mode. The frequencies or, in the case of RDS stations the programme names, are displayed.
- Actuate the BAND button 15 and set the waveband. Each time the button is actuated, the waveband is changed in the following sequence:
$$ \begin{array}{l}\text {F M 1} \rightarrow \text {F M 2} \rightarrow \text {F M 3} \rightarrow \text {A M (M W / L W)} \rightarrow\\text {F M 1 . . .}\end{array} $$
- Actuate SEARCH button 2 on right or left side to set the desired station.
Tuning
There are 3 types of tuning:
Automatic search,
- manual tuning and
- preset tuning.
Automatic search
There are 2 types of automatic search:
DX SEEK enables tuning of all receivable stations (including distant stations); LOCAL SEEK on the other hand, restricts the search to strong station signals.
- Actuate the BAND button 15 and set the desired waveband. (FM or AM (MW/LW))
-
Tuning to a station.
-
If "MANU" is illuminated on the screen (or if the unit is retracted and the display "SRCH" is extinguished), press the BAND button for at least 1 second. "MANU" is then extinguished on the display (or the display "SRCH" illuminates if the unit is retracted) and the search function is then available.
- The unit automatically searches for TA stations if "TA" illuminates on the display.
- DX SEEK
Actuate SEARCH button 2 on right or left side for automatic tuning.
If the SEARCH button is actuated on the right, the unit searches for stations of a higher frequency; if the SEARCH button is actuated on the left, the unit searches for stations of a lower frequency.
- "DX SEEK" appears on the display when the tuning is started.
- LOCAL SEEK (local automatic search)
A search for stations with strong signals is performed (local stations) if the right or left side of the SEARCH button is pressed for at least 1 second. Only stations with a clear received signal are tuned.
- "LO SEEK" appears on the display when the local automatic search is started.
Manual tuning
There are 2 types of tuning: Quick tuning and step-by-step tuning.
With step-by-step tuning, the frequency changes stepwise. With quick tuning, the desired frequency can be set quickly.
-
Actuate the BAND button 15 and set the desired waveband. (FM or AM (MW/LW))
-
If "MANU" is extinguished on the screen (or if the unit is retracted and the display "SRCH" is illuminated), press the BAND button for at least 1 second. "MANU" then appears on the display (or the display "SRCH" is extinguished if the unit is retracted) and manual tuning is then possible.
-
Tuning to a station.
Quick tuning:
Press the SEARCH button ② on right or left side and hold for at least 1 second to set a station.
- Step-by-step tuning:
Actuate the SEARCH button on right or left side to set a station manually.
Note:
- Manual tuning is cancelled if no button is pressed within 7 seconds.
Recalling a preset
There are a total of 24 preset positions (6 FM1, 6 FM2, 6 FM3, 6 AM) for storing individual radio stations. The stored radio frequency is automatically recalled by actuating the corresponding preset button.
- Actuate the BAND button 15 and set the desired waveband. (FM or AM (MW/LW))
- Actuate the corresponding preset button 13 to recall the stored station.
- Press and hold the one of the preset buttons for at least 2 seconds to store the station in the preset memory.
Manual storage
- Actuate the BAND button 15 and set the desired waveband. (FM or AM (MW/LW))
- Set the desired station by means of automatic search, manual tuning or preset tuning.
- Press and hold the one of the preset buttons for at least 2 seconds to store the currently set station in the preset memory.
Automatic storage - AS
Up to 6 stations can be stored automatically using the AS function button. If 6 receivable stations cannot be set, the station previously stored at this memory position is retained.
- Actuate the BAND button 15 and set the desired waveband. (FM or AM (MW/LW))
-
Press the AS/SCN button 5 for at least 2 seconds. This automatically stores all stations with a high signal strength.
-
When automatic storage is performed for VHF wavebands, the stations are stored under FM3 even if FM1 or FM2 was previously selected.
Preset scan - SCN
The stations stored in the preset memory are briefly scanned in sequence using the scan function. This function is particularly suitable for locating a desired station in the memory.
- Press the AS/SCN button ⑤.
- As soon as the desired station is received, press the AS/SCN button again to set the station.
RDS (Radio Data System)
This unit is equipped with an integral RDS decoder which supports stations that transmit RDS data. This system displays the name of the received station (PS) and can automatically set the station with the best reception during long-distance journeys (AF switching). Additionally, if a traffic announcement or a programme type (PTY) is transmitted by an RDS station, this can be received independent of the set operating mode. If additional EON data (extended other network) is received, the system can switch automatically between stations of the same network and interrupt programmes in order to receive traffic announcements (TP function). This function is not available in certain regions.
RDS functions are only available for VHF operation.
"AF":Alternative frequency
- "PS" : Programme service name
- "PTY":Programme type
"EON": Extended other network
- "TP": Traffic programme
- RDS interruption is not possible during AM radio reception or television operation.
AF function
Via the AF function, the unit switches to another frequency in the same station network in order to maintain optimal reception.
- The initial factory setting is "ON".
- Switching off AF function (OFF)
Press the AF button 7. "AF" extinguishes on the display.
- Switching on AF function (ON)
Press the AF button. "AF" illuminates on the display.
- If the reception of station deteriorates after a time, "SEARCH" appears on the display and the tuner searches for the same transmission on another frequency.
- The "AF" display begins to flicker if the reception deteriorates.
REG function (regional programme)
The optimal regional station can be received if the REG function is switched on. If this function is switched off and the regional transmission area changes during the journey, the regional station for this area is then received.
- The initial factory setting is "OFF".
Note:
- This function is blocked if a national station is being received, e.g. BBC 2 FM.
- The ON/OFF setting is effective if the AF function is set to ON.
- Switching on REG function
If "REG" does not illuminate on the display, press the AF button 7 for at least 2 seconds. "REG" illuminates on the display.
- Switching off REG function
Press the AF button for at least 2 seconds. The "REG" display extinguishes.
Manual tuning of a regional programme in the same station network
Note:
-
This function can be used for receiving a regional station in the same station network.
-
This function is effective if the AF function is switched on and the REG function is switched off.
- Actuate one of the preset buttons to recall the regional station.
- Each time the same preset button is pressed, the unit switches between the regional programmes of the same station network.
TA function (traffic announcement)
In order that traffic announcements can still be heard during e.g., CD changer operation, traffic radio stations with traffic announcements are given priority in TA stand-by mode. An automatic tuning for traffic programmes (TP) is also possible.
- This function is not available during AM radio reception or television operation.
- This function can only be used when "TP" illuminates on the display. If "TP" illuminates, this indicates that the received RDS station contains programmes with traffic announcements.
- Setting TA stand-by mode
If the TA button 10 is actuated when only "TP" illuminates on the display, "TP" and "TA" then illuminate on the display and the unit is set to TA stand-by mode until a traffic announcement is transmitted. "TRA INFO" then illuminates on the display when a traffic announcement begins. If the TA button is actuated during reception of a traffic announcement, the reception of the station with the traffic announcement is terminated and the unit switches back to TA stand-by mode.
Cancelling TA stand-by mode
Actuate the TA button 10 when "TP" and "TA" illuminate on the display. "TA" is then extinguished on the display and TA stand-by mode is cancelled.
- If "TP" does not illuminate, a search for a TP station is started by actuating the TA button.
- TP automatic search
If "TP" is extinguished and traffic radio stations are to be searched for automatically, press the TA button 10 whereupon "TA" illuminates on the display.
Note:
- The unit continues the search if no TP station is received. If the TA button is pressed again, "TA" extinguishes on the display and the TP automatic search is terminated.
Automatic storage of TP stations
Up to 6 TP stations can be stored automatically in the preset memory. If the number of receivable TP stations is less than 6, the stations already present in the memory are retained.
- When the "TA" display illuminates (traffic announcements), press the AS/SCN button 5 for at least 2 seconds.
-
All receivable traffic radio stations are stored in the preset memory.
-
The TP stations are stored in the memory for FM3 even if FM1 or FM2 was previously selected.
PTY
With the PTY function (PTY = programme type), a station of the selected programme type can be heard as soon as the set PTY identification is transmitted, even if the unit is set to another radio function mode.
- This function is not available during AM radio reception or television operation.
- In certain countries there is still no PTY station.
- In TA stand-by mode, a TP station has priority over a PTY station.
PTY setting
- The unit is switched to PTY selection mode by pressing the PTY button (programme type)
-
Select the desired programme type by pressing a preset button 13. Alternatively, the desired programme type can be selected by pressing the upper or lower side of the SEARCH button 2.
-
The stored initial factory settings for the preset buttons are listed below.
| Preset no. | PTY name | |
| ENGLISH | Contents | |
| 1 | NEWS | News |
| 2 | INFO | Information |
| 3 | POP M | Pop music |
| 4 | SPORT | Sport |
| 5 | CLASSICS | Classical music |
| 6 | MORM | Middle of the road music |
- PTY selection mode is automatically cancelled 7 seconds after a PTY station is set.
Cancelling PTY stand-by mode
If the PTY button 8 is pressed for more than 1 second, "PTY" and the unit quits PTY standby mode.
- Cancelling a PTY station interruption
If the PTY button 8 is pressed during a PTY programme interruption in order to recall the sub-menu, the PTY interruption is cancelled and the unit returns to PTY stand-by mode.
PTY search
- Switch to programme type selection mode by pressing the PTY button 3.
- Select the programme type.
- Actuate SEARCH button 2 on right or left side. If the button is actuated on the right, the unit searches for stations of a higher frequency; if the button is actuated on the left, the unit searches the lower frequencies.
- The unit returns to standard mode if no station of the entered programme type can be received.
PTY preset memory
- Switch to programme type selection mode by pressing the PTY button 3
- Select the programme type.
- If one of the preset buttons is pressed for longer than 2 seconds, the selected programme type is stored under this button.
It is possible to select from the 29 PTY programme types listed in the table.
| PTY name | |
| ENGLISH | Contents |
| NEWS | News |
| POLITICS | Current affairs |
| INFO | Information |
| SPORT | Sport |
| LEARNING | Education |
| DRAMA | Drama |
| CULTURE | Culture |
| SCIENCE | Science |
| ENTERT. | Entertainment |
| POP M | Pop music |
| ROCK M | Rock music |
| MORM | Middle of the road music |
| LIGHT M | Light music |
| CLASSICS | Classical music |
| OTHER M | Other music |
| WEATHER | Weather |
| FINANCE | Finance |
| CHILDREN | Children's' programme |
| SOCIAL A | Social affairs |
| RELIGION | Religion |
| PHONE-IN | Phone-in |
| TRAVEL | Travel |
| LEISURE | Leisure |
| JAZZ | Jazz |
| COUNTRY | Country |
| NATIONAL | Traditional music |
| OLDIES | Oldies |
| FOLK M | Folk music |
| DOCUMENT | Documentaries |
Programme type selection mode for extended unit
- Recall programme type selection menu (PTY SELECT) by pressing the PTY button 8.
- The programme type can be selected and stored via the programme type selection menu.
Press the JOYSTICK ③ to the right or left to switch between "PTY ITEM" (programme type) and "PRESET" (preset memory) (by pressing the button).
- The programme type can be selected if "PTY ITEM" (programme type) is marked. Press the JOYSTICK upwards or downwards to select the programme type. Subsequently, press the enter button in the centre of the JOYSTICK to switch to AUDIO operating mode.
(The selected programme type is shown at the lower right of the display.)
- A preset memory can be allocated by marking "PRESET".
- Press the JOYSTICK upwards or downwards to select between the preset memories 1 to 6.
- Subsequently, press the enter button in the centre of the JOYSTICK to enter the programme type.
Press the enter button in the centre of the JOYSTICK to allocate the programme type marked under "PTY ITEM" to the selected preset memory (shown at the lower right of the display).
- After setting, press the JOYSTICK to the right or left to switch to "MENU". Then press the enter button in the centre of the JOYSTICK to return to the normal display.
Emergency announcement
All operating mode functions are terminated if an emergency announcement is received. "ALARM" appears on the display and emergency announcement is made.
- RDS interruption is not possible during AM radio reception or television operation.
Cancelling the emergency announcement
The reception function for emergency announcements is deactivated if the AF button 7 is pressed.
Changing the PTY display language
Note:
- This function is only available with the unit extended.
One of 4 languages (English, German, Swedish and French) can be selected for the PTY display. - The initial factory setting is "GB" (English).
- Actuate the ADJ button to set setting selection display.
- Press the JOYSTICK ② upwards or downwards to select "PTY LANGUAGE". Then press the JOYSTICK to the right or left to select the language. Subsequently, press the enter button in the centre of the JOYSTICK to store the language setting.
"GB": English
"F": French
"D": German
"S": Swedish
- Actuate the ADJ button. The unit then returns to the previous operating mode.
Volume adjusting for TA, emergency announcement (ALARM) and PTY
The volume for TA, ALARM and PTY interruptions can be set during TA, ALARM or PTY interruptions.
- The initial factory setting is "15".
The volume (00 to 33) can be set during a programme interruption due to a traffic announcement, emergency announcement or a PTY signal. For this purpose, press the VOLUME button upwards or downwards. - When the TA, ALARM or PTY interruption is terminated, the volume returns to the level which was set before the interruption.
CD changer functions
If a CD changer (accessory) has been connected, all CD changer functions can be controlled via this unit.
To start play, actuate the FUNC button 1 for setting CD changer operation.
-
If "NO MAG" appears on the display, insert the magazine in the CD changer. While the player is loading (checking) the magazine, "LOADING" is shown on the display.
-
If "NO DISC" appears on the display, remove the magazine and place the CDs in the CD holder. Re-insert the magazine in the CD changer.
CAUTION
It is not possible to play CD ROMs in the CD changer.
Play pause
- Actuate the button 3 to interrupt play. "PAUSE" appears on the display.
- Press the button again to resume play.
Display of CD titles
With this unit, CD title data can be displayed with CD text and with titles entered by the user. Each time the DISP button 12 is actuated and held for at least 1 second, the title display changes in the following sequence:
Retracted unit:
User name (CD) -> CD text (CD name) -> CD text (title) -> User name (CD) ...
<h1 id="extended-unit-2">Extended unit:</h1>
```plaintext
User name (CD) -> CD text (CD name & title)
-> User name (CD) ...
<h1 id="note-17">Note:</h1>
- If the CD being played contains no text data and no user title was entered, "-----" appears on the display.
<h1 id="bullet-display-of-cd-names"> Display of CD names</h1>
If the title of a CD is longer than 16 letters (8 characters for a retracted unit), the title display can be leafed through as follows:
<h1 id="retracted-unit-4">Retracted unit:</h1>
1. Call up the CD text (CD name or title name) on the display.
2. Press the BAND button for at least 1 second. The titles are listed in sequence.
<h1 id="extended-unit-3">Extended unit:</h1>
1. Call up the CD text (CD name and title name) on the display.
2. Press the TITLE button 19 for at least 1 second to leaf through the CD names.
3. In order to leaf through the titles of a CD, press the TITLE button for at least one second within 30 seconds of recalling the corresponding CD name.
<h1 id="note-18">Note:</h1>
Listing of the CD titles begins immediately if the CD name comprises less than 16 characters.
- The title name is displayed statically if it comprises less than 16 characters.
<h1 id="selecting-a-cd">Selecting a CD</h1>
Each of the preset buttons corresponds to a CD loaded in the magazine.
<h1 id="bullet-selecting-a-cd-1-to-6"> Selecting a CD (1 to 6)</h1>
In order to select a CD, press the corresponding preset button (1 to 6) ⑧.
<h1 id="title-selection">Title selection</h1>
<h1 id="upward-title-selection">Upward title selection</h1>
1. Actuate the SEARCH button 2 on the right side to jump to the beginning of the next title.
2. Each time the SEARCH button is actuated on the right side, the unit jumps to the beginning of the next title.
<h1 id="bullet-downward-title-selection"> Downward title selection</h1>
1. Actuate the SEARCH button on the left side to jump back to the beginning of the current title.
2. Actuate the SEARCH button twice on the left side to jump back to the beginning of the previous title.
<h1 id="fast-forward-i-rewind">Fast forward I rewind</h1>
<h1 id="fast-forward">Fast forward</h1>
Actuate the SEARCH button 2 on the right side and hold for at least 1 second.
<h1 id="fast-rewind">Fast rewind</h1>
Actuate the SEARCH button on left side and hold for at least 1 second.
<h1 id="top-function">TOP function</h1>
With the TOP function, the first title (title no. 1) on the CD is played.
<h1 id="playing-a-cd-from-1-to-6">- Playing a CD from 1 to 6</h1>
Actuate the preset button (1 to 6) with the same number as that of the CD being played.
<h1 id="scan-play-scn">Scan play - SCN</h1>
With scan play, the first 10 seconds of each title of a CD are played.
* Scan play is especially suitable for selecting a desired title.
1. Press the AS/SCN button 5 to scan the titles.
2. Pressing the SCN button again terminates the scan function. The current title is then played.
<h1 id="cd-scan-play-d-scn">CD scan play - D-SCN</h1>
With CD scan play, the first 10 seconds of the first title of each CD in the currently inserted CD magazine are played.
* CD scan play is especially suitable for selecting a desired CD.
1. Press the AS/SCN button ⑤ for at least 1 second to scan all CDs.
2. Pressing the AS/SCN button again terminates the CD scan function. The unit then switches to normal play of the current title.
<h1 id="repeat-rpt">Repeat - RPT</h1>
With repeat, the current title is constantly repeated.
1. Press the RPT button to repeat titles. "RPT" illuminates on the display.
2. Press the RPT button again to switch off the repeat function. "RPT" extinguishes on the display and the unit switches to normal play.
<h1 id="cd-repeat-d-rpt">CD repeat - D-RPT</h1>
With CD repeat, the current CD is automatically repeated from the first title.
1. Press the RPT button 7 for at least 1 second to repeat CDs. "D-RPT" illuminates on the display.
2. Press the RPT button again to switch off the CD repeat function. "D-RPT" extinguishes on the display and the unit switches to normal play.
<h1 id="random-play-rdm">Random play - RDM</h1>
With random play, all titles on the CD are played in random order.
1. Press the RDM button (random play) to switch to random play. "RDM" illuminates on the display.
2. Press the RDM button again to switch off repeat play. "RDM" extinguishes on the display and the unit switches to normal play.
<h1 id="cd-random-play-d-rdm">CD random play - D-RDM</h1>
With CD random play, individual titles of all CDs are played in random order.
1. Press the RDM button ③ for at least 1 second for CD random play. "D-RDM" illuminates on the display.
2. Press the RDM button again to switch off CD random play. "D-RDM" extinguishes on the display and the unit switches to normal play.
<h1 id="television-functions">Television functions</h1>
If a TV 6000 TV tuner (accessory) has been connected, all TV tuner functions can be controlled via this unit.
<h1 id="warning-2">WARNING</h1>
For safety reasons, the driver should not watch television or operate the TV tuner whilst driving. Please note that it is illegal in certain countries to watch or operate the television whilst driving.
<h1 id="television">Television</h1>
<h1 id="note-19">Note:</h1>
- For safety reasons, the MR 6000 is equipped with an inhibiting device which switches off the picture when the vehicle is in motion so that only the tone can be heard. The picture only appears when the vehicle is stationary and the parking brake is applied.
- In order to be able to set television stations, it may first be necessary to set the country of reception. See sub-section "Entering the TV receiver range" for setting the country.
1. Actuate the FUNC button 1 and set television mode.
2. Actuate the BAND button to set the desired television band (TV1 or TV2). Each time the button is actuated, the entry selection between TV1 and TV2 is switched.
3. Actuate the SEARCH button 2 on right or left side to set the desired television station.
<h1 id="video-play">Video play</h1>
The television tuner is equipped with a video input to which an external unit can be connected (e.g. 12 V video cassette player, video recorder, etc.).
1. Press the PTY/RDM button 3 and select VTR (video recorder).
2. Press the PTY/RDM button again to return to television reception.
<h1 id="tuning-2">Tuning</h1>
There are 3 types of tuning. Automatic search, manual tuning and preset tuning.
<h1 id="automatic-search-2">Automatic search</h1>
1. Actuate the BAND button 5 to set the desired television band (TV1 or TV2).
* If "MANU" is illuminated on the screen (or if the unit is retracted and the display "SRCH" is extinguished), press the BAND button for at least 1 second. "MANU" is then extinguished on the display (or the display "SRCH" illuminates if the unit is extended) and the search function is then available.
2. Actuate SEARCH button 2 on right or left side for automatic search. Actuate the SEARCH button on the right side to automatically set the next receivable television station in the higher waveband; actuate the SEARCH button on the left side for automatic setting in the lower frequency.
<h1 id="manual-tuning-2">Manual tuning</h1>
There are 2 types of tuning: Quick tuning and step-by-step tuning. With step-by-step tuning, the frequency changes stepwise. With quick tuning, the desired frequency can be set quickly.
1. Actuate the BAND button ⑤ to set the desired television band. (TV1 or TV2)
* If "MANU" is extinguished on the screen (or if the unit is retracted and the display "SRCH" is illuminated), press the BAND button for at least 1 second. "MANU" then appears on the display (or the display "SRCH" is extinguished if the unit is retracted) and manual tuning is then possible.
2. Tuning to a station.
<h1 id="quick-tuning-2">Quick tuning:</h1>
Actuate the SEARCH button 2 on the right or left side and hold for at least 1 second to set a station.
<h1 id="bullet-step-by-step-tuning"> Step-by-step tuning:</h1>
Actuate the SEARCH button on the right or left side to set a station manually.
<h1 id="note-20">Note:</h1>
- Manual tuning is terminated if the unit is not operated for at least 7 seconds.
<h1 id="recalling-a-preset-2">Recalling a preset</h1>
A total of 12 television stations can be stored (6 for TV1 and 6 for TV2). Favourite television stations can thus be set and stored as presets.
1. Actuate the BAND button ⑤ to set the desired television band (TV1 or TV2).
2. Actuate the corresponding preset button 13 to recall the stored television station.
* Press and hold the one of the preset buttons for at least 2 seconds to store the current station in the preset memory.
<h1 id="manual-storage-2">Manual storage</h1>
1. Set the desired station by means of automatic search or manual tuning.
2. Press and hold the one of the preset buttons for at least 2 seconds to store the station in the preset memory.
<h1 id="automatic-storage-as-2">Automatic storage - AS</h1>
With automatic storage, 6 stations are set automatically and each is stored in a preset memory.
If 6 stations with good reception are not available, the stations previously stored are retained in the memory and only stations with good reception are stored.
1. Actuate the BAND button 5 to set the desired television band (TV1 or TV2).
2. Press the AS/SCN button 5 for at least 2 seconds. All stations with high field strength are then stored under the preset buttons 13.
<h1 id="preset-scan-scan">Preset scan - SCAN</h1>
With preset scan, each preset can be looked at briefly before the next preset is automatically recalled. This function is particularly suitable for locating a desired television station in the memory.
1. Press the AS/SCN button ⑤.
2. As soon as the desired station is received, press the AS/SCN button again.
<h1 id="switching-the-video-system-between-ntsc-and-pal">Switching the video system between NTSC and PAL</h1>
* This function is only available with the unit extended.
Set the video system to the applicable television standard.
1. Press the ADJ button to recall the setting menu.
2. Press the JOYSTICK ③ upwards or downwards to mark "VTR N/P".
3. Press the JOYSTICK to the right or left to select between "NTSC" or "PAL".
4. Press the enter button in the centre of the JOYSTICK to store the selected standard.
<h1 id="entering-the-tv-receiver-range">Entering the TV receiver range</h1>
* This function is only available with the unit extended.
After entry of the TV reception range, the setting of the TV tuner is changed.
1. Press the ADJ button to recall the setting menu.
2. Press the JOYSTICK ③ upwards or downwards to mark "TV AREA". Press the enter button in the centre of the JOYSTICK to display the country list.
3. Press the JOYSTICK upwards or downwards to select the country. Subsequently, press the enter button in the centre of the JOYSTICK to store the setting.
4. After setting, press the JOYSTICK to the right or left to mark "MENU". Press the enter button in the centre of the JOYSTICK to return to the setting menu.
<h1 id="entering-the-tv-diversity">Entering the TV diversity</h1>
* This function is only available with the unit extended.
* Normally, the "ON" position should be selected for TV DIVERSITY.
The reception setting of the TV antenna which is connected to the TV tuner can be changed.
1. Press the ADJ button to recall the setting menu.
2. Press the JOYSTICK ③ upwards or downwards to select "TV DIVER".
3. Then press the JOYSTICK to the right or left to select "ON" or "OFF". Press the enter button in the centre of the JOYSTICK to store the selected setting.
- ON: Always selects the antenna with the best signal for optimal reception (for multiple antennae).
- OFF: Switches TV diversity off (only the antenna connected to "MAIN" is used).
4. Press the ADJ button to return to the previous operating mode.
<h1 id="adjusting-brightness-colour-and-hue">Adjusting brightness, colour and hue</h1>
<h1 id="note-21">Note:</h1>
- These functions can only be performed when the vehicle is stationary and the parking brake is applied.
This function is only available with the unit extended.
- HUE can only be set in NTSC mode.
1. Press the BAND button ⑤ to recall the setting menu.
2. Press the JOYSTICK ③ upwards or downwards to select the option "MONI ADJ" (screen setting).
3. Press the enter button in the centre of the JOYSTICK.
4. Press the JOYSTICK to the right or left to select between "BRIGHT", "COLOR" and "HUE".
- "BRIGHT": Determines the brightness of the display picture.
- "COLOR": Determines the colour saturation.
- "HUE": Determines the hue (ratio of red to green component).
5. Press the JOYSTICK upwards or downwards to adjust the level.
6. After setting, press the JOYSTICK to the right or left to access "MENU". Subsequently, press the enter button in the centre of the JOYSTICK to return to the setting menu.
<h1 id="switching-the-tv-picture-format">Switching the TV picture format</h1>
* This function is only available with the unit extended.
1. Press the WIDE button to change the TV picture format. Repeated pressing of the WIDE button changes the picture size in the following sequence:
"NORMAL" -> "WIDE" -> "F. WIDE" -> "CINEMA" -> "NORMAL"
- "NORMAL": (normal format)
A black stripe is visible at the right and left edges of the screen.
For normal programme formats (4:3) etc., the entire television picture appears undistorted.
- "WIDE": (wide picture mode) The picture is stretched horizontally at the right and left edges.
- "F. WIDE": (full width picture mode) The entire picture is stretched horizontally.
- "CINEMA": (cinema mode) The upper and lower borders of the picture disappear.
<h1 id="note-22">Note:</h1>
- If pictures are shown in normal 4:3 format in wide picture or full width picture mode, part of the border is cut off or appears distorted. Original pictures can always be shown in normal mode, independent of format.
- Full width picture mode is best suited to pictures with sub-titles.
<h1 id="setting-the-unit-to-navigation-system">Setting the unit to navigation system</h1>
It is essential that the following settings are performed after connecting the navigation system.
1. With the unit extended, press the ADJ button to recall the setting menu.
2. Press the JOYSTICK ③ upwards or downwards to select "INPUT". A toolbar appears on the right which contains the following items:
- "NAVI": Select if VDO Dayton PC 5000 navigation computer is connected.
- "CCD": Select if a reversing camera (accessory) is connected.
- "RGB": Select if RGB pictures are fed in from other manufacturers' components.
- "COM": Select if composite pictures are fed in from other manufacturers' components.
3. Press the JOYSTICK to the right or left to select "NAVI". Subsequently, press the enter button in the centre of the JOYSTICK to set the system for connection of the VDO Dayton navigation system.
<h1 id="switching-between-navigationand-audio-video-display">Switching between navigationand audio / video display</h1>
- Switching between audio / video and navigation display is only possible with the unit extended.
Switching between navigation system and audio/video is performed via the "stand-by" function of the navigation system.
<h1 id="using-the-navigation-system">Using the navigation system</h1>
Operation of the navigation system is described in the operating instructions supplied with the unit.
<h1 id="reverse-monitoring-via-reversing-camera">Reverse monitoring via reversing camera</h1>
Connection of a reversing camera is possible with the MR 6000.
<h1 id="note-23">Note:</h1>
This function is only available with the unit extended.
- If a reversing camera and a TV tuner are to be connected to the unit simultaneously, connect the camera to the CCD input of the MR 6000.
<h1 id="setting-the-unit-to-reversing-camera">Setting the unit to reversing camera</h1>
It is essential that the following settings are performed after connecting a camera.
1. With the unit extended, press the ADJ button to recall the setting menu.
2. Press the JOYSTICK ③ upwards or downwards to select "INPUT".
3. Press the JOYSTICK to the right or left to select "CCD". Subsequently, press the enter button in the centre of the JOYSTICK to set the system for connection of the camera.
<h1 id="continuous-button-illumination">Continuous button illumination</h1>
<h1 id="note-24">Note:</h1>
The following function is only available with the unit extended.
Continuous button illumination can be switched on and off as required with the system extended.
- "ON": The button illumination switches on automatically for 5 seconds when a button is touched.
- "OFF": The button illumination is always on when the ignition is switched on.
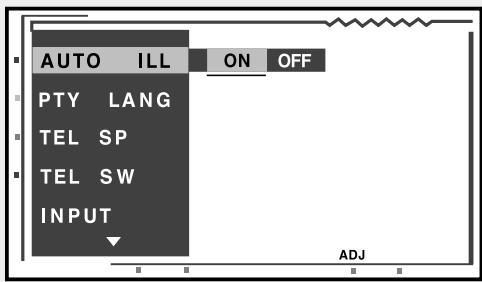
1. With the unit extended, press the ADJ button to recall the setting menu.
2. Press the JOYSTICK ③ upwards or downwards to recall "AUTO ILL" (auto-illumination).
3. Subsequently, press the JOYSTICK to the right or left to select "ON" or "OFF" and then press the enter button in the centre of the JOYSTICK.
4. Press the ADJ button to return to the previous operating mode.
<h1 id="entering-titles">Entering titles</h1>
Titles or names for TV stations and CDs with a maximum of 10 characters can be stored and displayed.
1. Press the FUNC button ① to select the mode (CD changer or TV) in which a title is to be entered.
2. Play the CD or tune the TV station for which a title is to be entered.
3. Press the TITLE button 19 for at least 1 second until the display switches to title entry.
4. Press the JOYSTICK ② upwards or downwards or to the right or left to select characters. Press the enter button in the centre of the JOYSTICK to confirm the selected character.
* If the cursor is at the upper or lower edge of the display, the following lines will appear if the JOYSTICK is pressed upwards or downwards.
4. VORSICHTSMASSNAHMANFÜR INSTALLATION
Druk FUNC-knop 1 in.
"Z-EHCR 1" (Klank 1):
"Z-EHCR 2" (Klank 2):
"Z-EHCR 3" (Klank 3):
- "Z-EHCR OFF" (sound processor ui):
"Z-EHCR 1" -> "Z-EHCR 2" -> "Z-EHCR 3" -> "Z-EHCR OFF" -> "Z-EHCR 1"...
"OFF" (sound processor uit),
"Z-EHCR 1" -> "Z-EHCR 2" -> "Z-EHCR 3" -> "Z-EHCR OFF" -> "Z-EHCR 1"...
"NORMAL" -> "WIDE" -> "F. WIDE" -> "CINEMA" -> "NORMAL"
- "NORMAL": (formato normal)
Indstilling of station 315
Stationssogning 315
Manuel stationsindstilling 315
Valg af fast station 316
Manuel lagring 316
Automatisk lagring - AS 316
Kort afspiling af fast station - SCN 316
RDS-funktion 317
RDS (radiodatasystem) 317
AF-funktion 317
"Z-EHCR 1" -> "Z-EHCR 2" -> "Z-EHCR 3" -> "Z-EHCR OFF" -> "Z-EHCR 1"...
"OFF" (sound-processor fra),
Ending at PTY-showsprog
Bemerk:
Nominal effekt (sinus):
17 W ∞ 4 (20 Hz til 20 kHz, 1% klr, 4 Ω)
142 mm bred x 78 mm hoj (6,5-tommers wide-screen)
Billedgengivelse: Overforings-TN-LCD
Displaytype: TFT-aktivmatrix (tyndfilmstransistor)
Grafikelementer:
280800 (1200 x 234)
Generelt
Strømforsyning:
14,4 V jaevnstrom (10,8 til 15,6 V)
Jordforbindelse:
Minus på stel
Effektforbrug:
4,0 A (1 W)
VDO Control Systems (Belgium)
Tel. 02/714130
Fax 02/714130
VDO Car Communication Nederland B.V.
Ekkersrijt 4611
5692 DR Son
Tel. 0499494380
Fax 0499494387
VDO Luxembourg S.A.
Tel. +32 2/714 13 02
Fax +32 2/714 13 04
VDO Control Systems (Belgium)
Tel. 02/714 13 02
Fax 02/7141304
VDO Car Communication Nederland B.V.
Ekkersrijt 4611
5692 DR Son
Tel. 0499494380
Fax 0499494387
VDO Luxembourg S.A.
Tel. +32 2 / 714 13 02
Fax +32 2/714 13 04
VDO Control Systems (Belgium)
Tel. 02/7141302
Fax 02/7141304
VDO Car Communication Nederland B.V.
Ekkersrijt 4611
5692 DR Son
Tel. 0499494380
Fax 0499494387
VDO Luxembourg S.A.
Tel. +32 2 / 714 13 02
Fax +32 2/714 13 04
VDO Car Communication Spain S.A.
VDO Car Communication France
Thank you for purchasing this VDO product which has been designed and manufactured to the highest standards and subjected to rigorous testing. Provided it is properly operated and maintained it will perform well for many years.
VDO guarantees to provide free of charge labour and replacement parts in any country where VDO has authorised dealers for all serviceable VDO branded consumer electronic products purchased in those countries.
The legal responsibility for meeting any in-guarantee service needs for your product rests with the dealer from whom you bought it. If your dealer has no service facilities, he can arrange for any work to be carried out by a competent authorized third party organisation.
In the event that you require service whilst in another country please contact the local VDO Help Desk whose number can be found in the relevant part of this booklet.
The foregoing applies during a period of 24 months from the date of purchase, provided the product is properly used in accordance with its operating instructions and upon presentation of the original invoice or cash receipt indicating the date of purchase, dealer's name with the product type and serial number.
The VDO guarantee may not apply if:
The invoice or cash receipt has been altered in any way or made illegible.
- The type or serial number on the product has been altered, deleted, removed or made illegible.
- Repairs have been executed by unauthorised service organisations or persons.
- Damage is caused by accidents including and not limited to lightning, water or fire, misuse or neglect.
- The product requires modification or adaption to operate in any country other than the country for which it was designed and manufactured, or if any damage results from these modifications.
In order to avoid unnecessary inconvenience, we advise you to read the operating instructions carefully before contacting your dealer or service organisation.
Continuing service after the guarantee period is available but the service will be chargeable.
These statements do not affect your statutory rights as a consumer.
If you have any questions which your dealer cannot answer please write or call:
U.K.
VDO Car Communication U.K.
6 Talisman Road,
Bicester, Oxon., OX6 0JX
Tel: (01869) 320333
Fax: (01869) 365005
Address for service:
VDO Car Communication,
2219 Coventry Road, Sheldon,
Birmingham B26 3EG
Tel: 0121-742 0558
Ireland
VDO Car Communication Ireland Ltd
Newstead
Clonskeagh
Dublin 14
Tel: 640000
Your United States Limited Warranty
Dear Customer
Thank you for purchasing this VDO product which has been designed and manufactured to the highest standards and subjected to rigorous testing.
Warranty coverage begins the day you buy your product. For 1 year thereafter, all parts will be repaired or replaced and labor is free. After 1 year from the date of purchase, you pay for the replacement or repair of all parts, and for all labor charges.
What is covered?
All parts, including repaired and replaced parts, are covered only for the original warranty period. When the warranty on the product expires, the warranty on all replaced and repaired parts also expires.
Your warranty does not cover:
Labor charges for installation or set-up of the product and all adjustment of customer controls.
Product repair and/or part replacement because of misuse, accident, unauthorized repair or other cause not within the control of VDO.
Reception problems caused by signal conditions or antenna systems outside the unit.
Where is service available?
Service is available in all countries where the product is officially distributed by VDO. In countries where VDO does not distribute the product, the local VDO service organization will attempt to provide service (although there may be a delay if the appropriate spare parts and technical manual(s) are not readily available).
Please, keep your sales receipt or other document showing proof of purchase. Attach it to this owner's manual and keep both nearby. Also keep the original box and packing material in case you need to return your product.
Before requesting service ...
Please check your owner's manual before requesting service. Adjustments of the controls discussed there may save you a service call.
To get warranty coverage in the USA ...
Take the product to your installing dealer, VDO factory service center, or authorized service center for repair. When the product has been repaired, you must pick up the unit at the center. Centers may keep defective parts.
(In the USA, Puerto Rico, and the US Virgin Islands, all implied warranties of merchantability and fitness for a particular purpose, are limited in duration to the duration of the express warranty. Because some states do allow limitations on how long an implied warranty may last, this limitation may not apply to you).
This warranty gives you specific legal rights. You may have other rights which vary from state to state.
VDO North America LLC
Attn: AN Division
188 Brooke Road
Winchester, Virginia 22603
Tel: (540) 665-0100