
NOMAD PACK WIRELESS 2 - Gaming Accessories THRUSTMASTER - Free user manual and instructions
Find the device manual for free NOMAD PACK WIRELESS 2 THRUSTMASTER in PDF.
| Product Type | Laptop accessory pack including a wireless optical mini-mouse, a numeric keypad, and headphones |
| Brand | THRUSTMASTER |
| Model | NOMAD PACK WIRELESS 2 |
| Category | Gaming accessories |
| Mini-mouse power supply | 2 rechargeable Ni-MH AAA 1.2 V batteries (included) |
| Mini-mouse battery life | Approximately 100 hours |
| Initial charging time | Approximately 7 hours |
| Normal charging time | Approximately 2 hours 30 minutes |
| Power saving system | Automatic standby after 10 minutes of inactivity |
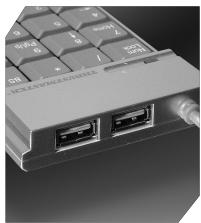
| Numeric keypad | With 2 additional USB ports to connect other peripherals |
| Headphones | With adjustable retractable cable |
| Connectivity | Radio frequency transmitter/receiver via USB port |
| Compatibility | Windows 98 SE, Me, 2000 and XP (USB ports) |
| Included accessories | Mini-mouse, 2 rechargeable batteries, transmitter/receiver, charging cable, USB extension cable, numeric keypad, headphones, storage pouch, user manual |
| Maintenance and cleaning | Unplug the whole set and remove the batteries before cleaning; use a damp cloth; avoid aerosols |
| Safety | Do not open the accessories; do not use a charging cable not provided; use only rechargeable Ni-MH AAA 1.2 V 600 mA batteries |
| Replacement batteries | Ni-MH AAA 1.2 V 600 mA (for the mini-mouse) |
| Warranty | 2 years (see conditions in the manual) |
| Environmental information | Do not dispose of with household waste; take to a collection point for recycling at end of life |
Frequently Asked Questions - NOMAD PACK WIRELESS 2 THRUSTMASTER
User questions about NOMAD PACK WIRELESS 2 THRUSTMASTER
0 question about this device. Answer the ones you know or ask your own.
Ask a new question about this device
Download the instructions for your Gaming Accessories in PDF format for free! Find your manual NOMAD PACK WIRELESS 2 - THRUSTMASTER and take your electronic device back in hand. On this page are published all the documents necessary for the use of your device. NOMAD PACK WIRELESS 2 by THRUSTMASTER.
USER MANUAL NOMAD PACK WIRELESS 2 THRUSTMASTER
USER MANUAL
MANUEL DE L'UTILISATEUR
BENUTZERHANDBUCH
HANDLEIDING
MANUALE D'USO
MANUAL DEL USUARIO
MANUAL DO UTILIZADOR
THRUSTMASTER
Nomads' Wireless Pack
For/Pour


-PC laptop
- PC portable
User Manual
WARNING: this product contains chemicals, including lead, known to the State of California to cause birth defects or other reproductive harm. Wash hands after handling.
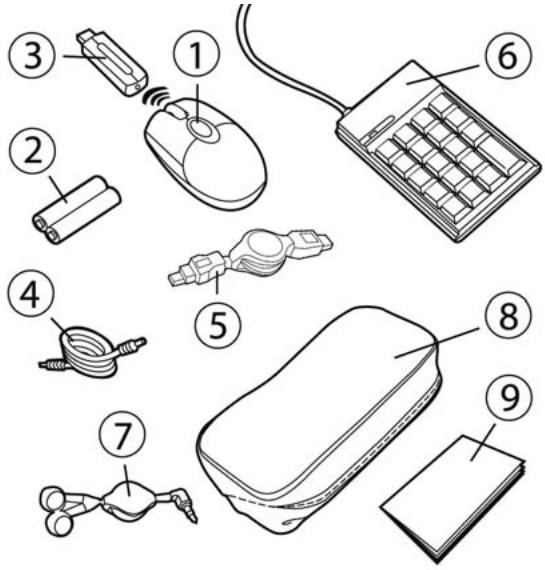
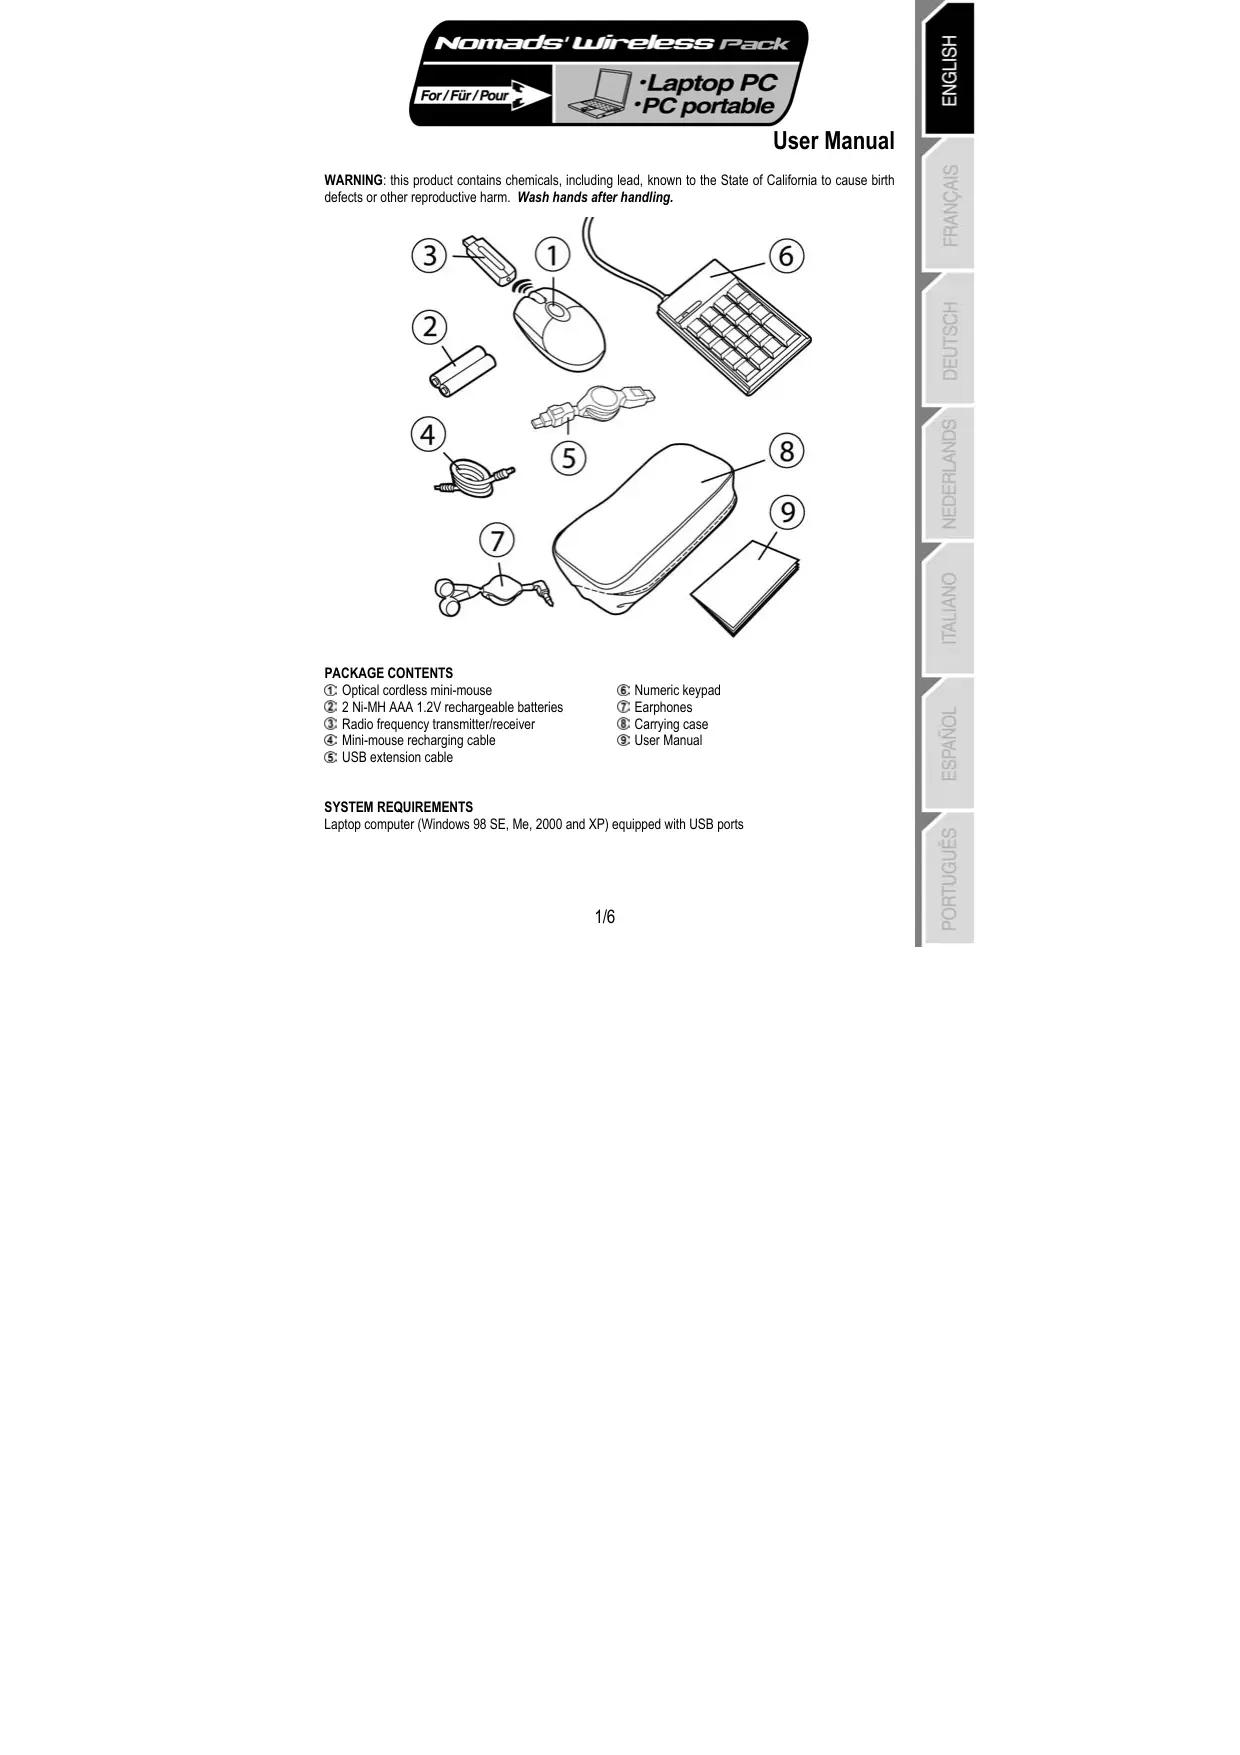
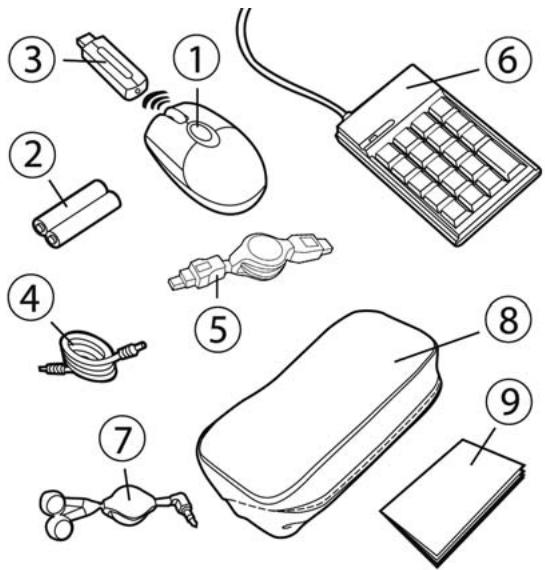
PACKAGE CONTENTS
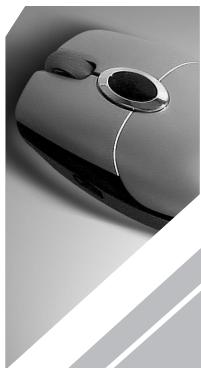
① Optical cordless mini-mouse
② 2 Ni-MH AAA 1.2V rechargeable batteries
③ Radio frequency transmitter/receiver
④ Mini-mouse recharging cable
⑤ USB extension cable
⑥ Numeric keypad
⑦ Earphones
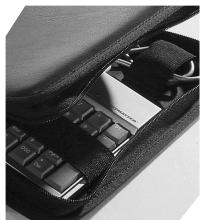
⑧ Carrying case
User Manual
SYSTEM REQUIREMENTS
Laptop computer (Windows 98 SE, Me, 2000 and XP) equipped with USB ports
RECOMMENDED USE
For your security, please take care to respect the following precautionary measures:
- Never open up your Nomads' Wireless Pack accessories, as you risk damaging the internal components.
- Place your Nomads' Wireless Pack on a flat surface to avoid the risk of it falling.
- Do not pull on or twist the cable(s).
- Never recharge your mini-mouse with a recharging cable other than the one provided with your Nomads' Wireless Pack.
- Do not bother removing the batteries when you are not using the mini-mouse, as it is equipped with a battery-saving system.
- Disconnect your Nomads' Wireless Pack and remove the batteries from the mini-mouse before cleaning. Do not use liquid or aerosol cleaners. Use a damp cloth for cleaning.

If you have to change the rechargeable batteries in your Nomads' Wireless Pack mini-mouse, replace them with Ni-MH AAA 1.2V 600mA rechargeable batteries exclusively.
INSTALLING THE WIRELESS MINI-MOUSE'S BATTERIES
- Slide the battery compartment cover off by applying light pressure with your fingers.
- Remove the cover to reveal the battery compartment.
- Insert the 2 AAA batteries provided into the compartment, making sure to respect the polarity indicated.
A red LED lights up on the underside of the mini-mouse.
4. Replace the battery compartment cover.
INSTALLING THE WIRELESS MINI-MOUSE
- Switch on your laptop computer.
- If necessary, disconnect the mouse already connected to your computer.
- Connect the transmitter/receiver to one of your computer's USB ports.
A green LED lights up on the transmitter/receiver, indicating that it is powered on.
If your computer's USB ports are too close together for you to insert the transmitter/receiver, you can use the USB extension cable:
- Connect the USB extension cable to one of your computer's USB ports.
- Connect the other end of the cable to the transmitter/receiver.
If you have Windows 98 SE installed on your computer, you must also install the USB drivers for your new device:
- Using your laptop's pointing device, click on Next in the dialog box that appears.
- If prompted by Windows to do so, insert the Windows 98 SE CD-ROM into your computer's CD-ROM drive in order to install the required system files.
- Follow the on-screen instructions to complete the installation.
USING THE WIRELESS MINI-MOUSE
If the mini-mouse does not respond once you have started up your computer, you will have to establish communication between the transmitter/receiver and the mini-mouse. To do this:
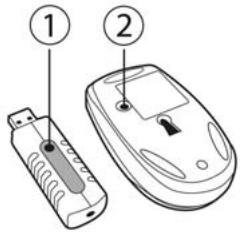
- Press the + button on the transmitter/receiver.
The green LED on the transmitter/receiver flashes. - Without delay, press the ID Connect button on the back of the mini-mouse.
Communication is established between the mini-mouse and the transmitter/receiver. You can now use the wireless mini-mouse.
Note: your mini-mouse has a battery life of approximately 100 hours and automatically switches to standby mode after 10 minutes of inactivity.
To switch off the mini-mouse: press and hold the ID Connect button on the back of the mini-mouse for three seconds (the red LED flashes). Press this button again to switch the mini-mouse back on.
CHARGING AND RECHARGING THE WIRELESS MINI-MOUSE
Even though your mini-mouse has already been charged so that it is functional when you open up your Nomads' Wireless Pack, you will still have to charge it completely. Once this has been done, the green LED on the mini-mouse's left-hand side will flash when the batteries need recharging. Follow the instructions below to charge or recharge your mini-mouse:
-
Connect the shorter connector on the recharging cable to the transmitter/receiver.
-
Connect the longer connector on the recharging cable to the port on the mini-mouse.
A green LED on the mini-mouse's left-hand side lights up, indicating that it is powered on. The mini-mouse begins to charge. Your mini-mouse remains functional while it is being charged or recharged. The green LED on the mini-mouse's left-hand side switches off when charging is complete.
Note: the initial charging time is approximately 7 hours. Subsequently, the normal recharging time is approximately 2 hours 30 minutes.
- Once charging is complete, you may disconnect the recharging cable and use the wireless mini-mouse at a distance from your computer.
CONNECTING THE NUMERIC KEYPAD AND EARPHONES
- Connect the numeric keyboard's USB connector to one of your laptop's USB ports.
A green LED lights up on the numeric keypad; the keypad is locked numerically by default. Your numeric keypad features two USB ports which you can use to connect USB peripherals such as a printer, digital camera, webcam, external audio module, etc.

As the numeric keypad is not powered by an external power source, it may happen that the keypad will not accept certain USB peripherals which require a great deal of power, such as some vibrating game controllers for example (gamepad or racing wheel) or even some printers.
If you have Windows 98 SE installed on your computer, you must also install the USB drivers for the numeric keypad:
- Click on Next in the dialog box that appears.
- If prompted by Windows to do so, insert the Windows 98 SE CD-ROM into your computer's CD-ROM drive in order to install the required system files.
-
Follow the on-screen instructions to complete the installation.
-
Connect the earphones' connector to the headphone plug on your computer.
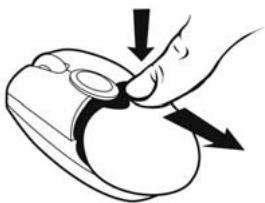
Give the retractable earphone cable a sharp little tug to release it or lock it in place at the length you require.
TROUBLESHOOTING
1) The mini-mouse does not switch on.
The mini-mouse is not detected.
The mini-mouse switches on but does not work.
- Make sure that you have inserted the batteries correctly, in accordance with the polarity indicated on the inside of the battery compartment.
- Make sure that you have closed the battery compartment cover properly.
-
Move closer to your laptop computer.
-
Verify all connections. If necessary, disconnect and then reconnect all cables. Verify in particular that you have connected the longer connector on the recharging cable to the port on the mini-mouse.
- Establish communication between the mini-mouse and the transmitter/receiver: press the + button on the transmitter/receiver and then the ID Connect button on the back of the mini-mouse.
- Under Windows 98 SE: make sure that you have properly installed the USB drivers required for your mini-mouse to function.
- Make sure that your laptop computer's USB port is working properly, for example by reconnecting your old mouse or another USB peripheral.
- Recharge or change the batteries.
- Restart your computer.
- Repeat the installation procedure.
2) The transmitter/receiver does not switch on.
- Verify all connections. If necessary, disconnect and then reconnect all cables.
- Establish communication between the mini-mouse and the transmitter/receiver: press the + button on the transmitter/receiver and then the ID Connect button on the back of the mini-mouse.
- Repeat the installation procedure.
3) The numeric keypad does not switch on.
The numeric keypad is not detected.
The numeric keypad switches on but does not work.
The USB peripheral I have connected to the numeric keypad does not work.
- Verify the connection. If necessary, disconnect and then reconnect the numeric keypad's USB connector.
- Under Windows 98 SE: make sure that you have properly installed the USB drivers required for your numeric keypad to function.
- Make sure that your laptop computer's USB port is working properly, for example by reconnecting your old mouse or another USB peripheral.
- Repeat the installation procedure.
- As the numeric keypad is not powered by an external power source, it may happen that the keypad will not accept certain USB peripherals which require a great deal of power, such as some vibrating game controllers for example (gamepad or racing wheel) or even some printers.
TECHNICAL SUPPORT
If you encounter a problem with your product, please go to http://fts.thrustmaster.com and click Technical Support. From there you will be able to access various utilities (Frequently Asked Questions (FAQ), the latest versions of drivers and software) that may help to resolve your problem. If the problem persists, you can contact the Thrustmaster products technical support service ("Technical Support"):
By email:
In order to take advantage of technical support by email, you must first register online. The information you provide will help the agents to resolve your problem more quickly. Click Registration on the left-hand side of the Technical Support page and follow the on-screen instructions. If you have already registered, fill in theUsername and Password fields and then click Login.
By telephone:
| United Kingdom | 0207 216 0047 | price of a national phone call, Monday to Friday from 12PM to 4PM and from 5PM to 10PM |
| United States / Canada | 514-279-9911 | price of a long distance phone call, Monday to Friday from 7AM to 11AM and from 12PM to 5PM (Eastern time) |
| Denmark | 82 33 28 58 | price of a national phone call, Monday to Friday from 1PM to 5PM and from 6PM to 11PM |
| Finland | 09 81 71 01 54 | price of a national phone call, Monday to Friday from 2PM to 6PM and from 7PM to 12AM |
| Netherlands | 0900 2026765 | €0.30/min, Monday to Friday from 1PM to 5PM and from 6PM to 11PM |
| Norway | 23 50 01 16 | price of a national phone call, Monday to Friday from 1PM to 5PM and from 6PM to 11PM |
| Sweden | 08-51992032 | price of a national phone call, Monday to Friday from 1PM to 5PM and from 6PM to 11PM |
Warranty information
Worldwide, Guillemot Corporation S.A. ("Guillemot") warrants to the consumer that this Thrustmaster product will be free from material defects and manufacturing flaws for a period of two (2) years from the original date of purchase. Should the product appear to be defective during the warranty period, immediately contact Technical Support, who will indicate the procedure to follow. If the defect is confirmed, the product must be returned to its place of purchase (or any other location indicated by Technical Support).
Within the context of this warranty, the consumer's defective product will, at Technical Support's option, be either repaired or replaced. Where authorized by applicable law, the full liability of Guillemot and its subsidiaries (including for indirect damages) is limited to the repair or replacement of the Thrustmaster product. The consumer's legal rights with respect to legislation applicable to the sale of consumer goods are not affected by this warranty.
This warranty shall not apply: (1) if the product has been modified, opened, altered, or has suffered damage as a result of inappropriate or abusive use, negligence, an accident, normal wear, or any other cause not related to a material defect or manufacturing flaw; (2) in the event of failure to comply with the instructions provided by Technical Support; (3) to software not published by Guillemot, said software being subject to a specific warranty provided by its publisher.
Additional warranty provisions
In the United States of America and in Canada, this warranty is limited to the product's internal mechanism and external housing. Any applicable implied warranties, including warranties of merchantability and fitness for a particular purpose, are hereby limited to two (2) years from the date of purchase and are subject to the conditions set forth in this limited warranty. In no event shall Guillemot Corporation S.A. or its affiliates be liable for consequential or incidental damage resulting from the breach of any express or implied warranties. Some States/Provinces do not allow limitation on how long an implied warranty lasts or exclusion or limitation of incidental/consequential damages, so the above limitation may not apply to you. This warranty gives you specific legal rights, and you may also have other legal rights which vary from State to State or Province to Province.
ENVIRONMENTAL PROTECTION RECOMMENDATION
At the end of its working life, this product should not be disposed of with standard household waste, but rather dropped off at a collection point for the disposal of Waste Electrical and Electronic Equipment (WEEE) for recycling.
This is confirmed by the symbol found on the product, user manual or packaging. Depending on their characteristics, the materials may be recycled. Through recycling and other forms of processing Waste Electrical and Electronic Equipment, you can make a significant contribution towards helping to protect
the environment. Please contact your local authorities for information on the collection point nearest you.
COPYRIGHT
© 2005 Guillemot Corporation S.A. All rights reserved. Thrustmaster® is a registered trademark of Guillemot Corporation S.A. Microsoft Windows® 98 SE, Me, 2000 and XP are either registered trademarks or trademarks of Microsoft Corporation in the United States and/or other countries. All other trademarks and brand names are hereby acknowledged and are property of their respective owners. Illustrations not binding. Contents, designs and specifications are subject to change without notice and may vary from one country to another.
CONTENU DE LA BOITE
INSTALAR O MINI-RATIO SEM FIOS
CARREGAR E RECARREGAR O MINI-RATIO SEM FIOS
- THRUSTMASTER
- Nomads' Wireless Pack
- User Manual
- PACKAGE CONTENTS
- SYSTEM REQUIREMENTS
- RECOMMENDED USE
- INSTALLING THE WIRELESS MINI-MOUSE'S BATTERIES
- INSTALLING THE WIRELESS MINI-MOUSE
- USING THE WIRELESS MINI-MOUSE
- CHARGING AND RECHARGING THE WIRELESS MINI-MOUSE
- CONNECTING THE NUMERIC KEYPAD AND EARPHONES
- TROUBLESHOOTING
- TECHNICAL SUPPORT
- By email:
- Warranty information
- Additional warranty provisions
- ENVIRONMENTAL PROTECTION RECOMMENDATION
- COPYRIGHT
- CONTENU DE LA BOITE
- INSTALAR O MINI-RATIO SEM FIOS
- CARREGAR E RECARREGAR O MINI-RATIO SEM FIOS
Brand : THRUSTMASTER
Model : NOMAD PACK WIRELESS 2
Category : Gaming Accessories