
ICN320 - Navigation GPS NAVMAN - Free user manual and instructions
Find the device manual for free ICN320 NAVMAN in PDF.
| Product type | GPS navigation |
| Brand | NAVMAN |
| Model | ICN320 |
| Navigation technology | GPS system with reception up to 12 satellites |
| Screen | Non-touch, multi-select key navigation |
| Power supply | Rechargeable internal battery + cigarette lighter adapter |
| Main functions | Road navigation, address search, POI, voice instructions (male/female), automatic Back-On-Track recalculation |
| Memory | Removable memory card for road maps |
| Interface languages | Multilingual (French, English, German, etc.) |
| Maintenance and cleaning | Avoid excessive heat and prolonged exposure to sunlight |
| Safety | Do not operate while driving; secure mounting that does not obstruct airbags or visibility |
| Included accessories | Windshield mount, power cable, memory card |
| General information | Manufactured by Navman USA Limited |
Frequently Asked Questions - ICN320 NAVMAN
User questions about ICN320 NAVMAN
0 question about this device. Answer the ones you know or ask your own.
Ask a new question about this device
Download the instructions for your Navigation GPS in PDF format for free! Find your manual ICN320 - NAVMAN and take your electronic device back in hand. On this page are published all the documents necessary for the use of your device. ICN320 by NAVMAN.
USER MANUAL ICN320 NAVMAN
A. New Destinations 6
B. Saved Destinations 9
- Preferences 10
- GPS Status 11
Appendices 12
Address Search Rules 12
Troubleshooting 12
1. Introduction
Welcome
Thank you for purchasing the Navman iCN. This user manual has been prepared to guide you through the operation of your Navman iCN from first set-up through to continuous use. Please read this manual carefully before using your device for the first time. Keep this manual available for future reference.
How Your iCN Works
The Global Positioning System (GPS) is a network of satellites that transmit accurate time and position information worldwide. GPS receivers receive signals from these satellites and use the information to determine an exact location. Satellites orbit the earth at 20,200 kilometres (around 12,000 miles). While a GPS receiver can detect signals from up to 12 satellites at any time, only three signals are needed to provide a position or "GPS fix" (latitude and longitude) for vehicle navigation systems.
Your iCN GPS antenna receives GPS signals and uses these to calculate your position on the maps stored on its memory card. To receive GPS signals, ensure that the iCN is outdoors, or in a vehicle outdoors, and the GPS antenna has an unobstructed view of the sky. The iCN can operate in all weather types except snowfall.
The first time you switch on your iCN, it may take a few minutes to get a GPS fix. This may also be the case when you activate your iCN after the battery has completely drained.
For more information about GPS and your iCN, see page 11.
Safety Notice
WARNING: In a vehicle, it is your sole responsibility to place, secure and use the ICN in a manner that will not cause accidents, personal injury or property damage. The user of this product is solely responsible for observing safe driving practices. It is your responsibility to read and follow the vehicle mount installation instructions and to use the product consistent with your government's laws/regulations. Consult the vehicle manual to ensure the mounting location is safe.
It is your sole responsibility to adhere to the following safety instructions at all times:
- Do not operate the iCN while driving or place the iCN in a position that obstructs the driver's view.
- Do not mount the ICN in a way that may be distracting or interfere with the safe operation of the vehicle, the deployment of airbags or other safety equipment.
- Do not leave the iCN in view while your vehicle is unattended, especially in strong or direct sunlight.
- Do not use or handle the iCN when it is hot; leave it to cool, out of direct sunlight.
Failure to adhere to these instructions may lead to serious personal injury, including death, or property damage. Navman disclaims all liability for use of the iCN that contributes to injuries, death, property damage or violates law.
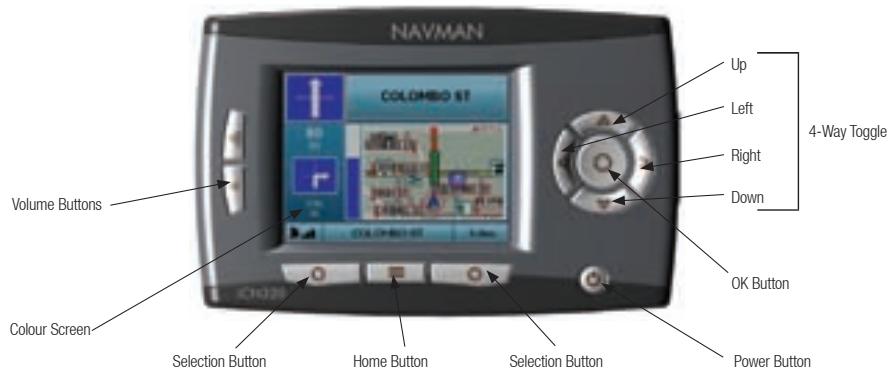
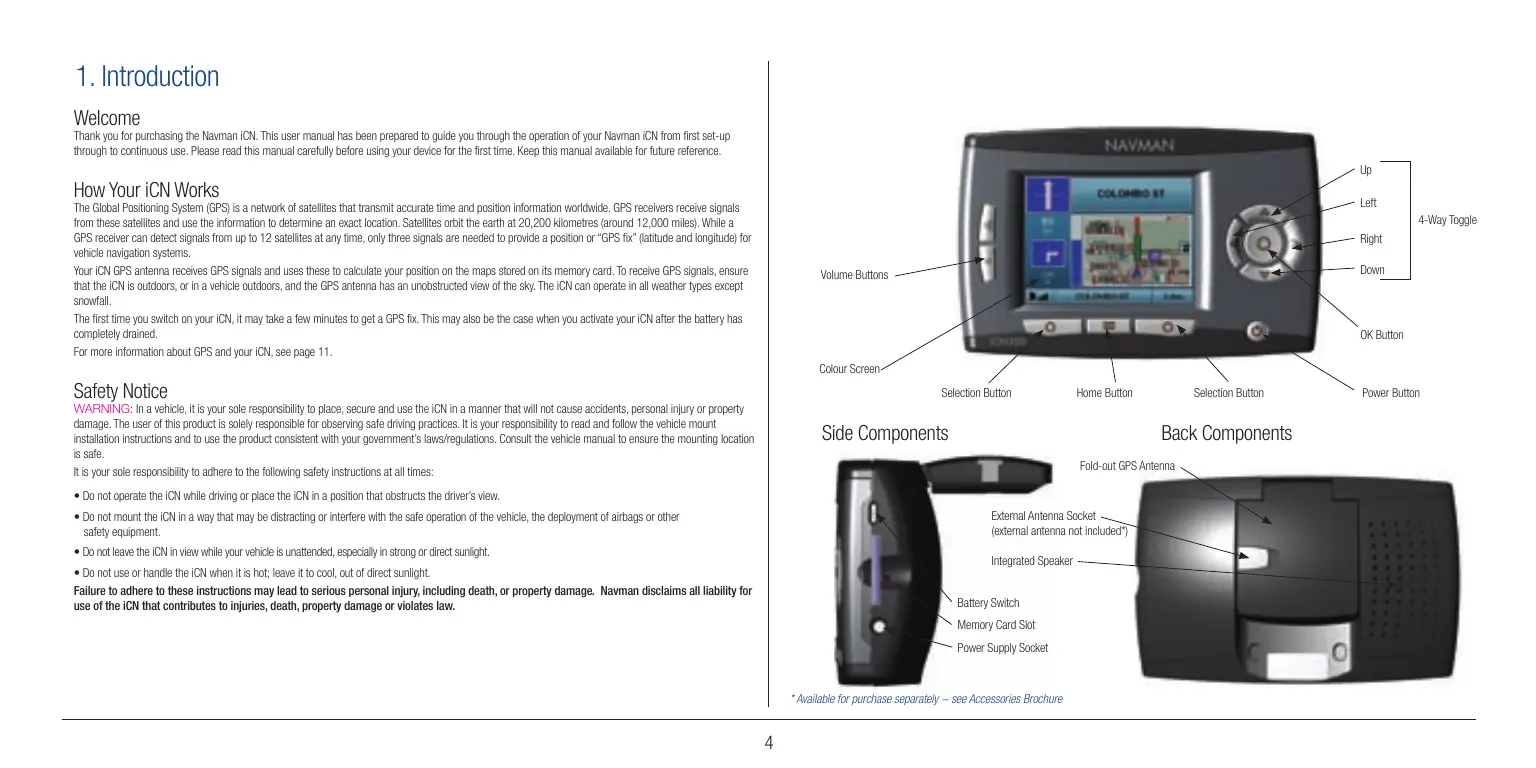
Side Components
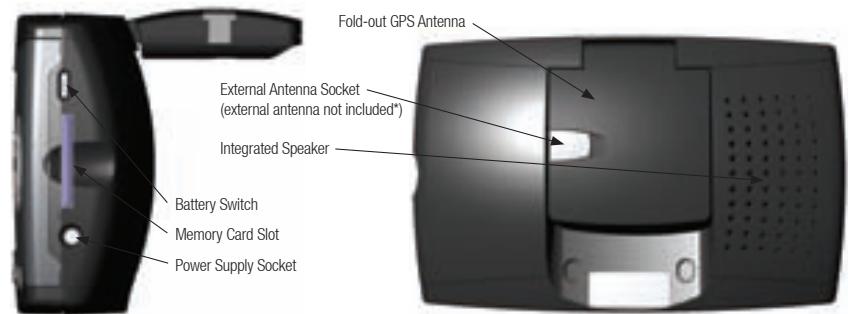
* Available for purchase separately – see Accessories Brochure
2. Setting Up Your iCN
Using your iCN for the first time
- Position your ICN in your vehicle as shown in your In-Car Installation Guide. Ensure that the GPS Antenna is pulled out to the horizontal position and the Battery Switch is in the On position.
- Press the Power button to turn on your iCN. The Language screen will display.
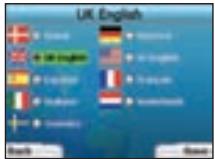
- Use the 4-way toggle to choose your language, then save by pressing the right Selection Button.
- Read the Warning message that is displayed.
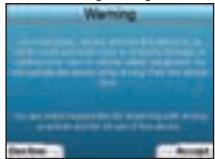
- If you agree with the Warning, select Accept by pressing the right Selection Button.
NOTE: If you do not accept the Warning, your iCN will turn off.

- The Welcome screen will open. Press the right Selection Button to proceed to setting your preferences.
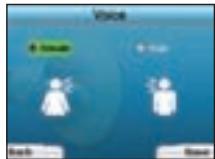
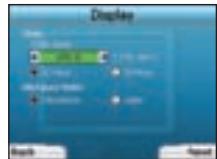
- You can set your iCN to provide spoken instructions in either a male or female voice. Select your preferred option by using the left and right buttons on the 4-way toggle, then press the OK button. When you have selected your preferred option, press the right Selection Button to Save. The Display screen will open.
-
Using the Display screen, you can set your time and distance preferences:
-
To set your Time Zone, press the left and right buttons on the 4-way toggle to set the number of hours difference between your time zone and UTC (GMT).
- Use the 4-way toggle and the OK button to set your iCN to display the time in 12 or 24 hour format.
- If you have set UK English or US English as the Language, you can use the 4-way toggle to set whether your iCN will display distances in miles or kilometres.
-
When you have set your preferences, press the right Selection Button to continue.
-
You can move back to any of the earlier screens by pressing the left Selection Button. Press the right Selection Button to open the Go To screen. You can access your preferences at any time from the Go To screen by pressing the right Selection Button.
3. Navigation
For your safety, enter destination information before you start a journey. Never operate the iCN while driving..
Do not leave your iCN attached to your windscreen when not in use as prolonged exposure to heat may damage the device.
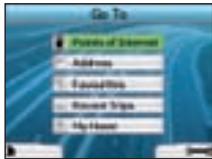
After you have set up your iCN, the Go To screen will be displayed. This lists the different types of destinations that you can visit.
The destinations to which you can navigate fall into two broad categories - New Destinations and Saved Destinations. When you first use your iCN, you will not yet have saved favourites, and will need to input the point to which you wish to navigate. You can navigate to either a Point of Interest (POI) or to a specific area or street.
NOTE: You can return to the Go To screen at any time by pressing the Home Button.
If you have programmed a trip, you can return to the navigation screens by pressing the left Selection Button on the
Go To screen. If you have not programmed a trip, pressing this button will open the GPS Status screen (see page 11).
Press the right Selection Button in the Go To screen to open the Preferences screen (see Page 10).
A. New Destinations
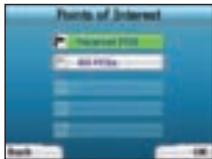
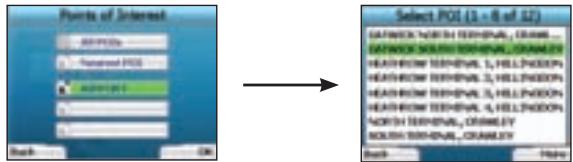
Navigating to a Point of Interest (POI)
A POI is a named site, feature, landmark or public venue which can be displayed as an icon on the map. POIs are grouped by type, such as car parks and airports. Your ICN comes with a number of POIs stored on its map.
NOTE: The POIs in your iCN will vary depending on the map that you use.

-
To navigate to a POI, use the 4-way toggle to highlight Points of Interest on the Go To screen and press OK. The first time you do this, you may be asked to select your country. Use the 4-way toggle to highlight your country and press OK.
-
You can choose to either navigate to the nearest POI or choose from all available POIs. If you are searching for a specific POI, select All POIs using the 4-way toggle, and press OK. If you are looking for a convenient POI such as a nearby petrol station, select Nearest POI and press OK. In this screen, the right Selection Button also acts as an OK button.
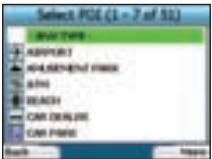
- In the Select POI screen, use the 4-way toggle to select the type of POI you are seeking, and press OK.
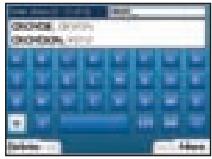
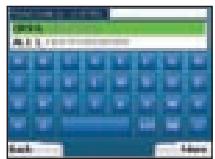
- The Keyboard screen will display. If you selected Nearest POI in the earlier screen, the distance to the POI will be shown.
- Use the 4-way toggle to move around the Keyboard screen. To select a character, press OK. This will narrow your search. To delete a character, press the left Selection Button or select; hold the left Selection
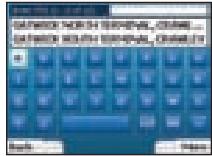
Button to delete the line.

When you have entered the first few characters of your destination, or you can see your destination on the screen, press the right Selection Button.
NOTE: The keyboard screen can be viewed in three modes:
To display the number/symbol Keyboard screen,
select ,then press OK
- To display the alternate Keyboard screen, which features accented characters.
select, then press OK;
- To return to the alphabet Keyboard screen,
select, then press OK.
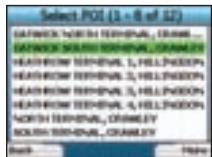

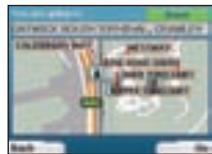
- Use the 4-way toggle to highlight your preferred destination and press OK. Use the left and right Selection Buttons to scroll back and forth through the list of possible destinations. If you are at the top of the list, pressing the left Selection Button will bring you back to the previous screen. When you select a destination, your iCN will display the Destination screen, which clearly shows your chosen destination. Press the left Selection Button to return to the previous screen. Press the right Selection Button to confirm your destination. Your iCN will calculate your route and guide you to your destination.
NOTE: You can save this destination as a Favourite, use the 4-way toggle to select Save and press OK.
You will be guided to the Favourites screen. See page 9 for more on saving destinations.
Navigating to an Address
Using your iCN, you can navigate to an area, the centre of a street, or a certain intersection. To navigate to an address, select Find Address on the Go screen. See Address Search Rules on Page 12 for more about searching for addresses.
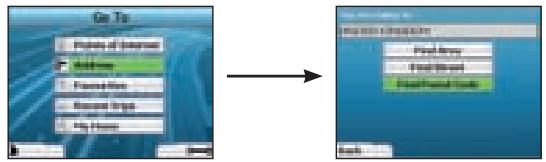
- Use the 4-way toggle to select whether you want to search for an area or a street and press OK. In some countries, you can also search by postal code.
If you choose to Find Area or Find Postal Code, proceed to Step 2. If you choose to Find Street, proceed to Step 5.
The first time you do this, you may be asked to select your country. Use the 4-way toggle to highlight your country and press OK. You can change your country at any time using the Change Country button in the You Are Going To screen.
- Use the 4-way toggle to move around the Keyboard screen. To select a character, press OK. This will narrow your search. To delete a character, press the left Selection Button or select : hold the left Selection Button to delete the line.
When you have entered the Selection Button.
first few characters of the name of the place you are seeking, or you can see it on the screen, press the right

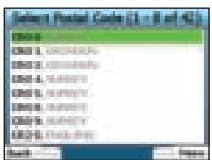
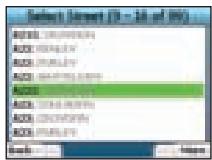
- Use the 4-way toggle to highlight the name of the area and press OK. If you cannot see the area or postal code you are searching for on the screen, use the left and right Selection Buttons to scroll back and forth through the list. If you are at the start of the list, pressing the left Selection Button will bring you back to the previous screen.
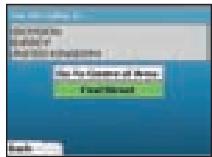
- Use the 4-way toggle and the OK button to decide if you want to go to the centre of the area or to find a street within that area.
If you choose to Go To Centre of Area, proceed to Step 7. If you choose to Find Street, proceed to Step 5.
- Use the 4-way toggle to move around the Keyboard screen. To select a character, press OK. This will narrow your search. To delete a
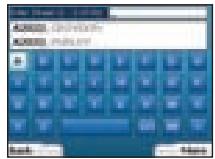
character, press the left Selection Button or select ; hold the left Selection Button to delete the line.
When you have entered the first few Selection Button.
characters of the name of the place you are seeking, or you can see it on the screen, press the right
- Use the 4-way toggle to highlight the name of the street and press OK.

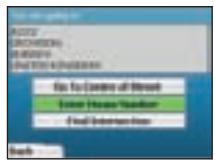
Select whether you want to go to the centre of your destination street or to a particular intersection. In certain countries, you may be able to enter the house number of your destination.
If you choose to go to a particular intersection, proceed to Step 7. If you choose to go to a particular street number, proceed to Step 8. If you choose to go to the centre of the street, proceed to Step 9.
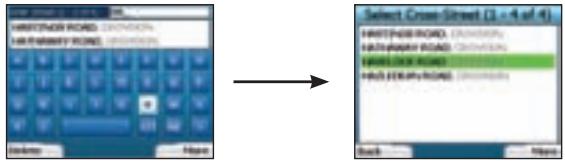
- If there is a high number of intersections on your destination street, you will be returned to the Keyboard screen.
Enter the first few characters of the cross-street you are seeking and press the right Selection Button. A list screen similar to that of Step 6 will display. You will go directly to this screen if there is only a limited number of intersections on your destination street.
Use the 4-way toggle to scroll to your target cross-street and press OK. This will bring you to the Destination screen. Proceed to Step 9.
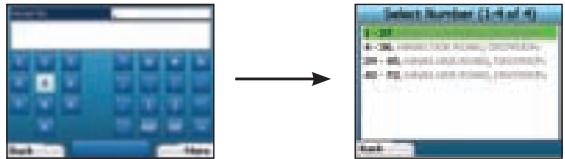
- Use the 4-way toggle and the OK button to enter the number of the building that you wish to visit and press the right Selection Button.
Use the 4-way toggle to select the number you wish to go to from the list and press OK.
- When you select a destination, your iCN will display a map with that destination highlighted.
To choose a specific point on the Destination screen as your destination, use the 4-way toggle to highlight the map and press OK. A cursor will appear. Use the 4-way toggle to point the cursor at your destination and press OK. Your iCN will automatically update your destination to that point.
Press the right Selection Button to confirm that you wish to go to this destination. Your iCN will calculate your route, and guide you on your journey.
Press the left Selection Button to return to the previous screen without calculating a route.
NOTE: You can save this destination as a Favourite; use the 4-way toggle to select Save and press OK.
You will be guided to the Favourites screen. See page 9 for more on saving destinations.
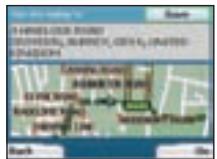
Navigation Screens
Once you have entered a destination, your iCN will calculate your route. You can view your route in a number of ways. Use the left and right direction buttons on the 4-way toggle to switch between screens.
Next Instruction Screen
The Next Instruction screen displays information that you need for the next instruction, the direction to follow and the distance to the instruction. This is the default screen displayed when your iCN calculates a route. A route must have been calculated in order for it to be possible to open this screen.

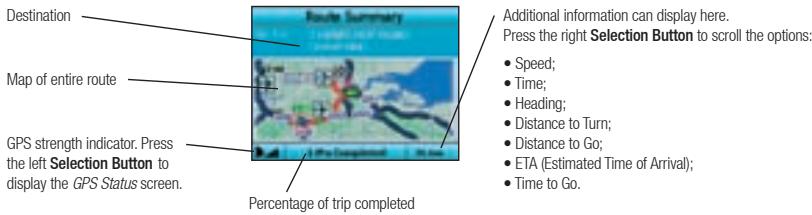
Route Summary Screen
This screen provides high-level summary information about your route.
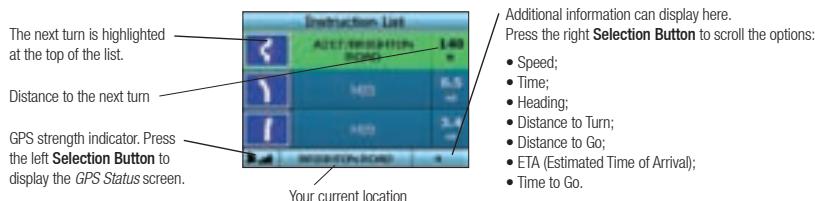
Instruction List Screen
The Instruction List screen displays all of the turns of your route, the turn direction, the street name and the distance to the turn. A route must have been calculated for this screen to be able to display. The screen shows three turns at a time. The route can be scrolled through using the up and down buttons on the 4-way toggle.
Back-On-Track™ Automatic Rerouting
Your iCN automatically re-calculates your trip if you make a wrong turn or miss a turn.
If the Next Instruction or Instruction List screens are open, a large question mark will be displayed while your iCN recalculates your route. The instructions in the Instruction List screen will clear.
B. Saved Destinations
Your iCN can save destinations for future use. These can be accessed in a number of ways:
Recent Trips
Recent POIs
Favories
My Home
Recent Trips
Your iCN automatically saves the destinations you visit. It will hold your last 30 destinations in memory as Recent Trips. To access a recent trip, use the 4-way toggle to select Recent Trips from the Go To screen, and press OK. The Recent Trips screen will open.
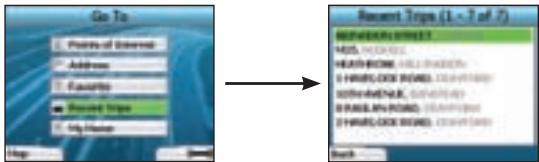
Use the 4-way toggle to highlight the name of your destination and press OK. Use the left and right Selection Buttons to scroll back and forth through the list. If you are at the start of the list, pressing the left Selection Button will bring you back to the previous screen.
Recent POIs
Your iCN automatically stores the types of POI that you visit.
If you have recorded a POI as a destination in your iCN, the next time you open the Points of Interest screen, that type of POI is listed. Your iCN will record the last three types of POI you have visited.
If you select a recent POI, the Select POI screen will display, listing nearby POIs of that type.
Use the 4-way toggle to highlight the name of your destination and press OK. Use the left and right Selection Buttons to scroll back and forth through the list. If you are at the start of the list, pressing the left Selection Button will bring you back to the previous screen.
Saving a Destination
Every time you open the Destination screen, you can save the destination as a favourite. You can store up to 50 Favourites on your iCN. There are two types of Favourite - My Home and Favourites.
- To save a destination as a favourite, select Save on the Destination screen and press OK.
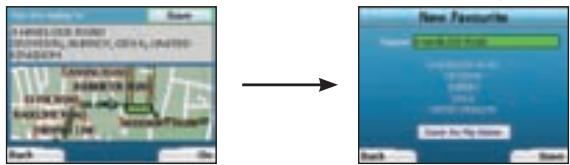
- The New Favourite screen will display. You can change the name of your favourite by pressing OK when the Name field is highlighted. This will open the Keyboard screen, where you can enter a new name for your Favourite.
- You can choose to save the favourite as My Home. To do this, use the 4-way toggle to highlight the Save As My Home button and press OK. If you already have a Favourite stored as My Home, you will be asked if you want to overwrite the existing Favourite. Press the right Selection Button to confirm.
- To save your destination as an ordinary Favourite, press the right Selection Button. Your destination will be saved. To exit without saving your destination, press the left Selection Button.
Navigating to a Favourite
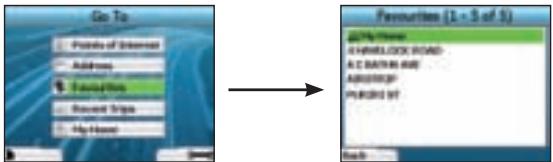
To access a Favourite, use the 4-way toggle to select Favourites on the Go To screen, and press OK. This will open the Favourites screen.
Use the 4-way toggle to highlight the name of your destination and press OK. Use the left and right Selection Buttons to scroll back and forth through the list. If you are at the start of the list, pressing the left Selection Button will bring you back to the previous screen.
Navigating to My Home
From the Go To screen, select My Home then press OK. The route is calculated and displayed. The My Home button is only enabled when a Favourite has been saved as My Home.
Editing Favourites
- From the Go To screen, use the 4-way toggle to select Favourites and press OK.
- In the Favourites screen, highlight the Favourite you want to edit and press OK.
- The Destination screen will open. Use the 4-way toggle to select Edit and press OK.
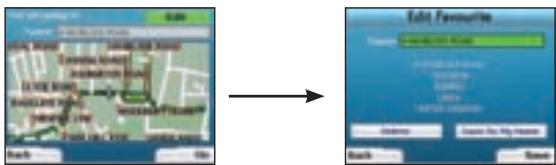
- You can rename, Save As My Home or Delete the Favourite.
To rename the favourite, press OK when the Name is highlighted and use the Keyboard screen to edit the name. Save the name when finished by pressing the right Selection Button.
- To delete the Favourite, use the 4-way toggle to highlight Delete and press OK. You will be asked if you are sure you wish to delete the Favourite. Press the right Selection Button to confirm.
To save the Favourite as My Home, use the 4-way toggle to highlight Save As My Home and press OK. If you already have a My Home stored, you will be asked if you are sure you wish to overwrite the existing Favourite. Press the right Selection Button to confirm.
4. Preferences
You can customise your iCN to suit your needs.
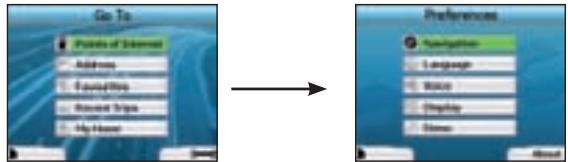
To display the Preferences screen, press the right Selection Button when in the Go To screen.
Navigation Preferences
- From the Preferences screen, use the 4-way toggle to activate Navigation and press OK.
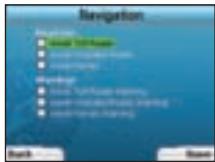
- Your iCN can avoid certain types of roads or ferries when calculating a route. You can also set your iCN to warn you if a route contains those roads or ferries.
Use the 4-way toggle to select the roads you want to avoid or be warned about and press OK. - Save your preferences by pressing the right Selection Button.
Language Preferences
- From the Preferences screen, select Language then press OK.
- Use the 4-way toggle and the OK button to set your preferred language as you did when setting up your iCN for the first time. See page 5 for further details.
Voice Preferences
- From the Preferences screen, select Voice then press OK.
- Use the 4-way toggle and the OK button to choose between a male and female voice as you did when setting up your iCN for the first time. See page 5 for further details.
Display Preferences
- From the Preferences screen, select Display and press OK.
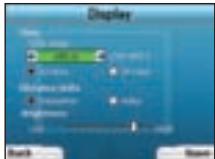
- You can change the following display items in the same fashion as you did when first setting up your iCN.
Time Zone
12 Hour/24 Hour clock
- Distance Units; i.e. whether your iCN calculates distance in kilometres or miles (US English and UK English only).
- You can also adjust Brightness settings. Use the 4-way toggle to select the Brightness control, and to move the pointer up and down.
- Save your preferences by pressing the right Selection Button.
Volume
You can change the volume at any time by using the volume buttons on the left-hand side of the front of your iCN.
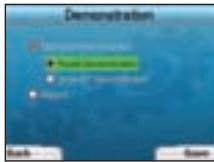
Demonstrations
- From the Preferences screen, select Demo and press OK.
-
Use the 4-way toggle to highlight Demonstration Enabled and press OK.
-
Select Route Demonstration if you want your iCN to display a route before you undertake your journey. You can use the 4-way toggle to scroll through the Navigation screens as if you were driving the route. If your iCN is receiving a GPS signal, it will calculate your trip from your current location. Otherwise, it will calculate your trip using your last recorded destination as the starting point.
The SmartST Demonstration guides you through the functionality of your iCN. You can follow this demonstration to further familiarise yourself with your iCN. -
Selecting Repeat will place the demonstration you have chosen on a continuous loop.
-
Save your preferences by pressing the right Selection Button.
- To cancel demonstration mode, return to this screen, highlight Demonstration Enabled and press OK. Select Save by pressing the right Selection Button.
5. GPS Status
Your iCN works by receiving signals from the GPS. The GPS Status screen provides a visual representation of the information being received. Latitude and longitude are displayed, along with a north-pointing compass, the heading in degrees and ground speed.
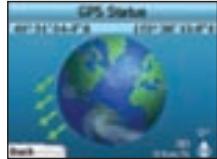
You can check the GPS Status at any time by pressing the left Selection Button on the Preferences screen or on any of the Navigation screens.
You can also open this screen by pressing the left Selection Button on the Go To screen when you have not programmed a trip into your iCN. If you have programmed a trip, pressing this button will return you to the navigation screens.
The satellites available from your current position are shown in different colours:
| Colour | Description |
| Yellow | A satellite that is being tracked, but not being used to fix your position |
| Green | A satellite that is being tracked and being used to fix your position |
The globe in the GPS Status screen will appear grey if no GPS signal is being received.
You can determine your GPS Status at a glance in any of the Navigation screens.
The GPS Strength Indicator will display between one and three bars to indicate the strength of the signal; the GPS Strength Indicator will display red

when no fix is available.
Appendices
Address Search Rules
The following rules apply when searching for a destination in Europe:
Street Names with Dates
If a street name contains a date or a number, search by the first number:
Example 1: If searching for "Faubourg du 13 Juillet 1920", search by "13".
Example 2: If searching for "Avenue du 14 Avril 1914", search by "14".
Example 3: If searching for "Rue de la 1 ere Armée", search by "1".
Streets Named After People (excluding Italy)
If a street name is a person's name (including at least a first and last name), search by the first name:
Example 1: If searching for "Rue Albert Mathieu", search by "Albert".
Example 2: If searching for "Fred Archer Way", search by "Fred".
Example 3: If searching for "Franz Grillparzer-Strasse", search by "Franz".
Streets Named After People - Italy
In Italy, if a street name is a person's name (including at least a first and last name), search by the last name:
Example 1: If searching for "Via de Angelo de Thomasis", search by "Thomasis".
Example 2: If searching for "Via Placido Giovanella", search by "Giovanella".
Example 3: If searching for "Via della Giacomo Marca", search by "Marca".
Postcodes in United Kingdom and Netherlands
When searching by postcode in United Kingdom or Netherlands, type the postcode with spaces and without the last two letters.
Example 1: If searching for "RH6 9ST", search by "RH6 9".
Example 2: If searching for "3514 BN", search by "3514".
Troubleshooting
| Problem | Possible Cause | Recommended Solution |
| I can't turn on my iCN while using battery power | The battery has insufficient charge | Connect your iCN to a power source, then try to activate it. |
| My iCN doesn't recognise the memory card | Incorrect memory card inserted | Insert the memory card that came with your iCN. Your iCN will only operate with a Navman iCN Memory Card installed. |
| Screen does not activate when I turn on my iCN | Low battery | Ensure the hard reset switch is in the 'on' position. Connect your iCN to a power source, then try to activate it. |
| Screen is hard to read | Screen not bright enough | Change the brightness setting on the Display screen. |
| I can't find the street I'm looking for | Use of abbreviations | Follow the Address Search Rules opposite when entering addresses. Only enter the first few characters of the street you are seeking, and then use the Select Street screen to find it. |
| The GPS isn't working | GPS antenna unable to receive signal | Ensure that your GPS antenna is in the horizontal position. If you have a car with a heated or heat-reflecting windscreen, you may require an external antenna in order to receive GPS signals. |
| The GPS has stopped working | Physical position of vehicle. | It is possible for the GPS signal to be interrupted due to your environment, e.g. if you are surrounded by tall buildings or if it is snowing. Your iCN will continue to try to get a fix at all times and will inform you when it is receiving a valid signal again. |
Support Information
Australia:
Navman Australia Pty. Ltd
PO Box 479
Gladesville
NSW 2111
Australia
pcnsupport.aus@navman.com
www.navman.com
New Zealand:
Navman NZ Ltd
PO Box. 68-155
Newton
Auckland
New Zealand
pcnsupport.nz@navman.com
www.navman.com
Europe:
Navman Europe Limited
4G Gatwick House
Peeks Brook Lane
Horley, Surrey RH6 9ST
United Kingdom
Support: www.navman-europe.
com/support.php
www.navman-europe.com
US and Canada:
Navman USA Limited
27142 Burbank
Foothill Ranch, CA 92610
United States of America
support@navmanusa.com
www.navmanusa.com
NAVMAN DISCLAIMER ALL LIABILITY FOR ANY USE OF THIS PRODUCT IN A WAY THAT MAY CAUSE ACCIDENTS, DAMAGE OR VIOLATE THE LAW.
Indhold
Navman Australia Pty. Ltd
PO Box 479
Gladesville
NSW 2111
Australia
pcnsupport.aus@navman.com
www.navman.com
New Zealand:
Navman NZ Ltd
PO Box. 68-155
Newton
Auckland
New Zealand
pcnsupport.nz@navman.com
www.navman.com
Europa:
Navman Europe Limited
4G Gatwick House
Peeks Brook Lane
Horley, Surrey RH6 9ST
United Kingdom
Support: www.navman-europe.
com/support.php
www.navman-europe.com
US og Canada:
Navman USA Limited
27142Burbank
Foothill Ranch, CA 92610
United States of America
support@navmanusa.com
www Navmanusa.com
NAVMAN FRALEGGER SIG ETHVERT ANSVAR FOR BRUG AF PRODUKTET PÄ EN MADE, SOM KAN FORARSAGE ULYKKER, SKADER, ELLER SOM KAN VERE I STRID MED LOVEN.
Inhalt
Navman Australia Pty. Ltd
PO Box 479
Gladesville
NSW 2111
Australia
pcnsupport.aus@navman.com
www.navman.com
Neuseeland:
Navman NZ Ltd
PO Box. 68-155
Newton
Auckland
New Zealand
pcnsupport.nz@navman.com
www.navman.com
Europa:
Navman Europe Limited
4G Gatwick House
Peeks Brook Lane
Horley, Surrey RH6 9ST
United Kingdom
Support: www.navman-europe.
com/support.php
www.navman-europe.com
US and Kanada:
Navman USA Limited
27142 Burbank
Foothill Ranch, CA 92610
United States of America
support@navmanusa.com
www Navmanusa.com
Navman Australia Pty. Ltd
PO Box 479
Gladesville
NSW 2111
Australia
pcnsupport.aus@navman.com
www.navman.com
Nueva Zelanda:
Navman NZ Ltd
PO Box. 68-155
Newton
Auckland
New Zealand
pcnsupport.nz@navman.com
www.navman.com
Europa:
Navman Europe Limited
4G Gatwick House
Peeks Brook Lane
Horley, Surrey RH6 9ST
United Kingdom
Support: www.navman-europe.
com/support.php
www.navman-europe.com
EE UU y Canada:
Navman USA Limited
27142Burbank
Foothill Ranch, CA 92610
United States of America
support@navmanusa.com
www.navmanusa.com
NAVMAN NO SE HACE RESPONSABLE SI EL USO DE Este PRODUCTO OCASIONA ACCIDENTES,
DANOS O INFRINGE LAS LEYES.
Table des matières
Assistance technique 52
1. Introduction
Bienvenue
Ecran Listed instructions
Assistance technique
Australia:
Navman Australia Pty. Ltd PO Box 479
Gladesville
NSW 2111
Australia
pcnsupport.aus@navman.com
www.navman.com
Nouvelle-Zélande:
Navman NZ Ltd
PO Box. 68-155
Newton
Auckland
New Zealand
pcnsupport.nz@navman.com
www.navman.com
Europe:
Navman Europe Limited
4G Gatwick House
Peeks Brook Lane
Horley, Surrey RH6 9ST
United Kingdom
Support: www.navman-europe.
com/support.php
www.navman-europe.com
Foothill Ranch, CA 92610
United States of America
support@navmanusa.com
www.navmanusa.com
NAVMAN DÉCLINE TOUTE RESPONSABILITÉ EN CAS D'UTILISATION DE CE PRODUIT D'UNE
MANIÈRE QUELCONQUE QUI SERAIT SUSCEPTIBLE DE CAUSER DES ACCIDENTS, DESDOMMAGES OU D'ENFREINDRE LA LOI.
Indice
Navman Australia Pty. Ltd
PO Box 479
Gladesville
NSW 2111
Australia
pcnsupport.aus@navman.com
www.navman.com
Nuova Zelanda:
Navman NZ Ltd
PO Box. 68-155
Newton
Auckland
New Zealand
pcnsupport.nz@navman.com
www.navman.com
Europe:
Navman Europe Limited
4G Gatwick House
Peeks Brook Lane
Horley, Surrey RH6 9ST
United Kingdom
Support: www.navman-europe.
com/support.php
www.navman-europe.com
USA e Canada:
Navman USA Limited
27142Burbank
Foothill Ranch, CA 92610
United States of America
support@navmanusa.com
www.navmanusa.com
LA NAVMAN DECLINA OGNI RESPONSABILITA PER UN UTILIZZO DEL PRESENTE PRODOTTO ATTO A PROVOCARE INCIDENTI O DANNI, O CHE POSSA
VIOLARE LA LEGGE.
Inhoudsopgave
- Inleiding 64
2.Uw iCN 320 instellen .65
3.Navigatie 66
Navman Australia Pty. Ltd
PO Box 479
Gladesville
NSW 2111
Australia
pcnsupport.aus@navman.com
www.navman.com
Nieuw Zeeland:
Navman NZ Ltd
PO Box. 68-155
Newton
Auckland
New Zealand
pcnsupport.nz@navman.com
www.navman.com
Europa:
Navman Europe Limited
4G Gatwick House
Peeks Brook Lane
Horley, Surrey RH6 9ST
United Kingdom
Support: www.navman-europe.
com/support.php
www.navman-europe.com
VS en Canada:
Navman USA Limited
27142 Burbank
Foothill Ranch, CA 92610
United States of America
support@navmanusa.com
www.navmanusa.com
NAVMAN IS NIET AANSPRAKELIJK VOOR ENIG GEBRUK VAN DIT PRODUCT, WAARBIJ ONGELUKKEN
OF SCHADE WORDEN VEROORZAAKT, OF DAT IN STRIJD IS MET DE WET
Innehäll
Supportinformation 82
1. Inledning
Välkommen
Navman Australia Pty. Ltd
PO Box 479
Gladesville
NSW 2111
Australie
pcnsupport.aus@navman.com
www.navman.com
Nya Zeeland:
Navman NZ Ltd
PO Box. 68-155
Newton
Auckland
Nouvelle-Zélande
pcnsupport.nz@navman.com
www.navman.com
Europa:
Navman Europe Limited
4G Gatwick House
Peeks Brook Lane
Horley, Surrey RH6 9ST
Royaume-Uni
Soutien: www.navman-europe.
com/support.php
www.navman-europe.com
USA och Kanada:
Navman USA Limited
27142 Burbank
Foothill Ranch, CA 92610
Etats-Unis
support@navmanusa.com
www.navmanusa.com
NAVMAN FRANSAGER SIG ALLT ANSVAR OM PRODUKTEN ANVANDS PÀ ETT SÄTT SOM KAN FÖRORSAKA OLYCKOR, SKADOR ELLER STRIDER MOT GALLANDE LAGSTIFTNING.
- Introduction
- Welcome
- How Your iCN Works
- Safety Notice
- Setting Up Your iCN
- Using your iCN for the first time
- Navigation
- New Destinations
- Navigating to a Point of Interest (POI)
- Navigating to an Address
- Navigation Screens
- Next Instruction Screen
- Route Summary Screen
- Instruction List Screen
- Back-On-Track™ Automatic Rerouting
- Saved Destinations
- Recent Trips
- Recent POIs
- Saving a Destination
- Navigating to a Favourite
- Navigating to My Home
- Editing Favourites
- Preferences
- Navigation Preferences
- Language Preferences
- Voice Preferences
- Display Preferences
- Volume
- Demonstrations
- GPS Status
- Appendices
- Address Search Rules
- Street Names with Dates
- Streets Named After People (excluding Italy)
- Streets Named After People - Italy
- Postcodes in United Kingdom and Netherlands
- Support Information
- Australia:
- New Zealand:
- Europe:
- US and Canada:
- Indhold
- Europa:
- US og Canada:
- Inhalt
- Neuseeland:
- US and Kanada:
- Nueva Zelanda:
- EE UU y Canada:
- Table des matières
- Bienvenue
- Ecran Listed instructions
- Assistance technique
- Nouvelle-Zélande:
- Indice
- Nuova Zelanda:
- USA e Canada:
- Inhoudsopgave
- Nieuw Zeeland:
- VS en Canada:
- Innehäll
- Inledning
- Välkommen
- Nya Zeeland:
- USA och Kanada:
Brand : NAVMAN
Model : ICN320
Category : Navigation GPS