
RACE X LITE AEROBAR - Aerobars BONTRAGER - Free user manual and instructions
Find the device manual for free RACE X LITE AEROBAR BONTRAGER in PDF.

User questions about RACE X LITE AEROBAR BONTRAGER
0 question about this device. Answer the ones you know or ask your own.
Ask a new question about this device
Download the instructions for your Aerobars in PDF format for free! Find your manual RACE X LITE AEROBAR - BONTRAGER and take your electronic device back in hand. On this page are published all the documents necessary for the use of your device. RACE X LITE AEROBAR by BONTRAGER.
USER MANUAL RACE X LITE AEROBAR BONTRAGER
Race X Lite Aerobar Owner's Manual
READ THIS MANUAL BEFORE YOU RIDE
Please read this instruction manual thoroughly before using your new aerobar; it contains important safety and maintenance information. Also check our web site for further information or updates. If you do not understand the information, or you have a question about your aerobar that this manual does not cover, consult your Bontrager dealer. If you have a question or problem that your Bontrager dealer can't handle, contact us at:
Bontrager Components
920.478.4678
Attn: Customer Service
http://www.bontrager.com
801 W. Madison Street
Waterloo, Wisconsin 53594
Contents
Conditions for use 1
Safe use 2
Inspect the aerobar before every ride 2
Test ride the aerobar before your first ride. 5
Only install and use approved accessories. 5
Maintenance. 6
Adjust the position 6
Keep all fasteners tight. 6
Remove the arm pads before transporting on a car . 7
Installation 8
Bontrager limited warranty 14
Carbon crash replacement policy. 15
CONDITIONS FOR USE
Many bicycle parts are intended to be used in a specific type or condition of riding. It is unsafe to use a bicycle or part in a condition higher than the condition for which it is intended, as listed below:
| Use Condition | Bontrager part | |
| For riding on pavement only | Riding on a paved surface where the tires do not lose ground contact | All Bontrager aerobars |
For more information about Use Conditions, visit our web site at http://www.bontrager.com.

In this manual, the Safety Alert Symbol is used to alert you to potential personal injury hazards. Obey all safety messages that follow this symbol to avoid possible injury or death.
SAFE USE
The following information is very important for your safety. Warning! Failure to follow the safety information in this manual may result in failure of the aerobar resulting in serious personal injury or death.
Inspect the aerobar before every ride
Before every ride, complete the following check list to inspect the aerobar and its connected parts: the handlebar, stem, and fork. If any part of the bicycle fails the inspection, repair the bicycle by following the information provided in this manual or take the bicycle
to your dealer for service. Never
ride a bicycle with a damaged part; replace the part.

Check the handlebar and stem
Make sure the stem is aligned with the front wheel. Test the stem connection to the fork by attempting to turn the handlebar from side to side with the front wheel locked between your knees (Figure 1). Test the security of the handlebar by attempting to rotate it in the stem. It should not move or be loose. Make sure that no

Figure 1-Function testing the handlebar and stem
cables are stretched or pinched by rotating the handlebar.
Check that the aerobar cannot rotate around the handlebar. Check that the handlebar plugs are properly inserted into both ends of the aerobar. If your bicycle fails a test, see the Maintenance section or take the bicycle to your dealer for service.

Check the aerobar for fatigue or impact damage
Before and after each ride, carefully inspect your aerobar for signs of impact or fatigue stress:
Dents
Cracks
-Scratches
- Deformation
- Discoloration
- Noise
Even if you perform regular inspections, if you exceed the limit of strength of a given part, it may fail if overloaded. After any high force load, thoroughly inspect all the parts of your bicycle. High
WARNING
A damaged carbon fiber part can fail suddenly. Inspect your carbon fiber bicycle or parts for damage frequently. If you have crashed or impacted your bicycle, or suspect a carbon part is damaged, IMMEDIATELY STOP RIDING YOUR BICYCLE. Take it to your dealer for inspection, service, and evaluation under the crash replacement policy.
force loads include crashes, but you don't have to crash to put a high force load on your bicycle. For example, hitting a large hole in the road or a sharp bump such as a railroad track can put large forces on your bicycle.
The manner in which you ride will determine whether your bicycle and its parts will last. If you ride hard or aggressively, you should replace the bicycle and/or its parts more often than riders who ride smoothly or cautiously. When evaluating your use of the bike or part, there are many variables: weight, speed, technique, terrain, maintenance, riding environment (humidity, salinity, temperature, etc.), and the frame or part itself—so it is impossible to give a precise timetable for replacement. But as a rule, it is better to err on the safe side and replace the bicycle or parts more frequently. If you aren't sure, ask your dealer.
Carbon fiber composite inspection procedures
Carbon fiber is among the strongest materials used in bicycle manufacture. However, carbon fiber has unique qualities, different from metal parts, and must be inspected carefully for damage.
Inspecting carbon fiber parts
Unlike metal parts, carbon fiber parts that have been damaged may not bend, bulge, or deform; a damaged part may appear to be normal to a cursory glance. Use the following procedures to inspect carbon fiber parts (These tests may not be conclusive):
- Check for scratches, gouges, or other surface problems.
- Check the part for loss of rigidity.
- Check the part for delamination.
- Listen for unusual creaking or clicking noises.
The tests are difficult to describe, so we provide a movie of
Inspecting a carbon fiber part in the owner's manual section of the Bontrager web site as an aid to describing the tests. If you have any doubts about the integrity of a part, do not ride the bicycle.
Test ride the aerobar before your first ride
Be extra careful when using aerobars for the first time. Riding with aerobars requires a position that may be new or different, and the bicycle may steer or handle differently. Practice using these aerobars in a low traffic area to become accustomed to any changes in the steering or handling characteristics.
Also, look forward when riding. Do not look down at the ground.
Only install and use approved accessories
Not all accessories are compatible or safe, so only add accessories that are approved by the manufacturer. As an example, the clamp design on some parts applies a powerful but uneven force, which
WARNING
Never modify your aerobar in any way, including sanding, drilling, filing, removing redundant retention devices, or by any other technique. Such modifications will void your warranty, may cause your aerobar to fail, and may contribute to loss of control resulting in personal injury or death.
can crush or damage the part to which it clamps. If you are unsure whether a part is approved, consult your dealer.
MAINTENANCE
This section explains the possible adjustments to the position of your aerobar and the maintenance that you should regularly perform.
Adjust the position
The Race X Lite aerobar offers several adjustments to provide an increase in comfort or aerodynamics. For instructions on how to perform these adjustments, read the Installation section.
Extension tube length- the distance from the handlebar to the ends of the extension tubes. Slide the extension tubes forward or backward in the extension tube clamps. Leave at least 15mm of extension tube exposed behind the clamp.
Extension tube angle- the angle of the aerobar. Rotate the handlebar clamp on the handlebar.
Arm width- the width of the arm rests. Move the arm rests on the arm rest adjusters, or move the handlebar clamps on the handlebar.
Arm pad position- the position of the arm rests relative to the front of the bike. Move the arm rests forward or backwards on the width adjusters. Choose from one of four possible positions.
Arm pad angle- the angle of the arm rests. Rotate the brackets on the extension tubes.
Keep all fasteners tight
Follow these maintenance suggestions to keep your aerobar in correct condition.
Once a month
Check that all the fasteners (screws or bolts) on your aerobar are tightened correctly:
- Handlebar clamp bolts: 100 lb·in (11.3 N·m)
- Extension tube pinch bolts: 60 lb·in (6.7 N·m)
- Width adjusters attachment bolts: 60 lb·in (6.7 N·m)
Arm pad holder screws: 30lb· in (3.4N· m)
Tighten threaded fasteners correctly
All fasteners must be tightened to Bontrager (or the bicycle manufacturer's) specifications. A threaded fastener that is too loose can result in a part coming loose. The torque specifications should be used to make sure you do not over-tighten a fastener. Applying more than the recommended torque to a fastener does not provide extra holding power, and may actually lead to damage or failure of a part. If a part that is tightened to the correct torque is still loose, take the bicycle to your dealer for service.
During production, threaded areas of all fasteners have been pretreated with a special blue thread-locking compound. This special compound is easy to detect. If you cannot detect this thread locking compound or if you have cleaned it off through normal maintenance, re-apply a suitable blue thread-locking compound such as Loctite ^8 242 before assembly.
Do not grease the handlebar clamping area. This may cause the aerobar to slip while riding.
Remove the arm pads before transporting on a car
When carrying your bicycle on a roof rack, remove the arm pads.
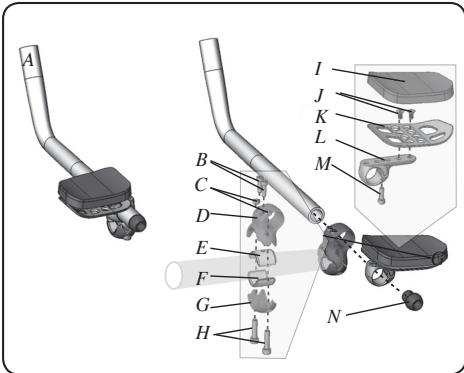
Figure 2 Race X Lite aerobar parts
Parts List
Part name Quantity
A Extension tube 2
B Bolt, extension tube pinch 4
C Nut, handlebar clamp 4
D Bracket, upper handlebar clamp 2
E Shim, upper 2
F Shim,lower 2
G Bracket,lower handlebar clamp 2
H Bolt, handlebar clamp, M6 x 18 4
I Arm pad, right 1
Arm pad, left (not shown) 1
J Screw,arm pad holder 4
K Arm pad holder, right 1
Arm pad holder, left (not shown) 1
L Pad width adjuster 2
M Bolt, width adjuster pinch 2
N Cable guide plug 2
INSTALLATION
Incorrect installation of the aerobar could cause you to lose control and fall from your bicycle. If you are not familiar with the installation of aerobars, have your dealer install them.
Before installing your aerobar, read the Safety information. Note to Dealers: If you install this product for the consumer, please provide him or her with this owner's manual after installation of the aerobar.
Make sure this aerobar is compatible with your bicycle
Some lightweight aluminum or carbon fiber handlebars are not compatible with aerobar assemblies; refer to the handlebar manufacturer's installation instructions.
This aerobar is designed to fit handlebars with either a 26.0mm or 31.8mm stem clamp diameter using the following parts:
-
For a 26.0mm handlebar, use the four shims (two each, E and F, Figure 2) included with this aerobar assembly.
-
For a 31.8mm handlebar, no shims are required.
Tools and materials required:
3,4,and 5mm allen wrenches
- Torque wrench
To install the extension tubes to the handlebar
The following letter references (A, B, C, etc.) are for Figure 2.
- Determine the desired aerobar width.
If needed, unwrap the top section of handlebar tape to attain the desired width.
- Attach the upper brackets (D) and lower brackets (G) to the handlebar. Insert two handlebar clamp bolts (H) through each upper bracket and lower bracket, and into the nuts (C), which fit into the upper bracket.
For a 26.0mm handlebar, use the shims (E and F) listed above. Locate and place the dimple on the shim into the recess of the bracket. If the dimple is in the recess, it will prevent each shim from rotating.
- Tighten the handlebar clamp bolts (H) to 100 lb·in (11.3 N·m).
- Slide the left and right extension tubes (A) through the upper brackets (D) and adjust the position of the extension tubes to the desired length and rotational angle. Leave a minimum of 15mm of extension tube exposed behind the clamp of the upper bracket.
- Insert the extension tube pinch bolts (B) and tighten to 60 lb·in (6.7 N·m). Do not overtighten bolts, as this may damage the carbon tube.
- Slide the left pad width adjuster (L) and right pad width adjuster (L) onto the extension tubes.
- Insert the width adjuster pinch bolts (M).
- Adjust the angle of the width adjusters. Rotate the bracket to the desired angle, and tighten the pinch bolts to 60 lb*in (6.7N m) Note that extreme angle adjustment might limit the ability of the arm pad holders to align correctly.
To install the arm pad holders and arm pads
The width of the arm pad holders can be customized to suit your body type and riding style.
- Insert two arm pad holder screws (J) through the desired holes of the left and right arm pad holders (K) and into the pad width adjusters (L).
- Tighten each arm pad holder screw to 30 lb·in (3.4 N·m). Two screws are required per side to prevent the arm pad holders from spinning on the arm width adjusters.
- Repeat on the second arm pad holder.
- Place the arm pads on the hook-and-loop fasteners of the arm pad holders.
To install shift levers
If you wish to install bar end shift levers into the tip of the Race X Lite® extension tubes (A), slide the control cables and housing through the cable guide plug (N). Do not drill or cut the extension tubes. Tighten the shift lever mounting bolt until the shift lever is firmly in place.
Do not over tighten the shift lever mounting bolt as this may damage the carbon extension tube. Do not exceed 45 lb·in (5 N·m).
To check the installation
Re-check all fasteners for tightness after the first use of the aerobar and periodically thereafter to insure secure attachment of the aerobar.
BONTRAGER LIMITED WARRANTY
Bontrager warrants each new Bontrager component or wheelset against defects in workmanship and materials:
For five years
- All Bontrager components and accessories, except consumables such as tires and inner tubes.
For one year-
- Bontrager consumables such as tires and inner tubes.
This warranty does not cover
Normal wear and tear
- Improper assembly
- Improper follow-up maintenance
- Installation of parts or accessories not originally intended for or compatible with the Bontrager components or wheelsets as sold
- Damage or failure due to accident, misuse, abuse, or neglect
Labor charges for part replacement or changeover
This warranty is void in its entirety by any modification of the wheelset or components.
This warranty is expressly limited to the repair or replacement of a defective item and is the sole remedy of the warranty. This warranty extends from the date of purchase, applies only to the original owner, and is not transferable. Bontrager is not responsible for incidental or consequential damages. Some states do not allow the exclusion of incidental or consequential damages, so the above exclusion may not
apply to you.
Claims under this warranty must be made through an authorized Bontrager dealer. Proof of purchase is required.
This warranty gives the consumer specific legal rights, and those rights may vary from place to place. This warranty does not affect the statutory rights of the consumer.
Carbon crash replacement policy
Assessing any damage done to a carbon fiber part requires more experience than is needed to inspect metal parts. If you crash or impact your bicycle and the force of the impact is absorbed by a carbon part, we strongly encourage you to replace the part, even if there are no indications of damage.
If such a crash or impact occurs, Bontrager offers a crash replacement program for carbon parts, substantially reducing any replacement cost. To take advantage of this program, contact us using the information listed in the front of this manual and ask for the Warranty department.
LEA ESTME MANUAL ANTES DE UTILizar EL MANILLAR AERODINAMICO
Attn: Customer Service
http://www.bontrager.com
801 W. Madison Street
Waterloo, Wisconsin 53594
Contenido
Attn: Customer Service
http://www.bontrager.com
801 W. Madison Street
Waterloo, Wisconsin 53594
Inhalt
Attn: Customer Service
http://www.bontrager.com
801 W. Madison Street
Waterloo, Wisconsin 53594