
POWER CHARGER - Electric bike charger BONTRAGER - Free user manual and instructions
Find the device manual for free POWER CHARGER BONTRAGER in PDF.
| Product Type | Portable air compressor with rechargeable battery |
| Brand | Bontrager |
| Model | Power Charger |
| Power Supply | Internal 12V rechargeable battery via AC mains (110V) or DC cigarette lighter (12V) |
| Maximum Pressure | 300 psi (20 kgf/cm²) |
| Valve Type | Presta and Schrader (reversible pump head) |
| Included Accessories | AC charger, DC charger, three additional inflation accessories |
| Charge Indicator | Solid red while charging, flashing red when fully charged |
| Pressure Indicator | Integrated pressure gauge on top |
| Charge time (AC mode, first charge) | 14 to 16 hours |
| Charge time (AC mode, subsequent charges) | 7 to 9 hours (up to 20 hours) |
| Charge time (DC mode, first charge) | 5 to 6 hours |
| Charge time (DC mode, subsequent charges) | 3 to 7 hours |
| Recommended charging temperature | 18 to 24 °C (do not charge below 5 °C or above 40 °C) |
| Storage temperature | 18 to 24 °C, dry place |
| Battery maintenance | Recharge at least once every three months |
| Maximum continuous use | 15 minutes, then allow to cool |
| Safety | Do not use in wet environments or near flammable gases; do not leave unattended while inflating |
| Warranty | 5 years for components and accessories (excluding consumables), 1 year for consumables |
| Battery disposal | Rechargeable lead-acid battery; return to authorized dealer in accordance with local laws |
Frequently Asked Questions - POWER CHARGER BONTRAGER
User questions about POWER CHARGER BONTRAGER
0 question about this device. Answer the ones you know or ask your own.
Ask a new question about this device
Download the instructions for your Electric bike charger in PDF format for free! Find your manual POWER CHARGER - BONTRAGER and take your electronic device back in hand. On this page are published all the documents necessary for the use of your device. POWER CHARGER by BONTRAGER.
USER MANUAL POWER CHARGER BONTRAGER
Please read this instruction manual thoroughly before you use your new Bontrager product; the manual contains important safety and maintenance information. Also check our web site for further information or updates. If you do not understand the information, or you have a question about this part that this manual does not cover, speak to your Bontrager dealer. If you have a question or problem that your Bontrager dealer can not handle, contact us at:
Bontrager Components
Attn: Customer Service
801 W. Madison Street
Waterloo, Wisconsin 53594
920.478.4678
http://www.bontrager.com

In this manual, the safety alert symbol indicates a potential hazard of personal injury. Obey all safety messages that follow this symbol to avoid possible injury or death.
Contents
Introduction 1
General safety 1
Before the first use. 2
A comparison of AC and DC charging 2
Safety 2
Maintenance 2
Battery charging 2
Inflating 3
To charge the battery in AC mode 3
To charge the battery in DC mode 3
Safety 3
To inflate 4
After use 4
Storage 4
Battery disposal 4
Bontrager Limited warranty. 5
INTRODUCTION
This Bontrager Power Charger, an electric air compressor, is small and portable, yet supplies up to 300 psi (20 atm) for tires, rafts, and sports equipment. It is very portable, and can run on its battery in cordless mode. Its battery pump is easily rechargeable, and it includes the necessary equipment to recharge with either AC current (house outlet) or DC current (automobile cigarette lighter).
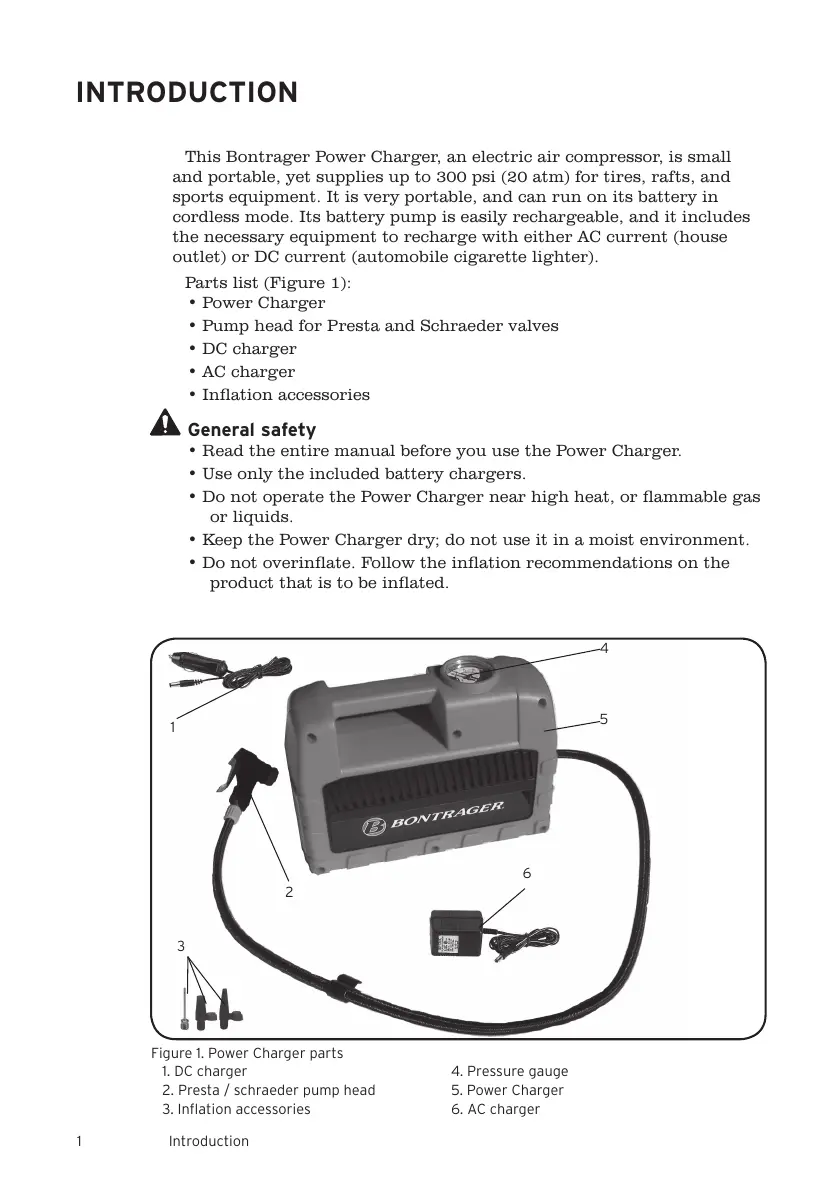
Parts list (Figure 1):
Power Charger
- Pump head for Presta and Schraeder valves
DC charger
- AC charger
Inflation accessories

General safety
- Read the entire manual before you use the Power Charger.
- Use only the included battery chargers.
- Do not operate the Power Charger near high heat, or flammable gas or liquids.
- Keep the Power Charger dry; do not use it in a moist environment.
- Do not overinflate. Follow the inflation recommendations on the product that is to be inflated.
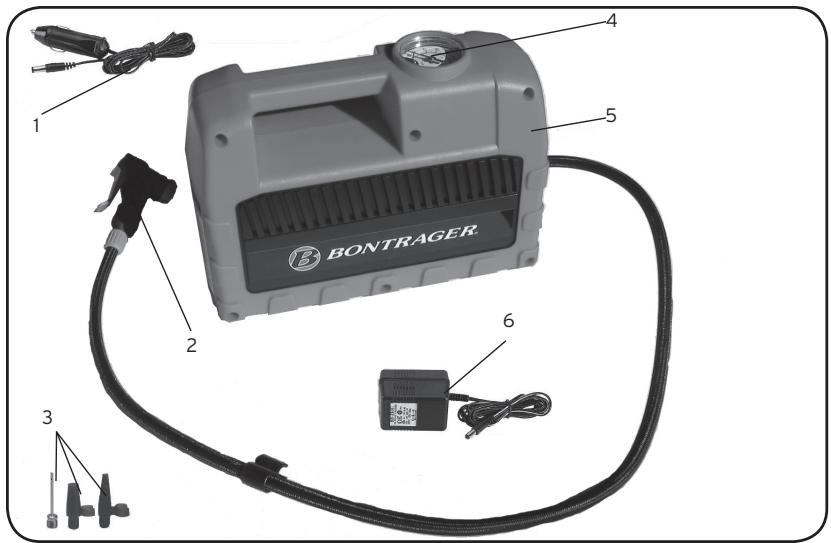
Figure 1. Power Charger parts
-
DC charger
-
Pressure gauge
-
Presta / schraeder pump head
-
Power Charger
-
Inflation accessories
-
AC charger
The battery can be charged with either AC (Alternating Current, 110V, from the outlets of your home, for example) or DC (Direct Current, 12V, from the cigarette lighter of your car, for example). Two chargers are supplied with the Power Charger, one for each power source.
Do not completely drain the battery of the Power Charger. If the battery runs low, the charging indicator turns yellow.
When charging the battery, place the Power Charger in a dry location. The you will obtain the best results when the temperatures is between 65 and 75^ (18 and 24^ ).
Before the first use
The Power Charger battery must be charged before its first use.
A comparison of AC and DC charging
The Power Charger battery uses 12V current. When you use AC charging, the 110V current is converted to 12V. The converter does not provide as much charging power as charging directly off of a 12V system.
With DC, the initial charge takes 5 to 6 hours. After the initial charge, DC charging takes about 3 hours. If the battery is used too long, recharging could take up to 7 hours
Because the AC charger must convert the electricity from 110V to 12V, the initial charge with the 110V charger takes about 14 to 16 hours. After the initial charge, AC charging takes about 7 to 9 hours. If the battery is used too long, recharging could take up to 20 hours.
After the battery is charged, the Power Charger is ready for use.

Safety
- Do not charge the battery at temperatures below 40^ ( 5^ ) or above 105^ ( 40^ ).
Maintenance
Charge the battery at least once every three months. If the battery is completely drained and left for a month, the battery could lose the ability to charge.
To charge the battery in AC mode
Do not operate the Power Charger when it is connected to the AC charger (Figure 2).
- Plug the AC charger into the Power Charger.
- Plug the AC charger into a 110V electrical outlet.
- Press the On/Off/Battery Charge switch to Battery Charge (Figure 5). When the battery is charging, the red Charging Indicator light becomes steady (Figure 3). When the charge is complete, the light flashes.
To charge the battery in DC mode
Only charge the battery when the vehicle's engine is running. Otherwise, charging the Power Charger battery will drain the car battery.
Do not start the vehicle engine if the DC charger (Figure 4) is plugged into a cigarette lighter. The change in voltage could cause damage to the charger.
- Start the car.
- Plug the DC charger into the Power Charger.
- Plug the DC charger into the socket of a vehicle cigarette lighter or
other 12V receptacle. Rotate the plug of the charger in the socket to ensure a good connection.
- Press the On/Off/Battery Charge switch to Battery Charge (Figure 5). When the battery is charging, the red Charging Indicator light becomes steady (Figure 3). When the charge is complete, the light flashes.
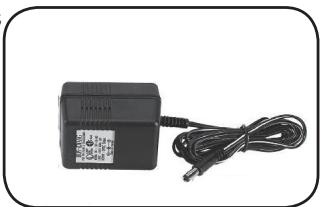
Figure 2. AC charger
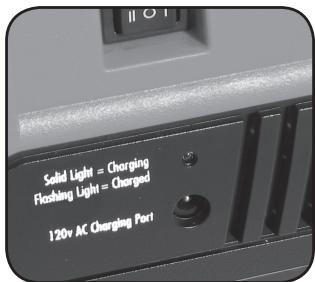
Figure 3. Charging indicator and the charger cord
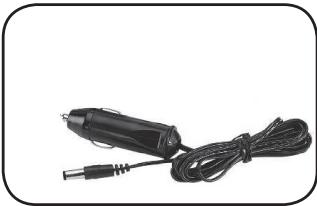
Figure 4. DC charger
INFLATING
The Power Charger uses a pump head that works with either schraeder or presta valves. In addition, there are three inflation accessories.

Safety
- Do not leave the Power Charger unattended when inflating. It does not automatically stop inflating, which could cause over-inflation.
- Do not overinflate. When you inflate anything, follow the inflation recommendations on the product.
-
Always lock the pump head onto the valve stem or inflation accessory. If the pump head is not locked, at high pressure it could blow off suddenly and violently.
-
The Power Charger can get hot during use. After 15 minutes of use, allow the Power Charger to cool.
To inflate
- Attach the pump head to the product's valve or to an inflation accessory.
- Lock the pump head.
- Press the On/Off/Battery Charge switch to ON (Figure 5).
- Watch the pressure gauge on the top of Power Charger.
- When the product is inflated, Press the On/Off/Battery Charge switch to OFF.
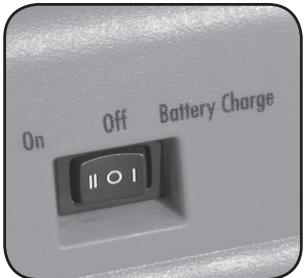
Figure 5. On/Off/Battery Charge switch
WARNING
The Power Charger can release air at high pressure. If the pump head comes off during inflation, the pressure could make it move uncontrollably, possibly strike you, and cause injury. If a product is overinflated, it could explode, sending pieces at high velocity or creating noise that could cause damage to your ears. Always lock the pump head to the valve or inflation accessory prior to inflation, and follow the inflation recommendations of the product.
AFTER USE
After 15 minutes of use, allow the Power Charger to cool.
Storage
Store the Power Charger in a dry place where the temperatures is between 65 and 75^ (18 and 24^ ). Leave the lock of the pump head in the Open position (Figure 6). Make sure the On/Off/Battery Charge switch is in the Off position.
Battery disposal
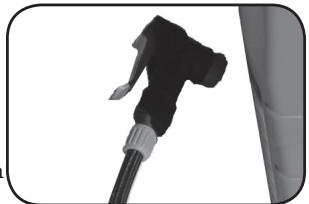
Figure 6. Lock lever of pump head in Open position
This Power Charger includes a lead-acid battery that is rechargeable and sealed. The environmental laws in some countries require your dealer to accept returns of rechargeable batteries for proper disposal. Check the country laws before disposing of the battery.
WARNING
The coated electrical wires of the Power Charger contain lead. Handling the wires exposes you to lead, a chemical known to the State of California to cause cancer, birth defects, or other reproductive harm. Always wash your hands after contact with the wires.
Bontrager Limited warranty
Bontrager warrants each new Bontrager component or wheelset against defects in workmanship and materials:
For five years-
- All Bontrager components and accessories, except consumables such as tires and inner tubes.
For one year-
- Bontrager consumables such as tires and inner tubes.
This warranty does not cover
Normal wear and tear
- Improper assembly
- Improper follow-up maintenance
- Installation of parts or accessories not originally intended for or compatible with the Bontrager fork, components, or wheelsets as sold
- Damage or failure due to accident, misuse, abuse, or neglect
Labor charges for part replacement or changeover
This warranty is void in its entirety by any modification of the wheelset or components.
This warranty is expressly limited to the repair or replacement of a defective item and is the sole remedy of the warranty. This warranty extends from the date of purchase, applies only to the original owner, and is not transferable. Bontrager is not responsible for incidental or consequential damages. Some states do not allow the exclusion of incidental or consequential damages, so the above exclusion may not apply to you.
Claims under this warranty must be made through an authorized Bontrager dealer. Proof of purchase is required.
This warranty gives the consumer specific legal rights, and those rights may vary from place to place. This warranty does not affect the statutory rights of the consumer.
Carbon crash replacement policy
Assessing any damage done to a carbon fiber part requires more experience than is needed to inspect metal parts. If you crash or impact your bike and the force of the impact is absorbed by a carbon part, we strongly encourage you to replace the part, even if there are no indications of damage.
If such a crash or impact occurs, Bontrager offers a crash replacement program for carbon parts, substantially reducing any replacement cost. To take advantage of this program, contact us using the information listed in the front of the manual, and ask for the Warranty department.