
DVD 552 HC - DVD player CLATRONIC - Free user manual and instructions
Find the device manual for free DVD 552 HC CLATRONIC in PDF.

| Product type | DVD player |
| Brand | CLATRONIC |
| Model | DVD 552 HC |
| Playable formats | DVD, DVD±R/RW, VCD, SVCD, CD, CD-R/RW, MP3, JPEG |
| Dimensions (W x D x H) | 430 x 250 x 40 mm |
| Weight | 2 kg |
| Power supply | 220-240 V, 50 Hz |
| Power consumption | < 15 W |
| Video outputs | HDMI, composite (RCA), YUV (component) |
| Audio outputs | Stereo RCA, digital coaxial, digital optical |
| Special features | Multi-region playback, zoom, repeat, search, programming |
| Care and cleaning | Clean the device with a soft, dry cloth. Do not use aggressive solvents. Clean the lens with a suitable cleaning disc. |
| Safety | Do not open the casing. Protect from moisture and shocks. Use only on a stable, ventilated surface. |
| Spare parts and repairability | Remote control, power adapter, audio/video cables available. Repair by an authorized professional. |
| General information | Versatile DVD player for playing optical discs and multimedia files via USB. |
Frequently Asked Questions - DVD 552 HC CLATRONIC
User questions about DVD 552 HC CLATRONIC
0 question about this device. Answer the ones you know or ask your own.
Ask a new question about this device
Download the instructions for your DVD player in PDF format for free! Find your manual DVD 552 HC - CLATRONIC and take your electronic device back in hand. On this page are published all the documents necessary for the use of your device. DVD 552 HC by CLATRONIC.
USER MANUAL DVD 552 HC CLATRONIC
Instructions for use Page 26-45
H
GENERAL SAFETY INSTRUCTIONS
To avoid the risk of fire or an electric shock, you should not expose the device to rain or moisture. Consequently, do not use the device in the immediate vicinity of water - for example near a bath tub, a swimming pool or in a damp cellar.
Use the device only for the intended purpose.
Only connect the device at a properly installed plug socket. Pay attention that the specified voltage corresponds to the voltage of the plug socket.
When using external mains supply, pay attention to the correct polarity and voltage. Always place the batteries in the correct direction.
Assemble the device in such a way that the available ventilation openings are not covered.
Never open the housing of the device. Incorrect repairs can constitute a considerable risk for the user. Should the device become damaged, in particular the mains supply cable, do not operate the device any longer, but rather have it repaired by an expert. Check the mains supply cable regularly for damage.
For safety reasons a broken or damaged mains lead may only be replaced by an equivalent lead from the manufacturer, our customer service department or a similary qualified person.
If the device is not used for a longer period, remove the plug connector from the plug socket or take out the batteries.
These symbols may be found on the machine and are intended to indicate the following:
The lightning symbol should advise the user of parts in the inside of the device which carry dangerously high voltage levels.
The symbol with an exclamation mark should advise the user of important operation or maintenance instructions in the accompanying documentation.
Devices bearing this symbol work with a „class 1 laser“ for tracing the CD. The built-in safety switches should prevent the user being exposed to dangerous laser light, which is invisible to the human eye, when the CD compartment is opened.
Under no circumstances should these safety switches be bypassed or manipulated, as this could result in a danger of exposure to the laser light.
ÁLTALÁNOS BIZTONSÁGIRENDSZABÁLYOK
For your protection and for the safety of the device, we would like to remind you to observe the safety instructions highlighted in grey.
DOLBY DIGITAL AND DOLBY SURROUND Page 27
SETTING UP THE INDIVIDUAL DEVICES Page 27-28
- Operating location of the DVD receiver
- Setting up the speakers
Note on disposal
CONNECTION
Page 28-31
- Connections at the front of the device
- Connections on the rear of the unit
- Speaker connection
- Tuning of the speaker system
Aerial connection - Connection to the television set
- Connecting additional units
- Headphone connection
- Mains connection
OPERATING ELEMENTS
Page 31-32
- Front of the device
Remote control
PUTTING INTO OPERATION AND BASIC FUNCTIONS
Page 32-34
- Menu functions
- Switching the device on and off
- Selecting the operating mode
- Setting the volume
Basic settings - Setting and storing radio stations
- Listening to radio
- Inserting and removing a CD
Adjusting the loudspeakers
- Dolby Surround operation
PLAYING A DVD OR A VIDEO-CD
Page 35-38
About DVDs and video CDs
- Playing a CD
Content of DVD CDs (menus)
- Playing a video CD with PBC
- Freeze frame and single frame
- Slow motion
Search
- Frame zoom function
Repeat functions
Language and subtitles
Selection of the camera angle
Other playback function
- Displaying the playback information
PLAYING A MUSIC CD
Page 38-39
- General information about audio CDs
- Playing a CD
Title selection and search mode - Other playback functions
Repeat functions
Programme memory
SPECIAL FUNCTIONS
Page 39-41
Device configuration (set-up)
- Preferred settings (language)
Child lock
- Resetting to original factory settings
- Setting the automatic switch
SPECIAL SOUND FUNCTIONS
Page 42
Time delay for centre and surround speakers
Sound dynamic range
CARE AND MAINTENANCE
Page 43
- Cleaning the components
Notes about compact disc
(DVD, video-CD, audio-CD, MP3-CD)
Notes about the CD Player - Maintenance
BEFORE YOU CALL THE SERVICE TECHNICIAN...
Page 44
TECHNICAL SPECIFICATIONS
Page 45
DOLBY DIGITAL AND DOLBY SURROUND
Dolby Digital and Dolby Surround are special sound recording procedures that were originally developed for film. To be able to also use these spatial sound effects at your home, video tapes, TV broadcasting, CDs and LDs have been manufactured with this technology. In contrast to Dolby Surround Pro Logic, stereo channels are also used for both surround speakers in Dolby Digital.
When buying DVDs, video cassettes, LDS and music CDs look out for the DOLBY SURROUND logo and the DOLBY DIGITAL logo. These logos mark all picture and sound media that contain recordings in Dolby-Pro-Logic Surround and Dolby Digital quality.
VHS video cassettes that are only marked by the DOLBY B NK logo do not contain the required information.


Manufactured under license from Dolby Laboratories Licensing Corporation. DOLBY, the Double-D symbol and PRO LOGIC are registered trademarks of the Dolby Laboratories Licensing Corporation.
This system is for a 5.1 decoder with 5 different audible sound channels (right forward, left forward, middle, right rear left rear) plus 1 subwoofer.
SETTING UP THE INDIVIDUAL DEVICES
Operating location of the DVD receiver
Protect the device against moisture and rain. It must not be operated in damp rooms nor subjected to drips or splashes. Do not place any receptacles containing liquids e.g. flower vases, flowerpots on the device. Electrical current can deliver life-threatening shocks when in contact with water.
No objects should enter the device through the ventilation openings as these objects could then touch live parts.
Open sources of fire such as, e.g. burning candles must not be placed on top of the device.
Caution
If fluids or foreign object get inside the device then immediately pull the mains plug. Before re-starting the unit have it checked by an authorised dealer.
Condensed water can build up inside the device when moved form a cold location to a warm location. Leave the device switched off for several hours.
The device should be placed on a stable, horizontal surface to ensure that it sits securely and is not subject to vibrations.. Vibrations can damage the sensitive electronic components inside the device.

The heat generated when operating the device must be able to escape. A build-up of heat causes failure to electronic components.
Do not place the device near other devices that generate strong magnetic fields (e.g. motors, speakers, transformers, etc.).
Caution!
To protect the user's eyes, a distance of at least 2 to 3m should be maintained when looking at the television (4x screen diagonal).
Setting up the speakers
All speakers should normally be located at the same distance to the listener (except for the subwoofer). However, this system also allows you to place the centre speaker and the surround speaker at a smaller distance to listener. The drawing provides you with a suggestion for how to set up the front, centre and surround speakers.
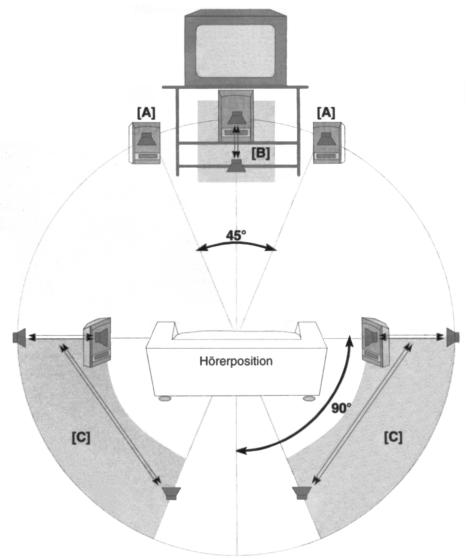
For the right and left channels, the front speakers (A) are set up (A) at the same distance to the listener. For optimal sound, these speakers should form an isosceles triangle to the listener. The tweeters should then be at the same level as the ears of the listener when seated.
For the middle channel, the centre speaker is placed central to the listening position (B) e.g. under the television. The main task of the middle channel is to play back events that come from the centre (e.g. speech) exactly from this location.
The surround speakers should be at a sufficient distance to the left and right of the listener or behind the listener in area (C). They must not be located below the ears of the listener when seated.
The Subwoofoers can be placed anywhere as the base frequencies can not be localised by the human ear. However, sufficient distance form the television must be observed as the magnetic speaker may otherwise cause disturbances to the picture.
Notes:
- The distance between the centre speaker and the surround speakers must not be greater than the distance between the front speakers and the listener.
- The subwoofer should be placed in a corner when possible in order to achieve maximal playback of back frequencies. The other speakers should not be placed in a corner.
- The main direction of the sound from the speakers should not be impinged by furniture, curtains, etc. The listener should be able to see the speakers.
Depending on whether you place the speakers on a flat surface or on the wall, you should stick the adhesive film supplied with the device on the base or the rear of the speakers.
Note on disposal
Make a contribution to the environment!
Packaging and packing aids are recyclable and should always be disposed of accordingly.
Caution!
Keep packing material such as, e.g. packing bags away from children (Danger of suffocation)!
Remove the batteries before disposing of the unit. Old batteries and rechargeable batteries do not belong in the normal household waste.
The device and the batteries must be handed in to a special station for special refuse or to your centre for special resources.
Specialist dealers, specialist markets or sales partners will also accept your dead batteries.
CONNECTIONS
Open facing page 3. This allows you to find the parts more easily.
Warning!
Before connecting the individual components, all devices must be switched off and unplugged. Only suitable cable should be used. Only plug in the devices and switch them on when all connections have been correctly made.
Connections at the front of the device
11 PHONES
Headphones socket
Connections on the rear of the unit
Warning!
The connection contacts at the rear of the device must not be touched by metal objects or by fingers. This may cause short circuits.
46 SCART OUT
Scart connector(EURO-AV) for RGB-signal (picture and sound), for connecting a television.
47 S-VIDEO OUT
S-VHS output socket for video playback; Connection for a television with S-VHS input
48VIDEO OUT
Cinchoutput socket (video) for video playback; connection, e.g. to a television
49 AM ANTENNA
AM aerial connection socket (for the frame aerial supplied with the accessories).
50 FM ANTENNA
Aerial socket for a 75-Ohm coax plug
51 AUDIO OUT L/R
Cinch output socket (audio) for sound reproduction; connection to , e.g. a television or to another stereo receiver
52 AUDIO IN AUX 1/2 - L/R
Cinch input socket for connecting external playback appliances (reel-to-reel, video recorder, satellite receiver, etc.) or for sound reproduction from a television, etc. using the speakers.
53 OPTICAL OUT /COAX OUT
COAX Cinch digital output socket for audio OPTICAL digital optical output
These sockets are used for connecting to a digital multi channel A/V receiver or to a 5.1 digital amplifier.
Warning: A digital audio signal is only available at these sockets when the CD being played contains the appropriate digital information.
54 SPEAKERS
Speaker terminals (impedance 4 Ohm)
FR Front speakers right
FL Front speakers left
C Centre box (speaker, middle)
SR Surround speaker right
SL Surround speaker left
SUB Subwoofer
55 Mains cable
To establish the connection required for 230V, 50Hz
Speaker connection (54)
When connecting the speakers, always observe the speaker connection plan on page 4.
When plugging in the speaker cable at the device (terminal 54) also only plug the black wire into the black socket and the coloured wires into the corresponding coloured socket. Make sure that when connecting the front and surround speakers (red and green), that for the right speaker you connect F/S R and for the left speaker you connect F/S L.
Warning!
Both rear speakers must always be connected. Confusing the connections can ruin the speakers.
After connecting the loudspeakers it is possible to test the sound. The way to do this is explained in the following section.
Tuning of the speaker system
In such multi channel systems, the system must be tuned to the listening position (e.g. sofa) after positioning the speakers. This is termed »noise focusing the system «. The basic setting, once found, must only be changed when the listening position or the position of the speakers has been changed.
Switch on the DVD receiver with the STANDBY switch POWER 6. Using ADJ/VOL + / - 5/40, set the volume to a middle value, about 10-15 dB, (see display unit 10). Take a seat on your sofa.
After the function »TEST TONE« has been set on the screen, the test signal generator transmits the noise (the technical term is "pink noise") for approximately 3-4 seconds to each of the connected loudspeakers in turn. The procedure can be observed in display unit 10.
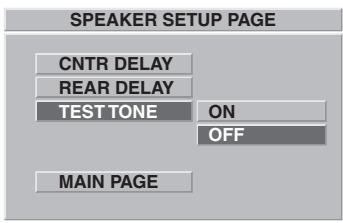
The following abbreviations are used for each of the sound channels (speakers).
TEST FL
TEST C
TEST FR
TEST SURR
TEST SURL
Front speakers Left
Centerbox (speaker middle)
Front speaker Right
Surround speaker Right
Surround speaker Left
The volume of the respective speaker is to be set with ADJ/VOL +/-40 in such a way that the noise level sounds the same from the position of the listener.
Aerial connection
FM reception:
To connect to the house aerial or to a satellite system, plug this cable in as the connection to the aerial socket FM 50
If a reception is too weak and there is interference from noise on the received station, you are advised to turn to FM Mono (remote control, button 39).
AM reception:
It is also possible to improve reception using the supplied aerial. This aerial should be fixed in place in as high a position as possible. Connect the supplied frame aerial to the AM 49 socket. To plug in the cable, flip the claming lever to the side and re-close it. Then align the frame aerial to achieve the best reception. If reception is too weak and there is interference from noise on the station being received, it may be possible to improve reception by turning and unwinding or winding up the aerial.
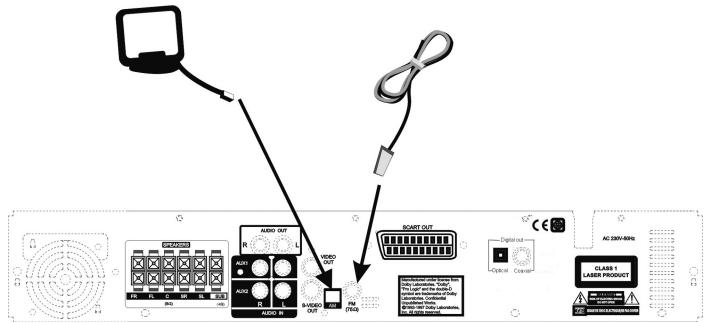
Connection to the television set
There are various connection possibilities depending on the connections available at the television and any additional devices. Additional instructions are contained in the respective manuals for the television and the additional devices.
Connection to a television using SCART (46):
This connection possibility offers the best picture and sound quality. Connect the «SCART OUT« 46 scart socket at the rear of the device with the television' scart socket. The required scart cable is contained in the enclosed package.
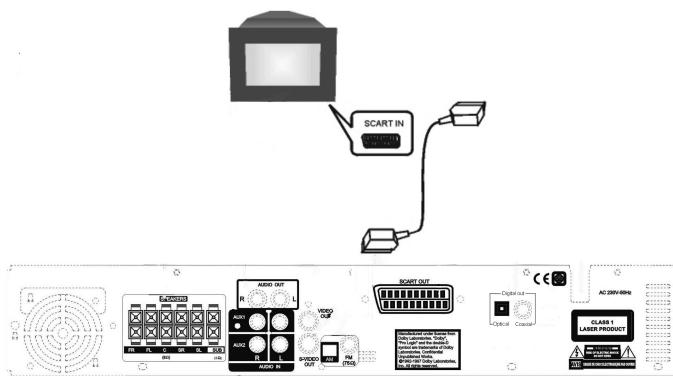
Note:
Connect the DVD receiver directly to the television and not through the video recorder. The picture quality could be seriously degraded due to copy-protection systems.
Connecting to a television viaVIDEO-(48) or via the S-VIDEO SOCKET (47):
Use the yellow cinch cable to connect the video socket «VIDEO OUT« 48 to the corresponding Video IN socket of the television set, or connect your television set via an S-VHS input. To do this, connect the S-VHS video socket «S-VIDEO-OUT« 47 to the S-VHS input on the television set. You can purchase the cable required at your local store.
If you also want to hear the sound from the DVD receiver over the speakers on your television then an AUDIO connection is also required when connecting the video sockets. To do this, connect the «AUDIO OUT« 51 sockets with the red/white cinch cable to the corresponding AUDIO IN sockets of your television. When doing so, make sure that you maintain the correct polarity (red = right R, white = left L).
Connecting additional units
The DVD receiver is equipped with digital and analog outputs and inputs. This means that you have many possibilities for connecting external devices.
Connecting to the digital outputs:
Warning: A digital audio signal is only available at these sockets when the CD being played contains the appropriate digital information.
Connecting to a digital multi channel A/V receiver or to a digital 5.1 amplifier:
This connection type offers the best sound quality. A digital multi-channel A/V receiver (e.g., MPEG 2 multi channel, Dolby Digital etc.) is required. To do this, connect the COAXIAL OUT « 53 digital output socket at the rear of the device to the corresponding DIGITAL AUDIO IN digital input then connect this to the OPTICAL OUT « 53 socket. The required connection cable can be obtained from your local shop.
Connecting a Digital Audio Recorder (DAT):
Via the digital outputs 53, you can copy CDs to DAT cassettes or to a CD recorder without any loss of quality. To do this, connect the COAXIAL OUT 53 digital audio socket to the DIGITAL IN input socket at the digital recorder. If the digital recorder has an optical input then connect this to the OPTICAL OUT 53 socket. The required connection cable is available form your local store.
Connecting analog playback devices:
You can also listen to the sound from other playback appliances such as a stereo television, stereo video recorder, CD placer, DVD placer or satellite receiver over the speakers of the surround systems by connecting these to the «AUDIO IN« 52 sockets. To do this, connect the sound output sockets (AUDIO OUT) or SCART) of the appropriate device to the sound inputs AUDIO IN « AUX1 « or « AUX 2 « 52. These inputs are identical and can be used as required. Their designations are only used in order for easier differentiation when switching on the sound source. The required connection cable and adapters are available from your local store.
Warning:
- Make sure that you maintain the correct polarity (red = right R, white = left L)..
- To playback, the corresponding source «SOURCE« 13 or «AUX« 28 must be switched to the respective sound source using «AUX 1« or «AUX 2«.
Headphone connection
The socket «PHONES« 11 is for all commercially available headphones equipped with a 6.3 mm jack. For other jacks, use an adapter (available from specialised dealers).
Notes:
- The connected speakers are switched off when using the headphones.
- When plugging in the jack, the system automatically switches over to STEREO.
- The following message appears for a short time when plugging in the headphone jack:

Caution!
High volumes especially of headphones, can damage your hearing.
Mains connection 55
Only connect the device to the mains after all other connections have been made. To connect to the mains, plug the mains plug into the socket.
Caution!
If the mains plug of the device is faulty or if the device is otherwise damaged then it must not be put into operation.
When removing the mains cable from the socket then always pull on the mains plug – not on the cable.
Warning:
To avoid damage from lightning pull the mains and aerial plug during thunderstorms.
OPERATING ELEMENTS
Open facing page 3. This allows you to find the parts more easily.
Front of the device
1 PREV/NEXT
selection of title, section, music title / manual station tuning / station search
2 STOP
Cancel CD playback / deletes the CD program memory
3 II PLAY/PAUSE
Stars CD playback / interrupts CD playback for a short time, freeze-frame
4 REMOTE SENSOR
Remote control receiver
5 ADJ/VOL.+ / ADJ/VOL. - to set the desired volume
6 POWER
STANDBY switch for switching on the device in standby mode
7 STANDBY
Standby indicator / Mute indicator
8 CD-tray
9 OPEN / CLOSE
Opens and closes the CD tray
10 Display unit
11 PHONES
Headphone socket
12 SELECT
Selects the individual sound channels for setting the volume
13 SOURCE
Selects the sound source DVD, TUNER FM, TUNER AM, AUX 1, AUX 2
Remote control
14 STANDBY
Switches the device to standby and switches back on from standby.
15 SUBTITLE
Selects the subtitle language for DVDs (when available on the DVD)
16 LANGUAGE
Selects the dubbing language for DVDs when these are available on the DVD
17 GOTO
Selects a starting time for playback
18 ZOOM
Enlarges the picture
19 Numeric buttons 1-0/>10
20 SETUP
Calls up the menu for the device settings
21 ENTER
To confirm input
A/ ▶/ ▲/
Cursor control for the settings menu; to the left , to the right , upward , downwards
22 STOP
Stops CD playback / deletes the CD program memory
23 / (during CD operation)
Searches the CD forwards / backwards
PRESET + / - (during radio operation)
Calls up the stored radio stations in steps
24 I▶/▶ITUNING
Selects the title, section, music title in steps
TUNING +/TUNING -
Manual station setting / station search
25 REPEAT
Repeat function for section, title, music title, CD
26 A-B
Repeat function for a freely selectable sequence
27 PROG
CD memory button
28 Operating mode selection button
Selection of the sound source DVD, TUNER, AUX/TV
29 RETURN
Calls up the DVD menu, if it exists / jumps back to
the PBC menu for video CD
30 TITLE
Calls up the DVD menu, if it is available
31 ANGLE
Selects DVD camera angle, if it exists on the CD.
32 MENU/PBC
Switches on or off the PBC function of video CDs.
33 AUDIO
Selects the synchronous language of video CDs, if these are available on the VCD.
34 DISPLAY
Displays info on the playback / playback times
35 SLEEP
For setting the automatic switch -off time
36 MUTE
Pauses the sound, for switching off the sound
37 OPEN/CLOSE
Opens and closes the CD tray
38 II PLAY/PAUSE
Starts CD playback / pauses CD playback for a short period, freeze-frame
39 STEP
For single frame advance
ST/MO
Switches over between mono/stereo for FM stations
40 ADJ/VOL +/-
For setting the required volume
41 SLOW
Playback in slow motion
MEMORY
Tuner memory button
42 SELECT
Selects the individual sound channels for setting the volume
43 LISTENING
Sets the LISTENING Mode such as Dolby Surround or Dolby 3 Stereo.
Operating with the remote control:
Identicalabelling on the remote control transmitter and the dice means that these have the same function (e.g. button 12 on the device or button 43 on the remote control is described by »button 12/43«).
When operating the device using the remote control, please observe the following:
- Aim the remote control. (transmitter) at the remote control receiver 3 on the device..
- You must have a clear view between the transmitter and the receiver..
- If the range of the remote control begins to be impaired, then you should replace the batteries.
Replacing the batteries:
Caution!
The batteries from the remote control should be kept away from children. Swallowing batteries can result in serious injuries to health.
Normal batteries must not be charged, heated up or thrown into open fires (danger of explosion)
If the remote control is not used for a longer period of time then the batteries should be removed. The remote control could otherwise be damaged battery acid.
PUTTING INTO OPERATION AND BASIC FUNCTIONS
Menu functions
All operations of the DVD operating mode are shown on the screen in MENU-Form for simpler operation. Various languages can be selected for the menu. To set the menu language, please refer to the Basic settings section on page 33.
In all menus, the selections and the settings are made using the buttons / / / 21 . The setting is confirmed by pressing ENTER 21 .
The TEST-TONE option, for example, is explained as follows...
SETUP MENU-MAIN PAGE SPEAKER SETUP TEST TONE
...then these operating Steps are to be carried out.
- Press the button SETUP ^ 20 so that the SETUP MENU-MAIN PAGE appears on the screen.
- Use the button 21 to select the line SPEAKER SETUP.
- Call up the SPEAKER SETUP by pressing the «ENT-ER« 21 button.
- Use the button 21 to select TEST-TONE
- Press the button, the marking now switches to the right side of the menu into the set-up mode.
- Highlight the required setting using the / buttons.
- Confirm the setting using the ENTER button 21.
- To leave the menu, press the SETUP< button 20.
If there is SETUP menu on the screen then the other device functions

If a command can not be executed because, e.g. the CD does not contain a given piece of information, then this symbol appears on the top left corner of your screen.
Switching the device on and off
Switch on the television. If the DVD receiver is connected to the television by SCART then switch over to the respective Scart input if necessary.
If the DVD receiver is connected to the television via the VIDEO or S-VIDEO socket then the corresponding video input must be selected at the television.
Switch on the DVD receiver with the «POWER« button 6. Display 10 of the DVD receiver now lights up and you are prompted an the television screen to insert a CD. If a CD is already inserted, please press the
II PLAY< button.
Switch the device to standby mode by pressing the
STANDBY button 14 LED 7 lights up now. Re-pressing
STANDBY< button 14 or >SOURCE< button 13
switches the device back on from standby mode.
Note: Depending on the reception conditions of your television, it is possible that there is disturbance to the picture when watching normal television. In this case, switch off the DVD receiver using the »POWER« button 6.
Selecting the operating mode
For playback of picture and sound, the corresponding operating mode must be selected. The respective operating modes can be selected directly using the buttons «DVD«, «TUNER« or «AUX/TV« 28. The individual operating modes are run through by pressing the «SOURCE« button 13.
DVD Playing-back from the built-in DVD compact disc Player
TUNER Radio operation selecting the frequency band
AUX 1 Playback from a device connected to one of
AUX 2 the >AUDIO IN AUX 1/2 « sockets 52.
Display 10 is used for control purposes..

Setting the volume
By pressing the ADJ/VOL. +/-← buttons5/40, you can set the volume as desired.
To switch off the sound, press the MUTE button 36 on the remote control.
On re-pressing this button or one of the »ADJ/VOL +/-« 5/40 the sound is switched back on.
Basic settings
The following settings only need to be carried out once before putting the system into operation for the first time. Before changing the basic settings (in the General Setup), check which corrections are required based on the following table.
| Menu display: | Factory setting: | |
| Menu language | OSD LANG | ENGLISH |
| Video output | VIDEO OUT | SCART |
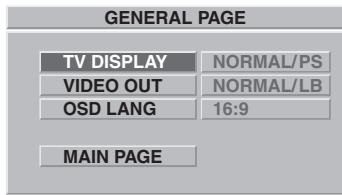
Menu language (OSD LANG):
Select between GERMAN, ENGLISH, FRENCH, ITALIAN, and SPANISH
Video output (VIDEO OUT):
Select...
SCART, when «SCART OUT« 46 is connected to the television.
S-VIDEO, when «S-VIDEO OUT« 47 is connected to the television.
Setting the menu language (OSD LANG):
Switch on the device using the STANDBY switch
POWER « 6. If necessary, select the video input at the television. Switch to DVD operation by pressing the
DVD « button 28.
Press SETUP 20. The SETUP MENU-MAIN PAGE appears on the screen. The GENERAL SETUP line is highlighted.
By pressing the ENTER button 21, GENERAL SETUP will appear.
Using button select OSD-LANG to change the menu language.
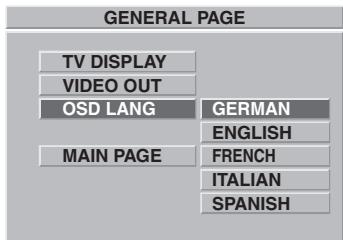
Press 21 and highlight the desired language with / 21 . Confirm the setting with ENTER< button 21.
Press SETUP\~ 20 to leave the menu.
Setting the video output (VIDEO OUT)
(Proceed the same as when setting the menu language; the device must be switched on and in DVD operating mode).
- Press the SETUP 20 button until SETUP MENU-MAIN PAGE appears. The GENERAL SETUP line is highlighted.
- Press «ENTER« 21; the GENERAL SETUP appears.
- Use button 21 to select VIDEO OUT.
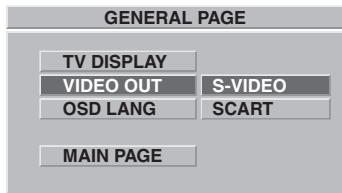
- Press
- Use the / to select the video output.
- Press ENTER button 21 to confirm your selection.
- Use SETUP button 20 to leave the menu.
Setting and storing the radio stations
Switch on the device using the STANDBY switch
POWER « 6. Use >>TUNER « 28 or >>SOURCE « button 13 to switch to tuner mode and select the desired frequency band (FM or AM).
FM 87,5 MHz - 108,0 MHz
AM 522 kHz - 1620 kHz
Keep one of the «TUNING +/ -« buttons 24 pressed until the frequency in display unit 10 automatically changes.
When a station is sufficiently strong, the search is stopped and the station is simultaneously optimally set and displayed. When an RDS signal is transmitted, the name of the station appears in the display.

To store the station, press MEMORY button 41.

Set the desired channel position using the PRESET + / - « button 23 or the numeric keys 19.

Re-press MEMORY 41 to confirm your entry.
To store additional programs, repeat the above steps.
Note:
- If, after pressing the MEMORY button, no button is pressed for 5 seconds then the device switches back to the normal frequency display.
- You can set stations with a weaker signal by repeatedly pressing the TUNING + / - button 24.
Listening to radio
Switch on the device using the STANDBY switch POWER 6. Use TUNER 28 or SOURCE 13 to switch to tuner mode and select the desired frequency band (FM of AM).
The previously stored channel positions can be selected using the numeric buttons 19 or the PRESET + / - button 23. Set non-stored stations using the TUNING + / - - buttons 24.
The device switches between stereo and mono reception when you repeatedly press ST/MO 39. In case of bad reception, we suggest that you switch to MONO.
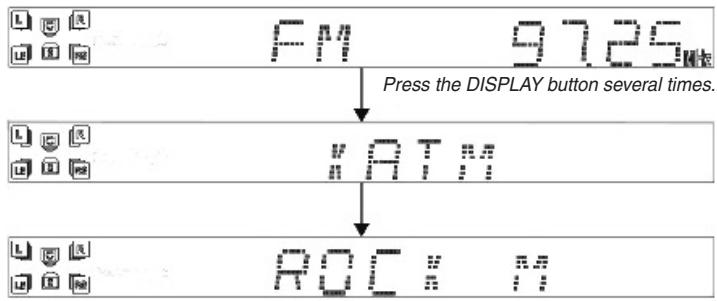
By repeatedly pressing «DISPLAY« button 34, the device switches between station names, program type and transmission frequency.
Inserting and removing a CD
DVD Video CDs, Video-CDs, MP3-CDs and Audio-CDs can be played back on this device. The device automatically recognises the corresponding format after reading-in the CD. Playable CDs are marked with one or more of the following logos.


Switch on the DVD receiver and switch to DVD mode. Then press «OPEN/CLOSE« 9/37. The CD tray 8 is opened. Now insert the CD with the side to be played facing downwards. The side to be played is blank. If both sides are bland (e.g. in case of some DVDs that are recorded on both sides), then first play back the side that is marked with A or a 1, depending on the CD. Single CDs (8cm) without adapter can also be inserted.
Now close the CD tray by re-pressing OPEN/CLOSE 9/37. The machine immediately begins to play back DVDs. For CDs please press "PLAY".
Warning!
To avoid damage to the device, no foreign objects must enter the CD tray.
Note: This DVD receiver supports the copy-protection codes of most DVDs and video CDs. This means that the contents of these CDs can not normally be copied by a video recorder onto tape during normal playback.
Adjusting the loudspeakers
The volume of the speakers can be manually set for each individual speaker connected to the system. During this procedure it is also possible to adjust the high tones (treble) to your personal taste.
The following abbreviations are used for each of the sound channels (speakers).
FL Front speakers Left
C Centerbox (speaker middle)
FR Front speaker Rright
SR Surround speaker Rright
SL Surround speaker Left
SUB Subwoofer
Which speakers can be selected depends on the set LISTENING mod (for TUNER and AUX) or from the contents of the CD. (see section »Dolby Surround operation«).
Switch between the individual channels by pressing >SELECT « 12/42.
Treble of front speakers

Bass of front speakers


Volume of the individual speakers


Adjust the values to your own liking by pressing ADJ/VOL+/-< 5/40.
About 2 to 3 seconds after the last entry, the display switches back. The changes are automatically stored.
Dolby-Surround-operation
By repeatedly pressing «LISTENING« 43 the device switches through the following functions (LISTENING MODE):
PRO LOGIC....: corresponds to Dolby Pro Logic reproduction. This only makes sense if all 5 speakers are connected..
PRO LOGIC BYPASS: (no display) reproduction is over both front speakers and the subwoofer.
Note
If only a MONO signal is available then you should always switch to PRO LOGIC BYPASS. In DVD mode, you can not switch over to LISTENING MODE. The LISTENING MODE is automatically selected, depending on the CD that has been inserted.
PLAYING A DVD OR A VIDEO CD
DVDs can be recognized by the logo on the left and video CDs by the logo on the right.


DVDs and video CDs can contain films, video clips, television series, and so on. Depending on their content, these CDs may have one or more titles. Every title on a DVD can contain one or more sections (chapters). The titles of a video CD consists of one or more index items. Information on the content of a CD is also usually contained on the cover.
The region code of the DVD sets the countries for which this DVD has been intended for use. The region code of this DVD receiver is «2«. DVDs that do not contain a «2« on the code label can not be played on this device.


Playable in all countries
Certain video CDs are equipped with a »Play Back Control (PBC).
Playing a CD
Switch on the television. If the DVD receiver is connected to the television by SCART then switch over to the respective Scart input if necessary.
If the DVD receiver is connected to the television via the Video or SVIDEO socket then the corresponding video input must be selected at the television.
Switch on the DVD receiver using POWER button 6. Press DVD 28 or SOURCE 13 to switch to DVD mode and insert a DVD or a video CD.
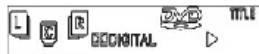
The following mode indicators inform you of the current drive status.
| Function | On the screen | In the display |
| Wait | WAITING | |
| Scanning CD | DISC LOADING | LOADING |
| Open | OPEN | OPEN |
| Close | CLOSE | CLOSE |
| Playback | PLAY | PLAY |
| No CD | NO DISC | NO DISC |
| Defective CD | BAD DISC | BAD DISC |
| Medium | DVD/VCD/CD/MP3 | DVD/VCD/CD/MP3 |
| Region code | WRONG REGION | |
| Childproof lock | PARENTAL VIOLATION | |
Due to the built-in auto-play function, the DVD automatically starts to play back when...
- A DVD is already inserted when switching on the DVD receiver (not for every DVD).
With some DVDs and video CDs, the DVD menu or the title menu is displayed at the start of playback.
If the device is in STOP mode then press >>II PLAY/PAUSE« 3/38 to start playback.
On pressing »NEXT/TUNNING 1/24 playback of the next title/chapter is continued.
On pressing 1 1 / 24 the previous title/chapter begins to play.
To Stop playback, press STOP 2 / 22
Note:
If the device is in PAUSE or STOP mode for more than a minute then the screen saver automatically appears. The screen saver disappears on pressing II PLAY/ PAUSE « 3/38.
Contents of DVD CDs (menu)
Some DVD-CDs contain selection menus for title and sections or a root menu to call up additionally stored information. This Menu may also contain selection possibilities for synchronised languages, subtitles etc.
The menu items are selected with the / / / 21 and confirmed by ENTER 21 . If the menu items are numbered then these can be directly selected using the digit buttons. 1 - 0 19 .
Playing a video CD with PBC
If the video CD inserted is equipped with «Play Back Control (PBC)« then the PBC menu appears on the screen at the start of playback. With some CDs the machine does not start automatically; please use «MENU/PBC« 32.
Note:
- During playback of a CD with PBC, the buttons GO TO « 17, REPEAT « 25 and the numeric buttons « 1-0 « do not function.
- If the PBC function is active then you can switch back to the previous menu by pressing RETURN 29.
- To switch off the PBC function, press »MENU/PBC« 32 »PBC OFF«. Appears on the screen. In this case, playback of the video CD is stated using »▶II PLAY/ PAUSE« 3/38.
Freeze frame and single frames
To look at a frozen frame during playback, press▶PLAY/PAUSE« 3/38.
Screen: PAUSE
Playback is continued by re-pressing II PLAY/ PAUSE ^《 3/38.
Screen: PLAY
The next single frame appears each time you re-press STEP 39.
Screen: STEP
Playback is continued by pressing II PLAY/PAUSE« 3/38.
Slow motion
To switch to slow motion during a freeze frame or playback, press SLOW 41. The speed of slow motion is selected by continually re-pressing this button. The direction is shown on the screen.
Slow motion forwards:
Screen: SF2 SF4 SF8
Slow motion backwards (only for DVDs):
Screen: SR2 SR4 SR8
To continue playback, keep pressing «SLOW« button 41 until PLAY appears or press «▶II PLAY/PAUSE« button 3/38.
Search
To find particular location during playback, press one of the / buttons 23. The fast search is started. The search speed is set by pressing several times. The sound is muted during this time. The direction of search is shown on the screen.
Search forwards▶▶:
Screen: FF2 FF4 FF6 FF8
Search backwards:
Screen: FR2 FR4 FR6 FR8
To continue the playback, keep pressing the corresponding / 23 button until PLAY appears of press II PLAY/PAUSE 3/38.
Frame zoom function
During playback, freeze frame and search mode functions, you can enlarge (zoom) the picture.
To do this, press ZOOM button 18.
Screen:
ZOOM x 1,5
ZOOMx2
ZOOM OFF
Note:
- The zoomed picture can be shifted on the screen using the / / / 21 .
Depending on the DVD video or video CD inserted, not all zoom functions are always available. - Subtitles and screen overlays can not be zoomed.
Repeat functions
The following repeat functions (REPEAT) are available when playing back a CD:
- Continuous repetition of all sections of a title or of a CD
- Continuous repetition of all titles of a CD
- Continuous repetition of an individual section or title of a CD.
- Continuous repetition of a particular passage of a section or title of a CD
During playback, press REPEAT 25. once or repeatedly. You have the following possibilities:
Playback of a DVD:
| Screen: | Display (10): | Function: |
| REP. ONE | REPEAT 1 | Repeats the current section |
| REP. ALL | REPEAT | Repeats all of the current title |
| REPEAT OFF | ---- | Repeat function is off |
Playback of a Video-CD:
| Screen: | Display (10): | Function: |
| REP. ONE | REPEAT 1 | Repeats the current section |
| REP. ALL | REPEAT | Repeats all titles on the CD |
| REPEAT OFF | --- | Repeat function is off |
To continuously repeat a particular passage of a section or title, proceed as follows. Press the A - B button 26 at the beginning of the desired passage. If the end of the passage is reached, then re-press A - B button 26. The following appears in display unit 10:
| L | R | DVD | TITLE | GHP | A-B |
Playback will be continued as normal by re-pressing A - B button 26.
Note: Points A and B must be within a title.
Language and subtitles
Depending on the DVD inserted, there are often several languages recorded for the sound and the subtitles.
During playback...
- the playback language for the sound can be selected by repeated pressing of »LANGUAGE« Button 16.
- the language can be selected for the subtitles by repeatedly pressing «SUBTITLE« button 15.
- This does not work for every DVD and must then be set in the menu of the CD.
If the various languages for the sound are not recorded in the same audio format then the audio format can be switched-over by pressing LANGUAGE button 16. You can then see this on the screen overlay.
Note:
Language selection using the »LANGUAGE« and »SUB-TITLE« buttons is only possible when using DVDs. If several languages are available for the sound on a video CD, then these can be selected by pressing »AUDIO« button 33
A preferred language for sound and the DVD selection menu can be set in the PREFERENCES menu.
Selection of the camera angle
If the CD contains scenes that have been recorded at different camera angles then a symbol for this appears in the heading as well as details of the number of available angles.
The various angles are moved through by repeatedly pressing ANGLE button 31.
Other playback functions
Selecting a section within DVDs:
Usually, the titles of a DVD consist of several sections (CHAPTER). To select the next section during playback, briefly press NEXT/TUNING button 1/24. To go back to the previous section, press
PREV/TUNING< button 1/24.
You can see which section (CHAPTER) is selected on the screen.
Selecting a title for video CDs:
If the content of a video CD consists of titles, then the next and the previous title can be selected during playback. Select the next title by pressing NEXT/TUNING
▶▶按钮 1/24. To go back to the previous title, press
▶PREV/TUNING按钮 1/24 for a short time.
Starting playback at a particular location...
For this function, you must know the playback time of the scene you are looking for.
...when a DVD is inserted:
TITLE and CHAPTER appear on pressing GO TO « button 17. These can be selected with / button 21. Enter the desired time using the numbered buttons "1-9" 19. After pressing ENTER« button 21, the DVD plays back from the beginning of the selected chapter.
...when a video CD is inserted:
The time prompt appears on pressing GO TO button 17. The desired time can now be entered using the numeric keys 1-0 19. Playback commences automatically at the set playback time.
Displaying the playback information:
Depending on which information is available on the respective CD, this information can be called up by repeatedly pressing DISPLAY button 34. On the screen, there now appears, e.g. the number of the current title and the current section, the total number of all titles and chapters/sections of the CD, as well as the various play times of titles, section or of the CD..
Example:
TITLE 01/03 CHAPTER 006 / 035 00:25:43
or:
TITLE REMAIN 00:25:43
or:
TITLE ELAPSED 00:25:43
PLAYING A MUSIC CD
General information about audio CDs
Audio CDs are recognized by the following logo.

Audio CDs only contain music. This device can also play back MP3 CDs.
The device recognizes automatically whether a normal music CD or and MP3 CD is inserted.
Note:
- The device supports MP3 bit rates of 32-320 Kbit/s, variable bit rate and mono/stereo.
- CD-R CDs and CD-RW CDs can be played back.
- MP3 titles in CD Mode 1 (ISO 96609), Mode 2XA and Multi Session can be played back.
Playing a CD
Switch on the DVD receiver using POWER switch 6, press DVD button 28 and insert an audio CD.
If the device is in STOP mode then press II PLAY/ PAUSE « button 3/38 to start playback. During playback, display 10 shows the title being played and the played time already elapsed. Playback automatically stops at the end of the CD.

Note:
In case of MP3 CDs, the title is displayed in three digits.
To interrupt playback for a short time, press II PLAY/ PAUSE button 3/38.

Playback is continued by pressing the II PLAY/ PAUSE ^次 button 3/38.
To stop playback, press STOP button 2/22.
Title selection and search mode
Title selection:
To select the next title during playback, press NEXT/TUNING I button 1/24 for a short time. To go back to the beginning of the title currently being played, press I PREV/TUNING button 1/24 for a short time. The previous title is selected by re-pressing I PREV/TUNING .
To select a title directly during playback, enter the title using the numeric keys 1 - 0 19 when selecting a multi digit title using >10 button 19, first select the tens position and then enter the second position with 1 - 0 19
Search:
To find a particular location during playback, press one of the / buttons 23. Search mode starts. The search speed is set by repeatedly pressing the button. Search mode can be carried out in two speeds. The direction of search is shown on the screen.
Search forwards:
Display:

PLAY
Search backwards:
Display:


To continue with playback, press II PLAY/PAUSE« button 3/38.
Note:
The search mode function is not possible for MP3 CDs.
Other playback functions
Displaying information on the play time:
The play time of the CD or the title appears on the screen and in display 10.
By repeatedly pressing «DISPLAY« button 34 during playback, you can switch-over between the following display of:
- elapsed time of the title
- remaining play time of the title
- elapsed time of the CD
remaining play time of the CD
Repeat functions
The following repeat functions (REPEAT) are available when playing back a CD:
- continuous repetition of all titles of a CD
- continuous repetition of the individual titles of a CD
- continuous repetition of a particular passage of a title on the CD.
During playback, press REPEAT button 25 once or repeatedly. You have the following possibilities:
| Screen: | Display: | Function: |
| REP. ONE | REPEAT 1 | Repeats the current title |
| REP. ALL | REPEAT | Repeats all titles on the CD |
| REPEAT OFF | ---- | Repeat function is off |
To repeat a particular title continuously, proceed as follows: Press A-B< button 26 at the beginning of the desired passage. If the end of the passage is reached, then
re-press A-B button 26. The following appears in display unit 10:
Playback will be continued as normal by re-pressing A-B< button 26.
Note: Points A and B must be within a title.
Programme memory
You can store and play back up to 99 titles in any order. If you try to programme more than 99 titles then a FULL message is displayed in display 10.
Note:
Title programming is not possible for MP3 CDs.
- In stop mode, you can switch to programming mode by pressing PROG< button 27.
| L | R | D | D | P | Q | R | PRO Logic |
| L | R | D | D | P | Q | L | CD |
- Enter the required title using the numeric keys «1-0« 19. This title is then stored on the 1st programme position and the memory automatically switches to the 2nd programme position.
- Enter the remaining titles using the numeric keys 1 - 0 19 Note: When selecting a multi-digit title using >10 button 19, first select the tens position and then enter the second position with 1 - 0 19
When all titles have been stored, press II PLAY/PAUSE button 3/38 to play back. When the PROG display lights up, then the programmed sequence can be played back again at any time by pressing II PLAY/PAUSE button 3/38.
Clearing the programming:
If the CD player is in stop position, then the entire programming is cleared by pressing STOP button 2/22.
SPECIAL FUNCTIONS
Device configuration (setup)
You can adapt the following options in the SETUP MENU-MAIN PAGE to your individual requirements. To do this, the device must be switched on in DVD operating mode. You can check which changes are required using the following table.
| Menu display: | Factory setting: | |
| TV-Display | BILDFORMAT | NORMAL / LB |
Selecting the picture format:
SETUP MENU-MAIN PAGE
GENERAL PAGE
TV DISPLAY
GENERAL PAGE
TV DISPLAY
VIDEO OUT
OSD LANG
MAIN PAGE
NORMAL/LB
16:9
Select with the / buttons 21...
NORMAL / PS, when a 4:3 television is connected that is being operated in "ZOOM"-Mode. When playing back a broadcast in 16:9 format, the picture fills the entire screen; the picture information at the sides can no longer be seen.
NORMAL / LB, whena normal 4:3 television is connected. Black borders appear on the top and bottom of the screen when playing back a 16:9 format broadcast.
16:9, when a 16:9 television is connected. On playing back 16:9 broadcasts, the picture fills up the entire screen.
Confirm the setting with «ENTER« 21. Press «SETUP« button 20 to quit the menu.
Note:
- The same picture format must be selected on the connected television.
- If the information for the selected picture format does not exist on the CD, with some CDs, playback is then automatically carried out in the normal 4:3 format. Otherwise, another picture format must be manually selected.
Preferred settings (language)
In the PREFERENCES page, you can set your preferences for the language of the sound, the subtitles and the CD menu for playback of DVDs and video CDs.
| Language of the.. | Menu display: | Factory settings: |
| Playback sounds | DISK-AUDIO | GERMAN |
| CD menu | DISK-MENU | GERMAN |
Note:
- To access the PREFERENCES page, the CD drive must be in the STOP position.
- If the information set here is not contained on the CD inserted, another language is automatically selected.
Preferred playback sound (AUDIO):

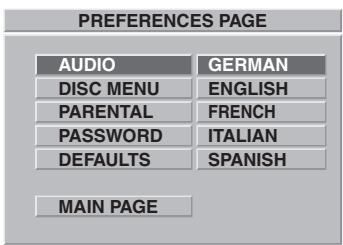
Select the preferred playback language using the 21 buttons.
Confirm the setting with «ENTER« 21. Switch to the left side of the menu by pressing the « button in order to make further settings. Or fade out the menu by pressing « SETUP« button 20.
Note: During playback, you can also change the language of the playback sound by pressing LANGUAGE button 16 (not for every DVD).
Note: During playback, you can also switch-over the language of the subtitles by pressing «SUBTITLE« button 15.(not for every DVD).
Preferred language of the CD menu (DISC MENU)

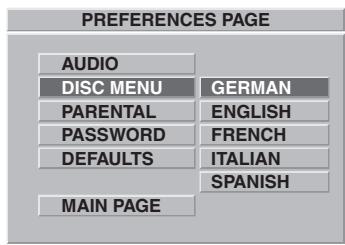
Select the desired language using the / 21 buttons. Confirm the setting with ENTER button 21 and fade out the menu by pressing SETUP button 20.
Childproof lock
How the childproof lock works:
To protect children from watching films that are not suitable for their age, some DVDs and video CDs contain a special coding.
Special >substitute Scenes « are even stored on some CDs. If an »age limitation « has been selected then these stored scenes are automatically played back. If the »age limitation « you have selected is so low that the contents of the CD is no longer meaningful then the CD can no longer be played back.
If the Childproof lock is not actively selected (OFF) then all CDs inserted into the drive can be played back.
Note:
Please note that not all dangerous films contain this coding. Check the safety function of the film to make sure. If a correspondingly coded DVD is played back when the childproof lock is activated then this is only possible after a 4-digit safety code has been entered.
Setting or changing the safety code:
To do this, the DVD receiver must be in STOP mode.

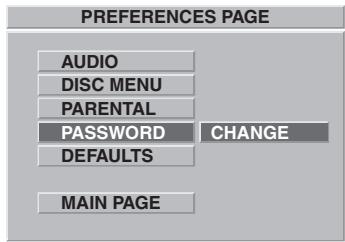
- Press the button.
Press ENTER button 21; the PASSWORD CHANGE PAGE appears on the screen.
password CHANGE PAGE
OLD PASSWORD: NEW PASSWORD CONFIRM PWD:

First enter your OLD PASSWORD (4-digit numeric code) using the numeric keys «1-0«. «3308« has been set at the factory. Now you just have to re-enter the NEW PASSWORD twice.
To store the password, press ENTER button 21. To be on the safe side, you should make a note of your safety code. Fade out the menu by pressing SETUP button 20.
Note:
If you forget your safety code (password) then you can reset the code to 3308
Proceed as above, but enter the number «3308« as the old password. You can now enter and confirm a new password.
Switching on or off the childproof lock:
To do this, the DVD receiver must be in STOP mode.
SETUP MENU-MAIN PAGE
PREFERENCES
PARENTAL
PREFERENCES PAGE
AUDIO
1G
1 + u7 = 70%
= childproof lock without age delimitation
DISC M
2
=onlywithadults
4PG13
= children under 12 years only with adults
DEFAULTS
5
1 + u1 - 1 = ( 1 + u) u1 < 1 = u
= children under 16 years only with adults
MAIN PAGE
7 NC-17
not under 16 years
8 ADULT
= only for adults
NO-PARENTAL
= no childproof lock
Select the required settings for the childproof lock using the 21 buttons. If the childproof lock is not to be activated, then select NO PARENTAL.
Confirm the setting using «ENTER« button 21 and enter the 4-digit safety code using the numeric keys «1-0«. Repress «ENTER« button 21 and fade out the menu with «SETUP« 20.
Resetting to the original factory settings (RESET)
On resetting the device, the following basic settings are reset to the original condition when leaving the factory.
| Menu display: | Factory sett.: | |
| Picture format | BILDFORMAT | NORMAL/ LB |
| Video Output | VIDEO OUT | SCART |
| Menu language | OSD-SPRACHE | DEUTSCH |
| Dynamic control | DYNAMIC | AUS |
| Sound language | DISK-AUDIO | DEUTSCH |
| CD menu | DISK-MENU | DEUTSCH |
| Childproof lock | KINDERSICH | AUS |
| Volume | VOLUME | 9 |
To do this, the DVD receiver must be in STOP mode. Use button 21 to select RESET and ENTER按钮 21 to confirm. Now switch the machine off and on again using the STANDBY switch POWER6. The device is now ready for delivery.
SETUP MENU-MAIN PAGE
PREFERENCES
DEFAULTS
PREFERENCES PAGE
AUDIO
DISC MENU
PARENTAL
Password
DEFAULTS
RESET
MAIN PAGE
Note:
The safety code for the childproof lock is not reset by resetting the device.
Setting the automatic switch-off time
Here, with the device switched on, the time is set in 15-minute steps from 120 minutes to 15 minutes after which the device automatically switches to standby.
Press SLEEP button 35 on the remote control so often until the required duration appears on display unit 10 (120-15 minutes).

When the sleep timer is activated, SLEEP appears in the display. The device switches off automatically after the time set has expired.
To call up the remaining time press «SLEEP« button. This time can also be shortened at a later time or switched off entirely (00 min).
In order to deactivate the timer, press SLEEP ^16 repeatedly until "OFF" appears
SPECIAL SOUND FUNCTIONS
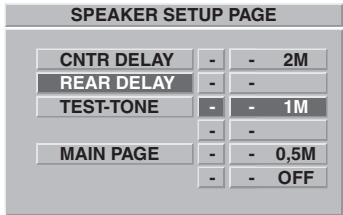
Time delay for centre and surround speakers
Due to limitations imposed by the room, it may be possible that the centre speaker and/or the surround speakers cannot be optimally setup. In order to obtain perfect sound, a time delay can be set on the screen for the playback of each of these channels.
Centerbox:
If the centre speaker is nearer to the listening position


then the front speakers then the front speakers then enter this difference in meters (m) into the menu using the / 21 buttons. Then select REAR DELAY or fade out the menu using SETUP button 20.
Surround speakers
If the surround speakers are nearer to the listening posi

on than the front speakers then you should also set this difference in meters (m) in the menu using / 21 buttons. Then fade out the menu using SETUP button 20.
Sound dynamic range
In some situations it can be uncomfortable if the sound is very loud. To avoid this, the loudest positions must be compacted. In the same way, very quiet passages are almost inaudible and must therefore be made slightly louder.
Dolby Digital allows you to make these adjustments using the "Dynamic Range Control".

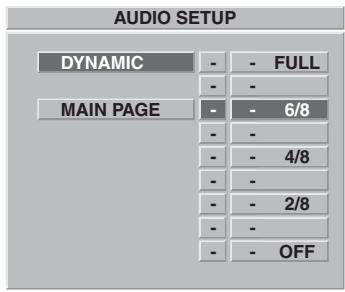
Select with the / 21 buttons...
OFF to FULL, if the dynamic ranges are to be entirely or partially compacted.
OFF, to switch off this automatic control.
Confirm the setting with «ENTER« 21. Press «SETUP« button 20 to quit the menu.
Note:
This setting is only possible when recordings are played back in Dolby Digital..
CARE AND MAINTENANCE
Cleaning the components
Before cleaning, switch off the DVD receiver and unplug the subwoofer from the mains. Clean all components using a wet cloth or a little synthetic cleaner. Solvents, spirits, dilutents, etc. can damage the surface of the device.
Notes about compact disc (DVD, video CD, audio CD, MP3 CD)
Always keep the CD in its cover and touch the edges only. The surface shimmering in rainbow colours must not be touched and should always be kept clean. Do not stick paper or adhesive tape onto the labelled side of the CD. Keep the CD away from direct sunlight and heat sources such as heating.
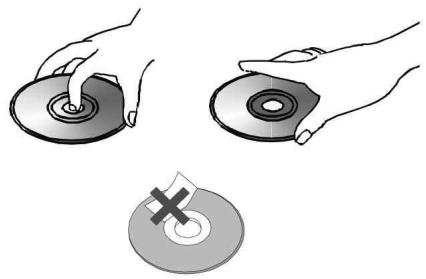
A CD must also never be left in a car parked in direct sunlight as the temperature inside the car gets very high. Clean the CD with a cloth before playing it. Do not use any solvents such as petrol, dilutions or other detergents.
Clean the CD in a straight line from the centre outwards. Never clean the CD using circular cleaning movements.

Notes about the CD player
If the CD player is not being used, the CD tray should always remain closed to protect the mechanism against dust. However, it is still possible that the lens becomes dirty from dust or is covered by a thin, hardly visible, film. The CD system is then no longer able to scan the inserted CD. In this case you need to have the lens cleaned by a technician.
Maintenance
Electronic components are subject to a natural ageing process. The mechanical parts are subject to normal wear. Dust Particles inside the device may also cause faults to occur, e.g. due to dirtying of the laser lens. Consult your authorised dealer in the case of any faults. For transporting the set use the original packaging only.
Caution!
The device is powered by dangerous voltage. The set may therefore be opened by authorised specialists only. All maintenance and service work must be carried out by authorised companies only. Inexpert repair work may endanger the operator's life. Any work on the set done by non-authorised persons on their own account causes the guarantee to expire.
Note:
To help identifying the device in case of after-sales service, always mention the number of the ID on the inscription plate on the rear of the device.
BEFORE YOU CALL THE SERVICE TECHNICIAN…
If the device fails to function normally, this does not necessarily mean it is defective. Please use the following list to check whether the malfunction has a simple cause. Never open the cabinet to look for a fault. This invalidates the guarantee resulting in the manufacturer accepting no liability.
| Fault | Possible cause | Troubleshooting |
| Blank display after switching on | • Mains cable not plugged in correctly • No power at the socket • Device not switched on | Check the mains cable. Check the supply voltage. Press »POWER« button 6 |
| No picture | • TV set switched off • Wrong channel on the TV set • DVD player is connected incorrectly or the connection cable is defective | Switch on the television set. Set the correct channel (AV). Check the connection. See page 28 |
| Picture is distorted. | • CD dirty Note: Light distortion can sometimes arise when there is no mail function. | Clean the CD. See page 43. Note: The DVD receiver should be connected directly to the television; do not connect via the video recorder. |
| Distorted picture or no colour in the DVD menu | • Colour system has been set incorrectly | Checking the VIDEO OUT connection type setting |
| CD cannot be played. | • The CD was inserted with the wrong side up. • CD dirty • CD defective | Check the inserted CD. The side to be played must point down. Clean the CD Try another CD. |
| No sound | • Volume has been set too low or mute function is active. • Audio connections not made correctly. • Sound source has been incorrectly selected or not switched on. • Speaker cable has not been connected correctly. | Increase volume using the »ADJ/VOL. +/- « 5/40 buttons. Check the connections (see page 28-30) Check the sound source; try another playback source. Check the connections (see page 28) |
| No screen menu when the CD is removed | • Internal safety Mechanism is active. | Turn the machine to standby using the >>POWER<< 6 button. |
| Device does not react to the remote control or reacts incorrectly. | • Device is not receiving the signals • Batteries too weak • Faulty signal due to light sources such as fluorescent lights or energy-saving lights • Faulty signals due to other remote control devices | Move obstacles out of the way. Check batteries and replace if necessary. Check foreign light sources. Remove the batteries from other remote control devices. |
| Distorted or black and white picture with DVD or video CD | • Incorrect CD format | Check the format of the CD by looking at the cover. This device is only suitable for PAL and NTSC. |
| No sound from digital output | • Incorrect connection • Incorrect audio format has been selec-ted. | Check the connections. See page 28 Check whether the audio format of the selected audio language corresponds to the possibilities of the receiving device. |
| Device does not react to pushbuttons | • Internal safety mechanism is active. | Turn the machine to standby using the >>POWER<< 6 button. |
TECHNICAL SPECIFICATIONS
| Scope of delivery: |
| DVD player |
| Remote Control 2 x R03P AAA |
| Subwoofer |
| 2 front speaker |
| 1 Centre box |
| 2 Surround speaker |
| SCART cable |
| Video with Cinch plug yellow |
| Audio cable with chinch plug red and white |
| FM cast aerial |
| AM frame aerial |
| 20 rubber feet for the speakers |
| Operating instructions |
| General: | |
| Mains Voltage | 230 V, 50 Hz |
| Power consumption | 160 Watt |
| Power consumption standby | >5 Watt |
| Laser type | Semiconductor Laser |
| Wave-length of laser | 650 nm |
| TV-standard | PAL/NTSC |
| DVD-Data: | ||
| Video Output | 1 Vp-p (75 Ohm) | |
| S-Video | Y | 1 Vp-p (75 Ohm) |
| C | 286 mVp-p (75 Ohm) | |
| Frequency response DVD | 4 Hz – 22 kHz (48 kHz) | |
| Frequency response CD | 4 Hz – 44 kHz (96 kHz) | |
| Video format | 16:9 | |
| MP3-Data: | |
| Data rate (Bit rate) | 64 kbit/s – 320 kbit/s |
| Variable Bit-Rate | |
| Mono/Stereo | |
| Compatible data carrier: | |
| CDR 650/CDR 70 | |
| CD-RW | |
| Playback data: | |
| CD Mode1 (ISO 96) | |
| Kodak Picture CD | |
| DVD | |
| VCD | |
| S-VCD | |
| Photo CD (JPEG format) | |
| MP3 format | |
| Amplifier/Tuner: | |
| Output performance (Stereo) | 2 x 15 Watt |
| Output performance (Surround) | 15 Watt RMS per Channel |
| Signal-to-noise ratio | >65 dB (CCIR) |
| Input level | 400 mV |
| Performance passive Subwoofer | 25 Watt |
| Speaker output (Subwoofer) | 4 Ohm |
| Speaker output | 8 Ohm |
| FM frequencies | 87,5-108 MHz |
| AM frequencies | 522-1620 kHz |
| Frequency accuracy | FM 180 Hz -10 kHz/+-6 dB |
| Stereo channel separation | FM 26 dB (1 kHz) |
| Nonlinear distortion factor | FM mono 3% |
| FM stereo 3% | |
| Signal-to-noise ratio (Tuner) | FM 60 dB, AM 40 dB |
| Connections: | |
| SCART | Euroconnector |
| Output | Video-Cinch |
| Output S-Video | Hosiden |
| Digital Output | Coaxial & Optical |
| Output Audio R/L | Cinch 1x |
| Input Audio R/L | Cinch 2x |
| Antenna | FM 75 Ohm Coax |
| AM Loop connector (300 Ohm) | |
| Speakers | 6 terminals |
| Headphones | 6,3 mm jack (30-600 Ohm) |
Technical changes reserved
TARTALOMJEGYZÉK
Figyelem
| L | R | D | Y | D | T | W | C | H | P | A-B |
This device has been tested according to all relevant current CE guidelines, such as electromagnetic compatibility and low voltage directives, and has been constructed in accordance with the latest safety regulations.
Subject to technical changes without prior notice!
Guarantee
The device supplied by our Company is covered by a 24 month guarantee starting on the date of purchase (receipt).
During the life of the guarantee any fault of the device or its accessories *) ascribable to material or manufacturing defects will be eliminated free of charge by repairing or, at our discretion, by replacing it. The guarantee services do not entail an extension of the life of the guarantee nor do they give rise to any right to a new guarantee!
Proof of the guarantee is provided by the proof of purchase. Without proof of purchase no free replacement or repair will be carried out.
For repairs or replacement during the life of the guarantee return the device in its original packing together with the proof of purchase to your dealer.
*) Damage to accessories does not mean automatic free replacement of the whole machine. In such cases please contact our hotline. Broken glass or breakage of plastic parts are always subject to a charge.
Defects to consumables or parts subject to wearing (e.g. motor pistons, kneading blades, drive shafts, spare remote control, spare toothbrushes, saw blades, etc.) as well as cleaning, maintenance or the replacement of said parts are not covered by the guarantee and hence are to be paid!
The guarantee lapses in case of unauthorized tampering.
After the expiry of the guarantee
After the expiry of the guarantee repairs can be carried by the competent dealer or repair service against the payment of the ensuing costs.
- GENERAL SAFETY INSTRUCTIONS
- ÁLTALÁNOS BIZTONSÁGIRENDSZABÁLYOK
- DOLBY DIGITAL AND DOLBY SURROUND Page 27
- SETTING UP THE INDIVIDUAL DEVICES Page 27-28
- CONNECTION
- OPERATING ELEMENTS
- PUTTING INTO OPERATION AND BASIC FUNCTIONS
- PLAYING A DVD OR A VIDEO-CD
- PLAYING A MUSIC CD
- SPECIAL FUNCTIONS
- SPECIAL SOUND FUNCTIONS
- CARE AND MAINTENANCE
- BEFORE YOU CALL THE SERVICE TECHNICIAN...
- TECHNICAL SPECIFICATIONS
- DOLBY DIGITAL AND DOLBY SURROUND
- SETTING UP THE INDIVIDUAL DEVICES
- Operating location of the DVD receiver
- Caution
- Caution!
- Setting up the speakers
- Notes:
- Note on disposal
- Make a contribution to the environment!
- CONNECTIONS
- Warning!
- Connections at the front of the device
- PHONES
- Connections on the rear of the unit
- SCART OUT
- S-VIDEO OUT
- 48VIDEO OUT
- AM ANTENNA
- FM ANTENNA
- AUDIO OUT L/R
- AUDIO IN AUX 1/2 - L/R
- OPTICAL OUT /COAX OUT
- SPEAKERS
- Mains cable
- Speaker connection (54)
- Tuning of the speaker system
- TEST FL
- Aerial connection
- FM reception:
- AM reception:
- Connection to the television set
- Connection to a television using SCART (46):
- Note:
- Connecting to a television viaVIDEO-(48) or via the S-VIDEO SOCKET (47):
- Connecting additional units
- Connecting to the digital outputs:
- Connecting to a digital multi channel A/V receiver or to a digital 5.1 amplifier:
- Connecting a Digital Audio Recorder (DAT):
- Connecting analog playback devices:
- Warning:
- Headphone connection
- Mains connection 55
- Front of the device
- Remote control
- Operating with the remote control:
- Replacing the batteries:
- Menu functions
- SETUP MENU-MAIN PAGE SPEAKER SETUP TEST TONE
- Switching the device on and off
- Selecting the operating mode
- Setting the volume
- Basic settings
- Setting the video output (VIDEO OUT)
- Setting and storing the radio stations
- Listening to radio
- Inserting and removing a CD
- Adjusting the loudspeakers
- Dolby-Surround-operation
- Note
- PLAYING A DVD OR A VIDEO CD
- Playing a CD
- Contents of DVD CDs (menu)
- Playing a video CD with PBC
- Freeze frame and single frames
- Slow motion
- Search
- Frame zoom function
- Repeat functions
- Language and subtitles
- During playback...
- Selection of the camera angle
- Other playback functions
- Selecting a section within DVDs:
- Selecting a title for video CDs:
- Starting playback at a particular location...
- Displaying the playback information:
- General information about audio CDs
- Title selection and search mode
- Title selection:
- Search:
- Search forwards:
- Search backwards:
- Displaying information on the play time:
- Programme memory
- Clearing the programming:
- Device configuration (setup)
- Selecting the picture format:
- Preferred settings (language)
- Preferred language of the CD menu (DISC MENU)
- Childproof lock
- How the childproof lock works:
- Setting or changing the safety code:
- password CHANGE PAGE
- Switching on or off the childproof lock:
- SETUP MENU-MAIN PAGE
- PREFERENCES
- PARENTAL
- PREFERENCES PAGE
- Resetting to the original factory settings (RESET)
- DEFAULTS
- Setting the automatic switch-off time
- Time delay for centre and surround speakers
- Centerbox:
- Surround speakers
- Sound dynamic range
- Cleaning the components
- Notes about compact disc (DVD, video CD, audio CD, MP3 CD)
- Notes about the CD player
- Maintenance
- BEFORE YOU CALL THE SERVICE TECHNICIAN…
- TARTALOMJEGYZÉK
- Figyelem
- Guarantee
- After the expiry of the guarantee
Brand : CLATRONIC
Model : DVD 552 HC
Category : DVD player