CR 464 - CD Player CLATRONIC - Free user manual and instructions
Find the device manual for free CR 464 CLATRONIC in PDF.
| Product type | Cassette player for children with karaoke function |
| Brand | CLATRONIC |
| Model | CR 464 |
| Power supply | 4 x 1.5V UM2 (R14) batteries or AC adapter (not included) |
| Main functions | Play, stop, fast forward, cassette eject |
| Built-in microphone | Yes, for karaoke |
| Headphone jack | Yes, for private listening |
| Speaker | Built-in |
| Volume control | Adjustment knob |
| Power indicator | POWER LED |
| Safety | Do not expose to moisture; do not open the casing; use only properly inserted batteries |
| Maintenance and cleaning | Clean with a damp cloth; do not use abrasive detergents; remove batteries when not in use for long periods |
| Warranty | 24 months from date of purchase |
| Compliance | CE |
Frequently Asked Questions - CR 464 CLATRONIC
User questions about CR 464 CLATRONIC
0 question about this device. Answer the ones you know or ask your own.
Ask a new question about this device
Download the instructions for your CD Player in PDF format for free! Find your manual CR 464 - CLATRONIC and take your electronic device back in hand. On this page are published all the documents necessary for the use of your device. CR 464 by CLATRONIC.
USER MANUAL CR 464 CLATRONIC
General safety instructions
To avoid the risk of fire or an electric shock, you should not expose the device to rain or moisture. Consequently, do not use the device in the immediate vicinity of water - for example near a bath tub, a swimming pool or in a damp cellar.
Use the device only for the intended purpose.
Only connect the device at a properly installed plug socket. Pay attention that the specified voltage corresponds to the voltage of the plug socket.
When using external mains supply, pay attention to the correct polarity and voltage.
Always place the batteries in the correct direction.
Assemble the device in such a way that the available ventilation openings are not covered.
Never open the housing of the device. Incorrect repairs can constitute a considerable risk for the user. Should the device become damaged, in particular the mains supply cable, do not operate the device any longer, but rather have it repaired by an expert. Check the mains supply cable regularly for damage.
For safety reasons a broken or damaged mains lead may only be replaced by an equivalent lead from the manufacturer, our customer service department or a similar qualified person.
If the device is not used for a longer period, remove the plug connector from the plug socket or take out the batteries.
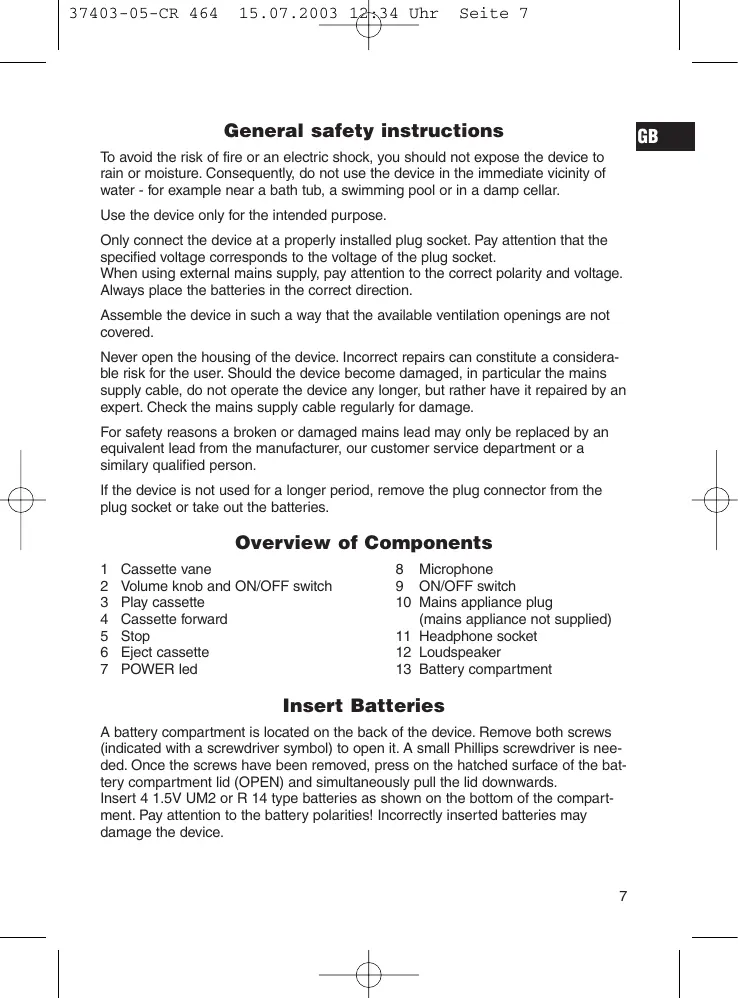
Overview of Components
1 Cassette vane
2 Volume knob and ON/OFF switch
3 Play cassette
4 Cassette forward
5 Stop
6 Eject cassette
7 POWER led
8 Microphone
9 ON/OFF switch
10 Mains appliance plug (mains appliance not supplied)
11 Headphone socket
12 Loudspeaker
13 Battery compartment
Insert Batteries
A battery compartment is located on the back of the device. Remove both screws (indicated with a screwdriver symbol) to open it. A small Phillips screwdriver is needed. Once the screws have been removed, press on the hatched surface of the battery compartment lid (OPEN) and simultaneously pull the lid downwards.
Insert 4 1.5V UM2 or R 14 type batteries as shown on the bottom of the compartment. Pay attention to the battery polarities! Incorrectly inserted batteries may damage the device.
GB
Using the device
- Open the cassette vane with the blue button.
- Insert a cassette with the side to be played facing outwards and the cassette opening facing upwards.
- Close the cassette vane.
- The following functions can be activated:
Blue button = eject cassette
Red button = stop
Yellow button = cassette forward
Green button = play cassette
When sending the tape back or forward both POWER LED's light up.
- Set the desired volume with the green knob on the right side of the device.
- While a cassette is playing, shift the switch on the microphone to ON. Now you can sing in the microphone while the music plays. Your voice and the music are heard simultaneously through the loudspeakers.
- Once the cassette finishes, press the red button. The playing stops and the device is switched off.
Cleaning and storage
Clean the device only with a moist cloth.
- Do not use abrasive detergents.
- If the device is not for long periods of time (a few months), remove the batteries from the battery compartment to avoid leakage of acid from the batteries.
This appliance conforms with the CE directives for radio interference suppression and low-voltage safety and has been built to meet current safety requirements. Subject to technical changes without prior notice!
Warranty
We undertake to guarantee the appliance sold by our company for 24 months as of the date of purchase (cash receipt).
During the life of the warranty we shall provide for the repair or replacement of the appliance owing to material or manufacturing defects absolutely free of charge.
Proof for the warranty is provided by the purchase document. The replacement and repair will not be performed free of charge without this proof of purchase.
Should the warranty be valid, please consign the complete appliance in its original packing together with the cash receipt to your local dealer.
You are not entitled to the replacement of the appliance owing to broken glass parts and faulty accessories. However, said parts will be replaced free of charge. In this
case only the faulty accessory needs to be ordered without sending back the whole appliance!
GB
The cleaning, servicing and replacement of wear parts are not covered by this warranty and hence are to be paid for.
The warranty is terminated in case of handling on the part of Third parties.
After the warranty
Once the warranty has expired, repairs can be carried out by specialized technicians or repair services against the payment of the service.