
AT-3630 - Cordless lawn mower DOLMAR - Free user manual and instructions
Find the device manual for free AT-3630 DOLMAR in PDF.

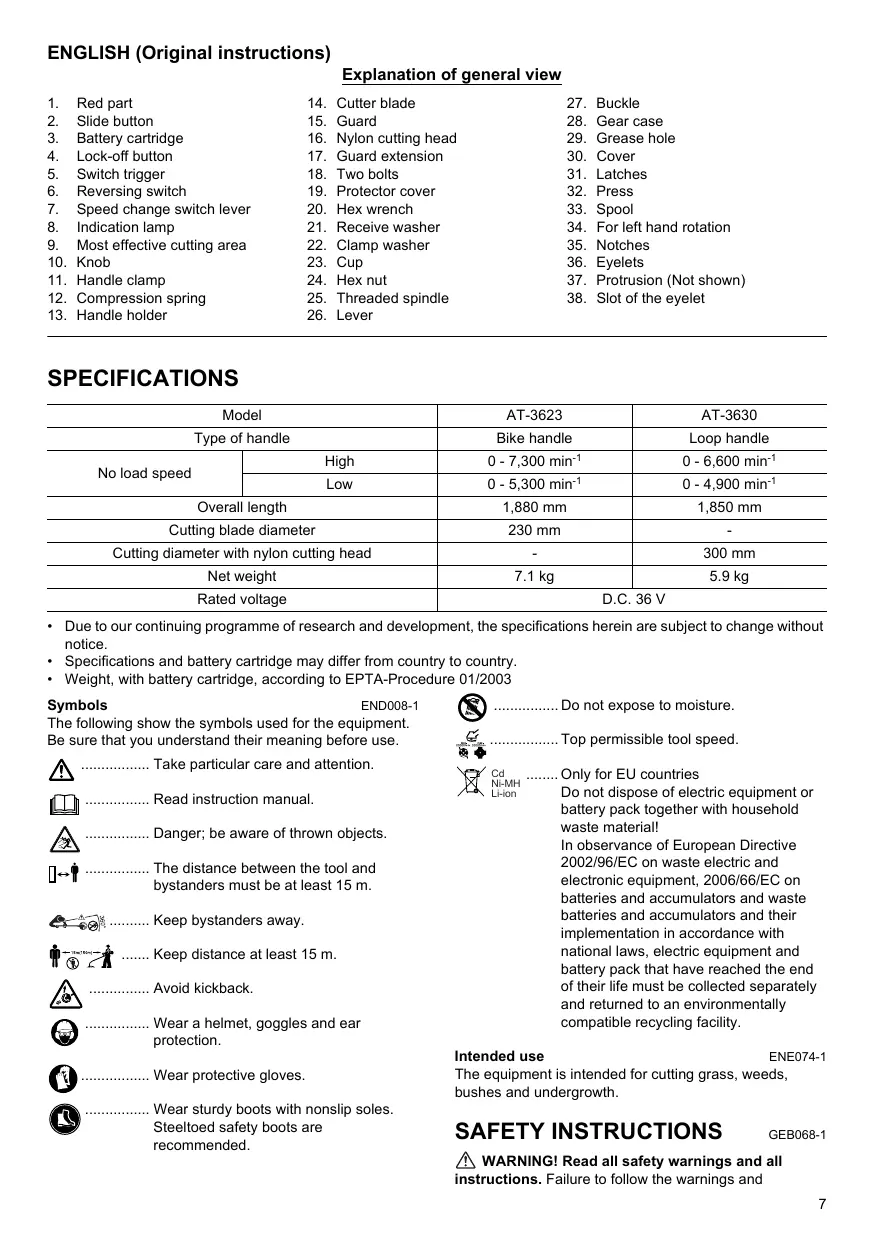


| Product type | Cordless lawn mower |
| Brand | DOLMAR |
| Model | AT-3630 |
| Handle type | Closed handle |
| No-load speed (high) | 0 - 6,600 min⁻¹ |
| No-load speed (low) | 0 - 4,900 min⁻¹ |
| Total length | 1,850 mm |
| Cutting diameter (nylon line head) | 300 mm |
| Net weight (with battery) | 5.9 kg |
| Rated voltage | 36 V DC |
| Battery type | Lithium-ion, removable |
| Available speeds | 2 speeds (slow and fast) |
| Rotation direction | Reversible with switch |
| Line feed | Semi-automatic by bumping on ground |
| Blade guard | Included, with extension for nylon head |
| Protection system | Battery protection, overload, overheating, malfunction |
| Sound pressure level | 79.3 dB(A) (K=2.5 dB) |
| Vibration emission | ≤ 2.5 m/s² (K=1.5 m/s²) |
| Gear case maintenance | Grease every 30 hours |
| Recommended spare parts | Blade, nylon line head, original Dolmar battery and charger |
Frequently Asked Questions - AT-3630 DOLMAR
User questions about AT-3630 DOLMAR
0 question about this device. Answer the ones you know or ask your own.
Ask a new question about this device
Download the instructions for your Cordless lawn mower in PDF format for free! Find your manual AT-3630 - DOLMAR and take your electronic device back in hand. On this page are published all the documents necessary for the use of your device. AT-3630 by DOLMAR.
USER MANUAL AT-3630 DOLMAR
ENGLISH (Original instructions)
Explanation of general view
-
Red part
-
Cutter blade
-
Buckle
-
Slide button
-
Guard
-
Gear case
-
Battery cartridge
-
Nylon cutting head
-
Grease hole
-
Lock-off button
-
Guard extension
-
Cover
-
Switch trigger
-
Two bolts
-
Latches
-
Reversing switch
-
Protector cover
-
Press
-
Speed change switch lever
-
Hex wrench
-
Spool
-
Indication lamp
-
Receive washer
-
For left hand rotation
-
Most effective cutting area
-
Clamp washer
-
Notches
-
Knob
-
Cup
-
Eyelets
-
Handle clamp
-
Hex nut
-
Protrusion (Not shown)
-
Compression spring
-
Threaded spindle
-
Slot of the eyelet
-
Handle holder
-
Lever
SPECIFICATIONS
| Model | AT-3623 | AT-3630 | |
| Type of handle | Bike handle | Loop handle | |
| No load speed | High | 0 - 7,300 min-1 | 0 - 6,600 min-1 |
| Low | 0 - 5,300 min-1 | 0 - 4,900 min-1 | |
| Overall length | 1,880 mm | 1,850 mm | |
| Cutting blade diameter | 230 mm | - | |
| Cutting diameter with nylon cutting head | - | 300 mm | |
| Net weight | 7.1 kg | 5.9 kg | |
| Rated voltage | D.C. 36 V | ||
- Due to our continuing programme of research and development, the specifications herein are subject to change without notice.
- Specifications and battery cartridge may differ from country to country.
- Weight, with battery cartridge, according to EPTA-Procedure 01/2003
Symbols
END008-1
The following show the symbols used for the equipment.
Be sure that you understand their meaning before use.

Take particular care and attention.

Read instruction manual.

Danger; be aware of thrown objects.

The distance between the tool and
bystanders must be at least 15 m.

Keep bystanders away.

Keep distance at least 15m

Avoid kickback.

Wear a helmet, goggles and ear
protection.

Wear protective gloves.

Wear sturdy boots with nonslip soles.
Steeltoed safety boots are
recommended.

Do not expose to moisture.

Top permissible tool speed.

Cd
N-MF Li-ion
Only for EU countries
Do not dispose of electric equipment or battery pack together with household waste material!
In observance of European Directive 2002/96/EC on waste electric and electronic equipment, 2006/66/EC on batteries and accumulators and waste batteries and accumulators and their implementation in accordance with national laws, electric equipment and battery pack that have reached the end of their life must be collected separately and returned to an environmentally compatible recycling facility.
Intended use
ENE074-1
The equipment is intended for cutting grass, weeds, bushes and undergrowth.
SAFETY INSTRUCTIONS
GEB068-1

WARNING! Read all safety warnings and all
instructions. Failure to follow the warnings and
instructions may result in electric shock, fire and/or serious injury.
Save all warnings and instructions for future reference.
General instructions
- To ensure correct operation, user has to read this instruction manual to make himself familiar with the handling of the equipment. Users insufficiently informed will risk danger to themselves as well as others due to improper handling.
- It is recommended only to lend the equipment to people who have proven to be experienced with brushcutters/string trimmers. Always hand over this instruction manual.
- First users should ask the dealer for basic instructions to familiarize oneself with the handling of brushcutters/ string trimmers.
- Never allow people unfamiliar with these instructions, people (including children) with reduced physical, sensory or mental capabilities, or lack of experience and knowledge to use the equipment. Local regulations can restrict the age of the operator.
- Use the equipment with the utmost care and attention.
- Operate the equipment only if you are in good physical condition. Perform all work calmly and carefully. Use common sense and keep in mind that the operator or user is responsible for accidents or hazards occurring to other people or their property.
- Never use the equipment after consumption of alcohol or drugs, or if feeling tired or ill.
- The motor is to be switched off immediately in case that the equipment shows any problem or abnormal sign.
- Switch off and remove the battery cartridge when resting and when leaving the equipment unattended, and place it in a safe location to prevent danger to others or damage to the equipment.
- Don't force the equipment. it will do the job better and with less likelihood of a risk of injury at the rate for which it was designed.
- Don't overreach. Keep proper footing and balance at all times.
Intended use of the equipment
- Use right equipment. The cordless brushcutter/string trimmer is only intended for cutting grass, weeds, bushes and undergrowth. It should not be used for any other purpose such as edging or hedge cutting as this may cause injury.
Personal protective equipment
- Dress Properly. The clothing worn should be functional and appropriate, i.e. it should be tight-fitting but not cause hindrance. Do not wear either jewelry or clothing which could become entangled with bushes or shrubs. Wear protective hair covering to contain long hair.
-
In order to avoid either head, eye, hand or foot injuries as well as to protect your hearing the following protective equipment and protective clothing must be used during operation of the equipment. (Fig. 1)
-
Always wear a helmet where there is a risk of falling objects. The protective helmet is to be checked at regular intervals for damage and is to be replaced at the latest after 5 years. Use only approved protective helmets.
- The visor of the helmet (or alternatively goggles) protects the face from flying debris and stones. During operation of the equipment always wear goggles, or a visor to prevent eye injuries.
- Wear adequate noise protection equipment to avoid hearing impairment (ear muffs, ear plugs etc.). (Fig. 2)
- The work overalls protect against flying stones and debris. It is strongly recommended that the user wears work overalls.
- Special gloves made of thick leather are part of the prescribed equipment and must always be worn during operation of the equipment.
- When using the equipment, always wear sturdy shoes with a nonslip sole. This protects against injuries and ensures a good footing.
Electrical and battery safety
- Avoid dangerous environment. Don't use the equipment in damp or wet locations or expose it to rain. Water entering an equipment will increase the risk of electric shock.
- Recharge only with the charger specified by the manufacturer. A charger that is suitable for one type of battery pack may create a risk of fire when used with another battery pack.
- Use power tools only with specifically designated battery packs. Use of any other battery packs may create a risk of injury and fire.
- When battery pack is not in use, keep it away from other metal objects, like paper clips, coins, keys, nails, screws or other small metal objects, that can make a connection from one terminal to another. Shorting the battery terminals together may cause burns or a fire.
- Under abusive conditions, liquid may be ejected from the battery; avoid contact. If contact accidentally occurs, flush with water. If liquid contacts eyes, additionally seek medical help. Liquid ejected from the battery may cause irritation or burns.
- Do not dispose of the battery(ies) in a fire. The cell may explode. Check with local codes for possible special disposal instructions.
- Do not open or mutilate the battery(ies). Released electrolyte is corrosive and may cause damage to the eyes or skin. It may be toxic if swallowed.
Starting up the equipment (Fig. 3)
- Make sure that there are no children or other people within a working range of 15 meters (50 ft), also pay attention to any animals in the working vicinity. Otherwise stop using the equipment.
- Before use always check that the equipment is safe for operation. Check the security of the cutting tool and the guard and the switch trigger/lever for easy and proper action. Check for clean and dry handles and test the function of the start/stop.
- Check damaged parts before further use of the equipment. A guard or other part that is damaged should be carefully checked to determine that it will operate properly and perform its intended function.
Check for alignment of moving parts, binding of moving parts, breakage of parts, mounting, and any other condition that may affect its operation. A guard or other part that is damaged should be properly repaired or replaced by our authorized service center unless indicated elsewhere in this manual.
- Switch on the motor only when the hands and feet are away from the cutting tool.
- Before starting make sure that the cutting tool has no contact with hard objects such as branches, stones etc. as the cutting tool will revolve when starting.
Method of operation
- Only use the equipment in good light and visibility. During the winter season, beware of slippery or wet areas, ice and snow (risk of slipping). Always ensure a safe footing.
- Take care against injury to feet and hands from the cutting tool.
- Never cut above waist height.
- Never stand on a ladder and run the equipment.
- Never climb up into trees to perform cutting operation with the equipment.
- Never work on unstable surfaces.
- Remove sand, stones, nails etc. found within the working range. Foreign particles may damage the cutting tool and can cause dangerous kick-backs.
- Should the cutting tool hit stones or other hard objects, immediately switch off the motor and inspect the cutting tool.
- Inspect the cutting tool at short regular intervals for damage (detection of hairline cracks by means of tapping-noise test).
- Before commencing cutting, the cutting tool must have reached full working speed.
- Operate the equipment only with the shoulder harness attached which is to be suitably adjusted before putting the equipment into operation. It is essential to adjust the shoulder harness according to the user size to prevent fatigue occurring during use.
- During operation always hold the equipment with both hands. Never hold the equipment with one hand during use. Always ensure a safe footing.
- The cutting tool has to be equipped with the appropriate guard. Never run the equipment with damaged guards or without guards in place!
- All protective installations and guards supplied with the equipment must be used during operation.
- Never use the equipment striking or bumping the weeds or similar to cut away them.
- Except in case of emergency, never drop or cast the equipment to the ground or this may severely damage the equipment.
- Remember to lift the entire equipment from the ground when moving the equipment.
-
Always remove the battery cartridge from the equipment:
-
whenever leaving the equipment unattended;
- before clearing a blockage;
- before checking, cleaning or working on the equipment;
- after striking a foreign object;
-
whenever the equipment starts vibrating abnormally.
-
Always ensure that the ventilation openings are kept clear of debris.
Kickback (blade thrust)
- When operating the equipment, uncontrolled kickback (blade thrust) may occur. (Fig. 4)
- This is particularly the case when attempting to cut within a blade segment between 12 and 2 o'clock.
- Never apply the equipment within a segment between 12 and 2 o'clock.
- Never apply this segment of the cutter blade to solids, such as bushes and trees, etc., having a diameter in excess of 3cm or the cutter blade will be deflected at great force with the risk of injuries.
Kickback prevention
To avoid kickbacks, observe the following:
- Operation within a blade segment between 12 and 2 o'clock presents positive hazards, especially when using metal cutting tools. (Fig. 5)
- Cutting operations within a blade segment between 11 and 12 o'clock, and between 2 and 5 o'clock, must only be performed by trained and experienced operators, and then only at their own risk.
- Easy cutting with almost no kickback is possible within a blade segment between 9 and 11 o'clock.
Cutting Tools
- Employ only the correct cutting tool for the job in hand.
- To cut thick materials, such as weed, high grass, bushes, shrubs, underwood, thicket etc. (max. 2 cm dia. thickness), perform the cutting work by swinging the equipment evenly in half-circles from right to left (similar to using a scythe).
Maintenance instructions
- The condition of the equipment, in particular of the cutting tool of the protective devices and also of the shoulder harness must be checked before commencing work.
- Particular attention is to be paid to the cutting blades which must be correctly sharpened.
- Turn off the motor and remove the battery cartridge before carrying out maintenance, replacing/ sharpening cutting tools or cleaning the equipment or cutting tool.
- Check loose fasteners and damaged parts such as cracks in the cutting attachment.
- Follow instructions for lubricating and changing accessories.
- When not in use, store the equipment indoors in dry and high or locked-up place - out of the reach of children. Clean and maintain before storage.
- Use only the manufacturer's recommended replacement parts and accessories.
- Inspect and maintain the equipment regularly, especially before/after use. Have the equipment repaired only by our authorized service center.
- Keep handles dry, clean and free from oil and grease.
SAVE THESE INSTRUCTIONS.
WARNING:
DO NOT let comfort or familiarity with product (gained from repeated use) replace strict adherence to safety rules for the subject product. MISUSE or failure to follow the safety rules stated in this instruction manual may cause serious personal injury.
IMPORTANT SAFETY INSTRUCTIONS
ENC007-4
FOR BATTERY CARTRIDGE
- Before using battery cartridge, read all instructions and cautionary markings on (1) battery charger, (2) battery, and (3) product using battery.
- Do not disassemble battery cartridge.
- If operating time has become excessively shorter, stop operating immediately. It may result in a risk of overheating, possible burns and even an explosion.
- If electrolyte gets into your eyes, rinse them out with clear water and seek medical attention right away. It may result in loss of your eyesight.
- Do not short the battery cartridge:
(1) Do not touch the terminals with any conductive material.
(2) Avoid storing battery cartridge in a container with other metal objects such as nails, coins, etc.
(3) Do not expose battery cartridge to water or rain.
A battery short can cause a large current flow, overheating, possible burns and even a breakdown.
- Do not store the tool and battery cartridge in locations where the temperature may reach or exceed 50ircC (122ircF) .
- Do not incinerate the battery cartridge even if it is severely damaged or is completely worn out. The battery cartridge can explode in a fire.
- Be careful not to drop or strike battery.
- Do not use dropped or struck battery.
SAVE THESE INSTRUCTIONS.
Tips for maintaining maximum battery life
- Charge the battery cartridge before completely discharged.
Always stop tool operation and charge the battery cartridge when you notice less tool power. - Never recharge a fully charged battery cartridge. Overcharging shortens the battery service life.
- Charge the battery cartridge with room temperature at 10ircC - 40ircC (50ircF - 104ircF) . Let a hot battery cartridge cool down before charging it.
PARTS DESCRIPTIONS

| 1 | Battery cartridge | 7 | Gear case |
| 2 | Indication lamp | 8 | Cutting tool |
| 3 | Switch trigger | 9 | Shoulder harness |
| 4 | Hanger (suspension point) | 10 | Buckle |
| 5 | Grip | 11 | Barrier |
| 6 | Cutting tool guard | 12 | Guard extension |
FUNCTIONAL DESCRIPTION
CAUTION:
- Always be sure that the equipment is switched off and the battery cartridge is removed before adjusting or checking function on the equipment.
Installing or removing battery cartridge (Fig. 6)
Always switch off the equipment before insertion or removal of the battery cartridge.
- To remove the battery cartridge, withdraw it from the equipment while sliding the button on the front of the cartridge.
- To insert the battery cartridge, align the tongue on the battery cartridge with the groove in the housing and slip it into place. Always insert it all the way until it locks in place with a little click. If you can see the red part on the upper side of the button, it is not locked completely. Insert it fully until the red part cannot be seen. If not, it may accidentally fall out of the equipment, causing injury to you or someone around you.
- Do not use force when inserting the battery cartridge. If the cartridge does not slide in easily, it is not being inserted correctly.
Power switch action
CAUTION:
- Before inserting the battery cartridge into the equipment, always check to see that the switch trigger actuates properly and returns to the "OFF" position when released. (Fig. 7 & 8)
To prevent the switch trigger from being accidentally pulled, a lock-off button is provided.
To start the equipment, depress the lock-off button and pull the switch trigger. The tool speed is increased by increasing pressure on the switch trigger. Release the switch trigger to stop.
Reversing switch action
WARNING:
- Always be sure that the equipment is switched off and the battery cartridge is removed before removing the weeds or similar entangled in the cutting tool that
cannot be removed in spite of using the reversing switch.
CAUTION:
- Always check the direction of rotation before operation.
- Use the reversing switch only after the equipment comes to a complete stop. Changing the direction of rotation before the equipment stops may damage it. (Fig. 9 & 10)
This equipment has a reversing switch to change the direction of rotation to remove weeds entangled on the cutting tool. Depress the reversing switch lever from the A side for counterclockwise (normal) rotation or from the B side for clockwise (reverse) rotation.
In the reversing mode, the equipment automatically stops in a short time after turned on.
Speed change (Fig. 11 & 12)
Two speed ranges can be preselected with the speed change switch.
To change the speed range, turn the speed change switch lever so that it points toward "1" for low speed or "2" for high speed.
Battery/motor protection system
The battery cartridge and machine are equipped with protection systems, which automatically reduces or cuts off the output power for their long service life.
Under overloaded situation, the protector drops the revolution to protect the motor. In this case, the following two indication lamps do not light up or blink.
The other functions can be recognized by two indication lamps as follows when working. (Fig. 13)
| Status | Action to be taken | ||
| - | Blinking | Battery power has been nearly used up. | Replace the battery with fully charged one. |
| - | Lighting On | Battery protector is shutting off the power - battery power has been used up. | Replace the battery with fully charged one. |
| Blinking | - | Overload protector is shutting off the power - the motor was locked. | Release the switch trigger and remove the cause of the motor lock or overload. If the cutting tool is locked by entangling weeds or the like, always remove the battery cartridge before clearing it. |
| Lighting On | - | Overheat protector is shutting off the power - overheating. | Rest the equipment for a while. |
| Blinking | Blinking | Electric or electronic malfunction | Ask your local authorized service center for repairs. |
Nylon cutting head (optional accessory for machines equipped with cutter blade)
CAUTION:
- Do not bump the head when it rotates greater than 4,500 min-1 or it is stopped. (Fig. 14)
The nylon cutting head is a dual string trimmer head with bump & feed mechanisms.
Bump the nylon cutting head against the ground to feed out extra cord during driving the equipment. The cord will be automatically cut to the appropriate length by the cutter on the guard extension.
NOTE:
If the nylon cord does not feed out with bump, rewind/ replace the nylon cord by following the procedures described under "Maintenance".
ASSEMBLY
CAUTION:
Always be sure that the equipment is switched off and the battery cartridge is removed before carrying out any work on the equipment.
- Start the equipment only after having assembled it completely.
Installing the handle (for bike handle type model only) (Fig. 15)
Loosen knob.
Place handle between handle clamp and handle holder. Adjust the handle to an angle that provides a comfortable working position and then secure by firmly hand-tightening knob.
Installing the guard (Fig. 16 & 17)
WARNING:
- Only the cutting tool/guard combinations as indicated below must be used. Failure to do so can cause serious injury. Never use the equipment without the guard.
- The outside diameter of the cutter blade must be 230mm . Never use any blade exceeding 230mm in outside diameter.
In use of the metal blade (Fig. 18)
Fix the guard to the clamp with two bolts as shown.
Tighten the right and left bolts evenly.
In use of the nylon cutting head
CAUTION:
Take care not to injure yourself on the cutter for cutting the nylon cord on the inside of the guard extension.
- Be sure to push in the guard extension until it is fully inserted. (Fig. 19)
Fix the guard to the clamp with two bolts as shown.
Tighten the right and left bolts evenly.
Mount the guard extension by sliding it into place from the flank of the guard as shown.
NOTE:
- Remove tape adhered to cutter, which cuts nylon cord, on guard extension at the first use. (Fig. 20)
To remove the guard extension, apply a flat-blade screwdriver into the notch on the guard, push it in and meanwhile slide the guard extension.
Installing the cutter blade
CAUTION:
- Be sure to use genuine Dolmar cutter blade.
- The cutter blade must be well polished, free of cracks or breakage. If the cutter blade hits against a stone during operation, stop the motor and check the blade immediately.
- Polish or replace the cutter blade every three hours of operation.
Always wear gloves when handling the cutter blade. - Always attach the blade cover when the machine is not in use or is being transported.
- The cutter blade-fastening nut (with spring washer) is a consumable part. If there appears any wear or deformation on the spring washer, replace the nut. Ask your local authorized service center to order it.
Turn the machine upside down so that you can replace the cutter blade easily. (Fig. 21)
To dismount the cutter blade, insert the hex wrench through the hole on the protector cover and gear case.
Rotate the receive washer until it is locked with the hex wrench. Loosen the hex nut (left-hand thread) with the socket wrench and remove the nut, cup, clamp washer and hex wrench. (Fig. 22)
Mount the cutter blade onto the shaft so that the guide of the receive washer fits in the arbor hole in the cutter blade. Install the clamp washer, cup, and secure the cutter blade with the hex nut with 13 to 23Nm of tightening torque during holding the receive washer with hex wrench. (Fig. 23)
Make sure that the blade is the left way up.
Installing of nylon cutting head
CAUTION:
- Always mount not only guard but also guard extension when using nylon cutting head.
- Be sure to use genuine Dolmar nylon cutting head.
- If the nylon cutting head hits against a stone during operation, stop the motor and check the nylon cutting head immediately.
Turn the machine upside down so that you can replace the nylon cutting head easily. (Fig. 24)
Insert the hex wrench through the hole on the protector cover and the gear case and rotate the receive washer until it is locked with the hex wrench. Mount the nylon cutting head onto the threaded spindle directly and tighten it by turning it counterclockwise. Remove the hex wrench. To dismount the nylon cutting head, turn the nylon cutting head clockwise during holding the receive washer with hex wrench.
OPERATION
Correct handling of machine (with bike type handle)
Correct posture
WARNING:
- Always position the equipment on your right-hand side so that the shaft of the left handle is always ahead of you. The correct posture reduces the risk of injury caused by kickback. (Fig. 25)
Fit the shoulder harness as shown and hang the machine firmly on your right side so that the shaft of the left handle is always ahead of you.
Attachment of shoulder harness (Fig. 26)
Wear the shoulder harness on your back and buckle it up until a click is heard. Make sure that it cannot be taken off with pulling it off. Hang the machine as shown.
Adjust the strap length so that the cutter blade will be kept parallel with the ground at the level of 10 to 30 cm above the ground.
Detachment (Fig. 27)
In case of emergency, press the lever of the buckle strongly to take off the harness and the machine.
WARNING:
- Be extremely careful to maintain control of the machine at this time. Do not allow the machine to be deflected toward you or anyone in the work vicinity. Failure to do so could result in serious injury.
Correct handling of machine (with loop type handle)
Correct posture
WARNING:
- Always position the equipment on your right-hand side so that the shaft of the barrier is always ahead of you. The correct posture reduces the risk of injury caused by kickback. (Fig. 28)
Fit the shoulder harness as shown and hang the machine firmly on your right side so that the barrier is always ahead of you.
Attachment of shoulder harness (Fig. 29)
Hang the shoulder harness on your left shoulder with putting your head and right arm though it. Buckle it to the hook unit until a click is heard. Make sure that it cannot be taken off with pulling it off. Hang the machine as shown. Adjust the strap length so that the cutter blade will be kept parallel with the ground at the level of 10 to 30 cm above the ground.
In case of emergency, press the emergency detachment lever strongly.
WARNING:
- Be extremely careful to maintain control of the machine at this time. Do not allow the machine to be deflected toward you or anyone in the work vicinity. Failure to do so could result in serious injury.
MAINTENANCE
CAUTION:
Always be sure that the equipment is switched off and the battery cartridge is removed before attempting to perform inspection or maintenance.
- Never use gasoline, benzine, thinner, alcohol or the like. Discoloration, deformation or cracks may result.
Supply of grease to gear case (Fig. 31)
Supply grease (Shell Alvania 2 or equivalent) to the gear case through the grease hole every 30 hours. (Genuine Dolmar grease may be purchased from your Dolmar dealer.)
Replacing the nylon cord
WARNING:
- Release the switch trigger and remove the battery pack before replacing nylon cord.
- Make sure that the cover of the nylon cutting head is secured to the housing properly as described below. Failure to do so may make it fly apart and cause serious injury. (Fig. 32)
Press on the housing latches inward to lift off the cover, then take the spool out and remove the remaining nylon cord on it. (Fig. 33)
Hook the center of new nylon cord into the notch in the center of the spool, with one end of the cord extending about 80 mm more than the other.
Then wind both ends firmly around the spool in the direction of the head rotation (left-hand direction indicated by LH and right-hand direction by RH on the side of the spool). (Fig. 34)
Wind all but about 100mm (3-15/16") of the cords, leaving the ends temporarily hooked through a notch on the side of the spool. (Fig. 35)
Mount the spool in the housing so that the grooves and protrusions on the spool match up with those in the housing. Keep the side with letters on the spool visible on the top. Now, unhook the ends of the cord from their temporary position and feed the cords through the eyelets to come out of the housing. (Fig. 36)
Align the protrusion on the underside of the cover with the slots of the eyelets. Then push cover firmly onto the housing to secure it. Make sure the latches fully spread in the cover.
To maintain product SAFETY and RELIABILITY, repairs, any other maintenance or adjustment should be performed by Dolmar Authorized Service Centers, always using Dolmar replacement parts.
TROUBLE SHOOTING
Before asking for repairs, conduct your own inspection first. If you find a problem that is not explained in the
manual, do not rashly dismantle the equipment. Instead, ask Dolmar Authorized Service Centers, always using Dolmar replacement parts for repairs.
| Malfunction status | Cause | Action |
| Motor does not run. | Battery cartridge is not installed. | Install the battery cartridge. |
| Battery problem (under voltage) | Recharge the battery. If recharging is not effective, replace battery. | |
| The drive system does not work correctly. | Ask your local authorized service center for repair. | |
| Motor stops in a while after start. | Rotation is reverse. | Change the direction of rotation with the reversing switch. |
| Battery is nearly flat. | Recharge the battery. If recharging is not effective, replace battery. | |
| Overheating. | Rest the equipment for a while. | |
| Revolution does not achieve the appropriate speed. | Battery is installed improperly. | Install the battery cartridge as described in this manual. |
| Battery power is dropping. | Recharge the battery. If recharging is not effective, replace battery. | |
| The drive system does not work correctly. | Ask your local authorized service center for repair. | |
| Cutting tool does not rotate: Stop the machine immediately! | Foreign object such as a branch is jamming between the guard and the cutting tool. | Remove the foreign object. |
| Cutter blade fastening nut is loose. | Tighten the nut properly as described in this manual. | |
| The cutter blade is bended. | Replace the cutter blade. | |
| The drive system does not work correctly. | Ask your local authorized service center for repair. | |
| Abnormal vibration: Stop the machine immediately! | One end of the nylon cord has been broken. | Bump the nylon cutting head against the ground during driving the equipment to feed the cord. |
| The cutter blade is bended, cracked or worn. | Replace the cutter blade. | |
| Cutter blade fastening nut is loose. | Tighten the nut properly as described in this manual. | |
| Cutter blade is fastened improperly. | ||
| The drive system does not work correctly. | Ask your local authorized service center for repair. | |
| Cutting tool and motor cannot stop: Remove the battery immediately! | Electric or electronic malfunction. | Remove the battery and ask your local authorized service center for repair. |
ACCESSORIES
CAUTION:
- These accessories or attachments are recommended for use with your Dolmar equipment specified in this manual. The use of any other accessories or attachments might present a risk of injury to persons. Only use accessory or attachment for its stated purpose.
If you need any assistance for more details regarding these accessories, ask your local Dolmar Service Center.
- Cutter blade
- Nylon cutting head
- Pole hedge trimmer attachment
- Pole saw attachment
Cultivator attachment - Dolmar genuine battery and charger
For Model AT-3623
Noise
ENG104-2
The typical A-weighted noise level determined according to ISO22868:
Sound pressure level (LpA) : 79.7 dB (A)
Uncertainty (K): 2.5 dB (A)
The noise level under working may exceed 80 dB (A).
Wear ear protection.
Vibration
ENG244-1
The vibration emission value determined according to ISO22867, EN786:
Vibration emission (ah) .. 2.5m / s2 or less
Uncertainty (K): 1.5m / s2
For Model AT-3630
Noise
ENG104-2
The typical A-weighted noise level determined according to EN786:
Sound pressure level (LpA) : 79.3 dB (A)
Uncertainty (K): 2.5 dB (A)
The noise level under working may exceed 80 dB (A).
Wear ear protection.
Vibration
ENG244-1
The vibration emission value determined according to
EN786:
Vibration emission (ah) : 2.5m / s2 or less
Uncertainty (K): 1.5 m/s²
For European countries only
ENH021-5
EC Declaration of Conformity
The undersigned, Tamiro Kishima and Rainer
Bergfeld, as authorized by Dolmar GmbH, declare that
the DOLMAR machine(s):
Designation of Machine:
Cordless Brushcutter
Model No./ Type: AT-3623
Specifications: see "SPECIFICATIONS" table.
are of series production and
Conforms to the following European Directives:
2000/14/EC, 2006/42/EC
And are manufactured in accordance with the following
standards or standardised documents:
EN60745, ISO11806
The technical documentation is on file at:
Dolmar GmbH,
The conformity assessment procedure required by
Directive 2000/14/EC was in Accordance with annex V.
Measured Sound Power Level: 93.6 dB
Guaranteed Sound Power Level: 95 dB
16th October 2009
Tamiro Kishima
Managing Director

Rainer Bergfeld
Managing Director
For European countries only
ENH212-10
EC Declaration of Conformity
The undersigned, Tamiro Kishima and Rainer
Bergfeld, as authorized by Dolmar GmbH, declare that
the DOLMAR machine(s):
Designation of Machine:
Cordless String Trimmer
Model No./ Type: AT-3630
Specifications: see "SPECIFICATIONS" table.
are of series production and
Conforms to the following European Directives:
2000/14/EC, 2006/42/EC
And are manufactured in accordance with the following
standards or standardised documents:
EN60745, EN60335
The technical documentation is on file at:
Dolmar GmbH,
The conformity assessment procedure required by
Directive 2000/14/EC was in Accordance with annex VIII.
Notified Body:
Measured Sound Power Level: 91.3 dB
Guaranteed Sound Power Level: 93 dB
16th October 2009

Tamiro Kishima
Managing Director

Rainer Bergfeld
Managing Director
Richtlijn 2000/14/EC was is Overeenstemming met annex VIII.
Officèle instantie:
Tamiro Kishima
Director general

Rainer Bergfeld
Director general

Tamiro Kishima
Director general

Rainer Bergfeld
Director general
Corpo notifications:
2000/14/EF, 2006/42/EF
Og er produceret i overensstemmelse med følgende
standarder aller standardiserede Dokumente:
EN60745, ISO11806
Den tekniske dokumentation opbevares pa:
Dolmar GmbH,
2000/14/EF, 2006/42/EF
Móvo yia tiC xwpeC tsE E
Mny atoppipttete tov nAektpiko
EgoTIAO np TIV mtaTApia pa ie ta
oiikka atoppipmuata!
Suipwva ne TIV Eupwtaikn Odbyia
2002/96/EK TEpi aTOBAAHTuv nAektpkou
kai nAektpovikou EoTIAOou,TNV 2006/
68/EK TEpi mTaTAPWv KAI
auaowpeutuv KAI TUV aTOBAAHTuv
mTaTAPWv KAI aUauOWPeUTW KAI TIV
evovawtoon Touc OTN VEVIKI
Vootheia, o nAektpikoC EoTIAOos KAI
n MTApatia Tou v Exouv PAtaei OTTeLoC
TNS cwoh TouePtei va OuaLeyovtaI
Exewpiota kai v EtTIpEpoVtai OE
EykataoTAEIE TPIBaALovTKHC
avakkuwana.
H ouakeun autn tripoopietai via tny kottyn ypaaoiou, xoptw, aauuvw kai xanns baootnns.
ZHMANTIKEOADHIGEAZAΦAΛEIAZ
GEB068-1
IPOEIAOIOIHHEIaiaoTe oaes TIC
TPOeioiOIOIEc aoaaiaeias kai oes TIG oyniecs.AV
Dev akouthetaote oes TIC TPOeioTOIOIEc KAI TIG
oynieics, utapxei Kivduoc nAekptpnnxiac, Tupkayiacn/
kai oobapou tpaumiatou.
Tia to movtEa OAT-3630
OópuβoS
ENG104-2
To ouvnoe otaauiévo etiriteo doopou Tou exi Kaobopiotei oumuwva eT EN786:
2000/14/EK, 2006/42/EK
Kai kataoekuáζeTai oμφwva μe Ta napakatw TpóTuTt a n
TUTTOINJeva Eyypa:
EN60745, ISO11806
Ta texvika eyyapa β piokovtai oTo apxio oTnv:
Dolmar GmbH,
Bergfeld, (\lambda \alpha \beta \gamma \alpha \nu \tau \alpha) 3 (\xi \xi \xi \xi \xi \xi \xi \eta \eta \eta \eta \eta \eta \eta \eta \eta \eta \eta \eta \eta \eta \eta \eta \eta \eta \eta \eta \eta \eta \eta \eta \eta \eta \eta \eta \eta \eta \eta \eta \eta \eta \eta \eta \eta \eta \eta \eta \eta \eta \eta \eta \eta \eta \eta
Dolmar GmbH, δηλω oTI to µ η hi ανηµ (τ α) tns
DOLMA:
Ovoaia Mxavnpatos:
Oauvokottiko mtatapiaç με εοηνεζα
Eumopwvetai e ticakoloue Eupwnaikes
OsnyieS:
2000/14/EK, 2006/42/EK
Kai kataokeuεzetaoi uφwva μe ta napakatw πpóttta n TUTTOIηvá éyypa:
EN60745, EN60335
Ta texvikéyypapaβpiokovtai oTo apxiooTnV:
Dolmar GmbH,
KoVToOnIevoS OpyAviouOc:


- ENGLISH (Original instructions)
- Explanation of general view
- SPECIFICATIONS
- Symbols
- Intended use
- SAFETY INSTRUCTIONS
- Save all warnings and instructions for future reference.
- General instructions
- Intended use of the equipment
- Personal protective equipment
- Electrical and battery safety
- Starting up the equipment (Fig. 3)
- Method of operation
- Kickback (blade thrust)
- Kickback prevention
- To avoid kickbacks, observe the following:
- Cutting Tools
- Maintenance instructions
- SAVE THESE INSTRUCTIONS.
- WARNING:
- IMPORTANT SAFETY INSTRUCTIONS
- FOR BATTERY CARTRIDGE
- Tips for maintaining maximum battery life
- PARTS DESCRIPTIONS
- FUNCTIONAL DESCRIPTION
- CAUTION:
- Installing or removing battery cartridge (Fig. 6)
- Power switch action
- Reversing switch action
- Speed change (Fig. 11 & 12)
- Battery/motor protection system
- Nylon cutting head (optional accessory for machines equipped with cutter blade)
- NOTE:
- ASSEMBLY
- Installing the handle (for bike handle type model only) (Fig. 15)
- Installing the guard (Fig. 16 & 17)
- In use of the metal blade (Fig. 18)
- In use of the nylon cutting head
- Installing the cutter blade
- Installing of nylon cutting head
- OPERATION
- Correct handling of machine (with bike type handle)
- Correct posture
- Attachment of shoulder harness (Fig. 26)
- Detachment (Fig. 27)
- Correct handling of machine (with loop type handle)
- Attachment of shoulder harness (Fig. 29)
- MAINTENANCE
- Supply of grease to gear case (Fig. 31)
- Replacing the nylon cord
- TROUBLE SHOOTING
- ACCESSORIES
- For Model AT-3623
- For Model AT-3630
- Wear ear protection.
- ZHMANTIKEOADHIGEAZAΦAΛEIAZ
- Tia to movtEa OAT-3630
- OópuβoS
- DOLMA:
- Eumopwvetai e ticakoloue Eupwnaikes
- OsnyieS:
Brand : DOLMAR
Model : AT-3630
Category : Cordless lawn mower