
LATITUDE D610 - Laptop DELL - Free user manual and instructions
Find the device manual for free LATITUDE D610 DELL in PDF.


| Product type | Laptop |
| Brand | DELL |
| Model | LATITUDE D610 |
| Dimensions (approx.) | 33.8 x 27.3 x 3.2 cm |
| Weight (approx.) | 2.4 kg |
| Power supply | 65 W AC adapter, 6-cell lithium-ion battery (53 Wh) |
| Processor | Intel Pentium M (up to 2 GHz) |
| RAM (typical) | 256 MB or 512 MB, expandable up to 2 GB |
| Hard drive (typical) | 40 GB to 80 GB, 5400 rpm |
| Display | 14.1 inches, XGA resolution (1024x768) |
| Connectivity | USB 2.0 (2 ports), Ethernet 10/100, V.92 modem, WiFi 802.11b/g (optional) |
| Operating system | Microsoft Windows XP Professional |
| Battery life (approx.) | 3 to 5 hours depending on usage |
| Main functions | Web browsing, office productivity, DVD playback, CD burning (optional optical drive) |
| Maintenance and cleaning | Clean with a soft, dry cloth; do not use liquid products; dust the air vents regularly |
| Security | Kensington lock, BIOS password, TPM module (optional) |
| Spare parts and repairability | Battery, hard drive, memory, processor (replaceable); motherboard and display require a technician |
| General information | 168-page manual; compatibility with Dell docking stations; driver CD included |
Frequently Asked Questions - LATITUDE D610 DELL
User questions about LATITUDE D610 DELL
0 question about this device. Answer the ones you know or ask your own.
Ask a new question about this device
Download the instructions for your Laptop in PDF format for free! Find your manual LATITUDE D610 - DELL and take your electronic device back in hand. On this page are published all the documents necessary for the use of your device. LATITUDE D610 by DELL.
USER MANUAL LATITUDE D610 DELL
Notes, Notices, and Cautions

NOTE: A NOTE indicates important information that helps you make better use of your computer.

NOTICE: A NOTICE indicates either potential damage to hardware or loss of data and tells you how to avoid the problem.

CAUTION: A CAUTION indicates a potential for property damage, personal injury, or death.
Abbreviations and Acronyms
For a complete list of abbreviations and acronyms, see the User's Guide (depending on your operating system, double-click the User's Guide icon on your desktop or click the Start button, click Help and Support Center, and click User and system guides).
If you purchased a Dell™ n Series computer, any references in this document to Microsoft® Windows® operating systems are not applicable.

NOTE: Some features may not be available for your computer or in certain countries.
Information in this document is subject to change without notice. © 2004 Dell Inc. All rights reserved.
Reproduction in any manner whatsoever without the written permission of Dell Inc. is strictly forbidden.
Trademarks used in this text: Dell, the DELL logo, and Latitude are trademarks of Dell Inc.; Intel and Pentium are registered trademarks of Intel Corporation; Microsoft and Windows are registered trademarks of Microsoft Corporation.
Other trademarks and trade names may be used in this document to refer to either the entities claiming the marks and names or their products. Dell Inc. disclaims any proprietary interest in trademarks and trade names other than its own.
Contents
Finding Information 5
Setting Up Your Computer 8
Battery Performance 9
Checking the Battery Charge 11
DellTM QuickSet Battery Meter 11
Microsoft®Windows®Power Meter. 11
Charge Gauge 12
Health Gauge 12
Low-Battery Warning 13
Charging the Battery 13
Removing a Battery 14
Installing a Battery 14
Storing a Battery 14
About Your Computer 15
Front View 15
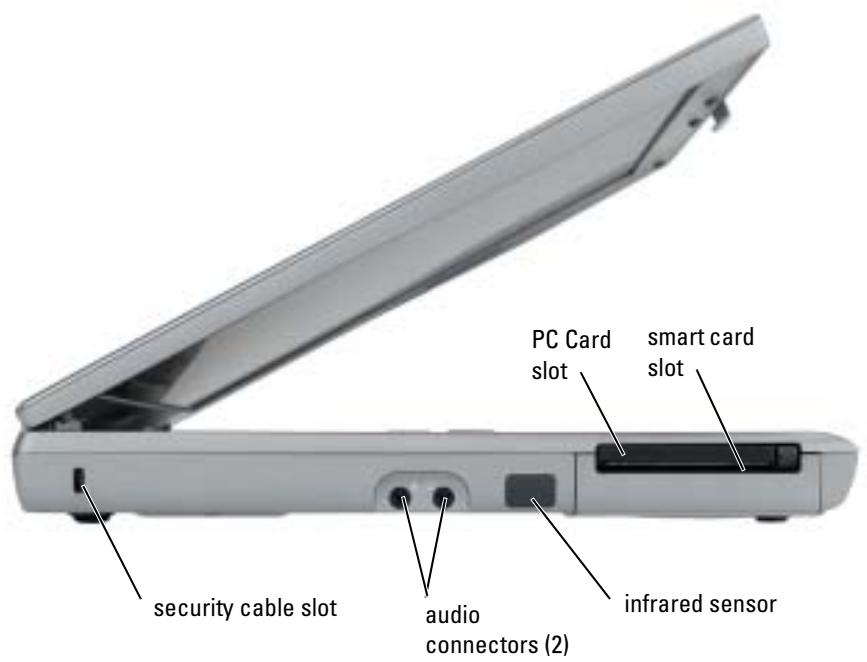
Left View 16
Right View 17
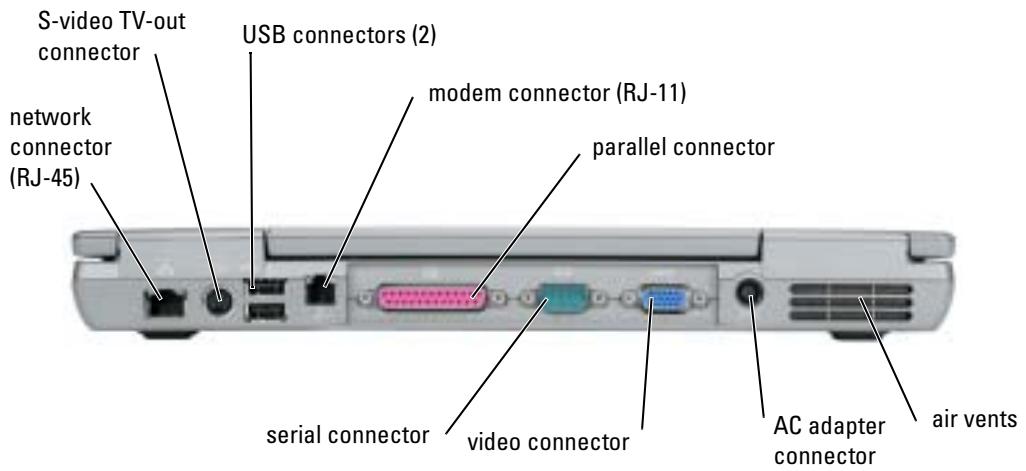
Back View 18
Bottom View 19
Solving Problems 20
Notebook System Software 20
Lockups and Software Problems 20
Running the Dell Diagnostics 22
Index 27
Finding Information

NOTE: Some features may not be available for your computer or in certain countries.

NOTE: Additional information may ship with your computer.
| What Are You Looking For? | Find It Here |
| ·A diagnostic program for my computer ·Drivers for my computer ·My computer documentation ·My device documentation ·Notebook System Software (NSS) | Drivers and Utilities CD (also known as ResourceCD) Documentation and drivers are already installed on your computer. You can use the CD to reinstall drivers, run the Dell Diagnostics, or access your documentation. Readme files may be included on your CD to provide last-minute updates about technical changes to your computer or advanced technical-reference material for technicians or experienced users. |
| NOTE: Drivers and documentation updates can be found at support.dell.com. NOTE: The Drivers and Utilities CD is optional and may not ship with your computer. | |
| ·Warranty information ·Terms and Conditions (U.S. only) ·Safety instructions ·Regulatory information ·Ergonomics information ·End User License Agreement | Dell™ Product Information Guide |
| ·How to remove and replace parts ·Specifications ·How to configure system settings ·How to troubleshoot and solve problems | User's Guide Microsoft® Windows® XP Help and Support Center 1 Click the Start button and click Help and Support. 2 Click User's and system guides and click User's guides. The User's Guide is also available on the optional Drivers and Utilities CD. |
What Are You Looking For?
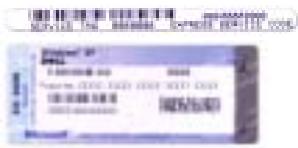
Service Tag and Express Service Code
- Microsoft Windows License Label
Find It Here
Service Tag and Microsoft Windows License
These labels are located on the bottom of your computer.
- Use the Service Tag to identify your computer when you use support.dell.com or contact technical support.
-
Enter the Express Service Code to direct your call when contacting technical support.
-
Solutions — Troubleshooting hints and tips, articles from technicians, online courses, frequently asked questions
Community—Online discussion with other Dell customers - Upgrades — Upgrade information for components, such as memory, the hard drive, and the operating system
- Customer Care — Contact information, service call and order status, warranty, and repair information
- Service and support — Service call status and support history, service contract, online discussions with technical support
- Reference — Computer documentation, details on my computer configuration, product specifications, and white papers
- Downloads — Certified drivers, patches, and software updates
- Notebook System Software (NSS) — If you reinstall the operating system for your computer, you should also reinstall the NSS utility. NSS provides critical updates for your operating system and support for Dell™ 3.5-inch USB floppy drives, Intel® Pentium® M processors, optical drives, and USB devices. NSS is necessary for correct operation of your Dell computer. The software automatically detects your computer and operating system and installs the updates appropriate for your configuration.
Dell Support Website - support.dell.com
NOTE: Select your region to view the appropriate support site.
NOTE: Corporate, government, and education customers can also use the customized Dell Premier Support website at premier/support.dell.com. The website may not be available in all regions.
| What Are You Looking For? | Find It Here |
| ·How to use Windows XP ·Documentation for my computer ·Documentation for devices (such as a modem) | Windows Help and Support Center 1 Click the Start button and click Help and Support. 2 Type a word or phrase that describes your problem and click the arrow icon. 3 Click the topic that describes your problem. 4 Follow the instructions on the screen. |
| ·How to reinstall my operating system | Operating System CD The operating system is already installed on your computer. To reinstall your operating system, use the Operating System CD. See your Latitude User's Guide for instructions. After you reinstall your operating system, use the Drivers and Utilities CD to reinstall drivers for the devices that came with your computer. Your operating system product key label is located on your computer. |
| NOTE: The color of your CD varies based on the operating system you ordered. NOTE: The Operating System CD is optional and may not ship with your computer. |
Setting Up Your Computer

CAUTION: Before you begin any of the procedures in this section, follow the safety instructions in the Product Information Guide.
1 Unpack the accessories box.
2 Set aside the contents of the accessories box, which you will need to complete the setup of your computer.
The accessories box also contains user documentation and any software or additional hardware (such as PC Cards, drives, or batteries) that you have ordered.
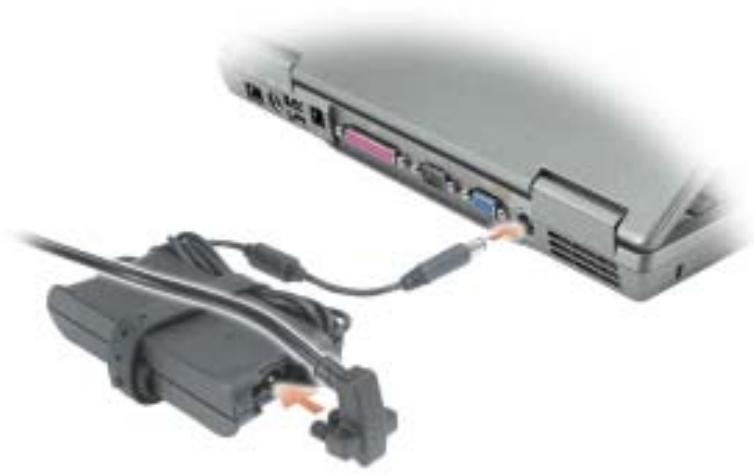
3 Connect the AC adapter to the AC adapter connector on the computer and to the electrical outlet.
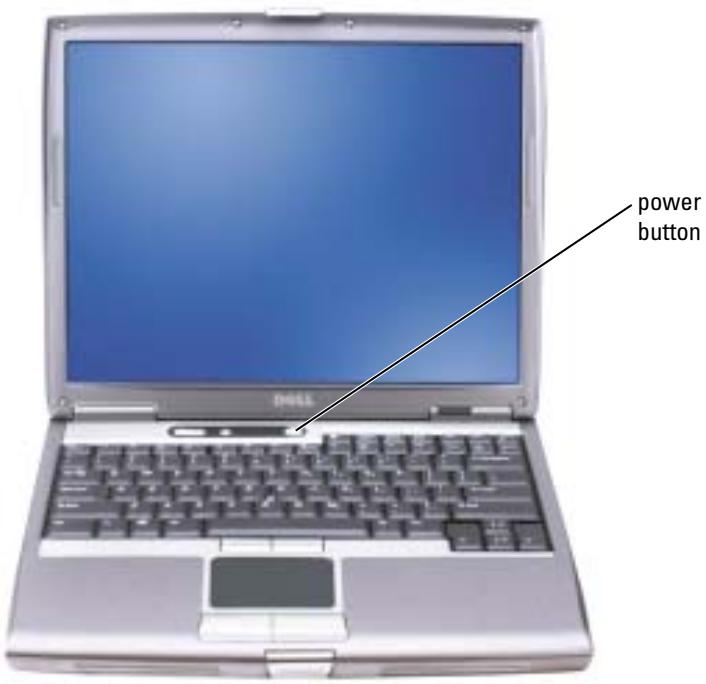
4 Open the computer display and press the power button to turn on the computer.

NOTE: Do not connect the computer to the docking device until the computer has been turned on and shut down at least once.
Battery Performance

CAUTION: Before you begin any of the procedures in this section, follow the safety instructions located in the Product Information Guide.

NOTE: Batteries for portable computers are covered only during the initial 1-year period of the limited warranty for your computer. For more information about the Dell warranty for your computer, see the Product Information Guide or separate paper warranty document that shipped with your computer.
For optimal computer performance and to help preserve BIOS settings, operate your Dell™ portable computer with the main battery installed at all times. Use a battery to run the computer when it is not connected to an electrical outlet. One battery is supplied as standard equipment in the battery bay.

NOTE: Battery operating time (the time the battery can hold a charge) decreases over time. Depending on how often the battery is used and the conditions under which it is used, you may need to purchase a new battery during the life of your computer.
Battery operating time varies depending on operating conditions. You can install an optional second battery in the module bay to significantly increase operating time. For more information about the second battery, see your User's Guide.
Operating time is significantly reduced when you perform operations including, but not limited to, the following:
Using optical drives, such as DVD and CD drives
- Using wireless communications devices, PC Cards, or USB devices
- Using high-brightness display settings, 3D screen savers, or other power-intensive programs such as 3D games
- Running the computer in maximum performance mode

NOTE: It is recommended that you connect your computer to an electrical outlet when writing to a CD or DVD.
You can check the battery charge before you insert the battery into the computer. You can also set power management options to alert you when the battery charge is low.

CAUTION: Using an incompatible battery may increase the risk of fire or explosion. Replace the battery only with a compatible battery purchased from Dell. The lithium-ion battery is designed to work with your Dell computer. Do not use a battery from other computers with your computer.

CAUTION: Do not dispose of batteries with household waste. When your battery no longer holds a charge, call your local waste disposal or environmental agency for advice on disposing of a lithium-ion battery. See "Battery Disposal" in the Product Information Guide.

CAUTION: Misuse of the battery may increase the risk of fire or chemical burn. Do not puncture, incinerate, disassemble, or expose the battery to temperatures above 65^ (149°F). Keep the battery away from children. Handle damaged or leaking batteries with extreme care. Damaged batteries may leak and cause personal injury or equipment damage.
Checking the Battery Charge
The Dell QuickSet Battery Meter, the Microsoft® Windows® Power Meter window and icon, the battery charge gauge and health gauge, and the low-battery warning provide information on the battery charge.
For more information about checking the charge on the second battery, see your User's Guide.
Dell™ QuickSet Battery Meter
If Dell QuickSet is installed, press <Fn> < F8> to display the QuickSet Battery Meter.
The Battery Meter window displays status, charge level, and charge completion time for the battery in your computer.

NOTE: You can use your docking device to charge a computer battery. However, a battery in a docking device does not power the docking device or computer.
In addition, when your computer is connected to a docking device ( docked), the Battery Meter window includes a Dock Battery tab, which displays the charge level and current status of the docking device battery.
The following icons appear in the Battery Meter window:

- The computer or docking device is running on battery power.
- The battery is discharging or idle.

- The computer or docking device is connected to an electrical outlet and running on AC power.
- The battery is charging.

- The computer or docking device is connected to an electrical outlet and running on AC power.
- The battery is discharging, idle, or charging.
For more information about QuickSet, right-click the 15 icon in the taskbar, and click Help.
Microsoft® Windows® Power Meter
The Windows Power Meter indicates the remaining battery charge. To check the Power Meter, double-click the icon on the taskbar. For more information about the Power Meter tab, see your User's Guide.
If the computer is connected to an electrical outlet, a icon appears.
Charge Gauge
Before you insert a battery, press the status button on the battery charge gauge to illuminate the charge-level lights. Each light represents approximately 20 percent of the total battery charge. For example, if the battery has 80 percent of its charge remaining, four of the lights are on. If no lights appear, the battery has no charge.

Health Gauge
The battery operating time is largely determined by the number of times it is charged. After hundreds of charge and discharge cycles, batteries lose some charge capacity, or battery health. To check the battery health, press and hold the status button on the battery charge gauge for at least 3 seconds. If no lights appear, the battery is in good condition, and more than 80 percent of its original charge capacity remains. Each light represents incremental degradation. If five lights appear, less than 60 percent of the charge capacity remains, and you should consider replacing the battery. See your User's Guide for more information about the battery operating time.
Low-Battery Warning

NOTICE: To avoid losing or corrupting data, save your work immediately after a low-battery warning. Then connect the computer to an electrical outlet, or install a second battery in the module bay. If the battery runs completely out of power, hibernate mode begins automatically.
A pop-up window warns you when the battery charge is approximately 90 percent depleted. For more information about low-battery alarms, see your User's Guide.
A low-battery warning occurs when the battery charge is approximately 90 percent depleted. The computer beeps once, indicating that minimal battery operating time remains. During that time, the speaker beeps periodically. If two batteries are installed, the low-battery warning means that the combined charge of both batteries is approximately 90 percent depleted. The computer enters hibernate mode when the battery charge is at a critically low level. For more information about low-battery alarms, see your User's Guide.
Charging the Battery

NOTE: The AC adapter charges a completely discharged battery in approximately 1 hour with the computer turned off. Charge time is longer with the computer turned on. You can leave the battery in the computer as long as you like. The battery's internal circuitry prevents the battery from overcharging.
When you connect the computer to an electrical outlet or install a battery while the computer is connected to an electrical outlet, the computer checks the battery charge and temperature. If necessary, the AC adapter then charges the battery and maintains the battery charge.
If the battery is hot from being used in your computer or being in a hot environment, the battery may not charge when you connect the computer to an electrical outlet.
The battery is too hot to start charging if the light flashes alternately green and orange. Disconnect the computer from the electrical outlet and allow the computer and the battery to cool to room temperature. Then connect the computer to an electrical outlet to continue charging the battery.
For more information about resolving problems with a battery, see your User's Guide.
Removing a Battery

CAUTION: Before performing these procedures, disconnect the modem from the telephone wall jack.
For information about removing the second battery, see your User's Guide.

NOTICE: If you choose to replace the battery with the computer in standby mode, you have up to 1 minute to complete the battery replacement before the computer shuts down and loses any unsaved data.
1 Ensure that the computer is turned off, suspended in a power management mode, or connected to an electrical outlet.
2 If the computer is connected to a docking device ( docked), undock it. See the documentation that came with your docking device for instructions.
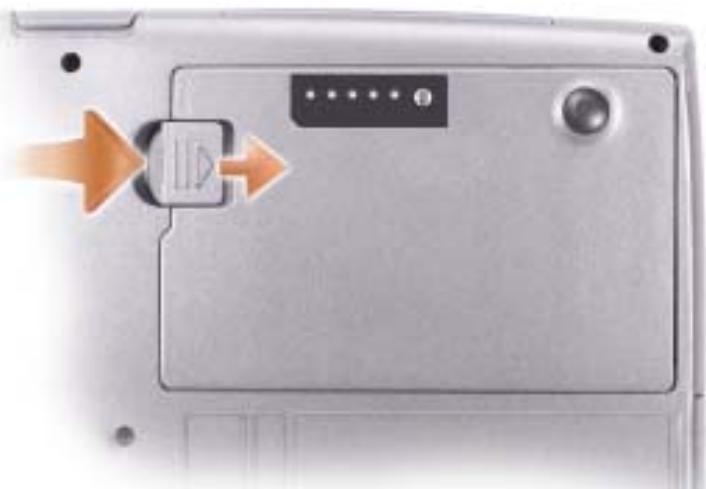
3 Slide and hold the battery-bay (or module-bay) latch release on the bottom of the computer, and then remove the battery from the bay.
Installing a Battery
Slide the battery into the bay until the latch release clicks.
For information about installing the second battery, see your User's Guide.
Storing a Battery
Remove the battery when you store your computer for an extended period of time. A battery discharges during prolonged storage. After a long storage period, charge the battery fully before you use it.
About Your Computer
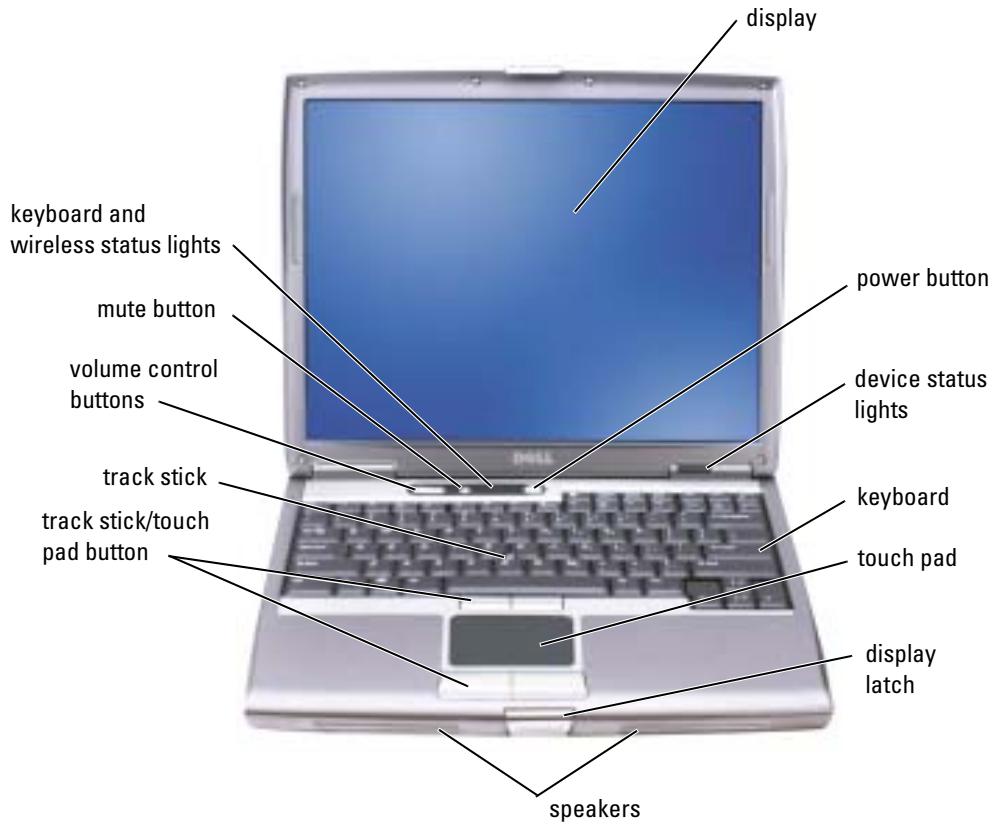
Front View
Left View
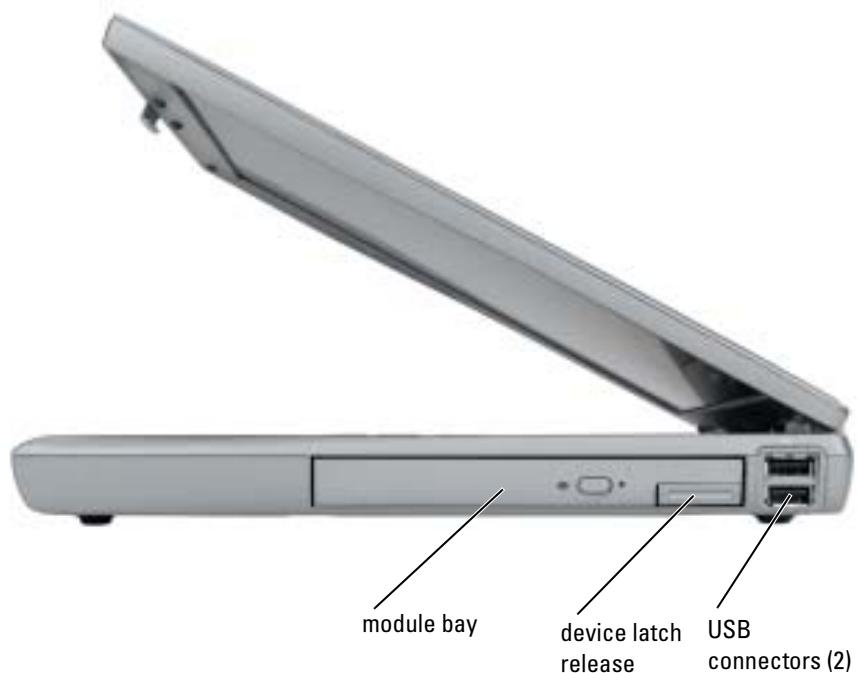
Right View
Back View

CAUTION: Do not block, push objects into, or allow dust to accumulate in the air vents. Do not store your computer in a low-airflow environment, such as a closed briefcase, while it is running. Restricting the airflow can damage the computer or cause a fire.
Bottom View
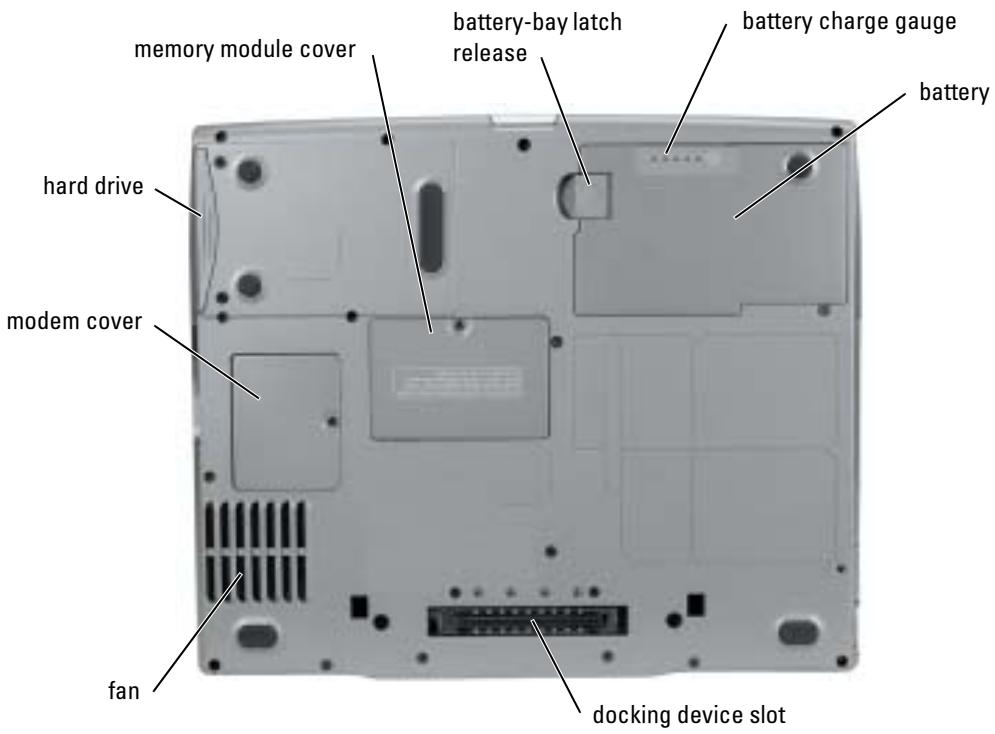
Solving Problems
Notebook System Software
Notebook System Software (NSS) is a utility that provides critical updates for your operating system. Install the Notebook System Software program to gain support for Dell 3.5-inch USB floppy drives, Intel® Pentium® M processors, optical drives, and USB devices. NSS is necessary for correct operation of your Dell computer.

NOTICE: NSS is critical for the correct operation of USB devices, including the Dell D/Bay, D/Dock, D/Port, and D/View devices.
Lockups and Software Problems

CAUTION: Before you begin any of the procedures in this section, follow the safety instructions in the Product Information Guide.
The computer does not start up
ENSURE THAT THE AC ADAPTER IS FIRMLY CONNECTED TO THE COMPUTER AND TO THE ELECTRICAL OUTLET
The computer stops responding

NOTICE: You might lose data if you are unable to perform an operating system shutdown.
TURN THE COMPUTER OFF — If you are unable to get a response by pressing a key on your keyboard or moving your mouse, press and hold the power button for at least 8 to 10 seconds until the computer turns off. Then restart your computer.
A program stops responding
END THE PROGRAM
1 Press <Ctrl> < Shift> < Esc> simultaneously.
2 Click Applications.
3 Click the program that is no longer responding.
4 Click End Task.
A program crashes repeatedly

NOTE: Software usually includes installation instructions in its documentation or on a floppy disk or CD.
CHECK THE SOFTWARE DOCUMENTATION — If necessary, uninstall and then reinstall the program.
A program is designed for an earlier Windows operating system
IF YOU ARE USING WINDOWS XP, RUN THE PROGRAM COMPATIBILITY WIZARD —
The Program Compatibility Wizard configures a program so it runs in an environment similar to non-Windows XP operating system environments.
1 Click the Start button, point to All Programs Accessories, and then click
Program Compatibility Wizard.
2 In the welcome screen, click Next.
3 Follow the instructions on the screen.
A solid blue screen appears
TURN THE COMPUTER OFF — If you are unable to get a response by pressing a key on your keyboard or moving your mouse, press and hold the power button for at least 8 to 10 seconds until the computer turns off. Then restart your computer.
Other software problems
CHECK THE SOFTWARE DOCUMENTATION OR CONTACT THE SOFTWARE MANUFACTURER FOR TROUBLESHOOTING INFORMATION —
- Ensure that the program is compatible with the operating system installed on your computer.
- Ensure that your computer meets the minimum hardware requirements needed to run the software. See the software documentation for information.
- Ensure that the program is installed and configured properly.
- Verify that the device drivers do not conflict with the program.
- If necessary, uninstall and then reinstall the program.
BACK UP YOUR FILES IMMEDIATELY
USE A VIRUS-SCANNING PROGRAM TO CHECK THE HARD DRIVE, FLOPPY DISKS, OR CDS
SAVE AND CLOSE ANY OPEN FILES OR PROGRAMS AND SHUT DOWN YOUR COMPUTER THROUGH THE Start MENU
SCAN THE COMPUTER FOR SPYWARE — If you are experiencing slow computer performance, you frequently receive pop-up advertisements, or you are having problems connecting to the Internet, your computer might be infected with spyware. Use an anti-virus program that includes anti-spyware protection (your program may require an upgrade) to scan the computer and remove spyware. For more information, go to support.dell.com and search for the keyword spyware.
RUN THE RUNNING THE DELL DIAGNOSTICS — If all tests run successfully, the error condition is related to a software problem.
Running the Dell Diagnostics

CAUTION: Before you begin any of the procedures in this section, follow the safety instructions located in the Product Information Guide.
When to Use the Dell Diagnostics
If you experience a problem with your computer, perform the checks in "Solving Problems" and run the Dell Diagnostics before you contact Dell for technical assistance.
It is recommended that you print these procedures before you begin.

NOTICE: The Dell Diagnostics works only on Dell computers.
Start the Dell Diagnostics from either your hard drive or from the Drivers and Utilities CD (also known as the ResourceCD).
Starting the Dell Diagnostics From Your Hard Drive
The Dell Diagnostics is located on a hidden diagnostic utility partition on your hard drive.

NOTE: If your computer cannot display a screen image, see "Contacting Dell" section in your User's Guide.
1 Shut down the computer.
2 If the computer is connected to a docking device ( docked), undock it. See the documentation that came with your docking device for instructions.
3 Connect the computer to an electrical outlet.
4 Turn on the computer. When the DELL^TM logo appears, press <F12> immediately.

NOTE: If you cannot see anything on your display, hold down the mute button and press the computer's power button to begin the Dell Diagnostics. The computer automatically runs the Pre-boot System Assessment.

NOTE: If you see a message stating that no diagnostics utility partition has been found, run the Starting the Dell Diagnostics From the Drivers and Utilities CD.
If you wait too long and the operating system logo appears, continue to wait until you see the Microsoft® Windows® desktop. Then shut down your computer and try again.
5 When the boot device list appears, highlight Diagnostics and press Enter .
The computer runs the Pre-boot System Assessment, a series of initial tests of your system board, keyboard, hard drive, and display.
During the assessment, answer any questions that appear.
- If a failure is detected, the computer stops and beeps. To stop the assessment and restart the computer, press <n> ; to continue to the next test, press <y> ; to retest the component that failed, press <r> .
- If failures are detected during the Pre-boot System Assessment, write down the error code(s) and see "Contacting Dell" in your User's Guide before continuing on to the Dell Diagnostics.
If the Pre-boot System Assessment completes successfully, you receive the message Booting Dell Diagnostic Utility Partition. Press any key to continue.
6 Press any key to start the Dell Diagnostics from the diagnostics utility partition on your hard drive.
Starting the Dell Diagnostics From the Drivers and Utilities CD
1 Insert the Drivers and Utilities CD.
2 Shut down and restart the computer.
When the DELL logo appears, press <F12> immediately.
If you wait too long and the Windows logo appears, continue to wait until you see the Windows desktop. Then shut down your computer and try again.

NOTE: The next steps change the boot sequence for one time only. On the next start-up, the computer boots according to the devices specified in system setup.
3 When the boot device list appears, highlight CD/DVD/CD-RW Drive and press
4 Select the CD/DVD/CD-RW Drive option from the CD boot menu.
5 Select the Boot from CD-ROM option from the menu that appears.
6 Type 1 to start the ResourceCD menu.
7 Type 2 to start the Dell Diagnostics.
8 Select Run the 32 Bit Dell Diagnostics from the numbered list. If multiple versions are listed, select the version appropriate for your computer.
9 When the Dell Diagnostics Main Menu appears, select the test you want to run.
Dell Diagnostics Main Menu
1 After the Dell Diagnostics loads and the Main Menu screen appears, click the button for the option you want.
| Option | Function |
| Express Test | Performs a quick test of devices. This test typically takes 10 to 20 minutes and requires no interaction on your part. Run Express Test first to increase the possibility of tracing the problem quickly. |
| Extended Test | Performs a thorough check of devices. This test typically takes 1 hour or more and requires you to answer questions periodically. |
| Custom Test | Tests a specific device. You can customize the tests you want to run. |
| Symptom Tree | Lists the most common symptoms encountered and allows you to select a test based on the symptom of the problem you are having. |
2 If a problem is encountered during a test, a message appears with an error code and a description of the problem. Write down the error code and problem description and follow the instructions on the screen.
If you cannot resolve the error condition, see "Contacting Dell" section in your User's Guide.

NOTE: The Service Tag for your computer is located at the top of each test screen. If you contact Dell, technical support will ask for your Service Tag.
3 If you run a test from the Custom Test or Symptom Tree option, click the applicable tab described in the following table for more information.
| Tab | Function |
| Results | Displays the results of the test and any error conditions encountered. |
| Errors | Displays error conditions encountered, error codes, and the problem description. |
| Help | Describes the test and may indicate requirements for running the test. |
| Configuration | Displays your hardware configuration for the selected device. The Dell Diagnostics obtains configuration information for all devices from system setup, memory, and various internal tests, and it displays the information in the device list in the left pane of the screen. The device list may not display the names of all the components installed on your computer or all devices attached to your computer. |
| Parameters | Allows you to customize the test by changing the test settings. |
4 When the tests are completed, if you are running the Dell Diagnostics from the Drivers and Utilities CD, remove the CD.
5 When the tests are complete, close the test screen to return to the Main Menu screen. To exit the Dell Diagnostics and restart the computer, close the Main Menu screen.
Index
B
battery
charge gauge, 12
charging, 13
checking the charge, 11
health gauge, 12
installing, 14
low-battery warning, 13
performance, 9
power meter, 11
removing, 14
storing, 14
C
CD
operatingsystem,7
computer
crashes, 20-21
slow performance, 22
stops responding, 20
D
Dell
support site, 6
Dell Diagnostics, 22
Dell Premier Support
website, 5-6
diagnostics
Dell, 22
Drivers and Utilities CD, 5
documentation
device, 5
online, 6
ResourceCD, 5
System Information Guide, 5
User's Guide, 5
drivers
ResourceCD, 5
Drivers and Utilities CD, 5
F
Finding Information, 5
H
hardware
Dell Diagnostics, 22
Help and Support Center, 7
L
labels
Microsoft Windows, 6
Service Tag, 6
M
Microsoft Windows label, 6
0
Operating System
CD, 7
Installation Guide, 7
Operating System CD, 7
P
problems
blue screen, 21
computer crashes, 20-21
computer does not start up, 20
computer stops responding, 20
Dell Diagnostics, 22
lockups, 20
program crashes, 21
program stops responding, 20
programs and Windows compatibility, 21
slow computer
performance, 22
software, 20-21
spyware, 22
R
reinstalling
Drivers and Utilities CD, 5
ResourceCD, 5
ResourceCD
Dell Diagnostics, 22
s
safety instructions, 5
Service Tag, 6
software problems, 21
spyware, 22
Starting the Dell Diagnostics From Your Hard Drive, 22
system views bottom, 19 right side, 17
U
User's Guide, 5
W
warranty, 5
Windows XP Help and Support Center, 7 Program Compatibility Wizard, 21
wizards Program Compatibility Wizard, 21
T
troubleshooting Dell Diagnostics, 22 Help and Support Center, 7
Dell™ Latitude™ D610
Snelle referentiegids
Dell Support-website - support.dell.com
de cd Drivers and Utilities, 33
Dell support-website, 34
Dell Premier Support- website, 33-34
Dell-diagnoseprogramma, 50
diagnostiek de cd Drivers and Utilities, 33 Dell, 50
documentatie apparaat, 33 Gebruikshandleiding, 33 on line, 34 ResourceCD, 33 systeiminformatiegids, 33
G
Help and Support Center, 35
probleemoplossing Dell-diagnoseprogramma, 50 Help and Support Center, 35
problemen blauw venster, 49 computer crasht, 49 computer reageert nichteer,48 computer start nicht op,48 Dell-diagnoseprogramma,50 lock-ups,48
programma crasht, 49
programma reageert nichtmeer,48
Help and Support Center, 35
Wizard
Programmacompatilitieit, 49
wizards
Wizard
Programmacompatabilitieit, 49
R
ResourceCD
Dell-diagnoseprogramma, 50
s
Servicelabel,34
software
problemen, 49
spyware, 50
stuurprogramma's
ResourceCD, 33
systeemaanzachten
onderkant, 47
rechteraanzicht, 45
V
Dell Diagnostics, 78
Dell Diagnostics, 78
Demarrage de Dell
Dell Diagnostics, 78
diagnostics
CD Drivers and Utilities, 61
Dell, 78
documentation
CD ResourceCD, 61
en ligne, 62
Drivers and Utilities CD, 61
E
étiquette Microsoft
Windows, 62
étiquettes
Microsoft Windows, 62
Dell Diagnostics, 78
N
Dell Diagnostics, 78
écranbleu,77
l'ordinatournde marrepas,76
CD Drivers and Utilities, 61
CD ResourceCD, 61
s
Dell Support-Website - support.dell.com
Dell Diagnostics, 107
Installationshandbuch, 92
Dell Diagnostics, 107
Dell Premier Support
Website, 89, 91
Diagnose
Dell, 107
Drivers and Utilities CD, 89
Dokumentation
Drivers and Utilities CD, 89
E
Etikette
Microsoft Windows, 90
Dell Diagnostics, 107
Drivers and Utilities CD, 89
ResourceCD, 89
P
Probleme
CHUIDERE IL PROGRAMMA —
Dell Diagnostics, 134
diagnostica CD Drivers and Utilities, 117 Dell, 134
driver ResourceCD, 117
E
hardware Dell Diagnostics, 134
1
CD Drivers and Utilities, 117
ResourceCD, 117
ResourceCD
Dell Diagnostics, 134
Dell Diagnostics, 134
(Premier Support) di
Dell, 117
Dell™ Latitude™ D610
Guía de referencia
- Notes, Notices, and Cautions
- Abbreviations and Acronyms
- Contents
- Finding Information
- What Are You Looking For?
- Find It Here
- Setting Up Your Computer
- CAUTION: Before you begin any of the procedures in this section, follow the safety instructions in the Product Information Guide.
- Battery Performance
- Checking the Battery Charge
- Dell™ QuickSet Battery Meter
- Microsoft® Windows® Power Meter
- Charge Gauge
- Health Gauge
- Low-Battery Warning
- Charging the Battery
- Removing a Battery
- CAUTION: Before performing these procedures, disconnect the modem from the telephone wall jack.
- Installing a Battery
- Storing a Battery
- About Your Computer
- Left View
- Back View
- Bottom View
- Solving Problems
- Notebook System Software
- Lockups and Software Problems
- The computer stops responding
- A program stops responding
- END THE PROGRAM
- A program crashes repeatedly
- A program is designed for an earlier Windows operating system
- IF YOU ARE USING WINDOWS XP, RUN THE PROGRAM COMPATIBILITY WIZARD —
- A solid blue screen appears
- Other software problems
- CHECK THE SOFTWARE DOCUMENTATION OR CONTACT THE SOFTWARE MANUFACTURER FOR TROUBLESHOOTING INFORMATION —
- BACK UP YOUR FILES IMMEDIATELY
- SAVE AND CLOSE ANY OPEN FILES OR PROGRAMS AND SHUT DOWN YOUR COMPUTER THROUGH THE Start MENU
- Running the Dell Diagnostics
- When to Use the Dell Diagnostics
- Starting the Dell Diagnostics From Your Hard Drive
- Starting the Dell Diagnostics From the Drivers and Utilities CD
- Dell Diagnostics Main Menu
- Index
- B
- C
- D
- F
- H
- L
- M
- 0
- P
- R
- Snelle referentiegids
- Dell Support-website - support.dell.com
- G
- s
- V
- E
- N
- CHUIDERE IL PROGRAMMA —
- 1
- Guía de referencia
Brand : DELL
Model : LATITUDE D610
Category : Laptop