STUDIO MEDIASUITE - Video Editing PINNACLE - Free user manual and instructions
Find the device manual for free STUDIO MEDIASUITE PINNACLE in PDF.
User questions about STUDIO MEDIASUITE PINNACLE
0 question about this device. Answer the ones you know or ask your own.
Ask a new question about this device
Download the instructions for your Video Editing in PDF format for free! Find your manual STUDIO MEDIASUITE - PINNACLE and take your electronic device back in hand. On this page are published all the documents necessary for the use of your device. STUDIO MEDIASUITE by PINNACLE.
USER MANUAL STUDIO MEDIASUITE PINNACLE
Pinnacle Studio MediaSuite
QUICK START GUIDE
KURZANLEITUNG
GUIDE DE DEMARRAGE RAPIDE
KORTE HANDLEIDING
Pinnacle Studio MediaSuite Quick Start Guide
GB/D/F/NL October 2004
© Pinnacle Systems 2004
All rights reserved.
No part of this manual may be reproduced or transferred to other media without explicit written permission from Pinnacle Systems, Braunschweig, Germany.
All brand or product names are trademarks or registered trademarks of their respective holders.
© Pinnacle Systems 2004
© Pinnacle Systems 2004
© Pinnacle Systems 2004
The Installation Steps 2
STUDIO MEDIASUITE STARTER 4
Starting the Studio MediaSuite Launcher 4
The Studio MediaSuite Starter window 4
The Studio MediaSuite applications 5
STUDIO MEDIASUITE APPLICATIONS 6
INSTANT DVD REORDER 6
Starting the Instant DVD Recorder 6
The Direct-to-Disk Wizard 6
MEDIAMANAGER 11
The MediaManager Main Window 11
The Media Library 12
INSTANTDISC 14
The InstantDisc Main Window 14
Creating CDs and DVDs 15
INSTANTCOPY 19
Using InstantCopy 19
A closer look at disc copying 20
INSTANTBACKUP 22
Starting InstantBackup 22
Back up data 23
Restore data 24
Verify data 24
Creating a label 24
Backup log 24
INSTANTWRITE 25
Launching InstantWrite 26
Using InstantWrite 26
INSTANTCINEMA 28
Launching InstantCinema 28
InstantCinema Control panel 28
COREL PHOTOBOOK 30
WAVELAB LITE 31
Program settings 31
WELCOME TO Pinnacle Studio MediaSuite
Pinnacle Studio MediaSuite is the most complete solution to edit, mix, enhance, archive and share multimedia files saved on your PC. It comes with Studio Plus v.9, the most advanced version of Pinnacle's award-winning video editing application, complemented by a powerful suite of applications developed by specialists such as Corel for photo editing and Steinberg for audio editing.
About this Manual
In this manual you find a detailed description of the installation of the Studio MediaSuite as well as a short overview of the Studio MediaSuite components.
-
Starter
-
InstantBackup
-
Instant DVD Recorder
-
InstantWrite
MediaManager
InstantCinema
-
InstantDisc
-
Corel Photobook
InstantCopy
WabeLab Lite

For a detailed description of the different Studio MediaSuite applications, please refer to the manuals in .pdf format or to the online-help.
The Studio Plus software comes with a separate printed manual.
INSTALLATION
This section describes how to install the Studio MediaSuite application software on your PC.
Studio Plus CD
The Studio Plus software will be installed separately from the Studio Plus installation CD. For this installation, please refer to the Studio manual!
Studio Bonus Content DVD
With the Studio Bonus Content DVD you can install the tutorial, electronic manual and bonus content to your hard disc.
Studio MediaSuite CD
In the course of this installation the Instant DVD Recorder, the Media Manager, InstantDisc, InstantCopy, InstantBackup, InstantWrite, InstantCinema, and WaveLab Lite will be copied to the hard disk.
Corel Photobook CD
In addition Corel Photobook comes on a separate CD and will be installed separately.

During the installation, you will be asked to provide the product serial number(s).
- The serial number for Studio Plus and Studio MediaSuite is the same and is located on the cover of the Studio Plus CD.
- The serial number for Corel Photobook can be found on the sleeve of the Corel Photobook CD.
The Installation Steps
Install the Studio Plus CD.
Install Studio Bouns Content DVD.
Install the Studio MediaSuite CD.
Install the Corel Photobook CD.

For a detailed description of the different installation steps, please refer to the manuals in .pdf format. In addition, the Studio Plus software comes with a separate printed manual.
Install Studio Plus
1. Insert the Studio Plus CD.
Insert the Studio Plus CD into your CD-ROM drive. If you have Autorun enabled for your CD-ROM, Setup will run automatically. If you do not have Autorun enabled, navigate to your CD-ROM drive, and double-click on Welcome.exe.
2. Follow the on-screen instructions
Follow the installation instructions shown on your screen.
The serial number is located on the cover of the Studio Plus installation CD.
Install Studio Bonus Content DVD
1. Insert the Studio Content DVD into your DVD drive.
If you have Autorun enabled for your DVD drive, Setup will run automatically. If you do not have Autorun enabled, navigate to your DVD drive, and double-click on Setup.exe.
If you do not have a DVD drive you may order the tutorial, electronic manual and bonus content separately on CD ROMs at http://www.pinnaclesys.com/studio9cd.
2. Follow the on-screen instructions
Please follow the on-screen installation instructions.
Install Studio MediaSuite
1. Insert Studio MediaSuite CD.
Please insert the supplied Studio MediaSuite installation CD into the corresponding drive of your computer.
The setup program will now start either automatically or you can click on
DiscStart.exe in the setup directory of your CD-ROM.
2. Enter Name, e-mail, and Serial number.
If necessary, enter Name, e-mail address and the Product serial number.
The serial number is the same as for Studio Plus and can be found on the sleeve of the Studio Plus installation CD.
3. Follow the Assistant's instructions.
Please follow the Assistant's instructions shown on your screen.
The Studio MediaSuite components will be copied to your hard disk:
- Instant DVD Recorder
Instant CD/DVD
WaveLab Lite - Pinnacle Media Server / Media Manager.
4. Restart computer.
After the installation has been completed you will be prompted to restart your computer. For a successful installation of all components it is absolutely necessary that you restart your computer.
Install Corel Photobook
1. Insert Corel Photobook CD.
Please insert the supplied Corel Photobook installation CD into the corresponding drive of your computer.
The setup program will now start either automatically or you can click on Setup.exe in the setup directory of your CD-ROM.
2. Follow on-screen instructions.
Please follow the on-screen installation instructions.
You will find the serial number on the sleeve of the Corel Photobook installation CD.
Starting the Studio MediaSuite Launcher
- Start the Launcher by double-clicking the Studio MediaSuite Desktop icon. —Or—
- Open the Starter application by clicking on the Windows Start menu and selecting Programs > Studio MediaSuite > Studio MediaSuite.
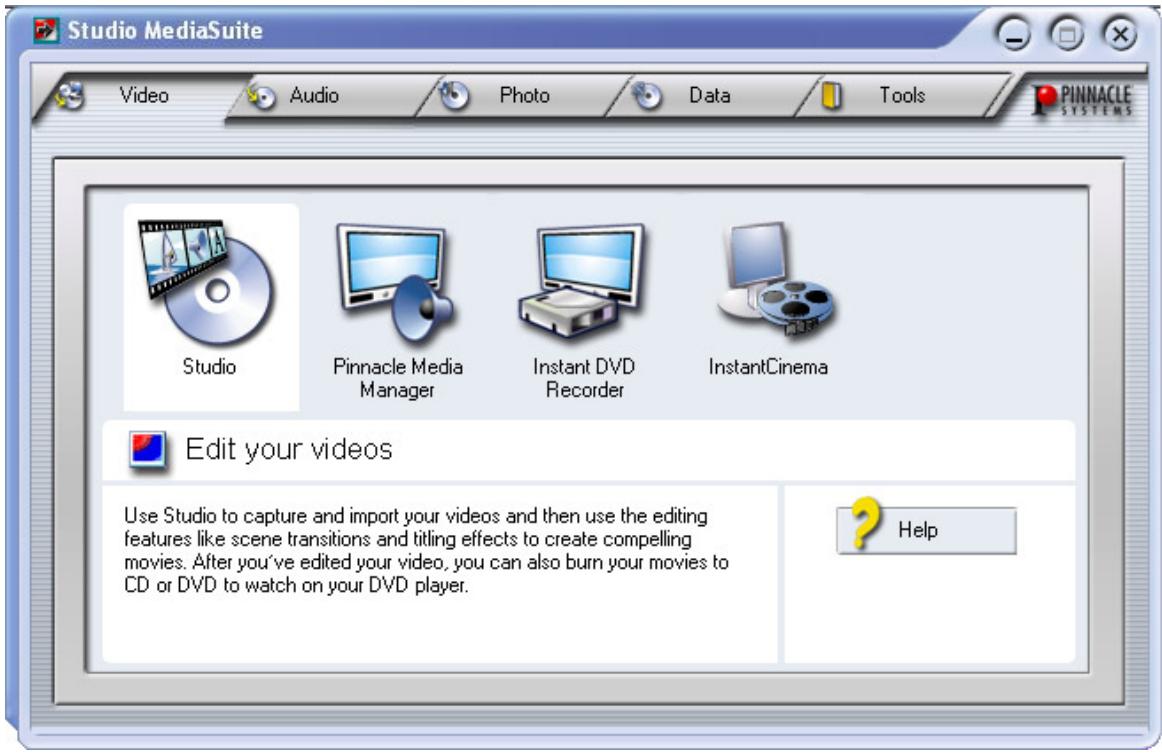
The Studio MediaSuite Starter window
Welcome to the Studio MediaSuite Starter window.
The Starter window consists of five tabs: Video, Audio, Photo, Data and Tools. From here you can access every function within the Studio MediaSuite.
The Studio MediaSuite applications
Selecting the application
Click on the corresponding tab and select the desired application.

Video

Studio Plus
Media Manager
Instant DVD Recorder
InstantCinema

Audio

WaveLab Lite
Media Manager

Photo

Photobook
Media Manager

Data

InstantDisc
InstantCopy
InstantWrite

Backup
Restore

Tools

Home
Support
Settings
INSTANT DVD REORDER
The Instant DVD Recorder makes it possible for you to quickly and easily burn videos direct-to-disc, i.e. from your video source directly to a DVD – without complicated intermediate storage on your hard disk!
You simply have to connect your video source, start Instant DVD Recorder and after just a few steps your burned DVD will be completed.
Starting the Instant DVD Recorder
The Instant DVD Recorder will be set up on your computer as a separate program group.
You can start the Instant DVD Recorder simply by clicking on the Desktop shortcut or by using the Start Menu:
- Open the Windows Start Menu by clicking it with the mouse.
- Move the cursor to Programs Studio MediaSuite and Instant DVD Recorder. The Instant DVD Recorder will be started.
The Direct-to-Disk Wizard
The Start Window
The Start Window of the Direct-to-Disc Wizard opens after the Instant DVD Recorder has been started.
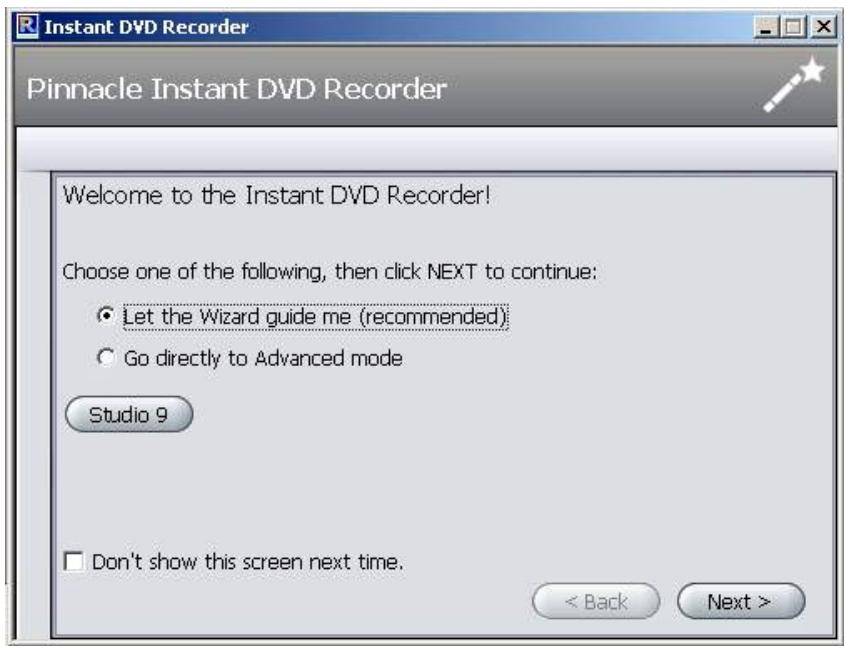
Here you can decide whether you want to have the Wizard guide you through the various settings in an easily understandably way or whether you would prefer to perform all of the necessary settings directly in Advanced Mode.

We recommend that let the Wizard guide you through the program at the beginning and only later perform the necessary settings in Advanced Mode after you have become familiar with the Instant DVD Recorder.
- After you have made your selection click Next. Depending on your selection, you will now be guided to the next window of the Direct-to-Disc Wizard or to Advanced Mode.
Selecting a burner and inserting the DVD
If you selected Let the Wizard Guide Me (recommended) option in the Start window of the Direct-to-Disc Wizard, then the next step will be that the Wizard will guide you to Select Burner window.
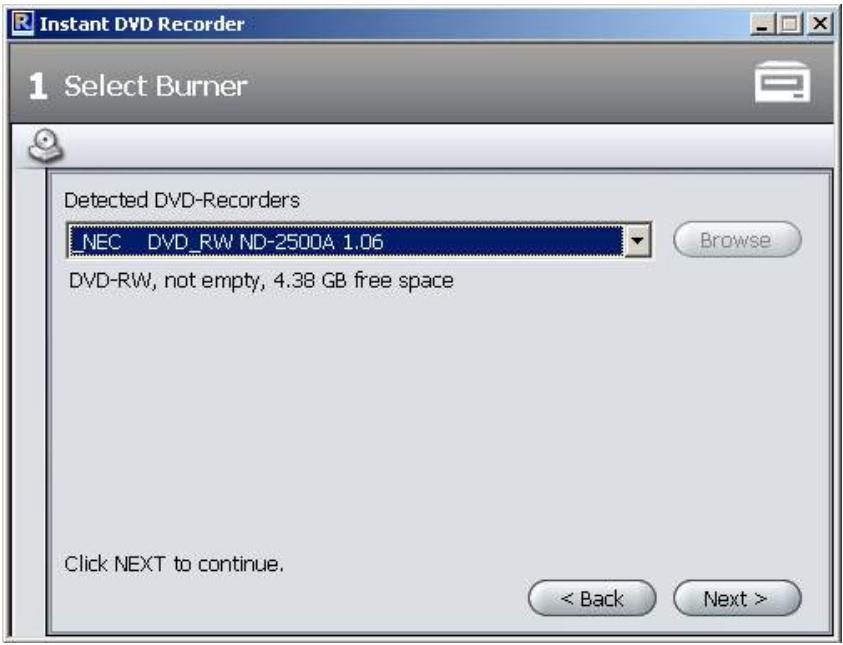
Any DVD burners available on your system that are suitable for recording will be displayed in the upper section of the window.
- Click Next and the Direct-to-Disc Wizard will guide you to the Select video source window.
Select video source
In this window you can select the video source and prepare it for DVD recording.
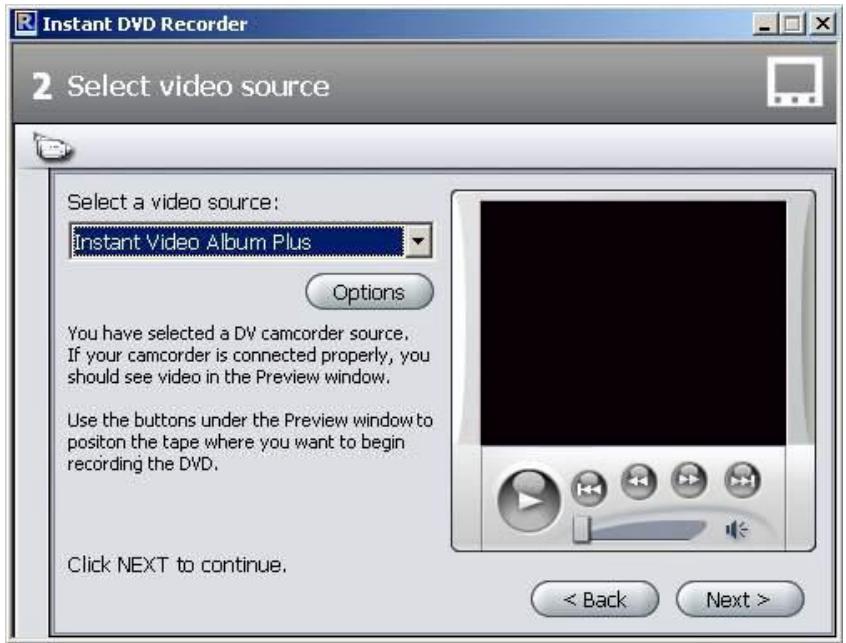
Video source device display
The video sources that are available and suitable for recording are displayed in the upper section of the window.
You can make additional driver settings for your video source device by clicking on Options. For this please consult the documentation for your video equipment.
- Click Next and the Direct-to-Disc Wizard will guide you to Select menu style window.
Select menu style
In this window you can decide whether you want to create a menu and thus divide your DVD into individual chapters or whether you would like to burn your video film to the DVD as a single movie file with no menu.
If you choose a menu, then this window also provides you with the possibility of selecting and/or modifying a menu design. In this case a thumbnail of the first scene of each chapter is shown before a background picture. Later on, when watching the DVD, you can start the respective scene by selecting a thumbnail.
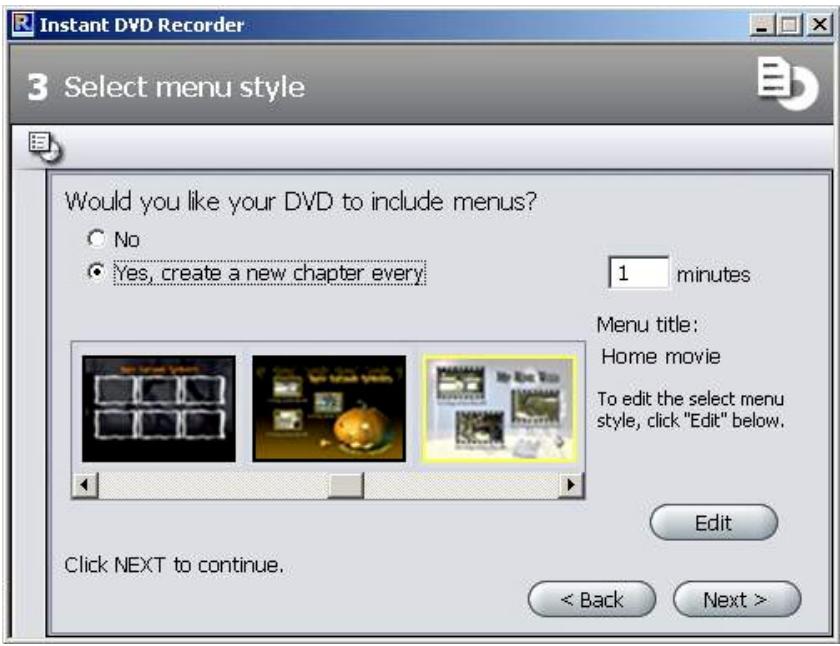
- Click Next and the Direct-to-Disc Wizard will guide you to the Start recording window.
Start recording
In this window you can adjust the recording length and quality as well as start the actual burning operation.
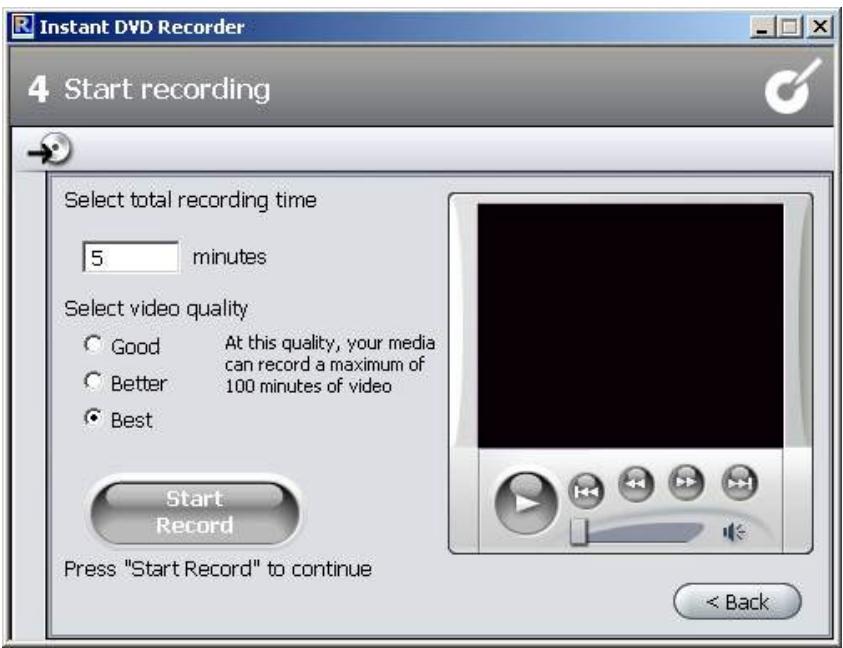
In the right section of the window you will see the video imported from the video source in the preview window. This allows you to correct the settings of the video source for the DVD recording and to follow the video during the recording. The available functions change depending on the video source.
Start recording
In order to start the recording, please click on Start Record The recording begins and the Start Record button changes into Stop Record. Please note that this operation may take several minutes.
Stop recording
You can click Stop Record at any time in order to stop the recording before it is completed.

If problems occur during the DVD recording, then this is indicated by the Instant DVD Recorder.
Advanced Mode
If you have selected the Go Directly to Advanced Mode option in the Start-up window of the Direct-to-Disc Wizard, the following window will appear:
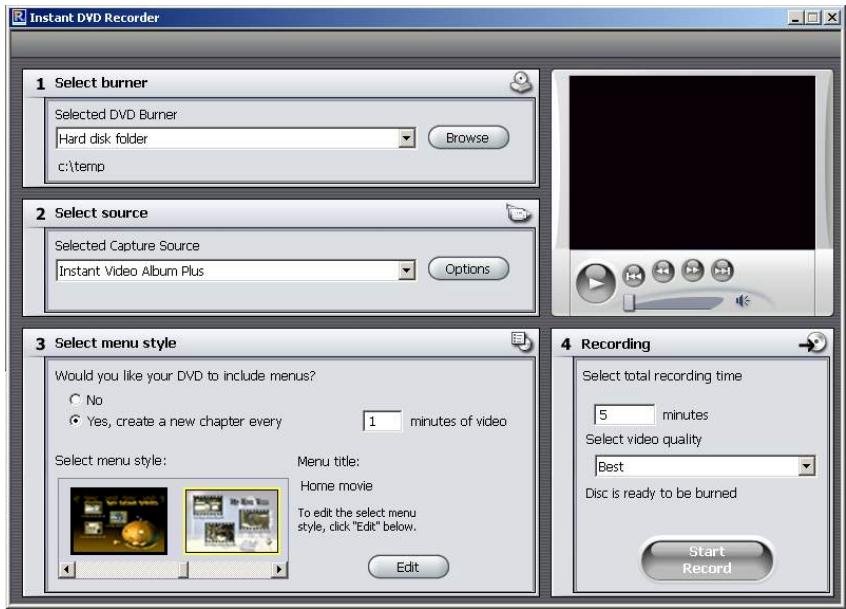
This mode gives you the option of performing all the necessary settings quickly and comfortably on a single screen. In this case, Fields 1 to 4 correspond to the four windows that you proceed through when using the Direct-to-Disc Wizard.
The Pinnacle MediaManager is installed on your PC so that you can import
Music files,
Movies and other video files, and
Digital photos
to the constantly updated MediaManager Database and then manage and organize them.
You can also create personal playlists – compilations of your favorite songs, movies or photos that are organized according to your own special criteria. These playlists can also be exported so that, among other things, you can burn an audio CD.
The MediaManager Main Window
You can launch the Pinnacle MediaManager from the Pinnacle program group in the Start Menu or by double-clicking the Desktop shortcut. The following window will open.
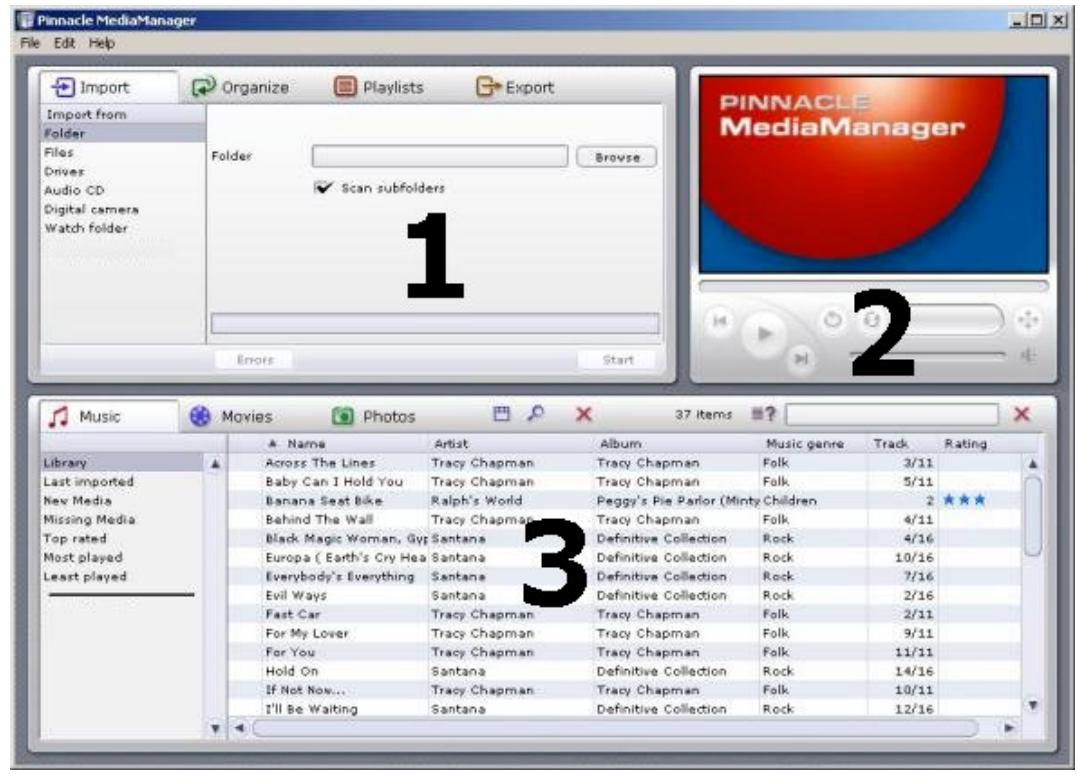
The window contains the following sections:
Section 1
The Tools section with the Import, Organize, Playlists and Export tabs, located in the upper left-hand corner.
Section 2
The Media Player in the upper right-hand corner.
Section 3
The Media Library with the Music, Movies and Photos tabs, located in the bottom half of the window.
- Menu Bar
At the very top of the window is the menu bar, which contains the File, Edit and Help menus.
The window layout varies depending on what tools and lists you have selected; the three sections work together closely and interactively.
The Media Library
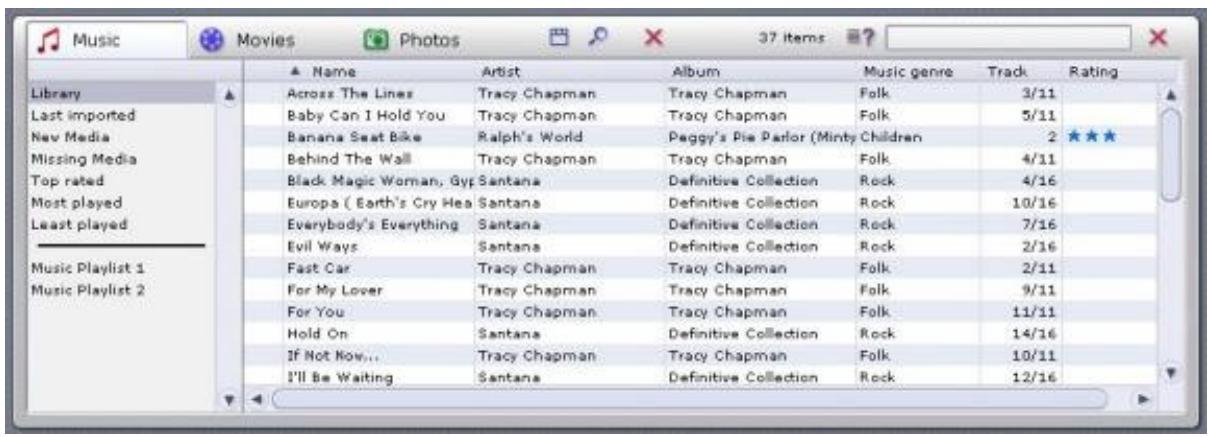
Media Types
The Media Library displays the contents of the database sorted by media type. It consists of the
Music tab
Movies tab and the
- Photos tab.
Categories
For each media type, you can toggle between the categories listed on the left-hand side.
- Library
Displays all the files in the database.
Lastimported
Displays the most recently imported files. For example, if you import 3 CDs in a row, you will only see the tracks from the third CD.
New Media
All the files imported over the past twenty-four hours.
- Missing Media
The media items displayed here are still existing as entries in the database but the belonging files are no longer available at their original storage location as they have been deleted or moved by mistake. These entries are indicated by a corresponding symbol in the left column of the Media Library. With a right click on the list you can open the context menu, search for the missing media files and "repair" the broken links.
- Top rated
Displays the files that have been rated four or five stars by the user. The rating is done via the context menu of the right column in the list and is indicated by stars.
Most played
Displays the media files that have been played the most by the user.
- Least played
Displays the media files that have been played least by the user.
- Playlists
Displays all the files in the selected playlist.

The MediaManager's installer copies sample files to your hard drive and automatically imports them to the database. You can already see these files in their assigned categories the first time you launch the MediaManager.
Details
The right-hand list displays details on individual files; these details will vary depending on whether you have selected the Music, Movies or Photos tab/media type. These sorting criteria are also called tags.
Depending on which media type is selected, you may see the following information: file status, track/movie/photo name, date created, etc.

If the database does not contain any data on individual tags, the associated columns will remain empty.
As in Windows Explorer, you can left-click a column header to resort the files in the list.
You can change the order of the columns by left-clicking the column headers and dragging them to a new location.
Right-clicking a column header will bring up a pop-up menu where you can choose which columns to display and which not.
InstantDisc is a versatile CD and DVD recording program, which you can use to create your own CDs and DVDs quickly and easily. To make working with InstantDisc an intuitive and familiar experience from the outset, the interface has been made as similar as possible to that of Windows Explorer.
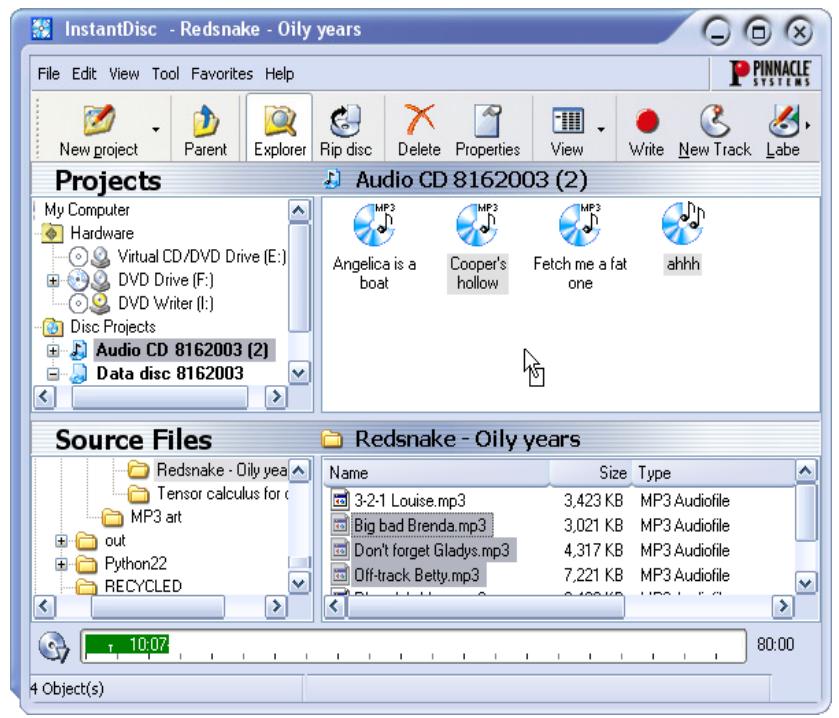
The InstantDisc Main Window
For experienced users, the main window is the place to start for creating new disks, reading CDs and DVDs, creating labels, editing music and much more.
The window is normally divided into two main areas:
- The upper part is the Projects area; it contains information about your disc creation projects and the recording hardware installed in the computer.
- The lower part is the Source Files area. It displays the file system of the computer and can be switched on or off from the View menu.
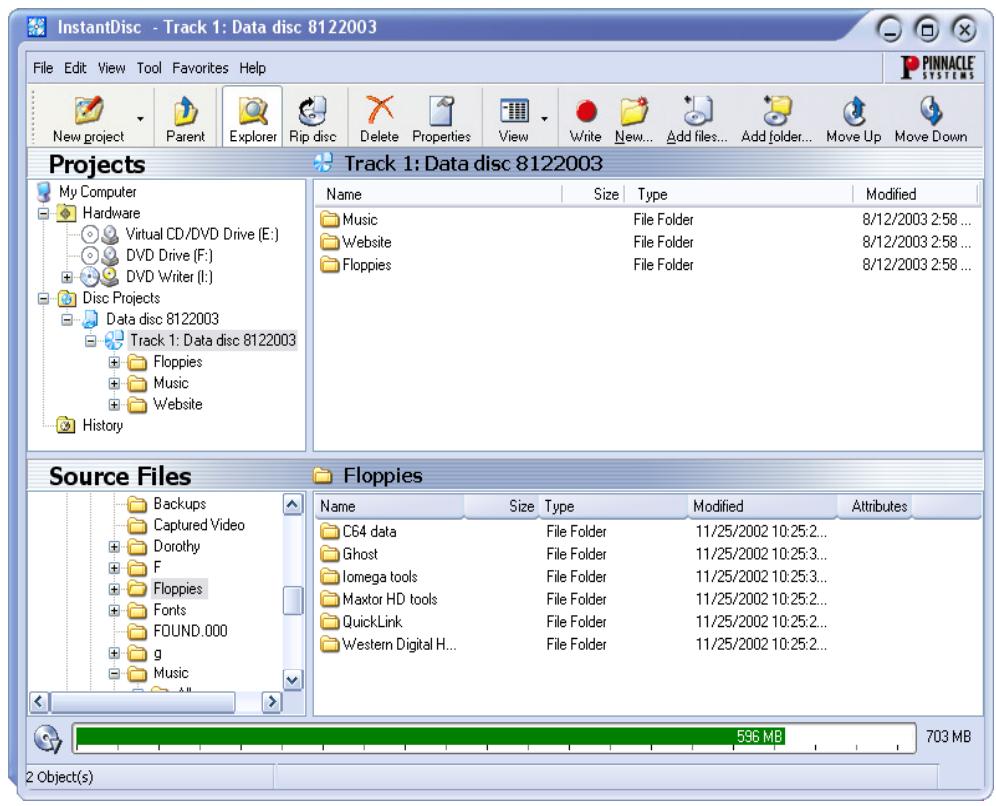
The left part of both area contains a "tree view", similar to the Folders panel of Windows Explorer. You can control the amount of depth displayed in the tree view by opening and closing ("expanding" and "collapsing") parts of the "tree". Entries that can be expanded are indicated by a symbol to the left of the entry. Click the symbol to expand the entry.
Drives and folders can be expanded in the file view in the right-hand panels of the display in the same manner as in Windows Explorer.
The Projects area is used to obtain access to your stored projects, past and present.. Current projects are located in the "Disc projects" folder, while past projects are stored under "History".
Creating CDs and DVDs
To create a new disc project the easy way, begin by opening the Studio MediaSuite starter application from your Start menu with Program Studio MediaSuite Studio MediaSuite. Select the Data tab and the InstantDisc icon.

You can also choose whether to be guided through the disc creation by the InstantDisc Assistant, or – if you need capabilities the Assistant doesn’t give you – to work directly with the controls in the InstantDisc Main window.
Starting a project from the Main window
You can also start a new disc project from the InstantDisc Main window. Either click the New project button or right-click the Disc projects folder in the Folder tree, and select the New command from the context menu.
The New Disc Project dialog appears, with (by default) four choices. You can create an audio CD, a data disc, a mixed-mode disc or an MP3 disc. Check the Use disc creation wizard option if you would like to use the InstantDisc Assistant when creating the disc.
Creating a data disc
Begin a new data disc using the Studio MediaSuite starter application and the InstantDisc controls in the main window as described above.
Creating a data disc with the Assistant
If you have requested the aid of the InstantDisc Assistant, it will now appear. Follow the Assistant's instructions.
Creating a data disc without the Assistant
If you are not using the Assistant, InstantDisc opens the Properties dialog for the project.
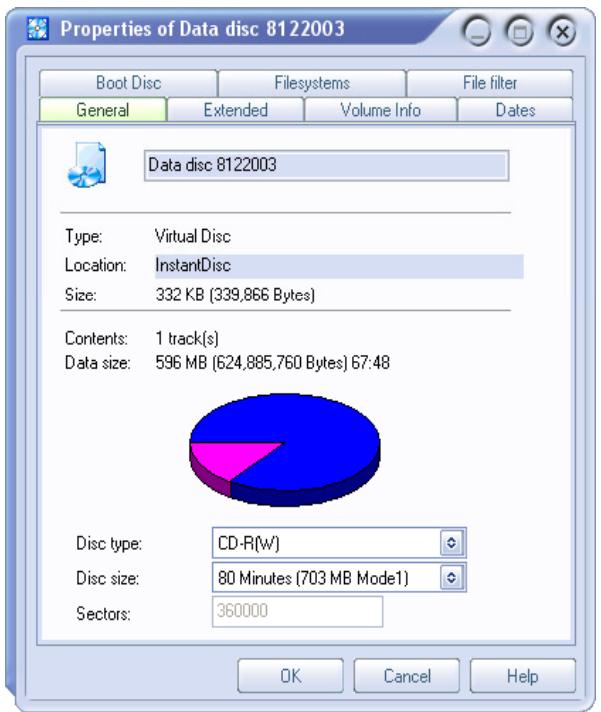
In principle, it is not necessary to make any entries in the Properties dialog. However, it is recommended that you should at least name the disc (or accept the default name). The use you make of the other settings will depend on your particular requirements for the disc.
After exiting the Properties dialog with the OK button you will be transferred to the InstantDisc main window.

Now click on the Write button and the data disc will be created.
Creating an audio CD
Begin a new audio CD using the Studio MediaSuite starter application and the controls in the main window as described under "Starting a project from the Main window" at the beginning of this section.
Creating a CD with the Assistant
If you have requested the aid of the InstantDisc Assistant, it will now appear.
The Assistant guides you through the process of creating an audio CD in a series of simple steps. In the first step, you choose the source for the audio tracks you want to create:
Audio files
An existing CD
- Direct audio input (turntable, microphone, etc.)
No matter which you choose, after you have added tracks from that source to the project, the Assistant offers three choices of what to do next:
- To proceed with burning the disc immediately (Write disc);
- To add further audio tracks, whether from files, CDs, or direct input (Add additional audio tracks); or,
- To continue working, but without the Assistant's help, by switching to the main InstantDisc window (Close this wizard).
Creating a CD without the Assistant
If you are not using the Assistant, InstantDisc opens the Properties dialog for the project. The CD-Text tab on this dialog lets you enter information about the disc.
When you close the Properties dialog, you will continue working in the InstantDisc main window.
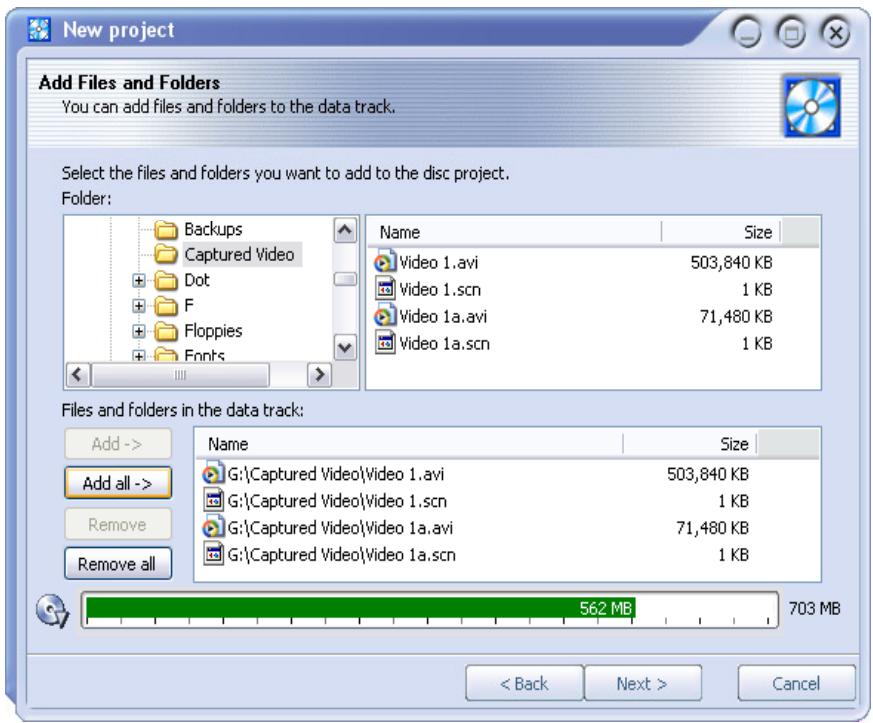
In the Source files folder browser, locate the folder containing the audio data that you want to burn onto the CD, and drag files into the right-hand panel of the Projects area.
You can also select files for the CD by selecting the New track command in the audio CD project's context menu. This invokes the Assistant to help you with creating one or more tracks.
Creating an MP3 disc
Begin a new MP3 disc using the Studio MediaSuite starter application and the InstantDisc controls in the main window as described under "Starting a project from the Main window" at the beginning of this section.
If you have requested the aid of the InstantDisc Assistant, it will now appear.
Creating an MP3 disc with the Assistant
The Assistant guides you through the process of creating an MP3 disc in a series of simple steps. In the first step, you choose the source for the tracks you want to create:
Audio files
An existing CD
The only difference with an MP3 project is that the option of using direct input to create an audio track is not available.
The audio data will be automatically written in mp3 format when your disc is created.
After you have added tracks from the chosen source to the project, the Assistant offers three choices of what to do next:
To proceed with burning the disc immediately (Write disc);
- To add further audio tracks, whether from files, CDs, or direct input (Add additional audio tracks); or,
- To continue working, but without the Assistant's help, by switching to the main InstantDisc window (Close this wizard).
Creating an MP3 disc without the Assistant
If you are not using the Assistant, the process of creating an MP3 disc is just the same as that for an ordinary data disc. The only difference is that the files you select will be either mp3 files or audio files (wav or wma). The audio files will be converted to mp3 format when your disc is created.
Creating discs in other formats
If you use the Advanced projects option on the New Disc Project dialog (click the New project button in the main window), InstantDisc offers a number of less frequently used formats in addition to the usual ones. The advanced options probably won't be needed by most users, but provided extra power for those who may require it.
InstantCopy is an easy-to-use program for copying CDs and DVDs. Despite its surface simplicity, InstantCopy has many powerful features, for example:
- Copy DVD video to either DVD or CD.
- Copy a dual-layer DVD to a single writable DVD using your choice of automatic or user-configured compression.
- Perform copies – even those requiring compression – directly from one disc to another, without having to use your hard drive for intermediate storage.
Using InstantCopy
InstantCopy can be started in different ways:
- With the InstantCopy command on your Windows Start menu.
- From the local menu of your disc-burner device. To access this, click on the device with the right mouse button and choose Copy CD/DVD from the local menu.
The InstantCopy window appears.
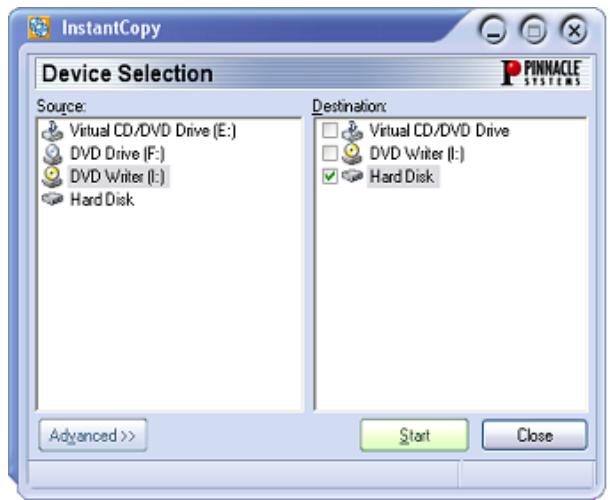
All connected drives are automatically shown in the Source and/or Destination device selection lists.
Copying a disc
Most disc copies can be performed simply by selecting the source and destination drives and pressing the Start button.
There are three possibilities:
- Copying from CD to CD.
- Copying from DVD to CD.
- Copying from DVD to DVD.
In each case, the disc you are copying to must be recordable (CD-R, DVD-R) or rewrite (CD-RW, DVD-RW), but the disc you are copying from can be of any type that is readable in the source drive.
Of course, InstantCopy also provides a number of ways of customizing the copy process for particular requirements.

Note: You are responsible for ensuring that your disc copying does not infringe any copyright restrictions on the source material. Copyright con-sid-erations aside, many DVD discs include built-in protection that prevents them from being copied.
To copy a disc using default settings:
- Select a drive on the Source side of the InstantCopy window by clicking on the drive name.
- Select one or more drives on the Destination side.
- Press the Start button to begin copying.
A closer look at disc copying
As we have seen, the first step in the copying process is to select the source and target drives in the InstantCopy window.
In addition, InstantCopy provides numerous settings that allow you to adjust and customize the copying process. These are available through the Advanced button.
Copying from a hard drive
If a hard drive is chosen as the source of a copy, the data to be copied must be in one of these formats:
- A disc image file with the extension pdi.
- A CUE file.
- In the case of a video DVD, a local copy of the files as they should appear on the DVD. InstantCopy will ask you to choose an ifo file that is contained in a folder named "Video-ts". That folder is created if you use a third-party product to copy a DVD to the hard drive, or if you use InstantCopy to copy a DVD that does not have CSS encryption.
Copying to a hard drive
Copying from CD or DVD to the hard drive creates a pdi file, which can be the source for sub-sequent copies to disc. This is one way to go about making multiple copies of a disc: first create a pdi image file on the hard drive, then make the copies from there.
Copying a CD or a data DVD
After you have selected the source and target drives, and perhaps adjusted some settings, simply click on Start and follow the instructions in the program.
Copying DVD video to DVD
Start the copying process as usual, by selecting the drives, adjusting any settings as needed, and clicking Start.
Copying DVD video to VCD or S-VCD
VCD (Video CD) and S-VCD (Super Video-CD) are disc formats for storing video on CD media. This allows you to copy DVD discs even with a CD burner (though you will still need a DVD-ROM drive to read the source disc). Most DVD players will play back VCDs, but S-VCDs are less widely supported.
If you are copying to CD, begin by inserting a blank CD in the target drive and clicking Start.
Next, whether you are copying to a CD or to the hard disk, choose VCD or S-VCD as the target format, and click Start.
Writing to multiple drives
InstantCopy enables you to write to several drives simultaneously. You can achieve this simply by selecting all the drives in the Destination list that you want to write to. The drives must be of the same type and able to write at the same speed. The best results are obtained when the same recorder models are used.
With Instant Backup it is easy to back up data on the hard disk to writeable CDs or DVDs. Backed-up data can be restored at any time.
Starting InstantBackup
- Launch the Studio MediaSuite starter application (with the command Programs Studio MediaSuite and Studio MediaSuite on your Start menu.
- In the starter application, click the Data tab and the Backup icon or the Restore icon. The InstantBackup window will appear.
Choose the kind of work you want to do:
- Back up your hard drive using the InstantBackup Assistant
- Back up data without using the Assistant
- Restore data
Compare data
Make a label for your CD/DVD

Important: To store data with InstantBackup to optical media, InstantWrite has to be installed.
Back up data
The InstantBackup menu offers two different methods of backing up: either with or without the InstantBackup Assistant wizard.
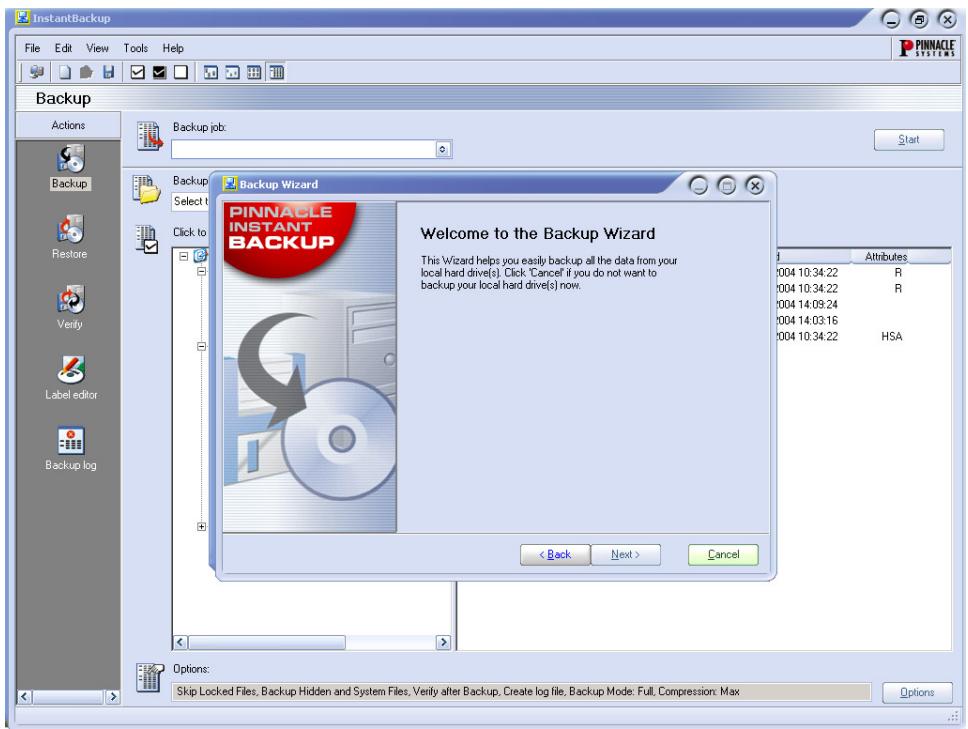
Using the InstantBackup Assistant
If you choose the Backup my Computer option (File Backup my Comuter), all the data in your system will be backed up. The InstantBackup Assistant gathers your input in a series of pages.
- The Assistant opens on the Welcome page. Click the Next button to advance to the second page.
- Moving on to the third page of the InstantBackup Assistant, you now select the folder or device where the back-up output file(s) should be stored. Click the destination in the folder browser window. The location will be entered for you in the Destination path edit box.
- Click the Finish button on the final page of the Assistant to begin the back-up process. Your whole system will be backed up. Afterwards you will be returned to the InstantBackup main window.

Important: If you use the encryption option, make sure that you will be able to remember the password when you need. If you do not, you will not be able to restore from your back-up and the data will be irretrievably lost!
Backing up without the Assistant
If you want to back up only part of your system, choose the Backup button in the InstantBackup main window. You can use the Backup button or View, Backup menu command to open the back-up interface.
Select the folders and files you want to back up by means of the checkboxes in the file browser panels. The Select All, Invert Selection and Clear Selection commands on the Edit menu may help you carry out the file-selection phase more rapidly.
Choose a target drive or folder for the copy. An optical disc writer is a typical choice of back-up destination, but other locations – such as a hard-drive file or a Zip disk – are also valid. Use the Browse button to help you locate the destination if desired.
If necessary, click on the Options button at the bottom right of the window. This opens the Backup Options dialog, which provides extra configuration options for the backup process.
Restore data
To retrieve data from a back-up, choose the Restore button in the InstantBackup main window. You can use either the Restore button or the View, Restore menu command.
Verify data
In order to ensure that the data in the stored back-up are in fact identical to the original, choose the Verify button in the InstantBackup main window. You can use either the Verify button or the View, Verify menu command.
Creating a label
After backing up your data onto one or more writable CDs or DVDs, you can create labels for the discs using the built-in Label Editor. Choose the Label editor button in the InstantBackup main window, you can use either the Label editor button or the View, Label editor menu command.
Backup log
The backup log file contains all the particulars of the last procedure carried out. Pinnacle recommends that the log be checked after every action using the View, Backup log menu command or the Backup log button in the InstantBackup main window.
With InstantWrite, you can use your writable CDs and DVDs in just the same way as normal floppy disks or Zip disks. You can format the media and store data directly on CD and DVD by drag-and-drop or from an application without having to resort to special programs.

Important: The full functionality of InstantWrite can only be used when a CD or DVD recorder and a compatible writable disc are available.

Launching InstantWrite
Some of InstantWrite's functions are available through integration with the Windows shell. Those functions may appear on menus in Windows Explorer, or may be executed automatically when a disc is inserted or rejected.
Some commands (Format and Defrag) are available via Programs Studio MediaSuite Instant Write on your Start menu.
- To access all of InstantWrite's functions from one place, run the Studio MediaSuite starter application and choose InstantWrite on the Data tab.
Using InstantWrite
The functions of InstantWrite follow the three stages of creating a disc:
Format: The format operation prepares the medium for writing. For many media types, this operation is handled automatically. With others, you must give an explicit command to format the disc.
Write: This is the main phase, in which you store and perhaps delete files on the medium.
Finalize: In this phase the control information on the disc is modified in order to make it compatible with other systems. As with formatting, finalizing is handled automatically with many media types but not all.
Formatting
Discs must be prepared for use by formatting. Three methods of formatting are available.
Automatic formatting
This convenient option works with CD-R, CD-MRW and DVD+/-R(W) media, but not CD-RW. Formatting take place automatically as you write to the medium.
If an error message appears, verify that you are using a previously-unformatted disc, and the Auto format optopin is activated in Settings.
- Formatting from the drive's context menu
To format a disc manually, click on the drive's icon in Windows Explorer with the right mouse button and choose the format command. The command name will be along the lines of "InstantWrite DVD-R Format".
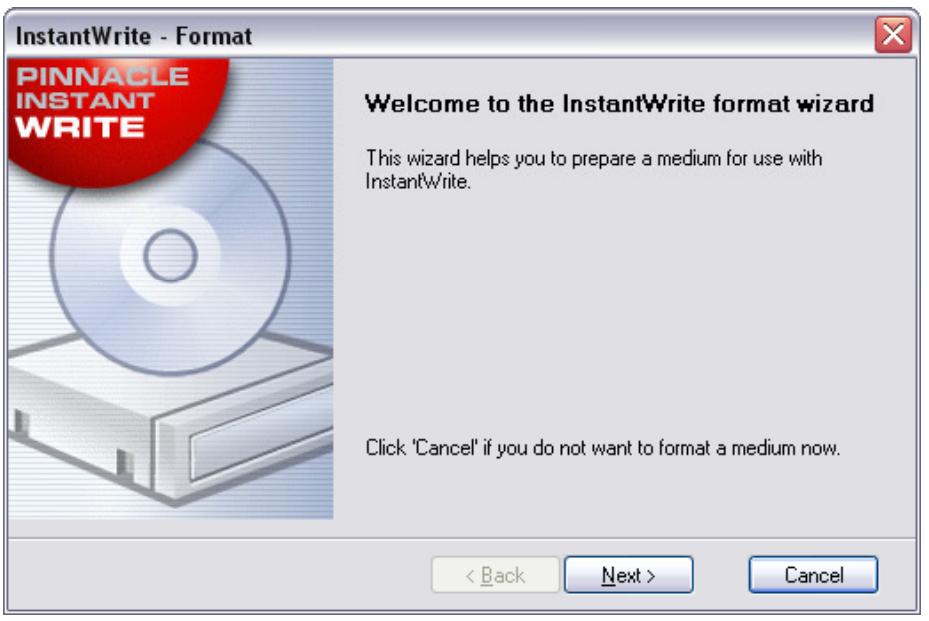
- Formatting using the Format Assistant
Choose Format from the context menu in the InstantWrite command center to bring up the Format Assistant, which will help you format the currently-selected drive.
The Format Assistant can also be opened with the command Studio MediaSuite, InstantWrite, InstantWrite format on your system Start menu.
Reading and writing to CD and DVD
After your writeable CD or DVD has been formatted, or if the Autoformat option is activated, you are ready to begin actually using the disc. File operations can now be carried out either with drag-and-drop or with any application program that reads, writes or deletes files.

Caution! With "write-once" media (CD-R, DVD±R), no disc space is reclaimed when files are deleted. This can lead to the disc becoming full even though the amount of data it contains is less than its rated capacity.
Finalizing
To make InstantWrite media compatible with other systems, the media must be "finalized" after modifications to it are complete. In the case of rewriting CDs and DVDs this occurs automatically. With CD-R, DVD-R and DVD+R, a dialog box appears when you attempt to eject the disc, enabling you to finalize it manually if you wish.
If the medium is not finalized, it will not be possible to read it on computers that do not have a CD/DVD recorder or UDF file system software.

Important! The finalizing process can take several minutes depending upon the type of medium. If you switch off the computer during this time, the medium may be damaged.
Defragmenting
Launch the InstantWrite disc defragmenter with the Studio MediaSuite InstantWrite InstantWrite defrag command.
The defragmenter optimizes the layout of the files on your InstantWrite discs to achieve maximum retrieval efficiency.
Note: The defragmentation operation is available only for DVD-RAM discs.
INSTANTCINEMA
With InstantCinema, you can view a wide variety of audio and video content on your system. Exactly which media types – digital audio files, VideoCD and DVD, for example – depends on the particular version of InstantCinema you are using.
Launching InstantCinema
Launch InstantCinema from the Video page of the Studio MediaSuite starter application, or from your Windows Start menu (Programs, Studio MediaSuite, Video and InstantCinema).
InstantCinema Control panel
Whichever of these methods you use, the InstantCinema control panel opens:

The leftmost area of the panel lets you select a device containing material that you want to play:
Use the up and down arrow buttons to move through the list of devices. When you find the one you want, click the OK button to open the contents of that device for viewing.
The central cluster in the next group of controls provides standard navigation buttons found on a DVD playback device, and can be used with versions of InstantCinema in which DVD playback is enabled.
The outer ring of buttons in this group is as follows, clockwise from the Source button:
- Source: Opens and closes the source device selection area described above.
- Angle: A DVD-specific control for selecting a new viewing angle if any are available on the current disc.
- Show playlist: InstantCinema lets you create, save and use a playlist of any media supported by the software. This button opens a pop-up menu of the items on the current playlist. The one you choose immediately begins to play back.
- Switch to fullscreen: When you are viewing video content with InstantCinema, this button (or the F9 function key, or a double-click on the window with the left mouse button) switches from normal view to the fullscreen view, or vice versa.
- Show rootmenu / Resume from menu: This control goes back to the first menu on a disc, or restarts playback.
- Create a new playlist: This button opens the Playlist dialog box, where you can select files (in the upper right panel of the dialog) from the current folder (the folder browser in the left panel) and add them to the list of files in the bottom right panel.
The buttons along the bottom of the dialog are:
- Down, Up: Move the currently-selected playlist file down or up in the list.
- Remove: Remove the currently-selected file from the playlist.
- Load, Save: Load a previously-defined playlist; or save the current playlist for later re-use.
- Add: Add the currently-selected files in the upper right panel to the playlist.
- OK, Close: Both these buttons close the Playlist dialog. If you choose the OK button, the first song on the playlist immediately begins to play.
Corel Photobook is the perfect companion for all your digital camera needs!
Fast, fun, and easy to use, Corel Photobook lets you capture, enhance, organize, and share your digital photos with the people in your life who matter the most. With Corel Photobook, perfect digital photos are just the click of a mouse away.
Retouch your photos with ease!
- Easy import options: import images directly from your digital camera or scanner, including TIFF, JPEG, PSD, and FlashPix formats. Plus, read, write, and edit EXIF tags that are output by most digital cameras, and automatically record and store information such as when the photo was taken in an easy-to-use format
- Correct common problems: easy-to-use wizards let you correct most common photo problems at the click of a mouse, including red-eye, contrast, and white balancing. Photobook also lets you save time by changing the hue and saturation, adjusting brightness, and making any other corrections to a single photo or an entire group of photos at one time. Plus, a full range of text, fill, retouch, and filter tools provide the depth and flexibility you need to correct and enhance your digital images
- Create stunning effects: take advantage of special image wizards to create stunning effects for your photos, including edges, borders, frames, shadows, special colors, and perspectives, and even realistic fire and lightning effects. Edges are now also more flexible, consisting of edge layers, corner layers, and bitmap layers
Organize and manage your pictures!
PhotoAlbum: just drag-and-drop your images to instantly create personalized photo albums
- Image browsing: store, organize, manage, and find your photos quickly and easily, even if you have thousands of images to choose from. Plus, categorize, browse, and search your photos with a Windows Explorer-type interface, including custom-sized thumbnails, image size, format, description, and any other information you want to have available at your fingertips
Share your memories with friends and family!
- High quality gifts and prints: share your photos with the people who mean the most, through high quality prints, by e-mail, or on the Web
- Inexpensive printing: save on expensive photo paper by printing multiple images on a single sheet of paper
- Multimedia slide shows: quickly create, preview, and publish photo slide shows to the Web, save them on disk, or e-mail them to one or multiple recipients. Plus, burn photos onto CD-ROM directly from within Photobook, without the need for an external CD-burning program
- Personalized screenshotsavers and wallpaper: customize your screenshotsaver and desktop wallpaper with your favorite photos
WaveLab Lite! Digital audio editing – an area previously reserved for professionals – has now been opened up to anyone involved in music or multimedia! WaveLab Lite makes audio editing even easier, by combining a very quick and user friendly interface with many professional features. We hope you will enjoy working with WaveLab Lite!
WaveLab Lite contains many of the features that can also be found in its professional "big brother" WaveLab. Using WaveLab Lite, you can:
Record audio.
Edit audio.
- Import tracks from Audio CDs.
- Save audio in the formats Wave and AIFF.
- Use Plug-in effects in real-time during playback or while saving.
Program settings
Before you start working with the program you should make the following settings.
Audio card settings
You need to "inform" WaveLab Lite of the audio card you intend to use:
- Select Preferences from the Options menu.
- Click on the Audio Card tab.
- Select the audio card you want to use for recording and playback, from the pop-ups. If you only have one audio card you can possibly also select the Microsoft Sound Mapper options, (the sound mapper is a "virtual audio card" which "maps" all audio to your real card). However this does not let you take full advantage of the card's driver when recording audio and is therefore not recommended.
- Choose your Preferred Playback Resolution. Normally this will be 16 bits.
Temporary files
You also need to specify where WaveLab Lite should store temporary files. Temporary files are used for certain operations, such as WaveLab Lite's extensive Undo function.
- In Windows, create a separate folder in which to store your temp files.
This folder should be on your fastest hard disk and you should make sure you have plenty of space available on that hard disk (or partition). Putting the temporary files on a separate hard disk (that is, not the same disk as your regular files) will speed up file operations considerably.
- In the Preferences dialog, click the File tab.
- Either type in the path to the directory or click the Browse button to locate and select the folder.
Save the Preferences
To make permanent the settings you just made, proceed as follows:
- Click on the General tab in the Preferences dialog.
- Activate the Save preferences on exit option.
- Close the Preferences dialog.
Pinnacle Studio MediaSuite
PINNACLE STUDIO MEDIASUITE 1
WILLKOMMEN ZUR PINNACLE STUDIO MEDIASUITE 1
Uber这意味着 Handbuch 1
INSTALLATION 1
InstantWrite starten 26
- Starter - InstantBackup
- Instant DVD Recorder
- InstantWrite
MediaManager InstantCinema - InstantDisc
- Corel Photobook
- InstantCopy - WabeLab Lite

InstantWrite starten
Lancer Instant DVD Recorder 6
L' assistant direct-to-disc 6
MEDIAMANAGER 11
Lancer InstantWrite 26
Utiliser InstantWrite 26
INSTANT CINEMA 28
Lancer InstantCinema 28
InstantCinema Panneau de configuration 28
COREL PHOTOBOOK 30
WAVELAB LITE 31
-
InstantBackup
-
Instant DVD Recorder
InstantWrite
MediaManager
-
InstantCinema
-
InstantDisc
Corel Photobook
- InstantCopy
WabeLab Lite

Pinnacle Media Server/Media Manager.
Assistance technique
Paramètres
INSTANT DVD REORDER
Lancer Instant DVD Recorder
L' assistant direct-to-disc
Lancer InstantCinema
InstantWrite starten 25
-
Starter
-
InstantBackup
-
Instant DVD Recorder
-
InstantWrite
MediaManager
- InstantCinema
InstantDisc
Corel Photobook
InstantCopy
WabeLab Lite