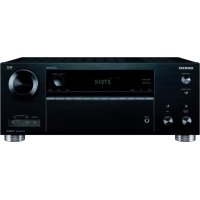
TX-SR705 - AV receiver ONKYO - Free user manual and instructions
Find the device manual for free TX-SR705 ONKYO in PDF.

User questions about TX-SR705 ONKYO
0 question about this device. Answer the ones you know or ask your own.
Ask a new question about this device
Download the instructions for your AV receiver in PDF format for free! Find your manual TX-SR705 - ONKYO and take your electronic device back in hand. On this page are published all the documents necessary for the use of your device. TX-SR705 by ONKYO.
USER MANUAL TX-SR705 ONKYO
Using SIRIUS Satellite Radio
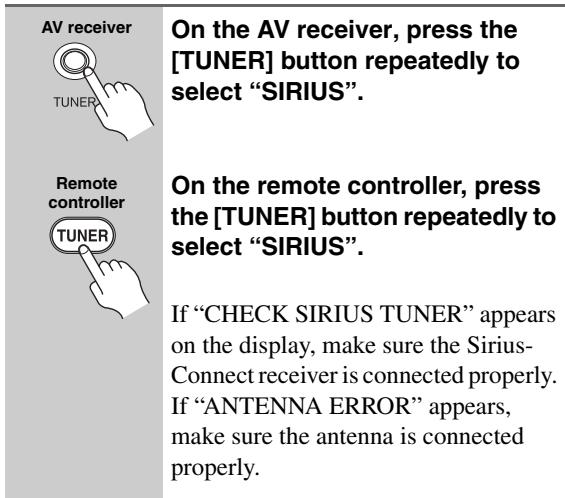
Listening to SIRIUS Satellite Radio® (North American Models Only)
Important SIRIUS Satellite Radio Information
SIRIUS is available in the US for subscribers with addresses in the continental US and is available in Canada for subscribers with a Canadian address. To Get SIRIUS Satellite Radio a subscription and compatible tuner and antenna are required and sold separately. Visit sirius.com for the most complete and up-to-date channel lineup and information. "SIRIUS" and the SIRIUS dog logo and related marks are trademarks of SIRIUS Satellite Radio Inc.
Note:
Hardware and required basic monthly subscription sold separately. Installation costs and other fees and taxes, including a one-time activation fee may apply. Subscription fee is consumer only. All fees and programming subject to change.
What is SIRIUS Satellite Radio?
Simply The Best Radio on Radio™ with all your favorite entertainment including 100% commercial-free music, plus superior sports coverage, uncensored talk and comedy, world-class entertainment, news, weather and more for your car, home or office. For more information visit sirius.com or siriuscanada.ca
A warning against reverse engineering:
It is prohibited to copy, decompile, disassemble, reverse engineer, or manipulate any technology incorporated in receivers compatible with the SIRIUS Satellite Radio system.
"SIRIUS" and the SIRIUS dog logo are registered trademarks of SIRIUS Satellite Radio Inc.

Setting Up the SiriusConnect™ Home Tuner
The optional SiriusConnect Home tuner kit includes everything for easy home installation, including the SiriusConnect receiver, indoor/outdoor antenna with 21-foot cable, 8-pin mini DIN connector cable, and an AC power adapter. See the SiriusConnect Home tuner's instructions for more information.
Use the 8-pin mini DIN connector cable to connect the SiriusConnect receiver to the SIRIUS jack on the rear of the AV receiver.
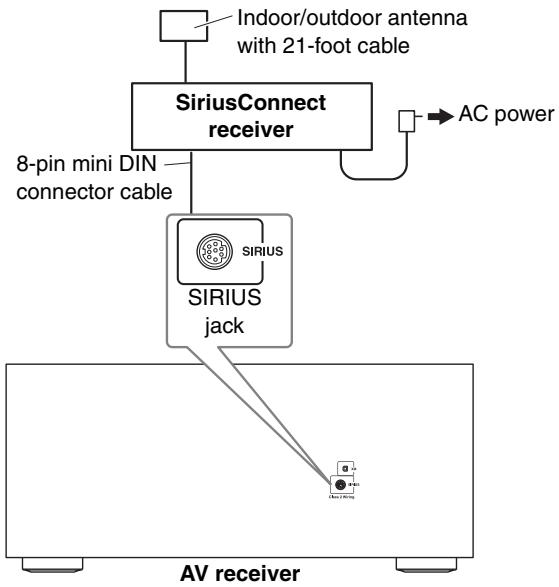
To use the included antenna indoors, you must place it at a north-, west-, or east-facing window, depending on where you live. If this isn't possible, you'll need to install it outside, away from any overhead obstructions.
Positioning the Antenna
For a consistent satellite signal, the antenna must be positioned correctly. Use the following map to determine which area you are in and position the antenna accordingly.
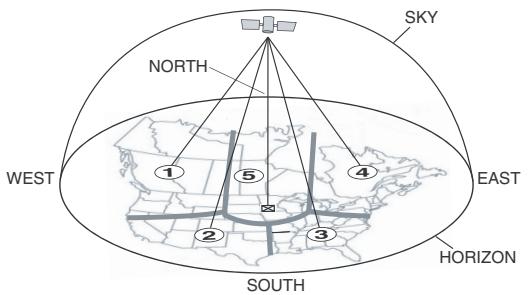
Area 1: Point the antenna toward the sky in the east, northeast, or southeast, either through a window or outside.
Area 2: Point the antenna toward the sky in the north or northeast, either through a window or outside.
Area 3: Point the antenna toward the sky in the north or northwest, either through a window or outside.
Area 4: Point the antenna toward the sky in the west, northwest, or southwest, either through a window or outside.
Area 5: Put the antenna outside and point it straight up. The antenna cannot be used indoors.
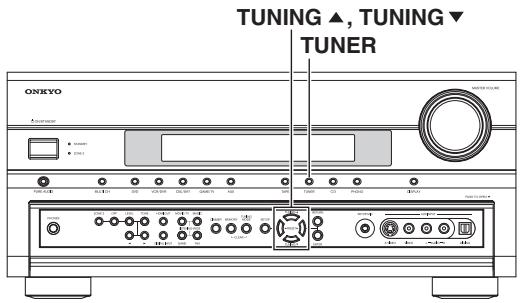
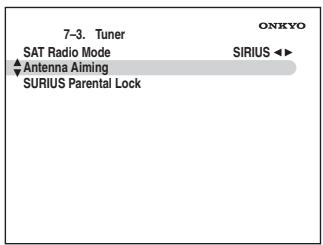
Setting the Satellite Radio Mode
Before you can listen to SIRIUS Satellite Radio, you must set the SAT Radio Mode to "SIRIUS".
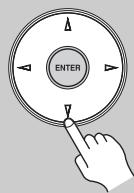
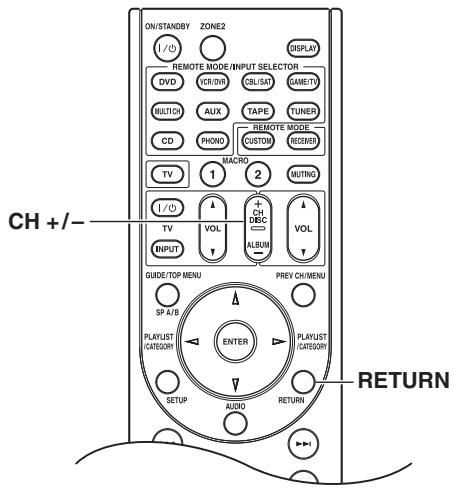
1
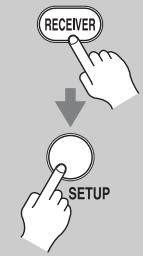
Press the [RECEIVER] button, followed by the [SETUP] button.
The main menu appears onscreen.
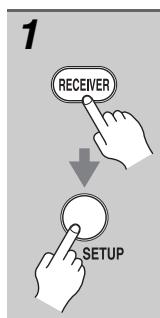
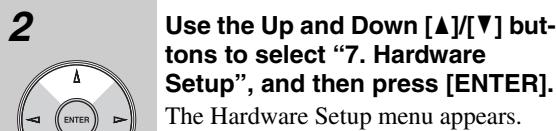
2
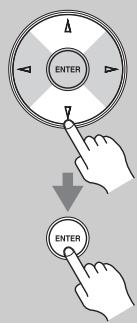
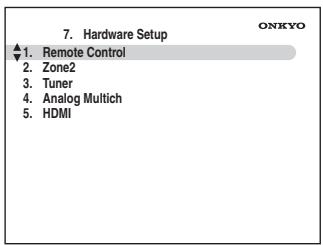
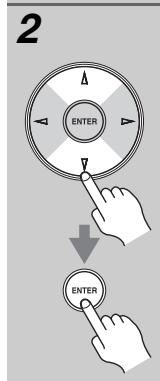
Use the Up and Down [▲]/[▼] buttons to select "7. Hardware Setup", and then press [ENTER].
The Hardware Setup menu appears.
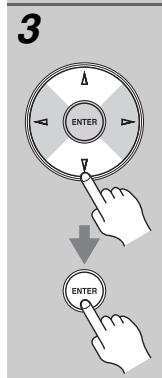
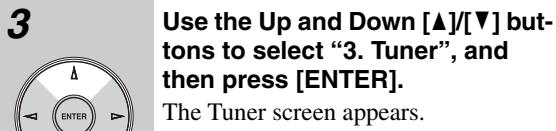
3
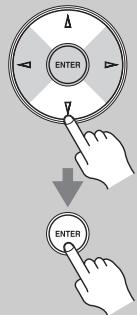
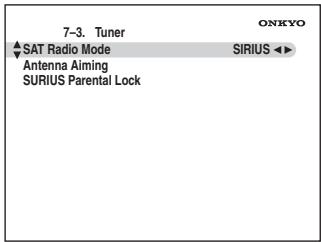
Use the Up and Down [▲]/[▼] buttons to select "3. Tuner", and then press [ENTER].
The Tuner screen appears.
4
Use the Left and Right []/[] buttons to select "SIRIUS". If there are 2 items on the Tuner screen, use Up and Down [] /[▼] buttons to select "SAT Radio Mode".
Pressing the Left and Right [] / [] buttons cycles through the following options: None XM SIRIUS XM/SIRIUS
None: Select if you're not using Satellite Radio.
XM: Select to use XM Satellite Radio.
SIRIUS: Select to use SIRIUS Satellite Radio.
XM/SIRIUS: Select to use XM Satellite Radio and SIRIUS Satellite Radio.

5
When you've finished, press the [SETUP] button.
Setup closes.
Selecting SIRIUS Satellite Radio
Signing Up for SIRIUS Satellite Radio
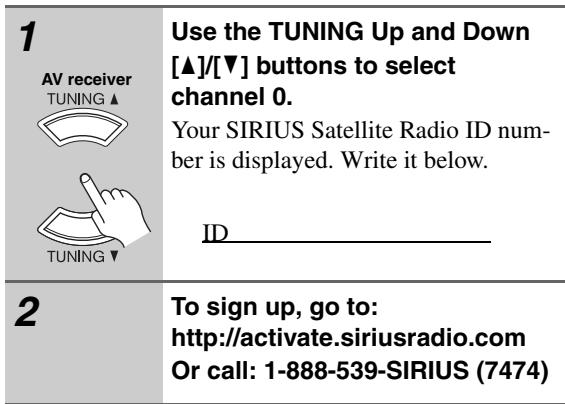
Before you can use SIRIUS Satellite Radio, you must first sign up for an account. You'll need a major credit card and your SIRIUS Satellite Radio ID, which you can get from the AV receiver, as explained below, or from the SiriusConnect Home tuner package.
Note:
Your ID is also displayed on the Satellite Radio screen. See "Positioning the SiriusConnect Home antenna" on page 9
Selecting SIRIUS Satellite Radio Channels
There are three ways to select SIRIUS Satellite Radio channels:
- Channel Search mode: select any channel.
- Category Search mode: select channels by category.
- Direct tuning: enter channel number.
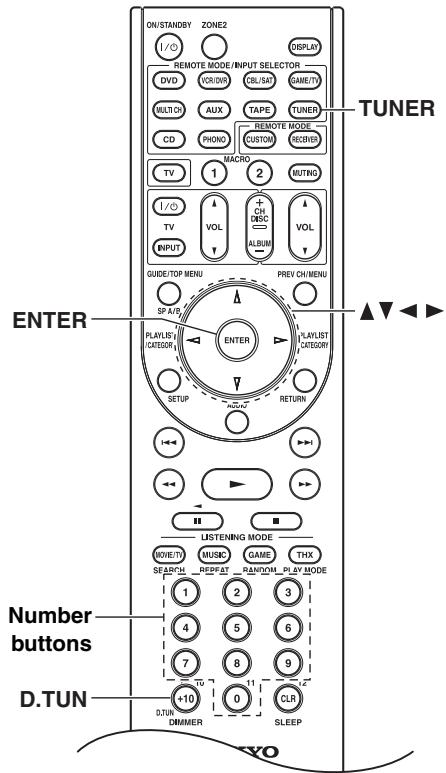
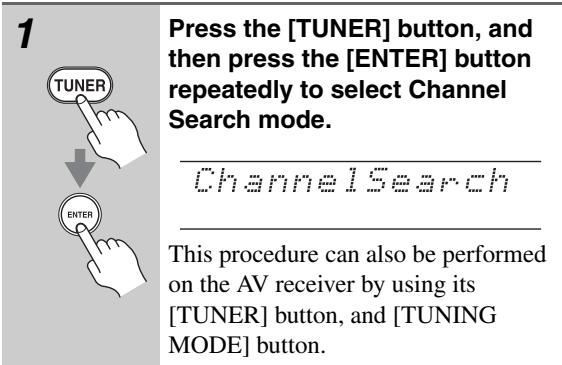
■ Channel Search Mode
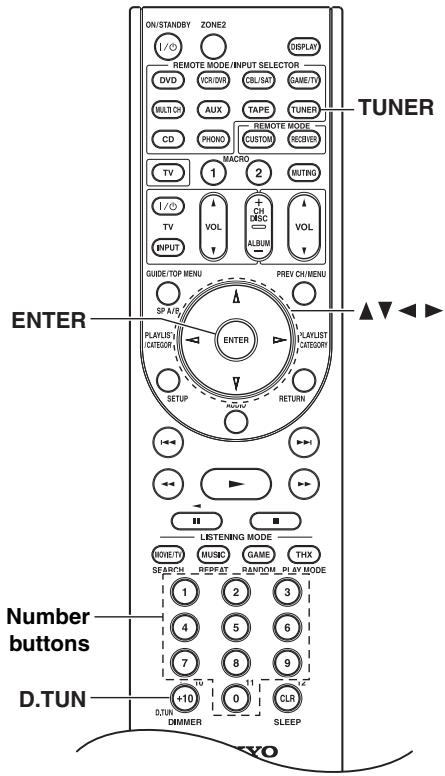
| 1 Remote controller TUNER ENTER | Press the [TUNER] button, and then press the [ENTER] button repeatedly to select Category Search mode. |
| Category Search | |
| This procedure can also be performed on the AV receiver by using its [TUNER] button, and [TUNING MODE] button. | |
| 2 ENTER | Use the Left and Right [/+] buttons to select a category, and use the Up and Down [/] but- tons to select a channel in that category. |
Direct Tuning
You can select a SIRIUS Satellite Radio channel directly by entering its number.
| 1 Remote controller TUNER +10 D.TUN | Press the [TUNER] button, followed by the [D.TUN] button. |
| F 11 11 11 | |
| 2 1 2 3 4 5 6 7 8 9 0 | Within 8 seconds, use the number buttons to enter the channel number. For example, to select channel #20, press 0, 2, 0, or 2, 0, [ENTER]. Note: While the [TUNER] button is flashing, you cannot select another input source with the remote controller. |
Notes:
- If you select an unavailable channel, "INVALID CHANNEL" appears on the display.
- If you select a channel that you are not subscribed to, "CALL SIRIUS" appears on the display.
- Channels that are locked must be unlocked before you can listen to them. See "Parental Lock" on page 6 for more information.
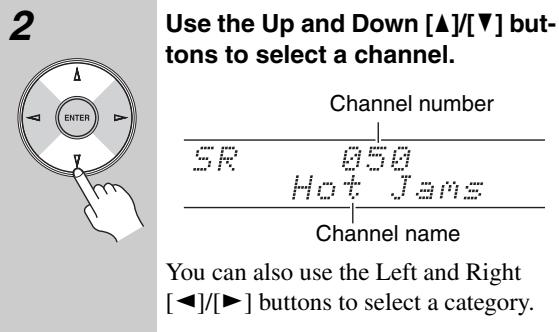
Selecting Channels on the AV receiver:
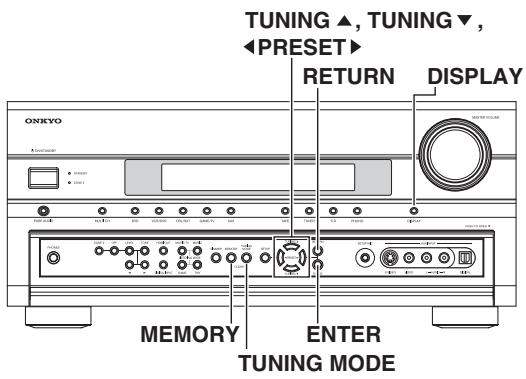
| 1 AV receiver TUNING MODE | Press the [TUNING MODE] button repeatedly to select Channel Search mode or Category Search mode. |
| 2 AV receiver ENTE | Press the [ENTER] button repeatedly to select a category. |
| 3 AV receiver TUNING▲ | Use the TUNING Up and Down [▲]/[▼] buttons to select a channel. In Channel Search mode, you can select any channel. In Category Search mode, you can only select channels from the currently selected category. |
| AV receiver RETURN | To listen to the previously selected SIRIUS Satellite Radio channel, press the [RETURN] button. |
| Remote controller | |
| RETURN |
Presetting SIRIUS Channels
You can store a combination of up to 40 of your favorite SIRIUS Satellite Radio channels and AM/FM radio stations as presets.
| 1 | Tune into the SIRIUS channel that you want to store as a preset. |
| 2 AV receiver MEMORY | Press the [MEMORY] button. The preset number flashes. |
| 3 AV receiver | While the preset number is flashing (about 8 seconds), use the PRESET [/][▶] buttons to select a preset from 1 through 40. |
| 4 AV receiver MEMORY | Press the [MEMORY] button again to store the channel. The channel is stored and the preset number stops flashing. Repeat this procedure for all of your favorite SIRIUS Satellite Radio channels. |
Selecting Presets
| AV receiver PreSET Remote controller +CH DISC ALBUM | To select a preset, use the PRE-SET [▲]/[▶] buttons, or the remote controller's CH [+/−] button. |
- Deleting Presets
| 1 | Select the preset that you want to delete. See the previous section. |
| 2 AV receiver MEMORY TUNING MODE CLEAR-」 | While holding down the [MEM-ORY] button, press the [TUNING MODE] button. The preset is deleted and its number disappears from the display. |

Parental Lock
With SIRIUS Parental Lock, you can lock out channels that you do not want to receive and use a 4-digit PIN number to prevent others from unlocking them.
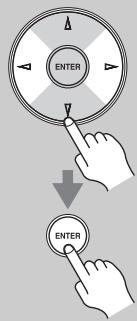
Press the [RECEIVER] button, followed by the [SETUP] button.
The main menu appears onscreen.
Use the Up and Down [▲]/[▼] buttons to select "7. Hardware Setup", and then press [ENTER].
The Hardware Setup menu appears.
Use the Up and Down [] / [] buttons to select "3. Tuner", and then press [ENTER].
The Tuner screen appears.
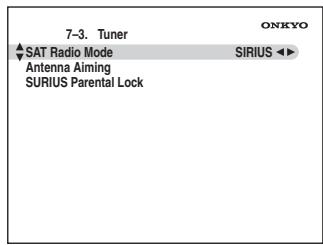
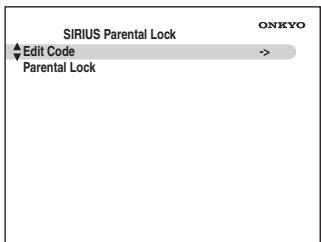
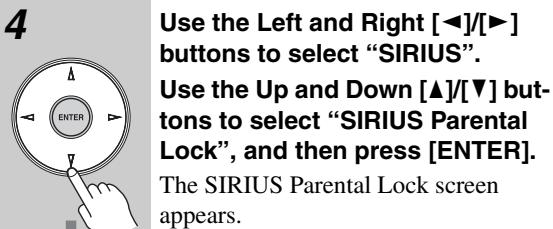
4
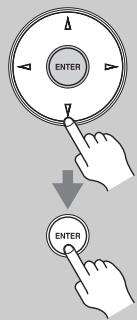
Use the Left and Right [] / [] buttons to select "SIRIUS". Use the Up and Down [] / [] buttons to select "SIRIUS Parental Lock", and then press [ENTER]. The SIRIUS Parental Lock screen appears.
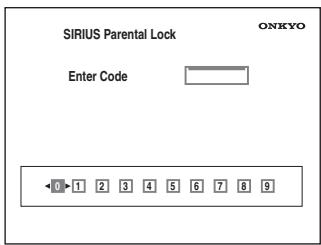
Note: If the SAT Radio Mode is set to "None" or "XM" (see page 2), the "SIRIUS Parental Lock" item is not available.
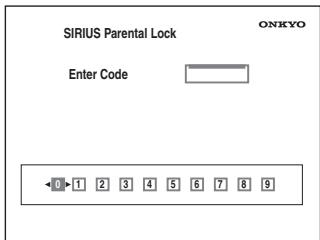
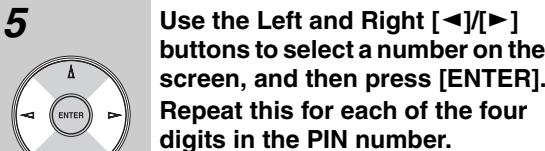
5
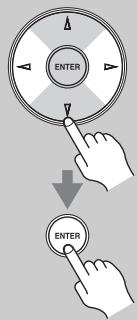
Use the Left and Right [] / [] buttons to select a number on the screen, and then press [ENTER]. Repeat this for each of the four digits in the PIN number.
If you're entering the PIN number for the very first time, the PIN is stored, and the following screen appears.
If you've already set a PIN number, you must enter the correct PIN to get to this screen. If you enter the wrong PIN, the message "Wrong Code!" appears and you'll have to enter the PIN again.
Note:
The SIRIUS Parental Lock cannot be set unless the AV receiver and the SiriusConnect receiver are connected.
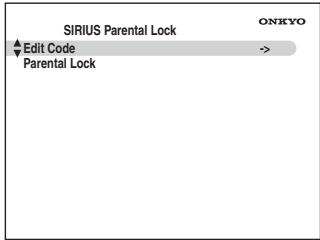
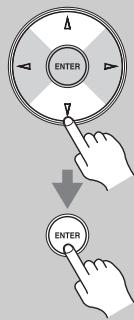
6
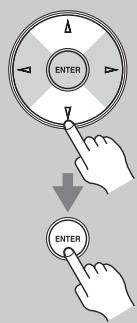
Use the Up and Down [] / [] buttons to select "Parental Lock", and then press [ENTER].
The Parental Lock screen appears.

Notes:
While a channel is locked, it cannot be selected for listening.
- To unlock a channel, you must enter the correct PIN number and change it to Unlocked in step 6.
Changing the PIN Number


Note: If the SAT Radio Mode is set to "None" or "XM" (see page 2), the "SIRIUS Parental Lock" item is not available.
If you're entering the PIN number for the very first time, the PIN is stored, and the following screen appears.
If you've already set a PIN number, you must enter the correct PIN to get to this screen. If you enter the wrong PIN, the message "Wrong Code!" appears and you'll have to enter the PIN again.
Note: The SIRIUS Parental Lock cannot be set unless the AV receiver and the SiriusConnect receiver are connected.
6
Use the Up and Down [] / [] buttons to select "Edit Code", and then press [ENTER].
The New Code screen appears.
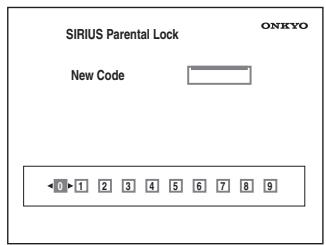
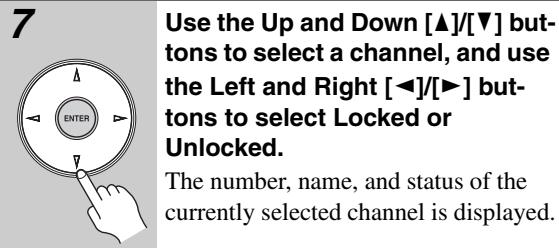
7
Use the Left and Right [] / [] buttons to select a number on the screen, and then press [ENTER]. Repeat this for each of the four digits in the new PIN number.
The Confirm screen appears.
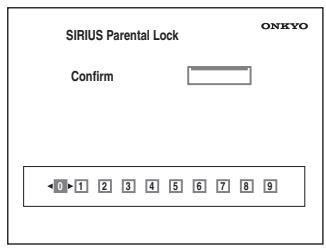
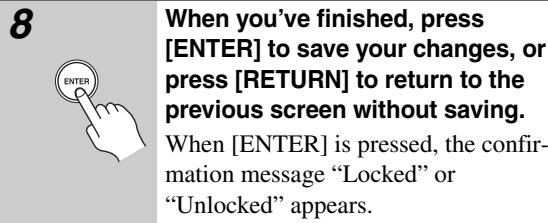
8
Confirm the new PIN number by entering it again.
If you confirm the PIN number correctly, the new PIN is saved and the message "Complete" appears. If you confirm the PIN number incorrectly, "Wrong Code!" appears, and you'll be returned to step 5 to try again.

9
Press the [SETUP] button.
Setup closes.
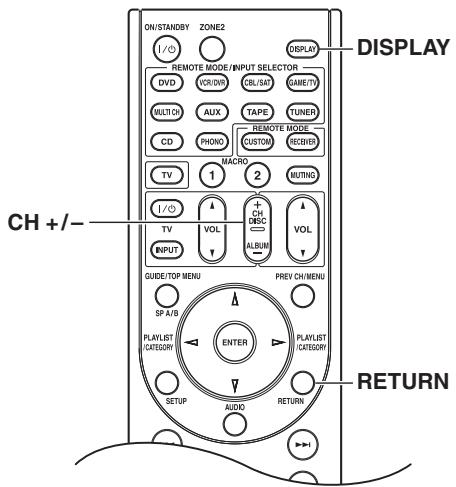
Displaying SIRIUS Satellite Radio Information
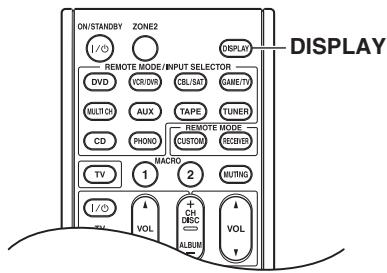
AV receiver

Press the [DISPLAY] button repeatedly to cycle through the available information.
Remote controller

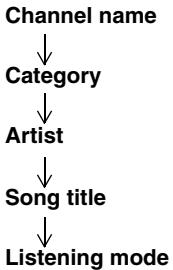
The following information can be displayed:
Note:
If the category, artist/composer, or song title is not available, “- - -” will be displayed instead.
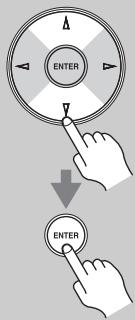
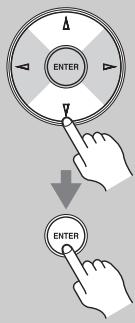
Positioning the SiriusConnect Home antenna
You can check the strength of the SIRIUS Satellite Radio signal and adjust the position of the SiriusConnect Home antenna accordingly.
Press the [RECEIVER] button, followed by the [TUNER] button, and [SETUP] button.
The main menu appears onscreen.
Use the Up and Down [▲]/[▼] buttons to select "7. Hardware Setup", and then press [ENTER].
The Hardware Setup menu appears.

Note:
If the SAT Radio Mode is set to "None" (see page 2), the "Antenna Aiming" item is not available.
3
Use the Up and Down [] / [] buttons to select "3. Tuner", and then press [ENTER].
The Tuner screen appears.
4
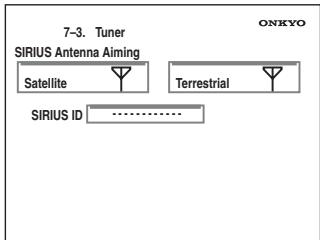
Use the Up and Down [▲]/[▼] buttons to select "Antenna Aiming", and then press [ENTER].
The Satellite Radio screen appears. The name of the currently selected input selector is displayed in a box.
Position the SiriusConnect Home antenna so that as many bars as possible (up to 3) appear on the SIRIUS Satellite signal strength meter.
5
If you cannot receive a satellite signal, position the SiriusConnect Home antenna so that as many bars as possible (up to 3) appear on the SIRIUS Terrestrial signal strength meter.
Notes:
- So long as the signal strength is good, you can enjoy SIRIUS Satellite Radio by using either satellite or terrestrial reception.
- Terrestrial signals are only available in certain areas.
- The SIRIUS information on the Satellite Radio screen is only displayed when the SAT Radio Mode is set to "SIRIUS" or "XM/SIRIUS" (see page 2).
- If you're using both XM Satellite Radio and SIRIUS Satellite Radio and the Satellite mode is set to "XM/SIRIUS" (see page 2), signal strength meters for both systems appear on the same screen.
The following messages may appear while using SIR-IUS Satellite Radio.
ACQUIRING
The SiriusConnect receiver is acquiring the signal or no signal is present. Make sure the SiriusConnect Home tuner is connected properly and that there are no obstacles close by.
ANTENNA ERROR
Make sure the SiriusConnect Home tuner is connected properly.
SUBUPDATED
Displayed while your subscription is being updated. No operations can be performed until this message has cleared.
UPDATING XXX%
Displayed while the channel map is being updated. Wait until the updating is complete.
UPDATING
Displayed while the SiriusConnect receiver's firmware is being updated.
INVALID CHANNEL
Displayed if you select an unavailable channel.
CALL SIRIUS
Displayed when you select a channel to which you are not subscribed. Call SIRIUS if you want to subscribe.
CHECK SR TUNER
Displayed if the SiriusConnect receiver is not connected. Make sure the SiriusConnect receiver is connected properly, and make sure its AC adapter is plugged in.
Utiliser SIRIUS Satellite Radio
Listening to XM Satellite Radio® (North American Model Only)
About XM Radio
XM is North America's number one satellite radio company, offering an extraordinary variety of commercial-free music, plus the best in premier sports, news, talk radio, comedy, children's and entertainment programming, broadcast in superior digital audio quality coast to coast. For more information, or to subscribe, U.S. customers visit xmradio.com or call XM Listener Care at 1-800-XMRADIO (1-800-967-2346); Canadian customers visit xmradio.ca or call XM Listener Care at 1-877-GETXMSR (1-877-438-9677).
XM Ready® Legal
XM monthly service subscription sold separately. XM Mini-Tuner and Home Dock required (each sold separately) to receive XM service. It is prohibited to copy, decompile, disassemble, reverse engineer, hack, manipulate or otherwise make available any technology or software incorporated in receivers compatible with the XM satellite Radio System. Installation costs and other fees and taxes, including a one-time activation fee may apply. All fees and programming subject to change. Channels with frequent explicit language are indicated with an XL. Channel blocking is available for XM radio receivers by calling 1-800-XMRADIO (U.S. residents) and 1-877-GETXMSR (Canadian residents). Only available in the 48 contiguous United States and Canada. ©2007 XM Satellite Radio Inc. All rights reserved.
XM Ready® Subscription
Once you have installed the XM Mini-Tuner Home Dock, inserted the XM Mini-Tuner, connected the XM Mini-Tuner Home Dock to your XM Ready® audio system, and installed the antenna, you are ready to subscribe and begin receiving XM programming. There are three places to find your eight character XM Radio ID: On the XM Mini-Tuner, on the XM Mini-Tuner package, and on XM Channel 0. Record the Radio ID below for reference.


Note:
The XM Radio ID does not use the letters "I", "O", "S" or "F".
Activate your XM Satellite Radio service in the U.S. online at http://activate.xmradio.com or call 1-800-XMRADIO (1-800-967-2346). Activate your XM Satellite Radio service in Canada online at https://activate.xmradio.ca or call 1-877-GET-XMSR (1-877-438-9677). You will need a major credit card. XM will send a signal from the satellites to activate the full channel lineup. Activation normally takes 10-15 minutes, but during peak busy periods you may need to keep your XM Ready audio system on for up to an hour. When you can access the full lineup on your XM Ready audio system you are done.
Connecting the XM Mini-Tuner and Home Dock
To receive XM Satellite Radio, you need an XM Mini-Tuner and Home Dock, which includes a home antenna. These are sold separately. For connection information, refer to the instruction manual supplied with the XM Mini-Tuner and Home Dock.
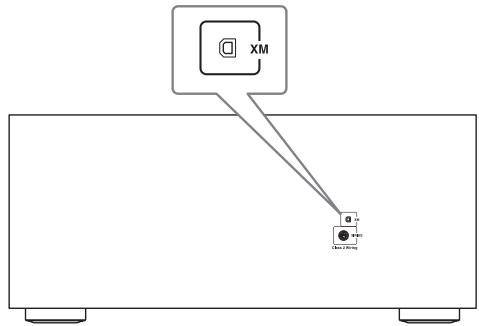
XM Mini-Tuner jack


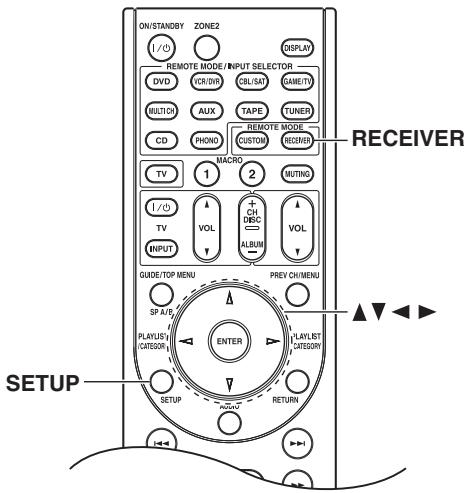
Setting the Satellite Radio Mode
Before you can listen to XM Satellite Radio, you must set the SAT Radio Mode to "XM".
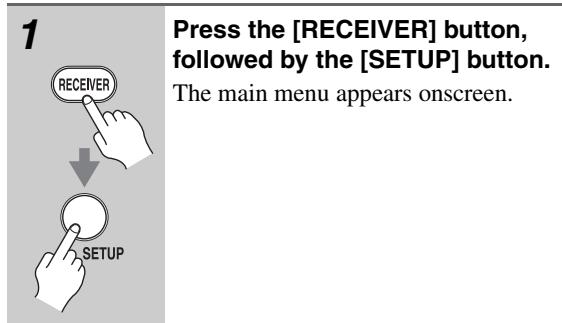
1
Press the [RECEIVER] button, followed by the [SETUP] button.
The main menu appears onscreen.
![ONKYO TX-SR705 - Press the [RECEIVER] button, followed by the [SETUP] button. - 1](/content/2025/01/151772/images/ee2f545a390da8c9c9664447349e7d56924dc1c3bddcba3ef7e3c99ae0fc8e1b.jpg)
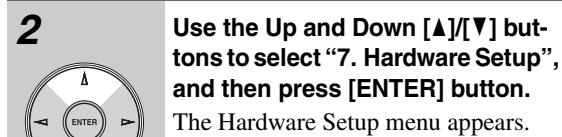
2
Use the Up and Down [▲]/[▼] buttons to select "7. Hardware Setup", and then press [ENTER].
The Hardware Setup menu appears.
![ONKYO TX-SR705 - Use the Up and Down [▲]/[▼] buttons to select "7. Hardware Setup", and then press [ENTER]. - 1](/content/2025/01/151772/images/779606bf1164b6a1d219d720251a1e52f737d457f74343b0e080921b239a786a.jpg)
![ONKYO TX-SR705 - Use the Up and Down [▲]/[▼] buttons to select "7. Hardware Setup", and then press [ENTER]. - 2](/content/2025/01/151772/images/aee5faa45a0f5237a08fde1a03c051f5b0312b4009308bea749958a67a39eadc.jpg)
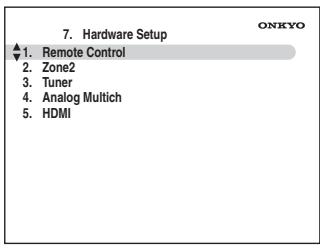
3
Use the Up and Down [] / [] buttons to select "3. Tuner", and then press [ENTER].
The Tuner screen appears.
![ONKYO TX-SR705 - Use the Up and Down [] / [] buttons to select "3. Tuner", and then press [ENTER]. - 1](/content/2025/01/151772/images/84a5ce34941cda76e5fea2619e3c83bdad67d6d2508f2945c992d8dbb6ee75e2.jpg)
![ONKYO TX-SR705 - Use the Up and Down [] / [] buttons to select "3. Tuner", and then press [ENTER]. - 2](/content/2025/01/151772/images/e010474ec2f847a1ef3e4fd728b91870f0b561956bcb2f0517b6243779a0039a.jpg)
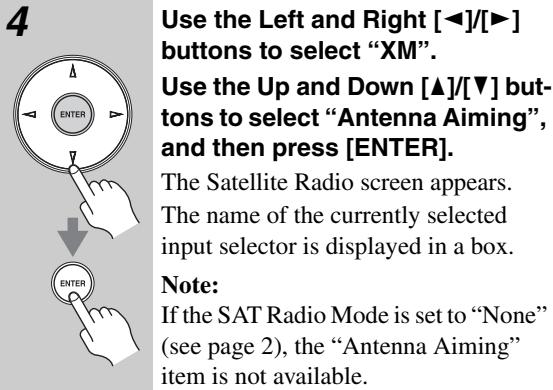
4
Use the Left and Right [] / [] buttons to select "XM".
If there are 2 items on the Tuner screen, use Up and Down [▲]/[▼] buttons to select "SAT Radio Mode".
Pressing the Left and Right [] / [] buttons cycles through the following options: None XM SIRIUS XM/SIRIUS
None: Select if you're not using Satellite Radio.
XM: Select to use XM Satellite Radio.
SIRIUS: Select to use SIRIUS Satellite Radio.
XM/SIRIUS: Select to use XM Satellite Radio and SIRIUS Satellite Radio.
![ONKYO TX-SR705 - Use the Left and Right [] / [] buttons to select "XM". - 1](/content/2025/01/151772/images/6c9f52484a76da1dd9d725e5ad7a40e4decd708c51a8b5d17fc609ff30f7a568.jpg)
5
When you've finished, press the [SETUP] button.
Setup closes.
![ONKYO TX-SR705 - When you've finished, press the [SETUP] button. - 1](/content/2025/01/151772/images/bfe9dafe2b204d9030effa21ba66a3ce6ce30e66490af96799c721a54510bfe5.jpg)
Selecting XM Satellite Radio
AV receiver
On the AV receiver, press the [TUNER] button repeatedly to select "XM".
![ONKYO TX-SR705 - On the AV receiver, press the [TUNER] button repeatedly to select "XM". - 1](/content/2025/01/151772/images/8a979f92592b4e3233b76c02edf2232077fbf424e56ad800093322ae67fa6fed.jpg)
Remote controller
On the remote controller, press the [TUNER] button repeatedly to select "XM".
If "CHECK XM TUNER" appears on the display, make sure the XM Mini-Tuner is connected properly.
Signing Up for XM Satellite Radio
Once you have installed the XM Mini-Tuner and Home Dock, you are ready to subscribe to XM Satellite Radio. You'll need a major credit card and your XM Radio ID. There are three places you can find your 8-character XM Radio ID:
- On the XM Mini-Tuner
- On the XM Mini-Tuner packaging
- On XM Channel 0, as explained below
| 1 AV receiver TUNING TUNING | Use the TUNING Up and Down [▲]/[▼] buttons to select RADIO ID. Your XM Radio ID number is displayed. Write it below for reference. ID |
| 2 | To sign up, go to: http://activate.xmradio.com Or call: 1-800-967-2346 For XM Canada, go to: http://xmradio.ca Or call: 1-877-438-9677 |
Notes:
- RADIO ID cannot be selected in Category Search mode. You must select Channel Search mode (see page 3).
The following letters are not used in XM Satellite Radio IDs: I, O, S, F. - XM Satellite Radio will transmit a special signal to your AV receiver to activate the full channel lineup. Activation normally takes between 10 and 15 minutes, but during busy peak periods, you may need to leave the AV receiver turned on for up to an hour.
Selecting XM Radio Channels
There are three ways to select XM radio channels:
- Channel Search mode: select any channel.
- Category Search mode: select channels by category.
- Direct tuning: enter channel number.
Note:
You cannot select Channel Search or Category Search mode while the Tuning Arrow indicators are flashing, as tuning is in progress.
■ Channel Search Mode
| 1 | Press the [TUNER] button, and then press the [ENTER] button repeatedly to select Channel Search mode. |
| Channel Search | |
| This procedure can also be performed on the AV receiver by using its [TUNER] button, and [TUNING MODE] button. | |
| 2 | Use the Up and Down [▲]/[▼] but-tons to select a channel. |
| Channel number | |
| You can also use the Left and Right [▲]/[▼] buttons to select a category. |
Category Search Mode
| 1 Remote controller TUNER ENTER | Press the [TUNER] button, and then press the [ENTER] button repeatedly to select Category Search mode. |
| Category Search | |
| This procedure can also be performed on the AV receiver by using its [TUNER] button, and [TUNING MODE] button. | |
| 2 ENTER | Use the Left and Right [▲]/[▼] buttons to select a category, and use the Up and Down [▲]/[▼] but- tons to select a channel in that category. |
Direct Tuning
You can select an XM radio channel directly by entering its number.
| 1 Remote controller TUNER +10 D.TUN | Press the [TUNER] button, followed by the [D.TUN] button. |
| Within 8 seconds, use the number buttons to enter the channel number. For example, to select channel #20, press 0, 2, 0, or 2, 0, [ENTER]. Note: While the [TUNER] button is flashing, you cannot select another input source with the remote controller. |
Selecting Channels on the AV receiver:
| 1 AV receiver TUNING MODE | Press the [TUNING MODE] button repeatedly to select Channel Search mode or Category Search mode. |
| 2 AV receiver ENTE | Press [ENTER] repeatedly to select a category. |
| 3 AV receiver TUNING▲ | Use the TUNING Up and Down [▲]/[▼] buttons to select a channel. In Channel Search mode, you can select any channel. In Category Search mode, you can only select channels from the currently selected category. |
Selecting the Previous Channel:
Presetting XM Channels
| AV receiver RETURN | To listen to the previously selected XM channel, press the [RETURN] button. |
| Remote controller RETURN |
You can store a combination of up to 40 of your favorite XM channels and AM/FM radio stations as presets.
| 1 | Tune into the XM channel that you want to store as a preset. |
| 2AV receiverMEMORY | Press the [MEMORY] button.The preset number flashes. |
| 3AV receiverPRESET | While the preset number is flashing (about 8 seconds), use the PRESET [/][ ] buttons to select a preset from 1 through 40. |
| 4AV receiverMEMORY | Press the [MEMORY] button again to store the channel.The channel is stored and the preset number stops flashing.Repeat this procedure for all of your favorite XM channels. |
Selecting Presets
| AV receiver | To select a preset, use the PRE-SET [▲]/[▶] buttons, or the remote controller's CH [+/−] button. |
| Remote controller |
- Deleting Presets
Displaying XM Radio Information
| 1 | Select the preset that you want to delete. See the previous section. |
| 2 AV receiver MEMORY TUNING MODE CLEAR-J | While holding down the [MEM-ORY] button, press the [TUNING MODE] button. The preset is deleted and its number disappears from the display. |
| AV receiver DISPLAY Remote controller DISPLAY | Press the [DISPLAY] button repeatedly to cycle through the available information. |
The following information can be displayed:
Note:
If the category, artist, or song title is not available, "---" will be displayed instead.

Positioning the XM Mini-Tuner System
You can check the signal strength of the XM radio signal and adjust the position of the XM Mini-Tuner System accordingly.

The Tuner screen appears.


The best signal is achieved when the antenna is pointing to the southern sky through an unobstructed window.
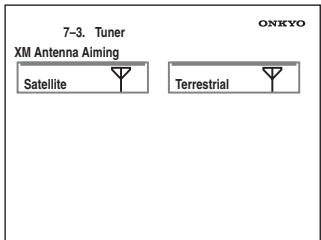
If you cannot receive a satellite signal, position the XM Mini-Tuner System so that as many bars as possible (up to 3) appear on the XM Terrestrial signal strength meter.
Notes:
- So long as the signal strength is good, you can enjoy XM Radio by using either satellite or terrestrial reception.
- Terrestrial signals are only available in certain areas.
- The XM information is only displayed when the SAT Radio Mode is set to "XM" or "XM/SIRIUS" (see page 2).
- If you're using both XM Satellite Radio and SIRIUS Satellite Radio and the Satellite mode is set to "XM/SIRIUS" (see page 2), signal strength meters for both systems appear on the same screen.
The following messages may appear while using XM Satellite radio.
CHECK ANTENNA
The XM antenna is not properly connected to the Mini-Tuner Dock. Check the connection. Check the antenna cable for damage.
CH UNAUTHORIZED
The XM channel you selected is blocked or cannot be receive with your XM subscription package.
Check xmradio.com or xmradio.ca for the latest channel listing.
To receive the desired channel, contact XM Satellite Radio.
NO SIGNAL
The XM Mini-Tuner can not receive the satellite signal. Check the XM antenna for obstructions to the southern sky. Check the antenna positioning with the Antenna Aiming function (see page 6).
LOADING
The AV receiver is tuning or decoding audio or text data. Please wait. If this occurs often, check the XM antenna position with the Antenna Aiming function. (see page 6)
OFFAIR
The XM channel you selected is not currently broadcasting. Select another channel.
UPGRADE XM TUNER
The connected XM CNP-1000 is incompatible. The AV receiver features advanced technology that is designed for use with the XM Mini-Tuner. Contact XM Listener Care and ask about upgrading your XM CNP-1000 to an XM Mini-Tuner. Have the AV receiver's model name and CNP-1000 XM ID number ready beforehand, and explain that your AV receiver is displaying the message "Upgrade XM Tuner". If you already have an XM Mini-Tuner connected and you see this message, turn off the AV receiver, make sure the XM Mini-Tuner is properly seated in the Mini-Tuner Dock, and then turn the AV receiver back on again. If the message reappears, contact XM Listener Care and explain the issue that you're experiencing and the corrective actions you've tried.
CHECK XM TUNER
The AV receiver is having difficulty communicating with the XM Mini-Tuner module. Make sure the XM Mini-Tuner is properly seated in the Mini-Tuner Dock. And make sure the Mini-Tuner Dock cable is properly connected to the AV receiver and is not damaged. If the issue persists, contact XM Listener Care. Have the AV receiver's model name ready beforehand, and explain the issue that you're experiencing and the corrective actions you've tried.
CH UNAVAILABLE
You may be attempting to select a channel that is unavailable or has changed to a different channel number. Check xmradio.com or xmradio.ca for the latest channel listing.
XM Listener Care phone number:
US: 1-800-967-2346
Canada: 1-877-438-9677