MI-SPORT - Muscle stimulator COMPEX - Free user manual and instructions
Find the device manual for free MI-SPORT COMPEX in PDF.
| Brand | COMPEX |
| Model | MI-SPORT |
| Product type | Muscle stimulator device |
| Power supply | Rechargeable nickel-metal hydride (NiMH) accumulator 4.8 V ~ 1200 mAh |
| Number of channels | 4 independent channels individually adjustable |
| Pulse shape | Rectangular, constant current compensated |
| Maximum current per pulse | 120 mA |
| Pulse duration | 60 to 400 microseconds |
| Pulse frequency | 1 to 150 Hertz |
| Integrated technology | mi-SENSOR (mi-scan, mi-action, mi-TENS, mi-RANGE) |
| Available programs | Sport, Cross-training, Physical preparation, Rehabilitation, Pain relief |
| Display | Screen with contrast and backlight adjustment |
| Charging | Specific charger supplied (Input: 90-264 VAC, Output: 9 V / 400 mA) |
| Battery life | Variable according to program and energy; full charge in 1h to 1h30 |
| Operating conditions | Temperature: 0°C to 40°C; relative humidity: 30% to 75% |
| Contraindications | Pacemaker, epilepsy, pregnancy (abdomen), arterial circulatory disorders, hernia |
| Maintenance and cleaning | Soft cloth and alcohol-based cleaning product without solvent |
| Warranty | 2 years on the stimulator and mi-sensor cable (parts and labor) |
| Standards | CE (Directive 93/42/EEC), IEC 60601-1, IEC 60601-1-2, IEC 60601-2-10 |
| Included accessories | Stimulator, charger, 4 electrode cables, 1 mi-sensor cable, electrodes, manuals, belt clip, motor point stylus, DVD, carrying case |
Frequently Asked Questions - MI-SPORT COMPEX
User questions about MI-SPORT COMPEX
0 question about this device. Answer the ones you know or ask your own.
Ask a new question about this device
Download the instructions for your Muscle stimulator in PDF format for free! Find your manual MI-SPORT - COMPEX and take your electronic device back in hand. On this page are published all the documents necessary for the use of your device. MI-SPORT by COMPEX.
USER MANUAL MI-SPORT COMPEX
E-mail: info@compex.fr
BENELUX
Compex
Type TR1509-06-E-133A03
Input 90-264 VAC / 47-63Hz / 0.5A max.
Output 9V / 1.4A / 15W
Output 9V / 400mA / 6W
Type TR1509-06-A-133A03
Input 90-264 VAC / 47-63Hz / 0.5A max. Output 9V / 1.4A / 15W
Type TR503-02-U-133A03
Input 90-264 VAC / 47-63Hz / 0.5A max.
Output 9V / 400mA / 6W
Type TR1509-06-U-133A03
Input 90-264 VAC / 47-63Hz / 0.5A max.
Output 9V / 1.4A / 15W
Neurostimulation
Easy-Snap-Elektrode:
Type TR1509-06-E-133A03
Input 90-264 VAC / 47-63Hz / 0.5A max. Output 9V / 1.4A / 15W
Type TR503-02-A-133A03
Input 90-264 VAC /47-63Hz /0.5A max. Output 9V/400mA/6W
Type TR1509-06-A-133A03
Input 90-264 VAC / 47-63Hz / 0.5A max.
Output 9V / 1.4A / 15W
:Type TR503-02-U-133A03
Input 90-264 VAC / 47-63Hz / 0.5A max.
Output 9V / 400mA / 6W
Type TR1509-06-U-133A03
Input 90-264 VAC / 47-63Hz / 0.5A max.
Output 9V / 1.4A / 15W
Neurostimulation
Type TR1509-06-E-133A03
Input 90-264 VAC / 47-63Hz / 0.5A max.
Output 9V / 1.4A / 15W
Type TR503-02-A-133A03
Input 90-264 VAC /47-63Hz / 0.5A max.
Output 9V / 400mA / 6W
Type TR1509-06-A-133A03
Input 90-264 VAC / 47-63Hz / 0.5A max.
Output 9V / 1.4A / 15W
Type TR503-02-U-133A03
Input 90-264 VAC / 47-63Hz / 0.5A max.
Output 9V/400mA/6W
Type TR1509-06-U-133A03
Input 90-264 VAC / 47-63Hz / 0.5A max.
Output 9V / 1.4A / 15W
Neurostimolazione
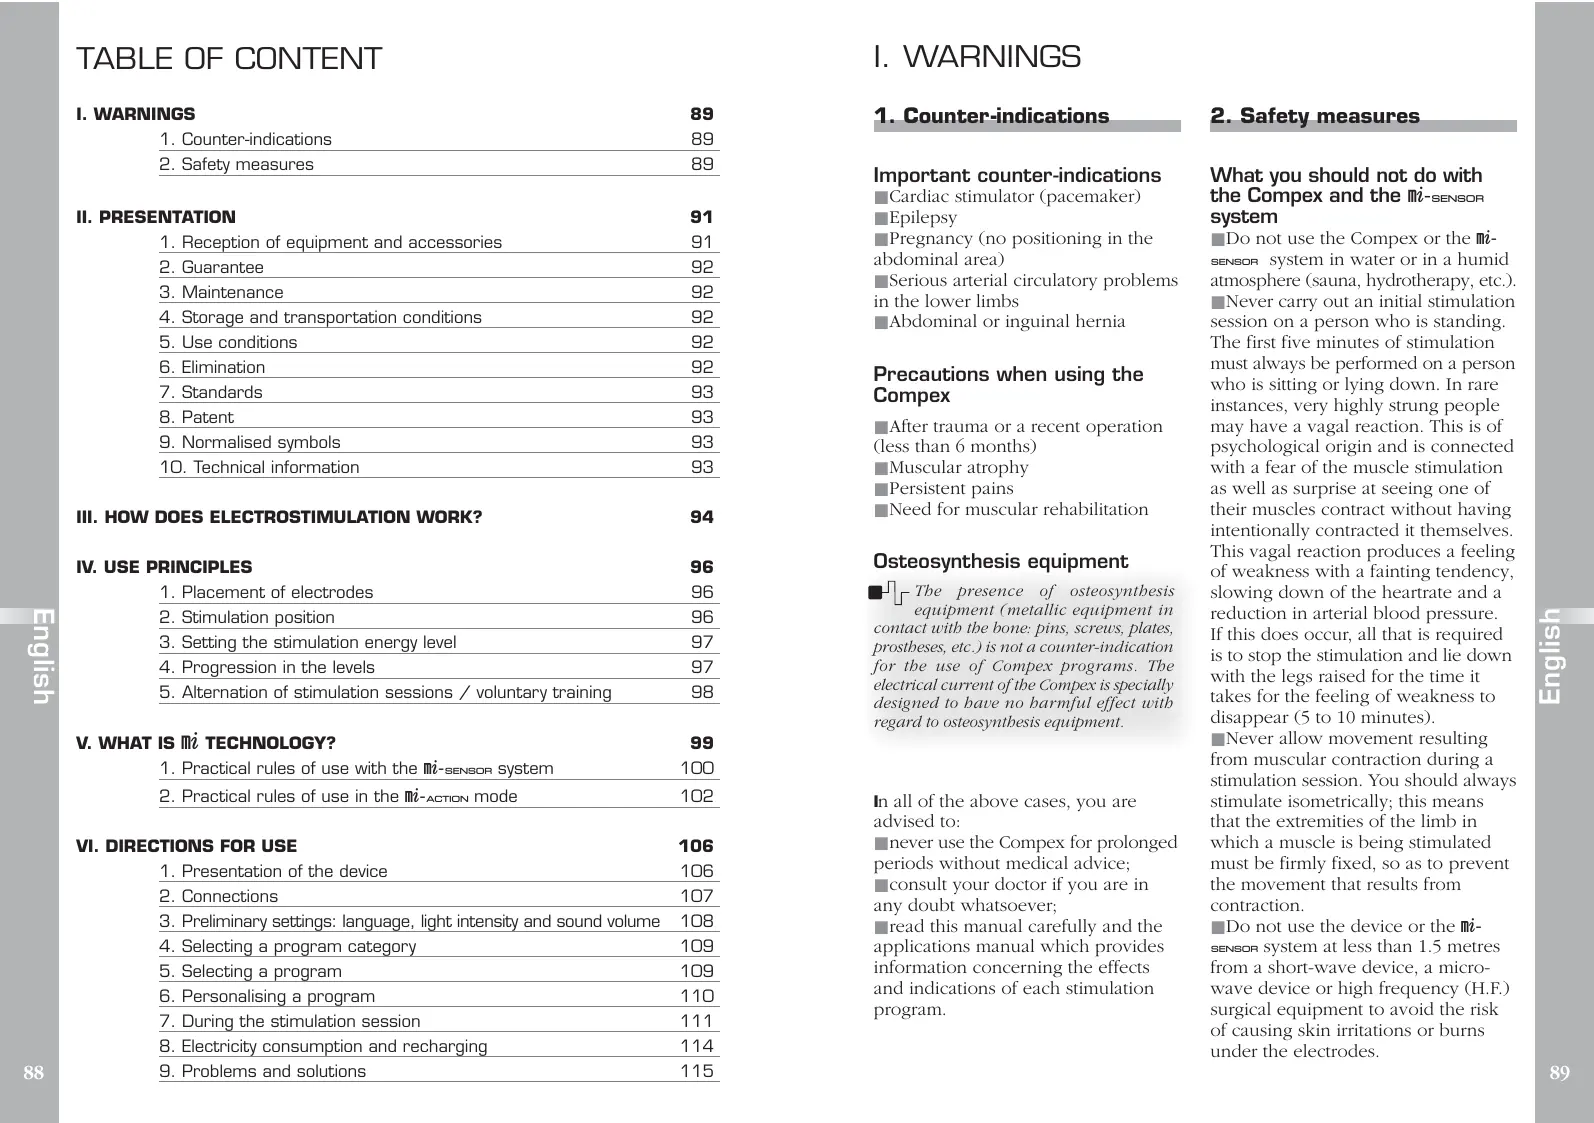
- Counter-indications 89
- Safety measures 89
II. PRESENTATION 91
- Reception of equipment and accessories 91
2.Guarantee 92 - Maintenance 92
4.Storage and transportation conditions 92
5.Use conditions 92 - Elimination 92
- Standards 93
- Patent 93
- Normalised symbols 93
- Technical information 93
III. HOW DOES ELECTROSTIMULATION WORK? 94
IV. USE PRINCIPLES 96
- Placement of electrodes 96
- Stimulation position 96
3.Setting the stimulation energy level 97 - Progression in the levels 97
- Alternation of stimulation sessions / voluntary training 98
V. WHAT IS MTECHNOLOGY? 99
- Practical rules of use with the mi-sensor system 100
2.Practical rules of use in the m i -ACTION mode 102
VI. DIRECTIONS FOR USE 106
- Presentation of the device 106
- Connections 107
- Preliminary settings: language, light intensity and sound volume 108
- Selecting a program category 109
- Selecting a program 109
- Personalising a program 110
7.During the stimulation session 111 - Electricity consumption and recharging 114
9.Problems and solutions 115
I. WARNINGS
1. Counter-indications
Important counter-indications
Cardiac stimulator (pacemaker)
Epilepsy
■ Pregnancy (no positioning in the abdominal area)
Serious arterial circulatory problems in the lower limbs
Abdominal or inguinal hernia
Precautions when using the Compex
After trauma or a recent operation (less than 6 months)
Muscular atrophy
Persistent pains
■ Need for muscular rehabilitation
Osteosynthesis equipment
The presence of osteosynthesis equipment (metallic equipment in contact with the bone: pins, screws, plates, prostheses, etc.) is not a counter-indication for the use of Compex programs. The electrical current of the Compex is specially designed to have no harmful effect with regard to osteosynthesis equipment.
In all of the above cases, you are advised to:
never use the Compex for prolonged periods without medical advice;
consult your doctor if you are in any doubt whatsoever;
■ read this manual carefully and the applications manual which provides information concerning the effects and indications of each stimulation program.
2. Safety measures
What you should not do with the Compex and the mi-sensor system
Do not use the Compex or the mi- sensor system in water or in a humid atmosphere (sauna, hydrotherapy, etc.).
Never carry out an initial stimulation session on a person who is standing. The first five minutes of stimulation must always be performed on a person who is sitting or lying down. In rare instances, very highly strung people may have a vagal reaction. This is of psychological origin and is connected with a fear of the muscle stimulation as well as surprise at seeing one of their muscles contract without having intentionally contracted it themselves. This vagal reaction produces a feeling of weakness with a fainting tendency, slowing down of the heartrate and a reduction in arterial blood pressure. If this does occur, all that is required is to stop the stimulation and lie down with the legs raised for the time it takes for the feeling of weakness to disappear (5 to 10 minutes).
Never allow movement resulting from muscular contraction during a stimulation session. You should always stimulate isometrically; this means that the extremities of the limb in which a muscle is being stimulated must be firmly fixed, so as to prevent the movement that results from contraction.
Do not use the device or the mi-sensor system at less than 1.5 metres from a short-wave device, a microwave device or high frequency (H.F.) surgical equipment to avoid the risk of causing skin irritations or burns under the electrodes.
Only use the electrode cables supplied by Compex.
- Do not disconnect the stimulator electrode cables during the session without first switching off the stimulator.
- Never connect stimulation cables to an external electric power supply because of risk of electric shock.
No not use rechargeable batteries other than the one supplied by Compex.
- Never recharge the stimulator when cables and electrodes are still connected onto the user.
- Never recharge the batteries with another charger than the one supplied with the Compex.
- Never use the Compex or the charger if it is damaged (case, cables, etc.) or if the compartment for the rechargeable battery is open. There is a risk of electric discharge.
- Disconnect immediately the charger if the Compex "bleeps" continuously, in case of abnormal heating or smell, or if smoke comes from the charger or the Compex. Do not recharge the batteries in a confined area (case, etc.) because of risk of fire or electric discharge.
- Keep the Compex and its accessories out of the reach of children.
- Do not allow any foreign items (soil, water, metal, etc.) to enter into the Compex, the compartment for the rechargeable battery and the charger.
Sudden temperature variations can create droplets in the device due to condensation. Use the device only once it reached ambient temperature.
Do not use the Compex while driving or operating machinery.
Do not use the stimulator in the mountains at an altitude higher than 3.000 metres.
Where you should never apply electrodes and the motor point pen...
To the head.
Counter-laterally: do not use the two poles of the same channel (one electrode connected to the positive/ red pole and one electrode connected to the negative/black pole) on either side of the body centreline (eg: right arm and left arm).
To or in the vicinity of skin lesions of any kind (wounds, inflammations, burns, irritations, eczema, etc.).
Precautions when using the mi-sensor system
To access the mi functions of the Compex, the special electrode cable of the mi-sensor system must be connected before the device is switched on.
- Avoid connecting the special electrode cable of the mi-sensor system when the Compex is switched on.
Do not disconnect the special electrode cable of the mi-sensor system before switching off the device.
To work correctly, the m-sensor system must not be blocked or subjected to pressure.
Precautions when using the electrodes and the motor point pen...
Only use the electrodes/the pen supplied by Compex. Other electrodes/ pens may have electrical properties that are unsuitable for the Compex stimulator.
- Do not remove or move the electrodes during a stimulation session without first switching off the instrument.
Do not plunge the electrodes/the pen into water.
Do not apply a solvent of any kind to the electrodes/the pen.
Before applying the electrodes, it is recommended to wash and degrease the skin, and then dry it.
Apply the whole surface of the electrodes to the skin.
For very important reasons of hygiene, each user must have his own electrode set. Do not use the same electrodes on different people.
Do not use a set of electrodes for more than fifteen sessions, as the quality of the contact between the electrode and the skin, which is important for the comfort and
effectiveness of stimulation, progressively degrades.
In certain people with very sensitive skin, redness may be observed under the electrodes after a stimulation session. Generally, this redness is completely harmless and disappears after 10 to 20 minutes. However, avoid starting a stimulation session on the same area until the redness is no longer evident.
Before using the motor point pen, clean and disinfect the tip of the pen.
II. PRESENTATION
1. Reception of equipment and accessories
Your set is supplied with:
A stimulator
A battery charger
One set of electrode cables with colour indicators (blue, green, yellow, red)
One special electrode cable for the mi-sensor system
Bags containing the electrodes (small (5× 5cm) and large (5× 10cm) electrodes)
A user manual
An applications manual with electrodes placements
A belt clip
A motor point pen and a gel sample
A quick start guide "Test your Compex in 5 minutes"
A DVD explaining how to use your Compex and the training planner
A travel pouch
2. Guarantee
The Compex stimulators are contractually covered with a guarantee of 2 (two) years: register on our web site: www.compex.info (section "Register").
The Compex guarantee comes into effect on the date of purchase of the device.
The guarantee covers the stimulator and the special electrode cable for the
mi-sensor system (goods and labour), but does not cover the other cables, the electrodes and the batteries. It covers all the defects resulting from a problem of quality of the material or from a production error. It does not apply if the device was damaged as the result of a shock, an accident, incorrect use, insufficient protection against humidity, plunging into water or a repair not carried out by our after-sales service department.
The guarantee is valid only on presentation of proof of purchase.
Legal rights are not affected by this guarantee.
3. Maintenance
To clean your unit, use a soft duster and an alcohol-based cleaning product, which does not contain any solvents.
The user must not attempt any repairs to the device or any of its accessories. Never dismantle the Compex or the charger containing high-voltage parts because of risk of electric discharge.
Compex Medical SA declines all responsibility for damages and consequences resulting from any attempt to open, modify or repair the device or any of its components by a person or a service centre not officially approved by Compex Medical SA.
Compex stimulators do not require
calibration or verification of performance parameters. The characteristics are systematically verified and validated for each device manufactured. These characteristics are stable and do not vary when used under normal conditions.
If your device seems not to function as expected, regardless of the situation, contact an official Compex service centre for assistance.
Medical and health professionals must refer to local legislation for information related to maintenance. Normally, these laws require verification of certain criteria at regular intervals.
4. Storage and transportation conditions
The Compex contains rechargeable batteries and so the storage and transportation conditions must not exceed the following figures:
Storage and transportation temperature: from -20°C to 45°C
Max. relative humidity: 75%
Atmospheric pressure: from 700 hPa to 1060 hPa
5. Use conditions
Temperature of use: from 0^ to 40^
Max. relative humidity: from 30% to 75%
Atmospheric pressure: from 700 hPa to 1060

Do not use in an explosion risk area.
6. Elimination
The Directive 2002/96/CEE (WEEE) has a first priority, the prevention of waste electrical and electronic equipment, and in addition, the re-use, recycling and other forms of recovery of such wastes so as to reduce the
disposal of waste. The pictogram wheeled bin barred means that the equipment can not be thrown with the household refuse, but that it makes the object of a selective collection.
The equipment has to be given to a suitable collection point for the treatment. By this way, you contribute to the safeguarding of the natural resources and the human health protection.
Batteries must be disposed of in accordance with your country's national laws governing the disposal of such items.
7. Standards
The Compex is based directly on medical technology.
To guarantee your safety, the design, manufacturing and distribution of Compex are in conformity with the requirements of the European Directive 93/42/CEE.
The device is in conformity with the standard for general safety rules for electromedical devices IEC 60601-1, the standard for electromagnetic compatibility IEC 60601-1-2 and the standard for special safety rules for nerve and muscle stimulators IEC 60601-2-10.
Current international standards (IEC 60601-2-10 AM1 2001) require that a warning be given concerning the application of electrodes to the thorax (increased risk of cardiac fibrillation).
Directive 2002/96/CEE Waste electrical and electronic equipment (WEEE).
8. Patent
mi-SENSOR
US Patent 6,324,432. Patents pending in the USA, Japan and Europe.
Snap electrode:
Patent pending
9. Normalised symbols
Important: Under some conditions, the effective figure for the stimulation pulses can exceed 10 mA and 10V The information given in this handbook must be strictly observed.
The Compex is a class II device unit

with its own internal electric power, with type BF applied sections.

Waste electrical and electronic equipment (WEEE).

The "On/Off" switch is a multifunction key:
| Functions | Symbol N° (according to CEI 878) |
| On/Off (2 positions, stable) | 01-03 |
| Waiting or preparation for part of the unit | 01-06 |
| Stop (switching off) | 01-10 |
10. Technical information
General points
Power supply: NIMH rechargeable battery (NIMH) (4,8V≈ 1200mA / h)
Chargers: The only chargers used for recharging the battery bear the following information:
E E E E E E E E E E E E E E E E E E E E E E E E E E E E E
Type TR503-02-E-133A03
Input 90-264 VAC / 47-63Hz / 0.5A max.
Output 9V / 400mA / 6W
Type TR1509-06-E-133A03
Input 90-264 VAC / 47-63Hz / 0.5A max.
Output 9V / 1.4A / 15W
雪
Type TR503-02-A-133A03
Input 90-264 VAC/47-63Hz / 0.5A max.
Output 9V/400mA/6W
Type TR1509-06-A-133A03
Input 90-264 VAC / 47-63Hz / 0.5A max.
Output 9V / 1.4A / 15W
当
Type TR503-02-U-133A03
Input 90-264 VAC / 47-63Hz / 0.5A max.
Output 9V / 400mA / 6W
Type TR1509-06-U-133A03
Input 90-264 VAC / 47-63Hz / 0.5A max.
Output 9V / 1.4A / 15W
Neurostimulation
All electrical specifications are given for a charge between 500 and 1000 ohms per channel.
Channels: Four independent and individually adjustable channels electrically insulated from each other and from ground
Impulse shape: Constant rectangular current compensated to eliminate any direct current component to avoid any residual skin polarisation
Maximum current of an impulse: 120 milliamperes
Intensity increase interval:
Manual stimulation intensity adjustment: 0-999 (energy units)
Minimum interval: 0.5mA
Impulse duration: from 60 to 400 microseconds
Maximum quantity of electricity per impulse: 96 microcoulombs (2× 48 C compensated)
Typical rise time for an impulse: 3 microseconds (between 20% and 80% of maximum current)
Impulse frequency: from 1 to 150 Hertz
III. HOW DOES ELECTROSTIMULATION WORK?
The principle of electrostimulation is to stimulate nerve fibres by means of electrical impulses transmitted by electrodes.
The electrical impulses generated by Compex stimulators are high-quality impulses - ensuring safety, comfort and efficiency - that stimulate different types of nerve fibres:
- the motor nerves to stimulate a muscular response. The quantity of work and the benefits obtained depend on the stimulation parameters. This is known as electromuscularstimulation (EMS).
- certain types of sensitive nerve fibres to obtain analgesic or pain-relieving effects
1. Motor nerve stimulation (EMS)
In voluntary activity, the order for muscular work comes from the brain, which sends a command to the nerve fibres in the form of an electrical signal. This signal is then transmitted to the muscular fibres, which contract.
The principle of electrostimulation accurately reproduces the process observed during a voluntary contraction. The stimulator sends an electrical current impulse to the nerve fibres, exciting them. This excitation is then transmitted to the muscular fibres causing a basic mechanical response (= muscular twitch). The latter constitutes the basic requirement for muscular contraction.
This muscular response is completely identical to muscular work controlled by the brain. In other words, the muscle cannot distinguish whether the command comes from the brain or from the stimulator.
The parameters of the Compex programs (number of impulses per
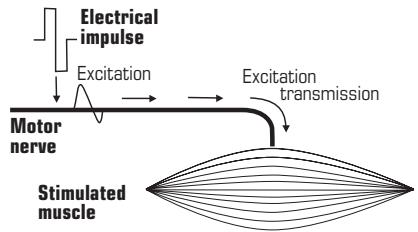
Basic mechanical response = muscular twitch
second, contraction time, rest time, total program time) subject the muscles to different types of work, according to muscular fibres. In fact, different types of muscular fibres may be distinguished according to their respective contraction speed: slow, intermediate and fast fibres. The fast fibres will obviously predominate in a sprinter, while a marathon runner will have more slow fibres.
With a good knowledge of human physiology and a perfect mastery of the stimulation parameters of the va
rious programs, the muscular work can be directed very precisely towards the desired goal (muscular reinforcement, increased blood flow, firming up, etc.).
2. Stimulation of the sensitive nerves
The electrical impulses can also excite the sensitive nerve fibres to obtain an analgesic or pain-relieving effect.
The stimulation of the tactile sensitive nerve fibres blocks the transmission of pain by the nervous system. The stimulation of another type of sensitive fibres creates an increase in the production of endorphins and, therefore, a reduction of pain.
With pain relief programs, electrostimulation can be used to treat localized sharp or chronic pains as well as muscular pains.

arning: do not use the pain relief programs for a long period without medical advice.

Benefits of electrostimulation
Electrostimulation is a very effective way to make your muscles work:
with significant improvement of different muscular qualities,
without cardio-vascular or mental fatigue,
with limited stress on the joints and tendons.
Electrostimulation thus allows a greater quantity of work by the muscles compared with voluntary activity.
To be effective, this work must involve the greatest possible number of muscular fibres. The number of fibres working depends on the stimulation
energy. It will therefore be necessary to use the maximum tolerable energy. The user controls this aspect of stimulation. The higher the stimulation energy, the greater the number of muscular fibres that are working and, therefore, the more significant the progress achieved.
To maximize your results, Compex recommends that you complement your electrostimulation sessions with other efforts, like:
regular exercise,
proper and healthy nutrition,
balanced lifestyle.
IV. USE PRINCIPLES
The use principles presented in this section should be considered general rules. For all programs, it is recommended that you read carefully the information and advice on use presented in the applications manuals.
1. Placement of electrodes
It is recommended that you comply with the suggested placements. To do this, refer to the pictures and pictograms shown on the inside cover of the applications manual.
A stimulation cable consists of two poles:
a positive pole (+) = red connection
a negative pole (-) = black connection
A different electrode must be connected to each of the two poles.
Note: It is possible and normal to have an electrode arrangement that leads one electrode connection free from a cable.
Depending on the characteristics of the current used for each program, the electrode connected to the positive pole (red connection) is more effective when placed in a "strategic" position.
For all muscle electrostimulation programs, i.e., programs involving muscle contractions, it is important to place the positive polarity electrode on the muscle motor point.
The choice of electrodes size (large or small) and the correct positioning of the electrodes on the muscular group to be stimulated are determinant and essential factors for the effectiveness of the stimulation. Therefore, always use the size of electrodes shown in the pictures. Unless you have other specific medical instructions, always follow the placement directions in the pictures. If necessary, find the best position by slightly moving the positive polarity electrode, so as to
obtain the best muscle contraction or the position that seems most comfortable.
For stimulation with the M -sensor system, all the suggested placements represent the optimal positioning of this system. It is therefore recommended that you follow these indications strictly.
Compex Group disclaims all responsibility for electrodes positioned in any other manner.
2. Stimulation positions
To determine the stimulation position to adopt depending on the placement of the electrodes and the chosen program, refer to the pictures and pictograms on the inside cover of the applications manual.
The stimulation position depends on the muscular group to be stimulated and the program chosen.
For the programs involving powerful muscular contractions, the muscle should always be stimulated in an isometric fashion. Consequently, you should fix the extremity of the stimulated limb(s) firmly. In this way, you provide maximum resistance to the movement and prevent any shortening of the muscle during the contraction, which could create cramp pains and serious stiffness after the session. For example, when stimulating the quadriceps, the user should be in a seated position with the ankles fixed with straps to prevent extension of the knees.
For the other types of programs (for example, the Pain and Recovery programs), which do not involve muscular contractions, position yourself as comfortably as possible.
3. Setting the stimulation energy level
In a stimulated muscle, the number of recruited fibres depends on the stimulation energy. It is therefore absolutely necessary to use maximum stimulation energies so as to involve the greatest possible number of fibres. Below a significant stimulation energy level, it is pointless, for an average user, to do stimulation sessions. In fact, the number of fibres involved in the stimulated muscle is too low for any interesting improvement in the performance of that muscle.
The progress of a stimulated muscle will be all the greater if a high number of its fibres are recruited by the Compex. If only 1/10 of the fibres of a muscle work under stimulation, only that 1/10 can progress. That is obviously much less appreciable than if 9/10 of the fibres work and can therefore progress. You should therefore take care to work with maximum stimulation energies, i.e., always at the limit of what you can support.
There is obviously no need for you to reach the maximum current strength right from the first contraction of the first session of the first cycle. If you have never used Compex stimulation before, you should do only half of the desired programme during the first 3 sessions with sufficient energy to produce powerful muscular contractions to familiarise yourself with the technique of electrostimulation. You can then start your first stimulation cycle with your own specific program and level. After the warm-up, which must produce very clear muscular twitches, you should raise the stimu
lation energy progressively, from contraction to contraction, during the first three or four minutes of the work sequence. You should also progress with stimulation energies used from session to session, particularly during the first three sessions of a cycle. A normally prepared person will already reach very significant stimulation energies during the fourth session.
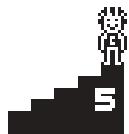
4. Progression in the levels
In general, it is not advisable to go through the different levels quickly with the intention of reaching level 5 as fast as possible. In fact, the different levels correspond to progress with electrostimulation.
The most frequent error is to change from level to level as stimulation occurs at increasingly higher stimulation energies. The number of fibres subjected to stimulation depends on the stimulation energy. The nature and amount of work that these fibres do depend on the program and level. The aim is, first of all, to progress through the electrical stimulation energies and then through the levels. The more numerous the muscle fibres you stimulate, the more numerous will be the fibres that are going to progress. But the speed of progress of these fibres and their aptitude for operating at a higher rating depend on the program and level used, the number of sessions per week and the length of these sessions, and also on intrinsic factors particular to each individual.
The simplest and most usual procedure is to start with level 1 and raise the level when changing to a new stimulation cycle.
At the end of a cycle, you may either start a new cycle at the next level up or do some maintenance at the rate of 1 session a week at the last level reached.
5. Alternation of stimulation sessions / voluntary training
The stimulation sessions can be done outside or during voluntary training. When voluntary training and stimulation are done during the same session, it is generally recommended that the voluntary training be done first followed by the stimulation. This means that the voluntary training is not done on muscle fibres which are already tired. This is particularly important for strength and explosive strength training. However, in resistance training, it can be very useful to proceed in the reverse order. Before the voluntary training, by means of stimulation for resistance, a "specific pre-fatigue session" is carried out on the muscle fibres without general and cardio-vascular fatigue. In this way, the voluntary effort on the "prepared" fibres will push the glycolytic metabolism faster and further.
V. WHAT IS MI TECHNOLOGY?
stands for "muscle intelligence"TM (All items referring to this technology are preceded by the symbol ).
This technology takes into account the specificities of each of our muscles and thus offers stimulation adapted to their characteristics.
It's simple, as the data is transmitted to the stimulator automatically!
It's personalised, as each of our muscles is unique!
mi-SPORT
Is the name of the muscular stimulator itself.
mi-SENSOR
This is a little sensor that links the stimulator to the electrodes. mi-sensor is the key component that enables to measure certain physiological characteristics of a muscle, to analyse them and to adapt the stimulation parameters accordingly.
It is this component that allows the muscle to talk.
mi-SCAN
This function adapts the electrostimulation session to the physiology of each user. Just before starting the work session Mi-SCAN probes the chosen muscular group and automatically adjusts the stimulator parameters to the excitability of this area of the body. It is a truly personalised measurement.
mi-ACTION
This is a work mode in which a voluntary muscular contraction is automatically accompanied by a contraction caused by electrostimulation. The electrostimulation contraction is therefore perfectly controlled, and the working session thus becomes more comfortable (from both the psychological and muscular standpoints), more intensive (the muscle works more and in greater depth) and more complete (improvement of coordination).
Mi-TENS
The optimal stimulation energy needs to be identified and used throughout the TENS program (analgesic). On the basis of the measurements taken regularly during the session, the device permanently and automatically readjusts the stimulation energy to avoid any onset of muscular contraction, which is strongly counter-indicated for programs of this type.
Mi-RANGE
This function indicates the ideal energy adjustment range for the low frequency programs. Using Mi-RANGE , you no longer need to ask yourself whether the energy you are using is too high or too low: this function tells you, thus optimising the efficiency of your treatment or training.

... as though each session had been programmed for you ...
1. Practical rules of use with the mi-sensor system
To access the mi technology functions of the Compex, the special electrode cable of the mi-Sensor system must be already connected before switching on the device.
Avoid connecting the special electrode cable of the -sensor system when the Compex is switched on. To work correctly, the -sensor system must not be blocked or subjected to pressure. During the stimulation session, self-adhesive electrodes must always be clipped on the special electrode cable of the -sensor system.
mi-scan function
The mi-SCAN function is accessible only for programs requiring the choice of a muscular group.
The mi-scan function allows you to adapt the characteristics of the stimulation impulses to the individual specificities of each person and the excitability characteristics of the stimulated muscle. This function is implemented, at the start of the program, by a short sequence during which measurements are taken (a horizontal bar scans the figurine at the left of the screen).
Throughout the entire measurement test, you must remain completely still and be perfectly relaxed. The mi-sensor system is very sensitive: the smallest contraction or the least movement could disturb the measurement test.
The duration of the mi-scan test varies depending on the muscle involved and the individual characteristics of each person. The test lasts 12 seconds on average and never more than 21 seconds.
During the test, an unpleasant tickling sensation may sometimes be felt by certain people.
Once the test has been completed, the program can start.
mi-ACTION mode
The -action mode allows the user to start the muscular contraction phase by voluntarily contracting the stimulated muscle. It thus offers an opportunity to associate voluntary work and stimulation.
The mi-ACTION mode is available only for certain programs that allow this work mode.
Programs using the mi-action mode are always preceded by the mi-scan measurement test (see previous section).
The mi-Action work mode is operational during the active rest phases of a work sequence. It is not operational during warming-up and relaxation sequences.
After the warming-up phase, the first muscular contraction is started automatically.
The voluntary start of a contraction (during an active rest phase) is possible only within a given time span that varies depending on the program used. An alternation of sound signals delimits this time span in the following order:
An initial sound signal (consisting of increasingly close "bleeps") indicates that the start of the voluntary contraction phase is possible.
The sound signal is continuous: this is the ideal time to start the voluntary contraction phase.
The sound signal decreases: the start is still possible and the work rate is still satisfactory.
After a certain time - which varies depending on the programs - during which the "bleeps" are more spaced out, the device automatically goes
into the "Pause" mode if no contraction phase has been started.
In the mi-Action mode, at the end of each contraction, the muscle must return to the same conditions that existed during the previous rest phase. You must therefore always make sure that exactly the same situations of relaxation and positioning that existed previously are restored, starting from the end of each contraction. If these conditions are not satisfied, the chronometer stops. To restart it, just increase the stimulation energy or wait until the stimulator registers the new position of your muscle (this takes place after 6 seconds).
To restart a muscular contraction during the active rest phase, the mi-sensor system must detect strong muscular twitches. To do this, the device prompts you, if necessary, to increase the stimulation energies during the active rest phase. If, despite that, the system does not detect sufficient muscular twitches within 20 seconds, the device goes into the "Pause" mode.
mi-TENS function
The mi-TENS function allows you to limit considerably the onset of unwanted muscular contractions, thus assuring a maximum of comfort and effectiveness.
The mi-TENS function is available only for the Modulated TENS and Epicon-dylitis.
For these programs, the _-TENS function allows you to control the stimulation energies while maintaining them at an effective level and considerably limiting the onset of muscular contractions.
Short measurement tests (lasting 2 to 3 seconds) are carried out regularly throughout the entire program.
There is a test phase after each increase of the stimulation energies.
To ensure the correct performance of these tests, you must remain perfectly still during this time.
Depending on the results of the measurement tests recorded by the device, the level of the stimulation energies may be slightly decreased automatically.
It is important always to adopt the most comfortable possible stimulation position. Also, you should try to remain still and not contract the muscles of the stimulated area.
Mi-RANGE function
This function indicates the ideal energy adjustment range for programs whose efficiency requires vigorous muscular twitches.
The -RANGE function is therefore accessible only for programs using low stimulation frequencies (less than 10 Hertz).
For programs allowing the use of the -RANGE function, the stimulator checks whether you are in the ideal energy range. If you are below the range, the stimulator prompts you to increase the energy by displaying + signs.
Once the stimulator has detected your ideal adjustment range, a bracket appears to the right of the bar chart of the channel to which the mi-sensor system is connected. This bracket indicates the energy range within which you should work for optimal stimulation.
If you adjust the stimulation energy below the ideal treatment range, the stimulator prompts you to increase it again with a continuous display of blinking + signs.
2. Practical rules of use in the -ACTION mode
To achieve maximum effectiveness, the M -action work mode requires good muscular qualities. Muscles with poor performance may, in certain cases, prevent the voluntary start of the contraction.
The -action work mode, associated with exercises carried out dynamically (i.e., with an associated movement), should be reserved for sportsmen doing voluntary muscular training and already familiar with muscular training by electrostimulation. Some of these exercises (such as squats) are difficult to do in the -action work mode, because of the particular order of the specific motor sequences of the exercise.
In the event of repeated failures when using the -action work mode, it is recommended that you carry out a complete work cycle in the "classic" mode, before making any new attempt in the -action mode.
The electrostimulation carried out with the "classic" type programs of the Compex gives particularly convincing results. The mi technology with which your stimulator is equipped goes even further and offers many additional advantages. The programs of the categories Sport, Cross-training, Conditioning and Rehabilitation, used in mi-action mode, offer certain undeniable benefits:
They ensure even more effective work, as they associate voluntary exercises and electrostimulation, which together stimulate the muscular fibres more intensively.
They leave the user free to choose whether to start a contraction, thus making the use of electrostimulation even more comfortable.
They require active participation and encourage the user to become fully involved in his treatment.
To make the most of all these advantages, it is particularly important to comply with certain rules of use.
The following table shows the different muscular groups and gives some very useful indications concerning the best stimulation position to adopt and how to start a contraction voluntarily.
| Muscular groups | Placement of electrodes | Stimulation positions | Voluntary start of the contraction phase |
| Plantar arch muscles | Take up a seated position with your feet resting on the floor | Vigorously contract the muscles of your plantar arch, trying to dig your toes into the floor | |
| Peroneous muscles | Take up a seated position with your feet resting on the floor | Contract your peroneous muscles by exercising a vigorous pressure on the floor with your big toe, while also trying to raise the outer toes from the floor | |
| Tibialis anterior | Take up a seated position with your feet placed under a piece of furniture, to avoid any ankle bending | Contract your tibialis anterior muscles while vigorously trying to raise the tip of your foot against an object that resists and prevents this movement | |
| Calf muscles | Take up a seated position with your back and feet firmly placed against supportsThis position is easy to adopt by sitting, for example, in a doorframe | Vigorously contract your calf muscles while strongly trying to push the tip of your foot against an object that resists and prevents this movement | |
| Hamstrings | Lie flat on your stomach with your ankles fixed in a convenient way | Contract vigorously the muscles on the back of the thigh (hamstrings) while trying to bend your knees | |
| Adductors | Take up a seated position and place a rigid (but comfortable) object between your knees | Strongly contract your adductors, while vigorously trying to bring your knees together | |
| Quadriceps | Take up a seated positionThe work can be done in two ways:■ statically, if you have taken the necessary measures to block the movement of your knees■ dynamically, if you want to emphasise work with movement, against an object offering resistance created by using heavy weights | Strongly contract your quadriceps, while trying to extend your legs | |
| Buttocks | Lie down on your stomach or stand upSpecial recommendations:For the buttocks, the mi-action mode requires very good muscular qualities and is not compatible with certain morphological configurationsIn the event of repeated failures with the mi-action mode, we recommend work on the buttocks in the "classic" mode | Vigorously contract your buttock muscles, while strongly trying to close your buttocks and trying to bring your thighs behind your trunk | |
| Abdominal muscles | Lie down stretched out on your back, which can be slightly raisedThe work can be done in two ways:■ statically, if you are simply trying to voluntarily start the muscular contraction phase■ dynamically, if you want to associate an exercise with the movement that consists of bringing the trunk towards the thighs; in this case, take care not to accen-tuate the lumbar region arch (lordosis); to do this, it is essential to work always with your knees well bent | Strongly contract your abdominal muscles, while strongly trying to raise your head and shoulders from their support | |
| Low back muscles | Take up a seated positionSpecial recommendations:Because of the anatomical and morphological specificity of the low back muscles region, it is necessary to have muscles with particularly good performance to work in the mi-action modeIn the event of repeated failures with this work mode, we recommend work in the "classic" mode or to use the recommended placement for combined stimulation of the low back muscles and erector spinalis (picture n° 14); in this case, always take care to position the mi-sensor system at the level of the dorsal region muscles, as shown in the picture | Vigorously contract the low back muscles, while making an effort to sit as tall as possible |
| Muscular groups | Placement of electrodes | Stimulation positions | Voluntary start of the contraction phase |
| Erector spinalis | Take up a seated position | Vigorously contract the dorsal region muscles, while making an effort to sit as tall as possible | |
| Cervical muscles | Take up a seated position | Vigorously contract the dorsal region muscles, while making an effort to sit as tall as possible | |
| Trapezius | Take up a seated position | Strongly contract your trapezius muscles, while vigorously trying to shrug your shoulders | |
| Deltoids | Take up a seated position, with your elbows placed inside armrests to create resistance of the arms to their movement away from the body | Vigorously contract your deltoids, while strongly trying to move your elbows away from your body | |
| Latissimus dorsi | Take up a seated position, with your elbows placed outside armrests to create resistance of the arms to their movement towards the body | Vigorously contract your latissimus dorsi, while strongly trying to move your elbows towards your body | |
| Pectoralis | Take up a seated position, with the palms of your hands in contact with each other | Vigorously contract your pectoral muscles, while trying to press strongly the palms of your hands against each other | |
| Current international standards require that a warning be given concerning the application of electrodes to the thorax: increased risk of cardiac fibrillation | |||
| Triceps | Take up a seated position, with your forearms and hands resting on armrests | Vigorously contract your triceps, while strongly trying to dig the palms of your hands into the armrests | |
| Biceps | Take up a seated position, with your forearms resting on armrests and the palms of your hands imperatively facing upwards Use a fixing system to avoid any movement of your elbows during stimulation | Vigorously contract your biceps, while trying strongly to move the palms of your hands towards your shoulders | |
| Hand extensors | Take up a seated position, with your forearms and the palms of your hands resting on armrests Fix your hands solidly to the armrests | Vigorously contract your hand extensors muscles, while trying to raise your hands | |
| Hand flexors | Take up a seated position, with your forearms resting on armrests Hold a crush-proof object in your hands so that your fingers are slightly bent | Strongly contract your hand flexors muscles, while strongly trying to grip the object that you were holding in your hands | |
VI. DIRECTIONS FOR USE
Before using the unit for the first time, you are strongly advised to take careful note of the counter-indications and safety measures detailed at the beginning of this manual (chapter I: "Warnings"), as this powerful equipment is neither a toy nor a gadget!
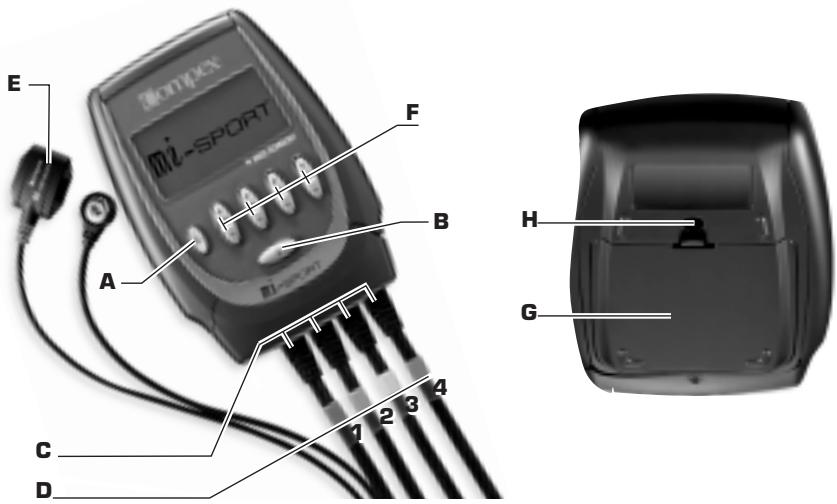
1. Presentation of the device
A - "On/Off" switch
B - "i" button:
to increase the energy level of several channels simultaneously
- to gain access to the top 5 menu (the 5 most recently used programs)
- to gain access to the contraction info menu (times and number of contractions)
C - Sockets for the 4 electrode cables
D - Electrode cables
channel 1 = blue
channel 2 = green
channel 3 = yellow
channel 4 = red
E - Electrode cable for the mi-sensor system
F - " +"/- " keys of the 4 stimulation channels
G - Compartment for the rechargeable battery
H-Belt clip socket
2. Connections
The electrical impulses generated by the Compex are transmitted to the nerves by self-adhesive electrodes. The choice of the size, the connection and the correct positioning of the electrodes are essential factors for ensuring effective and comfortable stimulation. So they require particular care. To do all this- and for information on the recommended stimulation positions - refer to the pictures and pictograms in the inside cover of the applications manual. The specific applications also provide useful relevant information.
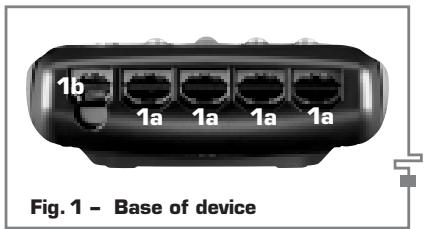
1a Sockets for the four electrode cables
1b Socket for the battery charger
Connecting the electrodes and cables
The electrode cables are connected to the stimulator through sockets on the base of the device.
Four cables can be connected simultaneously to the four channels of the device.
For easier use and better identification of the four channels, we advise you to follow the colour of the electrode cables and the stimulator sockets:
blue = channel 1 yellow = channel3
green = channel 2 red = channel 4
In addition to the four classic electrode cables, a fifth electrode cable is supplied with your Compex. This cable is equipped with the mi- sensor system giving access to all the mi (muscle intelligence) functions of your stimulator.
The special cable of the mi-sensor system can be connected to any one of the four sockets of the stimulation channels located on the front of the device and two electrodes are "clipped" onto it in the same way as for a classic cable.
It is important to place the electrodes correctly to the cable connectors; in order to do so, press the connector to the electrode until you bear a click.
Connecting the motor point pen
Use the motor point pen strictly for locating a motor point, as per the instructions described in this manual. Before using the motor point pen, clean and disinfect the tip of the pen.
The Compex is supplied with a motor point pen that allows you to locate exactly the motor point of the muscular group(s) to be stimulated. The following diagram indicates how to connect this accessory.

1c You must connect the positive (red) connection to the tip of the motor point pen. The other connection (black) must be connected to the negative electrode, placed according to the picture for the stimulated muscle.
Note: Concerning the actual use of the pen, refer to applications manual : " Test category", "Locating a motor point".
Connecting the charger
The Compex has considerable operating autonomy, as it uses rechargeable batteries. To recharge them, use the charger supplied with your device and connect it to the base of the device, then plug the charger in a socket.
To recharge the Compex, first disconnect the electrode cables from the device.
Before using your stimulator for the first time, it is always strongly recom
mended that you completely charge the battery to improve its autonomy and extend its working life.
3. Preliminary settings: language, light intensity and sound volume
Before using the unit for the first time, you should select the working language of the device which is displayed on the options screen. Proceed as per the instructions described below.
Afterwards, for the greatest comfort, Compex offers you a number of setting options (operating language selection, display contrast setting, adjusting backlighting and sound volume setting).
To do this, display the options screen by pressing the "On/Off" switch on the left of the Compex and hold it down for a few seconds.
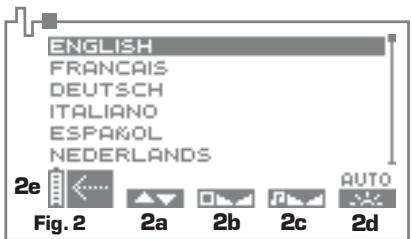
2a To select the language of your choice, press the " + " / - " key of channel 1.
2b To set the contrast of the display, press the + / - key of channel 2.
2c To set the sound volume, press the + / - of channel 3.
2d To adjust backlighting, press the "+"/"" key on channel 4 (on: backlighting is permanently activated; off: it is not activated; auto: it is activated every time a key is pressed)
2e To confirm the parameters selected, press the "On/Off" switch. Your stimulator saves your options. It is now ready for use with the settings you selected.
4. Selecting a program category
To switch on your stimulator, briefly press the "On/Off" switch on the left of the Compex. A musical signal can be heard and a screen showing the different program categories is displayed.
Before choosing a program, you should select the desired category.
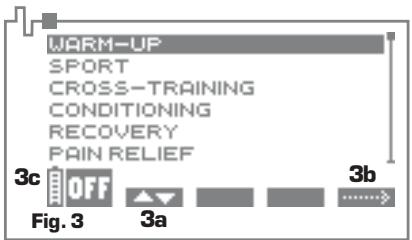
3a To select the desired category, press the + / - key of channel 1.
3b To confirm your choice and to move on to the program selection screen, press the + / - key of channel 4.
3c Press the "On/Off" key to switch off the stimulator.
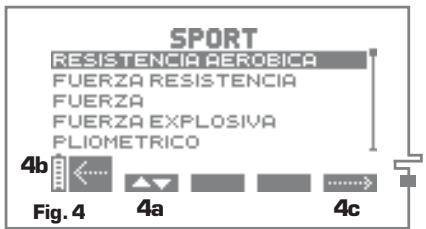
5. Selecting a program
To choose a program, it is particularly useful to consult the applications manual.
Regardless of the category you selected in the previous step, a list containing a select number of programs appears on the screen.
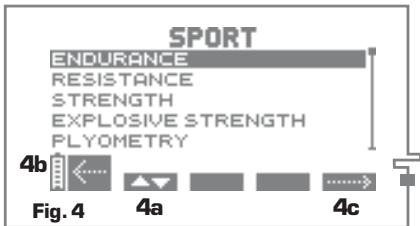
4a To select the desired program, press the + / - key of channel 1.
4b Press the "On/Off" key to return to the previous screen.
4c After selecting the desired program, press the "+" or -" key of channel 4 which, depending on the program selected, displays the symbol START or a) START = the stimulation session starts immediately; b) = a parameter setting screen displays.
TOP 5
To make your Compex more pleasant and easier to use, the TOP 5 menu allows you to directly access the 5 most recently used programs. In order to do so, press the "i" key when the screen showing the different program categories is visible (fig. 3). The TOP 5 menu will appear with a list of your 5 most recently used programs.
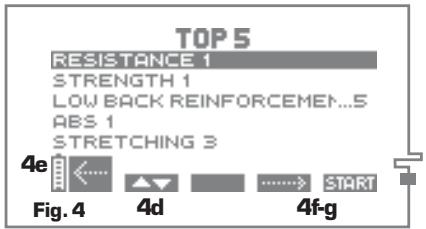
4d To select the desired program, press the + / - key of channel 1.
4e Press the "On/Off" key to return to the previous screen.
4f-g After highlighting the programme that you have chosen, press the +7 / - 1 key on channel 3 until a parameter setting screen appears or press the +7 / - 1 key on channel 4 to immediately begin the stimulation session.
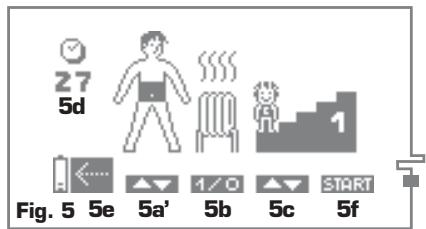
6. Personalising a program
The program personalisation screen is not available for all programs!
Without _i -SENSOR cable
With mi-SENSOR cable
5a' If the special electrode cable of the mi-sensor system is not connected to the stimulator, certain programs require manual selection of the muscular group that you want to stimulate and a figurine is displayed above channel 1.
To select your desired group, press the + / - key of channel 1 (to go up or down). The seven muscular groups are displayed in succession in black on the figurine:
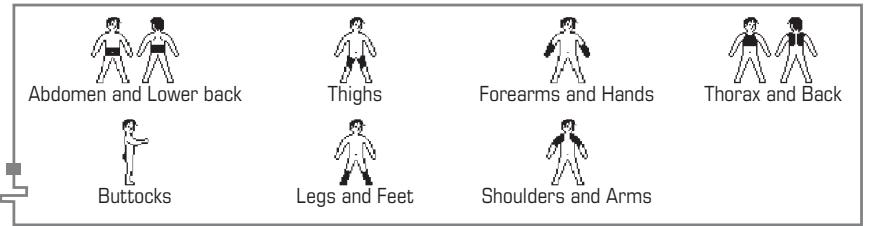
Current international standards require that a warning be given concerning the application of electrodes to the thorax (increased risk of cardiac fibrillation).
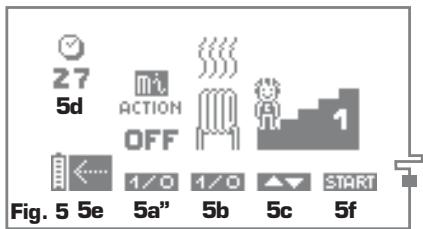
5a" When the device is connected to the mi- sensor cable - and if the program you have selected offers the feature mi-ACTION - you have the possibility of selecting your workout in the "classic" mode or in the mi-ACTION mode.
By default, your Compex device is set to work in the "classic" mode (mi-ACTION OFF). If you would like to select the mi-ACTION feature (mi-ACTION ON), press the "+"/- key of channel 1.

The selected program will run in the "classic" mode

The selected program will run in the mi-ACTiON mode
Regardless of the selected workout mode, muscle group selection will be done automatically. The program will start with a short sequence known as mi-scan, that automatically measures your neuromuscular characteristics.
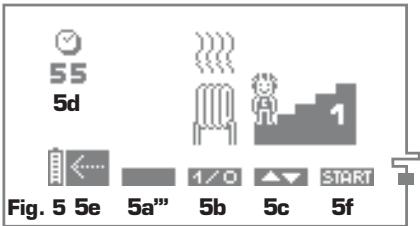
5a" When the device is connected to the mi- sensor cable - and if the program you have selected does not offer the feature mi-action - the selection area is not available (the symbol above channel 1 is solid and the corresponding zone above the symbol is empty). As always, if the selection of a muscle group is appropriate, the program will start with a short sequence known as mi-scan, that automatically measures your neuromuscular characteristics.
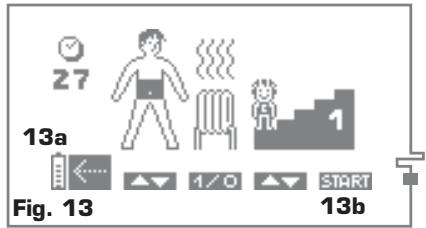
5b The warming-up sequence suggested for some programs is active by default (an animated rising convection symbol above the heater). If you prefer to skip this sequence, press the "+" key of channel 2.


Warming-up

No warming-up
5d Total program time in minutes.
5e By pressing the "On/Off" key, you can return to the previous screen.
5f To confirm your selection and start the program, press the " + / - " key of channel 4. Depending on the selected program, this:
a) starts the stimulation session;
b) runs the mi-SCAN test to detect automatically the neuromuscular characteristics of the muscular group to be stimulated.
5c Certain programs allow you to adjust the level of work. To do this, press the + / - key of channel 3 (to go up or down), until the desired level of work is displayed.
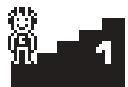
Level 1

Level 2
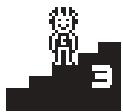
Level 3
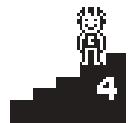
Level 4
Level 5
7. During the stimulation session
Mi-SCAN preliminary test
The mi -scan test is carried out only if the special electrode cable of the
mi-sensor system is already connected to the stimulator!
To avoid any disturbance, you must remain completely still and be perfectly relaxed throughout the entire test!
If the mi-sensor system is active, the mi-scan test starts immediately after the selection and personalisation of a program for which the choice of a muscular group is justified. Using mi technology, this choice is made automatically by the Compex, through test measurements of individual neuromuscular specificities and the excitability characteristics of the muscle to be stimulated.
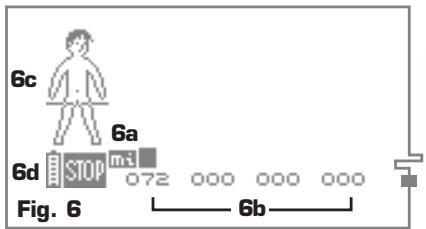
6a The small symbol is displayed above the channel to which the special cable of the mi-sensor system is connected, indicating that the system is active (in the above example, the mi-sensor cable is connected to channel 1).
6b The + / - keys of the four stimulation channels are inactive. It is not possible to influence the stimulation energies for the entire duration of the test. However, the numerical representation of the stimulation energy of the channel to which the mi-Sensor cable is connected varies automatically during the test to satisfy the needs of the various measurements taking place.
6c For the entire duration of the test, a scroll bar vertically scans the figurine symbolising the mi-scan function. The duration of the test varies depending on the characteristics of the muscular group and the person being tested. At most it lasts 21 seconds.
6d The test can be stopped by pressing the "On/Off" key (STO symbol). You can then either restart the entire test by pressing the key of a stimulation channel, or press the "On/Off" key a second time.
Once the test is completed, you automatically access the standard program start screen that prompts you to set the stimulation energies (see following section: "Setting stimulation energies").
Setting stimulation energies
When the program starts and, if necessary, after the mi-scan test, the Compex prompts you to increase the stimulation energies, a key factor for the effectiveness of the stimulation. To find out what energy level needs to be reached for each program, refer to the program table in the applications menu.
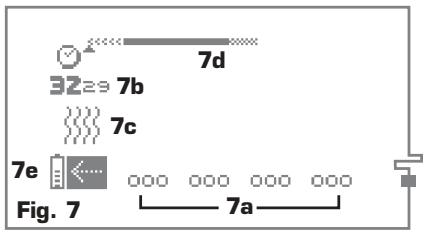
7a The Compex "bleeps" and the symbols of the four channels flash, changing from "+" to "000": the four channels are at O energy. You must increase the stimulation energy so that the stimulation can start. To do this, press the "+" of the keys of the relevant channels, until the desired setting is reached.
If you want to increase the energy level of all four channels simultaneously, press the "i" button, located below the "On/Off" key. You can also increase the energy level of three first channels, by pressing the "i" button twice, or the energy level of two first channels only, by pressing three times this button.
Once you activate the "i" button, the associated channels are highlighted in white on a black background.
7b Remaining time in minutes and seconds.
7c The animated rising convection symbol represented the warming-up sequence.
7d Session progression scale. For details on how it works, see the following section ("program progression").
7e By pressing the "On/Off" key, you can return to the previous screen.
The small symbol is displayed for the relevant channel, if the
Mi-Sensor cable is connected.
Program progression
Stimulation does really start when the stimulation energy has been increased. The examples reproduced below are sufficient to understand the general rules.
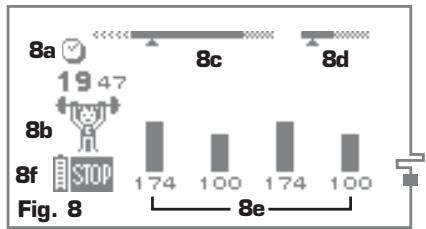
8a Remaining time (in minutes and seconds) before the end of the program.
8b A small animated symbol indicating the category to which the program belongs.
8c Session progression scale: The progression scale is composed of three distinct parts: the program consists of three stimulation sequences, i.e., warming up (light hatching /left), the actual work (black area/centre) and relaxation at the end of the program (heavier hatching/right). The progression scale can be also entirely hatched: the program then consists of a single stimulation sequence. The small cursor located just below the scale indicates precisely the state of progression of the program.
8d Contraction and active rest time bar: This bar is displayed, but only during the work sequence. It indicates the duration of the contraction (black part) and active rest times (hatched part).
8e Bar charts: The muscular contraction phase is represented by the black bar charts. The active rest phase is represented by the hatched bar charts.
8f You can interrupt the program momentarily (STOP = "PAUSE") by pressing the "On/Off" key. To restart the session, simply press the "+"/−" key of channel 4. After an interruption, stimulation restarts at 80% of the stimulation energy set before the "STOP".
The stimulation energy during the active rest phase is automatically set at 50% of the stimulation energy during the muscular contraction.
Contraction info
For programs provoking muscular contraction, the contraction info screen allows you to visualise in real time the number of contractions completed and the length of time spent in contraction. To access this information, press the "i" key and hold it down during the program.

9a Total contraction time
9b Number of contractions
Skip function
For some programs, the skip function allows you to end the current sequence and move on automatically to the following sequence of the program.
To access the skip function, you must first of all put the stimulator into the "Pause" mode.
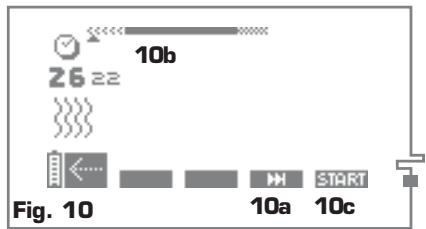
10a Press the "+" / "-" key of channel 3 (skip function represented by the symbol).
10b If you skip a sequence, the stimulator bleeps loudly and the cursor located under the progression scale moves to the beginning of the next sequence.
10c To start the sequence of the program you just reached, press the " + " / " - " key of channel 4.
The skip function is not available for all programs.
The skip function, which allows you to shorten the time of one or more sequence(s) of the program being used, entails the risk of decreasing the efficiency of the program, particularly if the work sequence has been significantly shortened.
Statistics
Your stimulator includes a statistics menu that allows you to view in real time the important information for a program. To access the statistics screen, you must put the stimulator into the "Pause" mode or wait for the end of the program.
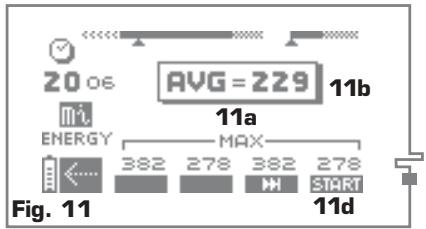
11a The mention "MAX" indicates by channel the maximum energy level reached during the contraction phases.
11b The mention "AVG" indicates the average energy level on all the channels used during the contraction phases.
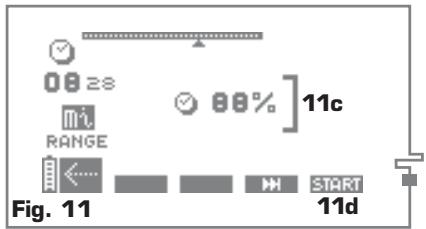
11c The mi-RANGE function, represented by a bracket, indicates the percentage of the stimulation time in the ideal energy adjustment range.
11d After viewing this screen, press the + / - key of channel 4 to resume the program where you interrupted it.
Depending on the programs, the displayed information may differ. In some cases, it may also happen that no information is displayed.
End of program
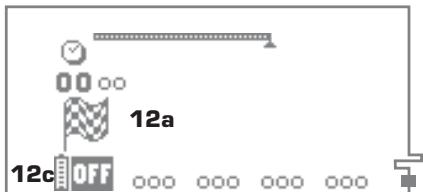
Fig. 12
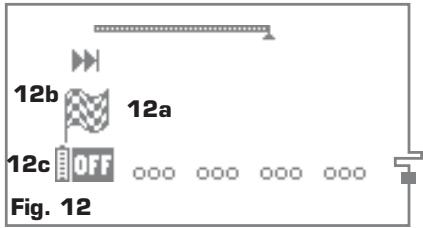
12a At the end of the session, you hear a musical signal, and a small flag is displayed.
12b The simultaneous presence of a flag and the symbol skip means that you have skipped one or several sequence(s) of the program. You have therefore changed the program being used. Depending on the programs, the displayed information may differ. In some cases, it may also happen that no information is displayed.
11a The mention "MAX" indicates by channel the maximum energy level reached during contraction phases (fig. 11).
11b The mention "AVG" indicates the average energy level on all the channels used during the contraction phases (fig. 11).
11c The m_i -RANGE function, represented by a bracket, indicates the percentage of the stimulation time in the ideal energy adjustment range (fig. 11).
12c It is then only necessary to switch off the stimulator by pressing the "On/Off" key (Off).
8. Electricity consumption and recharging
Never recharge the stimulator with cables still connected to it. Never recharge the batteries with a charger different from the one supplied by Compex.
The Compex runs on rechargeable batteries. The discharge time depends on the programs and stimulation energy used.
Before using your stimulator for the first time, it is always strongly recommended that you completely charge the battery to improve its autonomy and extend its working life. If you do not use your device for a long period of time, please regularly recharge the battery.
Electricity consumption
The symbol of a small battery indicates the charge level of the batteries.
13a The small battery symbol has only two reference marks: The batteries are losing their charge. Interrupt the session and recharge the device (see the following section).
13b The START symbol normally displayed above the "+"/ "-" key of channel 4 has disappeared [ ] and the small battery flashes: The batteries are completely flat. It is no longer possible to use the device. Recharge it immediately (see the following section).
Recharging
To recharge the Compex, first disconnect the electrode cables from the device, then plug the charger in a socket and lastly connect the stimulator to the charger. The charge menu illustrated below appears automatically.
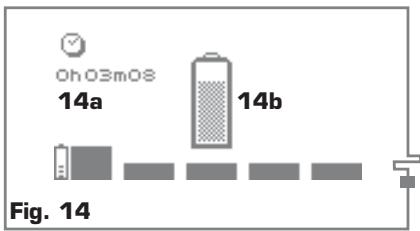
14a The Compex has been charging for 3 minutes and 8 seconds (a full charge may take from 1h00 to 1h30 hours with the rapid charger delivered with your device).
14b Charging is in progress and the small battery symbol is not completely full. When charging is completed, total charge duration flashes and the small battery is completely full. The Compex switches off automatically as soon as you disconnect the charger.
9. Problems and solutions
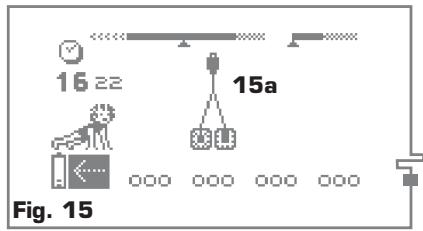
Electrode fault
15-14a The Compex "bleeps" and alternatively displays the symbol of a couple of electrodes and an arrow pointing to the channel where a problem has been detected. Below, the stimulator has detected an electrode fault on channel 2. This message may mean that:
1) there is no electrode connected to this channel;
2) the electrodes are old, worn out and/or the contact is poor: try using new electrodes;
3) the electrode cable is defective: try it using another channel. If cable shows a default again, please replace.
Recharging error
A recharging error may happen during charging. The Compex "bleeps" continuously and the following screen is displayed:
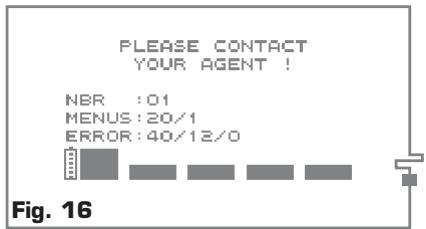
If this message appears, disconnect the charger and the device switches off automatically. Please contact the hotline, noting this error code.
If, for any reason, you experience any other trouble with your device, please contact the hotline mentioned and approved by Compex Medical SA.
SUMARIO
I. ADVERTENCIAS 117
Type TR1509-06-E-133A03
Input 90-264 VAC / 47-63Hz / 0.5A max.
Output 9V / 1.4A / 15W
Type TR503-02-A-133A03
Input 90-264 VAC /47-63Hz / 0.5A max.
Output 9V / 400mA / 6W
Type TR1509-06-A-133A03
Input 90-264 VAC / 47-63Hz / 0.5A max.
Output 9V / 1.4A / 15W
Type TR503-02-U-133A03
Input 90-264 VAC / 47-63Hz / 0.5A max.
Output 9V / 400mA / 6W
Type TR1509-06-U-133A03
Input 90-264 VAC / 47-63Hz / 0.5A max.
Output 9V / 1.4A / 15W
Neuroestimulación
Sea尤为重要 to understand the differences between the two categories of selection. In this section, we will discuss how to distinguish between the two categories of selection.
Belangrjke contra-indicatures
Type TR1509-06-A-133A03
Input 90-264 VAC / 47-63Hz / 0.5A max.
Output 9V / 1.4A / 15W
Type TR503-02-U-133A03
Input 90-264 VAC / 47-63Hz / 0.5A max.
Output 9V / 400mA / 6W
Type TR1509-06-U-133A03
Input 90-264 VAC / 47-63Hz / 0.5A max.
Output 9V / 1.4A / 15W