
DX17 - Auxiliary heating ZIBRO - Free user manual and instructions
Find the device manual for free DX17 ZIBRO in PDF.

User questions about DX17 ZIBRO
0 question about this device. Answer the ones you know or ask your own.
Ask a new question about this device
Download the instructions for your Auxiliary heating in PDF format for free! Find your manual DX17 - ZIBRO and take your electronic device back in hand. On this page are published all the documents necessary for the use of your device. DX17 by ZIBRO.
USER MANUAL DX17 ZIBRO
H CONDITIONS DE GARANTIE
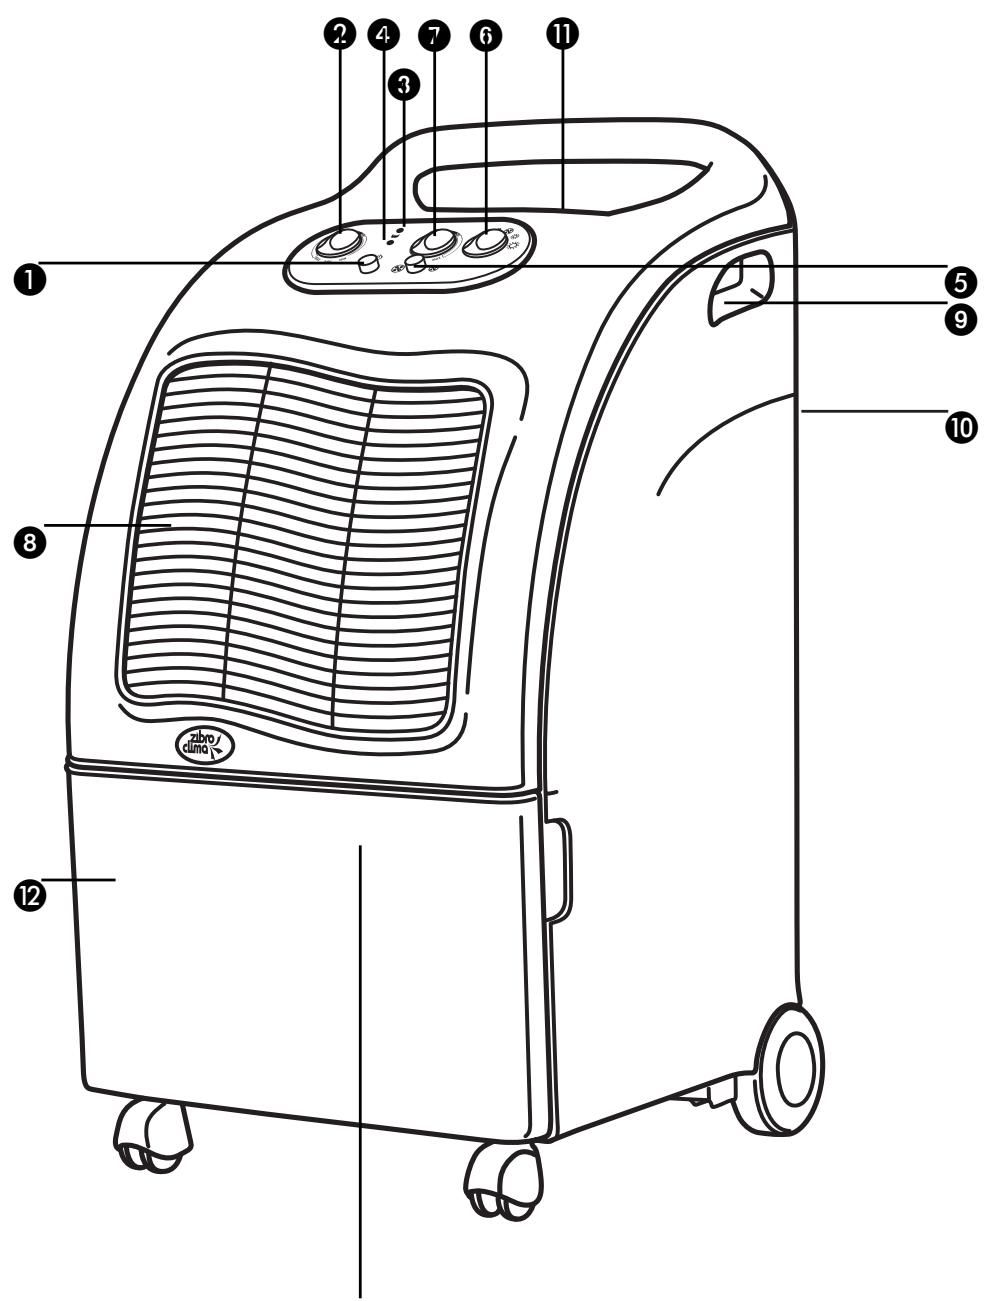
- button
control button/ moisture meter
red warning light 'reservoir full'
on/off light
ventilator speed selector knob
ventilator/selector switch
heating thermostat
dry air exhaust
9 handle
10 inlet for humid air
air filter
12 removable reservoir
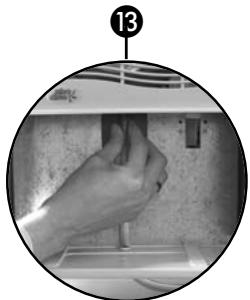
13 drainage spout with plug
1 READ THE DIRECTIONS FOR USE FIRST.
2 IN CASE OF ANY DOUBT, CONTACT YOUR DEALER.
DEHUMIDIFIER INSTRUCTIONS FOR USE
To guarantee maximum safety and optimum efficiency, we strongly recommend that you read these instructions carefully before installing and operating the dehumidifier.
THE DEHUMIDIFIER
The function of the machine is to reduce the level of humidity in the room where it is installed. However, the machine that you have purchased can also heat air. The specific properties make this machine a de-humidifier and/or a heater. It can be used in any room or area with elevated humidity levels, or in locations where a more comfortable temperature is desired, such as kitchens, basements, etc.
The machine is fitted with wheels and handles for convenient transportation.
Studies have revealed that environments with a relative humidity between 45% and 60% are ideal for both humans and animals, and the preservation of objects.
A INSTALLATION
Place the machine in the room or area that you wish to de-humidify, ventilate or heat. Leave a gap of at least 50~cm . around the machine to ensure effective circulation. Check the following before activating the machine:
Do you have the correct mains voltage, as stated in the "Technical specifications"?
Is the plug suitable for the wall socket? If this is not the case, the plug may only be replaced by a qualified individual.
Are you using an earthed socket?
B OPERATION
1 Insert the plug into the socket and press the -button ①. Light ④ lights up to indicate that the device is switched on.
2 Check whether the -light 3 is off. If so, the reservoir has been placed properly and does not need to be emptied.
3 Turn the control button 2 of the moisture meter to:
'Normal' setting; for automatic operation based on a normal humidity level (between 45% and 60% ).
'Max' setting; for continuous operation in specific situations, such as drying clothes, etc.
Selection of the ventilator speed 5:
Normal speed 23.
Low speed 3
5 To switch the machine off:
Press the -button 1.
ATTENTION
Adjusting the ventilator speed reduces the noise level. However, this also causes a slight loss of capacity as the machine works with reduced power at this setting.
We recommend that the machine be set to operate on reduced power if the humidity level is lower than 60% in order to generate the optimum power consumption/benefit ratio.

Attention: This machine has a safety system that automatically switches the machine off in case of overheating. If this occurs, disconnect the machine. Allow the machine to cool down for approximately 3 minutes before reconnecting it.
If this problem occurs more often, please contact your dealer.
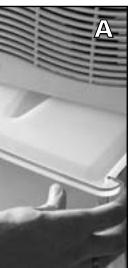
C WATER DRAINAGE
The red light will switch on when the reservoir is full. A safety system ensures that the machine then switches itself off. Simply remove the reservoir to drain the water (fig. A).
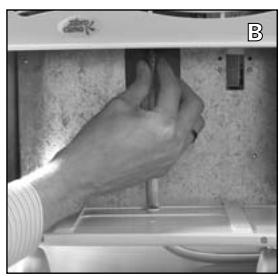
EXTERNAL DRAINAGE
If desired, it is possible to fit a drainage hose to the machine. Follow the steps below:
1 Remove the reservoir from the machine.
2 Remove the plug from the end of the drainage spout.
3 Connect the drainage hose to the spout (fig. B). The drainage hose is available at your dealer's.
4 The hose is led out of the hole in the bottom of the machine.
5 Install the reservoir in the machine.

Seal the drainage spout with the appropriate plug when you wish to operate the machine normally again, without a drainage hose.
When the machine is connected, select the desired air temperature with the ventilator selector switch 6:
Air circulation Hot air Extremely hot air
1 Select the desired airtemperature with de ventilator selector switch 6:
Warm air.
Hot air.
Regulate the thermostat 7 as follows:
- turn the thermostat button ⑦ clockwise to the 'max' setting.
- when the room or area has reached the desired temperature, turn the thermostat back until you hear a click.
- the thermostat will turn on and off automatically when the temperature either drops below or exceeds the required level.
E
MAINTENANCE
Remove the plug from the socket before carrying out any maintenance or cleaning work on the machine. For safety reasons it is forbidden to use water while cleaning:
Clean the outside with a slightly damp cloth followed by a dry cloth.
Do not use alcohol or cleaning products when cleaning.
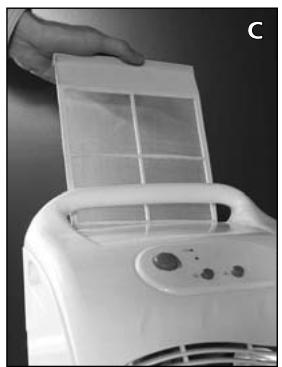
- Clean the air filter every week. Remove the filter from the back of the machine and clean it with a vacuum cleaner.
Clean the front (grille) with a vacuum cleaner (fig. C).
F
STORAGE
Take the following steps if you do not intend to use the machine for an extended period of time:
Allow the machine to cool down.
Remove the plug from the socket and empty the reservoir.
Clean and/or replace the air filter. Filters are available at your supplier.
Store the machine in a dust-free environment, e.g. in a plastic bag.
G
The machine was designed to dehumidify and to heat. You should not use it for any other purpose.
It is dangerous and forbidden to modify the machine.
Always contact your supplier if repairs are required.
It is forbidden for children to play with the machine. The machine may only be used by adults.
The machine must always be connected to the mains with an earthed connection.
Avoid the use of extension cables or multiple plug boards.
Always switch the machine off before carrying out maintenance or cleaning work.
- Do not install the machine near heat sources or near flammable installations/materials (e.g. curtains) or explosive environments.
Whenever you disconnect the machine, you must always wait at least three minutes before reconnecting it.
- When connecting and disconnecting the machine from the power supply, the ventilator/selector switch must be set to the '0' setting.
It is forbidden to cover the machine or to insert foreign objects into the machine in connection with the risk of overheating or fire.
Ensure that the wires are concealed when placing the machine.
The machine may not become wet.
The machine must always be placed vertically, particularly during transport. Always empty the water reservoir before transporting the machine.

This machine has a safety system that automatically switches the machine off in case of overheating or if the airflow is hampered. If this occurs, disconnect the machine and remove the object (from the back of the machine). Allow the machine to cool down for approximately 15 minutes before reconnecting it.
H GUARANTEE CONDITIONS
The dehumidifier has a 24-month guarantee period, commencing on the purchase date. All material or manufacturing defects will be repaired free of charge within this period. The following rules apply:
1 We expressly refute all further damage claims, including consequential damage.
2 Any repairs or replacement of components during the guarantee period will not result in an extension of the guarantee period.
3 The guarantee will be invalidated if any alterations have been made, not genuine components have been fitted or if the dehumidifier has been repaired by a third party.
4 Components subject to normal wear, such as the air filter, are not covered by the guarantee.
The guarantee is only valid on presentation of the original, unaltered and dated purchase invoice.
The guarantee does not cover damage caused by actions that deviate from those in the instructions for use or by neglect.
To prevent unnecessary expenses, we recommend that you always first carefully read the instructions for use. If this does not provide a solution, take the dehumidifier to your distributor for repairs.
| TECHNICAL SPECIFICATIONS | DX17 |
| Mains voltage (V, Hz) | 230, 50 |
| Power consumed (W) | 250 + 1200 |
| Amperage (A) | 6 |
| Dehumidification (L/24h at 32°C / 80% RH/RV) | 16 |
| Coolant (gr) | R 134 a (175) |
| Compressor | rotary |
| Automatic thaw | yes |
| Control button moisture meter/thermostat | yes |
| Dimensions wхhxd (mm) | 610x355x340 |
| Net weight (kg) | 17.5 |
| Resevoir capacity (L) | 6.5 |
| Operating range: temperature (°C) | 8-35 |
| Operating range: humidity (% RH/RV) | 40-95 |
| CFC-free | yes |
Dehumidifier
| MALFUNCTION | CAUSES | SOLUTIONS |
| The machine does not operate. | The plug is not in the socket. | Put the plug in the socket. |
| The control button is at the lowest setting. | Turn the control button to the desired setting. | |
| The reservoir is full. | Drain the water from the reservoir. | |
| The reservoir has not been installed properly. | Install the reservoir correctly. Clean the air filter. | |
| the machine does not reduce humidity. | The air filter is dirty. | It is normal that the dehumidifier does not reduce humidity under exceptional conditions (see Technical specifications). |
| The temperature or humidity in the room where the dehumidifier has been placed is too low. | ||
| The dehumidifier operates, but does not reduce humidity. | The room is too big. | We recommend that you place more dehumidifiers. |
| There are too many sources of humidity. | We recommend that you place more dehumidifiers. |
Heating
| MALFUNCTION | CAUSES | SOLUTIONS |
| The heater does not work. | The plug is disconnected from the wall socket. | Insert the plug into the wall socket. |
| The ventilator/selector switch is switched off. | Turn the regulator button to the desired position. | |
| The thermostat is at the lowest setting. | Adjust the thermostat (see heating instructions for use). | |
| The machine does not generate heat. | The ventilator/selector switch is either switched off or to the ventilator setting. | Turn the selector to the hot or extremely hot air setting (see heating instructions for use). |
| The thermostat is at the lowest setting. | Adjust the thermostat to the desired temperature. | |
| The overheating safety system is working because the airflow is blocked. | Switch the machine off, disconnect it and remove the blocking object. Let the machine cool down for 15 minutes. Before reconnecting it, make sure that the space around and above the machine is free (so the airflow is not blocked). |
The manufacturer reserves the right to alter this information without prior notice.
COMPONENTI PRINCIPALI
Holloway Bank, Wednesbury
West Midlands WS10 OAW
Tel.: +44 121 506 1818
Fax: +44 121 505 1744
email: gases@lister.co.uk
ITALIA
PVG Italy SRL
Via Niccolò Copernico 5
50051 CASTELFIORENTINO (FI)
tel: +39 571 628500
fax: +39 571 628504
email: pvgitaly@zbro.com
NORGE
Sunwind - Gylling A/S
Rudsetta 71-75 / P.O. Box 64
N-1309 RUD
tel: +47 67 17 13 70
fax: +47 67 17 13 80
email: pvgint@zibro.com
NEDERLAND
PVG International b.v.
P.O.Box 96
5340 AB OSS
tel: +31 412 694694
fax: +31 412 622893
email: pvgnl@zibro.com
PORTUGAL
Gardena, Lda