
PNEUMATIC 5000 E - Pneumatic tool AEG - Free user manual and instructions
Find the device manual for free PNEUMATIC 5000 E AEG in PDF.

| Product type | Pneumatic percussion electric rotary hammer |
| Brand | AEG |
| Model | PNEUMATIC 5000 E |
| Weight | 8.9 kg |
| Power consumption | 1050 W |
| Idle speed | 0 - 300 rpm |
| Max speed under load | 250 rpm |
| Impact frequency | 3200 bpm |
| Max drilling diameter in concrete (drill bit) | 50 mm |
| Max drilling diameter in concrete (core bit) | 150 mm |
| Chuck | SDS-max |
| Anti-vibration system | AVS (Anti-Vibration System) |
| Mode selection | Hammer drilling / Chiseling |
| Depth stop | Integrated in the adjustable auxiliary handle |
| Safety coupling | Yes |
| Speed variator | Yes, via trigger |
| Sound pressure level | 93 dB(A) |
| Sound power level | 106 dB(A) |
| Vibration level | 5.0 m/s² |
| Power supply | Single-phase alternating current (voltage according to rating plate) |
| Maintenance | Clean ventilation slots; have brushes replaced by an AEG service center |
| Spare parts | Use only AEG parts |
| Intended use | Hammer drilling and chiseling in stone, concrete, and similar materials |
Frequently Asked Questions - PNEUMATIC 5000 E AEG
User questions about PNEUMATIC 5000 E AEG
0 question about this device. Answer the ones you know or ask your own.
Ask a new question about this device
Download the instructions for your Pneumatic tool in PDF format for free! Find your manual PNEUMATIC 5000 E - AEG and take your electronic device back in hand. On this page are published all the documents necessary for the use of your device. PNEUMATIC 5000 E by AEG.
USER MANUAL PNEUMATIC 5000 E AEG
GB Instructions for use
Please read and save these instructions.
| Introduction | You have high standards and expect to purchase quality goods – quality offered by Atlas Copco. We have built a durable and reliable electric power tool for you. Please read the instructions for use before first operation so you can handle your power tool effectively and safely. We are sure that buying an AEG Electric Power Tool from Atlas Copco was the right choice! | |
| Technical Data | Nominal power 1050 W No-load speed 0-300 min-1 Speed under load max. 250 min-1 Percussion rate 3200 min-1 Drilling capacity in Concrete max. 50 mm concrete with core drill max. 150 mm Weight 8,9 kg | |
| Advice for your safety | | | Please pay attention to the safety instructions in the attached leaflet! |
| | | Dust that arises when working on material containing asbestos or stonework containing crystalline silicic acid is harmful to the health. Please follow accident prevention regulations. | |
| | | Appliances used at many different locations including open air must be connected via a current surge preventing switch. | |
| | | Always wear goggles when using the machine. It is recommended to wear gloves, sturdy non slipping shoes and apron. | |
| | | Sawdust and splinters must not be removed while the machine is running. | |
| | | Do not pierce the motor housing as this could damage the double insulation (use adhesives). | |
| | | Always disconnect the plug from the socket before carrying out any work on the machine. Only plug-in when machine is switched off. | |
| | | Keep mains lead clear from working range of the machine. Always lead the cable away behind you. | |
| | | Always use the auxiliary handle, even if the machine has a safety clutch since this safety clutch only engages when the machine blocks with a jerk. | |
| | | When drilling in walls ceiling, or floor, take care to avoid electric cables and gas or waterpipes. | |
| Measured sound value | | | Typically the A-weighted noise levels of the tool are: Sound pressure level = 93 dB (A). Sound power level = 106 dB (A). Wear ear protectors! Measured values determined according to EN 50 144. |
| Measured vibration value | | | Typically the weighted acceleration is : 5,0 m/s2. Measured values determined according to EN 50 144. |
| Use | The pneumatic hammer can be universally used for hammer drilling and chiselling. Do not use this product in another way as stated for normal use. | |
| Mains connection | Connect only to a single-phase AC current supply and only to the mains voltage specified on the rating plate. Connection to sockets without earth protection is possible as the appliance features protective insulation to DIN 57 740/ VDE 0740 and CEE 20. Radio suppression complies with the European standard EN 55014. | |
| When fitting the plug, make sure that the brown (live) wire of this appliance is connected to the plug terminal marked L or coloured red, and the blue (neutral) wire of this appliance is connected to the plug terminal marked N or coloured black. Under no circumstances must the wires of this appliance be connected to the earth terminal of the plug marked either E, with the earth symbol or coloured green or green/yellow. | ||
| ENGLISH | 1 | PNEUMATIC 5000 E |
Function of rotary pneumatic hammer
The impact needed for hammer drilling in stone is created by a pneumatic hammer striking mechanism. Similar to hitting a common chisel with a hammer, a plunger hits the axially moving chisel. The electric motor moves the plunger back and forth crank drive piston freely moving piston. There is a pneumatic cushion between piston and freely moving piston (pneumatic hammer mechanism). This results in a highly effective hammering action. Exerting greater power does not increase the machine's effectiveness.
Brief description
Anti Vibration System AVS
The hammer mechanism and motor are independant of the handgrips, cushioning elements absorb vibrations on both handgrips when hammering and chiselling.
Ergonomically designed housing with soft grip.
Hammer drilling chuck for bits and accessories with SDS-max reception - tools are locked automatically after insertion.
Selector lever for switching between hammer drilling and chiselling.
Auxiliary handle, has an integral depth gauge and can be rotated in various positions.
Built-in safety clutch helps prevent the machine from rotating if the drill bit jams.
Reception for auxiliary handle at the side of the machine. For drilling upward or downward the auxiliary handle can be fastened at the side of the machine.
Switch trigger for switching the machine on and off, and for smooth starting and varying speed.
Switching the machine on and off
Modifications: Text, diagrams and data are correct at the time of printing. In the interest of continuous improvement of our products, technical specifications are subject to alteration without prior notice.
Switching on: Press switch trigger
Switching off: Release switch trigger
The speed can be infinitely varied by slowly releasing/pressing the switch trigger.
| Inserting hammer drill bit or chisel | Always disconnect the plug from the socket before carrying out any work on the machine. The following tools can be inserted in the drill-hammer chuck using the SDS-max shank: - Hammer-drill for concrete and brickwork - Pointed chisel, flat chisel, hollow chisel, tile chisel Only use accessories with SDS-max shank! | |
| Inserting tools | 1. Clean and grease the shank of the bit. 2. Push bit into chuck turning it slightly, the chuck locks the bit automatically. 3. Check that the bit is properly locked into place. It must be possible to move it back and forth. 1. Pull back plastic ring in direction of arrow and remove bit. | |
| Tool removal | ||
| Switching between hammer drilling, chiselling | Depending on the inserted tool the machine can be operated with additional rotation (SDS-max-drills) or without additional rotation (SDS-max-chisels). For additional rotation turn the lever accordingly. hammer drilling rotary stop (chiselling) free turning position spindle locking position | |
| In "free turning position" the chisel can be turned by hand to the required angle. Afterwards lock the spindle with the selector lever while turning the chisel slightly. To help the lever lock into position twist the inserted bit slightly while turning lever. Do not switch when the machine is running. During no-load operation the pneumatic hammer mechanism is not yet activated even if the hammer mechanism is switched on. To activate the pneumatic hammer mechanism all you have to do is to firmly push the running machine against the work material. This unlocks the snap die from the safety device, and drilling with light pressure is now possible. | ||
| ENGLISH | 3 | PNEUMATIC 5000 E |
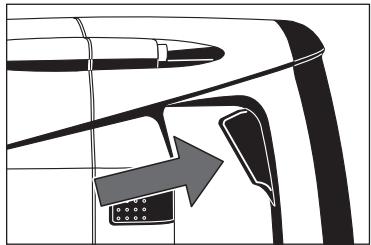
| Positioning the auxiliary handle | In order to re-position the auxiliary handle loosen it as shown in illustration and move to the required position. Refasten handle. | |
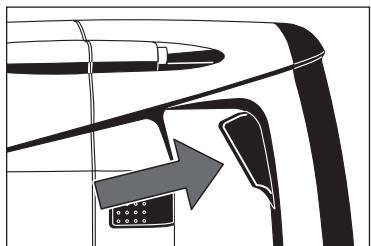
| Displacing the auxiliary handle | The auxiliary handle can also be attached to the side of the housing. This position may be preferred when drilling into the floor or into the ceiling, for example. Remove the auxiliary handle from the front position and screw it down at the side of the machine. | |
| Setting the depth gauge | For drilling to specific depth, slide the depth gauge into the hole provided in the handle and fasten it at the required drilling depth. | |
| Maintenance | The ventilation slots of the machine must be kept clear at all times. If the carbon brushes cut-out or the hammer capacity declines please contact your authorized AEG service station. This will ensure long service life as well as constant readiness for working of the machine. The location of your nearest service station is shown in our “Service addresses” leaflet attached to each product. Use only AEG accessories and spare parts. Should components need to be replaced which have not been described, please contact one of our AEG service agents (see our list of guarantee/service addresses). If needed, an exploded view of the tool can be ordered. Please state the ten-digit No. as well as the machine type printed on the label and order the drawing at your local service agents or directly at: Atlas Copco Electric Tools GmbH, Postfach 320, D-71361 Winnenden. | |
| ENGLISH | 4 | PNEUMATIC 5000 E |
NatpoH dnyapHoro CbepeHnA dny cBepI n DpyHx akCEccyapOB C XBOCTOBNIKOM SDS-max - HNCTPMyMeHTb 3aXmAlOTcR ABOTMATUeCKN PnB BCTABJIeHN B naTPOH.
Pyka nepeknoatele Mekdy yapHbM CBeplenemnDol6JeHnem
KypKOBbI BbIKIOUaTeJIb DnIe BKIOUeHnI N BbIKIOUeHnI INCTpymEHTa, PIIaBHOr BO KBIIOUeHnI N I3MeHeHnI CKOPOCTN.
MoDnHkaaNt: Tekct, NlIOCTpaunu n daHbHe BepHb Ha MOpENT bBxOda n3 neHAtu. B INHTpecax NOCToHHOrO yCOBeRheHCTBOBaHnHaHXu N3deJeI, TexHmecKne XapakTePncTKn MOrY 1M3eHbTaB6e3 npEbaAPTeNbHOrO yBeDMJIeHey.
BbIKIIOyateIb "On-Off" ("BKn./BbIKn.")
BkIIOueHHe: haxaTb BbIKIOUaTeIb "On-Off" ("BkN./ByKlN.") OTKIOUeHHe: OTnycNTb BbIKIOUaTeIb "On-Off" ("BkN./ByKlN.")
CkopocTb MoXHO npOn3BOJbHo
peYInpObaTb HaxIMaBbIKIOuAteIb "On-Off" ("Bkn./BbKn.).
| YctahOBka cBepLa Дя ydapHoro cBepLeHnry Пли dolota | 1.Пелед ВьлОнHeHnEм Кaknx-лбо pa6OT no obScIyJxIBaHnIO ИСТуРУМЕТа В сeгдд вьIHIMaIte BvILkyИз розETК. В ударны патрон можно BcTabITb СLEДуюше ИСТуРУМЕТа, ИмeЮшe хвocTobNK SDS-max: -Yudarhle cBepLa Дя Крпчa и БeToHа -Долота ИсpoЛьЗуITE TOLьKO ИСТуРУМЕТы CxbOCTOBKNOM SDS-max! |
| Вставka pa6ochx HHCTPUMENTOB | 1.ОчstITEи Смжыт ExBOCTOBNK CБЕРla. 2.BcTABTe СлЕКа NOBOPaUHBAЯ CBEPLOВ Патрон, патрон АВТOMaTHyeCKN Задирает CBEPLO. |
| ВыHMaHne pa6ochx HHCTPUMNTOB | 3.Проберы чTO pa6Oчи ИСТуРУМЕТ ЗадиФСИРован на МeCTe.Оно дOLЖHO перemeцATьСВЕрEDи HA3ad. |
| 1.ОttянITE Ha3ad Пл actIKOBOE KOJIbZO B нanpaВALEHIM CTpeLkN I BvHbTe CBEPLO. | |
| ПepeKlIoUeHne mexdny cBepLeHnry, ydapHoe cBepLeHnry, dol6bIeHnne | B ЗависmoSTи OT ИСоЛьЗуЕБIX pa6ochx ИСТуPUMENTВ моJOH ВКlIOuHTь (ДЯ经 SDS-max) Или OTKlIOuHTь ВраSUHNE (ДЯ DOLOT и ПИK SDS-max).Д耶ВКIOUeHry BAupeHry ПОБeRHTe pepeKlIOuHaTEь HuaKHOe ПОLOXeHne. YdapHoe CBepLeHnne 6LoKIPOBKA BVAUeHrya (ДOL6bIeHne) ПОLOXeHne 6LoKIPOBKIN pergynipOBKIN ⅡПОLOHry B"ПОLOXeHnр reGyIPOBKK"MOJNO BrpyHUYIO NOBepHyTB DOLOTO Na trpe6yembyr yrol. ПосLE 3tORO 3a6LokUpuyTe ⅢpINHdELpyruKoI пepeKlIOuHateLЯ, сlergka NOBOPaUHBAЯ рpr 3tOM DOLOTO. XTo6blп epeKlIOuHateLь 6blIO leyue 3aФeKCSIpOBArBu B HuxHOM ПОLOXeHnN Сlergka NOBepHnTe BCTaBLeHNOE CBEPLOpyripeKlIOUeHry. ПepeKlIOuHATь TOL6K ONUe OctaHOBKN BPAUeHry INHCTPyMENTA. При рбote 6e3 Harpy3kn PHEBMaTHyeCKN UdAPHbI MEXAH3M He ЗадиCTBBOVAN, д配电 ecInу YdAPHNAfФyHKZnR BKlIOUeHya. Bce ChTo BBy DoJxHbI СdelenTы Дя PrinBeDEHnE B DeIeCTBNe PHEBMaTHyeCKTO GuaHPO MEXAH3Ma, 3TO pe36K NaHxAkTb INHCTPyMENTOM Na OpbabTaBaEMbI MateriAl. 3To pra6bIokpuyET pReDoxpAHnTElbHbM MEXAH3M 6BoJa, n Tenerb moxHo CBepLIbT, priNaIagra Ne6OJIbShoe daVbIeHne. |
| PYCCKN | 47 |
| Посmiumн- роваим дороннельн оу рухотки | Д�� того чтобы поевруты дороннельную рухотку ocnaбteеgeeкпоказано ha иллострацими поеврнite в нжhoe паложенie.Сюва затян�te рухотку. | |
| Перессановka дороннельн оу рухотки | Дороннельная рухотка мочет сыт加快建设uringа сбokу к kopту. Тасая пошия поедношельни пос bсерлени в поу лим в notолke. ОтоSpecлие полинельную рухотку от поеденьч ( нструемта и ВВНтITEе сбokу в корpsc. | 2 |
| Уstановka глубиномера | Д�� сberлени OTberpctniо odnakobov глубиь bCTabte Глобиномер в OTberpctne B ryкогтke, установite trpebyemtu Глобину сberлении Зakpenite. | 3 |
| 06служинаме | Вenvtnia zuohnble OTberpctria INHctpymehta doJoxhblBcegda sblyb otKpbItbIMi. При otkniochenu yroIbIX zetok nii chixeHm MOUHOCTN ydapa obpatntecb B sblnkaiuichin cepBncbny ceHTpr AEG. 3TO obcepeyit Дл'tel'ьнiy nepnoD be3 obclnyxbanrya, a taKxe noctoHHyIO rotOBHOCtB INHcTpymehta K paObe. MeCTOHAOXJDeHne blnkaiuweO cepBncHoro ceHTPra yka3aHo B sbkylente "Service addresses" (Adepca cepBncbix opraHn3aui),\ prnilarayemomy K kaxdomy INHcTpyMeHTy. Рльзчteb akcesccyaupamn i 3apacnhbimn qactramn Tolbyko Фирмы AEG. B Слчae bo3NHKnOBeHnna HeobxOdmOCTN B 3aMene, KOtpora Ne 6bla onicaHa, pojanyiCTa, obpaauitcTeb Na OdiH n3 cepBncbix ceHTPROB (CM. cIncoK Nauxr rapantniHbIX/CepBncbix opraHn3aui). При neobxOdmOCTN moKet sblyt 3akazanч creptex INHcTpyMeHtca Трхmarhblm n3obpaqchenm Detalne. Пожалу�ста, ужite Decertn3nauHb# HomeR n TNI INHcTpyMeHtA n 3akazinte cheptex Y BausIX meCTHbIX areHTOB nii henocpeidctBeHNO y Atlas Copco Electric Tools GmbH Postfach 320, D-71361 Winnenden, Germany. | |
| Pyssckni | 48 | PNEUMATIC 5000 E |
EC-DECLARATION OF CONFORMITY
We declare under our sole responsibility that this product is in conformity with the following standards or standardized documents. EN 50144, EN 55014-1, EN 55014-2, EN 61000-3-2, EN 61000-3-3, in accordance with the regulations 98/37/EC, 73/23/EEC, 89/336/EEC
DEUTSCH
CE-KONFORMITETSERKL/ERING
Manager Product Marketing and Development


Atlas Copco
Copyright 2001
Atlas Copco Electric Tools GmbH
P.O.Box 320
D-71361 Winnenden Germany
www.atlascopco.de