DU-21 - Printing consumables KYOCERA - Free user manual and instructions
Find the device manual for free DU-21 KYOCERA in PDF.

User questions about DU-21 KYOCERA
0 question about this device. Answer the ones you know or ask your own.
Ask a new question about this device
Download the instructions for your Printing consumables in PDF format for free! Find your manual DU-21 - KYOCERA and take your electronic device back in hand. On this page are published all the documents necessary for the use of your device. DU-21 by KYOCERA.
USER MANUAL DU-21 KYOCERA
Declaration of Conformity
Manufacturer's name: Kyocera Corporation, Printer Division
Manufacturer's address: 2-14-9 Tamagawadai, Setagaya Ward, Tokyo 158-8610, Japan
declares that the product
Product name: Duplexer
Model number: DU-21 (as tested with Printer FS-1750 and enhancement optional units HS-21, PF-21, and ST-20 etc.)
Conforms to the following product specifications.
EN 55 022:1998 Class B
EN 50 082-1:1997
IEC 801-2:1991
IEC 801-3:1984
IEC 801-4:1988
EN 60 950:1992+A1+A2+A3+A4
The manufacturer and its merchandising companies retain the following technical documentation in anticipation of the inspection that may be conducted by the authorities concerned.
User's instruction that conforms to the applicable specifications
Technical drawings
Descriptions of the procedures that guarantee the conformity
Other technical information
KYOCERA ELECTRONICS EUROPE GmbH
KYOCERA ELECTRONICS EUROPE GmbH
Mollsfeld 12
40670 Meerbusch, Germany
Phone: +49 21 59 918 0
Fax: +49 21 59 918 100
Declaration of Conformity
Manufacturer's name: Kyocera Corporation, Printer Division
Manufacturer's address: 2-14-9 Tamagawadai, Setagaya Ward, Tokyo 158-8610, Japan
declares that the product
Product name: Duplexer
Model number: DU-21 (as tested with Printer FS-1750 and enhancement optional units HS-21, PF-21, and ST-20 etc.)
Description of device: This Page Printer Model FS-1750 is the 14ppm; up to A4 size plain paper, laser, dry toner etc. The printer can be equipped with several enhancement optional units such as the Paper Feeder PF-21, Duplexer DU-21 etc.
Conforms to the following product specifications.
AS/NZS 3548:1995
(CISPR 22:1993 Class B)
IEC60 950:1991+A1+A2+A3+A4
(EN 60 950:1992+A1+A2+A3+A4)
The manufacturer and its merchandising companies retain the following technical documentation in anticipation of the inspection that may be conducted by the authorities concerned.
User's instruction that conforms to the applicable specifications
Technical drawings
Descriptions of the procedures that guarantee the conformity
Other technical information
The manufacturer has been employed with ISO9001 scheme. The manufacturer has been attested by JQA and BS.
KYOCERA ELECTRONICS AUSTRALIA PTY., LTD
Unit 6, 112, Taravera Road North Ryde,
NSW 2113, Australia
Phone: +61 2-9888-9999
Fax: +61 2-9888-9588
Declaration of Conformity
Model Number: DU-21 (as tested with Printer FS-1750 and enhancement optional units HS-21, PF-21, and ST-20 etc.)
Trade Name: Kyocera
Responsible Party: Kyocera Electronics Inc.
Address: 11465 John's Creek Parkway
Suite #250 Duluth, GA 30097, U.S.A.
Telephone number: 770-623-2150
Fax number: 770-623-2151
Contact person for technical matter: Paul Bosak
Phone: 770-623-2163
Manufacturer's name: Kyocera Corporation, Printer Division
Manufacturer's address: 2-14-9 Tamagawadai, Setagaya Ward,
Tokyo 158-8610, Japan
This device complies with Part 15 of the FCC Rules, Operation is subject to the following two conditions: (1) This device may not cause harmful interference, and (2) this device must accept any interference received, including interference that may cause undesired operation.
The manufacturer and its merchandising companies retain the following technical documentation in anticipation of the inspection that may be conducted by the authorities concerned.
User's instruction that conforms to the applicable specifications
Technical drawings
Descriptions of the procedures that guarantee the conformity
Other technical information
Abb. 1 Namen der Teile
Fig.1 Nomenclature
Fig. 1 Nome delle parti
Figura 1 Nombres de las partes
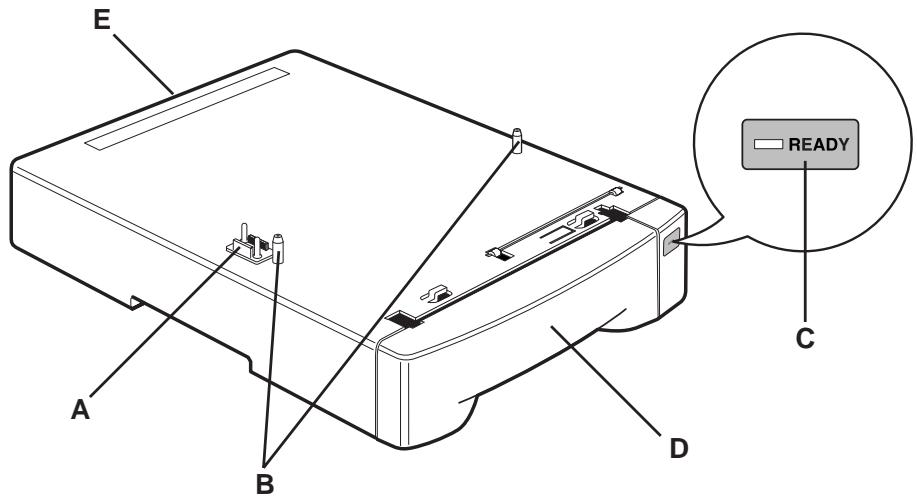
Fig. 1 Names of parts
A - Connector A - Anschluß A - Connecteur A - Connettore A - Conector
B - Positioning pins B - Positionierungssstifte B - Broches de positionnement
B - Pemi di posizionamento B - Clavijas de colocacion
C - READY indicator C - Anzeige READY C - Indicateur READY C - Indicatore READY
C - Indicador de puya punto (READY)
D - Duplexer drawer D - Duplexlade D - Caser de l'unité de duplexage D - Cassetto unità duplex
D-Cajon del duplexor
E - Rear cover E - Hintere Abdeckung E - Couvercle arrriere E - Coperchio posteriore E - Tapa trasera
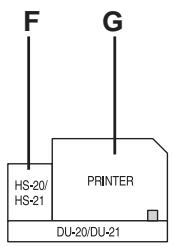
Fig. 2 Typical configurations using the duplexer
Abb. 2 Typische Konfigurationen mit der Duplexeinheit
Fig.2 Configurations typiques en utilisant 1'unité de duplexage
Fig. 2 Configurazione tipica con unità duplex
Figura 2 Configuraciones típicas realizando el duplexor
(a)
(b)
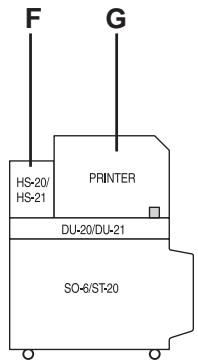
(c)
(d)
F - HS-20/HS-21 F - HS-20/HS-21 F - HS-20/HS-21 F - HS-20/HS-21 G - Printer G - Drucker G - Imprimante G - Stampante G - Impresora
- Optional PA-20 paper path adaptor
- Optionaler Papierwegadapter PA-20
- Adaptateur d'acheminement de papier optionnel PA-20
- Adattatore del percorso della carta opzionale PA-20
- Adaptador optional de recorrodo de papel PA-20
- Optional PA-1 paper path adaptor
- Optionaler Papierwegadapter PA-1
- Adaptateur d'acheminement de papier optionnel PA-1
- Adattatore del percorso della carta opzionale PA-1
- Adaptador optional de recorrodo de papel PA-1
Fig. 3 Installing the PA-20 on the front of the duplexer
Abb. 3 Installieren des PA-20 an Vorderseite der Duplexeinheit
Fig. 3 Installation du PA-20 à l'avant de l'unité de duplexage
Fig. 3 Installazione del PA-20 sul lato anteriore dell'unità duplex
Figura 3 Instalación del PA-20 en la parte delantera del duplexor
H - Duplexer H - Duplexer H - Duplexinheit H - Unité de duplexage H - Unità duplex H - Duplexor
To remove the PA-20, simply reverse the above procedure.
To remove the PA-1, press at the point indicated in the figure below while sliding the PA-1 to the right.
Abb. 6 Entfermen des PA-1
J - Push J - Drucken J - Appuyer J - Premere J - Pulse
Fig. 7 Installing the paper feeder on the duplexer
Abb. 7 Installieren der Papierzuführung auf die Duplexinheit
Fig. 7 Installation du chargeur de papier sur l'unité de duplexage
Fig. 7 Installazione l'alimentatore sull'unità duplex
Figura 7 Instalación del alimentador de papel en el duplexor
K - Paper feeder K - Papierzuführung K - Chargeur de papier K - Alimentatore carta
K - Alimentador de papel
L - Duplexer L - Duplexinheit L - Unité de duplexage L - Unità duplex L - Duplexor
Fig. 8 Paper path with duplex printing
Abb. 8 Papierweg bei doppelseitigem Drucken
Fig. 8 Acheminement du papier avec impression en duplex
Fig. 8 Percorso carta con stampa fronte-retro
Figura 8 Recorro del papel con impresión duplex
M - Paper handler/stacker M - Papier-Handler/Stapler M - Gestionnaire/empileuse
Information to users: 3
Introduction 4
Packing list. 4
Names of parts 5
Installation 6
Duplexer modes 9
PRESCRIBE commands 12
Troubleshooting 14
Adjusting the print position 15
Paper selection 17
Specifications 23
Deutsch
This page intentionally left blank
We shall have no liability or responsibility to customers or any other person or entity with respect to any liability, loss or damage caused or alleged to be caused directly or indirectly by equipment sold or furnished by us, including but not limited to, any interruption of service, loss of business or anticipatory profits, or consequential damages resulting from the use or operation of the equipment or software.
Caution
NO LIABILITY IS ASSUMED FOR ANY DAMAGE CAUSED BY IMPROPER INSTALLATION.
Notice
The information in this manual is subject to change without notification. Additional pages may be inserted in future editions. The user is asked to excuse any technical inaccuracies or typographical errors in the present edition.
No responsibility is assumed if accidents occur while the user is following the instructions in this manual.
The contents of this manual are protected by copyright. No part of this manual may be reproduced or copied by any means without the permission of the copyright holder.
Regarding Tradenames:
PREScribe is a registered trademark of Kyocera Corporation.
HP LaserJet is a product of Hewlett-Packard Company.
PCL is a registered trademark of Hewlett-Packard Company.
PostScript is a registered trademark of Adobe Systems Incorporated.
Copyright 1999 by Kyocera Corporation All rights reserved, Revision 1.0., June 1999
Warning
FCC Regulations state that any unauthorized changes or modifications to this equipment not expressly approved by the manufacturer could void the user's authority to operate the equipment.
Note: The equipment has been tested and found to comply with the limits for a Class B digital device, pursuant to Part 15 of the FCC Rules. These limits are designed to provide reasonable protection against harmful interference when the equipment is operated in a commercial environment.
The equipment generates, users, and can radiate radio frequency energy and, if not installed and used in accordance with the instruction manual, may cause harmful interference to radio communications. Operation of the equipment in a residential area is likely to cause harmful interference in which case the user will be required to correct the interference at his own expense.
Radio interference requirement in European countries
The optional duplexer DU-21 is intended for use with the printer models FS-1200/FS-1700/FS-1700+/FS-1750/FS-3700/FS-3700+/FS-3750, which are type tested and categorized as Class B computing devices in accordance with the EN55022 rules.
Devices in the Class B category may cause interference to radio or television reception, particularly in a residential installation.
Information to users:
This equipment has been tested and found to comply with the limits for a Class B digital device, pursuant to Part 15 of FCC Rules. These limits are designed to provide reasonable protection against harmful interference in a residential installation. This equipment generates, uses, and can radiate radio frequency energy and, if not installed and used in accordance with the instructions, may cause harmful interference to radio communications. However, there is no guarantee that interference will not occur in a particular installation. If this equipment does cause harmful interference to radio or television reception, which can be determined by turning the equipment off and on, the user is encouraged to try to correct the interference by one or more of the following measures:
Reorient or relocate the receiving antenna.
- Increase the separation between the equipment and receiver.
- Connect the equipment into an outlet on a circuit different from that to which the receiver is connected.
Consult the dealer or an experienced radio/TV technician for help.
Changes or modifications not expressly approved by the manufacturer for compliance could void the user's authority to operate the equipment.
Introduction
The DU-21 is an auxiliary unit designed for use with the Kyocera laser printers. Using the duplexer, you can automatically print on both sides of the paper.
This instruction manual explains how to install and use the duplexer.
Topics covered in this manual are:
□ Installing the duplexer
- Modes of duplexer operation
Mode selection from the printer's control panel
Mode selection by PRESCRIBE command
Mode selection by PCL (Hewlett-Packard Page Control Language) command
Packing list
Make sure that the duplexer package contains the following items in the indicated quantities.
DU-21 duplexer, 1
Cable holders, 2
Instruction manual (this booklet), 1
Names of parts
Before installing the duplexer, please read the following list of names. These names are used in describing procedures for installing and using the duplexer.
See Figure 1 on page iii.
Connector: When you install the duplexer, this connector plugs into a connector located inside the bottom of the printer (or of the optional paper feeder, if used together with the duplexer).
Positioning pins: These pins fit into two holes in the bottom of the printer (or of the optional paper feeder, if used together with the duplexer).
READY indicator: Lights when the duplexer is ready. Flashes when a jam occurs in the duplexer.
Duplexer drawer: Open to install the paper path adaptor, or to clear paper jams.
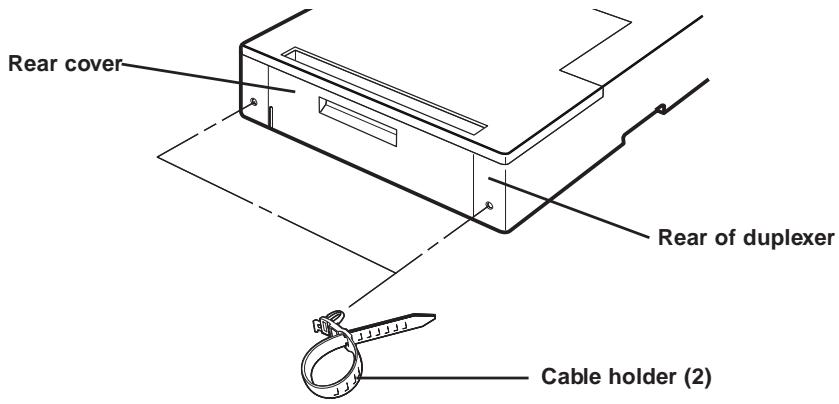
Rear cover: Opens to allow clearing paper jams.
Installation
The duplexer fits onto the bottom of the printer or of the optional paper feeder (if the optional paper feeder is installed together with the duplexer).
CAUTION
Before installing (or removing) the duplexer, be sure to turn off the printer's power.
Figure 2 on page iv shows allowable printer configurations including the duplexer. Depending on other optional units installed together with the duplexer, different paper path adaptors are required. Note that any configuration containing the duplexer also requires the optional paper handler/stacker. For details on how to install the optional paper handler, see the instructions provided with the optional paper handler/stacker.
Installing the duplexer with no other option units
If the duplexer is the only option unit you will be using with the printer, it mounts directly underneath the printer as shown in Figure 2(a). The printer sits directly on top of the duplexer.
- Install the optional PA-20 paper path adaptor on the duplexer as shown in Figure 3.
Pull the duplexer drawer slightly open.
- Align the tabs with the slots.
- After fitting the tabs to the slots, slide the paper path adaptor to the left to lock.
- Close the duplexer drawer.
-
Next, align the positioning pins on top of the duplexer and the lock pin on the paper path adaptor with the holes in the base of the printer, then slowly and carefully lower the printer onto the duplexer. Hold the printer level while lowering it onto the duplexer, and make sure that the connector on the duplexer fits squarely into the corresponding connector in the base of the printer. (Fig. 4)
-
Install the optional paper handler/stacker. For details, see the instructions provided with the paper handler/stacker.
Installing the duplexer together with other option units
The duplexer mounts underneath the paper feeder as shown in Figure 2(b). In this configuration, the printer sits on top of the paper feeder.
-
If you will be using the duplexer together with a paper feeder, you must install the PA-1 paper path adaptor on the rear of duplexer. Install the PA-1 as shown in Figure 5.
-
Align the tabs with the slots.
-
After fitting the tabs to the slots, slide the paper path adaptor in the direction indicated by the arrow to lock it. See Figure 6 for how to remove the PA-20.
-
Next, install the paper feeder on top of the duplexer as shown in Figure 7. Align the positioning pins on top of the duplexer and the lock pin on the paper path adaptor with the holes in the base of paper feeder, then carefully lower the paper feeder onto the duplexer. Hold the paper feeder level while lowering it onto the duplexer, and make sure that the connector on the duplexer fits squarely into the corresponding connector in the base of the paper feeder.
Note
You can stack two paper feeders on top of one another. For details, see the paper feeder instruction manual.
-
Install the optional PA-20 paper path adaptor on the paper feeder as shown in Figure 3.
-
Align the tabs with the slots.
-
After fitting the tabs to the slots, slide the paper path adaptor to the left to lock.
-
Lower the printer onto the paper feeder. Observe the same precautions as when lowering the paper feeder onto the duplexer. (Fig.4)
- Install the optional paper handler/stacker. For details, see the instructions provided with the paper handler/stacker.
Using the cable holder
The cable holder provided together with the optional duplexer provides a convenient means of bundling the printer's power and interface cables. To use the cable holder, press it into one of the holes to the left or right of the rear cover as shown.
Printer memory for duplex printing
With duplex printing, the printer basically needs twice as much memory as is required for simplex printing. Further, depending on the printer and the selected printing environment, it may be necessary to expand printer memory in order to perform duplex printing. For memory requirements, see the printer's User's Manual.
Duplexer modes
The duplexer allows you to print on both sides of the paper. First the printer prints on one side of the paper in the usual manner. Then it sends the paper to the duplexer, which turns it over to allow printing on the other side. Figure 8 shows the path through which paper travels when printing in the duplex mode.
Binding setups
The term binding refers to the manner in which printed pages of paper are joined together when pages are joined together (by gluing, stitching, etc.) in book form. The two possible types of binding are long-edge binding, in which pages are joined together along their long edge; and short-edge binding, in which they are joined together along their short edge. In selecting a binding type, you must also consider the orientation of the printed page. You can use long-edge or short-edge binding with either landscape or portrait printing.
Depending on the binding type and print orientation, the duplexer provides four types of binding setups. These are: (1) portrait, long-edge, (2) portrait, short edge, (3) landscape, long-edge, and (4) landscape, short-edge. Figure 9 shows these binding setups.
With portrait, long-edge binding and landscape, short-edge binding [setup (1) and (4) in Figure 9], text on both sides of the paper is oriented in the same direction.
With portrait, short-edge binding and landscape, long-edge binding [setups (2) and (3) in Figure 9], text on the rear side of the paper is printed upside down with respect to that on the front side.
Mode Selection
You can enable the duplexer by selecting the Duplex mode option using the MODE key on the printer's control panel, or by means of PRESCRIBE or PCL mode selection commands.
Mode selection by MODE key
To select duplex printing and binding setup from the printer's control panel, proceed as follows. (For printer control panel key operation, also see the printer's User's Manual.)
- Make sure that the printer is ready and on-line.
- Press the MODE key on the printer's control panel.
- Follow the key operation procedure for each printer until the message display indicates Duplex mode. The current duplex mode is indicated by one of the following messages:
None
Short edge bind
Long edge bind
The default duplex mode is None.
- To change the duplex mode, press the ENTER key. The message display shows a blinking question mark (?).
- Press the + or - key until the display shows the desired binding type. If you want to abandon the duplex mode selection procedure, press the CANCEL key now. The duplex mode remains unchanged.
- Press the ENTER key to set the new duplex mode.
- Press the EXIT key and the message display returns to Ready.
Complete the binding setup by selecting the appropriate print orientation, portrait or landscape. See the printer's instruction manual for the procedure.
Note
While using the duplexer, you can also select face-up or facedown delivery of printed pages. Select a delivery type that suits your needs. For information on this procedure, see the printer's User's Manual.
Manual feeding
Duplex printing is not available if paper is fed manually from the printer's manual feed tray or using the optional envelope feeder. If the paper is fed manually while the duplexer is activated, the printer automatically deactivates the duplex mode and delivers all output pages to the face-up tray.
Mode selection by command
As an alternative to the control panel selection procedure described on page 9, you can select duplex printing and the binding mode setup using certain PRESCRIBE and PCL commands. These commands also provide certain functions that are not available from the control panel.
The PRESCRIBE duplex control commands and their functions are:
DUPX (select/deselect DUPLeX mode)
DXPG (select DupleX PaGe side)
The PCL commands provide the same functions as the PRESCRIBE commands listed above. However, unlike the PRESCRIBE commands (which can be used in any printer emulation mode), the PCL commands are only effective while using the printer in the HP LaserJet emulation (PCL) mode.
The PCL duplex control commands and their functions are as follows.
PREScribe commands are described in detail below.
DUPX (select/deselect DUPlex mode)
Format DUPX mode;
Parameters mode: a number from 0 to 2
The DUPX command instructs the printer to select or deselect duplex printing and selects the duplex mode. The parameters are as follows.
0=Select simplex mode
1=Select duplex mode, long-edge binding
2=Select duplex mode, short-edge binding
The default duplex mode can be selected by the FRPO N4 command. The parameter values are the same as the DUPX command above. For example, to power up the printer with the long-edge duplex binding mode, enter the command:
ECHO !R! FRPO N4, 1; EXIT; > LPT1
For LPT1, substitute the port to which the computer is connected.
DXPG (select DupleX PaGe side)
Format DXPG side;
Parameters side: a number from 0 to 2
The DXPG command ends printing on the current page in the same manner as a form feed. However, unlike the form feed, it also selects the paper side, front or back, on which printing of the ensuing page is printed. The parameters are as follows.
0=Select next side (same as with a form feed)
1=Select front side (printing of the ensuing page begins on the front side of the next sheet, regardless of whether the current page was printed on the front or back side of the current sheet) 2=Select back side (printing of the ensuing page begins on the back side of the current sheet if the current page was printed on the front side, or on the back side of the next sheet if the current page was printed on the back side)
Example
The following example selects the duplex mode with short-edge binding, selects to portrait page orientation, and prints text on both sides of the page. The result is as shown in Figure 10.
!R! CMNT Initiates a PRESCRIBE command sequence;
RES; CMNT Causes a page break and resets parameters;
DUPX 2; CMNT Selects duplex mode, short-edge binding;
SPO P; CMNT Selects portrait orientation;
STAK 1; CMNT Select face-down delivery; EXIT;
This text prints rightside-up on the front side of the page.
!R! DXPG 0; CMNT Ends current page (front side of the paper); EXIT;
This text prints upside-down on the reverse side of the page.
!R! RES; EXIT;
Troubleshooting
This section explains how to handle paper jams in the duplexer and respond to error messages.
Paper jam
In the event of a paper jam, the Paper jam message appears on the printer's message display.
Note
When clearing jams, check other option units (the paper handler/stacker, paper feeder, sorter, and bulk paper stacker) for jammed paper before pulling out the DU-21's duplexer drawer. To check for other option units for jams, open their rear covers.
If paper jams inside the duplexer, the READY indicator flashes on the duplexer's indicator panel. To clear the jam, first check other option units for paper by opening their rear covers. Remove any paper you find. Then pull the duplexer drawer part-way open. If paper is visible under the clear plastic cover, open the cover and remove the paper as shown in Figure 11(a).
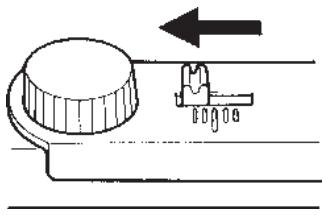
If the paper is stuck inside the duplexer, turn the knob on the left side of the duplexer drawer counterclockwise [see Figure 11(b)] to move the paper out of the duplexer.
If the paper jams at the rear of the duplex unit, open the rear cover and remove it.
Whenever you clear a jam, be sure to check inside other option units, as well as inside the duplexer drawer and the duplexer's rear cover.
After clearing the jam, reclose the drawer, open and close the printer's top cover or the paper feed unit. Then the printer automatically warm up, goes on-line, and continue printing. Depending on the part at which the jam occurred, the printer may or may not print the jammed page.
Error message
If the printer's message display shows Duplex unit front cover Open or Duplex unit rear cover Open, check the front/rear covers and ensure that they are securely closed.
Adjusting the print position
When using duplex printing, the image on the reverse side of the paper may be slightly out of alignment with that on the front side. If this occurs, the image position can be adjusted either to the left or right by about 2mm . When using the duplex unit, the reverse side of the paper (the second page) is printed first, followed by the front side (the first page). Adjustment of the print position affects only the image printed on the front side of the paper; i.e., print positioning on odd-numbered pages.
Adjustment procedure
- Prepare a double-sided print sample using the duplex printing mode.
- Pull the duplex drawer out as far as it will go.
- Open the two covers inside the drawer, then loosen the thumbscrew located on the right inside of the drawer. This frees the adjuster, allowing you to move it to the right or left. The adjuster is set to the center position upon shipment from the factory.
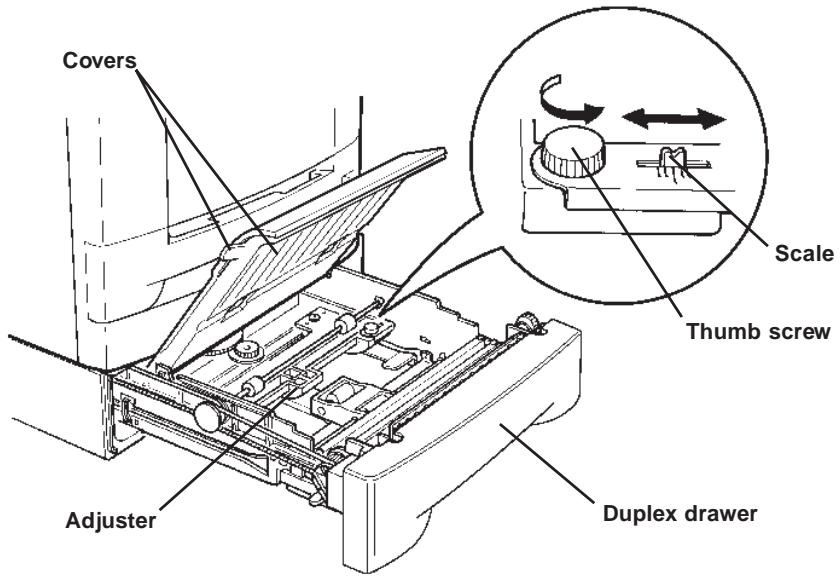
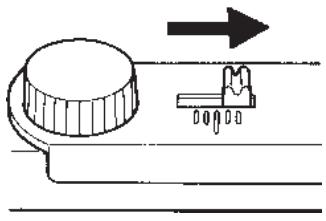
The scale located to the right of the thumbscrew is calibrated in millimeters. Moving the adjuster to the right of the center position moves the print position a corresponding amount to the left. Conversely, moving the adjuster to the left moves the print position a corresponding amount to the right.
- Hold the print sample up to a light with the front side facing towards you.
If the image on the front side of the paper is to the right of that on the rear side, move the adjuster to the left by that amount while referring to the adjuster scale.
If the image on the front side of the paper is to the left of that on the rear side, move the adjuster to the right by that amount while referring to the adjuster scale.
- When done, re-tighten the thumbscrew, close the two covers, and close the duplexer drawer.
Paper selection
General guidelines
The duplexer may not be used to print on paper not satisfying the requirements below. Also, special types of print media such as overhead projection (OHP) film, envelopes, adhesive-backed labels, and paper containing watermarks must not be used with duplex printing. These types can result in jams, misfeeds, and paper waste, and in extreme cases can damage the duplexer.
Note
The manufacturer assumes no liability for problems that occur when paper not satisfying these requirements is used with the duplexer.
Selection of the right paper is important. The wrong paper can result in jams, misfeeds, curl, poor print quality, and paper waste, and in extreme cases can damage the duplexer and the printer. The guidelines given below will increase the productivity of your office by ensuring efficient, trouble-free printing and reducing wear and tear on the duplexer and the printer.
Paper availability
Most types of paper are compatible with a variety of machines. Paper intended for xerographic copiers can also be used with the duplexer and the printer.
There are three general grades of paper: economy, standard, and premium. The most significant difference between grades is the ease with which they pass through the printer. This is affected by the smoothness, size, and moisture content of the paper, and the way in which the paper is cut. The higher the grade of paper you use, the less risk there will be of paper jam and other problems, and the higher the level of quality your printed output will reflect.
Differences between paper from different suppliers can also affect the duplexer's performance. A high-quality printer cannot produce high-quality results when the wrong paper is used. Low-priced paper is not economical in the long run if it causes printing problems.
Paper in each grade is available in a range of basis weights (defined later). The traditional standard weights are 19, 20, and 24 pounds (70g / m^2 to 90~g / m^2)
Paper Specifications
The following table summarizes the basic paper specifications. Details are given on the following table.
Table 1 Specification for White Bond Paper
| Item | Specification |
| Weight | 70 to 90 g/m2(19 to 24 lbs/ream) |
| Thickness | 0.086 to 0.110 mm (3.4 to 4.3 mils) |
| Dimensional accuracy | ±0.7 mm (±0.0276 inches) |
| Squareness of corners | 90° ± 0.2° |
| Moisture content | 4% to 6% |
| Direction of grain | Long grain |
| Pulp content | 80% or more |
Selecting the right paper
Printer printing is a process involving LED light, electrostatic discharge, toner, and heat. In addition, as the paper passes through the printer it undergoes considerable sliding, bending, and twisting motions. A high-quality printing paper matching the requirements withstands all these stresses, enabling the duplexer and the printer to turn out clean, crisp printed copy consistently.
Remember that all paper is not the same. Some of the factors to consider when selecting paper for duplex printing are as follows:
Condition of the paper
Avoid using paper that is bent at the edges, curled, dirty, torn, or contaminated with lint, clay, or paper shreds.
Use of paper in these conditions can lead to illegible printing, misfeeding, and paper jams, and can shorten the life of the duplexer and the printer. In particular, avoid using paper with a surface coating or other surface treatment. The paper should have as smooth and even a surface as possible.
Composition
Do not use paper that has been coated or surface-treated and contains plastic or carbon. The heat of fusing can cause such paper to give off harmful fumes.
Bond paper should contain at least 80% pulp. Not more than 20% of the total paper content should consist of cotton or other fibers.
Paper size
Printer's cassettes are available for the paper sizes listed in Table 2. The dimensional tolerances are ± 0.7mm ( ± 0.0276 inches) for the length and width. The angle at the corners must be 90^ ± 0.2^ .
Table 2 Paper Sizes for Printer's Cassette Paper Feed
| Printer's cassette | Size |
| Legal | 8.5 × 14 in |
| Letter | 8.5 × 11 in |
| ISO A4 | 210 × 297 mm |
| JIS B5 | 182 × 257 mm |
| ISO A5 | 148 × 210 mm |
Smoothness
The paper should have a smooth, uncoated surface. Paper with a rough or sandy surface can cause voids in the printed output. Paper that is too smooth, however, can cause multiple feeding and fogging problems. (Fogging is a gray background effect.)
Basis weight
Basis weight is the weight of a standard quantity of paper. In the traditional system the standard quantity is a ream consisting of 500 sheets measuring 17 × 22 inches each. In the metric system the standard quantity is 1 square meter. Paper that is too light or too heavy can cause misfeeding, jams, and premature wear of the duplexer and the printer. Uneven paper weight can cause multiple feeds, print defects, poor toner fusing, blurring, and other print quality problems. The proper weight is 70 to 90g / m^2 (19 to 24 lbs/ream).
Important
Although the printer can print on lighter paper with the basis weight of as low as 60g / m^2 in simplex printing, duplex printing is not possible with the paper weight of less than 70 g / m^2 .
Thickness (Caliper)
Thick paper is referred to as high-caliper paper and thin paper as low-caliper paper. The paper used with the printer in duplex mode should be neither extremely thick nor extremely thin. If you are having problems with paper jams, multiple feeds, and faint printing, the paper may be too thin. If you are having problems with paper jams, and blurred printing the paper may be too thick. The proper thickness is 0.086 to 0.110mm (3.4 to 4.3 mils).
Moisture content
Moisture content is defined as the percent ratio of moisture to the dry mass of the paper. Moisture can affect the paper's appearance, feedability, curl, electrostatic properties, and toner fusing characteristics.
The moisture content of the paper varies with the relative humidity in the room. When the relative humidity is high and the paper absorbs moisture, the paper edges expand, becoming wavy in appearance. When the relative humidity is low and paper loses moisture, the edges shrink and tighten, and print contrast may suffer.
Wavy or tight edges can cause misfeeding and alignment anomalies. The moisture content of the paper should be 4% to 6% .
To ensure the proper moisture content it is important to store the paper in a controlled environment. Some tips on moisture control are:
Store paper in a cool, dry location.
- Keep the paper in its wrapping as long as possible. Rewrap paper that is not in use.
Store paper in its original carton. Place a pallet etc. under the carton to separate it from the floor.
After removing paper from storage, let it stand in the same room as the printer for 48 hours before use.
Avoid leaving paper where it is exposed to heat, sunlight, or damp.
Paper grain
When paper is manufactured, it is cut into sheets with the grain running parallel to the length (long grain) or parallel to the width (short grain). Short grain paper can cause feeding problems in the duplexer and the printer. All paper used in the duplexer and the printer should be long grain.
Other paper properties
Porosity: Refers to the density of the paper structure; that is, to how openly or compactly the fibers are bonded.
Stiffness: Limp paper can buckle inside the duplexer and the printer, while paper that is too stiff may bind. Either way the result is a paper jam.
Curl: Most paper has a natural tendency to curl in one direction. The paper should be loaded so that the natural curl is downward, to counteract the upward curl imparted by the printer. Printed sheets will then come out flat. Most paper also has a top and bottom surface. Loading instructions are usually given on the paper package.
Electrostatic properties: During the printing process the paper is electrostatically charged to attract the toner. The paper must be able to release this charge so that printed sheets do not cling together in the output tray.
Whiteness: The contrast of the printed page depends on the whiteness of the paper. Whiter paper provides a sharper, brighter appearance.
Quality control: Uneven sheet size, corners that are not square, ragged edges, welded (uncut) sheets, and crushed edges and corners can cause the duplexer and the printer to malfunction in various ways. A quality paper supplier should take considerable care to ensure that these problems do not occur.
Packaging: Paper should be packed in a sturdy carton to protect it from damage during transport. Quality paper obtained from a reputable supplier is usually properly packaged.
Special paper
The following types of special paper can be used:
Colored paper
Preprinted paper
Use paper that is sold specifically for use with copiers (heat-fusing type).
Since the composition and quality of special paper vary considerably, special paper is more likely than white bond paper to give trouble during printing. No liability will be assumed if moisture etc. given off in printing on special paper causes harm to the machine or operator.
Note
Before purchasing any type of special paper, test a sample on the duplzer and the printer and check that printing quality is satisfactory.
Specifications for each type of special paper are given below.
Colored paper
Colored paper should satisfy the same conditions as white bond paper, listed in Table 1. In addition, the pigments used in the paper must be able to withstand the heat of fusing during the printing process (up to 200^ or 392^ ).
Preprinted paper
Preprinted paper should have a bond paper base. The preprinted ink must be able to withstand the heat of fusing during the printing process, and must not be affected by silicone oil.
Do not use paper with any kind of surface treatment, such as the type of paper commonly used for calendars.
Specifications
| Item | Specification |
| Applicable printers | Kyocera page printers |
| Paper size | Letter (8.5 × 11 inches) ISO A4 (21 × 29.7 cm) Legal (8.5 × 14 inches) JIS B5 (18.2 × 25.7 cm) ISO A5 (14.8 × 21 cm) |
| Environmental requirements | Temperature: 10°C to 32.5°C Humidity: 20% to 80% RH Ideal conditions are 20°C/65% RH Altitude under 2000 m |
| Dimensions | 110 mm (4.3") H × 345 mm (13.6") W × 513 mm (20.2") D |
| Weight | 6.4 kg (14.1 lbs) |
| Power supply | Supplied from printer |
This page intentionally left blank
© Copyright 1999 by Kyocera Corporation
Supports de cables, 2
Copyright 1999 by Kyocera Corporation
All rights reserved
Revision 1.0., June 1999
Printed on recycled paper
Unit 6, 112 Talavera Road North Ryde, NSW 2113
France
Kyocera Electronics France S.A.
Parc les Algorithms Saint Aubin 91194 Gif Sur Yvette
Germany
Kyocera Electronics Europe GmbH
Kyocera Electronics Italy S. R. L
Via Oslavia 17/12, I-20134 Milano (MI)
Japan
Kyocera Corporation
2-14-9 Tamagawadai, Setagaya Ward, Tokyo 158-8610
U.K.
Kyocera Electronics (UK) Ltd.
8 Beacontree Plaza, Gillette Way, Reading, RG2 0BP
U.S.A.
Kyocera Electronics, Inc.
11465 John's Creek Parkway, Suite #250, Duluth, GA 30097