
DF-730 - Multifunction Printer KYOCERA - Free user manual and instructions
Find the device manual for free DF-730 KYOCERA in PDF.
| Product Type | Document finisher for copier/multifunction printer |
| Brand | KYOCERA |
| Model | DF-730 |
| Category | Multifunction printer (accessory) |
| Dimensions (W × H × D) | 558 mm × 526 mm × 916 mm (22" × 20 11/16" × 36 1/16") |
| Weight | Approx. 25 kg (55 lbs) |
| Power Supply | Supplied by the host copier or printer |
| Supported Paper Weight | 64 to 128 g/m² |
| Tray Capacity (without stapling, paper ≤80 g/m²) | A3, B4, 11×17, 8½×14, 8K: 500 sheets; A4, A4R, B5, B5R, 8½×11, 11×8½, 16K: 1000 sheets |
| Stapling Capacity (paper ≤80 g/m²) | Up to 20 sheets (A3, B4, 11×17, 8½×14) or 30 sheets (A4, A4R, B5, 8½×11, 11×8½); mixed sizes: up to 30 sheets |
| Number of Stapled Sets (2-10 sheets) | Up to 28 sets (A3, B4, 11×17, 8½×14) or 50 sets (A4, A4R, B5, 8½×11, 11×8½) |
| Number of Stapled Sets (11-20 sheets) | Up to 12 sets (A3, B4, 11×17, 8½×14) or 16 sets (A4, A4R, B5, 8½×11, 11×8½) |
| Number of Stapled Sets (21-30 sheets) | Up to 16 sets (A4, A4R, B5, 8½×11, 11×8½) |
| Main Functions | Automatic sorting, stapling, offset ejection |
| Modes (Copier) | Sort on, sort off, stapling |
| Modes (Printer) | Offset ejection, stapling |
| Safety | Do not place on unstable surface; avoid heat sources and flammable objects; unplug before cleaning; do not touch output tray during operation |
| Maintenance and Cleaning | Internal cleaning by technician; clear paper jams by opening covers; add staples via staple cartridge |
| Spare Parts and Repairability | Replaceable staple cartridge; internal repair by authorized technician |
| General Information | Manual available in 7 languages; user manual included (French pages 11-20) |
Frequently Asked Questions - DF-730 KYOCERA
User questions about DF-730 KYOCERA
0 question about this device. Answer the ones you know or ask your own.
Ask a new question about this device
Download the instructions for your Multifunction Printer in PDF format for free! Find your manual DF-730 - KYOCERA and take your electronic device back in hand. On this page are published all the documents necessary for the use of your device. DF-730 by KYOCERA.
USER MANUAL DF-730 KYOCERA
This Operation Guide contains explanations in 7 different languages: English, French, Spanish, German, Italian, Chinese and Japanese. Refer to the corresponding pages as indicated below for the language of your choice.
- This Document Finisher can be installed on both copiers and printers.
- This Operation Guide focuses its explanations towards installation on copiers, but the same basic procedure can be used to install this Document Finisher on a printer.
- The few places where the procedures differ are clearly indicated with separate explanations.
ALWAYS read this Operation Guide thoroughly before use. After reading, maintain it in good condition and keep it together with the Operation Guide for your copier (or printer, as appropriate). Refer to the Operation Guide for your copier (or printer, as appropriate) for information on the service representative for your product.
The sections of this Operation Guide and parts of this product marked with symbols are safety warnings meant to protect the user, other individuals and surrounding objects, and ensure correct and safe usage of the product.
The symbols and their meanings are indicated below.

DANGER: Indicates that serious injury or even death will very possibly result from insufficient attention to or incorrect compliance with the related points.

WARNING: Indicates that serious injury or even death may result from insufficient attention to or incorrect compliance with the related points.

CAUTION: Indicates that personal injury or mechanical damage may result from insufficient attention to or incorrect compliance with the related points.
Symbols
The symbol indicates that the related section includes safety warnings. Specific points of attention are indicated inside the symbol.

[General warning]
The symbol indicates that the related section includes information on prohibited actions. Specifics of the prohibited action are indicated inside the symbol.

[Warning of prohibited action]

[Disassembly prohibited]
The symbol indicates that the related section includes information on actions which must be performed. Specifics of the required action are indicated inside the symbol.

[Alert of required action]
[Remove the power plug from the outlet]

[Always connect the product to an outlet with a ground connection]
Please contact your service representative to order a replacement if the safety warnings in the Operation Guide are illegible or if the Operation Guide itself is missing. (fee required)
CONTENTS
INSTALLATION PRECAUTIONS. 3
PRECAUTIONS FOR USE. 4
Names of parts 5
Cautions 6
Types of modes [copier] 6
Sort: ON 6
Sort: OFF 6
Stapling 6
Types of modes [printer] 7
Offset ejection 7
Stapling 7
Troubleshooting 7
Handling a paper jam. 7
Replenishing staples. 8
Handling a staple jam 9
Specifications 10
Environment
CAUTION
Avoid placing this product on or in locations which are unstable or not level. Such locations may cause the product to fall down or fall over. This type of situation presents a danger of personal injury or damage to the product.

Avoid locations near radiators, heaters, or other heat sources, or locations near flammable items, to avoid the danger of fire.

Other precautions
Adverse environmental conditions may affect the safe operation and performance of this product. Install in an air-conditioned room (recommended room temperature: around 22^ (71.6^) , humidity: around 60% ) and avoid the following locations when selecting a site for the product.
- Avoid locations near a window or with exposure to direct sunlight.
- Avoid locations with vibrations.
- Avoid locations with drastic temperature fluctuations.
- Avoid locations with direct exposure to hot or cold air.
Handling of plastic bags
WARNING
Keep the plastic bags that are used with this product away from children. The plastic may cling to their nose and mouth causing suffocation............

Cautions when using this product

WARNING
DO NOT place metallic objects or containers with water (flower vases, flower pots, cups, etc.) on or near this product. This type of situation presents a danger of fire or electrical shock should any water fall inside.

DO NOT damage, break or attempt to repair the signal line. DO NOT place heavy objects on the signal line, pull it, bend it unnecessarily or cause any other type of damage. These types of situations present a danger of fire or electrical shock.

NEVER attempt to repair or disassemble this product or its parts as there is a danger of injury, fire or electrical shock.
If this product becomes excessively hot, smoke appears, there is an odd smell, or any other abnormal situation occurs, there is a danger of fire or electrical shock. Turn the power switch to the copier or printer OFF (O) immediately, remove the power plug of the copier or printer from the outlet and contact your service representative.
If anything harmful (paper clips, water, other fluids, etc.) falls into this product, turn the power switch to the copier or printer OFF (O) immediately. Next, remove the power plug of the copier or printer from the outlet to avoid the danger of fire or electrical shock and then contact your service representative. If you do not take these steps, there is a danger of fine or electrical shock.

ALWAYS contact your service representative for maintenance or repair of internal parts.


CAUTION
For safety purposes, ALWAYS turn the power switch to the copier or printer OFF (O) and remove the power plug of the copier or printer from the outlet when performing cleaning operations on this product.
DO NOT touch the ejection tray when the product is in operation as there is a danger of injury.

If dust accumulates within this product, there is a danger of fire or other trouble. It is therefore recommended that you consult with your service representative in regard to cleaning of internal parts. This is particularly effective if accomplished prior to seasons of high humidity.

Consult with your service representative in regard to the cost of cleaning the internal parts of the product as well.
Other precautions
DO NOT place heavy objects on this product or cause other damage to the product.
When lifting or moving the product, contact your service representative.
Do not touch electrical parts, such as connectors or printed circuit boards. They could be damaged by static electricity.
DO NOT attempt to perform any operations not explained in this Operation Guide.
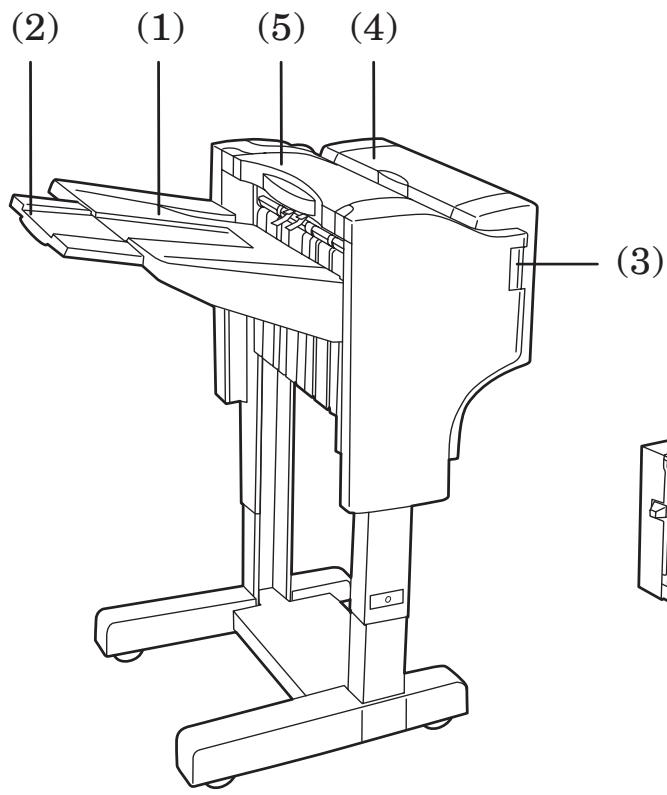

(1) Ejection tray
Copies and printouts will be ejected onto this tray.
(2) Ejection tray extension
Pull this extension out when you want to copy or print onto 11'' × 17'' , 8_1/2'' × 14'' , B4 or A3 size paper.
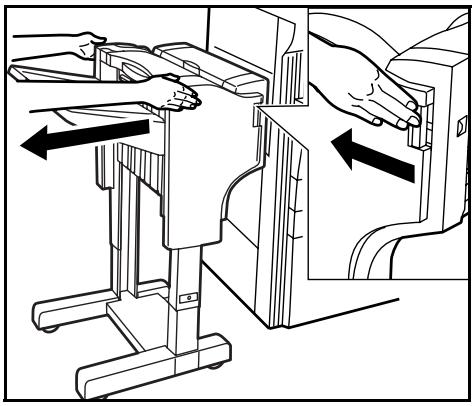
(3) Finisher release button
Push this button when you want to separate the Document Finisher from the copier (or printer).
(4) Reversing unit cover
Open this cover if a paper jam occurs inside of the Document Finisher.
(5) Top cover
Open this cover if a paper jam occurs inside of the Document Finisher.
(6) Stapler cover
Open this cover when you want to replenish staples.
(7) Staple holder
The staple cartridge is installed here. Pull out this holder when you want to replenish staples.
Cautions
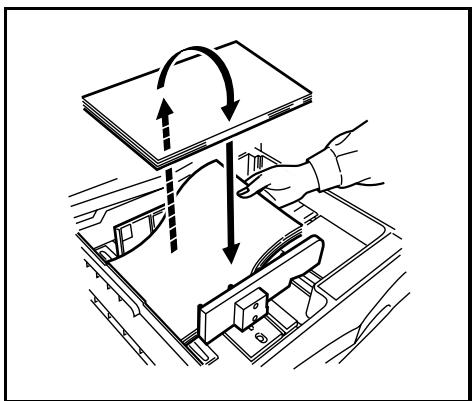
- If finished copies or printouts come out curled or are stacked unevenly, turn the paper in the drawer[cassette] over and reload it.
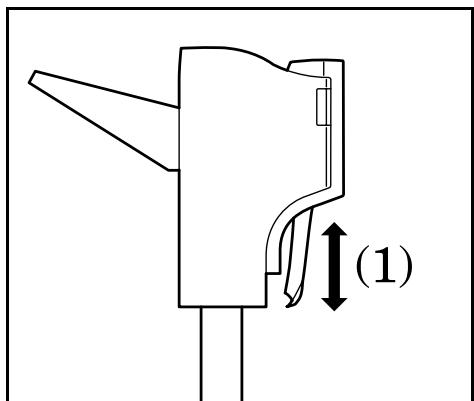
- While the Document Finisher is turning the copy or printout over, that paper will be visible (as shown in (1) in the illustration). NEVER attempt to grab the paper at this point.

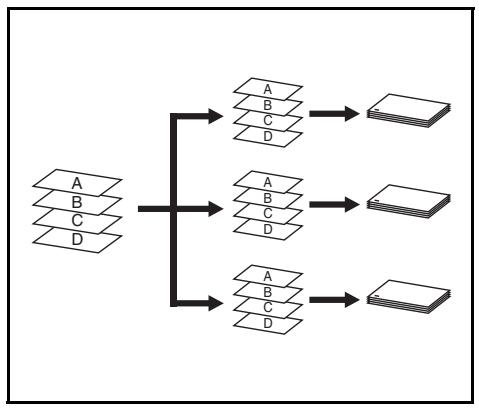
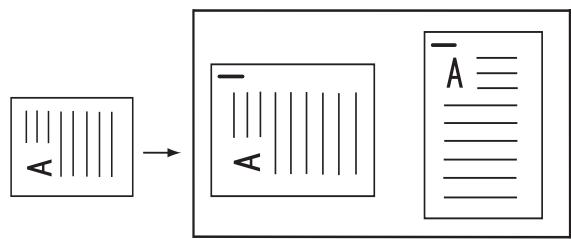
Sort: ON
This mode automatically sorts copies made from multiple originals into identical sets.
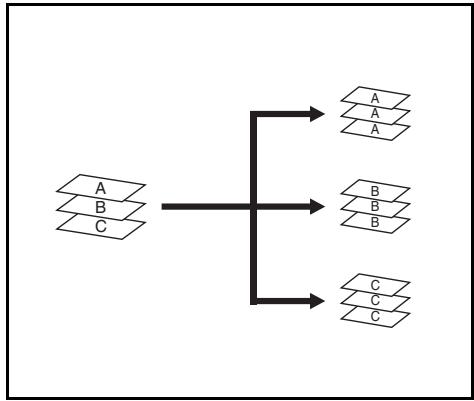
Sort: OFF
This mode automatically groups copies made from multiple originals, with all the copies produced from an individual original grouped together in one set.
Types of modes [copier]
![KYOCERA DF-730 - Types of modes [copier] - 1](/content/2019/11/145141/images/3627de5d22f2e9bbae33b4c94bd991f5e98c0a520677d4a1b93d72f6547c49d1.jpg)
Stapling
This mode automatically sorts and then staples each copy set.
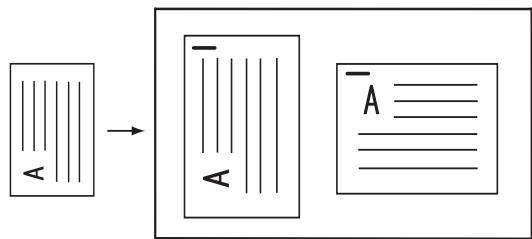
Types of modes [printer]
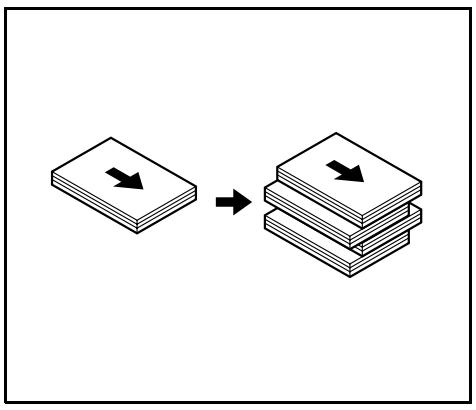
Offset ejection
This mode automatically shifts each set of printouts to the right and left in order to separate each individual set in a staggered fashion.
Stapling
This mode automatically staples each set of printouts.
Troubleshooting
(Paper jam, replenishing staples and staple jam)
Handling a paper jam
If a paper jam happens to occur, the operation will stop, and an indication of the cause of the jam will appear on the operation panel of the copier (or the message display of the printer).
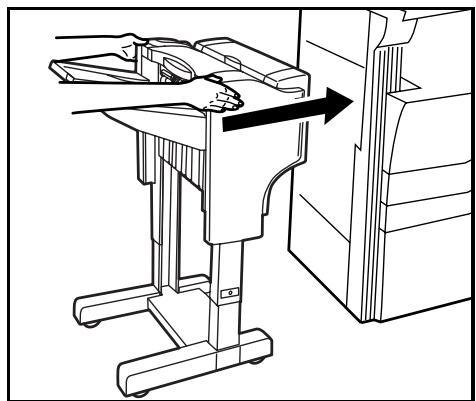
- Push the finisher release button to separate the Document Finisher from the copier (or printer).
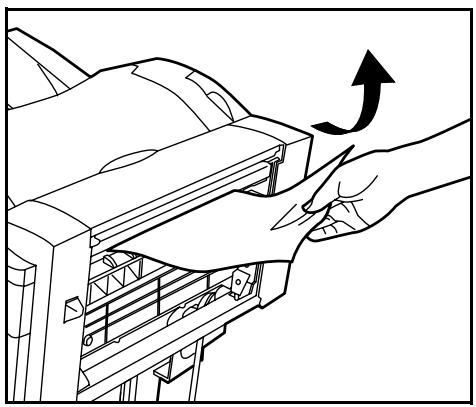
- Remove any jammed paper there.
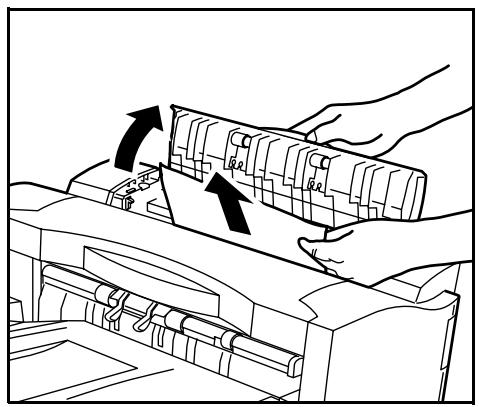
- Open the reversing unit cover and remove any jammed paper inside that cover.
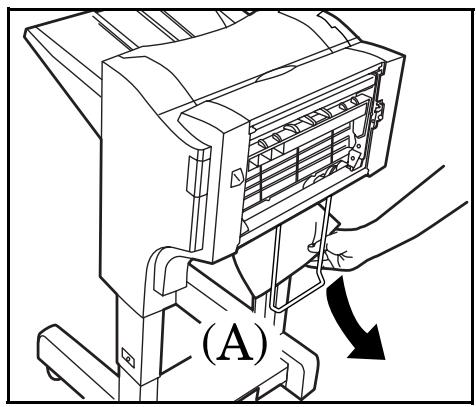
- Check the lower portion of the Document Finisher (A) and remove any jammed paper from that area.
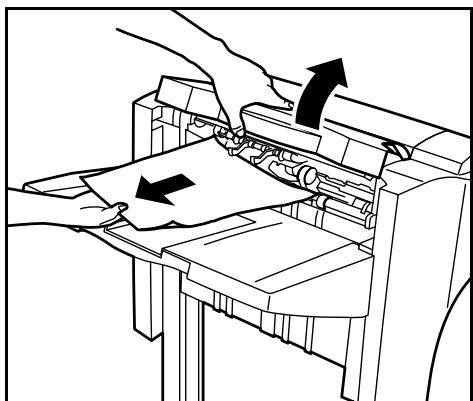
5. Open the top cover and remove any jammed paper inside that cover.
6. Close the top cover and the reversing unit cover and reattach the Document Finisher to the copier (or printer).

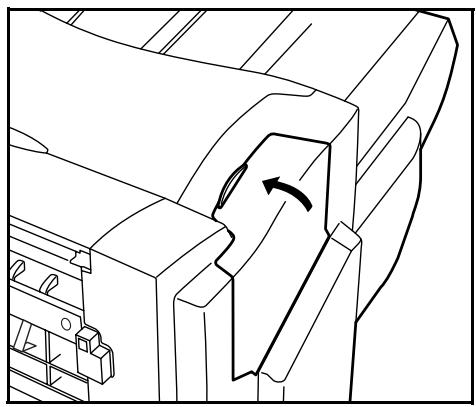
1. Open the stapler cover.

2. Pull out the stapler holder.
Replenishing staples
If an indication that staples have run out appears on the operation panel of the copier (or the message display of the printer), perform the following procedure.
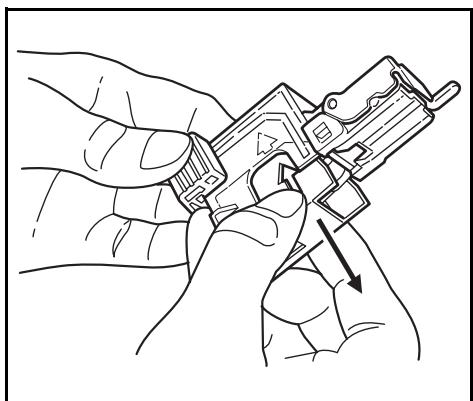
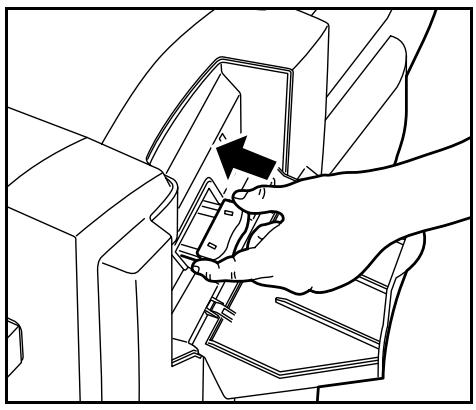
3. Remove the empty staple cartridge from the staple holder.
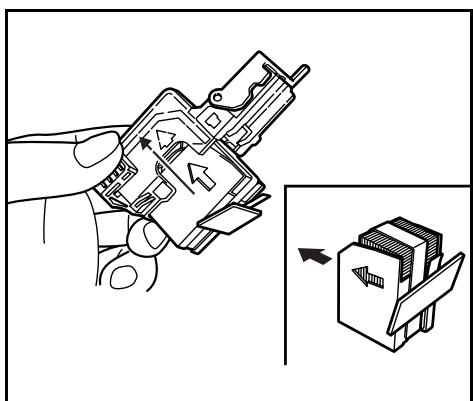
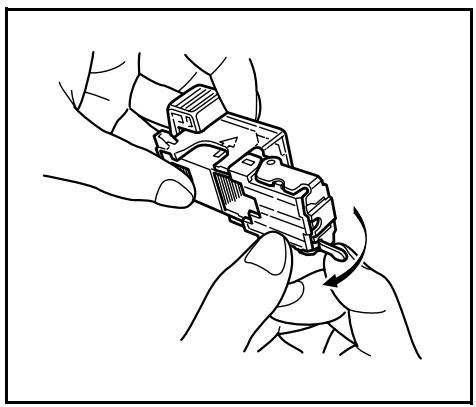
4. Hold the staple holder in one hand and the new staple cartridge in the other, and set the new cartridge into the staple holder paying due attention to the direction of insertion.
* Insert in the direction of the arrow shown on the staple cartridge.
5. Push the staple cartridge all the way into the staple holder and then peel off the paper tape that is attached to the cartridge.
6. Reinstall the staple holder in its original location inside the staple unit. The staple holder will click into place when it is properly inserted.
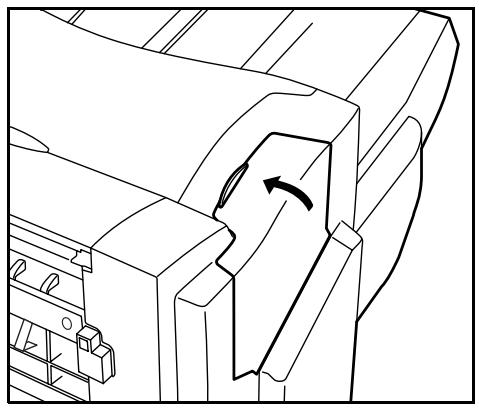
7. Close the stapler cover.
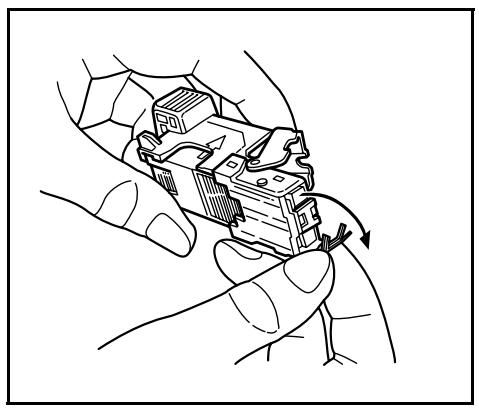
2. Remove any jammed staples from the front of the staple holder (where the staples are set).
Handling a staple jam
If a paper jam happens to occur during stapling, a staple may have jammed. In this case, perform the following procedure.
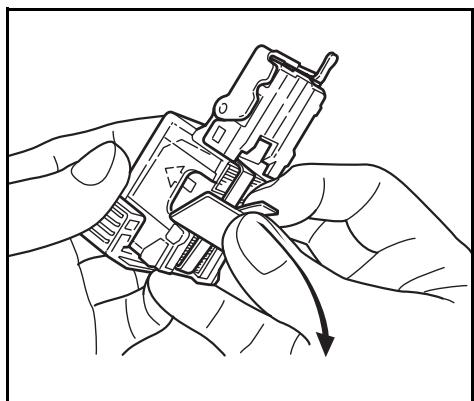
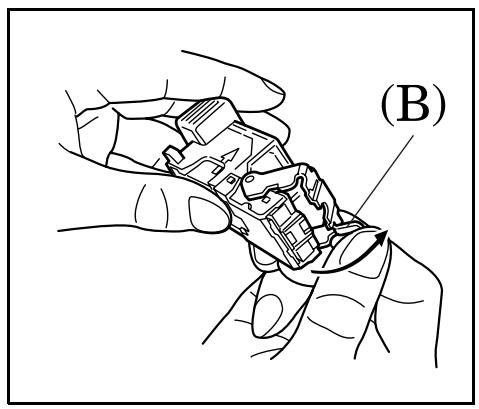
- Remove the staple holder using the same procedure as in "Replenishing staples". Then, open the face plate by pushing on the tab (B) with your finger.
3. Push the face plate closed into its original position.

4. Reinstall the staple holder in its original location inside the staple unit. The staple holder will click into place when it is properly inserted.
5. Close the stapler cover.
Specifications
Type . Floor model
Available trays. One
Thickness of paper. 64 to 128g / m^2
Tray capacity. (When using under 80g / m^2 weight paper)
When NOT stapling 11^ × 17^ ,8_1 / 2^ × 14^ , A3,B4 or 8K:500 sheets
8_1 / 2'' × 11'' , 11'' × 8_1 / 2 , A4, A4R*,
B5, B5R or 16K: 1000 sheets
When stapling 2 to 10 sheets 11'' × 17'', 8_1/2'' × 14'', A3 or B4: 28 sets
8_1 / 2'' × 11'' , 11'' × 8_1 / 2'' , A4, A4R or B5: 50 sets
When stapling 11 to 20 sheets 11'' × 17'', 8_1/2'' × 14'', A3 or B4: 12 sets
8_1 / 2'' × 11'' , 11'' × 8_1 / 2'' , A4, A4R or B5: 16 sets
When stapling 21 to 30 sheets 8_1/2'' × 11'', 11'' × 8_1/2'' , A4, A4R or B5: 16 sets
Stapling capacity (When using under 80g / m^2 weight paper)
11'' × 17'', 8_1/2'' × 14'', A3 or B4: 20 sheets
8_1/2'' × 11'', 11'' × 8_1/2'', A4, A4R or B5: 30 sheets
Mixed sizes: 30 sheets or less
- The specified stapling capacity may not be possible when using color copy paper.
This is due to the characteristics of the paper.
Power source. Supplied from the copier or printer
Dimensions (W× H× D) 22" 20_11 / 16'' 36 1/16
558mm× 526mm× 916mm
Weight. Approx. 55 lbs / 25 kg
(Specifications are subject to change without notice.)
- 500 sheets when printing out from the printer or when using the copier as a printer.
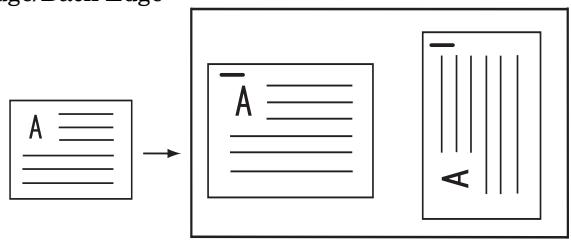
Staple
Orig. Set Direction:
Top Edge/Back Edge
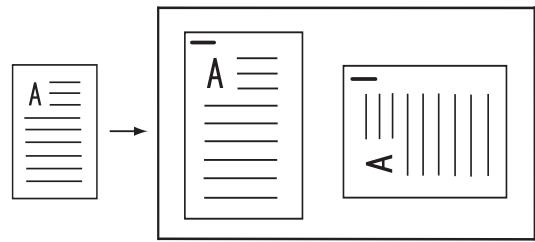
Orig. Set Direction:
Left Top Edge/Left top corner
Français
FCC Regulations state that any unauthorized changes or modifications to this equipment not expressly approved by the manufacturer could void the user's authority to operate the equipment.
Note: The equipment has been tested and found to comply with the limits for a Class B digital device, pursuant to Part 15 of the FCC Rules. These limits are designed to provide reasonable protection against harmful interference when the equipment is operated in a commercial environment.
The equipment generates, users, and can radiate radio frequency energy and, if not installed and used in accordance with the instruction manual, may cause harmful interference to radio communications. Operation of the equipment in a residential area is likely to cause harmful interference in which case the user will be required to correct the interference at his own expense.
Information to users:
This equipment has been tested and found to comply with the limits for a Class B digital device, pursuant to Part 15 of FCC Rules. These limits are designed to provide reasonable protection against harmful interference in a residential installation. This equipment generates, uses, and can radiate radio frequency energy and, if not installed and used in accordance with the instructions, may cause harmful interference to radio communications. However, there is no guarantee that interference will not occur in a particular installation. If this equipment does cause harmful interference to radio or television reception, which can be determined by turning the equipment off and on, the user is encouraged to try to correct the interference by one or more of the following measures:
Reorient or relocate the receiving antenna.
- Increase the separation between the equipment and receiver.
- Connect the equipment into an outlet on a circuit different from that to which the receiver is connected.
Consult the dealer or an experienced radio/TV technician for help.
Changes or modifications not expressly approved by the manufacturer for compliance could void the user's authority to operate the equipment.
This machine has passed all quality controls and final inspection