
SK 5012 - Wireless transmitter SENNHEISER - Free user manual and instructions
Find the device manual for free SK 5012 SENNHEISER in PDF.
| Product Type | Portable wireless transmitter |
| Brand | SENNHEISER |
| Model | SK 5012 |
| Dimensions | 53 x 60 x 17 mm |
| Weight (with batteries) | 130 g |
| Power Supply | 2 LR03 (AAA) alkaline-manganese batteries or 700 mAh rechargeable batteries |
| Battery Operating Time (alkaline) | Approx. 7 h |
| Battery Operating Time (rechargeable) | Approx. 5.5 h |
| Frequency Range | 450 - 960 MHz |
| Switchable Bandwidth | 24 MHz |
| RF Output Power | Typ. 30 mW |
| Input Sensitivity | Max. 49 mVeff (-24 dBu), switchable in 5 steps of 8 dB |
| Signal-to-Noise Ratio | > 110 dB(A) |
| AF Frequency Response | 60 Hz - 20 kHz |
| Total Harmonic Distortion | < 0.3% at 1 kHz |
| Connectors | AF: Lemo 3-pin; RF: Lemo coaxial |
| Protection | Metal die-cast housing, moisture protection |
| Main Features | PLL technology 16 channels, 6-position sensitivity selector, HiDyn plus™ noise reduction, LED indicator (on, low battery, peak) |
| Attachment | Removable and reversible belt clip |
| Care and Cleaning | Clean with a dry cloth; use only Sennheiser accessories |
| Safety | Do not open the device; observe battery polarity |
| Spare Parts and Repairability | Contact your Sennheiser dealer; use only original accessories |
| General Information | Complies with CE standards; subject to modifications |
Frequently Asked Questions - SK 5012 SENNHEISER
For receivers, HiDyn plus™ requires a receiver equipped with the same system (e.g., EM 1046).
User questions about SK 5012 SENNHEISER
0 question about this device. Answer the ones you know or ask your own.
Ask a new question about this device
Download the instructions for your Wireless transmitter in PDF format for free! Find your manual SK 5012 - SENNHEISER and take your electronic device back in hand. On this page are published all the documents necessary for the use of your device. SK 5012 by SENNHEISER.
USER MANUAL SK 5012 SENNHEISER
Alkali-Mangan = ca.7h;
Typ Mikro LRC AAA IEC LR 03
700 mAh je Zelle = ca. 5,5 h;
Typ Mikro LRC AAA IEC LR 03
eannnnnne
Thank you for choosing Sennheiser! We have designed this product to give you reliable operation over many years. Over half a century of accumulated expertise in the design and manufacture of high-quality electro-acoustic equipment have made Sennheiser a world-leading company in this field.
Due to its extremely compact design, the SK 5012 is especially suitable for all applications where a very unobtrusive transmitter is required.
English
Features
- Extremely small metal diecast casing
- Very rugged
- Special protection against the ingress of moisture
- 6-step sensitivity switch for optimum adaption to different microphone input levels
- Supplies powering for connected condenser microphones
- State-of-the-art PLL technology, 16 switchable channels
HiDyn plusTM noise reduction system - Signal-to-noise-ratio >110 dB (A)
- Voltage converter ensures constant output power until the batteries are completely discharged
- LED operation indicator: LED lights up
- LED "low battery" indicator: LED blinks periodically
- LED peak indicator: LED flashes brightly
- Reliable, easy-to-use clip attachment
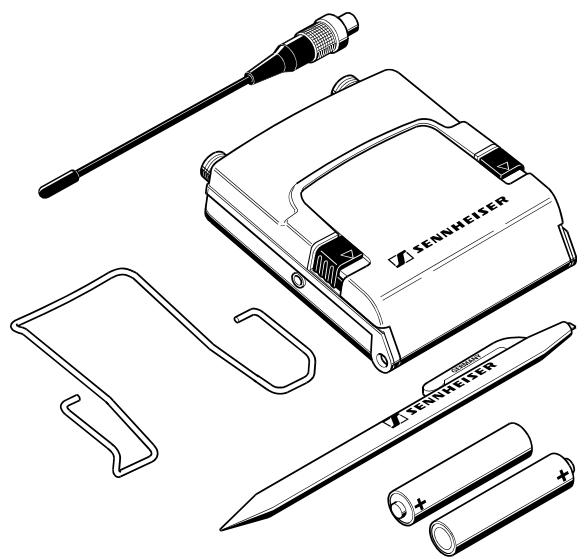
Delivery includes
- SK 5012
- Antenna
- 2 batteries
- Attachment clip
- Adjustment tool
English
SK 5012-23
English
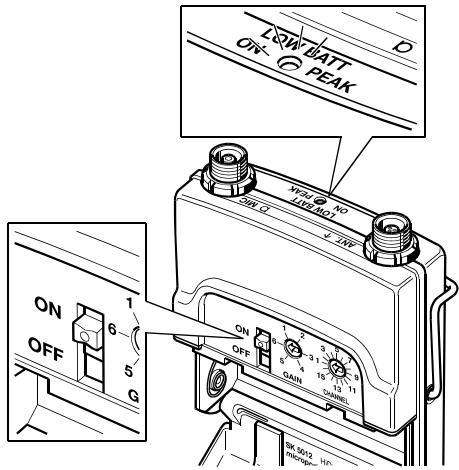
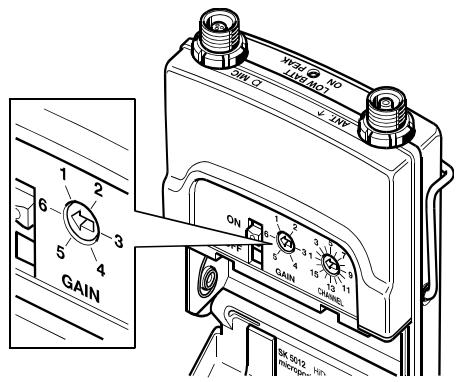
Operating elements
1 Microphone input socket
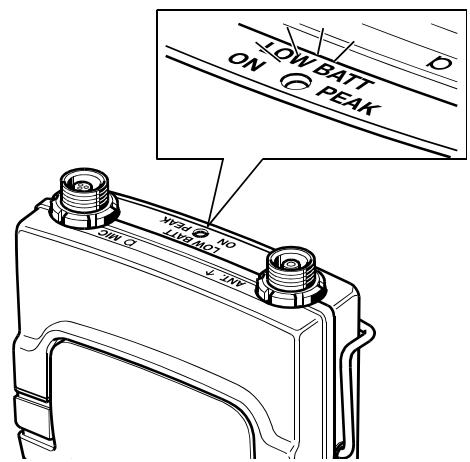
2 LED indicator
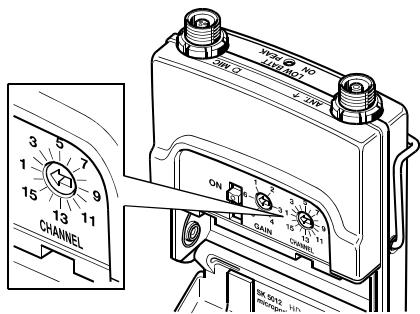
3 Antenna socket
4 Sensitivity switch
5 Channel selector switch
6 Frequency/channel data plate
7 Type plate (inside battery compartment)
8 ON/OFF switch

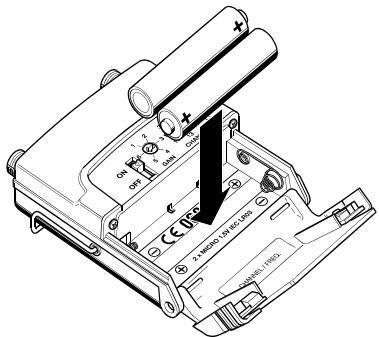
Inserting the batteries
Open the battery compartment by simultaneously pushing down the two catches at the sides. Insert the two AAA size alkaline batteries into the battery compartment.

Attention
Please observe correct polarity.
When closing the battery compartment, make sure that the two catches at the sides lock into place. An audible "click" should be heard.
The transmitter can also be powered by rechargeable batteries.

us6U
SK 5012 - 25
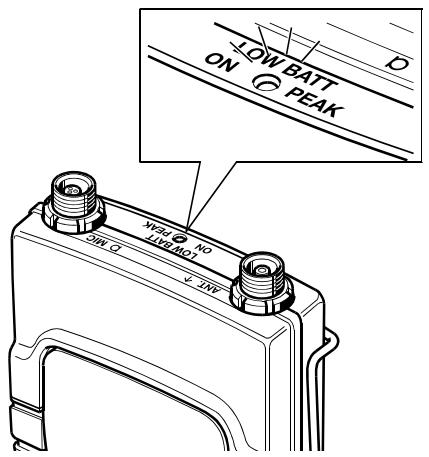
Turning the transmitter on
Set the ON/OFF switch to ON. The red LED lights up. This LED also serves as a peak indicator (PEAK) and "low battery" indicator (LOW BATT).
usU
"Low battery" indication
The transmitter has an integrated voltage converter which ensures constant operating conditions until the batteries are completely discharged. When the remaining operating time is approx. 30 minutes, the LED starts blinking periodically.
As the batteries discharge, the blinking of the LED accelerates.
usu6u

Note
If the transmitter is powered by rechargeable batteries, the LED only starts blinking shortly before the batteries are completely discharged.
English
Connecting microphones
The transmitter has been designed for use with Sennheiser "lavalier" clip-on microphones which are fitted with a special Lemo plug. The supply voltage for powering these microphones is fed via the transmitter's microphone input. Connect the microphone's Lemo plug to the socket at the top of the transmitter and lock the connection by screwing down the coupling ring.

Selecting a channel
Set the channel selector switch to the desired position. The assignment of a switch position/channel to a frequency is listed on the frequency/channel data plate (see inside battery compartment cover).
en nnnnne
English
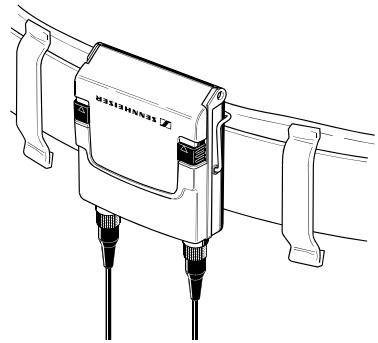
Attaching the transmitter
Due to its small dimensions and extremely flat design, the transmitter can easily be attached to clothing (e.g. pocket, waistband, belt) by means of the supplied clip.
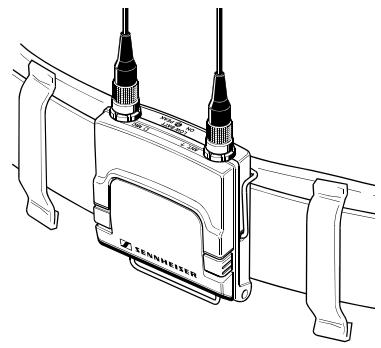
The clip can easily be withdrawn from its fixing points, if required, by pulling it sideways and attached the other way round.
Adjusting the sensitivity
Use the 6-step sensitivity switch (GAIN) to adapt the gain of the microphone input to the expected sound levels.
us6U
In practice, the following settings have proved their worth for adjusting the sensitivity:
Position 1 = high-frequency, loud audio material with many plosives
Position 2,3 = loud voices, vocals (close-miking)
Position 3,4,5 = normal voices, talkshows
Position 6 = soft voices
usu
To provide for an accurate setting, use a receiver fitted with a deviation indicator (e.g. EM 1046) when adjusting the sensitivity.
As an aid to orientation, the LED peak indicator (PEAK) lights up brightly. The sensitivity is set correctly, when the LED flashes brightly only during peak levels. When adjusting the sensitivity, hold or attach the microphone exactly where it will be positioned during use.
HiDyn plusTM
This transmitter is equipped with HiDyn plus™, the Sennheiser noise reduction system that reduces possible RF interference. Together with a receiver which is also equipped with HiDyn plus™ (e.g. EM 1046), an RF link of excellent operational reliability and highest transmission quality can be set up.
us6U
Accessories
Only use original Sennheiser accessories.

Attention
Components from other manufacturers may cause damage to the unit and will invalidate the warranty!
The following Sennheiser "lavalier" clip-on microphones are available:
- MKE 2-4, MKE 102-4 (omnidirectional pick-up pattern)
- MKE 40-4, MKE 104-4 (cardioid pick-up pattern)
Please order from your local Sennheiser dealer.

Important note
To reach the maximum operating time, we recommend using AAA size alkaline manganese batteries (IEC LR 03).
If problems occur ...
Insert the batteries properly into the battery compartment.
Check the polarity (+ / - ) of the batteries.
Check the battery status.
Turn the transmitter and the receiver on.
Set the transmitter and the receiver to the same frequency.
Make sure that the receiving antenna is within the transmitter's range.
Make sure that neither transmitting nor receiving antenna are shielded by metal constructions (or metallic clothing).
Make sure that the receiving antenna is not in direct contact with the skin.
If the problem persists, please contact your specialist dealer for assistance.

Never open the unit!
Socket assignment SK 5012

Antenna socket
Thread = ground
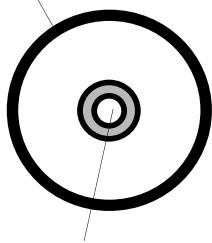
Antenna
50Ω impedance
AF socket
Thread + Pin 3 = ground
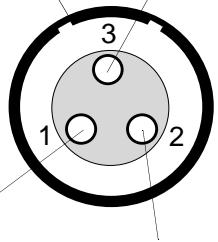
Pin 1
+5.2 V for
external special
microphones
Pin 2
AF and
AB-powering
8.2 kΩ at 5.2 V
for Sennheiser
condenser
microphones
Technical data
| Casing | metal diecast casing / light chromium plating 53 x 60 x 17 mm |
| Battery compartment | integrated, for 2 AAA size cells with reverse battery protection |
| Frequency range | 450 - 960 MHz |
| Switching bandwidth | 24 MHz |
| RF output power | typ. 30 mW |
| Frequency stability | ± 10 ppm |
| Spurious emission | < 4 nW |
| Modulation | FM |
| Nominal / peak deviation | ± 40 kHz / ± 56 kHz |
| Compander system | Sennheiser HiDyn plus™ |
| Input sensitivity | max. 49 mVrms = -24 dBu |
| for nominal deviation / 1 kHz AF | switchable in 5 steps of 8 dB max. input voltage 1.55 Vrms |
| Current consumption | 115 mA / 2.4 V |
| AF frequency response | 60 Hz - 20 kHz |
| Signal-to-noise ratio | 110 dB(A)rms |
| THD | < 0.3% at nominal deviation / 1 kHz |
| Connections | AF: 3-pin Lemo; RF: special co-ax Lemo |
| Weight with batteries | 130 g |
| Operating time with primary cells | AAA size alkaline batt. (IEC LR 03) = approx |
| Operating time with recharging. batt. | 700 mAh per cell (IEC LR 03) = approx. 5.5 h |
usU
English
Indication "LOW BATT"
Position 3,4,5 = Voix de volume normal, talk shows
Position 6 = Voix douces
Tip Micro LRC AAA IEC LR 03
Alkali-mangaan = ca. 7 h;
type Mikro LRC AAA IEC LR 03
700 mAh per accu = ca. 5,5 h;
type Mikro LRC AAA IEC LR 03
C0682①
Sennheiser electronic GmbH & Co. KG declare that this device is in compliance with the applicable CE standards and regulations. Before putting this device into operation, please observe the respective country-specific regulations!
Certification
Subject to alterations