HPI500 - Radio LEXIBOOK - Free user manual and instructions
Find the device manual for free HPI500 LEXIBOOK in PDF.

| Product type | Clock radio with iPod docking station |
| Power supply | 230V~50 Hz mains; lithium backup battery CR2430 |
| Main functions | AM/FM radio (20 presets), dual alarm (radio, iPod or buzzer wake-up), SmartSet® clock (auto setting, daylight saving time change, leap years), sleep timer (99 min), nap timer (99 min), alarm snooze (contactless sensor + button), LED display, 13-button remote control |
| Inputs/Outputs | iPod docking station (5 adapters included), auxiliary input (3.5 mm mini-jack), headphone output (3.5 mm mini-jack) |
| Radio reception | FM with integrated antenna in power cable, AM with internal antenna |
| Alarms | 2 independent alarms, modes: every day, weekdays only, weekends only; alarm duration: 1 hour |
| Display | Multifunction LED display with brightness adjustment (High/Low) |
| Remote control batteries | 2 AAA batteries (not included) |
| Supplied accessories | Remote control, 5 iPod adapters |
| Cleaning and maintenance | Soft, slightly damp cloth; do not use abrasive cleaners |
| Safety | Do not expose to water; unplug during storms; plug must be fully inserted |
| Spare parts and repairability | Replaceable CR2430 backup battery; remote control with AAA batteries; specific iPod adapters |
| General information | Brand: Lexibook; Model: HPI500; Warranty: 2 years; Made in China; Designed in Europe |
Frequently Asked Questions - HPI500 LEXIBOOK
User questions about HPI500 LEXIBOOK
0 question about this device. Answer the ones you know or ask your own.
Ask a new question about this device
Download the instructions for your Radio in PDF format for free! Find your manual HPI500 - LEXIBOOK and take your electronic device back in hand. On this page are published all the documents necessary for the use of your device. HPI500 by LEXIBOOK.
USER MANUAL HPI500 LEXIBOOK
Thank you for purchasing this Lexibook HPI500 MP3 Music Station with SmartSet.
This compact system has been designed with a powerful amplifier and matching high fidelity speakers to produce the kind of sound that you would only expect from a much larger, more expensive audio system. There is a built-in iPod® docking station that allows you to play any dockable iPod® model* through the speakers of this system. In addition while your iPod® is installed in the docking station the internal iPod® battery will be recharged automatically. You can even choose to wake up to your iPod® in the morning.
The digital tuner automatically scans the AM and FM bands and locks in stations perfectly with no repetitive fine tuning required. And you can save 20 of your favourite stations (10 AM and 10 FM) in the preset tuner memory for immediate recall at the touch of a button.
SmartSet® Automatic Time Setting System automatically sets the clock to the correct year, date, month, day, and time the first time you connect the system to your AC outlet, and after every power interruption. It even adjusts for Summer Time changes and Leap Years automatically. The unique dual alarm system allows you program one or both of the alarms for weekdays only, week-ends only or everyday operation. And you can wake to your iPod, to the radio, or an electronic buzzer that starts softly and gradually increases in volume to wake you gently.
The clock also includes a programmable 99-minute sleep to music timer with auto shutoff and a 99-minute Nap timer that will wake you up after a nap without having to change your regular alarm settings. Of course we also included a Snooze alarm so you can catch a few extra winks after the alarm turns on in the morning, but this is not your normal Snooze control. You can activate the Snooze by pressing the Snooze button on the top cabinet or the remote control, or you can just wave your hand in front of the "TOUCHLESS" SNOOZE SENSOR on the front panel.
The compact 13-key remote control lets you operate all the major functions of your system from across the room. And we have even included a stereo headphone jack and an Auxiliary Input Jack on the back panel so that you can also connect older, non-docking iPods®, MP3 players, and personal CD players.
iPod is a trademark of Apple Computer Inc., registered in the U.S. and other countries.
Smartset® is a trademark of Emerson Radi Corp., registered in the U.S. and other countries.
IMPORTANT NOTE
- Avoid installing this unit in places exposed to direct sunlight or close to heat radiating appliances such as electric heaters, on top of other stereo equipment that radiates too much heat, places lacking ventilation or dusty areas, places subject to constant vibration and/or humid or moist areas.
- Operate controls and switches as described in the manual.
- Before turning on the power, make certain that the AC power cord is properly installed.
- When moving the set, be sure to first disconnect the AC power cord.
PREPARATION FOR USE
Unpacking and Set Up
-
This carton contains the main unit, the remote control handset and 5 different iPod® adapters so that you can securely connect any dockable iPod® to the top mounted docking station. Remove all of the components from the carton and remove all packing materials from the components. We recommend that you save the carton and packing materials if possible in the event that your system ever needs to be retuned for service. Using the original carton and packing materials is the only way to protect you unit from damage in transit.
-
Remove any descriptive labels from the top or front panels of the main unit. Do not remove any labels from the back or bottom panels.
- Place the main unit on a stable, level surface such as a table, desk, or shelf, convenient to an AC outlet, out of direct sunlight, and away from sources of water, moisture, heat, dust, dirt, vibration, or strong magnetic fields. Note: The speakers in this system are not video shielded therefore it is not recommended to place this unit on top of your TV set. The magnets in the speakers could cause some colour distortion in your TV picture.
- Unwind the AC power cord and extend it to its full length. This is important. The FM antenna is built into the AC power cord and must be fully extended for best FM reception.
Protect Your Furniture
This model is equipped with non-skid rubber 'feet' to prevent the product from moving when you operate the controls. These 'feet' are made from non-migrating rubber material specially formulated to avoid leaving any marks or stains on your furniture. However certain types of oil based furniture polishes, wood preservatives, or cleaning sprays may cause the rubber 'feet' to soften, and leave marks or a rubber residue on the furniture. To prevent any damage to your furniture we strongly recommend that you purchase small self-adhesive felt pads, available at hardware stores and home improvement canters everywhere, and apply these pads to the bottom of the rubber 'feet' before you place the product on fine wooden furniture.
Battery Back-up System
This unit includes a battery back up system powered by a built-in, long life CR2430 lithium battery. The battery maintains the time and alarm settings, the Sleep and Nap timer settings, and the preset station tuner memories as well, whenever the power is interrupted. If the power is lost the display will go off and the system will not operate. However once the power is restored the clock will again reset itself and all of your other settings will be correct.
The lithium battery that was installed in your system can supply back up memory power for up to 5 years or even longer. The actual effective life of the lithium battery will be affected by the length of time between the date the battery was installed at our factory and the date that you connected your unit to your AC outlet, and by the number and duration of the power outages that you experience in your home. To maximize the life of the back up battery this system should be connected to an AC outlet that is always "live". When the lithium battery begins to weaken, the low battery indicator "low" will begin to flash in the display. When you see this flashing indicator you should replace the lithium battery as soon as possible. Instructions for replacing the lithium battery will be found at the end of this user guide.
Power Source
This system is designed to operate on 230V AC 50Hz house current only. Connecting this system to any other power source may cause damage to the system and such damage is not covered by your warranty.
CAUTION
TO PREVENT FIRE OR SHOCK HAZARD, DO NOT USE THIS PLUG WITH AN EXTENSION CORD, RECEPTACLE OR OTHER OUTLET UNLESS THE BLADES CAN BE FULLY INSERTED TO PREVENT BLADE EXPOSURE. TO PREVENT FIRE OR SHOCK HAZARD, DO NOT EXPOSE THIS APPLIANCE TO RAIN OR MOISTURE.
IMPORTANT SAFETY INSTRUCTIONS
- Read these instructions. Keep these instructions. Follow all instructions. Read all warnings.
- Do not use this apparatus near water.
- Clean only with dry cloth.
- Do not block any ventilation openings. Install in accordance with the manufacturer's instructions.
- If the provided plug does not fit into your outlet, consult an electrician for replacement of the obsolete outlet.
- Protect the power cord from being walked on or pinched particularly at plugs, convenience receptacles, and the point where they exit from the apparatus.
- Only use attachments / accessories specified by the manufacturer.
- Unplug this apparatus during lightning storms or when unused for long periods of time.
- Refer all servicing to qualified service personnel. Servicing is required when the apparatus has been damaged in any way, such as power-supply cord or plug is damaged, liquid has been spilled or objects have fallen into the apparatus, the apparatus has been exposed to rain or moisture, does not operate normally, or has been dropped.
- This appliance shall not be exposed to dripping or splashing water and no object filled with liquids such as vases shall be placed on the apparatus.
- Use only with the cart, stand, tripod, bracket, or table specified by the manufacturer, or sold with the apparatus. When a cart is used, use caution when moving the cart/apparatus combination to avoid injury from tip-over.
- Do not overload wall outlet. Use only power source as indicated.
- Use replacement parts as specified by the manufacturer.
- The product may be mounted to a wall only if recommended by the manufacturer.
- Upon completion of any service or repairs to this product, ask the service technician to perform safety checks.
eepnne eaeene nnnnne nee ennnnne ennnnne ennnnne ennnnne ennnnne ennnnne ennnnne ennnnne ennnnne ennnnne ennnnne ennnnne ennnnne ennnnne ennnnne ennnnne ennnnne ennnnne ennnnne ennnnne ennnnne ennnnne ennnnne ennnnne ennnnne ennnnnee
peepnnpnnpnnpnnpnnpnnpnnpnnpnnpnnpnnpnnpnnpnnpnnpnnpnnpnnpnnpnnpnnpnnpnnpnnpnnpnnpnnpnnpnnpnnpnnpnnpnnpnnpnnpnnpnnpnnpnnpnnpnnpnnpnnpnnp
| ● | !n#n#p#d! | ||||||||||||||||||
| ● | (002)P#D! D# | ||||||||||||||||||
| ● | ● | (006/02)P#D#P#D#P#D#P#D#P#D#P#D#P#D#P#D#P#D#P#D#P#D#P#D#P#D#P#D#P#D#P#D#P#D#P#D#P#D#P#D#P#D#P#D#P#D#P#D#P#D#P#D | |||||||||||||||||
| ● | ● | ● | (009/08)P#D! D# (002)P#D! D# (006)P#D! D# | ||||||||||||||||
| (009)P#D! D# | |||||||||||||||||||
| (00E)P#D! D# | |||||||||||||||||||
| ● | oue#p#d! | ||||||||||||||||||
| 85° | 85° | 85° | 85° | 9° | 85° | 85° | 85° | 85° | 85° | 85° | 85° | 85° | 85° | 85° | 85° | 85° | 85° | 85° | 85° |
| 01 | 02 | 03 | 04 | N# | O# | O# | O# | O# | O# | O# | O# | O# | O# | O# | O# | O# | O# | O# | s#es#es |
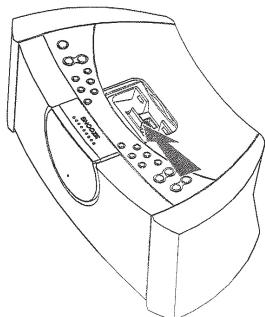
LOCATION OF CONTROLS AND INDICATORS
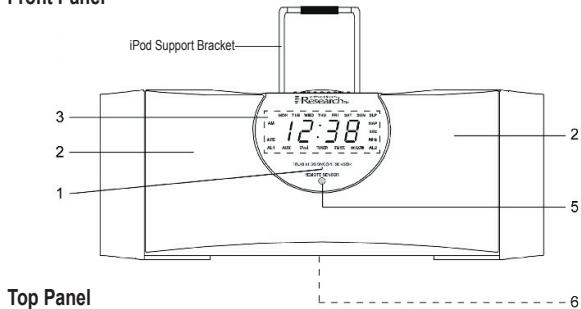
Front Panel

44
Left Side Panel
1.) Touchless Snooze Sensor.
2.) Speakers.
3.) Multi-Function LED Display
4. Remote Sensor.
5.) 3-Volt Lithium Battery Compartment (Bottom Cabinet).
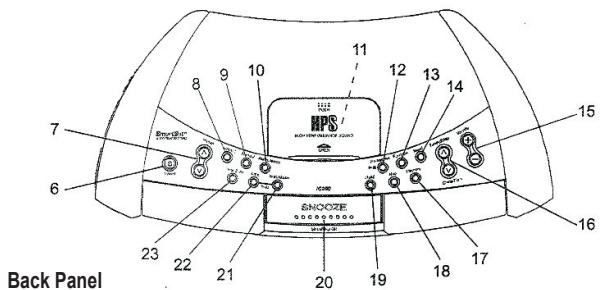
6.) Power "On/Off" Button.
7.) Preset / V Buttons.
8.) Alarm 1 Button.
9.) Alarm 2 Button.
10.) Alarm Mode Button.
11.) iPod® Sockets compartment.
12.) Play/pause Button.
13.) Function Button.
14.) Band Button.
15.) Volume +l Buttons.
16.) Tuning/Skip (Clock/Time) A / V Buttons.
17.) Memory Button.
18.) Nap Button.
19.) Sleep Button.
20.) SNOOZE (Sleep/Nap Off) Button.
21.) Date/Month Button.
22.) Time Button.
23.) Time Zone Button.
24.) AC Power Cord.
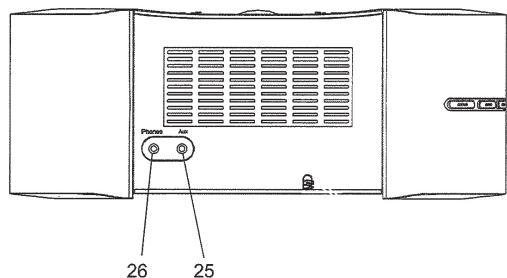
25.) Aux Input Jack.
26.) Phones Jack.
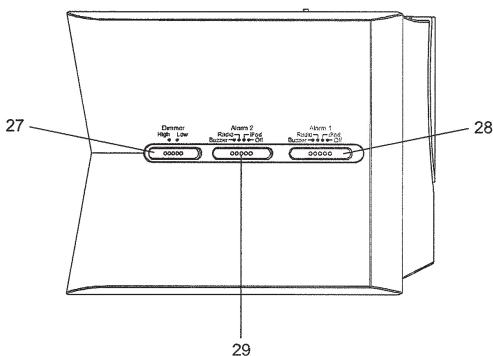
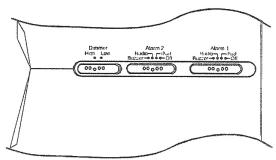
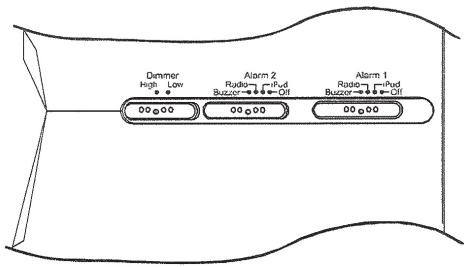
27.) Dimmer (High / Low) Selector Switch.
28.) Alarm 1 (Buzzer / Radio / iPod / Off) Selector Switch.
29.) Alarm 2 (Buzzer / Radio / iPod / Off) Selector Switch.
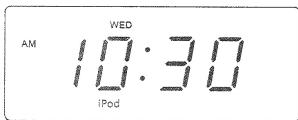
LED Display
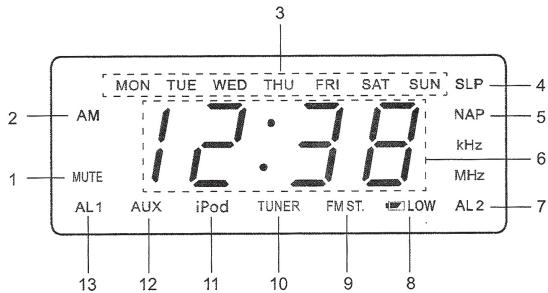
1.) MUTE Indicator.
2.) AM Indicator.
3.) Day of the week indicators.
4.) SLP (Sleep) Timer Indicator.
5.) NAP Timer Indicator.
6.) Time, Year, Date/Month, Volume Level (00-63), Radio Frequencies Display.
7.) AL2 (Alarm 2) Indicator.
8.) LOW Battery Indicator.
9.) FM ST. (FM Stereo) Indicator.
10.) TUNER Select Indicator.
11.) iPod Select Indicator.
12.) AUX Select Indicator.
13.) AL1 (Alarm 1) Indicator.
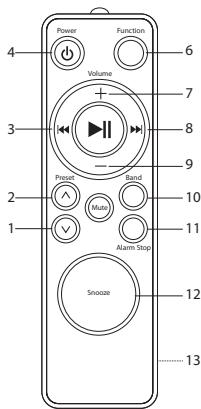
Remote Control
1.) Preset V Button.
2.) Preset A Button.
3.) Tuning/Skip Reverse Button.
4.) Power "On/Off" Button.
5.) Infrared Transmitter.
6.) Function Button.
7.) Volume + Button.
8.) Tuning/Skip Forward Button.
9.) Volume - Button.
10.) Band Button.
11.) Alarm Stop Button.
12.) Snooze Button.
13.) Battery Compartment (Back Cabinet).
INSTALLING THE REMOTE CONTROL BATTERIES
The remote control requires two "AAA UM-4" batteries, not included. We recommend that you use a well known brand batteries for longest life and best performance.
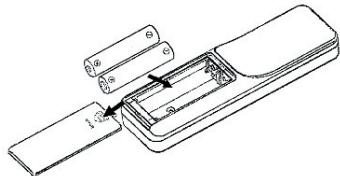
Open the remote control battery compartment by sliding the battery compartment cover in the direction of the 'arrow'.
Install two "AAA UM-4" batteries in the compartment according to the polarity markings inside the compartment as shown in the illustration. If the batteries are installed incorrectly, the remote control will not work. After installing the batteries replace the battery compartment cover.
Note: When the operation of the remote control becomes intermitted or stops working completely replace the batteries as soon as possible. Never leave weak or exhausted batteries in the remote for an extended period of time. They may eventually leak and cause permanent damage to the remote control.
Battery Precautions
- Replacement of batteries must be done by an adult.
- Do not mix old and new batteries.
- Do not mix alkaline (carbon-zinc) or rechargeable (nickel-cadmium) batteries.
- The supply terminals are not to be short-circuited.
- Non-rechargeable batteries are not to be recharged.
- Exhausted batteries are to be removed.
- Only batteries of the equivalent type are to be used.
- Dispose of batteries properly. Do not dispose of batteries in the fire. The batteries may explode or leak.
OPERATING INSTRUCTIONS
- Make sure that you have extended the mains power cord to its full length. The FM antenna is built into the power cord.
Setting The Time, The First Time
IMPORTANT: The first time you connect your new MP3 Music Station to the AC outlet the internal computer will automatically set the time correctly for the GTM Greenwich 0 (London Time), which is the initial default setting. The display will scan for a few seconds and then show the correct Day and time in the Greenwich zone. There's nothing else to do, your clock is set correctly and running.
If you do not live in the GMT 0 time zone you must change the default zone Time Zone setting (according to Greenwich timetable): GMT (Greenwich zero time)
Warning!
If the following occurs :
- The unit's battery runs out.
- An electrostatic shock reset the unit then the MP3 Music Station will be reset to GMT+1 time.
There are several time zones programmed into your MP3 Music Station as follows:
| 01: GMT-1 | 02: GMT-2 | 03: GMT-3 | 04: GMT-4 | 05: GMT-5 | 06: GMT-6 |
| 07: GMT-7 | 08: GMT-8 | 09: GMT-9 | 10: GMT-10 | 11: GMT-11 | 12: GMT-12 |
| 13: GMT+11 | 14: GMT+10 | 15: GMT+9 | 16: GMT+8 | 17: GMT+7 | 18: GMT+6 |
| 19: GMT+5 | 20: GMT+4 | 21: GMT+3 | 22: GMT+2 | 23: GMT+1 | 00: GMT |
To change the default time zone display, depress the Time Zone button.
Example: the number 23 will appear on the display indicating that the default zone is zone 23.
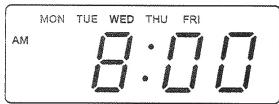
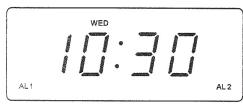
WED

Hold the Time Zone button and then press the Tuning/Skip (Clock/Time) buttons until your own time zone appears on the display, then release the buttons.
The clock display will change to the correct time in the time zone you selected. The clock will always return to the correct time in the zone you selected after every power interruption. If you move to a different time zone, simply change the default zone display to the new zone and the SmartSet® will remember that setting for you.
Date Display
To see the correct date at any time, depress the Date/Month button. The display changes from time to month and date (mm/dd).
For example, May 21^st will appear as "21.5".
When you release the Date/Month button the display returns to the correct time.

SUN
Year Display
To see the correct year, depress the Date/Month and Time buttons together, the display changes from time to year.

When you release the Date/Month and Time buttons the display returns to the correct time.
Summer Time and Leap Year Adjustments
All Daylight Saving and Leap Year adjustments are made automatically by the SmartSet® internal computer as follows:
- Start of Summer Time: At "2:00" on the last Sunday of March, the clock will automatically advance to "3:00".
- End of Daylight Saving Time: At "3:00" on the last Sunday in October, the clock will automatically reset to "2:00".
- Leap Year: At "12:00 Midnight" on February 28th, the calendar display will change to "29.2".
Manual Time Adjustments
Some people like to set their clocks 5 to 10 minutes earlier to make sure that they will always be on time. Even though the SmartSet® sets the time by itself, you still have the option of adjusting the time manually if you wish.
To manually adjust the time display depress and hold the Time button, and press either the Tuning/Skip (Clock/Time) or buttons to adjust the time display ahead or back as desired. Each press of the Tuning/Skip (Clock/Time) or buttons will change the display by one minute.
If you hold the Tuning/Skip (Clock/Time) or buttons the display will continue to change. The display will change slowly at first, one minute at a time. But if you continue holding the Tuning/Skip (Clock/Time) or buttons the display will change rapidly.
NOTE: If you manually adjust the time, your new setting is entered into the SmartSet® memory. If the power is interrupted, the display will return to your new setting, not the original setting, when the power is restored.
Adjusting the Wake Up Times
Your SmartSet® clock radio has two separate alarms that can be set and used independently. You may use the alarms to wake two people at different times, or you may use one alarm for weekdays and the other for weekend wake up times. The procedure for adjusting the wake up time is the same for both Alarm 1 and Alarm 2.
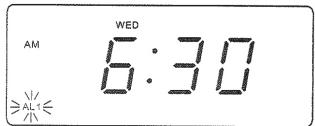
1.) Depress and hold either the Alarm 1 or Alarm 2 setting button. The display will change from the correct time to the Alarm 1 or Alarm 2 wake up time.
2.) While holding the Alarm 1 or Alarm 2 setting button, depress either the Tuning/ Skip (Clock/Time) or buttons to move the display ahead or back to your desired wake up time.
3.) When the desired wake up time appears on the display, release the Tuning/ Skip (Clock/Time) or buttons.
NOTE: Be sure that you have set the wake up time correctly by observing the AM indicator. If the AM indicator is 'On'the wake up time is "AM". If the AM indicator is 'Off', the wake up time is "PM".
4.) When the desired wake up time (AM or PM) appears on the display, release the Alarm 1 or Alarm 2 setting buttons.
Selecting The Alarm Mode
Your SmartSet® clock radio allows you to select from among three different alarm operation modes for either alarm. The alarm modes are:
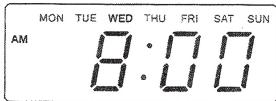
Everyday - the alarm will turn on all 7 days.
- Weekdays only - the alarm will only turn on Monday through Friday;
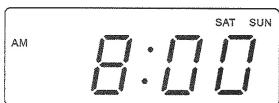
- Weekends only - the alarm will only turn on Saturday and Sunday;
To check the Alarm Mode setting for Alarm 1, depress the Alarm 1 setting button.
The display will show the Alarm 1 wake up time and the day of the week indicators will show you the alarm mode which is selected.
- If all 7 indicators are 'On', the Everyday mode is selected.
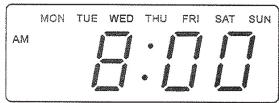
- If only the Monday through Friday indicators are 'On', the Weekdays only mode is selected.
- If only the Saturday and Sunday indicators are 'On', the Weekends only mode is selected.
To change the Alarm Mode setting for Alarm 1, hold the Alarm 1 setting button and press the Alarm Mode button until the day indicators show the desired mode setting, Weekdays only, Weekends only, or everyday operation. Release the Alarm Mode and Alarm 1 setting buttons and the display will return to the correct time.
Follow the same procedure to select the desired Alarm Mode for Alarm 2 if necessary.
Checking The Wake Up Times And Alarm Mode
Whenever you want to check the wake up time or the alarm mode settings simply press either the Alarm 1 or Alarm 2 setting buttons. The display will change from correct time to wake up time and the day indicators will show you the alarm mode which is currently selected.
Release the Alarm 1 or Alarm 2 setting buttons to return to correct time.
Using The Remote Control
The remote control unit supplied with this system allows you to perform the following operations:
- Switch the system 'On' and 'Off'.
- Select the desired function (iPod / AUX / TUNER).
- Select the AM or FM bands.
- Start and pause iPod playback or shut the iPod 'Off'. (NOTE: iPod Shuffle cannot be operated by the remote control.)
- Select from among your preset stations.
- Mute the system.
- Stop/reset the alarms and activate the Snooze function.
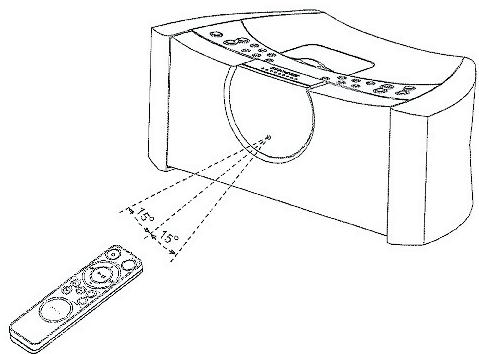
To operate the remote control point the handset at the REMOTE SENSOR on the front panel of the main unit and press the desired button on the handset. The effective operating range of the remote is approximately 15 feet. The effective operating angle is approximately 15 degrees to the left or right of dead center.
Listening To The Radio
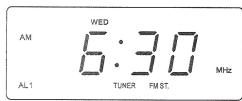
1.) Press the Power button on the top panel or remote control to turn the system On. If necessary press the Function button on the top panel or remote control to select the Tuner function. The TUNER indicator appears and the display changes from time to radio frequency. The first time you turn your unit 'On' the display will show FM 87.5 MHz.
2.) To switch between the FM and AM bands press the Band button on the top panel or remote control. The first time you select the AM band the display will show AM 520 KHz.

3.) Tune to the desired station with the Tuning/Skip or buttons on the top panel or the 1 1 buttons on the remote control as follows:
Manual Tuning
Repeatedly press either the Tuning/Skip or buttons on the top panel or the / buttons on the remote control until the display shows the frequency of the desired station.
Automatic Tuning
Depress and hold either the Tuning/Skip or buttons on the top panel or the 1 1 buttons on the remote control until the display begins to move and then release the buttons. The tuner searches up or down the band for the next strong station and then stops. Repeat this process until the tuner stops on the desired station.
4.) If you tuned to an FM Stereo station the FM ST. indicator appears in the display.

5.) A few seconds after you release the tuning controls the display changes from radio frequency back to the correct time. To see the station frequency again, press the Time button on the top panel. The display will change from time to radio frequency for a few seconds and then return to the correct time again.
6.) Adjust the volume to the desired level by pressing the Volume + or - buttons on the top panel or the remote control. The volume level appears in the display when the volume is adjusted.
The display level ranges "00" (minimum) to "63" (maximum).
7.) When you are finished listening press the Power button on the top panel or the remote control to shut the system 'Off'. The TUNER indicator goes off.
NOTE: The Tuner remembers the last station that you were listening to and the selected volume level, and automatically returns to the same station and volume level when the system is switched 'On' again.
Presetting Stations In The Tuner Memory
You can store a total of 20 stations, 10 FM and 10AM, in the tuner memory for easy recall at any time.
1.) Using either the Automatic or Manual Tuning method described above, tune to the first station you wish to store in the tuner memory. Example: FM 92.5
MHz

2.) When the desired frequency appears on the display, press the Memory button on the top panel once.
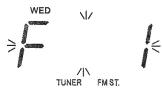
"F 1" will begin flashing on the display indicating that you can now store your station in FM Preset Memory #1.
3.) Press the Memory button again. The "F 1" stops flashing. This indicates that FM 92.5 is now stored in FM Preset Memory #1.

4.) Tune to the next station that you wish to store.
Press the Memory button once, and then press the Preset A button v to select Preset Memory #2. "F 2" begins flashing in the display.

5.) Press the Memory button again to enter your desired station in Preset Memory #2.
6.) Repeat steps 4 and 5, using the Preset or buttons to select a different preset memory number each time until you have stored up to 10 FM stations in the memory.
7.) Press the Band button to switch to the AM band and repeat the above procedure to store up to 10 AM stations in the tuner memory.
NOTES:
-
The FM memories are numbered “F 1” through “F 10”. The AM memories are numbered “A 1” through “A 10”.
-
After you press the Memory button the first time you must select a Preset Memory number and press the Memory button again within 10 seconds, while the memory number is flashing, or the station will not be memorized.
Recalling Preset Stations
Press the Band button to select the desired band.
Press the Preset A or V buttons to scroll through the preset stations one by one.
Changing Preset Stations
1.) Tune to the new station that you want to store.
2.) Press the Memory button and then press the Preset A or V buttons to select the Memory Number that you wish to change.
3.) When the desired Preset Memory Number is flashing, press the Memory button again. The new station is now stored and the previous station is deleted from the memory.
Antenna Information
FM: The FM antenna is built in the AC power cord. You may have to extend and vary the direction of the AC power cord until you find the position that provides the best reception.
AM: The AM bar antenna is inside the cabinet of the main unit. You may need to change the position of the main unit until you find the position that provides the best reception for your favorite AM stations.
Listening To your "Dockable" iPod / Charging The Battery IMPORTANT! To prevent distortion during iPod playback you should go to the main Menu of your iPod, select the Settings Menu page, select the EQ Setting, and make sure that the EQ function is set to 'Off'.
This system provides an iPod docking station on the top panel. You can connect any dockable iPod, available as of January 2006, to the docking station and play your iPod through the speakers of this system. When you "dockable" iPod is in the docking area, the power to your device is being supplied by this system, not by the iPod's internal battery. In addition when your iPod is switched 'Off' while resting in the dock the internal iPod battery is automatically recharged.
NOTE: To prevent any possible interference between the iPod and the Tuner in this system, the iPod battery is automatically switched 'Off' while you are listening to the radio. When the radio is 'Off' the battery charging circuit switches 'On' again automatically of whether the power button of this system is 'Off' or 'On'.
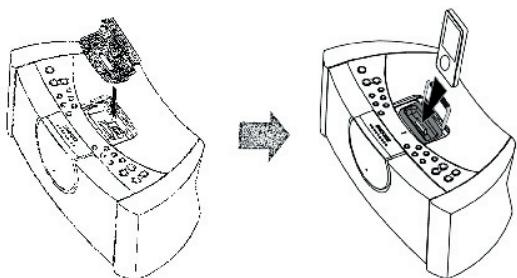
Follow these steps to connect and listen to your iPod. We recommend that you start with the power to this system switched 'Off':
1.) Open the docking area cover by gently pressing downward on the cover and sliding it backward.
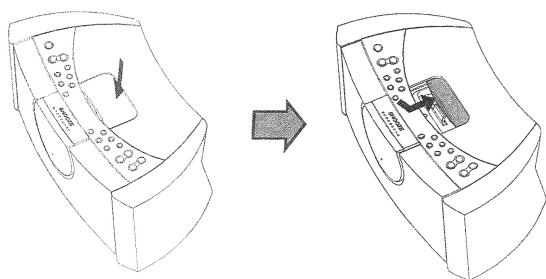
2.) Select the correct adapter for your particular iPod model from among the 5 different adaptors included (See page 43). Each adapter is engraved with the name and/or size of an iPod model. Place the selected adapter in the docking area so that the iPod 30-pin connector passes through the opening in the adapter.
Important iPod nano instructions!
If you are using this system with an iPod nano will notice that the iPod 30-pin connector on this unit is not properly aligned with the opening in the iPod nano adapter. Before inserting the iPod nano adapter into the docking area you must slide the iPod 30-pin connector to the left position and then place the nano adapter into the docking area.
After removing the nano adapter remember to slide the 30-pin connector back to the right position before attempting to install any iPod@adapter.
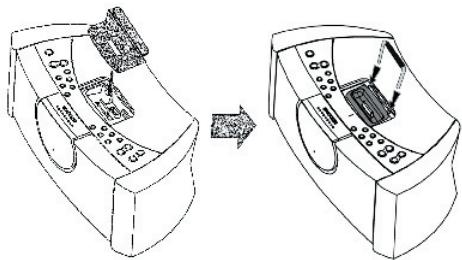
3.) After installing the necessary adapter in the docking area and making sure that it is locked in place, insert your iPod® into the adapter so that the 30-pin connector in the docking area is fully inserted into the 30-pin socket on the bottom of your iPod.
Or that the USB plug your iPod® shuffle inserted into the USB port in the docking area. If necessary set the Hold switch on your iPod® to the 'Off' position.
4.) Press the Power button on the top panel or remote control to turn this system 'On'. Depending on the setting of the Back Light Timer in your iPod® the display backlighting may turn 'On' and the "Charging" or "Charged" indicator will appear in the display.
5.) Press the Function button on the top panel or on the remote control to select the iPod function.
Your iPod® will begin to play. It may begin playback with the first song in your library in alphabetical order by song name, or if the iPod® was only shut off for short time it may begin playback of the same song that was playing before it was shut off.
NOTE: If the Power of this system is 'On' and the iPod function is already selected then your iPod® will begin to play as soon as it is connected to the dock, as long as the iPod® HOLD switch is 'Off'. If your iPod® enters the Pause mode when you connect it to the dock, press the Play/Pause button to begin playback.
6.) Once the iPod® is playing you can use the navigation controls on the iPod® to select among the menu items as usual. However you can only adjust the volume level by using the Volume +/- controls on the top panel or remote control of this unit. The click wheel volume control on the iPod® cannot be used to control the speaker volume level of this system.
7.) To skip or search forward or back to the next or previous song you can use the Tuning/Skip or buttons on the top panel or the / buttons on the remote control.
8) The Play/Pause buttons on the top panel of this system and the remote control have the same function as the Play/Pause button on your iPod®. Press once to begin playback. Press again to pause playback. Press and hold to shut the iPod® 'Off'.
9.) When you have finished listening to your iPod® you may press the Function button to switch to the Tuner function. Your iPod® will shut off automatically. You may also press the Power button to shut this system 'Off'. Your iPod® will shut off and the recharging circuit turns on automatically. If you remove your iPod® from the docking connector we suggest that you close the docking compartment cover again to keep dust and other foreign objects out of the docking area.
NOTES:
If you remove your iPod® from the docking connector during playback the power to this system is shut 'Off' automatically.
If you have a power failure while the iPod® is playing, the iPod® power will be shut off automatically to preserve the iPod® internal battery.
ALARM OPERATION
The dual alarms in this system give you the option of waking to the radio, an electronic buzzer tone, or even to your iPod®.
You may also program one or both of the alarms for weekdays only, weekends only, or everyday operation.
Before activating the alarms first check the settings for Alarm 1 and Alarm 2 and adjust if necessary.
Refer to "Adjusting The Wake Up Times" and "Selecting The Alarm Mode" on pages 17 and 18.
Wake To Radio
1.) Tune to the station that you want to wake you up, adjust the Volume control to the desired level, and then shut the system 'Off'.
2.) Slide the Alarm 1 and/or Alarm 2 selector switches, located on the left side panel to the "Radio" position.
The AL 1 and/or AL 2 indicators will appear in the main display to confirm that the alarms are 'On'.
2.) At the selected wake-up time the radio will turn on to the selected station. It will play for one hour and then shut off automatically and reset itself for the following day.
To shut the radio off sooner you can press either the Power button or the appropriate Alarm 1 or Alarm 2 button on the top panel.
WAKE TO BUZZER
Note: Alarm 1 and Alarm 2 have different buzzer sounds.
Alarm 1 is a "single beep" sound.
Alarm 2 is a "double beep" sound.
You will be able to tell which alarm is going off by the sound that it makes.
1.) Slide the Alarm 1 and/or Alarm 2 selector switches, located on the left side panel to the "Buzzer" position.
The AL 1 and/or AL 2 indicators will appear in the main display to confirm that the alarms are 'On'.
2.) At the selected wake up time the electronic buzzer tone alarm will come on. The buzzer sound will continue for one hour and then shut off automatically and reset itself for the following day.
To shut the buzzer off sooner you can press either the Power button or the appropriate Alarm 1 or Alarm 2 button on the top panel.
WAKE WITH YOUR iPod®
NOTE: You can only wake to the "Dockable" iPod®. You cannot wake to the iPod® Shuffle.
1.) Connect your iPod® to the docking station as usual, start playback, select the song that you would like to play at the wake up time and the desired volume level, then press the Power button to shut the system 'Off'.
2.) Slide the Alarm 1 and/or Alarm 2 selector switches, located on the left side panel to the iPod position.

The AL 1 and/or AL 2 indicators will appear in the main display to confirm that the alarms are 'On'.
3.) At the selected wake up time the system will turn on in the iPod® mode to the song you selected.
NOTE: If you selected the song from the iPod® Songs menu, playback will stop when that song ends. If you selected the song from within the iPod® Album menu, playback will continue for one hour or until the end of that Album, whichever comes first.
4.) To stop the iPod® alarm sooner press the Power button or the appropriate Alarm 1 or Alarm 2 buttons on the top panel.
NOTE:
-
If you selected the "Wake To iPod®" option but there is no iPod® connected to the docking station at the wake up time, the alarm automatically defaults to the "Wake To Buzzer" option.
-
You cannot wake to an iPod® Shuffle because the Shuffle has no interface to receive the alarm signal from this system. If you selected the "Wake To iPod®" option but you are using an iPod® Shuffle, the alarm will automatically default to the "Wake To Buzzer" mode.
TO CANCEL THE ALARMS
To cancel the alarm completely so they do not come on at all, slide the appropriate Alarm 1 and/or Alarm 2 selector switches to their "Off" positions.

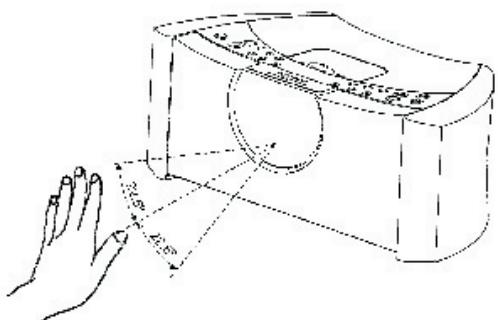
SNOOZE Alarm / "TOUCHLESS" SNOOZE
When the alarm turns on in the morning you can activate the SNOOZE control to catch a few minutes extra sleep. The snooze function stops the alarm for 9 minutes and then turns the alarm 'On' again.
There are three ways to activate the Snooze control:
By touching the snooze button on the top panel, using the remote control or by placing your hand in front of the TOUCHLESS SNOOZE SENSOR on the front panel.
When the snooze function has been activated the appropriate AL 1 or AL 2 indicator flashes in the display.
NOTE: The Snooze Sensor detects the difference in temperature between your hand and the ambient temperature. However in the unusual condition where there is almost no difference between your hand temperature and the room temperature the Touchless snooze function may no operate. In this case, please press the SNOOZE button on the panel or use the remote control.
SLEEP TIMER
The Sleep Timer allows you to operate the radio or iPod® for up to 99 minutes while you are falling asleep and then shuts the power off automatically.
1.) Turn the system 'On' and operate the radio or iPod® as usual.
Adjust the Volume control to the desired level for falling asleep, but remember that the level you set for falling asleep is that same level that you will hear in the morning if you are waking to radio or iPod®.
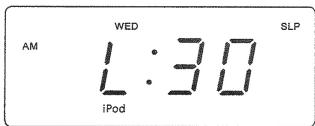
2.) Press the Sleep button on the top panel. The display will briefly show "L:30" and the SLP (Sleep) indicator will appear.
The radio or iPod® will operate for 30 minutes and then shut off automatically.
3.) To change the amount of Sleep time depress and hold the Sleep button and press the Tuning/Skip or buttons on the top panel or the 1 / 2 buttons on the remote control to decrease or increase the amount of sleep time from "01" minutes to "99" minutes.
NOTE: When you change the Sleep timer from the original 30-minute default setting your new setting becomes the new default setting. For example if you change the Sleep timer setting from 30 minutes to 45 minutes, 45 minutes
becomes the new default Sleep timer setting until you change it again.
4.) When the Sleep timer counts down to "00" the power shuts off automatically.
NOTE: If you set the Sleep timer for 60 minutes in the iPod mode, make sure you have selected an Album or a Playlist that is at least 60 minutes long. Otherwise the iPod® will stop at the end of your selected Album or Playlist, but the system Power will remain 'On' until the Sleep timer counts down to "00".
NAP TIMER (BUZZER ALARM ONLY)
The Nap timer function will wake you to the buzzer alarm after a nap of up to 99 minutes without the need to change your regular Alarm 1 or Alarm 2 settings.
1.) If the system is playing, shut the power 'Off'.
2.) Press the Nap button on the top panel. The display will briefly show "n:30" and the Nap indicator appears. After 30 minutes the buzzer alarm will turn on to wake you up.

3.) To change the amount of nap time depress and hold the Nap button and press the Tuning/Skip or buttons on the top panel or the | / buttons on the remote control to decrease or increase the amount of naptime from 2 minutes to 99 minutes.
NOTE: When you change the Nap timer from the original 30-minute default setting your new setting becomes the new default setting. For example if you change the Nap timer setting from 30 minutes to 45 minutes, 45 minutes becomes the new default Nap timer setting until you change it again.
To cancel Nap Timer, press the Snooze button.
DIMMER CONTROL
The display dimmer control was set to the High position at our factory. If you find the display to be too bright for sleeping, slide the Dimmer switch to the Low position.
Auxiliary Input Jack
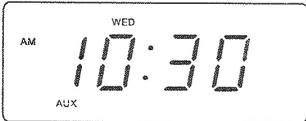
This system includes an Auxiliary Input Jack on the back panel so that you can connect older non-dockable iPods®, other MP3 players, or personal CD players, and listen to them through the speakers of this system. Use a mini stereo connection cable, not included, to connect the headphone jack of your external unit to the Aux In jack on the back panel of this system. Press the Function button on the top panel or remote control of this system to select the AUX function. The Aux indicator appears in the display. Set the Volume level control on this system to a medium level (approximately "30" on the volume level display).
Operate your external device as usual. Make final adjustments to the volume controls of this system and to your external device to achieve the desired level. Keep in mind that if the volume level of this system is set too low and the volume level of your external device is set too high the sound may be distorted. You need to experiment with both volume controls to find the most desirable volume level settings.
Mute Control (Remote Control Only)
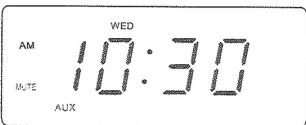
If you need to shut off the speakers of this system temporarily press the Mute button on the remote control.
The sound stops and the MUTE indicator appears in the display. To cancel the Mute function and restore the sound, press the Mute button again or press the Volume + or - buttons. The MUTE indicator disappears.
Phones (Stereo Headphone) Jack
This system includes a stereo headphone jack for private listening without disturbing others. The Phones jack is located on the back panel. The built in speakers automatically shut off when headphones are connected to the Phones jack.
IMPORTANT: Before connecting your headphones, set the Volume control to a low level. Then connect your headphones, put them on and gradually increase the volume to a comfortable listening level.
Remember that music files can often contain very loud passages as well as softer passages. It is a good idea to adjust the listening level during a louder passage so that you are not surprised by a sudden, uncomfortable increase in the headphone sound.
CHANGING THE LITHIUM BATTERY
Like all batteries, eventually the built in lithium battery will need to be replaced. A number of factors, such as, the length of time between the date the radio was manufactured and the date you plugged it in for the first time determine the amount of time before replacement.
During this initial storage period, the lithium battery is supplying power to the SmartSet® computer memory. Once you plug the radio in, your household outlet supplies the power, and the battery is not being used.
A fresh lithium battery can supply power to the SmartSet® computer for at least 3 years even if it is never connected to an AC power supply. If your radio was connected to your AC supply within a few months after it was manufactured, and you experience only the normal, nuisance type, short duration power interruptions, your battery may last for up to 5 years or even longer.
When the battery power drops below a certain level the "low" indicator will 'flash'. When you see this indicator, you should change the battery as soon as it is convenient for you to do so. To change the battery proceeds as follows:
1.) Purchase a replacement 3V lithium battery wherever batteries are sold. The battery type is CR2430 or equivalent.
2.) Remove the battery from its package so it is ready to install.
IMPORTANT: Leave the radio power cord connected to your AC outlet. This will provide power to the SmartSet® computer memory while the original lithium battery is removed.
3.) Turn the radio face up and use a small screwdriver to remove the screw securing the battery holder to the cabinet.
BE CAREFUL NOT TO LOSE THIS SMALL SCREW!
4.) Remove the original battery from the holder and insert the new battery into the holder the same way, observing the positive (+) direction. Slide the holder with the new battery back into the slot in the cabinet.
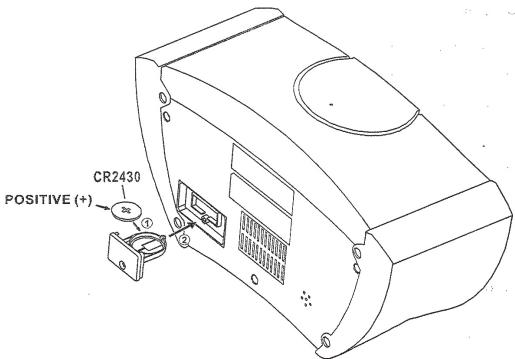
5.) Replace the screw that secures the battery holder in the cabinet.
6.) Turn the radio right side up and confirm that the "low" indicator goes 'Off'.
7.) Save these instructions. You'll have to do this again five to eight years from now!
Resetting The Clock After A Total Memory Loss
If you do not change the built in lithium battery within a reasonable period of time after you see the flashing "low" warning indicator, the lithium battery may become exhausted and will no longer be able to supply back up power to the SmartSet® internal computer.
If the unit is disconnected from the AC outlet after the battery is exhausted, or if a power interruption occurs, the SmartSet® memory will be lost and the clock will need to be reset when the power is restored. Be sure to install a fresh lithium battery before you reset the clock, otherwise the clock will need to be reset each time the power is interrupted.
If the lithium battery is exhausted and you experience an interruption in the AC power supply, the clock will reset itself to its initial default setting when the power is restored.
The initial default setting is "12:00, Saturday, January 1st (1.01), 2005".
If you notice that the time on your SmartSet® clock radio is completely incorrect, and the day indicator is also wrong, press the Date/Month button to see the date.
If the date display is showing "01.1" (January 1st), you probably experienced a total memory loss.

To reset the clock after a total memory loss, proceed as follows:
1.) Follow the instructions on pages 40-41 and install a new CR2430 lithium battery in the battery compartment.
2.) Connect the radio to your AC outlet and let the clock set itself.
3.) Depress the Date/Month and Time buttons together. The display will change from 'Time' to 'Year'. While holding the Date/Month and Time buttons, press the Tuning/Skip button to set the display to the correct year if necessary, and then release the buttons.
4.) Depress the Date/Month button. The display will change from 'time' to 'month/ date'(mm/dd).
While holding the Date/Month button, press the Tuning/Skip A button to set the display to the correct Month and Date. The Day indicator will change automatically as you adjust the month/date settings. When the correct Month and Date appear on the display, release the buttons.
5.) Depress the Time button and the Tuning/Skip button to set the display to the correct Time. Be sure to confirm that you have set the time correctly to 'AM'or 'PM'by observing the AM indicator.
6.) After you set the time, reconfirm that the Day, and Month/Date displays are still correct. Make final adjustments if necessary.
The SmartSet® clock memory is now reset and the new lithium battery will maintain it for the next 5 to 8 years, depending on the number and duration of the power outages you experience.
IMPORTANT NOTE:
After resetting the clock, don't forget to reset your wake up times, and alarm mode settings, and sleep timer settings as well.
CARE AND MAINTENANCE
If the cabinet becomes dusty, wipe it with a soft cloth. If the cabinet becomes smudged or dirty, clean it with a soft, slightly dampened cloth. Never allow water or any liquid to get inside the cabinet.
Never use any abrasive cleaners or cleaning pads as these will damage the finish of your unit.
Lithium Battery Precautions
- Dispose of the old battery properly. Do not leave it lying around where a young child or pet could play with, or swallow it. If the battery is swallowed, contact a physician immediately.
- Battery may explode if mistreated. Do not attempt to recharge it or disassemble it. Do not dispose of the old battery in a fire.
WARRANTY
This product is covered by our two-year warranty.
For all matters relating to the guarantee or our after-sales service, please contact your retailer and have your receipt on hand. Our guarantee covers manufacturing or assembly defects with the exception of all damage resulting from a failure to respect the instructions, or any inappropriate handling of the article (such as taking it apart, exposing it to heat or humidity, etc).
Note: It is recommended that all packaging be kept for future reference. Keep this instruction manual in a safe place as it contains important information.
Disclaimer: In our constant concern for improvement, the colours and details of the product may differ slightly from those shown on the packaging.
Reference: HPI500
2-years warranty
©2006 LEXIBOOK®
Designed and developed in Europe - Made in China
Customer Service
LEXIBOOK UK Ltd
Unit 10 Petersfield Industrial Estate
Bedford Road, Petersfield
Hampshire, GU32 3QA,
United Kingdom
Freephone helpline: 0808 100 3015
http://www.lexibook.com
C E
Environmental Protection
Unwanted electrical appliances can be recycled and should not be discarded along with regular household waste! Please actively support the conservation of resources and help protect the environment by returning this appliance to a collection centre (if available).

IM code: HPI500FR-GBIM0236