
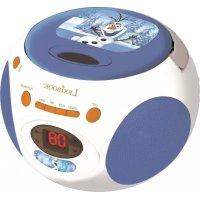
DMP23SP - Mp3 player LEXIBOOK - Free user manual and instructions
Find the device manual for free DMP23SP LEXIBOOK in PDF.

| Product type | MP3 Player |
| Brand | LEXIBOOK |
| Model | DMP23SP |
| Power supply | 1 AAA battery (not included) |
| Screen | LCD with adjustable backlight |
| Supported audio formats | MP3, WMA |
| Connectivity | USB 2.0, 3.5 mm headphone jack |
| Playback functions | Play/Pause, Stop, Next/Previous track, Fast forward/rewind, A-B Repeat, Playback modes (Normal, Repeat All, Repeat One, Shuffle, Folder Shuffle, Intro) |
| Equalizer | Normal, Rock, Jazz, Classic, Pop, Soft, DBB |
| Voice recording | Yes, via built-in microphone |
| Lock function | Yes, lock switch |
| Auto power off | Adjustable: 2 min, 10 min, 30 min or disabled |
| Lyrics display | Supports LRC files (synchronized) |
| Display languages | French, English, German, Italian, Dutch, Spanish, Portuguese, Simplified/Traditional Chinese, Korean, Japanese |
| Included accessories | Earphones, USB cable, driver CD (Windows 98) |
| Warranty | 2 years |
| Care and cleaning | Avoid exposure to water, moisture, and extreme temperatures. Clean with a dry cloth. |
| Safety | Do not expose to magnetic sources. Do not disassemble the device. Use only recommended batteries. |
| Spare parts and repairability | Not available separately. Contact after-sales service for any repairs. |
| General information | Brand: LEXIBOOK, Model: DMP23SP, Type: MP3 Player |
Frequently Asked Questions - DMP23SP LEXIBOOK
User questions about DMP23SP LEXIBOOK
0 question about this device. Answer the ones you know or ask your own.
Ask a new question about this device
Download the instructions for your Mp3 player in PDF format for free! Find your manual DMP23SP - LEXIBOOK and take your electronic device back in hand. On this page are published all the documents necessary for the use of your device. DMP23SP by LEXIBOOK.
USER MANUAL DMP23SP LEXIBOOK
-
Last 9LCD
-
Previous
-
Power ON 10.Hold /Play/pause
- Earphone 11. Volume -
- Mic 12. Volume +
B
Introduction
Thank you for purchasing the Lexibook DMP20SP Series digital media player. Listen to your favourite music files and record voice messages. Please read this user guide in full to discover all the functions this product has to offer.
Important notes: do not put heavy objects on the device. Do not expose the device to water or any other liquids. Avoid extreme temperatures, moisture and magnetic source.
Product description
Please refer to the images located at the back of the cover page.
Image A - Product layout
- Stop/Power off key
- Mode key
- Previous key
- Next key
- Power on/Play/Pause key
- Earphone socket
- Microphone
- USB key
- LCD screen
- Hold switch
- Volume - key
- Volume + key
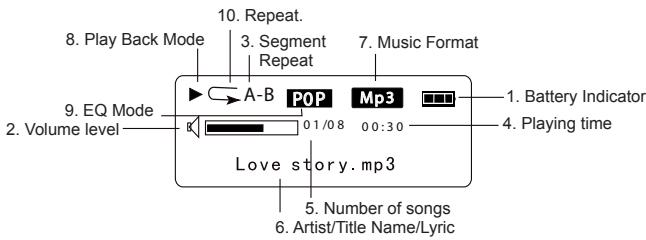
Image B-LCD screen
- Battery indicator
- Volume level
- Segment Repeat
- Playing time
- The number of songs
- Artist/Title name/Lyric
- Music format
- Playback mode
- EQ mode
- Repeat
Getting started
Software installation for users of Windows 98
If you operation system is Windows 98, you will first need to install the flash drive before connecting the MP3 player to your PC.
- Insert the Windows Installer driver CD into the CD-ROM drive of your PC.
- The driver will be automatically installed.
First steps
- Remove the static label from the unit's LCD screen.
- Insert 1 x AAA battery into the battery compartment observing the correct polarity (+/- signs).
- Plug the earphones in the microphone socket.
- Remove the USB cover. Connect the USB connector to the USB socket of your computer. You can also use the USB cable provided if necessary. "READY" will be displayed onscreen. Then, your PC will automatically search the movable hard disk.
- Double click on the new drive (MSCN) which appears in "My computer". Copy your music files (MP3/WMA) into that directory.
- When all your music files have been copied, right click on the plug-and-play icon located in the lower right corner of your computer's screen. When the "Safely Remove Software" dialogue box appears, click on STOP.
- Disconnect the USB connector from the USB socket.
Notes:
- Improper operation may cause the program to stop. Any improper operation method may delete some files.
- The manufacturer is not responsible for any damage caused by mishandling and non compliance of the instructions given in this user guide.
- Warning! Please format this unit by FAT! Don't format by FAT32.
- Because the internal F/W takes some space, the actual memory may be smaller than the labelled space.
Turning the unit On/Off
Press the key to turn the unit on. Press and hold STOP ( key) to turn the device off. The device will also power on automatically after you unplug the USB cable.
Note: this unit has an automatic power off feature when it is in STOP mode.
Low battery indicator
When the battery is low, the icon will be displayed on the LCD screen. Turn off the device and replace the battery.
Reset
WARNING: If the unit malfunctions or receives an electrostatic shock, switch the unit off and on again using the button. If this proves to be ineffective, remove the batteries and insert them again.
Hold function
To disable all the keys, push the Hold switch towards the left; "LOCKED" will be displayed onscreen.
Listening to music
Playback/Pause/Stop
- After you turn on the unit, the last song played will be displayed.
- Press to play all your tracks. Press again to pause the current track. Press once more to resume playback.
- Press STOP (■ key) to cancel playback.
Searching tracks
- In play mode, press | to go back to the beginning of the track currently playing. Press again to select the previous track.
- In play or stop mode, press to select the next track.
Fast forward and backward
In play mode or pause mode, press and hold | or to rewind or fast forward the track currently playing.
Adjusting the volume
Use the + (volume up) or - (volume down) key to adjust the volume.
A-B Repeat function
- In music playback mode, press the M key to define the starting point of the segment, and "A-" will appear on display.
- Then, press the M key again to define the ending point of the segment. "A-B" will appear on display.
- When the A-B Repeat function has been enabled, the unit will play the specified segment again and again.
- Press the M key once more to cancel the A-B Repeat function and return to normal play mode.
Function menu
In stop or pause mode, press the M key to enter the main menu. Use the or key to toggle the various menu options: Navigation, Play Music, Voice, Setting, Record, Delete, About, and Exit. Press the M key to enter a menu option.
Navigation
- Press the or key to toggle all the music folders and music files under the root folder.
- To view the files in a folder, select that folder and press the VOL + or - key.
- Press the M key to play the selected music file or folder.
Play Music
Select this option to return to normal music playback. Press the M key to start the playback from the first track. Press to begin playback.
Voice
In this mode, use the or key to toggle the voice files available and press to play a voice file. To exit this mode, you will need to go back to the menu and select "Play music" as described above.
Setting
This sub menu offers several settings:
EQ set
In setting mode, press M to enter EQ set. Use the or key to toggle the equalizer options available: Natural, Rock, Jazz, Classic, Pop, Soft, DBB and then press the M key to confirm.
Play mode
In setting mode, press M to enter Play mode. Use the or key to toggle the play mode options available: Normal, Repeat All, Repeat One, Random, Random All, Preview and then press the M key to confirm.
Contrast
In setting mode, press M to enter Contrast. The current "Contrast" level will be displayed. Use the or key to increase/decrease the contrast level of the LCD screen. Press the M key to confirm.
Backlight
In setting mode, press M to enter Backlight mode. Use the or key to select the time duration the backlight stays on after pressing a key: 5s, 10s, 15s, 20s, 25s, 30s, 35s, 40s, 45s, 0s, backlight off.
Powerset (Auto-off)
In setting mode, press M to enter Powerset. Use the || or key to select the time duration before the unit switches to auto-power off: 2 mins, 10 mins, 30 mins or disable (no auto-power off). Then press the M key to confirm.
Language
In setting mode, press M to enter the Language menu. Use the or key to select the desired on-screen display language: ENGLISH & GB, ENGLISH & BIG5, Simplified Chinese, Traditional Chinese, ENGLISH & KOR (English/Korea), ENGLISH & JAP (English/Japan), Français, Deutsch, ENGLISH/EUR(English/Europe), Italiano, Netherlands, Spanish, Portugues or Exit. Then press the M key to confirm.
Record
As soon as you press the M key to enter this menu, the unit will start recording. Speak clearly in the microphone. Press the key to pause recording. Press again to continue. Press the Stop key to stop the recording. You will then be in voice recording playback mode.
Delete
In setting mode, press M to enter Delete mode. Use the or key to select one of the following options: Delete music files, Delete voice files, or Exit. Press the M key to confirm, and use the or key to select the file you want to delete. Press the + or - key to choose Yes, and press the key to delete the file. Press the M key again and then press to exit.
About
When you enter this menu, the LCD will slowly display the version and attribute of the player. Press the M key to exit this menu.
Lyrics display
This unit supports LRC files. LRC files enable the unit to synchronize song lyrics with audio files such as MP3 files. You can find LRC files and related information on the Internet.
Warranty
NOTE: Please keep this instruction manual, it contains important information. This product is covered by our two-year warranty. To make use of the warranty or the after-sales service, please contact your retailer and supply proof of purchase. Our warranty covers material or installation-related defects attributable to the manufacturer, with the exception of wear caused by failure to respect the instructions for use or any unauthorized work on the equipment (such as dismantling, exposure to heat or damp, etc.).
LEXIBOOK UK Ltd, Unit 10 Petersfield Industrial Estate, Bedford Road, Petersfield, Hampshire, GU3 3QA, United Kingdom, Freephone helpline: 0808 100 3015, http://www.lexibook.com
Environmental Protection
Unwanted electrical appliances can be recycled and should not be discarded along with regular household waste! Please actively support the conservation of resources and help protect the environment by returning this appliance to a collection centre (if available).

Introduccion
EQ installing (equalizer)
Lexibook® is a registered trademark of Lexibook S.A. All rights reserved.
IM code: DMP20seriesIM0177

- B
- Introduction
- Product description
- Please refer to the images located at the back of the cover page.
- Image A - Product layout
- Image B-LCD screen
- Getting started
- Software installation for users of Windows 98
- First steps
- Notes:
- Turning the unit On/Off
- Low battery indicator
- Reset
- Hold function
- Listening to music
- Playback/Pause/Stop
- Searching tracks
- Fast forward and backward
- Adjusting the volume
- A-B Repeat function
- Function menu
- Navigation
- Play Music
- Voice
- Setting
- EQ set
- Play mode
- Contrast
- Backlight
- Powerset (Auto-off)
- Language
- Record
- Delete
- About
- Lyrics display
- Warranty
- Introduccion
- EQ installing (equalizer)
Brand : LEXIBOOK
Model : DMP23SP
Category : Mp3 player