USER MANUAL DIGITAL CAMERA LEXIBOOK
Please refer to images A & B located at the back of the cover page.
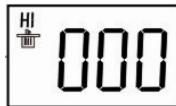
- USB socket cover 2. LCD display 3. // delete button 4. HI/LO/ button
- Strap mount 6. Shutter button 7. Viewfinder 8. Brace hole 9. Battery compartment
INSERTING NEW BATTERIES
Please refer to image C located at the back of the cover page.
- Make sure the camera is off.
- Open the battery compartment by sliding the cover off.
- Note the polarity of the batteries (+/- signs) inside of the battery compartment.
- Insert 2 new AAA batteries. Replace and close the battery cover by sliding it into place.
Warning: If the unit malfunctions or receives an electrostatic shock, remove the battery and insert it again. Important note: all files will be lost when replacing the batteries. Make sure you transfer the files to your PC before changing the batteries.
INSTALLING THE CAMERA DRIVER AND SOFTWARE
Follow these instructions to install the camera driver and application software on your PC system.
- Insert the CD Software (included) in your CD-ROM drive. The CD will auto run, and the following installation menu will appear:
Click on "Install driver", and then follow the instructions to install it. You will need to reboot your computer after the driver installation.

Note: If the CD does not auto run, click Start Run, type in "D:\setup.exe" in the Run dialog text box (where D:\ is your CD-ROM drive).
- Proceed similarly to install the Photolmpression and Funhouse software. Photolmpression and Funhouse software offer many applications for photo editing and printing.
Notes: - You must install the driver before downloading pictures from the camera. - You can click on "Browse CD" - "User guide" to read the user guides of the Photolmpression and Funhouse software. If you cannot read the files, you will have to install Acrobat Reader first.
TURING THE CAMERA ON AND OFF
Press the Shutter button [6] for 5 seconds to turn the camera ON. Note: The camera will auto power off after 60 seconds of inactivity.
SELECTING THE PHOTO RESOLUTION
There are 2 resolution modes:
High resolution: pictures of 1280*960 pixels. The camera can store about 25 pictures in this mode.
Low resolution: pictures of 640*480 pixels. The camera can store about 100 pictures in this mode.
Press the HI/LO/ button [4] to select HI (high) or LO (low) resolution on the upper left corner of the LCD screen.
TAKING PHOTOS
Press the Shutter button [6] to take a photo. You will hear a 'beep' sound after each photo taken. The number of pictures you can still take in memory is shown on the LCD screen.
DELETING FILES
Deleting the last picture taken
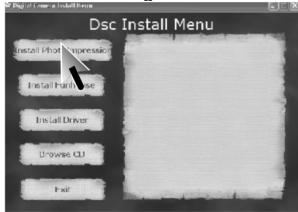
Press the button [3] to select the lower trash can icon
as shown on the LCD screen. Press the Shutter button [6] within 5 seconds to delete the last picture taken.
Deleting all files
Press the button [3] twice to select the upper trash can icon as shown on the LCD screen. Press the Shutter button [6] within 5 seconds to delete all the pictures stored in the camera.
Note: if you press the button by mistake, just wait 5 seconds to cancel this operation.
Continuous Picture Shots
This mode allows you to take a succession of quick shots which the camera will save as short video clips in AVI format.
Press and hold the HI/LO/ button [4] to select the icon on the LCD screen.
Keep the Shutter button [6] pressed to take several photos continuously and automatically.
DOWNSLOADING YOUR PHOTOS
- Connect the camera to your computer via the USB cable provided. You will hear a small beep sound and the LCD screen will turn on when the camera is connected to your PC.
- Open the Photolmpression software. On the left side of the opening screen, click on "Get photo".
- On the bottom part of the screen, click on "Camera/scanner", then in "Select source" select "Dual Camera". Finally, click on "acquire" (scan/camera icon).
- Your photos will be displayed on the bottom part of the screen.
Note: for more information on Photolmpression, please refer to the user guide included in the software CD.
PC CAM MODE
Connected to your PC, your camera can be used as a webcam. In "My Computer", double click on a new drive called "Dual Camera". You will be in webcam mode.
Video Conference
- Set your digital video camera to PC Cam mode.
-
Run the video conference software Microsoft NetMeeting on your computer.
-
Input the IP address of the computer you wish to dial in the address bar.
- Select tool/accept/transfer options. When the other parties have accepted your call, you can now hold a video conference.
MSN Chat
- Make sure the digital video camera is OFF.
- Press and hold the Power/Shutter button [7]. Plug the USB jack into the USB port of your PC.
- Sign in MSN.
- Connect the digital video camera to your computer using the USB cable.
- On the MSN interface, select Action/Start a video conversation.
- Select the person you want to chat with, and press OK.
INTERCHANGEABLE COVERS
Your digital camera comes with 2 interchangeable covers. To remove and insert a cover, use a sharp instrument to unsnap the cover on each corner of the camera. Snap in a new cover.
WARRANTY
NOTE: Please keep this instruction manual, it contains important information. This product is covered by our two-year warranty. To make use of the warranty or the after-sales service, please contact your retailer and supply proof of purchase. Our warranty covers material or installation-related defects attributable to the manufacturer, with the exception of wear caused by failure to respect the instructions for use or any unauthorised work on the equipment (such as dismantling, exposure to heat or damp, etc.).
LEXIBOOK UK Ltd, Unit 10 Petersfield Industrial Estate, Bedford Road, Petersfield, Hampshire, GU32 3QA, United
Kingdom, Freephone helpline: 0808 100 3015, http://www.lexibook.com
Environmental Protection
Unwanted electrical appliances can be recycled and should not be discarded along with regular household waste! Please actively support the conservation of resources and help protect the environment by returning this appliance to a collection centre (if available).

CONOCETUCAMARA
Marvel, Spider-Man, and the distinctive likenesses thereof are trademarks of Marvel Characters, Inc., and are used with permission. Copyright © 2007 Marvel Characters, Inc. All rights reserved. www.marvel.com
©2007 Mattel, Inc. ©2007 Lexibook®

Milieubescherming