
NWD-210N - USB Wi-Fi Adapter ZYXEL - Free user manual and instructions
Find the device manual for free NWD-210N ZYXEL in PDF.

| Product Type | USB Wi-Fi Adapter |
| Brand | ZYXEL |
| Model | NWD-210N |
| Wi-Fi Standard | IEEE 802.11n (up to 150 Mbps) |
| Frequency Band | 2.4 GHz |
| Wireless Security | WEP, WPA/WPA2, WPS (Wi-Fi Protected Setup) |
| Operating Modes | Infrastructure (access point) and ad-hoc (peer-to-peer) |
| Host Interface | USB 2.0 |
| Supported Operating Systems | Windows (driver on CD) and Mac OS X (driver on CD) |
| Dimensions (approx.) | 7 x 2 x 1 cm |
| Weight (approx.) | 20 g |
| Power Supply | USB port (5V, 500mA) |
| LED Indicator | Connection indicator light |
| Antenna | Built-in |
| USB cable included | Yes (for limited space) |
| Care and cleaning | Clean with a dry, soft cloth. Avoid liquids. |
| Repairability and spare parts | Device not user-serviceable and not repairable. No spare parts available. |
| User rating | 9.0 / 10 (based on reviews on notice-facile.com) |
Frequently Asked Questions - NWD-210N ZYXEL
User questions about NWD-210N ZYXEL
0 question about this device. Answer the ones you know or ask your own.
Ask a new question about this device
Download the instructions for your USB Wi-Fi Adapter in PDF format for free! Find your manual NWD-210N - ZYXEL and take your electronic device back in hand. On this page are published all the documents necessary for the use of your device. NWD-210N by ZYXEL.
USER MANUAL NWD-210N ZYXEL
Wireless N USB Adapter
Apple Macintosh User's Guide
Version 1.00
4/2008
Edition 1
CONTENTS
ENGLISH 1
DEUTsCH 35
ESPANOL 47
FRANÇAIS 59
ITALIANO 71
PYCCKN 83
中文 95
Overview
The NWD210N is a USB wireless network adapter for your computer. The NWD210N is compatible with WPS (Wi-Fi Protected Setup).
Use the NWD210N to connect your computer to a wireless access point (AP). This is known as infrastructure mode.


You can also use the NWD210N to connect wirelessly to another wireless-enabled computer. This is known as ad-hoc mode.


This User's Guide shows you how to set up and use your NWD210N with your Apple Macintosh running Mac OS X. This is described in the following sections:
Table 1 Getting Started Contents
| SECTION | PAGE |
| Install the Software | 2 |
Table 1 Getting Started Contents
| SECTION | PAGE |
| Install the Hardware | 7 |
| Connect to a Wireless Network | 9 |
This User's Guide also includes a section detailing the NWD210N utility's various screens, beginning on page 11. It contains the following:
Table 2 The Utility Screens
| SECTION | PAGE |
| The Profile Screens | 11 |
| The Link Status Screen | 20 |
| The Site Survey Screen | 23 |
| The Statistics Screen | 26 |
| The Advanced Screen | 29 |
| The About Screen | 32 |
For more background and technical information, see the Windows User's Guide on the CD that came with your NWD210N.
1 Install the Software
Take the following steps to install the NWD210N's driver and utility on your Mac.

Install the software from the CD before you insert the NWD210N. Do not insert the NWD210N yet.
1 Remove the NWD210N if you already inserted it. Insert the included CD into the CD-ROM drive on your computer.
2 Double-click the NWD210N CD icon that appears.
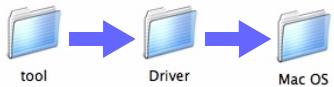
3 Select Tool > Driver > Mac OS.
4 Double-click the.dmg file icon.

NWD210N_D1.0.1.0
U1.4.8.0.dmg
5 The NWD210N Installer window displays. Select your operating system version.

Mac OS 10.3

Mac OS 10.4

If you are not sure which operating system version your computer is running, click About This Mac to check.
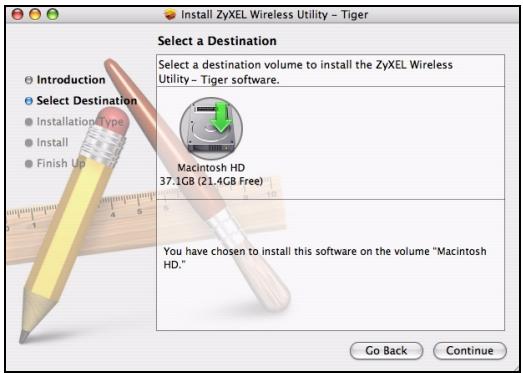
6 Double-click Install. The following screen displays. Click Continue.

Select the volume on which you want to install the NWD210N software. Click Continue.

Choose an internal hard drive (identifiable by its icon).
7 Click Upgrade.

The following message displays. Click Continue Installation to proceed.

Installing this software requires you to restart your computer when the installation is done. Are you sure you want to install the software now?
Cancel
Continue Installation
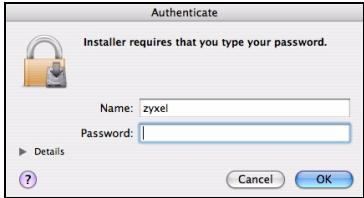
If a security window displays, enter your computer's administrator name and password and click OK.
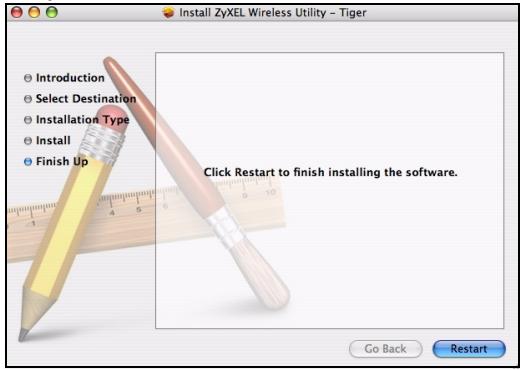
8 You must restart your computer before using the NWD210N software.

Make sure you have saved all your work before you restart!
Click Restart. Your computer shuts down, then restarts automatically.
2 Install the Hardware

Do not install the hardware until you have installed the software from the CD.
1 Locate an available USB port on the computer.
2 Remove the protective cap to expose the USB connector. Insert the NWD210N into an available USB port on the computer.
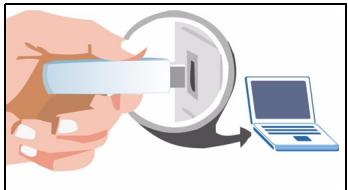

Never bend, twist or force the NWD210N into the port. If there is not enough space to attach the NWD210N, use the included USB cable.
The NWD210N's LED (light) turns on if it is properly inserted.

If the NWD210N's LED is not on after you have installed the software and the NWD210N, make sure the NWD210N is properly inserted.
The NWD210N automatically connects to an available wireless network without security enabled.
However, this may not be the wireless network to which you want to connect. Run the utility to ensure you are connected to the correct network.
2.1 Run the Utility
The utility is an interface that allows you to see information about and control the NWD210N.
When you insert the NWD210N, an icon appears in the dock.

The utility runs automatically. The Site Survey screen displays (see section 4.3 on page 23).

If the utility does not run automatically, click the icon.
3 Connect to a Wireless Network
This section describes how to connect your NWD210N to an existing wireless network.
1 If the Site Survey screen is not already open, open the utility and click the Site Survey tab.

2 The available wireless networks display in the AP List. SSID means Service Set Identifier and is the name of the wireless network.
3 Choose the network you want to connect to by clicking on it and clicking Connect.
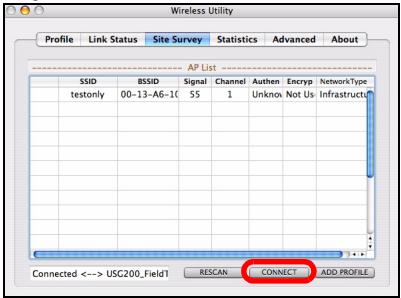
4 If a network has no security, go to step 6.
5 If a network has security, a screen displays prompting you to enter security information.
Get this information from the network administrator. Be sure to enter the information exactly as it was given to you. Click OK.
6 A green icon ( ) displays to the left of the network's SSID, indicating that the NWD210N is successfully connected.
To access the Internet, open your Internet browser and enter the URL of a web site in the address bar. The AP should be connected to the Internet.
Address http://www.zyoxel.com
If the web site displays correctly, you are successfully connected to the Internet.
4 The Utility's Screens
This section describes each of the NWD210N utility's interface screens. See the Windows User's Guide (on the CD) for background information about the NWD210N's features.
4.1 The Profile Screens
A profile lets you automatically connect to the same wireless network every time you use the ZyXEL utility. You can also configure different profiles for different networks - for example if you use wireless networks both at home and at work.
4.1.1 The Profile List Screen
Click the utility's Profile tab. The following screen displays.
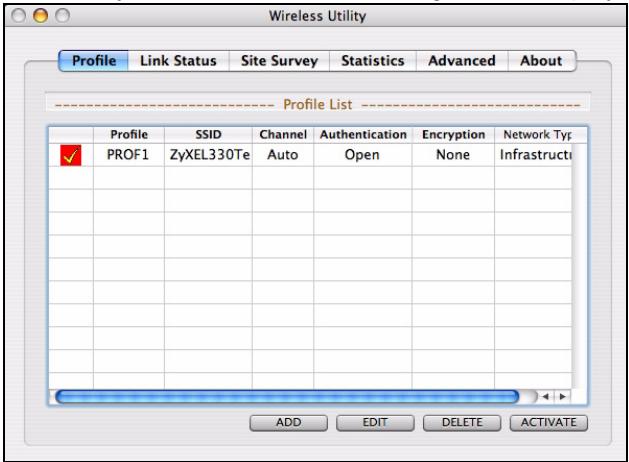
The following table describes the labels in this screen.
Table 3 The Profile List Screen
| LABEL | DESCRIPTION |
| ✓ | This indicates the currently-active profile. |
| Profile | This is the name of the pre-configured profile. |
| SSID | This is theSSID of the wireless network to which the selected profile associates. |
| Channel | This field displays the channel number used by the profile. |
Table 3 The Profile List Screen
| LABEL | DESCRIPTION |
| Authentication | This field displays the type of authentication used by the network (Open, Shared, WPA-PSK or WPA2-PSK). |
| Encryption | This field displays the encryption protocol used by the network. · When WEP security is used, WEP displays. · When WPA-PSK or WPA2-PSK security is used, TKIP or AES displays. |
| Network Type | This field displays Infrastructure when the profile is configured to connect to an access point, or Ad Hoc when the network is configured to connect to another computer. |
| Add | Click this to create a new profile. |
| Edit | Click this to alter the settings of an existing profile. |
| Delete | Click this to remove a profile from the list. |
| Activate | Click this to select the profile to use. Alternatively, double-click the profile's name in the list. |
4.1.2 The Add Profile: System Configuration Screen
Use this screen to configure a profile's basic settings. Click Add in the Profile List screen. The following screen displays.
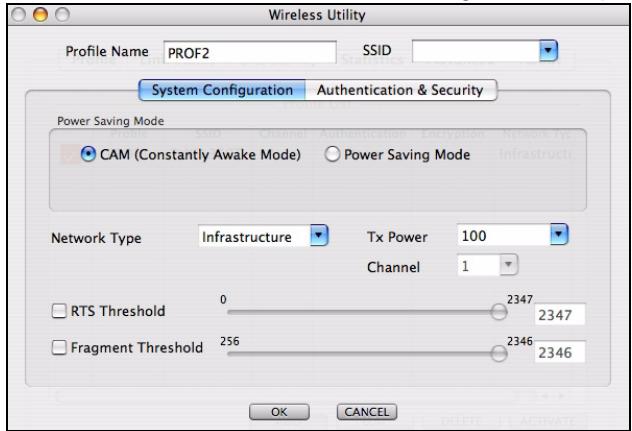
The following table describes the labels in this screen.
Table 4 The Add Profile: System Configuration Screen
| LABEL | DESCRIPTION |
| Profile Name | Enter a descriptive name in this field, or alternatively keep the name assigned by the utility. |
| SSID | Select an available wireless device from the list, or enter theSSID of the wireless device to which you want to associate. |
Table 4 The Add Profile: System Configuration Screen
| LABEL | DESCRIPTION |
| CAM (Constantly Awake Mode) | Select this to have the NWD210N never go into sleep mode. |
| Power Saving Mode | Select this to have the NWD210N go into sleep mode when it is not transmitting data. |
| Network Type | Select Infrastructure to connect to a wireless access point, or select 802.11 Ad Hoc to connect to another wireless-enabled computer. |
| Tx Power | This field controls the transmission power of the NWD210N. When using the NWD210N with a notebook computer, select a lower transmission power level when you are close to the AP in order to conserve battery power. |
| Channel | In ad-hoc mode, choose the radio channel to use for the wireless network. If there are other networks in the area, choose a channel as far away as possible, in order to minimize the risk of interference. In Infrastructure mode, this field is not configurable; the NWD210N uses whichever channel the access point uses. |
| RTS Threshold | Select the packet size above which the NWD210N transmits an RTS (Request To Send) message. |
Table 4 The Add Profile: System Configuration Screen
| LABEL | DESCRIPTION |
| Fragment Threshold | Select the packet size above which the NWD210N fragments (breaks up) the packet into smaller pieces. |
| OK | Click this to save your changes and return to the Profile List screen. |
| Cancel | Click this to return to the Profile List screen without saving your changes. |
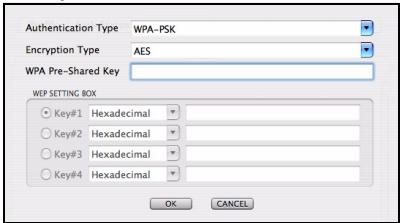
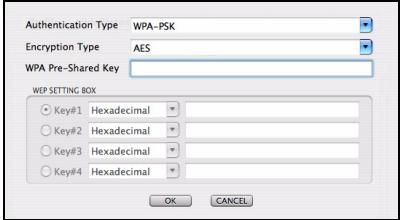
4.1.3 The Add Profile: Authentication & Security Screen
Use this screen to configure a profile's security settings. Click Authentication & Security in the Add Profile: System Configuration screen. The following screen displays.
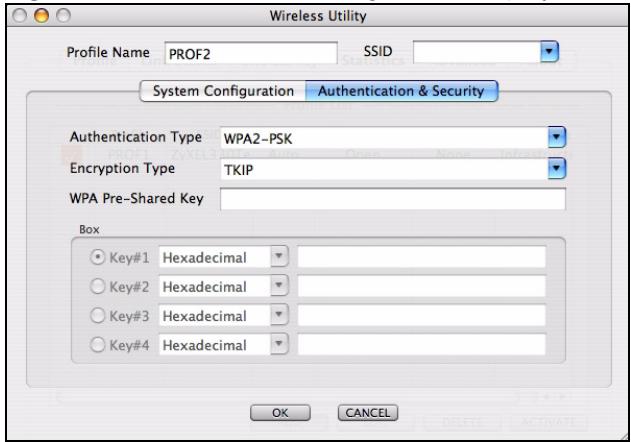
The following table describes the labels in this screen.
Table 5 The Add Profile: Authentication & Security Screen
| LABEL | DESCRIPTION |
| Authentication Type | Select the security standard you want to use. All the other wireless devices on your network must be able to use the same standard you select. ·Open mode is used when security is not an issue. No authentication is required, and any wireless device can join the network. ·Shared mode security is used with WEP (Wired Equivalent Privacy). ·WPA-PSK security uses a pre-shared key. All the wireless devices on the network use the same key to access the network. This option is not available in ad-hoc mode. ·WPA2-PSK is an improved version of WPA-PSK security. This option is not available in ad-hoc mode. |
| Encryption Type | ·When you select Open or Shared in the Authentication Type field, either select None to use no security, or select WEP to use Wired Equivalent Privacy security. ·When you select WPA-PSK or WPA2-PSK in the Authentication Type field, select TKIP to use the Temporal Key Integrity Protocol. Alternatively, select AES to use the Advanced Encryption Standard. |
Table 5 The Add Profile: Authentication & Security Screen
| LABEL | DESCRIPTION |
| WPA Pre-Shared Key | When you select WPA-PSK or WPA2-PSK in the Authentication Type field, enter the network's pre-shared key (8~64 uppercase or lowercase letters and numbers). |
| Key #1~4 | When you select WEP in the Encryption Type field, you must enter the network's WEP key. Check with your network's administrator for the correct settings. Select the key number (1~4), select the key type (Hexadecimal or ASCII), and enter the WEP key in the field to the right. Hexadecimal keys use numerals and the letters a~f only, whereas ASCII keys use numerals and all letters. |
| OK | Click this to save your settings and return to the previous screen. |
| Cancel | Click this to return to the previous screen without saving your settings. |
4.1.4 The Edit Profile: System Configuration Screen
Use this screen to change a profile's basic settings. Click Edit in the Profile List screen. The screen that displays is identical to that described in section 4.1.2 on page 14.
4.1.5 The Edit Profile: Authentication and Security Screen
Use this screen to change a profile's security settings. Click Authentication and Security in the Edit Profile: System Configuration screen. The screen that displays is identical to that described in section 4.1.3 on page 17.
4.2 The Link Status Screen
Use this screen to see your current connection status, configuration and data rate statistics. Click the utility's Link Status tab. The following screen displays.
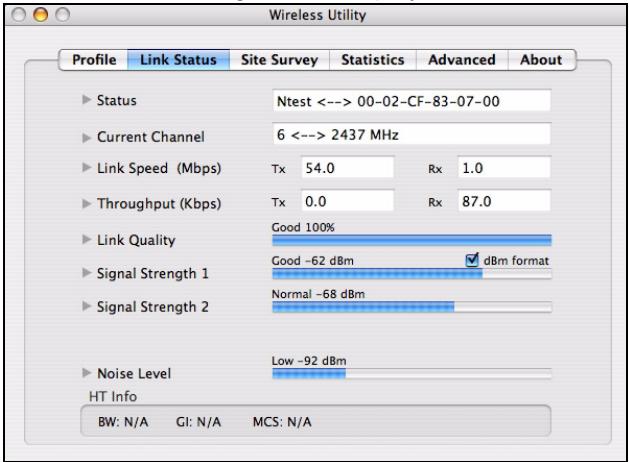
The following table describes the labels in this screen.
Table 6 The Link Status Screen
| LABEL | DESCRIPTION |
| Status | This displays the SSID (Service Set Identifier) and MAC (Media Access Control) address of the access point or peer device to which the NWD210N is connected. |
| Current Channel | This displays the channel number of the current wireless connection, as well as the radio frequency of the channel in megahertz. |
| Link Speed (Mbps) | This displays the maximum possible data transmission (tx) and reception (rx) speeds of the current connection in megabits per second. |
| Throughput (Kbps) | This displays the actual data transmission (tx) and reception (rx) speeds of the current connection in kilobits per second. |
| Link Quality | This shows the quality of the wireless connection. This refers to the percentage of packets transmitted successfully. If there are too many wireless stations in a wireless network, collisions may occur which could result in a loss of messages even though you have high signal strength. |
| Signal Strength 1~2 | These show the strength of the signal. The NWD210N has two internal antennas, each of which has a separate display bar.The signal strength depends mainly on the antenna output power and the distance between your NWD210N and the AP or peer computer. |
| dBm format | Click this to display the Signal Strength 1 and 2 values in dBm (decibels below 1 milliwatt). |
| Noise Level | This displays the amount of interference on the wireless connection. |
| HT Info | This section displays advanced information about the 802.11n wireless connection (if you are using 802.11b or 802.11g, nothing displays here).HT stands for “high throughput”.BW: this displays the bandwidth (20 or 40 Mhz) of the wireless connection.GI: this displays the guard interval length. The guard interval is used to prevent wireless transmissions from interfering with one another.MCS: this displays the modulation and coding scheme, which dictates how the data is transmitted over the wireless link. |
4.3 The Site Survey Screen
Use this screen to see information about the wireless networks in your area, and to connect to a wireless network. Click the utility's Site Survey tab. The following screen displays.
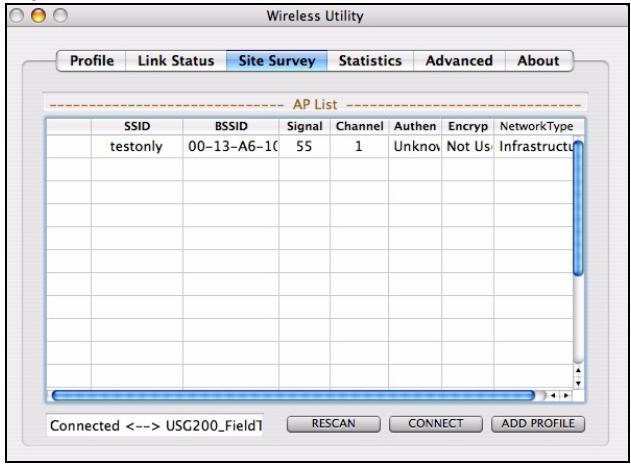
The following table describes the labels in this screen.
Table 7 The Site Survey Screen
| LABEL | DESCRIPTION |
| SSID | This displays the network's Service Set Identifier. TheSSID is the name of the network. |
| BSSID | This displays the Basic Service Set Identifier. The BSSID is the MAC (Media Access Control) address of the access point or peer wireless device. Every networking device has a unique MAC address, which identifies it on the network. |
| Signal | This displays the received radio signal strength of the network. The higher the value, the better the connection. |
| Channel | This displays the wireless channel on which the network is operating. |
| Authentication | This displays whether WPA, WPA2, WPA-PSK or WPA2-PSK is used on the network. If the network uses no security or WEP, Unknown displays. At the time of writing, the NWD210N does not support WPA or WPA2. |
| Encryption | When WPA, WPA2, WPA-PSK or WPA2-PSK is used, this displays the encryption protocol used (TKIP or AES).When WEP is used, WEP displays.When no security is used, Not Used displays. |
| Network Type | This field displays the network type (Infrastructure or Ad Hoc) of the wireless device. |
| RESCAN | Click this to update the list. |
| CONNECT | Click this to connect to the highlighted wireless network. |
| ADD PROFILE | Click this to go to the Add Profile: System Configuration screen (see <Links>Section 4.1.2 on page 14). |
4.4 The Statistics Screen
Use this screen to view details of your NWD210N's transmission and reception performance. Click the utility's Statistics tab. The following screen displays.
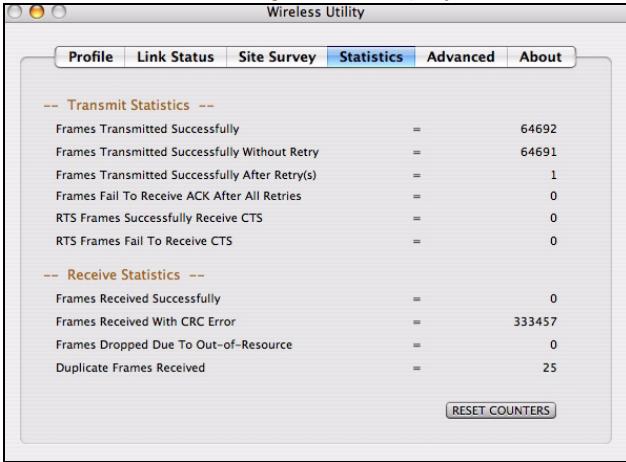
The following table describes the labels in this screen.
Table 8 The Statistics Screen
| LABEL | DESCRIPTION |
| Transmit Statistics | This section displays statistics about the data frames sent by the NWD210N. |
| Frames Transmitted Successfully | This displays the total number of frames transmitted by the NWD210N. |
| Frames Transmitted Successfully Without Retry | This displays the number of frames successfully transmitted by the NWD210N on the first attempt. |
| Frames Transmitted Successfully After Retry(s) | This displays the number of frames transmitted by the NWD210N after a second or subsequent attempt. |
| Frames Failed to Receive ACK After All Retries | This displays the number of frames transmitted by the NWD210N that did not receive an acknowledgement response from the other wireless device. |
| RTS Frames Successfully Received CTS | This displays the number of frames, large enough to require the sending of a “Request to Send” message, that then received a “Clear to Send” message from the other wireless device. |
Table 8 The Statistics Screen
| LABEL | DESCRIPTION |
| RTS Frames Failed toReceive CTS | This displays the number of frames, large enough to require the sending of a “Request to Send” message, that did not receive a “Clear to Send” message from the other wireless device. |
| Receive Statistics | This section displays statistics about the data frames received by the NWD210N. |
| Frames ReceivedSuccessfully | This displays the number of frames received by the NWD210N without error. |
| Frames Received withCRC Error | This displays the number of frames received by the NWD210N that contained a Cyclic Redundancy Check error. Cyclic Redundancy Checks are used to determine whether received data has been altered in transit (by radio interference, for example). |
| Frames Dropped DueTo Out-of-Resource | This displays the number of frames that were not processed because the NWD210N did not have the necessary memory. |
Table 8 The Statistics Screen
| LABEL | DESCRIPTION |
| Duplicate Frames Received | This shows the number of received frames that were identical to other received frames. |
| RESET COUNTERS | Click this to turn all the counters back to zero. |
4.5 The Advanced Screen
Use this screen to configure the wireless standard used by the NWD210N, its transmission rate, and to enable or disable burst transmission. Click the utility's Advanced tab. The following screen displays.

The following table describes the labels in this screen.
Table 9 The Advanced Screen
| LABEL | DESCRIPTION |
| Wireless Mode | Select the type of network to which you want to connect. • Select 802.11 B/G mixed mode to connect to IEEE 802.11b or IEEE 802.11g devices. • Select 802.1.1 B mode to connect to IEEE 802.11b devices only. • Select 802.11 B/G/N mixed mode to connect to IEEE 802.11b, 802.11g or 802.11n wireless devices. Choose this if you are not sure which to use. |
| TX Rate | This field displays the maximum rate at which data is sent by the NWD210N over the wireless network. • When you select 802.11 B/G mixed mode or 802.11 B/G/N mixed mode in the Wireless Mode field, this field is set to Auto and is not user-configurable. • When you select 802.1.1 B mode in the Wireless Mode field, select Auto to have the NWD210N choose the highest speed the network supports, or select 1, 2, 5.5 or 11 Mbps. |
| Enable TX Burst | Select this to turn burst transmission on. Deselect it to turn burst transmission off. |
Table 9 The Advanced Screen
| LABEL | DESCRIPTION |
| Radio On/Off | A green icon ( ) displays when the NWD210N's radio is enabled. A red icon ( ) displays when the NWD210N's radio is disabled. • Select Radio Off to disable the NWD210N's wireless functions. • Select Radio On to enable the NWD210N's wireless functions. |
| Apply | Click this to save your settings. |
4.6 The About Screen
Use this screen to see the version numbers of the NWD210N's utility and driver, and to see its MAC (Media Access Control) address. Click the utility's About tab. The following screen displays.
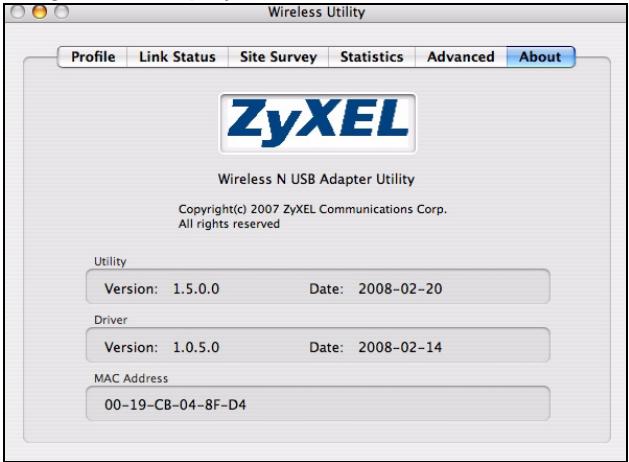
The following table describes the labels in this screen.
Table 10 The About Screen
| LABEL | DESCRIPTION |
| Utility | This section displays the version number and release date of the NWD210N's utility. |
Table 10 The About Screen
| LABEL | DESCRIPTION |
| Driver | This section displays the version number and release date of the NWD210N's driver. |
| MAC Address | This field displays the NWD210N Media Access Control (MAC) address. |
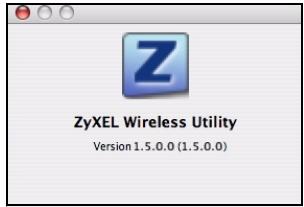
You can also see the utility's version number by clicking on the ZyXEL Wireless Utility menu at the top of your screen and selecting About Wireless Utility. The following screen displays.
Procedure to View a Product's Certification(s)
1 Go to www.zyxel.com.
2 Select your product from the drop-down list box on the ZyXEL home page to go to that product's page.
3 Select the certification you wish to view from this
Übersicht
Installing this software requires you to restart your computer when the installation is done. Are you sure you want to install the software now?
Cancel
Continue Installation
2.1 Executar lailers
Installing this software requires you to restart your computer when the installation is done. Are you sure you want to install the software now?
Cancel
Continue Installation
4 EcTn CeTb He NmEeT CnCTeMbI 6e3oNaChOCTN, To nepexoDnte K nyHKTy 6.
5 EcTn B cTe n akTnBnPoBaHa cnCTema 6e3oNaChOCTn,TO IPOBNTcOKHO C 3anpocOM HeoXoDnMoN INΦopMaun.
Ee moxho noluyntb y cncTeMHoro admHnctpaTopa. BbldoJHKbl 6ynde TBecTN 3TN daHHbIe 6e3 Ow6ok. IeJIKNHTe OK.
6 3eJIeHbI 3NaUOK ( ) cIeBa oT SSID cTeI roBOpIT o6 ycpeShHom IOdKJIIOUeHmN NWD210N.
Дл дocура K cetи ИntepheT BKJIIOHHTe BaW INHTepHeT-6pay3epи ВBEДNTe aIpec (URL) Be6-caNTaВ CTPOKe aIpeca. TOnka docTypa DoJIXHa 6bITb NOdKJIIOUeHa K cetu INHTepHeT.

EcnBcB-CanT OToBpaXaetc npabNlBHO,TO Bbl YcneHNOndKJIOnuHnncb K Internet.
Ppoueypa npocmoTpa ceptnuKata(cepTuKkaTOB) npoNykTa
1 Pocetnte caT www.zyxel.com.
2 BbIbePte BaW npOdyKT n3 BbIpaIauoIe rO cIuCKa Ha IOMaUHeN CTpaHnue ZyXEL npeRJnte Haero CTpaHnUy.
3 BbIepuTe Ha 3ToI cTpaHnIe cepTuΦnKaT, KOtOpbl BBXOTuTE npOCMOTpeTb.
概览
- Apple Macintosh User's Guide
- CONTENTS
- Overview
- Install the Software
- Choose an internal hard drive (identifiable by its icon).
- Click Upgrade.
- Install the Hardware
- Run the Utility
- Connect to a Wireless Network
- The Utility's Screens
- The Profile Screens
- The Profile List Screen
- The Add Profile: System Configuration Screen
- The Add Profile: Authentication & Security Screen
- The Edit Profile: System Configuration Screen
- The Edit Profile: Authentication and Security Screen
- The Link Status Screen
- The Site Survey Screen
- The Statistics Screen
- The Advanced Screen
- The About Screen
- Übersicht
- Executar lailers
- 概览
Brand : ZYXEL
Model : NWD-210N
Category : USB Wi-Fi Adapter