PS720R - Chain saw MTD - Free user manual and instructions
Find the device manual for free PS720R MTD in PDF.


User questions about PS720R MTD
0 question about this device. Answer the ones you know or ask your own.
Ask a new question about this device
Download the instructions for your Chain saw in PDF format for free! Find your manual PS720R - MTD and take your electronic device back in hand. On this page are published all the documents necessary for the use of your device. PS720R by MTD.
USER MANUAL PS720R MTD
Thank you for buying this quality product. This modern outdoor power tool will provide many hours of useful service. You will find it to be a great labor-saving device. This operator's manual provides you with easy-to-understand operating instructions. Read the whole manual and follow all the instructions to keep your new outdoor power tool in top operating condition.
PRODUCT REFERENCES, ILLUSTRATIONS AND SPECIFICATIONS
All information, illustrations, and specifications in this manual are based on the latest product information available at the time of printing. We reserve the right to make changes at any time without notice.
Copyright © 2004 MTD SOUTHWEST INC, All Rights Reserved.
SERVICE INFORMATION
Service on this unit both within and after the warranty period should be performed only by an authorized and approved service dealer.
For service call 1-800-345-8746 to obtain a list of authorized service dealers near you. For more details about your unit, visit our website at www.TrimmerPlus.com.
If you have difficulty assembling this product or have any questions regarding the controls, operation or maintenance of this unit, please call the Customer Support Department.
DO NOT RETURN THE UNIT TO THE RETAILER. PROOF OF PURCHASE WILL BE REQUIRED FOR WARRANTY SERVICE.
Make sure you carefully read and understand this manual before starting or operating this equipment.
THIS PRODUCT IS COVERED BY ONE OR MORE U.S. PATENTS. OTHER PATENTS PENDING.
TABLE OF CONTENTS
Introduction 2
Rules for Safe Operation 3
Know Your Unit 7
Operating Instructions 8
Maintenance and Repair Instructions 11
Specifications 13
Warranty Information 14
Parts List . . . . . . . . . . . . . . . . . . . . . . . . . . . . . . . . . . . . . . . . . . . . . . . . . . . . . . . . . . . . . . . . . . . . . . . . Inside Back Cover
Before beginning, locate the unit's model plate. It lists the model and serial numbers of your unit. Refer to the sample plate below and copy the information for future reference.
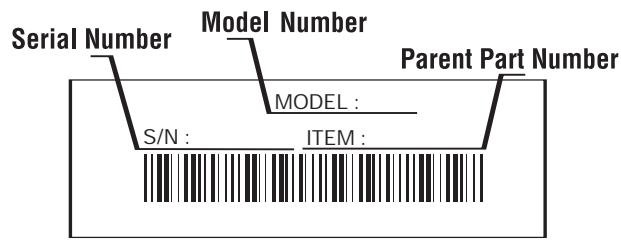
Copy the model and parent part number here: Copy the serial number here:
The purpose of safety symbols is to attract your attention to possible dangers. The safety symbols, and their explanations, deserve your careful attention and understanding. The safety warnings do not by themselves eliminate any danger. The instructions or warnings they give are not substitutes for proper accident prevention measures.
SYMBOL MEANING

SAFETY ALERT: Indicates danger, warning or caution. Attention is required in order to avoid serious personal injury. May be used in conjunction with other symbols or pictographs.
NOTE: Advises you of information or instructions vital to the operation or maintenance of the equipment.
Read the Operator's Manual(s) and follow all warnings and safety instructions.
Failure to do so can result in serious injury to the operator and/or bystanders.
FOR QUESTIONS, CALL 1-800-345-8746
SYMBOL MEANING

DANGER: Failure to obey a safety warning will result in serious injury to yourself or to others. Always follow the safety precautions to reduce the risk of fire, electric shock and personal injury.
WARNING: Failure to obey a safety warning can result in injury to yourself and others. Always follow the safety precautions to reduce the risk of fire, electric shock and personal injury.

CAUTION: Failure to obey a safety warning may result in property damage or personal injury to yourself or to others. Always follow the safety precautions to reduce the risk of fire, electric shock and personal injury.
- IMPORTANT SAFETY INSTRUCTIONS
READ ALL INSTRUCTIONS BEFORE OPERATING
WARNING: When using the unit, you must follow the safety rules. Please read these instructions before operating the unit in order to ensure the safety of the operator and any bystanders. Please keep these instructions for later use.
- Carefully read and understand the operator's manual of the unit that powers this attachment.
- Read this operating instruction manual carefully. Be thoroughly familiar with the controls and the proper use of the equipment. Know how to stop the unit and disengage the controls quickly.
- Do not operate this unit when tired, ill, or under the influence of alcohol, drugs, or medication.
- Never allow children to operate the equipment. Never allow adults unfamiliar with the instructions to use the unit. Never allow adults to operate the equipment without proper instruction.
- All guards and safety attachments must be installed properly before operating the unit.
SPECIAL SAFETY WARNINGS FOR GAS POWERHEADS

WARNING: Gasoline is highly flammable, and its vapors can explode if ignited. Take the following precautions:
- Store fuel only in containers specifically designed and approved for the storage of such materials.
- Always stop the engine and allow it to cool before filling the fuel tank. Never remove the cap of the fuel tank, or add fuel, when the engine is hot. Never operate the unit without the fuel cap securely in place. Loosen the fuel tank cap slowly to relieve any pressure in the tank.
- Mix and add fuel in a clean, well-ventilated area outdoors where there are no sparks or flames. Slowly remove the fuel cap only after stopping engine. Do not smoke while fueling or mixing fuel. Wipe up any spilled fuel from the unit immediately.
- Avoid creating a source of ignition for spilled fuel. Do not start the engine until fuel vapors dissipate.
- Move the unit at least 30 feet (9.1 m) from the fueling source and site before starting the engine. Do not smoke. Keep sparks and open flames away from the area while adding fuel or operating the unit.
- Never start or run the unit inside a closed room or building. Breathing exhaust fumes can kill. Operate this unit only in a well ventilated area outdoors.
- Keep bystanders, especially children and pets, at least 50 ft (15 m) away.
- Wear safety glasses or goggles that are marked as meeting ANSI Z87.1 standards, and ear/hearing protection when operating this unit. Wear a face or dust mask if the operation is dusty. Wear a hard hat.
- Wear heavy, long pants, boots, gloves and a long sleeve shirt. Do not wear loose clothing, jewelry, short pants, sandals or go barefoot. Secure hair above shoulder level.
- Use the unit only in daylight or good artificial light.
- Use the right tool. Only use this tool for the purpose intended.
- Always stop the engine/motor when operation is delayed or when walking from one location to another.
- Use only genuine factory replacement parts and accessories for this unit. These are available from your authorized service dealer. Use of any unauthorized parts or accessories could lead to serious injury to the user or damage to the unit, and void your warranty.
KICKBACK SAFETY PRECAUTIONS

WARNING: Kickback may occur when the nose or tip of the guide bar touches an object, or when the wood closes in and pinches the saw chain in the cut. Tip contact in some cases may cause a lightning-fast reverse action, kicking the guide bar rapidly back towards the operator. Pinching the saw chain along the top of the guide bar may push the guide bar rapidly back towards the operator. Either of these reactions may cause you to lose control of the saw, which could result in serious injury to the user.
Do not rely exclusively upon the safety devices built into your saw. As a pole saw user, you should take several steps to keep your cutting jobs free from accident or injury.
- With a basic understanding of kickback, you can reduce or eliminate the element of surprise. Sudden surprise contributes to accidents.
- Grip saw firmly. Hold the pole saw firmly with both hands when the motor is running. Keep a good firm grip on the saw with both hands, the right hand on the rear handle, and the left hand on the front handle.
- Do not let the nose of the guide bar contact a log, branch, ground or other obstruction.
-
Always cut with the engine running at full speed. Fully squeeze the throttle trigger and maintain a steady cutting speed.
-
Do not over reach.
- Follow the manufacturer's sharpening and maintenance instructions for the saw chain.
- Use only replacement bars and chains specified by the manufacturer or the equivalent.
OTHER SAFETY PRECAUTIONS
- DO NOT operate a pole saw with one hand! Serious injury to the operator, helpers, or bystanders may result from one-handed operation. A pole saw is intended for two-handed use.
- Do not operate a pole saw if you are fatigued.
- Do not wear loose clothing or jewelry, as they can get caught in moving parts. Non-skid footwear is recommended when working outdoors. Wear protective hair covering to contain long hair.
- Use safety glasses, safety footwear, snug fitting clothing, protective gloves, and protective hearing and head gear.
- Use caution when handling fuel. Move the pole saw at least 10 feet (3 m) from the fueling point before starting the engine.
- Do not allow other persons to be near the pole saw when starting or cutting with the pole saw. Keep bystanders and animals out of the work area.
- Keep the work area clean. Cluttered areas invite injuries. Do not start cutting until you have a clear work area, secure footing, and a planned retreat path from the falling branches.
- Stay Alert. Watch what you are doing. Use common sense. Do not operate the pole saw when you are tired. Keep all parts of your body away from the saw chain when the motor is operating. Before you start the saw, make sure the saw chain is not contacting anything.
- Disconnect the pole saw when not in use, before servicing, and when changing accessories and attachments such as saw chain and guard.
- Check damaged parts. Before further use of the pole saw, a guard or other part that is damaged should be carefully checked to determine that it will operate properly and perform its intended function. Check for alignment of moving parts, binding of moving parts, breakage of parts, mounting, and any other conditions that may affect its operation. A guard or other part that is damaged should be properly repaired or replaced by an authorized service center, unless otherwise indicated in this instruction manual.
- Use extreme caution when cutting small sized brush and sapling, as slender material may catch the saw chain and be whipped toward you or pull you off balance. Do not operate a pole saw in a tree unless you are specifically trained to do so. When cutting a limb that is under tension, be alert for spring back so that you will not be struck when the tension in the wood fibers is released. Do not expose the pole saw to rain. Do not use the pole saw in damp or wet locations. Do not use the pole saw in the presence of flammable liquids or gases.
- All pole saw service, other than the items listed in the user manual safety and maintenance instructions, should be performed by competent pole saw personnel. Do not attempt to repair it yourself; there are no user serviceable parts inside.
- When not in use, pole saws should be stored out of the reach of children, in a dry, high or locked-up place. When storing saw, use a scabbard or carrying case.
- The pole saw will do a better and safer job when used at the rate for which it was intended.
- Use the right tool. Cut wood only. Do not use the pole saw for purposes for which it was not intended. For example, do not use the pole saw for cutting plastic, masonry, or non-building materials.
- Use devices, such as low-kickback chain, guide bar nose guards and special guide bars, which reduce the risks associated with kickback.
- There are no other replacement components for achieving kickback protection in accordance with CSA Z62.3.
- Do not operate a pole saw that is damaged, improperly adjusted, or not completely and securely assembled. Be sure that the saw chain stops moving when the trigger is released.
- Do not attempt operations beyond your capacity or experience.
- Never remove, modify or make inoperative any safety device furnished with your unit.
-
This saw is classified by CSA as a Class 2C saw. It is intended for infrequent use by homeowner's, cottagers and campers, and for such general applications such as clearing, pruning, cutting firewood, etc. It is not intended for prolonged use. If the intended use involves prolonged periods of operation, this may cause circulatory problems in the user's hands due to vibration. It may be appropriate to use a saw having an anti-vibration feature.
-
Safety clothing required by your safety organizations, government regulations, or your employer should be used; otherwise, snug fitting clothing, safety footwear, and hand and ear protection should be worn.
Low-kickback saw chain is chain that has met the kickback performance requirements of ANSI B175.1- 1991 and is in accordance with CSA Z62.3. Do not use other replacement chain unless it has met these requirements for your specific model. - Do not use any other cutting attachment or accessories. Use only original equipment manufacturer replacement parts and accessories, which are designed specifically to enhance the performance and maximize the safe operation of our products. Failure to do so may cause poor performance and possible injury. Use only the chain and bar supplied with this product. Do not use any other cutting attachment. Use of such attachments will void your factory warranty and could result in serious bodily injury.
- Never touch the chain or attempt to service the saw while the engine is running. Make sure all moving parts have stopped. Allow the pole saw to cool, as the chain can be hot.
- Check the bar and chain at frequent intervals for proper adjustment. Make sure the bar and chain are properly tightened and sharpened. Visually inspect for damage. Repair any damage before restarting or operating the pole saw.
- Do not cut near electrical cables or power lines.
- Do not use the chain saw to fell a tree. Use a standard chain saw for this application.
MAINTENANCE AND STORAGE
- Allow the unit to cool before storing or transporting. Be sure to secure the unit while transporting.
- Store the unit in a locked up and dry or high and dry place to prevent unauthorized use or damage, out of the reach of children.
- Never douse or squirt the unit with water or any other liquid. Keep handles dry, clean and free from debris. Clean after each use.
- Keep these instructions. Refer to them often and use them to instruct other users. If you loan someone this unit, also loan them these instructions.
- Only qualified personnel should perform any repairs or maintenance procedures that are not described in this manual.
SAVE THESE INSTRUCTIONS
SAFETY AND INTERNATIONAL SYMBOLS
This operator's manual describes safety and international symbols and pictographs that may appear on this product. Read the operator's manual for complete safety, assembly, operating and maintenance and repair information.
SYMBOL

MEANING
- SAFETY ALERT SYMBOL
Indicates danger, warning, or caution. May be used in conjunction with other symbols or pictographs.
SYMBOL
MEANING
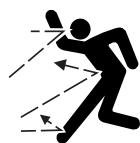
- THROWN OBJECTS CAN CAUSE SEVERE INJURY
WARNING: Do not operate unit without proper attachments and guards in place.

WARNING - READ OPERATOR'S MANUAL
Read the Operator's Manual(s) and follow all warnings and safety instructions. Failure to do so can result in serious injury to the operator and/or bystanders.


GUIDE BAR WARNING
Contact of the guide bar tip with any object should be avoided. Tip contact may cause the guide bar to move suddenly upward and backward, which may cause serious injury.
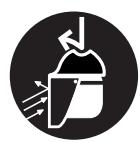
- WEAR HEAD, EYE AND HEARING PROTECTION
WARNING: Thrown objects and loud noise can cause severe eye injury and hearing loss. Wear eye protection meeting ANSI Z87.1- 1989 standards and ear protection when operating this unit. Falling objects can cause severe head injury. Wear head protection when operating this unit.Use a full face shield when needed.
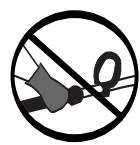
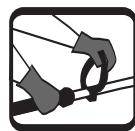
USE BOTH HANDS
Always use both hands while operating the chain saw. Never use only one hand to operate the saw.
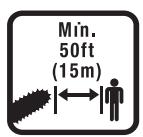
- KEEP BYSTANDERS AWAY
WARNING: Keep all bystanders, especially children and pets, at least 50 feet (15 m) from the operating area.

- HOT SURFACE WARNING
Do not touch a hot muffler or cylinder. You may get burned. These parts get extremely hot from operation. When turned off they remain hot for a short time.
The following TrimmerPlus Add-Ons are also available for your unit:
Cultivator .GC720r
Edger .LE720r
Hedge Trimmer HS720r
Straight Shaft Trimmer SS725r
Turbo Blower . TB720r
Pole Saw TBPS

WARNING: Prior to operation, read and understand the operator's manual for unit to be used with this add-on.
NOTE: To make installing or removing the add-on easier, place the unit on the ground or on a work bench.
NOTE: The extension pole with this unit is to give the user added reach. Follow the directions for removing the add-on or installing the add on to remove or install the extension pole.
Removing the add-on
- Turn the knob counterclockwise to loosen (Fig. 1).
- Press and hold the release button (Fig. 1).
- While firmly holding the upper shaft housing, pull the add-on out of the coupler (Fig. 2).
Installing the add-on

WARNING: To avoid serious personal injury and damage to the unit, shut the unit off before removing or installing add-ons.
- Remove the hanger from the top of the shaft housing.
- Turn knob counterclockwise to loosen (Fig. 1).
- While firmly holding the add-on, push it straight into the coupler (Fig. 2).
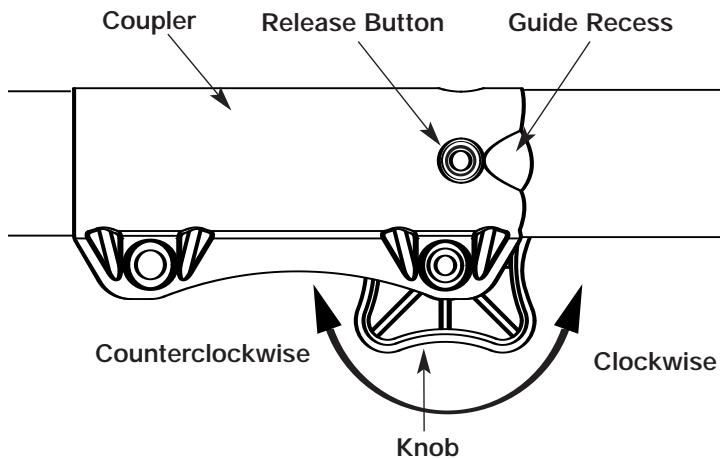
Fig. 1
NOTE: Aligning the release button with the guide recess will help installation (Fig. 1).
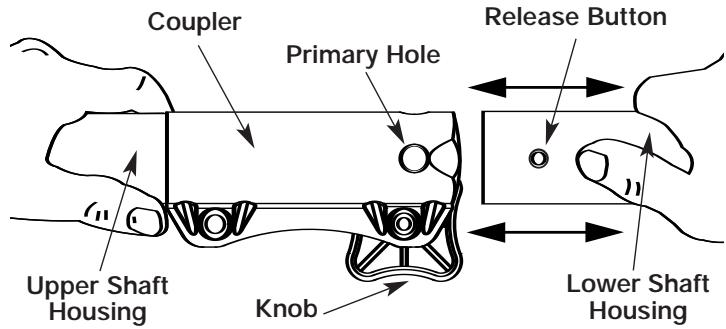
Fig. 2
- Turn the knob clockwise to tighten (Fig. 3).
CAUTION: Lock the release button in the primary hole (Fig. 2) and securely tighten the knob before operating this unit.
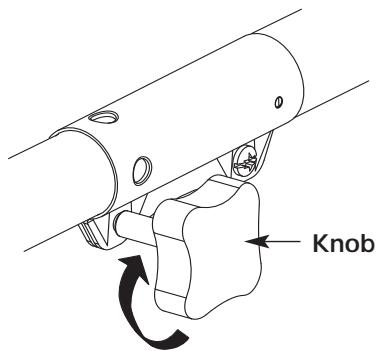
Fig. 3

CAUTION: The add-ons with the coupler system is to be used in the primary hole only. Using the wrong hole could lead to personal injury or damage to the unit.
The add-on should be installed with the release button in the primary hole.
Check Flex Shaft Engagement Prior to Using
- Start the unit.
- Briefly engage and release the trigger.
- Check that add-on is operating.
- If the add-on is not operating, remove add-on and repeat steps for installing the add-on.
- Recheck operation of add-on attachment.
OPERATING PRECAUTIONS

WARNING: Dress properly to reduce the risk of injury when operating this unit. Do not wear loose clothing or jewelry. Wear eye and ear/hearing protection. Wear heavy long pants, boots and gloves. Wear a hard hat. Use a full face shield when needed.
- Keep bystanders 50 feet (15 meters) away when operating the saw.
- Do not use the pole saw to cut down trees. Use a chain saw without a pole attachment.
- Grip pole saw securely - one hand on the pole, the other on the handle.
- Keep finger off the trigger until ready to make cut.
- Before starting the pole saw, make sure the chain is not touching anything.
- Keep all parts of your body away from the chain when the saw is running.
- Do not force the pole saw while cutting. Apply light pressure. It will do the job better and safer at the rate for which it was intended.
- When cutting limbs or branches that are under tension, use extreme caution. Be alert for wood springing back. When wood tension is released, the limb could spring back and strike operator causing severe injury or death.
-
When carrying pole saw from one place to another:
-
hold pole at balance point
-
keep guide bar and chain to the rear
-
Do not cut small brush and saplings with the pole saw. Use a chain saw only, with extreme care. Slender matter may catch in the chain and be whipped toward you. This could also pull you off balance.
- Never stand directly under the limb you are trimming. Always position yourself out of the path of falling debris (Fig. 4).
- Never stand on a ladder or other type of unstable support while using the pole saw.
- Always use both hands to operate pole saw. Keep a firm, steady pressure on the pole saw while cutting, but do not try to force the saw through the wood.
- Do not use the pole saw to cut limbs larger than 4'' (10 cm) in diameter.
- Keep other persons away from cutting end of pole saw and at a safe distance from work area. (Fig.5).
- Do not use the pole saw near cable, electric power or telephone lines. Maintain a minimum clearance of 10 feet from all power lines (Fig. 6).
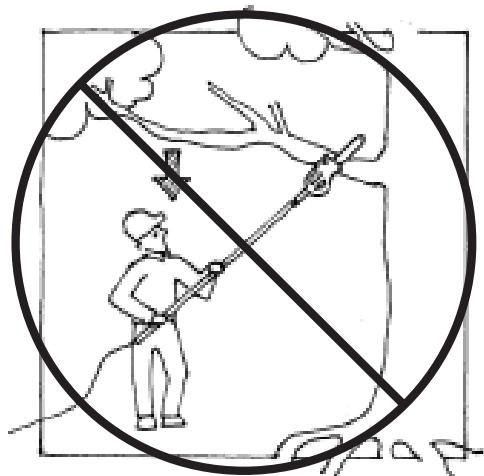
Fig. 4
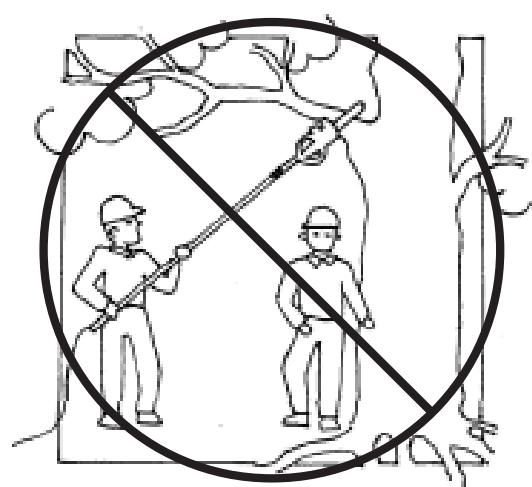
Fig. 5
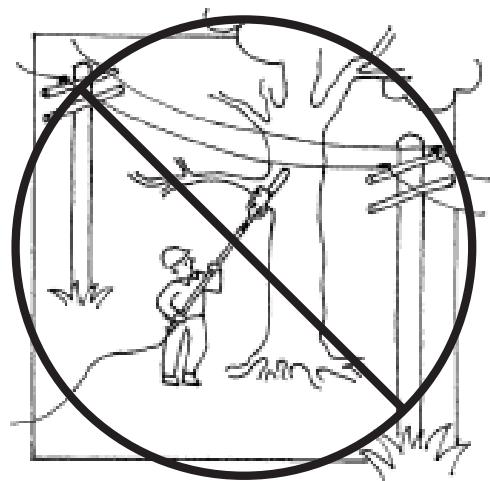
Fig. 6
OPERATING INSTRUCTIONS
OPERATING TIPS
| WARNING: Avoid kickback. Kickback can result in sever in jury or death. See Kickback, page 9, to avoid risk of kickback. |
| ! | WARNING: Do not operate Pole Saw while in a tree, on a ladder or any other unstable work surface, or in any awkward position. You may lose control of Pole Saw causing servere injury. |
| WARNING: Do not extend arms above shoulders when using Pole Saw. |
| WARNING: Seek professional help if facing conditions beyond your ability. |
Avoid kickback. Kickback can result in severe injury or death.
Do not operate the pole saw while in a tree, on a ladder or any other unstable work surface, or in any awkward position. You may lose control of the pole saw causing severe injury.
Do not extend your arms above shoulders when using the pole saw. Seek professional help if you are facing conditions beyond your ability.
Trimming a tree is the process of cutting limbs from a living tree. Make sure your footing is firm. Keep your feet apart. Divide your weight evenly on both feet.
- When operating the pole saw, rest the foot (A) of the pole saw against the tree limb that is being cut. (Fig. 7)
- Make the frist cut one (1) foot from where the final cut will be. (Fig. 8)
- Cut the outside of the branch collar to avoid damage to the tree. (Fig. 9)
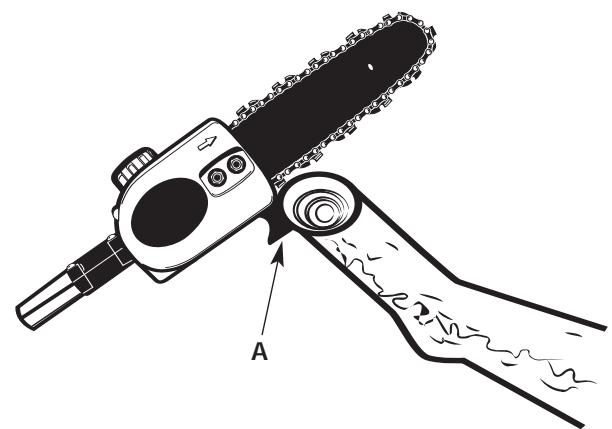
Fig. 7
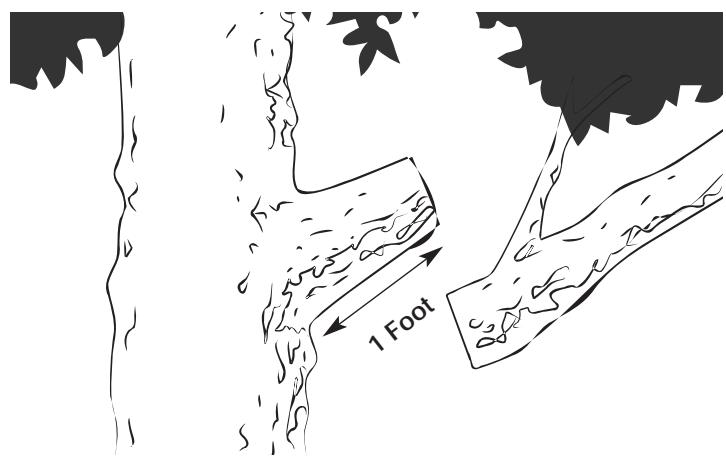
Fig. 8
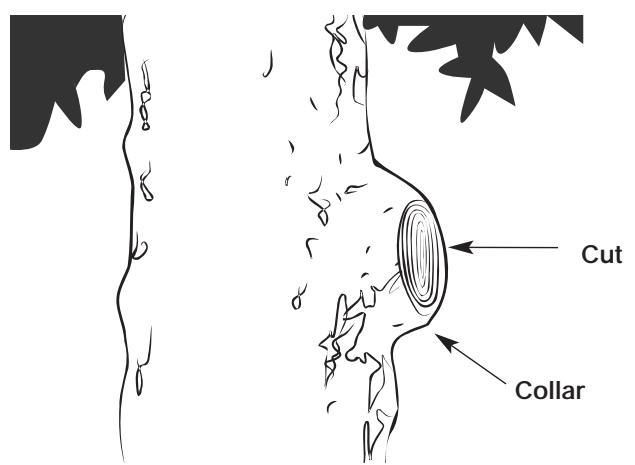
Fig. 9
MAINTENANCE AND REPAIR INSTRUCTIONS
SAW CHAIN REPLACEMENT/INSTALLATION

WARNING: Whenever handling the saw chain, always wear work gloves for protection against sharp cutting edges.
- Remove the bar retaining nuts and screw. Then take off the sprocket cover (Fig. 10a).
- Using a straight screwdriver turn tension adjustment screw counterclockwise (Fig. 10b) as far as it will go or to the end of its travel, take off the chain then remove the bar.
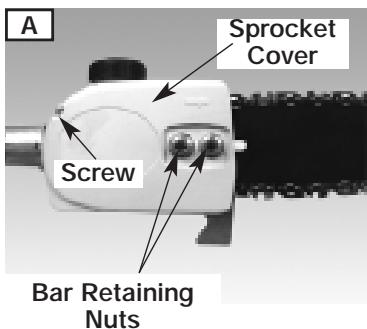
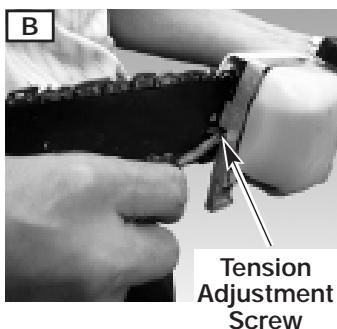
Fig. 10
- Prepare new chain or bar.
- Loop the saw chain over the drive sprocket with the cutting edges of the chain pointing in the direction of rotation (Fig. 11).
- Adjust the tension adjustment screw (Fig. 10b) to allow insertion of the bar (Fig. 12). Make sure the chain follows the slot in the guide bar and adjust the tension adjustment screw to make the chain tighten.
- Install the sprocket cover and tighten bar retaining nuts and screw (Fig. 10a).
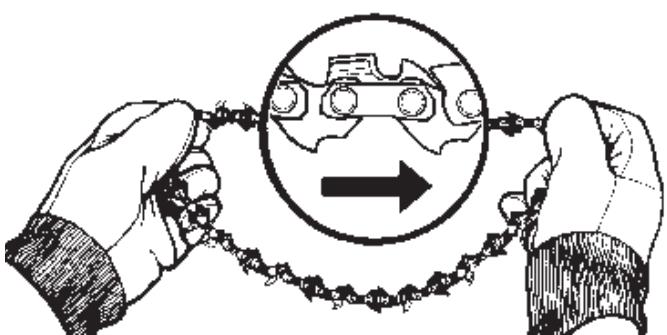
Fig. 10
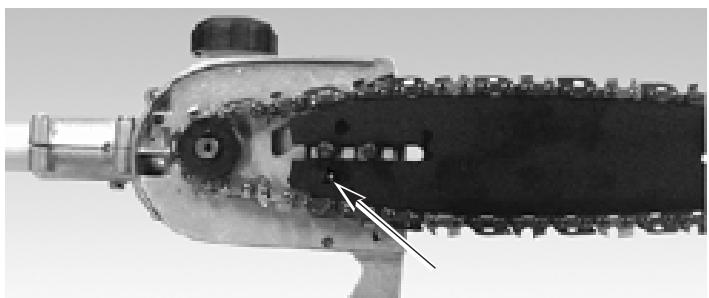
Fig. 11
SAW CHAIN TENSION ADJUSTMENT
Proper tension of the saw chain is extremely important and must be checked before starting, as well as during any cutting operation. Taking the time to make needed adjustments to the saw chain will result in improved cutting performance and prolonged chain life.
NOTE: A new chain and bar will need readjustment after as few as 5 cuts. This is normal during the break-in period, and the interval between future adjustments will lengthen quickly (Fig. 13).

CAUTION: If a chain is too loose or too tight, the bar, chain and saw bearings will wear more rapidly. Refer to Figure 14 for information concerning correct cold tension (A), correct warm tension (B), and a chain in need of adjustment (C).
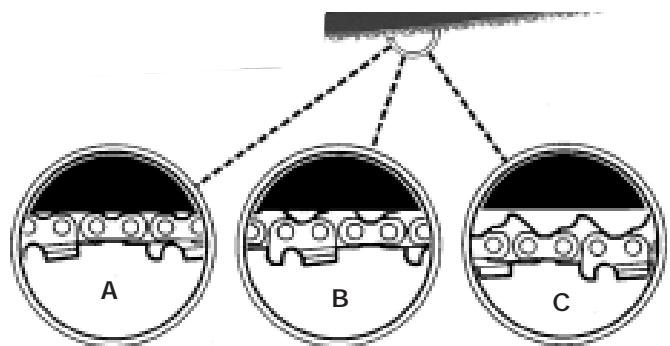
Fig. 13
To adjust the saw chain tension:
- Loosen the bar retaining nuts so they are hand tight (Fig. 8a).
- Holding the nose of the bar up, use the screwdriver or scrench (if provided in your unit's hardware pack) to turn the guide bar adjustment screw clockwise to tighten the chain (Fig. 8b). Turning the screw counterclockwise loosens the chain on the guide bar.
- While wearing heavy duty work gloves (after you've made the adjustment), move the saw chain back and forth on the guide bar to be sure the chain moves freely and is in proper mesh with the sprocket. Never move the chain with your bare hands.
NOTE: IF the chain is difficult to rotate or if it binds on the guide bar, there is too much tension applied and it must be adjusted. To decrease tension, turn the adjustment screw counterclockwise, slowly. Move the chain back and forth until it moves freely.
- Holding the nose in upper position, securely tighten the bar retaining nuts.
MAINTENANCE AND REPAIR INSTRUCTIONS
OILING THE CHAIN
The pole saw chain is self-lubricating. Oil is dispersed onto the chain as the unit is used. Keep an adequate amount of oil in the oil tank. Use the bar-chain oil provided in the hardware pack. Always use bar-chain and sprocket oil or similar chain saw oil.
GUIDE BAR MAINTENANCE

WARNING: Ensure that the unit is off and the spark plug is disconnected (gas powerheads) before performing any maintenance on your saw.
NOTE: Proper maintenance of the guide bar is essential to the performance of your pole saw. Proper guide bar maintenance will keep your saw in good working order.
Most guide bar problems can be prevented merely by keeping the chain saw well maintained.
Incorrect filing and non-uniform cutter and depth gauge settings cause most guide bar problems, primarily resulting in uneven bar wear. As the bar wears unevenly, the rails widen, which may cause chain clatter and difficulty in making straight cuts.
Insufficient guide bar lubrication and operating the saw with a chain that is too tight will contribute to rapid bar wear. Refer to Saw Chain Tension Adjustment.
To help minimize bar wear, the following guide bar maintenance is recommended:
Bar Wear
Turn guide bar frequently at regular intervals (for example, after 5 hours of use), to ensure even wear on top and bottom of bar.
Bar Grooves
Bar grooves (or rails which support and carry the chain) should be cleaned if the saw has been heavily used or if the saw chain appears dirty. Rails should always be cleaned every time the saw chain is removed.
To clean guide bar rails:
- Remove sprocket cover, bar and chain. Refer to Saw Chain Replacement / Installation.
- Using a screwdriver, putty knife, wire brush or other similar instrument, clear residue from the rails on the guide bar (Fig. 14).
This will keep the oil passages open to provide proper lubrication to the bar and chain.
3. Reinstall the bar, chain and bar bolt retaining nuts. Refer to Saw Chain Replacement / Installation.
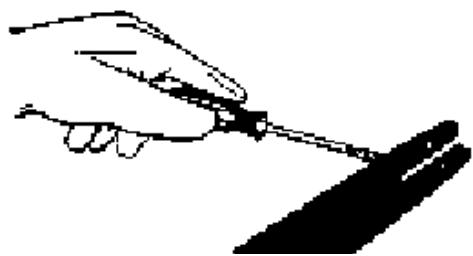
Fig. 14
Oil Passages
Oil passages at bar pad should be cleaned to insure proper lubrication of the bar and chain during operation. This can be done using a soft wire small enough to insert into the oil discharge hole.
MAINTENANCE AND REPAIR INSTRUCTIONS
CHAIN MAINTENANCE

WARNING: Unless you have experience and specialized training for dealing with kickback (see Important Safety Instructions), always use a low-kickback saw chain, which significantly reduces the danger of kickback. Low-kickback saw chain does not completely eliminate kickback. A low-kickback or "safety chain," should never be regarded as total protection against injury.
A low-kickback saw chain should always be used in conjunction with other kickback protection devices such as the hand guard, which is furnished with your unit.
Always use a replacement saw chain designed as "low-kickback" or a saw chain which meets the low-kickback performance.
A standard saw chain (a chain which does not have the kickback reducing guard links) should only be used by an experienced professional chain saw operator.
Low-Kickback Saw Chain
A low-kickback saw chain is a chain which has met the kickback performance requirements of ANSI B175.1. Do not use other replacement chain unless it has met these requirements for your specific model.
By keeping the saw chain in good working condition and correctly serviced as recommended in this manual, you will be able to maintain the safety system of your chain saw over the life of the product.
WARNING: Never remove, modify or make inoperative any safety device furnished with your unit. The low kick back saw chain is a major safety feature provided for your protection.

WARNING: Ensure that the unit is off and the spark plug is disconnected (for gas powerheads) when working on the saw chain. Wear heavy duty gloves too.
Chain Tension
Check the chain tension frequently and adjust as often as necessary to keep the chain snug on the bar, but loose enough to be pulled around by hand. Refer to Saw Chain Tension Adjustment.
Breaking in a New Saw Chain
A new chain and bar will need readjustment after as few as 5 cuts. This is normal during the break-in period, and the interval between future adjustments will begin to lengthen quickly.
Over a period of time, however, the moving parts of the saw chain will become worn, resulting in what is called chain stretch. This is normal. When it is no longer possible to obtain correct chain tension adjustment, a link will have to be removed to shorten the chain. See your TrimmerPlus Authorized Service Center to have this repair performed.

WARNING: Never use a loop of chain that has more than 3 links removed from it. This could damage the sprocket.
SPECIFICATIONS
POLE SAW ADD-ON
Approximate Operating Weight of Attachment 3.3 lbs. (1.5 kg)
Drive Shaft Length. 26" (66 cm)
Cutting Width 8" (200 mm)
MANUFACTURER'S LIMITED WARRANTY FOR:
TrimmerPlus®
The limited warranty set forth below is given by TrimmerPlus with respect to new merchandise purchased and used in the United States, its possessions and territories.
TrimmerPlus warrants this product against defects in material and workmanship for a period of two (2) years commencing on the date of original purchase and will, at its option, repair or replace, free of charge, any part found to be defective in material or workmanship. This limited warranty shall only apply if this product has been operated and maintained in accordance with the Operator's Manual furnished with the product, and has not been subject to misuse, abuse, commercial use, neglect, accident, improper maintenance, alteration, vandalism, theft, fire, water or damage because of other peril or natural disaster. Damage resulting from the installation or use of any accessory or attachment not approved by TrimmerPlus for use with the product(s) covered by this manual will void your warranty as to any resulting damage. This warranty is limited to ninety (90) days from the date of original retail purchase for any TrimmerPlus product that is used for rental or commercial purposes, or any other income-producing purpose.
HOW TO OBTAIN SERVICE: Warranty service is available, WITH PROOF OF PURCHASE THROUGH YOUR LOCAL AUTHORIZED SERVICE DEALER. To locate the dealer in your area, visit our website at www.TrimmerPlus.com, check for a listing in the Yellow Pages, call 1-800-345-8746 or write to P.O. Box 361131, Cleveland, OH 44136-0019.
This limited warranty does not provide coverage in the following cases:
A. Tune-ups - Spark Plugs, Carburetor Adjustments, Filters
B. Wear items - Bump Knobs, Outer Spools, Cutting Line, Inner Reels, Starter Pulley, Starter Ropes, Drive Belts
C. TrimmerPlus does not extend any warranty for products sold or exported outside of the United States of America, its possessions and territories, except those sold through TrimmerPlus's authorized channels of export distribution.
TrimmerPlus reserves the right to change or improve the design of any TrimmerPlus Product without assuming any obligation to modify any product previously manufactured.
No implied warranty, including any implied warranty of merchantability or fitness for a particular purpose, applies after the applicable period of express written warranty above as to the parts as identified. No other express warranty or guaranty, whether written or oral, except as mentioned above, given by any person or entity, including a dealer or retailer, with respect to any product shall bind TrimmerPlus During the period of the Warranty, the exclusive remedy is repair or replacement of the product as set forth above. (Some states do not allow limitations on how long an implied warranty lasts, so the above limitation may not apply to you.)
The provisions as set forth in this Warranty provide the sole and exclusive remedy arising from the sales. TrimmerPlus shall not be liable for incidental or consequential loss or damages including, without limitation, expenses incurred for substitute or replacement lawn care services, for transportation or for related expenses, or for rental expenses to temporarily replace a warranted product. (Some states do not allow limitations on how long an implied warranty lasts, so the above limitation may not apply to you.)
In no event shall recovery of any kind be greater than the amount of the purchase price of the product sold. Alteration of the safety features of the product shall void this Warranty. You assume the risk and liability for loss, damage, or injury to you and your property and/or to others and their property arising out of the use or misuse or inability to use the product.
This limited warranty shall not extend to anyone other than the original purchaser, original lessee or the person for whom it was purchased as a gift.
How State Law Relates to this Warranty: This warranty gives you specific legal rights, and you may also have other rights which vary from state to state.
To locate your nearest service dealer dial 1-800-345-8746.
MTD Southwest Inc
PO Box 361131
Cleveland, OH 44136-0019
TrimmerPlus
REPLACEMENT PARTS - MODEL PS720r
POLE SAW ADD-ON
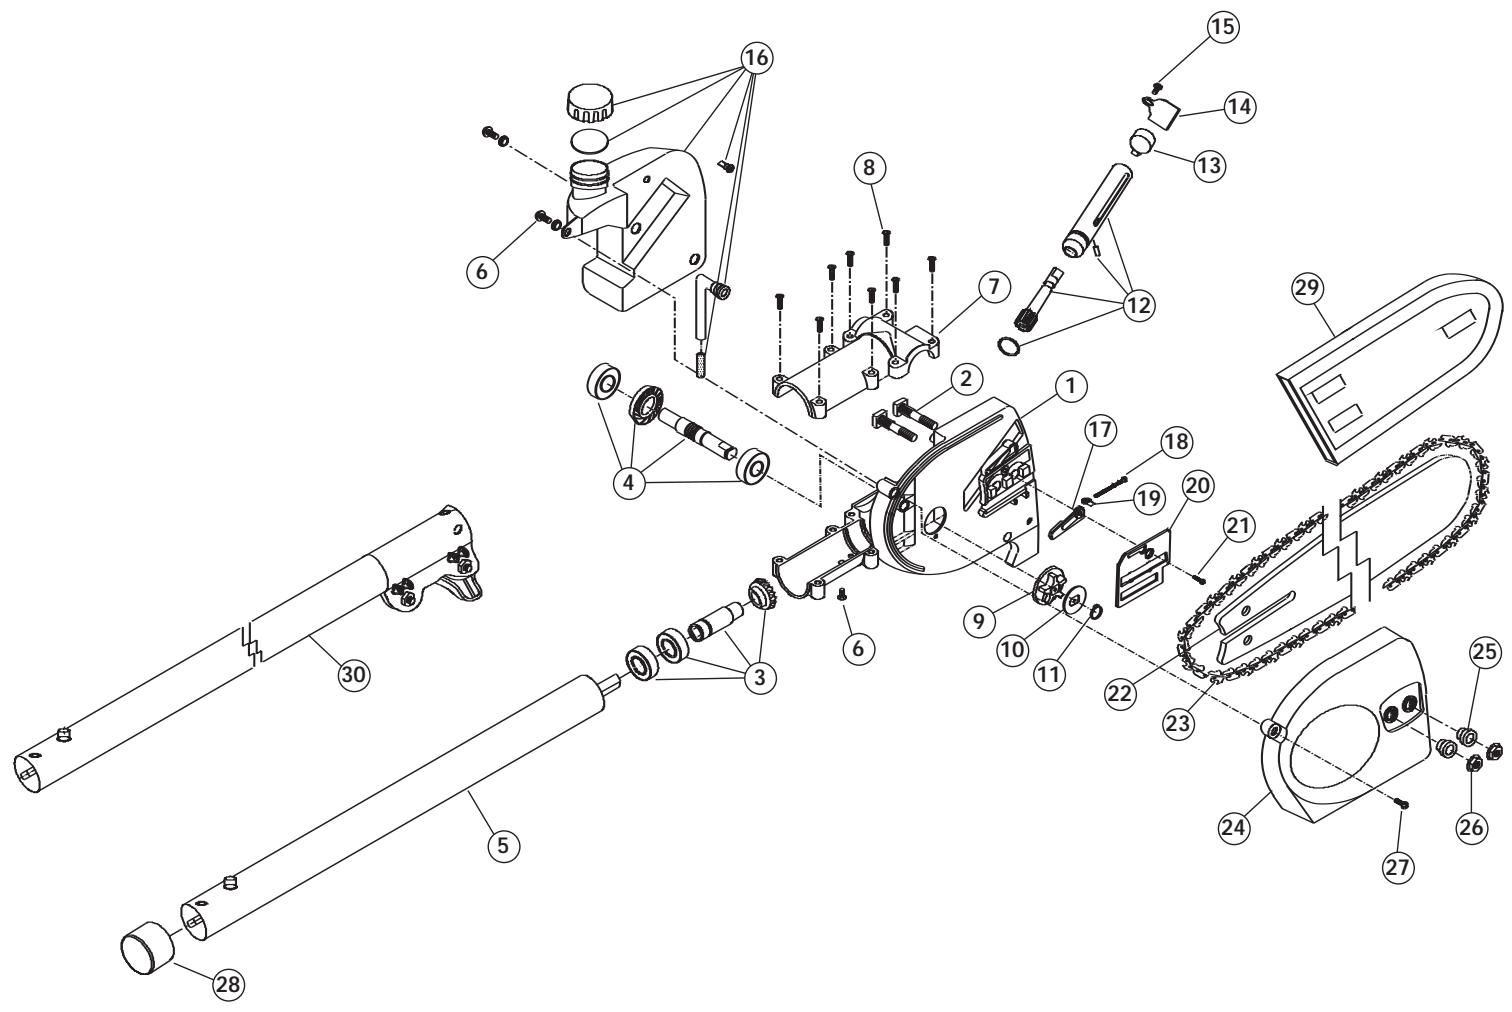
Item Part No.
1 753-04621 Gearbox
2 753-04622 Screw
3 753-04623 Shaft Assembly
4 753-04624 Spindle Assembly
5 753-04625 Connection Stick Assembly
6 753-04626 Screw
7 753-04627 Case Cover
8 753-04628 Screw
9 753-04629 Sprocket
10 753-04630 Wa
11 753-04631 C Ring
12 753-04632 Oil Pump Assembly
13 753-04633 Rubber Cork
14 753-04634 Fixed Plate
15 753-04635 Screw
Item Part No.
16 753-04636 Oiler Assembly
17 753-04637 Anti-Spillage Pad
18 753-04638 Regulation Screw
19 753-04639 Regulation Cap
20 753-04640 Adjustable Plate
21 753-04641 Screw
22 753-04642 Bar 8''
23 753-04643 Saw Chain
Guard
25 753-04644 Fixed Ring
26 753-04645 Nut
27 753-04646 Screw
Covering
Guard
30 753-04648 Inner Pipe Assembly