25P - Electric lawn mower MTD - Free user manual and instructions
Find the device manual for free 25P MTD in PDF.


User questions about 25P MTD
0 question about this device. Answer the ones you know or ask your own.
Ask a new question about this device
Download the instructions for your Electric lawn mower in PDF format for free! Find your manual 25P - MTD and take your electronic device back in hand. On this page are published all the documents necessary for the use of your device. 25P by MTD.
USER MANUAL 25P MTD
Maintenance Instructions
Pages 10-12
Rules for Safe Operation
Pages 2-6
Specifications
Page 12
Assembly Instructions
Page 7
Parts List
Page 13
Operating Instructions
Page 8-9
Notes
Page 14
Manufacturer's Limited Warranty
Page 15
WARRANTY STATEMENT
TWO YEAR LIMITED WARRANTY ON YARD MACHINES GRASS TRIMMER
For two years from the date of purchase, when this grass trimmer is used and maintained according to the operator's manual, Yard Machines will repair any defect in material for workmanship free of charge.
If this grass trimmer is used for commercial or rental purposes, this warranty applies for only 90 days from the date of purchase.
WARRANTY SERVICE IS AVAILABLE BY RETURNING THIS GRASS TRIMMER TO THE NEAREST MTD REPAIR DEALER.
This warranty gives you specific legal rights, and you may also have other rights which vary from state to state.
The purpose of safety symbols is to attract your attention to possible dangers. The safety symbols, and their explanations, deserve your careful attention and understanding. The safety warnings do not by themselves eliminate any danger. The instructions or warnings they give are not substitutes for proper accident prevention measures.
SYMBOL MEANING

SAFETY ALERT:
Indicates danger, warning or
caution. Attention is required in order to avoid serious personal injury. May be used in conjunction with other symbols or pictographs.
NOTE: Advises you of information or instructions vital to the operation or maintenance of the equipment.
Read the Operator's Manual(s) and follow all warnings and safety instructions.
Failure to do so can result in serious injury to the operator and/or bystanders.
FOR QUESTIONS, CALL 1-800-668-1238
SYMBOL MEANING

DANGER:
Failure to obey a safety warning will
result in serious injury to yourself or to others. Always follow the safety precautions to reduce the risk of fire, electric shock and personal injury.

WARNING:
Failure to obey a safety warning can self and others.
Always follow the safety precautions to reduce the risk of fire, electric shock and personal injury.

CAUTION:
Failure to obey a safety warning may
result in property damage or personal injury to yourself or to others. Always follow the safety precautions to reduce the risk of fire, electric shock and personal injury.
- IMPORTANT SAFETY INSTRUCTIONS
READ ALL INSTRUCTIONS BEFORE OPERATING
- Read the instructions carefully. Be familiar with the controls and proper use of the unit.

WARNING: When using the unit, safety rules.
Please read these instructions before operating the unit in order to ensure the safety of the operator and any bystanders. Please keep these instructions for later use.
- Do not operate this unit when tired, ill or under the influence of alcohol, drugs or medication.
- Children must not operate the unit. Teens must be accompanied and guided by an adult.
- All guards and safety attachments must be installed properly before operating the unit.
-
Inspect the unit before use. Replace damaged parts. Make sure all fasteners are in place and secure. Replace parts that are cracked, chipped or damaged in any way. Do not operate the unit with loose or damaged parts.
-
Carefully inspect the area before starting the unit. Remove all debris and hard or sharp objects such as glass, wire, etc.
- Clear the area of children, bystanders, and pets. At a minimum, keep all children, bystanders, and pets outside a 50 feet (15m.) radius; there still may be a risk to bystanders from thrown objects. Bystanders should be encouraged to wear eye protection. If you are approached, stop the unit immediately.
PLEASE READ - SAVE THESE INSTRUCTIONS
When using an electrical appliance, basic precautions should always be followed to assure maximum safety and optimum performance. Read this manual before assembling and operating this appliance. Failure to comply with instructions may result in electrical shock, burns, fire, or personal injury.
WARNING
1-1. TO REDUCE THE RISK OF ELECTRIC SHOCK, BURNS, FIRE OR PERSONAL INJURY:
- FOLLOW ALL SAFETY INSTRUCTIONS listed in this manual before/during operation of this trimmer.
- TO REDUCE THE RISK OF ELECTRIC SHOCK this equipment has a polarized plug (one blade is wider than the other). This plug will fit in a polarized extension cord only one way. If the plug does not fit fully in the extension cord, reverse the plug. Do not change the plug in any way.
- INSPECT UNIT FOR DAMAGE to the housing or plug. Keep all fasteners tight. Do not use if the trigger does not turn the unit off properly. Never use unit if cord or plug has been damaged, the motor or unit itself is not working as it should or has been dropped, damaged, left outdoors or dropped in water. Never operate with any air opening blocked. Keep air openings free of debris that may reduce air flow. Replace damaged parts that are chipped, cracked or damaged in any way. Keep cutter knife sharp.
- DOUBLE INSULATED to help protect against electric shock. Double insulation construction consists of 2 separate "layers" of electric insulation. Appliances built with this insulation system are not intended to be grounded. As a result, the extension cord used with your unit can be plugged into any conventional 120 volt electrical outlet. Normal safety precautions must be observed when operating an electrical appliance. The double insulation system is only for added protection against injury resulting from a possible internal electrical insulation failure.
- EXTENSION CORD - Use only with an extension cord intended for outdoor use. Match wire gauge to the cord length. See table below. A 2-wire cord without a ground connection may be used since this appliance is double insulated. If in doubt of proper wire size, use the next heavier gauge. Please note that the smaller the gauge number, the heavier the cord.
Table 1
| MINIMUM WIRE GAUGE RECOMMENDATIONS | ||
| VOLTS | EXTENSION CORD LENGTH | WIRE SIZE REQUIRED |
| 120 | 25 feet / 7.5m | 18 A.W.G.* |
| 50 feet / 15m | 16 A.W.G.* | |
| 100 feet / 30m | 16 A.W.G.* | |
| *American Wire Gauge | ||
(1). When using the appliance, an extension cord of adequate size must be used for safety and to prevent loss of power and overheating.
(2). The extension cord must be specifically intended for outdoor use and marked "SJ" or "SJT" and with the suffix "WA". In Canada, the extension cord must be marked "SFTW".
(3). Inspect extension power cord for loose or exposed wires and damaged insulation. If damaged, replace before using appliance.
DO NOT ABUSE CORD - Never carry appliance by cord or pull cord to disconnect from outlet. Keep cord clear of operator and obstacles at all times. Do not expose cord to heated surfaces, oil or water. Do not pull cord around sharp edges, corners or close door on cord.
- NO SERVICEABLE PARTS INSIDE - Your double insulated appliance has no serviceable parts inside. Do not attempt to repair it yourself. For service information, contact the Yard Machines Product Service Department.
- RISK OF EYE INJURY - Always wear goggles or other suitable eye protection when operating your trimmer. Edging increases the risk of injury caused by flying debris. Always keep bystanders at a safe distance.
- KEEP HANDS AND FEET AWAY from rotating line. Do not operate without debris shield attached.
- DRESS PROPERLY - Always wear long pants, shoes and gloves. Do not wear loose clothing, jewelry, short pants, sandals or go barefoot.
- KEEP AREA CLEAR - Keep everyone, especially children and pets away from the area of operation 50 feet (15m). Turn off unit immediately if you are approached. Never allow children to operate the appliance to be used as a toy or to run unattended at any time.
- AVOID A DANGEROUS ENVIRONMENT - Do not use in the presence of flammable liquids or gases, smoking or burning materials to avoid creating a fire or explosion. Never operate the trimmer in wet or damp conditions or around swimming pools, hot tub, etc. Do not use in rain. Do not handle plug, cord or appliance with wet hands.
- USE APPLIANCE CORRECTLY - Use this appliance only for its intended use as described in this manual. DO NOT SWEEP WITH TRIMMER - Sweeping refers to tilting stringhead to sweep away debris from walkways, etc. Your trimmer is a powerful tool and small stones or other such debris may be hurled 50 feet or more, causing injury or damage to nearby property such as automobiles, homes and windows. Inspect area before starting the appliance to remove debris and other objects that can cause damage during operation.
- DO NOT USE ACCESSORIES or attachments except as recommended and provided by Yard Machines. Do not use any type of wire or metal cutting line.
- DO NOT OVERREACH - Keep firm footing and balance at all times.
- AVOID UNINTENTIONAL STARTING - Do not carry plugged in trimmer with your finger on the switch.
- DISCONNECT trimmer from power supply when not in use and before servicing stringhead.
- STORE idle trimmer indoors. Appliance should be stored in a dry, high or locked up place - out of the reach of children.
- Don't grasp the exposed cutting blades or cutting edges when picking up or holding the appliance.
- Don't force appliance - it will do the job better and withth less likelihood of a risk of injury at the rate for which it was designed.
EXPLANATION OF NOTE, WARNING, and WARRANTY SYMBOL
- A NOTE is used to convey additional information, or highlight a particular explanation, or to expand a step instruction.
- A WARNING identifies a procedure which, if not undertaken or if improperly done, can result in a serious personal injury or damage to the unit and/or both.
- (WARRANTY SYMBOL) serves notice that unless instructions or procedures are followed, any damage will void the warranty and repairs will be at owner's expense. Service other than user maintenance should be performed by a Yard Machines Authorized Service Center. Damage or conditions caused by improper maintenance practices which render this product inoperable will void the manufacturer's warranty.
- FOR WARRANTY OR SERVICE contact the nearest Yard Machines Authorized Service Center by calling 800# on back cover.
SAVE THESE INSTRUCTIONS
SAFETY AND INTERNATIONAL SYMBOLS
This operator's manual describes safety and international symbols and pictographs that may appear on this product. Read the operator's manual for complete safety, assembly, operating and maintenance and repair information.
SYMBOL

MEANING
- SAFETY ALERT SYMBOL
Indicates danger, warning, or caution. May be used in conjunction with other symbols or pictographs.
SYMBOL
MEANING
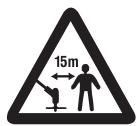
WARNING: Keep children, bystanders, and animals 50 feet (15 meters) away. If approached stop unit immediately.

- WARNING - READ OPERATOR'S MANUAL
Read the Operator's Manual(s) and follow all warnings and safety instructions. Failure to do so can result in serious injury to the operator and/or bystanders.

DANGER: Objects thrown up by machine.

- WEAR HEAD, EYE AND HEARING PROTECTION
WARNING: Thrown objects and loud noise can cause severe eye injury and hearing loss. Wear eye protection meeting ANSI Z87.1-1989 standards and ear protection when operating this unit. Falling objects can cause severe head injury. Wear head protection when operating this unit. Use a full face shield when needed.
ASSEMBLY INSTRUCTIONS
If you receive your unit assembled, check each step to insure your unit is properly assembled. Follow all safety information in the manual and on the unit.
ASSEMBLY
- Assemble three parts into unit. (Fig. 1)
- Take out assembly screw bolts, washers, nuts from parts pack and lock into the unit holes (the correspond location are as Fig. 2)
- First of all, put the nut in the hole, then support the nut with your finger and put plug the bolt and washer in from other side and tighter. (Fig. 3)
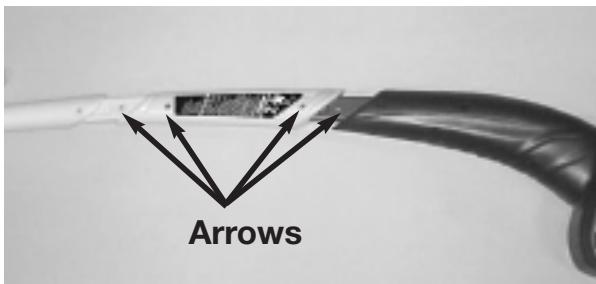
Fig. 1
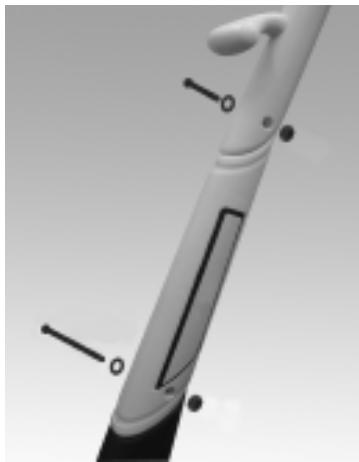
Fig. 2
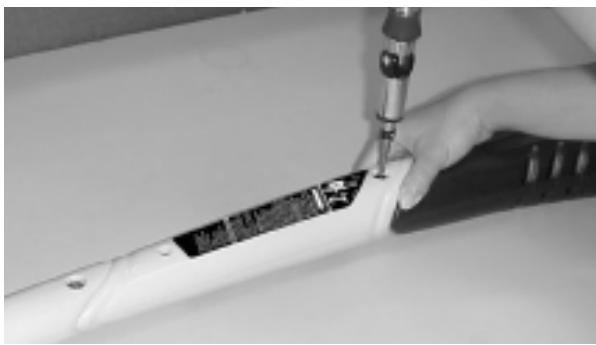
Fig. 3
DEBRIS SHIELD INSTALLATION
Assemble shield as shown (Fig. 4). Keep hands and fingers away from the sharp blade. Twist shield in direction of arrow to assemble.
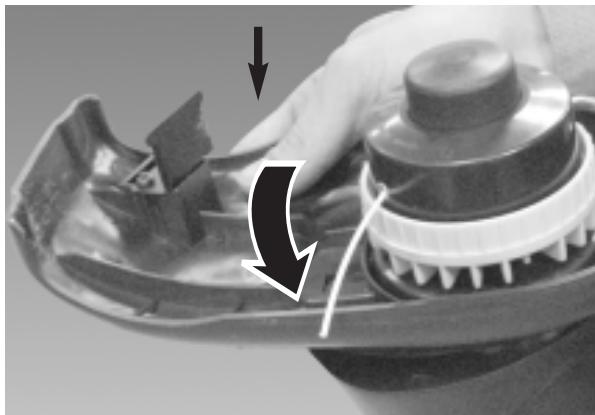
Fig. 4
OPERATING INSTRUCTIONS
CONNECT THE CORD
- Ensure the cord is NOT plugged into a receptacle before this procedure.
- Make a loop with 8'' - 10'' (20 - 25cm) of the end of the extension cord.
- Place the loop into the groove at the end of the rear handle and lock into place as shown in Fig. 5.
- Connect the extension cord to the plug on the trimmer.
- Plug the extension cord into a receptacle ONLY when you are ready to operate the trimmer.
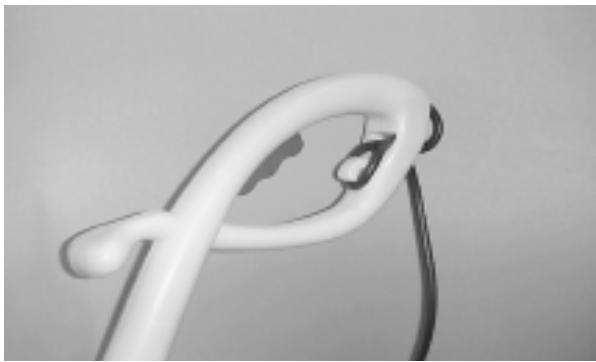
Fig. 5
STARTING
- When starting the string trimmer for the first time, check that the nylon lines touch or pass over the line-cutting blade. If they are not long enough, press the button and, at the same time, pull the nylon lines (Fig. 6).
- Connect the plug of the string-trimmer to the extension cord and attach this to the handle. (Fig. 5)
- Take a secure hold of the grass trimmer. Without letting the trimmer touch the grass, press the switch (A) on the upper handgrip (Fig. 7). Let the string trimmer run for a few seconds and "bump" the string head against the lawn. Nylon line will automatically release. The cut-off knife in the debris shield will trim off excess line.
- To switch off the string trimmer let go of the switch.

CAUTION:
so, to improve its operation on subsequent occasions, tap the spool button lightly on the ground while the trimmer is running. This will bring about the self-adjustment of the nylon line. (Fig. 8)
These operations should be repeated a few times before starting work to make sure that everything is functioning properly and to familiarize yourself with the string trimmer. Start off slowly, when you have gained experience, you will be able to use the grass trimmer to its full potential.
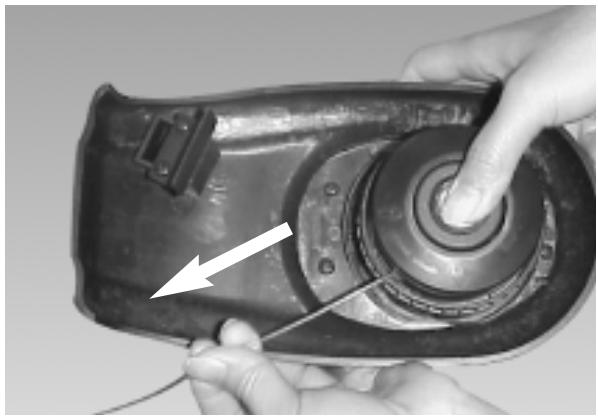
Fig. 6
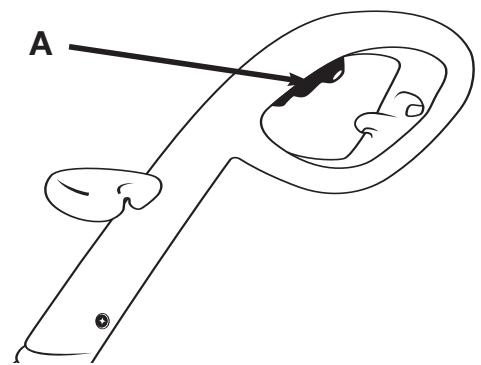
Fig. 7
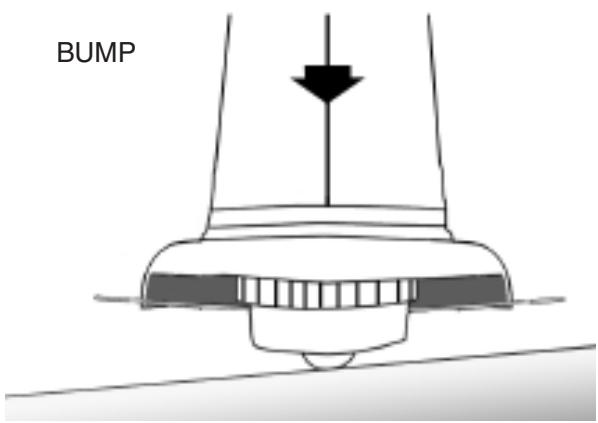
Fig. 8
OPERATING INSTRUCTIONS
STAND AS SHOWN (FIG. 9) AND CHECK THE FOLLOWING:
- Operator wearing safety glasses and heavy clothing.
- Right hand holding handle.
- Unit below waist level.
- Use the left side for cutting so debris is thrown away from the operator. Without operator bending over, keep the line near and parallel to ground and not crowded into material being cut.

CAUTION: Never use as an edge or lean over the trimmer head when trimming. Spinning line causes objects to be thrown violently which can cause blindness or other serious injury.
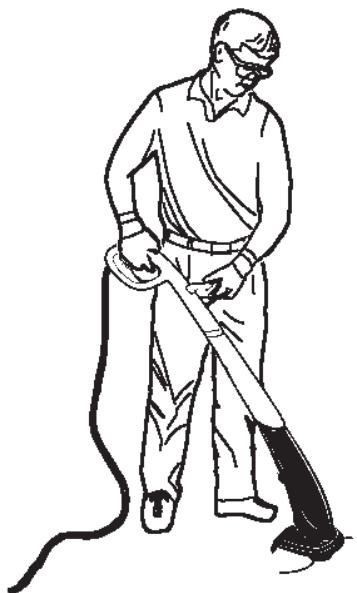
Fig. 9
EXTENDING THE LINE
To advance the line, tap the bottom of the cutting head on the ground while the trimmer is running. The line cutting blade will cut the line to the proper length. (Fig. 10)
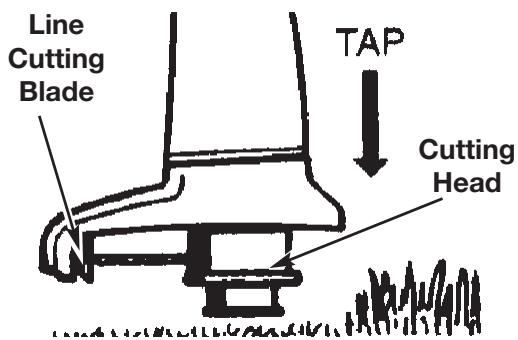
Fig. 10
MAINTENANCE INSTRUCTIONS
REPLACE THE SPOOL OF NYLON LINE
- Unplug the trimmer.
- Remove the spool assembly from the trimmer. To do so, hold the outer ribbed part of the assembly with one hand, while pushing down and turning the spool head with the other to unlock it. (Fig. 11 & Fig. 12) The spool carrier and spool will now disassemble easily.
NOTE: There is a spring inside the spool head that could easily be lost. Ensure that it is put in a safe place.
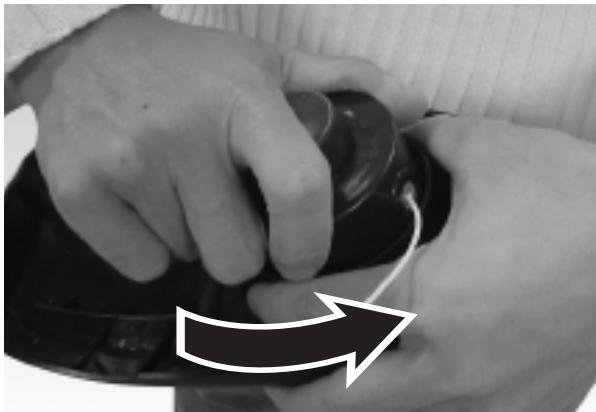
Fig. 11
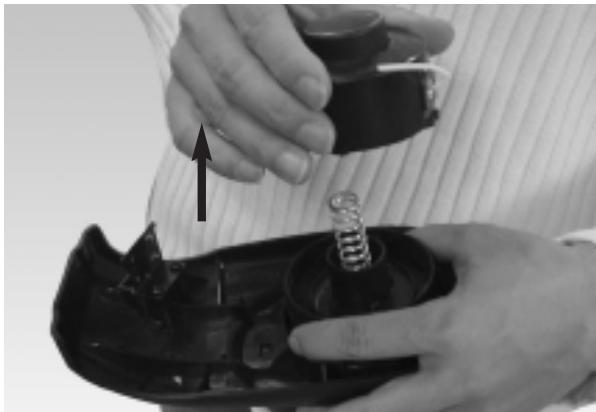
Fig. 12
- Remove the clear plastic line retaining ring. Remove any existing line from the spool.
- Using 0.065" replacement line measure off approximately 14' of line. Double over the cutter line into two equal lengths and place loop in slot of the spool divider (Fig. 13).
- Wind the line onto the spool by turning the spool. The line should go on in the direction of the arrow (A) on the spool (Fig. 14). Line should be wrapped tightly around the spool. The line is wound with each half separated by the divider. Tightly wind it until there is about 6'' of line left (Fig. 15).
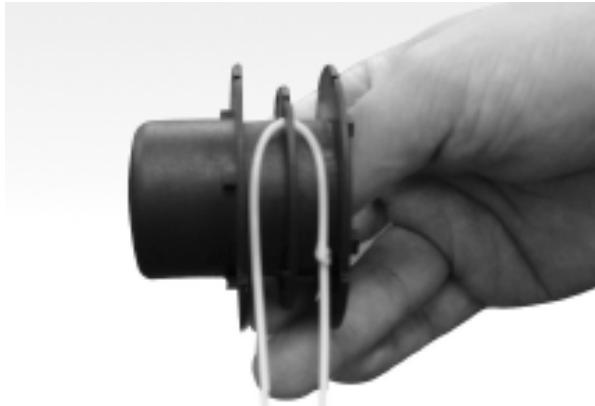
Fig. 13
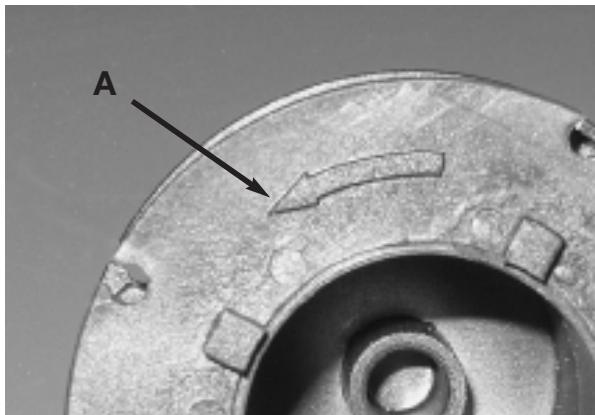
Fig. 14
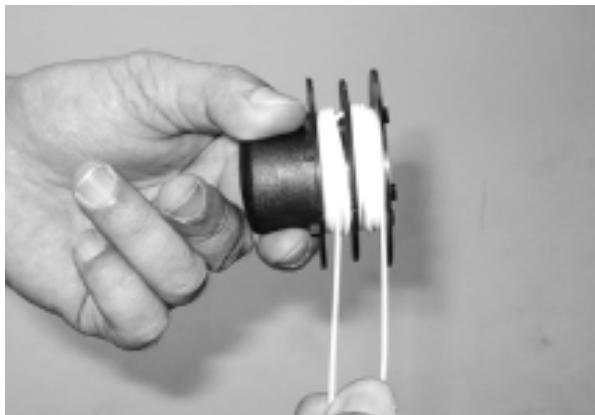
Fig. 15
MAINTENANCE INSTRUCTIONS
- Lock the ends of the line in opposite slots on the spool (Fig. 16). Place the clear plastic line retainer back over the line and spool (Fig. 17). Pull the lower line up into the lower slot in the clear plastic line retainer (Fig. 18). Pull the upper line down into the upper slot (Fig. 19).
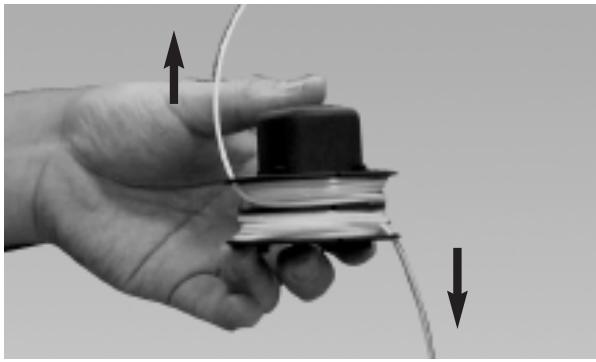
Fig. 16
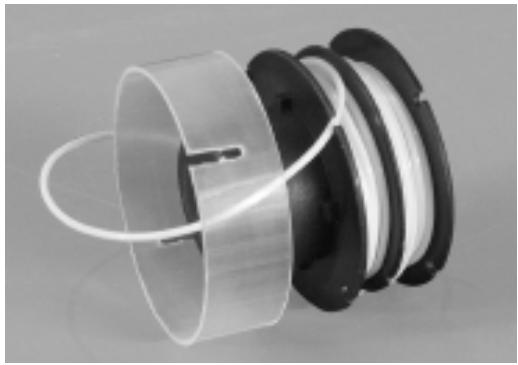
Fig. 17
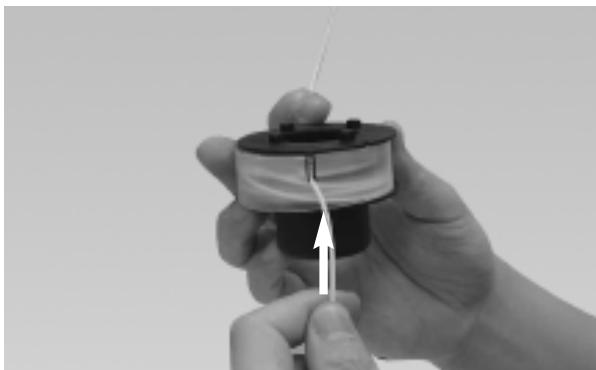
Fig. 18
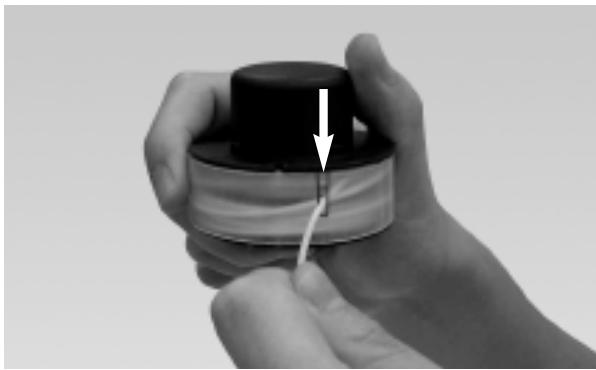
Fig. 19
- Insert the line through each eyelet in the spool carrier and slide the spool into the carrier. (Fig. 20)
NOTE: Ensure that the line is within the clear plastic line retainer. If it's outside of the clear plastic line retainer, the line will not feed.
- Make sure to insert the spring, assemble the spool and spool carrier back onto the trimmer. To do so, push the head on and turn it clockwise until it locks. (Fig. 21 and Fig. 22)
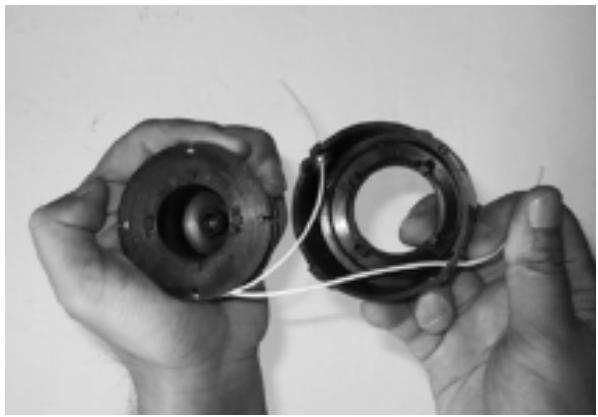
Fig. 20
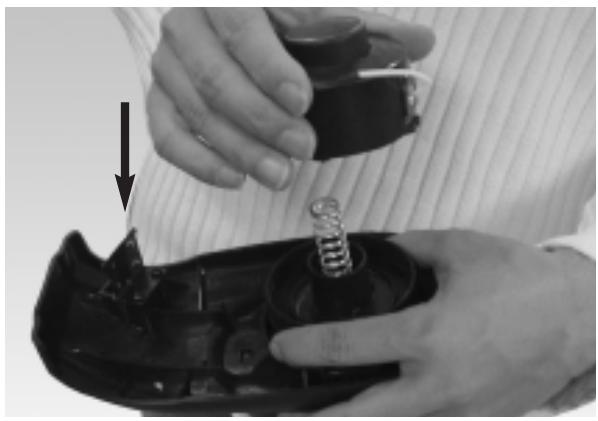
Fig. 21
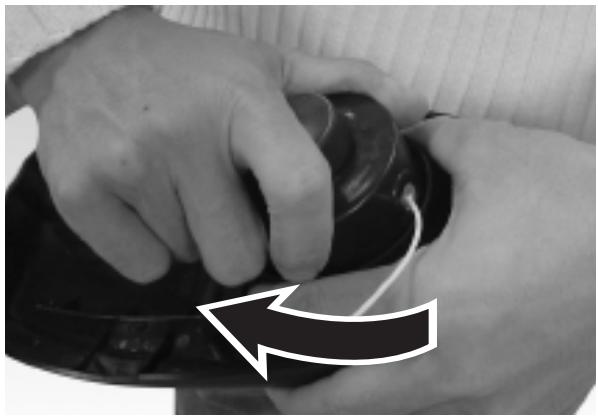
Fig. 22
MAINTENANCE INSTRUCTIONS
- To test if the line is advancing properly, push the button with your thumb while pulling the line with your fingers. The line should advance freely. (Fig. 23).
- In the event of the line breaking inside the spool, repeat the replacement operation.
- Start the grass trimmer following the instructions in the "STARTING" section.
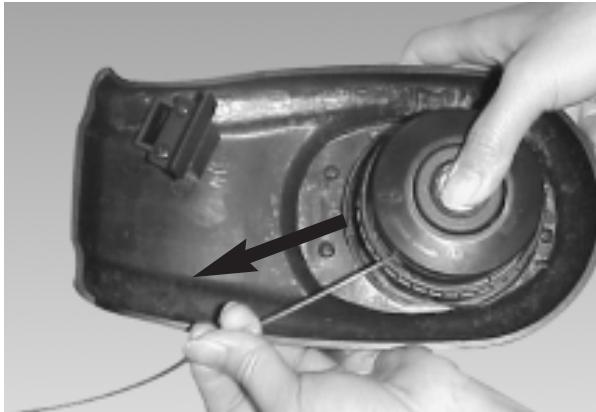
Fig. 23
MAINTENANCE

CAUTION: Before carrying out any maintenance operations, cut off the electric power supply by disconnecting the plug from the extension cord.
- Regular cleaning and maintenance of your string trimmer will ensure efficiency and prolong the life of your machine.
- After each cutting operation, take apart and clean out the grass and soil from: the spool and its slot and in particular the debris shield.
- During operation, keep the air slots clean and free of grass.
- Only use a cloth soaked with hot water and a soft brush to clean the string trimmer.
- Do not spray or wet the appliance with water.
- Do not use detergents or solvents as these could ruin the trimmer. The parts made of plastic can easily be damaged by chemical agents.
- If the line cutting blade no longer cuts or breaks, have this replaced by contacting an authorized service center.
SPECIFICATION
Input 120V\~, 60Hz, 2.2 Amp
No Load Speed 10,000/min.
Cutting width 9" (225mm)
Line Diameter .0.065" (1.65mm)
Net Weight 3.52 Lbs (1.6 Kg)
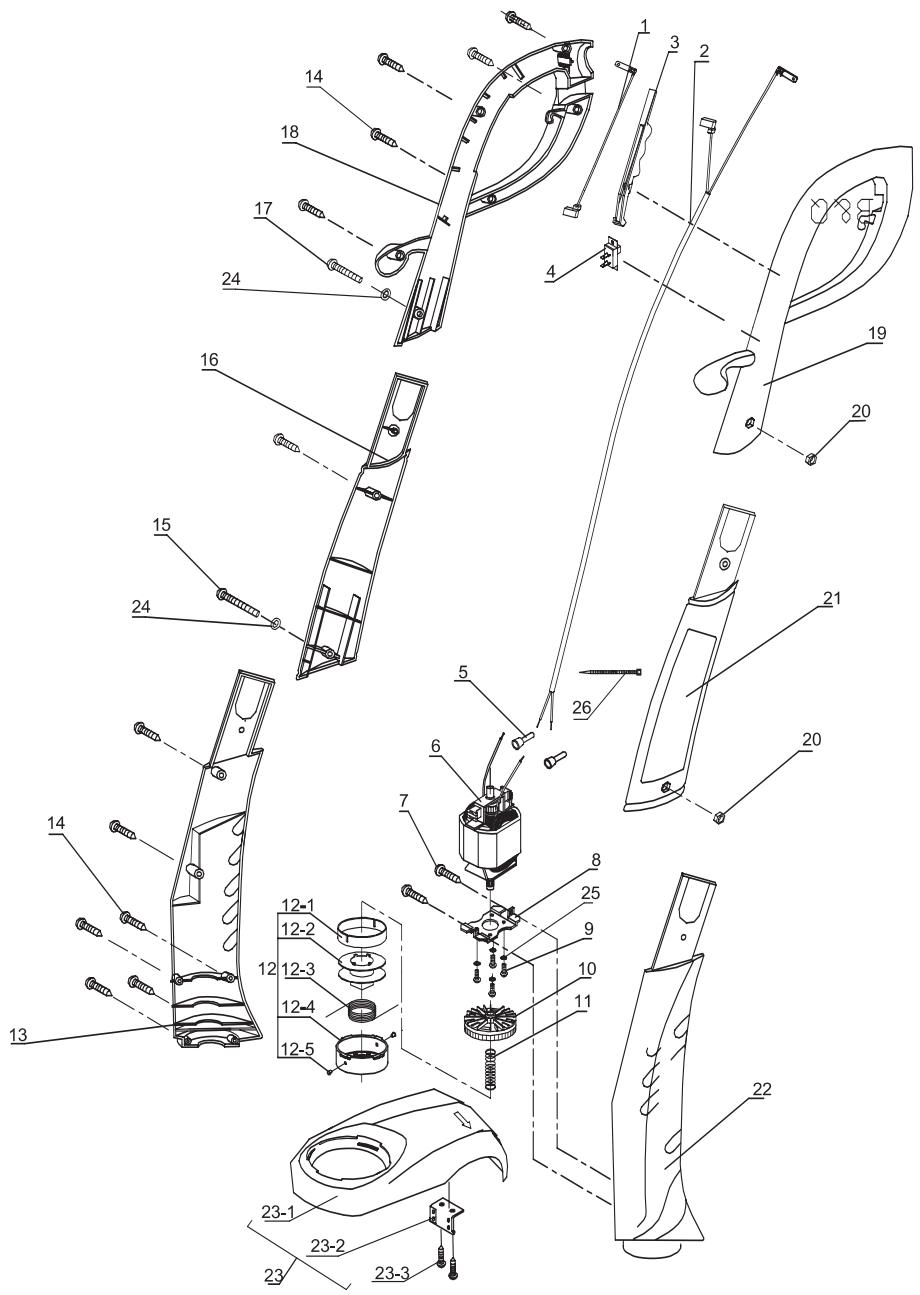
| No. | Parts No. | Description | No. | Parts No. | Description |
| 1 | 6010-202502 | LEAD WIRE | 13 | 6038-202501 | HOUSING (R) |
| 2 | 6010-202501 | WIRE | 14 | 6SDABB04-18 | SCREW |
| 3 | 6028-202502 | SWITCH BUTTON | 15 | 6SDAB-06-46 | SCREW |
| 4 | 6022-230001 | SWITCH | 16 | 6207-202505 | SHAFT HOUSING (R) |
| 5 | 6154-840001 | TRIMINAL BLOCK | 17 | 6SDAB-06-28 | SCREW |
| 6 | 6099-202502 | MOTOR | 18 | 6068-202505 | HANDLE HOUSING (R) |
| 7 | 6SDABB04-14 | SCREW | 19 | 6068-202506 | HANDLE HOUSING (L) |
| 8 | 6072-202501 | MOTOR PLATE | 20 | 6NAB-06 | NUT |
| 9 | 6SDAZJ03-08 | SCREW | 21 | 6207-202506 | SHAFT HOUSING (L) |
| 10 | 6270-202502 | STRING HEAD CARRIER | 22 | 6038-202502 | HOUSING (L) |
| 11 | 6024-202604 | SPRING | 23 | 6228-202402 | DEBRIS SHIELD ASS'Y |
| 12 | 6228-202004A | SPOOL CARRIER ASS'Y | 23-1 | 6262-202501 | GUARD |
| 12-1 | 6059-202004 | SPOOL COVER | 23-2 | 6250-202503 | WIRE CUTTING BLADE |
| 12-2 | 6008-202001A | SPOOL CARRIER | 23-3 | 6SDABB04-10 | SCREW |
| 12-3 | 6194-202001 | WIRE-CUTTING | 24 | 6WFB-06 | FLAT WASHER |
| 12-4 | 6059-202005A | SPOOL COVER | 25 | 6WSB-03 | SPRING WASHER |
| 12-5 | 6140-B23101 | PILOT | 26 | 6032-090-01 | BAND, PLASTIC |
NOTES
MANUFACTURER'S LIMITED WARRANTY FOR:
YARD MACHINES) by MTD
The limited warranty set forth below is given by MTD LLC ("MTD") with respect to new merchandise purchased and used in the United States and Canada, its possessions and territories.
MTD warrants this product against defects in material and workmanship for a period of two (2) years commencing on the date of original purchase and will, at its option, repair or replace, free of charge, any part found to be defective in material or workmanship. This limited warranty shall only apply if this product has been operated and maintained in accordance with the Operator's Manual furnished with the product, and has not been subject to misuse, abuse, commercial use, neglect, accident, improper maintenance, alteration, vandalism, theft, fire, water or damage because of other peril or natural disaster. Damage resulting from the installation or use of any accessory or attachment not approved by MTD for use with the product(s) covered by this manual will void your warranty as to any resulting damage. This warranty is limited to ninety (90) days from the date of original retail purchase for any MTD product that is used for rental or commercial purposes, or any other income-producing purpose.
HOW TO OBTAIN SERVICE: Warranty service is available, WITH PROOF OF PURCHASE THROUGH YOUR LOCAL AUTHORIZED SERVICE DEALER. To locate the dealer in your area, please check for a listing in the Yellow Pages or contact the Customer Service Department of MTD LLC by calling 1-866-747-9816 or writing to P.O. Box 361131, Cleveland OH 44136-0019 or if in Canada call 1-800-668-1238. No product returned directly to the factory will be accepted unless prior written permission has been extended by the Customer Service Department of MTD LLC.
This limited warranty does not provide coverage in the following cases:
A. Trimmer line.
B. MTD does not extend any warranty for products sold or exported outside of the United States of America and Canada, its possessions and territories, except those sold through MTD's authorized channels of export distribution.
MTD reserves the right to change or improve the design of any MTD Product without assuming any obligation to modify any product previously manufactured.
No implied warranty, including any implied warranty of merchantability or fitness for a particular purpose, applies after the applicable period of express written warranty above as to the parts as identified. No other express warranty or guaranty, whether written or oral, except as mentioned above, given by any person or entity, including a dealer or retailer, with respect to any product shall bind MTD. During the period of the Warranty, the exclusive remedy is repair or replacement of the product as set forth above. (Some states do not allow limitations on how long an implied warranty lasts, so the above limitation may not apply to you.)
The provisions as set forth in this Warranty provide the sole and exclusive remedy arising from the sales. MTD shall not be liable for incidental or consequential loss or damages including, without limitation, expenses incurred for substitute or replacement lawn care services, for transportation or for related expenses, or for rental expenses to temporarily replace a warranted product. (Some states do not allow limitations on how long an implied warranty lasts, so the above limitation may not apply to you.)
In no event shall recovery of any kind be greater than the amount of the purchase price of the product sold. Alteration of the safety features of the product shall void this Warranty. You assume the risk and liability for loss, damage, or injury to you and your property and/or to others and their property arising out of the use or misuse or inability to use the product.
This limited warranty shall not extend to anyone other than the original purchaser, original lessee or the person for whom it was purchased as a gift.
How State Law Relates to this Warranty: This warranty gives you specific legal rights, and you may also have other rights which vary from state to state.
To locate your nearest service dealer dial 1-866-747-9816 in the United States or 1-800-668-1238 in Canada.
MTD LLC
P.O. Box 361131
Cleveland, OH 44136-0019
DANGER: Objects thrown up by machine.

No. Pieza N^0
13 6038-202501
14 6SDABB04-18
15 6SDAB-06-46
16 6207-202505
17 6SDAB-06-28
18 6068-202505
19 6068-202506
20 6NAB-06
21 6207-202506
22 6038-202502
23 6228-202402
23-1 6262-202501
23-2 6250-202503
23-3 6SDABB04-10
24 6WFB-06
25 6WSB-03
26 6032-090-01
Descripción
CARCASA (R)
TORNILLO
TORNILLO
CUBIERTA DEL EJE (R)
TORNILLO
CUBIERTA DE LA MANIJA (R)
CUBIERTA DE LA MANIJA (L)
TUERCA
CUBIERTA DEL EJE (L)
CARCASA (L)
ASAMBLEA DEL PROTECTOR DE LA RUINA
GUARDIA
ALAMBRE CORTANDO HOJA
TORNILLO
ARANDELA PLANA
ARANDELA DE RESORTE
VENDA, PLASTICO
NOTAS
GARANTÍA LIMITADA DEL FABRICANTE PARA:
YARD MACHINES) by MTD
For problems or questions, DO NOT return this product to the store. Contact your
Customer Service Agent .
Canada Imported by / Importé par:
MTD PRODUCTS LIMITED
97 Kent Avenue
Kitchener, ON
CANADA N2G 4J1
For Consumer Assistance Please Call