
SSMA 67 B2 - Food Processor SILVERCREST - Free user manual and instructions
Find the device manual for free SSMA 67 B2 SILVERCREST in PDF.


| Product type | Multifunction food processor |
| Brand | SilverCrest |
| Model | SSMA 67 B2 |
| Dimensions (W x D x H) | 35 x 25 x 30 cm |
| Weight | 5.2 kg |
| Rated power | 800 W |
| Supply voltage | 220-240 V ~ 50/60 Hz |
| Bowl capacity | 5 L (stainless steel) |
| Main functions | Knead, beat, mix, chop, blend, cut, grate |
| Included accessories | Dough hook, whisk, flat beater, chopper, reversible grater, slicing disc |
| Speeds | 6 speeds + pulse |
| Materials | Plastic body, stainless steel bowl, metal and plastic accessories |
| Safety | Motor lock in case of overload, safety cover, non-slip feet |
| Care and cleaning | Bowl and accessories dishwasher safe; wipe body with a damp cloth |
| Cable length | 1.2 m |
| Warranty | 3 years |
| Spare parts and repairability | Parts available through SilverCrest after-sales service |
Frequently Asked Questions - SSMA 67 B2 SILVERCREST
User questions about SSMA 67 B2 SILVERCREST
0 question about this device. Answer the ones you know or ask your own.
Ask a new question about this device
Download the instructions for your Food Processor in PDF format for free! Find your manual SSMA 67 B2 - SILVERCREST and take your electronic device back in hand. On this page are published all the documents necessary for the use of your device. SSMA 67 B2 by SILVERCREST.
USER MANUAL SSMA 67 B2 SILVERCREST


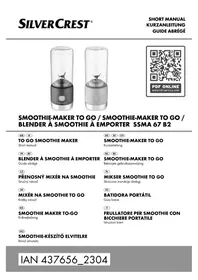
SMOOTHIE-MAKER TO GO / SMOOTHIE-MAKER TO GO / BLENDER À SMOOTHIE À EMPORTER SSMA 67 B2
GB IE
TO GO SMOOTHIE MAKER
Short manual
FR BE
BLENDER À SMOOTHIE À EMPORTER
Guide abrégé
CZ
PŘENOSNÝ MIXÉR NA SMOOTHIE
Stručný návod
SK
MIXÉR NA SMOOTHIE TO GO
Krátky návod
DK
SMOOTHIE MAKER TO-GO
Quick guide
DE AT CH
SMOOTHIE-MAKER TO GO
Short manual
NL BE
SMOOTHIE-MAKER TO GO
Before reading, unfold the page containing the illustrations and familiarise yourself with all functions of the device.
DE AT CH
GB/IE Short manual Page 1
Information about this short manual 2
Proper use 2
Warnings and symbols used 2
Notes on trademarks 3
Safety information....3
Package contents....6
Appliance description....6
Before first use ....6
Charging the integrated battery 7
Preparing ingredients....7
Operation 8
Cleaning....10
Storage 11
Ordering replacement parts 11
Disposal....11
Disposal of the appliance 12
Disposal of the packaging 12
Appendix 13
Technical specifications 13
Service 13
Importer 13
Introduction
Information about this short manual
This document is a shortened print version of the complete operating instructions.

Scanning the QR code will take you directly to the Lidl Service page (www.lidl-service.com), where you can view and download the full version of the operating instructions by entering the article number (IAN) 437656_2304.
WARNING!
The short manual is an integral part of this product. Before using the product, please familiarise yourself with all operating and safety instructions. Keep the short manual in a safe place and hand over all documents when passing the product on to any future owner/user.
Proper use
This appliance is exclusively for chopping fruits together with liquid to make smoothies. This appliance is intended solely for use in private households. Do not use it for commercial purposes.
Warnings and symbols used
The following warnings and symbols are used in these short manual, on the packaging and on the appliance (where applicable):
 | DANGER! A warning with this symbol and the signal word "DANGER" indicates an imminently hazardous situation which will result in death or serious injury if not avoided. |
 | WARNING! A warning with this symbol and the signal word "WARNING" indicates a potentially hazardous situation which could result in death or serious injury if not avoided. |
 | CAUTION! A warning with this symbol and the signal word "CAUTION" indicates a potentially hazardous situation which could result in a minor or moderate injury if not avoided. |
 | ATTENTION! A warning with this symbol and the signal word "ATTENTION" indicates a potential situation which could result in property damage if not avoided. |
 | Note: A note provides additional information that will assist you in using the appliance. |
 | Read the instructions. |
 | DC current/voltage. |
 | Removable power supply. |
 | Protection class III (protection through extra-low voltage). |
 | All of the parts of this appliance that come into contact with food are food-safe. |
 | Suitable for dishwashers. |
 | Press the button 7 twice to start the appliance. |
Notes on trademarks

USB® is a registered trademark of USB Implementers Forum, Inc.
All other names and products may be trademarks or registered trademarks of their respective owner.
Safety information
DANGER!
- Connect the USB power adapter only to a properly installed and earthed mains socket. Ensure that the power supply corresponds with the specifications on the type plate of the USB power adapter. ▶ Make sure that the charging cable does not become wet or damp. Route the cable in such a way that it cannot get caught or damaged.
- Keep the appliance and the charging cable away from hot surfaces.
▶ Switch off the appliance after each use and before cleaning it.
- Do not perform any repairs to the appliance. All repairs must be performed by our customer service department or by a qualified specialist technician.
- Do not use the appliance if the charging cable or accessories are defective, if the appliance is not working properly, or if it has been dropped. Have the appliance checked and/or repaired by a qualified technician, if necessary.
▶ Never immerse the motor unit in water or other liquids.
WARNING!
▶ Always disconnect the appliance from the USB power supply before assembly, disassembly or cleaning.
This appliance is not suitable for use by children. The appliance and its mains cable must be kept away from children.
▶ Do not allow children to play with the appliance.
- Store the appliance and accessories somewhere out of reach of children.
This appliance may be used by persons with limited physical, sensory or mental capabilities or lack of experience and knowledge, provided that they are under supervision or have been told how to use the appliance safely and are aware of the potential risks.
▶ Use only the original accessory parts for this appliance.
Accessory parts from other manufacturers may not be suitable, and this may lead to risks!
▶ Warning: The cross blade is very sharp! Clean with care.
Warning: The blade is very sharp! Therefore, be very careful when removing the blender jug.
Warning: The cross blade is very sharp! Leave the blender jug on the appliance during charging.
Never use the appliance for purposes other than those described in these instructions. Otherwise, there is a risk of serious injury!
Do not change accessories unless the drive unit is entirely at a standstill and the appliance is switched off! The appliance may continue to run for a short time after it has been switched off!
WARNING! SAFETY GUIDELINES FOR RECHARGEABLE BATTERIES
The product is equipped or supplied with a lithium-ion battery. - This appliance contains a battery that cannot be replaced by the user. The appliance has an integrated lithium-ion battery. Incorrect handling can lead to fire, explosions, leakage of dangerous substances or other hazards! Do not throw the appliance into an open fire. Do not open or short-circuit the battery. This could cause the battery to overheat and explode. There is a risk of fire! Never leave the appliance unattended during charging.
ATTENTION!
- When using a USB power adapter, the mains power socket used must always be easily accessible so that the USB power adapter can be quickly removed from the socket in a hazardous situation. You should also observe the operating instructions for the USB power adapter. Use only the supplied charging cable to charge the appliance.
- Keep the appliance away from heat sources (radiators, ovens, etc.) and do not expose it to extreme temperature fluctuations.
- Do not use any aggressive cleaning liquids or solvents to clean the appliance. They could damage the surface.
Never fill the appliance with hard ingredients such as ice cubes, nuts, stalks, large grains or seeds! Never fill the appliance with hot ingredients! Do not run the appliance while empty.
Package contents
The product includes the following components:
• To go smoothie maker • Lid - Charging cable - Short manual
WARNING! Do not allow children to play with packaging materials. There is a risk of suffocation.
Note: Check the package for completeness and signs of visible damage. If any items are missing or damaged as a result of defective packaging or transportation, contact the customer service hotline (see section Service).
Appliance description
(For illustrations, see the fold-out page)
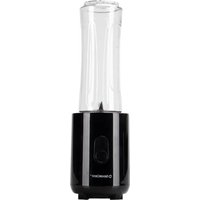
① Lid ② Sealing ring ③ USB charging cable (USB type-A to USB type-C) ④ Blender jug (can also be used as a drinking cup) ⑤ Cross blade ⑥ USB-C socket ⑦ On/Off button ⑧ Indicator light (integrated in the pressure switch) ⑨ Motor unit
Before first use
1) Charge the battery as described in the section Charging the integrated battery. 2) Clean all components as described in the section Cleaning and care. Ensure that all parts are completely dry.
The appliance is now ready for use.
Charging the integrated battery
⚠️ DANGER! Risk of fatal electric shock! Charge the appliance indoors in dry locations away from water. Do not charge the appliance next to or above a sink filled with water.
CAUTION! The blade is extremely sharp! Therefore, be careful when charging the battery and make sure that the blender jug ⑤ is screwed on.
Note: The integrated battery must be completely charged before using the appliance.
The USB charging cable ③ and the USB-C socket ⑥ are used only to charge the internal battery. They are not suitable for data transmission.
Charge the appliance with a USB power adapter with protection class II that is approved for use with household appliances and has an output voltage of 5 V and a maximum output current of 1 A.
Use only the supplied USB charging cable ③ to charge the integrated battery. Disconnect the USB charging cable ③ from the appliance when charging is complete.
The appliance cannot be operated during charging.
1) Make sure that the blender jug ④ is firmly attached and the appliance is switched off. The indicator light ⑧ must be off.
2) Open the protective cap of the USB-C socket ⑥ and connect the USB-C plug of the USB charging cable ③ to the USB-C socket ⑥ on the appliance.
3) Connect the USB-A plug of the USB charging cable ③ to a suitable mains adapter.
4) Plug the mains adapter into a mains power outlet.
5) The charging status is indicated by the indicator light ⑧ as follows:
| Indicator light 8 Charge level | |
| Flashes red 10 times Low battery. Recharge immediately. | |
| Lights up continuously red Battery is charging. | |
| Lights up continuously white Battery fully charged. |
6) Unplug the power adapter from the socket and disconnect the USB charging cable ③ from the appliance when the battery is fully charged.
7) Close the USB-C socket ⑥ of the appliance again with the protective cap.
Preparing ingredients
■ Remove peels, such as orange peel or the skin of kiwis, and also large, hard seeds and stones, such as in peaches, from the fruit.
- Cut the food into the smallest possible pieces (approx. 1–2 cm).
ATTENTION! The appliance is not suitable for processing hard ingredients, such as frozen fruit, nut shells or ice cubes.
Operation
A smoothie is a kind of "whole-fruit drink". Whole fruits (except for the peel and seeds) are blended to make smoothies. This helps create a creamy consistency. Taste combinations are almost unlimited when making smoothies: you can also use yoghurt, milk and milk substitutes or juices for smoothies.
A processing time of 50 seconds per cycle is preset. Once the ingredients are chopped to the desired size, stop the cycle by pressing the On/Off button ⑦.
For the appliance to work optimally, do not add more ingredients than the MAX mark on the blender jug ④. Consider the guide values in the table for the mixing ratio of solid food to liquid.
| Ingredients | Mixing ratio solid : liquid |
| Bananas, milk | 100 g : 150 ml |
| Blueberries, straw berries, yoghurt1 | 100 g : 150 ml |
| Apple, orange juice | 50 g : 150 ml |
| Raspberries, banana, apple juice | 120 g : 120 ml |
If you use yoghurt, add the solid foods first. If possible, do not use stiff yoghurt or stir it until creamy beforehand.
2 Different solid foods can be mixed to make up the indicated quantity according to the mixing ratio.
① Note: Processing time may vary depending on the quality and ripeness of the fruit or consistency of the ingredients.
CAUTION! The cross blade ⑤ is very sharp! Therefore, be careful when removing and attaching the blender jug ④.
Do not remove the motor unit ⑨ until the cross blade ⑤ has come to a complete stop.
1) Add the prepared ingredients to the blender jug ④, first the liquid ingredients and then the fruit.
① Note: Never fill the blender jug ④ with ingredients up to more than the MAX mark! The appliance will not be able to process the ingredients.
2) Turn the motor unit ⑨ around so that the cross blade ⑤ faces downwards. Place the motor unit ⑨ on the blender jug ④ and screw it in place clockwise.
① Note: A safety mechanism ensures that the appliance can only work when the blender jug ④ is correctly screwed on. If the indicator light ⑧ flashes red 5 times, it means that the blender jug ④ is not screwed on correctly. The blender jug ④ is seated correctly when the indicator light ⑧ flashes white 5 times.
3) Press the On/Off button ⑦ twice to start the appliance. Hold the appliance firmly in your hand. The appliance starts working, the indicator light ⑧ lights up white.

Fig. 1
4) To distribute the ingredients better, you can move the appliance while it chops the food. To do this, hold the appliance in your hand and make sweeping back and forth movements with it (see Fig. 1). Make sure that the blender jug ④ does not come off the motor unit ⑨.
① Note: If the cross blade ⑤ is blocked, the indicator light ⑧ lights up alternately 5 times red and 5 times white. Carefully loosen the stuck parts, e.g. using a fork, and restart the appliance. The indicator light ⑧ lights up white again.
5) Carefully loosen stuck parts using a fork, for example, and then start a new cycle. After 50 seconds, one cycle is completed and the appliance switches off automatically. Wait 3-5 minutes before starting the next cycle to allow the motor to cool down.
6) If you want to stop the chopping process before the appliance is finished, press the On/Off button ⑦ once. The appliance stops working immediately.
7) Once the chopping process is finished, hold the appliance so that the opening of the blender jug ④ faces upwards and the cross blade ⑤ on the motor unit ⑨ faces downwards. Unscrew the motor unit ⑨ by turning it anticlockwise.
8) You can also use the blender jug ④ as a drinking cup. For transport or storage in the refrigerator, use the supplied lid ①.
① Note: Consume the drink as soon as possible after preparation. Do not store the freshly prepared smoothie for longer than 6 hours, as small chopped ingredients can spoil quickly.
9) Clean the appliance immediately after use as described in the section Cleaning.
Cleaning
DANGER! Risk of fatal electric shock!
Do not clean the appliance while it is charging. Switch off the appliance before cleaning. Ensure that no moisture can get into the appliance during cleaning.
Never immerse the motor unit ⑨ in water or other liquids.
After cleaning, ensure that the appliance is completely dry before using it again!
CAUTION! The cross blade ⑤ is very sharp! Clean with care.
ATTENTION! Do not use abrasive or caustic cleaning agents. They can corrode the surface and irreparably damage the appliance.
■ Wipe the motor unit ⑨ off with a damp cloth.
■ To remove light soiling, fill the blender jug ④ up to the MAX mark with lukewarm water and a drop of washing-up liquid. Then let the appliance run for about 30 seconds as described above. Let the appliance operate for about 30 seconds as described in the section Operation. Then unscrew the motor unit ⑨ and tip the rinsing water out of the blender jug ④.
- Rinse only the cross blade ⑤ carefully, if necessary using a scrub brush, under running water. Make sure that no water flows onto the motor unit ⑨, and do not immerse the appliance in water! Tilt the appliance so that only the cross blade ⑤ is in the water jet (see Fig. 2). Cleaning the appliance immediately after use helps to loosen food remains more easily.

Fig. 2
■ Pull the sealing ring ② out of the lid ①. If necessary, use a narrow, blunt object to help you. Clean the sealing ring ② with washing-up water. Replace it when it is completely dry.
- Clean the blender jug ④ and the lid ① in washing-up water. Afterwards, rinse them with fresh water to remove any detergent residues.
(i) Note:

The blender jug ④ and the lid ① can also be cleaned in the dishwasher. Place the parts, if possible, in the upper basket and ensure that none of the parts can get stuck.
Storage
■ Store the cleaned appliance in a clean, dust-free and dry place without direct sunlight.
- Allow the appliance to dry completely before assembling it.
■ Always place the blender jug ④ on the motor unit ⑨ so that the cross blade ⑤ is not exposed.
■ To ensure a long battery life, recharge the battery at regular intervals during extended periods of non-use.
Ordering replacement parts
You can order replacement parts for this product on the internet at www.kompernass.com.

Scan the QR code with your smartphone/tablet. You can use this QR code to go directly to our website to view and order the available replacement parts.
(i) Note:
If you have problems with your online order, you can contact our service centre by phone or email.
Always quote the article number (IAN) 437656_2304 in your order.
Please note that online ordering of replacement parts is not possible for all countries.
Disposal
Applies only to France:

The product, its packaging and the operating instructions are recyclable. They are subject to an extended manufacturer responsibility and will be collected separately.
Disposal of the appliance

The adjacent symbol of a crossed-out dustbin means that this appliance is subject to Directive 2012/19/EU. This directive states that this appliance may not be disposed of in the normal household waste at the end of its useful life, but must be taken to specially set-up collection locations, recycling depots or disposal companies.
The disposal is free of charge for the user. Protect the environment and dispose of this appliance properly.
If your old appliance has stored any personal data, you are responsible for deleting it yourself before returning it.
If it is possible to do so without destroying the old appliance, remove the old batteries or rechargeable batteries before returning the appliance for disposal and take them to a separate collection point. In the case of permanently installed rechargeable batteries, you must indicate during disposal that the appliance contains a battery.

Your local community or municipal authorities can provide information on how to dispose of the worn-out product.
Disposal of the packaging

The packaging materials have been selected for their environmental friendliness and ease of disposal and are therefore recyclable. Dispose of packaging materials that are no longer needed in accordance with applicable local regulations.

Dispose of the packaging in an environmentally friendly manner. Note the labelling on the packaging and separate the packaging material components for disposal, if necessary. The packaging material is labelled with abbreviations (a) and numbers (b) with the following meanings: 1–7: plastics, 20–22: paper and cardboard, 80–98: composites.
Appendix
Technical specifications
| Appliance | |
| Input voltage 5 V | == |
| Input current max. 1 A | |
| Integrated battery (Li-ion) 2000 mAh / 3.6 V | == / 7.2 Wh |
| Protection class | III /III |
| Blender jug4 | |
| Capacity | 435 ml |
| Useful volume 300 ml up to the MAX mark | |

All parts of this appliance that come into contact with food are food-safe.
The unit switches off automatically after 50 seconds. Then let the appliance cool down for approx. 3 - 5 minutes before starting a new cycle.
Service
GB Service Great Britain
Tel.: 0800 404 7657
E-Mail: kompernass@lidl.co.uk
IE Service Ireland
Tel.: 1800 101010
E-Mail: kompernass@lidl.ie
IAN 437656_2304
Importer
Please note that the following address is not the service address. Please use the service address provided in the operating instructions.
KOMPERNASS HANDELS GMBH
BURGSTRASSE 21
44867 BOCHUM
GERMANY
www.kompernass.com
Table of Contents
Introduction 16
Fig. 1
Fig. 2
KOMPERNASS HANDELS GMBH
BURGSTRASSE 21
44867 BOCHUM
DEUTSCHLAND
www.kompernass.com
Table of Contents
Introduction 30
Fig. 1
Fig. 2
KOMPERNASS HANDELS GMBH
BURGSTRASSE 21
44867 BOCHUM
GERMANY
www.kompernass.com
Table of Contents
Introduction 44
⚠ WARNING! SAFETY INSTRUCTIONS FOR BATTERIES
Fig. 1
Fig. 2
KOMPERNASS HANDELS GMBH
BURGSTRASSE 21
44867 BOCHUM
GERMANY
www.kompernass.com
Table of Contents
Introduction....58
Fig. 1
Fig. 2
KOMPERNASS HANDELS GMBH
BURGSTRASSE 21
44867 BOCHUM
GERMANY
www.kompernass.com
Table of Contents
Introduction 72
Fig. 1
Fig. 2
KOMPERNASS HANDELS GMBH
BURGSTRASSE 21
44867 BOCHUM
GERMANY
www.kompernass.com
Table of Contents
Introduction....86
Fig. 1
Fig. 2
Pull the sealing ring ② out of the lid ①. If necessary, use a blunt narrow object. Clean the sealing ring ② with water and dishwashing liquid. Once it is completely dry, put it back on.
KOMPERNASS HANDELS GMBH
BURGSTRASSE 21
44867 BOCHUM
GERMANY
www.kompernass.com
Table of Contents
Introduction....100
Fig. 1
Fig. 2
KOMPERNASS HANDELS GMBH
BURGSTRASSE 21
44867 BOCHUM
GERMANY
www.kompernass.com
Table of contents
Introduction....114
Fig. 1
Fig. 2
KOMPERNASS HANDELS GMBH
BURGSTRASSE 21
44867 BOCHUM
GERMANY
www.kompernass.com
Index
Introduction....128
Fig. 1
Fig. 2
KOMPERNASS HANDELS GMBH
BURGSTRASSE 21
44867 BOCHUM
GERMANY
www.kompernass.com
Table of contents
Introduction 142
- Figure
- Figure
KOMPERNASS HANDELS GMBH
BURGSTRASSE 21
44867 BOCHUM
GERMANY
www.kompernass.com

KOMPERNASS HANDELS GMBH
BURGSTRASSE 21
44867 BOCHUM
GERMANY
www.kompernass.com
Last Information Update · Stand der Informationen · Version des informations · Stand van de informatie · Stav informaci Stan informacji · Stav informácií · Estado de las informaciones · Tilstand af information · Versione delle informazioni · Információk állása: 07 / 2023 · Ident.-No.: SSMA67B2-052023-2



- SMOOTHIE-MAKER TO GO / SMOOTHIE-MAKER TO GO / BLENDER À SMOOTHIE À EMPORTER SSMA 67 B
- SAFETY INFORMATION
- PACKAGE CONTENTS
- APPLIANCE DESCRIPTION
- BEFORE FIRST USE
- CHARGING THE INTEGRATED BATTERY
- PREPARING INGREDIENTS
- OPERATION
- CLEANING
- STORAGE
- ORDERING REPLACEMENT PARTS
- DISPOSAL
- APPENDIX
- INTRODUCTION
- INFORMATION ABOUT THIS SHORT MANUAL
- WARNING
- PROPER USE
- WARNINGS AND SYMBOLS USED
- NOTES ON TRADEMARKS
- DANGER
- WARNING! SAFETY GUIDELINES FOR RECHARGEABLE BATTERIES
- ATTENTION
- NOTE
- APPLIES ONLY TO FRANCE
- DISPOSAL OF THE APPLIANCE
- THE DISPOSAL IS FREE OF CHARGE FOR THE USER. PROTECT THE ENVIRONMENT AND DISPOSE OF THIS APPLIANCE PROPERLY
- DISPOSAL OF THE PACKAGING
- TECHNICAL SPECIFICATIONS
- SERVICE
- IMPORTER
- TABLE OF CONTENTS
- ⚠ WARNING! SAFETY INSTRUCTIONS FOR BATTERIES
- INDEX
- KOMPERNASS HANDELS GMBH
Brand : SILVERCREST
Model : SSMA 67 B2
Category : Food Processor