USER MANUAL KH 1106 MICROWAVE BIFINETT
natural_image
Exterior view of a bifipett microwave oven with control panel and display (no visible text or symbols on main body)
GB MICROWAVE
IE
CY Operating instructions
FI MIKROAALTOUUNI
Käyttöohje
SE MIKROVÅGSUGN
FI Bruksanvisning
DK MIKROB∅LGEOVN
Betjeningsvejledning
PL MIKROFALÓWKA
Instrukcja obstugi
HU MIKROHULLÁMÚ SÜTÖ
Használati utasítás
KH 1106
natural_image
Two technical illustrations of a metal plate: one with a grid-like structure and the other a empty pan (no text or symbols)

LIST OF CONTENTS
PAGE
Introduction 3
Proper Use 3
Package Contents 3
Description of Components 3
Buttons/controls on the control panel 3
Technical data 4
Safety 4
Safety precautions for the avoidance of excessive contact with microwave energy 4
Important safety instructions 4
Earthing notice/Correct Installation 7
Interference with other appliances 7
Installation of the appliance 7
Before you begin 8
Basic principles of microwave cookery 8
Use suitable cookware 8
Description of functions 9
Setting the clock 9
Setting 12-hour-mode 9
Setting 24-hour-mode 9
Setting the kitchen timer 9
Operation 9
Cooking in the microwave oven 10
Quick start function 11
Memory function 11
Selecting pre-settings 11
Auto menu 12
Grill function 14
Grill/Combi cooking procedure 14
Defrosting by weight 14
Defrosting by time 15
Query functions 15
Child protection system 15
Power-saving function 16
Magnetron control protection function 16
Acoustic signal function 16
Cleaning and Care 16
Disposal 17
Warranty & Service 17
Importer 18
Tips 18
Freezing and defrosting – the easy way ... 18
Cooking – the easy way ... 19
Grilling - the easy way ...
22
Recipe suggestions 24
Pizza 24
Onion soup with gratinated cheese topping 24
Lentil Hotpot 25
Cauliflower with gratinated cheese topping 25
Maccaroni and minced meat casserole with broccoli 26
Filet of pork with mushrooms in spicy paprika sauce 26
Potato gratin 27
Chicken fricassee 27
Green chicken casserole 28
Bread or bacon dumplings 28
White sauce 29
Vanilla sauce 29
Rice pudding 29
Red fruit pudding (with strawberries and raspberries) 30
Index 31
Read these operating instructions carefully before using the appliance for the first time and preserve this manual for later reference. Pass this manual on to whoever might acquire the appliance at a future date.
MICROWAVE KH 1106
Introduction
Proper Use
This appliance is intended for the heating and preparation of foodstuffs according to the described procedures. Any modifications of the appliance shall be deemed to be improper use and implies substantial danger. The manufacturer takes no responsibility for damage(s) arising out of usage that is contrary to the instructions laid down. This appliance is not intended for commercial use.
Legend
⚠️ Important! Warnings against damages to the appliance.
Danger! Risk of injuries!
Notes! Hints and tips for handling the microwave.
Package Contents
Immediately after unpacking the appliance, please ensure that the contents are complete and not damaged.
1 Microwave oven, Model KH 1106
1 Turnable ring
1 Glass turntable
1 Metal rack
1 Crispy-Pan
1 Operating manual
Description of Components
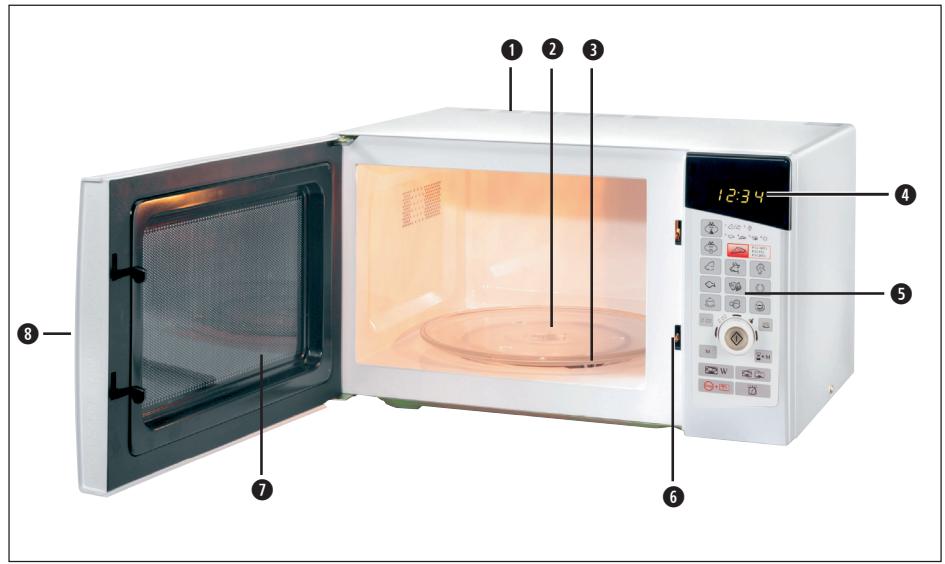
① Air vent
② Glass turntable
③ Turnable ring
4 LED display
5 Control panel
6 Door safety latch
⑦ Window
8 Door handle
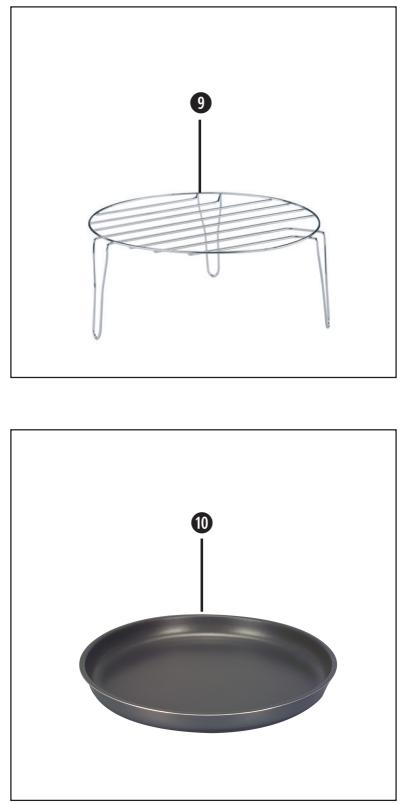
9 Metal rack
⑩ Crispy-Pan
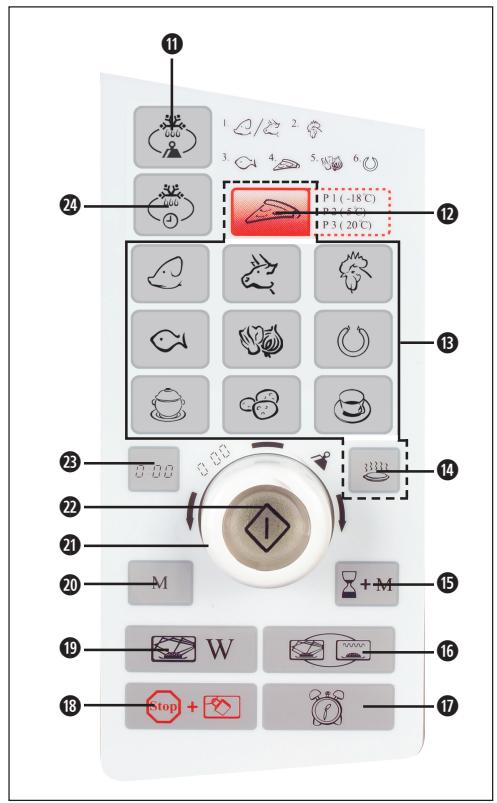
11 Weight defrost
12 Pizza
13 Button panel for preset cooking functions. With the buttons 12 and 14 a total of 11 cooking functions is available
14 Pre-heat
15 Pre-settings
16 Grill/combi
⑰ Kitchen timer
18 Cancel/stop/childlock
19 Microwave
20 Memory
21 Dial
22 Start/quick start
23 Clock/energy save
24 Time defrost

This symbol on the microwave warns you about the risk of burning.
Technical data
| Rated voltage: | 230 V ~ 50 Hz |
| power output |
| Microwave: | 800 W |
| Grill: | 1000 W |
| power consumption: | 1300 W |
| Capacity: | approx. 20 l |
| Glass turntable diameter: | 270 mm |
Safety
- Do not try to operate the appliance while the door is open, as this can lead to a damaging dose of microwave radiation. It is also important not to break open or manipulate the safety locks.
- Do not jam anything between the front of the appliance and the door, and make sure that there is no residual food or cleaning agent on the seals.
⚠ WARNING: If the door or door seals are damaged, the oven must not be operated until it has been repaired by a competent person.
- It is hazardous for anyone other than a competent person to carry out any service or repair operation that involves the removal of a cover which gives protection against exposure to microwave energy.
Important safety instructions
When using electrical appliances, elementary safety precautions must be taken, including the following:
- Do not allow individuals (including children) to use the appliance whose physical, sensorial or mental abilities or lack of experience and knowledge hinder their safe usage of it if they have not previously been supervised or instructed in its correct usage. Tell children about the appliance and its potential dangers so that they do not play with it.
⚠️ Danger: To reduce the risk of burns, electric shock, fires, bodily injuries or excessive contact with microwave radiation:
Please read all instructions before using the appliance.
- Only use this appliance for its intended purpose as described in this manual. Do not use any caustic chemicals or vapours in this appliance. This microwave oven is especially designed for heating, cooking, grilling, or drying foodstuffs. It is not designed for use in industrial or laboratory areas.
- Do not use an external timing switch or a separate remote control system to operate the appliance.
- Do not use the microwave oven when it is empty.
- If the supply cord is damaged, it must be replaced by the manufacturer, its service agent or similarly qualified persons in order to avoid a hazard.
- Place the microwave oven so that there is a minimum distance of 30 cm to walls or cupboards. Ensure ventilation openings are always free. The microwave is not designed to fit into a kitchen unit.
- The AC power supply must be 230 V, 50 Hz, with a minimum 16 A distribution line fuse, or a minimum 16 A distribution circuit breaker. It is recommended that a separate circuit serving only this appliance be provided.
- Do not install the oven in an area of high humidity or where moisture may collect.
-
Do not leave the oven unattended when using disposable plastic, paper or other combustible foot containers.
-
Do not place flammable materials near the oven or ventilation openings.
- Remove all metallic seals, wire twists, etc., from food and food packages. Arcing on metallic surfaces may cause a fire.
- To make popcorn, use only special microwave popcorn makers.
- Do not warm up seed, cherry pip or gel filled pillows in the microwave oven. Risk of fire!
- Do not store food or any other items inside the oven.
- Check the settings after you start the oven to ensure the oven is operating as desired.
- Inside the oven cavity or on the door; make sure there are no dents.
- Do not allow grease or dirt to build up on the door seals and adjacent parts.
- Under no circumstances should you remove the outer cabinet. Never spill or insert any objects into the door lock openings or ventilation openings. In the event of a spill, turn off and unplug the oven immediately, and call an authorised service agent.
- Do not attempt to replace the oven lamp yourself or allow anyone who is not an electrician authorised to do so. If the oven lamp fails, please consult your dealer or an authorised service agent. If the power supply cord of this appliance is damaged, it must be replaced by an authorised service agent.
• Take care when microwaving liquids. Use a widemouth container to allow bubbles to escape.
• To prevent sudden eruption of boiling liquid and possible scalding:
- Stir liquid prior to heating/reheating.
- It is advisable to insert a glass rod or similar utensil into the liquid whilst reheating.
- Let liquid stand for at last 20 seconds in the oven at the end of cooking time to prevent delayed eruptive boiling.
-
Pierce the skin of such foods as potatoes, sausages and fruit before cooking, or they may explode.
-
To avoid burns, always test food temperature and stir before serving and pay special attention to the temperature of food and drink given to babies, children or the elderly. Temperature of the container is not a true indication of the temperature of the fod or drink, always check the food temperature.
- Sliced stuffed baked foods after heating to release steam and avoid burns.
- Keep children away from the door, to prevent them burning themselves.
- Do not touch the oven door, outer cabinet, oven cavity, ventilation openings, bottom grill, accessoires and dishes during grill, dual and automatic operation (except auto defrost) as they will become hot. Before cleaning make sure they are not hot.
- Only allow children to use the oven without supervision when adequate instructions have been given so that the child is able to use the oven in a safe way and understands the hazards of improper use.
- Do not lean or swing on the oven door. Do not play with the oven or use it as a toy.
- Children should be taught all important safety instructions: use of pot holders, careful emoval of food coverings; paying special attention to packaging (e.g. self-heating materials) designed to make food crisp, as they may be extra hot.
• Never modify the oven in any way.
- Do not move the oven while it is in operation.
- When using a browning dish or self-heating material, always place a heat resistant insulator such as a porcelain plate under it to prevent damage to the turntable due to heat stress. The preheating time specified in the dish's instructions must not be exceeded.
- Do not use metal utensils, which reflect microwaves and may cause electrical arcing. Do not put cans in the oven.
• Use only the turntable designed for this oven.
-
Do not place anything on the outer cabinet during operation.
-
Do not use plastic containers for microwaving if the oven is still hot from using the grill, dual and automatic operation (except auto defrost), because they may melt. Plastic containers must not be used during above modes unless the container manufacturer says they are suitable.
- If you are unsure how to connect your oven, please consult an authorised, qualified electrician.
- Water vapour or drops may occasionally form on the oven walls or around the door seals and sealing surfaces. This is a normal occurrence and is not an indication of microwave leakage or a malfunction.
- The electrical outlet must be readily accessible so that the unit can be unplugged easily in an emergency.
- Do not place the oven in areas where heat is generated. For example, close to a conventional oven.
- Clean the waveguide cover, the oven cavity and the turntable after use. After cooking fatty foods without lid, always clean the cavity and especially the grill heating elements thoroughly. These must be dry and free from grease. Built-up grease may overheat and begin to smoke or catch fire.
- Individuals with pacemakers should check with their doctor or the manufacturer of the pacemaker for precautions regarding microwave ovens.
- Do not immerse the power supply cord or plug in water or any other liquid.
- Do not let the power supply cord hang over the edge of a table or work surface.
- Keep the power supply cord away from heated surfaces, including the rear of the oven.
- Always open containers, popcorn makers, oven cooking bags, etc., away from the face and hands to avoid steam burns.
- Always stand back from the oven door when opening it, to avoid burns from escaping steam and heat.
⚠️ Danger: Only permit children unsupervised use of the microwave oven when they have received adequate instruction in its operation. Children must understand the dangers from improper usage.
- To minimize the risk of fire in the microwave: When heating food in plastic or paper containers, always keep an eye on the microwave when it is in operation, as these materials can catch fire.
- Remove closures containing wire from paper or plastic bags, before placing them in the microwave.
- Should you notice smoke, switch the appliance off or pull the plug from the socket and keep the door closed to suffocate any possible flames.
- Do not use the interior of the microwave for storage purposes. Do not leave paper items, cooking utensils or food in the microwave when it is not being used.
⚠️ Important: Liquids and other foods must not be heated in airtight containers, as these may explode and damage the appliance. When heating beverages in the microwave, bubbling may be delayed when the drink boils. Therefore, be careful when handling the container.
- Do not fry in the microwave. Hot oil can damage parts of the appliance and utensils and even cause skin burns.
- Eggs in their shells and hard-boiled eggs should not be heated in the microwave, as they may explode, even after completion of the heating process.
Food with thick skins, such as potatoes, whole pumpkins, apples and chestnuts must be pricked before cooking.
The content of babies' bottles or jars of baby food should be shaken or stirred.
Danger: Before feeding, check the temperature to avoid potentially lethal burns for babies. Cooking utensils may become hot from the heat emitted by the food, so you may require oven gloves to touch them. In this case it should be checked if the cooking utensils are suitable for use in the microwave.
Danger: Microwave radiation is dangerous! Arrange for service and repair work, in which the coverings that protect you from contact with microwave radiation need to be removed, to be carried out only by trained specialists.
⚠️ Danger: Inadequate cleanliness of the cooking appliance can lead to destruction of the upper surface, which on your part influences the total period of use and could possibly lead to dangerous situations.
Earthing notice/Correct Installation
This appliance must be earthed. The appliance has a lead with an earthing wire and earthing connector. A correspondingly installed and earthed wall socket is required for this. In the case of a short circuit, earthing with the earthing cable reduces the risk of an electric shock. An individual circuit solely for the connection of the microwave is recommended. The use of high voltages is dangerous and can cause fires or other accidents, resulting in damage to the appliance.
⚠️ Danger: Improper use of the earthing connector can cause the risk of an electric shock.
NOTE: Should you have any questions about earthing or the instructions on the use of this electrical appliance, please consult an electrician or a maintenance technician.
Neither the manufacturer nor the dealer can accept liability for damage to the microwave oven or injury to persons resulting from failure to comply with the instructions for electrical connection.
Interference with other appliances
The operation of the microwave can cause interference on your radio, television or similar appliances. If such interference should occur, it may be reduced or corrected with the following remedial measures:
- Clean the door and the seal of the microwave.
- Re-align the receiver antenna of your radio or television.
- Position the microwave in a different place to the receiver.
- Move the microwave away from the receiver.
- Plug the microwave into another wall socket. The microwave and the receiver should be connected to different circuits.
Installation of the appliance
- Choose an even surface with enough space for the ventilation of the appliance.
- Keep a distance at least 7.5 cm between the appliance and the adjacent walls. Make sure that the door of the microwave oven can be easily opened.
- Make sure that the power plug is easily accessible and can be reached and disconnected in emergencies or dangerous situations.
- Keep a gap at least 30 cm free above the microwave.
- Do not remove the feet underneath the micorwave.
- Do not block air supply and exhaust openings. Otherwise the appliance may be damaged.
• Install the appliance as far away as possible from radios and televisions. The operation of the microwave oven can cause malfunctions of radio and television reception.
- Connect the appliance to a standard household wall socket. Make sure that the voltage and frequency ratings correspond to the details stated on the rated power label.
⚠️ Important! Do not install the microwave above a cooker or other appliance generating heat. Installation in such a location could lead to damage to the appliance and the loss of warranty.
- Remove packaging material and any protective film on the surface of the casing.
Note: Do not remove the light grey flimmer cover plate, which is mounted in the cooking area to protect the magnetron.
Before you begin
Basic principles of microwave cookery
- Arrange the food sensibly.
• The thickest parts near the edges.
- Pay attention to the cooking time. Select the shortest possible stated cooking time and increase as required. Food that is cooked too long can begin to smoke or catch fire.
- Cover the food during cooking with a lid suitable for microwave cookery. The lid prevents splashing and helps in the even cooking of the food.
- While cooking, turn the food in the microwave once so that items such as chicken or hamburgers are cooked more quickly.
• Large pieces of food such as joints of meat must be turned at least once.
- Completely re-arrange foods such as meatballs after half the cooking time. Turn them and place the meatballs from the middle of the tabelware to the edge.
Use suitable cookware
- The ideal material for a microwave oven is microwave-permeable, allowing the energy to penetrate the container to heat the food. Microwave cannot penetrate metal. Therefore metal containers and cookware should not be used.
- When heating in the microwave, do not use items which made of recycling paper. This can contain tiny metal fragments which generate sparks and/or even cause fires.
- We recommend the use of round/oval cookware instead of square or oblong containers, as food in corner areas tends to overcook. The following list is intended to assist you in selecting the correct tableware.
| Cookware | Micro-wave | Grill | Combination |
| Heat-resistant glass | Yes | Yes | Yes |
| Not heat-resistant glass | No | No | No |
| Heat-resistant ceramic | Yes | Yes | Yes |
| Microwaves suitable plastic cookware | Yes | No | No |
| Kitchen roll | Yes | No | No |
| Metal tray Metal plate | No | Yes | No |
| Metal racks | No | Yes | Yes |
| Kitchen foil & Foil container | No | Yes | No |
| Crispy-Pan | Yes | No | Yes |
Description of functions
Setting the clock
After inserting the mains plug into the socket and powering on, open the microwave door once. The LED display reads „0:00“. The oven emits an acoustic signal and goes into standby mode.
Setting 12-hour-mode
- Press button ☑3 "Clock" once. A red clock symbol appears on the LED display ⏻ and 12-hour-mode is indicated via "12 H".
- Turn the dial 21 to set the hours.
- Now press the button 23 "Clock" and the display changes over to the minutes setting.
- Turn the dial 21 to set the minutes.
- To finish press the button 23 "Clock". The following display flashes in the LED display ,:" indicating that the "Set clock" process has been successfully completed.
Setting 24-hour-mode
- Press button 23 „Clock" twice. A red clock symbol appears on the LED display and 24-hour-mode is indicated via „24 H".
- Turn the dial ② to set the hours.
- Now press the button ☑ "Clock" and the display changes over to the minutes setting.
- Turn the dial 21 to set the minutes.
- To finish press the button 23 „Clock/energy save“. The following display flashes in the LED display “:” indicating that the „Set clock“ process has been successfully completed.
Note: If you press the button „Cancel/Stop“ 18, the appliance automatically changes back to its previous status.
Setting the kitchen timer
The microwave has a kitchen timer, which you can use independently with microwave operation.
- Press button 📋 "Kitchen timer" if the appliance is in standby mode. The LED display shows a flashing "0:00" and the red clock symbol lights up.
- Now set the desired time by using the dial ②1. You can select any time range from 5 seconds to 95 minutes.
- Press button ☎ "Start/quick start". An acoustic signal is issued and the read clock symbol flashes. The count down begins.
As soon as the set time is expired, you will hear a repeated acoustic signal. Press the button „Cancel/Stop” ^18 to stop the acoustic signal.
(i) Note: While the Kitchen timer is running, the current time cannot be displayed.
Operation
Door safety latch ⑥
Pull the handle to open the door. If the door is opened during operation, the cooking process is interrupted, the program or function, however, remain. The cooking process is continued when the door is closed and the button Start/quick start 📋 is pressed again.
Glass turntable ②
Place the turnable ring ③ in the middle of the microwave. Position the turntable ② sich that the indentations on thje back of the turntable lock into the three base clips. Always leave the glass turntable with the turnable ring ③ in the appliance during operation. Due to the rotating turntable an even distribution of energy and microwaves is guaranteed.
Use the metal stand for grilling.
Place a heat-resistant plate underneath the metal stand. This will collect any splashes of grease or food.
⚠️ Important! The metal stand must only be used on the glass turntable. Always place the metal stand in the middle of the turntable. When removing food after cooking, always use oven gloves or similar.
Please note that it may become very hot inside the appliance and take care.
Crispy-Pan 10
Use the Crispy-Pan to give a crispy touch to pizza. Place the Crispy-Pan onto the metal rack.
⚠️ Important! After cooking the Crispy-Pan is hot. Use a kitchen cloth to remove the pan.
① Note: Clean the Crispy-Pan with a damp cloth. Never clean in a dish washer.
The Crispy-Pan is suitable for all conventional ready-made pizzas with a diameter of 25.5 cm.
Cooking in the microwave oven
If you wish to use the classical basic functions of the microwave (reheat, boiling, cooking), you must simply select the microwave power and set the desired cooking time. You can choose between eight power levels from 100 to 800 watts, with a maximum cooking time of 95 minutes.
1) Select power
- Press the button ⑲ „Power“ the appropriate number of times to set the required power level.
• 1x for 800 watt power.
• 2x for 700 watt power.
• 3x for 600 watt power.
• 4x for 500 watt power.
- 5x for 400 watt power.
- 6x for 300 watt power.
- 7x for 200 watt power.
• 8x for 100 watt power.
The power is shown in the LED display (e.g. P 800 at 800 watts power).
2) Setting the cooking time
- Turn the dial 21 to set the cooking time.
The increments for setting the time with the control knob are as follows:
• from 0 to 1 min: in 5 second increments
• from 1 to 5 min: in 10 second increments
• from 5 to 10 min: in 30 second increments
• from 10 to 30 min: in 1 minute increments
• from 30 to 95 min: in 5 minute increments
Press button 18 „Cancel/Stop" once, to abort or stop an input process. The appliance switches back to standby mode.
3) Start the cooking process
To start the cooking process, please press button 22 „Start/quick start“. In the LED display, the symbols for microwave operation and cooking appear. The count down begins.
Note: If you press button ② "Start/quick start" during operation, the cooking time will be increased by 30 seconds, while the power level remains unchanged.
Interrupting processes (Cancel/Stop)
You can stop a process, interrupt it and then continue.
Interrupting the cooking process
Press button 18 „Cancel/Stop" once to interrupt a cooking process. The appliance interrupts the cooking process and stops the remaining time.
Press button 22 „Start/quick start“, to continue the cooking process.
Abort the cooking process
Press button 18 „Cancel/Stop" twice to abort a cooking process. The appliance switches back to standby mode.
Prolong/shorten the cooking time
To increase/decrease the cooking time during cooking, turn the dial 21:
- turn clockwise and the cooking time is increased by one minute.
- turn anti-clockwise and the cooking time is decreased by one minute.
In order to increase the cooking time by 30 seconds at a time, press button ☎ „Start/quick start“.
Note: In standby mode and during defrosting, the time cannot be altered by means of the dial.
Quick start function
With this function you can immediately for 30 seconds (or longer, up to 95 minutes) begin cooking at 100 % power.
- Press button ② „Start/quick start". In the LED display the symbols for microwave operation and cooking flash. The count down begins.
Memory function
Use the memory function, if you wish to carry out 3 processes after one another. If you choose several operations and one of them includes defrosting, defrosting must be set as the first in the sequence.
After finishing a process, the acoustic signal sounds once, then the next process immediately starts
Example
You require 300 watts for 15 minutes.
Use microwave power for defrosting + 10 minutes at 600 watts microwave power for cooking + 10 minutes grilling for the preparation of food.
- Press button 20 „Memory” once. „3-1“ is displayed in the LED display.
- Press button 19 „Microwave“ six time to set 300 watts power for defrosting. „P300“ is displayed in the LED display.
- Turn the dial ② to set the cooking time (duration). Set 15:00 at 300 w power.
- Press button 20 "Memory" once again. Now "3-2" is displayed in the LED display.
- Press button 19 „Microwave“ three times, to set 600 watts power. „P600“ is displayed in the LED display.
- Turn the dial 21 to set the cooking time (duration: 10:00) at 600 w power.
- Press button 20 „Memory“. „3-3“ is displayed in the LED display.
- Press button 16 „Grill/Combi" once to set the grilling function. „G-1" is displayed in the LED display.
- Turn the dial 21 to set the grilling time (duration: 10:00).
- Press button 22 „Start/quick start“, to activate the pre-setting function.
Selecting pre-settings
With this program you can pre-program a certain starting time for cooking or grilling food.
If you have correctly adjusted the settings, the appliance will automatically start at the set time.
(i) Note: The clock must be set to select the „Pre-settings“ function.
- Press button ⑮ „Pre-settings“. The LED display shows the currently set time, and the hour figure flashes.
- Turn the dial ② to set the hours.
- Press button 15 „Pre-Settings“ again. Now the minute indicator starts flashing.
- Turn the dial 21 to set the minutes.
- Enter the desired cooking program: For microwave operation: Press button 19 „Microwave” correspondingly often to select the power level. Set the desired cooking time using the dial 21. For grilling: Press button 16 „Grill/Combi” once to activate the grill function. Set the desired cooking time using the dial 21.
- Press button 22 „Start/quick start".
The clock symbol and the colon flash. The microwave automatically starts the process at the pre-set time.
Example:
It is 12:30 a.m. You wish to heat your food at 12:45 a.m. automatically at 400 watts power for 10 minutes.
- Press button 15 „Pre-settings“. The LED display shows the currently set time (12:30 a.m., and the hour figure flashes).
- Press button ⑮ „Pre-settings“ again and set the minutes to „:45“ with the dial ②1.
- Press button 19 „Microwave" five times, to set 400 watts power.
- Set the 10 minutes cooking time using the dial 21.
- Press button 22 „Start/quick start“, to start the stored process.
For foods to be prepared in auto menu mode, it is not necessary to enter the cooking time or power setting. It is quite sufficient to enter which type of food is to be cooked/boiled, and its weight. To do this, press the button on which the food you wish to cook is pictured and named. The weight of the item must then be set via the dial ②.
Enter the weight of the food
The weight setting is important to determine the necessary cooking time.
After pressing the respective symbol, a weight appears on the LED display in grams „g“; for starters the number of portions and for beverages in „ml“. You can change the respective details via the dial 21. As soon as the weight of the food ap-pear's, press button 22 „Start/quick start“. „Auto-Cook“ appears on the LED display AUTO COOK.
Note: For some foods such as beef, pork, poultry and cooked meats it is necessary to turn the food after approx. 2/3 of the cooking time. The acoustic signal sounds twice and „turn“ appears on the display, to remind you to turn the food.
- Press button ⑱ „Cancel/Stop“, to interrupt the cooking process and turn the food.
- To continue please close the door. Press button 22 Start/quick start. The microwave automatically resumes operation for the remaining time.
Note: If you wish to carry on without turning, wait for the acoustic signal. The microwave automatically continues its program. We recommend that you turn the food. This ensures even cooking. However, during turning process, make sure that you are extremely careful as handling very hot foods in the microwave.
Your microwave oven can cook different types of food of following weights:
| Type of food | Symbol | Weight | turn over after ... |
| Pizza |  | P1 150-450 gP2 150-450 gP3 700-900 g | - |
| Pork |  | 200-1500 g | 2/3 of the cooking time |
| Beef |  | 200-1500 g | 2/3 of the cooking time |
| Poultry |  | 400-1400 g | 2/3 of the cooking time |
| Fish |  | 200-1200 g | - |
| Vegetables/fruit |  | 100-1000 g | - |
| Sausage |  | 100-500 g | 2/3 of the cooking time |
| Potatoes |  | 100-800 g | - |
| Beverages |  | 200-500 ml | - |
| Entrees |  | 1-2 portions | - |
| Auto warming |  | 300-700 g | - |
① Note: The acoustic signal sounds twice to remind you to turn the food over.
Example 1:
Proceed as follows to cook 400 g vegetables or fruit:
- Press button „Vegetables/fruit“ (in standby mode).
- Using the dial 21 select „400 g“.
- Press button 22 „Start/quick start".
Example 2:
To heat 300 ml water, proceed as follows:
- Press button „Beverages“ in standby mode.
- Using the dial ② to select „300 ml“.
- Press button 22 „Start/quick start“.
Example 3:
Proceed as follows if you wish to heat a starter:
- Press button „Enteres“ in standby mode.
- Press button 22 „Start/quick start“.
Making pizza in the Crispy-Pan
Using the „Crispy-Pan“ you can make crisp pizzas in the microwave. To do this, use the button 12 „Pizza“. Press button 12 „Pizza“:
- once for frozen pizza, temperature approx. -18°/weight 150 g - 450 g („P-1“ appears on the LED display).
- twice for chilled pizzas, temperature approx. 5°/weight 150 g - 450 g
(„P-2“ appears on the LED display).
- three times for fresh pizzas, temperature approx. 20°/weight 700 g - 900 g ("P-3" appears on the LED display).
Example:
Proceed as follows if you wish to cook a pizza:
-
Press button ⑫ „Pizza“ once. The LED displays „P-1“.
(„P-2“ or „P-3“ if the button is pressed twice or three times respectively).
-
Turn the dial ② to set the weight of the pizza.
- Place the pizza in the Crispy-Pan ⑩ and position the Crispy-Pan on the metal rack ⑨ in the middle of the turntable ② in the microwave.
- Press button 22 „Start/quick start“, to start the grilling process. The LED displays the time.
Grill function
The grilling function can be used for thin slices of meat, steaks, meatballs, sausage or pieces of chicken. It is also suitable for toasted sandwiches, gratins and for the baking of crispy rolls.
When grilling, always use the metal rack ⑨. This way you will achieve optimal grilling results.
- Press button 16 „Grill/Combi“ once to activate the grill function.
The red symbol for the grilling function and G-1 appears on the LED display.
- Set the desired cooking time using the dial ②. The maximum possible cooking time is 95 minutes.
- To start the grilling function press button 22 „Start/quick start".
Grill/Combi cooking procedure
The function combines the grilling function with normal microwave operation. In combined mode, the microwave automatically cooks for a certain amount of time and grills for the remaining time. You can notice a quiet clicking noise when the oven is changing between modes.
Grill/Combi 1
In Grill/Combi 1 the microwave power is 36% and the grilling power is 64% of the cooking time. This is suitable e.g. for fish, potatoes or gratins.
- Press button 16 „Grill/Combi“ twice to activate the grill/combi function 1. In the LED display the red symbol for microwave operation appears as well as grilling function and C-1.
- Set the desired cooking time using the dial ②1. The maximum possible cooking time is 95 minutes.
- To start please press button 22 „Start/quick start”.
Grill/Combi 2
In Grill/Combi 2 the microwave power is 55% and the grilling power is 45% of the cooking time. This is suitable e.g. for puddings, omettes or poultry dishes.
- Press button 16 „Grill/Combi“ three times to activate the grill/combi function 2. In the LED display the red symbol for microwave operation 📋 appears as well as grilling function 🌐 and C-2.
- Set the desired cooking time using the dial ②. The maximum possible cooking time is 95 minutes.
- To start please press button 22 „Start/quick start”.
Defrosting by weight
With this function you can defrost meat, poultry and fish without any problems. The defrosting time and the power level are calculated and set automatically once you have entered the weight.
- Press button ⑪ „Weight defrost“:
- once to defrost meat („dEF1“ appears in the LED display),
- twice to defrost poulty („dEF2“ appears in the LED display),
- three times to defrost fish („dEF3“ appears in the LED display),
-
four times to defrost pizza („dEF4“ appears in the LED display),
-
five times to defrost vegetables („dEF5“ appears in the LED display),
- six times to defrost cooked meats („dEF6“ appears in the LED display).
The red symbols for microwave operation and defrosting 35, 36 also appear on the LED display.
- Using the dial ② to enter the weight of the food to be defrosted in grams (the LED display shows g). You can set the following weight ranges for the various foods:
Meat: 100 to 2300 g
Poultry: 100 to 4000 g
Fish: 100 to 1000 g
Pizza: 150 to 900 g
Vegetables: 100 to 600 g
Sausage: 100 to 500 g
- To start the defrosting process by weight, please press button ☎ "Start/ quick start". In the LED display the symbols for microwave operation and defrosting flash. The calculated time counts backwards.
Note: With some foods, such as meat, poultry, fish, vegetables and sausage, it is necessary to turn the food after a while. The acoustic signal sounds twice and „turn“ appears on the display, to remind you to turn the food.
-
Press „Cancel/Stop“ button ⑱ then open the door and turn the food.
-
Close the door and press button 22 „Start/quick start“.
The defrosting process is continued.
i Note: If you wish to carry on without turning, wait for a while after the acoustic signal. The microwave automatically continues its program. We recommend that you turn the food. This ensures even defrosting.
Defrosting by time
- Press button 24 „Defrosting“. The red symbols for microwave operation and defrosting also appear on the LED display.
- Turn the dial ② to set the defrosting time: The maximum possible defrosting time is 95 minutes.
- Press button 22 „Start/quick start“, to start the defrosting process. In the LED display the symbols of microwave operation and defrosting flash 36, 37. The calculated time counts backwards
Query functions
Query the time during operation
During the cooking process, press button 23 „Clock“. The time appears on the LED display for 2–3 seconds.
Query the power level operation
During the cooking process, press button 19 „Microwave“. The activated power level appears on the display for 2–3 seconds.
Child protection system
Activate this setting to prevent accidental activation by children and other persons not familiar with the operation of the appliance.
The symbol for the child protection system 📋 appears on the LED display, and the appliance cannot be put into operation as long as this function is active.
Setting the child protection system
Keep button 18 „Delete/Stop“ for 3 seconds. At first an acoustic signal sounds, then the symbol for the child protection system 📋 appears on the LED display.
Deactivating the child protection system
Keep button 18 "Delete/Stop" pressed again for 3 seconds, until an acoustic signal sounds and the symbol for the child protection system goes out.
Power-saving function
You can activate the power-saving function if you do not wish to use the microwave.
Activating the power-saving function
In standby mode, press button 23 "clock" for three seconds. The LED display goes out and the power-saving function is activated.
Deactivating the power-saving function
As long as any button is pressed, the microwave is in standby mode and the clock is displayed.
(i) Note: The clock continues to run despite the power-saving function.
Magnetron control protection function
If the microwave function has been in operation for 30 minutes or longer at a power level of 800 W, the power level of the microwave is automatically reduced to 700 W. This takes place when the memory function is activated and also in an other status.
Acoustic signal function
After completion of the cooking process a long acoustic signal sounds five times.
Note:
- If you have pressed a button and activated a valid function, a long acoustic signal sounds. If, however, you have selected an invalid button/function, no acoustic signal sounds.
- If after setting cooking mode for 5 minutes you have not pressed the button „Start/quick start“, the appliance returns to stand-by mode (time is displayed).
Cleaning and Care
Before cleaning, switch the microwave off and pull the power plug out of the wall socket.
• Always keep the interior of the microwave clean.
- If splash of food or spilt liquids stick to the walls of the microwave, wipe them off with a damp cloth.
- Use a mild detergent if the micro-wave is more heavily soiled.
- Avoid using cleaning sprays and other aggressive cleaning agents, as they can cause stains, stripes or a blurring of the door surface.
- Clean the external walls with a damp cloth.
- To avoid damage to the functional components in the interior of the microwave, do not let any water seep in through the ventilation slits.
- Regularly remove splashing or contamination. Clean the door, both sides of the window, door seals and adjacent components with a damp cloth. Do not use abrasive cleaning agents.
- If steam should collect on the outside of the appliance door, wipe it off with a soft cloth. This can happen if the microwave is operated in extremely humid conditions.
- Regularly clean the glass turntable. Rinse the plate in warm soapy water or in the dishwasher.
- Clean the turnable ring and the appliance door regularly to prevent excessive noise generation. Simply wipe the bottom of the microwave with a mild detergent. You can also wash the turnable ring in mild soapy water or in the dishwasher. Make sure after removing the turnable ring for cleaning, that you re-install it correctly.
- Regularly eliminate odours. Put a deep microwave bowl with a cup of water, juice and peel of a lemon into the microwave. Heat for 5 minutes. Wipe off thoroughly and rub dry with a cloth.
- Clean the Crispy-Pan with a damp cloth and mild detergent. Never attempt to clean it in a dish washer!
- If the replacement of the bulb in the microwave should be necessary, have it changed by a dealer or consult our service department.
Disposal

Do not dispose of the appliance in your normal domestic waste. This product is subject to the European guideline 2002/96/EC.
Dispose of the appliance through an approved disposal centre or at your community waste facility. Observe the currently applicable regulations. In case of doubt, please contact your waste disposal centre.

Dispose of all packaging materials in an environmentally responsible manner.
Warranty & Service
The warranty for this appliance is for 3 years from the date of purchase. This appliance has been manufactured with care and meticulously examined before delivery. Please retain your receipt as proof of purchase date. Should a claim need to be made under the warranty, please make contact by telephone with our service department. Only in this way can a post-free despatch for your goods be assured.
The warranty covers ONLY claims for material and manufacturing defects, not for wearing or consumable or for damage to fragile components. This product is for private use only and is not intended for commercial applications.
The warranty will become void in the event of abusive and improper handling, use of force and internal tampering not carried or approved by our authorized service branch. Your statutory rights are not restricted in any way by this warranty.
GB DES Ltd
Units 14-15
Bilston Industrial Estate
Oxford Street
Bilston
WV14 7EG
Tel.: 0870/787-6177
Fax: 0870/787-6168
e-mail: support.uk@kompernass.com

Irish Connection
Harbour view
Howth
Co. Dublin
Tel: 00353 (0) 87 99 62 077
Fax: 00353 18398056
e-mail: support.ie@kompernass.com
Importer
KOMPERNASS GMBH
BURGSTRASSE 21
44867 BOCHUM, GERMANY
www.kompernass.com
Tips
Freezing and defrosting – the easy way ...
The microwave is the ideal appliance for even and quick defrosting of deep-frozen goods. The selection of power, defrosting and standing times depend on the nature and amount of food.
Microwaves always penetrate the food from the outside to the inside. Therefore particularly large items cannot be defrosted right to the middle, otherwise the outer layers may begin to cook.
Correct defrosting begins with the freezing process.
Consider what you are doing and freeze small, flat portions suitable for your household. Consider also the size of the various bowls or plates on which you wish to defrost the deep-frozen goods later in the microwave.
In the following defrosting chart, several foods are listed. You will find a so-called „standing time“ as well as details regarding time and amount. This serves as a temperature compensation time, in which the remaining heat from the defrosted layers is transferred to the still frozen layers in the middle. During this standing time, leave the deep-frozen goods in the switched off microwave or outside the appliance.
There may be deviations in the stated values. These are caused by the different factors of the foods.
Use the integrated defrosting functions. See also the chapters „Defrosting by weight“ and „Defrosting by time“.
| Type of food | Rolls |
| Weight/quantity | 50 g/2 pc |
| Defrosting time | approx. 1 min |
| Standing time | -- |
| Notes/tips | -- |
| Type of food | Bread |
| Weight/quantity | 500 g |
| Defrosting time | 8-10 mins |
| Standing time | 10-20 mins |
| Notes/tips | -- |
| Type of food | Layer cake |
| Weight/quantity | 400-800 g |
| Defrosting time | 8-12 mins |
| Standing time | 90-120 mins |
| Notes/tips | only slightly defrost the fancy cake |
| Type of food | Butter |
| Weight/quantity | 250 g |
| Defrosting time | approx. 1 min |
| Standing time | 20-30 mins |
| Notes/tips | remove the packaging and put the butter on a plate |
| Type of food | Cheese (piece) |
| Weight/quantity | 500 g |
| Defrosting time | 5-6 mins |
| Standing time | 60-90 mins |
| Notes/tips | turn the item once after half of the time |
| Type of food | Cold meats |
| Weight/quantity | 200 g |
| Defrosting time | approx. 3 mins |
| Standing time | 10–15 mins |
| Notes/tips | turn the cold meat after half the time, carefully cut slices with the knife before standing time begins |
| Type of food | Strawberries |
| Weight/quantity | 250 g |
| Defrosting time | approx. 8 mins |
| Standing time | 5-10 mins |
| Notes/tips | defrost the strawberries or other fruit in a dish wiht a lid. Stir carefully after half of the time |
To defrost meat, poultry and fish please read the chapter „Defrosting by weight“.
Cooking – the easy way ...
- When cooking food, always use tablewear with a lid suitable for microwave cookery (unless stated otherwise).
The cooking details refer to food at refrigerator temperature. Defrost food to be cooked first.
Note: The defrosting time for deep-frozen vegetables (-18°C, approx. 100–1000 g) can vary between 5 and 15 minutes. Follow the instructions on the packet if in doubt. Prepare vegetables by washing and cleaning them before cooking.
Preparation instructions are important
- Please absolutely observe the various preparation instructions. While the addition of liquid is required (usually 1 - 2 tblsp. per 100 g vegetables) for some foods, no liquid is required e.g. for cucumberse, spanish onions, mushrooms and spinach. Other foods must be stirred at least once during cooking.
Observe standing times
- The so-called „standing time“ is particularly important, as for defrosting. The temperature compensation and the resulting after-cooking should always be 5–10 minutes.
- During this standing time, leave the food in the switched off microwave or outside the appliance.
• After this standing time you can season vegetables or add a little butter if desired.
- When cooking food in bowls or deep-frozen convenience foods, pay attention to the preparation times for cooking in microwave ovens stated on the packaging.
- The details in the following chart are only intended as standard values.
| Type of food | Boiled potatoes |
| Weight/quantity | 250 g |
| Add liquid | 3 Tbls water |
| Watts/power | 600 Watt |
| cooking time in mins. | approx. 5 mins |
| Preparation information | evenly sized pieces if possible - directly after cooking drain off the water |
| Type of food | Noodles |
| Weight/quantity | 125 g |
| Add liquid | 600 ml water |
| Watts/power | 500 Watt |
| cooking time in mins. | approx. 5 mins |
| Preparation information | at 800 W add noodles to boiling water approx. 7 min and cook without the lid |
| Type of food | Rice |
| Weight/quantity | 100 g |
| Add liquid | 300 ml water |
| Watts/power | 600 Watt |
| cooking time in mins. | approx. 3-4 mins |
| Preparation information | The expansion time depends on the type of rice. Brown rice takes longer. |
| Type of food | Cauliflower |
| Weight/quantity | 400 g |
| Add liquid | 4 Tbls water |
| Watts/power | 600 Watt |
| cooking time in mins. | approx. 6-7 mins |
| Preparation information | Values also apply to broccoli |
| Type of food | Peas |
| Weight/quantity | 300 g |
| Add liquid | 3 Tbls water |
| Watts/power | 600 Watt |
| cooking time in mins. | approx. 3-4 mins |
| Preparation information | -- |
| Type of food | Spinach |
| Weight/quantity | 500 g |
| Add liquid | -- |
| Watts/power | 600 Watt |
| cooking time in mins. | approx. 6 mins |
| Preparation information | add a little cream to the spinach |
| Type of food | Mushrooms |
| Weight/quantity | 400 g |
| Add liquid | -- |
| Watts/power | 600 Watt |
| cooking time in mins. | approx. 5-6 mins |
| Preparation information | before cooking add a little butter |
| Type of food | Fish filet |
| Weight/quantity | 400-600 g |
| Add liquid | see notes |
| Watts/power | 500 Watt |
| cooking time in mins. | approx. 8-12 mins |
| Preparation information | for every 100 g of fish, add 1 tblsp. water, lemon, stock or wine |
Grilling – the easy way ...
- For all grilling processes, please use the metal rack ⑨. Additionally place a large heat-resistant plate underneath the metal rack ⑨. This collects gravy/fat, juices and contamination by food splashes.
- The grill function is e.g. suitable for thin slices of meat, fish, meatballs, shish-kebab, sausage or pieces of chicken. Toast or rolls can be toasted with the grill (read slo „Tips“) and gratinated toast (e.g. Hawaii-Toast) can be made.
- You can directly select the grill function or select several foods via the quick-selection buttons with the menu images.
- For some foods and/or the way of their preparation, a combined cooking and grilling process is advisable. For both possible functions, cooking and grilling times are automatically carried out in the corresponding length. Please also read chapter „Grill/Combi cooking process“.
- Prepare the food you wish to grill just as you would usually do. For example, remove the scales from fish first, then gut them. Rub chicken with seasoning and always cook chicken legs skin side first.
- Turn the food after the first stated cooking time. The stated value 1 corresponds with the time for th first side, value to for the second, following side.
(i) Note: Make sure to enter the times for the first and second side separately.
There may be deviations in the following stated values. They result from various factors (e.g. temperature, shape) of the food.
| Type of food | 2 turkey steaks 400 g |
| Function | Grill |
| Time (1nd side) in mins. | approx. 12 mins |
| Function | Grill |
| Time (2nd side) in mins. | approx. 10 mins |
| Type of food | 2 chicken legs 500 g |
| Function | Grill |
| Time (1st side) in mins. | approx. 8 mins |
| Function | Grill |
| Time (2nd side) in mins. | approx. 7 mins |
| Type of food | 2 shish kebab 400 g |
| Function | Grill |
| Time (1nd side) in mins. | approx. 12 mins |
| Function | Grill |
| Time (2nd side) in mins. | approx. 12 mins |
| Type of food | 2 trouts 400 g |
| Function | Combi 2 |
| Time (1st side) in mins. | approx. 8 mins |
| Function | Grill |
| Time (2nd side) in mins. | approx. 7 mins |
| Type of food | 4 Meatballs 600 g |
| Function | Combi 2 |
| Time (1nd side) in mins. | approx. 12 mins |
| Function | Grill |
| Time (2nd side) in mins. | approx. 8 mins |
| Type of food | 2 pork chops 600 g |
| Function | Grill |
| Time (1nd side) in mins. | approx. 15 mins |
| Function | Grill |
| Time (2nd side) in mins. | approx. 13 mins |
Suitable tableware
For defrosting, cooking etc., always use dishes or bowls suitable for microwave cookery. In most cases glass dishes are suitable. Procure microwave tableware in various sizes with lids.
Baking crispy rolls
By means of the grill function of your microwave, you can bake crisp rolls. Before baking, moisten the rolls with a little water. Bake the rolls for appro. 2 minutes, depending on the amount and type. So that the rolls have that „fresh-from-the-oven“ taste, even inside, we recommend that you cut the rolls after the first period and re-bake for one minute, the turnand bake for a further minute.
Recipe suggestions
Pizza
Ingredients:
300 g ready-made dough
200 g strained tomato pulp
150 g Topping (as desired, e.g. cabon, salami, mushrooms)
50 g grated cheese
Spices: basil, oregano, thyme, salt, pepper
Preparation:
Prepare the dough as per instructions on the packing. Roll out the dough to the size of the Crispy-Pan. Lightly grease the Crispy-Pan and lay the pizza dough into it. Pierce a few holes in the dough. Spread the tomatoes along with the seasonings over the pizza base. Place the desired layer over it. Now cover the pizza with cheese. Place the pizza on the metal stand in the middle of the turntable and bake it with the setting „fresh pizza" (P-3).
Onion soup with gratinated cheese topping
Ingredients for 4 portions:
300 g onions
30 g butter, salt, white pepper,
500 ml instant meat broth
125 ml white wine, dry
2 slices of toasted bread
2 slices of young Gouda cheese
Preparation:
Peel the onions and cut them into rings. Put them into a microwave dish with the butter and pepper, add the meat broth and cook with lid at 800 watts for approx. 12–15 minutes. Then add white wine and season to taste. Now cut the toasted bread into small cubes.
Fill the onion soup into 4 soup dishes and add the bread cubes. Place 1/2 slice of cheese on each soup dish.
Place the four soup dishes on the turn-table and gratinate via the grill function for approx. 10 minutes.
Lentil Hotpot
Ingredients:
200 g dried lentils
50 g smoked fat bacon
125 g pork belly
1 bunch vegetable mix for soups
500 ml water
1 bay leaf
250 g potatoes
2 smoked boiling sausages
Spices: salt, pepper, vinegar, sugar
Preparation:
Soak the lentils in plenty of water over night.
Clean and wash the soup vegetables and cut them into small pieces. Cube the meat and the bacon. Put the draines lentils into a microwave dish together with 500 ml water and meat, bacon, soup vegetables and the bay leaf.
Cook at 600 watts for 10–12 minutes with the lid on. Peel, wash and cube the potatoes and cut the boiling sausage into slices. Add the pieces of potato and slices of sausage to the hotpot and mix well. Cook at 500 watts for approx. 18 minutes and then add seasoning to taste.
Cauliflower with gratinated cheese topping
Ingredients:
500 g cleaned cauliflower
250 ml water
Salt
1 tblsp. starch
2 egg whites
2 egg yolks
1 carton of cream (200 ml)
2 tblsp.chives,
1 touch of cayenne pepper
150 g raw bacon (lean)
50 g grated Emmentaler cheese
Preparation:
Split the cauliflower into small pieces and put it into a microwave dish with 250 ml water and salt. Cook with the lid on at full power 800 Watt for approx. 5 minutes.
Then drain off the vegetable water and save it. Now stir the cream into the starch and add it to the vegetable water. Cook at full power 800 watts for approx. 2 to 3 minutes, stirring several times.
Add the egg yolk, chives and cayenne pepper, beat the egg white and fold it gently into the mixture Place the cauliflower and the bacon (in strips) into a flat casserole, then pour over the sauce and cover with grated cheese. Cook and gratinate using the Grill/Combi function „C-1“ at 500 watts for 18–22 minutes.
Maccaroni and minced meat casserole with broccoli
Ingredients:
150 g maccaroni, 500 ml water
1 tsp. salt, 1 onion, 1 clove of garlic
20 g butter, 300 g mixed mincemeat
(half pork, 1/2 beef)
1 packet of tomato purée with herbs
(approx. 350 g)
400 g broccoli, 4 tblsp. water
1 carton sour cream (200 g)
150 g sliced Gouda cheese semi-mature
Spices: salt, pepper
Preparation:
Fill 500 ml water and 1 tsp. salt into a microwave dish with lid and boil at full power 800 watts in approx. 10 minutes. Then add macaroni and cook for 3–5 minutes at 600 watts and then at 300 watts for another 3–5 minutes. Then drain off in a colander. Now braise the onion and the clove of garlic with the butter in a microwave dish at 600 watts for approx. 4–5 minutes. Then add the mince-meat and the tomato purée – cook again for 8–10 minutes at 600 watts. Stir in 3/4 carton of sour cream and season with salt and pepper. Wash and clean the broccoli and place it into a microwave dish with 4 tblsp. water. Pre-cook with lid at 800 watts for aprox. 5 minutes, then allow to drain off. Put the macaroni, vegetables and mince-meat in sauce into a casserole and mix. Distribute the remaining 1/4 carton of sour cream over the top and cover with cheese slices. Cook and gratinate with the Grill/Combi function „C-2“ at 500 watts for approx. 16–18 minutes.
Filet of pork with mushrooms in spicy paprika sauce
Ingredients:
4 fillets of pork, each approx. 150 g
350 g white mushrooms
150 g cubed bacon
2 cartons of cream (400 ml)
Season the filets of pork and place them in a flat casserole. Clean and halve the mushrooms and put them into the casserole with the filets of pork.
Mix the cream, tomato purée and pap-rika in a microwave dish and boil at 600 watt for approx. 5–6 minutes.
Cook and gratinate using the Grill/Combi function „C-2“ at 300 watts for approx. 20–22 minutes.
Potato gratin
Ingredients:
1000 g potatoes
Fat (to grease the casserole)
2 tblsp. breadcrumbs
1 carton of cream (200 ml)
50 g grated Emmentaler cheese
Butter (flakes)
Spices: salt, pepper
Preparation:
After peeling and washing, cut the potatoes into thin slices and season them. Grease a casserole, layer the potatoes and pour the cream over them. Finally sprinkle with the cheese and breadcrumbs and distribute the butter flakes over the top. Gratinate with the Grill/Combifunction „C-1“ at 500 watts for approx. 20 minutes.
Chicken fricassee
Ingredients:
1 chicken (approx. 1000 g)
300 g mushrooms
500 g asparagus
250 ml instant meat broth
100 ml cream
2 packets white sauce (instant)
1 tblsp. white wine
Spices: salt, pepper, nutmeg
Preparation:
Sprinkle salt on the chicken and put it into a microwave dish.
Cook with lid at 800 watts for approx. 16-18 minutes
Clean and halve the mushrooms, peel the asparagus and cut into 2 to 3 cm long pieces. Remove the skin and bones from the cooked chicken and cut the meat into bite-size pieces.
Put the meat broth, chicken, asparagus and mushrooms into a microwave dish. Heat with lid at 600 watts for approx. 13–15 minutes, stirring occasionally. Now stir the cream and the powdered sauce in and boil at 600 watts for a further 5–6 minutes. Season to taste with white wine, salt, pepper and nutmeg.
Green chicken casserole
Ingredients:
400 g chicken breast fillet
1 small courgette
1 small green paprika
125 ml instant chicken broth
200 g leeks
150 g turnip cabbage
150 g celery
50 g cream cheese with herbs
Preparation:
Clean and wash the vegetables. Cut the leeks into rings and the turnip cabbage and celery into thin slices. Braise in a microwave dish with lid at 600 watts for approx. 6–8 minutes. Cut the chicken breast into small pieces, the courgette into half slices and the paprika into cubes, and put them into the dish together with the hot instant chicken broth and the other ingredients. Cook with lid at 600 watts for approx. 12–15 minutes, stirring occasionally. Then stir in the crème fraîche and the cream cheese with herbs.
Bread or bacon dumplings
Ingredients for 4 dumplings:
4 wheat rolls
1/2 tsp. salt
150 ml milk
40 g butter
3 eggs
2-3 tblsp. breadcrumbs
2-3 tblsp. chopped parsley
30 g cubed bacon (for bacon dumplings)
Preparation:
Cut the rolls small and sprinkle with salt. Heat the milk in a microwave dish (at 800 watts for approx.
2-4 minutes), then pour it over the rolls and leave to stand for approx. 15 minutes.
Beat the butter and the eggs until creamy, then add the soaked rolls together with the breadcrumbs and the parsley and knead to a firm dough (Note: for bacon dumplings also knead in the cubed bacon).
Moisten your hands and shape 4 evenly sized dumplings, immerse them in cold water for a moment. Cook at 500 watts for approx. 6–8 minutes, then they are ready to be served.
White sauce
Ingredients:
40 g flour
30 g butter
250 ml instant broth
250 ml milk
Spices: salt, white pepper, sugar
Preparation:
Put flour, butter, hot broth and milk into a microwave dish, mix well and cook at full power, 800 watts for approx. 4-5 minutes, stirring well occasionally.
Then cook further for another 4-5 minutes at just 300 watts.
Mix well and add the seasonings to taste.
Vanilla sauce
Ingredients:
250 ml milk
Pulp of 1/2 a vanilla bean
1 carton of cream (250 ml)
2 tblsp. starch
3 tblsp. sugar
1 egg yolk
Preparation:
Mix the milk, vanilla paste, cream, corn flour and sugar in a microwave-safe bowl. Cook at 800 watts for approx. 4–5 minutes, stirring once.
Stir the cooked sauice well and bind it with egg yolk.
Rice pudding
Ingredients:
250 g rice for milk puddings
1 l. milk
1 tsp. butter
40 g sugar, cinnamon and sugar (for sprinkling) or stewed fruit
Seasoning: salt
Preparation:
Put rice, milk, a pinch of salt, butter and sugar into a large microwave basin. Boil with lid at full power, 800 watts for approx. 10–12 minutes, then stir and allow to swell at only 100 watts for approx. 20–22 minutes. Then leave to stand for a few minutes, stir and sprinkle with sugar and cinnamon or stewed fruit.
Red fruit pudding
(with strawberries and raspberries)
Ingredients:
250 g deep-frozen strawberries
250 g deep-frozen raspberries
1 pecket of vanilla sugar
2 tbsp. sugar
2 tblsp. starch
Preparation:
First stir the starch into 3 tblsp. water. Then put the fruit into a microwave bowl with lid and defrost and heat at full power, 800 watts, in approx. 6–8 minutes.
Lightly squash the fruits and add vanilla sugar, sugar and starch. Stir well and cook with lid at 600 watts for approx. 6–8 minutes.
Finally pour the pudding into dessert bowls and allow to cool.
Serve the red fruit pudding with the described vanilla sauce ...
Enjoy your meal!
Recipes provided without guarantee. All ingredients and preparation information are guiding values.
Add your own personal experience to these recipes. We hope you enjoy the recipes and wish you „bon appetit“.
Index
12-hour-mode 9
24-hour-mode 9
Acoustic signal function 16
Auto menu 12
Beef 12, 13, 26
Beverages 6, 12, 13
Boiled potatoes 20
Bread 18, 24, 28
Butter 19, 20, 21, 24, 26, 27, 28, 29
Buttons/controls on the control panel 3
Cancel/stop 3, 11
Cauliflower 21, 25
Cheese 19, 24, 25, 26, 27, 28
Chicken legs 22
Child protection system 15
Cleaning and care 16
Clock 3, 9, 12, 16
Cold meats 19
Cooking process 10, 11, 12, 15, 16, 22
Cooking time 5, 8, 10, 11, 12, 13, 14, 20, 21, 22
Cooking utensils 6, 7
Cookware 8
Crispy-Pan 3, 8, 13, 14, 17, 24
Deep-frozen goods 18
Defrosting by time 15
Defrosting by weight 14
Description of Components 3
Dial 3, 9, 10, 11, 12, 13, 14, 15
Fish 13, 14, 15, 19, 21, 22
Fish filet 21
Glass Turntable 3, 4, 16
Grill function 12, 14, 22, 23, 24
Grill/Combi 3, 14, 25, 26
Kitchen timer 3, 9
Layer cake 18
Magnetron control protection function 16
Meatballs 8, 14, 22, 23
Memory 3, 11, 16
Memory function 11, 16
Metal stand 24
Microwave power 10, 11, 14
Microwave radiation 4, 7
Mushrooms 20, 21, 24, 26, 27
Noodles 20
Peas 21
Pizza 3, 13, 14, 15, 24
Pork 12, 13, 23, 25, 26
Pork chops 23
Potatoes 5, 6, 13, 14, 20, 25, 27
Poultry 12, 13, 14, 15, 19
Power 4, 5, 6, 10, 11, 12, 14, 15, 16, 18, 20,
21, 25, 26, 29, 30
Power-saving function 16
Pre-heat 3
Pre-settings 3, 11
Quick start 3, 9, 10, 11, 12, 13, 14, 15, 16
Recipes 30
Rice 21, 29
Rolls 14, 18, 22, 23, 28
Shish-kebab 22
Spinach 20, 21
Standing times 18, 20
Start/quick start 3, 12
Starters 12
Strawberries 19, 30
Time defrost 3
Trouts 23
Turnable ring 3, 16
Vegetables/fruit 13
Weight defrost 3
Weight of the food 12, 15
Kello 35, 41, 44, 47, 48
Kiertosäädin 35
Kukkakaali 53, 57
Kyljystä 55
Kypsennys 40, 42, 43, 44, 46, 54
Kypsennysaika 40, 42, 43, 44, 46, 52, 53
Pitsa 35, 45, 46, 47, 56
Sulatus 35, 43, 46, 47
Teho 35, 36, 42, 43, 44, 47, 50, 52, 53
Voi 37, 38, 39, 43, 44, 47, 50, 51, 52, 56, 60,
61, 62
INNEHÅLLSFÖRTECKNING
SIDAN
Inledning 67
Upptining after tid 79
Baka pizza i Crispy-Pan
1 paket soppgrönsaker
5 dl vatten:
1 lagerbärsblad
250 g potatis
2 rökta fläskkorvar
Kryddor: salt, peppar, ättika, socker
Tillagning:
47623 Kevelaer, Germany
Tlf.: +49 (0) 180 5 008107
Crispy-Pan 131, 137, 143, 146, 154
Ziemniaki 135, 142, 150, 155, 157
Ziemniaki solone 150