INCANTO - Coffee machine SAECO - Free user manual and instructions
Find the device manual for free INCANTO SAECO in PDF.
User questions about INCANTO SAECO
0 question about this device. Answer the ones you know or ask your own.
Ask a new question about this device
Download the instructions for your Coffee machine in PDF format for free! Find your manual INCANTO - SAECO and take your electronic device back in hand. On this page are published all the documents necessary for the use of your device. INCANTO by SAECO.
USER MANUAL INCANTO SAECO
Read these operating instructions carefully before using the machine
BEDIENUNGSANLEITUNG
natural_image
Exterior view of a modern coffee machine with saeco branding and control panel (no visible text or symbols on main body)CE
natural_image
Exterior view of a modern stainless steel coffee machine (no visible text or symbols)natural_image
White plastic water dispenser with orange lid (no text or symbols visible)natural_image
Close-up of a device with a hand inserting a component into a container (no visible text or symbols)natural_image
Close-up of a white electronic device with a black socket and red arrow pointing to its left side (no visible text or symbols)natural_image
Close-up of a small espresso machine with liquid being poured into it, no visible text or symbolsnatural_image
Close-up of a mechanical component with a red arrow indicating rotation or change (no text or symbols visible)natural_image
Close-up of a white industrial machine with a water dispenser and tubing (no visible text or symbols)natural_image
Close-up of a mechanical component with a red arrow indicating rotation or change (no text or symbols visible)natural_image
Close-up of a hand washing machine with liquid and a red arrow indicating a drop (no text or symbols visible)text_image
Control panel with three circular indicators: liquid drop, sensor, and warning symbolnatural_image
Close-up of a coffee maker's interior showing seeds and gears, with red arrows indicating rotation (no text or symbols)natural_image
Close-up of a small mechanical device with granular material inside, showing a red arrow indicating rotation (no text or symbols visible)natural_image
Close-up of a mechanical component with gears and seeds, showing a red arrow indicating rotation (no text or symbols)natural_image
Close-up of a container with dark granular material and two metallic gears, no visible text or symbolsnatural_image
Close-up of a coffee ear with visible seeds and a red arrow indicating rotation (no text or symbols)Caffè più forte.

natural_image
Close-up of a coffee maker's lid with gears and wooden coffee beans, showing a red arrow indicating rotation (no text or symbols visible)Caffè più leggero.
CAFFÈ IN TAZZA
natural_image
Close-up of hands operating a computer with a mouse and cable, no visible text or symbolsnatural_image
Close-up of hands holding a computer mouse with a red upward arrow indicating motion (no text or symbols visible)natural_image
Close-up of hands installing a black tool on a microwave oven, with a red arrow indicating the action (no text or symbols visible)natural_image
Close-up of hands operating a computer tower with a red arrow indicating the handle (no text or symbols visible)natural_image
Exterior view of a modern coffee machine with cups and side arm (no text or symbols visible)natural_image
Modern coffee machine with glass cups and a spoon, no visible text or symbolsnatural_image
Exterior view of a modern coffee machine with water bottles and control knobs (no text or symbols visible)natural_image
Close-up of a hand using a sewing machine to press or install a brown object, no visible text or symbols on the device itself.natural_image
Close-up of a white industrial machine with glass and water dispenser, showing mechanical components and a red arrow indicating motion (no text or symbols visible)natural_image
Close-up of hands operating a kitchen appliance with a handle (no visible text or symbols)natural_image
Close-up of a kitchen mixer with a brush and digital applicator, showing red arrows indicating rotation (no text or symbols)natural_image
Modern stainless steel milk dispenser with glass beaker and control panel (no visible text or symbols)Attendere.

natural_image
Close-up of a white industrial machine with a red arrow indicating rotation or adjustment (no text or symbols visible)natural_image
Close-up of a white industrial machine with a glass beaker and control panel, no visible text or symbolsnatural_image
Close-up of hands operating a kitchen appliance with a metallic tool and tubing (no visible text or symbols)natural_image
Close-up of a kitchen blender with red arrows indicating motion or adjustment (no text or symbols visible)natural_image
Close-up of a white industrial machine with a circular dial and red directional arrows indicating motion (no text or symbols visible)natural_image
Close-up of a hand pouring liquid into a glass pitcher with milk, next to a kitchen appliance (no visible text or symbols)natural_image
Close-up of a kitchen mixer with red directional arrows indicating motion (no text or symbols)natural_image
Close-up of a hand using a coffee machine to press a cup, with a red arrow indicating the press direction (no text or symbols visible)natural_image
Close-up of a kitchen mixer with red arrows indicating rotation and contraction (no text or symbols visible)natural_image
Two-step cooking process: adding a small glass bowl to a metal pitcher with a hand pouring liquid (no text or symbols visible)natural_image
Close-up of a laboratory setup with a glassware and a control panel, showing a red curved arrow indicating rotation (no text or symbols visible)natural_image
Close-up of a microwave oven with a glass beaker and a red arrow indicating rotation (no text or symbols visible)natural_image
Simple line drawing of a steaming cup (no text or symbols)natural_image
Close-up of hands adjusting a black tool inside a kitchen appliance (no visible text or symbols)natural_image
Close-up of a kitchen blender with red directional arrows indicating rotation (no text or symbols)natural_image
Two-panel image showing a kitchen mixer with a circular dial and a side view of its base dish with a straw bulb (no text or symbols visible)natural_image
Hand holding a milk dispenser with a red arrow pointing to the product (no visible text or symbols)natural_image
Close-up of a mechanical device's control panel with red arrow indicating rotation (no text or symbols visible)natural_image
Hand holding a small white beverage in a modern kitchen appliance, with a red arrow indicating rotation (no text or symbols visible)natural_image
Close-up of a mechanical device's control panel with a red arrow indicating rotation (no text or symbols visible)natural_image
Hand holding a small glass container with a brush, next to a modern kitchen appliance (no visible text or symbols)natural_image
Close-up of a modern kitchen appliance with a glass bowl and a red arrow pointing to it (no visible text or symbols)natural_image
Close-up of a mechanical device's control panel with red arrow indicating rotation (no text or symbols)natural_image
Close-up of hands using a tool to adjust or install a device component, with red arrows indicating direction (no text or symbols visible)natural_image
Cross-sectional diagram of a device casing with internal components (no text or symbols visible)natural_image
Close-up of a modern milk dispenser with a red arrow pointing to the cup (no visible text or symbols)natural_image
Close-up of a mechanical device's front panel with a red arrow indicating rotation (no text or symbols visible)natural_image
Modern kitchen mixer with a glass pitcher and control panel (no visible text or symbols)natural_image
Close-up of a modern blender oven with red arrows indicating rotation or adjustment (no text or symbols visible)natural_image
Cross-sectional view of a device casing with internal components (no visible text or symbols)natural_image
Close-up of a modern milk tea machine with a cup and side arm, no visible text or symbolsnatural_image
Close-up of a white industrial machine head with a red arrow indicating rotation or adjustment (no text or symbols visible)natural_image
Close-up of a mechanical device's top component with a red arrow indicating rotational motion (no text or symbols)natural_image
Close-up of a white milk dispenser with a glass pitcher and lever, no visible text or symbolsnatural_image
Close-up of a computer interface with a cable plugged into a socket, showing red arrows pointing to the socket (no text or symbols visible)natural_image
Interior view of a device casing with a red circle highlighting a component (no text or symbols visible)natural_image
Close-up of a hand inserting a device into a computer case, showing internal components and a red arrow indicating the next component (no text or symbols visible)natural_image
Close-up of a hand pressing down on a computer motherboard with a red arrow indicating the action (no text or symbols visible)natural_image
Close-up of a hand using a tool to apply liquid into a container, with an inset showing the same step (no text or symbols visible)natural_image
Hand holding a small mechanical device with a red arrow pointing to a component (no visible text or symbols)natural_image
Hand holding a small object with a red curved arrow indicating rotation or change (no text or symbols visible)natural_image
Close-up of a hand pressing a component into a machine (no visible text or symbols)natural_image
Close-up of a hand pressing down on a mechanical component with red arrows indicating motion (no text or symbols visible)natural_image
Person washing a black plastic appliance on a stainless steel kitchen sink (no text or symbols visible)natural_image
Close-up of hands assembling a black plastic electronic device into a bowl (no visible text or symbols)natural_image
Close-up of a mechanical component with a red arrow pointing to a specific area (no visible text or symbols)natural_image
Exterior view of a modern silver coffee machine (no visible text or symbols)natural_image
Close-up of hands holding a small red object over a white appliance (no visible text or symbols)natural_image
Close-up of hands applying red substance to a white object with a curved arrow (no text or symbols visible)natural_image
Hand holding a black cylindrical object with red arrows indicating motion or change (no text or symbols)natural_image
Hand holding a white cylindrical object with a black chimney and red arrow pointing to it (no text or symbols visible)natural_image
Interior view of a device with a red arrow pointing to a component (no text or symbols visible)natural_image
Close-up of a laboratory instrument with a red arrow pointing to a component, no visible text or symbolsnatural_image
Close-up of a mechanical device with a red downward arrow indicating a component (no text or symbols visible)natural_image
Diagram of a device with arrows indicating motion or force, no visible text or symbolsnatural_image
Cross-sectional view of a device with internal components and ventilation duct (no visible text or symbols)natural_image
Close-up of a stainless steel appliance with a hand pump and control panel, showing red arrows pointing to the side (no text or symbols visible)natural_image
Close-up of a white industrial device's control knob with red arrow indicating rotation (no text or symbols visible)natural_image
Modern kitchen appliance with a glass beaker and side-mounted stand (no visible text or symbols)natural_image
Interior view of a device with visible internal components and wiring (no text or symbols)natural_image
Close-up of a black printer's front panel with a red arrow pointing to the button (no visible text or symbols)natural_image
Close-up of a printer's front panel showing a green control button with a red arrow pointing to it (no text or symbols visible)
text_image
Control panel with hand icon pointing at a button set to various function buttonsDUREZZA ACQUA
natural_image
Close-up of a hand inserting a small object into a device (no visible text or symbols)text_image
Control panel with circular buttons and a hand pointing to the button, showing icons for function or operation.natural_image
Control panel with multiple circular buttons and a red circle highlighting the button (no text or symbols visible)text_image
Control panel with multiple function buttons and a red circle highlighting the buttontext_image
Control panel with indicator lights and a hand gesture pointing to the buttontext_image
Control panel with labeled buttons and a red circle highlighting a button on the right side.text_image
Control panel with labeled buttons and a red circle highlighting a buttonnatural_image
Close-up of a control panel with circular buttons and a hand gesture pointing to the button (no text or symbols visible)text_image
Control panel with labeled buttons and a red circle highlighting a specific buttontext_image
Control panel with labeled buttons and a red circle highlighting a specific buttonnatural_image
Close-up of a black rectangular device with a small display panel and a red arrow pointing to it (no visible text or symbols)natural_image
Close-up of a black button with a green 'O' and red arrow pointing to it, no visible text or symbolstext_image
Diagram showing five labeled icons with green circles highlighting the first two positions, likely representing a system or control panel.Lampeggiante
natural_image
Five circular icons with different shapes and colors, one highlighted in green (no text or symbols)Lampeggiante
text_image
Image showing five circular icons with Chinese characters, one highlighted in red.Lampeggiante lento
natural_image
Five circular icons with different shapes and colors, one highlighted in red (no text or symbols)Lampeggiante lento
text_image
Diagram showing five circular icons with green and red circles, likely representing indicators or symbols in a software interface.Fisso
text_image
Diagram showing five labeled circular icons with green and red circles, likely representing a system or control panel.Lampeggiante
natural_image
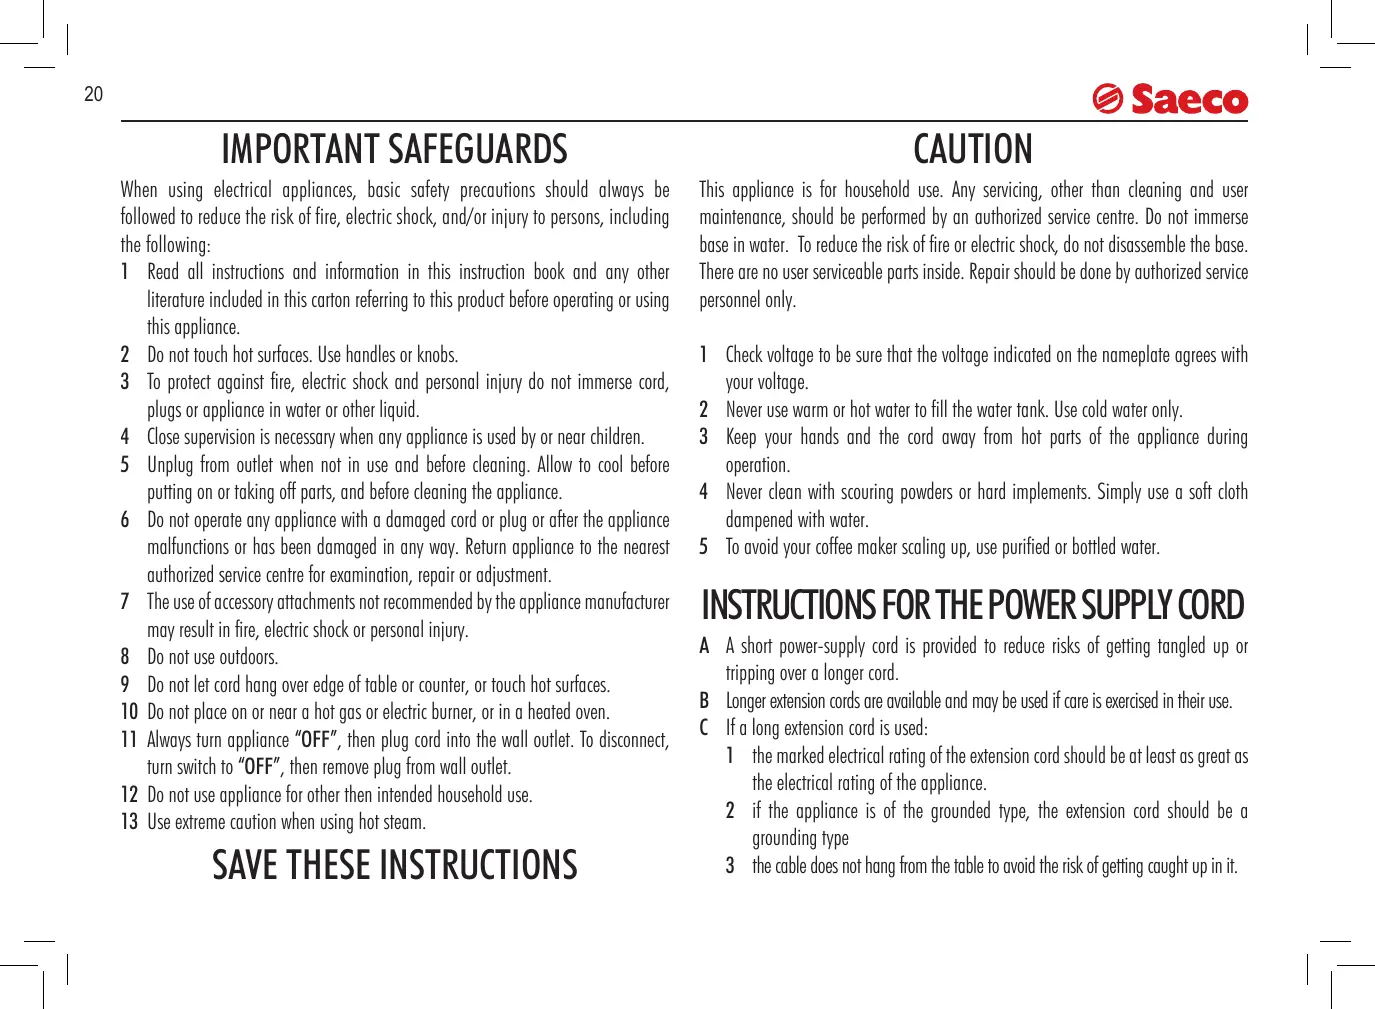
White plastic water dispenser with orange handle and white base, no visible text or symbolsWhen using electrical appliances, basic safety precautions should always be followed to reduce the risk of fire, electric shock, and/or injury to persons, including the following:
1 Read all instructions and information in this instruction book and any other literature included in this carton referring to this product before operating or using this appliance.
2 Do not touch hot surfaces. Use handles or knobs.
3 To protect against fire, electric shock and personal injury do not immerse cord, plugs or appliance in water or other liquid.
4 Close supervision is necessary when any appliance is used by or near children.
5 Unplug from outlet when not in use and before cleaning. Allow to cool before putting on or taking off parts, and before cleaning the appliance.
6 Do not operate any appliance with a damaged cord or plug or after the appliance malfunctions or has been damaged in any way. Return appliance to the nearest authorized service centre for examination, repair or adjustment.
7 The use of accessory attachments not recommended by the appliance manufacturer may result in fire, electric shock or personal injury.
8 Do not use outdoors.
9 Do not let cord hang over edge of table or counter, or touch hot surfaces.
10 Do not place on or near a hot gas or electric burner, or in a heated oven.
11 Always turn appliance "OFF", then plug cord into the wall outlet. To disconnect, turn switch to "OFF", then remove plug from wall outlet.
12 Do not use appliance for other then intended household use.
13 Use extreme caution when using hot steam.
SAVE THESE INSTRUCTIONS
CAUTION
This appliance is for household use. Any servicing, other than cleaning and user maintenance, should be performed by an authorized service centre. Do not immerse base in water. To reduce the risk of fire or electric shock, do not disassemble the base. There are no user serviceable parts inside. Repair should be done by authorized service personnel only.
1 Check voltage to be sure that the voltage indicated on the nameplate agrees with your voltage.
2 Never use warm or hot water to fill the water tank. Use cold water only.
3 Keep your hands and the cord away from hot parts of the appliance during operation.
4 Never clean with scouring powders or hard implements. Simply use a soft cloth dampened with water.
5 To avoid your coffee maker scaling up, use purified or bottled water.
INSTRUCTIONS FOR THE POWER SUPPLY CORD
A short power-supply cord is provided to reduce risks of getting tangled up or tripping over a longer cord.
B Longer extension cords are available and may be used if care is exercised in their use.
C If a long extension cord is used:
1 the marked electrical rating of the extension cord should be at least as great as the electrical rating of the appliance.
2 if the appliance is of the grounded type, the extension cord should be a grounding type
3 the cable does not hang from the table to avoid the risk of getting caught up in it.
GENERAL INFORMATION
The coffee machine is suitable to make espresso coffee using coffee beans and is equipped with a device for the distribution of steam and hot water.
This elegantly styled machine is designed for household use only. It is not suitable for continuous professional-type use.
Warning. The manufacturer shall accept no liability for damage or injury caused by:
- improper use or use for other than the intended purposes;
• repairs carried out by anyone other than an authorised service centre;
• tampering with the power cord;
• tampering with any machine component; - use of spare parts and accessories other than those supplied by the manufacturer;
• no descaling and storage in rooms below 0°C.
The warranty will be invalidated in such cases.

TO FACILITATE INTERPRETATION
A warning triangle draws attention to the instructions that are important for user safety. Please carefully abide by these instructions to avoid serious injury!
How to use these operating instructions
Keep these operating instructions in a safe place and make them available to anyone else who should use the coffee machine. For further information or an explanation of problems not completely or sufficiently addressed in these instructions, contact an authorised service centre.
TECHNICAL SPECIFICATIONS
| • Voltage rating | See rating plate on appliance |
| • Power rating | See rating plate on appliance |
| • Power supply | See rating plate on appliance |
| • Casing material | Metal |
| • Size (w x h x d) (mm) | 265 x 360 x 400 |
| • Weight (Kg) | 10 |
| • Cord length (mm) | 1200 |
| • Control panel | Front |
| • Water tank (lit.) | 2 - Extractible |
| • Pump pressure (bars) | 15 |
| • Boiler | Stainless steel |
| • Coffee container capacity (g.) | 180 of coffee beans |
| • Quantity of ground coffee | 6 - 9 g |
| • Dreg drawer capacity | 13 |
| • Safety devices | Boiler pressure safety valve safety thermostat |
Subject to engineering and manufacturing changes as warranted by technological developments.
Machine in conformity with European Directive 89/336/EEC (Italian Legislative Decree 476 of 04/12/92) concerning electromagnetic compatibility.
IN THE EVENT OF AN EMERGENCY
Immediately unplug the appliance.
THE APPLIANCE MAY ONLY BE USED
- In a closed place.
- To prepare coffee, dispense hot water, froth milk or heat beverages using steam.
- For household use.
- By adults in full possession of their physical and mental capacities.
NEVER USE THE APPLIANCE
for purposes other than those indicated above to avoid hazards.
Never place any substances in the containers other than those specified in the instruction manual.
When you fill a container, make sure all nearby containers are closed.
Fill the water tank only with fresh drinking water: hot water and/or other liquids may damage the machine.
Do not use carbonated water. The coffee grinder may be adjusted only while it is running.
Do not introduce your fingers or any material other than coffee beans into the coffee grinder.
Before attempting to access the inside of the coffee grinder, switch OFF the machine and remove the plug from the electric socket. Do not put coffee beans or instant coffee into the ground coffee container.
Any water left in the tank for several days should not be consumed. Wash the tank and refill it with fresh drinking water.
MAINS CONNECTION
Connect the coffee machine to a suitable electric socket. The voltage must match the voltage specified on the appliance rating plate.
INSTALLATION
- Choose a perfectly level supporting surface. Do not place on a hot surface!
- Maintain a distance of 10 cm from walls and electric or gas burners.
- Do not keep at temperatures below 0 °C; the appliance may be damaged by freezing.
- The electric socket must be accessible at all times.
-
The power cord must not be damaged, secured with clamps, placed on very hot surfaces etc.
-
Do not let the power cord hang loosely (Warning: danger of tripping or of causing the appliance to fall).
- Do not use the power cord to carry or pull the coffee machine.
HAZARDS
- The appliance must not be used by children or by individuals unacquainted with the operating instructions.
- The appliance is dangerous for children. If left unattended it must be switched off.
- Do not leave the materials used to pack the appliance within children's reach.
- Do not direct a jet of hot steam and/or hot water toward yourself or others: danger of scalding.
- Do not introduce any objects through the openings in the appliance (Electrical hazard!).
- Do not touch the plug when your hands or feet are wet. Do not unplug the appliance by yanking at the power cord.
- Warning: contact with hot water, steam or and hot water/steam nozzle may cause burns.
FAULTS
- Do not use the appliance if it malfunctions or you suspect damage, e.g. after a fall.
- Do not use spirit, solvents and/or aggressive chemical agents.
- Repairs must be performed by an authorised service centre.
- Do not use an appliance with a defective power cord. The cord may be replaced exclusively by a service centre (Electrical hazard!).
- Switch off the appliance before opening the service door. Danger of burns!
CLEANING
- Before cleaning the appliance, unplug it and allow it to cool down.
- Avoid exposing the appliance to splashes of water. Do not immerge it in water.
- Do not dry machine components in a conventional or microwave oven.
SPARE PARTS
To guarantee safety, you should use only original spare parts and accessories.
DISPOSAL
For a correct disposal of the machine, please follow the instructions contained on the last pages of the manual

text_image
Coffee bean container Cup plate Preground coffee dispenser lid Control panel Service door Height-adjustable brew unit Drip tray + grill Tray full indicator Swivel base Brew group Dregs drawer Coef bean container lid Water tank lid Water tank Steam knob ON/OFF switch Cappuccinatore Grind adjustment knob Dose adjustment knob Cleaning brush Cartridge filter applicator "Aqua Prima" cartridge filter (optional) Water hardness test Pannarello Water tank and circuit loading indicator light Preground coffee measure Warning light Coffee bean container and dregs drawer indicator light
The messages displayed by the machine during operation are shown on page 34.

Important warning for using the “Aqua Prima Filter” can be found at page 35.

natural_image
Exterior view of a modern stainless steel coffee machine (no visible text or symbols)Check that all components are correctly placed.

natural_image
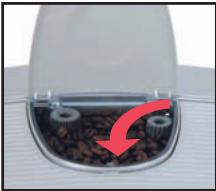
Hand pouring dark liquid into a metal container (no visible text or symbols)Fill the coffee bean container with coffee beans.

natural_image
White plastic water dispenser with orange lid (no text or symbols visible)The “Aqua Prima” filter can be installed (see pg.31). (Optional; it can be purchased separately).

natural_image
Close-up of a device with a hand inserting a component into a container (no visible text or symbols)Fill the tank with fresh drinking water.

text_image
See rating plateInsert the plug into a suitable electric socket.

natural_image
Close-up of a white electronic device with a black socket and red arrow pointing to its left side (no visible text or symbols)Move the ON/OFF switch to "I" to turn on the machine.

text_image
FlashingThe machine is warming up; lights are flashing.

natural_image
Close-up of a small espresso machine with liquid being poured into it, no visible text or symbolsPlace a glass under the cappuccinatore.

natural_image
Close-up of a mechanical component with a red arrow indicating rotation or change (no text or symbols visible)Turn the knob counterclockwise to start loading the circuit.

natural_image
Close-up of a white industrial machine with a water dispenser and tubing (no visible text or symbols)Wait until water flows steadily from the cappuccinatore.

natural_image
Close-up of a mechanical component with a red arrow indicating rotation or change (no text or symbols visible)Turn the knob clockwise to terminate the circuit-loading process.

natural_image
Close-up of a milk dispenser with liquid being poured into a glass container, no visible text or symbolsRemove the glass.

text_image
Steadily litWhen the indicator lights are fixed, the machine is ready for use.
Note: You must load the circuit before starting up the machine for the first time, if it has been inoperative for a lengthy period or if the water tank has been completely emptied. The circuit must also be loaded each time the light flashes:

text_image
Control panel with three circular indicators: liquid drop, sensor, and warning symbolCheck the dater on “Aqua Prima” filter; if filter is past its date, replace it with a new one.
COFFEE GRINDER
ADJUSTMENT

natural_image
Close-up of a coffee maker's interior showing hands operating on the lid with visible gears and coffee beans (no text or symbols)The fineness of the grind may be adjusted using the knob.

natural_image
Close-up of a small container with coffee beans and a red arrow indicating rotation (no text or symbols)Coffee flows out more slowly.

natural_image
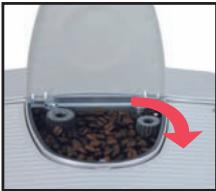
Close-up of a small container with dried coffee beans and a red arrow pointing to the lid (no text or symbols visible)Coffee flows out more quickly.
COFFEE DOSE ADJUSTMENT - You must adjust the dose before dispensing coffee. This adjustment will have an immediate effect on the coffee brewed.
COFFEE DOSE

text_image
ADJUSTMENTYou can adjust the quantity of coffee to be ground.

natural_image
Close-up of a coffee ear with visible seeds and a red arrow indicating rotation (no text or symbols)Stronger coffee.

natural_image
Close-up of a coffee maker's lid with gears and wooden coffee beans, showing a red arrow indicating rotation (no text or symbols)Weaker coffee.
COFFEE IN CUPS
To adjust the quantity of coffee dispensed to the size of your cups.
COFFEE IN CUPS

text_image
OrPlace a cup under the brew unit, press the button corresponding to the type of coffee desired and keep it pressed while coffee is being dispensed.
When the cup has filled to the desired level, release the button; the machine is now programmed to dispense the quantity of coffee you have chosen.

Adjustment may be made only while the coffee grinder is operating.
Use coffee bean blends for espresso coffee makers. If you do not obtain the desired result, try using different coffee blends. Store coffee in a cool place, in a hermetically sealed container.
You will note a change after dispensing 3 - 4 coffees.
CAPPUCCINATORE
Use for preparing cappuccinos
CAPPUCCINATORE

natural_image
Close-up of hands operating a computer with a mouse and cable, no visible text or symbolsLoosen the ring nut to remove the cappuccinatore.

natural_image
Close-up of hands holding a computer mouse with a red arrow pointing to the mouse (no text or symbols visible)To install the cappuccinatore, push it right in and tighten the ring nut.
PANNARELLO
Use to heat drinks and for hot water.
PANNARELLO

natural_image
Close-up of hands installing a black tool on a microwave oven, with a red arrow indicating the action (no text or symbols visible)To remove the pannarello, loosen the ring nut.

natural_image
Close-up of hands operating a computer tower with a red arrow indicating the handle (no text or symbols visible)To install the pannarello, push it right in and tighten the ring nut.

Warning: Hot water and steam can cause scalding! Direct the pannarello and the cappuccinatore (with tube) onto the drip tray.
COFFEE BEANS


text_image
Steadily litMake sure that the machine is ready.

natural_image
Exterior view of a modern coffee machine with cups and side arm (no text or symbols visible)Position a warm coffee cup or cups under the brew unit.

text_image
OrPress the button of the type of coffee desired. Once for 1 coffee

text_image
OrTwice for 2 coffees.

natural_image
Modern coffee machine with glass cups and a spoon, no visible text or symbolsWhen the machine stops making the coffee, remove the cup or cups.
PREGROUND COFFEE


natural_image
Exterior view of a modern coffee machine with liquid and glass components (no text or symbols visible)Position a warm coffee cup under the brew unit.

text_image
Steadily litSelect the product "Pre-ground coffee".

natural_image
Close-up of a hand using a sewing machine to press or install a brown object, no visible text or symbols on the device itself.Introduce ground coffee using the coffee measure. MAX 1 MEASURE

text_image
OrPress the button of the type of coffee desired.

natural_image
Close-up of a white industrial machine with glass and water dispenser, showing mechanical components and a red arrow indicating motion (no text or symbols visible)When the machine stops making the coffee, remove the cup.
HOT WATER


natural_image
Close-up of hands using a handheld device to adjust a small component (no visible text or symbols)Take off the cappuccinatore and install the pannarello (see page 25).

natural_image
Close-up of a kitchen mixer with a brush and digital display, showing red arrows indicating rotation (no text or symbols)Introduce a container. Turn the knob counter-clockwise to start dispensing water.

natural_image
Modern stainless steel milk dispenser with glass beaker and control panel (no visible text or symbols)Wait.

natural_image
Close-up of a white industrial machine with a red arrow indicating rotation (no text or symbols visible)When you reach the desired amount, close the knob.

natural_image
Close-up of a white industrial machine with a glass beaker and control panel, no visible text or symbolsRemove the container.

Warning: Hot water and steam can cause scalding! Direct the pannarello and the cappuccinatore (with tube) onto the drip tray.
CAPPUCCINO

text_image
FlashingPress the button to select the function. The light is flashing.

text_image
Steadily litWhen the light is steadily lit, the machine is ready to release steam.

natural_image
Close-up of hands holding a metallic object with a cable, next to a kitchen appliance (no visible text or symbols)Make sure the cappuccinatore is installed.

natural_image
Close-up of a kitchen blender with red arrows indicating motion or adjustment (no text or symbols visible)Introduce a container. Open the knob to discharge any residual water.

natural_image
Close-up of a white industrial machine with a circular dial and red directional arrows indicating motion (no text or symbols visible)When only steam comes out, close the knob. Remove the container.

natural_image
Close-up of a hand pouring milk from a glass pitcher into a water-filled mottle (no visible text or symbols)Put the suction pipe into the milk container.

natural_image
Close-up of a kitchen mixer with red directional arrows indicating press or control (no text or symbols visible)Place the cup under the cappuccinatore. Open the knob.

natural_image
Close-up of a hand using a coffee machine to lift a cup, with a red arrow indicating the motion (no text or symbols visible)Regulate the froth. Up = thicker froth.

natural_image
Close-up of a kitchen mixer with red arrows indicating rotation and contraction (no text or symbols visible)After frothing the milk, close the knob. Remove the cup.

natural_image
Two-step cooking process: adding a small glass bowl to a metal pitcher with a hand holding the lid (no text or symbols visible)Place a glass under the cappuccinatore. Put the tube in a container of clean water.

natural_image
Close-up of a white ceramic lamp on a cutting board with a red arrow indicating rotation (no text or symbols visible)Open the knob. Wait for clean water to flow steadily from the cappuccinatore.

natural_image
Close-up of a microwave oven and a glass beaker with a red arrow indicating rotation (no text or symbols visible)Turn the knob to close. Remove the glass.

text_image
FlashingPlace a container under the cappuccinatore. Press the button. Open the knob.

text_image
Steadily litWhen the lights remain on, close the knob and remove the container.

natural_image
Simple line drawing of a steaming cup (no text or symbols)Dispense coffee into the cup to prepare a delicious cappuccino.

Warning: Hot water and steam can cause scalding! Direct the pannarello and the cappuccinatore (with tube) onto the drip tray.
STEAM

natural_image
Close-up of hands adjusting a black tool on a kitchen appliance (no visible text or symbols)Take off the cappuccinatore and install the pannarello (see page 25).

text_image
FlashingPress the button to select the function. The light is flashing.

text_image
Steadily litWhen the light is steadily lit, the machine is ready to release steam.

natural_image
Close-up of a kitchen blender with red directional arrows indicating rotation (no text or symbols visible)Introduce a container. Open the knob to discharge any residual water.

natural_image
Two-panel image showing a kitchen blender with a red arrow indicating rotation and a side view of the blender with a white tube (no text or symbols visible)When only steam comes out, close the knob. Remove the container.

natural_image
Hand holding a white milk dispenser with a red arrow pointing to it, no visible text or symbolsTake the container and place it under the panna-rello.

natural_image
Close-up of a mechanical device's handle and lever mechanism with red arrow indicating rotation (no text or symbols)Open the knob to release steam.

natural_image
Hand holding a small white beverage in a modern kitchen appliance, with a red arrow indicating rotation (no text or symbols visible)Move the container in a circular fashion to heat evenly.

natural_image
Close-up of a mechanical device's front panel with a red arrow indicating rotational motion (no text or symbols visible)After you have finished, close the knob.

natural_image
Hand holding a small glass container with a brush, next to a modern kitchen appliance (no visible text or symbols)Remove the container.

text_image
FlashingPress the button to restore the machine to normal operation. Lights are flashing.

natural_image
Close-up of a modern kitchen appliance with a glass bowl and a red arrow pointing to it (no visible text or symbols)Place a container under the pannarello.

natural_image
Close-up of a mechanical device's control panel with red arrow indicating rotation (no text or symbols)Open the knob and dispense hot water.

text_image
Steadily litWhen the lights remain on, close the knob and remove the container.

text_image
Steadily litThe machine is ready to brew coffee or dispense hot water.

Warning! Never use vinegar as a descaling agent. You can use any commercially available non-toxic, non-harmful descaling product for coffeees. We recommend using a Saeco descaling agent.
Descaling is necessary every 3-4 months, when there is a reduction in the water capacity. The machine must be on; it automatically controls the distribution of the descaling solution.
DESCALING

text_image
FlashingWhen the machine needs descaling, the indicator light will flash.

natural_image
Close-up of hands using a tool to adjust or install a device component, with red arrows indicating direction (no text or symbols visible)Carefully remove the cartridge filter. Remove the pannarello or the cappuccinatore.

natural_image
Cross-sectional diagram of a device casing with internal components (no text or symbols visible)Fill the water tank with the descaling solution.

natural_image
Close-up of a modern milk dispenser with a red arrow pointing to the cup (no visible text or symbols)Place a large container under the steam tube.

text_image
Steadily litPress the button for 5 seconds.

natural_image
Close-up of a mechanical device's front panel with a red arrow indicating rotation (no text or symbols visible)Open the knob. The descaling process starts.

natural_image
Modern milk dispenser with glass pitcher and control panel (no visible text or symbols)The solution will be discharged at intervals.

text_image
FlashingThe lights will flash to signal when descaling is over.

natural_image
Close-up of a modern blender oven with red arrows indicating rotation or adjustment (no text or symbols visible)Close the knob. Remove the container.

natural_image
Cross-sectional view of a device casing with internal components (no visible text or symbols)Rinse out the tank and fill it with fresh drinking water.

natural_image
Close-up of a modern milk tea machine with a cup and side arm, no visible text or symbolsPlace a large container under the steam tube.

natural_image
Close-up of a white industrial machine head with a red arrow indicating rotation or adjustment (no text or symbols visible)Open the knob to rinse.

natural_image
Close-up of a mechanical device's top component with a red arrow indicating rotational motion (no text or symbols visible)When no water is left, close the knob.

natural_image
Close-up of a white milk dispenser with a glass pitcher and side arm, no visible text or symbolsRemove the container.
If the descaling cycle is interrupted, the water tank and internal machine circuits must be rinsed.
After descaling the machine, reload the machine circuit. Install the cartridge filter again in the water tank.

Do not dry the machine and/or its components in a microwave and/or conventional oven.

Do not immerge the machine in water and do not place any of its components in a dishwasher.
BASIC
CLEANING

natural_image
Close-up of a computer interface with a cable plugged into a socket, showing red arrows pointing to the socket (no text or symbols visible)Turn the machine off. Unplug the machine.

natural_image
Interior view of a device casing with a red circle highlighting a component (no text or symbols visible)Wash the water tank. Wash the filter inside it.

natural_image
Close-up of a hand inserting a device into a computer case, showing internal components and a red arrow indicating the next component (no text or symbols visible)Remove the drip tray, empty it out and wash it.

natural_image
Close-up of a hand pressing down on a computer motherboard with a red arrow indicating the action (no text or symbols visible)Remove the dregs drawer, empty it out and wash it.

natural_image
Close-up of a hand using a tool to apply liquid into a container, with an inset showing the same step (no text or symbols visible)Remove and clean the pannarello and the cappuccinatore. Use the brush to clean the ground coffee dispenser.

natural_image
Hand holding a small mechanical device with a red arrow pointing to a component (no visible text or symbols)Remove the brew unit and wash it with water.
Clean the machine, its components, and the brew group once a week at least.
Do not use spirit, solvents and/or aggressive chemical agents.
BREW GROUP

natural_image
Hand inserting a small object into a machine gun, with red arrows indicating motion (no text or symbols visible)Open the front door.

natural_image
Close-up of a hand inserting a device into a plastic housing (no visible text or symbols)Remove the drip tray and the dregs drawer.

natural_image
Close-up of a hand pressing down on a mechanical component with red arrows indicating motion (no text or symbols visible)Press the PUSH button to release the brew group.

natural_image
Person washing a black plastic appliance on a stainless steel kitchen sink (no text or symbols visible)Wash the brew group with running water.

natural_image
Close-up of hands assembling a black plastic electronic device into a container (no visible text or symbols)Wash the upper filter carefully.

natural_image
Close-up of a mechanical component with a red arrow pointing to a specific area (no visible text or symbols)Dry the group and reassemble on the machine. Do not press the "PUSH" button.

natural_image
Exterior view of a modern silver coffee machine (no visible text or symbols)Set all machine components back in position. Close the door.

The filter must be replaced 90 days after opening the packing or after treating 60 litres of drinking water.

Before descaling, remove the filter from the tank.
INSTALLATION

natural_image
Close-up of hands holding a small red object over a white appliance (no visible text or symbols)Remove the filter from the packing container.

natural_image
Close-up of hands holding a red, glossy substance with a white container and a curved arrow (no text or symbols visible)Adjust the dater to the current month.

natural_image
Hand holding a black cylindrical object with red arrows indicating motion or change (no text or symbols)Insert the applicator and turn it clockwise to secure it to the filter.

natural_image
Hand holding a white cylindrical object with a black chimney and red arrow pointing to it (no text or symbols visible)Check where the filter positioning and reference mark is.

natural_image
Interior view of a device with a red arrow pointing to a component (no text or symbols visible)Put the filter into the empty tank.

natural_image
Close-up of a laboratory instrument with a red arrow pointing to a component, no visible text or symbolsThe reference must be positioned in correspondence with the groove.

natural_image
Close-up of a mechanical device with a red downward arrow indicating a component (no text or symbols visible)Press until the end limit.

natural_image
Diagram of a device with red arrows indicating motion or force, no visible text or symbolsTurn the applicator counter-clockwise and remove it from the tank.

natural_image
Cross-sectional view of a device with internal components and ventilation duct (no visible text or symbols)Fill the tank with fresh drink-able water.

natural_image
Close-up of a stainless steel appliance with a hand pump and control panel, showing red arrows pointing to the side (no text or symbols visible)Position a container under the steam tube and turn the machine on.

natural_image
Close-up of a white industrial machine dial with red arrow indicating rotation (no text or symbols visible)Open the knob and dispense water.

natural_image
Modern stainless steel milk dispenser with glass cup and side arm (no visible text or symbols)Empty the water tank out at intervals.

natural_image
Interior view of a device showing internal components and wiring (no visible text or symbols)When the tank is empty, fill it again with fresh drinkable water.
It is possible to use the machine without filter, Saeco suggests its use. If filter is not used, the machine must be descaled more frequently.
Adjust the water hardness (see “programming the machine functions”).
You can now use your coffee machine.
The user can change some machine operating parameters to suit his/her personal needs.
PROGRAMMING START
Procedure for accessing machine programming mode.

natural_image
Close-up of a black printer's front panel with a red arrow pointing to the button (no visible text or symbols)Turn the machine off.

text_image
andPress the buttons together. Keeping the buttons pressed down, turn on the machine.

natural_image
Close-up of a black printer's front panel with a red arrow pointing to the button (no visible text or symbols)Keeping the buttons pressed
WATER
HARDNESS
The hardness of tap water may vary depending on the region. For this reason, the appliance can be set according to the water hardness in the place where it is to be used, expressed on a scale of 1 to 4.

natural_image
Close-up of a hand inserting a small electronic component into a device (no visible text or symbols)Dip the strip in water for 1 second.

text_image
Hardness 4 Hardness 3 Hardness 2 Hardness 1Check how many squares change colour.

text_image
Control panel with indicator lights and a hand cursor pointing to the buttonPress the button to program the water hardness.
The appliance is factory set on a hardness value of 3*. The setting should be adjusted according to the level of water hardness in the local area.


text_image
Hardness 4 Hardness 3 Hardness 2 Hardness 1If the “Aqua Prima” filter has been installed in the machine, set the machine according to these indications. The degree of hardness will be signalled by the indicator lights.

text_image
Hardness 4 Hardness 3* Hardness 2 Hardness 1If the “Aqua Prima” filter has NOT been installed, set the machine according to these indications. The degree of hardness will be signalled by the indicator lights.
 | When this function is enabled, the internal machine circuits will be rinsed immediately after the warming-up phase to ensure that coffee is prepared with fresh water only. | 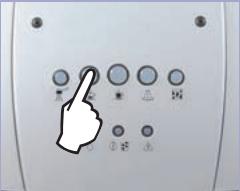 | 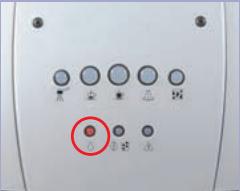 | 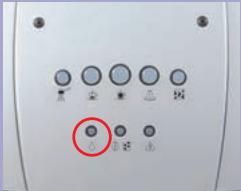 |
| In all new appliances this function has already been enabled in the factory. | Press the button to set the function. | Rinsing enabled (ON). | Rinsing disabled (OFF). | |
| [2B17] | With the pre-brewing process the coffee is slightly moistened before actual brewing. This brings out the full aroma of the coffee and lends it an excellent flavour. It is possible to choose either “enabled” or “disabled”. | 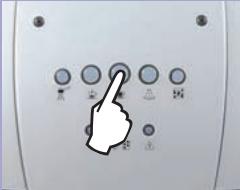 | 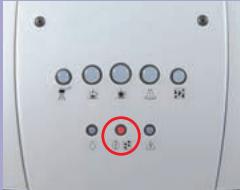 |  |
| Press the button to set the function. | Prebrewing enabled (ON). | Prebrewing disabled (OFF). | ||
| [1584] | With the pre-grinding process the machine grinds twice: the first time for the type of coffee selected and the second time for the subsequent coffee (not yet selected).This function is useful when you want to reduce the time necessary for dispensing several coffees in sequence (e.g. while entertaining guests or during a party). | 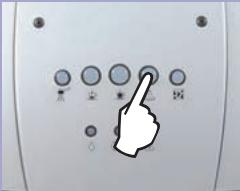 | 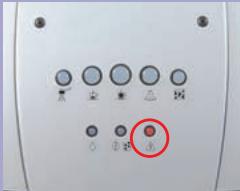 |  |
| Press the button to set the function. | Pregrinding enabled (ON). | Pregrinding disabled (OFF). | ||
| This procedure serves to activate all the settings made. |  |  |
The control panel display guides users and helps them to use the machine correctly.

natural_image
Control panel with five circular indicators and icons, no visible text or symbolsFlashing
Steadily lit
The machine is warming up to brew coffee, and dispense hot water.
The machine is ready to brew coffee and dispense hot water.

natural_image
Five circular icons with different shapes and colors, one highlighted in green (no text or symbols)Flashing
Steadily lit
The machine is warming up to dispense steam.
The machine is ready to dispense steam.

text_image
Image showing five circular icons with Chinese characters, one highlighted in red.Slow
Flashing
Fast
Flashing
The machine is brewing only one espresso.
The machine is brewing two espressos.

natural_image
Row of six circular icons with different shapes and colors, one highlighted in green (no text or symbols)Slow
Flashing
Fast
Flashing
The machine is brewing only one coffee.
The machine is brewing two coffees.

text_image
Image showing five circular icons with Chinese characters and a red circle highlighting the first icon, likely indicating a selection or status.Steadily lit
The function for brewing ground coffee has been selected.

text_image
Diagram showing five labeled circular icons with green and red circles, likely representing a system or control panel.Flashing
Machine overtemperature. Place a container under the pannarello/cappuccinatore and open the steam knob. When the lights remain on, close the knob.

Flashing
Descale the machine

Steadily lit
Fill the water tank with fresh drinking water.

Flashing
Load the circuit (Starting up)

Steadily lit
Fill the coffee bean container with coffee beans.

Flashing
Open the door, remove the dregs drawer and empty the used coffee grinds into a suitable container.
Important note: the dregs drawer may be emptied only when the machine is on. The drawer must be removed for at least 5 seconds. If you empty the drawer with the machine off, you will not be able to dispense coffee the next time you switch the machine on.

Steadily lit
Fit the brew unit, drip tray and dregs drawer correctly into place.
Close the front door.

Flashing
Coffee grinder motor jammed.
Brew unit motor jammed.
Contact an Authorised Service Centre.
ADDITIONAL INFORMATION FOR CORRECTLY USING THE "AQUA PRIMA" FILTER.
Please follow these simple instructions to correctly use the “Aqua prima” filter:
- Keep the "Aqua prima" filter cool and away from sunlight; the room temperature should be between +5°C and +40°C;
- Do not use the filter in temperatures over 60^ C.
- If the coffee machine is not used for 3 days, we recommend washing the "Aqua prima" filter;
4 If the coffee machine is not used for more than 20 days, it is advisable to replace the filter. - To store an already opened filter, seal it in a nylon bag and keep in the fridge; do not store it in the freezer to avoid damaging the filter properties.
- Before using the filter, leave it to soak in the water tank for 30 minutes.
- Once it is taken out of its pack, do not keep the filter in the open air.
- The filter must be replaced 90 days after opening the packing or after treating 60 litres of drinking water.

natural_image
White plastic water dispenser with orange handle and white base, no visible text or symbols| PROBLEMS | CAUSES | REMEDIES |
| The machine does not turn on. | The machine is not connected to the power supply. | Move the main switch to ON. |
| Check the plug and the connection | ||
| The coffee is not hot enough. | The cups are cold. | Warm up the cups. |
| No hot water or steam is dispensed. | The tube nozzle is clogged. | Clean the nozzle opening with a needle. During this operation, the knob must be closed and the machine must be off. During this operation, the knob must be closed and the machine must be off. |
| A noise can be heard coming from the steam tube of the machine. | ||
| The machine takes a long time to warm up. | Excessive scale has built up. | Descale the machine. |
| The brew unit cannot be removed. | The unit has stopped in the wrong position. | Close the door and switch on the machine; the brew unit will move back into position. |
| PROBLEMS | CAUSES | REMEDIES |
| Coffee flows out in slow trickle or not at all. | Excessively fine grind | Adjust to a coarser grind (turn the knob clockwise). |
 |  | |
| and too much coffee. | Decrease the quantity. | |
 |  |
This product complies with EU Directive 2002/96/EC.

The symbol ∧ on the product or on its packaging indicates that this product may not be treated as household waste. Instead it shall be handed over to the applicable collection point for the recycling of electrical and electronic equipment.
By ensuring this product is disposed of correctly, you will help prevent potential negative consequences for the environment and human health, which could otherwise be caused by inappropriate waste handling of this product.
For more detailed information about recycling of this product, please contact your local city office, your household waste disposal service or the shop where you purchased the product.
natural_image
Exterior view of a modern stainless steel coffee machine (no visible text or symbols)natural_image
Hand pouring dark liquid into a machine (no visible text or symbols)natural_image
White plastic water dispenser with orange lid (no text or symbols visible)natural_image
Close-up of a device with a hand inserting a component into a container (no visible text or symbols)natural_image
Close-up of a white electronic device with a black port and red arrow pointing to a green component (no visible text or symbols)natural_image
Close-up of a small espresso machine with liquid being poured into it, no visible text or symbolsnatural_image
Close-up of a mechanical component with a red arrow indicating rotation or change (no text or symbols visible)natural_image
Close-up of a white industrial machine with a water dispenser and tubing (no visible text or symbols)natural_image
Close-up of a mechanical component with a red arrow indicating rotation or change (no text or symbols visible)natural_image
Close-up of a milk Millimeter with water being poured into a glass container (no visible text or symbols)Becher wegnehmen.

text_image
konstanttext_image
Control panel with three circular indicators: liquid drop, sensor, and warning symbolnatural_image
Close-up of a coffee maker's interior showing seeds and gears, with red arrows indicating rotation (no text or symbols)natural_image
Close-up of a small mechanical device with granular material inside, showing a red arrow indicating rotation (no text or symbols visible)natural_image
Close-up of a mechanical component with gears and seeds, showing a red arrow indicating rotation (no text or symbols)natural_image
Close-up of a container with dark granular material and two metallic gears, no visible text or symbolsnatural_image
Close-up of a coffee ear with visible seeds and a red arrow indicating rotation (no text or symbols)Stärkerer Kaffee.

natural_image
Close-up of a coffee maker's lid with gears and wooden coffee beans, showing a red arrow indicating rotation (no text or symbols)Leichterer Kaffee.
KAFFEEMENGE IN DER TASSE
natural_image
Close-up of hands operating a computer device with a mouse and cable, no visible text or symbolsnatural_image
Close-up of hands operating a computer mouse with a red upward arrow indicating motion (no text or symbols visible)natural_image
Close-up of hands installing a black tool on a microwave oven, with a red arrow indicating the action (no text or symbols visible)natural_image
Close-up of hands operating a computer tower with a red arrow indicating the handle (no text or symbols visible)natural_image
Exterior view of a modern coffee machine with cups and side arm (no text or symbols visible)natural_image
Modern coffee machine with glass cups and a spoon, no visible text or symbolsnatural_image
Exterior view of a modern coffee machine with red arrows indicating flow or movement (no text or symbols visible)natural_image
Close-up of a hand using a sewing machine to press or install a brown object, no visible text or symbols on the device itself.natural_image
Close-up of a white industrial machine with glass and water dispenser, showing mechanical components and a red arrow indicating motion (no text or symbols visible)natural_image
Close-up of hands using a handheld device to adjust a black cable or cable (no visible text or symbols)natural_image
Close-up of a kitchen mixer with red arrows indicating motion or adjustment (no text or symbols visible)natural_image
Close-up of a modern stainless steel milk dispenser with a glass beaker and control panel (no visible text or symbols)Warten.

natural_image
Close-up of a white industrial vacuum cleaner's head panel with a red arrow indicating rotation (no text or symbols visible)natural_image
Close-up of a modern kitchen appliance with a glass tube and side-mounted stand, no visible text or symbols.Behälter wegnehmen.

natural_image
Close-up of hands holding a metallic object with a cable, next to a kitchen appliance (no visible text or symbols)natural_image
Close-up of a kitchen blender with red arrows indicating motion or adjustment (no text or symbols visible)natural_image
Close-up of a white industrial sewing machine with a circular dial and red directional arrows indicating motion (no text or symbols visible)natural_image
Close-up of a hand pouring liquid into a glass pitcher on a kitchen appliance (no visible text or symbols)natural_image
Close-up of a kitchen mixer with red directional arrows indicating press or control (no text or symbols visible)natural_image
Close-up of a hand using a coffee machine to lift a cup, with a red arrow indicating the lever (no text or symbols visible)natural_image
Close-up of a kitchen mixer with red arrows indicating rotation and contraction (no text or symbols visible)natural_image
Two-step cooking process: adding a small glass bowl to a metal pitcher with a hand pouring liquid (no text or symbols visible)natural_image
Close-up of a white ceramic lamp on a cutting board with a red arrow indicating rotation (no text or symbols visible)natural_image
Close-up of a microwave oven and a glass beaker with a red arrow indicating rotation (no text or symbols visible)natural_image
Simple line drawing of a steaming cup (no text or symbols)natural_image
Close-up of hands adjusting a black tool on a kitchen appliance (no visible text or symbols)natural_image
Close-up of a kitchen blender with red directional arrows indicating rotation (no text or symbols visible)natural_image
Two-panel image showing a kitchen blender with a red arrow indicating rotation and a side view of the blender with a straw (no text or symbols visible)natural_image
Hand holding a white milk dispenser with a red arrow pointing to it, no visible text or symbolsnatural_image
Close-up of a mechanical device's handle and lever mechanism with red arrow indicating rotation (no text or symbols)natural_image
Hand holding a small white beverage in a modern kitchen appliance, with a red arrow indicating rotation (no text or symbols visible)natural_image
Close-up of a mechanical device's front panel with a red arrow indicating rotational motion (no text or symbols visible)natural_image
Hand holding a small glass container with a brush, next to a modern kitchen appliance (no visible text or symbols)Behälter wegnehmen.

text_image
blinktnatural_image
Close-up of a modern kitchen appliance with a glass bowl and a red arrow pointing to it (no visible text or symbols)natural_image
Close-up of a mechanical device's front panel with a red arrow indicating rotation (no text or symbols visible)natural_image
Close-up of hands using a tool to adjust or install a device component, with red arrows indicating direction (no text or symbols visible)natural_image
Cross-sectional diagram of a device casing with internal components (no text or symbols visible)natural_image
Close-up of a modern milk dispenser with a red arrow pointing to the cup (no visible text or symbols)natural_image
Close-up of a mechanical device's handle and control knob with red arrow indicating rotation (no text or symbols)natural_image
Modern milk dispenser with glass pitcher and control panel (no visible text or symbols)natural_image
Two kitchen appliances: a hand mixer and a steamer with a side view showing liquid being poured into it (no text or symbols visible)natural_image
Cross-sectional view of a device casing with internal components and ventilation slots (no text or symbols visible)natural_image
Close-up of a modern milk tea machine with a glass pitcher and fork, no visible text or symbolsnatural_image
Close-up of a mechanical device with a red arrow indicating rotation or adjustment (no text or symbols visible)natural_image
Close-up of a white industrial device's control panel with a red arrow indicating rotation (no text or symbols visible)natural_image
Close-up of a white milk dispenser with a glass pitcher and side arm, no visible text or symbolsBehälter wegnehmen.
natural_image
Close-up of a computer monitor with a cable plugged into a wall socket, showing red arrows pointing to the ports (no text or symbols visible)natural_image
Interior view of a device showing a transparent casing with a red circle highlighting a component (no text or symbols visible)Tank reinigen.
natural_image
Close-up of a hand inserting a device into a computer case, with a red arrow pointing to the component (no visible text or symbols)natural_image
Close-up of a hand pressing down on a computer monitor with a red arrow indicating the action (no text or symbols visible)natural_image
Close-up of a hand using a tool to apply liquid into a container, with an inset showing the same step (no text or symbols visible)natural_image
Hand holding a small mechanical device with a red arrow indicating downward motion (no text or symbols visible)natural_image
Hand holding a small object with a red curved arrow indicating rotation or change (no text or symbols visible)Fronttür öffnen.

natural_image
Close-up of a hand pressing a component into a machine (no visible text or symbols)natural_image
Close-up of a mechanical device with red arrows indicating force or movement, no visible text or symbolsnatural_image
Person washing a black plastic bag on a stainless steel kitchen sink (no text or symbols visible)natural_image
Close-up of hands assembling a black plastic electronic device into a bowl (no visible text or symbols)natural_image
Close-up of a mechanical component with a red arrow pointing to a specific area (no visible text or symbols)natural_image
Exterior view of a modern silver coffee machine (no visible text or symbols)natural_image
Close-up of hands holding a small red object over a white appliance (no visible text or symbols)Filter auspacken

natural_image
Close-up of hands applying red substance to a white object with a curved arrow (no text or symbols visible)natural_image
Hand holding a black cylindrical object with red arrows indicating motion or change (no text or symbols)natural_image
Hand holding a white cylindrical object with a black chimney and red arrow pointing to it (no text or symbols visible)natural_image
Interior view of a device with a red arrow pointing to a component (no text or symbols visible)natural_image
Close-up of a laboratory instrument with a red arrow pointing to a component, no visible text or symbolsnatural_image
Close-up of a mechanical device with a red downward arrow indicating a component (no text or symbols visible)natural_image
Diagram of a device with red arrows indicating motion or force, no visible text or symbolsnatural_image
Cross-sectional view of a device with internal components and ventilation duct (no visible text or symbols)natural_image
Close-up of a stainless steel appliance with a hand pump and control panel, showing red arrows pointing to the side (no text or symbols visible)natural_image
Close-up of a white industrial device's control knob with red arrow indicating rotation (no text or symbols)natural_image
Modern stainless steel milk dispenser with glass cup and side arm (no visible text or symbols)natural_image
Interior view of a device with visible internal components and wiring (no text or symbols)natural_image
Close-up of a black printer's front panel with a green indicator light and a red arrow pointing to it (no visible text or symbols)natural_image
Close-up of a black printer's front panel with a red arrow pointing to the button (no visible text or symbols)
text_image
Control panel with finger pointing at circular buttons and icons, including a white hand iconWASSERHÄRTE
natural_image
Close-up of a hand inserting a small object into a device (no visible text or symbols)text_image
Diagram showing five circular icons with green circles highlighting the first two, each labeled with a small symbol.blinkt
konstant
natural_image
Five circular icons with different shapes and colors, one highlighted in green (no text or symbols)blinkt
konstant
text_image
Image showing five circular icons with Chinese characters, one highlighted in red.natural_image
Row of five circular icons with varying shapes and colors, one highlighted in red (no text or symbols)text_image
Image showing five circular icons with Chinese characters, likely representing indicators or symbols.konstant
text_image
Image showing five circular icons with green and red circles, likely representing indicators or status labels.blinkt
natural_image
White plastic water dispenser with orange handle and white base, no visible text or symbolsnatural_image
Exterior view of a modern stainless steel coffee machine (no visible text or symbols)natural_image
White plastic water dispenser with orange lid (no text or symbols visible)natural_image
Close-up of a device with a hand inserting a component into a container (no visible text or symbols)natural_image
Close-up of a white electronic device with a black port and red arrow pointing to a green component (no visible text or symbols)natural_image
Close-up of a small espresso machine with liquid being poured into it, no visible text or symbolsnatural_image
Close-up of a mechanical component with a red arrow indicating rotation or change (no text or symbols visible)natural_image
Close-up of a white industrial machine with a water dispenser and tubing (no visible text or symbols)natural_image
Close-up of a mechanical component with a red arrow indicating rotation or change (no text or symbols visible)natural_image
Close-up of a milk dispenser with liquid being poured into a glass container, no visible text or symbolsRetirer le verre.

text_image
Fixetext_image
Control panel with three circular indicators: liquid drop, sensor, and warning symbolnatural_image
Close-up of a small electronic device with visible components and a red arrow indicating rotation (no text or symbols)natural_image
Close-up of a small mechanical device with granular material inside, showing a red arrow indicating rotation (no text or symbols visible)natural_image
Close-up of a mechanical component with gears and seeds, showing a red arrow indicating rotation (no text or symbols)natural_image
Close-up of a container with dark granular material and two metallic gears, no visible text or symbolsnatural_image
Close-up of a coffee ear with visible seeds and a red arrow indicating rotation (no text or symbols)Café plus fort.

natural_image
Close-up of a coffee maker's lid with gears and wooden coffee beans, showing a red arrow indicating rotation (no text or symbols)Café plus léger.
CAFÉ EN TASSE
natural_image
Close-up of hands operating a computer device with a mouse and cable, no visible text or symbolsnatural_image
Close-up of hands holding a computer mouse with a red upward arrow indicating motion (no text or symbols visible)natural_image
Close-up of hands installing a black tool on a microwave oven, with a red arrow indicating the action (no text or symbols visible)natural_image
Close-up of hands operating a computer tower with a red arrow indicating the handle (no text or symbols visible)natural_image
Exterior view of a modern coffee machine with cups and side arm (no text or symbols visible)natural_image
Modern coffee machine with glass cups and a spoon, showing internal components (no visible text or symbols)natural_image
Exterior view of a modern coffee machine with water bottles and control knobs (no text or symbols visible)natural_image
Close-up of a hand using a sewing machine to press or install a brown object, no visible text or symbols on the device itself.natural_image
Close-up of a white industrial machine with glass and water dispenser, showing mechanical components and a red arrow indicating motion (no text or symbols visible)natural_image
Close-up of hands operating a kitchen appliance with a handle (no visible text or symbols)natural_image
Close-up of a kitchen appliance with a hand tool and red directional arrows indicating motion (no text or symbols)natural_image
Modern stainless steel milk tea machine with glass cup and side arm (no visible text or symbols)Attendre.

natural_image
Close-up of a white industrial machine with a red arrow indicating rotation (no text or symbols visible)natural_image
Close-up of a white industrial machine with a glass beaker and control panel, no visible text or symbolsnatural_image
Close-up of hands operating a kitchen appliance with a tool and tubing (no visible text or symbols)natural_image
Close-up of a kitchen blender with red arrows indicating motion or adjustment (no text or symbols visible)natural_image
Close-up of a white industrial machine with a circular dial and red directional arrows indicating motion (no text or symbols visible)natural_image
Close-up of a hand pouring liquid into a glass pitcher with milk, next to a kitchen appliance (no visible text or symbols)natural_image
Close-up of a kitchen mixer with red directional arrows indicating motion (no text or symbols)natural_image
Close-up of a hand using a coffee machine to press a cup, with a red arrow indicating the press direction (no text or symbols visible)natural_image
Close-up of a kitchen mixer with red arrows indicating rotation and contraction (no text or symbols visible)natural_image
Two-step cooking process: adding a small glass bowl to a metal pitcher with a hand pouring liquid (no text or symbols visible)natural_image
Close-up of a laboratory setup with a glassware and a control panel, showing a red curved arrow indicating rotation (no text or symbols visible)natural_image
Close-up of a microwave oven with a glass beaker and a red arrow indicating rotation (no text or symbols visible)Fermer le robinet. Retirer le verre.

text_image
Clignotantnatural_image
Simple line drawing of a steaming cup (no text or symbols)natural_image
Close-up of hands adjusting a black tool on a kitchen appliance (no visible text or symbols)natural_image
Close-up of a kitchen blender with red directional arrows indicating rotation (no text or symbols visible)natural_image
Two-panel image showing a kitchen blender and its side view of a small appliance with a red arrow indicating rotation (no text or symbols)natural_image
Hand holding a milk dispenser with a red arrow pointing to it, no visible text or symbolsnatural_image
Close-up of a mechanical device's control panel with red arrow indicating rotation (no text or symbols visible)natural_image
Hand holding a small white beverage in a modern kitchen appliance, with a red arrow indicating rotation (no text or symbols visible)natural_image
Close-up of a mechanical device's control panel with a red arrow indicating rotation (no text or symbols visible)natural_image
Hand holding a small glass container with a brush, next to a modern kitchen appliance (no visible text or symbols)natural_image
Close-up of a modern kitchen appliance with a glass bowl and a red arrow pointing to it (no visible text or symbols)natural_image
Close-up of a mechanical device's front panel with a red arrow indicating rotation (no text or symbols visible)natural_image
Close-up of hands using a tool to adjust or install a device component, with red arrows indicating direction (no text or symbols visible)natural_image
Cross-sectional diagram of a device casing with internal components (no text or symbols visible)natural_image
Close-up of a modern milk dispenser with a red arrow pointing to the cup (no visible text or symbols)natural_image
Close-up of a mechanical device's front panel with a red arrow indicating rotation (no text or symbols visible)natural_image
Modern milk dispenser with glass bowl and side arm (no visible text or symbols)natural_image
Two kitchen appliances: a hand mixer and a steamer with a side view showing liquid being poured into it (no text or symbols visible)natural_image
Cross-sectional view of a device casing with internal components (no visible text or symbols)natural_image
Close-up of a modern milk tea machine with a glass pitcher and fork, no visible text or symbolsnatural_image
Close-up of a mechanical device with a red arrow indicating rotation or adjustment (no text or symbols visible)natural_image
Close-up of a white industrial device's control panel with a red arrow indicating rotation (no text or symbols visible)natural_image
Close-up of a white milk dispenser with a glass pitcher and lever, no visible text or symbolsnatural_image
Close-up of a computer interface with a cable plugged into a socket, showing red arrows pointing to the socket (no text or symbols visible)natural_image
Interior view of a flat-screen TV or audio device showing internal structure and a red circle highlighting a component (no text or symbols visible)natural_image
Close-up of a hand inserting a device into a computer case, showing internal components and a red arrow indicating the next component (no text or symbols visible)natural_image
Close-up of a hand pressing down on a computer motherboard with a red arrow indicating the action (no text or symbols visible)natural_image
Close-up of a hand using a tool to apply liquid into a container, with an inset showing the same step (no text or symbols visible)natural_image
Hand holding a small mechanical device with a red arrow pointing to a component (no visible text or symbols)natural_image
Hand inserting a small object into a machine component, with red arrows indicating rotation (no text or symbols visible)natural_image
Close-up of a hand inserting a device into a plastic housing (no visible text or symbols)natural_image
Close-up of a hand operating a mechanical device with red arrows indicating motion or force (no text or symbols visible)natural_image
Person washing a black plastic appliance on a stainless steel kitchen sink (no text or symbols visible)natural_image
Close-up of hands assembling a black plastic electronic device into a container (no visible text or symbols)natural_image
Close-up of a mechanical component with a red arrow pointing to a specific area (no visible text or symbols)natural_image
Exterior view of a modern silver coffee machine (no visible text or symbols)natural_image
Close-up of hands holding a small red object over a white appliance (no visible text or symbols)natural_image
Close-up of hands holding a red, glossy substance with a white container and a curved arrow (no text or symbols visible)natural_image
Hand holding a black cylindrical object with red arrows indicating motion or change (no text or symbols)natural_image
Hand holding a white cylindrical object with a black chimney and red arrow pointing to it (no text or symbols visible)natural_image
Interior view of a device with a red arrow pointing to a component (no text or symbols visible)natural_image
Close-up of a laboratory instrument with a red arrow pointing to a component, no visible text or symbolsnatural_image
Close-up of a mechanical device with a red downward arrow indicating a component (no text or symbols visible)natural_image
Diagram of a device with arrows indicating motion or force direction (no text or symbols)natural_image
Cross-sectional view of a device with internal components and ventilation duct (no visible text or symbols)natural_image
Close-up of a stainless steel appliance with a hand pump and control panel, showing red arrows pointing to the side (no text or symbols visible)natural_image
Close-up of a white industrial device with a red arrow indicating rotation or adjustment (no visible text or symbols)natural_image
Modern stainless steel milk dispenser with a glass beaker and control panel (no visible text or symbols)natural_image
Interior view of a portable electronic device with visible internal components and wiring (no text or symbols)natural_image
Close-up of a white electronic device with a black control panel and a red arrow pointing to the button (no visible text or symbols)Eteindre la machine.

text_image
etnatural_image
Close-up of a black rectangular device with a green button and a red arrow pointing to it, no visible text or symbols.
text_image
Control panel with indicator lights and a hand pointing to a button, showing various function buttons.DURETE D'EAU
natural_image
Close-up of a hand inserting a small object into a device (no visible text or symbols)natural_image
Control panel with five circular indicators and icons, no visible text or symbolsClignotant
natural_image
Five circular icons with different shapes and colors, one highlighted in green (no text or symbols)Clignotant
text_image
Image showing five circular icons with Chinese characters, one highlighted in red.Clignotant lent
natural_image
Row of six circular icons with a highlighted green circle, no text or symbols presentClignotant lent
text_image
Image showing five circular icons with Chinese characters, likely representing indicators or functions.Fixe
text_image
Diagram showing five labeled circular icons with green and red circles, likely representing a system or control panel.Clignotant
natural_image
White plastic water dispenser with orange handle and white base, no visible text or symbolsnatural_image
Exterior view of a modern stainless steel coffee maker with control panel (no visible text or symbols)natural_image
Hand pouring dark granular substance into a machine (no visible text or symbols)natural_image
White plastic water dispenser with orange handle (no text or symbols visible)natural_image
Close-up of a device with a hand inserting a component into a tray (no visible text or symbols)natural_image
Close-up of a white electronic device with a black socket and red arrow pointing to its left side (no visible text or symbols)text_image
Centelleantenatural_image
Close-up of a small espresso machine with liquid being poured into it, no visible text or symbolsnatural_image
Close-up of a mechanical component with a red arrow indicating rotation or change (no text or symbols visible)natural_image
Close-up of a white industrial machine with a water dispenser and tubing (no visible text or symbols)natural_image
Close-up of a mechanical component with a red arrow indicating rotation or movement (no text or symbols visible)natural_image
Close-up of a milk dispenser with clear liquid and a glass container, no visible text or symbolsRetirar el vaso.

text_image
Fijatext_image
Control panel with three circular indicators: liquid drop, sensor, and warning symbolnatural_image
Close-up of a small electronic device with visible components and a red arrow indicating rotation (no text or symbols)natural_image
Close-up of a small mechanical device with granular material inside, showing a red arrow indicating rotation (no text or symbols visible)natural_image
Close-up of a mechanical component with gears and seeds, showing a red arrow indicating rotation (no text or symbols)natural_image
Close-up of a container with dark granular material and two metallic gears, no visible text or symbolsnatural_image
Close-up of a coffee ear with visible seeds and a red arrow indicating rotation (no text or symbols)Café más fuerte.

natural_image
Close-up of a coffee maker with hands operating the machine, showing seeds and a rotating arrow (no text or symbols visible)Café más ligero.
CAFÈ EN TAZA
natural_image
Close-up of hands operating a computer with a mouse and cable, no visible text or symbolsnatural_image
Close-up of hands holding a computer mouse with a red upward arrow indicating motion (no text or symbols visible)natural_image
Close-up of hands installing a black tool on a microwave oven, with a red arrow indicating the action (no text or symbols visible)natural_image
Close-up of hands operating a computer tower with a red arrow indicating the handle (no text or symbols visible)natural_image
Exterior view of a modern coffee machine with cups and side arm (no text or symbols visible)natural_image
Modern coffee machine with glass cups and a spoon, showing internal components (no visible text or symbols)natural_image
Exterior view of a modern coffee machine with water bottles and control knobs (no text or symbols visible)natural_image
Close-up of a hand using a sewing machine to press or install a brown object, no visible text or symbols on the device itself.natural_image
Close-up of a white industrial machine with glass and water dispenser, showing mechanical components and a red arrow indicating motion (no text or symbols visible)natural_image
Close-up of hands operating a kitchen appliance with a tool (no visible text or symbols)natural_image
Close-up of a kitchen mixer with a brush and digital display, showing red arrows indicating rotation (no text or symbols)natural_image
Modern stainless steel milk dispenser with glass beaker and control panel (no visible text or symbols)Esperar

natural_image
Close-up of a white industrial machine with a red arrow indicating rotation or adjustment (no text or symbols visible)natural_image
Close-up of a white industrial machine with a glass pitcher and control panel, showing no visible text or symbols.text_image
Centelleante®natural_image
Close-up of hands holding a small metallic object with a cable, next to a kitchen appliance (no visible text or symbols)natural_image
Close-up of a kitchen blender with red arrows indicating motion or adjustment (no text or symbols visible)natural_image
Close-up of a sewing machine's side profile showing a knob and handle mechanism (no text or symbols visible)natural_image
Close-up of a hand pouring liquid into a glass pitcher on a kitchen machine (no visible text or symbols)natural_image
Close-up of a kitchen mixer with red arrows indicating rotation (no text or symbols visible)Coloque la taza debajo del cappuccinatore. Abrir el grifo.

natural_image
Close-up of a hand using a coffee machine to lift a cup, with a red arrow indicating the lever (no text or symbols visible)natural_image
Close-up of a kitchen mixer with red arrows indicating rotation and contraction (no text or symbols visible)natural_image
Two-step cooking process: adding a small glass bowl to a metal pitcher with a hand pouring liquid (no text or symbols visible)natural_image
Close-up of a laboratory setup with a glassware and a control panel, showing a red arrow indicating rotation (no text or symbols visible)natural_image
Close-up of a microwave oven with a glass beaker and a red arrow indicating rotation (no text or symbols visible)text_image
Centelleantenatural_image
Simple line drawing of a steaming cup (no text or symbols)natural_image
Close-up of hands adjusting a black tool on a white appliance (no visible text or symbols)text_image
Centelleantenatural_image
Close-up of a kitchen blender with red directional arrows indicating rotation (no text or symbols visible)natural_image
Two-panel image showing a kitchen mixer with a circular dial and a side view of its base dish with a straw bulb (no text or symbols visible)natural_image
Hand holding a milk dispenser with a red arrow pointing to it, no visible text or symbolsnatural_image
Close-up of a mechanical device's control panel with red arrow indicating rotation (no text or symbols visible)natural_image
Hand holding a small white cup with a brush, next to a silver appliance (no visible text or symbols)natural_image
Close-up of a mechanical device's control panel with a red arrow indicating rotation (no text or symbols visible)natural_image
Hand holding a small glass container with a brush, next to a modern kitchen appliance (no visible text or symbols)text_image
Centelleantenatural_image
Close-up of a modern kitchen appliance with a glass bowl and a red arrow pointing to it (no visible text or symbols)Coloque un recipiente debajo del pannarello.

natural_image
Close-up of a mechanical device's handle and control knob with red arrow indicating rotation (no text or symbols)natural_image
Close-up of hands using a tool to adjust or install a device component, with red arrows indicating direction (no text or symbols visible)natural_image
Cross-sectional diagram of a device casing with internal components (no text or symbols visible)natural_image
Close-up of a modern milk dispenser with a red arrow pointing to the cup (no visible text or symbols)natural_image
Close-up of a mechanical device with a red arrow indicating rotation or change (no text or symbols visible)natural_image
Modern milk dispenser with glass bowl and side arm (no visible text or symbols)text_image
Centelleantenatural_image
Two kitchen appliances: a hand mixer and a microwave oven, both with red arrows indicating rotation or adjustment (no text or symbols visible)natural_image
Cross-sectional view of a device casing with internal components (no visible text or symbols)natural_image
Close-up of a modern milk dispenser with a red arrow pointing to the cup (no visible text or symbols)natural_image
Close-up of a white industrial machine head with a red arrow indicating rotation or adjustment (no text or symbols visible)natural_image
Close-up of a white industrial device's control panel with a red arrow indicating rotation (no text or symbols visible)natural_image
Close-up of a white milk dispenser with a glass pitcher and lever, no visible text or symbolsnatural_image
Close-up of a cable outlet with red arrows pointing to a connector (no text or symbols visible)natural_image
Interior view of a flat-screen TV or audio device showing internal structure and a red circle highlighting a component (no text or symbols visible)natural_image
Close-up of a hand inserting a device into a computer case, showing internal components and a red arrow indicating the next component (no text or symbols visible)natural_image
Close-up of a hand pressing down on a computer motherboard with a red arrow indicating the action (no text or symbols visible)natural_image
Close-up of a hand using a tool to apply liquid into a container, with an inset showing the same step (no text or symbols visible)natural_image
Hand holding a small mechanical device with a red arrow indicating downward motion (no text or symbols visible)natural_image
Hand holding a small object with a red curved arrow indicating rotation or change (no text or symbols visible)Abrir la portezuela frontal.

natural_image
Close-up of a hand inserting a device into a machine (no visible text or symbols)natural_image
Close-up of a hand pressing down on a mechanical component with red arrows indicating motion (no text or symbols visible)natural_image
Person washing a black plastic bag on a stainless steel kitchen sink (no text or symbols visible)natural_image
Close-up of hands assembling a black plastic electronic device into a bowl (no visible text or symbols)natural_image
Close-up of a mechanical component with a red arrow pointing to a specific area (no visible text or symbols)natural_image
Exterior view of a modern stainless steel coffee machine (no visible text or symbols)natural_image
Close-up of hands holding a small red object over a white appliance (no visible text or symbols)natural_image
Close-up of hands applying red substance to a white object with a curved arrow (no text or symbols visible)natural_image
Hand holding a black cylindrical object with red arrows indicating motion or change (no text or symbols)natural_image
Hand holding a white cylindrical object with a black vertical rod and red arrow pointing to it (no text or symbols visible)natural_image
Interior view of a device with a red arrow pointing to a component (no text or symbols visible)natural_image
Close-up of a laboratory instrument with a red arrow pointing to a component, no visible text or symbolsnatural_image
Close-up of a mechanical device with a red downward arrow indicating a component (no text or symbols visible)Presionar completamente.

natural_image
Diagram of a device with arrows indicating motion or force direction (no text or symbols)natural_image
Cross-sectional view of a device with internal components and ventilation duct (no visible text or symbols)natural_image
Close-up of a stainless steel appliance with a hand pump and control panel, showing red arrows pointing to the side (no text or symbols visible)natural_image
Close-up of a white industrial device with a red arrow indicating rotation or adjustment (no visible text or symbols)natural_image
Modern stainless steel milk dispenser with glass cup and side arm (no visible text or symbols)natural_image
Interior view of a portable electronic device with visible internal components and wiring (no text or symbols)text_image
Control panel with finger pointing at multiple function buttons including alarm, display, and function icons
natural_image
Close-up of a hand inserting a small object into a device (no visible text or symbols)text_image
Diagram showing five labeled icons with green circles highlighting the first two positions, likely representing a system or control panel.Centelleante
natural_image
Five circular icons with different shapes and colors, one highlighted in green (no text or symbols)Centelleante
text_image
Image showing five circular icons with Chinese characters, one highlighted in red.Centelleante lento
natural_image
Row of six circular icons with varying shapes and colors, one highlighted in red (no text or symbols)Centelleante lento
text_image
Image showing five circular icons with Chinese characters and a red circle highlighting the first icon, likely indicating a selection or status.Fija
text_image
Diagram showing five labeled circular icons with green and red circles, likely representing indicators or functions.Centelleante
natural_image
White plastic water dispenser with orange handle and white base, no visible text or symbolsnatural_image
Exterior view of a modern stainless steel coffee maker with control panel (no visible text or symbols)natural_image
White plastic water dispenser with orange lid (no text or symbols visible)natural_image
Close-up of a device with a hand inserting a component into a container (no visible text or symbols)natural_image
Close-up of a white electronic device with a red arrow pointing to a green component (no visible text or symbols)natural_image
Close-up of a small espresso machine with liquid being poured into it, no visible text or symbolsnatural_image
Close-up of a mechanical component with a red arrow indicating rotation or change (no text or symbols visible)natural_image
Close-up of a white industrial machine with a water dispenser and tubing (no visible text or symbols)natural_image
Close-up of a mechanical component with a red arrow indicating rotational motion (no text or symbols)natural_image
Close-up of a modern coffee maker with liquid and glassware, no visible text or symbolsRetirar o copo.

text_image
Fixatext_image
Control panel with three circular indicators: liquid drop, sensor, and warning symbolnatural_image
Close-up of a small electronic device with visible components and a red arrow indicating rotation (no text or symbols)natural_image
Close-up of a small container with dried coffee beans and a red arrow indicating rotation (no text or symbols)natural_image
Close-up of a mechanical component with gears and seeds, showing a red arrow indicating rotation (no text or symbols)natural_image
Close-up of a container with dark granular material and two red arrows pointing to the side (no text or symbols visible)natural_image
Close-up of a coffee maker's lid with visible gears and coffee beans, no text or symbols presentCafé mais forte.

natural_image
Close-up of a mechanical device with gears and wooden blocks, showing internal components (no text or symbols visible)Café mais fraco.
CAFÈ EM XÍCARA
natural_image
Close-up of hands operating a computer with a mouse and cable, no visible text or symbolsPara remover o cappuccinatore desparafusar a virola.

natural_image
Close-up of hands operating a computer mouse with a red upward arrow indicating motion (no text or symbols visible)natural_image
Close-up of hands installing a wall-mounted cable or switch component into a microwave oven (no text or symbols visible)Para remover o pannarello desparafusar a virola.

natural_image
Close-up of hands operating a computer tower with a red arrow indicating the handle (no text or symbols visible)natural_image
Exterior view of a modern coffee machine with cups and side arm (no text or symbols visible)natural_image
Exterior view of a modern coffee machine with glass cups and control knobs (no text or symbols visible)natural_image
Exterior view of a modern coffee machine with water bottles and control valves (no text or symbols visible)natural_image
Close-up of a hand using a sewing machine to press or install a brown object, no visible text or symbols on the device itself.Colocar o pó de café com o dosador. MÁX. 1 DOSE

text_image
Ounatural_image
Close-up of a white coffee machine with glass cups and control knobs, showing no visible text or symbols.natural_image
Close-up of hands using a handheld device to adjust a small component (no visible text or symbols)Desmontar o cappuccinatore e instalar o pannarello (veja pág.97).

natural_image
Close-up of a kitchen mixer with a brush and digital display, showing red arrows indicating rotation (no text or symbols)natural_image
Modern stainless steel milk dispenser with glass beaker and control panel (no visible text or symbols)Esperar.

natural_image
Close-up of a white industrial machine with a red arrow indicating rotation (no text or symbols visible)natural_image
Close-up of a white industrial machine with a glass beaker and control panel, no visible text or symbolsnatural_image
Close-up of hands holding a small metallic object with a cable, next to a kitchen appliance (no visible text or symbols)natural_image
Close-up of a kitchen blender with red arrows indicating motion or adjustment (no text or symbols visible)natural_image
Close-up of a white industrial sewing machine with a circular dial and red directional arrows indicating motion (no text or symbols visible)natural_image
Close-up of a hand pouring liquid into a glass pitcher on a kitchen counter (no visible text or symbols)natural_image
Close-up of a kitchen mixer with red arrows indicating press or control buttons (no text or symbols visible)natural_image
Close-up of a hand using a coffee machine to lift a cup, with a red arrow indicating the motion (no text or symbols visible)natural_image
Close-up of a kitchen mixer with red arrows indicating rotation and contraction (no text or symbols visible)natural_image
Two-step photo showing a small glass beaker being dispensed into a metal pitcher, with a hand pouring liquid from the cup (no text or symbols visible)natural_image
Close-up of a white ceramic lamp on a cutting board with a red arrow indicating rotation (no text or symbols visible)natural_image
Close-up of a microwave oven and a glassware machine with a red arrow indicating rotation (no text or symbols visible)natural_image
Simple line drawing of a steaming cup (no text or symbols)natural_image
Close-up of hands using a tool to adjust or install a device (no visible text or symbols)Desmontar o cappuccinatore e instalar o pannarello (veja pág.97).

text_image
Intermitentenatural_image
Close-up of a kitchen blender with red directional arrows indicating rotation (no text or symbols visible)natural_image
Two kitchen appliances: a hand mixer and a digital brush (no visible text or symbols)natural_image
Hand holding a white milk dispenser with a red arrow pointing to it, no visible text or symbolsnatural_image
Close-up of a mechanical device's handle and lever mechanism with red arrow indicating rotation (no text or symbols)Abrir a torneira para forne- cer vapor.

natural_image
Hand holding a small white beverage in a modern kitchen appliance, with a red arrow indicating rotation (no text or symbols visible)natural_image
Close-up of a mechanical device's front panel with a red arrow indicating rotational motion (no text or symbols visible)natural_image
Hand holding a small glass container with a brush, next to a modern kitchen appliance (no visible text or symbols)natural_image
Close-up of a modern kitchen appliance with a glass bowl and a red arrow pointing to it (no visible text or symbols)natural_image
Close-up of a mechanical device's handle and control knob with red arrow indicating rotation (no text or symbols)natural_image
Close-up of a modern milk tea machine with a cup and side arm, no visible text or symbolsnatural_image
Close-up of a white industrial machine head with a red arrow indicating rotation or adjustment (no text or symbols visible)natural_image
Close-up of a white industrial machine control panel with a red arrow indicating rotation (no text or symbols visible)natural_image
Close-up of a white milk dispenser with a glass pitcher and side arm, no visible text or symbolsnatural_image
Interior view of a device casing with a red circle highlighting a component (no text or symbols visible)Lavar o depósito.
natural_image
Close-up of a hand inserting a device into a computer case, showing internal components and a red arrow indicating the next component (no text or symbols visible)natural_image
Close-up of a hand pressing down on a computer motherboard with a red arrow indicating the action (no text or symbols visible)natural_image
Close-up of a hand using a tool to apply liquid into a container, with an inset showing the same step (no text or symbols visible)natural_image
Hand holding a small mechanical device with a red arrow pointing to a component (no visible text or symbols)natural_image
Hand holding a small object with a red curved arrow indicating rotation or change (no text or symbols visible)natural_image
Close-up of a hand pressing down on a mechanical component with a red arrow indicating motion (no visible text or symbols)natural_image
Close-up of a mechanical device with red arrows indicating force or movement, no visible text or symbolsnatural_image
Person washing a black plastic bag on a stainless steel kitchen sink (no text or symbols visible)natural_image
Close-up of hands assembling a black plastic electronic device into a bowl (no visible text or symbols)natural_image
Close-up of a mechanical component with a red arrow pointing to a specific area (no visible text or symbols)natural_image
Exterior view of a modern silver coffee machine (no visible text or symbols)natural_image
Close-up of hands holding a small red object over a white appliance (no visible text or symbols)natural_image
Close-up of hands applying red substance to a white object with a curved arrow (no text or symbols visible)natural_image
Hand holding a black cylindrical object with red arrows indicating motion or change (no text or symbols)natural_image
Hand holding a white cylindrical object with a black vertical rod and red arrow pointing to it (no text or symbols visible)natural_image
Interior view of a device with a red arrow pointing to a component (no text or symbols visible)natural_image
Close-up of a laboratory instrument with a red arrow pointing to a component, no visible text or symbolsnatural_image
Close-up of a mechanical device with a red downward arrow indicating a component (no text or symbols visible)natural_image
Diagram of a device with arrows indicating motion or force, no visible text or symbolsnatural_image
Cross-sectional view of a device with internal components and ventilation duct (no visible text or symbols)natural_image
Close-up of a stainless steel appliance with a hand pump and control panel, showing red arrows pointing to the side (no text or symbols visible)natural_image
Close-up of a white industrial device with a red arrow indicating rotation or adjustment (no visible text or symbols)natural_image
Modern stainless steel milk dispenser with glass cup and side arm (no visible text or symbols)natural_image
Interior view of a portable electronic device with visible internal components and wiring (no text or symbols)text_image
Control panel with indicator lights and a hand pointing to a button, showing various function buttons.
natural_image
Close-up of a hand inserting a small object into a device (no visible text or symbols)natural_image
White industrial machine with orange handle and control panel, alongside four labeled Dureza units (1-4) in grayscale, no visible text or symbols on the device itself.text_image
Diagram showing five labeled icons with green circles highlighting the first two positions, likely representing a system or control panel.Intermitente
text_image
Control panel with five circular icons and one highlighted green circle, likely indicating a status or operation.Intermitente
text_image
Image showing five circular icons with Chinese characters, one highlighted in red.Intermitente lenta
natural_image
Five circular icons with different shapes and colors, one highlighted in green (no text or symbols)Intermitente lenta
Intermitente
rápida
text_image
Image showing five circular icons with green and gray colors, each circled in red, likely indicating a rating or indicator.Fixa
text_image
Diagram showing five labeled circular icons with green and red circles, likely representing a system or control panel.Intermitente
natural_image
White plastic water dispenser with orange handle and white base, no visible text or symbolsnatural_image
Exterior view of a modern stainless steel coffee machine (no visible text or symbols)natural_image
White plastic water dispenser with orange lid (no text or symbols visible)natural_image
Close-up of a device with a hand inserting a component into a container (no visible text or symbols)natural_image
Close-up of a white electronic device with a black port and red arrow pointing to a green component (no visible text or symbols)natural_image
Close-up of a small espresso machine with liquid being poured into it, no visible text or symbolsnatural_image
Close-up of a mechanical component with a red arrow indicating rotation or change (no text or symbols visible)natural_image
Close-up of a white industrial machine with a water dispenser and tubing (no visible text or symbols)natural_image
Close-up of a mechanical component with a red arrow indicating rotation or change (no text or symbols visible)natural_image
Close-up of a milk Millimeter with water being poured into a glass (no visible text or symbols)Beker wegnemen.

text_image
Brandttext_image
Control panel with three circular indicators: liquid drop, sensor, and warning symbolnatural_image
Close-up of a coffee maker's side panel with visible seeds and gears, showing red arrows indicating rotation (no text or symbols)natural_image
Close-up of a small mechanical device with granular material inside, showing a red arrow indicating rotation (no text or symbols visible)natural_image
Close-up of a mechanical component with gears and seeds, showing a red arrow indicating rotation (no text or symbols)natural_image
Close-up of a container with dark granular material and two metallic gears, no visible text or symbolsnatural_image
Close-up of a coffee ear with visible seeds and a red arrow indicating rotation (no text or symbols)Sterkere koffie.

natural_image
Close-up of a coffee maker with hands operating the machine, showing grain and seeds (no text or symbols visible)Slappere koffie.
KOFFIE IN KOPJE
natural_image
Close-up of hands operating a computer device with a mouse and cable, no visible text or symbolsnatural_image
Close-up of hands operating a computer mouse with a red upward arrow indicating motion (no text or symbols visible)natural_image
Close-up of hands installing a black tool on a microwave oven, with a red arrow indicating the action (no text or symbols visible)natural_image
Close-up of hands operating a kitchen appliance with a red arrow indicating the handle (no text or symbols visible)natural_image
Exterior view of a modern coffee machine with cups and side arm (no text or symbols visible)natural_image
Modern coffee machine with glass cups and a spoon, no visible text or symbolsnatural_image
Exterior view of a modern coffee machine with liquid and glass components (no text or symbols visible)natural_image
Close-up of a hand using a sewing machine to press or install a brown object, no visible text or symbols on the device itself.natural_image
Close-up of a white industrial machine with glass and water dispenser, showing mechanical components and a red arrow indicating motion (no text or symbols visible)natural_image
Close-up of hands using a handheld device to adjust a small component (no visible text or symbols)natural_image
Close-up of a kitchen mixer with a brush and digital applicator, showing red arrows indicating motion (no text or symbols)natural_image
Modern stainless steel milk tea machine with glass cup and side arm (no visible text or symbols)Even wachten

natural_image
Close-up of a white industrial machine with a red arrow indicating rotation (no text or symbols visible)natural_image
Close-up of a white industrial machine with a glass pitcher and control panel, showing no visible text or symbols.Neem de kan weg

natural_image
Close-up of hands holding a small metallic object connected to a computer monitor (no visible text or symbols)Controleer of de cappuccinobereider is gemonteerd.

natural_image
Close-up of a kitchen blender with red arrows indicating motion or adjustment (no text or symbols visible)natural_image
Close-up of a white industrial machine with a circular dial and red directional arrows indicating motion (no text or symbols visible)natural_image
Close-up of a hand pouring liquid into a glass pitcher on a kitchen machine (no visible text or symbols)natural_image
Close-up of a kitchen mixer with red arrows indicating rotation (no text or symbols visible)natural_image
Close-up of a hand using a coffee machine to press a cup, with a red arrow indicating the press direction (no text or symbols visible)Stel de schuim in. Omhoog = dikkere schuim.

natural_image
Close-up of a kitchen mixer with red arrows indicating rotation and contraction (no text or symbols visible)natural_image
Two-step cooking process: adding a small glass bowl to a metal pitcher with a hand pouring liquid (no text or symbols visible)natural_image
Close-up of a laboratory setup with a glassware and a control panel, showing a red arrow indicating rotation (no text or symbols visible)natural_image
Close-up of a microwave oven with a glass beaker and a red arrow indicating rotation (no text or symbols visible)natural_image
Simple line drawing of a steaming cup (no text or symbols)natural_image
Close-up of hands adjusting a black tool on a kitchen appliance (no visible text or symbols)natural_image
Close-up of a kitchen blender with red directional arrows indicating rotation (no text or symbols visible)natural_image
Two-panel image showing a kitchen blender and its side view of a small appliance with a red arrow indicating rotation (no text or symbols)natural_image
Hand holding a white milk dispenser with a red arrow pointing to it, no visible text or symbolsnatural_image
Close-up of a mechanical device's control panel with red arrow indicating rotation (no text or symbols visible)natural_image
Hand holding a small white beverage in a modern kitchen appliance, with a red arrow indicating rotation (no text or symbols visible)natural_image
Close-up of a mechanical device's control panel with a red arrow indicating rotation (no text or symbols visible)natural_image
Hand holding a small glass container with a brush, next to a modern kitchen appliance (no visible text or symbols)Neem de kan weg.

text_image
Knippertnatural_image
Close-up of a modern kitchen appliance with a glass bowl and a red arrow pointing to it (no visible text or symbols)natural_image
Close-up of a mechanical device's handle and control knob with red arrow indicating rotation (no text or symbols)natural_image
Close-up of hands using a tool to adjust or install a device component, with red arrows indicating direction (no text or symbols visible)natural_image
Cross-sectional diagram of a device casing with internal components (no text or symbols visible)natural_image
Close-up of a modern milk dispenser with a red arrow pointing to the cup (no visible text or symbols)natural_image
Close-up of a mechanical device's front panel with a red arrow indicating rotation (no text or symbols visible)natural_image
Modern milk dispenser with glass bowl and side arm (no visible text or symbols)natural_image
Two kitchen appliances: a hand mixer and a microwave oven, both with red arrows indicating rotation or adjustment (no text or symbols visible)natural_image
Cross-sectional view of a device casing with internal components (no visible text or symbols)natural_image
Close-up of a modern milk tea machine with a cup and side arm, no visible text or symbolsnatural_image
Close-up of a white industrial machine head with a red arrow indicating rotation or adjustment (no text or symbols visible)natural_image
Close-up of a white industrial machine control panel with a red arrow indicating rotation (no text or symbols visible)natural_image
Close-up of a white milk dispenser with a glass pitcher and lever, no visible text or symbolsNeem de kan weg.
natural_image
Close-up of a cable outlet with red arrows pointing to a component (no text or symbols visible)natural_image
Interior view of a device casing with a red circle highlighting a component (no text or symbols visible)natural_image
Close-up of a hand inserting a device into a computer case, showing internal components and a red arrow indicating the next component (no text or symbols visible)natural_image
Close-up of a hand pressing down on a computer motherboard with a red arrow indicating the process (no text or symbols visible)natural_image
Close-up of a hand using a tool to apply liquid into a container, with an inset showing the same step (no text or symbols visible)natural_image
Hand holding a small mechanical device with a red arrow pointing to a component (no visible text or symbols)natural_image
Hand inserting a small object into a machine gun, with red arrows indicating motion (no text or symbols visible)natural_image
Close-up of a hand pressing down on a mechanical component with a red arrow indicating motion (no visible text or symbols)natural_image
Close-up of a mechanical device with red arrows indicating force or movement, no visible text or symbolsnatural_image
Person washing a black plastic bag on a stainless steel kitchen sink (no text or symbols visible)natural_image
Close-up of hands assembling a black plastic electronic device into a bowl (no visible text or symbols)natural_image
Close-up of a mechanical component with a red arrow pointing to a specific area (no visible text or symbols)natural_image
Exterior view of a modern silver coffee machine (no visible text or symbols)natural_image
Close-up of hands holding a small red object over a white appliance (no visible text or symbols)natural_image
Close-up of hands applying red substance to a white object with a curved arrow (no text or symbols visible)natural_image
Hand holding a black cylindrical object with red arrows indicating motion or change (no text or symbols)natural_image
Hand holding a white cylindrical object with a black chimney and red arrow pointing to it (no text or symbols visible)natural_image
Interior view of a device with a red arrow pointing to a component (no text or symbols visible)natural_image
Close-up of a laboratory instrument with a red arrow pointing to a component, no visible text or symbolsnatural_image
Close-up of a mechanical device with a red downward arrow indicating a component (no text or symbols visible)natural_image
Diagram of a device with arrows indicating motion or force direction (no text or symbols)natural_image
Cross-sectional view of a device with internal components and ventilation duct (no visible text or symbols)natural_image
Close-up of a stainless steel appliance with a hand pump and control panel, showing red arrows pointing to the side (no text or symbols visible)natural_image
Close-up of a mechanical device with a red arrow indicating rotation or change (no text or symbols visible)natural_image
Modern coffee maker with glass cup and side arm (no visible text or symbols)natural_image
Interior view of a device showing internal components and wiring (no visible text or symbols)natural_image
Close-up of a black electronic device with a green indicator light and a red arrow pointing to it, no visible text or symbols.natural_image
Close-up of a black printer's front panel with a red arrow pointing to the button (no visible text or symbols)
text_image
Control panel with finger pointing at multiple function buttons including alarm, display, and function iconsnatural_image
Close-up of a hand inserting a small electronic component into a device (no visible text or symbols)natural_image
White plastic water dispenser with orange handle and white base (no text or symbols visible)
natural_image
Four rows of circular icons with different symbols and colors, no text or labels presentHardheid 4
Hardheid 3
Hardheid 2
Hardheid 1


natural_image
White plastic appliance with red X mark, no visible text or symbols
natural_image
Four rows of circular icons with different colors and symbols, no text or labels presentHardheid 4
Hardheid 3 ^1
Hardheid 1
Hardheid 2

natural_image
Control panel with five circular indicators and icons, no visible text or symbolsKnippert
natural_image
Five circular icons with different shapes and colors, one highlighted in green (no text or symbols)Knippert
text_image
Image showing five circular icons with Chinese characters, one highlighted in red.Langzaam knipperend
natural_image
Row of six circular icons with different shapes and colors, one highlighted in green (no text or symbols)Langzaam knipperend
text_image
Image showing five circular icons with Chinese characters and a red circle highlighting the first icon, likely indicating a selection or status.Brandt
text_image
Diagram showing five labeled circular icons with green and red circles, likely representing a system or control panel.Knippert