
MFB295DB - Oven AEG - Free user manual and instructions
Find the device manual for free MFB295DB AEG in PDF.


| Brand | AEG |
| Model | MFB295DB |
| Product Type | Built-in Electric Oven |
| Energy Type | Electric |
| Oven Capacity | 71 Liters |
| Temperature Range | 50°C - 275°C |
| Heating Functions | Conventional, Fan Forced, Grill, Fan Grill, Pizza, Slow Cook |
| Cleaning Type | EasyClean® (Enamel catalytic cleaning) |
| Display Type | Digital LED Display |
| Control Type | Touch + Rotary Knobs |
| Door Type | Double-glazed, removable inner glass |
| Safety Features | Child lock, cool door, automatic shut-off |
| Dimensions (H×W×D) | 590 mm × 560 mm × 560 mm |
| Weight | 35 kg |
| Power Consumption | 0.89 kWh (conventional), 0.72 kWh (fan forced) |
| Energy Class | A+ |
| Features | Delayed start, minute minder, fast heat-up |
Frequently Asked Questions - MFB295DB AEG
User questions about MFB295DB AEG
0 question about this device. Answer the ones you know or ask your own.
Ask a new question about this device
Download the instructions for your Oven in PDF format for free! Find your manual MFB295DB - AEG and take your electronic device back in hand. On this page are published all the documents necessary for the use of your device. MFB295DB by AEG.
USER MANUAL MFB295DB AEG
MFB295DB
HR Upute za uporabu | Mikrovalna pećnica 2
Dobro došli u AEG! Hvala vam što ste odabrali naš uređaj.

Koristi se za:
- roštiljanje hrane
Komplet za kuhanje na pari

Koristi se za:
- Kuhanje na pari
4. PRIJE PRVE UPORABE

UPOZORENJE!
4.2 Početno čišćenje

UPOZORENJE!
Pogledajte poglavlje „Čišćenje i održavanje“.
- Uklonite sav pribor iz mikrovalne pećnice.
- Pažljivo očistite unutrašnjost pećnice vlažnom mekom krpom.
4.3 Prethodno zagrijavanje
Prije prve uporabe unaprijed zagrijte praznu pećnicu.
- Postavite funkciju
- Pustite pećnicu da radi 30 minuta.
- Otvorite vrata i pustite da se ohladi.
- Unutrašnjost pećnice očistite vlažnom mekom krpom i pažljivo osušite.
Pećnica može stvarati neugodan miris i dim.
Provjerite je li protok zraka u prostoriji dovoljan.

4.4 Postavljanje sata

5. SVAKODNEVNA UPORABA

UPOZORENJE!
Umetanje rešetke roštilja

OPREZ!

Umetanje kompleta za kuhanje na pari

OPREZ!

Použití:
- grilování jídla
Použití:
- Pečení v páře
4. PŘED PRVNÍM POUŽITÍM

VAROVÁNÍ!
4.2 První čištění

VAROVÁNÍ!
8. DOPLŇKOVÉ FUNKCE
Welcome to AEG! Thank you for choosing our appliance.

Get usage advice, brochures, trouble shooter, service and repair information:
www.aeg.com/support
Subject to change without notice.
CONTENTS
- SAFETY INFORMATION......38
- SAFETY INSTRUCTIONS.... 41
- PRODUCT DESCRIPTION....42
- BEFORE FIRST USE....44
- DAILY USE......45
- AUTOMATIC PROGRAMMES....48
- USING THE ACCESSORIES....50
- ADDITIONAL FUNCTIONS....51
- HINTS AND TIPS....52
- CARE AND CLEANING....53
- TROUBLESHOOTING....53
- INSTALLATION....54
- ENVIRONMENTAL CONCERNS....55
1. ⚠ SAFETY INFORMATION
Before the installation and use of the appliance, carefully read the supplied instructions. The manufacturer is not responsible for any injuries or damage that are the result of incorrect installation or usage. Always keep the instructions in a safe and accessible location for future reference.
1.1 Children and vulnerable people safety

WARNING!
Risk of suffocation, injury or permanent disability.
- This appliance can be used by children aged from 8 years and above and persons with reduced physical, sensory or mental capabilities or lack of experience and knowledge if they have been given supervision or instruction concerning the use of the appliance in a safe way and understand the hazards involved. Children of less than 8 years of age and
persons with very extensive and complex disabilities shall be kept away from the appliance unless continuously supervised.
- Children should be supervised to ensure that they do not play with the appliance.
- Keep all packaging away from children and dispose of it appropriately.
- WARNING: The appliance and its accessible parts become hot during use. Keep children and pets away from the appliance when in use and when cooling down.
- If the appliance has a child safety device, it should be activated.
- Children shall not carry out cleaning and user maintenance of the appliance without supervision.
1.2 General Safety
- This appliance is for cooking purposes only.
- This appliance is designed for single household domestic use in an indoor environment.
- This appliance may be used in, offices, hotel guest rooms, bed & breakfast guest rooms, farm guest houses and other similar accommodation where such use does not exceed (average) domestic usage levels.
- WARNING: The appliance and its accessible parts become hot during use. Care should be taken to avoid touching heating elements.
- WARNING: If the door or door seals are damaged, the appliance must not be operated until it has been repaired by a qualified person.
- WARNING: Do not heat liquids and other foods in sealed containers. They are liable to explode.
- Do not use a steam cleaner to clean the appliance.
-
Before any maintenance operation, deactivate the appliance and disconnect the mains plug from the socket.
-
If the mains power supply cable is damaged, it must be replaced by the manufacturer, its Authorised Service Centre or similarly qualified persons to avoid an electrical hazard.
- Only a qualified person can carry out any service or repair operation that involves the removal of a cover which gives protection against exposure to microwave energy.
- Do not operate the appliance by means of an external timer or separate remote-control system.
- Metallic containers for food and beverages are not allowed during microwave cooking. This requirement is not applicable if the manufacturer specifies size and shape of metallic containers suitable for microwave cooking.
- Only use utensils that are suitable for use in microwave ovens.
- When heating food in plastic or paper containers, keep an eye on the appliance due to the possibility of ignition.
- The appliance is intended for heating food and beverages. Drying of food or clothing and heating of warming pads, slippers, sponges, damp cloth and similar may lead to risk of injury, ignition or fire.
- If smoke is emitted, switch off or unplug the appliance and keep the door closed in order to stifle any flames.
- Microwave heating of beverages can result in delayed eruptive boiling. Care must be taken when handling the container.
- The contents of feeding bottles and baby food jars shall be stirred or shaken and the temperature checked before consumption, in order to avoid burns.
- Eggs in their shell and whole hard-boiled eggs should not be heated in the appliance since they may explode, even after microwave heating has ended.
- The appliance should be cleaned regularly and any food deposits removed.
- Failure to maintain the appliance in a clean condition could lead to deterioration of the surface that could adversely
affect the life of the appliance and possibly result in a hazardous situation.
- The temperature of accessible surfaces may be high when the appliance is operating.
- The microwave oven is intended to be used freestanding.
- The microwave oven shall not be placed in a cabinet unless it has been tested in a cabinet.
- The rear surface of appliances shall be placed against a wall.
- Do not use harsh abrasive cleaners or sharp metal scrapers to clean the glass door since they can scratch the surface, which may result in shattering of the glass.
- Do not activate the appliance when it is empty. Metal parts inside the cavity can create electric arcing.
2. SAFETY INSTRUCTIONS
2.1 Installation

WARNING!
Only a qualified person must install this appliance.
- Do not install or use a damaged appliance.
- Follow the installation instructions supplied with the appliance.
- The appliance can be placed almost anywhere in the kitchen. Make sure the oven is placed on a flat, level surface and that vents as well as the surface underneath the appliance are not blocked (for sufficient ventilation).
2.2 Electrical Connection

WARNING!
Risk of fire and electric shock.
- All electrical connections should be made by a qualified electrician.
• The appliance must be earthed. - Make sure that the parameters on the rating plate are compatible with the
electrical ratings of the mains power supply.
- If the appliance is connected to the socket via an extension cord, make sure the cord is earthed.
- Make sure not to cause damage to the mains plug and to the mains cable. Contact the Service or an electrician to change a damaged mains cable.
- Do not pull the mains cable to disconnect the appliance. Always pull the mains plug.
2.3 Use

WARNING!
Risk of injury, burns and electric shock or explosion.
- Do not change the specification of this appliance.
- Do not let the appliance stay unattended during operation.
- Do not apply pressure on the open door.
- Make sure that the ventilation openings are not blocked.
- Do not use the appliance as a work surface and do not use the cavity for storage purposes.
2.4 Care and Cleaning

WARNING!
Risk of injury, fire, or damage to the appliance.
- Before maintenance, deactivate the appliance and disconnect the mains plug from the mains socket.
- Clean regularly the appliance to prevent the deterioration of the surface material.
- Do not allow food spills or cleaner residue to accumulate on door sealing surfaces.
- Fat and food remaining in the appliance can cause fire and electric arcing when the microwave function operates.
- Clean the appliance with a moist soft cloth. Use only neutral detergents. Do not use abrasive products, abrasive cleaning pads, solvents or metal objects.
- If you use an oven spray, obey the safety instructions on the packaging.
2.5 Service
• To repair the appliance contact the Authorised Service Centre. Use original spare parts only.
- Concerning the lamp(s) inside this product and spare part lamps sold separately: These lamps are intended to withstand extreme physical conditions in household appliances, such as temperature, vibration, humidity, or are intended to signal information about the operational status of the appliance. They are not intended to be used in other applications and are not suitable for household room illumination.
2.6 Disposal

WARNING!
Risk of injury or suffocation.
- Disconnect the appliance from the mains supply.
- Cut off the mains electrical cable close to the appliance and dispose of it.
3. PRODUCT DESCRIPTION
3.1 General overview

1 Lamp
2 Safety interlock system
3 Display
4 Control panel
5 Setting knob
6 Door opener
7 Waveguide cover
8 Grill
9 Turntable support
3.2 Control Panel
![graph TD A[" "] --> B["1"] A --> C["2"] A --> D["3"] A --> E["4"] A --> F["5"] A --> G["6"] A --> H["7"] I["10"] --> J["图标1"] K["9"] --> L["图标2"] M["8"] --> N["图标3"] O["-"] --> P["+"] Q["+"] --> R["图标4"]](/content/2026/06/1388869/images/071145f058d6f6860a777dd59f213f27deccfee0dacb72b945da14be6e9f34f4.jpg)
| Symbol Function Description | ||
| 1 | — Display Shows the settings and current time. | |
| 2 |  | Grill To select the grilling function. |
| 3 |  | Combi cooking To select the Combi cooking function. |
| 4 |  | Timer/Clock To set the hour of the day and the Kitchen tim-er. |
| 5 |  | Presets/Steam Menu To choose in between two auto cooking mod-els. |
| 6 |  | Start / +30 sec button To activate the appliance or increase the cook-ing time for 30 seconds at the selected power. |
| 7 | 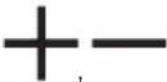 | Setting knob To set the cooking time or weight. |
| 8 |  | Stop/Clear button To deactivate the appliance or delete the cook-ing settings. |
| 9 |  | Defrost To defrost food by time or weight . |
| 10 |  | Microwave To select the Microwave function. |
3.3 Accessories
Turntable set

Always use the turntable set to prepare food in the microwave.

Glass cooking tray and turntable support.
Grill Rack
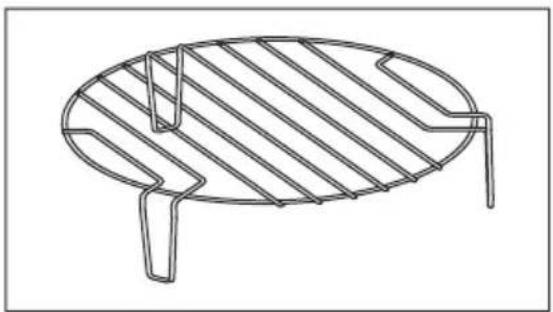
Use for:
- grilling food
Steam Pot set

For the suggested cooking table refer to "Hints and tips" chapter.
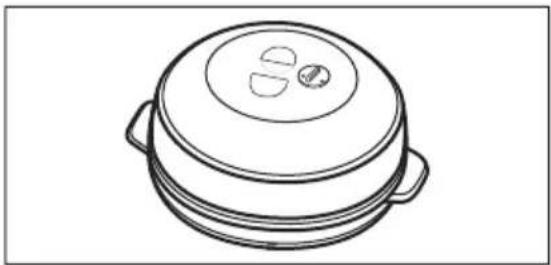
Use for:
- Steam cooking
4. BEFORE FIRST USE

WARNING!
Refer to Safety chapters.
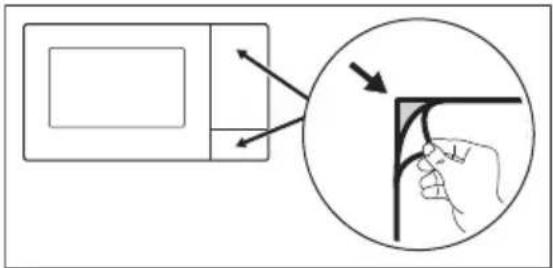
4.1 Removing protective film
Before first use remove the protective film from the control panel and the door opening button.
4.2 Initial Cleaning

WARNING!
Refer to "Care and cleaning" chapter.
- Remove all the accessories from the microwave.
- Carefully clean the oven cavity with a moist soft cloth.
4.3 Preheating
Preheat the empty oven before first use.
- Set the function

- Let the oven operate for 30 minutes.
-
Open the door and let it cool down.
-
Clean the oven cavity with a moist soft cloth and dry carefully.
The oven can emit an odour and smoke. Make sure that the airflow in the room is sufficient.
4.4 Setting the Clock

You can set the time in 12 hour or 24 hour clock system.
- Press until 12 h or 24 h is displayed.
-
Turn the Time Setting knob to enter the amount of hours.
-
Press to confirm.
-
Turn the Time Setting knob to enter the amount of minutes.
-
Press to confirm.
- If you do not want the clock visible on the display, press ⏻ until the display shows OFF and press ⏻ to confirm.

If the clock is not set, the display will turn off automatically 10 seconds after the end of the function.
5. DAILY USE

WARNING!
Refer to Safety chapters.
5.1 General information about using the appliance
• After you deactivate the appliance, let the food stand for several minutes.
- Remove the aluminium foil packaging, metal containers, etc. before you prepare the food.
Cooking
- If possible, cook food covered with a material suitable for use in the microwave. Only cook food without a cover if you want to keep it crusty
- Do not overcook the dishes by choosing too high a power setting and too long a time. The food can dry out, burn or catch fire in some places.
- Do not use the appliance to cook eggs or snails in their shells as they may explode. With fried eggs, pierce the yolks first.
- Pierce the skin or peel of potatoes, tomatoes, sausages and similar types of food with a fork several times before cooking so that the food does not burst.
- For chilled or frozen food, set a longer cooking time.
- Dishes which contain sauce must be stirred from time to time.
• Vegetables that have a firm structure, such as carrots, peas or cauliflower, must be cooked in water.
- Turn larger pieces of food halfway through the cooking process.
- If possible, cut vegetables into similar-sized pieces.
- Use flat, wide dishes.
- Do not use cookware made of porcelain, ceramic or earthenware with unglazed bottoms or small openings, for example, on handles. Moisture may get into these openings causing the cookware to crack when heated up.
- The glass cooking tray is necessary for the operation of the microwave. Place the food or liquids on it.
Defrosting meat, poultry, fish
- Put frozen, unwrapped food on a small angled plate with a container below so that the defrosting liquid collects in the container.
- Turn the food halfway through the defrosting time. If possible, separate and then remove the pieces that started to defrost.
Defrosting butter, portions of gateau, quark
- Do not fully defrost the food in the appliance, but let it defrost at room temperature. It gives a more even result. Remove all metal or aluminium packaging before defrosting.
Defrosting fruit, vegetables
- If fruit and vegetables should remain raw, do not defrost them fully in the appliance. Let them defrost at room temperature.
- To cook fruit and vegetables without defrosting them first use a higher microwave power.
Ready meals
- You can prepare ready meals in the appliance only if their packaging is suitable for microwave use.
- You must follow the manufacturer's instructions printed on the packaging (e.g. remove the metal cover and pierce the plastic film).
Suitable cookware and materials
| Cookware / Material Microwave Grilling | ||||
| Defrosting | Heating | Cooking | ||
| Ovenproof glass and porcelain with no metal com-ponents, e. g. Pyrex, heat-proof glass | √ | √ | √ | √ |
| Non-ovenproof glass and porcelain 1) | √ | X X X | ||
| Glass and glass ceramic made of ovenproof/frost-proof material (e. g. Arcoflam), grill shelf | √ | √ | √ | √ |
| Ceramic 2), earthenware 2) | √ | √ | √ | X |
| Heat-resistant plastic up to 200 °C 3) | √ | √ | √ | X |
| Cardboard, paper X X X | √ | |||
| Clingfilm X X X | √ | |||
| Roasting film with microwave safe closure 3) | √ | √ | √ | X |
| Roasting dishes made of metal, e. g. enamel, cast iron | X X X | √ | ||
| Baking tins, black lacquer or silicon-coated 3) | X X X | √ | ||
| Baking tray X X X | √ | |||
| Browning cookware, e. g. crisp pan or crunch plate | X | √ | √ | X |
| Ready meals in packaging 3) | √ | √ | √ | √ |
| Steam pot set X | √ | √ | √ | |
1) With no silver, gold, platinum or metal plating / decorations
2) Without quartz or metal components, or glazes which contain metals
3) You must follow the manufacturer's instructions about the maximum temperatures.
√ suitable
X not suitable
5.2 Activating and deactivating the microwave

CAUTION!
Do not let the microwave operate if there is no food in it.
- Press

- If necessary repeatedly press or turn the Setting knob to choose the power level.
- Press to confirm.
- Turn the Setting knob to set the time.
- Press to confirm and activate the microwave.
5.3 Power setting table
To deactivate the microwave:
- wait until the microwave deactivates automatically, when the time comes to an end.
- open the door. The microwave stops automatically. Close the door and press to continue to cook. Use this option to inspect food.
- press .

When the microwave deactivates automatically, an acoustic signal sounds.
| Symbol Power setting Power | ||
| Microwave 90 - 900 W | ||
| Grill 1000 W | ||
| Combi Cooking | ||
| 1 | Combi Cooking 1 (Lo) | |
| 2 | Combi Cooking 2 (Hi) | |
| Defrost 270 W | ||
5.4 Quick Start
Press to activate the microwave.
The default cooking time is 30 second and it increases by 30 second with each additional press of the button. The cooking time can also be adjusted by turning the knob.
The default power level is 900 W and it can be change by pressing and turning the knob.
5.5 Defrosting
You can choose between 2 defrosting modes:
- Weight defrosting

- Time defrosting


Do not use weight defrosting on food that is left out of the freezer for more than 20 minutes, or for frozen ready-made food.
i
To activate weight defrosting you must use more than 100 g of food and less than 2000 g.
i
To defrost less than 200 g of food place it on the edge of the turntable.
- Press and set the defrosting mode: time for weight.
- Press to confirm.
- Turn the knob to set the weight or time. For weight defrosting the time is set automatically.
- Press to confirm and activate the microwave.
5.6 Multistage cooking
This function allows to set two consecutive cooking stages programmes. Each cooking programme is counted down separately. After finishing the first set time, the second cooking programme starts automatically.
You can set the following programmes in the Multistage cooking mode: Defrost ⚙️,
Microwave 📋, Grill 🌐, Combi Cooking . 🏠
The automatic programmes (Auto and Steam Cooking) cannot be used.
i
If one of stages is defrosting, set it as the first stage.
Cook all frozen foods in 2 stages.
Example: Defrost and Microwave

- Press and set the defrosting mode: time or weight.
- Press to confirm.
- Turn the Setting knob to set the defrosting time or weight.
- Press
- Turn the setting knob to set the power level.
- Press to confirm.
- Turn the Setting knob to set the time.
- Press to confirm and start the multistage cooking.
5.7 Grilling and Combi Cooking
- Press or to set the desired function.
- Press to confirm.
- Turn the Setting knob to set the time.
- Press to confirm and activate the microwave.
6. AUTOMATIC PROGRAMMES
!
WARNING!
Refer to Safety chapters.
6.1 Steam Cooking
- Place the steam cooking set on the turntable set. Refer to "Using The Accessories".
- Press to activate the Steam function.
-
Turn the Setting knob to choose the desired auto menu
-
Press to confirm.
- Turn the Setting knob to set the weight.
- Press to confirm and activate the microwave.
i
You can increase or decrease the set time at will by turning the Setting knob.
| Food Water (ml) Food weight (g) Time | (min) | Standing time (min) 1) | ||
| St1Carrots in slices | 400 | 150 5 1 | ||
| 300 6:30 1 | ||||
| St2Baby Carrots | 400 500 10:30 2 | |||
| St3Cauliflower | 400 | 125 4:30 1 | ||
| 250 5:30 1 | ||||
| St4Broccoli | 400 | 125 4 1 | ||
| 250 5:30 1 | ||||
| St5Spinach | 400 200 6:00 1 | |||
| St6Potatoes in slices | 400 | 300 7:30 2 | ||
| 500 10 2 | ||||
| St7Green Beans | 400 | 150 5 1 | ||
| 300 6 1 | ||||
| St8Asparagus | 400 | 250 5 1 | ||
| 500 7 :30 1 | ||||
| St9Salmon | 400 250 5 1 | |||
| St10Shrimps | 400 | 250 4 1 | ||
| 400 5:30 1 | ||||
| St11Chicken Breast | 400 500 9:30 2 | |||
1) After cooking, keep the food inside the Steam Pot with the lid and the valve closed.
6.2 Auto cooking
Use this function to easily cook favourite food. The microwave automatically sets the optimum settings.
-
Press to enter the menu.
-
Turn the Power setting knob clockwise to choose the desired menu.
-
Press +30 to confirm.
-
Turn the Setting knob to set the weight of the menu.
- Press ◇ to confirm and activate the microwave.
i
You can increase or decrease the set time at will by turning the Setting knob.
| Menu Amount(g) | Display Power(W) | Time(min) | Note | |
| P1Auto Reheat | 200 200 g | 1:50 Cover with plastic wrap and make some holes in it. | ||
| 400 400 g 3:30 | 900 | |||
| P2Meat | 250 250 g | 3:30 | Cover with plastic wrap and make some holes in it. | |
| 350 350 g 4:30 | 900 | |||
| 450 450 g 5:30 | ||||
| P3Vegetable | 200 200 g | 3:00 Add 10 ml of water for every 100 g of vegetables. Cover with plastic wrap and make some holes in it. | ||
| 300 300 g 4:00 | 900 | |||
| 400 400 g 5:00 | ||||
| P4Pasta | 50 (add 450 ml of water) | 50 g | 18:00 | Add pasta to 450 ml of cold water. |
| 100 (add 800 ml of water) | 100 g 20:00 | Add pasta to 800 ml of cold water. | ||
| P5Potatoes | about 230 (1) 1 | 5:00 | ||
| about 460 (2) 2 8:00 | 900 | |||
| about 690 (3) 3 12:00 | ||||
| P6Fish | 250 250 g | 4:30 | Cover with plastic wrap and make some holes in it. | |
| 350 350 g 5:30 | 700 | |||
| 450 450 g 7:00 | ||||
| P7Beverage | 120 ml (1 cup) 1 | 0:50 | ||
| 240 ml (2 cups) | 2 1:40 | 900 | ||
| 360 ml (3 cups) | 3 2:30 | |||
| P8Popcorn | 50 50 g | 1:10 | ||
| 100 100 g 1:50 | 900 | |||
7. USING THE ACCESSORIES

WARNING!
Refer to Safety chapters.
7.1 Using the accessories

WARNING!
Refer to Safety chapters.
Inserting the turntable set

CAUTION!
Do not cook food without the turntable set. Use only the turntable set provided with the microwave.

Never cook food directly on the glass cooking tray.
- Place the glass cooking tray on the turntable support

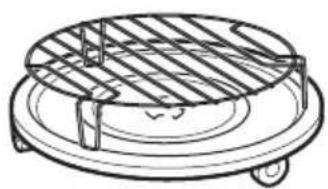
Inserting the grill rack

CAUTION!

Grill rack can not be used with the microwave function. There is a risk of damage to the appliance. Use the grill rack only with the Grill function.
Place the grill rack on the turntable set.
8. ADDITIONAL FUNCTIONS
8.1 Kitchen Timer
You can set a maximum 95 minutes.
- Press

-
Turn the Setting knob to set the time.
-
Press

The Timer still works when you open the door or pause the microwave. Press ☐ to cancel.
Inserting the steam pot set

CAUTION!

Steam pot set can not be used with fill function.
- Fill the water collector (C).
- Combine the steam pot parts: C - water collector, B - steam basket, A - lid.
A
B
C
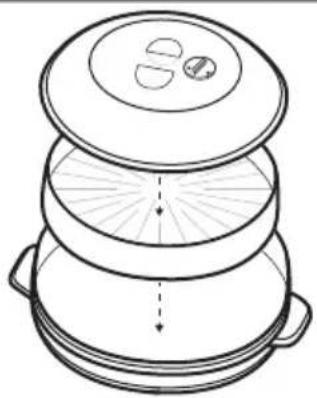
- Place the steam pot on the turntable set.

Keep The Steam valve closed during cooking.
8.2 Child Safety Lock
The Child Safety Lock prevents an accidental operation of the microwave.

When the clock is set, press the Clear button first
Press and hold for 3 seconds.
To deactivate the Child Safety Lock open the door then press and hold 📋 for 3 seconds.
9. HINTS AND TIPS

WARNING!
Refer to Safety chapters.
9.1 Tips for the microwave cooking
Problem Remedy
| You cannot find details on the amount of food prepared. | Look for a similar type of food. Increase or shorten the length of the cooking times according to the following rule:• Double the amount almost double the time.• Half the amount is a half time. |
| The food got too dry. Set a shorter cooking time or select a lower microwave power. | |
| The food is not defrosted, hot or cooked when the time ends. | Set a longer cooking time or a higher power. Note that large dishes need a longer time. |
| After the cooking time ends, the food is overheated on the outside, but still not ready inside. | Next time set a lower power and a longer time. Stir liquids half-way through, e.g. soup. |
| Rice cooking results are poor. To get better results for rice use a flat, wide dish. | |
9.2 Defrosting
Always defrost roast fat side down.
Do not defrost covered meat as it may cause cooking instead of defrosting.
Always defrost whole poultry breast side down.
9.3 Cooking
Always remove chilled meat and poultry from the refrigerator at least 30 minutes before cooking.
Let the meat, poultry, fish and vegetables stay covered after cooking.
Brush a little oil or melted butter over the fish.
All vegetables should be cooked at the full microwave power.
Add 30 - 45 ml of cold water for every 250 g of vegetables.
Cut fresh vegetables into even sized pieces before cooking. Cook all vegetables with a cover on the container.
9.4 Reheating
When you reheat packed ready meals always follow the instruction written on the packaging.
9.5 Grilling
Grill flat food items in the middle of the grill rack.
Turn the food over halfway through the set time and continue grilling.
9.6 Combi Cooking
Use Combi Cooking to keep the crispness of certain foods.
Halfway through the cooking time turn the foods over and then continue cooking.
There are 2 modes for Combi Cooking. Each mode combines the microwave and the grill functions at different time periods and power levels.
10. CARE AND CLEANING

WARNING!
Refer to Safety chapters.
10.1 Notes and tips on cleaning
- Clean the front of the appliance with a soft cloth with warm water and a cleaning agent.
• To clean metal surfaces, use a usual cleaning agent. - Clean the interior of the appliance after each use to keep it in good condition.
Remove food remains regularly. Make sure to get rid of excess steam/humidity.
- Clean stubborn dirt with a special cleaner.
- Clean all accessories regularly and let them dry. Use a soft cloth with warm water and a cleaning agent.
• To soften the remains that are hard to remove boil a glass of water at the full microwave power for 2 to 3 minutes.
• To remove odours, mix a glass of water with 2 tsp of lemon juice and boil at full microwave power for 5 minutes.
11. TROUBLESHOOTING

WARNING!
Refer to Safety chapters.
11.1 What to do if...
| Problem Possible cause Remedy | ||
| The appliance does not operate. | The appliance is not plugged in. Plug in the appliance. | |
| The appliance does not operate. | The fuse in the fuse box is blown. Check the fuse. If the fuse blows more than once, contact a qualified electrician. | |
| The appliance does not operate. | The door is not closed properly. Make sure that nothing blocks the door. | |
| The lamp does not operate. | The lamp is defective. The lamp has to be replaced. | |
| There is sparking in the cavity. | There is a metal dish or a dish with a metal trim inside. | Remove the dish from the appliance. |
| There is sparking in the cavity. | There is a metal skewer or some aluminium foil inside that touches the interior walls. | Make sure that the skewer or foil does not touch the interior walls. |
| The turntable set makes a scratching or grinding noise. | There is an object or dirt below the glass cooking tray. | Clean the area below the glass cooking tray. |
| The appliance stops operating without a clear reason. | There is a malfunction. If this situation repeats itself, call the Authorised Service Centre. | |
11.2 Service data
If you cannot find a solution to the problem yourself, contact your dealer or an Authorised Service Centre.
The necessary data for the service centre is on the rating plate. The rating plate is on the appliance. Do not remove the rating plate from the appliance.
We recommend that you write the data here:
Model (MOD.) ......
Product number (PNC) ....
Serial number (S.N.) ....
12. INSTALLATION

WARNING!
Refer to Safety chapters.
12.1 General Information

CAUTION!
Do not connect the appliance to adapters or extension leads. This can cause overloading and risk of fire.

CAUTION!
The minimum installation height is 85 cm.
- The microwave is for a kitchen counter top use only. It must be placed on a stable and flat surface.
- Put the microwave far away from steam, hot air and water splashes.
- If the microwave is too close to a radio or TV set it may cause interference in the received signal.
- If you transport the microwave in the cold weather, do not activate it immediately after the installation. Let is stand in the room temperature and absorb the heat.
12.2 Electrical installation
This microwave is supplied with a main cable and main plug.
The cable has an earth wire with an earthing plug. The plug must be plugged into an outlet
that is properly installed and earthed. In the event of an electrical short circuit, earthing reduces the risk of electric shock.
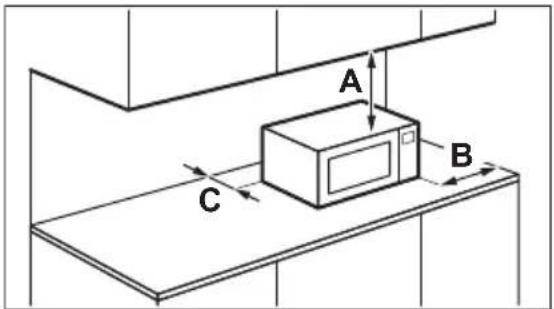
12.3 Minimal distances
| Dimension mm | |
| A1) | 300 |
| B 200 | |
| C | 0 |
1) The minimum height of free space necessary above the top surface of the appliance.
12.4 Product dimensions
| Dimension mm |
| Height 290 |
| Width 495 |
| Depth 370 |
13. ENVIRONMENTAL CONCERNS
Recycle materials with the symbol Put the packaging in relevant containers to recycle it. Help protect the environment and human health by recycling waste of electrical and electronic appliances. Do not dispose of
appliances marked with the symbol ⚫with the household waste. Return the product to your local recycling facility or contact your municipal office.
Kasutatakse:
• toiduainete grillimiseks
Aurupoti komplekt

Kasutatakse:
- Auruküpsetus
4. ENNE ESIMEST KASUTAMIST

HOIATUS!
4.2 Esmane puhastamine

HOIATUS!
Grillresti sisestamine

ETTEVAATUST!

8. LISAFUNKTSIOONID
8.1 Köögitaimer
Verwendung für:
Verwendung für:
• Garen mit Dampf
4.2 Erste Reinigung

WARNUNG!
8. ZUSATZFUNKTIONEN
8.1 Küchen-Timer
Χρήση για:
Χρήση για:
• Μαγείρεμα με ατμό
4. AZ ELSÖ HASZNÁLAT ELÖTT

FIGYELMEZTETÉS!
Utilizzare per:
Utilizzare per:
• Cottura a vapore
4. PRIMA DEL PRIMO UTILIZZO

AVVERTENZA!
Inserire la griglia

ATTENZIONE!

Pielietojums:
Pielietojums:
Paskirtis:
Paskirtis:
4.2 Pirminis valymas

JSPÈJIMAS!
Utilizați pentru:
Utilizați pentru:
• Gătire la abur
4. ÎNAINTE DE PRIMA UTILIZARE

AVERTISMENT!
Предназначена для:
Предназначена для:
Použite pre:
- grilovanie jedla
Použite pre:
- Parné varenie
4. PRED PRVÝM POUŽITÍM

VAROVANIE!
4.2 Prvé čistenie

VAROVANIE!
8. DOPLNKOVÉ FUNKCIE
- DOBRO DOŠLI U AEG! HVALA VAM ŠTO STE ODABRALI NAŠ UREĐAJ
- PRIJE PRVE UPORABE
- UPOZORENJE
- 4.2 POČETNO ČIŠĆENJE
- 4.3 PRETHODNO ZAGRIJAVANJE
- 4.4 POSTAVLJANJE SATA
- SVAKODNEVNA UPORABA
- OPREZ
- PŘED PRVNÍM POUŽITÍM
- VAROVÁNÍ
- 4.2 PRVNÍ ČIŠTĚNÍ
- DOPLŇKOVÉ FUNKCE
- WELCOME TO AEG! THANK YOU FOR CHOOSING OUR APPLIANCE
- CONTENTS
- ⚠ SAFETY INFORMATION
- 1.1 CHILDREN AND VULNERABLE PEOPLE SAFETY
- WARNING
- 1.2 GENERAL SAFETY
- SAFETY INSTRUCTIONS
- 2.1 INSTALLATION
- 2.2 ELECTRICAL CONNECTION
- 2.3 USE
- 2.4 CARE AND CLEANING
- 2.5 SERVICE
- 2.6 DISPOSAL
- PRODUCT DESCRIPTION
- 3.1 GENERAL OVERVIEW
- 3.2 CONTROL PANEL
- 3.3 ACCESSORIES
- TURNTABLE SET
- GRILL RACK
- STEAM POT SET
- BEFORE FIRST USE
- 4.1 REMOVING PROTECTIVE FILM
- 4.2 INITIAL CLEANING
- 4.3 PREHEATING
- 4.4 SETTING THE CLOCK
- DAILY USE
- 5.1 GENERAL INFORMATION ABOUT USING THE APPLIANCE
- COOKING
- DEFROSTING MEAT, POULTRY, FISH
- DEFROSTING BUTTER, PORTIONS OF GATEAU, QUARK
- DEFROSTING FRUIT, VEGETABLES
- READY MEALS
- 5.2 ACTIVATING AND DEACTIVATING THE MICROWAVE
- CAUTION
- 5.3 POWER SETTING TABLE
- 5.4 QUICK START
- 5.5 DEFROSTING
- 5.6 MULTISTAGE COOKING
- 5.7 GRILLING AND COMBI COOKING
- AUTOMATIC PROGRAMMES
- 6.1 STEAM COOKING
- 6.2 AUTO COOKING
- USING THE ACCESSORIES
- 7.1 USING THE ACCESSORIES
- INSERTING THE TURNTABLE SET
- ADDITIONAL FUNCTIONS
- 8.1 KITCHEN TIMER
- 8.2 CHILD SAFETY LOCK
- HINTS AND TIPS
- 9.1 TIPS FOR THE MICROWAVE COOKING
- 9.2 DEFROSTING
- 9.3 COOKING
- 9.4 REHEATING
- 9.5 GRILLING
- 9.6 COMBI COOKING
- CARE AND CLEANING
- 10.1 NOTES AND TIPS ON CLEANING
- TROUBLESHOOTING
- 11.1 WHAT TO DO IF
- 11.2 SERVICE DATA
- WE RECOMMEND THAT YOU WRITE THE DATA HERE
- INSTALLATION
- 12.1 GENERAL INFORMATION
- 12.2 ELECTRICAL INSTALLATION
- 12.3 MINIMAL DISTANCES
- 12.4 PRODUCT DIMENSIONS
- ENVIRONMENTAL CONCERNS
- ENNE ESIMEST KASUTAMIST
- HOIATUS
- 4.2 ESMANE PUHASTAMINE
- GRILLRESTI SISESTAMINE
- ETTEVAATUST
- LISAFUNKTSIOONID
- 8.1 KÖÖGITAIMER
- 4.2 ERSTE REINIGUNG
- WARNUNG
- ZUSATZFUNKTIONEN
- 8.1 KÜCHEN-TIMER
- AZ ELSÖ HASZNÁLAT ELÖTT
- FIGYELMEZTETÉS
- PRIMA DEL PRIMO UTILIZZO
- AVVERTENZA
- ATTENZIONE
- 4.2 PIRMINIS VALYMAS
- JSPÈJIMAS
- ÎNAINTE DE PRIMA UTILIZARE
- AVERTISMENT
- PRED PRVÝM POUŽITÍM
- VAROVANIE
- 4.2 PRVÉ ČISTENIE
- DOPLNKOVÉ FUNKCIE
Brand : AEG
Model : MFB295DB
Category : Oven