
EPB331000M - Oven AEG - Free user manual and instructions
Find the device manual for free EPB331000M AEG in PDF.


| Product Type | Built-in Electric Oven |
| Brand | AEG |
| Model | EPB331000M |
| Installation Type | Built-in under hob |
| Energy Source | Electric |
| Energy Efficiency Class | A+ |
| Oven Capacity | 71 L |
| Number of Cooking Functions | 8 |
| Grilling Function | Yes |
| Fan Convection | Yes |
| Self-Cleaning | Pyrolytic self-cleaning |
| Display | Digital LCD |
| Control Type | Touch + rotary knobs |
| Programming | Electronic timer with delay |
| Safety Child Lock | Yes |
| Automatic Safety Shut-off | Yes |
| Residual Heat Indicator | Yes |
| Door Type | Cool front, 4 panes |
| Interior Lighting | Yes |
| Dimensions (H x W x D) | 594 x 594 x 567 mm |
| Weight | 35 kg |
| Voltage | 220-240 V |
| Frequency | 50/60 Hz |
| Spare Parts Availability | 10 years after discontinuation |
Frequently Asked Questions - EPB331000M AEG
User questions about EPB331000M AEG
0 question about this device. Answer the ones you know or ask your own.
Ask a new question about this device
Download the instructions for your Oven in PDF format for free! Find your manual EPB331000M - AEG and take your electronic device back in hand. On this page are published all the documents necessary for the use of your device. EPB331000M by AEG.
USER MANUAL EPB331000M AEG
FOR PERFECT RESULTS
Thank you for choosing this AEG product. We have created it to give you impeccable performance for many years, with innovative technologies that help make life simpler – features you might not find on ordinary appliances. Please spend a few minutes reading to get the very best from it.
Visit our website to:

Get usage advice, brochures, trouble shooter, service and repair information:
www.aeg.com/support

Register your product for better service:
www.registeraeg.com

Buy Accessories, Consumables and Original spare parts for your appliance:
www.aeg.com/shop
CUSTOMER CARE AND SERVICE
Always use original spare parts.
When contacting our Authorised Service Centre, ensure that you have the following data available: Model, PNC, Serial Number.
The information can be found on the rating plate.

Warning / Caution-Safety information

General information and tips

Environmental information
Subject to change without notice.
CONTENTS
- SAFETY INFORMATION....3
- SAFETY INSTRUCTIONS......4
- PRODUCT DESCRIPTION....7
- CONTROL PANEL 8
- BEFORE FIRST USE....9
- DAILY USE....10
- CLOCK FUNCTIONS....11
- USING THE ACCESSORIES....13
- ADDITIONAL FUNCTIONS....14
- HINTS AND TIPS.... 15
- CARE AND CLEANING.... 29
- TROUBLESHOOTING....32
- ENERGY EFFICIENCY....34
- ENVIRONMENTAL CONCERNS......35
1. ⚠SAFETY INFORMATION
Before the installation and use of the appliance, carefully read the supplied instructions. The manufacturer is not responsible for any injuries or damage that are the result of incorrect installation or usage. Always keep the instructions in a safe and accessible location for future reference.
1.1 Children and vulnerable people safety
- This appliance can be used by children aged from 8 years and above and persons with reduced physical, sensory or mental capabilities or lack of experience and knowledge if they have been given supervision or instruction concerning the use of the appliance in a safe way and understand the hazards involved. Children of less than 8 years of age and persons with very extensive and complex disabilities shall be kept away from the appliance unless continuously supervised.
- Do not let children play with the appliance.
- Keep all packaging away from children and dispose of it appropriately.
- WARNING: Keep children and pets away from the appliance when it operates or when it cools down. Accessible parts become hot during use.
- If the appliance has a child safety device, it should be activated.
- Children shall not carry out cleaning and user maintenance of the appliance without supervision.
1.2 General Safety
- Only a qualified person must install this appliance and replace the cable.
-
The control panel must be connected to specified heating unit with matching colours of connectors, to avoid possible hazard.
-
WARNING: The appliance and its accessible parts become hot during use. Care should be taken to avoid touching heating elements.
• Always use oven gloves to remove or put in accessories or ovenware. - Before carrying out any maintenance, disconnect the appliance from the power supply.
- WARNING: Ensure that the appliance is switched off before replacing the lamp to avoid the possibility of electric shock.
- Do not use the appliance before installing it in the built-in structure.
- Do not use a steam cleaner to clean the appliance.
- Do not use harsh abrasive cleaners or sharp metal scrapers to clean the glass door since they can scratch the surface, which may result in shattering of the glass.
- If the mains power supply cable is damaged, it must be replaced by the manufacturer, its Authorised Service Centre or similarly qualified persons to avoid an electrical hazard.
- Excessive spillage must be removed before the pyrolytic cleaning. Remove all parts from the oven.
- To remove the shelf supports first pull the front of the shelf support and then the rear end away from the side walls. Install the shelf supports in the opposite sequence.
- The means for disconnection must be incorporated in the fixed wiring in accordance with the wiring rules.
2. SAFETY INSTRUCTIONS
2.1 Installation

WARNING!
Only a qualified person must install this appliance.
- Remove all the packaging.
- Do not install or use a damaged appliance.
- Follow the installation instructions supplied with the appliance.
• Always take care when moving the appliance as it is heavy. Always use safety gloves and enclosed footwear.
- Do not pull the appliance by the handle.
• Install the appliance in a safe and suitable place that meets installation requirements.
- The kitchen cabinet and the recess must have suitable dimensions.
- Keep the minimum distance from other appliances and units.
- Before mounting the appliance, check if the oven door opens without restraint.
- Parts of the appliance carry current. Close the appliance with furniture to prevent touching the dangerous parts.
- The built-in unit must meet the stability requirements of DIN 68930.
| Cabinet minimum height(Cabinet under the worktopminimum height) | 600 (600) mm |
| Cabinet width 550 mm | |
| Cabinet depth 605 (580) mm | |
| Height of the front of the appliance | 594 mm |
| Height of the back of the appliance | 576 mm |
| Width of the front of the appliance | 549 mm |
| Width of the back of the appliance | 548 mm |
| Depth of the appliance 567 mm | |
| Built in depth of the appliance | 546 mm |
| Depth with open door 1017 mm | |
| Ventilation opening minimum size. Opening placed on the bottom rear side | 550 x 20 mm |
| Mounting screws 4 x 12 mm | |
2.2 Electrical connection

WARNING!
Risk of fire and electric shock.
- All electrical connections should be made by a qualified electrician.
• The appliance must be earthed. - Make sure that the parameters on the rating plate are compatible with the electrical ratings of the mains power supply.
• Always use a correctly installed shockproof socket. -
Do not use multi-plug adapters and extension cables.
• Make sure not to cause damage to the mains plug and to the mains cable. Should the mains cable need to be replaced, this must be carried out by our Authorised Service Centre. -
Do not let mains cables touch or come near the appliance door or the niche below the appliance, especially when it operates or the door is hot.
- The shock protection of live and insulated parts must be fastened in such a way that it cannot be removed without tools.
- Connect the mains plug to the mains socket only at the end of the installation. Make sure that there is access to the mains plug after the installation.
- If the mains socket is loose, do not connect the mains plug.
- Do not pull the mains cable to disconnect the appliance. Always pull the mains plug.
- Use only correct isolation devices: line protecting cut-outs, fuses (screw type fuses removed from the holder), earth leakage trips and contactors.
- The electrical installation must have an isolation device which lets you disconnect the appliance from the mains at all poles. The isolation device must have a contact opening width of minimum 3 mm.
- Fully close the appliance door before you connect the mains plug to the mains socket.
- This appliance is supplied without a main plug and a main cable.
2.3 Use

WARNING!
Risk of injury, burns and electric shock or explosion.
• This appliance is for household use only.
- Do not change the specification of this appliance.
• Make sure that the ventilation openings are not blocked.
- Do not let the appliance stay unattended during operation.
- Deactivate the appliance after each use.
- Be careful when you open the appliance door while the appliance is in operation. Hot air can release.
- Do not operate the appliance with wet hands or when it has contact with water.
- Do not apply pressure on the open door.
- Do not use the appliance as a work surface or as a storage surface.
- Open the appliance door carefully. The use of ingredients with alcohol can cause a mixture of alcohol and air.
- Do not let sparks or open flames to come in contact with the appliance when you open the door.
- Do not put flammable products or items that are wet with flammable products in, near or on the appliance.

WARNING!
Risk of damage to the appliance.
• To prevent damage or discoloration to the enamel:
– do not put ovenware or other objects in the appliance directly on the bottom.
- do not put aluminium foil directly on the bottom of cavity of the appliance.
– do not put water directly into the hot appliance.
– do not keep moist dishes and food in the appliance after you finish the cooking.
– be careful when you remove or install the accessories.
- Discoloration of the enamel or stainless steel has no effect on the performance of the appliance.
- Use a deep pan for moist cakes. Fruit juices cause stains that can be permanent.
- This appliance is for cooking purposes only. It must not be used for other purposes, for example room heating.
• Always cook with the oven door closed.
2.4 Care and cleaning

WARNING!
Risk of injury, fire, or damage to the appliance.
- Before maintenance, deactivate the appliance and disconnect the mains plug from the mains socket.
• Make sure the appliance is cold. There is the risk that the glass panels can break. - Replace immediately the door glass panels when they are damaged. Contact the Authorised Service Centre.
-
Be careful when you remove the door from the appliance. The door is heavy!
-
Clean regularly the appliance to prevent the deterioration of the surface material.
- Clean the appliance with a moist soft cloth. Use only neutral detergents. Do not use abrasive products, abrasive cleaning pads, solvents or metal objects.
- If you use an oven spray, follow the safety instructions on its packaging.
2.5 Pyrolytic cleaning

WARNING!
Risk of Injury / Fires / Chemical Emissions (Fumes) in Pyrolytic Mode.
- Before carrying out a Pyrolitic self-cleaning function or the First Use please remove from the oven cavity:
– any excess food residues, oil or grease spills / deposits.
– any removable objects (including shelves, side rails etc., provided with the product) particularly any non-stick pots, pans, trays, utensils etc.
- Read carefully all the instructions for Pyrolytic cleaning.
- Keep children away from the appliance while the Pyrolytic cleaning operates. The appliance becomes very hot and hot air is released from the front cooling vents.
- Pyrolytic cleaning is a high temperature operation that can release fumes from cooking residues and construction materials, as such consumers are strongly advised to:
– provide good ventilation during and after each Pyrolytic cleaning.
– provide good ventilation during and after the first use at maximum temperature operation.
- Unlike all humans, some birds and reptiles can be extremely sensitive to potential fumes emitted during the cleaning process of all Pyrolytic Ovens.
- Remove any pets (especially birds) from the vicinity of the appliance location during and after the Pyrolytic cleaning and first use maximum temperature operation to a well ventilated area.
- Small pets can also be highly sensitive to the localized temperature changes in the
vicinity of all Pyrolytic Ovens when the Pyrolytic self cleaning program is in operation.
• Non-stick surfaces on pots, pans, trays, utensils etc., can be damaged by the high temperature Pyrolytic cleaning operation of all Pyrolytic Ovens and can be also a source for low level harmful fumes.
- Fumes released from all Pyrolytic Ovens / Cooking Residues as described are not harmful to humans, including children, or persons with medical conditions.
2.6 Internal lighting

WARNING!
Risk of electric shock.
- Concerning the lamp(s) inside this product and spare part lamps sold separately: These lamps are intended to withstand extreme physical conditions in household appliances, such as temperature, vibration, humidity, or are intended to signal information about the operational
status of the appliance. They are not intended to be used in other applications and are not suitable for household room illumination.
- Use only lamps with the same specifications.
2.7 Service
• To repair the appliance contact the Authorised Service Centre.
- Use original spare parts only.
2.8 Disposal

WARNING!
Risk of injury or suffocation.
- Disconnect the appliance from the mains supply.
- Cut off the mains electrical cable close to the appliance and dispose of it.
- Remove the door catch to prevent children or pets from becoming trapped in the appliance.
3. PRODUCT DESCRIPTION
3.1 General overview
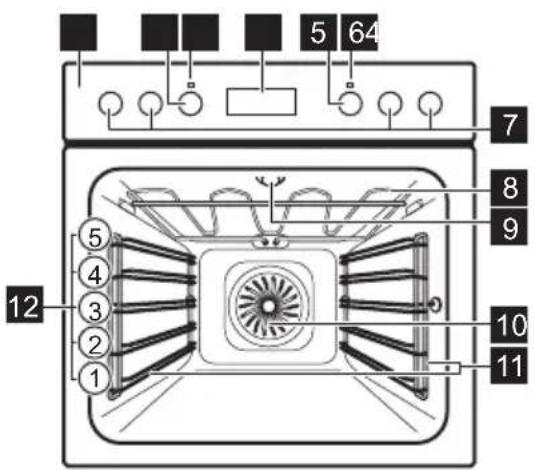
1 Control panel
2 Knob for the heating functions
3 Power lamp / symbol
4 Display
5 Control knob (for the temperature)
6 Temperature indicator / symbol
7 Knobs for the cooking zones
8 Heating element
9 Lamp
10 Fan
11 Shelf support, removable
12 Shelf positions
3.2 Accessories
Wire shelf

For cookware, cake tins, roasts.
Combi pan

For cakes and biscuits. To bake and roast or as a pan to collect fat.
4. CONTROL PANEL
4.1 Knobs for the cooking zones
You can operate the hob with the knobs for the cooking zones.

You must read the Safety chapters in the hob user manual.
4.2 Heat settings
| Knob indication Function | |
| 0 Off position | |
| $ | Keep warm setting |
| 1 - 9 Heat settings | |
- Turn the knob to a necessary heat setting.
- To complete the cooking process, turn the knob to the off position.
4.3 Automatic heat-up

Only applicable for hobs with the automatic heat-up function.
The automatic heat-up function heats the cooking zone with full power for some time.
- Turn the knob for the cooking zone clockwise as far as possible (beyond the highest heat setting).
- Immediately set the necessary heat setting.
- To deactivate the function, turn the knob to the off position.
4.4 Using the double zone (if applicable)

To activate the double zone, turn the knob clockwise. Do not turn it through the stop position.
- Turn the knob clockwise to position 9.
- Turn the knob slowly until you can hear a click. The two cooking zones are on.
- To set the necessary heat setting refer to "Heat settings".
4.5 Sensor fields / Buttons
| — | To set the time. |
| 💡 | To set a clock function. |
4.6 Display
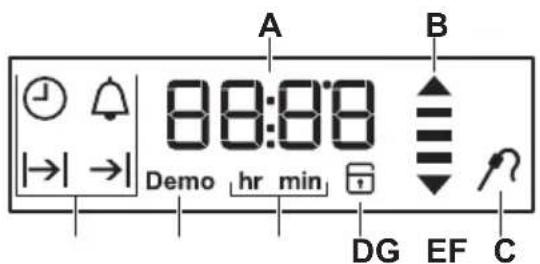
A. Timer / Temperature
B. Heat-up and residual heat indicator
C. Food Sensor (selected models only)
D. Door lock (selected models only)
E. Hours / minutes
F. Demo Mode
G. Clock functions
5. BEFORE FIRST USE

WARNING!
Refer to Safety chapters.
Set the time before you use the oven.
5.1 Initial Cleaning
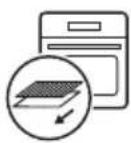


Step 1 Step 2 Step 3
Remove all accessories and removable shelf supports from the oven.
Clean the oven and the accessories with a soft cloth, warm water and a mild detergent.
Place the accessories and the re- movable shelf supports in the oven.
5.2 Initial preheating

Preheat the empty oven before the first use.
Step 1 Remove all accessories and removable shelf supports from the oven.
Step 2
Set the maximum temperature for the function: Let the oven operate for 1 h.

Step 3
Set the maximum temperature for the function: Let the oven operate for 15 min.

i
The oven can emit an odour and smoke during preheating. Make sure that the room is ventilated.
6. DAILY USE

WARNING!
Refer to Safety chapters.
6.1 How to set: Heating function
Step 1 Turn the knob for the heating functions to select a heating function.
Step 2 Turn the control knob to select the temperature.
Step 3 When the cooking ends, turn the knobs to the off position to turn off the oven.
6.2 Heat-up indicator
When the oven function operates, the bars in the display appear one by one when the temperature in the oven increases, and disappear when it decreases.
6.3 Heating functions
Heating func- tion
Application

Off position
The oven is off.

Light

True Fan Cooking
To turn on the lamp.
To bake on up to three shelf positions at the same time and to dry food.
Set the temperature 20 - 40 °C lower than for Conventional Cooking.

Pizza Function
To bake pizza. To make intensive browning and a crispy bottom.

Conventional Cooking
To bake and roast food on one shelf position.
| Heating func-tion | Application |
 | To bake cakes with crispy bot-tom and to preserve food. |
| Bottom Heat | |
 | To defrost food (vegetables and fruit). The defrosting time de-pends on the amount and size of the frozen food. |
| Defrost | |
 | This function is designed to save energy during cooking.When you use this function, the temperature in the cavity may differ from the set temperature.The residual heat is used. The heating power may be reduced.For more information refer to "Daily Use" chapter, Notes on: Moist Fan Baking. |
| Moist Fan Baking | |
 | To grill thin pieces of food and to toast bread. |
| Grill | |
 | To roast large meat joints or poultry with bones on one shelf position. To make gratins and to brown. |
| Turbo Grilling | |
 | To turn on the pyrolytic cleaning of the oven. |
| Pyrolysis |

The lamp may turn off automatically at a temperature below 60 °C during some oven functions.
6.4 Notes on: Moist Fan Baking
This function was used to comply with the energy efficiency class and ecodesign requirements according to EU 65/2014 and EU 66/2014. Tests according to EN 60350-1.
The oven door should be closed during cooking so that the function is not interrupted and the oven operates with the highest energy efficiency possible.
When you use this function the lamp automatically turns off after 30 sec.
For the cooking instructions refer to "Hints and tips" chapter, Moist Fan Baking. For
general energy saving recommendations refer to "Energy Efficiency" chapter, Energy Saving.
7. CLOCK FUNCTIONS
7.1 Clock functions table
| Clock function Application | |
| Time of Day | To show or change the time of day. You can change the time of day only when the oven is off. |
| |→|Duration | To set the length of cooking. Use only when a heating function is set. |
| →|End Time | To set the oven turn-off time. Use only when a heating function is set. |
| |→|→|Time Delay | Combination of functions: Duration, End Time. |
| Minute Minder | To set a countdown time. This function has no effect on the operation of the oven.Minute Minder - can be set at any time, also if the oven is off. |
| 00:00Count Up Timer | If you do not set any other clock function the function automatically monitors how long the oven works.Counting starts immediately when the oven starts to heat.Count Up Timer cannot be used with the functions: Duration, End Time. |
7.2 How to set: Time of day
After the first connection to the mains, wait until the display shows: hr, 12:00. 12 - flashes.
| Step 1 | +, — press to set the hour. |
| Step 2 | ➊ - press to confirm.The display shows the set hour and: min. 00 - flashes. |
| Step 3 | +, — press to set the minutes. |
| Step 4 | ➊ - press to confirm.The display shows the set time. |
| ➊ - press repeatedly to change the time of day. ⏻ flashes in the display. | |
7.3 How to set function: Duration
Step 1 Set a heating function.
| Step 2 | 1 - press repeatedly. |→| starts to flash. |
| Step 3 | +, — press to set the minutes. - press to confirm. |
| Step 4 | +, — press to set the hours. - press to confirm.When the set time ends the signal sounds for 2 min. Time setting flashes in the display. The oven turns off automatically. |
| Step 5 Press any button to stop the signal. | |
| Step 6 Turn the knobs to the off position. | |
7.4 How to set function: End Time
Step 1 Set a heating function.
| Step 2 | 1 - press repeatedly. → starts to flash. |
| Step 3 | +, — press to set the hour. - press to confirm. |
| Step 4 | +, — press to set the minutes. - press to confirm.At the set end time the signal sounds for 2 min. The time setting flashes in the display. The oven turns off automatically. |
| Step 5 | Press any button to stop the signal. |
| Step 6 | Turn the knobs to the off position. |
7.5 How to set function: Time Delay
Step 1 Set a heating function.
| Step 2 | 1 - press repeatedly. |→| starts to flash. |
| Step 3 | +, — press to set the minutes for the function: Duration. - press to confirm. |
| Step 4 | +, — press to set the hour for the function: Duration. - press to confirm.→| - starts to flash. |
| Step 5 | +, — press to set the hour for the function: End Time. - press to confirm. |
| Step 6 | +, — press to set the minutes for the function: End Time. - press to confirm. |
The display shows: the set temperature, |→|→| Oven turns on automatically later on, works for the set Duration time and stops at the set End Time.
At the set End Time the signal sounds for 2 min. The time setting flashes in the display. The oven turns off.
Step 7 Press any button to stop the signal.
Step 8 Turn the knobs to the off position.
7.6 How to set function: Minute Minder
Minute minder can be both set when the oven is turned on and off.
Step 1
- press repeatedly. - 00 - flash.
Step 2
+ , - press to set the seconds and than the minutes. When the time you set is longer than 60 min, hr flashes.
Step 3 Set the hours.
Minute Minder - starts automatically after 5 sec. After 90% of the set time the signal sounds.
Step 4
When the set time ends the signal sounds for 2 min. 00:00, 🔔 - flash. Press any button to stop the signal.
7.7 How to set function: Count Up Timer
+, - press and hold to reset the Count Up Timer. The timer starts to count up again.
8. USING THE ACCESSORIES

WARNING!
Refer to Safety chapters.
8.1 Inserting accessories
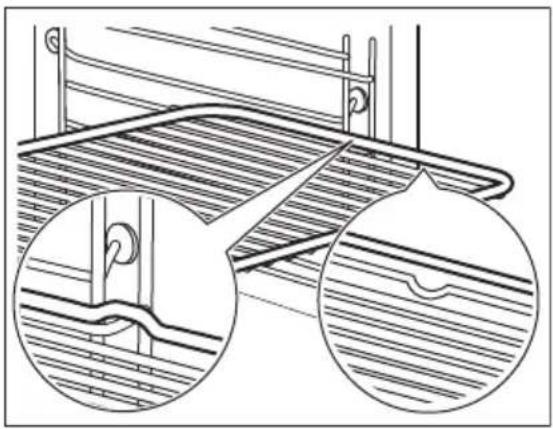
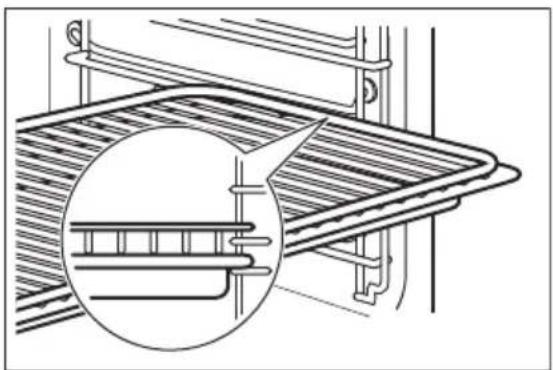
A small indentation at the top increases safety. The indentations are also anti-tip
devices. The high rim around the shelf prevents cookware from slipping of the shelf.
Wire shelf:
Push the shelf between the guide bars of the shelf support.
Deep pan:
Push the tray between the guide bars of the shelf support.

Wire shelf, Deep pan:
Push the tray between the guide bars of the shelf support and the wire shelf on the guide bars above.
9. ADDITIONAL FUNCTIONS
9.1 How to use: Child lock
When the function is on the oven cannot be turned on accidentally.
Step 1 Ensure the knob for the heating functions is in the off position.
Step 2
① , + press and hold at the same time for 2 sec.
The signal sounds. SAFE, 📋 appear on the display. The door is locked.
To turn off the Child Lock, repeat the step 2.
9.2 How to use: function lock
You can turn on the function only when the oven works. When the function is on the temperature and time settings cannot be changed accidentally.
Step 1 Set an oven function.
Step 2
①, + press and hold at the same time for 2 sec. The signal sounds. Loc appears on the display for 5 sec.
To turn off the Function Lock, repeat step 2.
Loc appears on the display when you turn the control knob or press any button when the Function lock is on. When you turn the knob for the oven functions, the oven stops.
When you turn off the oven while the Function Lock is on, the Function Lock switches automatically to the Child Lock. Refer to "Additional functions" chapter, Using the Child Lock.
9.3 Residual heat indicator
When you turn off the oven, the display shows the residual heat indicator if the temperature in the oven is more than 40 °C.
9.4 Automatic switch-off
For safety reasons the oven turns off after some time, if a heating function works and you do not change any settings.


30 - 115 12.5
120 - 195 8.5
200 - 245 5.5
250 - maximum 3
After an automatic switch-off, turn the knobs to the off position.
The Automatic switch-off does not work with the functions: Light, Duration, End Time.
9.5 Cooling fan
When the oven operates, the cooling fan turns on automatically to keep the surfaces of the oven cool. If you turn off the oven, the cooling fan can continue to operate until the oven cools down.
10. HINTS AND TIPS

Refer to Safety chapters.
10.1 Examples of cooking applications for the hob
| Heat setting | Application Time | Hints |
| (min) | ||
| 1 To keep cooked food warm. as required Put a lid on the cookware. | ||
| 1 - 2 To make Hollandaise sauce, and to melt butter, chocolate and gelatine. | 5 - 25 Mix at intervals. | |
| 1 - 2 To solidify fluffy omelettes and baked eggs. | 10 - 40 Cook with a lid on. | |
| 2 - 3 To simmer rice and milk-based dishes, and to heat up ready-cooked meals. | 25 - 50 Add a minimum of two times as much liquid as rice. Stir milk dishes halfway through. | |
| 3 - 4 To steam vegetables, fish and meat. 20 - 45 Add some tablespoons of a liquid. | ||
| Heat setting | Application Time | Hints (min) |
| 4 - 5 To steam potatoes. 20 - 60 Use a maximum of 1/4 l water for 750 g of potatoes. | ||
| 4 - 5 To cook larger quantities of food, stews and soups. | 60 - 150 Add a maximum of 3 l of a liquid to the ingredients. | |
| 6 - 7 To lightly fry escalopes, veal cordon bleu, cutlets, rissoles, sausages, liver, eggs, pancakes and doughnuts, and to cook roux. | as required Turn halfway through. | |
| 7 - 8 To fry hash browns, loin steaks and steaks. | 5 - 15 Turn halfway through. | |
| 9 To boil large quantities of water, to cook pasta, to sear meat (goulash, pot roast) and to deep-fry chips. | ||
10.2 Cooking recommendations

The temperature and cooking times in the tables are guidelines only. They depend on the recipes and the quality and quantity of the ingredients used.
Your oven may bake or roast differently to the oven you had before. The tables below show recommended settings for temperature, cooking time and shelf position for specific types of the food.
If you cannot find the settings for a special recipe, look for the similar one.
10.3 Inner side of the door
On the inner side of the door you can find:
• the numbers of the shelf positions.
• information about the oven functions, recommended shelf positions and temperatures for dishes.
10.4 Baking
For the first baking, use the lower temperature.
10.5 Tips on baking
You can extend the baking time by 10 – 15 minutes if you bake cakes on more than one shelf position.
Cakes and pastries at different heights do not always brown equally. There is no need to change the temperature setting if an unequal browning occurs. The differences equalize during baking.
Trays in the oven can distort during baking. When the trays are cold again, the distortions disappear.
Baking results Possible cause Remedy
The bottom of the cake is not baked sufficiently. The shelf position is incorrect. Put the cake on a lower shelf.
Baking results Possible cause Remedy
| The cake sinks and becomes soggy or streaky. | The oven temperature is too high. Next time set slightly lower oven temperature. | |
| The oven temperature is too high and the baking time is too short. | Next time set a longer baking time and lower oven temperature. | |
| The cake is too dry. The oven temperature is too low. Next time set higher oven temperature. | ||
| The baking time is too long. Next time set shorter baking time. | ||
| The cake bakes unevenly. The oven temperature is too high and the baking time is too short. | Next time set a longer baking time and lower oven temperature. | |
| The cake is not ready in the baking time specified in a recipe. | The oven temperature is too low. Next time set a slightly higher oven temperature. | |
10.6 Baking on one shelf level

BAK-
ING IN TINS (°C) (min)


Flan base - short True Fan Cooking 170 - 180 10 - 25 2 pastry, preheat the empty oven
Flan base - True Fan Cooking 150 - 170 20 - 25 2 sponge cake mix-ture
Ring cake / Brio-che True Fan Cooking 150 - 160 50 - 70 1
Madeira cake / Fruit cakes True Fan Cooking 140 - 160 70 - 90 1
Cheesecake Conventional Cooking 170 - 190 60 - 90 1
Use the third shelf position.
Use the function: True Fan Cooking.
Use a baking tray.

CAKES / PASTRIES / BREADS

(°C) (min)

Cake with crumble topping 150 - 160 20 - 40
Fruit flans (made of yeast dough / sponge cake mix- 150 35 - 55 ture), use a deep pan

CAKES / PASTRIES / BREADS

(°C) (min)

Fruit flans made of short pastry 160 - 170 40 - 80
Preheat the empty oven.
Use the function: Conventional Cooking.
Use a baking tray.

CAKES /

PASTRIES / BREADS (°C) (min)


Swiss roll 180 - 200 10 - 20 3
Rye bread: first: 230 20 1
then: 160 - 180 30 - 60
Buttered almond cake / Sugar cakes
190 - 210 20 - 30 3
Cream puffs / Eclairs 190 - 210 20 - 35 3
Plaited bread / Bread crown
170 - 190 30 - 40 3
Fruit flans (made of yeast dough / sponge cake mixture), use a deep pan
170 35 - 55 3
Yeast cakes with delicate toppings (e.g. quark, cream, custard)
160 - 180 40 - 80 3
Christstollen 160 - 180 50 - 70 2
Use the third shelf position.
BISCUITS


(°C) (min)
Short pastry biscuits True Fan Cooking
150 - 160
10 - 20
Rolls, preheat the empty oven
rue Fan Cooking
60
10 - 25
Biscuits made of sponge cake mixture
True Fan Cooking
150 - 160
15 - 20
Puff pastries, preheat the empty oven
True Fan Cooking
170 - 180
20 - 30
Biscuits made of yeast dough
True Fan Cooking
150 - 160
20 - 40
Macaroons True Fan Cooking
100 - 120
30 - 50

BISCUITS


(°C) (min)

Pastries made of egg white / Meringues
True Fan Cooking 80 - 100 120 - 150
Rolls, preheat the empty oven Conventional Cooking 190 - 210 10 - 25
10.7 Bakes and gratins
Use the first shelf position.


(°C) (min)
Baguettes topped with melted cheese
True Fan Cooking 160 - 170 15 - 30
Vegetables au gratin, pre-heat the empty oven
Turbo Grilling 160 - 170 15 - 30
Lasagne Conventional Cooking 180 - 200 25 - 40
Fish bakes Conventional Cooking 180 - 200 30 - 60
Stuffed vegetables True Fan Cooking 160 - 170 30 - 60
Sweet bakes Conventional Cooking 180 - 200 40 - 60
Pasta bake Conventional Cooking 180 - 200 45 - 60
10.8 Multilevel Baking
Use the function: True Fan Cooking.
Use the baking trays.

CAKES /
PASTRIES (°C)

(min)

2 positions
Cream puffs / Eclairs, pre-heat the empty oven
160 - 180
25 - 45
1/4
Dry streusel cake
150 - 160
30 - 45
1 / 4

BIS-
CUITS / SMALL CAKES / PAS- TRIES / ROLLS

(°C) (min)


2 positions 3 positions
Rolls 180
20 - 30 1 / 4
-

BIS-
CUITS / SMALL
CAKES / PAS-
TRIES / ROLLS

(°C) (min)


2 positions 3 positions
Short pastry biscuits 150 - 160 20 - 40 1 / 4 1 / 3 / 5
Biscuits made of sponge cake mixture 160 - 170 25 - 40 1 / 4 -
Puff pastries, pre- 170 - 180 30 - 50 1 / 4 - heat the empty oven
Biscuits made of 160 - 170 30 - 60 1 / 4 - yeast dough
Macaroons 100 - 120 40 - 80 1 / 4 -
Biscuits made of egg 80 - 100 130 - 170 1 / 4 - white / Meringues
10.9 Tips on Roasting
Use heat-resistant ovenware.
Roast lean meat covered (you can use aluminium foil).
Roast large meat joints directly in the tray or on the wire shelf placed above the tray.
Put some water in the tray to prevent dripping fat from burning.
Turn the roast after 1/2 - 2/3 of the cooking time.
Roast meat and fish in large pieces (1 kg or more).
Baste meat joints with their own juice several times during roasting.
10.10 Roasting
Use the first shelf position.

BEEF


(°C) (min)
Pot roast 1 - 1.5 kg Conventional Cook-
230 120 - 150
ing
Roast beef or fillet, rare, per cm of thickness Turbo Grilling 190 - 200 5 - 6 preheat the empty oven
Roast beef or fillet, medi- per cm of thickness Turbo Grilling 180 - 190 6 - 8 um, preheat the empty oven
Roast beef or fillet, well done, preheat the empty oven per cm of thickness Turbo Grilling 170 - 180 8 - 10

PORK

Use the function: Turbo Grilling.


(kg)

(°C) (min)

Shoulder / Neck / Ham joint 1 - 1.5 160 - 180 90 - 120
Chops / Spare rib 1 - 1.5 170 - 180 60 - 90
Meatloaf 0.75 - 1 160 - 170 50 - 60
Pork knuckle, precooked 0.75 - 1 150 - 170 90 - 120

VEAL

Use the function: Turbo Grilling.


(kg)

(°C) (min)

Roast veal 1 160 - 180 90 - 120
Veal knuckle 1.5 - 2 160 - 180 120 - 150

LAMB

Use the function: Turbo Grilling.


(kg)

(°C) (min)

Lamb leg / Roast lamb 1 - 1.5 150 - 170 100 - 120
Lamb saddle 1 - 1.5 160 - 180 40 - 60

GAME

Use the function: Conventional Cooking.


(kg)

(°C) (min)

Saddle / Hare leg, preheat up to 1 230 30 - 40 the empty oven
Venison saddle 1.5 - 2 210 - 220 35 - 40
Haunch of venison 1.5 - 2 180 - 200 60 - 90

POULTRY

Use the function: Turbo Grilling.


(kg)

(°C) (min)

Poultry, portions 0.2 - 0.25 each 200 - 220 30 - 50
Chicken, half 0.4 - 0.5 each 190 - 210 35 - 50
Chicken, poulard 1 - 1.5 190 - 210 50 - 70
Duck 1.5 - 2 180 - 200 80 - 100
Goose 3.5 - 5 160 - 180 120 - 180
Turkey 2.5 - 3.5 160 - 180 120 - 150
Turkey 4 - 6 140 - 160 150 - 240

FISH (STEAMED)

Use the function: Conventional Cooking.


(kg)

(°C) (min)

Whole fish
1 - 1.5 210 - 220 40 - 60
10.11 Crispy baking with: Pizza Function

PIZZA

Use the first shelf position.


(°C) (min)

Tarts 180 - 200 40 - 55
Spinach flan 160 - 180 45 - 60
Quiche lorraine / 170 - 190 45 - 55 Swiss flan
Cheesecake 140 - 160 60 - 90
Vegetable pie 160 - 180 50 - 60

PIZZA

Preheat the empty oven before cook-

Use the second shelf position.


(°C) (min)

Pizza, thin crust, 200 - 230 15 - 20 use a deep pan

PIZZA

Preheat the empty oven before cook-

Use the second shelf position.


(°C) (min)
Pizza, thick crust
180 - 200 20 - 30
Unleavened bread
230 - 250 10 - 20
Puff pastry flan 160 - 180 45 - 55
Flammkuchen 230 - 250 12 - 20
Pierogi 180 - 200 15 - 25
10.12 Grill
Preheat the empty oven before cooking.
Grill only thin pieces of meat or fish.
Put a pan on the first shelf position to collect fat.

GRILL

Use the function: Grill




Roast beef 210 - 230 30 - 40 30 - 40 2
Beef fillet 230 20 - 30 20 - 30 3
Pork loin 210 - 230 30 - 40 30 - 40 2
Veal loin 210 - 230 30 - 40 30 - 40 2
Lamb saddle 210 - 230 25 - 35 20 - 25 3
Whole fish, 0.5 kg - 1 kg 210 - 230 15 - 30 15 - 30 3 / 4
10.13 Frozen Foods

DEFROSTING

Use the function: True Fan Cooking.


(°C) (min)


Pizza, frozen 200 - 220 15 - 25 2
Pizza American, frozen 190 - 210 20 - 25 2
Pizza, chilled 210 - 230 13 - 25 2
Pizza snacks, frozen 180 - 200 15 - 30 2
French fries, thin 200 - 220 20 - 30 3
French fries, thick 200 - 220 25 - 35 3
Wedges / Croquettes 220 - 230 20 - 35 3
Hash browns 210 - 230 20 - 30 3
Lasagne / Cannelloni, fresh 170 - 190 35 - 45 2
Lasagne / Cannelloni, frozen 160 - 180 40 - 60 2
Baked cheese 170 - 190 20 - 30 3

DEFROSTING

Use the function: True Fan Cooking.


(°C) (min)


Chicken wings 190 - 210 20 - 30 2
10.14 Defrost
Remove the food packaging and put the food on a plate.
Do not cover the food, as this can extend the defrost time.
Use the first shelf position.
For large portions of food place an upturned empty plate on the bottom of the oven cavity. Put the food in a deep dish and set it on top of the plate inside the oven. Remove the shelf supports if necessary.


(kg)

(min)
Defrosting time

(min)
Further defrost- ing time

Chicken 1 100 - 140 20 - 30 Turn halfway through.
Meat 1 100 - 140 20 - 30 Turn halfway through.
Trout 0.15 25 - 35 10 - 15 -
Strawberries 0.3 30 - 40 10 - 20 -
Butter 0.25 30 - 40 10 - 15 -
Cream 2 x 0.2 80 - 100
10 - 15 Whip the cream when
still slightly frozen in pla- ces.
Gateau
1.4 60 60
10.15 Preserving
Use the function Bottom Heat.
Use only preserve jars of the same dimensions available on the market.
Do not use jars with twist-off and bayonet type lids or metal tins.
Use the first shelf position.
Put no more than six one-litre preserve jars on the baking tray.
Fill the jars equally and close with a clamp.
The jars cannot touch each other.
Put approximately 1/2 litre of water into the baking tray to give sufficient moisture in the oven.
When the liquid in the jars starts to simmer (after approximately 35 - 60 minutes with one-litre jars), stop the oven or decrease the temperature to 100 °C (see the table).
Set the temperature to 160 - 170 °C.

SOFT FRUIT

(min)
Cooking time until simmering
Strawberries / Blueberries / Raspberries / Ripe gooseberries
35 - 45

STONE
FRUIT (min)

Cooking time until simmering

(min)
Continue to cook at 100 °C
Peaches / Quinces / Plums
35 - 45 10 - 15

VEG-
ETABLES (min)

Cooking time until simmering

(min)
Continue to cook at 100 °C
Carrots 50 - 60 5 - 10
Cucumbers 50 - 60 -
Mixed pickles 50 - 60 5 - 10
Kohlrabi / Peas / Asparagus
50 - 60 15 - 20
10.16 Dehydrating - True Fan Cooking
Cover trays with grease proof paper or baking parchment.
For a better result, stop the oven halfway through the drying time, open the door and let it cool down for one night to complete the drying.
For 1 tray use the third shelf position.
For 2 trays use the first and fourth shelf position.

VEGETA-
BLES (°C) (h)


Beans 60 - 70 6 - 8
Peppers 60 - 70 5 - 6
Vegetables for soup 60 - 70 5 - 6
Mushrooms 50 - 60 6 - 8
Herbs 40 - 50 2 - 3
Set the temperature to 60 - 70 °C.

FRUIT

(h)
Plums 8 - 10
Apricots 8 - 10
Apple slices 6 - 8
Pears
6 - 9
10.17 Moist Fan Baking - recommended accessories
Use the dark and non-reflective tins and containers. They have better heat absorption than the light colour and reflective dishes.

Pizza pan
Dark, non-reflective 28 cm diameter

Baking dish
Dark, non-reflective 26 cm diameter

Ramekins
Ceramic 8 cm diameter, 5 cm height

Flan base tin
Dark, non-reflective 28 cm diameter
10.18 Moist Fan Baking
For the best results follow suggestions listed in the table below.
Use the third shelf position.


(°C) (min)

Pasta gratin 200 - 220 45 - 55
Potato gratin 180 - 200 70 - 85
Moussaka 170 - 190 70 - 95
Lasagne 180 - 200 75 - 90
Cannelloni 180 - 200 70 - 85
Bread pudding 190 - 200 55 - 70
Rice pudding 170 - 190 45 - 60
Apple cake, made of sponge cake mixture (round cake 160 - 170 70 - 80 tin)
White bread 190 - 200 55 - 70
10.19 Information for test institutes
Tests according to: EN 60350, IEC 60350.

BAKING ON ONE LEVEL. Baking in tins


(°C) (min)
Fatless sponge cake True Fan Cooking 140 - 150 35 - 50 2
Fatless sponge cake Conventional Cooking 160
35 - 50 2

BAKING ON ONE LEVEL. Baking in tins



(°C) (min)
Apple pie, 2 tins ∅20 cm True Fan Cooking 160 60 - 90 2
Apple pie, 2 tins ∅20 cm Conventional Cooking 180 70 - 90 1

BAKING ON ONE LEVEL. Biscuits

Use the third shelf position.


(°C) (min)
Short bread / Pastry strips True Fan Cooking 140 25 - 40
Short bread / Pastry strips, pre- Conventional Cooking 160 20 - 30 heat the empty oven
Small cakes, 20 per tray, preheat True Fan Cooking 150 20 - 35 the empty oven
Small cakes, 20 per tray, preheat Conventional Cooking 170 20 - 30 the empty oven

MULTILEVEL BAKING. Biscuits


(°C) (min)
Short bread / Pastry strips True Fan Cooking 140 25 - 45 1 / 4
Small cakes, 20 per tray, pre-True Fan Cooking 150 23 - 40 1 / 4 heat the empty oven
Fatless sponge cake True Fan Cooking 160 35 - 50 1 / 4

GRILL

Preheat the empty oven for 5 minutes.

Grill with the maximum temperature setting.


(min)

Toast Grill 1 - 3 5
Beef steak, turn halfway through Grill 24 - 30 4
11. CARE AND CLEANING

WARNING!
Refer to Safety chapters.
11.1 Notes on cleaning

Cleaning Agents
Clean the front of the oven with a soft cloth with warm water and a mild detergent.
Use a cleaning solution to clean metal surfaces.
Clean stains with a mild detergent.

Everyday Use
Clean the cavity after each use. Fat accumulation or other residue may cause fire.
Do not store the food in the oven for longer than 20 minutes. Dry the cavity with a soft cloth after each use.

Accessories
Clean all accessories after each use and let them dry. Use a soft cloth with warm water and a mild detergent. Do not clean the accessories in a dishwasher.
Do not clean the non-stick accessories using abrasive cleaner or sharp-edged objects.
11.2 How to remove: Shelf supports
Remove the shelf supports to clean the oven.
Step 1 Turn off the oven and wait until it is cold.
Step 2 Pull the front of the shelf support away from the side wall.

Step 3 Pull the rear end of the shelf support away from the side wall and remove it.
Step 4 Install the shelf supports in the opposite sequence.

11.3 How to use: Pyrolytic cleaning
Clean the oven with pyrolytic cleaning.

WARNING!
There is a risk of burns.

CAUTION!
If a hob is installed above the oven or if there are other appliances installed in the same cabinet, do not use them at the same time as this function. It can cause damage to the oven.
Before the pyrolytic cleaning:
| Turn off the oven and wait until it is cold. | Remove all accessories and removable shelf supports. | Clean the oven floor and the inner door glass with warm water, a soft cloth and a mild detergent. |
| Step 1 | Set the function: - flashes. | |
| Step 2 | +, - press to set the cleaning mode. | |
| Option Cleaning mode Duration | ||
| P1 Light cleaning 1 h 30 min | ||
| P2 Normal cleaning 3 h | ||
| Step 3 | - press to start the cleaning. | |
| Step 4 After cleaning, turn the knob for the heating functions to the off position. | ||
| During the cleaning the oven lamp is off. The oven door stays locked. When the oven is cold, the door unlocks. | ||
| When the oven is at the set temperature, the door locks. Until the door unlocks the display shows: the bars of the heat indicator, | ||
When the cleaning ends:
Turn off the oven and wait until it is cold.
Clean the cavity with a soft cloth. Remove the residue from the bottom of the cavity.
11.4 Cleaning reminder
The oven reminds you when to clean the oven with: pyrolytic cleaning.
PYR - flashes in the display for 10 sec after each activation and deactivation of the oven.
+, — press at the same time to turn off the reminder.
11.5 How to remove and install: Door
You can remove the door and the internal glass panels to clean it. The number of glass panels is different for different models.

WARNING!
The door is heavy.

CAUTION!
Carefully handle the glass, especially around the edges of the front panel. The glass can break.
Step 1 Fully open the door.
Step 2 Lift and press the clamping levers (A) on the two door hinges.
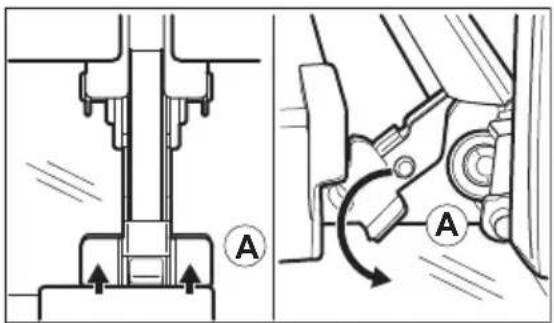
Step 3 Close the oven door to the first opening position (approximately 70° angle). Hold the door at both sides and pull it away from the oven at an upwards angle. Put the door with the outer side down on a soft cloth on a stable surface.
Step 4 Hold the door trim (B) on the top edge of the door at the two sides and push inwards to release the clip seal.
Step 5 Pull the door trim to the front to remove it.
Step 6 Hold the door glass panels on their top edge one by one and pull them up out of the guide.

Step 7 Clean the glass panel with water and soap. Dry the glass panel carefully. Do not clean the glass panels in the dishwasher.
Step 8 After cleaning, do the above steps in the opposite sequence.
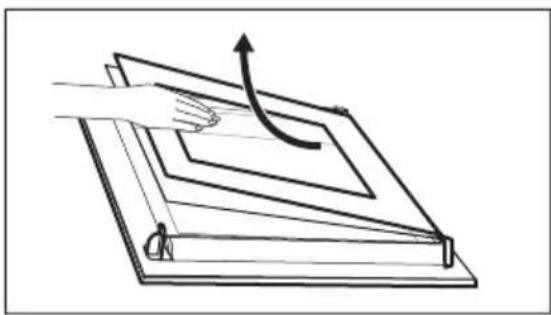
Step 9 Install the smaller panel first, then the larger and the door.
11.6 How to replace: Lamp

WARNING!
Risk of electric shock.
The lamp can be hot.
Before you replace the lamp:
Step 1 Step 2 Step 3
| Turn off the oven. Wait until the oven is cold. | Disconnect the oven from the mains. | Put a cloth on the bottom of the cavity. |
Top lamp
Step 1 Turn the glass cover to remove it.

Step 2 Clean the glass cover.
Step 3 Replace the lamp with a suitable 300\ °C heat-resistant lamp.
Step 4 Install the glass cover.
12. TROUBLESHOOTING

WARNING!
Refer to Safety chapters.
12.1 What to do if...
In any cases not included in this table please contact with an Authorised Service Centre.

The oven does not turn on or does
not heat up
Problem Check if...

The oven does not turn on or does eat up
| You cannot activate or operate the oven. | The oven is correctly connected to an electrical supply. |
| The oven does not heat up. | The automatic switch-off is deactivated. |
| The oven does not heat up. | The oven door is closed. |
| The oven does not heat up. | The fuse is blown. |
| The oven does not heat up. | The Child Lock is off. |

Components
Problem Check if...
The lamp is turned off. Moist Fan Baking - is turned on.
The lamp does not work. The lamp is burnt out.

Error codes
The display shows... Check if...
C3 The oven door is closed or the door lock is not broken.
F102 The oven door is closed.
F102 The door lock is not broken.

Error codes
12:00 There was a power cut. Set the time of day.
If the display shows an error code that is not in this table turn the house fuse off and on to restart the oven. If the error code recurs contact an Authorised Service Centre.

Other problems
Problem Check if...
The appliance is activated and does not heat up. The fan does not operate. The display shows "Demo".
The Demo Mode is deactivated:
-
Turn off the oven.
-
- press and hold.
-
The first digit on the display and Demo flash.
-
/ + press to enter the co
-
Press:
The next digit flashes.
12.2 Service data
If you cannot find a solution to the problem yourself, contact your dealer or an Authorised Service Centre.
The necessary data for the service centre is on the rating plate. The rating plate is on the front frame of the oven cavity. Do not remove the rating plate from the oven cavity.
We recommend that you write the data here:
Model (MOD.) ......
Product number (PNC) ....
Serial number (S.N.) ....
13. ENERGY EFFICIENCY
13.1 Product Information and Product Information Sheet*
Supplier's name AEG
| Model identification | EPB331000M 940321358EPB331020M 940321353 |
| Energy Efficiency Index 81.2 | |
| Energy efficiency class A+ | |
| Energy consumption with a standard load, conventional mode 1.09 kWh/cycle | |
| Energy consumption with a standard load, fan-forced mode 0.69 kWh/cycle | |
| Number of cavities 1 | |
| Heat source Electricity | |
| Volume 71 l | |
| Type of oven Built-Under Oven | |
| Mass | EPB331000M 35.0 kg |
| EPB331020M 35.0 kg | |
* For European Union according to EU Regulations 65/2014 and 66/2014.
For Republic of Belarus according to STB 2478-2017, Appendix G; STB 2477-2017, Annexes A and B. For Ukraine according to 568/32020.
Energy efficiency class is not applicable for Russia.
EN 60350-1 - Household electric cooking appliances - Part 1: Ranges, ovens, steam ovens and grills - Methods for measuring performance.
13.2 Energy saving

The oven has features which help you save energy during everyday cooking.
Make sure that the oven door is closed when the oven operates. Do not open the oven door too often during cooking. Keep the door gasket clean and make sure it is well fixed in its position.
Use metal cookware to improve energy saving.
When possible, do not preheat the oven before cooking.
Keep breaks between baking as short as possible when you prepare a few dishes at one time.
Cooking with fan
When possible, use the cooking functions with fan to save energy.
Residual heat
If a programme with the Duration or End Time selection is activated and the cooking time is longer than 30 min, the heating elements automatically turn off earlier in some oven functions.
The fan and lamp continue to operate. When you turn off the oven, the display shows the residual heat. You can use that heat to keep the food warm.
When the cooking duration is longer than 30 min, reduce the oven temperature to minimum 3 - 10 min before the end of cooking. The residual heat inside the oven will continue to cook.
Use the residual heat to warm up other dishes.
Keep food warm
Choose the lowest possible temperature setting to use residual heat and keep a meal warm. The residual heat indicator or temperature appears on the display.
Moist Fan Baking
Function designed to save energy during cooking.
When you use this function the lamp automatically turns off after 30 sec.
14. ENVIRONMENTAL CONCERNS
Recycle materials with the symbol Put the packaging in relevant containers to recycle it. Help protect the environment and human health by recycling waste of electrical and electronic appliances. Do not dispose of
appliances marked with the symbol with the household waste. Return the product to your local recycling facility or contact your municipal office.
www.aeg.com/shop

CE


- FOR PERFECT RESULTS
- CUSTOMER CARE AND SERVICE
- CONTENTS
- ⚠SAFETY INFORMATION
- 1.1 CHILDREN AND VULNERABLE PEOPLE SAFETY
- 1.2 GENERAL SAFETY
- SAFETY INSTRUCTIONS
- 2.1 INSTALLATION
- WARNING
- 2.2 ELECTRICAL CONNECTION
- 2.3 USE
- 2.4 CARE AND CLEANING
- 2.5 PYROLYTIC CLEANING
- 2.6 INTERNAL LIGHTING
- 2.7 SERVICE
- 2.8 DISPOSAL
- PRODUCT DESCRIPTION
- 3.1 GENERAL OVERVIEW
- 3.2 ACCESSORIES
- CONTROL PANEL
- 4.1 KNOBS FOR THE COOKING ZONES
- 4.2 HEAT SETTINGS
- 4.3 AUTOMATIC HEAT-UP
- 4.4 USING THE DOUBLE ZONE (IF APPLICABLE)
- 4.5 SENSOR FIELDS / BUTTONS
- 4.6 DISPLAY
- BEFORE FIRST USE
- 5.1 INITIAL CLEANING
- 5.2 INITIAL PREHEATING
- PREHEAT THE EMPTY OVEN BEFORE THE FIRST USE
- DAILY USE
- 6.1 HOW TO SET: HEATING FUNCTION
- 6.2 HEAT-UP INDICATOR
- 6.3 HEATING FUNCTIONS
- 6.4 NOTES ON: MOIST FAN BAKING
- CLOCK FUNCTIONS
- 7.1 CLOCK FUNCTIONS TABLE
- 7.2 HOW TO SET: TIME OF DAY
- 7.3 HOW TO SET FUNCTION: DURATION
- 7.4 HOW TO SET FUNCTION: END TIME
- 7.5 HOW TO SET FUNCTION: TIME DELAY
- 7.6 HOW TO SET FUNCTION: MINUTE MINDER
- 7.7 HOW TO SET FUNCTION: COUNT UP TIMER
- USING THE ACCESSORIES
- 8.1 INSERTING ACCESSORIES
- WIRE SHELF
- DEEP PAN
- WIRE SHELF, DEEP PAN
- ADDITIONAL FUNCTIONS
- 9.1 HOW TO USE: CHILD LOCK
- 9.2 HOW TO USE: FUNCTION LOCK
- STEP 2
- 9.3 RESIDUAL HEAT INDICATOR
- 9.4 AUTOMATIC SWITCH-OFF
- 9.5 COOLING FAN
- HINTS AND TIPS
- 10.1 EXAMPLES OF COOKING APPLICATIONS FOR THE HOB
- 10.2 COOKING RECOMMENDATIONS
- 10.3 INNER SIDE OF THE DOOR
- ON THE INNER SIDE OF THE DOOR YOU CAN FIND
- 10.4 BAKING
- 10.5 TIPS ON BAKING
- BAKING RESULTS POSSIBLE CAUSE REMEDY
- 10.6 BAKING ON ONE SHELF LEVEL
- 10.7 BAKES AND GRATINS
- 10.8 MULTILEVEL BAKING
- 10.9 TIPS ON ROASTING
- 10.10 ROASTING
- PORK
- VEAL
- LAMB
- GAME
- POULTRY
- FISH (STEAMED)
- 10.11 CRISPY BAKING WITH: PIZZA FUNCTION
- 10.12 GRILL
- 10.13 FROZEN FOODS
- DEFROSTING
- 10.14 DEFROST
- 10.15 PRESERVING
- SOFT FRUIT
- STONE
- FRUIT (MIN)
- VEG
- ETABLES (MIN)
- 10.16 DEHYDRATING - TRUE FAN COOKING
- VEGETA
- BLES (°C) (H)
- FRUIT
- 10.17 MOIST FAN BAKING - RECOMMENDED ACCESSORIES
- 10.18 MOIST FAN BAKING
- 10.19 INFORMATION FOR TEST INSTITUTES
- BAKING ON ONE LEVEL. BAKING IN TINS
- BAKING ON ONE LEVEL. BISCUITS
- MULTILEVEL BAKING. BISCUITS
- CARE AND CLEANING
- 11.1 NOTES ON CLEANING
- 11.2 HOW TO REMOVE: SHELF SUPPORTS
- 11.3 HOW TO USE: PYROLYTIC CLEANING
- CAUTION
- WHEN THE CLEANING ENDS
- 11.4 CLEANING REMINDER
- 11.5 HOW TO REMOVE AND INSTALL: DOOR
- 11.6 HOW TO REPLACE: LAMP
- TOP LAMP
- TROUBLESHOOTING
- 12.1 WHAT TO DO IF
- COMPONENTS
- PROBLEM CHECK IF
- ERROR CODES
- THE DISPLAY SHOWS... CHECK IF
- OTHER PROBLEMS
- 12.2 SERVICE DATA
- WE RECOMMEND THAT YOU WRITE THE DATA HERE
- ENERGY EFFICIENCY
- 13.1 PRODUCT INFORMATION AND PRODUCT INFORMATION SHEET
- 13.2 ENERGY SAVING
- COOKING WITH FAN
- RESIDUAL HEAT
- KEEP FOOD WARM
- MOIST FAN BAKING
- ENVIRONMENTAL CONCERNS
Brand : AEG
Model : EPB331000M
Category : Oven