USER MANUAL I.WIP 2000 YOO DIGITAL
Cautions for safety 06
Product features 10
Parts 12
Before using the product 13
Name of parts 14
Installing the product 17
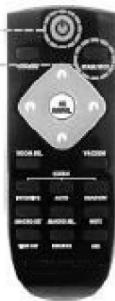
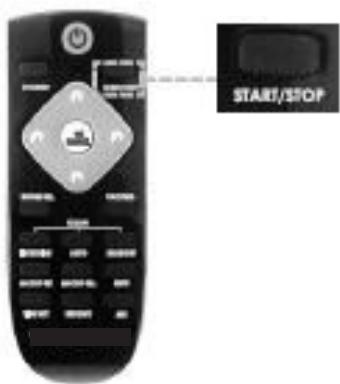
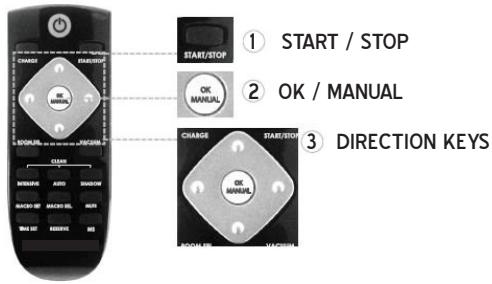
Descriptions for remote controller buttons 20
Basic cleaning (Automatic cleaning) 23
Using advanced cleaning functions 24
Setup of time and reservation 32
Setup and execution of macros 34
Using the indicator 36
Using through setup of cleaning areas 38
Managing the product 40
Battery usage and management 44
Voice announcement list 46
System error codes list 47
Checkpoints before request for after-sales service 48
Product specifications 49
The instructions with the following caution marks must be carefully read and followed in order to use the product properly and to prevent accident or damage which may occur during the operation of the product.
SIGNIFICATION DES SYMBOLES

Important
It refers to important information, definitions, general knowledge and references.

Warning
If you do not follow the instruction with this warning icon, a serious injury or property loss may occur.

Danger
If you do not follow the instruction with this danger icon, a serious injury, death, or property loss may occur.
WARNING : BEFORE USING THE PRODUCT
- Remove light clothes or fragile materials from the floor. These matters may obstruct movement of the product or cause a breakdown of the product.
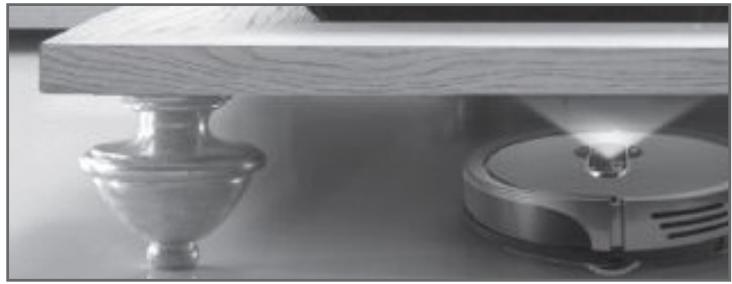
- Remove any obstacle from the floor in the space where the product travels about. The product can't travel the area which is blocked with an obstacle of certain height.
- Do not install the product in the place under direct sunlight. Direct sunlight may cause discoloration of the product. Adapters may cause electric shock or fire due to overheat during charging.
- Do not install the charger on an inclined floor, and do not give an impact to the charger. The charger may be damaged or broken.
- Install the charger in a place that can be easily detected by the robot. If the site is in a corner or has many obstacles around it, automatic charging is not possible.
- Do not use the product in the room with a child or an elderly person who is left alone. A child or an elderly person can be frightened or injured.
- Make sure that the power of the charger is always supplied. Otherwise, you cannot use the function of making the robot go back to the charger for automatic charging after it finishes cleaning.
IN USING THE PRODUCT
- Do not stand or sit on the product. Movement of the product may cause an injury or the product can be damaged.
- Do not use the product in a narrow and elevated place such as a desk. The product may fall down, causing an injury to people or damage to the product.
- Make sure that no liquid enters the product. The product may malfunction or can be damaged.
- If the product happens to inhale plastic bags or others, they should be immediately removed. If the dust intake gets clogged and the product is used for a long time with the internal motor overheated, the product will be damaged.
- Do not use the enclosed battery charger for charging of any other product. The charger or other products can be damaged.
- Make sure that clothes, hair, fingers or other body parts are not caught by the wheels. An injury may occur.
- Do not press the bumper of the product severely or give excessive shock. The bumper sensor can be damaged and then work abnormally.
- Do not keep or use the product at too low or high temperature. Do not use the product at the temperature of · 5^ or lower or 35^ or higher.
- Do not make the robot perform cleaning with the dust box filled with dust. It can cause reduction in sucking power.
- Check if the filer is inserted into the dust box. If the robot gets activated with no filter, it can cause product failure.
- Prevent the main brush and the side brush from being clogged with hairs or other foreign substances. It can cause noise and reduction in sucking power or damage to the product.
- Before using the product, clear away stuffs from the floor and make arrangement nearby. Small dish towels, bath towels, pads, telephone lines, power cables, strings or belts can be entangled with the operating wheels or the brushes. Make sure to remove stuffs that can be broken (ceramic wares, glass cups, etc.).
- Do not use the product in a site whose walls or floor is made of mirror or glass. The obstacle sensor of the robot cleaner uses an infrared sensor and so it may not see glass or mirrors as obstacle.
- Do not use the product in a utility room, on a wet floor, in stairs, on a table or shelf, in an underground room, a warehouse, a commercial building or the outdoors.
- If you have dropped the product or caused an impact to the product, contact the designated service center immediately.
ELECTRICAL CAUTIONS
- Make sure to use the specified voltage and current. Power supply outside the specifications ranges may cause a serious damage to the product.
- The battery can be discharged if the product is not used for a long time. If the battery is fully discharged, charge it manually.
- Do not use a damaged power cord or plug. You can get shocked or seriously injured.
- If the power cord of the charger is damaged, contact the service center immediately.
- Make sure that the power cord is not pulled or pressed down by the door. The power cord can be pulled out or damaged.
- When connecting / disconnecting the plug into / from the receptacle, make sure to hold the plug part tight, rather than to pull the cord.
- Do not touch the power cord with wet hands. You can get shocked.
- If the product is wet, pull out the power cord, and dry up the product before use. An electric shock or a fire may occur. If water enters the product, contact the service center.
- Use the enclosed charger only. The product may be damaged due to overvoltage, or a fire or electric shock may occur.
- Do not bend the power cord with excessive force or place a heavy stuff on it. A damaged cord may cause an electric shock or a fire.
- Do not install the charger in a place which is damp or dusty, where water splashes or where steam belches out. The product may malfunction, or a shock or damage of the product may occur.
- Do not contact any metal objects such as clip and pin to the charger terminal. It can cause electric shock and fire.
- For indicator power, use rated batteries and adapters. If not, the product can be damaged and then set afire or it may not work.
- In case of insufficient indicator battery, replace with a new one. Or, indicator functions may not work normally.
IN PRODUCT MANAGEMENT
- Use the standard filter only. No warranty service will apply to any error or failure of the product caused due to a substandard filter.
- In cleaning the product, turn the power off in advance. If you happen to care for the product while it is working or the power is being connected, you can get hurt.
- Periodically clear brushes, dust box, dust box filter and dust intake. If the product is used for a long time with no clearing done, it can work abnormally and cause product failure.
OTHERS
- Do not operate the product in a site with inflammable substances. Places with alcohol, gasoline, distilled water, thinners, ashtrays with flames, candle lights and stoves in them.
- Disassembling or repairing the product must be performed by the designated service center or the authorized engineers. The product can be damaged or users can get shocked.
- Do not discard the battery carelessly. If you put it near fire or expose it to the sun's rays for a long time, it can cause fire and explosion. Discard used-up batteries safely according to local discarding regulations.
DANGER
- Do not place hot or flammable objects such as cigarette, candle, heater, match or gasoline. The product can be badly damaged or a fire may break out.
- Do not use the product near an explosive object or in an explosive place.
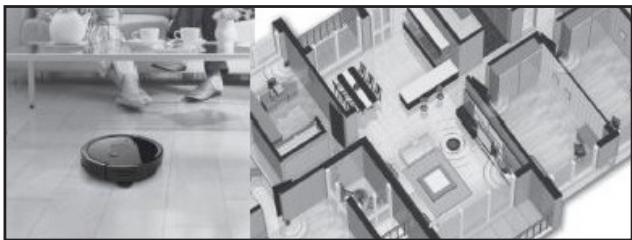
ROOM INDICATOR SYSTEM
This system divides cleaning areas into up to five to select cleaning of some specified areas and the entire place. Each indicator can help you set each room and it can work as guide for room cleaning areas so that the cleaner will not move out of some specified areas.
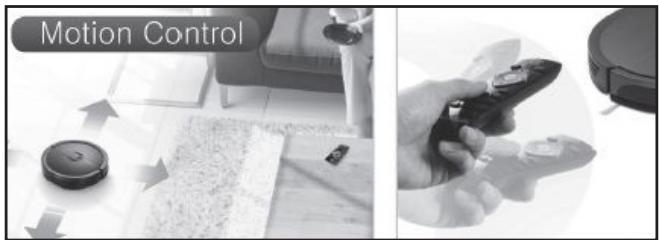
MOTION CONTROL
The cleaner adopts a motion-controlling remote controller, the first time in the world, to make the robot cleaner freely move through minute moves of the remote controller. With this function, the product provides users with convenient and funny cleaning environments.
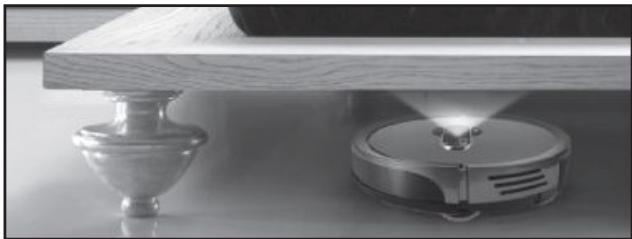
SHADOW ACTIVE
The cleaner can clean dark floors with no lights in them. It can clean every part under the bed, which cannot be cleaned with existing cleaners.
MACRO SYSTEM
This function enables the user to manually save the most optimized cleaning pattern suitable for home environments to make the cleaner work more efficiently than before. This is useful in homes whose furniture does not frequently change its position. With this function, the cleaner can reduce the time to identify the internal structure every time it starts working and finish cleaning in the shortest time.
- Main body
- Battery (Inserted into the main body)
- Charger
- Charger adapter
- Charger adapter power cord
Indicator
- Indicator adapter (Not supplied with the product)
- Indicator battery (Not supplied with the product)
Remote control
- Battery for remote control (2X AAA)
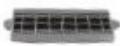
- 2x Side brush
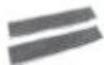
Dustcloth guard
2x Dustcloth
Brush
- Dust box filter
Superfine fibers
- User manual
Main body
Charger
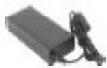
Charger sdapter
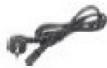
Charger sdapter power cord

Indicator

Remote control & Battery(2x AAA)
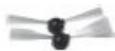
2x Side brush
Dustcloth guard & 2x Dustcloth

Brush

Dust box filter
User manual

Quick User Guide

Important
The appearance and specifications are subject to change without prior notice for better product functions or performance.

Important
The battery, the filter, tools and dustcloths are consumables. You need separate purchase for used-up or damaged consumables to replace them. The life span of the dust box filter is around six months and it can increase/decrease depending on usage environments.

Important
Make sure to use expendables in standard. For inquires for appropriate standards, please contact our customer care center.
BEFORE USING THE PRODUCT
-
The appearance, specifications and other parts of the product are subject to change without prior notice for better features.
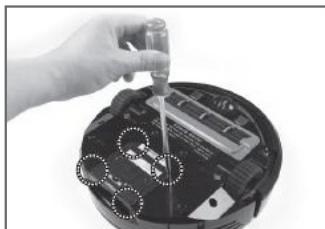
-
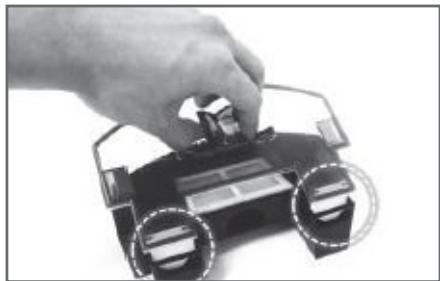
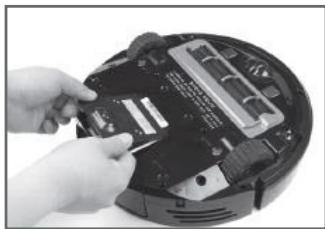
Install the left/right side brushes in the robot cleaner.
Turn over the robot cleaner and press the left/right side brushes to insert them.
Make sure to check the groove(D) of the side brushes before inserting them.
- Make sure to prevent the product and the components from being shocked in opening the package.
For product installation, see the page 17
- When you open the product package, charge it manually before others.
In initial opening, the battery may have been discharged and not work. For manual charging method, see the page 18.
- Clear away stuffs from the floor to be cleaned.
Clear away objects, which might be broken or fall, from the floor. For carpets and other decorative stuffs with long tassels, they can hinder the product from moving normally. Fold the tassels or clear away the carpets.
- If the dust box of the robot cleaner gets filled, the cleaning performance will be worsened.
After cleaning operation, check if the dust box is filled up.
For clearing methods, see the page 40.
- If there are foreign substances in the location-detecting sensor and the wheels, remove them.
Or, the robot cleaner may not move in an accurate way.
For each location, see the page 42.
- Children or the old and the weak may get frightened at the robot.
To prevent children or the old and the weak nearby from being taken aback, let them fully understand the product is being working.
- Be careful that the robot cleaner can fall from some sites.
At an entrance and a place whose height is different from that of the living room, if shoes are placed at entrance, the robot might see the shoes as floor, falling from the living room. Use the product carefully in a narrow site (e.g. desks, tables, etc.) where the robot may fall.
- The cleaner may not cross over a threshold in 1cm or longer height.
- The robot cleaner may not move properly on a carper with long wool.
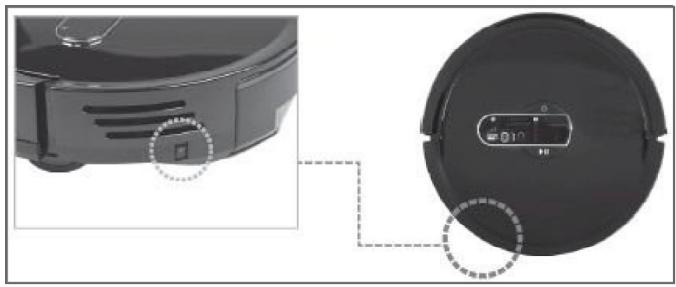
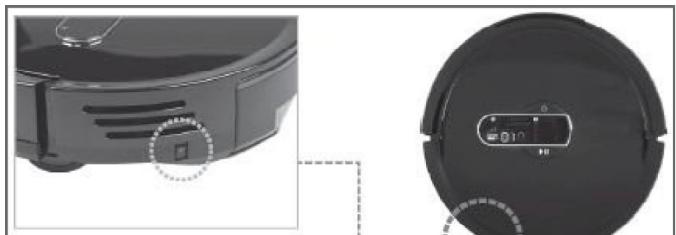
ROBOT CLEANER (TOP)
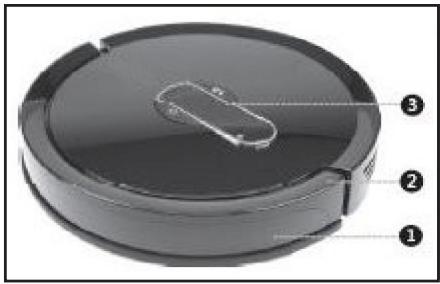
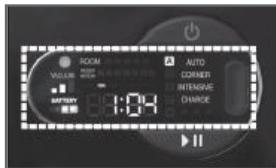
Control buttons and operation lamps
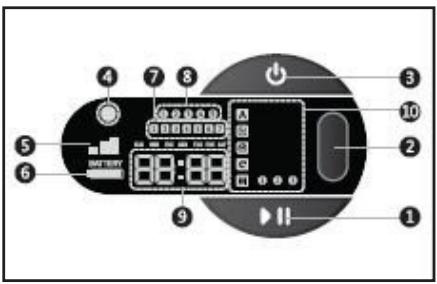
- Obstacle- and signal-detecting sensor
- Bumper
-
Control buttons and operation lamps
-
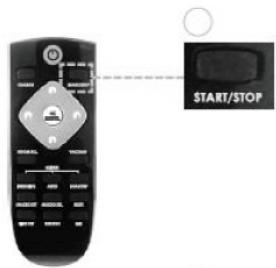
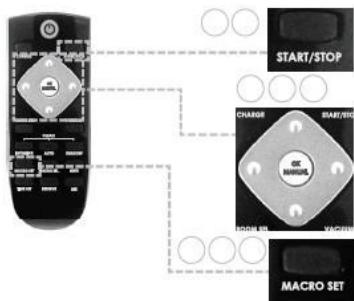
Start/Stop button
- Mode setup button
- Power button
- Brightness-detecting sensor
- Sucking power lamp
- Battery status lamp
- Reservation information lamp
- Room selection lamp
- Time lamp
- Operation mode lamp
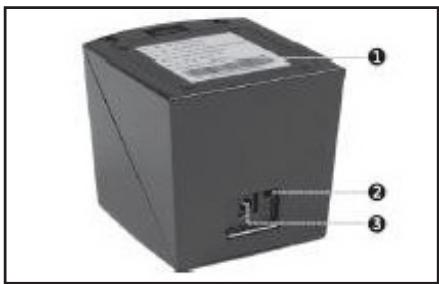
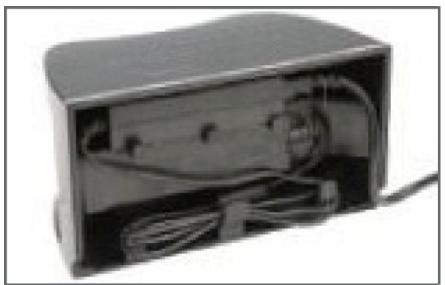
ROBOT CLEANER (REAR)
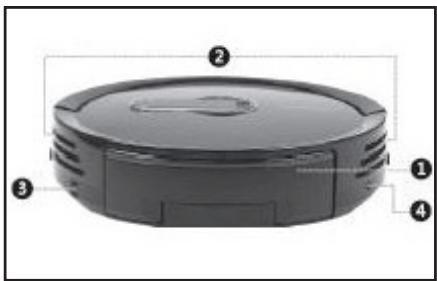
- Dust box
- Air outlet
- Power switch
- Adapter jack
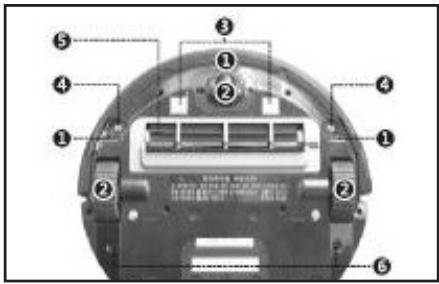
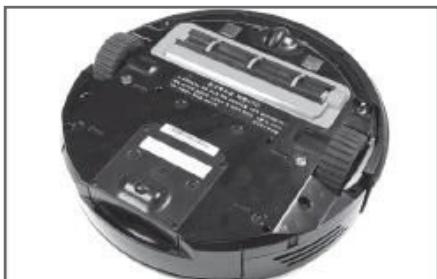
ROBOT CLEANER (BOTTOM)
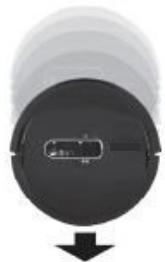
INDICATOR (TOP)
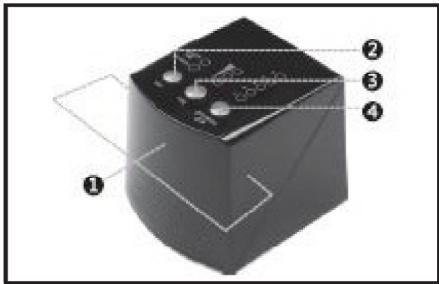
INDICATOR (BOTTOM/REAR)
- Falling point-detecting sensor
2.Wheels
- Charging terminal
- Side brush mounting pin
- Dust intake
-
Dustcloth guard mounting holes
-
Signal transmission sensor
- Mode switch button
- Distance setup button
-
Indicator number setup button
-
Battery cover
- Power button
- Adaptor jack
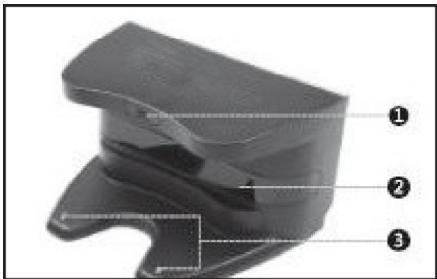
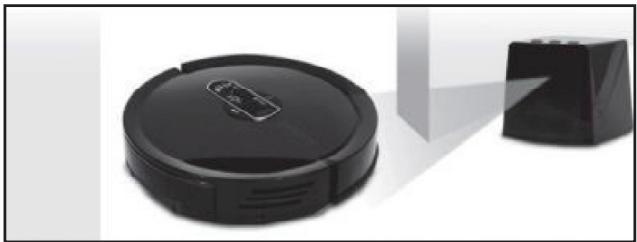
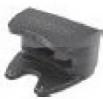
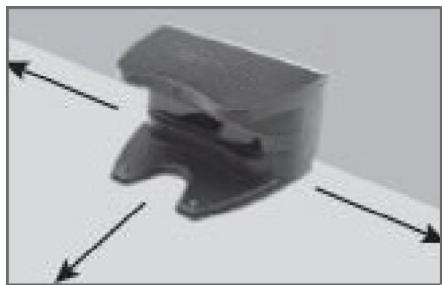
CHARGER (FRONT)
- Operation lamp
- Guide signal transmission sensor
- Charging terminal
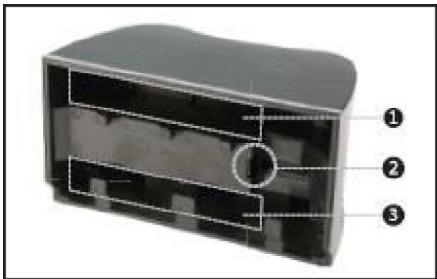
CHARGER (REAR)
- Adapter jack
- Adapter compartment
-
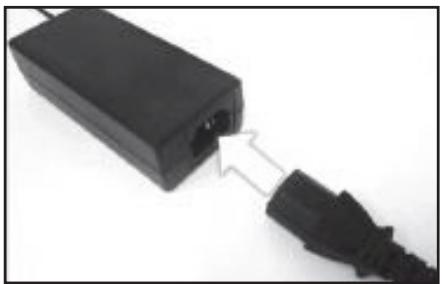
Plug the adapter power cord in the adapter and connect with the power.
-
Connect the charger adapter with the charger.
-
Once the power is connected, the blue lamp is turned on at the front.
- For appropriate charging of the product, the charger adapter should be connected with the power in any case.

-
Arrange the position of the charger.
-
The charger should be distant at least 1m away from the front and side parts.
- The wall facing the rear of the charger should not be made of glass or glossy materials.
- Insert the adapter into the compartment of the charger, properly.
- If you put it in a site under direct sunlight, automatic charging may not be made or the product can be discolored/decolorized.
-
Install the dustcloth guard into the robot cleaner.
-
If you do not want the dustcloth function, go to the next procedure.
-
Turn on the power switch of the robot cleaner (at the left of the rear dust box).
-
When you lift it to the [] position, the product gets turned on.
- Without the power switch turned on, no charging will be made.
-
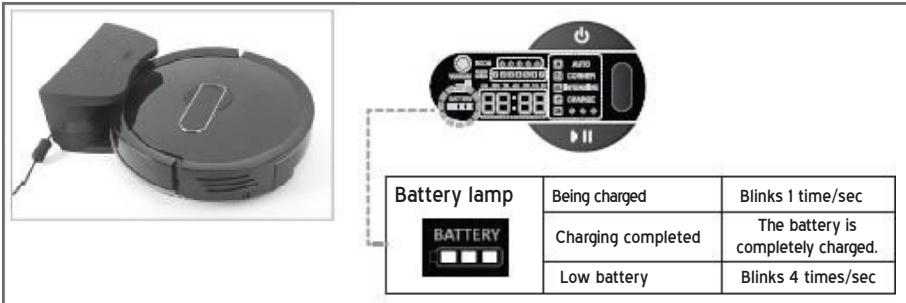
Put the robot cleaner in the charger with your both hands and activate manual
-
Locate the robot cleaner and the charging terminal of the charger, face to face.
- The charging time can be around one (1) hour depending on the remaining battery capacity.
- After 1-hour charging, you can use the product for around one (1) hour.
Usage time may vary depending on the strength of the sucking power.
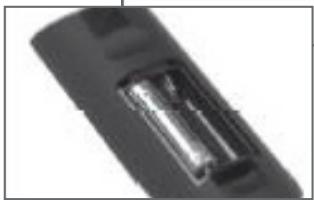
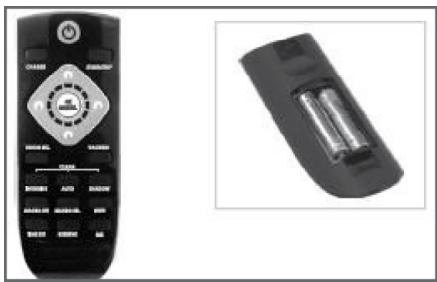
-
Insert the battery of the remote controller and the indicator.
-
You need to insert the battery in a correct position following the polarity data indicated in the insertion position.


Important
The indicator battery (D2 specifications) is not supplied with the product.
-
Install the indicator in a desired position.
-
The product can perform cleaning, anyway, with no indicator installed.
- For detailed installation methods, see the page 36.

Important
The indicator can be used in connection with an additional adaptor (5V). (In this connection, the battery power will not be consumed.)
With the remote controller, you can use main functions and advanced functions of the robot cleaner.

Important
Function available only with the main body of the robot cleaner.
Cleaning of corners

Important
Functions available only with the remote controller.
Setup of current time, setup of reservation, selection of rooms, cleaning of under the bed, macro setup and selection, mute tone, adjustment of sucking power and manual move and cleaning

Important
RF signal modules of the remote controller may cause radio wave interference depending on features of usage environments.
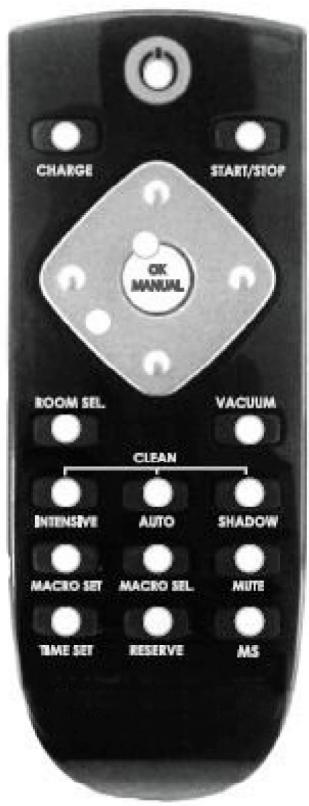
Turns on/off the power
- If the product operation gets stopped due to errors, the button makes the product go back to the operation mode.
- Moves the robot cleaner with the charger
- Starts selected operation
- Stops current cleaning and move
Used for manual cleaning operation (See the page 28.)
- Acts as [Ok] key in various setup modes.
- In manual cleaning, moves the product forward and backward and make the product rotate in the left and right directions.
- Selects setting values in setup of time and reservation ROOM SEL. button
- Makes the product select a room and move there (See the page 27.)
- Adjusts the strength of dust inhalation
- Selects the focused cleaning (See the page 24.).
- Selects the automatic cleaning or the basic cleaning mode
- Selects the cleaning under the bed (See the page 26.)
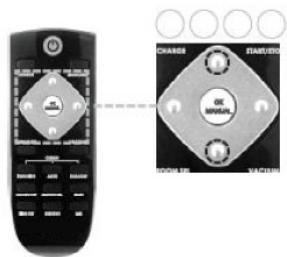
- Starts/cancels macro setup.
- Selects a macro number to be set or executed.
Turns on and off operation announcement tone
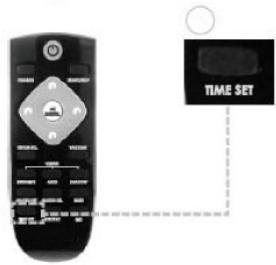
Used to set current time (See the page 32.).
Used to make reservation setup (See the page 33.)
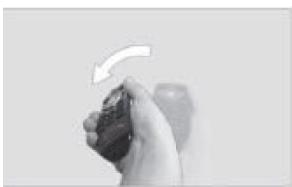
- Press this button to use the remote controller as motion-controlling tool (See the page 29).
HOW TO SET SYNCHRONIZATION OF THE REMOTE CONTROLLER

Important
You do not have to set synchronization for the remote controller supplied with the product.

Important
If you need to buy a new remote controller due to loss of the existing remote controller or other reasons, you need to synchronize the robot cleaner with the new remote controller.
- Turn off the power switch at the side of the main body.
- While pressing the power switch at the upper part of the main body, turn on the power switch at the side of the main body.
- The display of the main body will start blinking for synchronization.
-
Pull out one battery of the remote controller.
-
While pressing the OK button from the remote controller, re-insert the battery in.
-
The OK button of the remote controller will turn on and then off in red and blue in turn.
- The synchronization will be completed in a few seconds.
- If the main body is 3 meters or more distant from the remote controller, the synchronization will fail.
- Turn off and then on the power switch at the side of the main body.
-
Pull out and then re-insert the battery of the remote controller.
-
The synchronization will be completed.
BASIC CLEANING(AUTOMATIC CLEANING)
- It means essential cleaning method.
- Without the indicator installed, the product will clean all rooms whose doors are open. With the indicator installed, the product will clean rooms in an order according to a fixed rules. (See the page 36-39.)
After cleaning of all rooms, the product will go back to the charger for charging.
- After cleaning, empty the dust box. While the dust box remains full, the sucking power may get lowered.
- Cleaning efficiency may vary depending on the condition of obstacles such as Carpets etc on the floor.
O1. Turn the power on of the main body.

- Press the [START/STOP] button.
- When you press the [Start/Stop] button after the product starts working cleaning, it stops cleaning.
- When the cleaning is stopped and you press the [Start/Stop] button, the product will resume cleaning.
At this time, existing cleaning operation will be ignored and the automatic cleaning will be newly activated.
O3. The automatic cleaning gets started.
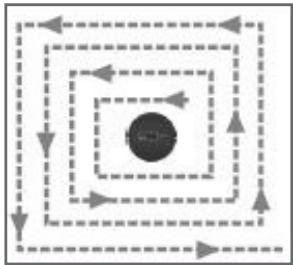
- The robot cleaner moves in the "2" shape for cleaning.
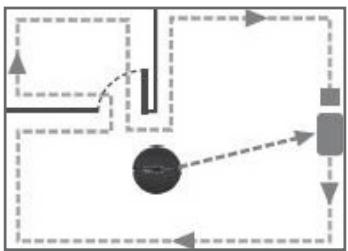
- If an indicator signal is detected during cleaning, the product will finish cleaning of a current place and move to the place with the indicator and perform cleaning.

Important
If the product gets equipped with a dustcloth panel, it gets ready for dustcloth cleaning and it does not go to the sites with carpets.
If there is a carpet or other objects ahead of the charger in cleaning with the dustcloth, the cleaner may fail to reach the charger.

Important
The product can perform cleaning of sites, which cannot be easily cleaned through automatic cleaning.

Important
For corners and some spots where the robot cleaner cannot go, the product cannot perfectly clean them.

Important
Before using the advanced cleaning functions...
- If the robot cleaner is working or being charged, you cannot select a cleaning mode.
- In this case, you need to press the [Start/Stop] button to stop current operation and select a cleaning mode.
FOCUSED CLEANING
The robot cleaner can perform focused cleaning on some spots. lm away from the front/rear/sides of the body.

Important
If the site has many obstacles around it, the cleaning may not be successful due to interference from them.
-
Select the focused cleaning mode.
-
The main body shows the [Focused cleaning] indication.
| Main body button | Remote controller button |
| Press the mode selection button repetitively. | INTENSITY
STAI/SSTOP |
-
Press the [START/STOP] button.
-
After the cleaning is completed, the product will stop at the current place.
CLEANING CORNERS
The product performs cleaning following the wall of a current room. After one lap is completed, it will finish cleaning.
-
Select the corner-cleaning mode.
-
The main body shows the [Cleaning corners] indication.
| Main body button | Remote controller button |
| Press the mode selection button repetitively | (None) |
- Press the [START/STOP] button.
After the cleaning is completed, the product will move to the charger.
SHADOW CLEANING
The product can perform cleaning under the bed or other furniture.

Important

Important
Use the product with the room light turned on. In a dark room, the product cannot recognize the space under the bed.
In a dark room, the product may see all the space as one under the bed.
-
Place the robot cleaner under the bed.
-
Under the light, product may not perform cleaning correctly.
-
If the robot is not under a piece of furniture, it will move there before starting cleaning. To reduce the moving time, place the robot cleaner in front of desired furniture before it starts working.
-
Select the cleaning under the bed mode.
| Main body button | Remote controller button |
| (None) | |
- After the cleaning is completed, the product will move to the charger..
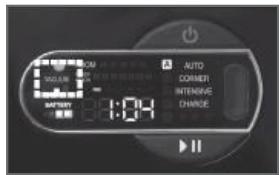
SELECTING A ROOM FOR CLEANING
The product will directly move to the room where the indicator is installed to perform cleaning there. When you buy additional indicators, up to five (5) indicators can be additionally installed. This function can be activated when the indicator for assortment of rooms has been installed (See the page 36-39).
01. Select a room number.
- The main body shows the room number.
- If all room number lamps are turned off, it means no status has been selected (No selection status).
- In the no selection status, the product will perform cleaning in the same method as automatic cleaning.
| Main body button | Remote controller button |
| (None) | Every time you press the but
the number/status is change
among 1-2-3-4-5-no selection. |
After the cleaning is completed, the product will move to the charger.
MOP CLEANING
With a mop, the cleaner can clean the floor.
In the Mop cleaning mode, the cleaner does not cross over carpets, thresholds etc.
- Put a mop made of superfine fibers onto the mop guard.
- Install the mop guard to meet the mounting hole seen at the bottom of the main body.
- Press the [Start/Stop] button.
| Main body button | Remote controller button |
| (None) | |
CLEANING THROUGH MANUAL CONTROL 1
You can manually operate the robot cleaner.
- Press the [START/STOP] button to stop the robot cleaner in operation.
-
Press the [OK/MANUAL] button from the remote controller.
-
For cleaning, the product starts inhaling air at the site.
-
When you press the [OK/MANUAL] one more time, the air inhalation will stop.
-
Operate the robot cleaner as you like with the direction keys of the remote controller.
-
During charging, the manual control is not available.

If you only need manual move, not air inhalation, this function is useful.
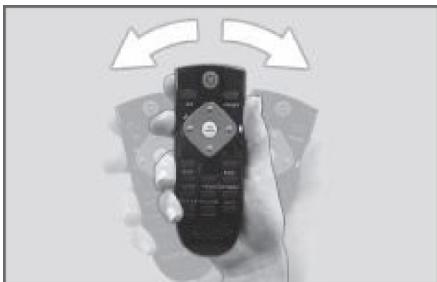
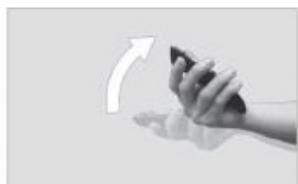
CLEANING THROUGH MANUAL CONTROL 2(CONTROL OF THE MOTION)
When you use the motion control function of the remote controller, you can manually control the robot in a convenient way.

- If the main power switch of the robot is turned off, turn it on.
- Press the [START/STOP] button if the robot is in operation.
- Press the button seen below to change the remote controller operation mode for the motion control mode.

If no operations are detected for five (5) or longer seconds during motion control, the motion control mode will be released.
- Use the motion shown in the figure below to manually control the robot.
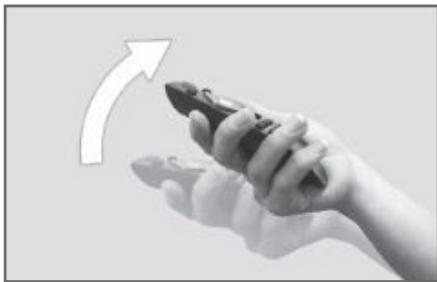
[Turning on/off the power - [POWER] button from the remote controller]
Quickly flick the front of the remote controller upward.
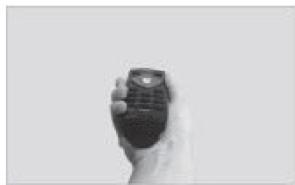
[Turning on/off cleaning mode - [OK/MANUAL] button from the remote controller]
Slightly flick the remote controller toward left/right.
The inhalation motor will start/stop working.
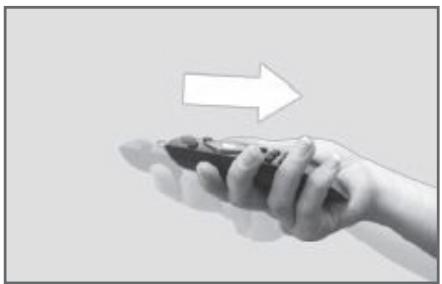
[Adjusting the sucking power - [VACUUM] button from the remote controller]
Slightly pull the remote controller following the
arrow.
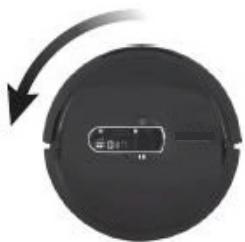
[Moving the robot straightly to the fore/back direction - [UP/DOWN] button from the remote controller]
Bend the fore part of the remote controller downward or pull it upward.
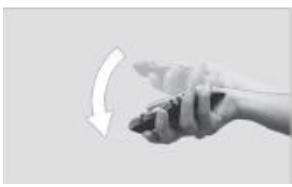
(Forward move)
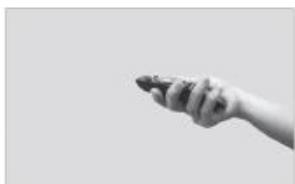
(Stop)
(Backward move)

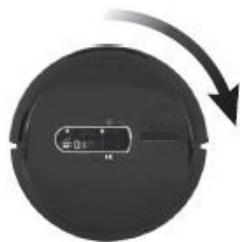
[Controlling the rotation - [LEFT/RIGHT] button from the remote controller]
Turn the remote controller to the left/right.
(Turning counterclockwise)
(Stop the rotation)

(Turning clockwise)
- To release the remote controller from the motion control mode, press the motion control conversion key again.
SETTING CURRENT TIME

Important

Important
The time setup is available only with the remote controller.
When you lower down the power switch of the robot cleaner, the time setup will be initialized; you need to make the setup again.
- If the robot cleaner is working, press the [START/STOP] button to stop it.
- Press the [TIME SET] button. At the robot cleaner, the 'Hour' part starts blinking.
-
Use the "Up" and "Down" direction keys to set the 'Hour'.
-
After the setup, press the "Right" direction key to go to the "Minute" setup.
- Use the "Up" and "Down" direction keys to set the 'Minute'.
- After the setup, press the "Right" direction key to go to the "Day of the week" setup. When you press the "Left" direction key, you can go back to the previous stage.
- Use the "Up" and "Down" direction keys to set the 'Day of the week'.
O6. When all the settings are completed, press the [CONFIRM/MANUAL CLEAN] button.
SETTING RESERVATION
You can set the product to perform cleaning at a desired time for each day of the week.

Important
At first, make "Set the current time". With no time set, reserved setup will not work correctly.
The reservation is available only with the remote controller.
If the battery is being charged at a reserved time, the reserved cleaning will be executed after the charging.
Once the battery is discharged, the system time will be initialized.
In this case, reserved cleaning may not be executed; you need to reset the time.
If the robot cleaner is working, press the [START/STOP] button to stop it.

-
Press the [RESERVE] button.
-
At the main body of the robot cleaner, the 'Reservation number' starts blinking (The numbers 1-7 mean Monday - Sunday).
-
Select one with the"Up"and"Down"direction keys and press the"Right"direction key to go to a next procedure.
-
When the time setup is completed, press the [OK/MANUAL].
-
Set [Start time: End time]
- When [Start time] is reset changed, the End time will be automatically set to be after two hours.
- If the cleaning is completed before the End time, the robot will go on working until the set End time
-
When you press the [Reservation setup] button, the reservation setup will exit without the next stage appearing.
-
Repeat the steps 01-02 to set the time for each day of the week.
-
For any date requiring no reservation, you can set the time as [00:00].
-
After all the settings for the day of the week are completed or if you want to go out of the setup mode, press the [RESERVE] button.
With several manual operations, you can make the robot move as you like and save the process to keep the robot follow the same move, if required.
SETTINGMACROS

Macro setup is available only with the remote controller.
If the power switch of the robot cleaner is turned off, the setup will not be initialized.
Up to 50 controls for macro setup is available; if the same controls are consecutively inputted, they will not be differently counted.
-
If the robot cleaner is working, press the [START/STOP] button from the remote controller to stop it.
-
If the robot cleaner is cleaning or being turned off, the macro setup will not work.
-
Press the [MACRO SEL.] button from the remote controller.
-
A currently-selected macro number gets lit.
-
When you press the [OK/MANUAL] button, the inhalation fan will work.
-
While a macro is executed, the inhalation fan also will work.
-
Select a macro number with the 'Left' and Right' direction keys.
-
Press the [MACRO SET] button from the remote controller.
-
A currently-selected macro number starts blinking.
O6. Adjust the robot with the'Up,"Down,"Left'and'Right'direction keys in manual operation mode. If one key from the remote controller ('Charging,' 'Automatic cleaning,' 'Focused cleaning' or 'Shadow cleaning') is entered during macro setup, the macro will be saved through the latest control and, at the same time, an inputted function will be executed. (During macro setup, the Motion control function will not be activated.
-
During the manual operation, there will be restriction on the functions of avoiding collision with obstacles or fall risk areas.
-
To complete the setup, press the [START/STOP] button from the remote controller. With the voice announcement for the completed setup being heard, the macro setup will be terminated (At this time, the upper display may blink).
-
If you press the [MACRO SET] button from the remote controller during the control, the macro setup will be cancelled.
EXECUTING MACROS
- If the robot cleaner is working, press the [START/STOP] button from the remote controller to stop it.
- If the robot cleaner is cleaning or being turned off, the macro execution will not work.
- Press the [MACRO SEL.] button from the remote controller.
- Select a macro number you want to execute, using the'Left'and'Right' direction keys from the remote controller.
-
Press the [START/STOP] button from the remote controller. With the voice announcement for the execution of the macro, the robot will work for itself as the saved control.
-
During the execution, a currently-selected macro number blinks.
- After all controls saved are completed, the voice announcement for the completed execution will be heard and the execution of the macro will be terminated.
- If an obstacle is detected during the execution, the robot will go to the next control.
- The robot will automatically let the inhalation fan work at the time when the inhalation fan was operated during the saving work.
- If you press the [START/STOP] button during the execution, the macro execution will be terminated.
- If 'Charging,'Automatic cleaning,'Focused cleaning'or 'Shadow cleaning'is entered while a macro is being set, an inputted function will be executed and the macro execution will be terminated.
The indicator enables you to use spaces at home in various forms depending on each zone. Using the room assortment mode or setting a cleaning area, you can make good use of the indicator.

Important
Check the indicator battery status.
- Press any button to check if the lamp blinks; if so, it means the indicator is normally turned on.
- If the battery reaches the end of life, press the button; all the lamps will blink at the same time. In this case, you need to replace the battery.
- If you do not want to use the indicator, turn off the power switch at the rear part.
USING THE PRODUCT FOR THE ROOM ASSORTMENT MODE
-
Put the rear of the indicator on the floor at the entrance of a room.
-
If the indicator is put at a place 10cm or higher than the bottom, the robot cleaner may fail to identify it.
- In general, you can install the indicator at the position marked with the asterisk seen in the figure below.
- Up to five (5) indicators can be installed.
- If there is a door at the place with the indicator in it, the door should stay opened as wide as possible to make the robot work with no restriction.

Important
For other indicators except one provided by default, you need to separately buy them.
-
Press the [Mode] button to set the product in the [Indicator] mode.
-
When the lamp gets turned on, repeat the pressing until the [Indicator] lamp gets turned on.
-
Press the [Distance] button to set a door width.
-
1M () - 3m( ) - 5m( ) .
-
For common home.1m setup is available.
-
If you set the distance excessively, the robot cleaner may wrongly decide the path.
- Press the [Indicator number] button to set a room number.
- Every time you press the button, the lamps are turned on in the order of "1-2-3-4-5-Off".
- When two or more indicators are installed, room numbers should not be duplicated.
-
Open the door.
-
If you do not want to clean a room with the indicator in it, just close the door.
| Mode | Set cleaning areas | Make limited cleaning areas |
| Indicator | Operate in the room assortment mode. |
| Distance | Set the output distance for room assortment si-
gnals.
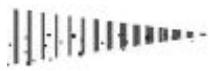
Every time you press the button, the distance is shifted as follows: 1m(●) - 3m(●●) - 5m(●••).
Set to fit to the door width. |
| Indicator number | Set the room number.
When you use 2 or more indicators, room numbers should not be duplicated. |
USING THROUGH SETUP OF CLEANING AREAS
- You can make the robot cleaner work within a specified space (gray area in the figure).
- In addition to the example below, you can make other spaces in various forms.
- Indicator signals are transmitted into three front/right/left directions.
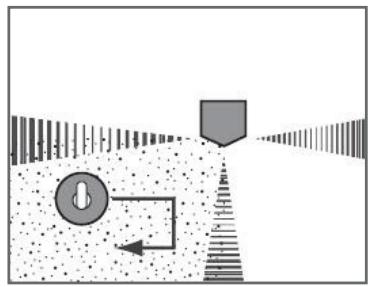
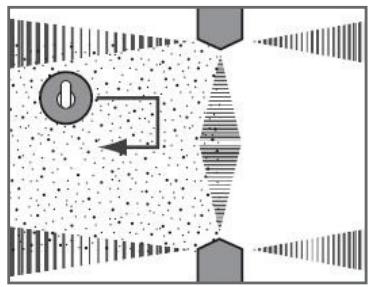

Indicator (The pointy part is the front.)
Transmission signal (up to 5m)

Robot cleaner
-
Press the [Mode] button to set the [Set cleaning areas] mode.
-
When the lamp gets turned on, repeat the pressing until the [Set cleaning areas] lamp is turned on.
-
Press the [Distance] button and adjust the distance of signals to set cleaning areas.
-
Repeat the pressing until the distance of signals to set cleaning areas becomes a desired level.
- 1m()· 3m( )· 5m( )
-
If the distance is set as too short or too long, the robot cleaner may decide the area wrongly.
-
Calculate the signal distance to arrange the indicator in an appropriate position.
-
If the signal does not reach the wall, the robot cleaner may slip through the crack.

Important
If the emitting signals of each indicator get overlapped, no setup for cleaning area will be made.
In this case, it will become as if no indicator were installed.
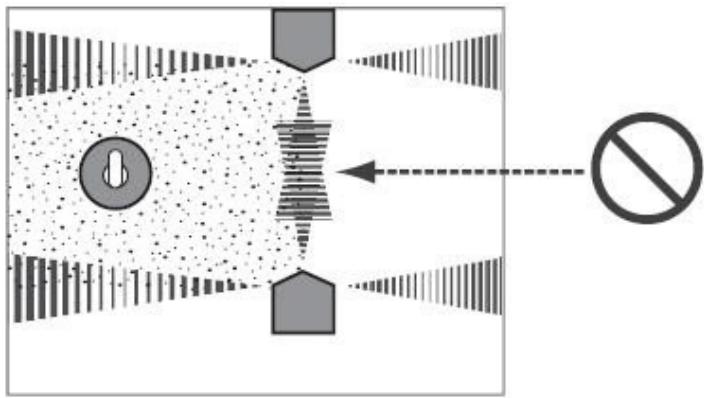
It is recommended not to install indicators in a place with the charger in it. The emitting signals of the charger (in the radius of 5 meters) may be overlapped with the signals of indicators, which can be ignored.


Charger

Emitting signals of the charger

Important
If the robot cleaner is working, press the [Start/Stop] button - the [Power] button to turn off the power.
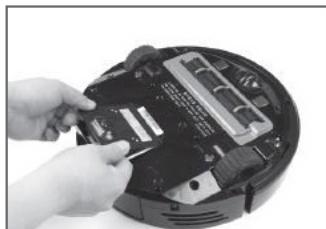
CLEANING THE DUST BOX
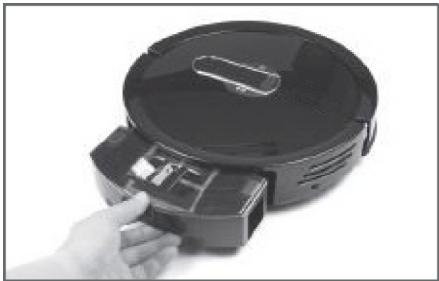
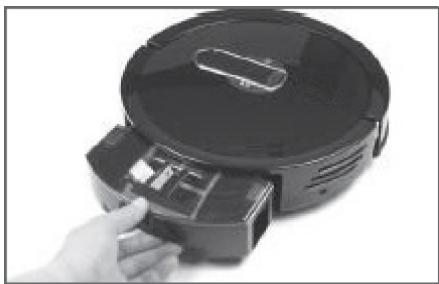
- Hold the dust box and remove it.
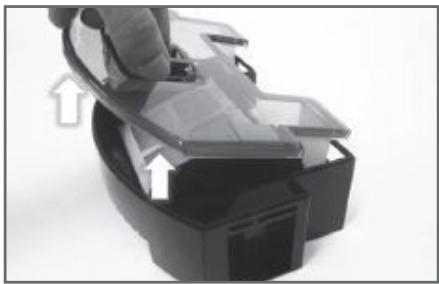
- Lift the cover of the dust box.
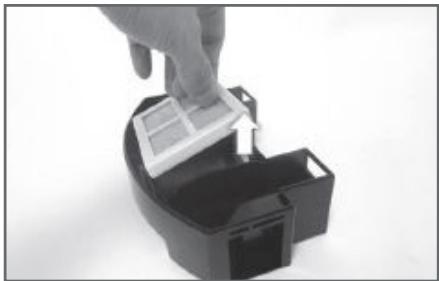
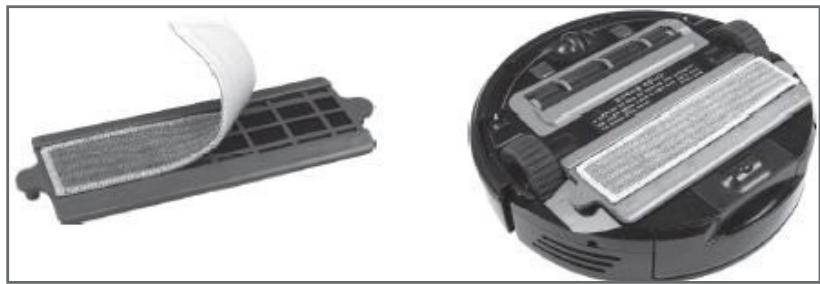
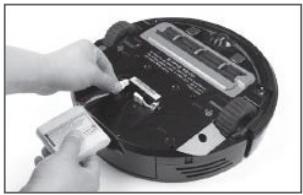
O3. Remove the dust filter.
- The dust filter can be water-cleaned. After cleaning the filter with water, dry it completely in the shade.
-
In water-cleaning the filter, do not use any detergent.
-
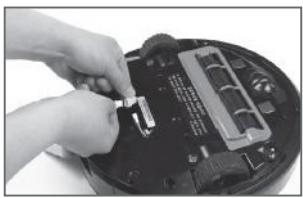
Empty the dust box.
-
Insert the filter back into the dust box.
-
If the filter is water-cleaned, wait until it gets completely dried before insert it.
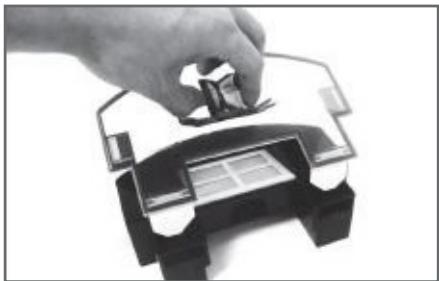
O6. Insert the cover of the dust box.
- The white wings of the cover should be put into the dust box.
-
Insert the dust box back into the robot cleaner.
-
When you push it smoothly, it will be naturally inserted due to the magnetic power.
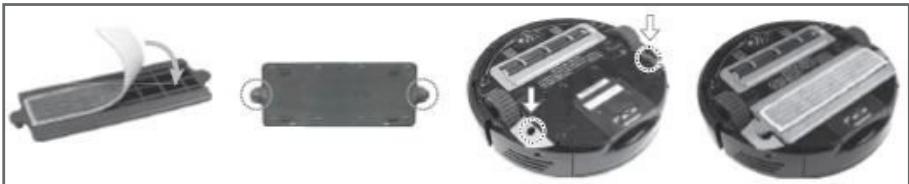
REPLACING THE FILTER
- To reuse the filter, you need to water-clean it after removing it from the dust box.

Important
Do not use any detergent: use only water to clean it.
- For removal of the filter, see the Step 3 at the "Cleaning the dust box".
- The life span of the filter is around six (6) months. Any end-of-life filter shows worsened performance.
- The life span of the filter can decrease depending on usage environments.
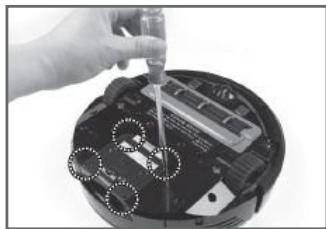
CLEANING THE FALLING POINT-DETECTING SENSOR
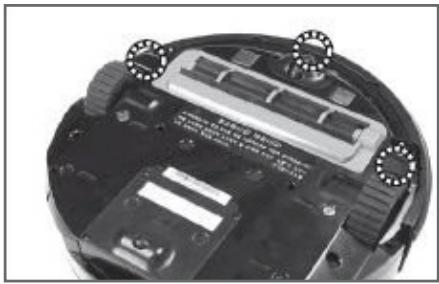
CLEANING WHEELS
CLEANING THE DUST INTAKE
- Turn over the robot cleaner.
- Clean the three spots of the sensor seen in the figure. using cotton swabs.
Use some water.
- Do not directly moisten the floor or do not use benzene or alcohol.
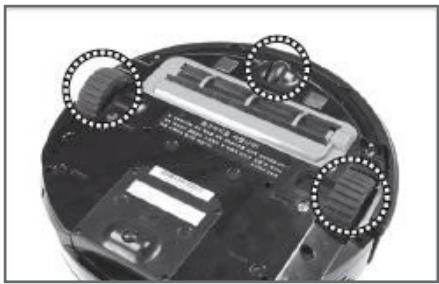
- Turn over the robot cleaner.
-
Clean the wheels using the brush.
-
In cleaning, it is advised to use only the brush.
- Turn one wheel a bit to clean the whole wheel part.
-
Remove hairs and other foreign substances, which disturb operation of wheels.
-
Turn over the robot cleaner.
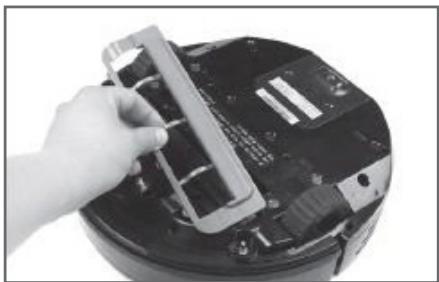
- Lift the cover of the dust intake.

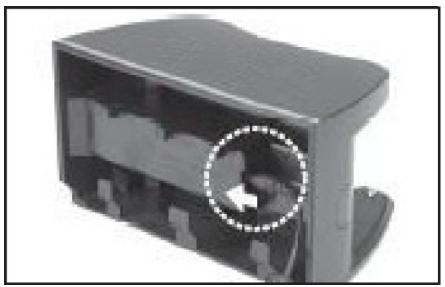
O3. Hold the fixing pin of the rubber brush and lift it to remove it.
- Clean the removed brush with the brush.
-
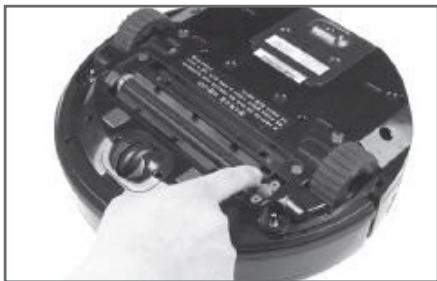
Insert back the rubber brush.
-
Check the groove shape and insert it into the fixing hole of the rubber brush. Then, fix the wing of the fixing pin to the fixing pin.
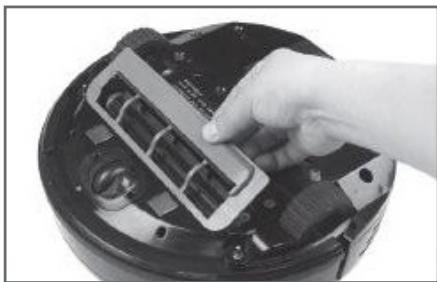
-
Insert the cover of the dust intake.
-
Insert the protruding part of the cover before others. Then, it will be fixed due to the magnetic power.
Batteries are consumables. The longer they are used, the shorter the usage time becomes.
LIFE SPAN OF THE BATTERY
We guarantee twelve (12) months month in general usage environments.
- For ideal battery use, make sure that it is always charged.
- The life span of the battery can vary depending on the usage environments.
USAGE TIME OF THE BATTERY
- In initial use, you need to manually charge the battery to fill it up before using it.
The charging time is around one (1) hour.
- After complete charging, the product can perform cleaning operation for around one hour.
- In complex or dirty adjacent environments, the cleaning operation time may decrease.
REPLACING THE BATTERY
- Once the cleaning operation time gets considerably shortened, you need to replace the battery.
- Make sure to use standard batteries.
- For purchase of additional batteries, please contact our service center.
REPLACING THE BATTERY MANUALLY
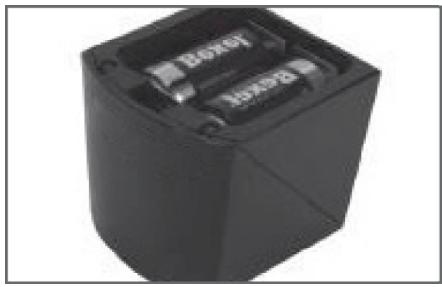
If you feel difficulty in manually replacing the battery, please contact our service center. O1. Turn over the robot cleaner.
-
Loosen the four screws of the battery cover and lift the cover.
-
Once the screws are loosened, the battery cover can be immediately open when you lift it with the flathead driver.
-
Remove the battery and pull out the battery pin.
-
In pulling out the battery pin, you need to press the lock at the same time.
O4. Fix the battery pin of the new battery in and then insert the battery.
- Close the battery cover and tighten the screws.
USING THE BATTERY FOR A LONG TIME
- If you do not use the battery for a long time, charge it completely and separate the battery from the main body before leaving it.
- Cleaning the dust intake and the dust box frequently. If you use the product filled with foreign substances and dust, it can cause increase in rotation of internal motors and then shortened life span of the battery.
- Charge the battery all the time before using the product.
- In charging or long-term storage, keep the product avoid direct sunrays and fire.
The list shows basic voice announcements, which is subject to change for users'convenience.
| Voice announcement functions |
| Start the automatic cleaning. | The automatic cleaning is launched. |
| Start the automatic cleaning of the dustcloth. | The automatic cleaning is launched with the dustcloth inserted. |
| Start the wall cleaning. | The corner-cleaning operation is launched. |
| Start the focused cleaning. | The focused cleaning is launched. |
| Start reserved cleaning. | The reserved cleaning is launched. |
| Start the cleaning under the bed. | The cleaning under the bed operation is launched. |
| The cleaning is completed. | The cleaning operation is completed. |
| The cleaning is cancelled. | The Stop button is pressed during cleaning. |
| Move to the charger. | The [Charging] button of the remote controller is pressed or the product is moving for automatic charging. |
| Start the charging. | The charging is launched. |
| Start the macro setup. | The macro setup is launched. |
| Macro No. X is set. | The macro setup is completed. |
| Execute the macro No. X | The macro execution is launched. |
| The macro is completed. | The macro execution is completed. |
| The time adjustment is completed. | The time setup is completed. |
| Move to the indicator No. X. | The product starts moving to clean a specified room. |
| The reservation No. X is set. | The reservation setup is completed. |
| Start the motion play. | The motion play is launched. |
| Stop the motion play. | The motion play is stopped. |
| Check the message function |
| The battery is discharged. | The battery is discharged. |
| There is no dust box inserted. | The dust box is removed. |
| Put the product on the floor. | The robot cleaner is lifted from the floor. |
| Check the wheel. | The wheel is overloaded. |
| Check the main brush. | Overload is generated due to foreign substan-ces in the main brush. |
| Check the side brush. | Overload is generated due to foreign substan-ces in the side brush. |
| Errors are generated. | Errors occur (See the error code). |

Important
If the product stops working with error codes displayed, you can resume the operation with the [POWER] button.
If you tried following the measures given below, please contact our local service
The announcement for faulty situations will be heard for the initial one time.
| [E01] | Reason | The battery is discharged and it cannot work. |
| Measures | Charge the product manually. |
| [E02] | Reason | Product operation is tried with the main body connected with the adapter. |
| Measures | Disconnect the adapter from the main body before the operation. |
| [E03] | Reason | Product operation is tried without the dust box inserted. |
| Measures | Insert the dust box. |
| [E06] | Reason | Both the wheels are lifted. |
| Measures | Place the robot cleaner on the floor or lift it to another site. |
| [E07] | Reason | Either or both the wheels are found to have overload. |
| Measures | Lift the robot cleaner to another site. |
| [E08] | Reason | The air inhalation fan is found to have overload. |
| Measures | Remove foreign substances from the air inhalation holes. Remove dust from the dust box. |
| [E09] | Reason | The main brush fan is found to have overload (over a reference level). |
| Measures | Clean foreign substances from the main brush. |
| [E10] | Reason | The side brush fan is found to have overload (over a reference level). |
| Measures | Lift the robot cleaner to another site. |
| [E11] | Reason | The product cannot normally move due to obstacles. |
| Measures | Lift the robot cleaner to another site. |
| [E12] | Reason | Too many bumper collisions are successively detected during move (over a reference level). |
| Measures | Lift the robot cleaner to another site. |
| [E13] | Reason | The product detects risks of fall successively (over a reference level). |
| Measures | Lift the robot cleaner to another site. |
| [E15] | Reason | Other errors |
| Measures | Please contact our service center. |
| Error details | Checkpoints and actions to be taken |
| Q. The robot does not work. | (1) Turn on the power switch at the right bottom of the rear part.
(2) Check if the battery is discharged.
→ Charge the robot with the charger. |
| Q. The robot cannot be charged. | (1) Clear away obstacles from the charger.
(2) Check if the charger is turned on.
(3) Turn on the power switch at the right bottom of the rear part.
→ If you force the robot to be charged, it may not work. |
| Q. The robot cannot be operated with the remote controller. | (1) Try matching with the remote controller.
(2) Change the battery of the remote controller. |
| Q. The remote controller does not work. | (1) Change the battery. |
| Q. The sucking power is weak. | (1) Empty the dust box.
(2) Clean the filter of the dust box.
(3) Check if there are foreign substances in the intake. |
| Q. The robot cannot be turned on. | (1) Turn on the power switch at the right bottom of the rear part.
(2) Check if the battery is discharged. |
| Q. The brush does not rotate. | (1) Check if there are any foreign substances around the brush.
(2) Check if the brush is properly inserted. |
| Q. The noise gets stronger than before. | (1) Check if the filter of the dust box is properly inserted.
(2) Check if there are any foreign substances around the brush. |
| Q. The robot works abnormally during cleaning. | (1) Check if the dustcloth is inserted (if exists) and then if it is appropriately inserted.
(2) Turn on the power switch at the right bottom of the rear part.
(3) Clean the sensor and the adjacent part with a soft cloth. |
| Q. Reserved cleaning cannot be made. | (1) Check if current time is properly set.
(2) Check if a reservation setup has been made. |
| Q. The robot does not work with any button. | If the main body is directly connected with the adapter for charging, no button input will work. |
ROBOT CLEANER
| Model | I.WIP 2000 |
| Dimension | 320 x 79.7 (DxH) |
| Weight | 3.2 Kg (TBD) |
| Max. speed | Cleaning mode: 30cm/sec.; Moving mode: 25cm/sec. |
| Operating noise | 60dB or less |
| Power consumption | Main body: 20W |
| Battery | Lithium iron phosphate (LiFePo4) 12.8V DC |
| Capacity of the dust box | 800 ml |
| Charging time | 60 mn |
| Operating time | 60 mn |

KOREA COMMUNICATIONS COMMISSION
This wireless system can cause interference of radio waves so that it is not available for services related to safety for human life.
Company name: Yoo Digital HOME, Inc.
- Product name: Wireless device for wireless data communication systems
Authentication No.: MOL-RYDISR750
CHARGER
| Model | RD-750 |
| Dimension | 220,8 x 120,1 x 160 mm (LxHxW) |
| Weight | TBD |
| Power consumption | 60W |
| Input voltage | 100 - 240V |
| Output voltage | 18vdc, 3,33 A |
| Signal transmission distance (IR) | 5m |
CAPTEUR
| Model | RI-750 |
| Dimension | 89.7 x 86.8 x 100 mm (LxHxW) |
| Weight | 0.22 kg |
| Battery | D alkaline batteries (LR20); 2EA |
| Battery operation time | Approx. six (6) months (standby mode) |
| Signal transmission distance (IR) | 1.5 m |
REMOTE CONTROL
| Model | RC-750 |
| Dimension | 132.7 x 23.4 x 46.9 (LxHxW) |
| Weight | 0.06 kg |
| Power source | AAA alkaline batteries (LR03) : 2EA |
| Signal transmission distance (IR) | 10m |

KOREA COMMUNICATIONS COMMISSION
This wireless system can cause interference of radio waves, and so, it is not available for services related to safety for human life.
Company name: Yoo Digital HOME, Inc.
- Product name: Wireless device for wireless data communication systems
Authentication No.: MOL-RC750
The warranty period for the product and the battery is one (1) year.
We, Yoo Digital HOME, offer the following warranty service to our consumers based on the customer compensation regulation. By the request for the warranty service, DAEWOO Elec Service Co., Ltd. will provide the service. The company will let the customer notified of whether to be compensated and the details within seven (7) business days after the requested day and offer the compensation within fourteen (14) business days after the notified day. We do not offer any paid/unpaid service for parallel imports.
| Product name | | Model name | |
| Purchased date | | Serial N° | |
| Dealer | | Price | |
PAID SERVICE
If you ask for the after-sales service and the product is not found faulty, you need to pay the service fee. Therefore, please read through the Users' manual before.
Cases when the product is not faulty
- Users ask for the after-sales service before fully understanding the Users' manual.
- Problems in external environments including propagation of radio waves and wired signals
- Initial installation for the supplied product
Treatment of the filter and removal of foreign substances from accessories
- Malfunctions caused from other companies' products (Including software)
Malfunctions due to customers negligence
- Malfunctions caused from wrong power capacity
- Malfunctions caused from external shock or fall
- Malfunctions due to use of consumables or optional devices not specified by our company
- Malfunctions caused from the repairing person, who is not from our partner companies specified by our company
- Malfunctions caused from ignorance of "Cautions for safety"described in the Users'manual
Other cases
- Malfunctions caused from natural disasters (Lightning, fire, salt damage and water damage)
- The life of consumables comes to an end.
UNPAID SERVICE
If products for general users are used for sale purpose, unpaid service may not be offered.
| Type of damages to customers | Compensation details |
| Malfunctions in performance and functions during normal use within the period when related parts are being stored | Essential repairing is required within ten (10) days after the purchase. | Replace the product with a new one or refund the product at the purchased price. | Not applicable |
| Essential repairing is required within one (1) month after the purchase. | Replace the product with a newone or offer unpaid repairing. |
| A replaced product gets faulty, requiring essential repairing within one (1) month after the replacement. | Refund the product atthe purchased price. |
| No replacement is available. |
| Repairis available. | Malfunctions are generated for three (3) times due to the same defects. | Undpaid repairing | Paid repairing |
| Malfunctions are ge-nerated for four (4) ti-mes dueto the same defects. | Replace the product with a new one. | Paid repairing |
| Malfunctions are ge-nerated for five (5) times dueto different defects. | Paid repairing |
| The repairing company has lost the product requested for repairingby the customer. | Refund the product at the fixed depreciated price added with 10% of the fixed deprecia-ted amount. |
| Repairing is NOT available as no parts for repairi-ring are put in stock within the period when related parts should be stored. | Refund the product afterthe fixed depre-ciation. |
| Repairing is NOT available although parts for repairing are stored. | | Replace the product by applying fixedde-preciation, after the expenses forpaid re-pairing is paid. |
| Malfunctions caused from intention or negligence of customers | Repairing is NOT available. | Replace the product after the amount- corresponding to the expenses forpaid re-pairing is paid. | |
| Repairing is available. | Paid repairing | Paid repairing |
All information subject to change without notice!
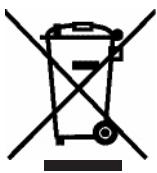
Recycling
This symbol is a symbol of sorting garbage electrical and electronic equipment (WEEE). This means that this product should be treated in accordance with European Directive 2002/96/EC to be recycled or dismantled to minimize its impact on the environment.
For more information, contact your local or regional authorities.