
DRR-M33 - CD Player DENON - Free user manual and instructions
Find the device manual for free DRR-M33 DENON in PDF.
| Product Type | Stereo cassette deck with horizontal loading |
| Brand | DENON |
| Model | DRR-M33 |
| Compatible Tape Types | Normal (Type I), High (Type II), Metal (Type IV) playback only |
| Noise Reduction | Dolby B NR |
| Record/Play Head | Hard permalloy |
| Erase Head | Double-gap ferrite |
| Tape Speed | 4.75 cm/s |
| Number of Tracks | 4 (stereo) |
| Playback Modes | One side, both sides, continuous play |
| Playback Functions | Auto reverse, automatic tape selector, music search (up to 16 selections) |
| System Functions (with RCD-M33/M35DAB) | CD synchronized recording, auto power on, auto function select, timer |
| Connectivity | LINE OUT (RCA), LINE IN (RCA), system connector |
| Power Supply | AC 230 V, 50 Hz (via AC OUTLET of CD receiver) |
| Weight | 3.1 kg |
| Included Accessories | Instruction manual, stereo audio cord (x2), system cable, list of authorized service stations |
| Maintenance | Clean heads after 10 hours of use; periodic demagnetization |
| Operating Precautions | Do not use C-120 or C-150 cassettes; avoid heat, humidity, magnetic fields |
| System Compatibility | System functions only with DENON RCD-M33/M35DAB |
| Warranty and Repairability | Contact an authorized DENON dealer for repairs |
Frequently Asked Questions - DRR-M33 DENON
User questions about DRR-M33 DENON
0 question about this device. Answer the ones you know or ask your own.
Ask a new question about this device
Download the instructions for your CD Player in PDF format for free! Find your manual DRR-M33 - DENON and take your electronic device back in hand. On this page are published all the documents necessary for the use of your device. DRR-M33 by DENON.
USER MANUAL DRR-M33 DENON
The lightning flash with arrowhead symbol, within an equilateral triangle, is intended to alert the user to the presence of uninsulated "dangerous voltage" within the product's enclosure that may be of sufficient magnitude to constitute a risk of electric shock to persons.

The exclamation point within an equilateral triangle is intended to alert the user to the presence of important operating and maintenance (servicing) instructions in the literature accompanying the appliance.
WARNING: TO REDUCE THE RISK OF FIRE OR ELECTRIC SHOCK, DO NOT EXPOSE THIS APPLIANCE TO RAIN OR MOISTURE.
- DECLARATION OF CONFORMITY
We declare under our sole responsibility that this product, to which this declaration relates, is in conformity with the following standards:
EN60065, EN55013, EN55020, EN61000-3-2 and EN61000-3-3.
Following the provisions of 73/23/EEC, 89/336/EEC and 93/68/EEC Directive.
* (For sets with ventilation holes)
- Do not obstruct the ventilation holes.
Die Beluftungssoffnungen durfen nicht verdeckt werden. - Ne pas obstruer les trou s d'airation.
Non coprite i fori di ventilazione - No obstruya los orificios de ventilación
- De ventilatieopeningen mogen nicht worden beblökkeerd.
- Tapp inte till ventilationsöppningarna.

- Do not let foreign objects in the set.
- Keire fremden Gegenstände in das Geraiskommen lassen.
- Ne pas laisser des objets étrangers dans l'appellé.
E: 'importante cheNSSUN oggetto es inserto all'interno dell'unita.' - Nodeojejobestexañosdentrolde equipo.
- Laat geen vreeinde voorwerpen in dit apparat aan vallen.
- Se till att fremmande foremål inte tränger in i apparaten.
- Do not let insecticides, benzene, and thinner come in contact with the set.
- Lassen Sie das Gerat nicht mit Insektiziden, Benzin oder Verdunnungsmitteln in Berhruhrung kommt.
- Ne pasmettre encontact des insecticides, du benzene et un diluent avec l'appellé.
- Accusatevrique che l'unita non venga in contatto con inseltici, benzolo o solventi.
- No permita el contacto de insecticidas, gasolina y diluyentes con el equipo.
- Laat geen inkeinvergelde middelen,
- Laat een harddrunner met dit apparata in negotiert komen.
- Se till att inte insetskmed mel sprayedbruk, bensen och thinner kommer i kontakt med apparatens hölje.

- Never disassemble or modify the set in any way.
Versuchen Sie nimals das Gerais auseinander zu halten oder auf jegliche Art zu verändern. - Ne jamais démonter ou modifier l'apparéel d'une manière ou d'une autre.
- Non smontate na, ne modifie l'unita inNSSun modo.
- Nunca desarme o modifiche el equipo de ninguna persona.
- Nooit dit appeaat demonteren of op andere wijze modifieen.
-
Ta inte isar apparaten och forsok inte bygga om den.
-
The ventilation should not be impeded by covering the ventilation openings with items, such as newspapers, table-cloths, curtains, etc.
- No naked flame sources, such as lighted candles, should be placed on the apparatus.
- Please be care the environmental aspects of battery disposal.
- The apparatus shall not be exposed to dripping or splashing for use.
- No objects filled with liquids, such as vases, shall be placed on the apparatus.
FRONT PANEL
FRONTPLATTE
PANNEAU AVANT
PANNELLO FRONTALE
TABLEERO FRONTAL
VOORPANEL
FRONT PANELEN
REAR PANEL
RUCKWAND
PANNEAU ARRIERE
IL PANNELLO POSTERIORE
PANEL TRASERO
ACHTERPANEL
BAKSIDAN
IMPORTANT TO SAFETY
WARNING:
TO PREVENT FIRE OR SHOCK HAZARD, DO NOT EXPOSE THIS APPLIANCE TO RAIN OR MOISTURE.
Please, record and retain the Model name and serial number of your set shown on the rating label.
Model No. DRR-M33 Serial No.
Thank you for purchasing this DENON cassette tape deck. Please read the operating instructions thoroughly in order to acquaint yourself with the cassette tape deck and achieve maximum satisfaction from it.
CAUTION:
- Handle the power supply cord carefully
Do not damage or deform the power supply cord. If it is damaged or deformed, it may cause electric shock or malfunction when used. When removing from wall outlet, be sure to remove by holding the plug attachment and not by pulling the cord.
- Do not open the top cover
In order to prevent electric shock, do not open the top cover.
If problems occur, contact your DENON DEALER.
- Do not place anything inside
Do not place metal objects or spill liquid inside this unit.
Electric shock or malfunction may result.
TABLE OF CONTENTS
1 MAIN FEATURES 4
2 BEFORE USING 4
3 CAUTIONS ON INSTALLATION 4
4 CONNECTIONs 5
5 PART NAMES AND FUNCTIONS 6
6 HANDLING CASSETTE TAPES AND CAUTIONS 6
7 BEFORE RECORDING AND PLAYING CASSETTE TAPES 7
8 PLAYBACK. 8
9 RECORDING 9
10 SYSTEM FUNCTIONS 10-12
11 TROUBLESHOOTING 13
12 OTHER INFORMATION 13
13 SPECIFICATIONS. 13
- ACCESSORIES
Check that the following parts are included in the package aside from the main unit:
① Operating instructions. 1
② Stereo audio cord. 2

②
③ System cord. 1
④ Service Station List
③
1 MAIN FEATURES
- Horizontal loading for stable travel
The horizontal loading mechanism used on the DRR-M33 is the ideal type of tray for the rotating parts, the most important part of the cassette deck. Mounting the deck mechanism horizontally lessens vibration of the flywheel in the thrust direction and reduces modulation noise.
-
Various editing and playback functions
-
Auto reverse mechanism for recording and playing for long periods of time.
- Auto tape selector for automatically identifying the tape type.
-
Music search for choosing selections up to 16 selections away in either direction.
-
Convenient system functions
The DRR-M33 is equipped for system functions allowing easy CD synchronized recording, auto function and auto power on operations when used in combination with a RCD-M33/M35DAB. In addition, the main operations of the system components can be performed using the system remote control unit included with the CD receiver (RCD-M33/M35DAB).
2 BEFORE USING
Read the following before using the set
- Before turning on the power
Check again that all connections are correct and that there are no problems with the connection cords. Be sure to unplug the power supply cord before connecting or disconnecting the connection cords.
- Moving the set
To prevent short-circuits or damage to the connection cords, always unplug the power supply cord and disconnect the connection cords between all other audio components when moving the set.
- Condensation (dew)
Water droplets may condense on internal operation parts if the set is brought into a heated room from the cold outdoors or when the room is heated rapidly. If this happens, the set may not operate properly.
Should condensation occur
The condensation will evaporate in one hour or less, at which time the system will function normally.
- Store this instructions in safe place
After reading, store this instructions along with the warranty in a safe place. Also fill in the items on the back paper for your convenience.
- Illustrations in this manual
Note that some of the illustrations used for explanations in this manual may differ from the actual set.
3 CAUTIONS ON INSTALLATION
The cassette tape deck uses a microcomputer for controlling internal electronic circuits.
In the event that the player is used while a near-by tuner or TV is turned on, although unlikely, interference could occur either in the sound from the tuner or the picture of the TV. To avoid this, please take the following precautions.
- Keep the cassette tape deck as far away from the tuner or TV set as possible.
- Keep the power cable and connecting cable of the cassette tape deck separate from the antenna wires of the tuner and TV.
Interference is particular likely to occur when an indoor antenna or a 300 / ohms feeder cable is used. Thus, use of an outdoor antenna and 75 / ohms coaxial cable is strongly recommended.
300 Ω/ohms feeder cable
75 Ω/ohms coaxial cable
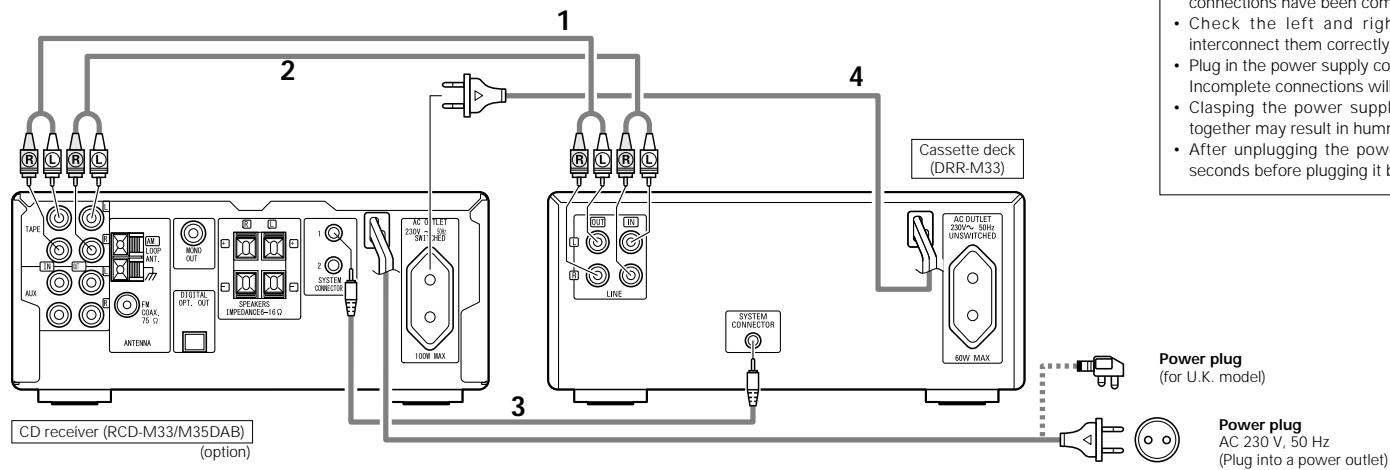
4 CONNECTIONS
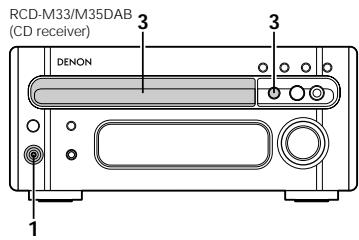
Connecting to the RCD-M33/M35DAB
When connecting to a receiver other than the one in the RCD-M33/M35DAB there is no need to make connection 3. Note that in this case none of the system functions (auto power on, etc.) will work.
- System operations such as the auto power on function can only be used if stereo audio cords and system cords are connected between all the system components. Be sure to securely connect all the connection cords between all the units.
- Disconnecting a system cord during system operation may result in malfunction. Be sure to unplug the power supply cords before changing the connections.
- Install the components in such a way that the ventilation holes of the CD receiver (RCD-M33/M35DAB) are not obstructed.
- Use the AC OUTLET for audio equipment only. Do not use them for hair driers, etc.
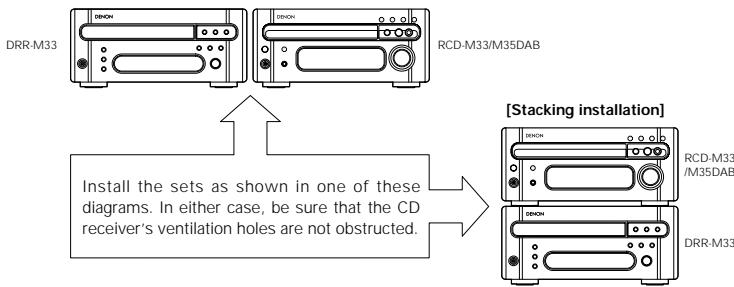
[Side by side installation]
* The illustration of the CD receiver in the diagram or the operation description is for the RCD-M33/M35DAB.
| 1 | Connect the DRR-M33's LINE OUT terminals to the CD receiver's TAPE IN terminals using the included stereo audio cord. |
| 2 | Connect the DRR-M33's LINE IN terminals to the CD receiver's TAPE OUT terminals using the included stereo audio cord. |
| 3 | Connect the DRR-M33's SYSTEM CONNECTOR terminal to the SYSTEM CONNECTOR terminal on the CD receiver (RCD-M33/M35DAB) using the included system cord. |
| 4 | Connect this unit's power supply cord to the AC outlet on the CD receiver (RCD-M33/M35DAB). |
| * The DRR-M33 can also be used when connected to a receiver other than the RCD-M33/M35DAB. In this case, none of the system functions (auto power on, etc.) will work.* Some receivers other than the RCD-M33/M35DAB are equipped for connections of two or more cassette deck's, allowing tapes to be copied. Read your receiver's operating instructions carefully before using it. | |
Recommended System Installation
- Do not place another component directly on top of the CD receiver (RCD-M33/M35DAB).
To ensure stability, do not stack more than two units.
NOTES:
- Do not plug power supply cords into power outlets until all connections have been completed.
- Check the left and right channels and be sure to interconnect them correctly (R to R, L to L).
- Plug in the power supply cords securely.
Incomplete connections will result in noise.
- Clasping the power supply cords and connection cords together may result in humming or noise.
- After unplugging the power supply cord, wait at least 5 seconds before plugging it back in.
Power plug
(for U.K. model)
Power plug
AC 230 V, 50 Hz
(Plug into a power outlet)
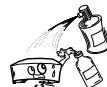
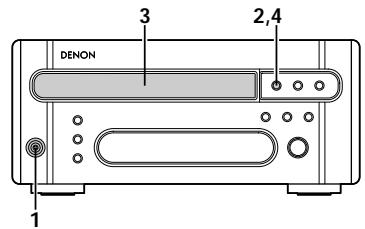
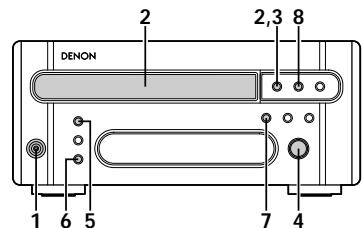
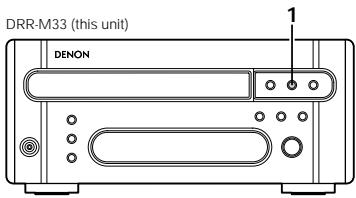
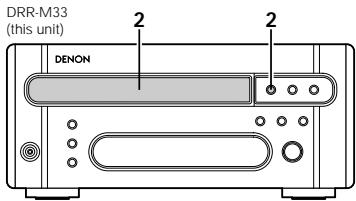
PART NAMES AND FUNCTIONS (See page 3.)
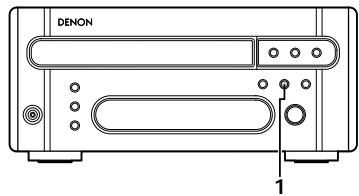
Power operation switch (ON/STANDBY)
- Press this once to turn the cassette deck's power on. Press again to set the cassette deck to the standby mode.
- The indicator color changes as follows, according to the condition: During power ON: green During STANDBY: red
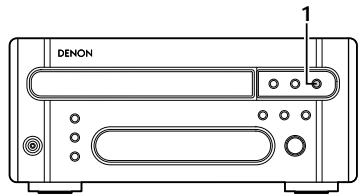
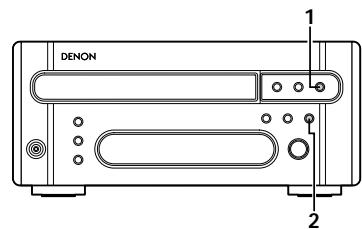
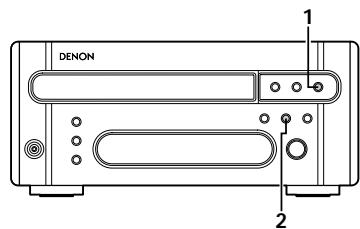
CD SRS (Synchronized Recording System) button
- Use this button for synchronized recording of CDs.
- For details, refer to page 11.
3 REC button
- This button is used when recording and when creating blank spaces between selections. If only the REC button is pressed, the recording pause mode is set.
- For details, refer to page 9.
NOTE:
- If the / II (play/pause) button on the CD receiver (RCD-M33/M35DAB) is pressed during the recording pause mode, recording of the CD begins automatically.
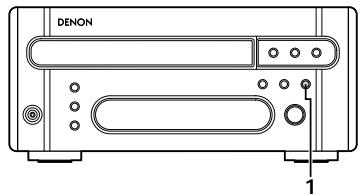
4 Dolby NR mode selector switch (DOLBY NR)
- Use this to select the Dolby NR mode (ON or OFF). When playing a tape, set the Dolby NR mode to the same mode as when the tape was recorded.
CD SRS indicator
This lights during system synchronized recording of a CD.
6 REC indicator
This lights during recording.
Play mode indicator (PLAY)
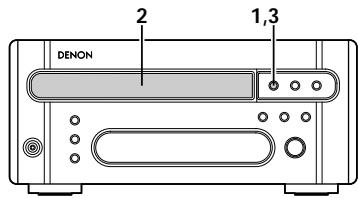
- The direction of tape travel and play mode are displayed here.
8 (direction) button
- Press to reverse the direction of tape playback or recording.
9 (rewind) button
- Press this button to rewind the front side of the tape. (The back side of the tape is fast-forwardsed.) Also use this button to search for the beginning of the current selection when playing in the forward () direction, or to search for the beginning of the following selection when playing in the reverse () direction.
10 Reverse mode selector switch
- Use this to select the direction of tape travel.
- For details refer to page 7.
(fast-forward) button
- Press this button to fast-forward the front side of the tape. (The back side of the tape is rewind.) Also use this button to search for the beginning of the following selection when playing in the forward () direction, or to search for the beginning of the current selection when playing in the reverse () direction.
12 (stop) button
- Press this button while the tape is moving to stop the tape.
15 PLAY button
- Press this button to play the tape.
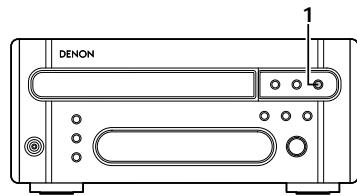
14 (open/close) button
- Press this to open and close the cassette tray.
- When pressed in the standby mode, the cassette deck's power turns on.
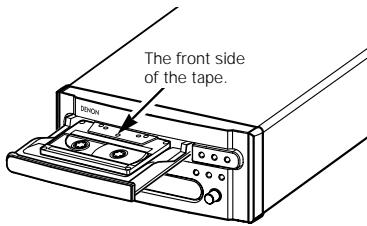
Cassette tray
- The cassette tray opens out when the (open/close) button is pressed. Load the cassette tape with the side on which the tape is exposed facing away from you. To close the cassette tray, press the (open/close) button again. For details, refer to page 7.
16 LINE OUT (analog output) terminals
- When these terminals are connected to the tape input terminals on the amplifier or the receiver, the sound from the DRR-M33 can be heard through the speakers connected to them.
- When connecting to the RCD-M33/M35DAB, connect to the TAPE IN terminals on the CD receiver (RCD-M33/M35DAB).
LINE IN (analog input) terminals
- When this terminals are connected to the tape output terminals on the amplifier or the receiver, the sound of other components connected to them can be recorded on the DRR-M33.
- When connecting to the RCD-M33/M35DAB, connect to the TAPE OUT terminals on the CD receiver (RCD-M33/M35DAB).
18 System Connector
- When using with the RCD-M33/M35DAB, connect this connector to the system connector on another unit using the included system connector cable.
19 Power Supply Cord
- Connect this unit's power supply cord to the AC outlet on the CD receiver (RCD-M33/M35DAB).
20 AC OUTLET
- Use the AC OUTLET for audio equipment only. (60 W MAX.)
6 HANDLING CASSETTE TAPES AND CAUTIONS
Cautions on Handling Cassette Tapes
C-120 and C-150 tapes
C-120 and C-150 cassette tapes use extremely thin tape that can easily get caught in the capstan or pinch roller. Do not use such cassette tapes.
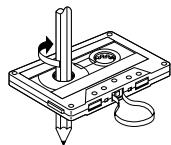
- Slack in the tape
The tape may get caught on the capstan and be damaged if the tape is slack when the cassette is loaded. Use a pencil, etc., to take up any slack in the tape before loading the cassette.
Cautions on Storing Cassette Tapes
-
Do not place cassette tapes in the following places:
-
Hot or humid places
- Dusty places
- Places exposed to direct sunlight
-
Places exposed to magnetic forces (near TVs, speakers, etc.)
-
Store cassette tapes in cases with stoppers to prevent the tape from becoming slack.
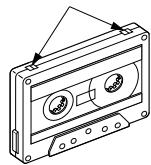
Accidental Erasure Prevention Tabs
- Cassette tapes are equipped with accidental erasure prevention tabs. To protect recordings from being erased accidentally, use a screwdriver, etc., to press on the tabs and break them off.
- To record on a cassette tape whose tabs have been broken off, cover the holes with cellophane tape, etc.
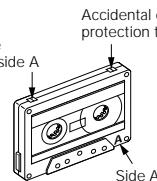
Accidental erasure protection tab for side A
Cleaning the Heads
A commercially available head cleaning cassette (wet type) is required to clean the heads (recording/ playback and erasing) on this product.
- If the heads are dirty, sound cannot be recorded or played with good quality.
To take full advantage of this product's performance and to achieve good sound quality, clean the heads periodically after approximately 10 hours of use. - We recommend using a wet type commercially available head cleaning cassette that also cleans the pinch roller and capstan.
Degaussing the Heads
- The heads become magnetized after extended use or after being exposed to magnetized objects. This results in noise or a loss of high frequencies.
- Use a commercially available cassette type head degausser to demagnetize the heads.
NOTE:
- Set the amplifier's volume to the minimum when cleaning and degaussing the heads.
7 BEFORE RECORDING AND PLAYING CASSETTE TAPES
(1) Loading and Unloading Cassette Tapes
1 Loading
2 Unloading
| 1 | Turn on the power. | ON/STANDBY |
| 2 | In the stop mode, press the▲(open/close) button. • The cassette holder opens. | ▲ |
| 3 | Set the cassette tape in the cassette tray with the side on which the tape is exposed facing the inside. | |
| 4 | Close the cassette holder. | ▲ |
| 1 | In the stop mode, press the▲ (open/close) button. • The cassette holder opens. |
| 2 | Remove the cassette tape. |
| 3 | Close the cassette holder. |
NOTES:
- If a foreign object is caught in the cassette tray during closing, simply press the (open/close) button again and the tray will open.
- Do not press the cassette tray in by hand when the power is off. Doing so will damage it.
- Do not place foreign objects in the cassette tray. Doing so will damage it.
(2) Auto Tape Select Mechanism
The DRR-M33 is equipped with an auto tape selector mechanism which uses the detection holes in the cassette halves to detect the type of tape and automatically set the most appropriate recording bias and equalization for that type of tape.
NOTE:
- The metal tapes can only be used for playback.
Detection holes
High tape (TYPE II)
(3) Using the Auto Reverse Function
This set is equipped with an auto reverse mechanism allowing one-sided recording and playback, two-sided recording and playback or continuous playback without removing the cassette tape.
1 Direction of cassette tape travel
- **Playback can be switched to the other side of the tape during playback by pressing the ▶ (direction) button.
NOTE:
- The diagram below shows the relationship between the play direction indicators and the direction of cassette tape travel. When loading cassette tapes in the cassette tray, pay attention to the direction of the tape.
| Buttons pressed and direction of tape travel. | ||
| (Operation button) | (Direction of travel indication) | (Operation button) |
| PLAY | ▶ | ▶ |
| ▶ | ▶ | ▶ |
| Front Side | ← | Back Side |
2 Reverse modes
There are three reverse modes, as described below.
For instructions on switching between them, refer to pages 7, 8.
- Single-sided recording/playback mode (Z)
Use this to record or play only the front or back side.
(The stop mode is set automatically when the end of that side of the tape is reached.)
-
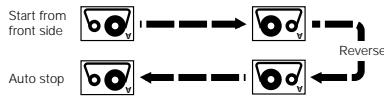
Double-sided recording/playback mode (▶)
-
In this mode, when the end of the front side of the tape is reached during recording or playback, the tape automatically switches to the back side and playback or recording continues.
(The stop mode is set automatically when the end of the tape on the back side is reached.)
- Continuous play mode (C2)
In this mode, playback continues until the (stop) button is pressed.
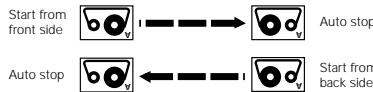
- When started from the back side, only the back side is recorded or played.
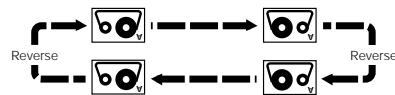
- During recording, the deck automatically operates in the same way as for the double-sided recording/playback mode (▶).
8 PLAYBACK
(1) Starting Playback
(2) Stopping Playback
| 1 | Turn on the power. | ON/STANDBY |
| 2 | Load the cassette tape you want to play. * Load the cassette tape with side A facing up. * Refer to page 7. | ▲ |
| 3 | Close the cassette holder. | ▲ |
| 4 | Set the reverse mode. * Refer to page 7. | ▲ REVERSE MODE |
| 5 | Set the Dolby NR mode. | DOLBY NR ON OFF |
| 6 | Press the (→) (direction) button to change the direction of playback. | ▲ |
| 7 | Press the PLAY button. •Playback starts. The play mode indicator flashes slowly. | PLAY |
| 1 | During playback,press the ■ (stop) button. • Playback stops. |
| NOTE: · Be sure to press the ■ (stop) button to stop playback before turning off the power or unplugging the power supply cord. |
(3) Fast-forwarding and Rewinding
To fast-forward the tape
2 To rewind the tape
| 1 | Stop playback. |
| 2 | Press the ➔ (fast-forward) button. |
| * To stop fast-forwarding, press the (stop) button. | |
| 1 | Stop playback. |
| 2 | Press the←(rewind) button. |
| * To stop rewinding, press the■(stop) button. | |
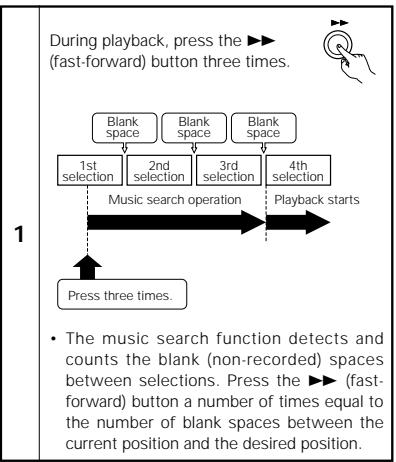
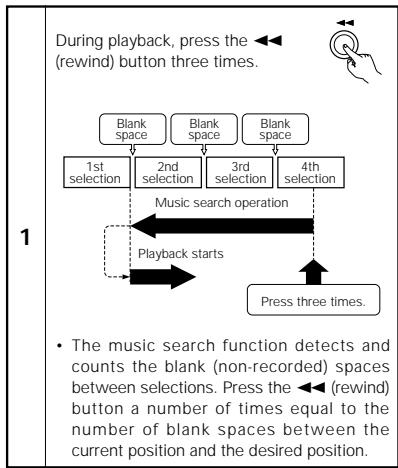
(4) Using the Music Search Function
Example 1:
Finding the beginning of the 4th selection on front side while playing the 1st selection.
Example 2:
Finding the beginning of the 2nd selection on front side while playing the 4th selection.
9 RECORDING
(1) Starting Recording
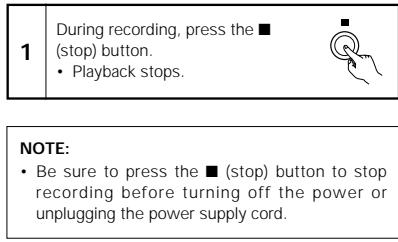
(2) Stopping Recording
NOTE:
- The music search function detects blank spaces of 4 seconds or more. It will not detect blank spaces that are less than 4 seconds long.
| 1 | Turn on the power. | ON/STANDBY |
| 2 | Load the cassette tape onto which you want to record. * Load the cassette tape with side A facing up. * Refer to page 7. | ▲ ▲ |
| 3 | Close the cassette holder. | ▲ |
| 4 | Set the reverse mode. * Refer to page 7. | ▲ ▲ ▲ REVERSE MODE |
| 5 | Set the Dolby NR mode. | DOLBY NR ON OFF |
| 6 | Press the REC button. • The recording pause mode is set. | REC |
| 7 | Set the DRR-M33's play direction indicator (← or ➔) to the direction in which you want to record. | ▲ |
| 8 | Press the PLAY button. • Recording starts. | PLAY |
| 9 | Start playing the track on the CD receiver. |

SYSTEM FUNCTIONS
Operation is even easier when the components in the RCD-M33/M35DAB is connected to the DRR-M33 with system connections. (For instructions on connections, refer to "CONNECTIONS" on page 5 and refer to the respective operating instructions of CD receiver (RCD-M33/M35DAB).)
The system functions will only work when the RCD-M33/M35DAB is connected. They will not work with other components. To use the system functions, connect the CD receiver (RCD-M33/M35DAB).
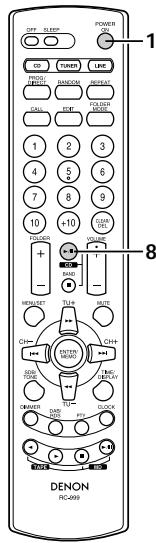
(1) System Remote Control
- When the DRR-M33 is used in a system with the RCD-M33/M35DAB, it can be operated with the system remote control unit included with the CD receiver (RCD-M33/M35DAB).
- The illustration used in the operation description is for the system control unit (RC-999) supplied with the RCD-M33/M35DAB.
■ When system connections are made, all the remote control signals are received at the RCD-M33/M35DAB's remote sensor.
The buttons on the remote control unit function in the same way as the corresponding buttons on the set. (Refer to "PART NAMES AND FUNCTIONS" on page 6.)
For instructions on operating the CD receiver (RCD-M33/M35DAB), refer to the respective operating instructions.
The system function signals for operating the components in the D-M33 series are all output from the CD receiver (RCD-M33/M35DAB). Thus, when making system connections, be sure to connect the CD receiver (RCD-M33/M35DAB).
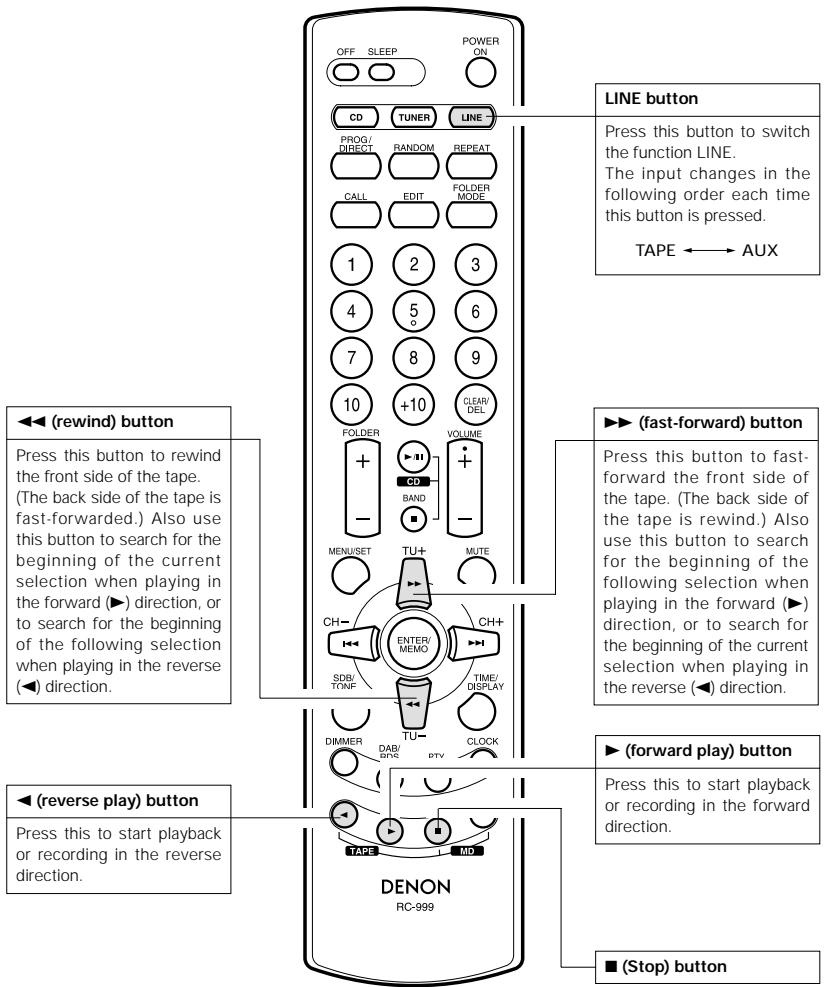
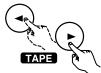
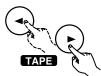
Names of remote control unit buttons (cassette deck section)
(2) Auto power on function (when connected to the RCD-M33/M35DAB)
- When the system is set to the standby mode, you can start the playback of tape simply by pressing the PLAY button on the system remote control unit.
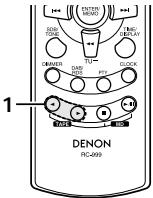
RC-999 (System remote control unit)
1
Press the PLAY button.
- System's power turn on and the function of CD receiver automatically switches to "TAPE".
And then, the TAPE starts playing.
- The auto power on function does not work even when the DRR
M33's PLAY button is pressed.
(RC-999)
- When a TAPE is loaded with the DRR-M33 in the standby mode, cassette deck can be started simply by pressing the DRR-M33's PLAY button.
(3) Auto function selection (when connected to the RCD-M33/M35DAB)
- Use this function to switch the function to "TAPE" and start playing the tape simply by pressing a single button.
1
Press the PLAY button while a unit other than the DRR-M33 (this unit) is playing.
- Playback on the currently playing unit stops.
At the same time, the CD receiver's function switches to "TAPE" and the cassette deck playing

PLAY
(DRR-M33)
(RC-999)

RC-999 (System remote control unit)
(4) CD synchronized recording (when connected to the RCD-M33/M35DAB)
Use this function to record CDs easily.
RC-999 (System remote control unit)
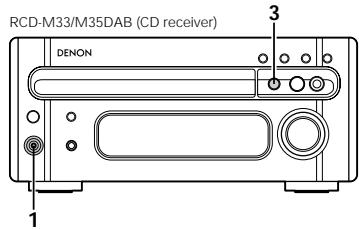
| 1 | Turn on the power of the CD receiver. | ON/STANDBY POWER ON (RCD-M33/M35DAB) (RC-999) |
| 2 | Load the cassette tape onto which you want to record into the DRR-M33's cassette holder. | ▲ (DRR-M33) |
| 3 | Load the CD into the CD receiver. | ▲ (RCD-M33/M35DAB) |
| 4 | Set the DRR-M33's play direction indicator (← or ➔) to the direction in which you want to record. (DRR-M33) |
| 5 | Set the reverse mode. * Refer to page 7. REVERSE MODE (DRR-M33) |
| 6 | Set the Dolby NR mode. DOLBY NR ON OFF (DRR-M33) |
| 7 | Press the DRR-M33's CD SRS button. • Recording of the CD starts automatically. * Once all the tracks on the CD have been played, the CD receiver is automatically set to the stop mode, a 5-second blank space is created on the tape in the DRR-M33 and the stop mode is set. * Please check that the CD receiver has completed the TOC reading operation of the CD before pressing the CD SRS button. The CD SRS button does not work while the TOC is being read on the CD receiver. * The DRR-M33 and the CD receiver are also automatically set to the stop mode if the cassette tape is fully recorded before playback of the CD has ended. |
| * To stop recording in the middle, press the (stop) button on the DRR-M33 or CD receiver to stop CD playback. CD synchro recording continues if any other buttons are operated. | |
NOTE:
- The CD synchronized recording function does not work when the CD receiver is set to the program play mode.
(5) Synchronized recording (when connected to RCD-M33/M35DAB)
■ When the DRR-M33 is set to the recording pause mode, recording starts automatically when the / 口 (play/pause) button on the CD receiver is pressed.
RC-999 (System remote control unit)
| 1 | Turn on the power of the CD receiver. | ON/STANDBY POWER ON (RCD-M33/M35DAB) (RC-999) |
| 2 | Load the cassette tape onto which you want to record into the DRR-M33's cassette holder. | ▲ (DRR-M33) |
| 3 | Make the CD receiver settings. | |
| 4 | Set the DRR-M33's play direction indicator (← or ➔) to the direction in which you want to record. | (DRR-M33) |
| 5 | Set the reverse mode. * Refer to page 7. | REVERSE MODE (DRR-M33) |
| 6 | Set the Dolby NR mode. | DOLBY NR (DRR-M33) |
| 7 | Press the DRR-M33's REC button once to set the recording pause mode. | REC (DRR-M33) |
| 8 | Press the ▲ / □ (show/pause) button on the CD receiver. | (CDC-M33/M35DAB) (RC-999) |
| · Recording starts automatically. · When playback on the CD receiver ends, the CD receiver is automatically set to the stop mode and the DRR-M33 is set to the recording pause mode. | ||
| * To stop recording in the middle, press the ■ (stop) button on the CD receiver to stop playback of the CD. | ||
(6) Timer functions (when connected to the RCD-M33/M35DAB)
The timer functions of the CD receiver (RCD-M33/M35DAB) can be used to play cassette tapes or record radio programs ("Air Check") at set times.
Refer to the operating instruction included with the RCD-M33/M35DAB.
(7) Editing functions (when connected to the RCD-M33/M35DAB)
Use this function to automatically edit the tracks on the CD to fit on the tape to be used for recording.
The editing function is set from system remote control unit included with the CD receiver (RCD-M33/M35DAB).
RC-999 (System remote control unit)
| 1 | Turn on the power of the CD receiver. | ON/STANDBY (RCD-M33/M35DAB) | POWER (RC-999) |
| 2 | Load the cassette tape onto which you want to record into the DRR-M33's cassette holder. | (DRR-M33) | |
| 3 | Load the CD into the CD receiver. | (RCD-M33/M35DAB) | |
| 4 | Now operate as described in the "Editing Function" section of the operating instructions included with the CD receiver (RCD-M33/M35DAB). | ||
NOTES:
- The editing function will not work with discs containing more than 26 tracks.
- Load the cassette tape onto which you want to record into the cassette deck's cassette tray with side A facing up before starting edited recording. The beginning of the tape is automatically found before recording starts.
- When using a recorded cassette tape for edited recording, recording stops and a blank section is left on side B of the tape if the tape is longer than the set time, so erase the tape beforehand.
- When the editing function is used for recording, set the REVERSE MODE switch to if not, it is not possible to record on side B after side A.
- In some cases it may not be possible to record all the tracks on the disc, even if the tape is longer than the disc's recorded time (because of how the tracks are divided onto sides A and B of the tape). The "OVER" indicator on the CD receiver flashes if there are tracks that cannot be recorded.
- REC button, button, CD SRS button, (direction) button and (open/close) button will not function during editing.
- To cancel the editing mode, press the (stop) button on the DRR-M33 or the CD receiver to stop playback of the CD. The editing mode is not canceled if other buttons are pressed.
TROUBLESHOOTING
Check the following before you draw the conclusion that your Stereo Cassette Deck is malfunctioning:
- Are all the connections correct?
- Are all system components being operated correctly in accordance with the operating instructions?
- Are the speakers and amplifier/receiver functioning correctly?
If the tape deck still does not function properly, check the symptom against the list below. If the symptom does not correspond to the check list, please contact your DENON dealer.
| Symptom | Cause | Countermeasure | Page |
| Recording does not start when REC button is pressed. | • No cassette tape is loaded. • Accidental erasure protection tabs are broken off. | • Load a cassette tape. • Cover the tab holes with cellophane tape. | 7 6 |
| Sound is broken or no sound is produced during recording and playback. | • Heads are dirty. • Cassette tape is defective. | • Clean the heads. • Replace the cassette tape. | 6 - |
| Humming sound is heard while playing cassette tapes. | • Noise from a TV. (Noise may be produced by some types of TVs.) | • Move the TV away from the system. • Turn the TV off. | 4 - |
| Wow (shaky sound) is heavy during recording or playback. | • Capstans or pinch rollers are dirty. | • Clean them. | 6 |
| System functions do not work. | • CD receiver (RCD-M33/M35DAB) setup is not proper. | • Set up the CD receiver (RCD-M33/M35DAB) properly. (Refer to “SETTING UP THE UNIT” on the RCD-M33/M35DAB's operating instructions.) | - |
OTHER INFORMATION
Cleaning the Heads
- If the cassette deck's head are dirty, tapes cannot be played or recorded with good sound quality.
- To take full advantage of all the performance this cassette deck has to offer and ensure good quality sound, clean the heads periodically after approximately 10 hours of use, using a commercially available cleaning cassette.
NOTE:
- Some commercially available cleaning cassettes are highly abrasive and may damage the heads. Avoid using such cleaning cassettes.
Demagnetizing the Heads
- The heads become magnetized after they have been used for an extended period of time or if they are exposed to a magnetic object. This results in noise or a loss of the treble sound.
- If the heads are magnetized, use a commercially available cassette-type head demagnetizer to demagnetize them.
13 SPECIFICATIONS
Type: Horizontal 4-track 2-channel stereo auto reverse cassette deck
1 hard permalloy recording/playback head
1 double-gap ferrite erasing head
Tape speed: 4.75 cm/s
Noise reduction: Dolby B NR
Usable tapes: Normal, High (TYPE I, II)
The metal tapes (TYPE IV) can only be used for playback
Power supply: AC 230 V, 50 Hz
Power consumption: 9 W
Maximum external dimensions: 210 (W) x 95 (H) x 325 (D) mm
(including feet, controls and terminals)
Mass: 3.1 kg
- Maximum dimensions include controls, terminals, and covers.
(W) = width, (H) = height, (D) = depth - For improvement purposes, specifications and functions are subject to change without advanced notice.
Manufactured under license from Dolby Laboratories.
DOLBY" and the double-D symbol are trademarks of Dolby Laboratories.
INHALT
Recommended System Installation
Alimentation:
Consommation:
CA 230 V, 50 Hz
9W
Dimensions externes maximales:
210 (L) x 95 (H) x 325 (P) mm
Recommended System Installation
6 OMGAAN MET CASSETTES EN WAARSCHUWINGEN
7 VOOR OPNAME EN WEERGAVE VAN TAPES


- WARNING: TO REDUCE THE RISK OF FIRE OR ELECTRIC SHOCK, DO NOT EXPOSE THIS APPLIANCE TO RAIN OR MOISTURE.
- - DECLARATION OF CONFORMITY
- IMPORTANT TO SAFETY
- WARNING:
- CAUTION:
- TABLE OF CONTENTS
- - ACCESSORIES
- MAIN FEATURES
- BEFORE USING
- Read the following before using the set
- CAUTIONS ON INSTALLATION
- CONNECTIONS
- Connecting to the RCD-M33/M35DAB
- Recommended System Installation
- NOTES:
- Power plug
- PART NAMES AND FUNCTIONS (See page 3.)
- Power operation switch (ON/STANDBY)
- CD SRS (Synchronized Recording System) button
- REC button
- NOTE:
- Dolby NR mode selector switch (DOLBY NR)
- CD SRS indicator
- REC indicator
- Play mode indicator (PLAY)
- (direction) button
- (rewind) button
- Reverse mode selector switch
- (fast-forward) button
- (stop) button
- PLAY button
- (open/close) button
- Cassette tray
- LINE OUT (analog output) terminals
- LINE IN (analog input) terminals
- System Connector
- Power Supply Cord
- AC OUTLET
- HANDLING CASSETTE TAPES AND CAUTIONS
- Cautions on Handling Cassette Tapes
- C-120 and C-150 tapes
- - Slack in the tape
- Cautions on Storing Cassette Tapes
- Accidental Erasure Prevention Tabs
- Cleaning the Heads
- A commercially available head cleaning cassette (wet type) is required to clean the heads (recording/ playback and erasing) on this product.
- Degaussing the Heads
- BEFORE RECORDING AND PLAYING CASSETTE TAPES
- Loading and Unloading Cassette Tapes
- Auto Tape Select Mechanism
- Using the Auto Reverse Function
- Direction of cassette tape travel
- Reverse modes
- PLAYBACK
- Using the Music Search Function
- Example 1:
- Example 2:
- RECORDING
- Starting Recording
- Stopping Recording
- SYSTEM FUNCTIONS
- System Remote Control
- Auto power on function (when connected to the RCD-M33/M35DAB)
- 1
- Auto function selection (when connected to the RCD-M33/M35DAB)
- CD synchronized recording (when connected to the RCD-M33/M35DAB)
- Synchronized recording (when connected to RCD-M33/M35DAB)
- Timer functions (when connected to the RCD-M33/M35DAB)
- Editing functions (when connected to the RCD-M33/M35DAB)
- TROUBLESHOOTING
- OTHER INFORMATION
- Demagnetizing the Heads
- SPECIFICATIONS
- INHALT
- OMGAAN MET CASSETTES EN WAARSCHUWINGEN
- VOOR OPNAME EN WEERGAVE VAN TAPES
Brand : DENON
Model : DRR-M33
Category : CD Player