PLANAVISION 42 PXW 110-8620 DOLBY - Television GRUNDIG - Free user manual and instructions
Find the device manual for free PLANAVISION 42 PXW 110-8620 DOLBY GRUNDIG in PDF.

User questions about PLANAVISION 42 PXW 110-8620 DOLBY GRUNDIG
0 question about this device. Answer the ones you know or ask your own.
Ask a new question about this device
Download the instructions for your Television in PDF format for free! Find your manual PLANAVISION 42 PXW 110-8620 DOLBY - GRUNDIG and take your electronic device back in hand. On this page are published all the documents necessary for the use of your device. PLANAVISION 42 PXW 110-8620 DOLBY by GRUNDIG.
USER MANUAL PLANAVISION 42 PXW 110-8620 DOLBY GRUNDIG
Controls on the plasma television
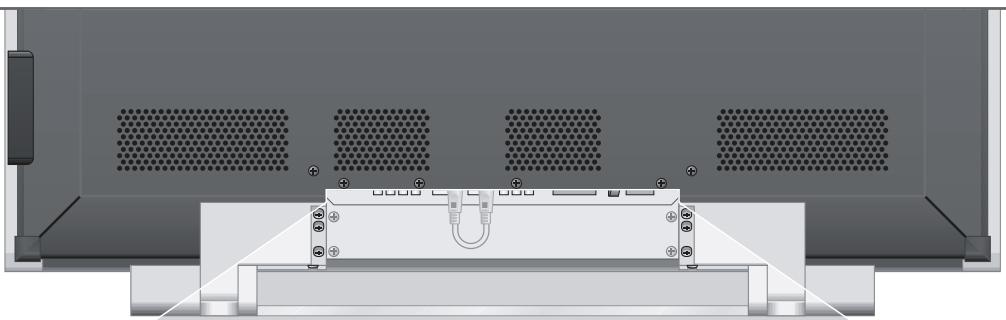
Connections on the plasma television
The remote control
Connection and preparation
Connecting the antenna cable
Connecting the external HiFi amplifier
Connecting the subwoofer
Connecting external loudspeakers
Connecting the power cord
Inserting batteries in the remote control
Settings
Setting the menu language
Setting television channels automatically
Changing preset channels
Picture settings
Audio settings
Television operation
Switching on
Switching to and from standby
Selecting channels
Selecting channels from the preset list
Selecting channels from external devices
Adjusting the volume
Muting
Displaying/concealing the clock
Displaying information about the television schedule
Displaying information about the channel position
Freeze-frame
Double window
Swap function
PIP mode
Changing the picture format
Teletext mode
TOP or FLOF text mode
Normal text mode
Additional functions
20-23
20
20
20
21
21
21
22
22
23
23
24-25
24
24
24-25
25
26-30
26
27-29
30
31-32
31
31
32
33
34-36
34
34
34
35-36
Convenience functions
Entering the switch-off time
Displaying and concealing information on the channel position
Changing the menu (on-screen display)
Displaying and concealing the logo
Setting the colour temperature
Setting the audio output signal level
Calling up information
Resetting the device
Setting the character set for teletext functions
Changing the menu language
Operation as a PC monitor
Connecting a PC
Operation with the PC
Settings for the PC
Evaluating synchronisation signals
Using external devices
Decoder or satellite receiver/set-top box
Video recorder or DVD player
Camcorder
Special settings
Tuning to new television channels
Entering the name for a television channel
Set the television channel by entering the channel number or the frequency
Re-tuning all television channels
Information
Technical data
Service information for dealers
Environmental note
Rectifying minor problems
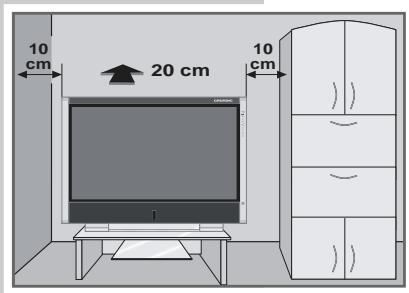
Please note the following information when setting up your PlanaVision:
The device is designed to receive and reproduce video and audio signals.
Any other use is expressly prohibited.
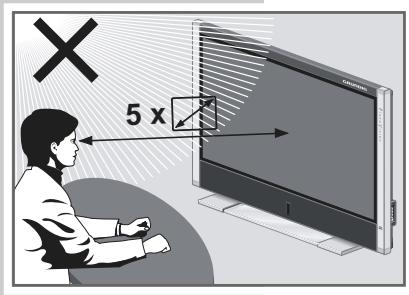
The ideal viewing distance is 5 times the screen diagonal (approx. 5.50m ).
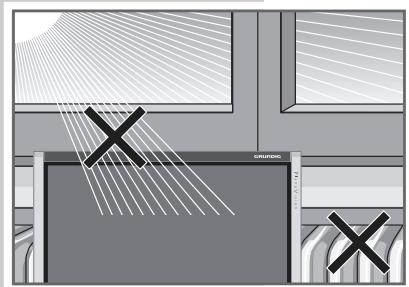
External light falling on the screen impairs picture quality.
Ensure there is enough clearance, for example when installing in an alcove.
The device is designed for use in dry rooms. If you do use it in the open, please ensure that it is protected from moisture, such as rain or splashing water. Do not expose the device to any moisture.
The device is not designed for areas of very high humidity (for example the tropics). The air humidity should not be more than 85% .
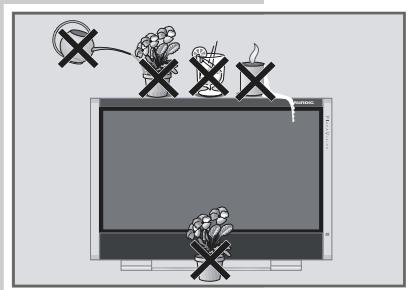
Do not place any vessels such as vases on the device. These may spill liquid, thus presenting a safety risk.
Do not lay any objects (newspapers, for example) on the device.
Do not use the device close to heating units or in direct sunlight. This will impair cooling.
Heat build-up can be dangerous and diminishes the working life of the set.
Have the inside of the set cleaned from time to time. Ask your specialist dealer.
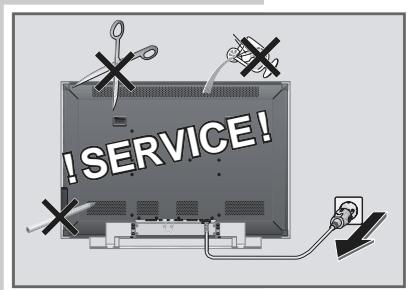
Do not open the device under any circumstances. No warranty claims are accepted for damage resulting from improper handling.
Only use genuine GRUNDIG connection cables, accessories and replacement parts.
Ensure that the mains cable is not damaged.
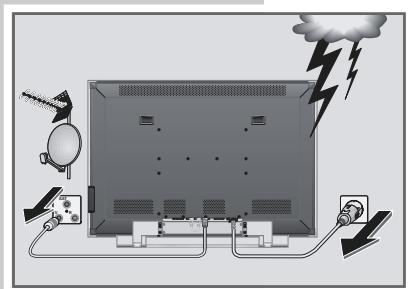
Thunderstorms are a danger to all electrical devices. Even if the device is switched off, it can be damaged by a lightning strike to the mains or the antenna cable. Always disconnect the mains and antenna plugs during a storm.
Only clean the plasma screen with a chamos leather and commercially available glass cleaner.
Only clean the housing of the plasma screen with a damp, soft cloth and plain water.
The plasma screen is equipped with a glass plate. If the device is subjected to excessive strain, for example through vibration, bending or heat shocks the glass plate can break.
Do not hit or put pressure on the glass plate.
Should the glass plate be damaged, pull out the mains plug immediately.
This highly digitalised device offers optimum picture and sound quality.
The essential requirements are a perfectly functioning antenna system and a high-quality antenna cable.
For this reason, avoid cable loops near the device.
Plasma screens operate using fluorescent materials. This technology can suffer sticking effects under certain operating conditions. These include:
- Prolonged display of a freeze-frame
- Constant display of the same background
- Use of a picture format (such as 4:3) which does not fill the screen.
Once these sticking effects occur, they cannot normally be reversed.
To avoid sticking effects please note:
- During the first 100 operating hours, ensure that the television displays mostly moving pictures or frequently changing stills which fill the screen
- Use a picture format which fills the screen (16:9)
- Always activate the screenshot when using a PC
- Decrease the contrast and brightness as much as possible
- Switch off the device when it is not in use
If a freeze-frame is on the plasma screen for a very long time (several hours), it is possible that this will be visible as a ghosting effect for some time when you switch to another channel. However, after a certain amount of time this ghosting disappears again.
This is caused by a type of memory effect. In order to prevent this effect, we recommend activating the screen saver when using a PC.
After a lengthy period without use (longer than one year) a temporary colour discrepancy is possible in some circumstances.
This effect is normal for plasma screens. After a while these colour discrepancies disappear again.
A plasma screen is made up of around 1.2 million colour pixels.
Within the industrial standard tolerance, a very small number of pixels (0.001%) can be defective. This is not regarded as a device defect within the warranty.
The plasma screen functions with inert gases and air pressure.
At 2000m above sea-level or higher, the picture can become unstable and the picture quality is reduced. However, when the device is returned to below 2000m above sea level, this effect disappears and the device functions perfectly.
Note:
Do not connect any other equipment while the device is switched on. Switch off the other equipment as well before connecting it.
Only plug the device into the mains socket after you have connected the external devices and the antenna.
Wall mounting
The plasma television may only be fixed to vertical walls.
The wall surface must be strong enough to bear the weight.
Use fastening equipment suitable for the weight of the device.
(PlanaVision 42: approx. 35kg , PlanaVision 50: approx. 53kg ).
For wooden or cavity walls, use suitable wall plugs and screws.
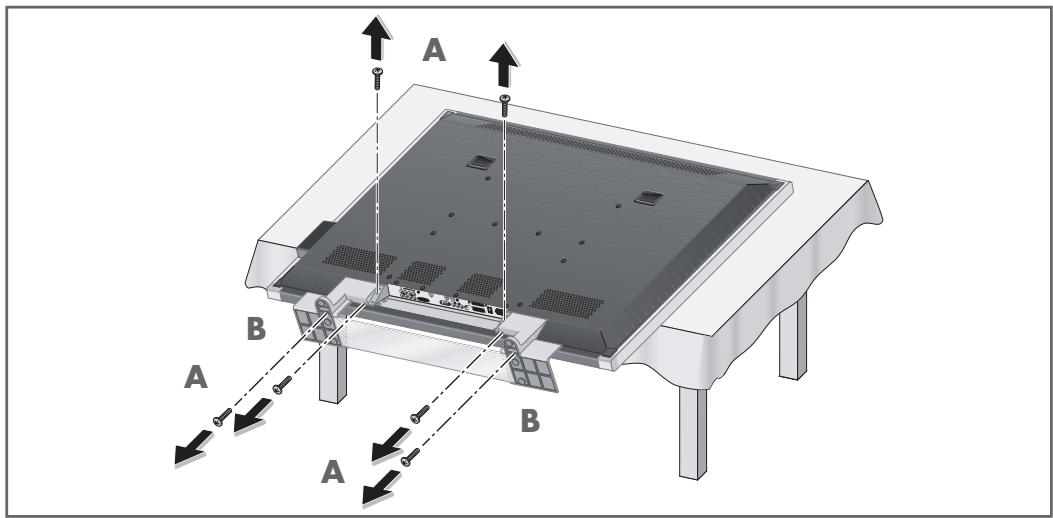
1 Place the plasma screen on a level surface (such as a table), and protect the screen from scratches.
2 Undo the screws of the device feet (A) using the torx driver supplied and take off the feet (B). Then tighten the screws again.
Note
Do no remove the spacers attached to the back of the device at the factory (they protect against overheating).
3 Mark the holes on the wall.
- The distance between the screw hooks must be 540 mm .
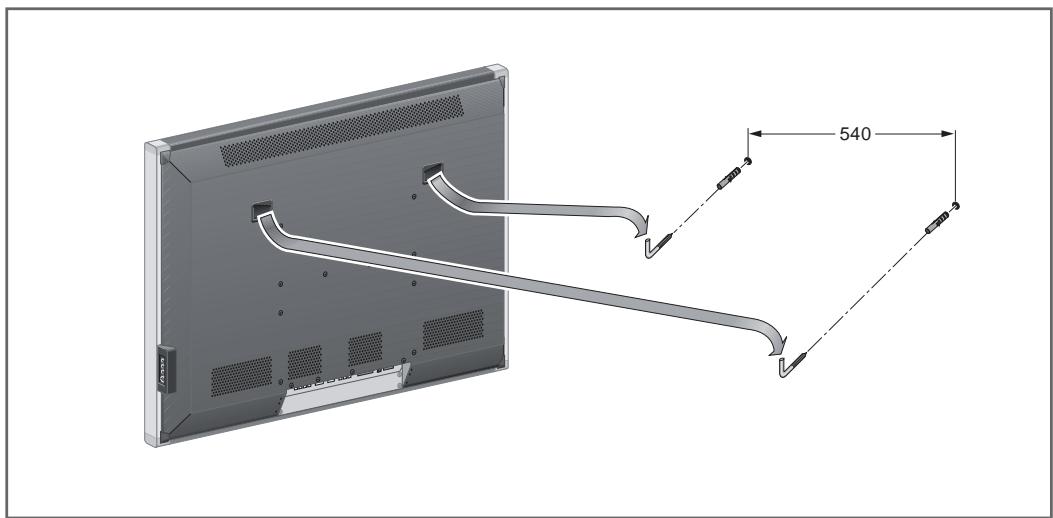
4 Drill the holes in the wall, insert the wall plugs and screw in the screw hooks.
5 Hang the plasma screen on the screw hooks.
Controls on the plasma television
L LINE IN R Audio signal input for camera recorders.
CVBS Video input socket (video) for camera recorders.
S-VIDEO Video input socket (S-video) for S-video camera recorders.
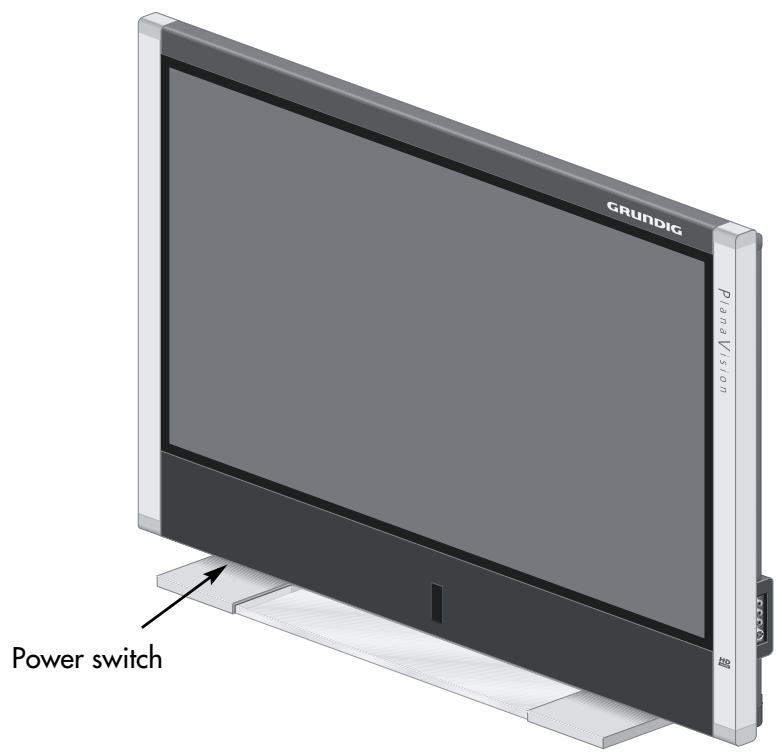
O/I Power switch (on the rear), switches the device to and from standby mode.
Connections on the device
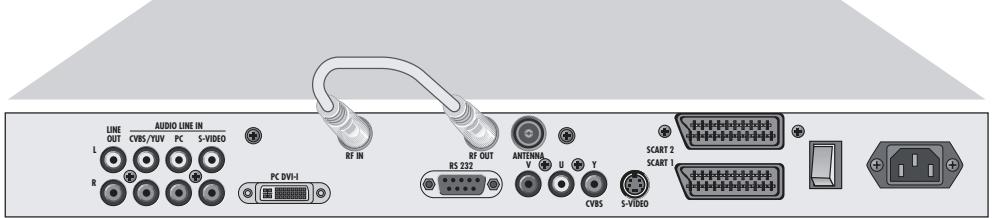
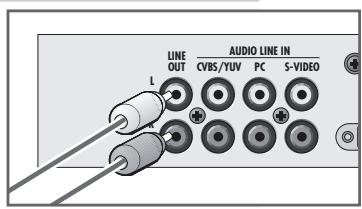
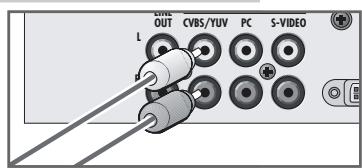
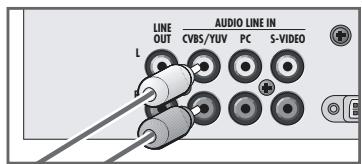
LINE OUT L R
Audio output sockets for a hi-fi system.
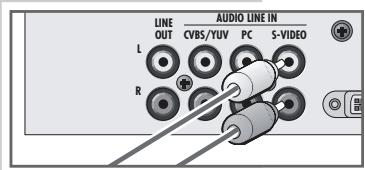
LINE IN
CVBS/YUV L R
PC L R
YC (S-VIDEO) L R
Stereo audio input sockets:
Audio input (CVBS) for DVD players, video recorders, satellite receivers.
Audio input for PCs.
Audio input (for S-video) for DVD players, video recorders, satellite receivers.
PC DVI-I
DVI-standard video input socket for digital (DVI) or analogue (RGB) signals from a PC.
RF IN RF OUT
Antenna connection for the second receiver unit.
ANTENNA
Antenna socket.
RS 232
Service socket for dealers.
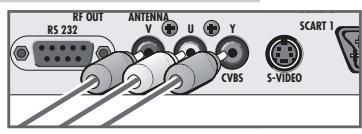
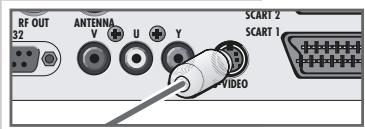
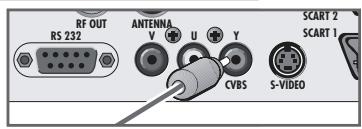
VIDEO IN
Video input sockets:
V U Y (CVBS)
Video input sockets for DVD players, video recorders, satellite receivers (YUV standard).
YC (S-VIDEO)
Video input socket for DVD players, video recorders, satellite receivers (S-video).
SCART 1
Euro/AV socket for a DVD player, video recorder or satellite receiver.
SCART 2
Euro/AV socket for a DVD player, video recorder, satellite receiver.
0/1
Power switch, switches the device to and from standby mode.

Mains socket.
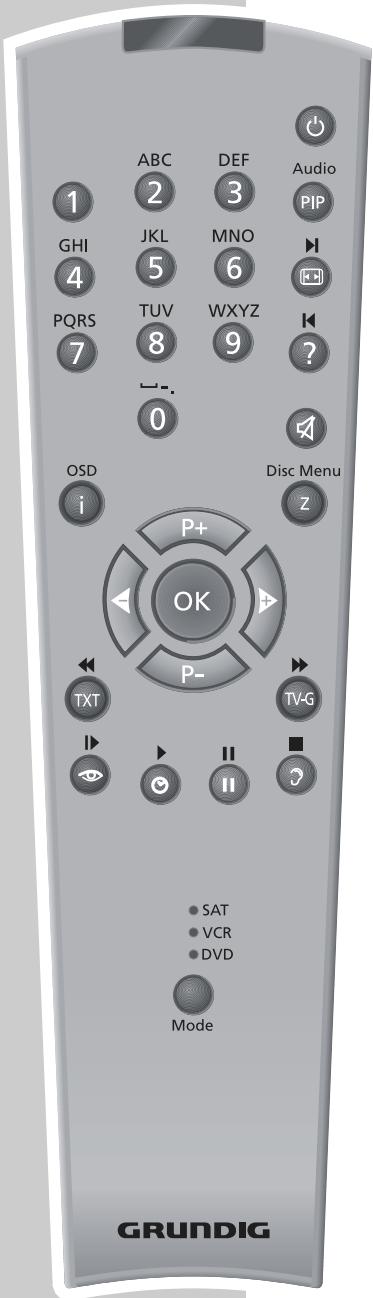
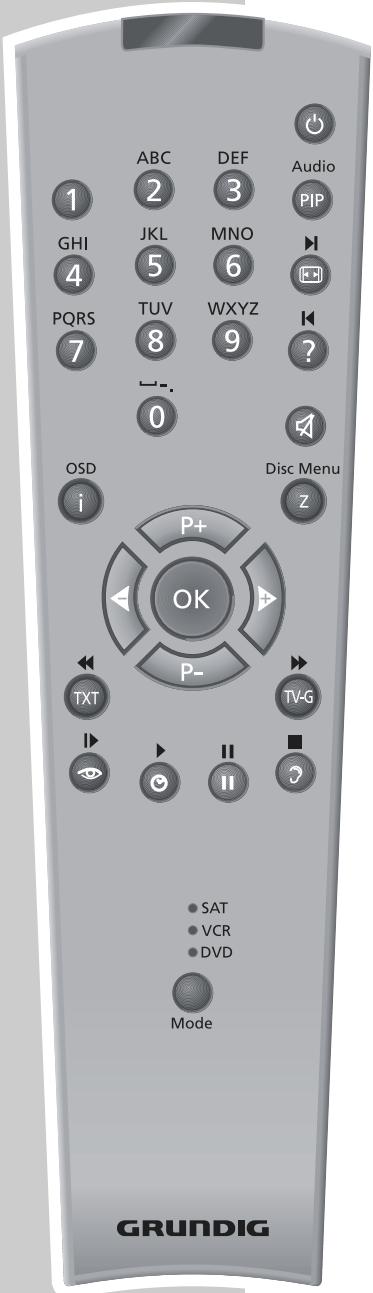
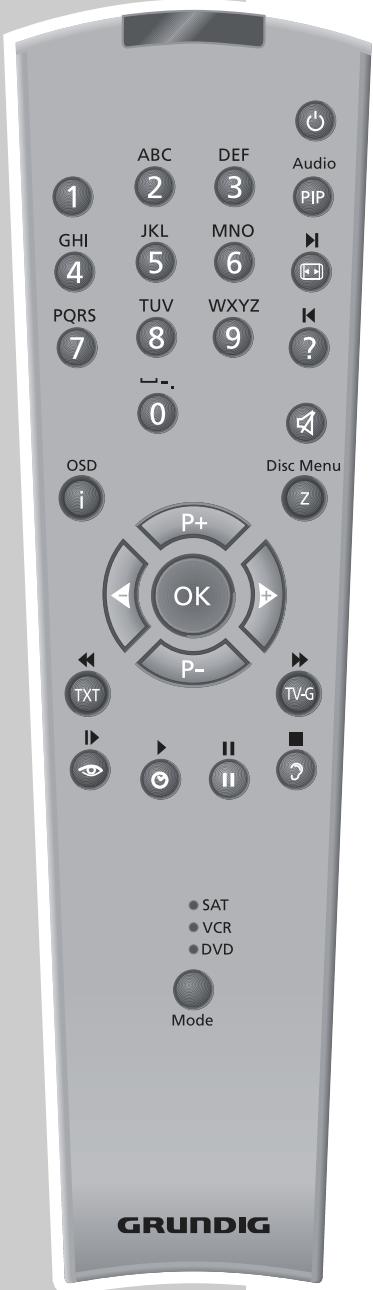
The remote control
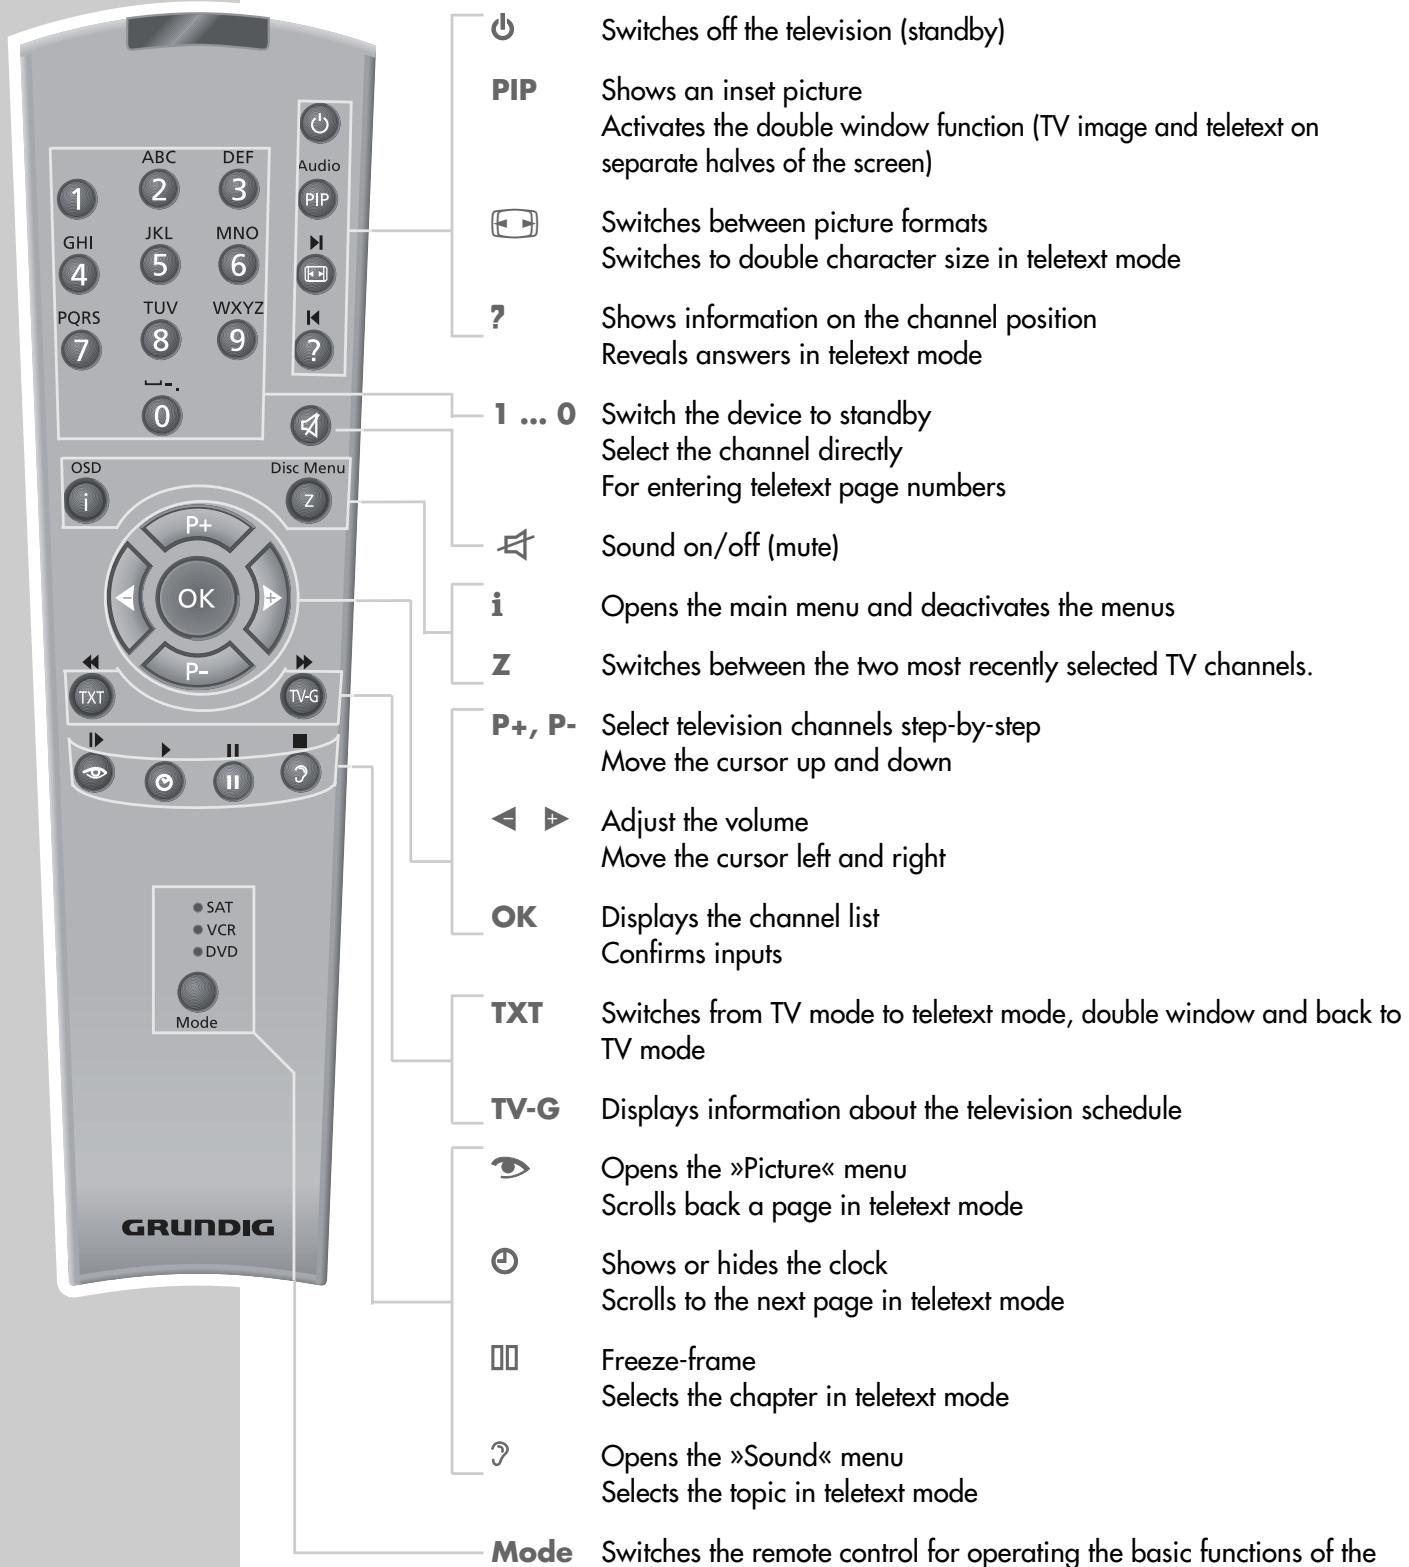
Switches the remote control for operating the basic functions of the Grundig satellite receiver (SAT), video recorder (VCR) und DVD player (DVD)
Keep pressing «Mode« until «SAT«, «VCR« or «DVD« lights up. Then press the appropriate button.
The available functions depend on the model of the device you are using. Just try it out.
This setting is active until the display disappears.
However, you can switch back to TV mode at any time by pressing Mode .
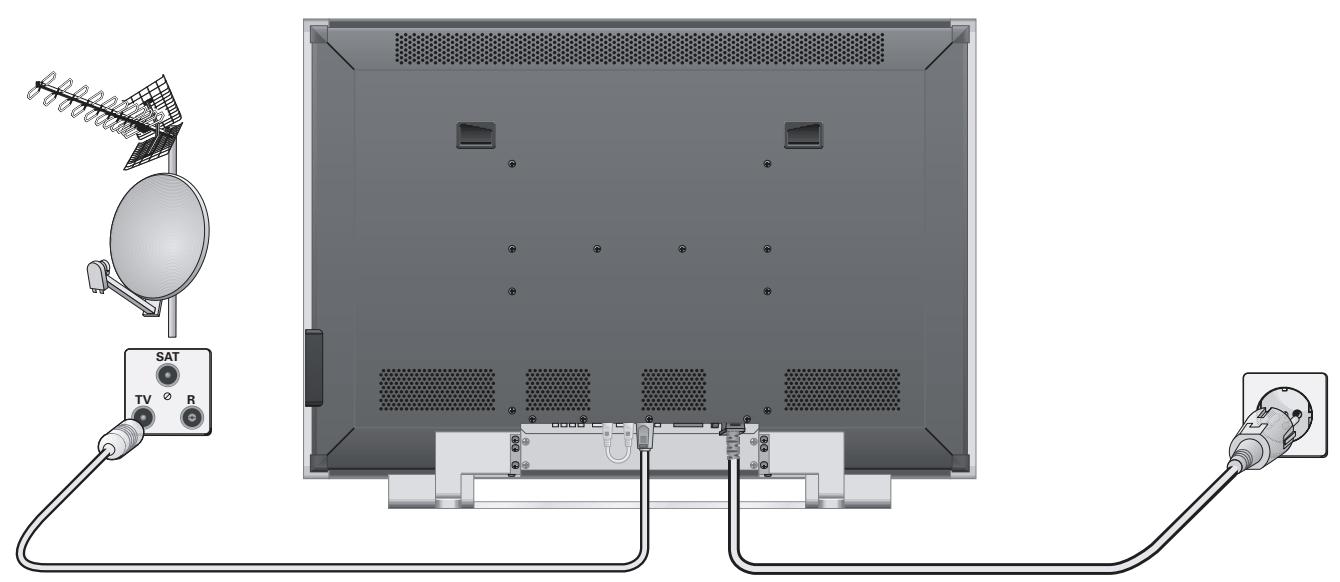
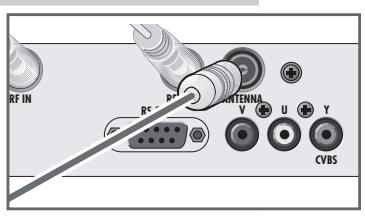

Connecting the antenna cable
1 Connect the antenna cable to the «ANTENNA« socket.
Connecting the external HiFi amplifier
1 Connect the HIFI amplifier to the «LINE OUT R L« cinch sockets.
Note:
You can set the audio output signal level, see "Convenience functions" on page 22.
High definition - HD ready
Your television can receive high-definition television signals (HDTV).
You can connect the input sources (HDTV set-top box or HDTV DVD player) directly to the «PC DVI-I« socket (digital HDTV signal) or via a standard adapter (analog HDTV signal).
This ensures that you can view digital HDTV programmes, even if they are copy-protected (HDCP High-Definition Copy Protection).
Note:
Connection examples can be found on page 27/28.
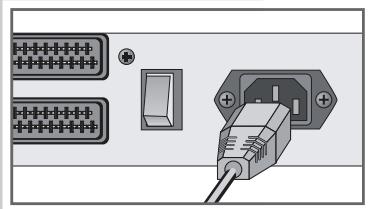
Connecting the power cord
1 Plug the power cord supplied into the mains socket of the device.
2 Plug the power cord plug into an earthed safety socket.
Note:
Only connect the television using the power cord supplied to a suitable earthed safety socket.
Do not use an adapter plug or extension lead which does not meet the applicable safety standards. Do not tamper with the power cord.
Do not connect any other equipment while the device is switched on. Switch off the other equipment as well before connecting it.
Only plug the device into the mains socket after you have connected the external devices and the antenna.
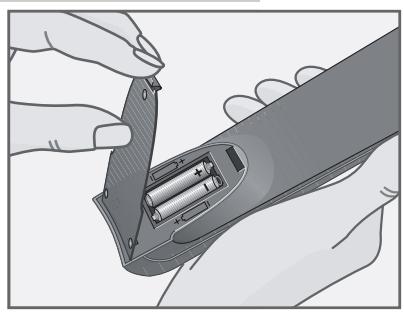
Inserting batteries in the remote control
1 Open the battery compartment by removing the lid.
2 Insert the batteries (Micro type, for example LR 03 or AAA, 2 × 1.5 ~V ). Observe the polarity (marked on the base of the battery compartment).
3 Close the battery compartment.
Note:
If the television no longer reacts properly to remote control commands, the batteries may be flat. Be sure to remove used batteries.
The manufacturer accepts no liability for damage resulting from leaking batteries.
Environmental note
Batteries, including those which contain no heavy metal, may not be disposed of with household waste. Please dispose of used batteries in an environmentally sound manner. Find out about the legal regulations which apply in your area.
Setting television channels automatically
The television is equipped with an automatic station search system.
You start the station search and can then sort the television channels into your order of preference.
There are 99 channel positions available for television stations.
You can delete television stations from the station list which were found more than once or which have poor reception.
If you receive stations with different TV standards where you live, continue the setup as described in the "Re-tuning to new television channels" on page 31.
1 Switch the device to standby by pressing the power switch 10 on the back of the device, and then switch it on by pressing P + one of the numerical buttons on the remote control.
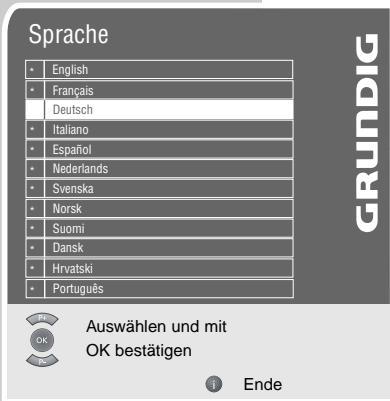
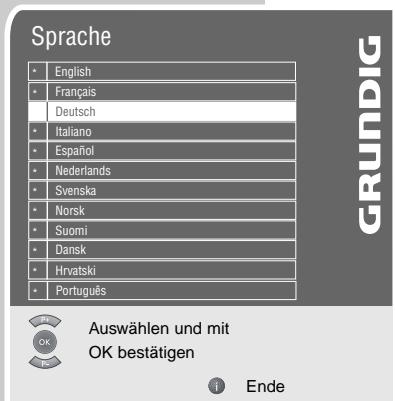
- The «Sprache« (Language) menu appears when the television is first switched on.
Hint:
If the «Sprache« (Language) menu does not appear on the screen, follow the instructions on re-tuning all television channels on page 33.
2 Select the language with P + or P - and press OK to confirm.
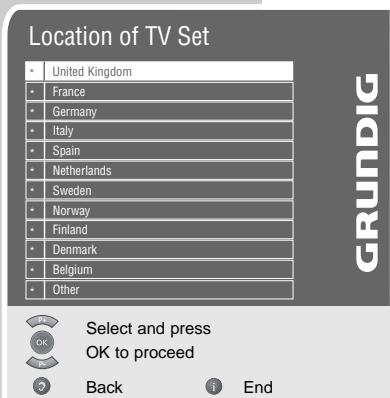
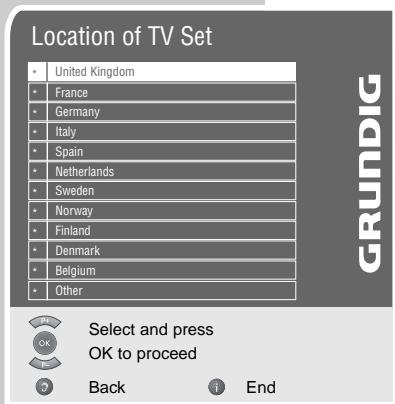
- The Location of TV Set menu appears.
3 Press P + or P - to select the installation site.
Note:
If your country (the site) is not shown, select the option Other\ll.
4 Press OK to start the search.
-
Display: SEARCHING IN PROGRESS. The station search begins, and may last a few minutes, depending on the number of television channels received.
-
After the search, the device switches to channel 1.
Note:
You can interrupt the search by pressing i
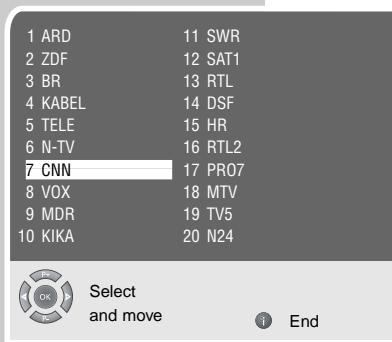
Changing preset channels
You can delete channels that have been stored more than once during the automatic search. You can also store channels in a different preset position, change or enter the name of a channel.
Deleting television channels
Press i to open the main menu.
2 Select Installation with P + or P - and confirm with OK
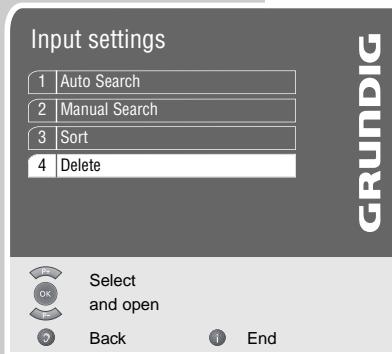
3 Select Main input settings with P + or P - and confirm with OK
4 Select Delete with P + or P - and confirm with OK The channel list is displayed.
5 Select the channel to delete with P + , P - , or .
6 Press (red) to delete the channel. The channel position is free and can be newly assigned.
7 Press i to finish the setting.

Sorting television stations
Press i to open the main menu.
2 Select «Installation« with «P+« or «P-« and confirm with «OK«.
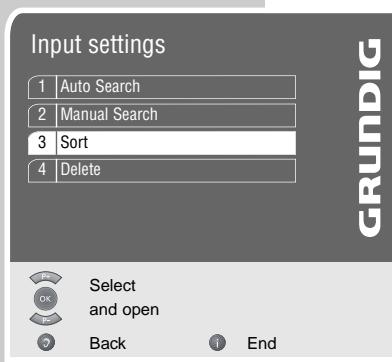
3 Select Main input settings with P + or P - and confirm with OK
4 Select Sort with P+ or P- and confirm with OK . The channel list is displayed.
5 Select the TV channel to be moved to another position by pressing P + , P - , or .
6 Highlight the channel with OK .
7 Select the new channel position by pressing P + , P - , or and then press OK to assign the channel to the new preset position.
Press i to finish the setting.
Picture settings

1 Open the Picture menu by pressing (red).
2 Select the function item by pressing P + or P - :
- «Contrast«
-
Brightness
-
Sharpness
-
Color
-
Tint( to change the colour balance)
-
»DNC« (dynamic noise suppression, improves the picture if the signal is weak)
- Film Mode (reduces flicker effects with external picture signals)
-
Photo CD«, picture optimisation for freeze-frames
3 Press or to set the value or switch the function on and off.
- The setting is saved automatically.
Note:
When using a PC only the «Contrast« and «Brightness« can be changed.
4 Press i\~ to finish the setting.
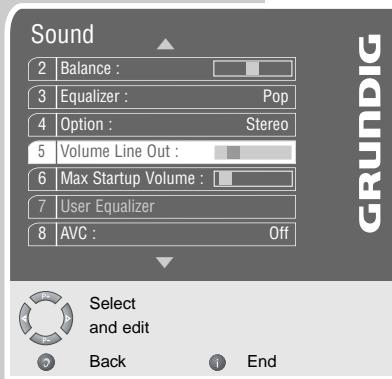
Audio settings
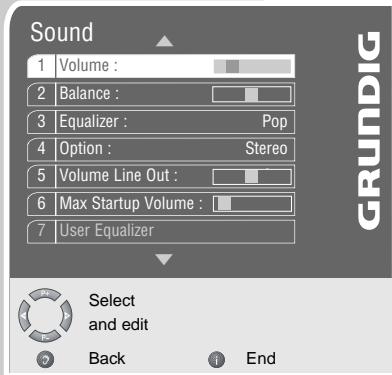
1 Open the «Sound« menu by pressing «(blue).
2 Select the desired line (function) by pressing P + or P - :
- Volume , the current set volume is displayed
- Balance, the current balance setting between the left and right speaker is displayed
- «Equalizer», choose between flat, pop, classic, vocal, rock and jazz and user-defined
- «Option», choose between mono, stereo, VirtualDolby and stereo basis. VirtualDolby is an innovative electronic solution, which is integrated in the television set and only requires the built-in speakers to produce Dolby Surround effects. Stereo basis widens the sound output for stereo programmes, and improves the sound with mono reception.
- «Volume Line Out«, the volume level at the «LINE OUT R L« socket
-
Max. Startup Volume«, the volume when switching on the device
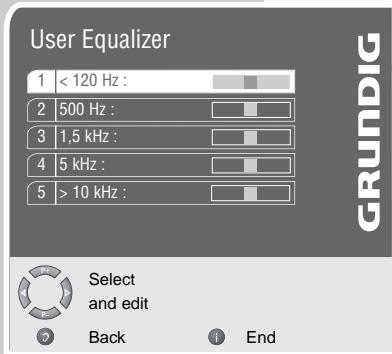
- «User Equalizer», for custom sound settings using the equaliser.
- «Volume control», this function guarantees a uniform volume when you switch from one channel to another.
Note:
To implement settings in the «User Equalizer« menu, select the «User« option in the «Equaliser« row and after selecting the «User Equalizer« row, activate the menu with «OK«.
3 Press or to set the value or switch the function on/off.
- The setting is saved automatically.
4 Press i to finish the setting.
Switching on
1 Press the power switch»IO« on the back of the device to switch it to standby mode.
- The indicator lights up orange.
2 Switch the television by pressing P + or one of the numerical buttons 1 0 .
- The indicator lights up blue.
Switching to and from standby
1 Press to switch the device to standby mode.
2 Completely switch off the device by pressing the power switch 10 on the back of the device.
- In this way you save electricity.
Selecting channels
1 Use 1 0 to select channels directly.
2 Press P + or P - to move up and down channels.
Selecting channels from the preset list
1 Press OK to open the preset list.
2 Select the channel position with P + , P - , or and call it up with OK .
3 Press i to switch off the preset list.
Selecting channels from external devices
1 Select the channel for an external device by pressing OK to open the station list, press P + or P - to select the channel and OK to confirm: The channel is displayed.
2 Switch back to television mode by selecting the desired channel with 1 0
Adjusting the volume
1 Adjust the volume with or
Muting
Press to switch the sound off (mute) and to switch it on again.
Displaying/concealing the clock
1 You can display or conceal the clock by pressing (only for stations with teletext).
Displaying information about the television schedule
1 Press TV-G to display information.
2 Press TV-G to switch off the information.
Displaying information about the channel position
Press ? to display the information.
- The display disappears automatically after a short while.
Freeze-frame
If you wish to view a particular scene for longer, you can freeze the frame of the current programme.
Press (yellow).
2 Press (yellow) to finish the freeze-frame.
Double window
This function enables you to view the television programme and teletext at the same time.
Press TXT twice.
- On the left you can see the television programme, on the right the teletext.
Note:
The remote control buttons are switched in teletext mode. To select teletext pages and for other functions, see «Teletext mode« on page 19.
2 Press »TXT« to end the function.
Swap function
This function allows you to switch between the two most recently viewed TV channels.
Press 1 0 to select a television channel.
2 Change channels with 1 0
3 Press Z to switch between the two channels.
PIP mode
PIP (picture in picture) allows you to watch an inset picture from a second video source in addition to the current channel.
A second receiver unit, DVD players, video recorders, satellite receivers or a PC can be used as video sources, they must be connected to the input jacks at the back of the device.
Displaying the inset picture
Press PIP to display the inset picture.
Swapping the main and inset pictures
Press Z to swap the main and inset pictures.
Double picture (Double Window)
1 Press PIP
- The last selected main and inset pictures are viewed next to each other.
Ending the PIP function
1 To hide the inset picture press PIP once or twice.
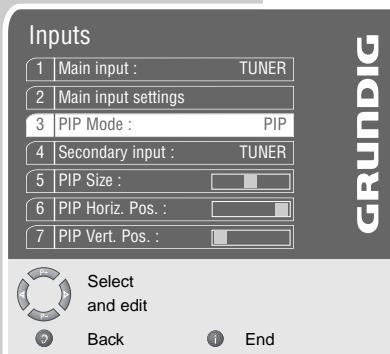
PIP settings
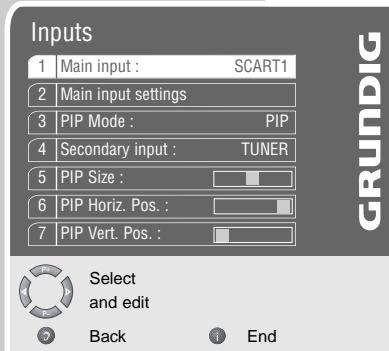
Press i to open the main menu.
2 Select Inputs / PIP with P + or P - and press OK to confirm.
3 Select PIP Mode with P + or P - and press to activate the desired function.
- PIP - an inset picture is displayed.
- «Split Screen« - the television programme and teletext are displayed simultaneously.
4 Select »Secondary input« for the desired input source by pressing P + or P - .
-
TUNER - another television channel can be selected as the inset image.
- «Front AV, YUV, SCART 1, SCART 2, CVBS« - picture from an external device (connected to these sockets), can be selected as the inset image.
5 Select other settings with P + or P - .
-
PIP Size « - the size of the inset picture
-
PIP Horiz. Pos.和 >PIP Vert. Pos. - the horizontal and vertical position of the inset picture on the television screen
Set the PIP source, size and position with or .
- The setting is saved automatically.
6 Press i\~ to finish the settings.
Changing the picture format
1 Select the picture format with . The selected picture format, for example 16:9 , appears on the screen.
- You can choose between the following picture formats:
During programmes in 4:3 format, the picture is stretched horizontally if 16:9 or 14:9 is selected.
The picture geometry is stretched horizontally.
With actual 16:9 signal sources (from a set-top box on the Euro-AV socket) the picture fills the screen completely and with the correct geometry.
"Panorama" format
This setting is suited to films with a large width/height ratio.
During programmes in 4:3 format the picture is stretched horizontally if the «Panorama« function is selected. The zoom factor is greater on the left and right edges of the picture than in the middle.
"Normal (4:3)" format
Programmes in 4:3 format are displayed in the correct aspect ratio.
There are black borders to the left and right of the picture.
"Full Screen" format
For programmes in 4:3 format, the picture automatically fills the screen.
"User Zoom" format
This function allows you to display an individual picture format from 10% to 200% of the original picture size.
1 Select the User Zoom picture format with
2 Press i to open the main menu.
3 Select Display with P + or P - and confirm with OK
4 Select UserZoom with P + or P - .
5 Select the picture size with or .
6 Press i\~ to switch off the menu.
"4:3 Letterbox to16:9 " format
The black borders which are usually at the top and bottom of the screen are eliminated, 4:3 pictures fill the screen.
The transmitted pictures are enlarged, but are slightly cropped at the top and bottom. The picture geometry remains unchanged.
TOP or FLOF text mode
1 Press »TXT« to switch to teletext mode.
2 Teletext pages can be selected directly with 1 0 The current programme overview (teletext page 333) can be called up with TV - G To return to teletext page 100, press i.
Note:
At the bottom of the screen, you will see an information line consisting of a red, green and, depending on the station, yellow and blue text field. Your remote control has buttons with the corresponding colours.
3 Press (red) to scroll back a page Press (green) to scroll to the next page Press (yellow) to select the chapter Press (blue) to select the topic
4 To switch off teletext, press »TXT« twice.
Normal text mode
1 Press TXT to switch to teletext mode.
2 Teletext pages can be selected directly with 1 0
3 Press P - to go back a page, press P + to skip to the next page.
4 To switch off teletext, press »TXT« twice.
Additional functions
Increasing character size
If you have difficulty reading the text on the screen, you can double the character size.
To enlarge the character size of a teletext page, keep pressing
Calling up a sub-page directly
If the selected teletext page contains additional pages, the numbers of the sub-pages are displayed at the bottom of the screen.
1 Select the desired sub-page with or .
Reveal answer
Certain teletext pages contain hidden answers or information. These can be viewed.
Press ? to display the information.
2 Press »?« to conceal the information.
CONVENIENCE FUNCTIONS
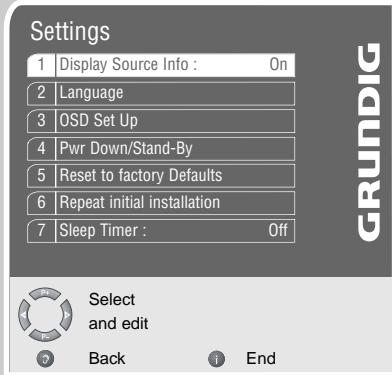
Entering the switch-off time
This function allows you to enter a switch-off time for the television. After this time has elapsed, the television switches to standby mode.
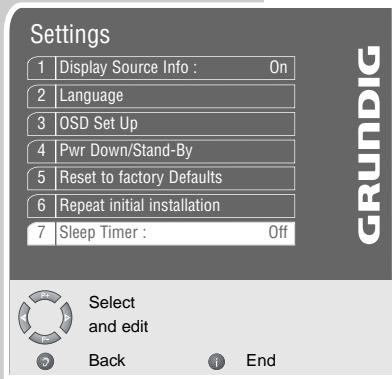
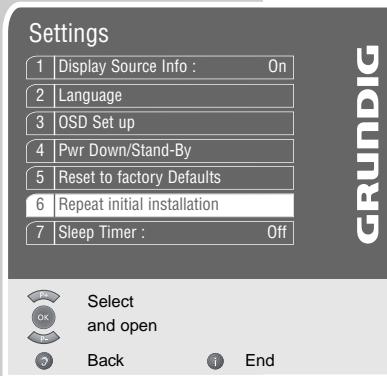
Press i to open the main menu.
2 Select Set Up with P + or P - and confirm with OK.
3 Select Sleep Timer with P + or P - .
4 Select the switch-off time (30 minutes, 60 minutes, 90 minutes) by pressing or .
Note:
When Off has been selected, the function is deactivated.
5 Press i\~ to finish the settings.
Displaying and concealing information on the channel position
Press i to open the main menu.
2 Select Set Up with P + or P - and confirm with OK
3 Select Display Source Info with + or - and press to switch on/off.
4 Press i to finish the settings.
Changing the menu (on-screen display)
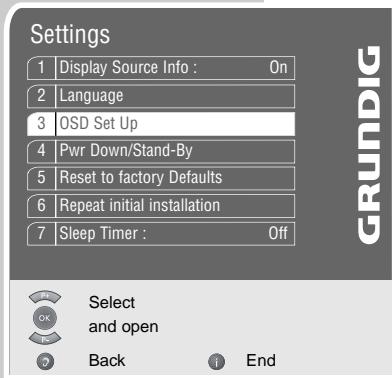
Press i to open the main menu.
2 Select Set Up with or and confirm with OK.
3 Select OSD Set Up with P + or P - and confirm with OK
4 Select Time Out with + or - and select the display duration (5 seconds, 10 seconds, 15 seconds) with or . Select Off to leave the menu on permanently. Select Transparency with + or - and select Off or On with or .
5 Press i\~ to finish the settings.
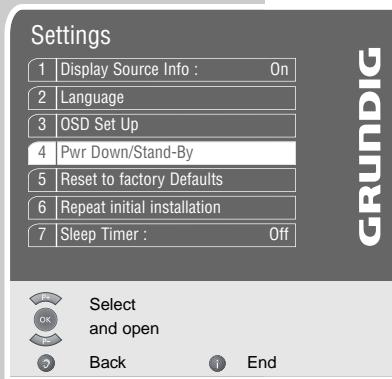
Displaying and concealing the logo
This function allows you to switch off the GRUNDIG logo, which is displayed after the television is switched on.
Press i to open the main menu.
2 Select Set Up with P + or P - and confirm with OK.
3 Select Pwr Down/Stand-By with P+ or P- and confirm with OK.
4 Select Show Logo with P + or P - and switch off or on with
5 Press i to finish the settings.
Setting the colour temperature
This function allows you to make the picture appear "warmer" or "colder".
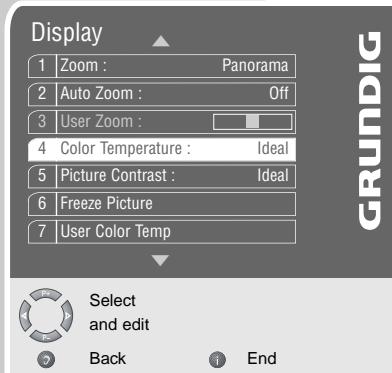
Press i to open the main menu.
2 Select Display with P + or P - and confirm with OK
3 Select the Colour Temperature option with P + or P - and select the desired setting with .
Note:
You can set the «User» setting according to your own individual preference.
To do this, select «User Color Temp« with «P+« or «P-« and confirm with «OK«.
Select the colour with P + or P - and set with or .
4 Press i\~ to finish the settings.
Setting the audio output signal level
This setting enables you to set the audio output signal for the «LINE OUT« sockets.
Press i to open the main menu.
2 Select Sound with P + or P - and confirm with OK
3 Select Volume Line Out with P + or P - .
4 Set the volume of the audio output signal by pressing or .
5 Press i to finish the settings.
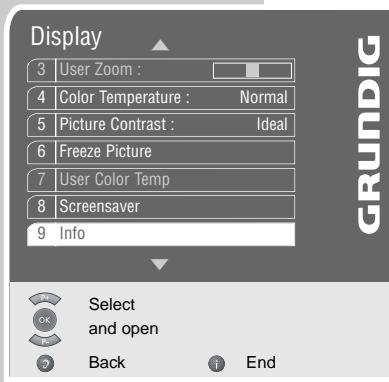
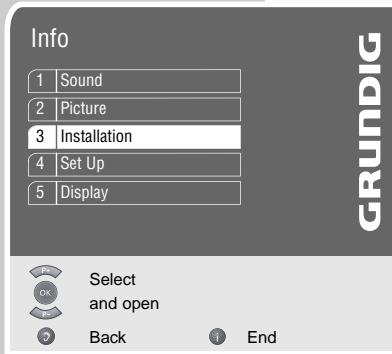
Calling up information
In this menu you will find information about the temperature of the device, the hardware and the software version of the device.
Press to open the main menu.
2 Select Display with P + or P - and confirm with OK
3 Select Info with P + or P - and press OK to confirm. The current information appears.
4 Press i\~ to quit the menu.
Resetting the device
All custom settings (for example, contrast, brightness, volume and switch-off time) are restored to the original status.
Channels are not deleted.
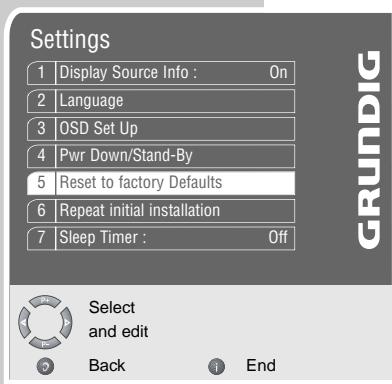
Press i to open the main menu.
2 Select Set Up with + or and confirm with OK.
3 Select the Reset to factory Defaults with P + or P - and confirm with OK .
4 Confirm Yes, delete my settings by pressing OK.
5 Press i to finish the settings.
Setting the character set for teletext functions
This setting allows you to set the character set for teletext for different special characters (e.g. for eastern European languages).
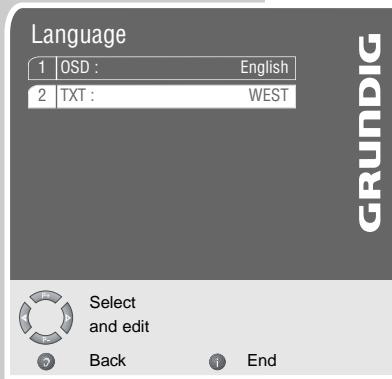
Press i to open the main menu.
2 Select Set Up by pressing P + or P - and press OK to confirm.
3 Select «Language« with «P+« or «P-« and press «OK« to confirm.
4 Select TXT with P + or P - .
5 Set the desired character set with or .
6 Press i to finish the settings.
Changing the menu language
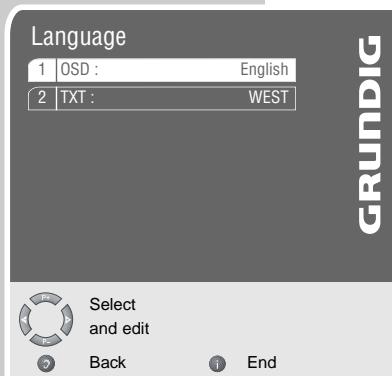
Press i to open the main menu.
2 Select Set Up by pressing P + P or P - P and press OK to confirm.
3 Select «Language« with «P+« or «P-« and press «OK« to confirm.
4 Select OSD with P+or P-
5 Select the language by pressing or
6 Press i to finish the settings.
OPERATION AS A PC MONITOR
Note:
Do not connect any other equipment while the device is switched on. Switch off the other equipment as well before connecting it.
Only plug the device into the mains socket after you have connected the external devices and the antenna.
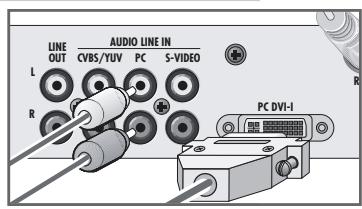
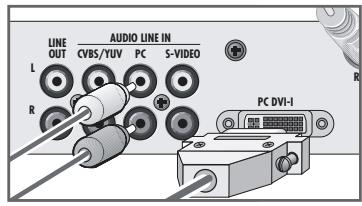
Connecting a PC
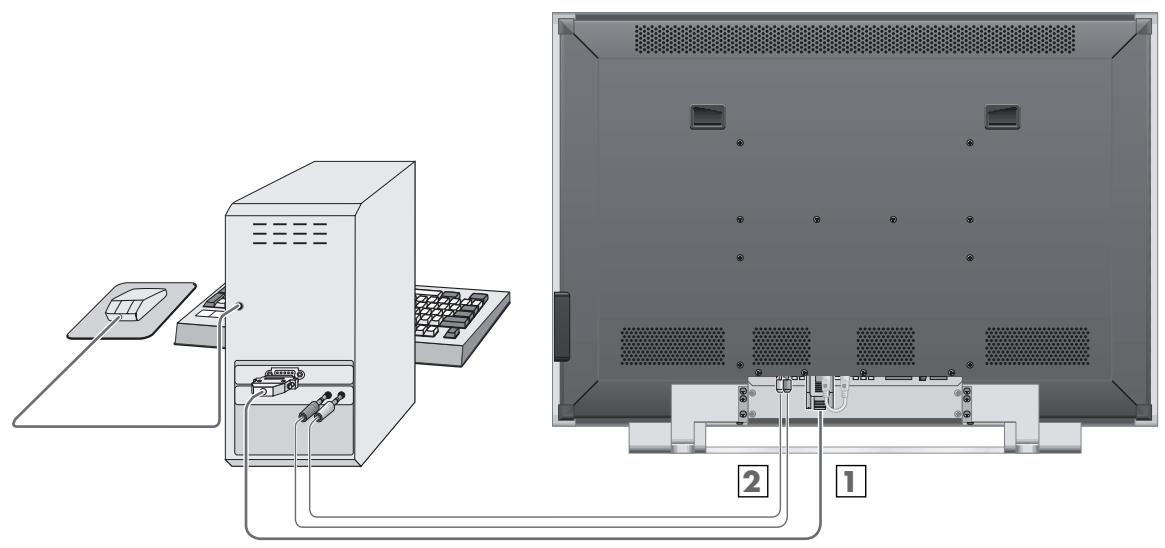
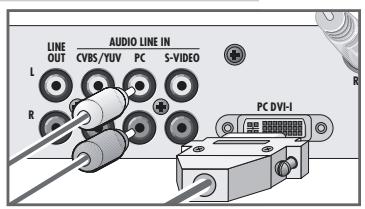
1 Connect the PC DVI-I socket on the television set and the appropriate socket of the PC with the VGA cable provided (video signal).
2 Connect the white and red LINE IN PC L R sockets on the television and the corresponding sockets on the PC with a cinch cable.
Operation with the PC
1 Turn on the television and the PC.
2 Select Monitor operation on the PC.
3 Select the channel for the PC by pressing OK to open the station list, press P + or P - to select the channel and OK to confirm:
- The picture format of the PC (for example 1024 × 768 ) is displayed.
Note:
If there is no signal from the PC, the television automatically switches to standby.
The television can be turned on again with P + .
Settings for the PC
Press i to open the main menu.
2 Select Inputs / PiP with P+ or P- and confirm with OK .
3 Select Main input Press P + or P - to select, and then press or to select PC (YUV) , PC (RGB) or PC (DVI) .
4 Select Main input settings by pressing P + or P - and press OK to confirm.
- The first two lines are information about the PC.
Note:
The other settings are explained in the following sections.
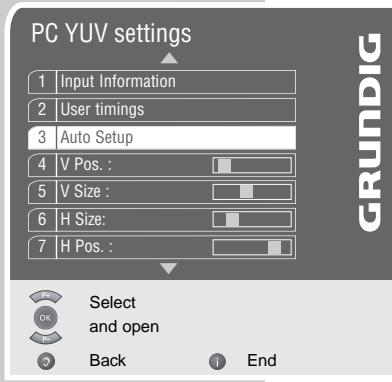
Adjusting the picture
1 Select Auto Setup with P + or P - and confirm with OK.
Note:
With the «V Pos«, «V Size«, «H Size«, «H Pos« and «Phase« settings, you can customise the picture of the PC.
Select with P + or P - and press or to implement the setting.
2 Press i\~ to finish the settings.
User formats
If different PCs are connected to the television, you can assign user formats.
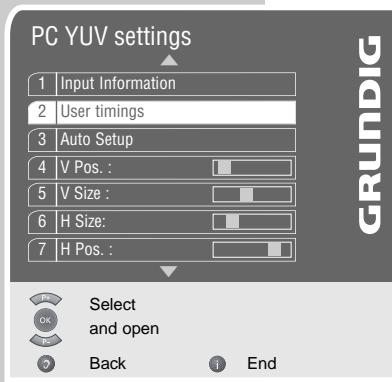
1 Select User timings with P + or P - and confirm with OK
Note:
With the «V Pos«, «V Size«, «H Size«, «H Pos« and «Phase« settings, you can customise the picture of the PC.
Select with P + or P - and press or to implement the setting.
2 Press i\~ to finish the settings.
Evaluating synchronisation signals
If this function is activated, the device automatically switches to standby when a signal is detected at the PC DVI-I« socket. The condition for this is that the preset channel PC (RGB)« or PC (DVI)« has been selected.

Press i to open the main menu.
2 Select Set Up with P + or P - and confirm with OK
3 Select Pwr Down/Stand-By with P + or P - and confirm with OK .
4 Select Reaction on PC syncs with P + or P - and switch off or on with .
5 Press i\~ to finish the settings.
USING EXTERNAL DEVICES
Decoder or satellite receiver/set-top box
In order for the television to receive encoded programs from a privately operated station, a decoder is needed.
Connecting a decoder or satellite receiver/set-top box
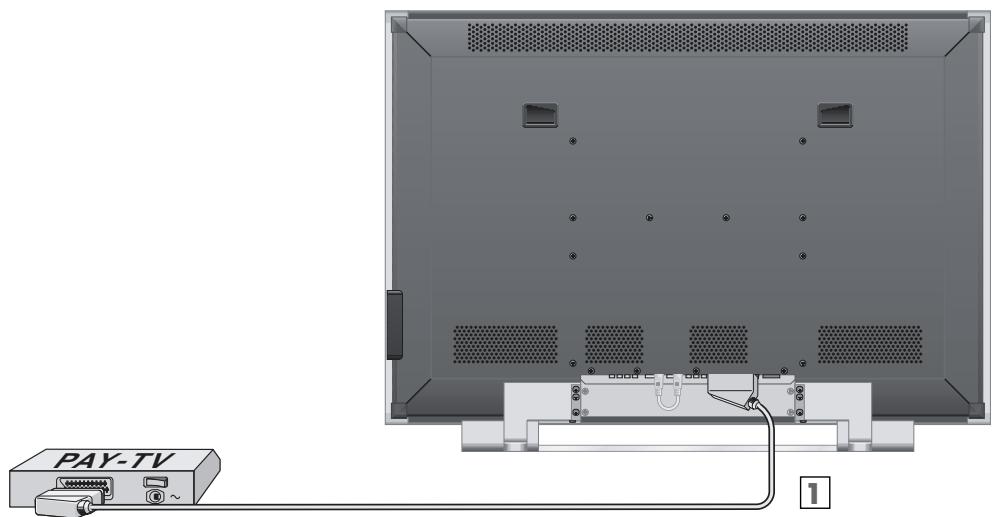
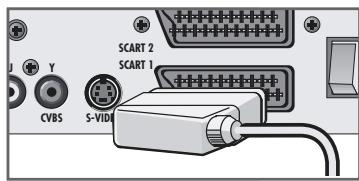

1 Connect the «SCART 1« or «SCART 2« socket on the television set and the appropriate socket on the decoder, satellite receiver or set top-box using a EURO-AV cable.
Setting the channel position for a decoder
Press i to open the main menu.
2 Select the channel position on which the encoded television channel is saved with 1 0
3 Select Inputs / PIP with P+or P- and confirm with OK .
4 Select Main input settings with P + or P - and confirm with OK.
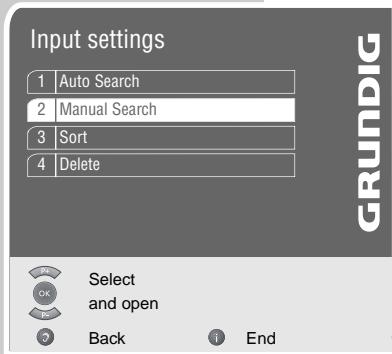
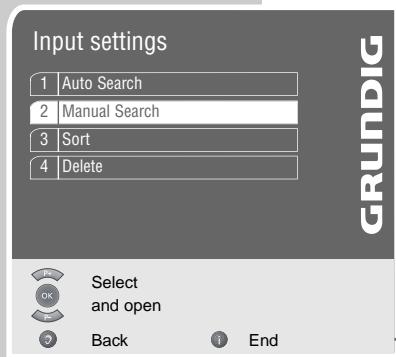
5 Select Manual Search with P + or P - and confirm with OK
6 Select Option with P + or P - and press or to select Decoder A (picture encoded only) or Decoder B (picture and sound both decoded).
7 Press i\~ to finish the settings.
Use with a decoder/satellite receiver/set-top box
1 Turn on the decoder/satellite receiver/set top box and the television.
2 Select the channel for the decoder/satellite receiver/set-top box by calling up the station list with OK and selecting the channel (»SCART 1« or SCART 2) with P + or P - and confirming with OK .
Video recorder or DVD player
Connecting a video recorder or DVD player …
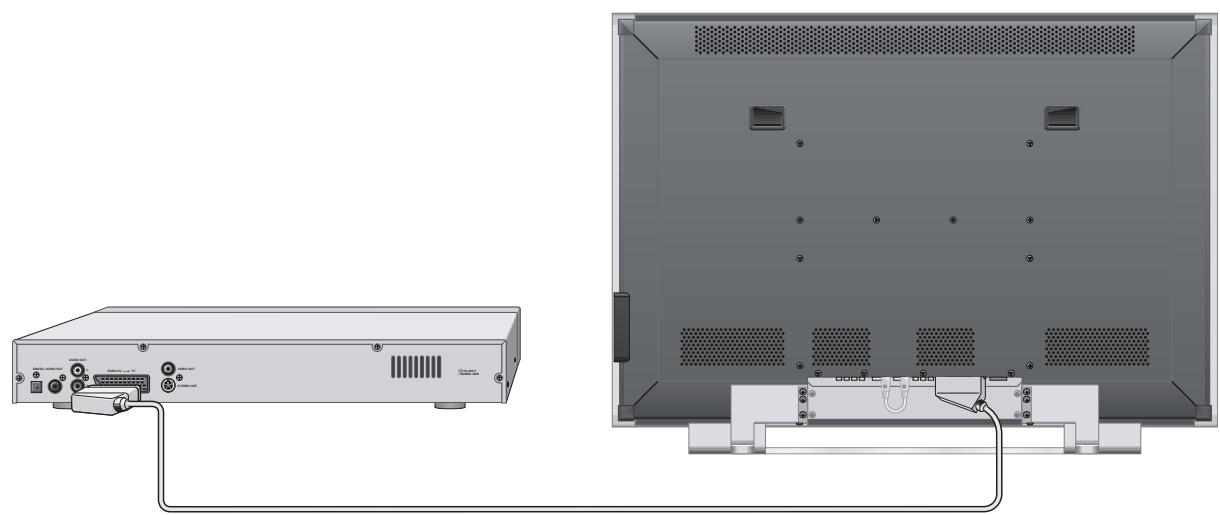
... with a digital signal (e.g. HDTV)
1 Connect the «PC DVI-I« socket of the television and the corresponding DVI socket of the DVD player or the set-top box with a standard DVI cable (digital video signal).
2 Connect the «LINE IN PCL R« sockets of the television to the corresponding sockets on the DVD player or set-top box with a cinch cable (audio signal).
… with an analog HDTV signal
1 Connect the «PC DVI-I« socket on the television to the corresponding cinch sockets on the DVD player or set-top box with a standard adapter cable cinch cable (analog video signal).
2 Connect the «LINE IN PCL R« sockets of the television to the corresponding sockets on the DVD player or set-top box with a cinch cable (audio signal).
… with an analog signal (progressive)
1 Connect the «Y U V (CVBS)« sockets of the television and the corresponding sockets of the DVD player with cinch cables (video signal).
2 Connect the «LINE IN CVBS/YUV L R« sockets on the television and the corresponding sockets on the DVD player with cinch cables (audio signal).

... using the Euro/AV socket
1 Connect the «SCART 1« or «SCART 2« socket of the television and the corresponding socket of the video recorder or the DVD player with a EURO/AV (Scart) cable.
Note:
You can copy recordings via the television from one external device to another by connecting the playback device to the «SCART 1« socket and the recording device to the «SCART 2« socket, then selecting the «AV1 SCART 1« channel. However, you will not be able to view a television channel.
… with an S-Video signal
1 Connect the «S-VIDEO« socket on the television and the corresponding socket on the video recorder/DVD player with an S-Video cable (video signal);
2 Connect the «LINE IN S-VIDEO L R« sockets on the television and the corresponding sockets on the video recorder/DVD player with cinch cables (audio signal).
… with an analog TV signal
1 Connect the «Y (CVBS)« cinch socket of the television and the corresponding sockets of the video recorder/DVD player with a cinch cable (video signal).
2 Connect the «LINE IN CVBS/YUV L R« sockets on the television and the corresponding sockets on the video recorder/DVD player with cinch cables (audio signal).
Setting a preset station for a video recorder or DVD player
This setting automatically selects the preset station for the video recorder or DVD player when the device is switched on.
Press i to open the main menu.
2 Select Inputs / PIP with P+or P- and confirm with OK .
3 Select Main input with >> + or - and press or to select SCART 1 or SCART 2 (depending on the socket the video recorder or DVD player is connected to).
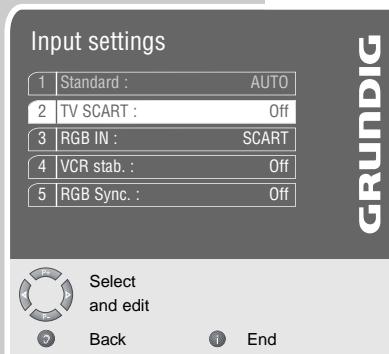
4 Select Main input settings with P + or P - and confirm with OK.
5 Select TV SCART with P + or P - and select VCR by pressing
Note:
If the picture jitters during playback of the video recorder, select «VCR stab.« with «P+« or «P-« and turn on picture stabilisation with «».
6 Press i to finish the settings.
Operation with a video recorder or DVD player
Switch on the video recorder or DVD player and select the function you wish to use.
2 Select the channel for the video recorder or the DVD player: press OK to open the program list, press P+ or P- to select the channel and OK to confirm:
- -PC (DVI)← - -PC DVI-I« socket;
- »YUV« - »Y U V (CVBS)« sockets;
- CVBS - Y(CVBS) socket on the back;
- Front AV « - »S-VIDEO« socket on the back or the right side or Y (CVBS)« socket on the right side;
-
SCART 1 « - >SCART 1 « socket;
-
SCART 2 « - >SCART 2 « socket;
- You will see the picture and hear the sound of the video recorder or the DVD player on the television.
Note:
You do not need to select a preset station if you have selected a preset station as described above.
Camera recorders
Connecting a camera recorder …
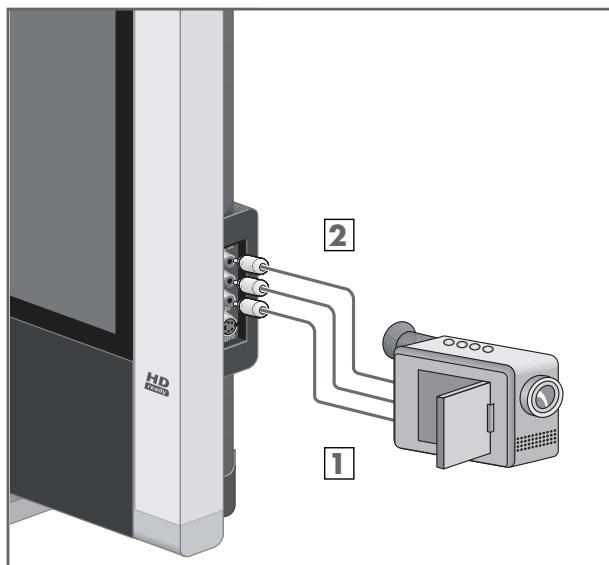
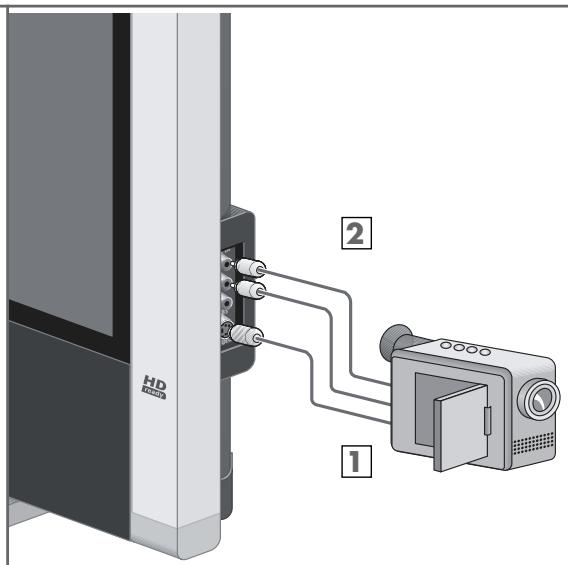
... with cinch cables
1 Connect the «CVBS« cinch socket of the television and the corresponding socket of the camera recorder (VHS/Video 8) using cinch cables (video signal).
2 Connect the «LINE IN L R« cinch sockets of the television and the corresponding sockets of the camera recorder with cinch cables (audio signal).
... with S-VIDEO cables
1 Connect the «S-VIDEO« sockets of the television and the corresponding sockets of the camera recorder (S-Video/Hi 8) with S-VHS cables (video signal).
2 Connect the «LINE IN L R« sockets on the television to the corresponding sockets of the camera recorder with a cinch cable (audio signal).
Operation with a camera recorder
Switch on the camera recorder, insert a cassette and start playback.
2 Select the channel for the camera recorder by calling up the station list with OK and selecting the channel (»Front AV) with P + or P - and confirming with OK.
- You will see the picture and hear the sound of the camera recorder on the television.
Tuning to new television channels
This setting is only required if a new television channel comes on air and you want to keep the order your channels are in, or if you receive channels with different TV standards where you live.
Press i to open the main menu.
2 Select >Inputs / PIP << with >>P++ or >>P-- and confirm with >>OK <<.
3 Select Main input by pressing P + or P - , and then press or to select TUNER.
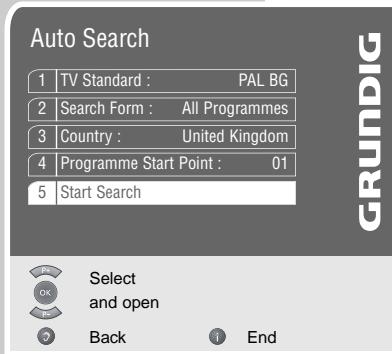
4 Select Main input settings with P + or P - and confirm with OK
5 Select Auto Search with P + or P - and press OK to confirm.
6 Select TV Standard by pressing P + or P - and set the TV standard by pressing or .
7 Select Search Form with >> + or >> - and select New Programs with or
8 Select Start Search with P + or P - and confirm with . Display: SEARCHING IN PROGRESS. The station search begins, and may last a few minutes, depending on the number of television channels received.
Note:
You can interrupt the search by pressing i
Entering the name for a television channel
1 Select the channel position with 1 0
2 Press i to open the main menu.
3 Select Inputs / PIP with P+or P- and confirm with OK .
4 Select Main input settings with P + or P - and confirm with OK
5 Select Manual search with P + or P - and confirm with OK
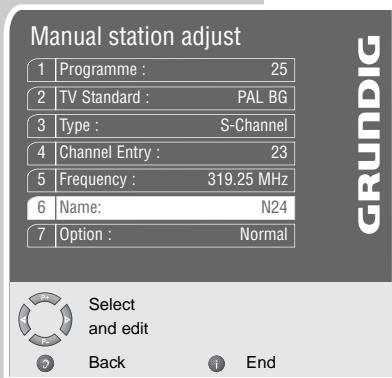
6 Select Name with P + or P - and confirm with . Select the first letters (first digits) with P + or P - , press and repeat to enter the next four letters.
7 Press i\~ to finish the settings.
Set the television channel by entering the channel number or the frequency
Press to open the main menu.
2 Select Inputs / PIP with P + or P and confirm with OK.
3 Select Main input by pressing P + or P - , and then press or to select TUNER.
4 Select Main input settings with P + or P - and confirm with OK.
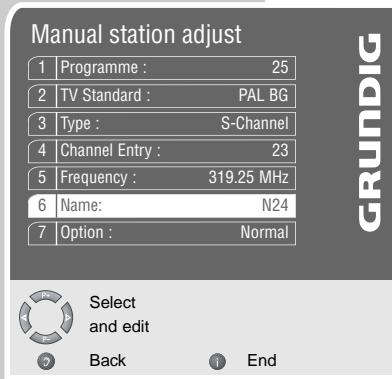
5 Select Manual search with P + or P - and confirm with OK
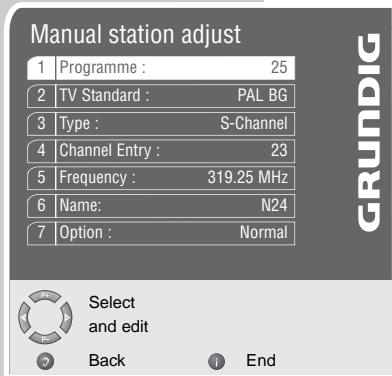
6 Select «Programme» with «P+« or «P-« and enter the two-digit number of the channel position where the new television channel is to be stored with «1...0«.
7 Select TV Standard with P + or P - and select the required norm with or .
8 Select Type with + or - . Switch from normal channels (display: Channel) to special/hyperband channels (display: S-Channel) with or .
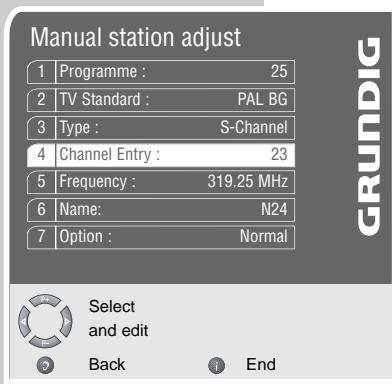
9 Select Channel Entry: with P + or P - . Select the required two-digit channel number with 1 0 ;
or
select Frequency: with P + or P - and confirm with . Enter the required five-digit frequency with 1 0
10 If the name of the TV channel is not assigned automatically, select Name with P+ or P- and confirm with Select the first letters (first digits) with P+ or P- press and repeat to enter the next four letters. Press to confirm your entry.
Note: To set further television channels, repeat this procedure starting at point 6.
11 Press i to finish the settings.
Re-tuning all television channels
This setting is a required after moving house. Please note that all saved television stations will be deleted by the setting.
Press i to open the main menu.
2 Select Set Up by pressing P + or P - and press OK to confirm.
3 Select Repeat initial installation with P + or P - and press OK to confirm. The Sprache menu appears.
4 Select language with P + or P - and press OK to confirm. The Location of TV Set menu appears.
5 Press P + or P - to select the installation site.
Note:
If your country (the site) is not shown, select the option Other .
6 Press OK to start the search.
-
Display: «SEARCHING IN PROGRESS«. The station search begins, and may last a few minutes, depending on the number of television channels received.
-
After the search, the device switches to channel 1.
Note:
You can interrupt the search by pressing i
Technical data
Operating voltage: 115 - 240 V~, 50/60 Hz
Power consumption: in operation 350 W (PlanaVision 42)
in operation 450 W (PlanaVision 50)
in standby approx. 5 W
Music signal power: 2 × 10 ~W
Sine wave power: 2 × 6 ~W
Reception range: C01-C80, special channels S01-S41
Preset channels: 99 and 6 AV
Screen diagonals: 42" (107 cm) (PlanaVision 42)
50^ (130 cm) (PlanaVision 50)
Max. resolution: WVGA 1024 x 768 pixels (PlanaVision 42)
WVGA 1366 x 768 pixels (PlanaVision 50)
Angle: 170^
Brightness: 1100 cd/m² (PlanaVision 42)
1000 cd/m² (PlanaVision 50)
Contrast ratio: 10.000:1 (PlanaVision 42)
5.000:1 (PlanaVision 50)
CE
Service information for dealers
The product complies with the following EU directives:
73/23/EEC directive for electrical equipment to be used within defined voltage ranges. 89/336/EEC directive on electromagnetic compatibility.
The device complies with the following standards: EN 60065, EN 55013, EN 55020
Environmental note
This product has been made from high-quality parts and materials which can be re-used and recycled.
Therefore, do not throw the product away with normal household waste at the end of its life. Take it to a collection point for recycling electrical and electronic devices. This is indicated by this symbol on the product, in the operating manual and on the packaging.
Please find out about collection points operated by your local authority.
Help protect the environment by recycling used products.
Rectifying minor problems
If the remedies below are not successful, please consult an authorised GRUNDIG dealer. Please bear in mind that malfunctions can also be caused by external devices such as video recorders or satellite receivers.
| Problem | Possible cause | Remedy |
| No picture or sound. | No mains voltage. | Is the mains cable connected? Is the mains switch on? |
| Television in standby mode. | Switch on using the remote control. | |
| Television set at a non-occupied AV channel positon. | Switch to another channel position. | |
| Screen lit (snow or blue) but no transmission visible. | Antenna cable. | Is the antenna cable connected? Check antenna system? |
| No station is set. | Start station search. | |
| Poor picture contrast. | Picture settings incorrectly adjusted. | Adjust brightness, contrast or colour setting. |
| Problem caused by station. | Test with another channel. | |
| Interference to picture and/or sound. | Malfunctions due to other devices (household devices, mobile phones etc.). | Move the devices. |
| Ghosting, reflection. | Channel setting. | Automatic or manual channel setting/fine tuning. |
| Antenna. | Have aerial cable or system checked. | |
| No colour. | Colour intensity set to minimum. | Turn up the colour. |
| TV norm setting (if this setting option is available). | Select the proper colour norm. | |
| Problem caused by station. | Test with another channel. | |
| Picture, but no sound. | Volume set to minimum or loud speaker switched off. | Turn up or switch on the volume. |
| Volume control via audio cinch sockets activated (if this option is available). | Select sound output via loudspeaker. | |
| Problem caused by station. | Test with another channel. | |
| SAT mode. | Check AV cable between television set and satellite receiver. | |
| Sound indistinct. | Sound setting. | Correct the sound setting. |
| Teletext missing or faulty. | Television channel (has no teletext) or antenna system. | Test with another television channel for ghosting or reflection or fine tuning. |
| Station signal too weak (picture interference). | Check aerial system. | |
| Remote control does not work. | Remote control position »TV « not switched on. | Switch to »TV « remote control position. |
| No optical connection. | Point the remote control at the television set. | |
| The remote control batteries. | Check or replace the batteries. Observe polarity. | |
| Operating condition undefined. | Switch off the television set with the main power button for approximately 2 minutes. |