
26 VLC 9201 BG - Television GRUNDIG - Free user manual and instructions
Find the device manual for free 26 VLC 9201 BG GRUNDIG in PDF.


| Product Type | LED TV |
| Screen Size | 26 inches (66 cm) |
| Resolution | 1366 x 768 pixels (HD Ready) |
| Dimensions (with stand) | 640 x 450 x 180 mm |
| Dimensions (without stand) | 640 x 400 x 50 mm |
| Weight (with stand) | 5.5 kg |
| Power Consumption | 60 W (typical), <0.5 W standby |
| Power Supply | AC 220-240V, 50/60 Hz |
| Connectivity | 2x HDMI, 1x USB, 1x SCART, 1x VGA, 1x CI slot, 1x RF input, 1x Composite AV |
| Audio Output | 2 x 5 W speakers, headphone jack |
| Tuner | DVB-T/T2/C, DVB-S/S2 (optional) |
| Smart TV Features | No (basic TV) |
| Remote Control | Yes, with batteries |
| Safety Features | Child lock, auto power-off, VESA mount (200 x 200 mm) |
| Cleaning Instructions | Unplug before cleaning; use soft, dry cloth; avoid liquids |
| Spare Parts Availability | Contact Grundig service center for remote, stand, power board |
| Repairability | Moderate; basic user tasks: reset, firmware update via USB |
| General Information | Manual available online in PDF; 59 pages |
Frequently Asked Questions - 26 VLC 9201 BG GRUNDIG
User questions about 26 VLC 9201 BG GRUNDIG
0 question about this device. Answer the ones you know or ask your own.
Ask a new question about this device
Download the instructions for your Television in PDF format for free! Find your manual 26 VLC 9201 BG - GRUNDIG and take your electronic device back in hand. On this page are published all the documents necessary for the use of your device. 26 VLC 9201 BG by GRUNDIG.
USER MANUAL 26 VLC 9201 BG GRUNDIG
natural_image
Line drawing of a flat-screen computer monitor (no text or symbols)4 setup AnD sAFetY
6 GenerAI inFormAtion
6 Special features of your television set
7 Receiving digital channels
7 Important notes on environmental protection
7 Notes on still images
8 ConneCtion AnD prepArAtion
8 Connecting the antenna and power cord
9 Inserting batteries into the remote control
10 overview
10 Connections on the television set
11 Controls on the television set
12 The remote control - Main functions
13 The remote control - All functions
14 settinGs
14 Initial set-up and tuning television channels
14 Selecting language, country and operating mode
15 Tuning the television channels from satellite (DVB-S)
17 Tuning terrestrial television channels (DVB-T)
17 Tuning television channels from the cable provider (DVB-C)
18 Changing the program table for the digital channels
21 Picture settings
22 Sound settings
24 television - operAtion
24 Basic functions
25 Zoom function
25 Eco mode
25 Zapping function
26 Electronic TV guide
27 Changing the picture format
28 usB operAtion
28 File formats
29 Connecting external data media
30 The file browser
30 Settings in the USB setup menu
31 Basic playback functions
32 Additional playback functions
34 teletext operAtion
34 TOP text or FLOF text mode
34 Additional functions
35 ConvenienCe FunCtions
35 Opening the SETTINGS menu
35 Language settings
36 Setting the date and time
36 Timer settings
37 Parental control settings
38 Updating software
38 Restoring the television to the default settings
39 operAtion usinG externAI DeviCes
39 DIGI LINK
39 The DIGI LINK functions on your television
40 Device operation
41 High definition HD ready
41 Connection options
42 Connecting external devices
43 Using a DVD player, DVD recorder, video recorder or set-top box
43 Headphones
44 Hi-fi system/AV receiver
45 operAtion As A pC monitor
45 Connecting a PC
45 Selecting presets for the PC
45 Settings for PC mode
46 operAtion with A Common interFACe
46 What is a Common Interface?
46 Inserting the CA module
46 Access control for CI module and smart card
47 speCiAl settinGs
47 Searching for digital television channels from a satellite automatically
48 Searching for digital television channels from a satellite manually
48 LNB settings
49 Settings for motorised antennas (DiSEqC 1.2)
52 Searching for digital terrestrial TV channels automatically
53 Searching for digital terrestrial TV channels manually
54 Tuning analogue television channels
55 Changing stored analogue channels
57 inFormAtion
57 Displaying signal information
57 Service information for retailers
57 Environmental note
58 Technical data
59 Troubleshooting
Please note the following instructions when setting up the television set:
■ This television is designed to receive and display video and audio signals.
All other uses are expressly prohibited.
■ The ideal viewing distance is five times the diagonal screen size.
■ Light falling on the screen impairs picture quality.
■ To ensure the device is always adequately ventilated, make sure there is sufficient space between the television set and nearby furniture (min 10 cm).
■ The television is designed for use in dry rooms. If you do use it outdoors, make sure it is protected from moisture such as rain or splashing water.
Never expose the television set to moisture.
- Do not place any vessels such as vases on the television, as they may spill liquid, thus presenting a safety risk.
■ Place the television on a hard, level surface.
- Do not place any objects such as newspapers on the television or put cloth or similar items under it.
- Do not place the television close to heating units or in direct sunlight, as this will impair cooling.
■ Heat build-up can be dangerous and shortens the service life of the television. For reasons of safety, have a repairman remove any dirt in the television from time to time.
■ Never open the television under any circumstances. Warranty claims are excluded for damage resulting from improper handling.
■ Make sure the power cord or the power supply unit (if provided) are not damaged.
■ Only operate the television with the power supply/power cord provided.
■ Thunderstorms are a danger to all electrical devices. Even when the television is switched off, it can be damaged by a lightning strike to the mains or the antenna. Always disconnect the mains and antenna plugs during a storm.
■ Use a damp, soft cloth to clean the screen. Do not use water with soap or detergent.
■ Only clean the housing of your television set with the cloth provided. Do not use water with soap or detergent.
- When deciding where to put the device, remember that furniture is often coated with various types of varnish and plastic. Many of these contain chemicals which can corrode the feet of the device, leaving marks on the surface of the furniture which can be difficult or impossible to remove.
■ The screen of your LCD television meets the highest quality standards and has been checked for pixel faults.
Despite the great care taken in manufacturing, technological reasons make it impossible to completely discount the possibility that some pixels may be faulty.
Provided they are within the thresholds specified by the DIN norm, pixel faults of this kind cannot be regarded as a defect as defined by the warranty.
■ To ensure fires do not occur, always keep candles and other open flames away from the device.
- Do not connect any other equipment while the device is switched on. Also switch off other equipment before connecting it.
- Do not plug in the power cord of the device until you have connected the external equipment and the antenna.
■ To avoid safety problems arising from the batteries used with the product, follow the instructions below.
In case of misplacement of batteries, they may cause explosion due to short circuit. - Do not expose the batteries to excessive heat such as direct sunlight, fire, etc.
- Do not use old and unused batteries together.
■ Only replace the exhausted batteries with those having the same model, value and properties.
■ To avoid environmental health problems arising from the product, batteries and accessories.
■ Make sure the mains plug is freely accessible.
Caution:
If you plan on using a wall bracket for your television, make sure you read the assembly manual for the wall bracket or have a specialist assemble it.
- When purchasing the wall bracket, make sure that all the fastening points on the television are also on the wall bracket and that they are all used when mounting it.
Special features of your television set
- You can receive and watch digital TV channels using your television set (via DVB-S, DVB-T and DVB-C) – including High Definition programmes (HD). However, the reception of digital TV channels in HD is currently limited to a few countries in Europe.
Although this television set complies with the current DVB-S, DVB-T and DVB-C standards (status: August 2010), the compatibility with future DVB-S satellite transmissions as well as terrestrial DVB-T and DVB-C cable programmes cannot be guaranteed. - Your television set can receive and process all analogue and non-encrypted digital TV channels. The television set is also equipped with digital and analogue receivers.
The electronic TV guide (for digital channels only) informs you about any schedule changes at short notice, and provides an overview of all the broadcasters' schedules for the next few days. Detailed information on the individual television programmes are – when provided by the broadcasting station – are also available in the electronic TV guide. - You can connect various data media, such as an external hard drive, a USB memory stick or a digital camera, to the USB socket. Using the file browser, you can then select and play the file formats of your choice (for example, MP4, MP3 or JPEG data).
Receiving digital channels
- You require a satellite antenna to receive digital satellite channels (DVB-S).
Your TV supports SCR system (Satellite Channel Router). If your antenna installation is equipped with an Single Cable Distribution multiswitch, all television sets which are connected on this antenna can receive the television channels stand-alone.
■ You require a digital roof antenna or indoor antenna (passive or active indoor antenna with its own power supply) to receive digital television channels (DVB-T).
If you wish to receive digital television channels via your cable system (DVB-C), the antenna cable for your cable operator must be connected to the television set.
■ Unlike analogue broadcasting, not every channel has its own transmission frequency. Instead, several channels are grouped into what are known as bouquets on a regional or national level. You can find the current transmission information on teletext from various broadcasters, or by consulting a current TV guide or the Internet.
■ Various digital television channels from private broadcasters are encrypted (DVB-S, DVB-T and DVB-C). Watching these channels and the recording and playback functions are only possible with the appropriate CI module and a SmartCard. Ask your specialist dealer. The range of channels available from the public broadcasting institutions (ARD with EinsExtra, EinsFestival or ZDF with ZDF Info and all third party broadcasters) are not encrypted and can be received without a SmartCard.
Important notes on environmental protection
- The following information will help you to save resources – and money as well.
If you are not using your television set for several days, you should pull out the mains plug for environmental and safety reasons. This way the television does not consume any electricity.
As switching off the television set does not completely disconnect it from the mains, pull out the plug to disconnect it from the mains completely.
If the device is equipped with a power switch, switching it off using this switch will be sufficient. The energy consumed by the television set is reduced to virtually 0 W.
In standby mode, the television set uses very little energy. However, it may be necessary to leave the television set in standby mode for certain functions (for example automatic switch-on and switch-off and for timer functions).
■ The television set uses less energy when the brightness is reduced.
Notes on still images
Watching the same image for a long time on the screen may cause a still image remains feebly on the background. Feeble image(s) on the background is originated from LCD/LED technology and does not require any action under guarantee. To avoid such cases and/or minimize the impact, you may observe the tips below.
- Do not allow the same TV channel to stay on the screen for a very long time. Channel logos may cause this situation.
- Do not allow the images, which are not full screen, to constantly stay on the screen; if not streamed in full screen format by the broadcaster, you can convert the images to full screen by changing picture formats.
- Higher brightness and/or contrast values will lead this impact to appear faster; therefore, you are recommended to watch your TV in the lowest brightness and contrast levels.
Connecting the antenna and power cord
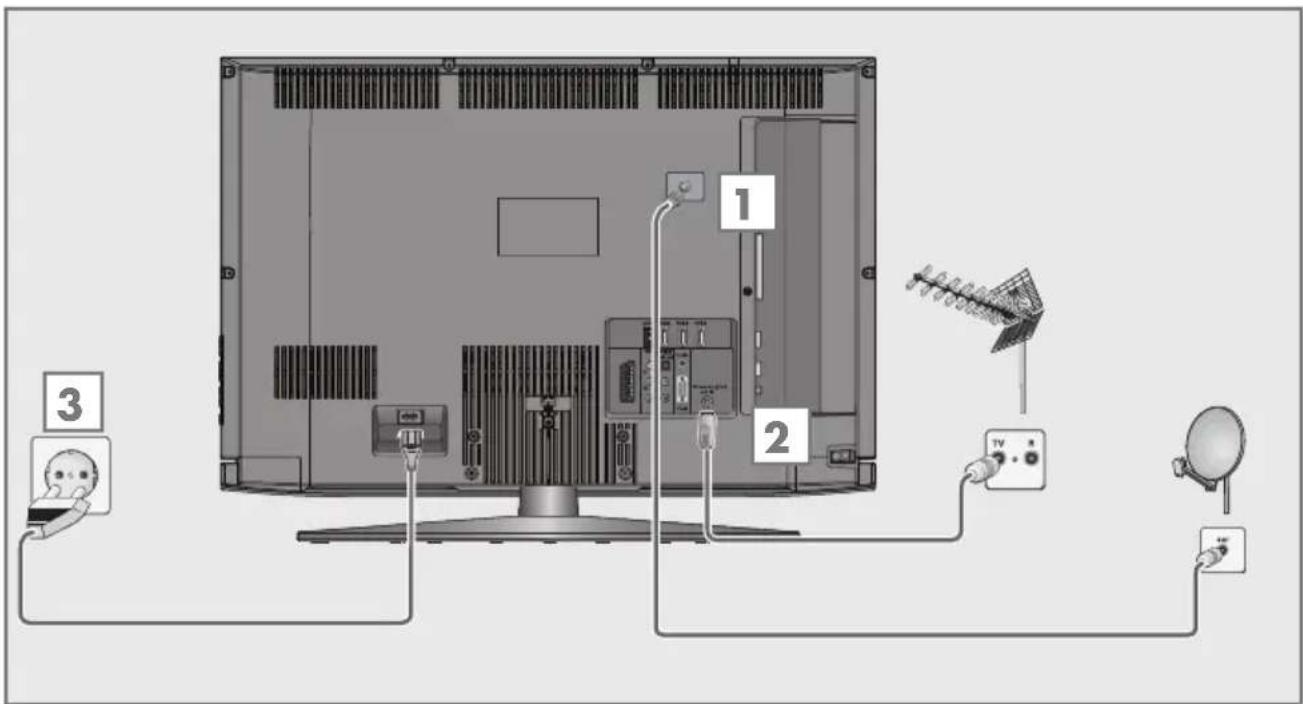
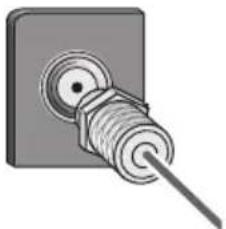
1 To receive digital satellite channels (DVB-S), connect the satellite antenna cable to the antenna socket »SATELLITE« on the television set.
natural_image
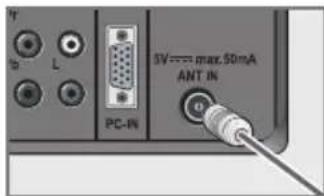
Illustration of a screwdriver inserted into a socket (no text or symbols)2a To receive terrestrial digital broadcasters (DVB-T) connect the cable for the rooftop or indoor antenna (passive or active indoor antenna with its own power supply) to the antenna socket »ANT IN« on the television set; or
2b To receive digital cable channels (DVB-C) connect the cable for the rooftop antenna to the antenna socket »ANT IN« on the television set; or
2c To receive analogue TV channels, connect the cable for the rooftop antenna to the antenna socket »ANT IN« on the television set
Note:
■ When connecting an indoor antenna you may have to try it out at different positions until you get the best reception.
3 Plug the power cord into a wall socket.
Note:
- Do not plug in the power cord of the device until you have connected the external equipment and the antenna.
■ Only use the power cord supplied to connect the television set to a suitable earthed safety socket.
- Do not use an adapter plug or extension lead which does not meet the applicable safety standards. Do not tamper with the power cord.
CONNECTION AND PREPARATION
Inserting batteries into the remote control
natural_image
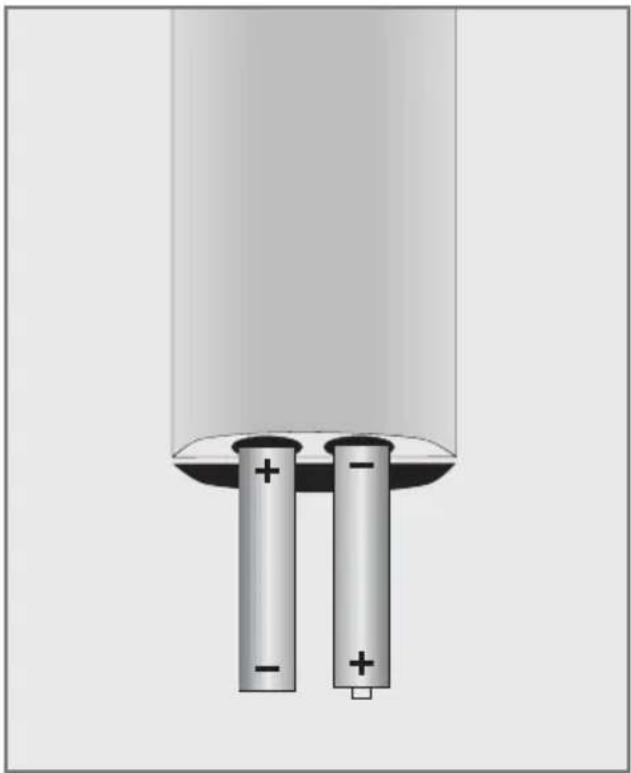
Diagram of two cylindrical batteries with positive and negative charges, placed on a base (no text or symbols)1 Open the battery compartment by removing the lid.
2 Insert the batteries (2 x 1.5 V micro, for example R03 or AAA). Observe the polarity marked in the bottom of the battery compartment.
3 Close the battery compartment.
Note:
If the television no longer reacts properly to remote control commands, the batteries may be flat. Always remove used batteries.
■ The manufacturer accepts no liability for damage caused by leaking batteries.
Environmental note
■
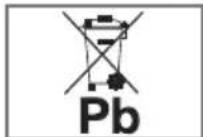
This symbol on rechargeable batteries/batteries or on the packaging indicates that the rechargea-
ble battery/battery may not be disposed of with regular household rubbish. For certain rechargeable batteries/batteries, this symbol may be supplemented by a chemical symbol. Symbols for mercury (Hg) or lead (Pb) are provided if the rechargeable batteries/batteries contain more than 0.0005% mercury or more than 0.004% lead.
Rechargeable batteries/batteries, including those which do not contain heavy metal, may not be disposed of with household waste. Always dispose of used batteries in accordance with local environmental regulations. Make enquiries about the applicable disposal regulations where you live.
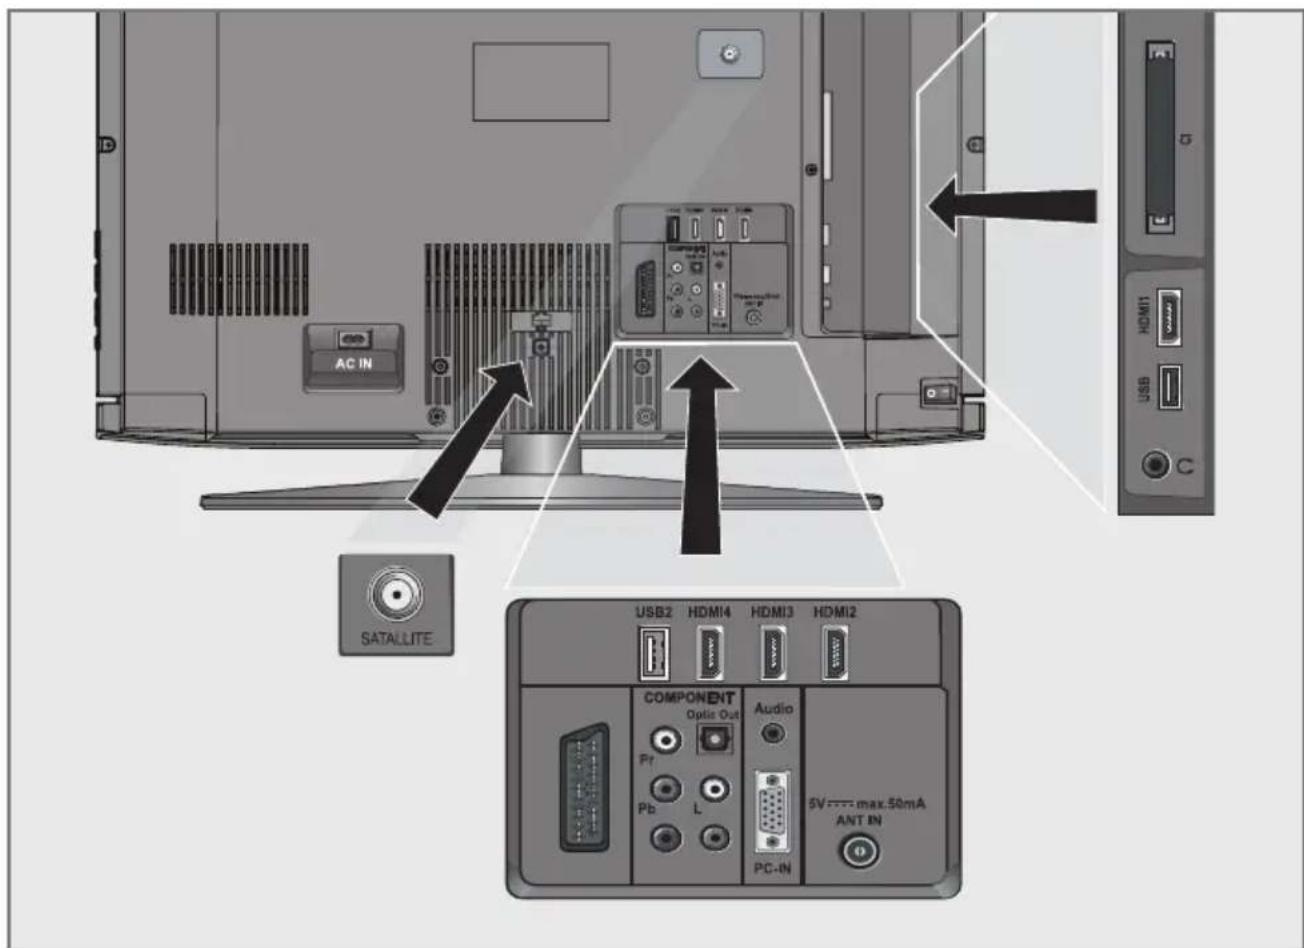
Connections on the television set
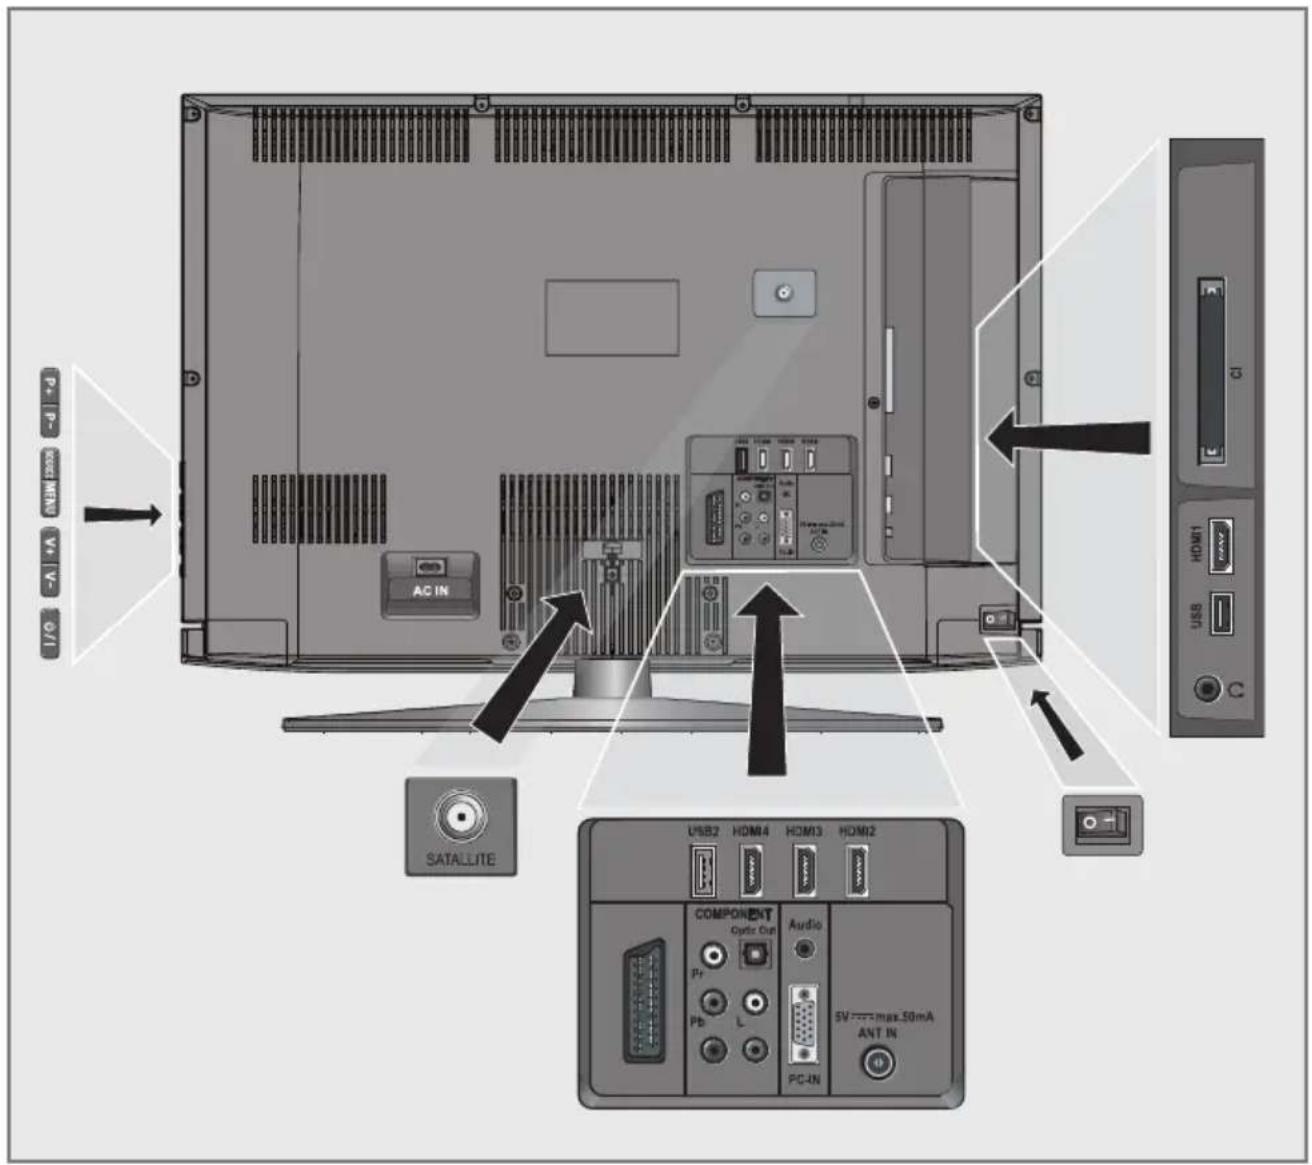
SATELLITE Antenna socket for the satellite antenna (DVB-S).
AV1 / S-VHS SCART socket (CVBS signal, RGB signal); Video and sound socket for S-Video camcorder.
COMPONENT
Pb Pr Y/AV2 Sockets for video input (YUV signal).
L R Sockets for audio input (YUV signal); Audio socket for camcorder.
Y/AV2 Video socket for camcorder
Optic Out Socket for audio output (optical) for PCM/AC3 signals. For connecting digital AV amplifiers or AV receivers.
Audio Socket for audio input for a PC.
PC-IN VGA socket, video input for PC.
ANT IN Antenna socket for a DVB-T, DVB-C and analogue antenna.
HDMI2 HDMI socket, audio/video input.
HDMI3 HDMI socket, audio/video input.
HDMI4 HDMI socket, audio/video input.
USB2 USB socket for external data media.
Headphone jack (3.5 mm jack plug); Sockets for audio output.
USB1 USB socket for external data media without a power supply of their own.
HDMI1 HDMI socket, audio/video input.
CI Common Interface Slot.
Controls on the television set
Switches the television on and back into standby mode.
V- V+ Adjusts the volume; selects menu functions.
MENU Opens the menu. Select a menu option with »P+« or »P-«. Activate the function with »V+«. Confirm the function with »V+« or »V-«.. Press »MENU« to quit the menu.
SOURCE Opens the pre-selection for AV channels. In the menu, press »P+« or »P-« to select and press »SOURCE« to confirm.
P- P+ Switches the television on from standby; selects channels in steps; selects function in the menu.
The remote control - Main functions
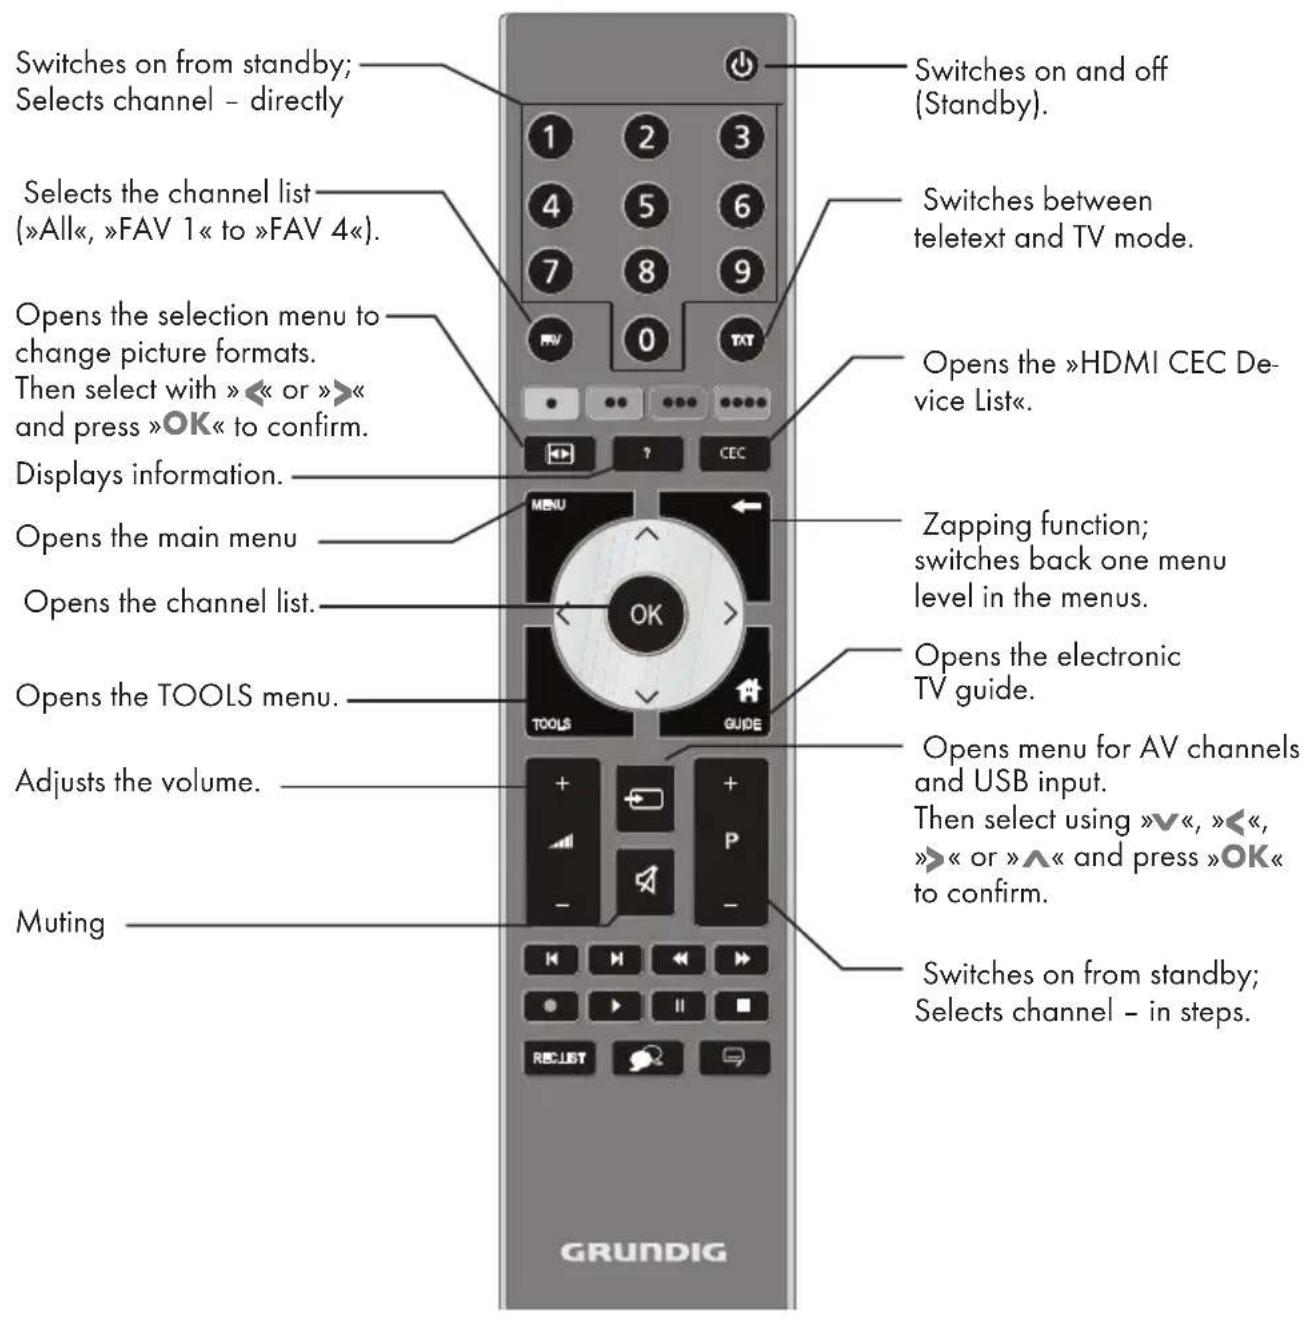
Navigation in the menus
natural_image
Circular button with black center and four directional arrows, no text or symbols visibleMoves the cursor up and down in the menus.
Moves the cursor to the left and right in the menus.
Activates various functions and save functions/settings.
The remote control – All functions
»•« (red) Selects pages in teletext; »••« (green) Selects/activates various »•••« (yellow) functions in the menus. »••••« (blue)
Key has no function.
Starts playing a programme from an external data medium.
Freeze frame; Playback pause from an external data medium.
Ends playback of a pro- gramme from an external data medium; Splits the screen in teletext.
Switches to double character size in teletext; Selects the next title/next picture in the file browser.
Refreshes a teletext page; Selects the previous track/previous picture in the file browser.
Stops scrolling through pages in teletext; Starts a fast reverse search in the file browser.
▶ Reveals answers in teletext; Starts a fast forward search in the file browser.

Selects different subtitles (only for digital television channels)

Selects different audio languages (only for digital television channels)
Initial set-up and tuning television channels
The television set is equipped with automatic channel search, which searches for satellite channels (DVB-S), terrestrial channels (DVB-T), cable channels (DVB-C) and analogue channels.
You start the search and the television channels will be stored into the Program Table. Following, you can sort the satellite channels (DVB-S) in the Program Table.
The sorting of terrestrial channels (DVB-T), cable channels (DVB-C) and analogue channels is only possible in the favourite list
For DVB-S channels there are 6000 presets available, for DVB-T and DVB-C channels 1000 presets, and 99 presets for analogue channels.
The various settings
Depending on the type of antenna connected, you can decide which channels you would like the television to search for.
■ Tunes digital television channels from the satellite, from page 15. You have two options for this search:
- the basic installation which presets a standard selection, e.g. the satellite Astra 19.2° East; you need only start the search;
- the professional installation, which allows you to make all required settings and set parameters for your receiver system.
■ Tunes digital terrestrial television channels, on page 17.
■ Tunes digital television channels from the cable provider, on page 17.
■ Tunes analogue television channels, in the chapter "Special functions", starting on page 54.
■ Further settings for digital television channels after the initial set-up can also be found in the chapter "Special functions", starting on page 47.
Note:
■ Make the language and country selection for all types, then continue reading the respective chapter.
Selecting language, country and operating mode
1 Switch on the television set from standby with »↓«, »1...0« or »P+« or »P-«.
- During initial set-up, the »Installation Guide« will be displayed.
Help:
If this menu is not displayed, restore the television set to its default settings (see page 38).
2 Select the menu language with » «, »»«, »V« or »∧« and press »OK« to confirm.
- The settings used in »Home Mode« help to save energy.
- Alternatively, the menu item »Shop Mode« can be selected which the retailer can use for demonstrating the device functions.
Note:
■ End the »Shop Mode« by restoring the television set to its default settings (see page 38).
4 Select the country in which the television set is operated with »«, »«, »V« or »∧« and press »OK« to confirm.
- The »Source Setup« menu appears with the »Connection Type« line marked.
Note:
- You can find a description of how to tune the television channel of your choice – depending on the antenna connected – in the following chapters.
Tuning the television channels from satellite (DVB-S)
You have two options for tuning digital satellite channels.
A The easy installation, which pre-configures all antenna settings for the satellite channels on Astra 19.2° East.
B The advanced installation can be used if you wish to receive satellite channels from various satellites. To do so, you must make the antenna settings (Satellite, LNB Power, LNB Type, DISEqC Mode, LNB Selection) for the satellites chosen.
Easy installation
In the »Source Setup« menu, in the »Connection Type« line, select the option »Satellite« with »« or »«.
2 Select the line »Easy Installation« with »V« or »A« and press »OK« to confirm.
- Other menu options will be displayed, the satellite Astra 19.2° East is preset.
3 Start the scan with » ••« (green).
- The »Search results« menu appears, and the scan for TV channels begins.
- Depending on the number of television channels received, this can easily take a few minutes.
- The scan is complete as soon as the »PROGRAM TABLE« appears.
Important note:
It is possible, that some TV channels (transponders) cannot be found. Repead the setting according the chapter "Advanced installation" and set the »Network Search« option to »On«.
Note:
■ You can abort the scan by pressing »MENU«.
Advanced installation
In the »Source Setup« menu, in the »Connection Type« line, select the option »Satellite« with »« or »«.
2 Select the line »Advanced Installation« with »V« or »A« and press »OK« to confirm.
- The menu appears.
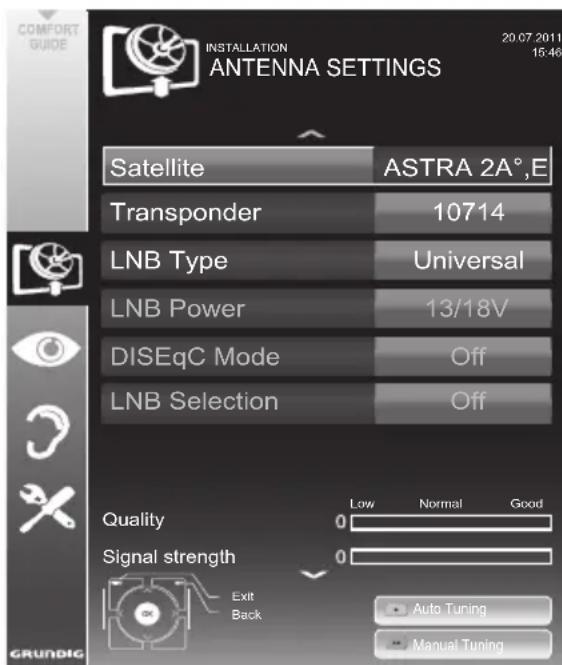
- The setting in the line »Transponder« is not required for this automatic scan.
4 Select the line »LNB Power« with »V« or »A«.
Depending on the type of LNB, set the LNB power supply to »13/18 V« or »14/19 V« with »« or »«.
5 Select the line »LNB Type« with »√« or »∧«. Select the type of LNB installed with »«« or »»«.
- DiSEqC 1.0 allows up to four satellites to be received simultaneously.
- DiSEqC 1.1 allows up to 16 satellites to be received simultaneously.
7 Select the line »LNB Selection« with » V« or »A«.
Select the setting for the respective satellites with »« or »«.
8 Once the settings for the satellite have been made, switch to the »AUTOMATIC CHANNEL SEARCH« menu with »•« (red).
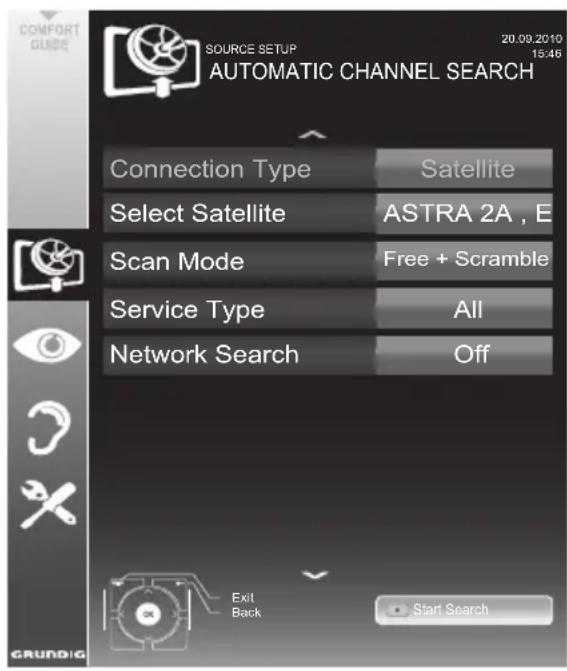
9 Select the line »Scan Mode« with » V« or »Λ«.
Select the scan mode with » « or »« (for unencrypted channels, for encrypted channels only, or for both).
Use » « or »» to select whether you want to search for television channels only (TV), radio stations only (Radio) or both (Radio + TV).
Important note:
It is possible, that some TV channels (transponders) cannot be found. This is caused by a change in satellite parameters made by the broadcaster, e.g. new channels have been added. Set the »Network Search« option to »On«.
11 Start the scan with »•« (red).
- The »Results« menu appears, and the scan for TV channels begins.
- Depending on the number of television channels received, this can easily take a few minutes.
- The scan is complete as soon as the »PROGRAM TABLE« appears.
Note:
■ You can abort the scan by pressing »MENU«.
12 Press »MENU« to end the setting.
Note:
■ If other television channels are to be tuned from a second satellite, proceed as follows:
Open the menu with »MENU«, select the line »SOURCE SETUP« with »V« or »A« and press »OK« to confirm. Then select the »Automatic Channel Search« with »V« or »A« and press »OK« to confirm. Confirm the line »Select Satellite« with »OK« and select the preferred satellite with »V«, »A«, »« or »«. Start the scan with »« (red). Continue the adjustment by step 7 of the chapter.
Note:
■ Before recording HD channels, please check signal quality and Strength, see chapter "Displaying signal information" on page 79. If the level is displayed in green, you can record HD channels without any problems.
Tuning terrestrial television channels (DVB-T)
In the »Source Setup« menu, in the »Connection Type« line, select the option »Air« with »« or »«.
- »DTV«, scan for digital television channels;
- »ATV«, scan for analogue television channels;
- »DTV & ATV«, scan for analogue and digital television channels.
Caution:
■ The antenna power supply (5V) may only be switched on if the antenna is an active indoor antenna with a signal amplifier and it is not already supplied with a voltage via a mains plug (or similar supply). Otherwise you may cause a short circuit and irreparably damage your antenna.
3 Select the line »Active Antenna Power« with »V« or »Λ«.
Switch on the antenna power supply for the antenna with »« or »« (»On«).
4 Start the scan with » ••« (green).
- The »Search Results« menu appears, and the search for TV channels begins.
- Depending on the number of television channels received, this can easily take a few minutes.
- The scan is complete as soon as the »PROGRAM TABLE« appears.
Note:
■ You can abort the scan by pressing » MENU«.
5 Press » MENU« to end the setting.
Tuning television channels from the cable provider (DVB-C)
- »DTV«, scan for digital television channels;
- »ATV«, scan for analogue television channels;
- »DTV & ATV«, scan for analogue and digital television channels.
3 Select the line »Cabel Scan Type« with » √« or »∧«. Select the preferred option (»Quick« or »Full«) with »◀« or »▶«.
- The search function Quick« sets up the channels according to the information provided by your cable provider in the transmission signal.
- If the option »Full« is selected, the entire frequency range will be scanned. The search can take a long time with this option. This option is recommended if your cable provider does not support the scan type »Quick«.
Note:
- You can accelerate the search. To do this, you need information about the frequency and network ID. You are usually able to get this data from your cable operator or find it in forums on the Internet.
4 Start the scan with » ••« (green).
- The »Search Results« menu appears, and the search for TV channels begins.
- Depending on the number of television channels received, this can easily take a few minutes.
- The scan is complete as soon as the »PROGRAM TABLE« appears.
Note:
■ You can abort the scan by pressing »MENU«.
5 Press » MENU« to end the setting.
Changing the program table for the digital channels
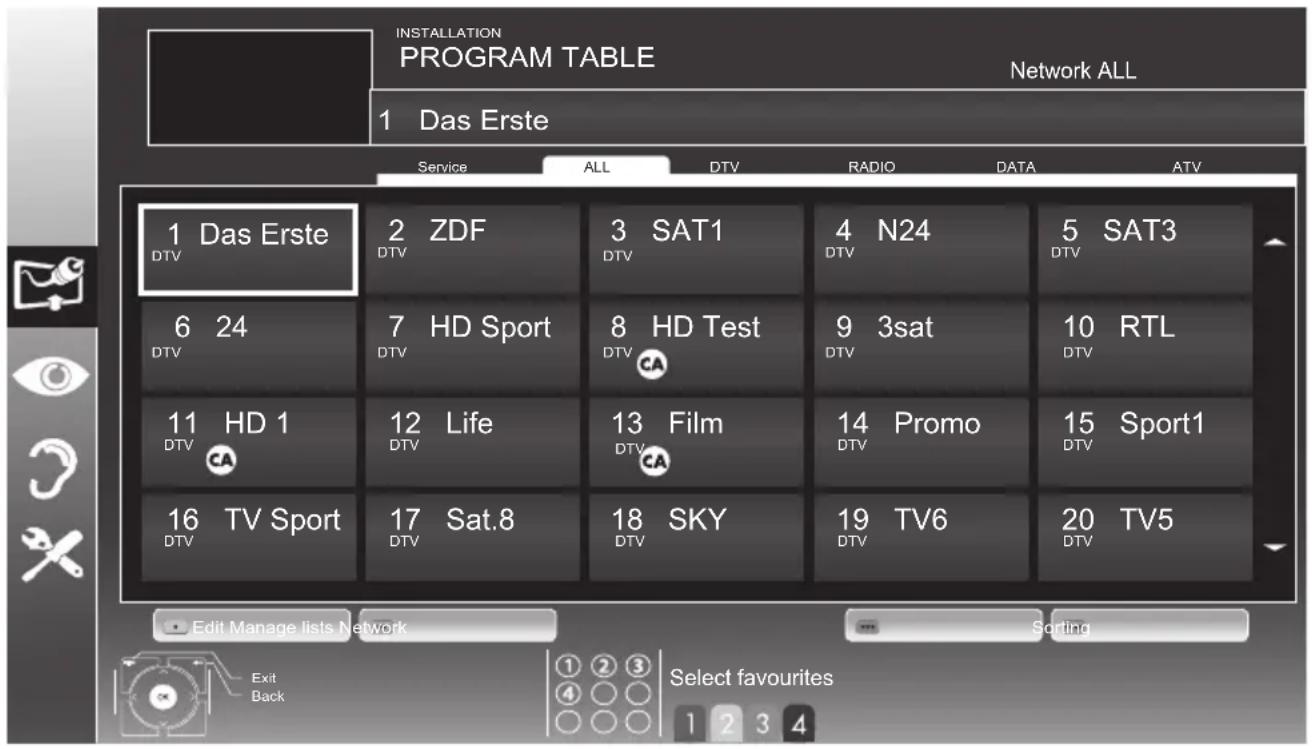
Channels which are found using the scan are saved in the »PROGRAM TABLE«.
You can delete channels which are not required from the programme table, and lock individual channels (Parental control).
You can also add channels to the favourites list; in addition, you can change the order of channels within the favourites list.
With »••« (green) you can display the channels which belong to one network.
Switch to the next page in the programme table with »P+« and to the previous page with »P-«.
With »...« (yellow) you can open the »LIST MANAGEMENT« within the programme table.
In this List Management you can create your own favourites lists.
Selecting channel lists
1 Open the menu with »MENU«.
2 Select the »SOURCE SETUP« menu with »V« or »A« and press »OK« to confirm.
- The »SOURCE SETUP« menu appears.
3 Select the line »Programe Table« with »V« or »A« and press »OK« to confirm.
- The menu »PROGRAM TABLE« appears.
Important:
■ Programe table and favourites lists are saved separately according to the different input sources (cable and air).
■ When opening the programme table, the respective channel list for the current input signal appears.
Note:
If in the Program Table appears added to the name of the channel, you need a CI module and a Smart-Card for watching these channels.
Deleting channels
In the »PROGRAM TABLE« menu, select the Edit mode by pressing »•• (red).
2 Select the television channel to be deleted with »∨«, »∧«, »« or »» and press »•••« (yellow) to delete.
Note:
■ You can delete all channels with »●●●●« (blue).
3 Confirm the deletion process with » ••« (green);
or
cancel the deletion process with » • « (red);
4 Quit the program table with »MENU«.
Change the order of the channels in the program table
(only for satellite channels)
In the »PROGRAM TABLE« menu, select the Edit mode by pressing »•• (red).
2 Select the channel which should be moved with »∨«, »∧«, »« or »» and mark it with »•« (red).
3 Move the channel to its new position with »V«, »A«, »« or »» and press »OK« to confirm.
Note:
■ Repeat steps 2 and 3 if you would like to change other channels.
4 Quit the program table with »MENU«.
Sorting channels in the program table
(only for satellite channels)
You can sort the order of the channels in the program table according different criteria: in order of Satellite, alphabetical or in order of encrypted/free channels.
In the »PROGRAM TABLE« menu, select the Sort mode by pressing »•••••« (blue).
2 Select the sort criteria with »•• (red), »••• (green) or »•••• (yellow).
3 Quit the program table with »MENU«.
Skipping channels
You can mark television channels which should be skipped when selecting with « or »«. It is still possible to select them using the number buttons.
In the »PROGRAM TABLE« menu, switch over to the list view with »●●●« (yellow).
2 Select the preferred channel with » V« or »A«.
3 Select the column »Skip« with »« or »»« and use »OK« to mark the channel.
- The channel is marked by »√«.
4 Quit the program table with »MENU«.
Note:
- Channels can also be reactivated. Select the channel with »V« or »A«, then select the column »Skip« and reactivate the channel with »OK«.
Creating lists of favourites
You can save your favourite channels in up to four favourites lists (FAV 1 to FAV 4).
Notes:
■ Favourites lists must be created separately for all input sources (satellite, cable, air).
■ You can select the favourites list by pressing »FAV«.
1 In the »PROGRAM TABLE« menu, switch over to the list view with »●●●« (yellow).
2 Select the channel of your choice with »V« or »Λ«.
3 "Push" the channel into the favourites lists 1 to 4 with »« or »« and press »OK« to confirm.
- The position in the favourites list is marked with »√«.
- You can enter the same channel in more than one favourite list.
- Each favourite list can store up to 250 channels.
Note:
- Channels can also be deleted from the favourites lists. Select the channel to be deleted with »V«, »A«, »« or »» and press »OK« to delete it.
■ When deleting a channel from the favourites list, the order within the favourites list will be updated.
4 Quit the program table with »MENU«.
Sorting channels in the favourite list
You can change the order of channels in the favourites list.
1 In the »PROGRAM TABLE« menu, select the favourites list »1« to »4«.
2 Select the channel which should be moved with »∨«, »∧«, »« or »» and mark it with »•« (red).
3 Move the channel to its new position with »V«, »A«, »« or »» and press »OK« to confirm.
Notes:
■ Repeat steps 2 and 3 if you would like to change other channels within the same favourites list.
■ Repeat steps 1 to 3 if you would like to change channels in a different favourites list.
4 Exit the current favourites list with »••••« (blue).
- The entire programme table will appear again.
5 Quit the program table with »MENU«.
Enter own names for the favourites lists (max. 6 characters)
You can enter own names for all favourites lists.
In the »PROGRAM TABLE« menu, switch over to the list view with »●●« (yellow).
2 Select the desired favourites list with »1« till »4«.
- The Favorite Name screen is displayed.
3 Delete the „old“ name (FAV1), for this purpose select with »V«, »A«, »« and »» the push button »x« and delete the character with »OK«.
4 Select the required character/numeric with »V«, »A«, »« and »» and confirm with »OK«.
Repeat the procedure for further characters/ numerics.
- Select »ABC« for uppercase and »abc« for lower case and confirm with »OK«.
- Select »?@123« for numbers and symbols and confirm with »OK«.
5 Confirm the new name, select the push button »Submit« with »V«, »A«, »« or »» and confirm with »OK«.
6 Press »MENU« to end the setting.
Picture settings
1 Open the menu with »MENU«.
2 Select the menu item »PICTURE SETTINGS« with »V« or »A« and press»OK« to confirm.
- The »PICTURE SETTINGS« menu appears.
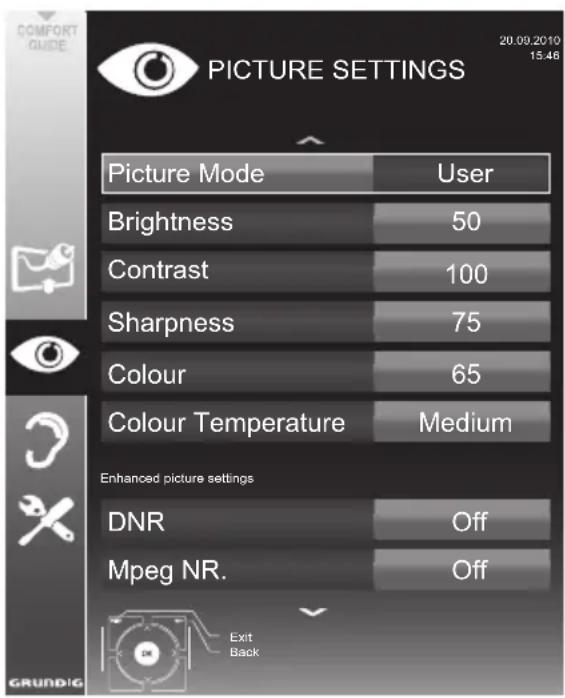
■ When changing the values with » « or »», the screen will be split. You can see the current setting on the left side, the new setting on the right side.
In the »PICTURE SETTINGS« menu you can also find other additional settings.
»Mpeg NR« reduces any interference from artefacts (pixel blocks) from digital programmes due to MPEG compression (such as from DVB-T receivers or DVD players).
■ The »Film Mode« detects and processes feature films automatically for all channel sources. This means you will always receive an optimal picture.
This functions in the modi 480i, 576i and 1080i in TV playback and for other channel sources.
If the »Film mode« is switched on for programmes without a feature film signal, minor problems such as picture freeze, defective subtitles or fine lines in the picture could occur.
The function »Dynamic Contrast« adapts the contrast dynamically and optimally for the respective picture content.
- With »Dynamic Backlight«, the device optimally adapts the background lighting to the picture content.
The »Backlight« can only be set manually when the function »Dynamic Backlight« is deactivated.
■ »MEMC« will only appear in menus of LCD products with 200 Hz PPR Feature and LED products with 400 Hz PPR feature..
5 Press » MENU« to end the setting.
Sound settings
1 Open the menu with »MENU«.
2 Select the menu item »SOUND SETTINGS« with »V« or »A« and press »OK« to confirm.
- The »SOUND SETTINGS« menu appears.
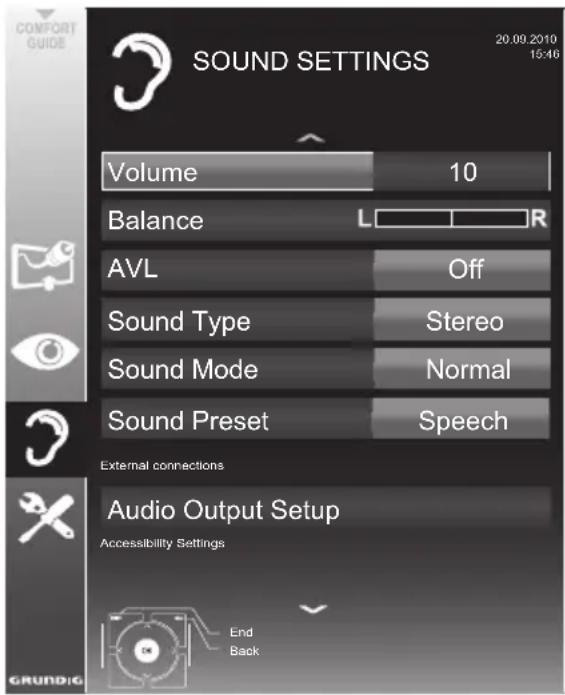
Note:
■ Additional operations are explained in the following sections.
Volume
1 Select the line »Volume« with »V« or »A« and change the setting with »« or »»«.
Balance
1 Select the line »Balance« with » V« or » ∧« and change the setting with »« or »»«.
Automatic volume
Television stations broadcast at different volumes. The automatic volume limiting (AVL) function means the volume is kept the same when you switch between channels.
1 Select the line »AVL« with » V« or »^« and select the option »On« with »« or »».
Note:
If the »SRS TSHD« setting has been selected in the »Audio Mode« line, the AVL line cannot be selected.
Stereo/two channel sound, mono
If the device receives two-channel-sound programmes, e.g. a film with the original soundtrack on audio channel B (display: »Dual II«) and the dubbed version on sound channel A (display: »Dual I«), you can select the audio channel you prefer.
If the device receives stereo or Nicam programmes, it switches automatically to stereo sound (display: »Stereo«).
You can switch the sound to »Mono« if the stereo sound quality is poor.
1 Select the line »Audio Type« with »∨« or »∧« and adjust the setting with »◀« or »▶«.
Stereo width
This broadens the sound output for stereo programmes and improves the sound with mono reception.
This menu offers three preset sound effects (Music, Natural and Speech) and one setting to be created by you (User).
1 Select the line »Sound Preset« with » V« or »A«.
2 Select the sound effect »Music«, »Natural« or »Speech« by pressing »« or »»«.
Note:
- »User« option is active when »Sound mode« setting is selected as »Normal or »Spatial«.
SRS TruSurround HD
SRS TruSurround HD is a patented audio technology which is integrated into the television set and only requires the built-in speakers to generate a Surround Sound effect.
1 Select the line »Sound Mode« with » V« or »^«.
2 Select the option »SRS TSHD« with »« or »»«.
3 Select the line »SRS Sound Preset« with » V« or »A«.
4 Select the sound effect »Music«, »Natural« or »Speech« with »«« or »»«.
Equalizer
Equalizer offers a sound setting that you can create.
Equaliser appears in the menu when »Sound mode« is selected as »Spatial« or »Normal«, and »Sound Medium« as »User«.
1 Select »Equalizer« with »V« or »A« and press »OK« to confirm.
The »EQUALIZER« menu appears.
Note:
If the »SRS TSHD« setting has been selected in the »Sound Mode« line, the »Equalizer« line will not indicate.
2 Select the frequency bandwidth »120Hz« with »V« or »A«.
Set the preferred value with »« or »»«.
3 Set the next frequency bandwidth with » V« or »A« and repeat the setting.
4 Press » ←« to save the setting.
Audio description (Audio subtitles)
Audio description is an additional audio channel for visually-impaired persons. Descriptions are provided of activities, surroundings, changes of scene, gestures and actors' facial expressions.
This audio channel is transmitted simultaneously with the normal sound on digital channels. Availability depends on the respective channel and broadcaster.
1 Select the line »Audio Description« with »V« or »A« and select the option »On« with »« or »»«.
2 Select the line »Volume« with »V« or »A« and change the volume with »« or »».
Exiting the setting
1 Press »MENU« to end the setting.
Basic functions
Switching on and off
1 Press »◀«, »1...0« or »P+« or »P-« to switch on the television from standby mode.
2 Press » ⏻ to switch the television to standby.
Selecting channels
1 Press »1...0« to select presets directly.
2 Select channels step by step with »P+« or »P-«.
3 Open the channel list with »OK«, select the preferred television channel with »V«, »A«, »« or »» and press »OK« to confirm. Exit the channel list with »MENU«.
Selecting channels from lists
You can select channels from various lists (e.g. all channels, FAV 1 to FAV 4).
1 Press » FAV« to open an overview of pro- grame tables.
- The overview is displayed.
2 Select a channel list with » ∧« or »∨« and open it with »OK«.
3 Select a television channel with » V«, »∧«, »« or »« and press »OK« to confirm.
4 Press » MENU« to exit the channel list.
Selecting a preset AV channel
1 Open the »Select Source« menu with » «
2 Select an AV preset with » V«, »∧«, »« or »» and press »OK« to confirm.
3 Use »1...0« to switch back to the television channel.
Adjusting the volume
1 Adjust the volume with » + ∥ -«.
Switching sound on/off
1 Press » 🔒 « to mute the sound or switch it on again.
Displaying information
1 Display information with »?«.
- The display disappears automatically after a short while.
Freeze-frame
If you wish to view a particular scene for longer, you can "freeze" the frame of the current programme.
1 Activate the freeze-frame function with » ||«.
2 End the freeze-frame function with » ||«.
Picture settings
Various picture settings are available.
Various audio settings are available.
1 Open the Tools menu with »TOOLS«.
2 Select the menu item »Sound Preset« with »V« or »A«.
3 Select the audio setting »User«, »Music«, »Natural« or »Speech« by pressing »« or »»«.
Note:
- »User« option is active when »Sound mode« setting is selected as »Normal or »Spatial«.
Audio language
Various languages are available on digital television channels. This depends on the programme being broadcast.
1 Open the selection menu with »
2 Select the language by pressing »V« or »A« and press »OK« to confirm.
Subtitles
Various subtitles are available on digital television channels. This depends on the programme being broadcast.
1 Open the selection menu with » «.
2 Select the subtitles with »V« or »A« and press »OK« to confirm.
Zoom function
1 Open the Tools menu with »TOOLS«.
2 Select the menu item »Zoom« with »V« or »A«.
3 Press »OK« repeatedly to enlarge the display in three steps.
Eco mode
This function allows you to reduce the power consumption.
1 Open the Tools menu with »TOOLS«.
2 Select the menu item »Eco TV« with »V« or »A«.
3 Switch on the Eco mode with » « or »«.
4 Switch the Eco mode off again with »« or »«.
Entering the switch-off time (sleep timer)
In the »Sleep Timer« menu you can enter a time for the television to switch off. After this time has elapsed, the television switches to standby mode.
1 Open the Tools menu with »TOOLS«.
2 Select the line »Sleep Timer« with »V« or »A«.
3 Enter the switch-off time with » « or »«.
Note:
■ To switch off the function, use »« or »» to set the switch-off time to »Off«.
Zapping function
This function remembers the channel you are currently watching while you switch over to other ones (zapping).
1 Press »1...0« or »P+«, »P-« to select the channel to be stored in the zapping memory and press »←« to confirm.
2 Press »1...0« or » ∧«, »V« to switch to another television channel.
3 Press » ←« to switch between the saved television channel and the last television channel viewed.
4 End the function with » MENU«.
Electronic TV guide
The electronic TV guide provides an overview of all programmes that will be broadcast in the next week (for digital channels only).
1 Press »GUIDE« to display channel information.
Notes:
■ Not all channels supply provide a detailed TV guide.
■ Many broadcasters transmit the current schedule, but do not offer detailed descriptions.
■ There are broadcasters which do not provide any information at all.
2 Press » V« or » A« to select a television channel.
- Today's programmes on the television channel selected are displayed.
3 Switch to the information about the current programme with »»«.
Notes:
- You can open and switch off the extensive programme information with »?«.
- You can can added the selected broadcast to the memory timer by pressing »OK«.
4 Press » v« to select information on the next programme and, » ∧« to return to the information for the current programme.
5 Select programmes on over the coming days with »••• (green), and switch back to the current day with »•• (red).
6 Switch back to the channel selection with »«.
Note:
■ Filter for certain programmes with »•••« (blue), select the channel type with »«, »», »V« or »^« and press »OK« to confirm. Programmes which match the selected channel type are displayed.
7 Quit the electronic TV guide with » MENU«.
Changing the picture format
The television automatically switches to the 16:9 format if this format is detected via the SCART socket.
1 Select the picture format with »
- The picture format (for example »16:9«) is displayed.
- You can choose between the following picture formats:
»Auto« format
The picture format is automatically switched to »16:9« for 16:9 programmes.
The picture format is automatically switched to »4:3« for 4:3 programmes.
For programmes in 4:3 format, the picture is stretched horizontally if the »16:9« format or »14:9« format is selected.
The picture geometry is stretched horizontally.
With actual 16:9 input sources (from a set-top box on the SCART socket) the picture fills the screen completely and with the correct geometry.
»4:3« format
The picture is shown in 4:3 format.
»LetterBox« format
The letterbox format is especially suitable for programmes in 16:9 format.
The black borders which are usually at the top and bottom of the screen are eliminated, 4:3 pictures fill the screen.
The transmitted pictures are enlarged, but are slightly cropped at the top and bottom. The picture geometry remains unchanged.
»Subtitle« format
If you cannot see the subtitles at the bottom of the screen, select »Subtitle«.
»Panorama« format
This setting is suitable for films in an especially wide format.
During programmes in 4:3 format, the picture is stretched horizontally if the »Panorama« function is selected. The picture geometry is stretched horizontally.
»Overscan« format
In this mode, HD pictures are not cropped by the HDMI sockets or component sockets, and are displayed in their original size. This only applies in HDMI mode and for resolutions of 720p or above.
File formats
Your television can work with the following file formats using the USB sockets:
Video data
Special codecs for video compression and decompression provide more memory space without compromising the picture quality excessively.
Your television plays video files in the formats DIVS, XVID, H.264/MPEG-4 AVC (L4.1, 4 reference pictures), MPEG-4, MPEG-2, MPEG-1, MJPEG and MOV.
The following file name extensions are also supported: AVI, MKV, MP4, TS, MOV, MPG, DAT, VOB. These files can also contain audio files compressed using MP3, AAC or Dolby Digital ^© .
Audio data
Your television can play audio data in the formats MP3, AAC, WMA.
MP3 is the abbreviation for MPEG-1 Level 3 and is based on the MPEG-1 standard, which was developed by the MPEG (Motion Picture Expert Group).
AAC stands for Advanced Audio Coding and was also developed by MPEG. AAC provides better sound quality at an identical data rate.
WMA (Windows Media Audio) is a compression standard for audio data developed by Microsoft.
These formats allow audio files to be recorded and played which sound as good as a CD, while taking up only a fraction of the memory space.
File name extensions which are supported: MP3, MP2, WMA, M4A, AAC.
MP3 files can be organised into folders and subfolders, as on the computer.
Image data
Your television can display pictures in the formats JPEG, PNG and BMP.
JPEG stands for Joint Picture Experts Group. It denotes a process for compressing picture files. PNG and BMP are process used to save image data with no, or very little, losses.
Picture files can be stored with other types of files on one medium.
These files can be organised into folders and subfolders.
Connecting external data media
Before connecting the data medium, switch the television to standby using ⬆. Connect the device and then switch the television on again. Before removing the external data medium, the television set must be switched to standby, so that no data loss occurs.
Notes:
■The »USB2« socket of the television set supplies a maximum power of 500 mA in accordance with USB specifications. External hard disks which require more power may therefore only be connected to the »USB1« of the television set.
If you use a network cable for external hard disks which are connected to the »USB1« socket on the television, this network cable must also be disconnected from the power supply when the television is switched off.
■ External data media may not be disconnected from the television set while files on the data medium are being accessed.
■ A bi-directional data transfer as defined for ITE (Information Technology Equipment) devices in EN 55022/EN 55024 is not possible.
■ USB transfer is not in itself an operating mode. It is only an additional function.
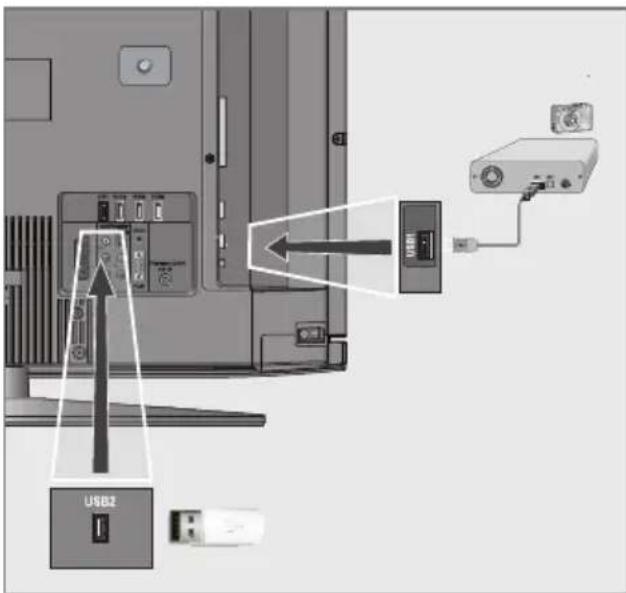
1 Connect the »USB1« socket of the television and the corresponding socket on the data device (external hard drive, digital camera, card reader or MP3 player) using a USB cable;
or
insert the USB plug of the USB memory stick into the »USB2« socket of the television set.
2 Confirm the display » (green).

with
●●<<
- The file browser appears.
The file browser
The file browser displays video, audio and picture files stored on external data media.
If an external data medium contains files in different formats, you can, when necessary, filter out the formats not required.
Main menu of the file browser
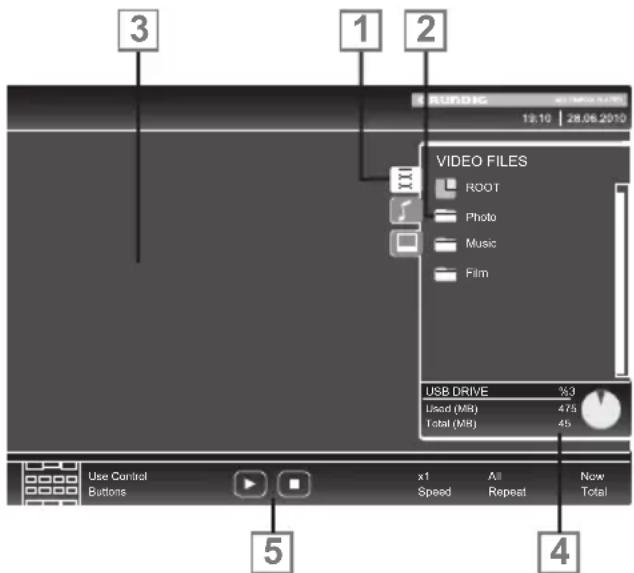
1 Selected data format.
2 Total number of folders on the data medium.
3 Preview of the selected file.
4 Information on the external data medium.
5 Menu navigation.
Settings in the USB setup menu
Selecting the menu
1 Open the menu with »MENU«.
2 Select the »SOURCE SETUP« menu item with »V« or »A« and press »OK« to confirm.
- The »USB SETUP« menu appears.
Note:
■ Additional functions are explained in the following sections.
Switching on automatic preview
If this function is switched on, a preview of the selected file then appears in the file browser.
Setting the display duration for pictures in a slideshow
1 Select »Slide Show Interval« with »V« or »A«.
2 Select the display duration (3, 5, 10 seconds) with »« or »«.
3 Press » MENU« to end the setting.
DivX® VOD
You must have your device registered in order to play the protected video that you will buy from DivX®.
1 Select »DivX ^® VOD« with »V« or »A« and confirm with »OK«.
- Registration Code appears.
2 Visit "http://vod.divx.com" and register the device with the registration code.
3 Press » MENU« to end the setting.
DIVX ^+ HD
DivX Certified ^® to play DivX ^® and DivX Plus ^™ HD (H.264/MKV) video up to 1080p HD including premium content.
ABOUT DIVX VIDEO: DivX ^® is a digital video format created by DivX, Inc. This is an official DivX Certified ^® device that plays DivX video. Visit divx.com for more information and software tools to convert your files into DivX video.
ABOUT DIVX VIDEO-ON-DEMAND: This DivX Certified ^® device must be registered in order to play purchased DivX Video-on-Demand (VOD) movies. To obtain your registration code, locate the DivX VOD section in your device USB setup menu. Go to vod.divx.com for more information on how to complete your registration.
Basic playback functions
1 Select the data medium by pressing »«,→
use »V«, »A«, »« or »» to select the option »USB« and press »OK« to confirm.
- The file browser appears.
2 Select the file format (video files, audio files, picture files) with »V« or »Λ«.
3 Switch to the folder/file list with »OK«.
Note:
■ USB data medium with several partitions is connected to the USB sockets, the letter for the respective drive (e.g. C) appears behind the folder symbol. Select the letter of the drive with »V« or »A« and press »OK« to confirm.
4 Select the folder or file with »V« or »A« and press »OK« to open it.
- A list of subdirectories appears.
Note:
■ Switch back to the main folder with »←«.
5 Select the track or picture with » V« or »∧« and press »▶« to start playing.
- You can view information on the film data by pressing »?«.
- When playing MP3 or WMA data, information on the album, track and singer is displayed at the left of the menu.
- When playing picture files, you can use »?« to display information about the resolution and size.
- When playing picture data, press » ?« twice to enter the DivX® Settings menu.
Note:
- When playing picture data, the file browser switches off. Press »« to display the file browser again.
The file browser appears.
Notes:
■ Use »^« to select »Up Folder«, when you would like to return to the last folder. Use »Root« (and then press »OK«) to return to the main folder.
It is possible that files which are actually supported do not function correctly in USB mode. This is because certain files are not recorded with standardised compression processes, although they feature the "right" file ending.
If a video file features several audio tracks (audio streams), you can switch these over during playback in full screen mode with » «.
■ When playing music files, you can use other options in the USB mode at the same time. This way, you can, for example, enhance a slideshow with music.
■ For films, only subtitles in the SRT format are supported. The names of the subtitle and film files must be identical. Otherwise, no subtitles will be shown.
Additional playback functions
Depending on the file format, the following additional functions are available:
Selecting chapters on DivX® files
(only video files)
1 During playback, select the next chapter with »»«.
2 During playback, select the previous chapter with »«.
Note:
- You can also select chapters by entering the chapter number with »1...0«.
Selecting titles on DivX® files
(only video files)
1 During playback, select the next title with »^«.
2 During playback, select the previous title with »V«.
Playing selected titles
Only the marked tracks are played.
1 Select the titles with » V« or » ∧« and press »OK« to mark it.
2 Select the next title with »V« or »A« and press »OK« to mark it.
3 Start playback with » ▶«.
4 Press » ■ « to end playback.
Note:
■ To remove the marking, select the title with »V« or »A« and press »OK« to remove the marking.
Selecting a track or picture in steps (SKIP)
1 During playback, select the next track/picture with »▶|«.
2 During playback, select the previous track/picture with »|«.
- Playback begins with the track or picture you selected.
Selecting a certain passage for playback
(video files only)
1 During playback, press »OK«.
2 Enter the passage (time) with »1 ... 0« and press »••« (green) or »OK« to confirm.
Fast forward
(for video and audio files only)
You can select different speeds (2-fold, 4-fold, 8-fold, 16-fold and 32-fold forwards and backwards).
1 Select the playback speed during playback with »«« or »»«.
2 Press » ▶ « to resume normal playback.
Rotating pictures
(picture files only)
You can rotate pictures by 90^ .
1 During playback, press » « or » to rotate the pictures by 90°.
Repeat functions
Options:
- »One Repeat«: the current track will be repeated.
- »All Repeat«: all tracks will be repeated.
1 Open the Tools menu with »TOOLS«.
2 Select the menu item »Repeat« with » V« or »A«.
At the bottom of the screen there is an info bar with red, green and - depending on the channel - yellow and blue panels. Similarly, the remote control also features buttons with different colours with which these pages can be selected.
3 Go back a page with » •« (red).
4 Go to the next page with » ••« (green).
5 Select a particular chapter with »•••« (yellow).
6 Select a particular subject with » ....« (blue).
7 Quit teletext with »TXT«.
Normal text mode
1 Press »TXT« to switch on teletext.
2 Press »1...0« to select teletext pages directly. Return to teletext page 100 with »?«.
3 Go back a page with » v«.
4 Go to the next page with » ∧«.
5 Quit teletext with »TXT«.
Additional functions
Skipping the waiting time
While a page search is progressing, you can switch to the TV programme.
1 Enter the teletext page number with »1...0« and then press »▶|«.
- As soon as the page is found, the page number is displayed.
2 Press » ▶|« to switch to the teletext page.
Enlarging the character height
If you have difficulty reading the text on the screen, you can increase the character height.
1 To enlarge the character height of a teletext page, keep pressing »|◀«.
Page hold
A multiple page may contain several sub-pages, which are automatically scrolled by the broadcasting station.
1 Stop the automatic scrolling of the sub-pages with »««.
2 Quit the function with » ◀◀◀.
Opening a sub-page directly
If the selected teletext page contains additional pages, the number of the current sub-page and the total number of pages are displayed.
1 Press » —« to open the sub-page function.
2 Use » « or »» to select the sub-page.
3 Quit the function with »—«.
Revealing answers
Certain teletext pages contain hidden answers or information.
1 Display information with » ▶▶«.
2 Press » ▶▶ « to conceal the information.
Split screen
This functions allows you to display the television channel on the left side, the teletext on the right side.
1 Switch the function on with » ■ «.
- The television channel and teletext are displayed next to each other.
2 Switch the function off with » ■ «.
Opening the SETTINGS menu
1 Open the menu with »MENU«.
2 Select the »SETTINGS« menu with »V« or »A« and press »OK« to confirm.
- The »SETTINGS« menu appears.
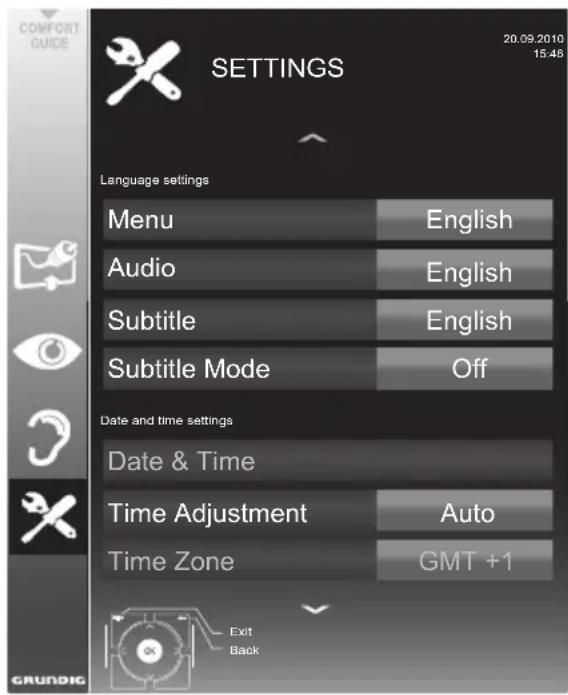
Note:
■ Additional operations are explained in the following sections.
Language settings
Changing the menu language
1 Select the line »Menu« with »V« or »A« and press »OK« to confirm.
- The »Select Menu Language« menu appears.
2 Select the menu language with »«, »«, »v« or »∧« and press »OK« to confirm.
3 Press » MENU« to finish the setting.
Changing the audio language
(only for digital television channels)
You can define a primary and a secondary audio language.
1 Select the line »Audio« with »V« or »A« and press »OK« to confirm.
- The »Select Audio Language« menu appears.
2 Select the audio language with »«, »«, »∨« or »∧« and then use »« (red) to set it as the primary audio language, or use »••« (green) to set it as the secondary audio language.
- The primary and secondary language is display at the top right in the menu.
3 Press » MENU« to end the setting.
Changing the subtitle language and subtitle mode
(only for digital television channels)
You can switch the subtitles on and off, select the subtitle language and allocate a second subtitle language.
1 Select the line »Subtitle« with »V« or »A« and press »OK« to confirm.
- The »Select Subtitle Language« menu appears.
2 Select the subtitle language with » √«, »∧«, »« or »»«, then use »•« (red) to set it as the primary subtitle language, or use »••« (green) to set it as the secondary subtitle language.
- The primary and secondary language is displayed at the top right in the menu.
3 To go back one menu level, press » ← «.
4 Select the line »Subtitle Mode« with » ▼« or »∧« and then set the preferred option »Off«, »Hard of Hearing« or »Basic« with «« or »»«.
5 Press » MENU« to end the setting.
Setting the date and time
Automatic setting
Your television set detects the difference in time to Greenwich Mean Time (GMT) automatically, as long as the channel selected transmits a time signal.
1 Select the line »Time Adjustment« with »V«, then select the option »Manual« with »« or »«.
- The lines »Time Zone« and »Daylight Saving« are active.
2 Select the line »Time Zone« with »V« and press »OK« to confirm.
- The »Select Time Zone« menu appears.
3 Select the appropriate time zone with »«, »«, »« or »« and press »OK« to confirm.
4 Select the line »Daylight Saving« with »∨« and use »« or »»« to set the option »Auto«, »Off« or »On«.
5 Press » MENU« to finish the setting.
Manual setting
You can also set the difference in time manually - for example, when the correct time is not detected automatically or does not correspond to local time for other reasons
1 Select the line »Date & Time« with » v« or »A« and press »OK« to confirm.
2 Select the line »Auto« with »V« or »A« and press »OK« to confirm.
- Date and Time will be updated automatically; or
3 Select the input box with »V« or »A«, enter the data for Date and Time with »1...0« and press »OK« to confirm.
Note:
If the option »Auto« is selected in the line »Time Adjustment«, the television set automatically adapts the time to the time signal from the respective broadcaster. However, different channels may also use time bases which are different to those of your country; e.g. foreign broadcasters. In these cases, reminders and planned recordings may be annulled due to the time difference.
Timer settings
Entering the switch-off time (sleep timer)
In the »Sleep Timer« menu you can enter a time for the television to switch off. After this time has elapsed, the television switches to standby mode.
1 Select the line »Sleep Timer« with »V« or »A«.
2 Enter the switch-off time with » « or »«.
Note:
■ To switch off the function, use » « or »» to set the switch-off time to »Off«.
3 Press » MENU« to end the set-up.
Switch-on timer
In the »Auto On« menu you can enter a switch-on time for the television. After the preset time has elapsed, the television switches on from standby – at the preselected volume and the preselected television channel.
1 Select the line » Auto On« with »V« or »A« and press »OK« to confirm.
2 Select the line »Mode« with »∨« or »∧« and use »«« or »»« to select when the television should switch on.
3 Select the line »Input Source« with »V« or »A« and use »« or »» to select the input source.
4 Select the line »Service Type« with »V« or »A« and use »« or »» to select the preferred option (ATV, DTV, Radio or DATA).
5 Select the line »Channel« with »V« or »A« and use »« or »« to select the preferred channel.
Note:
The line »Channel« is only active when the input signal currently in use has been set. If no entry has been made, then the first channel of the selected input source will be used.
6 Select the line »Volume« with »V« or »^« and use »« or »» to set the volume.
7 Select the line »Set Hour« with »V« or »A« and enter the time with »1...0«.
8 Save the data with » ••« (green).
Note:
■ You can abort the entry by pressing»•« (red).
9 Press »MENU« to end the setting.
Switch-off timer
In the »Auto Off« menu, you can enter a time for the television to switch off. After this time has elapsed, the television switches to standby mode.
1 Select the line »Auto Off« with »V« or »A« and press »OK« to confirm.
2 Select the line »Mode« with »V« or »^« and use »« or »» to set the preferred mode.
3 Select the line »Set Hour« with »V« or »Λ« and enter the time with »1...0«.
4 Save the data with » ••« (green).
Note:
■ You can abort the entry by pressing »•• (red).
5 Press » MENU« to end the setting.
Automatic switch-off (Auto Sleep)
If this function is activated, the television switches automatically to standby after 5 minutes if no video signal is broadcast or in accordance with the according to European regulations, the television switches automatically to standby after 4 hours provided that none of the buttons on the remote control or on the television is operated during this period.
3 Press » MENU« to end the setting.
Parental control settings
Authorising programmes
There are films which may be wholly or partially unsuitable for children.
These programmes contain information which marks the content or scenes with access levels of 4 to 18. You can select one of the access levels, thereby authorising playback.
1 Select the line »Parental Guidance« with »V« or »A« and press »OK« to confirm.
2 Enter the PIN code »1234« with »1 ... 0«.
3 Select the access level with » « or »«.
4 Press » MENU« to end the setting.
Locking menus
This function allows you to lock the »Automatic Channel Search«, »Digital Manual Tuning«, »Analogue Manual Tuning« and »Program Table« menus so that they can be only accessed by entering a PIN code.
4 Press » MENU« to end the setting.
Locking keys (Parental lock)
When the key lock is activated, the buttons on the television set do not function.
1 Select the line »Keypad Lock« with »V« or »A«.
2 Enter the PIN code »1234« with »1 ... 0«.
3 Activate (On) or deactivate (Off) the key lock with »« or »«.
4 Press » MENU« to end the setting.
Changing the PIN code
You can also enter a personal PIN code instead of the default code »1234«. Please take note of your own PIN code.
1 Select »Set PIN« with » V« or »Λ« and press »OK« to confirm.
2 Enter the current PIN code 1 2 3 4 with »1...0«.
3 Enter your new four digit PIN code with »1...0«.
4 Enter your new four digit PIN code with »1...0« again.
5 Press »MENU« to end the setting.
Locking television channels
You can lock individual television channels, for example channels unsuitable for children, using a personal PIN code.
1 Open the menu with » MENU«.
2 Select the »SOURCE SETUP« menu with »V« or »A« and press »OK« to confirm.
3 Select the line »Program Table« with » V« or »A« and press »OK« to confirm.
- The »PROGRAM TABLE« menu is displayed.
4 In the »PROGRAM TABLE« menu, switch over to the list view with »●●●« (yellow).
5 Select the channel to be locked with »V« or »A«.
6 Select the column »Lock« with »« or »« and press »OK« to lock the channel.
7 Enter the PIN code »1234« with »1 ... 0«.
- The channel is marked using »√«.
Note:
■ To remove the lock, select the channel again with »V« or »A«, press »OK« to confirm and then enter the PIN code 1 2 3 4 using »1 ... 0«.
8 Press » MENU« to end the setting.
Updating software
(for digital channels only)
1 In the »SETTINGS« menu, select the line »Check For Updates updates« with »V« or »A« and press »OK« to confirm.
- A search for new software will be made and - if available - it will be installed.
Note:
If a search for software updates should be made automatically, select the line »Automatic OAD« with »V« or »A« and use »« or »» to select the option »On«.
- The software will be updated automatically as far as possible.
2 Press » MENU« to end the setting.
Restoring the television to the default settings
This function allows you to delete the channel lists and all custom settings.
1 In the »SETTINGS« menu, select the line »Restore Factory Defaults« with »V« or »^« and press »OK« to confirm.
2 Press » ••• (green) to confirm the warning message.
- The »Source Setup« menu appears.
3 Continue the settings with the chapter "Initial set-up and tuning television channels" on page 14.
DIGI LINK

Your television is equipped with the DIGI LINK function. This function uses the CEC (Consumer Electronics Control) protocol.
CEC allows external devices which are connected to the »HDMI« sockets by an HDMI cable (e.g. DVD player) to be operated with a remote control.
Prerequisite is that the devices connected support CEC. Read the operating manual for the external device to find out how to activate the corresponding function.
The DIGI LINK functions on your television
Switching on the television automatically from standby
If the external device (e.g. Blu-ray player) is switched on, the television also switches on and the appropriate HDMI preset is selected automatically.
Depending on the features of the external device, the external device (e.g. AV receiver) can be switched on alone, the television stays in standby.
Automatic selection of the HDMI preset on the television
If your television is switched on and you then switch on the external device (e.g. DVD player), the appropriate HDMI preset on the television will be selected.
Selecting the menu language
The television menu language is automatically selected on the external device (e.g. DVD player). The external device must support this function.
Switching off the external device automatically
If you switch your television to standby, the external device (if it is switched on) will also be switched to standby.
DIGI LINK is always active on your television set.
Searching for and activating external devices
You can connect up to 11 devices with DIGI LINK functions to your television.
1 Open the CEC device list with »CEC«.
- The »HDMI CEC Device List« appears.
2 Start the device search with » •« (red).
- The devices found are displayed in the menu.
3 Select the device for operation with »V«, »A«, »« or »» and press »OK« to mark it. - If the selected device is connected to a different input to the current one, a switch to the respective input will occur automatically.
4 Press »MENU« to end the setting.
Device operation
You can decide whether external devices should react to your television's remote control.
1 Press »→«, use »V«, »A«, »« or »» to select the preset »HDMI1« to »HDMI4« and press »OK« to confirm.
2 Open the menu with » MENU«.
3 Select the menu item »SOURCE SETUP« with »V« or »A« and press »OK« to confirm.
- The »SOURCE SETUP« menu appears.
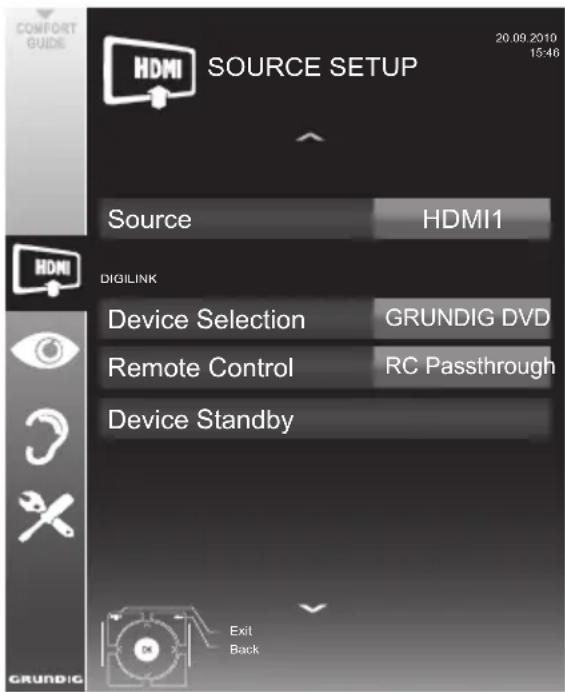
4 Select the line »Remote Control« with »V« or »A«.
5 Select the type of operation (»RC Pass-through«, »Deck« or »Tuner« with »« or »»«.
Notes:
■ »RC Passthrough« can be used for all devices. »Deck« and »Tuner« can be selected in accordance with the external device which has been connected.
■ Try out which type of remote control operation the external device reacts to the best.
- Read about the scope of functions of the DIGILINK-compatible device in the respective operating manual.
6 Press » MENU« to end the setting.
Switching the device to standby
This option switches the external device to standby.
1 Press »→«, use »V«, »A«, »« or »» to select the preset »HDMI1« to »HDMI4« and press »OK« to confirm.
2 Open the menu with » MENU«.
3 Select the menu item »SOURCE SETUP« with »V« or »A« and press »OK« to confirm.
- The »SOURCE SETUP« menu appears.
4 Select »Device Standby« with » V« or »A« and press »OK« to confirm.
- The external device switches itself off.
OPERATION USING EXTERNAL DEVICES
High definition HD ready

Connect the corresponding input sources (e.g. HDTV receiver or HD-DVD player) to the »HDMI« sockets (for digital HDTV sources).
This ensures that you can view digital HDTV programmes, even if they are copy-protected (HDCP High Bandwidth Digital Content Protection), without encountering problems.
Connection options
■ Which television socket(s) you connect your external devices to depends on the sockets the external device is equipped with and the signals which are available.
■ Please note: With many external devices, the resolution of the video signal must be adjusted to the input sockets of the television (see the operating manual of the external device). You can find out which values you need to set by referring to the guidelines in the sections about the various connection options.
- Do not connect any other equipment while the device is switched on. Also switch off the other equipment before connecting it.
■ Do not plug in the power cord of the device until you have connected the external equipment and the antenna.
Connecting external devices
... with digital audio/video signals
■ Suitable devices: Digital satellite receivers, Playstation, BluRay player, DVD player/recorder, set-top box, notebook, PCs.
■ Video signal: Digital video; resolution: standard 576p; HDTV 720p, 1080i.
■ Audio signal: digital audio (stereo, multi-channel compression, uncompressed).
■ Presets »HDMI 1«, »HDMI 2«, »HDMI 3« or »HDMI4«.
1 Connect the »HDMI1«, »HDMI2«, »HDMI3« or »HDMI4« socket on the television and the corresponding HDMI socket on the external device using a standard HDMI cable (digital video and audio signal).
... with analogue video signal (progressive)
■ Suitable devices: DVD recorders/players, games consoles.
■ Video signal: YUV; resolution: standard 576p; HDTV 720p, 1080i.
■ Audio signal: stereo, analogue.
■ »Component« preset.
1 Connect the »COMPONENT Y/AV2 Pb Pr« sockets on the television to the corresponding sockets of the external device with RCA cables (video signal).
2 Connect the »COMPONENT L R« sockets on the television to the corresponding sockets of the external device with RCA cables (audio signal).
... using the SCART socket (CVBS/RGB signal)
■ Suitable devices: Digital satellite receiver, DVD player/recorder, set-top box, games console, video recorder, decoder.
■ Video signal: CVBS/RGB.
■ Audio signal: stereo, analogue.
■ »AV1« preset.
1 Connect the »AV1/S-VHS« socket on the television and the corresponding socket on the external device using a SCART cable (video and audio signal).
Activating a decoder
If a decoder is connected to the »AV1/S-VHS« socket, this must be activated to provide an unencrypted video/audio signal.
1 Open the menu with » MENU«.
2 Select »SETTINGS« with »V« or »A« and press »OK« to confirm.
- The »SETTINGS« menu appears.
3 Select the »Decoder« with » V« or »Λ«.
4 Activate the function with »« or »»« (»On«).
5 Press » MENU« to end the setting.
... with S-Video signal
■ Suitable devices: DVD player/recorder, video recorder, camera recorder, notebook, PC.
■ Video signal: Y/C.
■ Audio signal: stereo, analogue.
■ »S-VHS« preset.
1 Connect the » AV1/S-VHS« socket on the television and the corresponding socket on the external device using an EURO/AV cable (video and audio signal).
... with an analogue TV signal
■ Suitable devices: Digital satellite receiver, DVD player/recorder, set-top box, camera recorder.
■ Video signal: CVBS.
■ Audio signal: stereo, analogue.
■ »AV2« preset.
1 Connect the »Y/AV2« socket on the television to the corresponding socket of the external device with an RCA cable (video signal).
2 Connect the »L R« sockets on the television to the corresponding sockets of the external device with RCA cables (audio signal).
Note:
There must not be a video signal at the »Y/AV2« and »AV1/S-VHS« socket at the same time. This could lead to picture disturbances.
Using a DVD player, DVD recorder, video recorder or set-top box
1 Switch on the external device and select the function you wish to use.
2 Press »→«, use »V«, »A«, »« or »» to select the preset for the input signal (»AV1«, »AV2«, »S-VHS«, »HDMI1«, »HDMI2«, »HDMI3«, »HDMI4« or »Component«) and press »OK« to confirm.
Headphones
Connecting the headphones
1 Plug the headphone jack (3.5 mm ∅ jack plug) into the headphone socket on the left side of the television.
Changing the headphone volume
1 Open the menu with »MENU«.
2 Select the menu item »SOUND SETTINGS« with »V« or »A« and press»OK« to confirm.
- The »SOUND SETTINGS« menu appears.
3 Select the menu item »Audio Output Setup« with »V« or »A« and press»OK« to confirm.
- The »Audio Output Setup« menu appears.
4 Select the line »Headphone« with »V« or »A«.
5 Set the preferred volume with » « and »«.
6 Press » MENU« to end the setting.
Note:
■ Prolonged listening with headphones at loud volumes can damage your hearing.
Hi-fi system/AV receiver
Connecting the hi-fi system/AV receiver
1 Connect the »Optic Out« socket on the television to the corresponding socket of the device with an optical digital cable (digital audio signal).
Setting the audio format
You can select whether the audio signal output via the »Optic Out« socket should be in the PCM or AC2 format.
1 Open the menu with » MENU«.
2 Select the menu item »SOUND SETTINGS« with »V« or »A« and press »OK« to confirm.
- The »SOUND SETTINGS« menu appears.
3 Select »Audio Output Setup« with »V« or »A« and press »OK« to confirm.
- The menu appears.
4 Select the »Optic Out« with » V« or »Λ«.
5 Select the preferred audio format (»PCM« or »Auto«) with »« or »«.
Note:
If you wish to output the audio only via a multi-channel amplifier/AV receiver, set the option »TV Speaker« to »Off« in the menu.
6 Press » MENU« to end the setting.
Playing the audio signal via the HiFi system
1 Connect the »○« sockets on the television to the corresponding socket of the AV receiver with an cable (digital audio signal).
Note:
If this function is not activated, the audio signal is transmitted to the HiFi system/AV receiver (connected to »○« 3.5 mm ∅ jack plug) into the headphone socket on the left side of the television.
1 Open the menu with » MENU«.
2 Select the menu item »SOUND SETTINGS« with »V« or »A« and press»OK« to confirm.
- The »SOUND SETTINGS« menu appears.
3 Select »Audio Output Setup« with »V« or »A« and press »OK« to confirm.
- The menu appears.
4 Select the line »Audio Out« with »√« or »^« and press »« or »»« to activate the audio output (»Line Out«).
5 Select the line »Audio Out Status« with »√« or »^« and select the option »Fixed« or »Adjustable« with »«« or »»«.
Notes:
If you select »Adjustable«, the volume can be changed in the menu option »Audio Out Volume«.
If the audio should only be output via the HiFi system/AV receiver, select the option »Off« in the line »TV Speaker with »« or »»«.
6 Press » MENU« to end the setting.
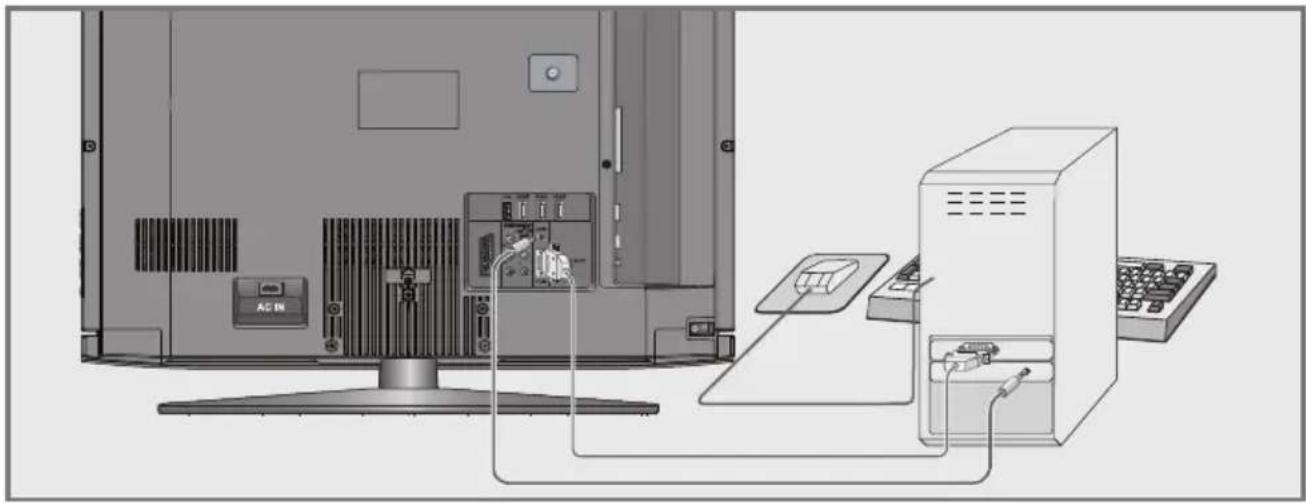
natural_image
Diagram of a computer setup with monitor, keyboard, and connected interface (no text or symbols visible)Connecting a PC
1 Connect the »PC-IN« socket on the television to the corresponding socket on the PC using a VGA cable (video signal).
2 Connect the »Audio« socket on the television to the corresponding socket on the PC using a suitable cable (audio signal).
Note:
■ Adjust your PC to the monitor (for example, picture resolution 1280 x 768, picture frequency 60 Hz).
Selecting presets for the PC
Settings for PC mode
1 Open the menu with »MENU«.
2 Select the »SOURCE SETUP« menu item with »V« or »A« and press »OK« to confirm.
- The »SOURCE SETUP« menu appears.
3 Select the function or setting with »∨« or »∧«, and then use »∨«, »∧« or »««, »»« to implement it.
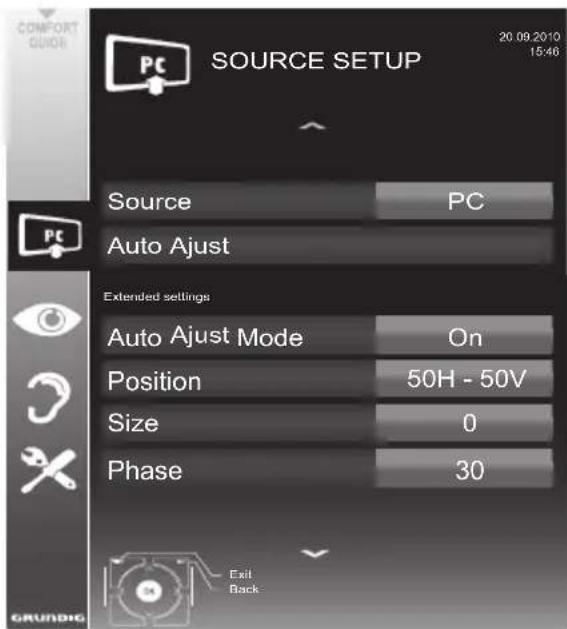
Options:
- »Auto Ajust« for automatic PC configuration.
- »Auto Ajust Mode«, select the option »On« if the configuration should be implemented automatically in PC mode.
- »Position« to configure the horizontal and vertical picture position.
- »Size« to set the cycle frequency.
- »Phase« to eliminate flicker, unfocused pictures or horizontal interference.
4 Press » MENU« to end the setting.
OPERATION WITH A COMMON INTERFACE
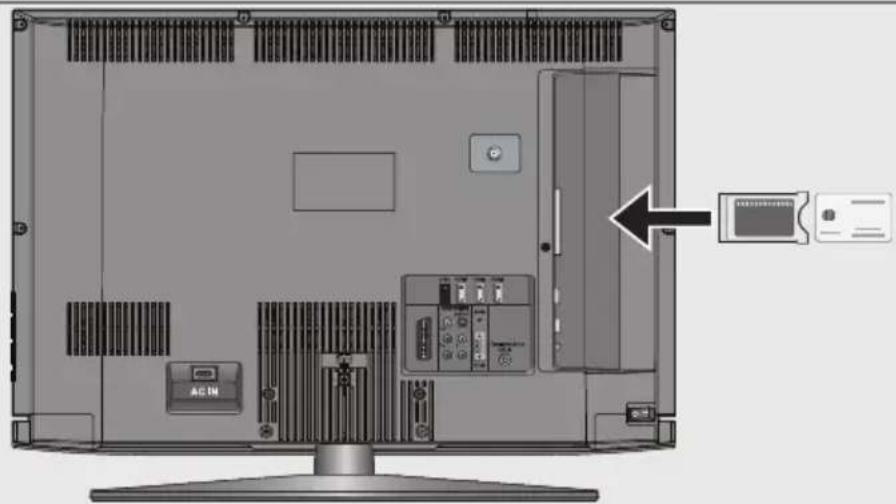
natural_image
Back view of a computer monitor showing internal components and a close-up of the screen (no text or symbols visible)What is a Common Interface?
■ Common Interface (CI) is an interface for DVB receivers.
■ Encrypted channels can only be viewed with a CA module suitable for the encryption system and in conjunction with the corresponding smart card.
■ The television set is equipped with a Common Interface slot into which CI modules from various providers can be inserted.
- You can insert the provider's smart card into the CA module in order to enable the encrypted channels you wish to view.
Inserting the CA module
Note:
■ Switch the device off before you insert a CA module into the »CI« slot.
1 Insert the corresponding smart card into the CI module.
2 Insert the CI module with the smart card into the »CI« slot on the television.
Note:
In the »CA Module« sub-menu you can see which CA module has been inserted in the CI slot.
If you are inserting a CA module into the CI slot of the television for the first time, you will need to wait a moment until the CA module is detected.
Access control for CI module and smart card
1 Open the menu with »MENU«.
2 Select the line »SOURCE SETUP« with » V« or »A« and press »OK« to confirm.
- The »SOURCE SETUP« menu appears.
3 Select the line »CA-Module« with » V« or »A« and press »OK« to confirm.
Notes:
This menu provides operating instructions and - after you enter your PIN code - access to the PAY-TV provider's channels.
■ The remaining settings are described in the operating manuals for your CI module and smart card.
■ The CA modul is not supported in certain countries and regions; please consult your authorised dealer.
4 Press » MENU« to end the setting.
Searching for digital television channels from a satellite automatically
Satellite data changes frequently, new channels are constantly being added. You should therefore perform an automatic search from time to time.
This searches all transponders for new channels.
1 Open the menu with »MENU«.
2 Select the line »SOURCE SETUP« with » V« or »A« and press »OK« to confirm.
- The »SOURCE SETUP« menu appears.
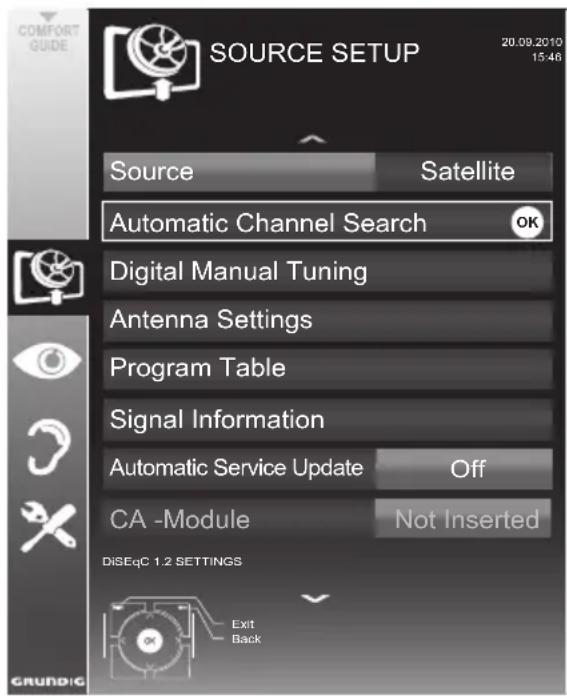
3 Select the line »Source« with »V« or »A« and press »OK« to confirm.
Select the input source »Satellite« with » «, »», »«, »« or »« and press »OK« to confirm.
4 Select the line »Automatic Channel Search« with »V« or »A« and press»OK« to confirm.
- The menu appears.
5 Select the line »Select Satellites« with » v« or »∧« and press »OK« to confirm.
- The »SELECT SATELLITE« menu appears.
6 Select a satellite with » V« or » ∧« and press »OK« to confirm.
Select the scan mode with » « or »« (for unencrypted channels, for encrypted channels only, or both).
Use » « or »» to select whether you want to search for television channels (TV) only, radio stations only (Radio) or both (Radio + TV).
9 Select the line »Network Search« with » V« or »A«.
- If the »Network Search« is set to »On«, the data will be accessed via the new transponder of the network which has been set.
10 Start the scan with »•« (red).
Note:
If the previously stored channels should be retained in the channel list and the new channels found be added to it, then press »•••« (green).
If » •« (red) is pressed, the saved channels will be deleted from the current channel list.
- The »Results« menu appears, and the scan for TV channels begins.
- Depending on the number of television channels received, this can easily take a few minutes.
- The search is complete as soon as the »PROGRAM TABLE« appears.
Note:
You can abort the search by pressing »MENU«.
11 Press »MENU« to end the setting.
Searching for digital television channels from a satellite manually
If you know the parameters of a new television channel, you can also search for it manually.
Current transponder data can be found in the teletext, in satellite TV magazines or on the Internet.
1 Open the menu with »MENU«.
2 Select the line »SOURCE SETUP« with » V« or »A« and press »OK« to confirm.
- The »SOURCE SETUP« menu appears.
- »Scan Mode«: Use » « or »» to select whether you want to search for unencrypted (Unencrypted) channels only, encrypted (Encrypted) channels only, or for both (Unencrypted + Encrypted).
- »Service Type«: Use » « or »» to select whether you want to search for television channels only (TV), radio stations only (Radio), or both (Radio + TV).
- The »Results« menu appears, and the scan for TV channels begins.
Note:
You can abort the search by pressing »MENU«.
6 Press »MENU« to end the setting.
LNB settings
Notes:
■ The following description about the LNB settings premise a substantial expertise about the satellite systems. Ask your specialist dealer.
- Your TV supports SCR system (Satellite Channel Router). If you are using SCR satellite system, follow the steps described in »LNB Type« section.
1 Open the menu with »MENU«.
2 Select the line »SOURCE SETUP« with » V« or »A« and press »OK« to confirm.
- The »SOURCE SETUP« menu appears.
3 Select »Antenna Settings« with » V« or »A« and press »OK« to confirm.
- The »ANTENNA SETTINGS« menu appears.
4 Select the line required for the parameters with »V« or »Λ«.
»KB Frequency (MHz)«: Enter the user band frequency assigned to the user band with »1...0« buttons.
»LNB Selection«: If more than one satellites are used in the current SCR system, select »1/2« to»2/2« for the satellite corresponding to the relevant positions using »« or »» buttons.
Notes:
■ Use installation equipment supported / suggested by your Multiswitch.
■ Other users / receivers connected to the system may be affected if the specified user band number and frequency is changed during installation.
■ User band and User band frequency is specified on the Multiswitch used; and each user / receiver uses a specified user band and user band frequency.
■With SCR satellite system, auto search by several users / receivers at the same time may cause problems.
- »22 KHz«: Depending on the LNB type, 22 kHz audio is selected. For a universal LNB, this option is set to »Auto« and cannot be changed.
- »DISEqC mode« and »LNB selection«:
depending on the type of antenna used,
use »« or »« select the option »Off«,
»DiSEqC 1.0« or »DiSEqC 1.1«.
»Off«: for a satellite system with only one antenna.
» DiSEqC 1.0«: allows up to four satellites to be received simultaneously.
Under »LNB selection«, use » « or »» to select the option »1/4«, »2/4«, »3/4« or »4/4«.
» DiSEqC 1.1«: allows up to 16 satellites to be received simultaneously.
Under »LNB selection«, use » « or »» to select the option »1/16« to »16/16«.
5 Press »MENU« to end the setting.
Settings for motorised antennas (DiSEqC 1.2)
Your television set supports motorised satellite systems in compliance with DiSEqC 1.2. This function allows the satellite antenna to be operated via the television set.
1 Open the menu with »MENU«.
2 Select the line »SOURCE SETUP« with » V« or »A« and press »OK« to confirm.
- The »SOURCE SETUP« menu appears.
3 Select the line »DiSEqC 1.2« with » v« or »∧«. Select the option »On« with »« or »»«
- The line »User Mode« is active.
Note:
Additional operations are explained in the following sections.
User mode
You can adjust the alignment of the satellite antenna to each individual satellite. These settings will be saved so that the antenna can later be easily guided to each saved alignment.
1 Select the line »User mode« with » V« or »A« and press »OK« to confirm.
- The »USER MODE« menu appears.
2 Select the preferred option with » v« or »^«.
- »Transponder«: »Press OK«, select the transponder from which the signal is being received with ««, »«, »V« or »^« and press »OK« to confirm.
- »Moving Mode«: Use » « or »» to select the option »Discrete« or »Continuous«.
- »Discrete«: Moves the antenna in defined steps to the west and the east.
- »Continuous«: Moves the antenna to the west or east continuously.
- »Step Size«: Use » « or »» to select the number of steps with which the antenna should turn. »Step Size« is only active when the »Transport Mode« was set to »Discrete«.
- »Move Motor«: Aligns the antenna with the selected satellite. Use »« to align it to »West«, use »« to align it to »East«.
- »Go To Stored Position«: Aligns the antenna to a saved satellite position. Up to 50 positions can be saved. »Press OK« and then select the saved position with »« or »«. Press »••« (green) to confirm – the antenna will be aligned with the saved position.
- »Store Stored Position«: The current antenna alignment is saved.
3 Press »MENU« to end the setting.
Expert mode
You can restrict the antenna's range or reset the antenna.
1 Select the line »Installer Mode« with » V« or »A« and press »OK« to confirm.
- The »INSTALLER MODE« menu appears.
2 Select the preferred option with » V« or »A«.
- »Limit Position«: Defines the range in which the antenna may move. Use »« to set the western limit, use »» to set the eastern limit.
- »Move Motor«: Aligns the antenna with the selected satellite. Use » « to align the antenna to »west«, use »« to align the antenna to »east«.
- »Go To Stored Position«: Press »OK« to save the current antenna alignment.
- »Store Stored Position«: Aligns the antenna with the reference point of the positioner.
- »Reset DiSEqC 1.2 Limit«: Resets the limit position of the antenna.
Searching for television channels from the cable provider automatically
1 Open the menu with »MENU«.
2 Select the line »SOURCE SETUP« with » V« or »A« and press »OK« to confirm.
- The »SOURCE SETUP« menu appears.
3 Select the line »Source« with » V« or »∧« and press »OK« to confirm.
Select the option »Cable« with »«, »»«, »V« or »∧« and press »OK« to confirm.
4 Select the line »Automatic Channel Search« with »V« or »A« and press»OK« to confirm. - The menu appears.
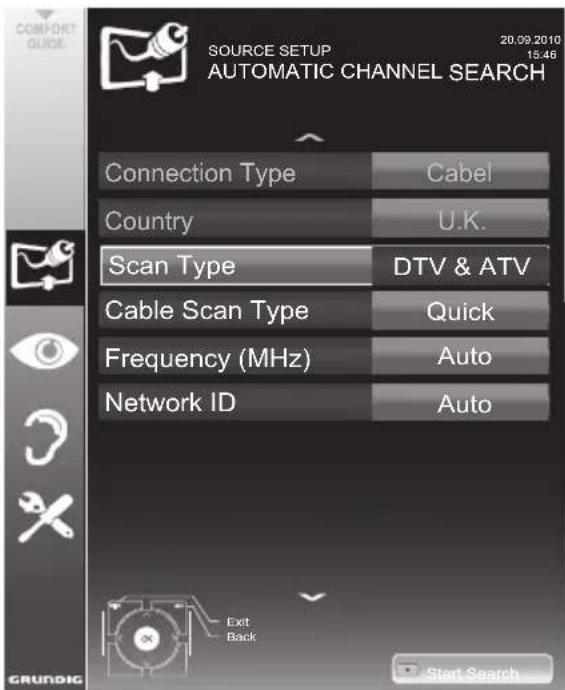
5 Select the line »Scan Typ« with » V « or »∧« and set the option »DTV« with »◀« or »▶«.
6 Select the line »Cable Scan Type« with » √« or »∧« and set the option »Quick« or »Full« with »«« or »»«.
- The search function »Quick« sets the channels according to the information provided by your cable provide in the transmission signal.
- If the option »Full« is selected, the entire frequency range will be scanned. The search can take a long time with this option. This option is recommended if your cable provider does not support the search type »Quick«.
Note:
■ You can accelerate the search. To do this, you need information about the frequency and network ID. You are usually able to get this data from your cable operator or find it in forums on the Internet. For example, the frequency 402MHz and network ID 61441 can be entered for Germany.
7 Start the scan with » •« (red).
- All channel and favourites lists will be deleted and compiled anew.
Note:
■ After starting the scan, a security query will appear. Press »•« (green) to confirm the option »Yes«.
- The »Results« menu appears, and the scan for TV channels begins. Depending on the number of television channels received, this can easily take a few minutes.
- The scan is complete as soon as the »PROGRAM TABLE« appears.
Note:
■ You can abort the search by pressing »MENU«.
8 Press » MENU« to end the setting.
Searching for television channels from the cable provider manually
1 Open the menu with »MENU«.
2 Select the line »SOURCE SETUP« with » V« or »A« and press »OK« to confirm.
- The »SOURCE SETUP« menu appears.
3 Select the line »Source« with »V« or »A« and press »OK« to confirm.
Select the option »Cable« with »«, »»«, »∨« or »∧« and press »OK« to confirm.
4 Select » Digital Manual Tuning« with » V« or »A« and press »OK« to confirm.
- The menu appears.
5 Enter the four-digit frequency with »1 ... 0« and press »OK« to confirm.
- The search starts after confirming, the channels found are displayed in the »Results« menu.
6 Press »MENU« to finish the setting.
Searching for digital terrestrial TV channels automatically
1 Open the menu with »MENU«.
2 Select the line »SOURCE SETUP« with » V« or »A« and press »OK« to confirm.
- The »SOURCE SETUP« menu appears.
3 Select the line »Source« with » or »A« and press »OK« to confirm.
Select the option »Air« with » ««, »»«, »V« or »∧« and press »OK« to confirm.
Caution:
The antenna power supply (line »Active Antenna Power«) may only be switched on if the antenna is an active indoor antenna with a signal amplifier and it is not already supplied with a voltage via a mains plug (or similar supply). Otherwise you may cause a short circuit and irreparably damage your antenna.
4 Select the »Active Antenna Power« with »√« or »^«. Switch on the antenna power supply for the antenna with »«« or »»« (»On«).
5 Select the line »Automatic Channel Search« with »V« or »A« and press»OK« to confirm.
- The menu appears.
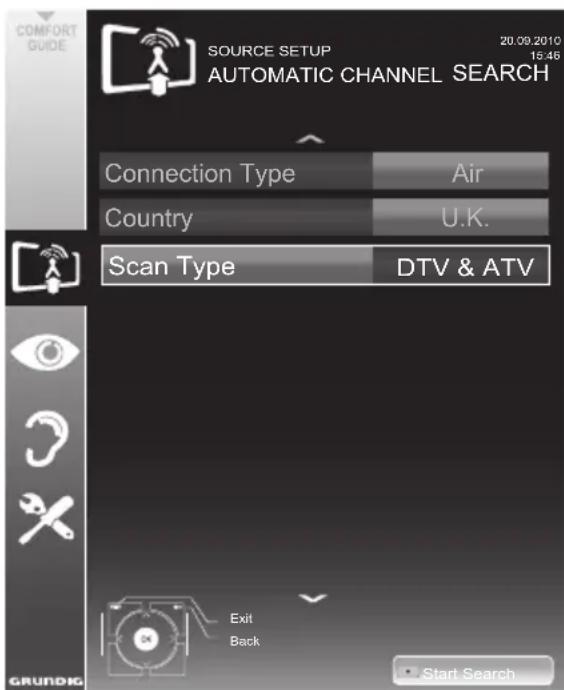
6 Select the line »Scan Typ« with » V« or »∧« and set the option »DTV« with »« or »»«.
7 Start the scan with » •« (red).
- All channel and favourites lists will be deleted and compiled anew.
Note:
■ After starting the scan, a security query will appear. Press »••• (green) to confirm the option »Yes«.
- The »Reults« menu appears, and the scan for TV channels begins. Depending on the number of television channels received, this can easily take a few minutes.
- The scan is complete as soon as the »PROGRAM TABLE« appears.
Note:
■ You can abort the search by pressing » MENU«.
8 Press » MENU« to end the setting.
Automatic service update
If this function is activated, possible changes of network operators are updated automatically.
The unit must be located in stand-by mode.
1 Open the menu with » MENU«.
2 Select the line »SOURCE SETUP « with »V« or »A« and press »OK« to confirm.
3 Select the line »Automatic Service Update« with »V« or »A«.
4 Select the automatic update with » « or » «
(»On«).
5 Press » MENU« to end setting.
Searching for digital terrestrial TV channels manually
1 Open the menu with »MENU«.
2 Select the line »SOURCE SETUP« with » V« or »A« and press »OK« to confirm.
- The »SOURCE SETUP« menu appears.
3 Select the line »Source« with »V« or »A« and press »OK« to confirm.
The antenna power supply (line »Active Antenna Power«) may only be switched on if the antenna is an active indoor antenna with a signal amplifier and it is not already supplied with a voltage via a mains plug (or similar supply). Otherwise you may cause a short circuit and irreparably damage your antenna.
4 Select the »Active Antenna Power« with »V« or »^«. Switch on the antenna power supply for the antenna with »« or »» (»On«).
5 Select » Digital Manual Tuning« with » v« or »∧« and press »OK« to confirm.
- The menu appears.
6 Enter the channel number directly with »1 ... 0« and press »OK« to confirm.
- After the search is complete, the channels found are displayed in the »Results« menu.
7 Press » MENU« to finish the setting.
Tuning analogue television channels
This setting is only necessary if you cannot receive any digital channels and you have not carried out an analogue search during initial setup.
The television channels can be set directly or using the scan.
Setting all analogue television channels
Analogue channels are displayed in the channel list after the digital channels.
Note:
- Plug the rooftop antenna cable (for analogue television channels) into the »ANT IN« socket on the television.
1 Open the menu with » MENU«.
2 Select the line »SOURCE SETUP« with » V« or »A« and press »OK« to confirm.
- The »SOURCE SETUP« menu appears.
3 Select the line »Source« with »V« or »A« and press »OK« to confirm.
■ After starting the scan, a security query will appear. Press »••« (green) to confirm the option »Yes«.
- All channel and favourites lists for the analogue channels will be deleted and compiled anew.
- The »Results« menu appears, and the scan for TV channels begins. Depending on the number of television channels received, this can easily take a few minutes.
- The search is complete as soon as the »PROGRAM TABLE« appears.
Note:
■ You can abort the search by pressing » MENU«.
7 Press » MENU« to end the setting.
Tuning the television channels by entering the channel numbers
1 Open the menu with »MENU«.
2 Select the line »SOURCE SETUP« with » V« or »A« and press »OK« to confirm.
- The »SOURCE SETUP« menu appears.
3 Select the line » Analogue Manual Tuning« with »V« or »A« and press»OK« to confirm.
- The menu appears.
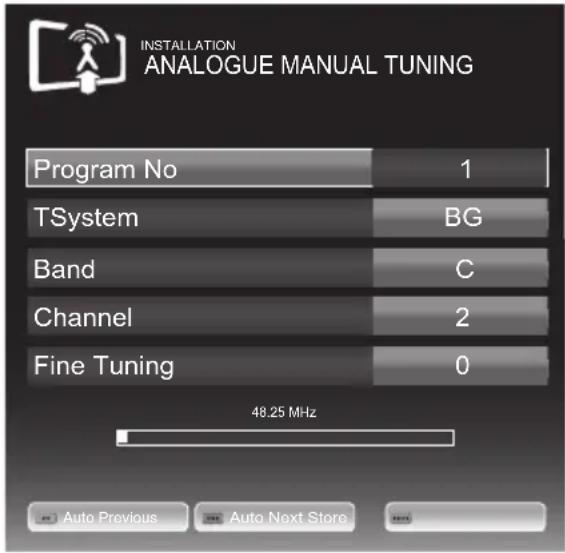
4 Select the line »Program No« by pressing » √« or » ∧« and use »◀« or »▶« to save the preset.
5 Select »Band« by pressing » V« or »∧« and use »»«« or »»« to choose between »S« (special channel) or »C« (normal channel).
6 Select the line »Channel« with »V« or »A« and enter the channel number with »« or »» step by step, or use »1...0« to enter it directly.
Notes:
■The current system is displayed in the »System« line. If the colour or sound is not functioning properly, select the line »System« with »∨« or »∧«. Use »«« or »»« to select the preferred setting.
If fine tuning is necessary, select the line »Fine Tuning« with »V« or »^« and use »« or »» to make the setting.
7 Press » ....« (blue) to save the setting.
Note:
■ If you wish to remedy other television channels, repeat steps 4 to 8.
8 Press » MENU« to end the setting.
Changing stored analogue channels
If channels were stored with the automatic channel search while tuning the television channels, you can delete them. You can also store channels in a different preset, change or enter the name of a channel as well as skip channels.
Selecting a channel list
1 Open the menu with »MENU«.
2 Select the line »SOURCE SETUP« with » V« or »A« and press »OK« to confirm.
- The »SOURCE SETUP« menu appears.
3 Select the line »Program Table« with »V« or »A« and press »OK« to confirm.
- The »PROGRAME TABLE« menu appears.
Note:
■ Additional operations are explained in the following sections.
Deleting channels
In the »PROGRAME TABLE« menu, select the television channel to be deleted with»∨ «, »∧«, »« or »« and press »•« (red) to confirm.
2 Press » •••« (yellow) to confirm the deletion process.
Note:
■ »●●●●« (blue) allows all television channels to be deleted.
3 Press » ••• (green) to confirm the deletion process.
Entering channel names (8 digit maximum)
1 In the »PROGRAME TABLE« menu, select the television channel with ▼ «, »∧«, ׫ or »»« and press »•« (red) to confirm.
2 Open the input keyboard with » ••« (green).
Note:
If necessary, delete the current channel name. To do this, select the » « button with »« or »« and delete repeatedly using »OK«.
3 Select the required letters or numbers with »V«, »A«, »« or »» and confirm with »OK«.
Repeat the entry for further letters/numbers.
Note:
■ Use the »ABC« button to switch to upper case letters and use the »?@123« button to switch to symbols and numbers.
4 Save the channel name by using » V«, »^«, »« or »« to select »Submit« and confirm with »OK«.
Note:
■ If you wish to enter other channel names, repeat steps 1 to 4.
Skipping television channels
You can highlight television channels to be skipped when you select with »A« or »V«. Selection is still possible using the number buttons.
In the »PROGRAMETABLE« menu, switch over to the list view with »●●●« (yellow).
2 Select the preferred channel with »V« or »A«.
3 Select the column »Skip« with »« or »»« and use »OK« to mark the channel.
- The channel is marked using »√«.
Note:
■ Channels can also be reactivated. Select the channel with »V« or »A«, then select the column »Skip« and reactivate the channel with »OK«.
Creating lists of favourites
You can select your favourite channels and save them in up to four favourites lists (Fav 1 to Fav 4).
In the »PROGRAME TABLE« menu, switch over to the list view with »●●●« (yellow).
2 Select the preferred channel with »V« or »A«.
3 Use » « or » » to "push" the channel into one of the favourites lists 1 to 4 and press »OK« to confirm.
- The position in the favourites list is marked with »√«.
- You can enter the same channel in more than one favourite list.
- Each favourite list can store up to 255 channels.
Note:
- Channels can also be deleted from favourites lists. Select the channel to be deleted with »V«, »A«, »« or »» and delete it with »OK«.
Exiting the settings
1 Press »MENU« to end the setting.
Displaying signal information
(for digital channels only)
1 Open the menu with » MENU«.
2 Select the line »SOURCE SETUP« with » V« or »A« and press »OK« to confirm.
3 Select the line »Signal Information« with »V« or »A« and press »OK« to confirm.
- Information on the channel, network, modulation, symbol rate, quality and signal strength is displayed.
Notes:
■ The signal information changes in accordance with the current input source.
The signal properties are displayed in the lower section of the menu. The further the bars for »Quality« and »Signal Strenght« extend to the right, the better the reception signal.
■ The signal level not only depends on your receiver system, but also on the channel which is currently active. Remember this when aligning your antenna based upon the signal level display.
4 Press » MENU« to close the menu.
Service information for retailers

Only operate the television with the power supply/power cord provided.
The product complies with the
following EU directives:
2006/95/EC directive on electrical equipment for use within certain voltage limits.
2004/108/EC directive on electromagnetic compatibility.
2009/125/EC directive on ecodesign requirements for energy-related products.
Power consumption values and classes are specified according to the regulations 2009/642 and 2010/1062 and the standards EN62087 and EN62301 as per European Union framework directives 2009/125/EC and 2010/30/EU
Environmental note
This product has been made from high-quality parts and materials which can be re-used and recycled.
Therefore, do not dispose of the
product along with normal household waste at the end of its service life. Take it to a collection point for the recycling of electrical and electronic equipment. Dispose of the used device at a collection point for electrical and electronic equipment. The symbol on the product, in the operating manual or on the packaging indicates that recycling is possible.
Information on collection points is available from your local authorities.
Help protect the environment by recycling used products.
GRUNDIG 26 VLC 9201 BG
Technical data
Operating voltage:
220-240 V,\~, 50-60 Hz
Power consumption:
On mode 60 W
Standby <0.50 W
Energy Efficiency class:
C
Maximum power consumption
On mode 105 W
Annual power consumption
88 kWh
Audio output:
2 x 14 W music power output
2 x 7 W Sine wave power
Rohs Limits: Pb (Lead)/Hg (Mercury)
Pb meets ROHS directive / 42 mg
Peak luminance ratio:
% 65
Default satellite:
20
LNB power supply:
13/18 V, 14/19 V optional, maximum 500 mA
LNB switching signal:
0/22 kHz 650mV +/- 250mVpp
DiSEqC:
1.0-operation, 1.1-operation, 1.2-operation
Digital reception ranges
Satellite:
Ku band: 10,700 MHz - 12,750 MHz
Modulation: DVBS QPSK, DVBS2 QPSK, 8 PSK
IF band: 950 MHz - 2,150 MHz
Signal level: -25dBm to -65 dBm
Cable:
Overall band: 110 MHz - 862 MHz
Modulation: 16QAM, 32QAM, 64QAM,
128QAM and 256QAM
Symbol rate: 4.0 Msym/s to 7.0 Msym/s
Terrestrial:
VHF/UHF band, Bandwidth 7 MHz and 8 MHz
COFDM modi: 2k and 8k
Constellation: 16QAM, 64QAM, QPSK
Terrestrial (DVB-T2):
VHF/UHF band, Bandwidth 7 MHz and 8 MHz
FFT Size: 1k, 2k, 4k, 8k, 16k, 32k
Modulation: 16QAM, 64QAM,
256QAM, QPSK
Guard Interval: 1/4, 19/256, 1/8, 19/128,
1/16, 1/32, 1/128
As this feature is optional, it is not available in all products.
Analogue reception ranges:
C02 ... C80, special channels S01 ... S41
Preset channels:
TV/Radio 6000 (Satellite DVB-S)
1000 (Cable - DVB-C) or
100 (Analogue)
1000 (Terrestrial - DVB-T) or
100 (Analogue)
9 AV, 2 USB
Screen (dm ^4 ):
19 dm²
Screen size:
66 cm/26 inch
Maximum resolution:
WXGA, 1366 x 768
Weight:
approx. 8.4 kg
Dimensions:
W H D 65.9 cm 48.7 cm 7.9 cm
Troubleshooting
If the information provided below does not help, please consult an authorised GRUNDIG dealer. Please bear in mind that malfunctions can also be caused by external devices such as video recorders or satellite receivers.
| Problem Possible cause Remedy | ||
| Screen lit (snow), but no station visible | Antenna cable is the antenna cable connected? | |
| No TV channel tuned Start a channel scan | ||
| Insufficient contrast in picture The picture settings are not correct Adjust the brightness, contrast or colour setting | ||
| Problem at station Try another channel | ||
| Picture and/or sound distorted Interference from other devices Place the device in a different position | ||
| Ghosting, reflection | Channel setting | Automatic or manual tuning/fine tuning |
| Antenna | Have antenna cable or system checked | |
| No colour Colour intensity too low Turn up the colour | ||
| Adjust TV standard (if setting option is available) | Select the correct colour standard | |
| Problem at station Try a different channel | ||
| Picture but no sound | Volume is set to a minimum | Turn up or switch on the volume |
| Teletext impaired or absent | Problem at station Try a different channel | |
| Television channel (no teletext) or antenna system | Try with a different TV channel, carry out fine tuning | |
| Station signal too weak | Check antenna | |
| The remote control does not work | Obstacle between remote control and device. | Point remote control at television |
| Battery problem | Check batteries and replace if necessary | |
| Operating mode undefined | Switch off the television at the mains switch for two minutes | |
| Picture too dark in PC mode | Incorrect setting for picture resolution and picture frequency on the PC | Change settings on the PC (e.g. 1280 x 768 resolution, refresh rate 60 Hz) |
Note:
This is a Class A product. During operation the device could cause radio interference. In this case the user may have to remedy this. Please contact your specialist dealer.

- setup AnD sAFetY
- GenerAI inFormAtion
- ConneCtion AnD prepArAtion
- overview
- settinGs
- television - operAtion
- usB operAtion
- teletext operAtion
- ConvenienCe FunCtions
- operAtion usinG externAI DeviCes
- operAtion As A pC monitor
- operAtion with A Common interFACe
- speCiAl settinGs
- inFormAtion
- Caution:
- Special features of your television set
- Receiving digital channels
- Important notes on environmental protection
- Notes on still images
- Connecting the antenna and power cord
- Note:
- CONNECTION AND PREPARATION
- Inserting batteries into the remote control
- Environmental note
- Connections on the television set
- COMPONENT
- Controls on the television set
- The remote control - Main functions
- Navigation in the menus
- The remote control – All functions
- Initial set-up and tuning television channels
- The various settings
- Selecting language, country and operating mode
- Help:
- Tuning the television channels from satellite (DVB-S)
- Easy installation
- Important note:
- Advanced installation
- Tuning terrestrial television channels (DVB-T)
- Tuning television channels from the cable provider (DVB-C)
- Changing the program table for the digital channels
- Selecting channel lists
- Important:
- Deleting channels
- Change the order of the channels in the program table
- Sorting channels in the program table
- Skipping channels
- Creating lists of favourites
- Notes:
- Sorting channels in the favourite list
- Enter own names for the favourites lists (max. 6 characters)
- Picture settings
- Sound settings
- Volume
- Balance
- Automatic volume
- Stereo/two channel sound, mono
- Stereo width
- SRS TruSurround HD
- Equalizer
- Audio description (Audio subtitles)
- Exiting the setting
- Basic functions
- Switching on and off
- Selecting channels
- Selecting channels from lists
- Selecting a preset AV channel
- Adjusting the volume
- Switching sound on/off
- Displaying information
- Freeze-frame
- Audio language
- Subtitles
- Zoom function
- Eco mode
- Entering the switch-off time (sleep timer)
- Zapping function
- Electronic TV guide
- Changing the picture format
- »Auto« format
- »4:3« format
- »LetterBox« format
- »Subtitle« format
- »Panorama« format
- »Overscan« format
- File formats
- Video data
- Audio data
- Image data
- Connecting external data media
- The file browser
- Settings in the USB setup menu
- Selecting the menu
- Switching on automatic preview
- Setting the display duration for pictures in a slideshow
- DivX® VOD
- DIVX + HD
- Basic playback functions
- Additional playback functions
- Selecting chapters on DivX® files
- Selecting titles on DivX® files
- Playing selected titles
- Selecting a track or picture in steps (SKIP)
- Selecting a certain passage for playback
- Fast forward
- Rotating pictures
- Repeat functions
- Normal text mode
- Additional functions
- Skipping the waiting time
- Enlarging the character height
- Page hold
- Opening a sub-page directly
- Revealing answers
- Split screen
- Opening the SETTINGS menu
- Language settings
- Changing the menu language
- Changing the audio language
- Changing the subtitle language and subtitle mode
- Setting the date and time
- Automatic setting
- Manual setting
- Timer settings
- Switch-on timer
- Switch-off timer
- Automatic switch-off (Auto Sleep)
- Parental control settings
- Authorising programmes
- Locking menus
- Locking keys (Parental lock)
- Changing the PIN code
- Locking television channels
- Updating software
- Restoring the television to the default settings
- DIGI LINK
- The DIGI LINK functions on your television
- Switching on the television automatically from standby
- Automatic selection of the HDMI preset on the television
- Selecting the menu language
- Switching off the external device automatically
- Searching for and activating external devices
- Device operation
- Switching the device to standby
- OPERATION USING EXTERNAL DEVICES
- High definition HD ready
- Connection options
- Connecting external devices
- ... with digital audio/video signals
- ... with analogue video signal (progressive)
- ... using the SCART socket (CVBS/RGB signal)
- Activating a decoder
- ... with S-Video signal
- ... with an analogue TV signal
- Using a DVD player, DVD recorder, video recorder or set-top box
- Headphones
- Connecting the headphones
- Changing the headphone volume
- Hi-fi system/AV receiver
- Connecting the hi-fi system/AV receiver
- Setting the audio format
- Playing the audio signal via the HiFi system
- Connecting a PC
- Selecting presets for the PC
- Settings for PC mode
- Options:
- OPERATION WITH A COMMON INTERFACE
- What is a Common Interface?
- Inserting the CA module
- Access control for CI module and smart card
- Searching for digital television channels from a satellite automatically
- Searching for digital television channels from a satellite manually
- LNB settings
- Settings for motorised antennas (DiSEqC 1.2)
- User mode
- Expert mode
- Searching for television channels from the cable provider automatically
- Searching for television channels from the cable provider manually
- Searching for digital terrestrial TV channels automatically
- Automatic service update
- Searching for digital terrestrial TV channels manually
- Tuning analogue television channels
- Setting all analogue television channels
- Tuning the television channels by entering the channel numbers
- Changing stored analogue channels
- Selecting a channel list
- Entering channel names (8 digit maximum)
- Skipping television channels
- Exiting the settings
- Displaying signal information
- Service information for retailers
- GRUNDIG 26 VLC 9201 BG
- Technical data
- Operating voltage:
- Power consumption:
- Energy Efficiency class:
- Maximum power consumption
- Annual power consumption
- Audio output:
- Rohs Limits: Pb (Lead)/Hg (Mercury)
- Peak luminance ratio:
- Default satellite:
- LNB power supply:
- LNB switching signal:
- DiSEqC:
- Digital reception ranges
- Satellite:
- Cable:
- Terrestrial:
- Terrestrial (DVB-T2):
- Analogue reception ranges:
- Preset channels:
- Screen (dm 4 ):
- Screen size:
- Maximum resolution:
- Weight:
- Dimensions:
- Troubleshooting
Brand : GRUNDIG
Model : 26 VLC 9201 BG
Category : Television