F.A. PLANAVISION PW 110-8110/9 DOLBY - Television GRUNDIG - Free user manual and instructions
Find the device manual for free F.A. PLANAVISION PW 110-8110/9 DOLBY GRUNDIG in PDF.

User questions about F.A. PLANAVISION PW 110-8110/9 DOLBY GRUNDIG
0 question about this device. Answer the ones you know or ask your own.
Ask a new question about this device
Download the instructions for your Television in PDF format for free! Find your manual F.A. PLANAVISION PW 110-8110/9 DOLBY - GRUNDIG and take your electronic device back in hand. On this page are published all the documents necessary for the use of your device. F.A. PLANAVISION PW 110-8110/9 DOLBY by GRUNDIG.
USER MANUAL F.A. PLANAVISION PW 110-8110/9 DOLBY GRUNDIG
In order to make handling and operation of the Planavision easier for you, the user manual contains various sections.
The symbols on the page margins of the user manual will guide you to the desired section.
TV Mode
In this section you will find the description on how to operate the Planavision.
DVD Mode
In this section you will find the description on how to operate the built-in DVD player.
Installation (for the authorized dealer)
In this section you will find the description on how to install and set up the Planavision.
Absolutely to observe!

Contact the forwarding agent of the Planavision if the shockwatch indicator on the carton box has discoloured.
Prior to installing the Planavision it is absolutely necessary to read the chapter «Installation and Safety« in the user manual.
Carry out the installation exactly in the indicated order.


CONTENTS
3 Planavision PW 110-8110/9 Dolby
Special features of your Planavision Scope of delivery
5 Installation and Safety
7 Important Information
9 At a Glance
The front of the Planavision The remote control
15 Operation
Switching the Planavision on and off
16 Easy Dialog System
The Easy Dialog system
The DIALOGENTER
Operating the Easy Dialog system
18 Recording
Recording with a GRUNDIG video recorder
PLANAVISION PW 110-520/9 PAL PLUS
Special features of your Planavision
Technology
Super-flat 107 cm plasma display, impressive 16:9 cinema format, Pal Plus system
GRUNDIG Megalogic
Megalogic possibilities:
- Perfect communication with a Megalogic video recorder.
No tedious programming of channel positions. - When starting playback on the video recorder, the video programme position is automatically selected on the Planavision.
Equipment
DVD player
Dolby Surround ProLogic
VGA interface for connecting a PC
2 tuning PIP - double window, picture-in-picture
Megatext, Level 2.5, 512-page memory
Easy Dialog System
EPG - Electronic Programme Guide
Retrofit options and accessories
2 × satellite receiver
Wireless transmission system for surround boxes.
Docking station - separate station for all connections via a single cable to the picture screen.
10m connection cable for docking station.
- Dolby noise reduction manufactured under license from Dolby Laboratories Licensing Corporation.
DOLBY and the double-D symbol are trademarks of Dolby Laboratories Licensing Corporation.

PLANAVISION PW 110-8110/9 DOLBY
Scope of delivery
1 Planavision
2 Operating panel cover
3 Aerial cable for the Planavision
4 Aerial cable for a video recorder
5 Euro-AV (Scart) cable
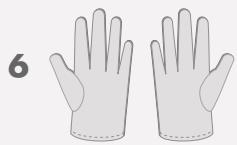
6 1 pair of cloth gloves for mounting the operating panel cover
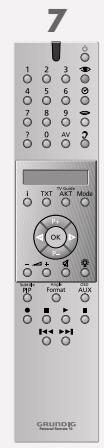
7 Remote control
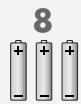
8 3 batteries, 1.5V- Micro type
9 Cleaning cloth for glass pane
10 User manual
1


INSTALLATION AND SAFETY

In order to assure that this high-quality and easy-to-use TV set will be able to provide you with good service and pleasure for a long time to come, it is important that you observe the following points when installing the TV set.
The TV set has been designed for the reception and reproduction of picture and sound signals.
Any other use is explicitly forbidden.
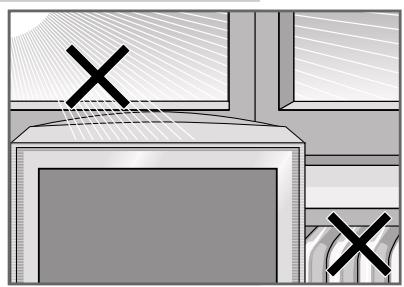
The ideal viewing distance from the screen is 5 times the diagonal width of the screen (about 5.5m ). External light shining on the screen adversely affects picture quality.
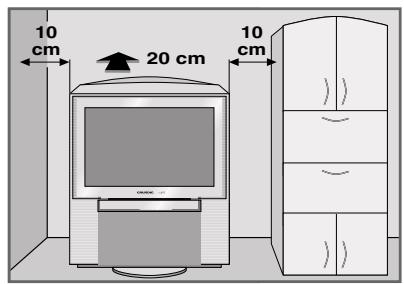
Assure that there is enough space when installing the set in a wall recess.
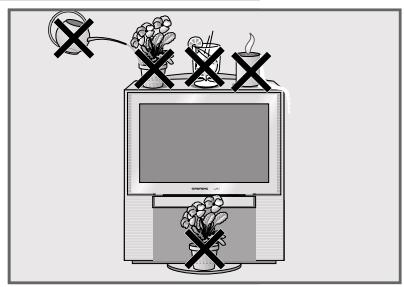
The TV set is designated for operation in dry rooms. Should you nevertheless operate it outside, make absolutely sure that it is protected against dampness (rain, water splashes). Never expose the TV set to any sort of moisture.
- Do not place vessels filled with fluid (vases or similar things) on the TV set.
- The vessel may tip over and the fluid may adversely affect electrical safety.
- Do not place objects (for example, newspapers) on the TV set.
Do not place the TV set close to the heating or in direct sunshine as it could overheat.
Heat build-up can be dangerous and is detrimental to the service life of the TV set.
For safety reasons, from time to time, have a technician come to clean the inside of the set, the blower and the inside of the pane. Consult your authorized dealer.

INSTALLATION AND SAFETY
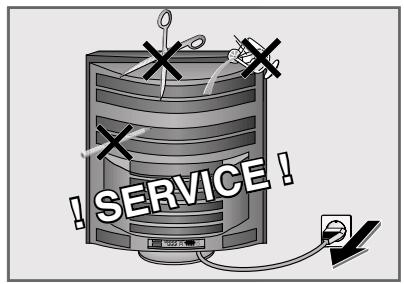
Do not open the TV set under any circumstance. The manufacturer will offer no liability for damage resulting from unauthorized tampering.
Use only original GRUNDIG connection cables, accessories and spare parts.
Be sure that the mains cable is not damaged at any time.
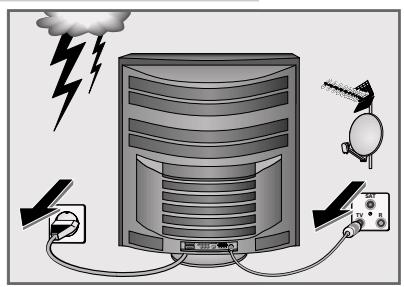
Storms represent a danger for every type of electrical device. Even if the set is switched off, it could be damaged by a lightning strike hitting the mains and/or the aerial lead. Therefore, always disconnect the mains plug and aerial plug when there is a storm.
Clean the picture screen only with the cloth supplied.
For cleaning the picture screen housing, use only a soft cloth moistened with clean water.
This TV set combines technology and ecology in a well thought-out overall concept. Only ecologically high-quality materials are used. The packaging is made almost entirely of 100% recycled paper, and the portion of plastic has been reduced to a minimum. The batteries supplied have no mercury or cadmium. The number of plastic types has been reduced in order to ensure high-quality recycling when the set is put out of use – all larger plastic parts are marked. To facilitate maintenance work and recycling, this TV set is easy to disassemble.
This digital TV set provides optimum picture and sound quality.
Condition for this is a perfectly operating aerial system and a high-quality aerial cable.
For this reason, use only the aerial cable supplied or an aerial cable of equivalent quality.
For the same reason, avoid cable loops near the TV set.
Still picture
If a still picture is displayed very long (several hours) on the picture screen, it may happen that it remains visible some time as "ghost picture" when changing the programme. After some time this ghost picture disappears again.
This phenomenon is caused by a kind of memory effect. To prevent this effect, it is recommended to switch on a screen saver when the Planavision is operated in connection with a PC.
Colour distortions
If the Planavision is not used for a long period of time (over one year), it may happen that colour distortions occur.
This effect can be considered normal for a plasma picture screen. After some time, the colour distortions will disappear.
Failure of colour pixels
A plasma picture screen consists of about 1.2 million colour pixels.
It must be expected that a small percentage of theses pixels (0,001%) within an industrial standard tolerance may be defect.
This is not visible in an animated picture.
Air pressure
The plasma picture screen functions technologically with inert gas under the influence of air pressure.
In heights 2000m above sea level, the picture may become instable and the picture quality affected. However, if the set is operated below 2000m above sea level again, this effect disappears and the set will operate correctly again.

Humidity
Do not operate the Planavision in areas of high humidity (e.g. in tropical regions). The maximum permissible humidity is 85% .
Remote control of external devices
For technical reasons it may happen in exceptional cases that an external device (video recorder, DVD player or similar) does not correctly respond to the remote control commands.
If this should be the case, change the position of the external device, or change the batteries in the remote control of the external device.
Display of a VGA picture
Check and correct if necessary the VGA mode setting on your PC (640 x 480/60Hz, 640 x 400/70Hz, 640 x 350/70Hz).
To ensure an optimum picture quality, use only a correctly shielded VGA cable (e.g. ferrite core) for a cable length over two meters.
When using a laptop:
In addition to checking the resolution setting, make sure that the laptop has been set for operation with an external video source (moitor).
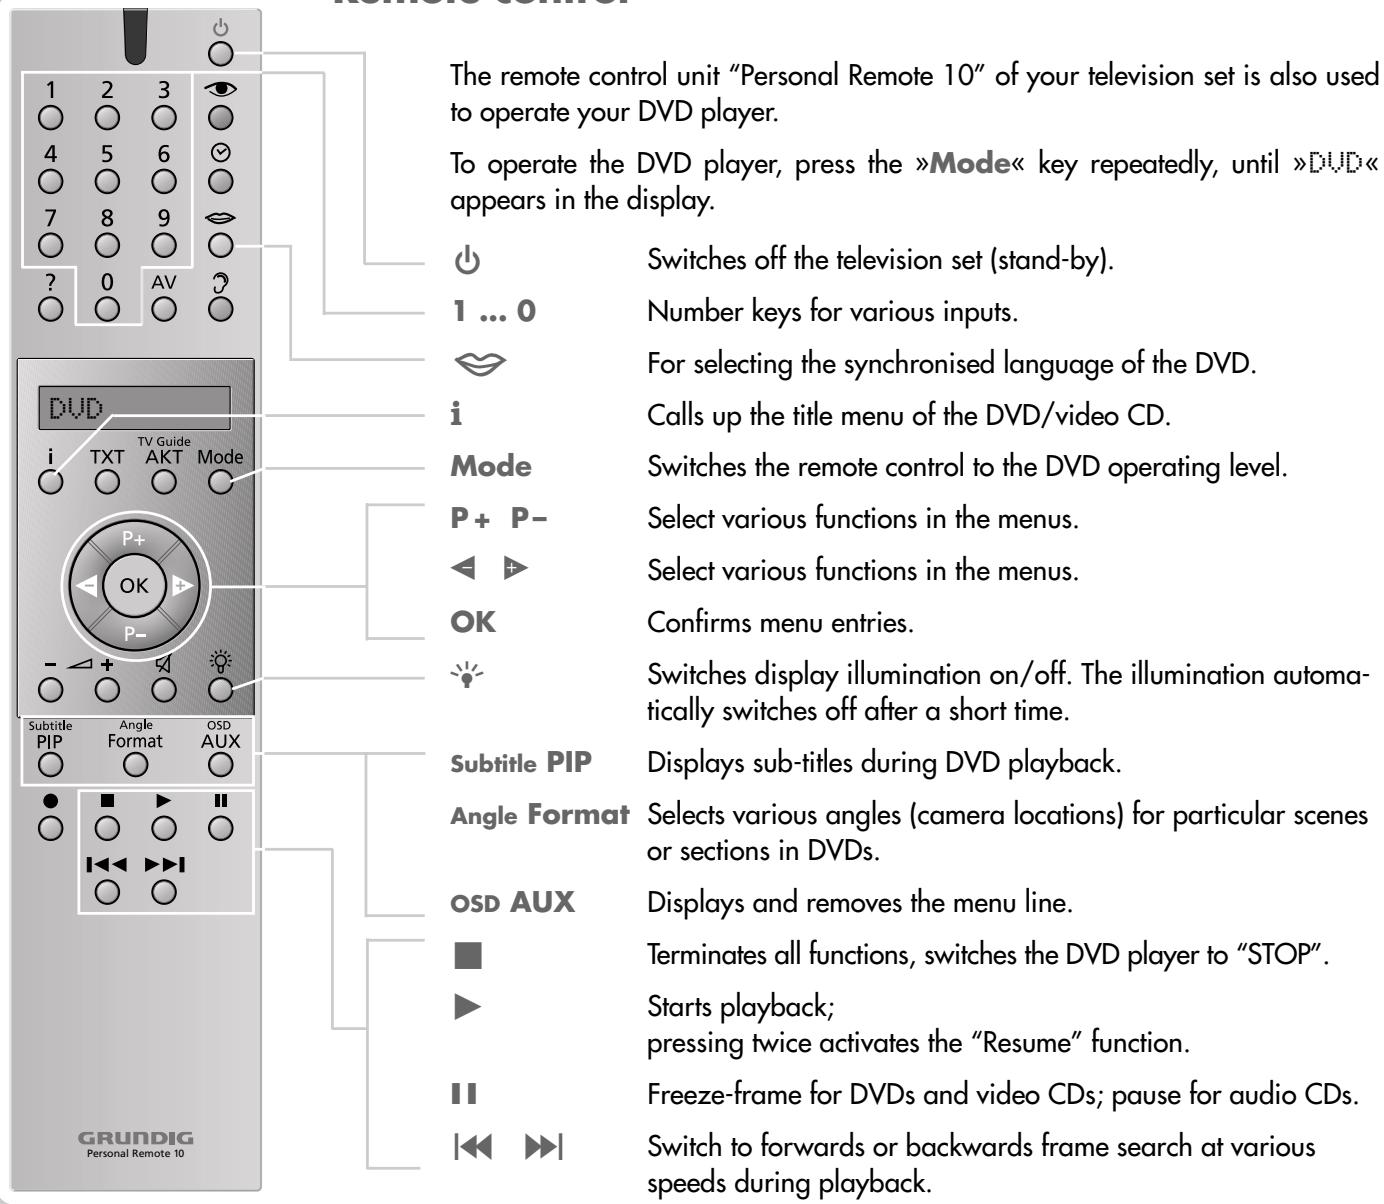
The remote control
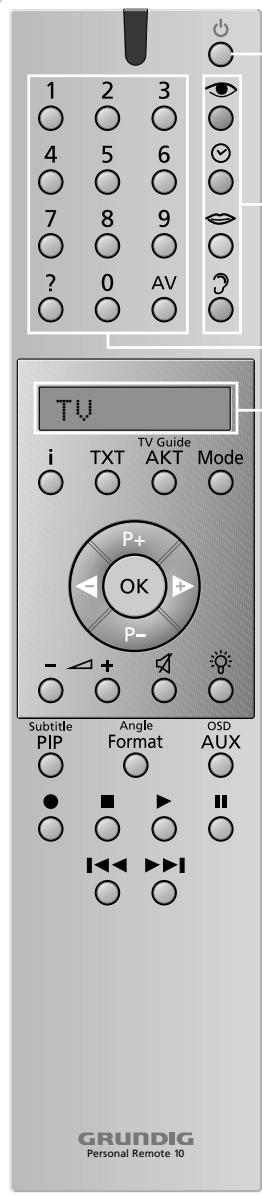
You can use the remote control Personal Remote 10 not only with the Planavision, but also with a video recorder and a DVD player.
For operating a video recorder or DVD player, it is necessary that the remote control is prepared for this by your specialized dealer.
For the operation of a video recorder or DVD player, refer to the separate user manuals supplied with these devices.
Operating the Planavision
For the operation of the Planavision, TV must be visible in the display of the remote control. If this is not the case, press the Mode button repeatedly until TV is visible in the display.
Switches the Planavision to standby.
Picture settings; displays the PICTURE SETTINGS< menu.
Clock time on/off.
No function in TV mode.
Sound settings; displays the «SOUND SETTINGS« menu.
Press the button repeatedly to select from the sound settings
»Stereo«, «Dolby Pro Logic« and «Dolby Surround«.
1...0 Select channels and switch the Planavision on from standby.
AV Enters the teletext page number; selects the AV programme position.
? Calls up brief operating instructions.
Display

Operation of a Grundig video recorder
To operate your video recorder, repeatedly press the Mode button until VCR is visible in the display.
Switches the video recorder to standby.
Channel selection and switching the recorder on from standby; for entering a ShowView number.
Track selection.
Displays the menu from the video recorder.
Select channel step by step, + up, - down, select various functions in the menus.
For channel finetuning; select various functions in the menus.
For calling up, confirming and saving data.
Starts recording.
Switches the video recorder on, ends all drive mechanism functions, and switches the video recorder in "Stop" mode.
Starts playback.
Pause on recording, still picture on playback.
Reverse picture search during playback; fast rewind in "Stop" mode.
Forward picture search during playback; fast foward wind in "Stop" mode.
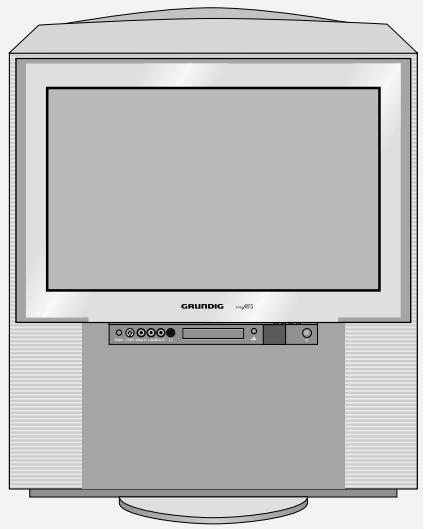
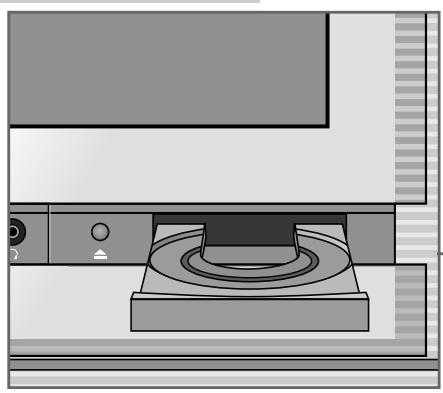
The front of the Planavision
Automatic opening of the operating panel cover
When moving your hand towards the cover of the operating panel, this slides automatically downwards and reveals the control elements.
After a few moments, the cover slides up again.
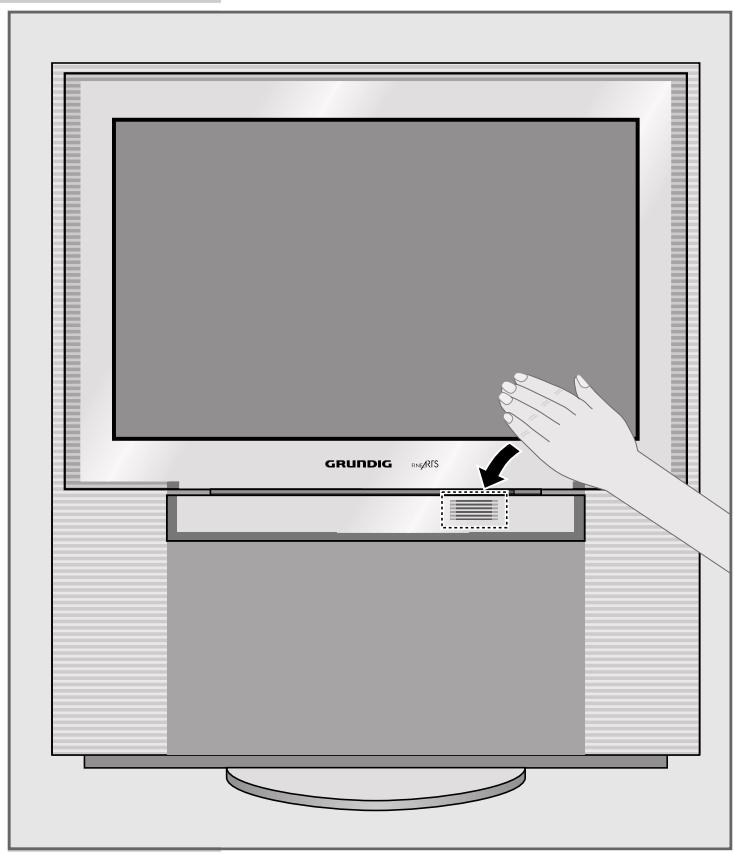
Note
If a camcorder, video recorder or headphones are connected to the sockets at the front of the Planavision, the cover of the operating panel does not automatically slide up again.

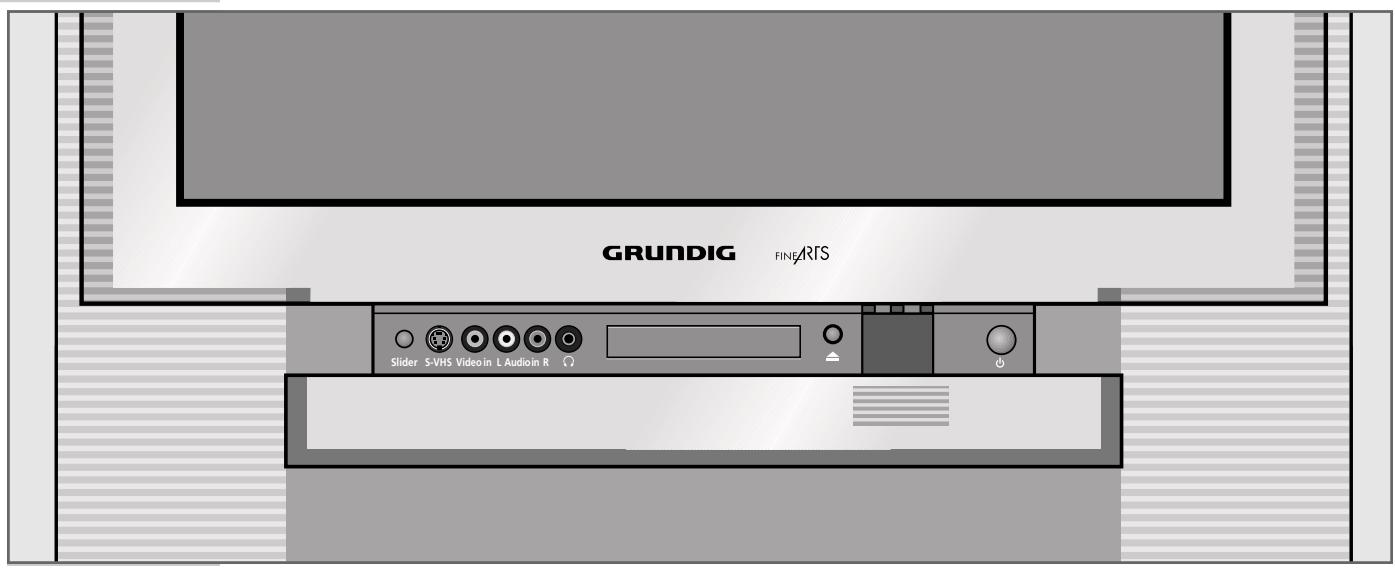
Control elements
Slider
Switches the automatic close function of the operating panel cover on and off.
S-VHS
S-VHS video input for camcorder.
Video in
Video input for camcorder.
L Audio in R
Audio input for camcorder.

Headphones socket.

Opens and closes the DVD player drawer

Switches the Planavision on and off.
Switching the Planavision on and off

Switching the Planavision on
1 Press the 10 button on the Planavision.
The LED lights red then changes to yellow after several seconds.
While the LED lights yellow, the Planavision carries out an internal system check. This takes several seconds. After that, the LED changes to green and the TV picture appears on the screen.
Switching the Planavision to standby
Press the button on the remote control once. The Planavision turns in its mid-position then switches to standby.
Switching the Planavision definitely off
1 Press the 10 button on the Planavision, or
press the button on the remote control twice.
Prerequisite:
The energy saver circuit has been activated (see Dialogcenter, >Special functions« menu).
Note:
The energy saver circuit is not triggered if a timer is programmed or the copy mode is activated.
Switching on again is only possible with 10 on the Planavision.
An LED at the front of the Planavision lights up in different colours to signal the current operating mode:
Green = Normal operation.
Yellow = TV GUIDE mode (about 1/2 h after the Planavision has been switched off, to load the programme data), copy mode.
Red = Standby (energy saving mode, timer programmed).

The Easy Dialog system
Your Planavision is equipped with an "Easy Dialog System".
That means that operating instructions are not, as is usual, in a printed manual, but rather appear on the screen as dialog fields.
The DIALOGENTER
The DIALOGENTER is the control centre for your Planavision.
Here you can make a variety of settings, call up information, and get specific help for operating your television (e.g. info about the remote control, a list of key words, tips and tricks).
Just try it out. You can't do anything wrong.
1 Call up the DIALOGENTER with «i« and then «OK«.
- At every step of operation, the DIALOGENTER shows which buttons can be used to carry out particular functions.
Operating the Easy Dialog system
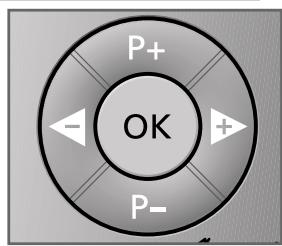
The cursor buttons of the remote control are displayed on the picture screen as shown in the figure below.
| Buttons on the picture screen | Buttons on the remote control. |
| P+ OK P- | P+ OK P- |
? Calls up brief operating instructions.
i Calls up the DIALOGENTER (with i and OK), switches one page back.
TXT Switches back to the TV picture.
P+ P- Move the cursor bar up/down; when in a double-page menu: switches to the second page.
Change settings.
OK Calls up or confirms functions.

Recording with a GRUNDIG video recorder
The following Grundig video recorders are especially suited for your Planavision: GV 3010, GV 5053, GV 6063, and all video recorders manufactured from 2001.
You may record TV programmes or DVD recordings.
Direct recording:
1 Select the TV programme to be recorded,
or, for a DVD recording,
repeatedly press the Mode button on the remote control until DVD appears in the remote control's display, then start the DVD play with .
2 Repeatedly press the Mode button on the remote control until VCR appears in the remote control's display.
3 Start recording with . The video recorder switches automatically to programme position A1 and records the selected TV programme or the film from the DVD.
Note:
During the recording you may switch to another TV programme without affecting the recording.
TIMER recording:
Using a Grundig video recorder, you may carry out TIMER recordings in a very convenient way by means of the timer of the TV set without programming the video recorder.
For this, the video recorder must not be in low power standby.
For TIMER programming, refer to the «TIMER« menu in the Easy Dialog system.
DVD MODE
Contents
3 Overview
Remote control
4 User guide
Menu line
Status display
Dialogue display
Operation with the user guide
8 Playback of a DVD/video CD
DVD and video CD features
Special features of DVDs
Before playback
Playback of a title
Calling up function display
Selecting another title or chapter
Interrupting playback
Ending playback
Removing DVD/video CD
Additional playback functions
Programming titles or chapters
20 Playback of an audio CD
Audio CD features
Before playback
Audio functions
Assembling a music programme
DVD MODE
26
Security system
Activating and switching off the security system of the DVD player
Changing the code number
Activating DVDs or video CDs for playback
Authorising the content of a DVD
Changing country
31
Settings
Picture settings
Sound settings
35
Comfort settings
Selecting language menu
Selecting dubbed language
Selecting language of the sub-titles
Selecting language of the DVD player's picture menu
Switching on/off the status display of the DVD player
38
Information
Technical data
General instructions for laser devices
Cleaning DVDs/CDs
Rectifying malfunctions yourself
Remote control
The user guide enables you to select all functions and make the required settings.
Symbols, keys and dialogue lines indicate the possible operating steps.
Menu line
1 Call up the menu line with the OSD AUX ^代 button.
- The illustrations show the options available in the menu line.

T = for selecting titles.
= for selecting chapters.
) 已 = for selecting the audio track.
» « = for selecting the language of the sub-titles.
for selecting various angles.
_v = for selecting the zoom function.
2 Select continuation of the menu line with

FTS = for programming scenes.
□>》= for selecting the type of sound.
D = for selecting various slow-motion speeds.
» K D D « = for selecting various frame search speeds.
^+ = for selecting a section to the nearest minute.
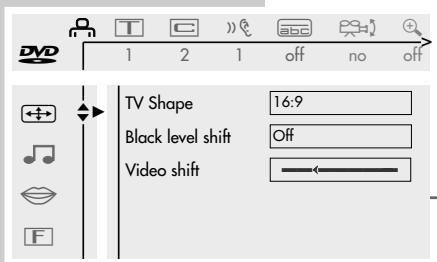
The menu item «Settings«


Picture menu with the functions
- TV Shape,
- Black level shift,
Video shift.
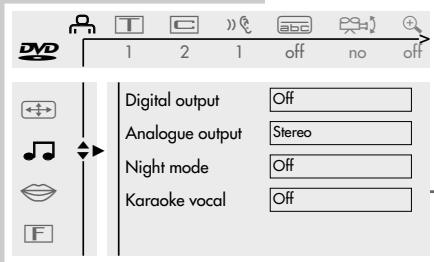
= Sound menu with the functions
- Digital output,
- Analog output,
Night mode, - Karaoke vocal
F = Menu Special functions with the functions
- Access control,
- Status window,
- Low power standby (no function).
Status display
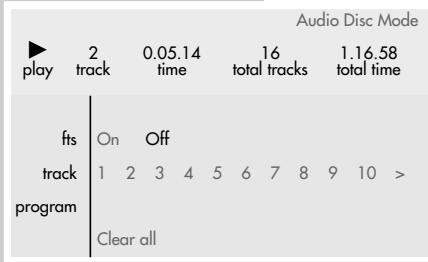
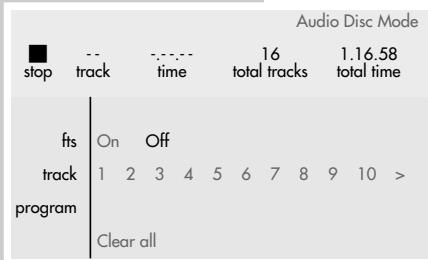
In the status display, information about the inserted DVD/video CD, the total running time and the elapsed running time of the DVD/video CD are displayed. The active function is also displayed.

DVD

pause
2:04:26
0:00:21
2:05:30 = Total running time.
0:15:00 =Elapsed running time.
9 DVD = DVD inserted.
9 VCD Video CD inserted.
» « reading = DVD is being read.
» « no disc = No DVD or video CD inserted.
口 opened = Disc tray opened.
closing = Disc tray closed.
1 error = Error message.
play Playback.
stop = Ending playback.
I pause Playback pause.x4× 8× 32 = Frame search forwards/backwards.
1 / 41 / 81 / 21 = Slow motion forwards/backwards.
Dialogue display
The dialogue line displays information about the operating condition.


= Function not possible.

= Security system activated.

= Security system switched off.

= Angle format of scene.

= Playback resumed.
Operation with the user guide
The following example illustrates the structure of the user guide and the selection of various menus and settings.
Select the menu line with the «osd AUX« key, select individual menu items with the keys «P - « or «P + «, « « or «» «.
The active menu item is highlighted in blue. Menu items having no function on the respective DVD are highlighted in grey and cannot be selected.
Select the continuation of the menu line by pressing

1 Call up the menu line with the OSD AUX ^次 button.
- The menu line is displayed.

2 Select the desired menu item (in the example, ) by pressing or and activate with P - .
- The menu is displayed.
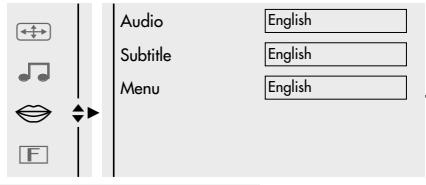
3 Select the desired menu (in the example, ) by pressing P - or P + and activate with .
- The language menu is displayed.

4 Select function (in the example, Subtitle) by pressing P - or P + and activate with .
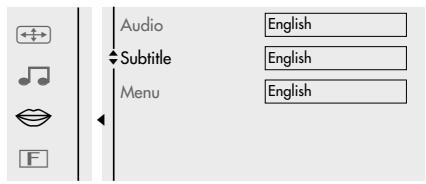
5 Select desired setting with P - or P + .
Note:
You can switch back step-by-step to the previous menus and menu items with OK.
6 Cancel menu line with the «OSD AUX« button.
- The set functions or values are automatically saved.

VIDEO

DIGITALVIDEO
DVD and video CD features
DVDs and video CDs can be recognised by their labels.
DVDs and video CDs may have one or more titles, depending on their contents (films, music videos etc.).
Each title may contain one or more chapters. Titles and chapters can be selected easily and comfortably.
Playback of a DVD or video CD can be controlled and directed via the menu of the DVD player on the television screen.
Special features of DVDs
DVDs may contain titles and sections which have been arranged in a fixed order by the manufacturer. However, you can also select individual titles and passages according to your preference and then play them back.
DVDs have a title menu which provide an overview of the titles and/or sections of titles they contain.
Some DVD player functions, such as slow motion, freeze-frame and auto-play, can also be controlled by the DVD. This may have the result that, for example, the freeze-frame function cannot be selected in particular scenes.
Many DVDs have audio tracks recorded in up to eight languages.
You may select the language you prefer.
Many DVDs are recorded by the manufacturer with sub-titles in several different languages. You may display sub-titles in up to 32 different languages.
Since films are released in different parts of the world at different times, all DVD players world-wide are provided with a regional code. Your DVD player is authorised for region code 2.
DVDs can also be provided with a supplementary regional code. When you insert a DVD with a regional code that does not correspond to that of the DVD player, a message about the regional code appears on the TV screen. This DVD cannot be played back.
Before playback
Preparation
1 Switch the remote control to DVD mode by pressing Mode*.
- The following appears in the remote control display: DUD «.
2 Switch on the Hi-fi system (if you wish) and select the audio input appropriate for the DVD player.
Inserting a DVD/video CD
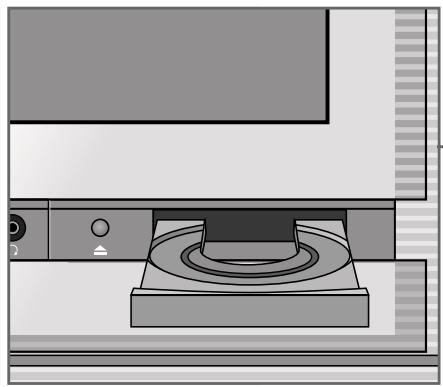
1 Open the control unit cover on the TV.
2 Press on the TV set to open the disc tray.
- The disc tray opens.
3 Insert the desired DVD/video CD in the disc tray with the label facing upwards.
4 Press to close the disc tray.
- The disc tray closes automatically.
- Display in the status display: reading , playback starts automatically.

reading

stop


Note:
If the security system is activated and the DVD/video CD has not been started (see the chapter entitled "SECURITY SYSTEM"), the code number must be entered.

DVD

play
2:04:26
0:15:00
Calling up function display
Each function you have selected (for example, running time, current title etc.) can be displayed on the screen.
1 Display the function display by pressing the «osd AUX« button.
2 Remove the function display by pressing the osd AUX< button.
Playback of a title
After the disc tray is closed, playback starts automatically.

DVD

play
2:04:26
0:11:30
Switch to playback pause (freeze-frame) by pressing
2 Resume playback by pressing
3 End playback by pressing ■
Note:
It may be necessary depending on the DVD/video CD being used, to select from an index of the DVD/video CD or chapter.
To select, use the P - or P + keys; to activate, use the OK key.
If the selections are numbered, use the 1 ... 0 keys.
Selecting another title or chapter ...
If a DVD/video CD contains several titles and/or chapters, you may select these.
... with the menu of the DVD player
1 Display the menu line by pressing the OSD AUX ^ button.

2 Select menu item (for title) with or .. or

Select menu item (for chapter) with or .

3 Select the next title/chapter with P - or P + .
Note:
Titles or chapters can also be directly selected by entering the number of the title or chapter in question as one or two digits with 1 ... 0
... with the title menu of the DVD/Video CD
The title menu of the DVD/video CD may contain selection options for titles, sections or scenes.
1 Call up the contents of the DVD/video CD by pressing 1
- If the DVD/video CD possesses a title menu, it appears on the screen.
2 If the selection options are numbered, select the appropriate title and section with 1 ... 0
3 If the selection options are not numbered, select titles and sections with P - or P + and activate with OK .
Selecting a section to the nearest minute
1 Display the menu line by pressing the OSD AUX< button.

2 Select menu item in the continuation of the menu line with or and activate with P - .
- The DVD player switches to pause.

3 Enter the desired start time as five digits (hours, minutes, seconds) with 1 ... 0 and confirm with OK .
- The DVD player locates the section and starts playback.
Interrupting playback (Resume)

DVD

stop
1:00:30 1
resume
The playback of a DVD/video CD can be interrupted at any point and then resumed from the same place.
This function can be used with the last four DVD/video CDs that you have played.
Press to interrupt playback.
2 Resume playback at the point where it was interrupted by pressing twice.
Ending playback
Playback of a DVD/video CD is automatically terminated at the end of a title.
Playback can be terminated at any time by pressing «.
Removing DVD/video CD
Press on the television set, the disc tray opens automatically.
Additional playback functions
Selecting playback speed
You may select from among eight different speeds.
1 Display the menu line by pressing OSD AUX
2 Select menu item D > from the continuation of the menu line with or and activate with P - . The DVD player switches to pause.
3 Select the desired playback speed with or and activate with OK.
4 Resume playback by pressing
Advancing freeze-frames step-by-step
Press to switch to freeze-frame (playback pause).
2 During the freeze-frame (playback pause), press repeatedly. The picture is advanced step-by-step to the next freeze-frame.
3 Resume playback by pressing
Frame search
The frame search can be selected with the keys or or from the menu line.
1 During playback, press « (for 4/32 frames forwards) or « (for 4/32 frames backwards) one or two times.
2 Resume playback by pressing
or
1 Display the menu line by pressing OSD AUX.
2 Select menu item from the continuation of the menu line with or and activate with P - .
3 Select frame search speed with
4 To resume playback, press
Note:
When the functions "slow motion", "freeze frame" and "frame search" are employed, the sound is muted.
Selecting the angle format of particular scenes or passages
Many DVDs contain scenes or passages which were filmed several times from different camera locations (different angles).
You can select from these different angles.
When DVDs which offer these functions are played, a display appears on the screen. The display 1/3 « indicates how many different angles (in example 3) are found on this particular DVD, as well as the angle which is currently set (in example 1).

1 Start playback with
2 Select angle format function with Angle Format().
- The display 1/3 in the dialogue line and 1/3 in the menu bar show the angle, in example 1.

3 To directly select another angle, enter the number of the appropriate angle with 1 ... 0 , or with P - or P + .
4 Switch off the function with the «Osd AUX« button.
- The 2/3 < display disappears.
Enlarging freeze-frames and moving screen sections (Zoom)
Press to start playback.
2 Display the menu line by pressing OSD AUX

3 Select menu item from the continuation of the menu line with or and activate with P - .
-
The DVD player switches to pause.
-
The enlargement factor ( 1.33 , 2 , 4 ) is displayed under the zoom symbol.

Press OK to pan
4 Select the desired enlargement with P - or P + and confirm with OK.
-A cursor appears in the centre of the screen.
5 Move the screen section with P - or P + , or .
Note:
The displays can be switched off with OK .
6 To resume playback, press
Selecting and displaying sub-titles
When sub-titles are available on a DVD, they can be displayed on your TV screen.
When sub-titles in several languages are available, you can select your language of choice.


1 During playback, press Subtitle PIP until the menu line appears. - The menu item is active.
2 Select the desired sub-title language with P - or P + .
3 Remove the menu line by pressing OSD AUX*. - The menu line automatically disappears after a short time.
Note:
To switch off the sub-titles, repeat steps 1 to 3 and select the off display with `P - << or >> P + «’.
Switching to dubbing
This adjustment switches out of the preset synchronised language, when the DVD offers alternatives.

1 Display the menu line by pressing
- The menu item is active.

2 Select the desired dubbed language with P - or P + .
3 Remove the menu line by pressing »osd AUX«.
- The menu line automatically disappears after a short time.
Note:
When the sound playback is changed (from Dolby Surround Sound to Stereo, for example), this is also displayed.
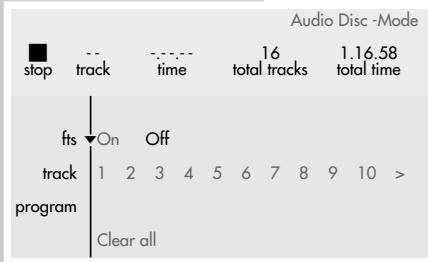
Programming titles or chapters
If a DVD/video CD contains several titles and/or chapters, you may assemble these to create your own programme.
The programme may contain up to 20 titles, which are displayed in a list.
Selecting titles or chapters

1 Open disc tray, insert desired CD and close disc tray again.
2 Switch DVD player to "STOP" by pressing
3 Call up the menu line with the OSD AUX< button.
4 Select menu item FTS (title memory) from the continuation of the menu line with or and activate with P - .
5 Switch on function with or . - Display: 0n
6 Select the title or chapter line by pressing P - or P + .
7 Select the titles or chapters which you wish to save in the title memory with or and confirm with OK . - The title and chapter numbers are shown in the program line.
8 Switch off title memory by pressing OSD AUX
Playing back titles or chapters
1 Open disc tray, insert desired CD and close disc tray again.
2 Start playback of programme by pressing
3 End playback of programme by pressing
Deleting individual titles or chapters
Switch DVD player to "STOP" by pressing
2 Call up the menu line with the »osd AUX« button.
3 Select menu item FTS (title memory) from the continuation of the menu line with or and activate with P - .
4 Select the program line with P - or P + .
5 Select the titles or chapters you wish to delete with or and delete by pressing OK.
6 Quit setting with «osd AUX«.
- The menu display is switched off.
Deleting all titles or chapters
Switch the DVD player to "STOP" by pressing
2 Call up the menu line with the »osd AUX« button.
3 Select menu item FTS (title memory) from the continuation of the menu line with or and activate with P - .
4 Select the Clear all « line with P - .
5 Delete titles/chapters with OK .
- All titles/chapters are deleted from the title list.
6 Quit setting with «OSD AUX«.
- The menu display is switched off.
PLAYBACK OF AN AUDIO CD
Audio CD features

Audio CDs can be recognised from this label.
Audio CDs contain only music recordings. They can be played, as accustomed, on a Hi-fi system.
With the help of the menu of the DVD player – which appears on your TV screen – you can organise your own music archive by selecting or deleting certain titles.
Before playback
Preparation
1 Switch the remote control to DVD mode by pressing Mode*.
- The following appears in the remote control display: »DUD «
2 Switch on the Hi-fi system and select the appropriate audio input for the DVD player.
Inserting an audio CD in the DVD player
1 Open the cover of the control unit on the TV.
2 Press on the TV set to open the disc tray.
- The disc tray opens.
3 Insert the desired CD in the disc tray with the label facing upwards.
4 Press to close the disc tray.
-
The disc tray closes automatically.
-
Display in the status display: reading , playback starts automatically and the menu Audio Disc Mode appears on the screen.

reading
stop


eading
eading


reading

CH
stop
-
m = 311
1
p
Audio functions
Information in the »Audio Disc Mode« menu
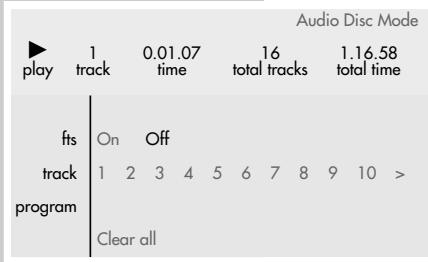
This menu provides you with information about the CD:
- play « - Play;
-
pause << - Playback pause;
-
1 track « Selected track;
-
0.00.01 time « Elapsed playing time of the tracks;
-
16 total tracks « Number of tracks;
-
1.16.58 total time Total playing time of CD.
Playback of a title
Press to start playback.
- Playback stops automatically at the end of the CD.
2 Switch to playback pause with
Resume playback with
3 End playback by pressing ■ «.
Selecting another title
1 To select the next track, press | briefly during playback.
2 To select the beginning of the track currently being played, briefly press .
3 To select the previous track, press ◆ ◆ briefly one more time.
4 To directly select a desired track, enter the number of the track in question as one or two digits with 1 ... 0 .
Ending playback
Playback is automatically terminated at the end of the CD.
Playback can be terminated at any time with .
Removing CD
Press on the television set, the disc tray opens.
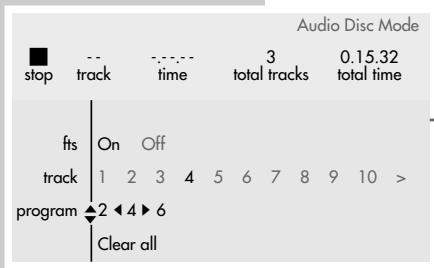
Assembling a music programme
This function allows you to select your favourite tracks from audio CDs in order to create your own music programme.
The programme may contain up to 20 tracks, which are displayed in a programme list.
When a music programme is played, it appears in the first line of the programme list. When a new music programme is created and the programme list is full, the last music programme in the programme list is automatically deleted.
Selecting a track
1 Open disc tray, insert desired CD and close disc tray again.
2 Switch DVD player to "STOP" by pressing
3 Select the track line with P -
4 Select the tracks which you wish to save in the title memory with or and confirm with OK.
- The track numbers ( program 246 ), the total number of tracks ( 3 total tracks ) and the playing time of the music programme ( 0.15.32 total time ) are displayed.
5 Save music programme by pressing playback starts automatically.
Playing back music programme
1 Open disc tray, insert desired CD and close disc tray again.
2 Start playback of music programme by pressing
3 End playback of programme by pressing
Deleting individual tracks
Switch the DVD player to "STOP" by pressing
2 Select the program line with P - .
3 Select the tracks you wish to delete with or and delete by pressing OK. The tracks are deleted from the title memory.
4 Save music programme by pressing , playback starts automatically.
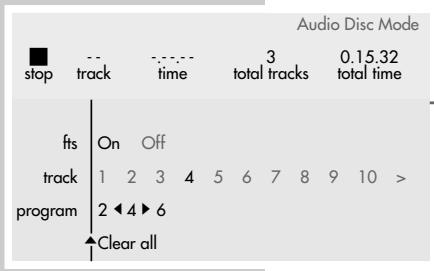
Deleting all tracks
Switch the DVD player to "STOP" by pressing
2 Select the Clear all line with P - .
3 Delete track by pressing OK. All tracks are deleted from the track memory.
With the security system, you can:
- Prevent the DVD player from being used;
- Activate or block access for playback of particular DVDs, video CDs or CDs;
- Block scenes which are not appropriate for children from DVDs or video CDs, or select alternative scenes.
Activating and switching off the security system of the DVD player
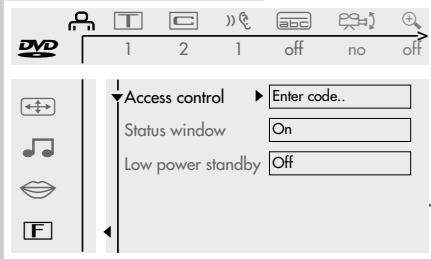
Activating the security system of the DVD player
1 Call up the menu line with «osd AUX«.
2 Select menu item (Settings) by pressing or and activate with P - .
3 Activate line F (Special functions) with - and activate by pressing .
4 Select the «Access control« line with «P - « or «P + « and activate by pressing »▶ «.
5 Enter the four-digit code number with keys 1 ... 0
Note:
When the code number is entered for the first time, the display changes to Confirm code .
Enter the four-digit code number again with keys 1 0
6 Select the Child lock line with P - or P + and activate by pressing .
7 Select the symbol with P - or P + .
8 Quit setting with «OSD AUX«. The DVD player is locked.
Note:
If a DVD or video CD is now inserted in the disc tray, the message «locked« appears and the four-digit code number must be entered.

De-activating the security system of the DVD player
1 To de-activate the security system, repeat steps 1 to 8 from the section entitled "Activating the security system of the DVD player" and select the symbol with P - or P + . The security system is de-activated.
Note:
If you forget or lose the code number, read the section entitled "Rectifying malfunctions yourself" on Page 42.
Changing the code number
1 To change the code number, repeat steps 1 to 5 from the section, "Activating the security system of the DVD player".
2 Select the Change code line with P - or P + and activate with .
3 Enter the new four-digit code number with keys 1 0 Enter the four-digit code number again with keys 1 0
4 Quit setting with OSD AUX*.
Activating DVDs or video CDs for playback
Permitting use of the DVD player
When the security system is activated, the «Access control« menu appears on the screen. You may choose whether you want the DVD or video CD to be played once or continuously.
If you select the function >>Play always«, the DVD or video CD is saved in a "list" and playback of this DVD or video CD is unlimited. A maximum of 50 DVDs or video CDs can be saved in this "list".
locked
Access control
Play once
()()()
Play always
()()()
Choose 'Play always' to insert the disc in the child-safe list
locked
Access control
Play once
( )
Play always
()()()
Choose 'Play always' to insert the disc in the child-safe list
1 Insert the DVD or video CD in the disc tray.
- The »Access control« menu appears on the screen.
2 Select the Play once line with P - or P + (for one-time use), or Select the Play always line with P - or P + .
3 Enter the four-digit code number with keys 1 0 - Playback starts automatically.
De-activating the «Play always« function
Insert the DVD or video CD in the disc tray. - Playback starts automatically.
2 Press while is visible. - Permission to play back this DVD or video CD is cancelled.
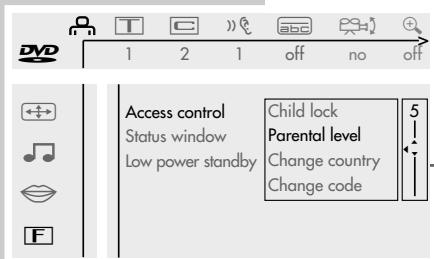
Authorising the content of a DVD
DVDs may offer films whose content or individual scenes are not appropriate for children. These DVDs contain information which identifies such content or scenes, and provides them with ratings from 1 to 8. You can select one of the ratings and thereby authorise alternative scenes for playback.
1 Call up the menu line with «osd AUX«.
2 Select menu item (Settings) with or and activate with P - .
3 Select line F (Special functions) with P - and activate by pressing .
4 Select the Access control line with - or + and activate with .
5 Enter the four-digit code number with keys 1 ... 0
6 Select the Child lock line with P - or P + and activate by pressing .
7 Select the Parental level line with P - or P + and activate by pressing .
8 Select the desired code number (from 1 to 8) with P - or P + .
9 Quit setting with »osd AUX«.
Changing country

1 Call up the menu line with OSD AUX*.
2 Select menu item (Settings) with or and activate with P = .
3 Select line F (Special functions) with P - and activate by pressing .
4 Select the «Access control« line with «P - « or «P + « and activate with »▶ «.
5 Enter the four-digit code number with keys 1 0
6 Select the Child lock line with P - or P + and activate by pressing .
7 Select the Change country line with P - or P + and activate by pressing .
8 Select your country of choice with P - or P + .
9 Quit setting with »osd AUX«.
Picture settings
Selecting picture menu
1 Display the menu line by pressing OSD AUX*.
2 Select menu item (Settings) with or and activate with P - .
3 Select + (Picture menu) with P - or P + and activate with
Note:
For further operation, see the following chapters, each one starting from step 1.
TV format
Your 16:9 picture format television set does not require any adjustment; the 16:9 setting is preset and should not be changed.
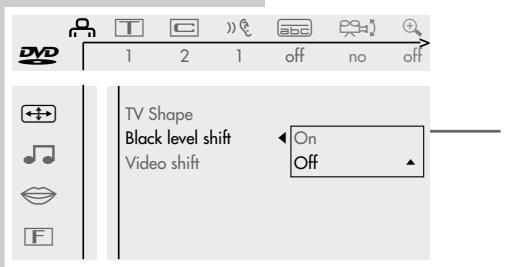
Black-and-white setting (only for NTSC transmissions)
This setting adjusts the color dynamics to create a better picture contrast.
1 Select the «Black level shift« line with «P - « or «P + « and activate by pressing «» «.
2 Switch function on/off with P - or P + .
3 Switch off menu with the «osd AUX« button.
Adjusting the screen position
The ex-works setting centres the picture on the screen.
Use this setting to adjust the position of the picture on your TV screen according to your personal taste, by shifting the picture to the left or to the right.
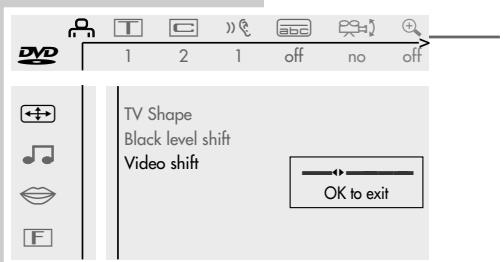
1 Select the «Video shift« line with «P - « or «P + « and activate by pressing »▶ «.
2 Shift the screen position with or and save with OK
3 Switch off menu with the «osd AUX« button.
Sound settings
Selecting the sound menu
1 Display the menu line by pressing OSD AUX*.
2 Select menu item _口 (Settings) with or and activate with P - .
3 Select (Sound menu) with P - or P + and activate with .
Note:
For further operation, see the following chapters, each one starting from step 1.
Adapting the digital outputs of the DVD player to an external audio device
If you are using a multiple-channel audio/video receiver, you must select the setting «All« (MPEG, AC 3 and PCM) or «PCM only« (normal stereo sound), depending on the receiver used.
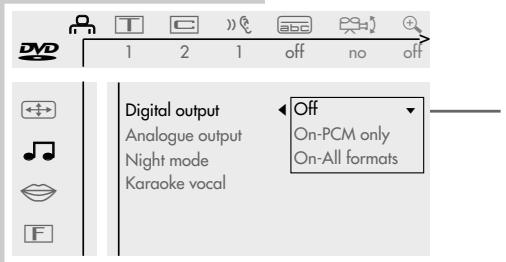
1 Select the Digital output line with P - or P + and activate by pressing .
2 Select required setting, «On-PCM only« or «On-All formats«, with «P - « or «P + «.
Note:
For your television, select the setting Off.
3 Switch off menu with the «osd AUX« button.
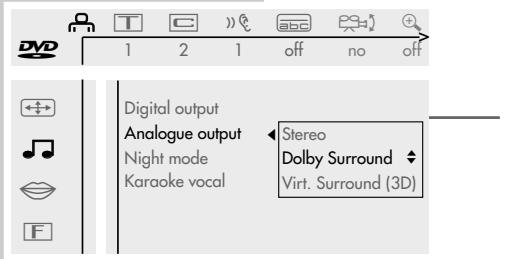
Selecting type of sound on the DVD player
Presetting for your TV set: Dolby Surround.
1 Select the Analogue output line with P - or P + and activate by pressing .
2 Select required setting, «Stereo« or «Dolby Surround« or «Virt. Surround (3D)«, with «P - « or «P + «.
3 Switch off menu with the « OSD AUX« button.

Switching night-time mode on/off
This function optimises the sound dynamics at low playback volume.
1 Select the Night mode line with P - or P + and activate by pressing .
2 Switch night-time mode on/off with P - or P + .
3 Switch off menu with the »osd AUX« button.
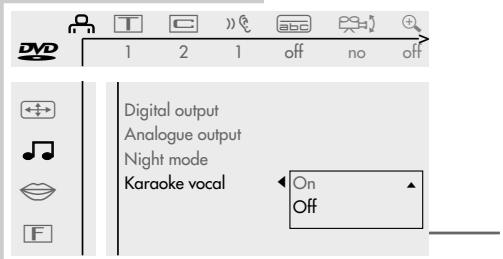
Switching karaoke on and off
Activate this function when you are playing a DVD with multi-channel karaoke sound.
1 Select Karaoke vocal by pressing or and then press to activate it.
2 Press or to switch karaoke on or off.
3 Press OSD to switch off the menu.
COMFORT SETTINGS
You can select your own individual setting for certain playback functions in the menu of the DVD player.
Selecting language menu
1 Display the menu line by pressing «osd AUX«.
2 Select menu item (Settings) with or and activate with P = .
3 Select (Language menu) with P - or P + and activate with .
Note:
For further operation, see the following chapters, each one starting from step 1.
Selecting dubbed language
When several languages are available on the inserted DVD, the sound is played back in the language you have selected.
If the language you have selected is not contained in the DVD, the first dubbed language on the DVD is automatically selected.
1 Select the «Audio« line with «P - « or «P + « and activate by pressing »».
2 Select the desired dubbed language with P - or P + .
3 Switch off menu with the «osd AUX« button.
Selecting the language of the sub-titles
When sub-titles are available on the inserted DVD, they are played back in the language you have selected.
If the language you have selected for the sub-titles is not on the DVD, the first language on the DVD is automatically selected.
1 Select the Subtitle line with P - or P + and activate by pressing .
2 Select the desired language with P - or P + .
3 Switch off menu with the « OSD AUX« button.
Note:
Sub-titles can be switched on and off during playback with SUBTITLE
Selecting the language of the DVD player's picture menu
1 Select the Menu line with P - or P + and activate by pressing .
2 Select the desired language for the picture menu with P - or P + .
3 Switch off menu with the «osd AUX« button.
Switching on/off the status display of the DVD player
1 Display the menu line by pressing OSD AUX*.
2 Select menu item _m (Settings) with or and activate with P = .
3 Select (Special functions) with P - or P + and activate with .
4 Select the Status window line with P - or P + and activate by pressing .
5 Switch status display on/off with P - or P + .
6 Switch off menu with the »osd AUX« button.
CE
Technical data
This DVD player conforms to the DIN EN 60065 (VDE 0860) safety regulations and thus the international safety regulations IEC 60065 or CEE 1.
You may not open the DVD player. The manufacturer accepts no liability for damage resulting from improper handling.
Mains voltage:
198 V - 264 V ~, 50 Hz
Power consumption:
approx. 20 W
Ambient temperature:
+10°C to +35°C
Relative humidity:
up to 80%
Playback standard:
PAL, 50Hz 625 lines/NTSC, 60Hz 525 lines
Playback system:
DVD-Video, Video CD, Audio CD/Multistandard
PAL/NTSC, CD-R, CD-RW
DVD disc format:
Diameter 12cm and 8cm
- Playing times (ø 12 cm) one-sided layer, approx. 2:13 hours
two-sided, approx. 4:01 hours
Two one-sided layers, approx. 4:26 hours
two-sided, approx. 8:02 hours
Video format
Signal: Digital
Digital compression: MPEG2 for DVD
MPEG1 for VCD
DVD 50 Hz
Horiz. Resolution: 720 pixels
Vert. Resolution: 576 lines
VCD
Horiz. Resolution: 352 pixels
Vert. Resolution: 288 lines
Audio format
Digital: MPEG/AC-3 Compres
sed Digital
PCM 16, 20, 24 bit
48/96 kHz
Analog: Stereo sound, Dolby
Surround, 3D Sound
Audio
Signal: Analog
DVD: fs 96 kHz 4Hz-44 kHz
fs 48 kHz 4Hz-22 kHz
Video CD: fs 48 kHz 4Hz-22 kHz
CD: fs 44,1 kHz 4Hz-20 kHz
Signal-to-noise ratio
(for 1 kHz): 110 dB
Sound volume
(for 1 kHz): 100 dB
Crosstalk attenuation
(for 1 kHz): 115 dB
CLASS 1 LASER PRODUCT

General instructions for laser devices
You will find a sign resembling the adjacent illustration on the back of your unit. CLASS 1 LASER PRODUCT signifies that the laser is safeguarded in such a way that the maximum allowed radiation value can never be exceeded under any circumstances.
Caution:
If operation devices or methods other than those specified here are employed, this may lead to dangerous radiation exposure.
LASER
Type Semiconductor laser GaAlAs
Wavelength 650 nm (DVD)
780 nm (VCD/CD)
Output 7 mW (DVD)
10 mW (VCD/CD)
Angle of radiation 60 degrees
This device emits laser radiation. Because of the danger of eye injuries, the unit may only be opened or serviced by trained personnel.
If settings other than those specified here are employed or OTHER PROCEDURES are carried out, this may lead to dangerous radiation exposure.
This product contains components which are covered by certain U.S. patents or are for other reasons considered intellectual property of the Macrovision Corporation and other proprietors. Use of this protected technology must be approved by the Macrovision Corporation and is only permissible for private presentation at home or for other limited applications, where no special permission has been granted by Macrovision Corporation. Reproduction or dismantlement of the device is prohibited.
Manufactured with permission from Dolby Laboratories. The "Dolby" label and the double-D logo "DQ" are trademarks of Dolby Laboratories. Confidential unpublished material.
(c)1992-1997 Dolby Laboratories, Inc. All rights reserved.
The DVD player conforms to the guidelines for electromagnetic compatibility and for low potential.
Cleaning DVDs/CDs
Wipe the dirty DVD/CD with a cloth from the centre outwards in a straight line.
Do not use any solvents such as benzene, flux, conventional cleaner or antistatic spray for analog records.
Rectifying malfunctions yourself
Not every interference to picture and sound is caused by a defect in your DVD player.
Accidentally pulled-out cables, damaged DVDs/CDs, and worn out batteries in the remote control can also impair functioning.
If the following measures do not bring about satisfactory results, consult an authorised dealer!
| Malfunction | Cause/Remedy |
| No return to start-up screen whenDVD/CD is removed | Switch the DVD player off and then on again. |
| Check if another DVD/CD must be inserted for the program. | |
| DVD player does not respond to remote control | Point the remote control directly at the TV. |
| Remove all obstacles which may impair the path of the re-mote control signal. | |
| Check or replace the remote control batteries. | |
| No picture | Switch the remote control to »DVD«. |
| Check the video connection. | |
| Distorted picture | Ensure that there are no fingerprints on the DVD/CD, follow the cleaning instructions on Page 38. |
| DVD/CD cannot be played | Check if the label on the DVD/CD is facing upwards. |
| Clean the DVD/CD. | |
| Check if the DVD/CD is damaged by testing it with anotherDVD/CD. | |
| No sound | Check the audio connections. |
| Try another playback source. | |
| Distorted sound from Hi-fi system | Ensure that the audio connections have not been connected at the phono input on the amplifier. |
| Security system is active, the four-digit code number is not known. | Cancel security system; instead of entering the code number, press the »■« key four times. |
INSTALLATION INSTRUCTIONS
Contents
2 Preparations
Installation and safety
Assembly
Putting batteries into the remote control
Preparing the remote control for additional appliances
6 Connecting
The connectors
Connecting the loudspeakers
Connecting an external hifi or Dolby Pro Logic amplifier
Connecting the aerial cable
Connecting AV appliances
Connecting a computer (VGA)
10 Setup
Setting up TV channels
Adjusting the Dolby level
12 Information
Technical data
Service information for the specialized dealer
Pin assignment of the EURO-AV socket
Correcting problems yourself

PREPARATIONS
Installation and safety
Observe the hints given in the 'TV mode' section.
Assembly
Fitting the centre loudspeaker panel
1 Insert the plug of the loudspeaker panel into the socket at the front side.
2 Attach the loudspeaker panel and fix it from the rear with the screws supplied.
PREPARATIONS
Fitting the rear panel
1 Attach the rear panel and slide it upwards.
2 Fix the rear panel with the screws supplied.

Fitting the operating panel cover
1 Connect the TV set to the mains.
2 Let holding devices for the operating panel cover slide downwards, approach sensor with hand to do so.
3 Press the Slider button.
4 Insert operating panel cover into the holding devices on the TV set.
5 Press Slider button and wait until the operating panel cover moves to the top.
6 Pull out mains plug, align operating panel cover with the glass pane and screw down.
7 Reconnect the mains plug.

Putting batteries into the remote control
1 Open the battery compartment (pull off cover).
2 Insert the batteries (Micro type, e.g. R03P, 3 × 1.5 ~V ). Observe the polarity when inserting the batteries.
Note:
If your TV set does not react to the remote control commands correctly, then the batteries could be used up. Remove empty batteries. There is no liability for damage caused by leaking batteries.
Preparing the remote control for additional appliances
In order to use the remote control with the DVD player and a Grundig video recorder, a code number must be entered.
| Appliance | DVD player* | Video recorder | Factory setting (reset) |
| Code no. | 424 | 238 | 859 |
| * Already entered in the factory | |||
1 Press and hold down the Mode button.
2 Use the 1 0 buttons to enter the code number. - The remote control now is prepared for the operation with the additional appliance.

The connectors

EURO AV1, AV3 Euro/AV sockets (the «Euro-AV2« socket is internally used by the DVD player).
DOLBY
R L Output sockets for active front loudspeakers. SURROUND Output sockets for active surround loudspeakers.
AUDIO OUT R L Output sockets for hifi system.
DVD DIGITAL OUT Digital audio output. (DVD-Player)
VGA
VGA IN Video connector for computer. VGA AUDIO IN Audio connector for computer.
LOUDSPEAKER
R+ R-, L+ L- Clamping terminals for external front loudspeakers. Center Clamping terminals for external center loudspeaker.
SW-SERVICE Service connector.
Y TERR. IN Aerial connector.
SAT 1 Aerial connector for satellite tuner (retrofitable).

Centre
Surround
Connecting the loudspeakers
The Planavision is equipped with front and centre loudspeakers, and a subwoofer.
Instead of the built-in front and centre loudspeakers you can also connect passive loudspeakers to the clamping terminals, or active loudspeakers to the phono (cinch) sockets.
For Dolby Surround ProLogic operation you must connect active surround loudspeakers to the phono sockets. Instead of active surround loudspeakers you can also connect the Wireless Surround System WST 864 or LSP3 (optional accessories) for the wireless transmission of the surround channel.
1 Connect the front loudspeakers to the clamping sockets R + R - , L + L - (passive) or to the phono sockets DOLBY L and DOLBY R (active).
Instead of the built-in centre loudspeaker you can also connect an external centre loudspeaker to the clamping terminals. For this the cable of the built-in centre loudspeaker must be disconnected from the «CENTER« clamping terminals. Attention! An external centre loudspeaker must not be operated in parallel with the built-in centre loudspeaker.
Note:
Press down the clamping lever to insert the loudspeaker cables into the terminals.
Insert the - core of the loudspeaker cable into the black (-) terminal and the + core (marked or coloured core) into the red terminal.
Instead of active loudspeakers you can also connect power amplifiers with passive loudspeakers to the respective phono terminals.
2 Connect the active surround loudspeakers to the «DOLBY SURROUND« phono sockets.
CONNECTING
Dolby Digital-Amplifier
Connecting an external hifi or Dolby Pro Logic amplifier
The Planavision can be connected to an existing hifi or Dolby Pro Logic amplifier.
1 Connect the amplifier to the AUDIO OUT L R ^次 phono sockets.
Aerial
Connecting the aerial cable
1 Connect the aerial cable to the »Y TERR. IN« socket.
Connecting AV appliances
Note:
AV appliances (video recorder etc.) can be connected to the two Euro-AV sockets* «AV1« and «AV3«, and to the «VIDEO IN« socket at the front of the TV set.
See also the menu item «Audio-/Video connections« in the «INSTALLATION« menu.
To avoid interferences, the video recorder must be operated at a distance of at least 45cm from the picture screen.
- The Euro-AV socket 2 is internally connected with the built-in DVD player.
Connecting a computer (VGA)
You may use the Planavision as a PC monitor.
The television set can adjust itself to the following input signals:
640 × 480 Pixel, 60Hz / 31.5kHz
640 × 400 Pixel, 70Hz / 31.5kHz
640 × 350 Pixel, 70Hz / 31.5kHz


1 Connect the VGA source (e.g. computer, games console) to the «VGA« socket using a commercially available VGA cable.
2 Connect the computer's audio output (if available) to the «L AUDIO IN R« sockets using a commercially available phono (Cinch) cable.
Note:
One of the above-mentioned resolutions must be set on the PC (see the PC's system control).
The display of a connected laptop computer must be switched off (using the keyboard or the laptop's system control; see the operating manual of the laptop).
When using a laptop, this has to be first connected and then switched on.
Setting up TV channels
The Planavision is equipped with the automatic tuning system "ATS euro plus" which carries out the channel position assignment for you.
1 After switching on the TV set, select the «English« dialogue language then confirm with «OK«.
Note:
If the Adjust language on screen page does not appear, press i and then OK to display the DIALOGENTER menu.
Use P + or P - to select the Automatic Programming row then confirm with OK .
Use P + or P - to select the Complete re-programming...row then confirm with OK
2 Confirm your country with OK .
- The automatic tuning system is started. Depending on the number of channels which can be received, the search can take one minute and more.
- When the automatic allocation of the channel positions is completed, a table with information about the installation menu is displayed.
3 Press TXT to exit this information table.
- The Installation « menu is displayed.
Adjusting the Dolby level
Note:
If you do not operate the TV set with the standard loudspeaker configuration (left/right, centre), select the «Speaker configuration« menu prior to setting the Dolby level and select there the loudspeakers connected.
1 Use the P_+ or P - button to select the Dolby level adjustment row then confirm with OK
2 Adjust the same volume level for all loudspeakers.
3 End the setting with TXT.
- A table with information about the Easy Dialogue system appears.
4 Press »TXT« to switch to TV operation.
Note:
It is possible to call up all functions of the «INSTALLATION« menu also later in the DIALOGENTER under «INSTALLATION«.

Technical data
Power supply voltage:
220 - 240V, 50/60Hz, (control range of power supply unit 190 ... 264V).
Power consumption:
in operation: 400 W (temporary power peaks of about 900 W may occur which are immediately regulated down to the normal power consumption of 350 W).
in standby: 7 W
Sound output stage:
Front: 2 x 30 Watt music 2 x 20 Watt sine Centre: 30 Watt music 20 Watt sine
Reception ranges:
C01 ... C99, special channels S01 ... S41
Service information for the specialized dealer:
The TV set may be operated only using the mains cable set supplied.
It prevents mains interference and is an integral part of the appliance approval.
For replacement purposes, please order only the mains cable set with the designation "GWN 9.36/part number 9290.991-406" from an approved after-sales service.
The product meets the requirements of the following EU guidelines: 73/23/EEC guideline on electrical equipment for use within certain voltage limits.
89/336/EEC guideline on electromagnetic compatibility.
The appliance complies with the standards:
EN 60065, EN 55013, EN 55020

Contact assignment of the EURO-AV socket
If you want to connect another appliance to the TV set (e.g. computer, amplifier), your specialist dealer can establish a proper connection using the following connection table:
| Pin | Signal | |
| 1 | = | audio output right |
| 2 | = | audio input right |
| 3 | = | audio output left |
| 4 | = | audio ground |
| 5 | = | blue ground |
| 6 | = | audio input left |
| 7 | = | RGB blue input |
| 8 | = | switching voltage |
| 9 | = | green ground |
| 10 | = | data line (MEGALOGIC) |
| 11 | = | RGB green input |
| 12 | = | - |
| 13 | = | red ground |
| 14 | = | ground |
| 15 | = | RGB red input (S Video = Chroma) |
| 16 | = | RGB switching voltage |
| 17 | = | video ground |
| 18 | = | RGB switching voltage ground |
| 19 | = | video output |
| 20 | = | video input, (S Video = luminance) |
| 21 | = | shielding/ground |
Correcting problems yourself
If the remedies below do not lead to a good result, contact an authorized GRUNDIG retailer.
Please consider that problems can also be caused by external appliances, such as video recorders and satellite receivers.
| Problem | Possible cause | Remedy |
| no picture, no sound | no mains voltage | mains cable connected? mains switch on? |
| TV set in standby | switch on with remote control | |
| TV set is not on a occupied AV channel position | switch to another channel position | |
| picture is bright (grainy or blue) but no programme can be seen | aerial cable | aerial cable connected? check aerial system? |
| no TV channel programmed | start channel search | |
| picture contrast | incorrect picture settings | change brightness, contrast, or colour settings |
| problem is with the broadcaster | test another channel | |
| poor picture and/or sound | interference from other appliances (household appliances, mobile telephones etc.) | change the position of the appliances |
| double image, reflection | channel setting | automatic or manual channel setting/fine tuning |
| aerial | have aerial cable or system checked | |
| no colour | colour intensity is on minimum | adjust colour upward |
| TV standard setting (if setting possibility is available) | select proper colour standards | |
| problem is with the broadcaster | test another channel |

INFORMATION
| Problem | Possible cause | Remedy |
| picture is there, no sound | volume at minimum or speakers switched off | increase/switch on volume |
| volume regulation activated via audio cinch socket (if this possibility is available) | select sound output via speaker | |
| problem is with the broadcaster | test another channel | |
| SAT mode | check AV cable between TV set and receiver | |
| sound unclear | sound setting | correct sound setting |
| poor or no Teletext | TV channel (has no Teletext) or check aerial system | check with another channel, possibly double image or reflection or fine tuning |
| transmission signal too weak (picture grainy) | check aerial system | |
| remote control does not work | remote control not in » TV« position | Switch remote control to »TV« |
| no optical connection | point remote control at the TV set | |
| remote control batteries | check or replace the batteries pay attention to polarity | |
| undefinable operating mode | switch off TV set with the main power button for about 2 minutes | |
| After switching on, “child lock” appears on the menu | child lock is activated | enter secret number or number combination 7038580. |