
CDP-M420 - CD Player SANYO - Free user manual and instructions
Find the device manual for free CDP-M420 SANYO in PDF.


| Product type | Portable CD player |
| Brand | SANYO |
| Model | CDP-M420 |
| Power supply | 230V~50Hz AC adapter (DC IN 4.5V) or 2 R03/AAA batteries |
| Disc compatibility | Audio CD, CD-R/RW, CD MP3 (ISO9660 standard, up to 99 folders or 300 files) |
| Playback functions | Play, pause, stop, skip forward/backward, fast search |
| Programming | Up to 64 tracks, custom order |
| Repeat | 1 track, all tracks, album (MP3), all albums (MP3) |
| Random playback | Yes (RAND mode) |
| Intro playback | Yes (first 10 seconds of each track) |
| Anti-shock | ESP (Electronic Shock Protection), 45s buffer (CD) / 120s (MP3) |
| Bass boost | DBBS (Dynamic Bass Boost System) |
| Audio outputs | Headphone jack (3.5mm), LINE OUT jack |
| Remote control | Wired, with PLAY/PAUSE, STOP, SKIP, VOLUME buttons |
| HOLD function | Key lock to prevent accidental presses |
| Auto power off | After about 60 seconds of inactivity |
| Operating temperature | 5°C to 35°C |
| Optical lens cleaning | Camera blower (do not touch the lens) |
| Casing cleaning | Soft cloth dampened with lukewarm water (no chemicals) |
| Safety | Laser stops when opened, do not expose to water or metal objects |
| Dimensions | Approx. 140 x 140 x 30 mm (estimated) |
| Weight | Approx. 300 g (with batteries, estimated) |
Frequently Asked Questions - CDP-M420 SANYO
User questions about CDP-M420 SANYO
0 question about this device. Answer the ones you know or ask your own.
Ask a new question about this device
Download the instructions for your CD Player in PDF format for free! Find your manual CDP-M420 - SANYO and take your electronic device back in hand. On this page are published all the documents necessary for the use of your device. CDP-M420 by SANYO.
USER MANUAL CDP-M420 SANYO
Compact Disc Player with MP3 Decoder
CAUTION - USE OF CONTROLS OR ADJUSTMENTS OR PERFORMANCE OF PROCEDURES OTHER THAN THOSE SPECIFIED HEREIN MAY RESULT IN HAZARDOUS RADIATION EXPOSURE.
ACHTUNG - WENN ANDERE ALS DIE HIER SPEZIFIZIEREN BEDIENUNGS-ODER JUSTIERINRICHTUNGEN BENUTZT ODER ANDERE VERFAHREN-SWEISEN AUSGEFUHRT WERDEN, KANN DIES ZU GEFÄHRlicher STRAHLUNGSEXPOSITION FUHREN.
ATTENTION - L'EMPLOI D'ORGANES DE COMMANDE OU DE RÉGLAGE, OU L'EXÉCUTION DE PROCÉDURES, AUTRES QUE CEUX SPECIFIÉS DANS LE MODE D'EMPLOI, PEUT PROVOQUER UNE EXPOSITION DANGEREUSE AU RAYONNEMENT.
OPGELET - HET GEBRUK VAN REGELAARS OF HET MAKEN VAN AFSTELLINGEN E.D. DIE NIET IN DEZE GEBRUIKSAANWIJZING ZIJN BESCHREVEN KAN LEIDEN TOT SCHADELIJKE STRALINGEN.
VARNING! OM APPARATEN ANVÄNDS PÄ ANNAT SÄTT ÄN VAD SOM BESKEIV I DENNA BRUKSANVISING, KAN ANVÄNDAREN UTSÄTTAS FÜR OSYNLIG LASERSTRÄLNING, SOM ÖVERSKRIDER GRÄNSEN FÜR LASERKLASS 1.
VAROITUS! LAITTEEN KÄYTTÄMINEN MUULLA KUIN TÄSSÄ KÄYTTOOHJEESSA MAINITULLA TAVALLA SAATTAA ALTISTAA KÄYTTÄJÄN TURVALLISUUSLUOKAN 1 YLITTÄVÄLLE NAKYMÄTTÖMÄLLE LASERSÄTEILLYLLE.
CAUTELA - L'USO DI COMANDI, AGGIUSTAMENTI O PROCEDIMENTI DIVERSO DA QUELLO QUI SPECIFICATO PUò DAR LUOGO AD ESPOSIZIONA A RADIAZIONI PERICOLOSE.
PRECAUCION - EL USO DE CONTROLES O AJUSTES, O PROCEDIMIENTOS DE OPERACION DIFFERENTES DE LOS ESPECIFICADOS EN este DOCUMENTO RESULTARAN EN EXPOSICION PELIGROS A LA RADIACION.
This set complies with the EMC Directive 89/336 and with the LVD Directive 73/23.
- High volume levels can create potentially dangerous situations by drowning out surrounding sounds. Use caution when driving while operating the unit, and obey all applicable laws.
Do not play your headset at a high volume level. Hearing experts advise against continuous extended play.
If you experience a ringing in your ears, reduce the volume or discontinue use. - No objects filled with liquids, such as vases, shall be placed on the apparatus.
- Do not use while bicycling, running or operating a motorized vehicle.
The apparatus shall not be exposed to dripping or splashing. - Do not use where there are extremes of temperature (below 5^ or exceeding 35^ ).
- Sudden changes in the ambient temperature may cause condensation to form on the optical lens inside the unit. If this happens, take out the disc, leave the unit for about 1 hour, and then proceed to operate.
- Do not insert pins, etc., inside the unit. This unit is equipped with a safety device which automatically turns the laser beam off when the disc compartment is opened. If a pin or other metal object should get inside the unit, however, this safety device may be deactivated.
The rating label is located on the bottom of the unit.



CONTROLS (Fig. 1)
- Disc compartment
- Open switch (OPEN)
- Bass expander switch (DBBS)
- Volume control (VOLUME
- STOP button (■)
- Headphones socket (O)
- Line output socket (LINE OUT)
- Skip/Search buttons (▶▲,▶▶)
- Hold switch (HOLD)
- Play/Pause button (▶/II)
- External DC socket (DC IN 4.5V)
- Mode button (MODE)
- Display
14.PROG button (PROG) - ASR/Album button (ALBUM/ASR)
- Battery compartment (bottom of the unit)
REMOTE CONTROL (Fig. 2)
The buttons on the remote control function in the same way as the corresponding buttons on the unit.
- Skip down button (▶SKIP)
- Skip up button (SKIP▶▶)
- Play/Pause button (PLAY/PAUSE/▶II)
- Stop button (STOP/□)
- Volume control (VOLUME



POWER SUPPLY
TO USE THE AC ADAPTOR
Plug one end of the supplied AC adaptor into the DC IN 4.5V socket, then plug the other end into an AC 230V, 50 Hz wall outlet.
Note:
The centre pin of the DC IN 4.5V socket is positive polarity (+) .
Caution:
Use only the supplied AC adaptor.
- Do not touch the AC adaptor with wet hands. Doing so is dangerous, as this could result in an electrical shock.
If the AC adaptor is connected, the installed batteries are automatically disconnected.
TO USE THE ALKALINE BATTERY
Insert four "R03/AAA" batteries (not supplied) (Fig. 3). Be sure to observe the proper polarity.

Notes on alkaline batteries
- When replacing the batteries, use four new batteries of the same type. Do not mix used battery with new one or mix different types of batteries.
- Never charge, heat, disassemble, or throw batteries into a fire.
- When the batteries have become discharged, they must be disposed of in a safe manner that complies with all applicable laws.
Battery replacement
If the batteries are weak, "d" appears on the display.
Replace the batteries.
Note:
When you are not going to use the unit for one month or more, take the alkaline batteries out of the battery compartment.



REMOTE CONTROL AND HEADPHONES CONNECTIONS
- Be sure to reduce the volume before connecting or disconnecting the headphones.
Connect the remote control and headphones, then plug the cord from the remote control or headphones to the PHONES socket. (Fig. 7)
HANDLING COMPACT DISCS
Use compact discs bearing the symbol shown in Fig. 6. In addition to conventional 12cm CDs, this unit can be used to play 8cm CDs without an adaptor. Place only one disc at a time in the CD compartment.
- Do not expose the disc to direct sunlight, high humidity or high temperatures for extended periods of time.
Discs should be returned to their cases after use. - Do not apply paper or write anything on the disc surface.
- Handle the disc by its edge. Do not touch the playing surface (glossy side).
- Fingersprints and dust should be carefully wiped off the playing surface of the disc with a soft cloth.
Wipe in a straight motion from the center to the outside of the disc. - Never use chemicals such as record cleaning sprays, antistatic sprays or fluids, benzene or thinner to clean compact discs.
The unit will not play a disc that has been inserted upside down, or discs which do not conform to the Compact Disc standard.
9



INFORMATION
This unit can play back the CD-R/RW that has recorded music data or MP3 files. Before playing back Music CD or MP3 CD, please read the following.
- MP3 CD is the disc that standardized by ISO9660, its file name must include 3-digit extension letters, "mp3".
- The directory and file names of the MP3 CD must be corresponded to the ISO standardized files.
- Single-session disc can be played back.
- Some multi-session discs and mixed discs cannot be played back depending on the recording condition.
This unit can recognize up to 99 folders or 300 files per disc. The CD with 99 folders or 300 files and over is not available to this unit. And if CD has a long file name, this unit can't recognize up to 300 files.
This unit can recognize up to 8 directory trees per disc. - MP3 CD may not be played in the recorded order.
Music section in "CD Extra" can be played back, not Data section.
Music files recorded by "Packet Writing" cannot be played back.
Notes on disc writing method
When you make MP3 CD by using your PC, set 44.1 kHz of sampling frequency. There are three basic methods for writing to a CD: "Track-at-Once", "Disc-at-Once", and "Packet Writing". Music files recorded by "Track-at-Once" or "Disc-at-Once" can be played back on this unit. (Note: The unit cannot play back the music files added with "Track-at-Once".) Music files recorded by "Packet Writing" cannot be played back.

MP3 CD directory sample:
Playback order: song01 song02 ... song14
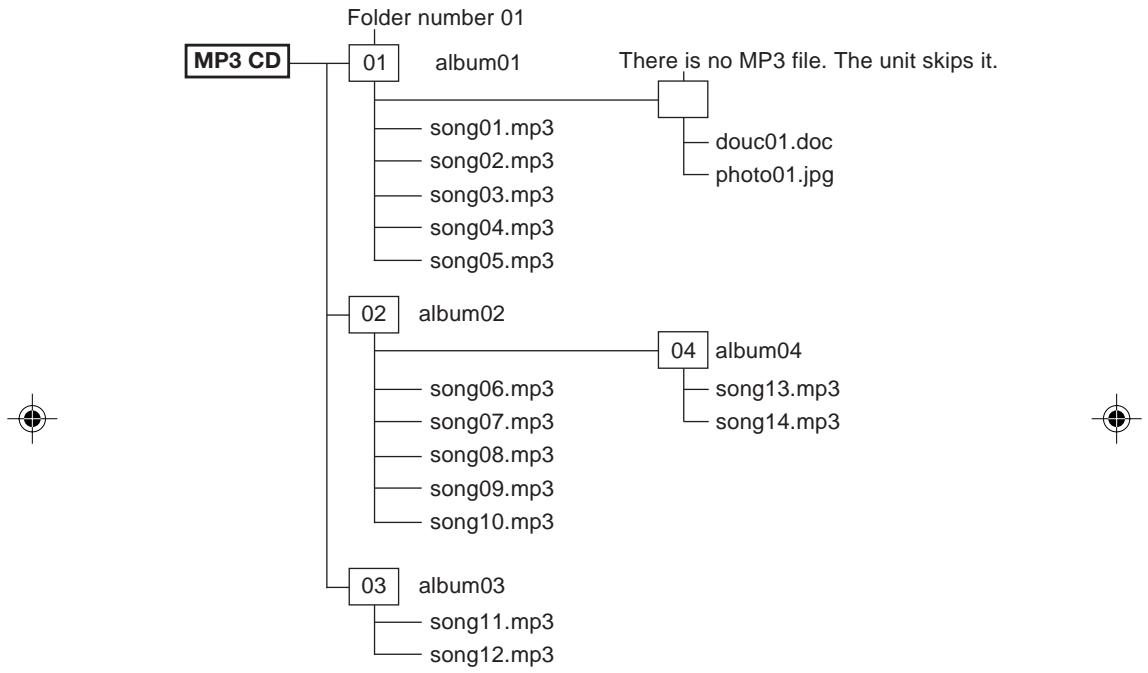
CAUTION:
- Some MP3 CDs can not be played back depending on the recording conditions.
The CD-R/RW that has no music data or non-MP3 files can not be played back. - Do not make an empty folder. It may not work correctly.
11




BEFORE OPERATION
Anti rolling shock function
In the previous anti-shock function, when skips occurred while available memory runs out, then the sound would suffer some interruption.
The new anti rolling shock function is designed to prevent skipping to the greatest extent possible instead of supplementing the skipped portion of the sound.
This is achieved by expanding the memory capacity, and in addition full attention has been given also to increasing the unit's signal reading capability.
Moreover, consideration has been given to eliminating the basic causes of skipping, both from the standpoint of horizontal shock and vertical shock.
Use this function when listening during walk or playing in a car.
When the / button is pressed first time, the anti rolling shock function turns on automatically. "ESP" appears on the display. Then "ESP" is remain standby when the buffer memory is full of next 45 seconds music data to Music CD and full of next 120 seconds music data to MP3 CD. (Fig. 4)
Note:
- Press the ALBUM/ASR button to turn the anti rolling shock function off. "ESP" disappears. Press the button again to turn it on.
Sound may skip or mute for a few seconds when you press the ALBUM/ASR button during play. - Playing may stop when the unit gets strong shock even when the anti rolling shock function is on.
- When playing back MP3 CD, this function always works even if "ESP" doesn't appear. (The function is not cancelled by pressing the ALBUM/ASR button.)



Dynamic bass boost system (DBBS)
Set the DBBS switch to ON to enhance the bass sound.
Auto power on function
The power turns on automatically when / II button is pressed.
Auto power off function
The power turns off automatically after about 60 seconds when all tracks on a disc have been played or when the button is pressed once to stop play.
Hold function (Fig. 5)
The HOLD switch disables the buttons from operating to prevent play from starting or stopping due to accidental operation. For normal use, leave the switch in the off position.
To prevent battery drain:
Set the HOLD switch to the on position when carrying the unit in a bag. The / button will not function even if the button is pressed accidentally. "HOLD" appears briefly on the display.
To prevent play from being interrupted:
Set the HOLD switch to the on position after starting play. "HOLD" appears briefly.
If the operating buttons do not function when pressed ...
- Check whether the HOLD switch is on or not.
- Remove the batteries and/or disconnect the AC adaptor from the unit. Wait a few seconds, then reinstall the batteries or reconnect the AC adaptor.
- If the buttons still do not function, insert new batteries.



PLAYING A DISC
BASIC OPERATION [MUSIC CD] [MP3 C
- Slide the OPEN switch right to open the disc compartment lid.
- Hold the disc with the labeled side up and press it onto the pivot until it "clicks" into place. (Fig. 8)
WARNING!
Do not insert your fingers into the opened panel. You may damage the unit or cause personal injury.
Do not allow young children to operate the unit unattended.
To remove the disc
Remove the disc while pressing the pivot.
Opening the disc compartment lid must be in stopped condition otherwise could scratch the disc.
- Close the disc compartment lid.



- Press the / 口 button to begin play.
For Music CD
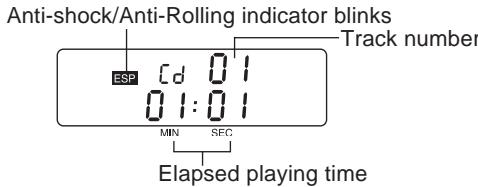
For MP3 CD
The music information ("Title", "Artist" and "Album") scrolls.
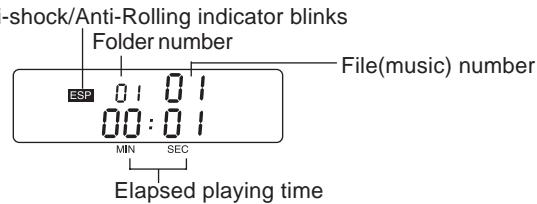
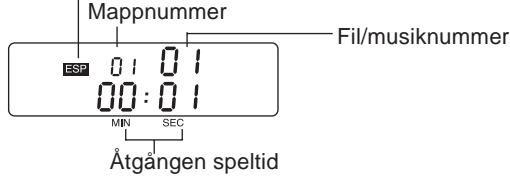
The track number and elapsed playing time for the current track are displayed.
- Adjust the VOLUME control as desired.
- To stop play temporarily, press the / II button. The elapsed playing time blinks. Press the / II button again to resume.
- To stop play, press the button once. The total number of tracks and total playing time appear.
To turn the power off, press the button once again.
Skip play
To skip to track 6 while track 3 is playing, press the button repeatedly until "06" appears on the display.
To skip back to track 3 while track 6 is playing, press the button repeatedly until "03" appears.
Search (forward/reverse)
If the or button is pressed during play, the player will search at high speed in the forward or reverse direction while the button is being pressed. When the button is released, normal play will continue.
15



VARIOUS PLAYING MODE
Press the MODE button repeatedly during play or in stop mode to select a various play mode available. Each time the button is pressed, the mode changes as shown below:
For MP3 CD
- Repeat one ( ) → Repeat an album ( ALBUM) → Repeat all album ( ALL ALBUM) → Introscan (INTRO) → Random PLAY (RAND) → Released
For MUSIC CD
- Repeat one ( ) Repeat all tracks ( ALL) Introscan (INTRO) Random Play (RAND) Released
Once the desired play mode is displayed, press the button to begin play in that mode.
REPEAT PLAY
You can play tracks repeatedly in normal or programmed play modes.
Single track repeat (Music CD only)
Press the MODE button once. " " appears on the display.
All tracks repeat (Music CD only)
Press the MODE button twice. "ALL" appears.
- To cancel repeat play, press the MODE button repeatedly until " " or " ALL" is disappeared.



Repeat an album (MP3 CD only)
Press the MODE button twice " ALBUM" appears.
All titles of the album are now repeated.
Repeat All album (MP3 CD only)
Press the MODE button three times, "ALL ALBUM" appears.
All albums are now repeated.
INTROSCAN
- Press the MODE button three times during stop. "INTRO" appears.
- Press the / button. The first 10 seconds of each track on a disc are played from the first track.
- When the desired track is playing, press the MODE button twice. Normal play continues.
RANDOM PLAY
- In stop mode press the MODE button four times. "RAND" appears. During play press the MODE button four times, "RAND" blinks, "RAND" remains lit when second track begins to play.
- Press the / button. All tracks on the disc are played in random order.
- To cancel random play, press the MODE button once.



PROGRAMMED PLAY
Up to 64 tracks on a disc can be programmed for play in any order.
Programmed playback [Music CD]
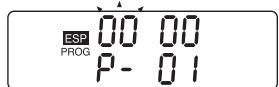
- Press the PROG button during stop.
![SANYO CDP-M420 - Programmed playback [Music CD] - 1](/content/2019/12/13408/images/bbfbf677d9b8163ec779b2bcf075a99fc4dd4217e248bce66b098a1ac12417fd.jpg)
- Press the skip buttons to select a track.
![SANYO CDP-M420 - Programmed playback [Music CD] - 2](/content/2019/12/13408/images/096f570367b627762cbc57c6c329ccd512662aa4440ea2a5c28b851edc5e61d3.jpg)
- Press the PROG button.
![SANYO CDP-M420 - Programmed playback [Music CD] - 3](/content/2019/12/13408/images/76cff80f69fbc3666f1d62972b6397d2f65fbdfd311575ec63f9eb0ad53036c1.jpg)
![SANYO CDP-M420 - Programmed playback [Music CD] - 4](/content/2019/12/13408/images/0f3e05b0996dbc6bf4a5659eb1053bc8320ba1007c378478c63272b086f6f1c7.jpg)
- Repeat steps 2 and 3 to programme tracks.
- To check the programme contents after all tracks have been programmed, press the PROG button repeatedly. The programmed track numbers sequentially appear on the display.
- Press the / II button to start programmed play.
- To cancel programmed play, press the button once.
![SANYO CDP-M420 - Programmed playback [Music CD] - 5](/content/2019/12/13408/images/0dbb848d7accf7757f7e33ec5495d692057510aec0aab6b219b687a545d79d7e.jpg)
![SANYO CDP-M420 - Programmed playback [Music CD] - 6](/content/2019/12/13408/images/a354cf04a457403891b46f7019083246e84170524e11d6a464490602c77229c8.jpg)
![SANYO CDP-M420 - Programmed playback [Music CD] - 7](/content/2019/12/13408/images/080359613e00104594b214bf4afb7974b68f03337dca331dcfcb5d878dd47659.jpg)
Programmed Playback [MP3 CD]
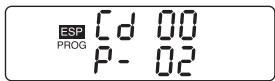
- Press the PROG button during stop.
![SANYO CDP-M420 - Programmed Playback [MP3 CD] - 1](/content/2019/12/13408/images/0caa6fb64a16849b394338e8d9a5a6225322b2e97d4afddbe0803ac59ad5323c.jpg)
- Press the skip button to select a folder number.
![SANYO CDP-M420 - Programmed Playback [MP3 CD] - 2](/content/2019/12/13408/images/92c9044d648b8e34b8d3eb52fef290ecc1fc753513d464dd2b9b488f20078555.jpg)
- Press the PROG button. The folder number remains.
Press the skip button to select a track.
![SANYO CDP-M420 - Programmed Playback [MP3 CD] - 3](/content/2019/12/13408/images/4b7f9ea5a201eb95948fc693f44841df12aa970bd785ef13e3b9e79ad87cd22d.jpg)
- Press the PROG button. It is programmed.
- Repeat steps 2 to 4 to programme track.
- Follow the same procedure as steps 5 to 6 in the "programmed playback [Music CD]".
Changing a programme
To add a new track to a programme:
- In the stop mode, press the PROG button repeatedly until "00" appears.
- Select a track as explained above.
- Press the PROG button.
To change a track:
- In the stop mode, press the PROG button repeatedly until the track number to be replaced is displayed.
- Select a track as explained above.
- Press the PROG button.
Note
- Programmed details cannot be partially deleted or inserted.
- The programmes will be lost after turn off the power or the disc compartment is opened.
19

ADVANCE OPERATION [MP3 CD]
Album name (folder name) search playback [MP3 CD]
- Press the ALBUM/ASR to select a folder during stop.
- Press the skip button to select a file (song).
- Press / to start playback.
![SANYO CDP-M420 - ADVANCE OPERATION [MP3 CD] - 1](/content/2019/12/13408/images/e2aba2b108b0052dfc8215e72cde25e7e0b36e17bc3b7e03160682eefc154a24.jpg)
![SANYO CDP-M420 - ADVANCE OPERATION [MP3 CD] - 2](/content/2019/12/13408/images/e28e13b37d3701077c7c1fa0abcab5c550a2e21e839e0cb6126612c5925d1e6e.jpg)
![SANYO CDP-M420 - ADVANCE OPERATION [MP3 CD] - 3](/content/2019/12/13408/images/fe6913c6c3d119c2a3ae348465efb555445b6c9e3fbb14b8ad318adfa0f700c8.jpg)
![SANYO CDP-M420 - ADVANCE OPERATION [MP3 CD] - 4](/content/2019/12/13408/images/a783ae8dfb167badb4fd9b5737cfea6643dd91df28aeca20387f9c7eccef42ff.jpg)
USING THE LINE OUT SOCKET
To record from the CD player
Connect the patch cable from the LINE OUT socket on the unit to the LINE INPUT sockets on a cassette recorder.
To hear through a pair of speakers
Connect the patch cable from the LINE OUT socket on the unit to the AUX or CD INPUT sockets on a stereo system.
CLEANING
Cleaning the pickup lens (Fig. 9)
Dust on the pickup lens can lead to erratic operation and interruption of the sound during play.
- To clean the pickup lens, open the disc compartment lid. Blow the dust off of the lens using a camera lens blower (available at most camera stores).
- Do not touch the surface of the lens.
Cleaning the cabinet
Use a soft cloth moistened with plain lukewarm water and wrung dry.
Never use benzol, benzene or other strong chemical cleaners.
21


DEUTSCH
VORSICHTSMASSNAHEN
Dynamic Bass Boost System (DBBS)
SUGGESTIONS PRATIQUES
MANUTENTION DES DISQUES COMPACTS
Lecture programme [CD MP3]
Dynamic bass boost system (DBBS)
[MUZIEK CD] [MP3-CD]
Search (forward/reverse)
GEPROGRAMMERDE WEERGAVE
- Druke ProG toets in de stop stand.
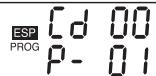
- Druke ProG toets in de stop stand.
Anti-shock/Anti-rolling-indikatorn blinkar.
- Tryck in PROG knappen.
Pick up light source:
Semiconductor laser
Pick up wave length:
790 nm
Laser output:
0.5 mW (continuous wave max.)
Terminal impedance:
PHONES: 16 - 32 ohms
Power source:
DC: 4.5V (AC adaptor)
DC: 3V (R03/AAA x 4)
Dimensions:
137 × 25 × 147 ~mm (W × H × D)
Weight:
Approx. 194g (without batteries)
Specifications subject to change without notice.
注意
- Compact Disc Player with MP3 Decoder
- CONTROLS (Fig. 1)
- REMOTE CONTROL (Fig. 2)
- POWER SUPPLY
- TO USE THE AC ADAPTOR
- Caution:
- TO USE THE ALKALINE BATTERY
- Notes on alkaline batteries
- Battery replacement
- REMOTE CONTROL AND HEADPHONES CONNECTIONS
- HANDLING COMPACT DISCS
- INFORMATION
- Notes on disc writing method
- MP3 CD directory sample:
- BEFORE OPERATION
- Anti rolling shock function
- Note:
- Dynamic bass boost system (DBBS)
- Auto power on function
- Auto power off function
- Hold function (Fig. 5)
- To prevent battery drain:
- To prevent play from being interrupted:
- If the operating buttons do not function when pressed ...
- PLAYING A DISC
- BASIC OPERATION [MUSIC CD] [MP3 C
- WARNING!
- For Music CD
- For MP3 CD
- Skip play
- Search (forward/reverse)
- VARIOUS PLAYING MODE
- REPEAT PLAY
- Single track repeat (Music CD only)
- All tracks repeat (Music CD only)
- Repeat an album (MP3 CD only)
- Repeat All album (MP3 CD only)
- INTROSCAN
- RANDOM PLAY
- PROGRAMMED PLAY
- Programmed playback [Music CD]
- Programmed Playback [MP3 CD]
- Changing a programme
- To add a new track to a programme:
- To change a track:
- Note
- ADVANCE OPERATION [MP3 CD]
- USING THE LINE OUT SOCKET
- To record from the CD player
- To hear through a pair of speakers
- CLEANING
- Cleaning the pickup lens (Fig. 9)
- Cleaning the cabinet
- VORSICHTSMASSNAHEN
- SUGGESTIONS PRATIQUES
- MANUTENTION DES DISQUES COMPACTS
- Lecture programme [CD MP3]
- [MUZIEK CD] [MP3-CD]
- GEPROGRAMMERDE WEERGAVE
Brand : SANYO
Model : CDP-M420
Category : CD Player