
XSS7 - Sports video camera POLAROID - Free user manual and instructions
Find the device manual for free XSS7 POLAROID in PDF.

| Product Type | Sports Video Camera |
| Brand | Polaroid |
| Model | XSS7 |
| Dimensions (without housing) | 2.64 x 1.89 x 1.14 inches (6.7 x 4.8 x 2.9 cm) |
| Weight (without housing) | 46.49 g |
| Power Supply | Rechargeable lithium-ion battery via USB |
| Charging Time | 2 to 4 hours |
| Recording Autonomy | Approximately 1 hour |
| Image Sensor | 1.3 MP CMOS |
| Photo Resolution | 5 MP (2592x1944), 3 MP (2048x1536), 1 MP (1280x720) |
| Video Resolution | 720p (1280x720 at 30 fps) or VGA (640x480 at 60 fps) |
| Photo Format | JPG |
| Video Format | AVI HD |
| Shooting Modes | Video, Photo, Vehicle Mounted |
| Screen | 2-inch color touchscreen |
| Field of View | 70° |
| Memory | microSD / microSDHC card (not included, up to 32 GB) |
| Water Resistance | Up to 10 meters with the included waterproof housing |
| Connectivity | USB 2.0 (Plug and Play) |
| Included Accessories | Waterproof housing, bike mount, helmet mount, mounting adapter, USB cable, manual |
| Maintenance and Cleaning | Clean with a soft, dry cloth. Do not expose to direct sunlight. Protect from sand and moisture. |
| Safety | Do not use without a memory card; do not remove the card during recording or transfer. |
Frequently Asked Questions - XSS7 POLAROID
User questions about XSS7 POLAROID
0 question about this device. Answer the ones you know or ask your own.
Ask a new question about this device
Download the instructions for your Sports video camera in PDF format for free! Find your manual XSS7 - POLAROID and take your electronic device back in hand. On this page are published all the documents necessary for the use of your device. XSS7 by POLAROID.
USER MANUAL XSS7 POLAROID
Thank you for purchasing the Polaroid XS7HD HD sports video & photo camera. This is one of our smallest cameras capable of recording 720p high definition video clips and 5MP still images. With proper use and care, your camera will provide many years of service, allowing you to photograph life, both on land and in the water while standing still or moving. Its small size, light weight and waterproof capabilities add up to one unique camera to help you expand your photographic experiences.
Please take the time to read this manual carefully and keep it in a safe place for future reference. The screen displays and illustrations used in this manual may not be an exact representation of your camera.
What's Included in the Box?
XS7 camera
- Waterproof case
- Bike mount
- Helmet mount
- Camera mount adapter
USB cable
- Manual
PRECAUTIONS
- Do not expose the video camera to direct sunlight by pointing its lens directly at the sun. The image sensor of the video camera may be damaged.
- Take good care of the video camera and prevent water or sand particles from entering the camera; it's only waterproof when it's sealed in its waterproof case. When it is used on the beach near or in the water, be sure the camera is enclosed in its waterproof housing. The housing will protect the camera from getting wet and will prevent sand particles and salt vapor damage.
- Do not store the camera in an environment with excess heat, humidity, dust or chemical materials.
- Battery life will be shortened if the camera is left unused for long periods of time (in excess of three months). It is recommended that you turn the camera on for a minute or more during long storage times to allow an electric current to run through the battery.
- If dirt accumulates on the camera and/or its lens, use a soft, clean, dry cloth to wipe it away gently.
- Do not touch the lens surface with fingers.
-
This camera uses a microSD flash card. You may find that your finger alone cannot press the card into its slot far enough for the card to lock in place or to push it inward enough to release it. Try nudging the card with a fingernail or a miniature flat blade screwdriver.
-
Protect the memory card from electromagnet fields and do not remove the card from its socket if the camera or computer is reading information from it.
- Your camera does not have a built-in memory. Be sure to install a microSD or microSDHC (high capacity) card in the card slot.
CHARGING THE BATTERY
- Connect the small plug of the USB cable into the USB Receptacle on the bottom of the camera; connect the opposite end into an available USB port of your computer.
- While the computer is on, the battery will charge as indicated by the Charging Indicator Light.
- The light will remain on during the entire charge cycle and will extinguish when charging is complete.
- Typical charge times will vary between 2 and 4 hours, depending upon the amount of pictures and length of time of all videos that have been recorded. NOTE: It is not necessary to run the battery down completely before recharging. The built-in Lithium-ion battery will charge to its full working capacity regardless of it state of depletion. This will considerably reduce recharge time.
TURNING THE CAMERA ON AND OFF
- On the camera's top left control panel locate the Power Button and press it once. The camera turns on and displays the screen shown here.
- After 4 seconds, the startup screen will disappear, and the camera will display live video.
- To power the camera off, press the Power Button.
RECORDING VIDEOS
- Insert a flash memory card into the Memory Card Slot.
- Press the Power Button.
- Place the Mode Switch in its center position.
- Press the Shutter Release Button once or press the center of the LCD Color Display once to begin recording a video clip. Press either shutter button once again to stop recording. NOTE: The camera will also stop recording automatically when the memory card becomes full or the battery runs down while recording.
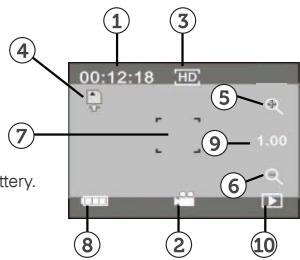
ICONS ON THE VIEWING SCREEN IN THE VIDEO MODE
- 00:12:18 : This timer shows that recording can continue for 12 minutes and 18 seconds.
- :The camera is in the video recording mode.
- : Video quality is set to high definition 720p.
- :The memory card is inserted.
- Digital zoom IN
- Digital zoom OUT
- : Touch-sensitive shutter release
- :The battery icon displays the power left in the battery.
- :Zoomvalue,1=wide angle,4=telephoto
- : Press this icon to switch to the playback mode.
TAKING PHOTOS
- Turn the camera on following the procedure explained previously.
- Slide the Mode Switch down to select the picture-taking mode.
- Aim the camera at your subject; using the touch-screen, adjust the zoom level and take the picture by either pressing the center of the viewing screen or the Shutter Release on the top-right of the camera body.
- The Busy Light will light up while the picture is being saved to the memory card.
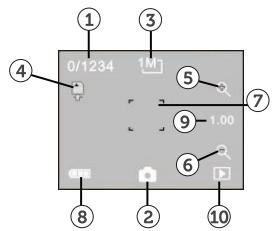
ICONS ON THE VIEWING SCREEN IN THE PICTURE-TAKING MODE
-
0/1234 : The number to the left of the slash counts the total pictures taken. The number to the right of the slash displays the total number of pictures that can fit on your memory card.
-
:The camera is ready to take still photos.
- : Press to select picture size: 1M/3M/5M .
- :The memory card is inserted.
- : Digital zoom IN
- : Digital zoom OUT
- : Touch-sensitive shutter release
- :The battery icon displays the present power available from the battery.
- :Zoomvalue, 1 = wideangle,4=telephoto
- :Press this icon to switch to the playback mode.
VEHICLE-MOUNTED MODE
- With the correct accessories, this mode allows you to mount the camera on a moving vehicle, bike helmet, snowboard, etc. During use, you probably won't be in a position to access the camera's control buttons. So, while driving down the road or in the woods, the camera will take 5-minute video clips, save the clip, then immediately record another 5-minute clip. This will continue until such time as the Power Button is pressed to turn off the recording.
NOTE: If allowed to continue without being turned off, the video clips will fill the memory card and go into a "recording loop" erasing previously recorded files as it continues. In the loop mode, recording won't stop until the battery is exhausted or the power button is pressed. - To activate the Vehicle-Mounted mode, slide the Mode Switch down. An icon of a small car will appear at the bottom-center of the viewing screen.
- To start recording, press the Shutter Release on the top of the camera or press the center of the viewing screen.
- Press either shutter release to stop recording.
ICONS ON THE VIEWING SCREEN IN VEHICLE-MOUNTED MODE
-
00:12:18 : Timer shows that recording can continue for 12 minutes and 18 seconds.
-
:The camera is in the Vehicle-Mounted Mode.
- : Video quality is set to high definition 720p.
- :The memory card is inserted.
- : digital zoom IN
- : digital zoom OUT
- : touch-sensitive shutter release
- : The battery icon displays the power left in the battery.
- : zoom value, 1= wide angle, 4= telephoto
- : Press this icon to switch to the playback mode.

- Turn on the camera using the Power Button.
- Place the Mode Selector in its center position (video recording).
- A movie camera icon will appear at the bottom-center of the LCD Color Display. To review the video clips, press the play icon at the bottom-right of the screen.
- The Browsing Arrows shown in Figure C will advance one file forward or backward. NOTE: While browsing in this mode, still photo images will also appear for reviewing and the letters "JPG" will appear in the top-left corner of the LCD Color Display The file extension "AVI" will appear if the image represents a video file.
- When a video frame is displayed that you want to review, press the Play Button, and the clip will play.
- While a clip is playing, you may pause the clip, play at normal speed, play faster or slower than normal speed (See Figures A and B below).

- AVI : Indicates you are reviewing a video AVI file.
- :You are viewing clip#1 of 1 clip.
- : current folder name (such as: I:\DCIM\100MEDIA)
- :Press this to browse video clips forward.
- : Press this to browse video clips backwards.
- : Press the trash icon to delete video clips.
- :Press to play the current video clip.
- :Press the movie camera icon to switch to previous mode.
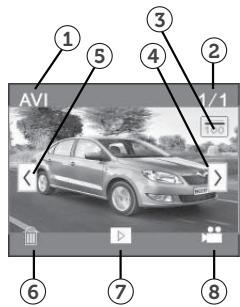
Figure C
DELETING FILES
- The screen shots shown in the last two sections on playing back files feature icons of a garbage can in their lower-left corners.
- If you wish to delete either a still image file or a video clip, press the garbage can icon.
- After pressing the icon (item in the figures below), the screen on the right will appear asking if you want to delete the file shown on the display.
- Press "Yes" to delete the file; press "No" to keep it.
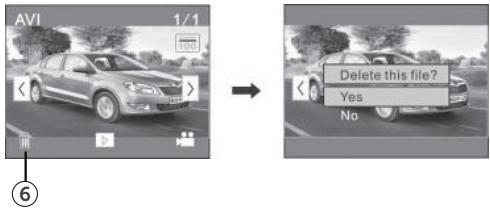
- After pressing your selection, the playback screen shown on the left will return along with the playback icons: type of file, file number/file counter, folder name, forward/ reverse advance arrows, garbage can, play, and still/video camera mode.
TRANSFERRING FILES FROM THE CAMERA TO YOUR COMPUTER
- Connect a compatible USB cable from the camera's USB Receptacle to your personal computer.
- The camera is a plug and play device which will be recognized immediately by your computer.
- Your computer will treat the camera as a removable disk and will appear as such under "My Computer."
- Photos and videos you've taken are stored in I:\DCIMX100MEDIA ("I" is the drive letter assigned to the camera by your computer).
- Vehicle-Mounted mode clips are saved in I:\DCIM\RECORDER. ("I" is the drive letter assigned to the camera by your computer).
- Files can be accessed by photo and video editing programs directly from the camera as a removable disk.
- It recommended that you save all the files from the camera to a folder on your C: drive.
TRANSFERRING FILES FROM THE MEMORY CHIP TO YOUR COMPUTER
- Remove the microSD memory card from the camera's Memory Card Slot.
- Insert the card in your computer's media card reader and follow the instruction steps 3-7 in the previous section "TRANSFERRING FILES FROM THE CAMERA TO YOUR COMPUTER."
TURNING THE CAMERA OFF
MANUALLY
You can turn the camera off at any time by pressing the Power Button.
AUTOMATICALLY
The camera will shutdown by itself if no button has been pressed for 5 continuous minutes.
WEAK BATTERY, WITH USER NOTIFICATION
When the battery becomes sufficiently discharged, the battery icon located in the lower-left corner, which is displayed during the video or picture-taking mode, will turn red and begin to blink. The camera will then shut itself off.
USING THE INCLUDED ACCESSORIES
WATERPROOF CASE
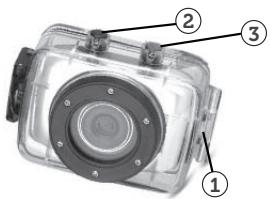
- Clamp
2.Shutter Release -
Power Button
-
Insert a finger at the half circle of the Clamp by prying the clamp up away from the case.
-
Before sealing the case, inspect the water sealing gasket to be sure it's in good condition. You can test the gasket by closing the case without inserting the camera. Submerse the case completely in a bowl of water for about a minute. Remove the case from the water, dry off its exterior with a towel, then open the case. If the entire interior is dry, the case and gasket are safe for use under water.
-
There are just two buttons required for recording video and images: the Shutter Release, and the Power Button.
- Remember to put the Mode Switch in your desired recording position before inserting the camera in the waterproof case. There is no external button for the Mode Switch.
HANDLEBAR CLAMP
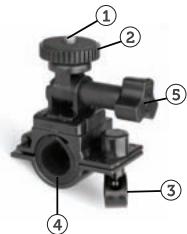
- 1/4-20 Screw
- Locking Wheel
- Bar Clamp Bolt
- Bar Clamp
-
Tilt Knob
-
The camera does not have a standard tripod mount. For all the accessories with a 14 - 20 screw, the camera must be enclosed in with the waterproof case or in the included mounting adapter.
- Turn the waterproof case (or mounting adapter) clockwise onto the 1/4 - 20 screw of the handlebar clamp until secure
- Turn the Locking Wheel so it applies pressure to the case to keep the connection secure.
- Loosen the Bar Clamp Bolt until the screw can be pushed 90^ upward.
- The bottom half of the Bar Clamp can be opened to allow you to wrap the Handlebar Clamp around the actual handlebar of your bicycle.
- After positioning the Handlebar Clamp where you want it, close up the bottom half of the clamp and tighten the Bar Clamp Bolt.
- Loosen the Tilt Knob, to adjust for the proper aiming angle; then tighten the knob.
- Panning adjustments can be made by loosening the Locking Wheel, adjust the pan angle; then tighten the wheel.
HELMET MOUNTING SYSTEM
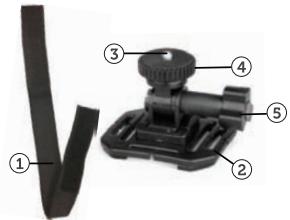
- Helmet Belt
- Helmet Mount
- 1/4-20 Screw
- Locking Wheel
-
Tilt Knob
-
Insert the free end of the Helmet Belt through one of the slots in the base of the Helmet Mount.
- Thread the same end in to the helmet vent and then back up to the Helmet Mount through another vent. Then insert the belt through the other side of the Helmet mount. Then insert the belt back through the helmet vent.
- You should have now both ends of the belt inside the helmet. Take both ends of the Belt and pull to tighten and then attach together with the Velcro strap.
- Turn the Waterproof case (or mounting adapter) onto the 1/4 -20 screw of the Helmet Mount until secured
- Turn the Locking Wheel so it applies pressure to the case to keep the connection secure.
- Loosen the Tilt Knob, to adjust for the proper aiming angle; then tighten the knob.
- Please note this helmet mount will only work with vented helmets.
MOUNTING ADAPTER
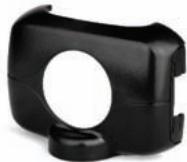
- This Mounting Adapter allows you to attach mounting accessories that have a 14 - 20 screw.
- The XS7 will clip right in to this adapter
Specifications
| Images sensor: | 1.3MP CMOS Sensor |
| Photo: | 5MP (2592x1944), 3MP (2048X1536), 1MP (1280X720) |
| Video: | 720p (1280X720p FPS 30 or VGA (640X480) FPS 60 |
| Photo Format: | JPG |
| Video Format: | AVI HD |
| 3 Modes: | Video, Stills, Car or sports Mounted Mode |
| LCD Display: | 2" full color touch screen |
| FOV: | 70° |
| Battery Capacity: | 300mah |
| Recording time: | 1 hr |
| Charge time: | 1 hr |
| USB: | USB 2.0 |
| Shutter: | Electronic |
| White balance, Scenes, Sensitivity: | Auto |
| Memory Card: | Micro SD |
| Memory capacity: | 1-32GB |
| Water depth With Case: | 10 meters |
| Weight: | 1.64oz (without case) |
| Dimensions: | 2.64 x1.89 x 1.14" |
Polaroid, Polaroid & Pixel, Polaroid Classic Border Logo, and Polaroid Color Spectrum are trademarks of PLR IP Holdings, LLC, used under license. All other trademarks are the property of the respective owner, who has not sponsored, endorsed or approved this product. PLR IP Holdings, LLC does not manufacture this product or provide any Manufacturer's Warranty or support.
Distributed by:
C&A Licensing LLC
2 Bergen Turnpike
Ridgefield Park, NJ 07660
© 2012 All Rights Reserved
MADE IN CHINA
Product features, specifications and appearances are subject to change without notice.
www.polaroidaction.com

Instantly recognizable. Instantly
reassuring. The Polaroid Classic Border
lets you know you've purchased a product
that exemplifies the best qualities of our
brand and that contributes to our rich
heritage of quality and innovation.
INTRODUCTION
Ridgefield Park, NJ 07660 USA
© 2012 Tous Droits Reservés
FABRIQUE EN CHINE
Instantly recognizable. Instantly
reassuring. The Polaroid Classic Border
lets you know you've purchased a product
that exemplifies the best qualities of our
brand and that contributes to our rich
heritage of quality and innovation.
INTRODUZIONE
Ridgefield Park, NJ 07660 USA
Instantly recognizable. Instantly
reassuring. The Polaroid Classic Border
lets you know you've purchased a product
that exemplifies the best qualities of our
brand and that contributes to our rich
heritage of quality and innovation.
EINFUHRUNG
Ridgefield Park, NJ 07660 USA
Instantly recognizable. Instantly reassuring. The Polaroid Classic Border lets you know you've purchased a product that exemplifies the best qualities of our brand and that contributes to our rich heritage of quality and innovation.
INTRODUCCION
Ridgefield Park, NJ 07660 USA
Instantly recognizable. Instantly
reassuring. The Polaroid Classic Border
lets you know you've purchased a product
that exemplifies the best qualities of our
brand and that contributes to our rich
heritage of quality and innovation.