
AutoCook Pro - Multifunction Cooker BOSCH - Free user manual and instructions
Find the device manual for free AutoCook Pro BOSCH in PDF.


| Product Type | Multifunction Cooker |
| Brand | Bosch |
| Model | AutoCook Pro |
| Dimensions (W x D x H) | 35 x 35 x 35 cm |
| Weight | 6.5 kg |
| Power Consumption | 1500 W |
| Voltage | 220-240 V |
| Capacity | 6.5 L |
| Functions | Pressure cooking, slow cooking, steaming, sautéing, stewing, rice cooking, porridge, yogurt making, keeping warm |
| Display Type | Digital LCD with backlight |
| Timer | 24-hour delay timer |
| Preset Programs | 12 automatic cooking programs |
| Inner Pot Material | Stainless steel with non-stick coating |
| Lid Material | Stainless steel with safety lock |
| Safety Features | Pressure release valve, lid lock sensor, overheat protection, anti-clogging design |
| Cleaning | Inner pot and steam basket dishwasher safe; lid and sealing ring hand wash only |
| Spare Parts | Sealing ring, inner pot, steam basket, measuring cup, rice paddle, soup ladle |
| Repairability | Modular design; parts available through Bosch service centers |
| Warranty | 2 years |
| Color | Stainless steel / Black |
Frequently Asked Questions - AutoCook Pro BOSCH
User questions about AutoCook Pro BOSCH
0 question about this device. Answer the ones you know or ask your own.
Ask a new question about this device
Download the instructions for your Multifunction Cooker in PDF format for free! Find your manual AutoCook Pro - BOSCH and take your electronic device back in hand. On this page are published all the documents necessary for the use of your device. AutoCook Pro by BOSCH.
USER MANUAL AutoCook Pro BOSCH
Register your new Bosch now: www.bosch-home.com/welcome

MUC6... MUC8...

BOSCH
en Instruction manual
Intended use
Please read and follow the operating instructions carefully and keep them for later reference! Please read all instructions! Enclose these instructions when you give this appliance to someone else.
If the instructions for correct use of the appliance are not observed, the manufacturer's liability for any resulting damage will be excluded. This appliance is intended for domestic use only.
The appliance is suitable for cooking with steam pressure, cooking, baking, roasting, stewing, steam-cooking, soft frying, pasteurising and heating up food, as well as keeping food warm. It must not be used for processing other substances or objects. All ingredients must be hygienically faultless. During handling, the rules of kitchen hygiene must be observed.
The appliance should only be used for its intended purpose. The relevant heat source may only be used in accordance with the operating instructions. Only use the manufacturer's original spare parts in conformity with the individual appliance model. In particular, make sure that a basic appliance and a lid that are specified as being compatible are from the same manufacturer. Only use the pan and the accessories with the basic appliance.
Only use the appliance indoors at room temperature and up to 2000 m above sea level. When installing the appliance, ensure that there are no sensitive surfaces and appliances above and behind the appliance that may be damaged by the temperature development and the escaping steam.
This appliance may not be used by persons (including children) with reduced physical, sensory or mental capabilities or a lack of experience and/or knowledge unless they have been given supervision or instruction. Keep children away from the appliance and connecting cable and do not allow them to use the appliance.
Children must not play with the appliance. Cleaning and user maintenance must not be performed by children.
Safety instructions
⚠️ Risk of electric shock and fire!
The appliance may only be connected to a power supply with alternating current via a correctly installed socket with earthing. Ensure that the protective conductor system of the domestic supply has been correctly installed. Connect and operate the appliance only in accordance with the specifications on the rating plate. Do not use the appliance if the power cord and/or appliance are damaged. To prevent hazards, the appliance may only be repaired by customer service. If the power cord of this appliance is damaged, it must be replaced with a special connection cord, which is available from our after-sales service. Never connect the appliance to timer switches or remote-controllable sockets. Never leave the appliance unattended while it is switched on! If there is a fault, pull out the mains plug immediately or switch off the power supply. The mains cable must not come into contact with hot parts or be pulled across sharp edges. Never immerse the appliance or the mains cable in water or place it in the dishwasher. Unplug the appliance before cleaning it.
⚠️ Risk of scalding!
The appliance uses steam pressure for cooking. There is a risk of scalding with improper use of the appliance. Before heating the appliance, check that it has been properly closed. Refer to the operating instructions. Before using the appliance each time, regularly check the steam valve openings to make sure that they are not blocked. Refer to the operating instructions. Never tamper with the safety systems in any manner that goes beyond the maintenance instructions described in the operating instructions.
→ “Care and daily cleaning” see page 22
Never use the appliance to roast or soft fry food with the steam pressure function activated. During operation, the appliance must never be used without the pan inserted. Before starting a preparation programme, check whether the appliance has been properly closed. Never place the appliance in a heated oven. The housing, pan and metallic components heat up while the appliance is in use! The pan and the accessories may only be removed using the tools provided. Use oven gloves. Hot steam is generated in the appliance. Do not lean over the appliance.
Move the appliance with great care whenever it is under pressure. Do not touch any hot surfaces. Use the handles. Use appropriate protection if necessary.
Never use force to open the appliance! Do not open the appliance until you have checked that the internal pressure has been completely reduced. Refer to the operating instructions.
→ "Preparation with steam pressure" see page 14
After preparing doughy food, shake the appliance slightly before opening the lid to prevent the food spraying out. After preparing meat still with the skin on it (e.g. ox tongue) that can swell up under pressure, do not pierce the skin while swollen as there is a risk of scalding.
Open the lid with care. Only transport or clean the appliance once it has fully cooled down! Parts that show visible discolouration, cracks or other damage or are not seated correctly must be replaced with original spare parts.
Health risk!
Sous-vide cooking is a method of cooking at low temperatures. Please pay particular attention to the safety instructions and the recommendations for preparation! → “Sous-vide cooking” see page 13
Risk of suffocation!
Do not allow children to play with packaging material.
⚠️ Important!
After usage or cleaning, allow the appliance to dry for at least 30 minutes with the lid open to prevent the formation of condensation.
It is essential to clean the appliance thoroughly after each use or after it has not been used for an extended period. → “Care and daily cleaning” see page 22
Caution!
Never use spatulas or cooking spoons with hot fat or oil or leave in a hot pan. They might melt!
Never use the appliance with the steam pressure function without adding water as this may cause serious damage.
Congratulations on the purchase of your new Bosch appliance.
On the following pages of these operating instructions you will find useful information for safe use of this appliance.
Please read these operating instructions carefully and observe all instructions.
This ensures you will be able to enjoy this appliance for a long time, and the results will confirm your choice of this appliance.
Retain these operating instructions for subsequent use or for the next owner.
You can find further information about our products on our website.
Contents
Intended use ....3
Safety instructions ....4
Overview....6
Control panel 7
Before using for the first time....8
Preparation 11
Additional functions ......17
Using inserts 18
Customised setting options ......20
Child lock 22
Care and daily cleaning ....22
Disposal 23
Guarantee....23
List of preparation programmes....24
Cooking times 25
Model overview and technical data .....27
Special accessories ......27
Troubleshooting 28
Overview
→ Figure A
1 Multi-cooker with steam pressure function (basic appliance)
2 Lid
3 Control panel
4 Pressure locking handle
5 Steam release button
6 Removable steam outlet
7 Removable condensation tank
8 Opening button for the lid
9 Pan with non-stick coating
10 Pan handles
11 Mains connection
12 Carrying handle
13 Removable lid insert
14 Sealing ring
15 Safety valve
16 Steam valve
17 Overpressure protection
18 Mount for lid insert
19 Fastening screw
20 Steam release chamber
21 Steam valve opening with seal
22 White steam release lever
23 Valve plug
24 Manual unlocking for overpressure protection
→ Fig. B
25 Frying basket with removable handle *
26 Steamer insert, 2-part
27 Spatula
28 Ladle
29 Measuring beaker *
30 Mains cable
31 Operating instructions
32 Recipe book
* Depending on the model
The operating instructions refer to different models of the appliance. → "Model overview and technical data" see page 27
Control panel
The control panel consists of controls (buttons) and indicators (LEDs). The buttons can be used to select the individual preparation programmes and adopt the different setting options (e.g. to select steam pressure function, preparation temperature / time). The settings are indicated via the illuminated LEDs and/or the display.
Controls
→ Fig. ©
Standby
Switches from standby mode to function selection mode and back again.
(L) Set the start time delay
The start time delay can be set for the selected preparation programme.
Select a preparation programme from the list (h)
The individual preparation programmes are displayed one after another by repeatedly pressing button ☐. The corresponding LED lights up in the control panel.
← Adjust the preparation time
The pre-configured preparation time [ medium ] for a preparation programme can be shortened [ short ] or lengthened [ long ]. The corresponding indicator (g) lights up. The corresponding pre-configured preparation time is shown in the display (a).
Set a customised preparation time
For customised adjustment of the preparation time.
Set a customised preparation temperature
For customised adjustment of the preparation temperature. For preparation programmes with enabled steam pressure function, the temperature is pre-configured (f) and cannot be adjusted individually.

Steam pressure function
The steam pressure functions "low steam pressure" [ 🔺 ] or "high steam pressure" [ 🔺 ] are selected by pressing button ⚙️. The respective indicators (f) light up. → "Preparation with steam pressure" see page 14
√ Confirm the programme
Pressing button √ starts the selected preparation programme.
X Delete a setting or abort the programme
Pressing button X deletes the settings or stops a programme that was previously started.
Indicators
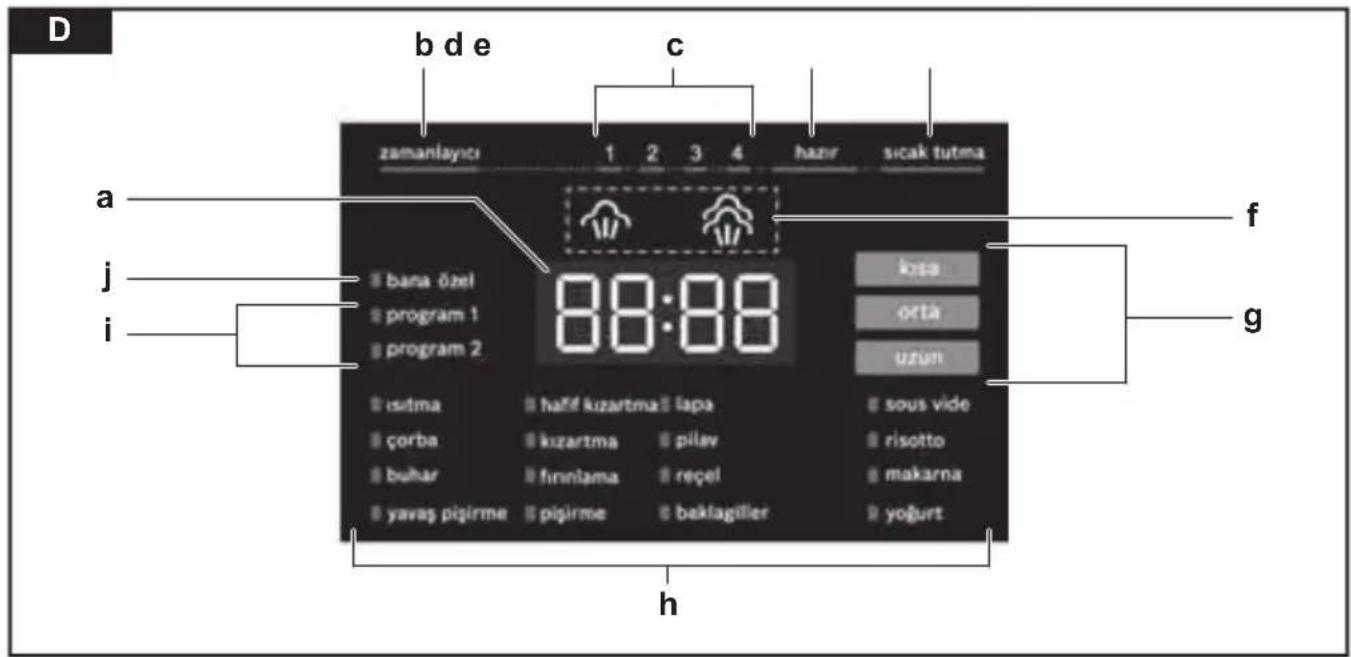
→ Fig. ©
a Display
Display of the remaining time or the temperature.
b Timer
Indicates that the start time delay is enabled. The display (a) shows the time until the start of the selected preparation programme.
c Preparation steps / programme progress
Display of the individual preparation steps and the programme progress. In the case of multiple preparation steps (e.g. the ingredients are added after heating the soft frying oil), these are visually indicated by the illumination of LEDs 1, 2, 3 or 4. An audible signal also sounds if a subsequent preparation step is required.
d finished
This indicates that the meal is ready. The display (a) flashes and shows "00:00". An audible signal also sounds.
e keep warm
Indicates that the keep warm function is switched on at the end of a preparation programme. A rectangle lights up in the display (dotted line).
f Steam pressure function
[ ] shows that low steam pressure (105°C) is selected.
[☀️] shows that high steam pressure (115°C) is selected. → “Preparation with steam pressure” see page 14
g Display of the pre-configured preparationtime
The pre-configured preparation time [ medium ] for a preparation programme can be shortened [ short ] or lengthened [ long ] using button ≡←. The corresponding indicator lights up.
h List of preparation programmes
There are 16 pre-configured preparation programmes available. The individual preparation programmes are displayed one after another by repeatedly pressing button ☐. The corresponding LED lights up in the control panel.
i recipe 1&2
Memory locations to store individual preparation programmes with steam pressure function, preparation time and temperature.
j my mode
Quick setting mode for customising the steam pressure function, preparation time and temperature for a cooking process.
Before using for the first time
Before the new appliance can be used, it must be fully unpacked, cleaned and connected to the power outlet. To do this, perform the following steps:
- Remove the base unit and all accessories from the packaging and dispose of all packing materials.
- Use the carrying handle to lift the appliance. Swing the carrying handle upwards accordingly.

Caution!
You should only use the carrying handle to ensure safe transport of the appliance.
- Place the appliance on a stable, level and smooth work surface.
Caution!
There must be no sensitive surfaces and appliances above and behind the appliance that may be damaged by the temperature development and the escaping steam.
4. Remove the steam outlet
Grip the steam outlet at the rear and pull up and off.

5. Remove the valve plug
Pull off the valve plug in the steam release chamber.

6. Open the appliance lid
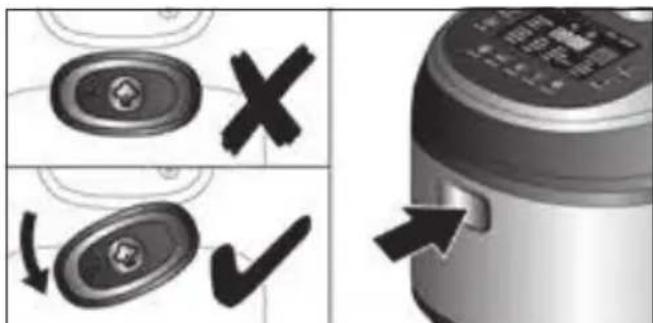
Open the pressure locking handle (☐). For this purpose, rotate the pressure locking handle as far as possible in an anti-clockwise direction. Press the opening button on the basic appliance to open the lid.
- Lift the pan out of the appliance interior.

8. Remove the lid insert
Turn the fastening screw anti-clockwise and remove it. Use one hand to keep the lid insert in position on the inside of the lid. Use the other hand on the outside of the lid to push the steam valve in the steam release chamber through the opening by applying slight pressure. Carefully remove the lid insert from the lid.

-
Remove the packaging material that is on the appliance and the accessory parts.
-
Check all parts for completeness.

- Check the appliance and the accessory parts for visible damage.
Caution!
Never operate a damaged appliance!
- Thoroughly clean and dry all parts before using for the first time. → “Care and daily cleaning” see page 22
13. Check safety devices
Lid insert: Check the sealing ring on the lid insert for visible discolouration, cracks or other damage.
Check that the safety and steam valve as well as the overpressure protection are clean. They must not be blocked by foreign bodies. The overpressure protection must be able to move freely. Steam release chamber: Check the steam valve seal in the steam release chamber for visible discolouration, cracks or other damage. Check that the white steam release lever is clean. It must not be blocked by foreign bodies.
en Before using for the first time
14. Insert pan
Reinsert the pan in the appliance interior. The pan handles must be sunk into the indentations.
Caution!
Before inserting the pan, check that the appliance interior is dry and clean.
15. Place lid insert
The pressure locking handle must be opened (☐). Place the lid insert on the lid insert mount with the steam valve at the bottom. At the same time, guide the steam valve through the steam valve opening. Tighten the fastening screw for the lid insert clockwise on the lid insert mount.
16. Close the lid
Press the lid down until it clicks into place. Close the pressure locking handle (◦). For this purpose, rotate the pressure locking handle as far as possible in a clockwise direction.
17. Insert the valve plug
Place the valve plug in the steam release chamber on the steam valve and press down firmly.

Caution!
Make sure that the white steam release lever is positioned below the valve plug.
18. Insert the steam outlet
Place the steam outlet on the lid from above and press down firmly.
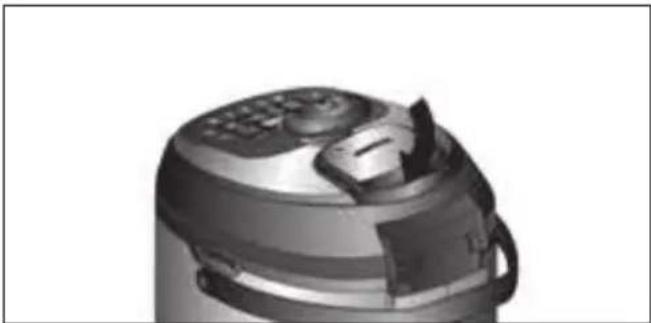
19. Insert the condensation water tank
Fold up the carrying handle. Hold the tank by the sides at the top and insert at the rear of the appliance.

20. Connect the supplied mains cable to the appliance first and then connect it to the socket.

Caution!
Use only the supplied mains cable.
On the control panel, buttons ① and √ and all LEDs briefly light up once and a five-level audible signal sounds. Button ① then flashes. The appliance is in standby mode and is ready for operation.
Preparation
General recommendations
For the best and tastiest results, we recommend using the suggestions in our recipe book, which was specially developed for use with the appliance.
The recipe book features detailed information on the required quantities of ingredients, recommendations for the preparation time and the preparation temperature, use of the steam pressure function and useful combinations of the preparation programmes.
Use these recipe recommendations in order to gain initial experience. Once you appreciate the benefits and the variety of the usage options, you will enjoy experimenting with new recipes. Use the individual setting options additionally offered by the appliance. → “Customised setting options” see page 20
To provide you with an overview of all preparation programmes, we have compiled this information in a clearly arranged table.
→ "List of preparation programmes" see page 24
⚠️ Risk of scalding!
■ Before using the appliance each time, check that the safety devices are in working order. → “Before using for the first time” see page 8
■ During operation, the appliance must never be used without the pan, lid insert, valve plug and steam outlet inserted.
■ Never move the appliance during operation.
■ Never use force to open the appliance!
Caution!
■ Use only the spatula provided for stirring (do not use metal cutlery).
■ Each time prior to operation, check the appliance for damage, completeness, cleanliness and proper installation.
→ "Before using for the first time" see page 8
Preparation without steam pressure
There are 16 pre-configured preparation programmes available to choose from.
→ "List of preparation programmes" see page 24
Note: When selecting and starting the preparation programme without the steam pressure function, make sure that the pressure locking handle is open at all times ( -° ).
- The appliance is ready to use. Fill the appliance with the desired ingredients. To do this, open the lid and pour the ingredients into the pan. The measuring scale on the inside of the pan can also be used to read the quantity.
Caution!
■ Fill the pan with a maximum of 4 litres. Only fill the pan at most half-full when preparing food that expands during cooking, e.g. rice or dried vegetables.
- Close the appliance. Press the lid down until it clicks into place.
- Press button ① to access function selection mode.
The desired preparation programme is selected in function selection mode and all settings of the appliance are made.
Button ① and the indicator [ my mode ] are permanently lit. Button √ flashes. "00:00" is shown in the display.

Notes:
■ Certain preparation programmes or steps are carried out with the lid open.
→ See recipe book provided
■ If no input is made on the control panel within 5 minutes, the appliance automatically switches to standby mode.
- Keep pressing button ☐ until the desired preparation programme is selected.

The corresponding LED lights up in the control panel and the pre-configured preparation time for the selected preparation programme flashes.
- Press button √ to start the preparation programme.

The appliance heats up the pan until the target temperature is reached. During the heating phase, lines that light up in a clockwise direction appear in the display. Once the target temperature is reached, the lines go out and the preparation time is shown in the display.
The preparation process starts automatically.
Note: When the programme [ pasta ] or [ soft fry ] is selected, a repeating audible signal is emitted and the display and button √ flash until the food has been added and button √ has been pressed.
The preparation time counts down.

Cooking produces steam, which escapes from the appliance to prevent excess pressure from building up.
Increasing or reducing the temperature during preparation
If the current temperature has been set too high or too low during preparation, this can also be increased (by +10°C max.) or decreased (by -10°C max.) accordingly during the cooking process.
To increase the temperature, press and hold button ♂. The current temperature will be briefly shown on the display and will then increase in 1°C increments until the maximum value is reached (+10°C). Press and hold the button until the temperature is at the increased level desired.
To reduce the temperature, press and hold button ♂. The current temperature will be briefly shown on the display and will initially increase in 1°C increments until the maximum value is reached (+10°C). Once the maximum value has been reached, the display will jump back to the minimum value (20°C lower). Press and hold the button until the temperature is at the reduced level desired.
To continue with the preparation programme, press button √.
Note: If button √ is not pressed, the preparation programme will continue with the temperature that was previously set. When the preparation programme ends, an audible signal sounds, and the indicator [finished] and button √ light up, or the keep warm function is activated. → “Keep warm function” see page 18
The display flashes and shows "00:00".
- Open the lid of the appliance and serve the meal that has been prepared.
⚠️ Risk of scalding!
■ During preparation, large amounts of steam accumulate in the appliance.
Always open the lid with care. Do not lean over the lid of the appliance.
■ The pan and any inserts that are used may be very hot. Always use suitable handles or oven gloves.
Caution!
Condensation is formed during cooking.
Empty the condensation tank regularly.
Notes:
■ The preparation programme can be stopped at any time using button X. The appliance subsequently switches to function selection mode.
■ Certain preparation programmes can consist of several preparation steps.
→ "Multiple preparation steps" see page 18
Extending the preparation time during preparation
If the ingredients are not yet fully cooked shortly before the end of a preparation programme, the preparation time can be extended.
-
To do this, press and hold button ☒. The current preparation time will be briefly shown on the display and will then increase in 1-minute increments.
-
Press and hold the button until the desired preparation time has been reached.
-
Activate the newly set preparation time using button √.
Note: The preparation time can only be extended by a maximum of 30 minutes. If the desired preparation time is exceeded, hold button ☒ until the maximum value is reached. The setting will then jump back to 5 minutes.
Sous-vide cooking
Sous-vide cooking is a method of cooking under a vacuum at low temperatures. Sous-vide cooking is a gentle, low-fat method of preparing meat, fish, vegetables and desserts. A vacuum-packing machine is used to heat-seal the food in a special air-tight, heat-resistant cooking bag.
Health risk!
Sous-vide cooking is a method of cooking at low temperatures. As a result, it is important that you always follow the application and hygiene instructions below:
■ Use only fresh, good-quality food.
■ Wash and disinfect your hands. Use disposable gloves or cooking/grill tongs.
■ Take extra care when preparing critical food, such as poultry, eggs and fish.
■ Always prepare poultry at min. 65°C.
■ Always thoroughly rinse and/or peel fruit and vegetables.
■ Always keep work surfaces and chopping boards clean. Use different chopping boards for different types of food.
■ Maintain the cold chain. Make sure that you only interrupt it briefly to prepare the food, and then return the food in its vacuum-sealed bag to the refrigerator for storage before you cook it.
- Food is suitable for immediate consumption only. Once the food is cooked, consume it immediately. Do not store it after cooking – not even in the refrigerator. It is not suitable for reheating.
Vacuum-sealing bags
■ When using the sous-vide cooking method, only use heat-resistant vacuum-sealing bags designed for this purpose.
■ Do not cook the food in the bag you bought it in (e.g. portions of fish). These bags are not suitable for sous-vide cooking.
Vacuum-sealing
■ Use a chamber vacuum-sealing machine that can create a vacuum of at least 99% to vacuum-seal the food. This is the only way to achieve an even heat transfer and therefore a perfect cooking result.
Notes:
■ The maximum capacity for sous-vide cooking is 3 l. After the food is added, the water level in the pan should not exceed 3 l.
■ Make sure you put the lid on whenever using the sous-vide cooking method.
Preparation with steam pressure
The multi-cooker is additionally equipped with a steam pressure function. With the steam pressure function, the food cooks under pressure, i.e. at temperatures above 100° C. This significantly reduces the cooking time. In addition, this represents a significant energy saving. Aroma, taste and vitamins are largely preserved with the short cooking time under steam.
There are 8 pre-configured preparation programmes which can be used with the steam pressure function. → "List of preparation programmes" see page 24
Low steam pressure
Use low steam pressure for the preparation of delicate food like vegetables, fish or fruit to cook the food particularly gently. Pressure that is too high is automatically controlled via the steam outlet.
High steam pressure
Use high steam pressure for the preparation of all other food to achieve optimum results. Pressure that is too high is automatically controlled via the steam outlet.
Steam pressure function activated
To be able to select preparation programmes with the steam pressure function, the pressure locking handle must first of all be closed (◦). For this purpose, rotate the pressure locking handle as far as possible in a clockwise direction.
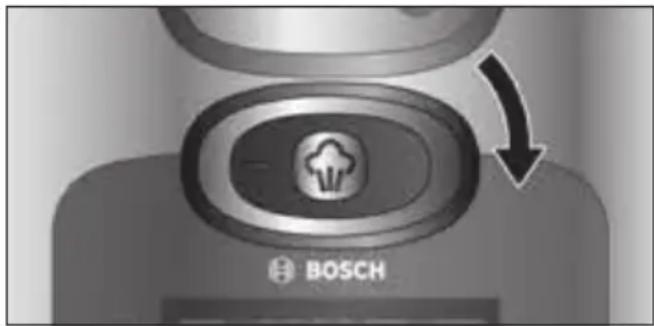
An audible signal is emitted when the appliance is correctly closed and the steam pressure function is switched on. Only then can the respective preparation programme with the steam pressure function be selected in function selection mode. The indicators “low steam pressure” [ ] or “high steam pressure” [ ] light up.
→ "Preparation with steam pressure" see page 14
Steam pressure function deactivated
To be able to select preparation programmes without the steam pressure function, the pressure locking handle must always be opened ( -°- ). For this purpose, rotate the pressure locking handle as far as possible in an anti-clockwise direction.
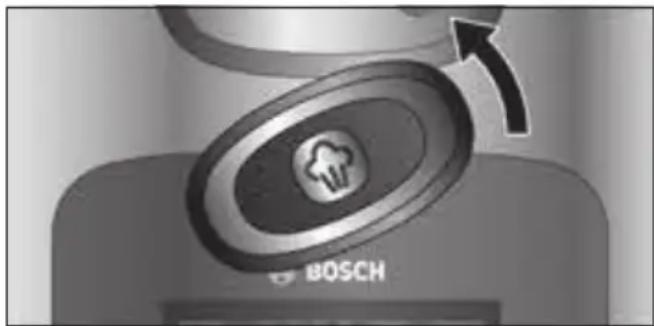
The desired preparation programmes can be selected in function selection mode without the steam pressure function.
→ "Preparation without steam pressure" see page 11
There are 8 pre-configured preparation programmes which can be used with the steam pressure function. → "List of preparation programmes" see page 24
⚠️ Risk of scalding!
■ Ingredients which are liable to froth up, e.g. like milk and cream must not be heated under steam pressure.
■ Do not use the steam pressure function to soft fry food in oil under pressure.
-
Open the appliance. Open the pressure locking handle for this purpose (→) and press the opening button on the basic appliance.
-
Fill the pan with the desired ingredients. The measuring scale on the inside of the pan can also be used to read the quantity.
Caution!
■ Never heat up the appliance under steam pressure without having added water or other liquids beforehand. Add at least 250 ml of water.
■ Fill the pan with a maximum of 3.3 litres. Only fill the pan at most half-full when preparing food that expands during cooking, e.g. rice or dried vegetables.
- Close the appliance. Press the lid down for this purpose until it clicks into place and close the pressure locking handle (-◦-).
An audible signal sounds. The steam pressure function is switched on.
- Press button ① to access function selection mode.
The desired preparation programme is selected in function selection mode and all settings of the appliance are made. Button ① and the indicators [my mode] and [ ] are permanently lit. Button √ flashes. "00:00" is shown in the display.

Note: If no input is made on the control panel within 5 minutes, the appliance automatically switches to standby mode.
- Keep pressing button ☐ until the desired preparation programme is selected.
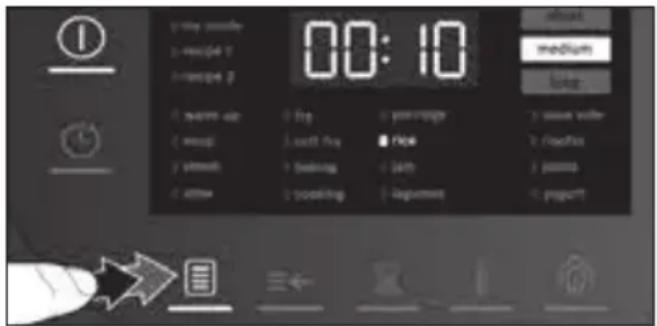
The corresponding LED lights up in the control panel and the pre-configured preparation time for the selected preparation programme flashes. The indicator "low steam pressure" [💡] or "high steam pressure" [💡] lights up. Press button 🔗 to switch between [💡] and [💡].
Note: If [💡] or [💡] does not light up, the steam pressure function is not available for the selected programme.
- Press button √ to start the preparation programme.

The appliance heats up the pan until the pre-configured steam pressure is reached. During the heating phase, lines that light up in a clockwise direction appear in the display. Once the pre-configured steam pressure is reached, the lines go out and the preparation time is shown in the display.
The preparation process starts automatically. The preparation time counts down.

Once the preparation time is completed, an audible signal sounds, the display flashes and shows "P". Steam automatically escapes from the appliance intermittently to reduce the pressure in the appliance interior.

Risk of scalding!
Never bend over the appliance while steam is escaping from it!
When the pressure in the appliance interior has been completely reduced, the indicator [finished] and button √ light up or the keep warm function is activated.
A rectangle lights up in the display (dotted lines). The preparation programme is completed.
- Open the appliance. Open the pressure locking handle for this purpose (☐) and press the opening button on the basic appliance.
Notes:
■ Never use force to open the appliance!
■ Always shake the appliance gently before opening in order to dissolve any steam bubbles that may have formed in the food and to prevent blocking.
■ The pressure locking handle can be easily opened when the steam has completely escaped from the appliance interior and the appliance is fully depressurised.
■ Automatic steam release can take some time. In order to accelerate the process or if the appliance is not completely depressurised, the steam can also be released manually. → “Release steam manually” see page 16
- Serve the prepared meal.

Risk of scalding!
■ The pan and any inserts that are used may be very hot. Always use suitable handles or oven gloves.
Caution!
Condensation is formed during cooking. Empty the condensation tank regularly.
Notes:
■ The preparation programme can be stopped at any time using button X. The appliance subsequently switches to function selection mode. Before the appliance can be opened, the steam in the appliance interior must be released manually. → “Release steam manually” see page 16
■ Certain preparation programmes consist of several preparation steps. → “Multiple preparation steps” see page 18
Release steam manually
Steam can also be released manually in the following cases:
■ If automatic steam release is to be accelerated at the end of a preparation programme.
■ If a preparation programme has been aborted.
■ If the pressure locking handle cannot be opened because the appliance is not completely depressurised.

Risk of scalding!
When pressing the steam release button, hot steam escapes from the steam outlet under high pressure. Never bend over the appliance while the steam release button is being pressed!
- Keep the steam release button pressed until no more steam escapes from the steam outlet.

- Open the appliance. Open the pressure locking handle for this purpose ( -- ) and press the opening button on the basic appliance.
Note: If the pressure locking handle cannot be opened, the appliance is not completely depressurised. In this case, manually depress the overpressure protection using a thin pin until no more steam escapes from the appliance. Then open the pressure locking handle ( -°- ) and press the opening button on the basic appliance.

Additional functions
The following additional functions are available for preparation programmes with and without steam pressure function.
Selecting a pre-configured preparation time
The pre-configured preparation time of the level [ medium ] is shown on the control panel for each preparation programme. The preparation time can be shortened [ short ] or lengthened [ long ].
- Keep pressing button ← until the desired indicator is lit. The display changes from [ medium ] to [ long ] and then to [ short ] before returning to [ medium ].
The corresponding pre-configured values for the preparation time are shown in the display.
- Press button √ to start the preparation programme.
Setting a start time delay
The start time delay can be set for the selected preparation programme so you can enjoy a freshly prepared meal at a specific time.
Note: The start time delay can only be set for certain preparation programmes. The pre-configured start time delay varies among these preparation programmes.
-
Select the preparation programme.
-
Press button Ⓤ. Button √ flashes. "00:10" flashes in the display.
Press button Ⓤ repeatedly to increase the displayed time. A brief press increases the time by 5 minutes. A slightly longer press increases the time by 10 minutes. Pressing and holding button Ⓤ for around 2 seconds increases the time by 30 minutes.
- Press button √ when the desired start time delay is displayed.
The desired start time delay is shown in the display. [timer] lights up in the display.
The time until the start counts down. Once this time has elapsed, the preparation process starts automatically.
Notes:
■ The start time delay can be switched off at any time by pressing button √. The preparation programme then starts immediately.
If "00:10" does not flash in the display, a start time delay cannot be set for the selected preparation programme.
Multiple preparation steps
Certain preparation programmes can consist of several preparation steps. An audible signal sounds once the next step is required. In the control panel, LEDs 1, 2, 3 or 4 are shown accordingly and button √ flashes.
■ Open the lid of the appliance.
■ Add additional ingredients.
■ Depending on the recipe, refer to the preparation method (e.g. with or without steam pressure function, open lid).
→ See recipe book provided
■ Start the next preparation step using button √.
The appliance heats up the appliance interior until the target temperature or the selected steam pressure of the next preparation step is reached. During the heating phase, lines that light up in a clockwise direction appear in the display. Once the target temperature or selected steam pressure is reached, the lines go out and the next preparation time is shown in the display. The preparation process starts automatically. The preparation time counts down.
Prematurely terminating the current preparation step
If the ingredients are cooked ahead of time during one of the preparation steps, the step can also be terminated manually.
- To do this, press button √ for at least 2 seconds.
This will terminate the current preparation step. An audible signal will then sound as usual once the next step can be carried out. In the control panel, LEDs 1, 2, 3 or 4 are shown accordingly and button √ flashes.
- Perform the next preparation step.
Keep warm function
Certain preparation programmes include the keep warm function. → "List of preparation programmes" see page 24
If the preparation programme features the keep warm function, this is switched on automatically once the dish is ready and keeps the dish warm for up to 10 hours at 40° C (pre-configured keep warm time depending on the preparation programme). [finished] and [keep warm] light up. A rectangle lights up in the display (dotted lines). The keep warm function can be ended using button X. The appliance subsequently switches to function selection mode.
Using inserts
Using the frying basket
To prepare meat, fish, baked items etc. in hot oil using the [ soft fry ] programme, it is necessary to use the soft frying basket (depending on the model in question).
Note: For the best and tastiest results, we recommend using the suggestions in our recipe book. → See recipe book provided
Example: Preparation programme [soft fry]
Risk of scalding!
■ Never use the steam pressure function when soft frying. It is automatically disabled for the preparation programme [soft fry].
■ Fill with oil or deep-frying fat up to the mark [1.0 🔒] at maximum.
■ Do not use more than 300 g fresh or defrosted food when frying.
■ During preparation, large amounts of steam may accumulate in the appliance. Open the lid with care. Do not lean over the lid of the appliance.
■ The pan and any inserts that are used may be very hot. Always use pan tongs, suitable handles or oven gloves.
■ Never use spatulas or ladles with hot fat or oil.
- Open the lid of the appliance.
- Fill the pan with a maximum of 1 litre of oil. The measuring scale on the inside of the pan can also be used to read the quantity.
-
Put the lid on.
-
In function selection mode, select the preparation programme [ soft fry ]
→ "List of preparation programmes" see page 24
- Press button √ to start the preparation programme.
The oil is heated. Once the target temperature is reached, an audible signal sounds and button √ flashes.
-
Fill the frying basket with food for soft frying.
-
Open the lid of the appliance.
-
Place the frying basket in the pan using the handle supplied and remove the handle.
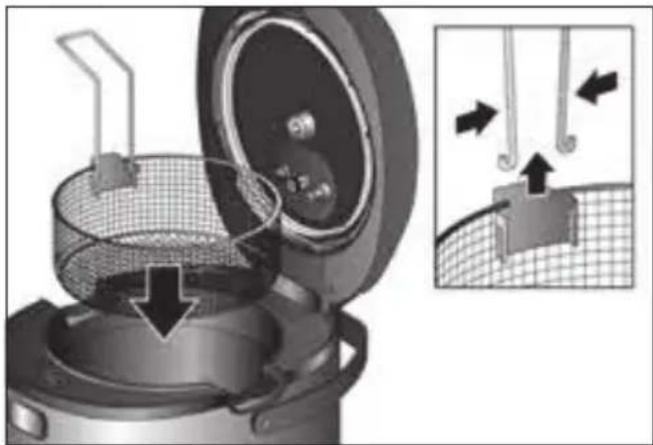
-
Do not put the lid on.
-
Press button √ to start the preparation programme.
Once the preparation programme ends, an audible signal sounds.
- To drain the deep-fried food, lift the frying basket using the handle and hang on the edge of the pan using the flange.
Using the steamer insert
It is necessary to use the steamer insert for the purpose of steam-cooking vegetables, meat and fish. The 2-part steamer insert enables different ingredients to be steamed separately at the same time (e.g. vegetables in the bottom part and fish in the top part).
Notes:
■ For the best and tastiest results, we recommend using the suggestions in our recipe book.
■ The steamer insert can be used with and without the steam pressure function.
Example: Preparation programme [steam] without steam pressure function
Risk of scalding!
■ Fill with water up to the mark [0.5 📋] at maximum.
■ During preparation, large amounts of steam may accumulate in the appliance. Open the lid with care. Do not lean over the lid of the appliance.
■ The pan and any inserts that are used may be very hot. Always use suitable handles or oven gloves.
- Open the lid of the appliance.
- Fill the pan with a maximum of 0.5 litres of water. The measuring scale on the inside of the pan can also be used to read the quantity.
- Hang the bottom part of the steamer insert in the pan.
- For steam-cooking different ingredients, fill the bottom part up to the lower edge.
- Position the top part and add additional ingredients.

- Put the lid on.
- In function selection mode, select the preparation programme [ steam ]
→ "List of preparation programmes" see page 24
- Press button √ to start the preparation programme.
Once the preparation programme ends, an audible signal sounds and button √ flashes. - Open the lid of the appliance.
- Lift the top part and the bottom part of the steamer insert out of the pan.
Customised setting options
The pre-configured values for the preparation time and the preparation temperature or steam pressure can be adapted to individual needs and the recipe guidelines.
Setting the preparation time
- In function selection mode, keep pressing button ☐ until the desired preparation programme is selected.
The corresponding LED lights up in the control panel and the pre-configured preparation time for this preparation programme is shown. - Press button ☒ once.
The pre-configured preparation time flashes in the display. - Keep pressing button ☒ until the desired preparation time is displayed.
When button ☒ is briefly pressed, the preparation time is increased by 1 minute. The time increases up to the pre-configured maximum value and then returns to the pre-configured minimum value. When button ☒ is pressed for a longer period, the preparation time is increased by 10 minutes. - Once the desired preparation time is displayed, press button √.
The preparation programme with the set preparation time is started. If the time needs to be adjusted individually for all preparation steps in a selected programme, then repeat points 2 to 4 prior to starting the respective preparation step.
Note: These settings are not saved. If this preparation programme is selected again, the pre-configured preparation time will be shown in the display once more.
Setting the preparation temperature
For preparation programmes without the steam pressure function, the temperature can be selected individually.
- In function selection mode, keep pressing button ☐ until the desired preparation programme is selected.
The corresponding LED lights up in the control panel and the pre-configured preparation time for this preparation programme is shown.
- Press button ⚠ once.
The pre-configured preparation temperature flashes in the display.
-
Keep pressing button ♂ until the desired preparation temperature is displayed. When button ♂ is briefly pressed, the preparation temperature is increased by 5°C. The temperature increases up to the pre-configured maximum value and then returns to the pre-configured minimum value. When button ♂ is pressed for a slightly longer period, the temperature is increased by 10°C.
-
Once the desired preparation temperature is displayed, press button √.
The preparation programme with the set preparation temperature is started. If the temperature needs to be adjusted individually for all preparation steps in a selected programme, then repeat points 2 to 4 prior to starting the respective preparation step.
Note: These settings are not saved. If this preparation programme is selected again, the pre-configured preparation time will be shown in the display once more.
Setting the steam pressure
For preparation programmes with pre-set steam pressure function, the temperature can be selected via "low steam pressure" [💡] or "high steam pressure" [💡].
- In function selection mode, keep pressing button ☐ until the desired preparation programme is selected.
The corresponding LED lights up in the control panel and the pre-configured preparation time for this preparation programme is shown. The indicator "low steam pressure" [💡] or "high steam pressure" [💡] additionally lights up.
Note: If [💡] or [💡] does not light up, the steam pressure function is not available for the selected programme.
- Press button ⚙️ to switch between [💡] and [💡] .
- If the desired steam pressure is displayed, press button √.
The preparation programme is started with the set steam pressure function.
Note: These settings are not saved. If this preparation programme is selected again, the set steam pressure function will be shown in the display once more.
my mode (manual)
Quick setting mode for customising the steam pressure function, preparation time and temperature setting for a cooking process.
In function selection mode, button ① and the indicator [my mode] are permanently lit. Button √ flashes. "00:00" is shown in the display.
Note: In order to switch on the steam pressure function, the pressure locking handle must be closed (◦). The indicator [◦] lights up.
Setting the preparation time
- Press button ☒ once.
"00:00" flashes in the display. - Keep pressing button ☒ until the desired preparation time is displayed.
Setting the preparation temperature or steam pressure
- Without steam pressure function:
The pressure locking handle must be opened (☐). Press button ☐ once. "0000" flashes in the display. Button ☐ must then be pressed repeatedly until the desired preparation temperature is displayed.
or
With steam pressure function: The pressure locking handle must be closed (◦). Press button ⚙️ to switch between [◦] and [◦].
- Press button √ to start with the selected settings.
The appliance heats up the pan until the target temperature or the steam pressure is reached.
Once the target temperature or steam pressure is reached, the lines go out and the next preparation time is shown in the display. The preparation process starts automatically.
recipe 1 / recipe 2 – saving personal preparation programmes
Personal preparation programmes with customised time / temperature and steam pressure function can be saved under the memory locations [ recipe 1 ] and [ recipe 2 ].
Notes:
■ If you have not previously saved any personal preparation programmes, the display does not show any values.
In order to switch on the steam pressure function, the pressure locking handle must be closed ( - ).
- In function selection mode, press button ☐ once.
The LED [ recipe 1 ] lights up. The pre-configured preparation time is shown in the display.
Saving the preparation time:
- Press button ☒ once.
The display flashes. LED 1 (preparation step 1) lights up in the control panel.
- Keep pressing button ☒ until the desired preparation time is displayed.
When button ☒ is briefly pressed, the preparation time is increased by 1 minute.
When button ☒ is pressed for a longer period, the preparation time is increased by 10 minutes. The time increases up to the pre-configured maximum value and then returns to the pre-configured minimum value.
Saving the preparation temperature or steam pressure:
- Preparation temperature: Press button ♂ once. The pre-configured preparation temperature is shown in the display. Press button ♂ repeatedly until the desired preparation temperature is displayed.
or
Steam pressure: Press button ⚙ to switch between [💡] and [💡].
- Press and hold button √ (>2 seconds) to save the set values.
Note: Either the temperature or the steam pressure can be set and stored for one preparation step. The value last selected is saved.
In order to programme other preparation steps, repeat points 2 to 6. Up to 3 preparation steps can be programmed. The saved preparation programme [recipe 1] can be selected as usual via function selection mode.
Note: To save a second personal preparation programme under [ recipe 2 ], use the same process as described above for [ recipe 1 ].
To delete a personal preparation programme, perform the following steps:
- In function selection mode, press button ☐ once.
The LED [ recipe 1 ] lights up. The saved preparation time is shown in the display.
- Press button ☒ once.
The display flashes. LED 1 (preparation step 1) lights up in the control panel.
- Press and hold button X (>2 seconds). The settings for [ recipe 1 ] are deleted.
Note: To delete the second personal preparation programme [ recipe 2 ], use the same process as described above for [ recipe 1 ].
Child lock
The child lock can be activated and deactivated during a preparation process. If the child lock has been activated, all buttons on the control panel are locked and settings can no longer be made on the appliance.
Warning
When the child lock is active, the preparation processes cannot be changed or terminated. The child lock must be deactivated first.
Press the following button combination:
1. Activate
Press and hold buttons ⏻ and ⚙ simultaneously for 3 seconds. A short audible signal sounds. The child lock is activated.
2. Deactivate
Press and hold buttons ⏻ and ⚙ simultaneously for 3 seconds once again. A short audible signal sounds. The child lock is switched off.
Care and daily cleaning
⚠️ Risk of electric shock
■ Never immerse the appliance in water.
■ Do not steam-clean the appliance.
■ Unplug the appliance before cleaning it.
Caution!
■ Do not use any cleaning agents containing alcohol or spirits.
■ Do not use any sharp, pointed or metal objects.
■ Do not use abrasive cloths or cleaning agents.

The appliance must be thoroughly cleaned after each use.
- Let the appliance cool down completely.
- Open the pressure locking handle ( -° ).
- Press the opening button on the basic appliance to open the lid.
- Remove the pan, lid insert, steam outlet, valve plug, condensation tank and accessories. → "Before using for the first time" see page 8
Cleaning the basic appliance
- Wipe the outside of the appliance with a soft, damp cloth and dry off.
- Wipe the interior of the appliance with a soft, damp cloth and dry off.
- Clean the control panel using a dry micro-fibre cloth.
Cleaning the lid insert, steam outlet and valve plug
- Clean the individual parts with a detergent solution and a soft cloth or sponge.
- Rinse with clean water and dry off.
Caution!
The following parts are not suitable for the dishwasher: removable lid insert, fastening screw, steam outlet and valve plug.
Cleaning the pan, condensation tank and accessories
- Clean the individual parts with a detergent solution and a soft cloth or sponge.
- Rinse with clean water and dry off.
The following parts are suitable for dishwashers: pan, condensation tank, frying basket with handle, steamer inserts, spatula, ladle and measuring beaker.
Caution!
After cleaning, replace all dried individual parts again on the basic appliance and check the functionality of the safety devices.
→ "Before using for the first time" see page 8
Disposal
Dispose of packaging in an environmentally-friendly manner. This appliance is labelled in accordance with European Directive 2012/19/EU concerning used electrical and electronic appliances (waste electrical and electronic equipment – WEEE). The guideline determines the framework for the return and recycling of used appliances as applicable throughout the EU. Please ask your specialist retailer about current disposal facilities.
Guarantee
The guarantee conditions for this appliance are as defined by our representative in the country in which it is sold. Details regarding these conditions can be obtained from the dealer from whom the appliance was purchased. The bill of sale or receipt must be produced when making any claim under the terms of this guarantee.
Changes reserved.
List of preparation programmes
AutoCook Pro offers you a total of 50 preparation programmes. They consist of 16 basic programmes, each with 3 time setting options, as well as 2 additional steam pressure functions. The following table contains the most important data for the various preparation programmes.
| Programme Number of | preparation steps | Keep warm function available | Steam pressure function available | Lid |
| my mode | ||||
| Customised setting for the desired temperature and preparation time | 1 | — | √ | Open / closed* |
| recipe 1&2 | 1-3 — | √ | Open / closed* | |
| 2 memory locations for personal recipes | ||||
| warm up | 1 | √ | — Closed | |
| Warming up cold (pre-cooked) meals | ||||
| soup | short: 1 | |||
| Preparing soups and stews | medium: 2long: 2 | √ | √ | Open / closed* |
| steam | ||||
| Steam-cooking vegetables, meat and fish (steamer insert required) | 1 | √ | √ | Closed |
| stew | short: 1 | |||
| Stewing vegetables, meat and fish | medium: 2long: 2 | √ | √ | Open / closed* |
| fry | 1 | √ | — Open | |
| Frying vegetables, meat and fish | ||||
| soft fry | ||||
| Soft frying of small quantities (e.g. meat, fish, baked items etc.). Soft frying basket required. Not suitable for frozen ingredients. | 1 — — Open | |||
| baking | ||||
| The maximum quantity of dough is 1000 g flour with water (ratio: 54 ml water to 100 g flour) | 1 — — Closed | |||
| cooking | ||||
| Cooking food | 1 | √ | √ | Closed |
| porridge | ||||
| Preparing dairy foods | 1 | √ | √ | Closed |
| rice | ||||
| Cooking cereals or rice | 1 | — | √ | Closed |
| jam | 1 — — Open | |||
| Preserving fruit as jams |
* Depending on recipe / preparation step – “Lid closed” for activated steam pressure function Please see the recipe book provided for notes on correct use of the programmes and for information on ingredients, quantities and cooking times.
| Programme Number of | preparation steps | Keep warm function available | Steam pressure function available | Lid |
| legumesCooking beans | short: 1 medium: 2 long: 2 | √ | √ | Closed |
| sous videGently cooking foods in a vacuum bag | 1 — — Closed | |||
| risottoPreparing risotto | short: 3 medium: 3 long: 3 | √ | √ | Open / closed* |
| pastaCooking pasta dishes | 1 — — | Closed / open* | ||
| yogurtPreparing yogurt | 1 — — Closed | |||
* Depending on recipe / preparation step – “Lid closed” for activated steam pressure function Please see the recipe book provided for notes on correct use of the programmes and for information on ingredients, quantities and cooking times.
Cooking times
The following table contains an overview of the cooking times for various dishes. The following cooking times depend on the thickness and consistency of the foods and should be viewed as recommendations for minimum times. Adjust cooking times accordingly. With frozen food extend the cooking time by at least 20%.
| Programme Setting Time (without steam pressure function) | Food Recommended quantity (maximum) | ||
| steam medium 30 mins Green beans (fresh) 500 g (800 g) | |||
| short 10 mins Cauliflower | (same-sized florets) | 500 g (800 g) | |
| long 50 mins Potatoes | (medium-sized, whole) | 500 g (1200 g) | |
| short 10 mins Fish fillet | 500 g (1000 g) | ||
| medium 30 mins Meatballs | 500 g (700 g) | ||
| short 10 mins Eggs | x 8 (x 12) | ||
| medium 30 mins Dumplings | 500 g (600 g) | ||
| short 5 mins | Broccoli | 500 g (800 g) | |
| short 3 mins | Peas | 500 g (800 g) | |
| medium 30 mins Carrots | 500 g (800 g) | ||
| medium 30 mins Chicken breast 500 g (800 g) | |||
| medium 30 mins Beetroot | (medium-sized, whole) | 500 g (800 g) | |
| rice medium 30 mins White, medium grain rice | 500 g rice,700 ml water | ||
| medium 25 mins White, medium grain rice | 250 g rice,500 ml water | ||
| long 60 mins Black rice 500 g rice, | 500 ml water | ||
| long 45 mins Black rice 250 g rice, | 350 ml water | ||
| porridge long 45 mins Milk porridge 250 g round grain rice, | 1000 ml milk,100 g sugar | ||
| medium 30 mins Milk porridge 125 g round grain rice, | 500 ml milk,50 g sugar | ||
| soft fry medium 20 mins Chicken legs 300 g | |||
| short 10 mins Button mushrooms 200 g | |||
| medium 20 mins Cannelloni 300 g | |||
| short 10 mins Fish fillet | 200 g | ||
| short 10 mins Wiener schnitzel (turkey) | 200 g | ||
| short 10 mins Wiener schnitzel (pork) | 200 g | ||
| steam + soft fry | short + short | 10 mins +10 mins | Raw vegetables(e.g. cauliflower)200 g |
| baking | long | 60 mins | Shoulder of pork1500 g |
| medium 40 mins Meat loaf | 800 g | ||
| long 60 mins Cake 500 g | |||
| fry medium 15 mins Vegetables | 300 g | ||
| medium 15 mins Fish | 200 g | ||
| medium 15 mins Meat | 500 g | ||
| short manual setting: | Onions | 200 g | |
| 5 mins | |||
| sous vide 1) | short, 60°C | 60 mins Fillet of beef (rare) | After adding the food,the water level inthe pan should notexceed 3.0 l. |
| medium, 65°C | 50 mins Fillet of beef (medium) | ||
| medium, 70°C | 45 mins Fillet of beef (well done) | ||
| short, 60°C | 30 mins Fish (salmon) | ||
| medium, 65°C | 60 mins Poultry (chicken breast) | ||
| long, 85°C | 60 mins Asparagus | ||
| long, 85°C | 80 mins Potatoes | ||
| long, 85°C | 100 mins Root vegetables | ||
1) Special hygiene measures must be observed when using the sous vide cooking method. Please pay particular attention to the safety instructions and the recommendations for preparation! → “Sous vide cooking” see page 13
Model overview and technical data
| MUC68... MUC88... | ||
 | ✓ ✓ | |
 | ✓ ✓ | |
| Individual memory locations 2 2 | ||
| Nominal volume 5 | 5 | | ||
| Maximum capacity without steam pressure function 4 | 4 | | ||
| Maximum capacity with steam pressure function 3.3 | 3.3 | | ||
| Temperature range 40-160°C 40-160°C | ||
| Operating pressure 80 kPa 80 kPa | ||
| Safety pressure | 150 kPa | 150 kPa |
| Electrical connection (voltage - frequency) | 220-240 V~ 50/60 Hz | 220-240 V~ 50/60 Hz |
| Heater wattage | 1050 W | 1200 W |
| Induction | — | ✓ |
| Length of power cable | 1.5 m | 1.5 m |
| Weight, empty | 5.8 kg | 6.5 kg |
Special accessories
 | MAZ8BIStainless steel pan, polished, with a non-stick coating and storage lid*; suitable for the induction multi-cooker with steam pressure function MUC88... | 5-litre pan; dishwasher-safe; very robust pan; 3 mm thick; stainless steel polished exterior; non-stick coating; lid* for the practical storage of food in the pan, e.g. in the refrigerator |
 | MAZ0FBFrying basket | Stainless steel basket with removable handle for easy handling; dishwasher-safe |
*The storage lid is not supplied as standard with the appliance. It is only supplied with pans as a special accessory. If an accessory is not included in the product package, it can be purchased via trade stockists or customer service.
Troubleshooting
| Problem Cause Remedy | ||
| The prepared meal is half-raw. | Filled beyond capacity. Do not fill the pan beyond the marking [4.0 litres]! | |
| The ratio of the amount of water and the ingredients is incorrect. | Adjust the ratio of the amount of water and the ingredients. | |
| Foreign objects in the appliance interior. | Remove all foreign objects. Do not use any water for this purpose! | |
| The pan is deformed. Contact customer service. | ||
| Fault in the appliance. | ||
| Fault in the sensor. | ||
| The prepared meal is burnt. There is dirt underneath the pan. Thoroughly clean the pan and the appliance interior. | ||
| The appliance boils over. Filled beyond capacity. Adjust the amount. | ||
| LED does not light up. The appliance is switched off. Switch on the appliance. | ||
| The hotplate does not function. | Fault in the appliance. Contact customer service. | |
| Water is flowing out of the appliance. | The appliance features overflow protection. The condensation tank is full and overflowing. | Remove water from condensation tank. Remove the pan and use a cloth to rub the appliance interior dry. Ensure that no water enters the appliance interior. |
| The pressure locking handle of the appliance cannot be opened. | Food is obstructing the overpressure lock and the pressure locking handle is blocked. | Proceed as described in chapter → “Release steam manually” see page 16. If the problem persists, contact customer service. |
| Steam constantly escapes from the steam outlet, even though the steam pressure function is switched on. | The valve plug is not properly placed on the valve. | Disconnect the appliance from the power supply and allow to cool down. Remove the steam outlet and place the valve plug properly on the valve. |
| Display screen P | This is not an error. The steam is released automatically. | Wait until the steam has been released completely or release steam manually. |
| Display screen OPEN | Pressure locking handle closed (→) for a preparation programme without steam pressure function. | Open pressure locking handle (→) to deactivate the steam pressure function. |
| Display screen CLOSE | Pressure locking handle open (→) for a preparation programme with steam pressure function. | Close the pressure locking handle (→) to activate the steam pressure function. |
| Display screen E1~E6 | Fault in the appliance. Abort the preparation programme. Disconnect the appliance from the power supply. Switch the appliance on again. If the problem persists, contact customer service. | |
| Display screen E0 | Incorrect pan inserted or pan not recognised. | Insert the pan properly. If the display persists for more than 20 seconds, disconnect the appliance from the power supply and contact customer service. |
| Display screen E1 | The steam pressure function does not work properly. | Disconnect the appliance from the power supply and restart. If the problem persists, contact customer service. |
| Display screen E2, E5, E6 or E7 | The appliance has overheated. Disconnect the appliance from the power supply and allow to cool down. Restart the appliance once it has cooled down. | |
| Short-circuit in the appliance. Disconnect the appliance from the power supply and contact customer service. | ||
| Display screen E3 | Mains voltage too high. Contact electricity provider or grid operator. Have the power supply checked by an expert. | |
| Display screen E4 | Mains voltage too low. | |
| Display screen E8 | Communication failure Restart the appliance once it has cooled down. | |
| Display screen E12 | When selecting a programme with a high temperature (e.g. “soft fry”), unsuitable ingredients have been added (e.g. water). The programme is aborted to prevent overpressure. | Remove the unsuitable ingredients from the pan. Clean pan and then fill correctly (e.g. with oil for the programme “soft fry”). Leave the lid open depending on the programme selected → “List of preparation programmes” see page 24. Restart preparation programme. |
If you are unable to solve the problem, always call the hotline!
You will find the telephone numbers at the back of these instructions.
i recipe 1&2 (recept 1&2)
Attentie!
19. Condenswaterreservoir aanbrengen
Attentie!
nBereiding
Aanwijzingen:
nBereiding
Extra functies
Attenzione!
Attenzione!
Note
Atenção!
Atenção!
Notas:
pPreparação
Funções adicionais
Προσοχή!
el Παρασκευή
Προσοχή!
Υποδείξεις:
Bemærk!
Bemærk!
Tips:
Ekstra funktioner
Huomio!
Huomio!
Huomautuksia:
Lisätoiminnot
⚠️ Fare for forbrenning!
e keep warm (holde varm)
Viser at. varmholdingsfunksjonen er aktivert etter at et tilberedningsprogram er avsluttet. I displayet lyser et rektangel (striplet linje).
f Damptrykkfunksjon
5. Fjerne ventilpluggen
Obs!
⚠️ Fare for forbrenning!
Apparatet varmer opp gryten til måltemperatur er nådd. Under oppvarmingsfasen viser displayet linjer som lyser opp med urviseren.
Så snart måltemperaturen er nådd, slukkes linjene, og tilberedningstiden vises i displayet.
⚠️ Fare for forbrenning!
⚠️ Fare for forbrenning!
⚠️ Fare for forbrenning!
⚠️ Fare for forbrenning!
⚠️ Fare for forbrenning!
Tilleggsfunksjoner
⚠️ Fare for forbrenning!
⚠️ Fare for forbrenning!
i recipe 1&2 (recept 1&2)
Varning!
5. Ta bort ventilproppen
6. Öppna apparatens lock
7. Lyft upp kastrullen ur apparatens inre.

8. Ta ut lockinsatsen
Varning!
Extrafunktioner
Lysdioden [ recipe 1 ] (recept 1) tänds.
Dikkat!
Dikkat!
Ek fonksiyonlar
www.bosch-home.com/tr
www.bosch-yetkiliservisi.com
Uwaga!
Uwaga!
Wskazówki:
Funkcje dodatkowe
■ للغابة
■ ایمکن
- الجهاز
- لمعرفة
٤ تغلق الغطاء.
الاوظائق الإضافية
19 المكتiff
خلع مخرج الابخار 4
تنبيه هام!
تنبيه هام!
www.bosch-home.com.au *Mo-Fr: 24 hours
BA Bosna i Hercegovina, Bosnia-Herzegovina
"HIGH" d.o.o.
Gradačačka 29b
71000 Sarajevo
Tel.: 061 10 09 05
Fax: 033 21 35 13
mailto:bosch_siemens_sarajevo@yahoo.com
European Trade Center Building, 5th floor
1784 Sofia
Tel.: 0700 208 17
Fax: 02 878 79 72
mailto:informacia.servis-bg@bshg.com
www.bosch.home.bg
BH Bahrain
Khalaifat Est.
P.O. Box 5111
Manama
Tel.: 01 7400 553
mailto:service@khalafat.com
To arrange an engineer visit, to order spare parts and accessories or for product advice please visit
www.bosch-home.co.uk
or call
*Calls are charged at the basic rate, please check with your telephone service provider for exact charges
GR Greece, Ελλάς
BSH Ikiakes Siskeves A.B.E.
Central Branch Service
17 km E.O. Athinon-Lamias &
Potamou 20
14564 Kifisia
Unit 1 & 2, 3rd Floor,
North Block, Skyway House,
3 Sham Mong Road
Tai Kok Tsui, Kowloon
Hong Kong
Tel.: 2565 6151
Fax: 2565 6681
mailto:bosch.hk.service@bshg.com
www.bosch-home.cn
HR Hrvatska, Croatia
BSH kućni uređaji d.o.o.
Kneza Branimira 22
10000 Zagreb
Tel.: 01 552 08 88
Fax: 01 640 36 03
mailto:informacije.servis-hr@
bshg.com
www.bosch-home.com/hr
www.bosch-home.com/hu
IE Republic of Ireland
BSH Home Appliances Ltd.
Unit F4, Ballymount Drive
Ballymount Industrial Estate
Walkinstown
Dublin 12
Service Requests, Spares and
Accessories
Tel.: 01450 2655*
Fax: 01450 2520
www.bosch-home.co.uk
*0.03 € per minute at peak.
Off peak 0.0088 € per minute.
IL Israel,
C/S/B/ Home Appliance Ltd.
1, Hamasger St.
North Industrial Park
Lod, 7129801
Tel.: 08 9777 222
Fax: 08 9777 245
mailto:csb-serv@csb-ltd.co.il
www.bosch-home.co.il
IN India, Bhārat, भारत
BSH Household Appliances
Mfg. Pvt. Ltd.
Arena House, 2nd Floor, Main Bldg.
Plot No. 103, Road No. 12,
MIDC, Andheri East
Mumbai 400 093
Toll Free 1800 266 1880*
www.bosch-home.com/in
*Mo-Sa: 8.00am to 8.00pm
IS Iceland
Smith & Norland hf.
Noatuni 4
105 Reykjavik
Tel.: 0520 3000
Fax: 0520 3011
www.sminor.is
IT Italia, Italy
www.bosch-home.com/it
IP Turebekov Yerzhan
Nurmanovich
Jangeldina str. 15
Shimkent 160018
Tel.: 0252 31 00 06
mailto:evrika_kz@mail.ru
LB Lebanon
Teheni, Hana & Co.
Boulevard Dora 4043 Beyrouth
P.O. Box 90449
Jdeideh, 1202 2040
Tel.: 01 255 211
mailto:Info@Teheni-Hana.com
LT Lietuva, Lithuania
Senuku prekybos centras UAB
Jonavos g. 62
44192 Kaunas
Tel.: 0372 12146
Fax: 0372 12165
www.senukai.lt
LU Luxembourg
General Serviss Limited
Bullu street 70c
1067 Riga
Tel.: 07 42 41 37
mailto:bt@olimpeks.lv
Elkor Serviss
Brivibas gatve 201
1039 Riga
Tel.: 067 0705 20; -36
mailto:domoservice@elkor.lv
www.servisacentrs.lv
MD Moldova
S.R.L. "Rialto-Studio"
ул. Щусева 98
2012 Кишинев
Unit F 2, 4 Orbit Drive
Mairangi Bay
Auckland 0632
Tel.: 0800 245 700*
Fax: 0800 256 535
mailto:aftersales.nz@bshg.com
www.bosch-home.co.nz
* Mo-Fr: 8.30am to 4.00pm
(exclude public holidays)
PL Polska, Poland
SA Kingdom Saudi Arabia,
and Airconditioning Co. Ltd.
BOSCH Service centre,
Kilo 5 Old Makkah Road
(Next to Toyota), Jamiah Dist.
P.O.Box 7997
Jeddah 21472
Tel.: 800 244 0043
mailto:kunnumalsp@alj.com
www.aljelectronics.com.sa
SE Sverige, Sweden
BSH Home Appliances AB
Landsvägen 32
169 29 Solna
Tel.: 0771 11 22 77 local rate
mailto:Bosch-Service-SE@bshg.com
www.bosch-home.se
SG Singapore,新加坡
BSH Home Appliances Pte. Ltd.
Block 4012, Ang Mo Kio Avenue 10
01-01 Techplace 1
Singapore 569628
Tel.: 6751 5000*
Fax: 6751 5005
mailto:bshsgp.service@bshg.com
www.bosch-home.com.sg
* Mo-Fr: 8.30am to 7.00pm, Sa: 8.30am to 5.30pm
(exclude public holidays)
SI Slovenija, Slovenia
BSH Hišni aparati d.o.o.
Litostrojska 48
1000 Ljubljana
Tel.: 01 583 07 00
Fax: 01 583 08 89
mailto:informacije.servis@bshg.com
www.bosch-home.com/si
SK Slovensko, Slovakia
www.bosch-home.com/tr
BSH Home Appliances Private Limited
台北市內湖區洲子街80號11樓
11F., No.80, Zhouzi St., Neihu Dist.
Taipei City 11493
Tel.: 0800 368 888
Fax: 02 2627 9788
mailto:bshtzn-service@bshg.com
Service-General SH.P.K.
Rruga Mag Prishtine-Ferizaj
70000 Ferizaj
Tel.: 0290 321 434
mailto:a_service@
gama-electronics.com
XS Srbija, Serbia
BSH Kućni aparati d.o.o.
15th Road Randjespark
Private Bag X36, Randjespark
1685 Midrand – Johannesburg
Tel.: 086 002 6724
Fax: 086 617 1780
mailto:applianceserviceza@bshg.com
www.bosch-home.com/za

- INTENDED USE
- SAFETY INSTRUCTIONS
- ⚠️ RISK OF ELECTRIC SHOCK AND FIRE
- ⚠️ RISK OF SCALDING
- HEALTH RISK
- RISK OF SUFFOCATION
- ⚠️ IMPORTANT
- CAUTION
- CONGRATULATIONS ON THE PURCHASE OF YOUR NEW BOSCH APPLIANCE
- CONTENTS
- OVERVIEW
- → FIGURE A
- → FIG. B
- CONTROL PANEL
- CONTROLS
- → FIG. ©
- STANDBY
- SET THE START TIME DELAY
- SELECT A PREPARATION PROGRAMME FROM THE LIST (H)
- ← ADJUST THE PREPARATION TIME
- SET A CUSTOMISED PREPARATION TIME
- SET A CUSTOMISED PREPARATION TEMPERATURE
- STEAM PRESSURE FUNCTION
- √ CONFIRM THE PROGRAMME
- X DELETE A SETTING OR ABORT THE PROGRAMME
- INDICATORS
- A DISPLAY
- B TIMER
- C PREPARATION STEPS / PROGRAMME PROGRESS
- D FINISHED
- E KEEP WARM
- F STEAM PRESSURE FUNCTION
- G DISPLAY OF THE PRE-CONFIGURED PREPARATIONTIME
- H LIST OF PREPARATION PROGRAMMES
- I RECIPE 1&2
- J MY MODE
- BEFORE USING FOR THE FIRST TIME
- REMOVE THE STEAM OUTLET
- REMOVE THE VALVE PLUG
- OPEN THE APPLIANCE LID
- REMOVE THE LID INSERT
- CHECK SAFETY DEVICES
- INSERT PAN
- PLACE LID INSERT
- CLOSE THE LID
- INSERT THE VALVE PLUG
- INSERT THE STEAM OUTLET
- INSERT THE CONDENSATION WATER TANK
- CONNECT THE SUPPLIED MAINS CABLE TO THE APPLIANCE FIRST AND THEN CONNECT IT TO THE SOCKET
- PREPARATION
- GENERAL RECOMMENDATIONS
- PREPARATION WITHOUT STEAM PRESSURE
- NOTES
- INCREASING OR REDUCING THE TEMPERATURE DURING PREPARATION
- EXTENDING THE PREPARATION TIME DURING PREPARATION
- SOUS-VIDE COOKING
- VACUUM-SEALING BAGS
- VACUUM-SEALING
- PREPARATION WITH STEAM PRESSURE
- LOW STEAM PRESSURE
- HIGH STEAM PRESSURE
- STEAM PRESSURE FUNCTION ACTIVATED
- STEAM PRESSURE FUNCTION DEACTIVATED
- RISK OF SCALDING
- RELEASE STEAM MANUALLY
- ADDITIONAL FUNCTIONS
- SELECTING A PRE-CONFIGURED PREPARATION TIME
- SETTING A START TIME DELAY
- MULTIPLE PREPARATION STEPS
- PREMATURELY TERMINATING THE CURRENT PREPARATION STEP
- KEEP WARM FUNCTION
- USING INSERTS
- USING THE FRYING BASKET
- EXAMPLE: PREPARATION PROGRAMME [SOFT FRY]
- USING THE STEAMER INSERT
- EXAMPLE: PREPARATION PROGRAMME [STEAM] WITHOUT STEAM PRESSURE FUNCTION
- CUSTOMISED SETTING OPTIONS
- SETTING THE PREPARATION TIME
- SETTING THE PREPARATION TEMPERATURE
- SETTING THE STEAM PRESSURE
- MY MODE (MANUAL)
- SETTING THE PREPARATION TEMPERATURE OR STEAM PRESSURE
- RECIPE 1 / RECIPE 2 – SAVING PERSONAL PREPARATION PROGRAMMES
- SAVING THE PREPARATION TIME
- SAVING THE PREPARATION TEMPERATURE OR STEAM PRESSURE
- CHILD LOCK
- WARNING
- ACTIVATE
- DEACTIVATE
- CARE AND DAILY CLEANING
- ⚠️ RISK OF ELECTRIC SHOCK
- CLEANING THE BASIC APPLIANCE
- CLEANING THE LID INSERT, STEAM OUTLET AND VALVE PLUG
- CLEANING THE PAN, CONDENSATION TANK AND ACCESSORIES
- DISPOSAL
- GUARANTEE
- LIST OF PREPARATION PROGRAMMES
- COOKING TIMES
- I RECIPE 1&2 (RECEPT 1&2)
- ATTENTIE
- CONDENSWATERRESERVOIR AANBRENGEN
- NBEREIDING
- AANWIJZINGEN
- EXTRA FUNCTIES
- ATTENZIONE
- NOTE
- MOVE 1
- MOVE 2
- TURN UP
- MAP1
- SOUND
- SHOW
- FLY
- STAFF ANY
- BOATING
- PSICKING
- PARTRIDGE
- FIC4
- LATH
- SEQUENCE
- PROJECT
- ATENÇÃO
- NOTAS
- PPREPARAÇÃO
- FUNÇÕES ADICIONAIS
- ΠΡΟΣΟΧΉ
- EL ΠΑΡΑΣΚΕΥΉ
- ΥΠΟΔΕΊΞΕΙΣ
- BEMÆRK
- TIPS
- DRY, BOILING
- VEILICE 1
- INCOJE 2
- WARRY UP
- SUCRAL
- CREAM
- SILVER
- EKSTRA FUNKTIONER
- HUOMIO
- HUOMAUTUKSIA
- LISÄTOIMINNOT
- ⚠️ FARE FOR FORBRENNING
- E KEEP WARM (HOLDE VARM)
- F DAMPTRYKKFUNKSJON
- FJERNE VENTILPLUGGEN
- OBS
- TILLEGGSFUNKSJONER
- VARNING
- TA BORT VENTILPROPPEN
- ÖPPNA APPARATENS LOCK
- LYFT UPP KASTRULLEN UR APPARATENS INRE
- TA UT LOCKINSATSEN
- EXTRAFUNKTIONER
- DIKKAT
- EK FONKSIYONLAR
- UWAGA
- WSKAZÓWKI
- FUNKCJE DODATKOWE
- الاوظائق الإضافية
- SIZE 1
- SIZE 2
- WARM UP
- HEAD
- SEAT
- DRIVE
- FRG
- SOFT FRG
- LOADING
- COOLING
- PACKAGE
- FOB
- FAN
- PAYLOAD
- خلع مخرج الابخار 4
- GR GREECE, ΕΛΛΆΣ
- HR HRVATSKA, CROATIA
- IE REPUBLIC OF IRELAND
- IL ISRAEL
- IN INDIA, BHĀRAT, भारत
- IS ICELAND
- IT ITALIA, ITALY
- LB LEBANON
- LT LIETUVA, LITHUANIA
- LU LUXEMBOURG
- MD MOLDOVA
- PL POLSKA, POLAND
- SA KINGDOM SAUDI ARABIA
- SE SVERIGE, SWEDEN
- SG SINGAPORE,新加坡
- TECHPLACE 1
- SI SLOVENIJA, SLOVENIA
- SK SLOVENSKO, SLOVAKIA
- XS SRBIJA, SERBIA
Brand : BOSCH
Model : AutoCook Pro
Category : Multifunction Cooker