
LUCINA AX-09 - Synthesizer ROLAND - Free user manual and instructions
Find the device manual for free LUCINA AX-09 ROLAND in PDF.

| Product Type | Portable Keyboard Synthesizer |
| Brand | ROLAND |
| Model | LUCINA AX-09 |
| Keyboard | 37 keys with velocity |
| Maximum Polyphony | 128 voices |
| Sounds | 144 normal sounds + 6 special sounds |
| Controllers | D-Beam controller, modulation bar, touch controller |
| Connectors | OUTPUT jacks (L/MONO, R), PHONES headphone jack, EXT IN jack, FOOT PEDAL jack, USB COMPUTER connector, USB MEMORY slot, MIDI OUT connector |
| Power Supply | AC adapter (included) or 8 Ni-MH AA rechargeable batteries |
| Power Consumption | 600 mA |
| Battery Life | Approximately 4 hours |
| Dimensions | 832 (W) x 245 (D) x 95 (H) mm |
| Weight | 3.7 kg (without adapter) |
| Supplied Accessories | Owner's manual, quick start guide, tutorial DVD, shoulder strap, sticker, USB cap, AC adapter |
| Options | DP series pedal switch, EV-5 expression pedal, USB flash drive |
| Supported Audio Formats | MP3 (44.1 kHz, 32-320 kbps), WAV, AIFF (44.1 kHz, 8/16/24-bit) |
| Main Functions | Sound selection, favorites, transpose, octave, D-Beam, modulation, touch, pedal, USB audio player, V-LINK, MIDI |
| Maintenance | Clean with a soft, dry cloth. Do not use solvents. |
| Safety | Follow the instructions in the manual. Do not open the device. Use only the supplied adapter. Do not expose to water or heat. |
| Spare Parts and Repairability | Contact an authorized Roland service center for repairs. No user-replaceable parts except batteries. |
Frequently Asked Questions - LUCINA AX-09 ROLAND
User questions about LUCINA AX-09 ROLAND
0 question about this device. Answer the ones you know or ask your own.
Ask a new question about this device
Download the instructions for your Synthesizer in PDF format for free! Find your manual LUCINA AX-09 - ROLAND and take your electronic device back in hand. On this page are published all the documents necessary for the use of your device. LUCINA AX-09 by ROLAND.
USER MANUAL LUCINA AX-09 ROLAND
Lucina
Synthesizer AX-09
Owner's Manual
Bedienungsanleitung
Mode d'emploi
Manuale dell'utente
Manual del usuario
IMPORTANT: THE WIRES IN THIS MAINS LEAD ARE COLOURED IN ACCORDANCE WITH THE FOLLOWING CODE.
BLUE: NEUTRAL
BROWN: LIVE
As the colours of the wires in the mains lead of this apparatus may not correspond with the coloured markings identifying the terminals in your plug, proceed as follows:
The wire which is coloured BLUE must be connected to the terminal which is marked with the letter N or coloured BLACK.
The wire which is coloured BROWN must be connected to the terminal which is marked with the letter L or coloured RED.
Under no circumstances must either of the above wires be connected to the earth terminal of a three pin plug.

Lucina
Synthesizer AX-09
Sounds that you'll enjoy playing!
- The total of 144 sounds covers all the bases, including not only synthesizer sounds but also piano, organ, strings, brass, and guitar, all immediately playable for instant enjoyment.
- There are also six highly expressive "Special Tones" as well.
These six high-quality sounds were created specifically for the Lucina AX-09 (synth lead, poly synth, synth bass, jazz scat, violin and trombone).

natural_image
Close-up of hands playing a guitar chord with a string (no visible text or symbols)Easy to use and handle!
- Operation is easy — simply turn on the power and choose a sound.
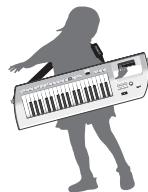
- With a lightweight, stylish body, and support for battery operation, you can play the Lucina AX-09 anywhere, anytime. Since you can sling the Lucina AX-09 over your shoulder when playing it, your performances can be more active and versatile.
Enjoy performing more than ever!
- All of the unique expressive capabilities of a traditional synthesizer are at your fingertips, thanks to the Lucina AX-09's D Beam controller, modulation bar, and touch controller.
- You can easily play along with your favorite songs, either by connecting your portable audio player to the EXT IN jack, or by using the USB memory audio playback function.

How Letters are Shown on the Lucina AX-09
$$ \begin{array}{ccccccccc} A & B & C & D & E & F & G & H & I & J & K & L & M & N & O & P & Q & R & S & T & U & V & W & X & Y & Z \ A & B & C & D & E & F & G & h & , & J & E & L & N & o & P & q & r & S & T & U & w & 8 & H & y & z \end{array} $$
Copyright © 2010 ROLAND CORPORATION
All rights reserved. No part of this publication may be reproduced in any form without the written permission of ROLAND CORPORATION.
Before using this unit, carefully read the sections entitled: "USING THE UNIT SAFELY" (p. 24) and "IMPORTANT NOTES" (p. 25). These sections provide important information concerning the proper operation of the unit. Additionally, in order to feel assured that you have gained a good grasp of every feature provided by your new unit, Owner's Manual should be read in its entirety. The manual should be saved and kept on hand as a convenient reference.
Features....2
How Letters are Shown on the Lucina AX-09 ..... 2
Panel Descriptions....4
Front Panel....4
Bottom Panel 5
Rear Panel 5
About Batteries....6
Installing Batteries 6
Checking the Remaining Battery Power ..... 6
Removing Batteries....6
Getting Ready....7
Connecting the AC Adaptor 7
Attaching the Strap 7
Connecting Your Speakers.... 8
Connecting Your Headphones 8
Turning the Power On 8
Selecting Tones....9
Selecting a Regular Tone 9
Selecting a Special Tone 9
Previewing Tones....9
Registering Frequently Used Tones in Memory (FAVORITE)....10
Using the Performance Functions......11
Raising or Lowering the Key Range by Octaves ..... 11
Raising or Lowering the Key Range by Semitones ... 11
Using the Touch Controller 11
Setting the Pitch Range of the Touch Controller....11
Using the Modulation Bar 11
Assigning the Modulation Bar's Effect ..... 12
Using the D Beam Controller.... 12
Changing the ASSIGNABLE Setting..... 12
Using a Foot Pedal 13
Preventing Tones from Changing During Performance (Lock function)....14
Playing Along with a Portable Audio Player ..... 14
Playing Along with an Audio File from USB Memory. 14 Making Audio Player Settings..... 15
Editing the Tone Settings.....16
Editing the Tone Parameters....16
Adjusting the Tuning....17
Master Tune....17
Key Scale Tune 17
Adjusting the Keyboard's Touch Sensitivity.17
Setting a Fixed Value for the Keyboard's Velocity.....17
Count In / Metronome ....18
Count In Settings....18
Various Settings (Utility) .....18
Checking the Lucina AX-09's Version 18
USB Driver Settings....18
Backing Up Lucina AX-09 Settings to USB Memory .. 19
Restoring Lucina AX-09 Settings from USB Memory . 19
Restoring the Factory Settings (Factory Reset)....19
Connecting Other Equipment .....20
Controlling MIDI Devices 20
MIDI Messages that can be Transmitted and Received....20
Connecting a MIDI Sound Module ..... 20
Making MIDI-related Settings....20
Connecting to Your Computer via USB 21
Controlling Video (V-LINK) 21
Troubleshooting....22
Specifications 23
Error Message List ....23
USING THE UNIT SAFELY....24
IMPORTANT NOTES ......25
Index 26
MIDI Implementation Chart .....26
Front Panel

- OCTAVE [+] / [-] Buttons
These buttons raise or lower the keyboard range in steps of one octave (p. 11).
- [TRANSPOSE] Button
By holding down this button and pressing the OCTAVE [+], [-] buttons you can raise or lower the keyboard range in steps of one semitone (p. 11).
- Display
This shows the selected tone or mode, or the value of the parameter you're editing.
- [SHIFT] Button
Use this button in conjunction with other buttons to execute various functions.
- [SPECIAL TONE] Button
Press this to select special tones.
- TONE [1]–[6] Buttons
Use these buttons to select the tone group for regular tones, or to select special tones.
- [INC/+] / [DEC/−] Buttons
Use these buttons to select variations of the regular tones.
- FAVORITE [A] / [B] Buttons
Use these buttons to select the FAVORITE memory bank (p. 10) in which you want to register a favorite tone.
- [WRITE] Button
This button stores the Lucina AX-09 settings you've edited, or the tone you registered in FAVORITE (p. 10, p. 18).
- [LOCK] Button
If this button is turned on, you won't be able to switch tones. Use this to prevent the tone from being accidentally switched during a performance (p. 14).
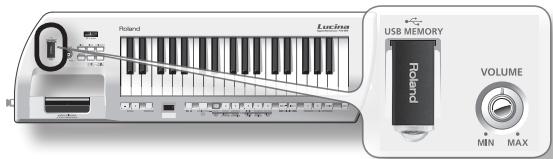
- USB MEMORY Slot
You can insert USB memory (sold separately) here (p. 15).
- [VOLUME] Knob
This knob adjusts the volume.
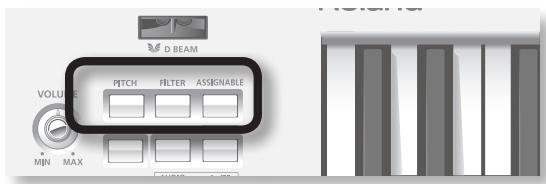
- D Beam
[PITCH] / [FILTER] / [ASSIGNABLE] Buttons
These buttons turn the D Beam on/off.
By placing your hand above the D Beam you can apply various effects to the sound (p. 12).
- [V-LINK] Button
This button turns V-LINK on/off (p. 21).
- [AUDIO PLAYER] Button
If you turn this on, you'll be able to play back audio files from USB memory (p. 14).
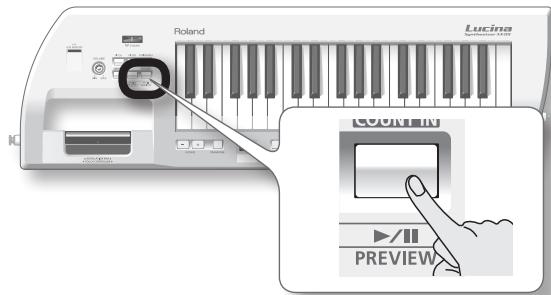
- [▶/Ⅲ / PREVIEW] Button
When the [AUDIO PLAYER] button is lit, this button starts/ stops playback of audio files in USB memory.
When the [AUDIO PLAYER] button is unlit, this button starts/stops a preview demo of the currently selected tone.
You can also get a count in to begin sounding by pressing the modulation bar while you press the [PREVIEW] button.
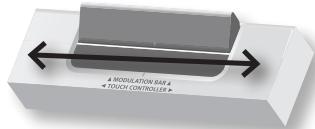
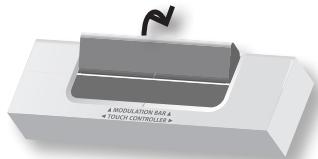
17. MODULATION BAR / TOUCH CONTROLLER
By pressing the modulation bar, you can apply vibrato. You can also switch to a Hold effect that sustains the sound you're playing (p. 11).
If you hold your finger on the touch controller and move it to left or right, the pitch will change (p. 11).
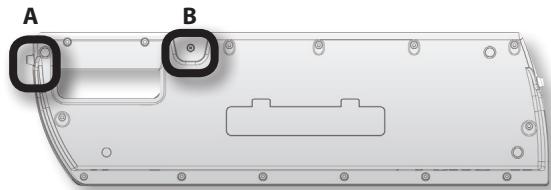
18. Strap Pin
Attach the included strap to this pin (p. 7).
19. Strap Pin (A)
Attach the included strap to this pin.
Depending on your playing style, you can use either this pin or the strap pin (B) located on the rear of the Lucina AX-09 (p. 7).
Bottom Panel
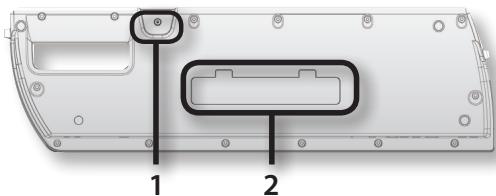
1. Strap Pin (B)
Attach the included strap to this pin.
Depending on your playing style, you can use either this pin or the strap pin (A) located on the side of the Lucina AX-09 (p. 7).
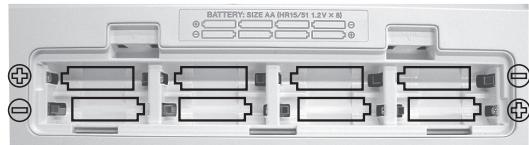
2. Battery Compartment
You can install Ni-MH AA rechargeable batteries here (p. 6).
Rear Panel

1. OUTPUT Jacks (L/MONO, R)
The sound of the Lucina AX-09 is output from these jacks. Connect them to your amplified speakers.
To employ monaural output, connect to only the L/MONO jack.
2. MIDI OUT Connector
If you connect this to another MIDI device, MIDI messages from the Lucina AX-09 will be transmitted to that device, allowing you to play it remotely (p. 20).
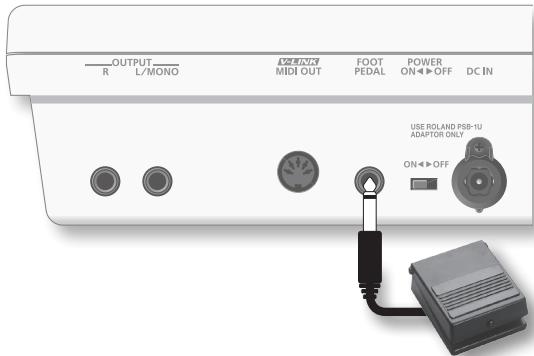
3. FOOT PEDAL Jack
Connect a separately sold Roland DP-series pedal here.
Alternatively, you can connect an expression pedal (EV-5; sold separately) (p. 13).
4. [POWER] Switch
This turns the power on/off (p. 8).
If you're using the included AC adaptor and need to turn off the power completely, turn off this POWER switch, and then disconnect the AC adaptor from the outlet.
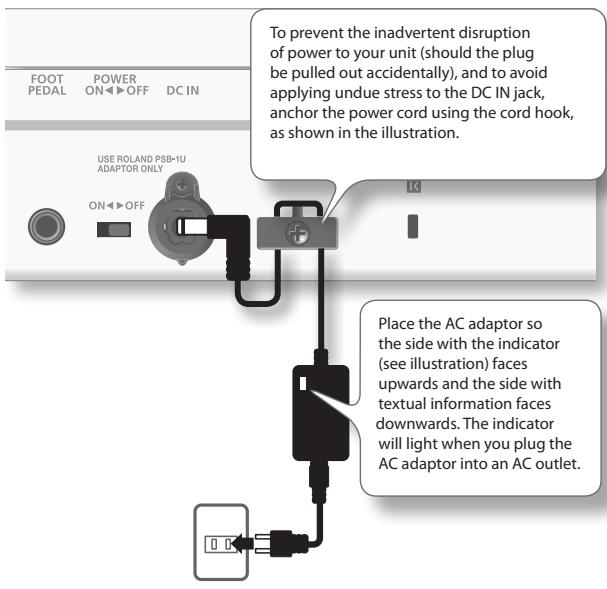
5. DC IN Jack
Connect the included AC adaptor here (p. 7).
6. Cord Hook
Use this to secure the cord of the included AC adaptor (p. 7).
7. Security Slot ( 🔒 )
http://www.kensington.com/
8. USB COMPUTER Connector
Use a USB cable to connect the Lucina AX-09 to your computer (p. 21).
9. EXT IN Jack
Connect your portable audio player or other audio source here. The sound that's input via this jack will be output from the OUTPUT jacks and the PHONES jack (p. 14).
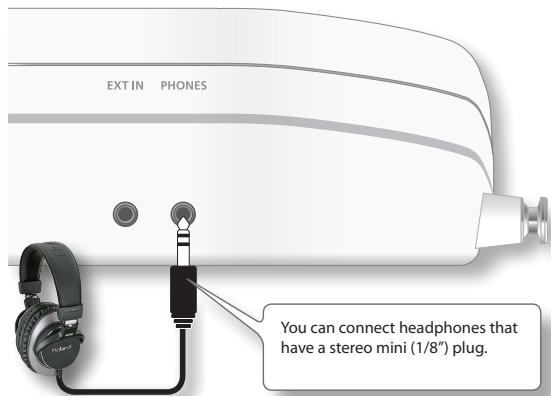
10. PHONES Jack
Headphones (sold separately) with a stereo mini plug (1/8" jack) can be connected here (p. 8).
If you're operating the Lucina AX-09 on batteries, you'll need eight Ni-MH AA rechargeable batteries. The battery life will differ depending on the conditions of use, but for continuous usage, it is approximately 4 hours.
About rechargeable batteries
When using rechargeable batteries, the battery lifespan will normally become shorter with each recharge cycle. If the batteries run down soon after being recharged, it's time to replace them.

Installing Batteries
- Switch off the Lucina AX-09's power (p. 8).
- Remove the cover of the battery compartment located on the Lucina AX-09's bottom panel.
While pressing the tabs of the cover, lift the cover up and remove it.
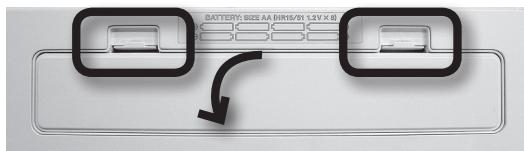
- Insert the batteries into the battery compartment.
Make sure to observe the correct polarity (+/- orientation) for each battery when inserting it.
natural_image
Front view of an electronic device rear panel with indicator lights and ports (no readable text or symbols)- Replace the battery compartment cover.
* When turning the unit upside-down, get a bunch of newspapers or magazines, and place them under the four corners or at both ends to prevent damage to the buttons and controls. Also, you should try to orient the unit so no buttons or controls get damaged.
* When turning the unit upside-down, handle with care to avoid dropping it, or allowing it to fall or tip over.
Checking the Remaining Battery Power
When the remaining battery power runs low, three dots will blink in the display. If this indication appears, replace the batteries as soon as possible.

A while after this indication, the display will indicate "L0," and it will no longer be possible to operate the Lucina AX-09.
You can also check the remaining battery power in the following way.
- Hold down the [SHIFT] button and press the [LOCK] button.
The display will indicate the remaining battery power as a percentage ("0"–"100").
MEMO
- The remaining battery power indication is an approximation.
- If you check the remaining battery power when the AC adaptor is connected, the display will always indicate "100."
Removing Batteries
To remove the batteries, power off the Lucina AX-09, open the battery compartment cover, and remove the batteries.
Note the following when using batteries
- Do not use alkaline batteries or zinc-carbon batteries.
- The Lucina AX-09 will not operate on batteries if the AC adaptor is connected.
- If batteries are installed, disconnecting or reconnecting the power cord at the AC outlet or disconnecting the DC plug from the Lucina AX-09's rear panel while the power is on will cause the power to turn off. You must turn off the power before you connect or disconnect the power cord or AC adaptor.
- Do not allow any objects (e.g., flammable material, coins, pins); or liquids of any kind (water, soft drinks, etc.) to penetrate the unit.
-
If used improperly, batteries may explode or leak and cause damage or injury. In the interest of safety, please read and observe the following precautions.
-
Carefully follow the installation instructions for batteries, and make sure you observe the correct polarity.
- Avoid using new batteries together with used ones. In addition, avoid mixing different types of batteries.
- Remove the batteries whenever the unit is to remain unused for an extended period of time.
- If a battery has leaked, use a soft piece of cloth or paper towel to wipe all remnants of the discharge from the battery compartment. Then install new batteries. To avoid inflammation of the skin, make sure that none of the battery discharge gets onto your hands or skin. Exercise the utmost caution so that none of the discharge gets near your eyes. Immediately rinse the affected area with running water if any of the discharge has entered the eyes.
- Never keep batteries together with metallic objects such as ballpoint pens, necklaces, hairpins, etc.
Connecting the AC Adaptor
The Lucina AX-09 can operate using the included AC adaptor, or using Ni-MH AA rechargeable batteries.
- Make sure that the Lucina AX-09's power is turned off (the [POWER] switch is in the OFF position).
- Turn the [VOLUME] knob all the way to the left (minimum).
- Connect the AC adaptor to the Lucina AX-09's rear panel DC IN jack, and then plug it into an AC outlet.
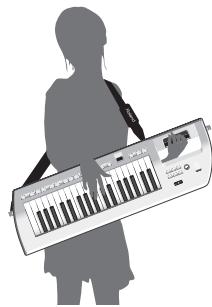
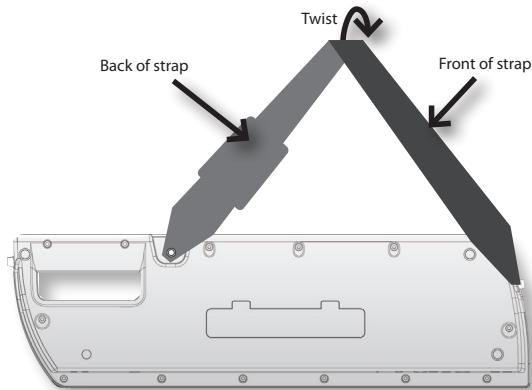
Attaching the Strap
Attach the strap to the Lucina AX-09 as shown in the illustrations below.
natural_image
Silhouette of a person holding a large electronic guitar with musical notes (no text or symbols visible)- Attach one end of the included strap to the strap pin shown in the illustration below.
natural_image
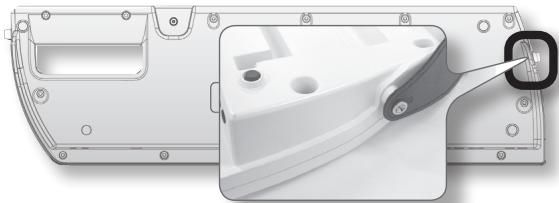
3D rendering of a white plastic mechanical component with a close-up view showing a small circular feature and a button (no text or symbols visible)- Attach the other end of the included strap to one of the other two strap pins.
A strap pin is provided in two locations; "A" and "B." You can use either one, whichever is more comfortable for you. For a larger-bodied person, attaching the strap to pin "A" will provide better stability.
natural_image
Technical diagram of a mechanical component with labeled points A and B, showing internal structure and mounting holes (no text or symbols beyond labels)NOTE
If you use strap pin "B," twist the strap as shown below. If you attach the strap without twisting it, the strap may come off of the Lucina AX-09.
Connecting Your Speakers
The Lucina AX-09 does not contain an amp or speakers. In order to produce sound, you'll need to connect the rear panel OUTPUT jacks to an audio device such as an amplified speaker system (subsequently referred to as "speakers"), or use headphones.
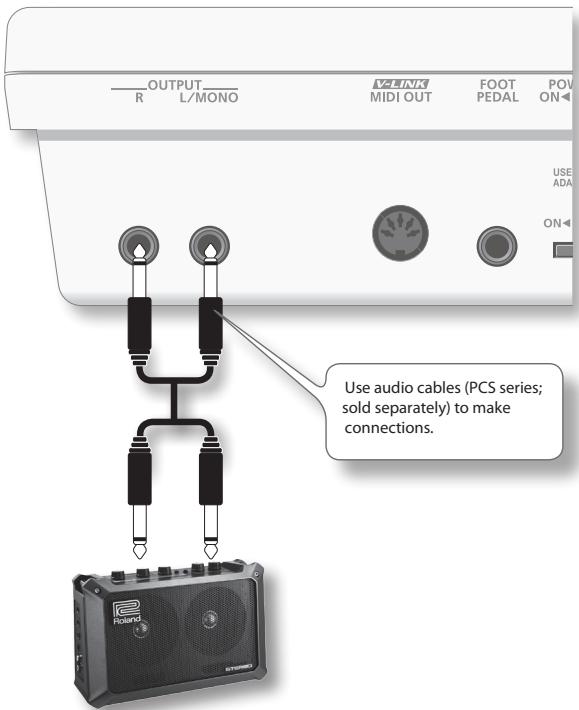
If you're outputting in monaural, connect only the L/MONO jack.
* To prevent malfunction and/or damage to speakers or other devices, always turn down the volume, and turn off the power on all devices before making any connections.
Connecting Your Headphones
Connect headphones to the rear panel PHONES jack.
Turning the Power On
* Once the connections have been completed (p. 8), turn on power to your various devices in the order specified. By turning on devices in the wrong order, you risk causing malfunction and/or damage to speakers and other devices.
- Minimize the volume of the Lucina AX-09 and your speakers.

- On the Lucina AX-09's rear panel, turn the [POWER] switch ON.
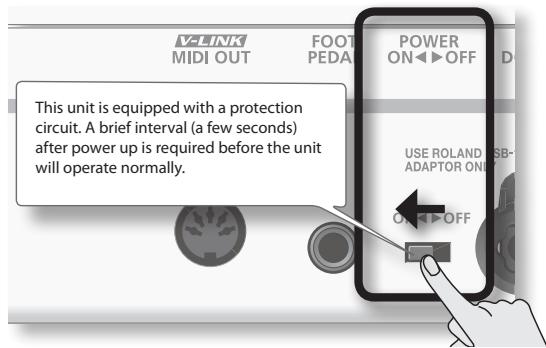
- Turn on the power of your speakers.
- Use the [VOLUME] knob to adjust the volume appropriately.
![Roland Lucina VOLUME While you play the keyboard to produce sound, slowly turn the [VOLUME] knob toward the right, and adjust the volume on the Lucina AX-09 and on your speakers.](/content/2024/12/131001/images/b42ed9ae8cec10a9d874e9dbf4cad11354da4610ea7b8beac6e78200eca648d5.jpg)
Turning the Power Off
- Minimize the volume of the Lucina AX-09 and your speakers.
- Turn off the power of your speakers.
- Turn the Lucina AX-09's [POWER] switch OFF.
On the Lucina AX-09, each of the sounds you play is called a "tone." There are two types of tones: "regular tones" and "special tones."
Selecting a Regular Tone
The Lucina AX-09 contains 144 regular tones that bring you the best sounds of Roland's synthesizers.
The regular tones are organized into six tone groups, with 24 tones in each group.
- If the [SPECIAL TONE] button or FAVORITE [A] / [B] button is lit, press the lit button to turn off its illumination.
- Press one of the TONE [1]–[6] buttons to select a tone group.
The button will light, and that tone group will be selected.
The name of the tone group is printed in black below each tone button.

MEMO
When you turn on the power, TONE [1] number 1 will always be selected.
- Use the [INC/+]/[DEC/-] buttons to select a tone within the group.

Each group contains tones 1–24, and the number of the selected tone (1–24) is shown in the display.
Press the [INC/+] button to select the next tone, or press the [DEC/−] button to select the preceding tone.
MEMO
- For a list of the tones, refer to the "Tone List" at the end of this manual.
- As indicated by the black characters printed below the TONE buttons, each tone group is subdivided into two categories. (For example, the TONE [1] button group contains the two categories "SYNTH" and "PAD.")
Each time you hold down the TONE button of the currently selected (lit) tone group and press the [INC/+] / [DEC/-] button, the first tone of that category will be selected.
- By holding down the [INC/+] / [DEC/-] button, you can select tones rapidly. To select tones even more rapidly, hold down one button and then press the other button as well.
Selecting the Rhythm Tone
No. 23–24 of the GUITAR/BASS group is the rhythm tone. For details, refer to the "Tone List" at the end of this manual.
Selecting a Special Tone
The Lucina AX-09 contains six "special tones" that were created specifically for it.
- Press the [SPECIAL TONE] button so it's lit.

- Press one of the TONE [1]–[6] buttons to select the desired special tone.
The names of the special tones are printed in blue characters below each tone button.

MEMO
To return to the regular tones, press the [SPECIAL TONE] button to turn it off.
Previewing Tones
With the [AUDIO PLAYER] button off, press the [PREVIEW] button; the button will light and the currently selected tone will be played using a demo phrase that's suitable for that tone.
To stop the phrase before it has finished playing, press the [PREVIEW] button once again to turn off its illumination.
Registering Frequently Used Tones in Memory (FAVORITE)
The Lucina AX-09 provides "FAVORITE memory locations" that allow you to register twelve of the tones. If you use this to register the tones that you use frequently, you'll be able to select those tones quickly and easily at any time.
Your settings for volume and reverb can also be registered along with the tone selections in the FAVORITE memory locations (p. 16).
MEMO
Only regular tones can be registered in FAVORITE memory.
Registering a tone as a FAVORITE
FAVORITE memory contains two banks, A and B; you can register six tones in each bank.
- Select the tone that you want to register in a FAVORITE memory location.
- Press the [WRITE] button to make it light.

- Press the FAVORITE [A] / [B] button to select the bank in which you want to register the favorite.

The FAVORITE button you pressed will light.
The display will indicate "R - " (bank "A") or "b - " (bank "B").
- Press one of the TONE [1]–[6] buttons to select the memory location in which you want to register the favorite tone.

The button you pressed will light, and the tone will be registered in that FAVORITE memory location. The [WRITE] button will go out.
MEMO
To return to regular tones, press the lit FAVORITE [A] / [B] button to turn off its illumination.
Recalling a FAVORITE tone
Here's how to recall a tone you've registered in FAVORITE memory.
- Press the FAVORITE [A] / [B] button to select the bank in which you registered the tone you want to recall.

The FAVORITE button you pressed will light.
- Press one of the TONE [1]–[6] buttons to select a FAVORITE memory location from the current bank.

You can also use the [INC/+]/[DEC/-] buttons to consecutively select FAVORITE memory locations in the same bank.
MEMO
To return to regular tones, press the lit FAVORITE [A] / [B] button to turn off its illumination.
Using the Performance Functions
The Lucina AX-09 provides various performance functions that can make your performance more expressive.
Raising or Lowering the Key Range by Octaves
You can raise or lower the range of the keyboard in steps of one octave, for a maximum of three octaves upward or downward.
Value
-3-3
1. Press an OCTAVE [+] / [-] button.

The display will indicate a value.
The OCTAVE [+] button will light if the octave setting is in the "+" direction; the OCTAVE [-] button will light if the octave setting is in the "-" direction.
MEMO
To return the octave setting to "0," press the OCTAVE [+] and [-] buttons simultaneously.
The OCTAVE [+] / [-] button will go out, and the keyboard will return to its normal range of pitches.
Raising or Lowering the Key Range by Semitones
You can raise or lower the range of the keyboard in steps of a semitone.
This function can be convenient when you need to play a song in an unfamiliar key signature.
Value
-5-6
1. Hold down the [TRANSPOSE] button.
The current setting will blink in the display.

2. Hold down the [TRANSPOSE] button, and press the OCTAVE [+]/[-] button to set the desired value.

3. The value will be applied when you release the [TRANSPOSE] button.
The [TRANSPOSE] button will be lit if you've specified a value other than "0."
MEMO
To return the setting to "0," hold down the [TRANSPOSE] button and press the OCTAVE [+] and [-] buttons simultaneously.
The [TRANSPOSE] button will go out, and the keyboard will return to its normal range of pitches.
Using the Touch Controller
By placing your finger on the touch controller and moving it to left or right, you can vary the pitch of the sound you're playing. Touching the left side of the controller will lower the pitch, and touching the right side will raise the pitch.
Setting the Pitch Range of the Touch Controller
By following the procedure below, you can set the range of pitches within which the pitch can be changed when you operate the Touch Controller. This setting is specified in terms of a value in semitones. For example, if you specify a value of "12," the pitch will rise by a whole octave when you touch the rightmost edge of the Touch Controller (12 semitones is equivalent to one octave).
1. While holding down [SHIFT], touch the Touch Controller.
The value currently set for the pitch range will appear, blinking, in the display.
2. Continue holding down the [SHIFT] button, and use the [INC/+]/[DEC/-] (OCTAVE [+]/[-] ) buttons to change the setting.
Value
0-24
3. Release the [SHIFT] button.
4. To save this setting, hold down the [SHIFT] button and press the [WRITE] button.
Using the Modulation Bar
You can apply vibrato by pressing the modulation bar while you play the Lucina AX-09.
MEMO
The same effect is applied to all tones. However, if you've selected 4 VIOLIN or 5 TROMBONE of the special tones, the dynamics (expression) will change in a way that's distinctive of that instrument, allowing you to play with highly realistic expressiveness.
Assigning the Modulation Bar's Effect
You can also change the assignment of the modulation bar so that it will hold notes or hold notes while applying vibrato.
1. Hold down the [SHIFT] button and press the modulation bar.
The current setting will blink in the display.
2. Continue to hold down the [SHIFT] button, and use the [INC/+]/[DEC/-] (OCTAVE [+]/[-] ) buttons to assign the desired effect.
This specifies the effect that will be applied when you operate the modulation bar.
| Value | Explanation |
| Nod (MODULATION) | Vibrato will be applied to the sounds you're playing. |
| hld (HOLD) | The sounds you're playing will be sustained while you press the modulation bar. |
| Cnb (COMBINATION) | Vibrato and Hold will both be applied to the sounds you're playing. |
MEMO
The same effect is applied to all tones. However, if you've selected 4 VIOLIN or 5 TROMBONE of the special tones, the dynamics (expression) of the instrument will be modified instead of the vibrato effect.
3. Release the [SHIFT] button.
4. To save this setting, hold down the [SHIFT] button and press the [WRITE] button.
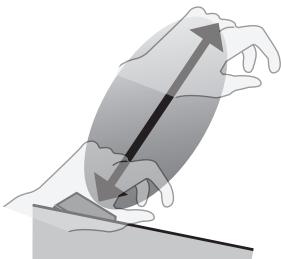
Using the D Beam Controller
By moving your hand above the D Beam controller's sensor, you can modify the sound by applying the effect you've assigned to the D Beam.
The D Beam controller's effective range
The illustration below shows the approximate effective range of the D Beam controller.
No effect will be obtained if you position your hand outside this effective range.
natural_image
Illustration of hands using a tool to lift a curved surface with an upward arrow (no text or symbols)* The usable range of D Beam controller will become extremely small when used under strong direct sunlight. Please be aware of this when using the D Beam controller outside.
1. Press one of the following buttons to select the function that you want to control using the D Beam controller.
| Button | Explanation |
| PITCH | Moving your hand above the D Beam controller will vary the pitch of the sounds you play. |
| FILTER | Moving your hand above the D Beam controller will vary the tonal character of the sounds you play.* For some tones, the change in character may be difficult to notice. |
| ASSIGNABLE | The D Beam controller will transmit the assigned function or control change message. |
2. While you play the keyboard, move your hand slowly up and down above the D Beam controller.
The button you pressed in step 1 will blink.
3. To turn off the D Beam controller, once again press the button you pressed in step 1; it will go out.
Changing the ASSIGNABLE Setting
You can assign a MIDI control change number (CC) or function to the [ASSIGNABLE] button, and use the D Beam controller to control that parameter in real time.
1. Hold down the [SHIFT] button and press [ASSIGNABLE].
The currently assigned function will blink in the display.
![ROLAND LUCINA AX-09 - Hold down the [SHIFT] button and press [ASSIGNABLE]. - 1](/content/2024/12/131001/images/c9abd411f79618e8e77417646b999e6f174f078512a206493d4f53b1ed52efe3.jpg)
2. Continue to hold down the [SHIFT] button, and use the [INC/+]/[DEC/-] (OCTAVE [+]/[-] ) button to specify the desired function or parameter that will be controlled by the D Beam controller.
| Display | Value | Explanation |
| C01 | CC01 (MODULATION) | Apply vibrato. |
| C05 | CC05 (PORTA TIME) | Control the portamento time over which the pitch changes between notes when playing with portamento. |
| C07 | CC07 (VOLUME) | Control the volume. |
| C10 | CC10 (PAN) | Control the panning. |
| C11 | CC11 (EXPRESSION) | Control the expression. |
| C64 | CC64 (HOLD) | Sustain the notes. |
| C65 | CC65 (PORTAMENTO) | Smoothly connect the pitch from one note to the next. |
| C66 | CC66 (SOSTENUTO) | Sustain the notes that are currently being held down. |
| C71 | CC71 (RESONANCE) | Control the resonance. Increasing the resonance value will produce a distinctive tonal character that is typical of a synthesizer. |
| C72 | CC72 (RELEASE TIME) | Control the time from note-off (when the key is released) until the sound is no longer heard (i.e., the release time). |
| C73 | CC73 (ATTACK TIME) | Control the sharpness (attack speed) with which the sound begins. |
| C74 | CC74 (CUTOFF) | Control the cutoff. Higher values will make the sound harder (brighter); lower values will make the sound softer (more mellow). |
| AFT | AFTERTOUCH(Default) | Apply the most suitable effect for each of the Lucina AX-09's tones. |
| Rdb | ADLIB | By fingering a chord and moving your hand above the D Beam controller, you can produce an arpeggio of that chord.The distance from the D Beam controller will determine the octave span of the chord that is played, and the speed at which you move your hand up and down will determine the speed at which the chord is arpeggiated.For example if you use your right hand to hold down the four notes “C D E G” and move your left hand above the D Beam controller, a phrase such as “C D E G C D E G C D E G...” will play. |
| SLo | SOLO SYNTH | The Lucina AX-09 will operate as a monophonic synthesizer whose pitch can be controlled by moving your hand above the D Beam controller. |
MEMO
By holding down the [INC/+]/[DEC/-] button you can choose this setting rapidly. To choose even faster, hold down the button and press the other button as well.
3. Release the [SHIFT] button.
- To save this setting, hold down the [SHIFT] button and press the [WRITE] button.
Using a Foot Pedal
If you connect a pedal switch (DP series; sold separately) to the FOOT PEDAL jack, you can hold down the pedal to make notes continue sustaining even after you release the keyboard.
Alternatively, you can use the pedal to apply numerous other effects.
Connecting a foot pedal
MEMO
Alternatively, you can connect an expression pedal (EV-5) instead of a pedal switch (DP series).
NOTE
Use only the specified expression pedal (EV-5; sold separately). By connecting any other expression pedals, you risk causing malfunction and/or damage to the unit.
Specifying the foot pedal assignment
Hold down the [SHIFT] button and press the [V-LINK] button twice; the screen will indicate "PDL," allowing you to assign the effect applied by the foot pedal.
You can assign the following functions to the pedal.
To save this setting, hold down the [SHIFT] button and press the [WRITE] button.
| Display | Value | Explanation |
| C01 | CC01 (MODULATION) | Apply vibrato. |
| C05 | CC05 (PORTA TIME) | Control the portamento time over which the pitch changes between notes when playing with portamento. |
| C07 | CC07 (VOLUME) | Control the volume. |
| C10 | CC10 (PAN) | Control the panning. |
| C11 | CC11 (EXPRESSION) | Control the expression. |
| C64 | CC64 (HOLD) | Sustain the notes. |
| C65 | CC65 (PORTAMENTO) | Smoothly connect the pitch from one note to the next. |
| C66 | CC66 (SOSTENUTO) | Sustain the notes that are currently being held down. |
| C71 | CC71 (RESONANCE) | Control the resonance. Increasing the resonance value will produce a distinctive tonal character that is typical of a synthesizer. |
| C72 | CC72 (RELEASE TIME) | Control the time from note-off (when the key is released) until the sound is no longer heard (i.e., the release time). |
| C73 | CC73 (ATTACK TIME) | Control the sharpness (attack speed) with which the sound begins. |
| C74 | CC74 (CUTOFF) | Control the cutoff. Higher values will make the sound harder (brighter); lower values will make the sound softer (more mellow). |
| AFT | AFTERTOUCH | Apply the most suitable effect for each of the Lucina AX-09's tones. |
| PUP | PEDAL UP | Select the tone of the next tone number. |
| Pdn | PEDAL DOWN | Select the tone of the preceding tone number. |
MEMO
With the factory settings, the foot pedal is assigned to £64 (Hold).
If using a foot pedal not made by Roland
If you're using a foot pedal that was made by a manufacturer other than Roland, the pedal polarity might be reversed, so that the operations that occur when you press and release the pedal are the opposite of what you expect. If so, hold down the [SHIFT] button and press the [V-LINK] button three times to make the display indicate "POL." Then use the [INC/+] / [DEC/-] (OCTAVE [+] / [-]) buttons to make the display indicate "rEu."
To save this setting, hold down the [SHIFT] button and press the [WRITE] button.
| Value | Explanation |
| Std(STANDARD) | Pedals made by Roland |
| rEu(REVERSE) | Pedals with a polarity opposite to that of Roland pedals |
Preventing Tones from Changing During Performance (Lock function)
You can lock the tone selected on the Lucina AX-09 to prevent a different sound from being selected even if you accidentally press a tone button while performing.
1. Hold down the [LOCK] button until it lights.

The Lock function will turn on; in this state, button operations will not switch the tone.
To re-enable tone switching, hold down the button once again until [LOCK] button goes out.
Playing Along with a Portable Audio Player
You can connect your portable audio player, and play the Lucina AX-09 along with your favorite songs.
1. Connect your portable audio player to the Lucina AX-09's EXT IN jack.
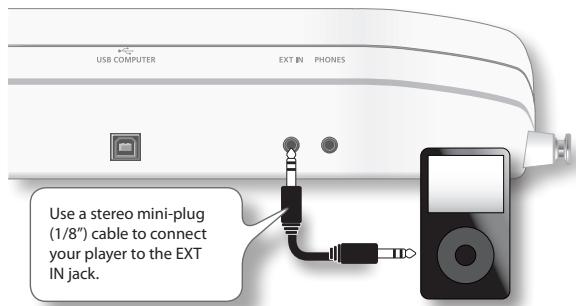
2. Play back a song on your portable audio player, and play along on the Lucina AX-09.
Use the controls of your player to adjust the volume and select songs.
* When connection cables with resistors are used, the volume level of equipment connected to the inputs (EXT IN) may be low. If this happens, use connection cables that do not contain resistors.
Playing Along with an Audio File from USB Memory
The Lucina AX-09 can play back audio files (MP3, WAV, AIFF) that you've copied to USB memory from your computer, allowing you to play along with your favorite songs.
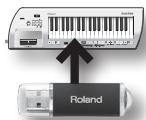
Copying audio files from your computer to USB memory
You'll need to copy the audio files from your computer to the root level of your USB memory.

Audio files that can be played
| MP3 | |
| Format | MPEG-1 audio layer 3 |
| Sampling Frequency | 44.1 kHz |
| Bit Rate | 32/40/48/56/64/80/96/112/128/160/192/224/256/320 kbps, VBR (Variable Bit Rate) |
| WAV, AIFF | |
| Sampling Frequency | 44.1 kHz |
| Bit Rate | 8/16/24 -bit |
Insert the USB memory
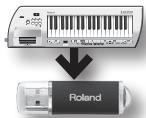
1. Insert your USB memory into the USB MEMORY slot as shown in the illustration below.
NOTE
- Never insert or remove a USB memory while this unit's power is on. Doing so may corrupt the unit's data or the data on the USB memory.
- Carefully insert the USB memory all the way in—until it is firmly in place.
- Use USB memory sold by Roland. We cannot guarantee operation if other products are used.
Play back audio files
1. Insert the USB memory containing the copied audio files into the Lucina AX-09's USB MEMORY slot.
2. Press the [AUDIO PLAYER] button.
The [AUDIO PLAYER] button will light and the [▶/Ⅱ] button will blink; now you can play back audio files from USB memory.
If you press the [AUDIO PLAYER] button once again, the button will go out; now audio files will not be played.
MEMO
The [▶/■] button will not blink if USB memory is not inserted, or if the USB memory contains no song that can be played.
3. Select a song.
When you hold down the [AUDIO PLAYER] button, the display will show the first three characters of the file name of the currently selected audio file.
Continue holding down the [AUDIO PLAYER] button, and press the [INC/+] button to jump to the next song, or press the [DEC/-] button to jump to the beginning of the song (or the preceding song if you're already at the beginning of the song).
MEMO
The songs will be ordered by their file name (in the order of numerals, uppercase letters, and lowercase letters).
4. Play or stop the song.
When you press the [▶/■] button, the button that was blinking will light, and the selected audio file will play.
If you press the [▶/■] button during playback, the lit button will blink, and playback will stop.
If you press the [▶/■] button once again, playback will resume from where it was stopped.
Switching songs during playback
During playback, you can hold down the [AUDIO PLAYER] button and press the [DEC/-] button to interrupt playback and return to the beginning of the current song. Similarly, pressing the [INC/+] button will move to the beginning of the next song, and resume playback.
MEMO
If you hold down the [AUDIO PLAYER] button and press the [DEC/–] button at the beginning of the song, you'll return to the beginning of the preceding song.
Making Audio Player Settings
- Hold down the [SHIFT] button and press the [AUDIO PLAYER] button; the current audio player setting will blink in the display.
- Continue holding down the [SHIFT] button, and press the [AUDIO PLAYER] button once again to switch parameters.
After a brief interval, the value will appear; continue holding down the [SHIFT] button, and use the [INC/+]/[DEC/-] (OCTAVE [+]/[-] ) buttons to edit the value.
| Parameter | Value | Explanation |
| LUL | 0–127 | Audio file playback volume level |
| PLY | IP (SINGLE PLAY), CP (CHAIN PLAY) | Choose whether playback will stop at the end of the selected song (SINGLE PLAY) or continue playing to the next song (CHAIN PLAY). |
- To save this setting, hold down the [SHIFT] button and press the [WRITE] button.
Editing the Tone Parameters
You can edit tone parameters such as the volume and reverb for a regular tone, and save your settings in a FAVORITE memory location (p. 10).
* You can't edit the tone parameters of a special tone.
-
Select the regular tone whose tone parameters you want to edit (p. 9).
-
Hold down the [SHIFT] button and press the TONE button of the tone you selected in step 1 (i.e., the TONE button that's lit).
The parameter name (PSB) will blink in the display, and then its value (oFF or on) will appear.
- Continue holding down the [SHIFT] button, and press the same TONE button to switch parameters.
The parameters will switch from top to bottom of the "Parameter" column in the following table.
* Don't release your finger from the [SHIFT] button while making this setting.
| Parameter | Value | Explanation |
| PSU | OFF, ON | Portamento SwitchPortamento is an effect that creates a smooth change in pitch from one note to the next. |
| PTN | 0–127 | Portamento TimeThis specifies the time over which the pitch will change when using portamento. Higher values will lengthen the time over which the pitch will reach the next note. |
| uOL | 0–127 | VolumeThis specifies the volume of the tone. |
| rEu | 0–127 | ReverbThis effect adds the reverberation that is characteristic of a performance in a large hall. Higher values produce deeper reverberation. |
| rEL | -64–63 | Release Time (*1)This adjusts the time from note-off (i.e., when you release the key) until the sound disappears. Higher values produce a longer release time. |
| RtU | -64–63 | Attack Time (*1)This adjusts the sharpness (speed) at which the sound begins. Higher values produce a more gentle attack. |
| CUT | -64–63 | Cutoff (*1)Increasing the cutoff value will make the sound harder (brighter); decreasing it will make the sound more mellow (darker). Use this parameter to make adjustments if the sound is too muffled or too bright. |
| rES | -64–63 | Resonance (*1)Increasing the resonance value will produce a distinctive tonal character that is typical of a synthesizer. If you want to emphasize the effect of resonance, it's a good idea to slightly lower the cutoff. |
*1 The values you specify here are an adjustment relative to the value assigned by each tone. If this value is set to 0, the parameter will be as specified by the tone's own settings.
- When the parameter value appears, continue holding down the [SHIFT] button and use the [INC/+]/[DEC/-] (OCTAVE [+]/[-] ) buttons to edit the value.
MEMO
- You can make the value change more quickly by holding down the [INC/+] / [DEC/-] button. If you want the value to change even faster, hold down the button and press the other button as well.
-
Even while editing the value, you can play the keyboard to hear the result.
-
Release the [SHIFT] button.
* If you select a different sound or turn off the Lucina AX-09's power in this state, the changes you made will be lost. If you want to keep your changes, you must store them in a FAVORITE memory location as follows.
- Press the [WRITE] button.
The [WRITE] button will light.
-
Press the FAVORITE [A] button or [B] button to select a bank.
-
Press one of the TONE [1]–[6] buttons to select the memory location in which you'll store the settings. When the [WRITE] button goes out, the settings have been stored.
Master Tune
This is the overall tuning setting for the entire Lucina AX-09. With the factory settings, this is set to 440 Hz. The displayed value is the frequency of the A4 key (middle "A").
Value
415.3–466.2 Hz
- Hold down the [SHIFT] button and press the [TRANSPOSE] button.
The display will indicate "πεσ," and then the current value of Master Tune will blink.
The display shows only the last three digits (the initial numeral of "4" is omitted).
- Continue holding down the [SHIFT] button, and use the [INC/+] / [DEC/-] (OCTAVE [+] / [-]) buttons to adjust the tuning value.
MEMO
- You can make the value change more quickly by holding down the [INC/+] / [DEC/-] button. If you want the value to change even faster, hold down the button and press the other button as well.
-
Even while editing the value, you can play the keyboard to hear the result.
-
Release the [SHIFT] button.
- To save this setting, hold down the [SHIFT] button and press the [WRITE] button.
Key Scale Tune
You can choose either equal temperament or an Arabian scale as the keyboard tuning.
| Value | Explanation |
| E9L (EQUAL) | Equal temperament |
| Arb (ARABIC) | Arabian scale |
- Hold down the [SHIFT] button and press the [TRANSPOSE] button twice.
The display will indicate "EY"; then the current setting of Key Scale Tune will blink. - Continue holding down the [SHIFT] button, and use the [INC/+]/[DEC/-] (OCTAVE [+]/[-] ) buttons to choose the desired value for Key Scale Tune.
MEMO
Even while editing the value, you can play the keyboard to hear the result.
- Release the [SHIFT] button.
- To save this setting, hold down the [SHIFT] button and press the [WRITE] button.
Adjusting the Keyboard's Touch Sensitivity
Setting a Fixed Value for the Keyboard's Velocity
In order to play using notes that all have a uniform level (velocity), regardless of the amount of force you use when pressing keys, carry out the following procedure.
- Hold down the [SHIFT] button and press the [V-LINK] button once.
The display will indicate "UEL," and then the value of the current setting will appear.
- Continue holding down the [SHIFT] button, and use the [INC/+]/[DEC/-] (OCTAVE [+]/[-] ) buttons to change the setting.
| Value | Explanation |
| r^AL (REAL) | Notes reflecting the actual amount of force you use when pressing keys will be output. |
| 1–127 | Notes having the specified velocity value will be output, regardless of the amount of force you use when pressing keys. |
- Release the [SHIFT] button.
- To save this setting, hold down the [SHIFT] button and press the [WRITE] button.
"Count in" refers to a feature that counts you in to the beginning of the performance. To have a two-measure count in be sounded, press the modulation bar while you press the [PREVIEW] button.
Note that, if you wish, you can have a metronome be sounded instead—simply change the Count Mode to r (METRONOME) using the setting below. The metronome will continue to sound until you press the [PREVIEW] button a second time.
* A count in will not be sounded when the [AUDIO PLAYER] button is lighted.
Count In Settings
-
Hold down the [SHIFT] button and press the [PREVIEW] button; the current count in setting will blink in the display.
-
Continue holding down the [SHIFT] button, and press the [PREVIEW] button once again to switch parameters.
After a brief interval, the value will appear; continue holding down the [SHIFT] button, and use the [INC/+]/[DEC/-] (OCTAVE [+]/[-] ) buttons to edit the value.
| Parameter | Value | Explanation |
| Cnt | _OFF (OFF),Cn(COUNT IN),Ntr(METRONOME) | Count modeDetermines whether count in or metronome will sound |
| bPN | 20–250 | Tempo of count |
| bAt | 0.4, 2.4, 3.4, 4.4, 5.4, 6.4, 7.4 | Time signature of count (2.4 indicates 2/4 time) |
| Lul | 0–10 | Volume of count |
| Typ | 1 (Electronic metronome)2 (Mechanical metronome)3 (Pulse)4 (Beep)5 (Cowbell)6 (Stick) | Sound used for count |
- To save this setting, hold down the [SHIFT] button and press the [WRITE] button.
MEMO
To have the tempo of the count be shown in the display, hold down the [PREVIEW] button. While in this state, you can set a new tempo by tapping the [SHIFT] button at least four times at the desired tempo; or you can set it using the [INC/+] and [DEC/-] buttons.
Various Settings (Utility)
Checking the Lucina AX-09's Version
Here's how to check the Lucina AX-09's version.
- While holding down the FAVORITE [A], [B], and [WRITE] buttons simultaneously, turn on the Lucina AX-09's power.
The display will indicate "UEL"; the Lucina AX-09 will be in Utility mode.
- Press the TONE [1] button.
The display will indicate the version of your Lucina AX-09.
If you want to continue playing the Lucina AX-09, turn off the power and wait several seconds before turning it on again.
USB Driver Settings
When using a USB cable to connect the Lucina AX-09 to your computer, you can choose whether to use the standard USB driver that's provided by your computer or the USB driver provided by Roland.

MEMO
For details on connecting the Lucina AX-09 to your computer via USB, refer to "Connecting to Your Computer via USB" (p. 21).
- While holding down the FAVORITE [A], [B], and [WRITE] buttons simultaneously, turn on the Lucina AX-09's power.
The display will indicate "UEL"; the Lucina AX-09 will be in Utility mode.
- Press the TONE [2] button.
The display will indicate "dr u"; then the current value is shown and the [WRITE] button will blink.
- Use the [INC/+] / [DEC/-] buttons to choose the desired setting.
| Value | Explanation |
| GEN (GENERIC)(Default) | Choose this if you're using the standard USB driver provided by your computer.Normally you'll use this mode. |
| und (VENDOR) | Choose this if you're using the USB driver downloaded from the Roland website. |
-
Press the [WRITE] button to save the setting.
-
Turn the Lucina AX-09's power off, then on again.
Now you'll be able to use the USB driver you choose.
Backing Up Lucina AX-09 Settings to USB Memory
Here's how to back up your Lucina AX-09 settings and the tone settings in FAVORITE memory (p. 16) to USB memory (sold separately).
- Insert your USB memory into the USB MEMORY slot (p. 15).
- While holding down the FAVORITE [A], [B], and [WRITE] buttons simultaneously, turn on the Lucina AX-09's power.
The display will indicate "UEL"; the Lucina AX-09 will be in Utility mode.
- Press TONE [3] button.
The display will indicate "BUP" and the [WRITE] button will blink.
- Press the [WRITE] button.
The backup will begin.
- When the display indicates "dnE," turn the Lucina AX-09's power off, then on again.
MEMO
If USB memory is not inserted in the Lucina AX-09 when you press the [WRITE] button, the display will indicate "Err."
Restoring Lucina AX-09 Settings from USB Memory
Here's how settings you saved as described in "Backing Up Lucina AX-09 Settings to USB Memory" (p. 19) can be restored to the Lucina AX-09.
- Insert the USB memory containing the backed up settings into the USB MEMORY slot (p. 15).
- While holding down the FAVORITE [A], [B], and [WRITE] buttons, turn on the Lucina AX-09's power.
The display will indicate "UEL"; the Lucina AX-09 will be in Utility mode.
- Press the TONE [4] button.
The display will indicate "r5" and the [WRITE] button will blink.
- Press the [WRITE] button.
The [WRITE] button will light, and the restore operation will begin.
- When the display indicates "dnE," turn the Lucina AX-09's power off, then on again.
MEMO
If USB memory is not inserted in the Lucina AX-09 when you press the [WRITE] button, or if backup data does not exist in the appropriate location of the USB memory, the display will indicate "E r r."
Restoring the Factory Settings (Factory Reset)
Here's how to return the Lucina AX-09 to its factory-set state.
NOTE
- When you execute this operation, all settings you've modified since purchasing the Lucina AX-09, including the tone settings you've stored in FAVORITES, will be lost.
-
If you want to keep your settings, be sure to back them up to USB memory before you execute the factory reset.
"Backing Up Lucina AX-09 Settings to USB Memory" (p. 19) -
While holding down the FAVORITE [A], [B], and [WRITE] buttons, turn on the Lucina AX-09's power.
The display will indicate "UEL"; the Lucina AX-09 will be in Utility mode.
- Press the TONE [5] button.
The display will indicate "F E," and the [WRITE] button will blink.
- Press the [WRITE] button.
The [WRITE] button will light, and the factory reset will begin.
NOTE
While the [WRITE] button is lit, the factory reset is being executed. Never turn off the power during this time. The Lucina AX-09 may malfunction if you do so.
- When the display indicates "dnE," turn the Lucina AX-09's power off, then on again.
Controlling MIDI Devices
If you're using the Lucina AX-09 by itself, there's no need for you to have a detailed understanding of MIDI. The following explanation of MIDI is provided for those who wish to connect the Lucina AX-09 to other MIDI devices and control them.
MEMO
MIDI stands for Musical Instrument Digital Interface, and is a global standard that allows electronic musical instruments and computers to exchange performance data.
"MIDI Implementation Chart" (p. 26) is a chart that provides an easy way of checking which MIDI messages the Lucina AX-09 is able to receive. By comparing the MIDI implementation charts of the Lucina AX-09 and some other MIDI device, you can see which messages are compatible between the two devices.
MIDI Messages that can be Transmitted and Received
The Lucina AX-09 can transmit and receive the following MIDI messages.
MEMO
The Lucina AX-09 always receives MIDI messages from the USB COMPUTER connector.
| MIDI message | Explanation | |
| Note On/Off (*1) | Transmission | Key on/off messages |
| Velocity | Transmission | Strength with which you play the key |
| Aftertouch | Transmission | Channel aftertouch messages transmitted by the D Beam [ASSIGNABLE] button assigned to “RFT” or by the PEDAL. (This message is not transmitted by the keyboard.) |
| Receive | Channel aftertouch, polyphonic aftertouch.Cannot be specified from the Lucina AX-09 | |
| Program Change | Transmission | |
| Bank Select (*2) | Transmission | Cannot be specified from the Lucina AX-09 |
| Modulation | CC01, transmission: MODULATION BAR | |
| CC01 (Modulation) | Transmission | Control change number assigned to the D Beam [ASSIGNABLE] button or to the PEDAL |
| CC05 (Porta-Time) | ||
| CC07 (Volume) | ||
| CC10 (Panpot) | ||
| CC11 (Expression) | ||
| CC64 (Hold) | ||
| CC65 (Porta-Sw) | ||
| CC66 (Sostenute) | ||
| CC71 (Resonance) | ||
| CC72 (ReleaseTime) | ||
| CC73 (AttackTime) | ||
| CC74 (Cutoff) | ||
*1 Local control is always on. It cannot be turned off. If you want to control a connected external sound module without playing the Lucina AX-09's own sounds, you can either disconnect the Lucina AX-09's OUTPUT jacks, lower the Lucina AX-09's volume, or lower the volume of the connected amp or mixer.
*2 The transmitted program change number and bank select data (CC00, CC32) cannot be specified from the Lucina AX-09, but when you select an internal tone, that tone's program change number and bank select data (CC00, CC32; see the "Tone List" at the end of this manual) will be transmitted according to the MIDI settings (p. 20).
Connecting a MIDI Sound Module
1. Use a MIDI cable to connect the Lucina AX-09's MIDI OUT connector to the MIDI IN connector of the MIDI sound module you want to control.
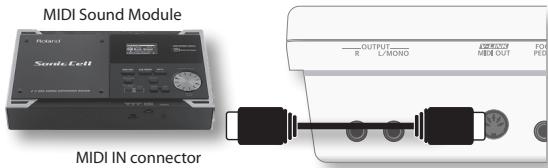
As necessary, connect an amp or speakers to the MIDI sound module or synthesizer you're using. For details, refer to the owner's manual of the sound module (or other device) you're using.
Making MIDI-related Settings
- Hold down the [SHIFT] button and press the [V-LINK] button the appropriate number of times to access the desired MIDI setting; four times for "Ch," five times for "bnE," or six times for "P".
- Continue holding down the [SHIFT] button, and use the [INC/+] / [DEC/-] (OCTAVE [+] / [-]) buttons to edit the setting.
| Parameter | Value | Explanation |
| Ch | 1–16(Default: 1) | MIDI channel setting |
| bnE | OFF, ON(Default: OFF) | Specifies whether MSB/LSB will be transmitted |
| PC | OFF, ON(Default: ON) | Specifies whether program change data will be transmitted |
-
Release the [SHIFT] button.
-
To save this setting, hold down the [SHIFT] button and press the [WRITE] button.
Connecting to Your Computer via USB
If you use a commercially available USB cable to connect the Lucina AX-09's rear panel USB COMPUTER connector to a USB connector of your computer, you'll be able to do the following things using MIDI.
- Play your software synthesizers by performing the Lucina AX-09.
- Record into your sequencer software by performing the Lucina AX-09.
- Use your sequencer software to play the Lucina AX-09.

* For details on operating requirements, refer to the Roland website.
Roland website
Here you can download the original driver, and view installation instructions and operating requirements.
http://www.roland.com/
NOTE
- Only MIDI data can be transmitted or received via USB.
- Power-on the Lucina AX-09 before starting the MIDI application on your computer. Do not turn the Lucina AX-09's power on or off while your MIDI application is running.
USB driver settings
Normally it will not be necessary to install a USB driver in your computer. However if you experience problems with the computer connection (if a malfunction occurs, or if the performance is poor), you may be able to solve the problem by downloading and installing Roland's original driver as described below.
- As described in "USB Driver Settings" (p. 18), change the driver setting to "und" (Vendor).
- Turn the Lucina AX-09's power off, and then on again.
- Download and install the original Roland driver.
For details on downloading and installing the original Roland driver, refer to the Roland website.
Controlling Video (V-LINK)
V-LINK (V-LINK) is a function that allows music and images to be performed together. By using MIDI to connect two or more V-LINK compatible devices, you can easily enjoy performing a wide range of visual effects that are linked to the expressive elements of a music performance.
For example, if you use the Lucina AX-09 in conjunction with the EDIROL P-10, you'll be able to do the following.
- You can use the Lucina AX-09's keyboard to switch images on the P-10.
- You can use the Lucina AX-09's touch controller to control the speed of image playback.
This example shows the Lucina AX-09 connected to an EDIROL P-10.
Use a MIDI cable to connect the Lucina AX-09's MIDI OUT connector to the EDIROL P-10's MIDI IN connector.

* You can't perform V-LINK communication via USB.
Turning V-LINK On
1. Press the [V-LINK] button to make it light.
Operations on the Lucina AX-09
V-LINK data is transmitted on MIDI channel 15. The following functions can be controlled from the Lucina AX-09.
| Controller | Explanation |
| Keyboard(the far-left octave) | Switch images.* Normally, the keyboard will sound at the same time that the clip is switched. If you don't want the keyboard to sound, change the Local Switch setting to "OFF." |
| Touch Controller | Control the playback speed.* However, the touch controller will also transmit pitch bend data at the same time. |
Local switch settings
- Hold down the [SHIFT] button and press the [V-LINK] button seven times.
The display will indicate "L [L]," and then the value of the current setting will appear.
- Continue holding down the [SHIFT] button, and use the [INC/+]/[DEC/-] (OCTAVE [+]/[-] ) buttons to change the setting.
| Value | Explanation |
| on | When V-LINK is on, the leftmost octave of the keyboard will sound. |
| off | When V-LINK is on, the leftmost octave of the keyboard will not sound. |
* This setting is not saved. It will always be ON when the Lucina AX-09 starts up.
| Problem | Items to check | Action |
| Power won't turn on | Are the included AC adaptor and power cord correctly connected to an AC outlet and to the Lucina AX-09? | Do not use any AC adaptor or power cord other than those supplied with the Lucina AX-09. Doing so may cause malfunctions (p. 7). |
| Could the batteries have run low? | Check the remaining battery power (p. 6). | |
| Are the batteries inserted in the correct orientation? | Open the battery compartment, and verify that the batteries are oriented correctly (p. 6). | |
| Three dots are blinking in the display | Battery power has run low. | Replace the batteries as soon as possible (p. 6). |
| No sound | Is the connected amp or speaker turned on? | Turn on the power of the connected amp or speaker. |
| Could the volume of the connected equipment be lowered? | Adjust the volume of the connected equipment. | |
| Could the [VOLUME] knob be set to the minimum level? | Adjust the [VOLUME] knob. | |
| Are the connections correct? | Make the correct connections (p. 8). | |
| Do you hear sound when you connect headphones? | If you hear sound in the headphones, it may be that the connection cable is broken, or that your amp or mixer has malfunctioned. Check your connection cable and equipment once again. | |
| Could the volume have been lowered by pedal operations, D Beam controller operations, or by MIDI messages (volume messages or expression messages) received from an external MIDI device? | Press the pedal, move your hand above the D Beam controller, or check the controller settings. | |
| Could you have selected a FAVORITE memory location whose volume level is set to "0"? | Increase the volume level (p. 16). | |
| Could you be using a connection cable that has a built-in resistor? | Use a connection cable that does not have a built-in resistor (such as one from the Roland PCS series). | |
| No sound from an external MIDI device | Does the Lucina AX-09's MIDI transmit channel match the connected device's MIDI receive channel? | Set the Lucina AX-09's transmit channel to match the connected device's receive channel (p. 20). |
| The volume level of the instrument connected to EXT IN jack is too low | Could you be using a connection cable that contains a resistor? | Use a connection cable that does not contain a resistor. |
| Something is wrong with the pitch | For some tones, pitches in a certain range may sound different than the pitch of other tones. | |
| It may be that the pitch was changed when you touched the touch controller, or when pitch bend messages were received from an external MIDI device. | ||
| Could the Lucina AX-09's tuning be set inappropriately? | Check the master tune setting and the key scale tune setting (p. 17). | |
| Can't play back audio files from USB memory | Audio files of a sample rate other than 44.1 kHz cannot be played by the Lucina AX-09. | Please use audio files whose sample rate is 44.1 kHz. |
| It may be that the audio file is of a file type that cannot be played by the Lucina AX-09. | Use an audio file of a type listed in "Audio files that can be played" (p. 15). | |
| It may be that the audio file is damaged. | Check the audio file. | |
| USB memory is not recognized/Files are not shown | Check the format of the USB memory. The Lucina AX-09 can use USB memory that is formatted as FAT. (Normally, USB memory you purchase will be formatted as FAT, and can be used without reformatting.) USB memory that was formatted by a computer with a file system other than FAT (for example, as NTFS) will not be recognized by the Lucina AX-09. | Use your computer to format the USB memory as FAT. (The Lucina AX-09 is not able to format USB memory.)In Computer (or My Computer), right-click the USB drive, choose "Format," and choose "FAT" as the file system to format the drive as FAT. For more about how to format USB memory, refer to your computer's owner's manual. |
| Can't back up to USB memory | Could the USB memory be write protected? | Turn off the write-protect setting. |
| Is there sufficient free space on the USB memory? | Use USB memory that has sufficient free space. | |
| Check the format of the USB memory. The Lucina AX-09 can use USB memory that is formatted as FAT. | (Refer to the item "USB memory is not recognized/ Files are not shown.") | |
Lucina AX-09: Synthesizer
| Keyboard | 37 Keys (with velocity) | |
| Sound Generator Section | ||
| Maximum Polyphony | 128 Voices | |
| Parts | 1 Part | |
| Tones | 150 Tones (Regular Tones 144, Special Tones: 6) | |
| Audio Player Section (playable formats) | ||
| MP3 | Format | MPEG-1 audio layer 3 |
| Sampling Frequency | 44.1 kHz | |
| Bit Rate | 32/40/48/56/64/80/96/112/128/160/192/224/256/320 kbps,VBR (Variable Bit Rate) | |
| WAV, AIFF | Sampling Frequency | 44.1 kHz |
| Bit Depth | 8/16/24 -bit | |
| Others | ||
| Controllers | D Beam ControllerModulation BarTouch Controller | |
| Connectors | OUTPUT Jacks (L (MONO), R) (1/4 inch phone type)PHONES Jack (Stereo 1/4 inch phone type)EXT IN Jack (Stereo mini type)FOOT PEDAL Jack (Assignable)USB COMPUTER Connector (for USB MIDI)USB MEMORY SlotMIDI OUT Connector (V-LINK)DC IN jack | |
| Display | 7 segments, 3 characters (LED) | |
| Power Supply | AC AdaptorNi-MH AA SIZE Rechargeable Battery x 8* Batteries sold separately.* Do not use alkaline batteries or zinc-carbon batteries. |
| Current Draw | 600 mA |
| Battery Life for Continuous Use | Ni-MH Rechargeable batteries: approximately 4 hours (This figure will vary depending on the actual conditions of use.) |
| Dimensions | 832 (W) x 245 (D) x 95 (H) mm32-13/16 (W) x 9-11/16 (D) x 3-3/4 (H) inches |
| Weight | 3.7 kg8 lbs 3 oz(Excluding AC Adaptor) |
| Accessories | Owner's Manual, Quick GuideTutorial DVDStrappanel StickerUSB MEMORY Connector CapAC adaptor (PSB-1U (S)) |
| Options | Pedal Switch: DP SeriesExpression Pedal: EV-5USB Memory* Use USB memory sold by Roland. We cannot guarantee operation if other products are used. |
* In the interest of product improvement, the specifications and/or appearance of this unit are subject to change without prior notice.
Error Message List
| Message | Description | |
| ENP | Empty | The USB memory does not contain the necessary data. |
| Err | Error | Can't access USB memory. Make sure that the USB memory is inserted. |
| FUL | Memory Full | Processing could not be carried out because there is insufficient free space on the USB memory. |
INSTRUCTIONS FOR THE PREVENTION OF FIRE, ELECTRIC SHOCK, OR INJURY TO PERSONS
About ⚠️ WARNING and ⚠️ CAUTION Notices
| WARNING | Used for instructions intended to alert the user to the risk of death or severe injury should the unit be used improperly. |
| CAUTION | Used for instructions intended to alert the user to the risk of injury or material damage should the unit be used improperly.* Material damage refers to damage or other adverse effects caused with respect to the home and all its furnishings, as well to domestic animals or pets. |
About the Symbols
| The △ symbol alerts the user to important instructions or warnings. The specific meaning of the symbol is determined by the design contained within the triangle. In the case of the symbol at left, it is used for general cautions, warnings, or alerts to danger. | |
| The 🔒 symbol alerts the user to items that must never be carried out (are forbidden). The specific thing that must not be done is indicated by the design contained within the circle. In the case of the symbol at left, it means that the unit must never be disassembled. | |
| The ● symbol alerts the user to things that must be carried out. The specific thing that must be done is indicated by the design contained within the circle. In the case of the symbol at left, it means that the power-cord plug must be unplugged from the outlet. |
ALWAYS OBSERVE THE FOLLOWING
WARNING
Do not open (or modify in any way) the unit or its AC adaptor.

Do not attempt to repair the unit, or replace parts within it (except when this manual provides specific instructions directing you to do so). Refer all servicing to your retailer, the nearest Roland Service Center, or an authorized Roland distributor, as listed on the "Information" page.

Never install the unit in any of the following locations.
- Subject to temperature extremes (e.g., direct sunlight in an enclosed vehicle, near a heating duct, on top of heat-generating equipment); or are
- Damp (e.g., baths, washrooms, on wet floors); or are
- Exposed to steam or smoke; or are
- Subject to salt exposure; or are
- Humid; or are
- Exposed to rain; or are
- Dusty or sandy; or are
- Subject to high levels of vibration and shakiness.
If you're using the Lucina AX-09 without a shoulder strap, make sure you always place it so it's level and sure to remain stable. Never place it on stands that could wobble, or on inclined surfaces.


Be sure to use only the AC adaptor supplied with the unit. Also, make sure the line voltage at the installation matches the input voltage specified on the AC adaptor's body. Other AC adaptors may use a different polarity, or be designed for a different voltage, so their use could result in damage, malfunction, or electric shock.

Use only the attached power-supply cord. Also, the supplied power cord must not be used with any other device.

Do not excessively twist or bend the power cord, nor place heavy objects on it. Doing so can damage the cord, producing severed elements and short circuits. Damaged cords are fire and shock hazards!

This unit, either alone or in combination with an amplifier and headphones or speakers, may be capable of producing sound levels that could cause permanent hearing loss. Do not operate for a long period of time at a high volume level, or at a level that is uncomfortable. If you experience any hearing loss or ringing in the ears, you should immediately stop using the unit, and consult an audiologist.

Do not allow any objects (e.g., flammable material, coins, pins); or liquids of any kind (water, soft drinks, etc.) to penetrate the unit.


WARNING
Immediately turn the power off, remove the AC adaptor from the outlet, and request servicing by your retailer, the nearest Roland Service Center, or an authorized Roland distributor, as listed on the "Information" page when:
- The AC adaptor, the power-supply cord, or the plug has been damaged; or
• If smoke or unusual odor occurs - Objects have fallen into, or liquid has been spilled onto the unit; or
- The unit has been exposed to rain (or otherwise has become wet); or
- The unit does not appear to operate normally or exhibits a marked change in performance.
In households with small children, an adult should provide supervision until the child is capable of following all the rules essential for the safe operation of the unit.
Protect the unit from strong impact. (Do not drop it!)
Do not force the unit's power-supply cord to share an outlet with an unreasonable number of other devices. Be especially careful when using extension cords—the total power used by all devices you have connected to the extension cord's outlet must never exceed the power rating (watts/amperes) for the extension cord. Excessive loads can cause the insulation on the cord to heat up and eventually melt through.
Before using the unit in a foreign country, consult with your retailer, the nearest Roland Service Center, or an authorized Roland distributor, as listed on the "Information" page.
Batteries must never be recharged, heated, taken apart, or thrown into fire or water.


CAUTION
The unit and the AC adaptor should be located so their location or position does not interfere with their proper ventilation.
Always grasp only the plug on the AC adaptor cord when plugging into, or unplugging from, an outlet or this unit.
At regular intervals, you should unplug the AC adaptor and clean it by using a dry cloth to wipe all dust and other accumulations away from its prongs. Also, disconnect the power plug from the power outlet whenever the unit is to remain unused for an extended period of time. Any accumulation of dust between the power plug and the power outlet can result in poor insulation and lead to fire.


CAUTION
Try to prevent cords and cables from becoming entangled. Also, all cords and cables should be placed so they are out of the reach of children.

Never climb on top of, nor place heavy objects on the unit.

Never handle the AC adaptor or its plugs with wet hands when plugging into, or unplugging from, an outlet or this unit.

Before moving the unit, disconnect the AC adaptor and all cords coming from external devices.

Before cleaning the unit, turn off the power and unplug the AC adaptor from the outlet (p. 7).

Whenever you suspect the possibility of lightning in your area, disconnect the AC adaptor from the outlet.

If used improperly, batteries may explode or leak and cause damage or injury. In the interest of safety, please read and observe the following precautions (p. 6).
- Carefully follow the installation instructions for batteries, and make sure you observe the correct polarity.
- Avoid using new batteries together with used ones. In addition, avoid mixing different types of batteries.
- Remove the batteries whenever the unit is to remain unused for an extended period of time.
- If a battery has leaked, use a soft piece of cloth or paper towel to wipe all remnants of the discharge from the battery compartment. Then install new batteries. To avoid inflammation of the skin, make sure that none of the battery discharge gets onto your hands or skin. Exercise the utmost caution so that none of the discharge gets near your eyes. Immediately rinse the affected area with running water if any of the discharge has entered the eyes.
- Never keep batteries together with metallic objects such as ballpoint pens, necklaces, hairpins, etc.
Used batteries must be disposed of in compliance with whatever regulations for their safe disposal that may be observed in the region in which you live.


Keep the USB MEMORY connector cap you may remove and the included USB MEMORY connector cap in a safe place out of children's reach, so there is no chance of them being swallowed accidentally.


Power Supply: Use of Batteries
- Do not connect this unit to same electrical outlet that is being used by an electrical appliance that is controlled by an inverter (such as a refrigerator, washing machine, microwave oven, or air conditioner), or that contains a motor. Depending on the way in which the electrical appliance is used, power supply noise may cause this unit to malfunction or may produce audible noise. If it is not practical to use a separate electrical outlet, connect a power supply noise filter between this unit and the electrical outlet.
- The AC adaptor will begin to generate heat after long hours of consecutive use. This is normal, and is not a cause for concern.
- The use of an AC adaptor is recommended as the unit's power consumption is relatively high. Should you prefer to use batteries, please use the nickel hydrogen type.
- When installing or replacing batteries, always turn off the power on this unit and disconnect any other devices you may have connected. This way, you can prevent malfunction and/or damage to speakers or other devices.
- Before connecting this unit to other devices, turn off the power to all units. This will help prevent malfunctions and/or damage to speakers or other devices.
- If batteries are installed, disconnecting or reconnecting the power cord at the AC outlet or disconnecting the DC plug from the Lucina AX-09's rear panel while the power is on will cause the power to turn off. You must turn off the power before you connect or disconnect the power cord or AC adaptor.
Placement
- Using the unit near power amplifiers (or other equipment containing large power transformers) may induce hum. To alleviate the problem, change the orientation of this unit; or move it farther away from the source of interference.
- This device may interfere with radio and television reception. Do not use this device in the vicinity of such receivers.
- Noise may be produced if wireless communications devices, such as cell phones, are operated in the vicinity of this unit. Such noise could occur when receiving or initiating a call, or while conversing. Should you experience such problems, you should relocate such wireless devices so they are at a greater distance from this unit, or switch them off.
- Do not expose the unit to direct sunlight, place it near devices that radiate heat, leave it inside an enclosed vehicle, or otherwise subject it to temperature extremes. Excessive heat can deform or discolor the unit.
- When moved from one location to another where the temperature and/or humidity is very different, water droplets (condensation) may form inside the unit. Damage or malfunction may result if you attempt to use the unit in this condition. Therefore, before using the unit, you must allow it to stand for several hours, until the condensation has completely evaporated.
- Do not allow objects to remain on top of the keyboard. This can be the cause of malfunction, such as keys ceasing to produce sound.
- Depending on the material and temperature of the surface on which you place the unit, its rubber feet may discolor or mar the surface. You can place a piece of felt or cloth under the rubber feet to prevent this from happening. If you do so, please make sure that the unit will not slip or move accidentally.
Maintenance
- For everyday cleaning wipe the unit with a soft, dry cloth or one that has been slightly dampened with water. To remove stubborn dirt, use a cloth impregnated with a mild, non-abrasive detergent. Afterwards, be sure to wipe the unit thoroughly with a soft, dry cloth.
- Never use benzine, thinners, alcohol or solvents of any kind, to avoid the possibility of discoloration and/or deformation.
Repairs and Data
- Please be aware that all data contained in the unit's memory may be lost when the unit is sent for repairs. Important data should always be backed up the USB memory, or written down on paper (when possible). During repairs, due care is taken to avoid the loss of data. However, in certain cases (such as when circuitry related to memory itself is out of order), we regret that it may not be possible to restore the data, and Roland assumes no liability concerning such loss of data.
Using USB Memories
- Carefully insert the USB memory all the way in-until it is firmly in place.
- Never touch the terminals of the USB memory. Also, avoid getting the terminals dirty.
- USB memories are constructed using precision components; handle the cards carefully, paying particular note to the following.
• To prevent damage to the cards from static electricity, be sure to discharge any static electricity from your own body before handling the cards.
- Do not touch or allow metal to come into contact with the contact portion of the cards.
- Do not bend, drop, or subject cards to strong shock or vibration.
- Do not keep cards in direct sunlight, in closed vehicles, or other such locations.
- Do not allow cards to become wet.
- Do not disassemble or modify the cards.
Handling DVDs
- Avoid touching or scratching the shiny underside (encoded surface) of the disc. Damaged or dirty DVD discs may not be read properly. Keep your discs clean using a commercially available disk cleaner.
Strap Holder Precautions
- Never unscrew the strap pins to avoid damaging the Lucina AX-09's plastic housing, which eventually compromises overall stability and safety.
- To avoid dropping the unit and damaging it or causing injuries to yourself or other people, be sure to double-check whether the supplied strap is securely attached to the two pins before using the Lucina AX-09.
- Roland recommends installing commercially available strap locks for guitar to guard against damage and injuries caused by the strap coming loose while your are playing.
Additional Precautions
- Please be aware that the contents of memory can be irretrievably lost as a result of a malfunction, or the improper operation of the unit. To protect yourself against the risk of loosing important data, we recommend that you periodically save a backup copy of important data you have stored in the USB memory.
- Unfortunately, it may be impossible to restore the contents of data that was stored on a USB memory or the internal memory once it has been lost. Roland Corporation assumes no liability concerning such loss of data.
- Use a reasonable amount of care when using the unit's buttons, sliders, or other controls; and when using its jacks and connectors. Rough handling can lead to malfunctions.
- Never strike or apply strong pressure to the display.
- When connecting / disconnecting all cables, grasp the connector itself-never pull on the cable. This way you will avoid causing shorts, or damage to the cable's internal elements.
-
To avoid disturbing your neighbors, try to keep the unit's volume at reasonable levels. You may prefer to use headphones, so you do not need to be concerned about those around you (especially when it is late at night).
-
When you need to transport the unit, package it in the box (including padding) that it came in, if possible. Otherwise, you will need to use equivalent packaging materials.
- Use only the specified expression pedal (EV-5; sold separately). By connecting any other expression pedals, you risk causing malfunction and/or damage to the unit.
- Some connection cables contain resistors. Do not use cables that incorporate resistors for connecting to this unit. The use of such cables can cause the sound level to be extremely low, or impossible to hear. For information on cable specifications, contact the manufacturer of the cable.
- The usable range of D Beam controller will become extremely small when used under strong direct sunlight. Please be aware of this when using the D Beam controller outside.
-
The explanations in this manual include illustrations that depict what should typically be shown by the display. Note, however, that your unit may incorporate a newer, enhanced version of the system (e.g., includes newer sounds), so what you actually see in the display may not always match what appears in the manual.
-
Microsoft and Windows are registered trademarks of Microsoft Corporation.
- Windows® is known officially as: "Microsoft® Windows® operating system."
- MMP (Moore Microprocessor Portfolio) refers to a patent portfolio concerned with microprocessor architecture, which was developed by Technology Properties Limited (TPL). Roland has licensed this technology from the TPL Group.
- MPEG Layer-3 audio compression technology is licensed from Fraunhofer IIS Corporation and THOMSON Multimedia Corporation.
- MatrixQuest™ 2010 TEPCO UQUEST, LTD. All rights reserved.
The Lucina AX-09's USB functionality uses MatrixQuest middleware technology from TEPCO UQUEST, LTD.
- Featuring digital fonts by Youname, Inc. Digital font: Copyright © Yourname, Inc.
- Roland and Lucina are either registered trademarks or trademarks of Roland Corporation in the United States and/or other countries.
- All product names mentioned in this document are trademarks or registered trademarks of their respective owners.
A
AC ADAPTOR.... 7
ADLIB 13
AFTERTOUCH.... 13, 14
AIFF 15
ARABIAN SCALE.... 17
ASSIGNABLE.... 12
ATTACK TIME 13, 14, 16
AUDIO FILE.... 14
AUDIO PLAYER 15
[AUDIO PLAYER] BUTTON.... 15
B
BACKING UP.... 19
BATTERIES.... 6
BATTERY COMPARTMENT...... 6
C
COMPUTER.... 21
CORD HOOK.... 7
COUNT IN 18
CUTOFF 13, 14, 16
D
D BEAM CONTROLLER.... 12
DC IN JACK 7
E
EQUAL TEMPERAMENT ..... 17
ERROR MESSAGE LIST 23
EXPRESSION.... 12, 13
EXPRESSION PEDAL 13
EXT IN JACK 14
F
FACTORY RESET 19
FAVORITE....10
FAVORITE [A] / [B] BUTTON ..... 10
FILTER.... 12
FOOT PEDAL 13,14
FOOT PEDAL JACK.... 13
H
HEADPHONES 8
HOLD 12,13
|
[INC/+] / [DEC/-] BUTTONS ..... 9
K
KEY SCALE TUNE 17
L
LETTERS.... 2
L/MONO JACK.... 8
[LOCK] BUTTON 14
LOCK FUNCTION 14
M
MASTER TUNE 17
METRONOME.... 18
MIDI....20
MIDI IMPLEMENTATION CHART.... 26
MODULATION 12, 13
MODULATION BAR 11
MP3 15
N
NI-MH AA RECHARGEABLE BATTERIES 6
O
OCTAVE [+] / [-] BUTTON ..... 11
OUTPUT JACKS 8
P
PAN 12,13
PEDAL DOWN 14
PEDAL SWITCH 13
PEDAL UP 14
PHONES JACK 8
PITCH 12
PORTABLE AUDIO PLAYER ..... 14
PORTAMENTO.... 12, 13, 16
RESONANCE.... 13, 14, 16
RESTORING.... 19
REVERB.... 16
S
SECURITY SLOT.... 5
SOLO SYNTH 13
SOSTENUTO.... 13
SPEAKERS 8
SPECIAL TONE 9
[SPECIAL TONE] BUTTON 9
SPECIFICATIONS.... 23
STRAP 7
STRAP PIN....7
T
TONE....9
TONE [1]–[6] BUTTONS ..... 9
TONE PARAMETERS.... 16
TONE SETTINGS 16
TROUBLESHOOTING.... 22
TUNING 17
U
USB COMPUTER CONNECTOR ..... 21
USB DRIVER 18,21
USB MEMORY 15,19
USB MEMORY SLOT.... 15
UTILITY.... 18
V
VERSION 18
V-LINK....21
VOLUME.... 12, 13, 16
[VOLUME] KNOB.... 8
W
WAV....15
[WRITE] BUTTON 10,18
MIDI Implementation Chart
Synthesizer
Lucina AX-09
Date: Jan. 1, 2010
Version : 1.00
natural_image
Close-up of hands playing a string instrument (no visible text or symbols)Einfache Bedienung
Copyright © 2010 ROLAND CORPORATION
Count-in / Metronom ....18
2. [TRANSPOSE]-Taster
natural_image
Silhouette of a person holding a Kiko keyboard (no text or symbols visible)natural_image
3D rendering of a white plastic mechanical component with a close-up view showing a small inset detail (no text or symbols visible)natural_image
Technical diagram of a device casing with labeled points A and B, showing internal components and mounting holes (no text or symbols beyond labels)HINWEIS

SYNTH 1 SYNTH 2 S
SYNTH/ PIANO/
natural_image
Illustration of two hands holding a circular object with an upward arrow, no text or symbols presentHINWEIS
Lucina AX-09: Synthesizer
FOOT PEDAL-BUCHSE 13
FUSSTASTER.... 13, 14
G
GURT....7
GURTHALTERUNG 7
H
HALL.... 16
HOLD 12,13
|
[INC/+] / [DEC/-]-TASTER 9
K
KABELKLEMME 7
KLANG-PARAMETER.... 16
KOPFHÖRER.... 8
L
LAUTSPRECHER 8
OCTAVE-TASTER [+] / [-] 11
OUTPUT-BUCHSEN 8
P
PAN 12,13
PEDAL DOWN 14
PEDAL UP 14
PHONES-BUCHSE 8
PITCH 12
RESONANCE.... 13, 14, 16
S
VOLUME.... 12, 13, 16
[VOLUME]-REGLER 8
W
WAV.... 15
WIEDERHERSTELLEN 19
[WRITE]-TASTER 10,18
Z
ZURÜCKSETZEN 19
ZURÜCKSETZEN AUF
natural_image
Close-up of hands playing a string instrument (no visible text or symbols)Copyright © 2010 ROLAND CORPORATION
Accord global (diapason) 17
REMARQUES IMPORTANTES....25
Index 26
natural_image
Silhouette of a person holding an electronic guitar (no text or symbols visible)natural_image
3D rendering of a mechanical component with a highlighted section showing a tool interacting with a hole (no text or symbols visible)natural_image
Technical diagram of a mechanical component with labeled points A and B, showing internal features and mounting holes (no text or symbols beyond labels)REMARQUE
natural_image
Illustration of two hands pressing a circular object with an upward arrow, no text or symbols presentREMARQUE
Accord global (diapason)
Lucina AX-09: Synthesizer
RESONANCE.... 13, 14, 16
RESTAURATION.... 19
RÉVERBÉRATION.... 16
S
SAUVEGARDE 19
SOLO SYNTH 13
SON 9
SON NORMAL 9
SON SPÉCIAL 9
SOSTENUTO.... 13
[SPECIAL TONE], BOUTON 9
T
TABLEAU D'IMPLÉMENTATION MIDI 26
TEMPÉRAMENT ÉGAL.... 17
TONE [1] À [6], BOUTONS ..... 9
[TRANSPOSE], BOUTON..... 11
U
UTILITAIRE.... 18
V
VERSION 18
V-LINK.... 21
VOLUME.... 12, 13, 16
[VOLUME], MOLETTE 8
W
WAV.... 15
[WRITE], BOUTON.... 10, 18
natural_image
Close-up of hands playing a guitar chord with a string (no visible text or symbols)1. Jack OUTPUT (L/MONO, R)
natural_image
Silhouette of a person holding a large electronic guitar (no visible text or symbols)natural_image
3D rendering of a white plastic electronic device casing with a close-up view showing internal components and a small component (no text or symbols visible)natural_image
Technical diagram of a mechanical component with labeled points A and B, showing internal features and mounting holes (no text or symbols beyond labels)NOTA
natural_image
Illustration of a hand holding a circular object with an upward arrow, no text or symbols presentLucina AX-09: Synthesizer
PEDALE ESPRESSIONE 13
PEDAL UP 14
PERNO DELLA TRACOLLA.... 7
PITCH 12
RESONANCE.... 13, 14, 16
RISOLUZIONE DEI PROBLEMI ..... 22
RIVERBERO 16
S
SLOT DI SICUREZZA 5
SLOT USB MEMORY.... 15
SOLO SYNTH 13
SOSTENUTO.... 13
SPECIFICHE.... 23
T
VOLUME.... 12, 13, 16
W
WAV.... 15
natural_image
Close-up of hands playing a string instrument (no visible text or symbols)Copyright © 2010 ROLAND CORPORATION
3. Conector FOOT PEDAL
4. Interruptor [POWER]
natural_image
Silhouette of a person holding a large electronic guitar with musical notes (no text or symbols visible)natural_image
3D rendering of a white plastic electronic device casing with a close-up view showing internal components and a small inset detail (no text or symbols visible)natural_image
Technical diagram of a mechanical component with labeled points A and B, showing internal structure and mounting holes (no text or symbols beyond labels)NOTA
natural_image
Illustration of hands using a directional arrow to lift a surface (no text or symbols)NOTA
Lucina AX-09: Synthesizer
CONECTOR FOOT PEDAL ..... 13
CONECTOR L/MONO 8
CONECTOR USB COMPUTER ..... 21
CONMUTADOR DE PEDAL ..... 13
CONTEO.... 18
CONTROLADOR D BEAM..... 12
CONTROLADOR TÁCTIL.... 11
RANURA USB MEMORY.... 15
REGISTRO DE UN TONO.... 10
RELEASE TIME 13, 14, 16
REPRODUCTOR DE AUDIO PORTÁTIL .. 14
REPRODUCTOR DE SONIDO ..... 15
RESONANCE.... 13, 14, 16
RESTABLECIMIENTO 19
RESTAURACIÓN 19
REVERBERACIÓN 16
S
SOLO SYNTH 13
VOLUME.... 12, 13, 16
W
WAV.... 15
natural_image
Close-up of hands playing a string instrument (no visible text or symbols)A B C D E F G H I J K L M N O P Q R S T U V W X Y Z A b c d E F G h, j E L N o P 9 r S t U u 8 H y 2
Copyright ©2010 ROLAND CORPORATION
Sobre as pilhas ....6
3. Plugue FOOT PEDAL
natural_image
Silhouette of a person holding a large electronic guitar (no visible text or symbols)natural_image
3D rendering of a white plastic electronic device casing with a close-up view showing internal components and a small inset detail (no text or symbols visible)natural_image
Technical diagram of a mechanical component with labeled points A and B, showing internal structure and mounting holes (no text or symbols beyond labels)OBSERVAÇÃO
natural_image
Illustration of hands using a circular arrow to lift a flat surface (no text or symbols)OBSERVAÇÃO
Lucina AX-09: Synthesizer
MatrixQuest UQUEST Middleware Technology
A funcionalidade USB do Lucina AX-09 usa a tecnologia middleware MatrixQuest da TEPCO UQUEST, LTD.
- Apresenta fontes digitais da Yourname, Inc.
Fonte digital: Copyright © Yourname, Inc.
PILHAS NI-MH AA RECARREGÁVEIS .. 6
PINO DA ALÇA.... 7
PITCH 12
PLUGUE DC IN.... 7
PLUGUE EXT IN 14
PLUGUE FOOT PEDAL.... 13
PLUGUE L/MONO.... 8
PLUGUE PHONES 8
PLUGUES OUTPUT.... 8
PORTAMENTO.... 12, 13, 16
Q
QUADRO DE IMPLEMENTAÇÃO DE MIDI .. 26
R
REGISTRO DE UM TOM.... 10
RELEASE TIME 13, 14, 16
REPERCUSSÃO 16
REPRODUTOR DE ÁUDIO ..... 15
RESET 19
RESONANCE.... 13, 14, 16
RESTAURAÇÃO 19
S
SLOT DE SEGURANÇA 5
SLOT USB MEMORY.... 15
SOLO SYNTH 13
VOLUME.... 12, 13, 16
W
WAV.... 15
Muziek maken was zelden zo leuk!
natural_image
Close-up of hands playing a guitar chord with a string (no visible text or symbols)natural_image
Silhouette of a person holding an electronic guitar (no text or symbols visible)natural_image
3D rendering of a white plastic electronic device casing with a close-up view showing internal components and a small inset detail (no text or symbols visible)natural_image
Technical diagram of a mechanical component with labeled points A and B, showing internal features and mounting holes (no text or symbols beyond labels)OPMERKING
natural_image
Illustration of hands holding a circular object with an upward arrow, no text or symbols presentOPMERKING
Lucina AX-09: Synthesizer
UQUEST Middleware Technology
RESONANCE.... 13, 14, 16
REVERB.... 16
S
SOLO SYNTH 13
SOSTENUTO.... 13
SPECIALE KLANK 9
SPECIFICATIONS.... 23
STEMMING 17
T
TOONSCHALEN (KEY SCALE TUNE).. 17
TOUCH-CONTROLLER 11
U
USB COMPUTER-CONNECTOR ..... 21
USB-GEHEUGEN 15
USB MEMORY-SLEUF 15
USB-STUURPROGRAMMA 21
UTILITY.... 18
V
VEILIGHEIDSSLOT 5
VERGRENDELFUNCTIE.... 14
VERSIE.... 18
V-LINK.... 21
VOETPEDAAL.... 14
VOLUME.... 12, 13, 16
VOORBELUISTEREN.... 9
W
WAV.... 15
MIDI-implementatietabel
Synthesizer
Lucina AX-09
Date: Jan. 1, 2010
Version : 1.00
| Function... | Transmitted | Recognized | Remarks | |
| Basic Channel | Default Changed | 1-16 1-16 | 1-16 1-16 | Memorized |
| Mode | Default Message Altered | Mode 3 Mono, Poly********** | Mode 3 Mode 3, 4 (M=1) X | *2 |
| Note Number | True Voice | 7-126********** | 0-127 0-127 | |
| Velocity | Note ON Note OFF | O O | O O | |
| After Touch | Key's Ch's | X O | O O | |
| Pitch Bend | O | O | ||
| Control Change | 0, 32 1 5 6, 38 7 10 11 64 65 66 71 72 73 74 75 84 91 93 100, 101 | O *1 O O X O O O O O O O O O O O O X (Reverb) X (Chorus) X | O O O O O O O O O O O O O O O O O O O O O O O O O O O O O O O O O O O O O O O O O O O O O O O O O O O O O O O O O O O O O O O O O O O O O O O O O O O O O O O O O O O O O O O O O O O O O O O O O O O O O | Bank Select Modulation Portamento Time Data entry Volume Panpot Expression Hold 1 Portamento SW Sostenuto Resonance Release Time Attack Time Cutoff Sound Control Portamento Control Effect 1 Depth Effect 3 Depth RPN LSB, MSB |
| Program Change | True # | O *1********** | O 0-127 | Program No. 1-128 |
| System Exclusive | X | X | ||
| System Common | Song Position Pointer Song Sel Tune | X X X | X X X | |
| System Real Time | Clock Commands | X X | X X | |
| Aux Messages | All Sounds Off Reset All Controllers Local On/Off All Notes Off Active Sensing Reset | X X X X O X | O O X O (123-127) X | |
| Notes | *1 O X is selectable *2 Recognized as M=1 even if M≠1 | |||
有关产品中所含有害物质的说明
This symbol indicates that in EU countries, this product must be collected separately from household waste, as defined in each region. Products bearing this symbol must not be discarded together with household waste.
DECLARATION OF CONFORMITY Compliance Information Statement
Model Name : AX-09
Type of Equipment : Synthesizer
Responsible Party : Roland Corporation U.S.
Address : 5100 S. Eastern Avenue, Los Angeles, CA 90040-2938
Telephone : (323) 890-3700
For EU Countries

This product complies with the requirements of EMC Directive 2004/108/EC.
For the USA
FEDERAL COMMUNICATIONS COMMISSION RADIO FREQUENCY INTERFERENCE STATEMENT
This equipment has been tested and found to comply with the limits for a Class B digital device, pursuant to Part 15 of the FCC Rules. These limits are designed to provide reasonable protection against harmful interference in a residential installation. This equipment generates, uses, and can radiate radio frequency energy and, if not installed and used in accordance with the instructions, may cause harmful interference to radio communications. However, there is no guarantee that interference will not occur in a particular installation. If this equipment does cause harmful interference to radio or television reception, which can be determined by turning the equipment off and on, the user is encouraged to try to correct the interference by one or more of the following measures:
– Reorient or relocate the receiving antenna.
– Increase the separation between the equipment and receiver.
- Connect the equipment into an outlet on a circuit different from that to which the receiver is connected.
- Consult the dealer or an experienced radio/TV technician for help.
This device complies with Part 15 of the FCC Rules. Operation is subject to the following two conditions:
(1) this device may not cause harmful interference, and
(2) this device must accept any interference received, including interference that may cause undesired operation.
Unauthorized changes or modification to this system can void the users authority to operate this equipment.
This equipment requires shielded interface cables in order to meet FCC class B Limit.
For Canada
NOTICE
This Class B digital apparatus meets all requirements of the Canadian Interference-Causing Equipment Regulations.
AVIS
This product contains chemicals known to cause cancer, birth defects and other reproductive harm, including lead.
AFRICA
EGYPT
Al Fanny Trading Office
9, EBN Hagar Al Askalany Street,
ARD E1 Golf, Heliopolis,
Cairo 11341, EGYPT
TEL: (022)-417-1828
REUNION
MARCEL FO-YAM Sarl
Royal Cape Park, Unit 24
Londonderry Road, Ottery 7800
Cape Town, SOUTH AFRICA
TEL: (021) 799 4900
ASIA
CHINA
Roland Shanghai Electronics
Co., Ltd.
5F. No.1500 Pingliang Road
Shanghai 200090, CHINA
TEL: (021) 5580-0800
Roland Shanghai Electronics
Co., Ltd. (BEIJING OFFICE)
10F. No.18 3 Section Anhuaxili
Chaoyang District Beijing
100011, CHINA
TEL:(010)6426-5050
HONG KONG
Tom Lee Music
11/F Silvercord Tower 1
30 Canton Rd
Tsimshatsui, Kowloon,
HONG KONG
TEL: 825-2737-7688
Parsons Music Ltd.
8th Floor, Railway Plaza, 39
Chatham Road South, T.S.T,
Kowloon, HONG KONG
TEL: 2333 1863
INDIA
Rivera Digitec (India) Pvt. Ltd.
411, Nirman Kendra Mahalaxmi
Flats Compound Off. Dr. Edwin
Moses Road, Mumbai-400011,
INDIA
TEL:(022)2493 9051
INDONESIA
PT Citra Intirama
VIET THUONG CORPORATION
386 CACH MANG THANG TAM ST.
DIST.3, HO CHI MINH CITY,
VIET NAM
TEL: (08) 9316540
PHILIPPINES
G.A. Yupangco & Co. Inc.
339 Gil J. Puyat Avenue
Makati, Metro Manila 1200,
PHILIPPINES
TEL: (02) 899 9801
MALAYSIA/
SINGAPORE
Roland Asia Pacific Sdn. Bhd.
45-1, Block C2, Jalan PJU 1/39,
Dataran Prima, 47301 Petaling
Jaya, Selangor, MALAYSIA
TEL: (03) 7805-3263
TAIWAN
ROLAND TAIWAN ENTERPRISE
CO., LTD.
9F-5, No. 112 Chung Shan
North Road Sec. 2 Taipei 104,
TAIWAN R.O.C.
TEL: (02) 2561 3339
THAILAND
Theera Music Co., Ltd.
100-108 Soi Verng Nakornkasem,
New Road, Sumpantawong,
Bangkok 10100, THAILAND
TEL: (02) 224-8821
OCEANIA
AUSTRALIA/
NEW ZEALAND
Roland Corporation
Australia Pty., Ltd.
38 Campbell Avenue
Dee Why West. NSW 2099,
AUSTRALIA
For Australia
TEL: (02) 9982 8266
For New Zealand
TEL: (09) 3098 715
CENTRAL/LATIN AMERICA
ARGENTINA
Instrumentos Musicales S.A.
Av.Santa Fe 2055
(1123) Buenos Aires, ARGENTINA
TEL: (011) 4508-2700
BARBADOS
A&B Music Supplies LTD
12 Webster Industrial Park
Wildey, St.Michael, BARBADOS
TEL: (246) 430-1100
BRAZIL
Roland Brasil Ltda.
Rua San Jose, 211
Parque Industrial San Jose
Cotia - Sao Paulo - SP, BRAZIL
TEL: (011) 4615 566
CHILE
Comercial Fancy II S.A.
Rut.: 96.919.420-1
Nataniel Cox #739, 4th Floor
Santiago - Centro, CHILE
TEL: (02) 688-9540
COLOMBIA
Centro Musical Ltda.
Cra 43 B No 25 A 41 Bododega 9
Medellin, COLOMBIA
TEL: (574) 3812529
COSTA RICA
JUAN Bansbach Instrumentos
Musicales
Ave.1. Calle 11, Apartado 10237,
San Jose, COSTA RICA
TEL: 258-0211
CURACAO
Zeelandia Music Center Inc.
Orionweg 30
Curacao, Netherland Antilles
TEL:(305)5926866
DOMINICAN REPUBLIC
Instrumentos Fernando Giraldez
Boulevard Andrews, Albrook,
Panama City, REP. DE PANAMA
TEL: 315-0101
PARAGUAY
155, New National Road
Patras 26442, GREECE
TEL: 2610 435400
HUNGARY
Roland East Europe Ltd.
2045 Torokbalint, FSD Park,
building 3., HUNGAR
TEL: (23) 511011
IRELAND
Roland Ireland
G2 Calmount Park, Calmount
Avenue, Dublin 12,
Republic of IRELAND
TEL: (01) 4294444
ITALY
Roland Italy S. p. A.
*1: Monophonic Tone
| No. | Name | MSB | LSB | PC | |
| 1 SYNTH / PAD | |||||
| 1 | Saw Lead | *1 | 87 | 0 | 1 |
| 2 | Brite Square | *1 | 87 | 0 | 2 |
| 3 | Sync Lead | *1 | 87 | 0 | 3 |
| 4 | GR Lead | *1 | 87 | 0 | 4 |
| 5 | JupiterLead | *1 | 87 | 0 | 5 |
| 6 | ResoSawLead | *1 | 87 | 0 | 6 |
| 7 | Simple Tri | *1 | 87 | 0 | 7 |
| 8 | Sine Lead | *1 | 87 | 0 | 8 |
| 9 | Sqr Lead | *1 | 87 | 0 | 9 |
| 10 | Octa-Juice | 87 | 0 | 10 | |
| 11 | Octa-Square | 87 | 0 | 11 | |
| 12 | Vintage | 87 | 0 | 12 | |
| 13 | SuperSaw Pad | 87 | 0 | 13 | |
| 14 | OB Strings | 87 | 0 | 14 | |
| 15 | Poly Synth 1 | 87 | 0 | 15 | |
| 16 | Poly Synth 2 | 87 | 0 | 16 | |
| 17 | Poly Synth 3 | 87 | 0 | 17 | |
| 18 | Euro Express | 87 | 0 | 18 | |
| 19 | Soft Pad | 87 | 0 | 19 | |
| 20 | Hollow Pad | 87 | 0 | 20 | |
| 21 | Phaser Pad | 87 | 0 | 21 | |
| 22 | Heaven Pad | 87 | 0 | 22 | |
| 23 | Cosmic Rays | 87 | 0 | 23 | |
| 24 | Voyager | 87 | 0 | 24 | |
| 2 PIANO / KEYBOARD | |||||
| 1 | Grand Piano | 87 | 0 | 25 | |
| 2 | E-Grand | 87 | 0 | 26 | |
| 3 | JD Piano | 87 | 0 | 27 | |
| 4 | Honky Tonk | 87 | 0 | 28 | |
| 5 | Phase EP | 87 | 0 | 29 | |
| 6 | Stage EP | 87 | 0 | 30 | |
| 7 | FM EP | 87 | 0 | 31 | |
| 8 | Wurly EP | 87 | 0 | 32 | |
| 9 | Harpsichord | 87 | 0 | 33 | |
| 10 | Phase Clav | 87 | 0 | 34 | |
| 11 | Amped Clav | 87 | 0 | 35 | |
| 12 | AX Clav | 87 | 0 | 36 | |
| 13 | Pulse Clav | 87 | 0 | 37 | |
| 14 | Celesta | 87 | 0 | 38 | |
| 15 | Music Box | 87 | 0 | 39 | |
| 16 | JUNO Bell | 87 | 0 | 40 | |
| 17 | Fantasia | 87 | 0 | 41 | |
| 18 | Dreaming Box | 87 | 0 | 42 | |
| 19 | Vibraphone | 87 | 0 | 43 | |
| 20 | Glocken | 87 | 0 | 44 | |
| 21 | Marimba | 87 | 0 | 45 | |
| 22 | Xylophone | 87 | 0 | 46 | |
| 23 | Steel Drums | 87 | 0 | 47 | |
| 24 | Santur Stack | 87 | 0 | 48 | |
| No. | Name | MSB | LSB | PC |
| 3 ORGAN / ACCORDION | ||||
| 1 | VK Organ 1 | 87 | 0 | 49 |
| 2 | D-Bars 1 | 87 | 0 | 50 |
| 3 | D-Bars 2 | 87 | 0 | 51 |
| 4 | Jazz Organ 1 | 87 | 0 | 52 |
| 5 | Rotary Org 1 | 87 | 0 | 53 |
| 6 | Vintage Org1 | 87 | 0 | 54 |
| 7 | VK Organ 2 | 87 | 0 | 55 |
| 8 | Jazz Organ 2 | 87 | 0 | 56 |
| 9 | Rotary Org 2 | 87 | 0 | 57 |
| 10 | Vintage Org2 | 87 | 0 | 58 |
| 11 | Old Fashion | 87 | 0 | 59 |
| 12 | JL Organ 1 | 87 | 0 | 60 |
| 13 | JL Organ 2 | 87 | 0 | 61 |
| 14 | Dist Org | 87 | 0 | 62 |
| 15 | Positive Org | 87 | 0 | 63 |
| 16 | Grand Pipes | 87 | 0 | 64 |
| 17 | Musette Acd | 87 | 0 | 65 |
| 18 | Accordion 1 | 87 | 0 | 66 |
| 19 | It.Accordion 1 | 87 | 0 | 67 |
| 20 | Accordion 2 | 87 | 0 | 68 |
| 21 | It.Accordion 2 | 87 | 0 | 69 |
| 22 | Harmonica 1 | 87 | 0 | 70 |
| 23 | Blues harp | 87 | 0 | 71 |
| 24 | Harmonica 2 | 87 | 0 | 72 |
| 4 STRINGS / CHOIR | ||||
| 1 | BrightViolin | 87 | 0 | 73 |
| 2 | Bright Cello | 87 | 0 | 74 |
| 3 | Strings 1 | 87 | 0 | 75 |
| 4 | Strings 2 | 87 | 0 | 76 |
| 5 | Staccato | 87 | 0 | 77 |
| 6 | Pizzicato | 87 | 0 | 78 |
| 7 | JP Strings | 87 | 0 | 79 |
| 8 | Synth Str 1 | 87 | 0 | 80 |
| 9 | Synth Str 2 | 87 | 0 | 81 |
| 10 | 106 Strings | 87 | 0 | 82 |
| 11 | JX Strings | 87 | 0 | 83 |
| 12 | Sawtooth Str | 87 | 0 | 84 |
| 13 | Tape Strings | 87 | 0 | 85 |
| 14 | Movie Scene | 87 | 0 | 86 |
| 15 | Vox Pad 1 | 87 | 0 | 87 |
| 16 | Aerial Choir | 87 | 0 | 88 |
| 17 | Angels Choir 1 | 87 | 0 | 89 |
| 18 | Synth Vox 1 | 87 | 0 | 90 |
| 19 | Vox Pad 2 | 87 | 0 | 91 |
| 20 | Synth Vox 2 | 87 | 0 | 92 |
| 21 | Gospel Hum | 87 | 0 | 93 |
| 22 | Angels Choir 2 | 87 | 0 | 94 |
| 23 | 3D Vox | 87 | 0 | 95 |
| 24 | Jazz Doos | 87 | 0 | 96 |
| No. | Name | MSB | LSB | PC |
| 5 BRASS / W WINDS | ||||
| 1 | Trumpet | 87 | 0 | 97 |
| 2 | Solo Tb | 87 | 0 | 98 |
| 3 | Breathy Sax | 87 | 0 | 99 |
| 4 | Soprano Sax | 87 | 0 | 100 |
| 5 | Alto Sax | 87 | 0 | 101 |
| 6 | Tenor Sax | 87 | 0 | 102 |
| 7 | Baritone Sax | 87 | 0 | 103 |
| 8 | BrassSection | 87 | 0 | 104 |
| 9 | Sax Section | 87 | 0 | 105 |
| 10 | Sousaphone | 87 | 0 | 106 |
| 11 | 80s Brass 1 | 87 | 0 | 107 |
| 12 | Soft SynBrs | 87 | 0 | 108 |
| 13 | 80s Brass 2 | 87 | 0 | 109 |
| 14 | Analog Brass | 87 | 0 | 110 |
| 15 | Poly Brass | 87 | 0 | 111 |
| 16 | 106 Brass | 87 | 0 | 112 |
| 17 | Octa Brass | 87 | 0 | 113 |
| 18 | Flute | 87 | 0 | 114 |
| 19 | Piccolo | 87 | 0 | 115 |
| 20 | Clarinet | 87 | 0 | 116 |
| 21 | Oboe | 87 | 0 | 117 |
| 22 | Pan Pipes | 87 | 0 | 118 |
| 23 | Shakuhachi | 87 | 0 | 119 |
| 24 | Tape Flute | 87 | 0 | 120 |
| 6 GUITAR / BASS | ||||
| 1 | Nylon Gtr | 87 | 0 | 121 |
| 2 | Folk Gtr | 87 | 0 | 122 |
| 3 | Jazz E.Gtr | 87 | 0 | 123 |
| 4 | Pick E.Gtr | 87 | 0 | 124 |
| 5 | Dist Gtr | 87 | 0 | 125 |
| 6 | SearingGtr | 87 | 0 | 126 |
| 7 | Fuzz Gtr | 87 | 0 | 127 |
| 8 | Aerial Harp | 87 | 0 | 128 |
| 9 | Sitar | 87 | 1 | 1 |
| 10 | Pick E.Bs | 87 | 1 | 2 |
| 11 | Finger E.Bs | 87 | 1 | 3 |
| 12 | Acoustic Bs | 87 | 1 | 4 |
| 13 | Slap Bs | 87 | 1 | 5 |
| 14 | Fat Analog | *1 | 87 | 1 |
| 15 | Moogue Bs 1 | *1 | 87 | 1 |
| 16 | Punch MG | *1 | 87 | 1 |
| 17 | Round Bs | *1 | 87 | 1 |
| 18 | Moogue Bs 2 | *1 | 87 | 1 |
| 19 | Acdg Bs | *1 | 87 | 1 |
| 20 | MKS SynBs | *1 | 87 | 1 |
| 21 | TB Dist Bs | *1 | 87 | 1 |
| 22 | JunoSqu Bs | *1 | 87 | 1 |
| 23 | Drums | 87 | 1 | |
| 24 | Percussion | 87 | 1 | |
| No. | Name | MSB | LSB | PC | |
| Special Tone | |||||
| 1 | Synth 1 (Synth Lead) | *1 | 87 | 64 | 1 |
| 2 | Synth 2 (Poly Synth) | 87 | 64 | 2 | |
| 3 | Synth Bass | *1 | 87 | 64 | 3 |
| 4 | Violin | 87 | 64 | 4 | |
| 5 | Trombone | *1 | 87 | 64 | 5 |
| 6 | Jazz Scat | 87 | 64 | 6 | |
Drums (GUITAR / BASS No. 23)
| Bass Drum | Snare Drum | Hi-hat | Cymbal |
Percussion (GUITAR / BASS No. 24)
| Low Conga | High Conga (Mute) | Cowbell | Tambourine |