EXR-46OR - Numeric keypad ROLAND - Free user manual and instructions
Find the device manual for free EXR-46OR ROLAND in PDF.

User questions about EXR-46OR ROLAND
0 question about this device. Answer the ones you know or ask your own.
Ask a new question about this device
Download the instructions for your Numeric keypad in PDF format for free! Find your manual EXR-46OR - ROLAND and take your electronic device back in hand. On this page are published all the documents necessary for the use of your device. EXR-46OR by ROLAND.
USER MANUAL EXR-46OR ROLAND
Thank you for choosing a Roland EXR-46 OR Interactive Arranger, a novel keyboard with a superior Roland sound source, an intuitive user interface, a USB port, V-LINK compatibility and a host of other useful functions.
To get the most out of the EXR-46 OR and to ensure many years of trouble-free service, we urge you to read through this Owner's Manual thoroughly.
To avoid confusion, let's agree to use the word "button" for all keys on the front panel, and use "key" only when referring to the EXR-46 OR's keyboard.
Before using this instrument, carefully read the "Important notes" (p. 7). They provide information concerning the proper operation of the EXR-46 OR. Be sure to keep this manual in a safe place for future reference.
1. Features
Superior sound source
The EXR-46 OR's sounds are based on full-length (uncompressed) waveforms, which is unique in this price range. This produces vibrant, realistic sounds quite unlike anything you would expect from a budget-friendly arranger keyboard. The EXR-46 OR's tone generator is 64-voice polyphonic. Combined with the new amplification system and Digital Bass Enhancer function, the EXR-46 OR sounds truly amazing, with a clear high end and a powerful low range.
Drum Pad mode
The EXR-46 OR provides a "Drum Pad" mode that allows you to assign drum sounds to the 8 highest keys (right side of the keyboard). You can use this function to play live drum or percussion parts to the EXR-46 OR's Style or Song playback.
Lock functions
The EXR-46 OR is equipped with five buttons that allow you to filter various settings from the User Programs you recall. This allows for a more flexible and efficient use of your registrations, because settings you do not need in a given situation can be ignored.
Flash memory and USB
The EXR-46 OR comes with 99 oriental Music Styles in ROM, 50 additional Music Styles and several Standard MIDI Files. The additional Styles and SMFs reside in the EXR-46 OR's Flash memory area, whose contents can be expanded and managed via a USB connection with your PC or Macintosh computer.
New concept
The EXR-46 OR is 19-part multitimbral, with 3 parts that can be played via the keyboard (Main, Split and Dual). The Main part can be used to play melodies or for drumming, while the Split and Dual parts allow you to quickly add a second sound to your solo playing.
Furthermore, the EXR-46 OR provides a new selection routine for Music Styles, Tones, songs, and User Programs: the FAMILY l buttons can be used for selecting specific groups, while the SELECT l buttons allow you to choose a setting within the selected group.
Excellent Arranger
The EXR-46 OR comes loaded with 149 Music Styles prepared by Roland's legendary Style foundry. As usual, several patterns are available (INTRO, ORIGINAL, VARIATION, FILL and ENDING), with additional options via the BAND ORCHESTRATOR buttons.
3 scale memories plus User Program-dependent scale settings
The EXR-46 OR is Roland's first arranger keyboard to provide 3 scale memories (for oriental tunings) and the possibility to save the currently used tuning settings in a User Program. That way, each of the 200 User Program memories could use a different tuning system.
And much, much more...
A metronome and several educational functions are provided, while three digital effects processors (Reverb, Chorus and MFX) can be used to further enhance the already amazing sound quality.
The EXR-46 OR can play back GM, GM2, GS and XG song data, so that you can virtually use any Standard MIDI File available at your Roland dealer or on the Internet.
Note: The EXR-46 OR supports XG Light and therefore only provides the basic set of compatible functions.
The EXR-46 OR is also equipped with a floppy disk drive (2DD/2HD) for data management and importing Music Styles prepared for older Roland arranger instruments.
Have fun!
Microsoft and Windows are registered trademarks of Microsoft Corporation USA in the United States and other countries.
Apple and Macintosh are registered trademarks of Apple Computer Corporation USA in the United states and other countries.
Mac OS is a registered trademark of Apple Computer Corporation.
Other names of companies, products, or standards are the trademarks or registered trademarks of their respective owners.
USING THE UNIT SAFELY
INSTRUCTIONS FOR THE PREVENTION OF FIRE, ELECTRIC SHOCK, OR INJURY TO PERSONS
About WARNING and CAUTION Notices
| ▲WARNING | Used for instructions intended to alert the user to the risk of death or severe injury should the unit be used improperly. |
| ▲CAUTION | Used for instructions intended to alert the user to the risk of injury or material damage should the unit be used improperly. * Material damage refers to damage or other adverse effects caused with respect to the home and all its furnishings, as well to domestic animals or pets. |
About the Symbols
| A | The △ symbol alerts the user to important instructions or warnings. The specific meaning of the symbol is determined by the design contained within the triangle. In the case of the symbol at left, it is used for general cautions, warnings, or alerts to danger. |
| B | The ⊙ symbol alerts the user to items that must never be carried out (are forbidden). The specific thing that must not be done is indicated by the design contained within the circle. In the case of the symbol at left, it means that the unit must never be disassembled. |
| C | The ● symbol alerts the user to things that must be carried out. The specific thing that must be done is indicated by the design contained within the circle. In the case of the symbol at left, it means that the power-cord plug must be unplugged from the outlet. |
ALWAYS OBSERVE THE FOLLOWING
WARNING
- Before using this instrument, make sure to read the instructions below, and the Owner's Manual.

- Do not open or perform any internal modifications on the unit.

- Do not attempt to repair the EXR-46 OR, or replace parts within it (except when this manual provides specific instructions directing you to do so). Refer all servicing to your retailer, the nearest Roland Service Center, or an authorized Roland distributor, as listed on the "Information" page.

-
Never use or store the EXR-46 OR in places that are:
-
Subject to temperature extremes (e.g., direct sunlight in an enclosed vehicle, near a heating duct, on top of heat-generating equipment); or are
- Damp (e.g., baths, washrooms, on wet floors); or are
- Humid; or are
- Exposed to rain; or are
- Dusty; or are
-
Subject to high levels of vibration.
-
This unit should be used only with a rack or stand that is recommended by Roland.

- Make sure you always have the unit placed in such a way that it is level and sure to remain stable. Never place it on stands that could wobble, or on inclined surfaces.

- The instrument should only be connected to a power supply of the type described in the operating instructions, or as marked on the adapter supplied with the EXR-46 OR.

WARNING
- Do not excessively twist or bend the adapter's power cord, nor place heavy objects on it. Doing so can damage the cord, producing severed elements and short circuits. Damaged cords are fire and shock hazards!

- This instrument, either alone or in combination with an amplifier and headphones or speakers, may be capable of producing sound levels that could cause permanent hearing loss. Do not operate for a long period of time at a high volume level, or at a level that is uncomfortable. If you experience any hearing loss or ringing in the ears, you should immediately stop using the unit, and consult an audiologist.
- Do not allow any objects (e.g., flammable material, coins, pins); or liquids of any kind (water, soft drinks, etc.) to penetrate the unit.


- Do not force the EXR-46 OR's adapter to share an outlet with an unreasonable number of other devices. Be especially careful when using extension cords—the total power used by all devices you have connected to the extension cord's outlet must never exceed the power rating (watts/amperes) for the extension cord. Excessive loads can cause the insulation on the cord to heat up and eventually melt through.

- Whenever you suspect the possibility of lightning in your area, disconnect the adapter from the outlet.

- Should you remove screws, make sure to put them in a safe place out of children's reach, so there is no chance of them being swallowed accidentally.

WARNING
- Before using the EXR-46 OR in a foreign country, consult with your retailer, the nearest Roland Service Center, or an authorized Roland distributor, as listed on the "Information" page.

CAUTION
- The EXR-46 OR should be located so that its location or position does not interfere with its proper ventilation.

- This unit for use only with Roland keyboard stand KS-12. Use with other stands is capable of resulting in instability causing possible injury.

- Always grasp only the plug on the adapter when plugging into, or unplugging from, an outlet or this unit.

- Try to prevent cords and cables from becoming entangled. Also, all cords and cables should be placed out of the reach of children.

- Never climb on top of, nor place heavy objects on the unit.

- Never handle the adapter's power cord or its plugs with wet hands when plugging into, or unplugging from, an outlet or this unit.

- If you need to move the instrument, take note of the precautions listed below. Make sure to have a firm grip, to protect yourself from injury and the instrument from damage.

- Disconnect the adapter.
- Disconnect all cords coming from external devices.
-
Remove the music stand.
-
Before cleaning the unit, turn off the power and unplug the adapter from the outlet.


This product must be disposed of separately at your local waste recycling centre.
Do not dispose of in household waste bin.
Contents
- Features 2
- Important notes 7
- Panel descriptions.. 9
Front panel 9
Rear panel. 11
4. First steps. 12
Setting up 12
Demo songs 12
Playing back a Tone demo song 12
Playback of a Style demo song 12
Leaving Demo mode 12
laying without accompaniment 13
Using the Main part 13
Using the Main and Split parts 13
Using the Main and Dual parts 14
Using the metronome. 14
5. Playing with accompaniment (Arranger) 15
Starting/using the Arranger. 15
Changing the tempo. 16
Automatic playback start (Sync Start & Stop) 16
Stopping Arranger playback 16
electing Music Styles. 16
Using the Band Orchestrator function. 17
Balance 18
6. Playing back songs 19
Basic song playback. 19
Additional playback functions 20
Selecting Song mode 20
Fast Forward, Rewind, and Reset 20
Loop playback (Repeat) 21
Live performance with song backing (Minus One). 21
Changing the track assignments. 22
7. Recording your music 23
Basic song recording 23
Listening to your song 23
Other recording functions 24
About the recording modes. 24
More about ALL mode 24
Keyboard recording mode 24
Single recording mode 24
Punch I/O 25
8.Additional Music Style functions. 26
One Touch 26
Using the Music Assistant 26
Melody Intelligence. 27
Changing the Melody Intelligence harmony type. 27
PIANO Mode 27
Bass Inversion (Bass Inv). 28
More Music Style functions 28
- Using oriental tunings 29
Tuning individual notes a quarter tone down 29
Using other tuning values 29
Saving and loading your tunings (SCALE MEMORY) 29
- Keyboard part functions 30
Selecting sounds for the Main, Split and Dual parts. 30
Selecting any of the available sounds 30
Using the USER TONES buttons 30
Assigning another Tone to a USER TONES button 30
Drum sounds and sound effects ("SFX") 31
Drum Kits 31
Sound effects ("SFX") 31
Using DRUM PAD mode 32
Using the Drum Pad function 32
Transpose 32
Global transpose function ("GLB") 33
Octave settings. 33
Other Keyboard part functions 33
- Performance functions and effects.. 34
Performance functions 34
Keyboard Touch (velocity sensitivity). 34
Pitch Bend and Modulation 34
Footswitch 34
Using effects. 35
Using the multi-effects processor (MFX) 35
Reverb. 36
Chorus 37
V-LINK function 38
V-LINK functions that the EXR-46 OR can control (and corresponding MIDI messages) 38
-
Function menu 39
Editing parameters (general procedure) 39
KB SET parameters 39
DRUM PAD parameters. 41
METRONOM parameters 41
OCTAVE parameters 41
VOLUME parameters 41
ARR SET parameters. 42
EFFECTS parameters 42
KB SCALE parameters. 43
MIDI parameters. 43
UTILITY parameters. 44 -
Working with User Programs 45
Writing your settings to a User Program. 45
Notes about writing User Programs 45
Selecting a User Program. 45
Lock: filtering certain User Program settings. 46
14.MIDI functions 47
Channels 47
MIDI Function parameters 47
Working with the Flash memory. 49
Saving songs to a Flash memory 49
Archiving User Programs in the Flash area 49
Saving Styles to a Flash memory 50
Loading a User Program set from the Flash memory. 50
Removing songs from the Flash memory. 50
Removing Styles from the Flash memory 51
Removing a User Program set from the Flash memory. 51
Archiving data using a computer (USB) 52
15.Data management. 49
Disk functions. 53
Loading User Programs from disk 53
Loading songs from disk 54
Loading Music Styles from disk 54
Saving files to disk. 54
Deleting files on disk 55
Format 56
16. Using the outputs and an optional footswitch. 57
17.Miscellaneous. 58
Functions for educational purposes 58
Deactivating or activating the Demo function 58
Deactivating or activating the Arranger 58
Deactivating or activating the Arranger and Demo functions... 58
Initializing your EXR-46 OR (Factory) 58
18. Specifications 59
Thanks 59
19.Lists 120
Tones selectable via the front panel 120
Drum Kits. 123
Music Styles. 130
Chord Intelligence ("Md1" setting) 131
MIDI Implementation Chart 133
2. Important notes
In addition to the items listed under "Using the unit safely" (p. 3), please read and observe the following:
Power supply
- Do not use this instrument on the same power circuit with any device that will generate line noise (such as an electric motor or variable lighting system).
- Before connecting the EXR-46 OR to other devices, turn off the power to all units. This will help prevent malfunctions and/or damage to speakers or other devices.
Placement
- Using the EXR-46 OR near power amplifiers (or other equipment containing large power transformers) may induce hum. To alleviate the problem, change the orientation of this instrument or move it further away from the source of interference.
- This instrument may interfere with radio and television reception. Do not use it in the vicinity of such receivers.
- Observe the following when using the unit's floppy disk drive. For further details, refer to "Before using floppy disks (handling the floppy disk drive)".
- Do not place the unit near devices that produce a strong magnetic field (e.g., loudspeakers).
- Install the EXR-46 OR on a solid, level surface.
- Do not move the unit or subject it to vibration while the drive is operating.
- Do not expose the EXR-46 OR to direct sunlight, place it near devices that radiate heat, leave it inside an enclosed vehicle, or otherwise subject it to temperature extremes. Excessive heat can deform or discolor the instrument.
- To avoid possible breakdown, do not use the unit in a wet area, such as an area exposed to rain or other moisture.
- Do not allow objects to remain on top of the EXR-46 OR. This can be the cause of malfunction.
Maintenance
- For everyday cleaning wipe the EXR-46 OR with a soft, dry cloth or one that has been slightly dampened with water. To remove stubborn dirt, use a mild, non-abrasive detergent. Afterwards, be sure to wipe the instrument thoroughly with a soft, dry cloth.
- Never use benzene, thinner, alcohol or solvents of any kind, to avoid the possibility of discoloration and/or deformation.
Repairs and data
- Please be aware that all data contained in the instrument's memory may be lost when it is sent for repairs. In certain cases (such as when circuitry related to memory itself is out of order), we regret that it may not be possible to restore the data. Roland assumes no liability concerning such loss of data.
Additional precautions
- Please be aware that the memory contents can be irretrievably lost as a result of a malfunction, or the improper operation of the instrument.
- Use a reasonable amount of care when using the instrument's buttons, other controls, and jacks/connectors. Rough handling can lead to malfunctions.
- Never strike or apply strong pressure to the display.
- When connecting/disconnecting cables, grasp the connector itself—never pull on the cable. This way you will avoid causing shorts, or damage to the cable's internal elements.
- A small amount of heat will radiate from the instrument during normal operation. This is perfectly normal.
- To avoid disturbing your neighbors, try to keep the instrument's volume at reasonable levels. You may prefer to use headphones, so you do not need to be concerned about those around you (especially late at night).
- When you need to transport the instrument, package it in the box (including padding) that it came in. Otherwise, you will need to use equivalent packaging materials, or a flightcase.
-
Use only a recommended footswitch (DP-2, DP-6, sold separately). By connecting any other footswitch, you risk causing malfunction and/or damage to the EXR-46 OR.
-
When the EXR-46 OR is used at excessive volumes, the protection system of its power amplifier stage may come on and mute the speakers. In that case, reduce the volume setting and wait a few seconds.
Before using floppy disks (handling the floppy disk drive)
- Install the unit on a solid, level surface in an area free from vibration. If the unit must be installed at an angle, be sure the installation does not exceed the permissible range: upward, 2^ ; downward, 18^ .
- Avoid using the EXR-46 OR immediately after it has been moved to a location with a level of humidity that is greatly different than its former location. Rapid changes in the environment can cause condensation to form inside the drive, which will adversely affect the operation of the drive and/or damage floppy disks. When the EXR-46 OR has been moved, allow it to become accustomed to the new environment (allow a few hours) before operating it.
- To insert a disk, push it gently but firmly into the drive—it will click into place. To remove a disk, press the EJECT button firmly. Do not use excessive force to remove a disk which is lodged in the drive.
- Never attempt to remove a floppy disk from the drive while the drive is operating (the indicator is lit); damage could result to both the disk and the drive.
- Remove any disk from the drive before switching the instrument on or off.
- To prevent damage to the disk drive's heads, always try to hold the floppy disk in a level position (not tilted in any direction) while inserting it into the drive. Push it in firmly, but gently. Never use excessive force.
- To avoid the risk of malfunction and/or damage, insert only floppy disks into the disk drive. Never insert any other type of disk. Avoid getting paper clips, coins, or any other foreign objects inside the drive.
Handling floppy disks
-
Floppy disks contain a plastic disk with a thin magnetic coating. Microscopic precision is required to enable storage of large amounts of data on such a small surface area. To preserve their integrity, please observe the following when handling floppy disks:
-
Never touch the magnetic medium inside the disk.
- Do not use or store floppy disks in dirty or dusty areas.
- Do not subject floppy disks to temperature extremes (e.g., direct sunlight in an enclosed vehicle). Recommended temperature range: 10^ 50^ ( 50^ 122^ ).
- Do not expose floppy disks to strong magnetic fields, such as those generated by loudspeakers.
- Floppy disks have a "WRITE" tab which can protect the disk from accidental erasure. It is recommended that the tab be kept in the PROTECT position, and moved to the WRITE position only when you wish to write new data onto the disk.
- Disks containing important performance data for this instrument should always be locked (have their write protect tab slid to the PROTECT position) before you insert them into the drive of another instrument.
- The identification label should be firmly affixed to the disk. If the label comes loose while the disk is in the drive, it may be difficult to remove the disk.
- Put the disk back into its case for storage.
Electromagnetic radiations
- Electromagnetic radiations may cause a deterioration of audio performances. Such possible deterioration consists in an audio signal being emitted. On ceasing the electromagnetic noise, the emission of the audio signal will simultaneously stop.
Liability and copyright
- Should data contained and stored on a floppy disk be lost, it is unfortunately impossible to restore them. Roland Europe S.p.a. assumes no liability concerning such loss of data.
- Unauthorized recording, distribution, sale, lending, public performance, broadcasting, or the like in whole or in part, of a work (musical composition, video, broadcast, public performance, or the like) whose copyright is held by a third party is prohibited by law.
- Do not use this unit for purposes that could infringe on a copyright held by a third party. Roland assumes no responsibility whatsoever with regard to any infringements of third-party copyrights arising through your use of this unit.
3. Panel descriptions
Front panel
① SCALE MEMORY buttons
These three buttons allow you to save and recall the tuning settings carried out with the ORIENTAL SCALE buttons. When the EXR-46 OR is shipped, these memories already contain useful settings (that will be recalled whenever you initialize your EXR-46 OR).
Note: The settings of the ORIENTAL SCALE buttons are also saved to a User Program, so that you can use these three memories for more "general" settings.
② ORIENTAL SCALE buttons
These buttons allow you to change the tuning of each note of the scale. By default, pressing one of these buttons will lower the corresponding notes in all octaves by a quarter tone (-50 cents). Other tunings can also be selected and saved to one of the three scale memories (see above) or a User Program.
③ POWERON button
Press this button to switch the EXR-46 OR on and off.
(28)
④ BENDER/MODULATION lever
By performing left/right movements, you can bend your solo notes down (left) or up (right). Press this lever towards the rear of the instrument to add modulation (usually vibrato) to the notes you are playing.
⑤ PHONES 1/2 sockets
This is where you can connect two pairs of optional headphones (Roland RH-25, RH-50, RH-200, or RH-300). By doing so, you switch off the EXR-46 OR's speakers.
⑥ VOLUME knob
Use this knob to set the global volume of your EXR-46 OR.
⑦ BALANCE ACCOMP KEYBOARD buttons
Use the BALANCE buttons to change the volume of the corresponding section (accompaniment/song, or the parts you play on the keyboard).
⑧ KEYBOARD TOUCH button
Press this button to switch the keyboard's velocity sensitivity on or off. When it is switched off, you can specify the fixed velocity value that should be used for all notes you play.
⑨ METRONOME button
This button allows you switch the metronome on and off. Holding it for more than one second calls up a FUNCTION parameter you can set.
10 MELODY INTELLIGENCE button
This button allows you to switch the Melody Intelligence function on/off. This function adds a harmony part to your melody playing. See p. 27. Holding it for more than one second calls up a FUNCTION parameter you can set for selecting the harmony type.
⑪ USB button
This button allows you to select the function of the USB port should perform: (i) mass storage (archiving and retrieving settings to/from a computer) or (ii) USB/MIDI (whereby the USB port has the same function as the MIDI IN and MIDI OUT connectors). See pages 47 and 52 for details.
Press it together with ONE TOUCH to select the EXR-46 OR's demo function (see p. 12).
⑫ ONE TOUCH button
Press this button to select the desired One Touch settings. One Touch memories contain a number of settings that complement the currently selected Music Style. There are two One Touch memories per Music Style. See p. 26.
13 V-LINK button
Press this button to take advantage of the EXR-46 OR's V-LINK functionality for controlling video material via certain performance functions and the right-most keys on the EXR-46 OR's keyboard. By using V-LINK-compatible video equipment, visual effects can be easily linked to, and made part of the expressive elements of a performance. By connecting the EXR-46 OR to an optional Edirol DV-7PR or V-4, you can switch images in synchronization with music, or use the EXR-46 OR's performance functions or right-most keys to switch clips, control playback speed, etc. During song and Music Style playback, this button flashes to indicate the tempo and beats (BEAT function).
(4) KEYBOARD CONTROL section
Press the SPLIT button to play different sounds with your left and right hands. Press the DUAL button to play two sounds simultaneously. Press SPLIT and DUAL simultaneously to activate the EXR-46 OR's Drum Pad mode (page 32). Use the TRANSPOSE button to transpose the keyboard (see p. 32).
15 BAND ORCHESTRATOR section
Press one of these buttons to choose the desired orchestration for the selected Music Style. See page 17.
16 ARRANGER & SONG -CONTROLS section
TAP TEMPO button: Press this button at least twice to set the Arranger's or Recorder's playback tempo.
SYNC START/STOP button: This button performs two functions: In Arranger mode (while using the automatic accompaniment), it allows you to switch the SYNC START and SYNC STOP function on and off.
In Song mode, it can be used to specify the beginning ("A") and end ("B") of the passage that should be repeated. The remaining buttons in this section allow you to control Arranger or Recorder playback. See pages 15 and 19.
⑰ LOCK section
The buttons in this section allow you to filter (ignore) certain settings that are usually recalled when you select a User Program. This allows for a more flexible use of your registrations. See page 46.
When the Minus One function is on, these buttons allow you to quickly mute several Standard MIDI File parts (these mute functions are not available while you are using the Arranger function).
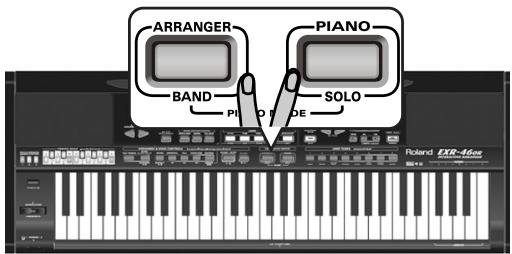
KEYBOARD MODE section
These two buttons allow you to quickly configure the EXR-46 OR for use with ([ARRANGER BAND]) or without ([PIANO/SOLO]) automatic accompaniment. At power-on, the EXR-46 OR selects the PIANO SOLO mode. Press them simultaneously to activate the PIANO MODE, which allows you to use the EXR-46 OR's Arranger (automatic accompaniment) without splitting the keyboard (see p. 27).
19 MUSIC ASSISTANT button
This button allows you to work with pre-programmed registrations (additional User Programs). See p. 26.
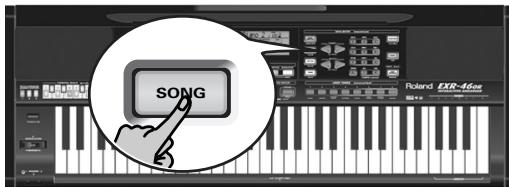
20 SONG button
This button allows you to select the EXR-46 OR's Song mode and to specify that the [INTRO], [ORIGINAL], etc., buttons should be used to operate the on-board Recorder.
② STYLE button
Press this button if you want to select Music Styles. By activating this button, you also specify that the [INTRO], [ORIGINAL], etc., buttons are used for selecting a Style Division, while the numeric buttons can be used to select the desired Style memory.
TONE button
Press this button if you want to use the FAMILY and numeric buttons for assigning a sound ("Tone") or Drum Kit to the Main, Split or Dual part. See p. 30.
DATA ENTRY buttons
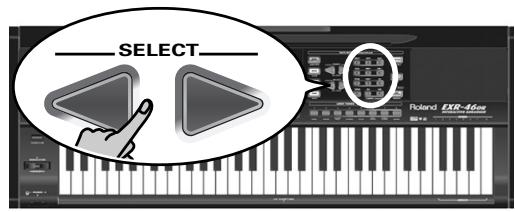
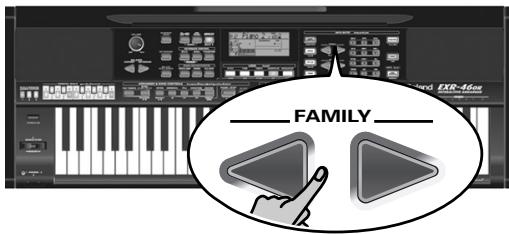
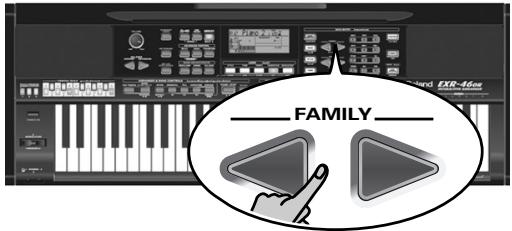
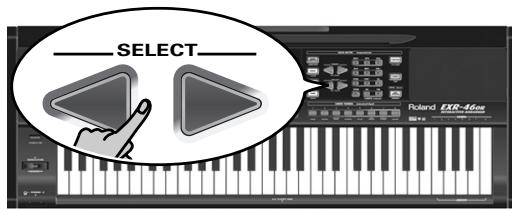
FAMILY and SELECT l buttons: The FAMILY and SELECT l buttons are used to select Tones, Styles, Music Assistant registrations, Songs, and Function parameters. The FAMILY l buttons allow you to select a group. You can press them, hold them, or press one while holding the other to change the scrolling speed.
The SELECT l buttons allow you to choose items within the selected group or family. You can press them, hold them, or press one while holding the other to change the scrolling speed. After selecting the last item of the currently selected group, pressing again takes you to the first entry of the following group. Conversely, pressing again after selecting the first entry of a group takes you to the last entry of the preceding group.
Numeric key pad: These buttons allow you to enter numbers (for Tone, Style, Music Assistant memory, song, track selection), values and characters (for entering names). The TEMPO/DATA + buttons allow you to set the arranger or Song tempo and the value of the selected FUNCTION parameter.
24 FUNCTION button
This button provides access to the FUNCTION menu. You can use the FAMILY and SELECT l buttons to select the desired function.
25 DISK button
Press this button to access the Disk functions. They are used for loading data from floppy, saving data to disk, and managing floppy disks. See p. 53.
Note: You can also save and load data via USB.
26 USER PROGRAM/WRITE button
Press this button whenever you want to select a User Program (a set of registrations). Press and hold it to save the current panel and parameter settings to a User Program. See page 45.
27 USER TONES section
These buttons allow you to select the "best" sound of the indicated family (i.e. the "best" piano, organ, guitar/bass, etc. sound). After pressing one of these buttons, you can use FAMILY and SELECT to select other families and other Tones within the active family. (At a later stage, these can be recalled by "double-clicking" these buttons.) You can also assign your favorite sounds to these buttons. See "Using the USER TONES buttons" (p. 30) for details.
Disk drive, in the middle below the keyboard (not pictured) This is where you insert floppy disks with Standard MIDI Files or Music Styles you may already own. The drive accepts 2DD (720k) and 2HD (1.44MB) floppy disks.
Rear panel

① OUTPUT R, L/MONO sockets
These sockets allow you to connect the EXR-46 OR to your HiFi amplifier, a mixer, a cassette deck, a keyboard amplifier, etc. If the external amplifier is mono, be sure to connect it to the OUTPUT L/MONO socket.
② DC IN socket
This is where you need to connect the supplied adapter (PSB-4U).
Note: Be sure to only use the adapter supplied with your EXR-46 OR. Other adapters may damage your Interactive Arranger.
③ Cord hook
After connecting the adapter cable, wind it around the cord hook to the socket's right to prevent accidental power failures.
④ FOOTSWITCH socket
This is where you can connect an optional DP-2, DP-6, or BOSS FS-5U footswitch that allows you to hold ("sustain") the notes you play with your right hand. It can also be used for controlling other parameters (see "FSW" (Footswitch Assign)" (p. 40)).
⑤ MIDI OUT/IN sockets
Connect the MIDI OUT socket to the MIDI IN jack of your computer (or MIDI instrument) to transfer MIDI data from the EXR-46 OR to the computer or external MIDI instrument. Connect the MIDI IN socket of the EXR-46 OR to the computer's MIDI OUT jack to receive data from the computer.
Note: The EXR-46 OR can also transmit/receive MIDI data via its USB port. To do so, you need to install the appropriate USB drivers from the supplied CD-ROM.
⑥ USB port
The USB port can be used for transmitting/receiving MIDI messages or for archiving purposes with a computer.
4. First steps
Setting up
The first thing you need to do is connect the supplied PSB-4U adapter to a suitable wall outlet.
(1) Unpack the EXR-46 OR and place it on a stable surface.
(2) Connect the small end of the adapter cable to the EXR-46 OR's DC IN jack, and the other end to a suitable wall outlet.
(3) Press the POWER ON button to switch on the EXR-46 OR.
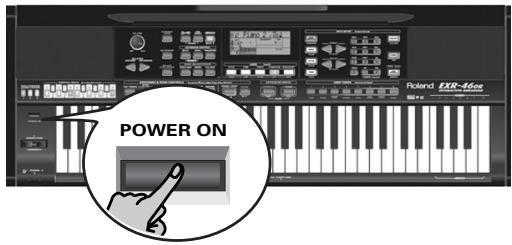
(4) Use the volume knob to set the EXR-46 OR's output volume.
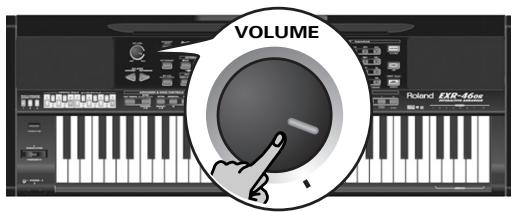
Note: When the EXR-46 OR is used at excessive volumes, the protection system of its power amplifier stage may come on and mute the speakers. In that case, reduce the volume setting and wait a few seconds.
(5) Press [POWER ON] again to switch the EXR-46 OR back off again.
If you wish to connect the EXR-46 OR to a keyboard or HiFi amplifier, do so before performing step (3) and switch on the amp before performing step (4).
Demo songs
Your EXR-46 OR comes with 1 song demo, 8 Tone demos, and various Style demos.
- The song demo illustrates the possibilities of the EXR-46 OR as a whole.
- Tone demos show off the EXR-46 OR's amazing sound quality.
- Style demos give you an impression of the quality of the on-board Music Styles.
(1) Hold down the USB button while pressing ONE TOUCH.
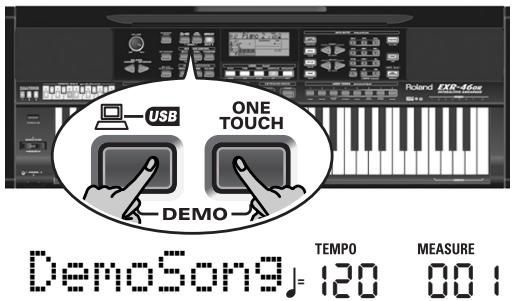
(2) If necessary, use the volume knob to change the playback volume.
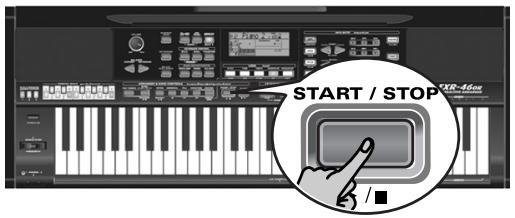
(3) Press START/STOP to stop playback.
Playing back a Tone demo song
(1) Press the TONE button.

Playback of the Tone demo song starts automatically.
You can now press START/STOP to stop playback of the currently selected Tone song. If you press this button again, the next Tone demo song will be played back.
(2) Press START/STOP to stop Tone demo song playback.
Playback of a Style demo song
(1) Press the STYLE button.
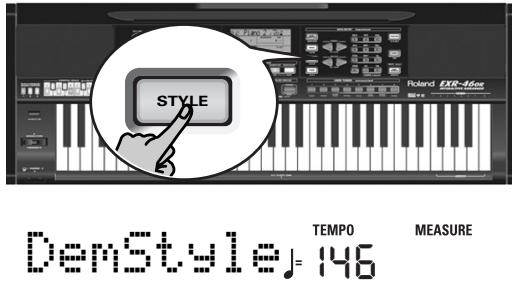
Playback of the Style demo song starts automatically.
You can now press START/STOP to stop playback of the currently selected Style demo song. If you press this button again, the next Style demo song will be played back.
(2) Press START/STOP to stop Style demo song playback.
Leaving Demo mode
(1) Hold down the USB button while pressing ONE TOUCH to leave the Demo mode.
Playing without accompaniment
When you switch on the EXR-46 OR, it selects the PIANO SOLO mode. This means that you can use the EXR-46 OR like a digital piano, or a synthesizer.
The accompaniment function (called "Arranger") and
ONE TOUCH button are not available in PIANO SOLO mode, while only the Main part is active.
The EXR-46 OR provides three parts for your live playing (and many more for Arranger backing and Song playback):
| Main | As its name suggests, this is the most important part. As long as the Split part is off, the Main part is assigned to the entire keyboard. |
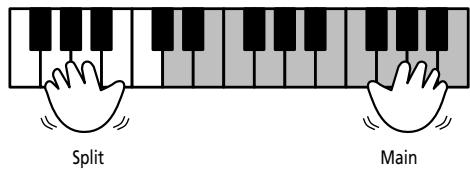
| Split | When you switch on this part, it is assigned to the left half of the keyboard, while the Main part can be played with your right hand. |
| Dual | This part can be added to the Main part and is also assigned to the entire keyboard. This allows you to play two sounds simultaneously. |
Using the Main part
(1) To activate the Main part and assign it to the entire keyboard, press the PIANO SOLO button.
The ARRANGER icon disappears, the Arranger stops (if it was playing), and the EXR-46 OR automatically selects a piano sound for you.
(2) Play a few notes on the keyboard.
(3) If necessary, select another sound by pressing one of the 8 USER TONES buttons. See p. 30 for details.
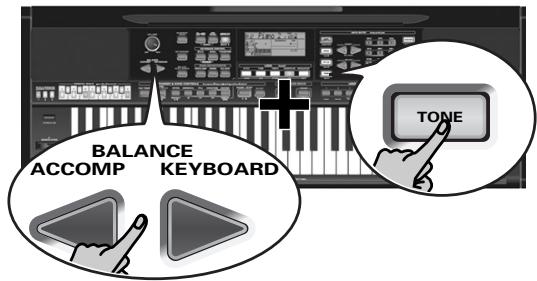
(4) If necessary, you can hold down the TONE button and use BALANCE [ACCOMP] (softer) or [KEYBOARD] (louder) to change the Main part's volume.
Note: Unlike previous Roland arranger instruments, the EXR-46 OR no longer distinguishes between "melodic" parts and a Manual Drums part. You can therefore also play a Drum Kit with the Main part.
Note: You can also press the START/STOP button to add a rhythm accompaniment to your playing. This is based on the currently selected Music Style. See p. 16 for how to select a different one.
Note: See p. 15 and "Automatic playback start (Sync Start & Stop)" (p. 16) for other ways to start Music Style playback (the drums, that is).
Using the Main and Split parts
(1) If you wish to play different sounds with your left and right hands, press the button.

The Split icon appears and the EXR-46 OR now automatically selects a sound for the Split part that complements the sound assigned to the Main part.
(2) Play a few notes on the keyboard.
At first, the keyboard is split at the G3 (note number "55"). If necessary, you can select a different split point. See "KeySplit* (Split point)" (p. 40).
To change the balance between the Main and Split sounds, proceed as follows:
(3) Hold down the SPLIT button and use BALANCE [ACCOMP] (decrease) or [KEYBOARD] (increase) to change the Split part's volume.
(4) To assign another sound to the Split part, hold down the SPLIT button and proceed like for the Main part (page 13).
Alternatively, press and hold one of the eight USER TONES buttons (Main part) while pressing another USER TONES button (Split part).
Note: You cannot assign Drum Kits to the Split part.
Note: You can also add a monophonic bass part ("Auto Bass") to the Split part. See "Auto Bass*: status and volume" (p. 41).
Using the Main and Dual parts
(1) To play two sounds simultaneously, press the DUAL button.
The Dual icon appears and the EXR-46 OR now automatically selects a sound for the Dual part that complements the sound assigned to the Main part.
You can also activate the Dual mode by holding down one of the eight USER TONES buttons while pressing another. The first USER TONES button's sound is then assigned to the Main part, while the second sound is assigned to the Dual part.
(2) Play a few notes on the keyboard.
To change the balance between the Main and Dual sounds, proceed as follows:
(3) Hold down the DUAL button and use BALANCE
ACCOMP (decrease) or KEYBOARD (increase) to change the Dual part's volume.
(4) To assign another sound to the Dual part, hold down the DUAL button and proceed like for the Main part (page 13).
Note: You cannot assign Drum Kits to the Dual part.
Using the metronome
You can switch on the metronome when practising a new song.
(1) Press the METRONOME button.

The icon appears in the display and you hear the metro-nome sound.
(2) Press and hold METRONOME to select the Metro TS function.
(3) Use the + buttons to set another time signature. The possibilities are: 1 / 4 9 / 4 1 / 8 9 / 8
(4) Press another "big" button in the DATA ENTRY section to leave this function.
(5) Press the METRONOME button again to switch the metronome off.
5. Playing with accompaniment (Arranger)
Let us now take advantage of the EXR-46 OR's accompaniment function. This function is called "Arranger".
Starting/using the Arranger
(1) Press the ARRANGER BAND button.

The ARRANGER icon appears in the display and the keyboard is split into two halves. The keys you press in the left half are used to specify the key of the accompaniment. The right half of the keyboard allows you to play a tune to the accompaniment.
(2) Press the START/STOP button to start Arranger playback.
The V-LINK button now flashes to indicate the tempo and beats (BEAT function).
Note: If the ARRANGER icon is displayed, playing in the left half of the keyboard while the Arranger is stopped, will sound a stereo string sound (to which you can add a monophonic bass sound, see "Auto Bass*: status and volume" (p. 41)). The left half of the keyboard is thus not muted (like on previous Roland arranger instruments). This "EP Chord" function can be switched off, however (page 42).
(3) Play a chord (or just one note) with your left hand.
(4) Play another chord (or note) to change the Arranger's key.
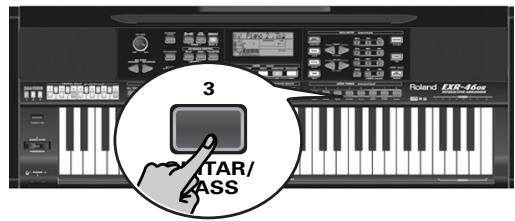
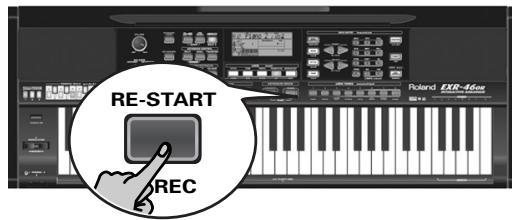
(5) To quickly return to the beginning of the accompaniment pattern (RE-START function), press the REC button while the accompaniment is running.
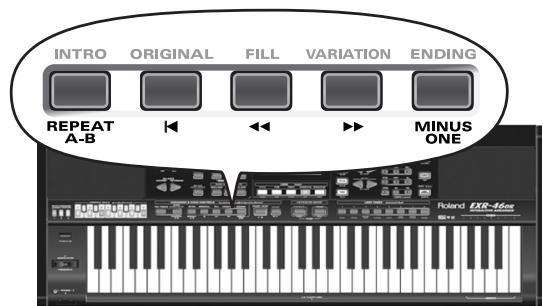
(6) Press the following buttons to use other patterns of the currently selected Music Style:
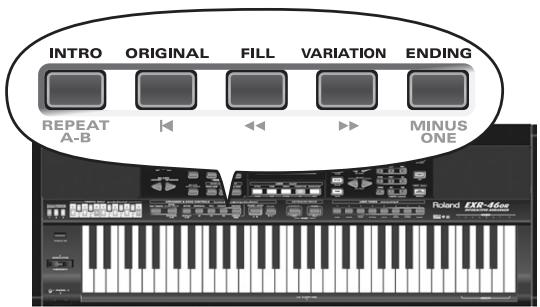
| Button | Function |
| INTRO | Selects an introduction. Press this button before activating START/STOP. |
| ORIGINAL | Simple accompaniment version. |
| FILL | Transition ("Fill In") to VARIATION or ORIGI-NAL. |
| VARIATION | Slightly more complex accompaniment ver-sion. |
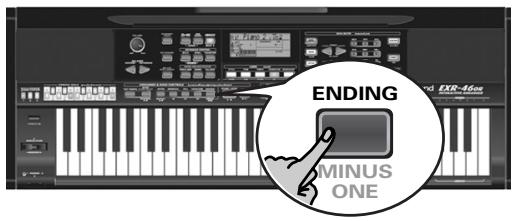
| ENDING | Phrase that indicates the end of the song. Use this button instead of START/STOP to stop playback. |
These buttons select Music Style "patterns". The icon corresponding to the button you press appears in the display.
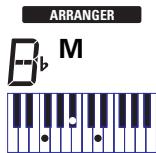
Also, the ARRANGER chord field in the display indicates the name of the chord you played last. This chord is used by the accompaniment.
As soon as you feel comfortable with the Arranger, you should try to play a melody with your right hand while using your left for specifying Arranger chords.
Changing the tempo
(7) Use the TEMPO/DATA buttons to decrease (□) or increase (⊕) the tempo (if necessary).
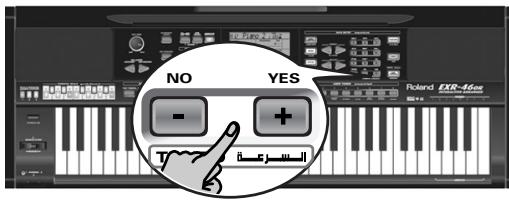
To return to the Music Style's default tempo, simultaneously press and + .
You can also press the TAP TEMPO button several times at the desired tempo.

Automatic playback start (Sync Start & Stop)
Press SYNC START/STOP (the SYNC START icon appears). "Sync Start" means that the Arranger starts playing back the selected Music Style as you play a note or a chord with your left hand (to the left of the split point).
In PIANO mode, Arranger playback will start when you press any note.
The EXR-46 OR also provides a SYNC STOP option: quickly press SYNC START/STOP twice ("double-click") so that the SYNC START icon starts to flash. This will cause the Arranger to
stop as soon as you release all keys in the chord recognition area. This is great for songs where you need breaks (i.e. one or several beats of silence).
Note: The behavior of the SYNC STOP function can be changed (see p. 42) by pressing and holding the [SYNC START/STOP] button.
Stopping Arranger playback
(8) Press START/STOP again to stop playback.
You can also press ENDING. In that case, you first hear an ending phrase. When it is finished, Arranger playback stops automatically.
Alternatively, you can press the SYNC START/STOP button twice in succession to activate the SYNC STOP function. If you then release all keys in the left half of the keyboard, playback stops at the same time.
Selecting Music Styles
The EXR-46 OR provides three memory areas for Music Styles: USER STL: (Memory 000) This is where a Music Style loaded from the Flash memory or floppy disk (MSA, MSD and MSE series, optional) is temporarily stored. The data in this RAM memory are erased when you switch off the EXR-46 OR. MAKSOUM (001~008), SAIDI (009~013), MASRI (014~025), MALFOLFUF (026~028), ARABI (029~035), TRADIT (036~049), OR-WORLD (050~066), KHALIGI (067~088), TURKISH (089~099): These are the Style families in the EXR-46 OR's internal ROM memory. These Styles cannot be erased (but you can modify them in realtime using the Band Orchestrator function, see page 17).
FLASH: (Memories 101~150) This is a Flash area inside the EXR-46 OR that already contains 50 Styles when the EXR-46 OR is shipped. You can expand the number of Styles in this area by copying more Styles from your computer (via USB) or by saving the Styles loaded from disk. There are 99 Flash memory slots in all, but the actual number of Styles you can save there depends on the data size of the Styles.
DISK: (Memories 201~...) This area refers to a floppy disk you inserted into the EXR-46 OR's drive. The number of available Styles depends on the floppy disk, of course. The Style you select is transferred to the EXR-46 OR's USER STL memory (see above), which is why it takes a little longer before you can use it. (You could, however, save it to a Flash memory, see p. 49.)
(1) Press the ARRANGER BAND button.
Check whether the ARRANGER and a
INTRO ORIGINAL FILL VARIATION ENDING icon are displayed.
(2) Press the STYLE button.
(3) If you want to use a style on floppy disk, insert the disk into the drive.
(4) Use FAMILY to select the memory area that contains the desired Music Style (see above).

The FAMILY buttons allow you to jump to the desired "family" (which also include the Flash and USER STL areas).
The display now shows the name of the selected family.
MALFOUF 73
FLASH 132
(5) Use SELECT to specify the desired Style within the selected group.

The first press of SELECT (or) shows the name of the first Music Style within the selected group. It is already selected, so if you need the first Style, there is actually no need to press SELECT. You must use SELECT or, however, to select another Style within the same group. You can also use the numeric buttons to select Styles. See also "Working with the FAMILY, SELECT and numeric buttons" (p. 20).
After selecting memory 101 (Flash) or 201 (first disk memory), the display shows a flashing YES message.
Note: If you forgot to insert a floppy disk into the drive, the display shows "No Disk" when you attempt to select the "disk family".
(6) If necessary, confirm your selection by pressing the +/[4]YES button.
The display briefly shows "LOADING" (only after selecting a Style from the inserted floppy disk).
If you selected a Music Style on floppy disk, the Disk icon now flashes, and the EXR-46 OR automatically selects the USER STL memory that now contains the Music Style you loaded from floppy disk.
If you press + / YES during Arranger playback, the new Style is used at the next downbeat (1st beat of the next measure). Otherwise, the EXR-46 OR displays its name and uses that Style when you press START/STOP.
Note: See page 50 for how to save the Music Style in the USER STL memory to the Flash memory.
Using the Band Orchestrator function
The Band Orchestrator function allows you to vary the accompaniment patterns played by the Arranger. You can leave out parts, thin out the drum part, etc. - in real-time (i.e. while you are playing).
(1) Press the ARRANGER BAND button to select the Arranger mode.
(2) Select the Music Style you wish to use for playing (or use the one that is currently selected). See page 16.
(3) Press one of the following buttons to select the desired level of musical "complexity" (the corresponding icon is displayed):
Obviously, these buttons should be used during Arranger playback.
| DRUM & BASS | The simplest accompaniment that only contains the drum and bass lines. |
| COMBO | Accompaniment pattern with only a few instruments (i.e. a band). |
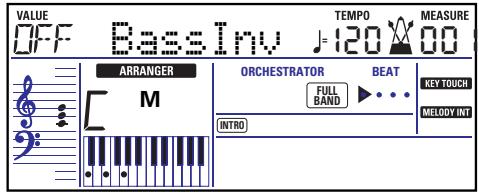
| FULL BAND | Accompaniment pattern with a lush arrangement (several melodic instrument lines). |
The corresponding icon appears in the display (only one of them can be displayed at any one time).

COMBO
FULL BAND
Note: Immediately after switching on the EXR-46 OR, the Orchestrator selects the "FULL BAND" level.
Note: The effect of these three levels also depends on whether the VARIATION or ORIGINAL button was pressed. In effect, the combination of the ORIGINAL/VARIATION and DRUM&BASS/COMBO/FULL_BAND buttons provides 6 accompaniment patterns per Music Style (3 x 2).
The last selection you make can be saved to a User Program. See p. 45.
Balance
The BALANCE l buttons allow you to change the volume balance between the Arranger (or Song) parts and the Keyboard parts (the ones you can play yourself).
(1) Press BALANCE [ACCOMP] if the Arranger (or Song parts) are too soft.

A10 Balance 80
(2) Press BALANCE [KEYBOARD] if you think your solo playing should be louder.
By holding down (or ) while pressing these buttons, you can modify the volume of those Keyboard parts.
Note: See p. 41 for setting the volume of individual parts.
6. Playing back songs
The EXR-46 OR allows you to play back commercially available music data files (called Standard MIDI Files) or your own songs you saved to disk or to the EXR-46 OR's Flash memory. Your own songs are saved as Standard MIDI Format 0 files and can also be played back using any other SMF compatible sequencer (or software).

Basic song playback
(1) Press the SONG button (it lights) to switch to Song mode.

This is necessary because, otherwise, pressing the START/STOP button will start Arranger playback. So be sure to check whether the SONG button lights and whether the ARRANGER and INTRO ORIGINAL FILL VARIATION ENDING icons are no longer displayed. Only then will the ARRANGER & SONG CONTROLS buttons allow you to control song playback (see above).
(2) If you want to play back a song from floppy disk, insert the disk into the drive (front right).
(3) Use FAMILY to select the memory area that contains the song you wish to play back.
The EXR-46 OR provides three memory areas for songs: USERSONG: (Memory 000) This where the song data you record are temporarily stored. The data in this RAM memory are erased when you switch off the EXR-46 OR.
FLASH: (Memories 101~199) This is the Flash area inside the EXR-46 OR that already contains several songs when the EXR-46 OR is shipped. You can expand the number of songs in this area by copying more songs from your computer (via USB). There are 99 Flash memory slots in all, but the actual number of songs you can save there depends on the data size of the songs.
DISK: (Memories 201~...) This area refers to a floppy disk you insert into the EXR-46 OR's drive. The number of available songs depends on the floppy disk, of course.
(4) Use SELECT or the numeric buttons to specify the desired song within the selected group.

This is only necessary for the Flash memory or a floppy disk (there is only one USERSONG memory).
The first press of SELECT (or) shows the name of the first song within the selected group. It is already selected, so if you need the first song, there is actually no need to press SELECT. You must use SELECT or, however, to select another song within the same group. After selecting memory 101 (the first Flash memory), the display looks as follows.
TEMPO
101SongName
You can also use numeric buttons to select songs.
Working with the FAMILY, SELECT and numeric buttons
You can press FAMILY l or l either repeatedly (brief presses) to go back or advance, or hold down l or l to quickly select another family. The fastest way to scroll through the available families is by holding down l while pressing l (go backwards), or by holding down l while pressing l (advance). The same methods are available for the SELECT l buttons. As a reminder: the FAMILY buttons are used for selecting groups, while the SELECT buttons allow you to select items within a group.
If you prefer to use the numeric buttons, enter three figures (e.g. "001" for entry "1"). If you only enter two figures (or only one), the EXR-46 OR takes slightly longer to accept your entry.
Note: If the number you enter lies beyond the last available entry, the EXR-46 OR does not change.
Note: Enter "000" (or "0") to select the USERSONG memory.
After selecting memory 101 (Flash) or 201 (first disk memory), the display shows a flashing YES message. You can ignore this if you like, and proceed with the next step (or you can press YES/+ and then proceed).
Note: If you forgot to insert a floppy disk into the drive, the display shows "No Disk" when you attempt to select a file on disk.
(5) After making sure that the correct song has been selected, you can press START/STOP (now called ▶ / ) to load it and immediately start playback.
The V-LINK button now flashes to indicate the tempo and beats (BEAT function).
You can already select a new song while the current one is still playing back. If you want to listen to it before the current song is finished, stop playback by pressing
/ STOP then press that button again. Otherwise, wait until the current song is finished, then press the / STOP button to start playback of the new song.
Note: Please bear in mind that starting playback of the selected song on disk will erase the song in the USERSONG memory. Be sure to save it to disk before proceeding (see p. 54).
(6) You can change the song tempo with the + buttons or TAP TEMPO.
Doing so, however, means that the tempo will still change if the song you are playing back contains tempo change messages. Furthermore, every time you jump back to the beginning or another position of the song using l ,or 出 ,the programmed song tempo is reset.
Note: In Song mode, the EXR-46 OR automatically selects the PIANO SOLO keyboard mode. If you like, you can play along with the song (and even use the Split or Dual part).
Note: In certain cases, the display may show the message XG Light or GM2 rather than a Tone name. Such a message means that the EXR-46 OR is using a Tone that cannot be selected via the front panel. There are 798 such "hidden" Tones whose sole purpose is to ensure XG/GM2 playback compatibility.
Additional playback functions
The INTRO, ORIGINAL, etc. buttons have two functions: one in Style mode (printed above the buttons), and another one in Song mode (printed below the buttons).
Selecting Song mode
The ARRANGER & SONG CONTROLS buttons have two functions: they can be used for selecting Music Style patterns (when the ARRANGER icon is displayed), or for Song navigation (when the SONG button lights).
To select Song mode (and the SONG CONTROL functions), you need to press the SONG button. Only then will the following functions be available.
Fast Forward, Rewind, and Reset
- To fast forward (jump to a measure later in the song), press.
- To rewind (return to a measure that lies before the current position), press l .
The measure indication in the upper right corner of the display will help you locate the measure you need.
- Press (Reset) to jump back to the first measure of the song. You need to stop playback before using the button.
Note: In certain cases, and may not be available. This is only the case for very large songs, however.
Note: By pressing , or , you also recall the song's preprogrammed tempo value.
Loop playback (Repeat)
Another clever feature of the EXR-46 OR's Recorder is that you can program playback loops. You can do so during playback or while the Recorder is stopped.
(1) Press MARKER A-B where you want the loop to begin (the H-A icon appears in the bottom right corner of the display).
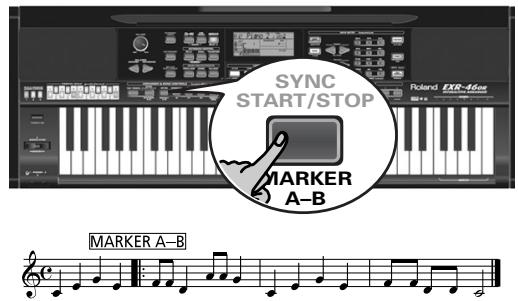

(2) Fast forward to the measure where you want the loop to end and press MARKER A-B again (the BII icon appears). You can also program loops on the fly. Remember, however, that the Recorder always memorizes the beginning (down-beat) of the next measure.
(3) If the icon isn't already displayed, press the REPEAT A-B button to activate the loop you have just programmed.
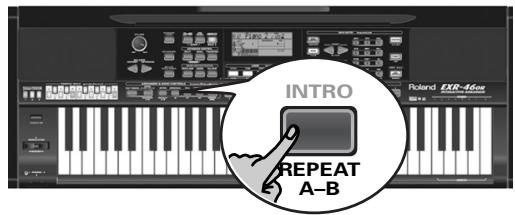
This button allows you to switch the EXR-46 OR's Repeat function on and off.
(4) To play back the loop, press the START/STOP button (now called l ).
The Recorder jumps to measure "A" and starts playing. At the end of measure "B", the Recorder immediately jumps back to the beginning of measure "A" and continues playing back the passage.
If necessary, repeat steps (1) and (2) to set other marker positions.
Note: The playback tempo is reset every time the Recorder reaches the "A" measure.
Note: In certain cases, the Marker function may not be available. This only happens with very large songs, however.
Live performance with song backing (Minus One)
Your EXR-46 OR allows you to mute parts you wish to play yourself or don't need in a given situation. This is called "Minus One" playback.
(1) Press the SONG button if it doesn't light. You can now select a Song, if you like (see p. 19).
(2) Press the MINUS ONE button (the "MinusOne" message appears in the display).
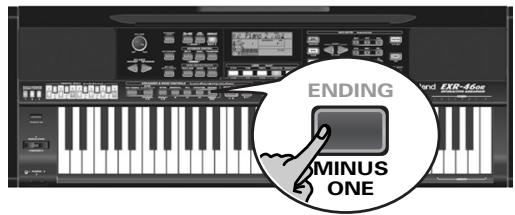
The 5 LOCK buttons light to indicate that all tracks will be played back.
(3) Press one of the LOCK buttons to switch off the corresponding track(s). The assigned track icon flashes.
(Example: if you switch off the DRUMS button, the 10 icon starts flashing.)
When a button lights, the corresponding track(s) is/are audible (i.e. not muted). You can also mute several tracks by switching off the corresponding LOCK buttons.
The MINUS ONE icon appears and the selected part is muted.
Note: The Main part does not automatically adopt the Tone and related settings of the melody part.
If you like, you can also mute several parts.
What are tracks?
The term "track" is used only for your convenience. We borrowed it from tape recorders that allow for recording several musical parts by the same person (one part after the other).
In the case of the EXR-46 OR, the term is only used to indicate that we are dealing with separate musical parts. Here indeed (like with computer-based sequencers) what really counts are the MIDI channels.
Songs you record with the EXR-46 OR, and the Standard MIDI Files you play back can consist of up to 16 tracks (i.e. MIDI channels). In many instances, only certain tracks are used, but the following are almost certainly present in every Standard MIDI File:
Track 2: bass
Track 4: melody
Track 10: drums
The LOCK buttons allow you to mute the following tracks:
RIGHT-Refers to track "4" of the selected Standard MIDI File. Music data for educational purposes (especially piano music) use this track for the right-hand part. Mute this track
to play the right hand yourself while listening to the left-hand part of the Standard MIDI File. The EXR-46 OR contains an excellent stereo piano Tone you could use.
LEFT-Refers to track "3" of the selected Standard MIDI File. Music data for educational purposes (especially piano music) use this track for the left-hand part. See also above.
OTHERS)-Mutes all tracks that cannot be muted with the remaining LOCK buttons, more specifically: 1, 3, 6~9, 12~16.
[BASS]-Mutes track "2", which is assigned to the bass part of a Standard MIDI File.
[DRUMS]-Mutes track "10", which is assigned to the drum part of a Standard MIDI File.
Note: You also switch off several buttons simultaneously.
(4) Press l and l to start playback.
(5) Press l again to stop playback.
(6) Press MINUS ONE again (or one of the "big" DATA ENTRY buttons) to switch the function of the same name back off again.
Note: The Minus One setting can be saved along with the selected song. See page 49.
Changing the track assignments
If the song files you are using do not conform to the GM system (and therefore do not correspond to the RIGHT, LEFT, BASS or DRUM assignments of the Minus One function), you can proceed as follows to assign other tracks (MIDI channels) to the LOCK [RIGHT], [LEFT], [BASS] and [DRUMS] buttons:
(1) Press the MINUS ONE button to activate the function of the same name.
(2) Press and hold the RIGHT, LEFT, BASS or DRUM button.
(3) While holding that button, use the + buttons to assign the desired MIDI channel to the button you are holding. Example: To assign MIDI channel "10" to the RIGHT button, press DATA ENTRY + until the display looks as follows:
VALUE
10
RIGHT
(4) Press MINUS ONE again (or one of the "big" DATA ENTRY buttons) to switch the function of the same name back off again.
Note: The Minus One setting can be saved along with the selected song. See page 49.
7. Recording your music
Your EXR-46 OR contains a 16-track Recorder you can use for recording your own songs.
Basic song recording
Let us first look at the most straight-forward way of recording your renditions with Arranger backing.
(1) Press the ARRANGER BAND button.

The ARRANGER icon appears. You can now use your left hand for transposing the Arranger's key in realtime.
(2) Press the STYLE button and select a Music Style (or select a Music Assistant memory).
(3) Select the desired Arranger division by pressing [INTRO], ORIGINAL or [VARIATION].
(4) Press the START/STOP button.
(5) Use TAP TEMPO or the + buttons to set desired tempo.
(6) Press START/STOP again to stop Arranger playback.
(7) Assign the desired Tone to the right half of the keyboard. Press TONE and use the FAMILY & SELECT buttons, the numeric buttons or the buttons in the USER TONES section. See also page 30.
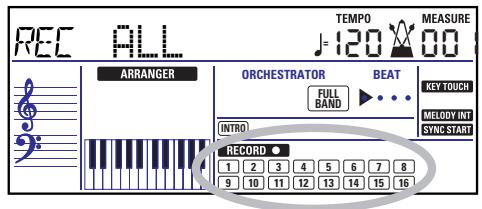
(8) Press the REC button.
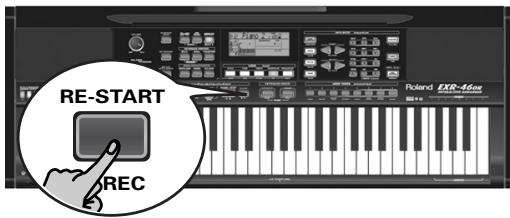
The display should look as shown above (if it doesn't, use the FAMILY l buttons ("REC MODE") to select RECALL): (The RECORD and 1~16 icons flash.) You are now in ALL mode, which means that everything you and the EXR-46 OR's Arranger play will be recorded.
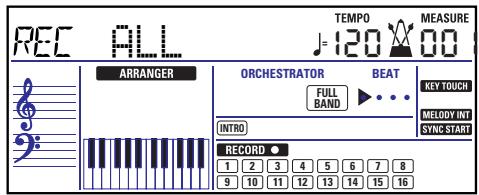
Note: If you select "REC ALL" with the FAMILY buttons, the song in the EXR-46 OR's USERSONG memory is erased. You may want to save the current song first (see p. 49). If you only pressed REC, the EXR-46 OR selects the Single mode if the USERSONG memory already contains data. See page 24 for details about that mode.
(9) Start recording in one of the following ways:
- Press the [START/STOP] button to start Arranger playback with the selected Division.
The V-LINK button now flashes to indicate the tempo and beats (BEAT function).
Note: If you start recording without the Arranger and want to bring it in at a later stage, it would be a good idea to switch on the metronome by pressing the METRONOME button.
- Activate the SYNC START function and press one or several keys to the left of the Split point.
Note: It is also possible to record in PIANO SOLO mode (after pressing the button of the same name). In that case, you should definitely use the metronome. The song's time signature can be set with the MetroTS function. See page 14.
(10) Stop recording in one of the following ways:
- Press START/STOP.

- Press the ENDING button to start the Ending phrase. As soon as it ends, Arranger playback and song recording stop.
Listening to your song
(1) Press the SONG button.
(2) Press START/STOP to start playback.
(3) Press START/STOP once again to stop playback.
(4) Press to return to the beginning of the song.
Other recording functions
The EXR-46 OR's 16-track Recorder can be used in several ways. Let us therefore have a look at the other recording modes.
About the recording modes
- Modes
The EXR-46 OR provides two modes for recording new music, and two for adding parts or correcting passages of existing music:
Recording a new song
ALL In this mode, you can record everything you and the EXR-46 OR can play simultaneously:
- Arranger (accompaniment).
- Keyboard parts (Main and Split or Dual).
Keyboard In this mode, you can record using the Keyboard parts. The track can be freely selected.
- Main and Split or Dual
Adding parts to an existing song
Single In this mode you can record onto one track at a time. The track can be freely selected.
Punch I/O This mode allows you to re-record a short section of an otherwise perfect part.
Note: Each time you select ALL or Keyboard mode, the data in the USERSONG memory are erased.
Recorder memory
The EXR-46 OR provides one "live" song memory, which can contain one song at a time. After completing a song, you should save it (see p. 54).
To keep you from accidentally erasing the song in the EXR-46 OR's internal memory, the EXR-46 OR automatically selects Single after your first recording. Bear in mind that selecting "ALL" or "Keyboard" will erase the song in the USERSONG memory. Do not select "ALL" or "Keyboard" for adding parts to an existing song - use "Single" or "Punch I/O" instead.
Conversely, you cannot select "Single" or "Punch I/O" if the USERSONG memory doesn't yet contain data.
And finally: playing back a Standard MIDI File erases the song in the EXR-46 OR's memory. In return, the SMF data will be available (and can be supplemented with your own renditions in "Single" or "Punch I/O" mode).
More about ALL mode
In addition to what you learned on p. 23, here are a few considerations:
After pressing the REC button, the 16 track and RECORD icons start flashing, signalling that all 16 tracks are available for recording.
Here is what the tracks correspond to (after recording a song with Arranger backing):
1Accomp1
2 Arranger bass
3Accomp2
4 Main
5Accomp3
Dual*
Accomp4
8 Accomp 5
9Accomp6
10 Arranger drums
11 Split
12 Auto Bass* (see p. 41)
13
14
15 Melody Intell. (see p. 27)
16 ( Main^*)
(*) Only one of these can be used alongside the Main part.
(**) If you assign a Drum Kit to the Main part. In that case, track 4 is not used.
For your convenience, the Keyboard parts are flagged with a "→" symbol in the above graphic.
Parts you do not hear during recording are not recorded. The track icons 1 16 thus do not show you what will be recorded, but rather what can be recorded.
Keyboard recording mode
In Keyboard mode, you can record the Keyboard parts. The Arranger is not available. Essentially, this mode allows you to record either one layered part using up to two sounds (Main +
Dual) or two parts (Split to the left, Main to the right). If you select a Drum Kit for the Main part, you can only record a drum part.
Note: When you select the Keyboard mode, song data in the EXR-46 OR's internal memory will be overwritten by your new recording.
(1) Press the REC button.
(2) Press FAMILY to make the display look as follows:
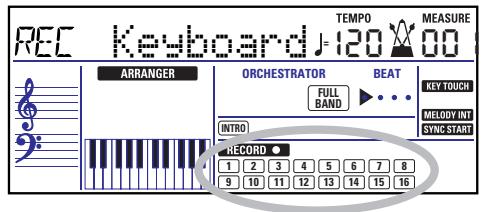
The RECORD and track icons flash.
(3) To create a split, press the button.
(4) Activate the metronome (if necessary), and set the desired tempo with the TAP TEMPO button or + . You can also record without metronome if you like.
Note: If you assign a Drum Kit to the Main part, your drum performance is recorded onto track 16.
Single recording mode
This mode is only available if the EXR-46 OR's song memory already contains data. When you press REC, the RECORD icon and the icon of the first empty track flash. You could therefore record a new part straight away. (If all tracks already contain data, Track 1 will be selected.) You can, however, also substitute an already recorded part with a new version.
(1) Press the REC button.
(2) Press FAMILY to select "Single".
(3) Use the SELECT l or numeric buttons to select the track you wish to record to. You can only select one track at a time (hence the name "Single"). If you select a track that already contains data your new version will overwrite the existing one.
(4) If necessary, assign the desired Tone to the part you are about to record (see p. 30).
If you select track 10, you can select Drum Kits rather than Tones. Track 10 is reserved for drum parts.
Note: If you use the Single recording mode for adding parts to a Standard MIDI File recorded with another instrument or sequencer, track 16 (or any other track defined as "second drum track") may also use a Drum Kit that can be changed.
Note: Even though the Main part can be used for recording all tracks in Single mode, the MFX only applies to track/MIDI channel 4.
(5) Press START/STOP to start recording.
After a two-measure count-in (see p. 41), you will hear all parts that have already been recorded. Start playing (and recording) your new part.
(6) Press START/STOP to stop recording.
(7) Return to step (3) to record additional parts.
Punch I/O
In this mode, you can re-record part of a track (the second chorus, for example). The important aspect of this mode is that newly recorded material does not erase the material before or after the passage you redo.
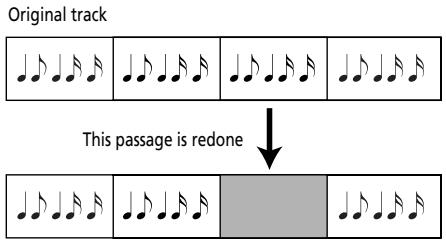

By contrast, in Single mode, the entire track you record is replaced by your new material. (So if you don't play anything during recording, the entire track will be empty afterwards.) Like the Single mode, Punch I/O can only be selected if the EXR-46 OR's memory already contains song data.
(1) Press the REC button.
(2) Press FAMILY to make the display look as follows:
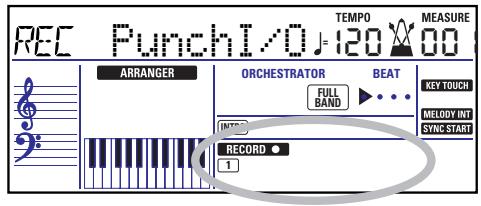
The flashing track icon (only one) depends on the first track that already contains data. In the above example, track 1 contains data, which is why its icon flashes.
(3) Use the SELECT l or numeric buttons to select the track you wish to record to.
You can only select one track at a time.
(4) Press START/STOP to start playback of the (old) song data.
The RECORD icon and the icon of the selected track flash.
(5) When the Recorder reaches the measure where you wish to start recording, press REC again.
The RECORD icon now lights steadily.
(6) Play the passage you want to redo.
(7) Press REC again to deactivate recording.
Song playback still continues, so...
(8) Press START/STOP to stop playback.
(9) Press START/STOP to listen to the new version. If you are not satisfied, return to step (3) above.
Return to step (3) to correct another track.
Using a footswitch for punching in/out
You can also use an optional footswitch for starting and stopping recording. Doing so has the advantage that you can use both hands for playing (or the left hand for Pitch Bend/Modulation effects and the right for playing the melody.)
- Connect an optional DP-2, DP-6, or BOSS FS-5U footswitch to the FOOTSWITCH socket on the EXR-46 OR's rear panel.
- Press the FUNCTION button (it must light).

- Use FAMILY to select "KB SET".
The EXR-46 OR's Function parameters are divided into 9 logical "families". For the following, we need to select the group that contains the global keyboard settings. - Use SELECT to select the "FSW" parameter.


Sustain
Note: See also "Working with the FAMILY, SELECT and numeric buttons" (p. 20).
- Use the + buttons to select "Punch I/O".
- Press SONG to return to the recording function.
- Continue with step (1) under "Punch I/O". In steps (5) and (7), press the footswitch (rather than the REC button).
8. Additional Music Style functions
Apart from the basic Music Style functions covered on page 15 and following, your EXR-46 OR also provides the following functions. Most of the following functions are only available after pressing the
ARRANGER BAND button (the ARRANGER icon must be displayed).
One Touch
The One Touch function automates quite a few tasks:
- The Arranger selects the preset Style tempo.
- Suitable Reverb and Chorus settings.
- The EXR-46 OR selects sounds for the Main, Split and Dual parts that are is suitable for the selected Style.
There are 2 One Touch memories per Style with different settings for the above parameters. Here is how to select one:
(1) Select the desired Music Style (see p. 16).
(2) Press the ONE TOUCH button.

The number field in the upper left corner reads "OT", followed by the number of the selected One Touch memory.

If the DATA ENTRY TONE button lights, the display now shows a Tone name ("Piano 2" in the example above).
(3) Press the ONE TOUCH button again if you need "OT2". One Touch needs to be activated again every time you select a new Music Style.
Note: One Touch is also available for USB and disk Styles, but it is less meaningful.
Using the Music Assistant
Another practical function for quickly making the right settings for a song you want to play is to take advantage of the EXR-46 OR's novel MUSIC ASSISTANT function. It prepares everything for working with the Arranger (Style, Tones, effects, etc.). The Music Assistant is not available for song playback. The following parameters are changed automatically when you select a Music Assistant memory:
Music Style
- Tempo
- Sounds for the Main, Split and Dual parts
Effect settings
Band Orchestrator
Keyboard Touch
(1) Press the MUSIC ASSISTANT button.

It lights and the display shows the name of the last Music Assistant setting you selected (or of the first Music Assistant memory).
(2) Use FAMILY to select the "family" (i.e. genre) that contains the desired Music Assistant settings.
MALFOUF 102
The following families are available: MAKSOUM, SAIDI, MASRI, MALFOUF, ARABI, TRADITIONAL, OR-WORLD, KHALIGI, TURKISH.
(3) Use SELECT to specify the desired Music Assistant memory within the selected family.
The first press of SELECT (or) shows the name of the first Music Assistant setting within the selected group. It is already selected, so if you need the first setting, there is actually no need to press SELECT. You must use SELECT or, however, to select another Music Assistant setting within the same group. You can also use the numeric buttons. See also "Working with the FAMILY, SELECT and numeric buttons" (p. 20).
Note: If necessary, you can now change the settings you do not like (e.g. select another sound for the Main part, etc.) and then save your new version to a User Program (see p. 45).
Melody Intelligence
The Melody Intelligence function adds a second voice (harmony notes) to the melodies you play with your right hand. In fact, the Melody Intelligence function uses both halves of the keyboard to determine which notes to play:
- It looks at the melody notes in the right half; and...
- It analyzes the chords you play in the left half to see which notes it must add to your melody.
Press the MELODY INTELLIGENCE button so that the corresponding icon appears in the display.


Changing the Melody Intelligence harmony type
The EXR-46 OR contains 18 different voicings (harmony types) for the MELODY INTELLIGENCE function. These voicings specify the number of harmony notes and the way in which they are added to your melody.
To select a different harmony type, press an hold the [MELODY INTELLIGENCE] button until the "M I" message appears in the upper left corner of the display. Then use the + buttons to select the desired voicing. The available types are:
| 1 Duet | 6 Block | 11 Gospel | 16 WltzOrg |
| 2 Organ | 7 BigBand | 12 Romance | 17 OctvTpe1 |
| 3 Combo | 8 Country | 13 Latin | 18 OctvTpe2 |
| 4 Strings | 9 Traditnl | 14 CntrGuit | |
| 5 Choir | 10 Broadway | 15 CntrBald |
Note: The MELODY INTELLIGENCE setting can be saved to a User Program memory.
PIANO Mode
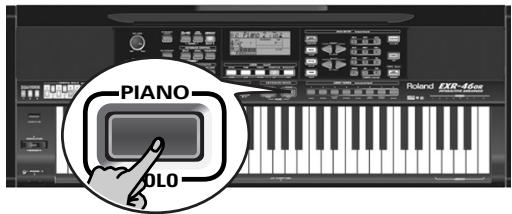
In PIANO mode, the Main part is assigned to the entire keyboard. Though the EXR-46 OR initially assigns a piano sound to the Main part, you can select any other one and save your setting to a User Program.
The main difference between PIANO SOLO and PIANIST mode is that the Arranger's melodic parts are available here, which is not the case in PIANO SOLO mode.
But there is no split for chord recognition (you may remember that the EXR-46 OR's keyboard is split when you switch on the ARRANGER BAND button): the Arranger decodes every chord you play – no matter where you play it. Causing the Arranger to play another chord requires that you play at least a triad (i.e. the three notes that make up a chord). Feel free to play more than three chord notes but remember that two notes won't cause the Arranger to play another chord.
When you use an optional sustain pedal, all notes you play simultaneously are recognized as a chord - irrespective of whether you play them with you left or right hand.
(1) Simultaneously press the ARRANGER BAND and PIANO SOLO buttons (both buttons light). The display briefly shows "PianoMod" and the ARRANGER icon flashes.
(2) Press STYLE and use the SELECT l buttons to select a Music Style. See also p. 16.
(3) Press TONE and use FAMILY and SELECT (or the USER TONES buttons) to assign a different sound to the Main part. You can also add the DUAL part (page 14). Even the SPLIT part could be used, yet chord recognition remains active for the entire keyboard.
(4) Press ARRANGER BAND or PIANO SOLO to leave PIANIST mode.
Bass Inversion (Bass Inv)
Use this function to change the way in which the Arranger reads the chords you play.
When this function is off (default), the Acc Bass part plays the root of the chords that feed the Arranger. If you play a "C" (or C chord), the bass sounds a "C"; if you play an A minor chord (or if you press "A" and the "C" to its right), the bass sounds an A, etc. By activating Bass Inversion, you can specify the note played by the A. Bass part (the lowest note of your chords). Switch on Bass Inversion for songs that rely on bass rather than on chord patterns (for example C - C/B - C/Bb, etc.).
(1) Press the FUNCTION button.

(2) Use FAMILY to select "IRR SET".
The EXR-46 OR's Function parameters are divided into 9 logical "families". As the Bass Inversion parameter is an Arranger function, you need to select the Arranger settings (hence ARR SET).
(3) Use SELECT to select the "Basis Invol" parameter.
(4) Press the + button to select "ON" for "VALUE".
Note: See also "Working with the FAMILY, SELECT and numeric buttons" (p. 20).
(5) Press another "big" button in the DATA ENTRY section to leave this function.
Note: This setting can be saved to a User Program (see p. 45).
More Music Style functions
Here are yet other functions related to Music Styles. These can be set via the FUNCTION menu, or are covered elsewhere:
- Balance between the Keyboard parts and the Music Style parts (see p. 18)
Volume of certain Music Style parts (see p. 41) - Arranger split point (see p. 40)
- Hold function for the Arranger notes (see p. 42).
9. Using oriental tunings
Your EXR-46 OR allows you to change the tuning of the keys, which then applies to all notes of the same name. Here's an example: If you press the ORIENTAL SCALE [b b] button (indicator lights), that note's tuning is lowered by a quarter tone (-50 cents). This setting applies to all B-flat keys on the keyboard.
Tuning individual notes a quarter tone down
(1) Press an ORIENTAL SCALE button to tune the corresponding notes a quarter tone down (the button must light).
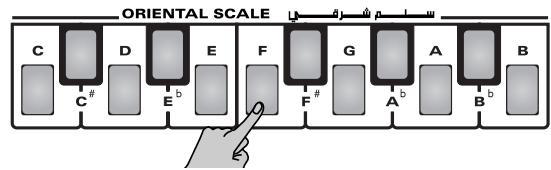
(2) If you also want to tune down other notes, press the corresponding button(s).
If you pressed the wrong button (indicator lights), press it again so that its indicator goes dark again. The pitch of the corresponding notes returns to normal.
Using other tuning values
Pressing an ORIENTAL SCALE button toggles between the western tuning of the corresponding notes and a setting that is a quarter tone below western tuning (-50 cents). However, you can also select other tuning values.
(1) Press and hold the ORIENTAL SCALE button of the note whose tuning you wish to change until the display reads Scale, followed by the note name. You can also select this page and parameter via the Function menu. See page 43.
(2) Use the DATA ENTRY + + buttons to modify the tuning of the selected note.

Setting range: -64 63 cents.
Note: To return to the default value, press + and - simultaneously.
Saving and loading your tunings (SCALE MEMORY)
After setting the desired tunings, you can save them to one of the three Scale Memories and recall them whenever you need them. Here's what you need to do:
(1) Tune the notes to your liking (see above).
(2) Press and hold the SCALE MEMORY button (1~3) that corresponds to the memory where you wish to save your tuning settings.
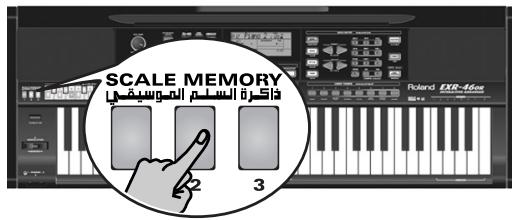
(3) Wait until all three SCALE MEMORY indicators briefly light, and release the button you pressed.
If necessary, you can select another, scale memory by briefly pressing the SCALE MEMORY button assigned to the settings you wish to use.
To return to the western tuning, press the SCALE MEMORY button in question again so that its indicator goes dark, and/ or switch off all ORIENTAL SCALE buttons whose indicators light.
In the second case, the SCALE MEMORY indicator of the last memory you selected starts flashing to signal that the current ORIENTAL SCALE settings no longer correspond to the ones contained in the currently selected memory.
The ORIENTAL SCALE settings are also saved to a User Program and therefore do not need to be saved to one of the SCALE MEMORY areas. Whenever you select a User Program
whose scale settings differ from the ones of the last memory you selected, the corresponding button (1) 3) starts flashing.
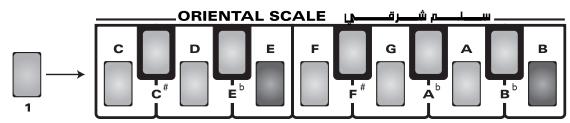


Note: When shipped, the EXR-46 OR already contains frequently used Scale Memory settings (see above).
Note: See also "Scl Mode** (p. 43) for deciding which sections should be affected by the Scale Tune settings.
10. Keyboard part functions
Selecting sounds for the Main, Split and Dual parts
The EXR-46 OR contains about 524 melodic sounds you can use for playing melodies (others are more like sound effects). Those sounds need to be assigned to a Keyboard part, of which there are three: Main, Split and Dual (see also p. 13).
Selecting any of the available sounds
Unlike previous arranger-type instruments, the EXR-46 OR no longer works with banks, numbers and variations: all available sounds can be selected via the same streamlined procedure.
(1) Press the DATA ENTRY TONE button (it must light).

(2) To assign another sound to the Split or Dual part, hold down the or button while performing the following steps.
Note: Now skip to step (5) if you prefer to enter the Tone number using the numeric key pad (0 9) . That is indeed the only way to select any available Tone.
(3) Use FAMILY to select the desired Tone family.
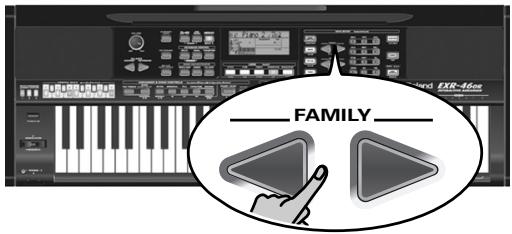
See below for the available families. By selecting another family, you immediately jump to the first sound of that group.
PIANO (001~011)
E.PIANO (012~026)
KEYBOARD (027~033)
- CHR PERC (034~063)
ORGAN (064~097)
- ACCORDN (098~111)
A.GUITAR (112~129)
E.GUITAR (130~163)
BASS (164~217)
- STRINGS (218~263)
VOCAL (264~275)
SAX (276~287)
WIND (288~301)
AC BRASS (302~329)
SYNBRASS (330~343)
SYNLEAD (344~380)
POLY SYN (381~391)
- PAD (392~426)
ETHNIC1 (427~499)
- ETHNIC2 (500~550)
PERCUSSION (551~575)
- SFX (576~617)
- DRUM KIT (618~650)
Note: See page 118 for a list of the available sounds.
(4) Use SELECT to specify a sound within the selected family.
The first press of SELECT (or ) shows the name of the first Tone within the selected group. It is already selected, so if you need the first sound, there is actually no need to press SELECT . You must use SELECT or , however, to select another Tone within the same group.
(5) Use the numeric buttons 0 9 to select other sounds within the current family that are skipped by the SELECT buttons.
Note: This setting can be saved to a User Program (see p. 45).
You can also use the numeric buttons. See also "Working with the FAMILY, SELECT and numeric buttons" (p. 20) and replace "song" with "sound" in the explanations.
Using the USER TONES buttons
The USER TONES buttons allow you to select 8 melodic sounds or Drum Kits directly (without using TONE, the FAMILY, SELECT and/or numeric buttons). At first, these buttons recall sounds assigned to them at the factory (but you can change that).
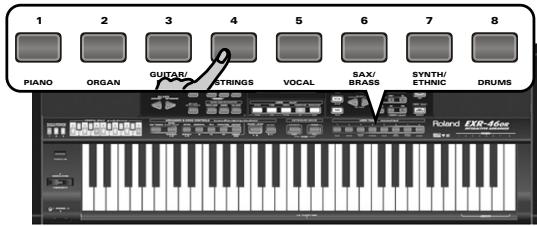
These buttons are assigned to our "favorite" sounds for the indicated categories, thus allowing you to quickly select "a piano", "a string sound", etc. The assignments to these buttons can be changed.
Note: The TONE DRUMS button is only available for the Main part.
Assigning another Tone to a USER TONES button
To assign another sound to one of the 8 USER TONES buttons:
(1) Select the sound you want to assign using the procedure described above.
(2) Press and hold the desired USER TONES button. The display briefly shows the message "Memrized".
You can assign whichever sound (or Drum Kit) you like to any of the USER TONES buttons and select it by pressing that button once.
Note: The assignments can be saved to a User Program (see p. 45). This allows to work with up to 1600 different assignments (because there are 200 User Programs).
To select the sound, which has been assigned to a USER TONES button at the factory, press the corresponding button twice in rapid succession ("double-click").
Drum sounds and sound effects ("SFX")
Drum Kits
The last 33 "sounds" (618~650) are so-called "Drum Kits". When you select such a Kit, each key is assigned to a different sound. With the left-most key, you can play a bass drum sound (also called "kick"). The white key next to it triggers a snare drum sound, etc. Try it out by pressing several keys, either in succession or simultaneously.
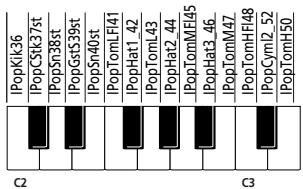
Drum Kits are collections of over 90 sounds, each assigned to a different key.
Note: Drum Kits can only be assigned to the Main part (so neither to the Split, nor the Dual part).
Note: One Kit (592) is actually a sound effects (SFX) kit that cannot be used for "drumming" but rather for triggering various sound effects.
Note: This setting can be saved to a User Program (see p. 45).
Sound effects ("SFX")
The EXR-46 OR also contains individual sound effects (like "Train, "Kitty", "HrseGllp", etc.) and individual drum and percussion sounds (576~617) that are assigned to the entire range of the part you select them for (Main, Split or Dual).
Note that those sounds do not work like the Drum Kits: only one sound is assigned to the keyboard – and can be played melodically (though "Train" melodies are probably "interesting" at best).
It might therefore be a good idea to proceed as follows:
(1) Press the SPLIT button.
(2) Decide whether you want to play the sound effect or percussion sound with your left or right hand.
If you want to use your left hand, assign a sound between "576" and "617" to the Split part. To play the effect with your right hand, assign it to the Main part.
(3) Change the split point (page 40) in such a way that only a few keys are assigned to the percussion sound/sound effect ("C6" for right-hand effect playing, "C3" for left-hand effect playing).
(4) To obtain a meaningful effect, you may also have to change the MAIN Oct or SPLT Oct setting (page 41).
If you assign a sound effect/percussion sound to the Split part, the key ranges could be set as shown below.

Using DRUM PAD mode
Drum Pad mode allows you to assign the desired drum/percussion sounds or sound effects to the highest 8 keys (the ones labeled "DRUM PAD") and to play those sounds in realtime. This function is available even when while the V-LINK function is on.
Using the Drum Pad function
(1) Simultaneously press the and buttons.
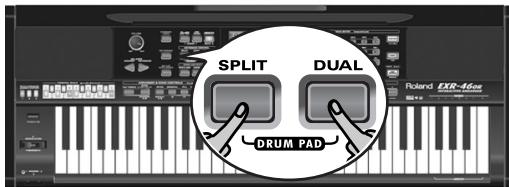
The display now looks as follows:
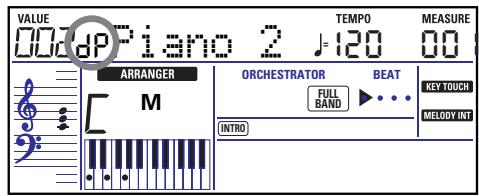
The "dP" message means that Drum Pad mode is active.
(2) Press the keys in the DRUM PAD area (1~8) to try out the sounds.
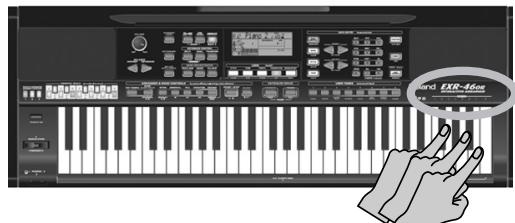
Those keys are no longer available for melody playing: they control the 8 drum/percussion sounds.
You can also assign other drum and percussion sounds to these keys. See page 41 for details. Those assignments can be saved to a User Program (page 45).
Note: If you select Drum Pad mode after assigning a Drum Kit to the Main part, the Main part reverts to the last "melodic" sound you selected (or the default sound). You cannot play a drum or percussion part with the Main part while Drum Pad mode is active. Conversely, assigning a Drum Kit to the Main part while Drum Pad mode is active will switch off Drum Pad mode.
(3) Again press the + buttons to leave Drum Pad mode.
Transpose
The Transpose function changes the pitch of the notes and chords you play. Instead of figuring out what other keys you need to press to accommodate the singer or an instrumentalist, you can set the required Transpose value and go on playing the song the way you practised it, while sounding in a different key. There are two transpose functions: one ("USRtnsp") whose setting can be saved to a User Program, and a second one ("GLBTrnsp") that applies to all sections and whose setting is added to (or subtracted from) the "USRtnsp") value. Its setting is never saved.
Let us begin with the "USRTrnsp" function, which is assigned to the TRANSPOSE button:
(1) Press the TRANSPOSE button.

The display now looks as follows:
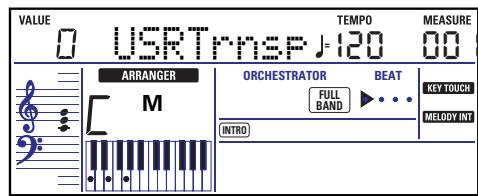
(2) Use the l and/or numeric buttons (0~9) to set the desired transposition interval.
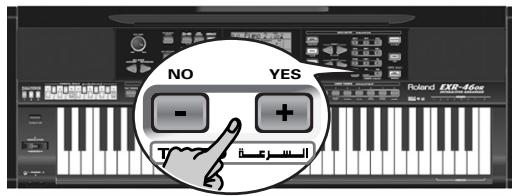
The setting range is -12 12 semitones. A "semitone" is one step between a white and a black key (or two adjacent white keys, i.e. between "E"/"F" and "B"/"C").
Press + or repeatedly to transpose the keyboard up or down. You can also directly enter the desired interval by pressing the corresponding numeric key.
To transpose the keyboard down, hold down l while pressing 0 9 (in that case, you can transpose the pitch down by up to 9 semitones)
Here's an example: to hear an "E" each time you play a "C", select "4". All other notes will be shifted by the same amount, so that you end up sounding in E major when you actually play in C major, etc.
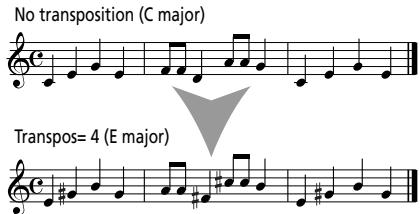
The corresponding value and the TRANSPose icon appear in the display.
(3) To switch the Transpose function back off, repeat steps (1) and (2), this time entering the value "0" (no transposition).
Note: This setting can be saved to a User Program (see p. 45). Note: There is also a function that allows you to specify which section(s) the Transpose function should apply to. See "TransMod*" (p. 40).
(4) Press another "big" button in the DATA ENTRY section to leave this function.
Global transpose function ("GLB")
There is also a "master transpose control" that alters the pitch of all sections of the EXR-46 OR. Its value is added to the current transposition interval until you reset it to "0" or until you switch off your EXR-46 OR.
(1) Press the TRANSPOSE button.
The display now shows the "USR TrnsP" message.
(2) Press the SELECT button once to select the following parameter:
VALUE
GLETrnsP
(3) Use the + and/or numeric buttons (0~9) to set the desired transposition interval.
The setting range is -6 0 5 semitones. This setting is added to (or subtracted from) the "USRTrnsp" value of all sections and all User Programs.
Press + or · repeatedly to transpose the keyboard up or down. You can also directly enter the desired interval by pressing the corresponding numeric key.
To transpose the keyboard down, hold down l while pressing l l (in that case, you can transpose the pitch down by up to 6 semitones).
As soon as you select a value other than "0", the TRANSPOSE icon starts flashing to signal that the EXR-46 OR is applying global transposition to all sections.
(4) To switch the global transposition back off, repeat step (3), this time entering the value "0" (no transposition).
The TRANSPose icon stops flashing (and disappears if the "USRTrnsp" function is off).
Note: This setting is not saved to a User Program and will be cancelled when you switch off the EXR-46 OR.
(5) Press another "big" button in the DATA ENTRY section to leave this function.
Octave settings
The EXR-46 OR allows you to transpose the Keyboard parts (Main, Split, Dual) up or down by 4 octaves.
To change the octave transposition of a part, hold down TONE (Main part), SPLIT (Split part) or DUAL (Dual part), while pressing (down) or + (up).
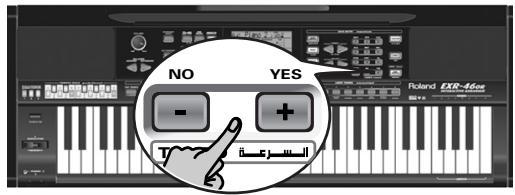
Other Keyboard part functions
Here are yet other functions related to the Keyboard parts. These can be set via the FUNCTION menu, or are covered elsewhere:
- Keyboard velocity (see p. 34)
- Master Tune (see p. 39)
Volume of the Keyboard parts (see p. 41) - Intelligence function for the Split part (see p. 40)
- Hold function for the Split part (see p. 40).
11. Performance functions and effects
Performance functions
Keyboard Touch (velocity sensitivity)
The EXR-46 OR is velocity sensitive, which means that the volume and brightness of the Main, Split and Dual notes depend on the force/speed with which you strike the keys.
All acoustic instruments (piano, violin, flute, drums, etc.) are velocity sensitive. The harder you play, the louder and brighter the resulting notes will be, which creates a perfectly natural effect. (That explains why the KEYBOARD TOUCH function is on when you power on the EXR-46 OR.)
If the EXR-46 OR is your first musical instrument ever, you may feel distracted by the volume and timbre variations of the notes you play.
(1) If the KEY TOUCH icon is not displayed, press the KEYBOARD TOUCH button to activate the EXR-46 OR's velocity sensitivity.

(2) Press the button again to switch the KEYBOARD TOUCH function off, if you don't need it.
(3) To set a fixed velocity value, press and hold the KEYBOARD TOUCH button until the "KbdTouch" message is displayed.
VALUE


(4) Use the numeric buttons and/or l to set the velocity value that should be used for all notes you play (1~127).
"1" is very low (usually inaudible), while "127" corresponds to maximum striking force (loud, bright notes). The value is only used when the KEY TOUCH icon is not displayed (otherwise, all notes use the velocity values that correspond to the force with which you strike the keys).
(5) Press another "big" button in the DATA ENTRY section to leave this function.
Note: Some sounds use "velocity switching". This means that by hitting the keys harder and softer, you alternate between two sounds. So only switch off this parameter if doing so makes you feel more comfortable.
Note: This setting can be saved to a User Program (see p. 45).
Note: Keyboard Touch applies to all parts you can play yourself (the "Keyboard parts"): Main, Split, and Dual.
Pitch Bend and Modulation
The BENDER/MODULATION lever to the left of the keyboard can be used to add two kinds of effects to the Keyboard-part notes. You can even use these effects simultaneously if you like.
(1) Press the lever towards the rear of the EXR-46 OR to add a vibrato effect ("wobble") to the notes you are playing.
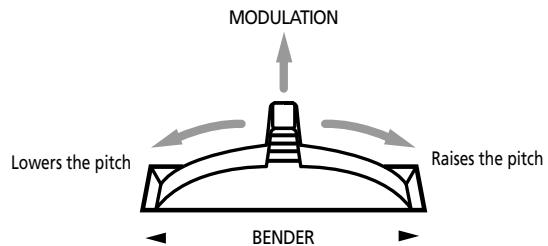
The Modulation axis can also be used for switching between the slow and fast Rotary speeds (if the "Rotary" effect is assigned to the MFX).
(2) Turn the lever to the left to temporarily lower the pitch of the notes you are playing. Turn it to the right to raise the pitch of your notes.
(3) In either case, you can release the lever if you no longer need the effect.
Note: If necessary, you can change the Pitch Bend interval. See "PB Range" (Pitch Bend Range)" (p. 40).
Note: Modulation is not available when the MFX type = "Rotary". In that case, the modulation axis of the lever is used for switching between the fast and slow speeds.
Footswitch
The EXR-46 OR's FOOTSWITCH socket (rear panel) allows you to connect optional DP-2, DP-6, or BOSS FS-5U footswitch.
The footswitch can be used for sustaining the notes you are playing (default), as Soft or Sostenuto pedal, to change the Rotary effect speed (MFX), and more. See "FSW" (Footswitch Assign) (p. 40) and "Using the outputs and an optional footswitch" (p. 57).
To use it for holding the notes you are playing, proceed as follows:
(1) Connect a DP-2, DP-6, or BOSS FS-5U footswitch to the FOOTSWITCH jack.
(2) Play a note with your right hand.
(3) Press the footswitch.
(4) Release the key. The note(s) you played keep on sounding after you release the corresponding keys.
(5) To stop the note(s) from sounding, release the footswitch.
Using effects
The EXR-46 OR contains digital Reverb and Chorus effects processors. You can switch them on/off and select other types. You can also set the Send level (the amount of reverb or chorus) to be applied to the various Keyboard parts. Please bear in mind that the chorus effect cannot be combined with the MFX (so you need to choose between chorus or MFX for the Main part).
Using the multi-effects processor (MFX)
The multi-effects (MFX) processor can be used for processing the Main part. It can generate various effects (47), some of which are combinations of two effects, while the Reverb and Chorus processors only generate effects that are somehow related to ambiance (REV) or modulation (CHR).
(1) Press the FUNCTION button (it must light).
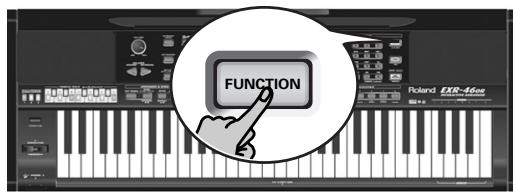
(2) Use FAMILY to select "EFFECTS".
The EXR-46 OR's function parameters are divided into 9 logical "families". For the following, we need to select the effects group.
(3) Use SELECT to select the "MFX" parameter.

Note: See also "Working with the FAMILY, SELECT and numeric buttons" (p. 20).
The "Of f" message means that the MFX is not being used.
(4) To switch on the MFX, select one of the remaining 47 types using the buttons.
Off: The MFX is off.
Enhancer: An Enhancer controls the overtone structure of the high frequencies, adding sparkle and tightness to the sound.
Overdrive1~4: Overdrive creates a soft distortion similar to that produced by tube amplifiers. Several types of overdrive are available: (1) Small combo amp, (2) Combo amp, (3) Large double-stack amp (2 cabinets), (4) Large double-stack amp (3 cabinets).
Distort1~4: This effect produces a more intense distortion than Overdrive. The numbers refer to different kinds of distortion.
Phaser: Adds a phase-shifted sound to the original sound, producing a twisting modulation that creates spaciousness and depth.
AutoWah: The Auto Wah cyclically controls a filter to create cyclic change in timbre.
Rotary: Simulates the sound of a classic rotary speaker. This effect is most suitable for electric organ. If you select this type, you can use the MODULATION axis of the BENDER/MODULATION lever for switching between the slow and fast modulation speeds: press the lever towards the back of the EXR-46 OR to alternate between slow and fast undulations.
StFlangr: This is a stereo Flanger. It produces a metallic resonance that rises and falls like a jet airplane taking off or landing.
SpFlangr: A Step Flanger is a Flanger effect with clearly noticeable steps rather than continuous pitch changes.
Compress: A compressor reduces signal peaks and boosts low levels, smoothing out unevenness in volume.
Limiter: A limiter prevents the volume from exceeding a certain level without boosting low levels.
HexaCho: Hexa Chorus uses six layers of chorused sound to give richness and spatial spread to the sound.
Trem Cho: Tremolo Chorus is a chorus effect with added Tremolo (cyclic modulation of the volume).
StChorus: This is a stereo chorus.
Space-D: A multiple Chorus that gives no impression of modulation, but produces a transparent Chorus effect (the perfect "stereo maker").
StDelay: Delay is an effect that allows you repeat the input signal, thus creating echoes (repetition).
Mod Dly: This effect adds modulation to the delayed sound, producing an effect similar to a Flanger.
3Tap Dly: The Triple Tap Delay produces three delay sounds; center, left and right.
4Tap Dly: Delay with four repetition lines.
TmCtrDly: This effect controls the delay time in realtime.
Reverb: A nice Reverb effect.
GteRevNr: Gate Reverb is a special type of Reverb in which the reverberant sound is suddenly cut off (and does not gradually decrease).
GteRevRv: A gated Reverb effect that sounds "backwards".
GteRevS1: The reverberant sound moves from right to left.
GteRevS2: The reverberant sound moves from left to right.
2PitchShf: A Pitch Shifter changes the pitch of the original sound. This 2-voice effect has two pitch shifters, and adds two transposed copies to the original sound.
FbPtchShf: Pitch Shifter with several echoes.
OD Chors: This effect connects an Overdrive and a Chorus in series. ("Series" means that the first effect is also processed by the second.)
OD Flger: This effect connects an Overdrive and a Flanger in series.
OD▶Delay: This effect connects an Overdrive and a Delay in series.
DSChors: This effect connects distortion and a Chorus in series.
DS▶Flger: This effect connects distortion and a Flanger in series.
DS▶Delay: This effect connects distortion and a Delay in series.
EHChors: This effect connects an Enhancer and a Chorus in series.
EH Flger: This effect connects an Enhancer and a Flanger in series.
EH▶Delay: This effect connects an Enhancer and a Delay in series.
Cho Dly: This effect connects a Chorus and a Delay in series.
FL▶Delay: This effect connects a Flanger and a Delay in series.
Cho▶ Flgr: This effect connects a Chorus and a Flanger in series.
Cho/Dly: This effect connects a Chorus and a Delay in parallel. ("Parallel" means that the input signal is processed by two effects that do not interact.)
FL/Delay: This effect connects a Flanger and a Delay in parallel.
Cho/Flgr: This effect connects a Chorus and a Flanger in parallel.
Note: This setting can be saved to a User Program (see p. 45).
Note: By default, MFX type selection is linked to Tone selection for the Main part. This can be switched off, however, see "Tone MFX" (p. 43). Note that this does not apply to all Tones.
(5) While selecting an MFX type, play a few notes on the keyboard to audition the effect.
(6) Press another "big" button in the DATA ENTRY section to leave this function.
Note: If the MFX is on, the Main part is no longer processed by the Chorus effect. But the MFX also contains Chorus algorithms (either in isolation or in combination with other effects).
Reverb
Reverb is an effect that gives you the impression of playing in a concert hall, a room or another acoustic environment that reflects the sounds that are being produced.
When you switch on the EXR-46 OR, all three Keyboard parts (Main, Dual, Split) as well as the Arranger and Song parts are processed by the internal Reverb effect.
If you don't need that, you can either switch off the Reverb processor (in which case none of the EXR-46 OR's 19 parts are processed) or prevent just one Keyboard part from being processed. You cannot change the amount of reverb that is added to the Arranger or pre-recorded Song parts.
- Switching the Reverb on/off
Use the following procedure if you want no reverb at all (for none of the EXR-46 OR's parts), or to select another Reverb type.
(1) Press the FUNCTION button (it must light).

(2) Use FAMILY to select "EFFECTS".
The EXR-46 OR's function parameters are divided into 9 logical "families". For the following, we need to select the effects group.
(3) Use SELECT to select the "REV" parameter.

Hall 2
Note: See also "Working with the FAMILY, SELECT and numeric buttons" (p. 20).
(4) Use the + buttons to select "Off" if you don't need the Reverb processor. Otherwise, select one of the eight available types:
| Type | Explanation |
| Room 1~3 | These types simulate the Reverb characteristics of a room. The higher the number (1, 2, or 3), the "bigger" the room becomes. |
| Hall 1, 2 | These types simulate the Reverb of a small (1) or large (2) concert hall and thus sound far "bigger" than the Room types above. |
| Plate | Digital simulation of a metal plate that is sometimes used for creating Reverb effects. Works well for percussive sounds. |
| Delay | A Delay effect (no Reverb). Works a lot like an echo effect and thus repeats the sounds. |
| Pan Delay | This is a stereo version of the preceding Delay effect. It creates repetitions that alternate between the left and right channels. |
(5) Play a few notes on the keyboard to audition the effect.
- Changing the amount of reverb processing for the Keyboard parts
To change the reverb depth (i.e. how much reverb is added to a part), proceed as follows:
(6) If the FUNCTION button still lights, use SELECT to select one of the following parameters.
VALUE


Reverb depth of the Main part.
VALUE


Reverb depth of the Dual part.
VALUE


Reverb depth of the Split part.
(If FUNCTION doesn't light, first perform steps (1) and (2) above.)
(7) Use + to select "0" if you don't want the selected Keyboard part to be processed by the reverb effect. Otherwise, set the desired value.
If you selected an MFX type (see p. 35), the Rev Main parameter no longer affects the Main part directly, but rather the MFX signal.
When the MFX is set to "Off"
Main
Reverb
Rev MAIN=
Reverb for Main
MFX "Off"
When the MFX is set to any other type

"Re\nMain = 100" then means: Reverb depth of the processed Main signal coming out of the MFX. This can be used for a variety of interesting applications: Distortion (MFX) + Reverb (REV), Rotary (MFX) + Plate (REV), etc.
(8) Play a few notes on the keyboard to audition the effect. Do not forget to activate the Split or Dual part if you wish to audition its Reverb depth.
Note: This setting can be saved to a User Program (see p. 45).
(9) Press another "big" button in the DATA ENTRY section to leave this function.
Chorus
Chorus broadens the spatial image of the sound and creates a stereo impression. You can choose from 8 types.
When you switch on the EXR-46 OR, none of the Keyboard parts (Main, Dual, Split) are processed by the internal chorus effect. Note also that the Chorus effect doesn't affect the Main part if the MFX is set to anything but "Off".
If you don't need Chorus, you can either switch off the Chorus processor (in which case none of the EXR-46 OR's 19 parts are processed) or prevent just one Keyboard part from being processed. You cannot change the amount of Chorus that is added to the Arranger or pre-recorded Song parts.
- Switching the Chorus effect on/off
Use the following procedure if you want no Chorus at all (for none of the EXR-46 OR's parts), or to select another Chorus type.
(1) Press the FUNCTION button (it must light).
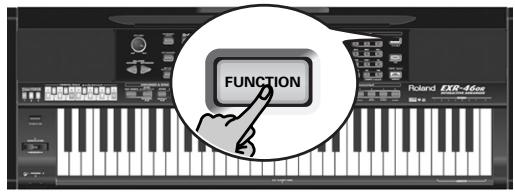
(2) Use FAMILY to select "EFFECTS".
(3) Use SELECT to select the "CHR" parameter:

Chorus 3
Note: See also "Working with the FAMILY, SELECT and numeric buttons" (p. 20).
(4) Use the + buttons to select "Off" if you don't need the Chorus processor. Otherwise, select one of the eight available types (see the list below).
Chorus 1
Chorus 4
S-Delay
Chorus 2
FB Chorus
SDelayFb
Chorus 3
Flanger
(5) Play a few notes on the keyboard to audition the effect.
- Changing the amount of Chorus processing for the Keyboard parts
To change the Chorus depth (i.e. how much Chorus is added to a part), proceed as follows:
(6) If the FUNCTION button still lights, use SELECT to select one of the following parameters.
VALUE


Chorus depth of the Main part*.
VALUE


Chorus depth of the Dual part.
VALUE


Chorus depth of the Split part.
(*) Though this parameter is displayed even when MFX is set to something else than "Off", the Main part is not processed by the Chorus effect.
(If FUNCTION doesn't light, first perform steps (1) and (2) above.)
(7) Use + to select "0" if you don't want the selected Keyboard part to be processed by the Chorus effect. Otherwise, set the desired value.
If you selected an MFX type (see p. 35), the Chir-MAIN parameter has no effect (even though it is displayed).
When the MFX is set to "Off"

Reverb

Chorus
When the MFX is set to any other type
Main

1 Reverb

Play a few notes on the keyboard to audition the effect. Do not forget to activate the Split or Dual part if you wish to audition its Chorus depth.
Note: This setting can be saved to a User Program (see p. 45).
(9) Press another "big" button in the DATA ENTRY section to leave this function.
V-LINK function
V-LINK is a function that provides for the integration of music and visual material. By using V-LINK-compatible video devices (i.e. an Edirol DV-7PR), visual effects can be easily linked to, and made part of the expressive elements of a performance. By using the EXR-46 OR with an Edirol DV-7PR, you can:
- Use the EXR-46 OR's keyboard (highest octave) to switch images (clips). Press and hold a key for longer transition ("fade"). Briefly press a key for fast transitions.
- The numeric buttons 0 9 are used for switching palettes (only if the USER PROGRAM button lights).
- Use the BENDER axis of the BENDER/MODULATION lever to change the playback speed of the picture material or to select a different color.
- Use the LOCK buttons to change the effect (VFX1~4).
V-Link signals can be transmitted via MIDI OUT.
(1) Connect the EXR-46 OR's MIDI OUT socket to the MIDI IN socket of the external video processor (or to a UM-1 interface).
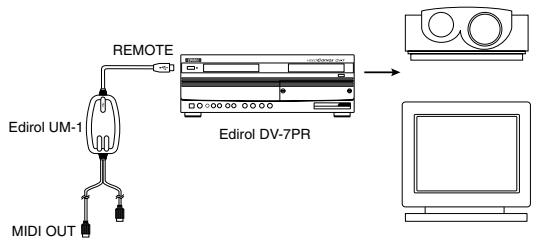
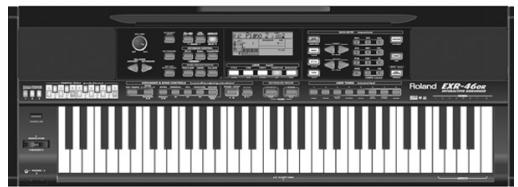
(2) Press the V-LINK button (it lights blue).

(3) Use the BENDER, the assigned buttons or "V-LINK" keys (highest octave) to manipulate the video pictures in sync with your music (see below).
(4) Press [V-LINK] again to switch off this function (the button goes dark).
V-LINK functions that the EXR-46 OR can control (and corresponding MIDI messages)
The EXR-46 OR provides the following functions for controlling V-LINK compatible video equipment.
- Keyboard: Clip 1 8 Program Change: 00H 08H Press the keys in the highest octave to switch clips.
- Keyboard velocity: Dissolve Time CC23 The velocity of the keys in the highest octave controls the speed of transition between images.
- 1~0 buttons (if the USER PROGRAM button lights): Palette 1 10 CC00 (Bank Select)/00H~09H While the V-LINK button lights, press buttons 1~0 to switch palettes 1~10. (The numeric buttons also perform their "normal" functions.)
- BENDER axis of the BENDER/MODULATION lever: Playback Speed Pitch Bend
- Moving the lever toward the right will speed up playback, and moving it toward the left will slow down playback. At the center position, playback speed will be normal.
- MODULATION axis of the BENDER/MODULATION lever: Clip color CC24 (Color CB), CC25 (Color CR) Press the lever towards the rear of the EXR-46 OR to change the color. There are five steps that can be selected by pressing the lever several times: green, violet, blue, red, original clip color.
-
LOCK buttons: VFX1~4, None (ACOUSTIC= None, POP= V-FX 1, ROCK= V-FX 2, DANCE= V-F1h
-
X 3, ETHNIC = V-FX 4)
Use these buttons to change the video effects. This function is not available if the receiving video processor is already set to "Off".
Note: VFX2 is not supported by the DV-7.
Note: All V-LINK messages are transmitted on MIDI channels 13 and 14.
12. Function menu
The EXR-46 OR's Function mode contains more advanced settings you may not need every day. They allow you to fine-tune your instrument's response. It would therefore be a good idea to familiarize yourself with these parameters. Most settings (^) can be written to a User Program (see p. 45). Other parameters (^) are saved to the Flash memory when you leave the Function mode.
Editing parameters (general procedure)
You can edit the EXR-46 OR's Function parameters via the display. Here is a general outline of the procedure for all parameters discussed below:
(1) Press FUNCTION.

(2) Use FAMILY to select the Function group that contains the desired parameter:
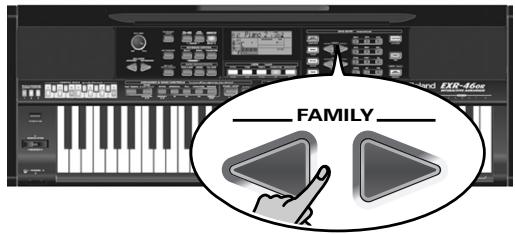
KB SET: KbdTouch, MsterTune, USRTrnsp, GLB Trnsp, TransMod, PB Range, KeySplit, SplitHold, SplitInt, FSW, Port Main, Port Dual, Mode Main, Mode Dual
DRUM PAD: DK1/DrumPad1~DK8/DrumPad8
METRONOM: Mtro TS, MetroVol, Count-In
OCTAVE: MAIN Oct, DUAL Oct, SPLT Oct
■ VOLUME: Main Vol, Dual Vol, SplitVol, Auto Bass, AccDrums, AccBass, Accompl1~Accomp6, Song1~Song16
ARR SET: ArrChord, Arr Hold, EP Chord, Bass Inv, MI (Melody Intelligence), InEnCHRD, Sync Stop
■ EFFECTS: REV (Reverb), CHR (Chorus), MFX, Tone MFX, Rev MAIN, Chr MAIN, Pan MAIN, Rev DUAL, Chr DUAL, Pan DUAL, RevSPLIT, ChrSPLIT, PanSPLIT
KB SCALE: Scale C/C#/D/Eb/E/F/F#/G/Ab/A/Bb/B, Scale Mode
■ MIDI: Local, MidiTxRx, Sync Rx, Style PC, LyricsTx, NTARx14, PitchBnd, Modulatn, ProgChng, Velo Rx, Clock Tx, StartStp, SongPosP
■ UTILITY: LockInit, InitFLASH, Resume
■ WriteSNG (see p. 49)
■ WriteSTL (see p. 50)
RemoveSNG (see p. 50)
Remove STL (see p. 51)
■ WriteUPG (see p. 50)
ReadUPG (see p. 50)
RemovUPG (see p. 51)
(3) Use SELECT to select the parameter you wish to edit (see below).
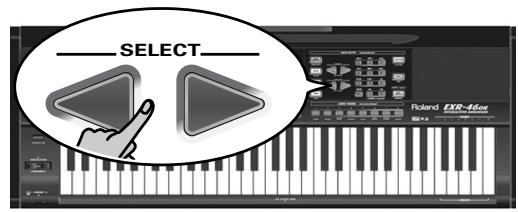
Note: In FUNCTION mode, SELECT l do not allow you to jump from one family to the next.
The "VALUE" message and a setting appear to signal that you can change ("edit") the selected parameter.
(4) Use the DATA ENTRY + or numeric buttons (only for values) to modify the setting of the selected parameter. Note: See also page 20.
Note: To return to the default value of the currently selected parameter, press + and - simultaneously.
(5) Use FAMILY to select another Function parameter.
(6) Continue with step (3).
(7) Press another "big" button in the DATA ENTRY section to leave this function.
KB SET parameters
Kbd Touch\*
(1~127, Default setting: 110) Use this parameter to set the EXR-46 OR's fixed velocity value that will be used when the
KEYTOUCH icon is not displayed. See p. 34.
Note: This parameter can also be selected by pressing and holding KEYBOARD TOUCH.
MstrTune° (Master Tune)
(427.4~452.6, Default setting: 440.0) This parameter allows you to change the EXR-46 OR's overall tuning, which may be necessary when you accompany a singer, an acoustic instrument, or when you play to a recording on CD or cassette.
USRTrnsp*
(-12 12, Default setting: 0) Use this parameter to transpose the EXR-46 OR in semitones. If you're not sure what transposition is, see p. 32. This parameter can also be selected by pressing the [TRANSPOSE] button.
GLBTrnsp
(-6 5, Default setting: 0) Use this parameter to temporarily transpose the EXR-46 OR in semitones. If you're not sure what transposition is, see (see p. 33). This parameter can also be selected by pressing the TRANSPose button and pressing SELECT once.
TransMod*
(Default setting: Int+Song) This parameter allows you to specify which parts should be affected by the Transpose setting:
Int: The Keyboard and Arranger parts will be transposed. Notes received via MIDI, however, will be played without change.
Song: Only the Song parts will be transposed. This is only meaningful when you play back a Standard MIDI File or one of your own songs with the EXR-46 OR's Recorder.
MIDI: Only the notes received via MIDI will be transposed.
Int+Sng, Int+MIDI, Sng+MIDI, All: These are combinations of the above. Int could be useful to transpose only the Keyboard parts so that you can play to a Recorder song in "your" key but sound in the song's key.
PB Range° (Pitch Bend Range)
(0~24, Default setting: 2) This parameter allows you to set the interval that will be used when you push the BENDER/MODULATION lever fully to the left or to the right (Pitch Bend effect). You can set this parameter in semitone steps, with a maximum of 24 semitones (2 octaves), the default value being "2", which should be OK in most situations.
Note: Pitch Bend is only available for the Main, Dual and Split parts. See also p. 34.
KeySplit* (Split point)
(48~84, Default setting: 60) Use this parameter to set the split point for the Arranger mode and the Split part. The note you set here is the lowest note you can play with the Main part. The number refers to a note. "60" corresponds to the note "C4".
Note: You can also select this parameter by pressing and holding the ARRANGER BAND button.
- SpltHold* (Hold function for the Split part)
(On/Off, Default setting: Off) The SplitHold function memorizes the chords you play while the Split part is on and holds the corresponding notes until you play another chord.
SplitInt* (Split Chord Intelligence)
(On/Off, Default setting: Off) When you activate the [SPLIT] button, the EXR-46 OR's Split Chord Intelligence function allows you to play major chords by pressing just one key, minor chords by pressing two keys, and more complex chords by pressing three keys. This system thus follows Arranger control, which is why it would be a good idea to select "On" whenever you are using the Split part while the ARRANGER icon is displayed.
FSW° (Footswitch Assign)

Sustain
(Default setting: Sustain) After connecting an optional DP-2, DP-6, or BOSS FS-5U to the FOOTSWITCH socket on the rear panel, you can use this parameter for assigning a function to the footswitch.
Sustain: Also called "Hold" or "Damper", this function allows you to use the footswitch to hold the notes you play on the keyboard in much the same way as on an acoustic piano.
Sostenut: In this case, the footswitch functions as Sostenuto pedal (another pedal found on grand and digital pianos that allows you to sustain only those notes you played at the time you pressed the pedal).
Note: This function only applies to the Keyboard parts.
Soft: In this case, the footswitch functions as Soft pedal (a pedal found on grand and digital pianos that reduces the volume).
Note: This function only applies to the Keyboard parts.
Rotary S/F: Allows you to select the slow or fast speed of the Rotary effect. This only works, if the "Rotary" type is assigned to the MFX (see p. 35).
UsrPrgUp: Selects the next User Program (i.e. "10" if "9" is currently active).
UsrPrgDw: Selects the previous User Program (i.e. "1" if "10" is currently active).
Start/Stop: Starts and stops Arranger or Song playback. Same function as the START/STOP button.
Bass Inv: Switches the Bass Inversion function on and off (see p. 28).
Punch I/O: The footswitch can be used to activate and switch off punch in/out recording (see p. 25).
■ Port Main
(Off, 1~127, Default setting: Off) Portamento is an effect that produces gradual pitch changes between the notes you play. The higher the value, the longer it takes before the pitch of the newly played note is reached.
This parameter allows you to set two parameters simultaneously for the Main part (there is a second parameter for the Dual part): the Portamento switch and the Portamento time. When you select a value between "1" and "127", the Portamento switch is automatically set to "on" (127).
Port Dual
(Off, 1~127, Default setting: Off) This parameter allows you to set two parameters simultaneously for the Dual part: the Portamento switch and the Portamento time. See above for an explanation.
Mode Main

Mode Main
(Mon/Pol, Default setting: Pol) This parameter allows you to specify whether the Main part can be played polyphonically ("Pol") or monophonically ("Mon"). "Polyphonic" means that you can play chords, while "monophonic" means that you can only play one note at a time. This may be useful for violin, woodwind and similar sounds, because the acoustic instrument in question cannot (or usually doesn't) play chords. If you press two keys after selecting "Mon", only the note of the last key you pressed sounds (nobody actually presses two keys at exactly the same time).
Mode Dual
(Mon/Pol, Default setting: Pol) This parameter allows you to specify whether the Dual part can be played polyphonically ("Pol") or monophonically ("Mon"). See also above.
DRUM PAD parameters
The parameters of this group allow you to assign the desired drum/percussion sounds to the eight DRUM PAD keys. These assignments are used when you activate DRUM PAD mode (see p. 32).
- Use the SELECT buttons to select the parameter you want to change.
The message to the right of the "dK" parameters (dK1~dK8) refers to the Drum Kit that contains the sound which is currently assigned to the DRUM PAD key (1~8, highest octave). When you select a "dK" parameter, the display looks as follows:

STANDARD1
(This illustration means that you can select another Drum Kit for the lowest DRUM PAD key, i.e. the one labeled "1".) See "Drum Kits" (p. 121) for the available Drum Kits.
- Use the DATA ENTRY + buttons to select the Drum Kit that contains the sound you wish to use.
- Press SELECT to select the "DrumPad" parameter (DrumPad1~8) that has the same number as the "dK" parameter you have just changed.
In our example, that would be "DrumPad1".

DruinFadi
You may remember that each Drum Kit contains up to 128 different drum/percussion sounds. Only one of those sounds can be assigned to each DRUM PAD key. (Just as a reminder: you are going to assign a sound to DRUM PAD key "1" here.) The number to the left refers to the note number. "036" represents the "Kick 2" sound. See the tables on page 121 and following.
- Use the DATA ENTRY + buttons to select the number of the sound you wish to assign.
- Use the SELECT l buttons to select the next DRUM PAD parameter you want to change and repeat the above.
Note: These settings can be saved to a User Program, so that you could (at least in theory) program 200 different assignments.
METRONOM parameters
Metro TS° (metronome time signature)
(1/4~9/4, 1/8~9/8, Default setting: 4/4) This parameter allows you to set the metronome's time signature (number of beats per bar). Please bear in mind that this setting changes whenever you select a Music Style with a different time signature. See also p. 14 for how to use the metronome. This parameter can also be selected by holding down the [METRONOME] button.
Metro Vol° (metronome volume)
(0~127, Default setting: 100) Use this parameter whenever you think the metronome is too loud/soft with respect to the music. The default value is usually an appropriate setting.
Count-In
(On/Off, Default setting: Off) This parameter allows you to switch the count-in function for punch-in and normal recording (see p. 25) on or off. When on, the metronome will count down two measures (8 beats for a song with a 4/4 time signature).
OCTAVE parameters
MAIN Oct*, DUAL Oct*, SPLIT Oct* (octave transposition)
(-4 0 4, Default setting: 0) These three parameters allow you to shift the octave of the part in question (Main, Split, or Dual) up or down by up to four octaves. This can be useful for Techno/Dance songs where you need a piano sound that plays in two different octaves.
To achieve this, assign two different (or the same) piano sounds to Main and Dual, activate the DUAL button, and set DUAL Octv to -1 (or 1 ).
Note: When a Drum Kit is assigned to the Main part, the pitch of the drum/percussion sounds is not transposed. Instead, the keys are assigned to other drum/percussion sounds ("shifted"). Example: after setting "MAIN Oct" to "-1", the bass drum can be played with the C3 key (rather than the C2), while other sounds are available to the left of the C3.
VOLUME parameters
Main Vol, Dual Vol, SplitVol*: volume

Main Vol
(0~127, Default setting: 127 Main/110 Dual/100 Split) These three parameters allow you to set the volume of the Main, Dual, and Split parts respectively. Please note that the settings you make here have no effect if you used BALANCE [ACCOMP] to set the maximum volume for the Arranger/Song parts.
Note: The volume of the Dual part can also be set by holding down DUAL while pressing ACCOMP or KEYBOARD. The same is true of the Split part, except that you need to press and hold SPLIT.
Auto Bass*: status and volume
(OFF, 0~127, Default setting: OFF) Whenever the Split part is active, this parameter allows you to set the volume of the Auto Bass part (in which case the Auto Bass part is switched on). This part sounds monophonic bass notes based on the chords you play. If the Bass Inversion function (see p. 28) is off, the Auto Bass part sounds the root notes (fundamentals) of the chords you play with your left hand (using the Split part).
The Auto Bass part can also be added to the EP Chord part (see below), and then follows the same rules as that part. The Auto Bass' volume and status can be set independently for "Split use" and "EP Chord use".
In either case, select off if you don't need the Auto Bass part.
AccDrums*, AccBass*, Acccomp1~Accomp6*: volume
(0~127, Default setting: 100 AccDrums/100 AccBass/
100 Accompl 1 6 ) These three parameters allow you to set the volume of three Music Style sections: the drums, the bass and the Accomp parts (1~6). You can use these parameters if you think the original "mix" of the selected Music Style is not quite right.
Song1~Song16: volume
(-64 0 63) These volume parameters apply to the respective tracks of the song you are currently playing back. In most cases, you may want to change the volume of track 4 (melody), 2 (bass) or 10 (drums). Finding another track (1,5 9,11 16) that's too loud or too soft may take some time, because their usage is more or less free. Be aware, however, that not all Standard MIDI Files use all 16 tracks that are available (so that changing the volume of track 16 may produce no audible change at all, for example).
These are relative parameters: the value you set here is subtracted from (negative values) or added to (positive values) the song parts' volume. Note that the upper limit (defined by the MIDI standard) is "127". It may thus be impossible to increase the volume of a track (because it already uses "127"). Select "0" if you like a track's volume the way it is.
Be aware that the changes you make here must be saved along with the song data. They are not written to a User Program. See pages 49 and 54 for how to save songs.
ARR SET parameters
ChordInt* (Arranger Chord intelligence)
(Md1, Md2, Off, Default setting: Md1) This parameter allows you to select the chord intelligence system to be used by the EXR-46 OR: the Roland system ("Md1", which makes more sense from an educational point of view, see page 129), or the "Md2" system, which can be used in the following way:
| Major chords | Press the key that corresponds to the chord's fundamental. |
| Minor chords | Fundamental + any black key to the left of the fundamental. |
| Seventh chords | Fundamental + any white key to the left of the fundamental. |
| Minor seventh chords | Fundamental + any black key to the left + any white key to the left. |
In either case, pressing just a few keys is therefore enough for obtaining full chords. If you are used to playing full chords, you can switch this function off.
ArrHold* (Arranger Hold)
(On/Off, Default setting: On) The Arranger Hold function memorizes the chords you play with your left hand and keeps playing the corresponding notes until you play another chord. If you switch off ArrHold, the melodic Arranger parts (A.Bass, Accomp) stop playing as soon as you release the key(s) in the left half of the keyboard, leaving you only with the drum accompaniment. For your convenience, this function is switched on every time you power on the EXR-46 OR.
EP Chord° (left-hand St. Strings + bass)
(On/Off, Default setting: On) The EP Chord function (for "Educational Purposes") activates a stereo string sound and monophonic bass (if Auto Bass is set to "on") whenever (a) the
ARRANGER icon is displayed and (b) the Arranger is stopped. This allows you to play chords (and a bass line) with your left hand in Arranger mode - without using the EXR-46 OR's accompaniment function.
If you select "Off", however, the left half of the keyboard will be muted when conditions (a) and (b) are met and if the split icon is not displayed.
Bass Inv*
(On/Off) Use this parameter to change the way in which the Arranger reads the chords you play. See p. 28.
MI* (Melody Intelligence harmony type)
(Default setting: Traditnl) This parameter allows you to select the desired harmony type for the Melody Intelligence function.
Note: This parameter can also be selected by pressing and holding the MELODy INTELLIGENCE button. See p. 27.
InEnCHRD* (Intro/Ending chord recognition)
(On/Off, Default setting: Off) This parameter allows you to block chord recognition during playback of the Intro or Ending pattern of the selected Music Style in PIANIST mode. Unlike the "normal" patterns (Original, Variation), Intro and Ending patterns usually contain chord changes. If you select "Off", chord recognition is active during Intro/Ending playback, so that the accompaniment may jump from one key to another. To avoid this, select "On".
Sync Stop* (system used for automatic stops)
(Int/Nor, Default setting: Nor) This parameter allows you to specify how the SYNC STOP function (see p. 16) should work. Select "Nor" if you want the Arranger to stop as soon as you release all keys in the chord recognition area (left side in ARRANGER mode, entire keyboard in PIANIST mode). When you play another chord, Arranger playback resumes from the beginning of the selected Style pattern.
If you select "Int", switch on the SYNC STOP (see p. 16) function and then release all keys in the chord recognition area, the Arranger stops on the next downbeat - and all notes that are on at that time keep sounding (only if the "ArrHold" function is on). When you play another chord, Arranger playback resumes from the point it had reached when you released all keys in the chord recognition area.
Note: This parameter can also be selected by pressing and holding the SYNC START/STOP button.
EFFECTS parameters
Rev* (Reverb Type)
(Default setting: Hall 2) Use this parameter to select the kind of Reverb that best suits your musical purposes, or to switch the Reverb processor "Off". See p. 36.
Chr* (Chorus Type)
(Default setting: Chorus 3) This parameter allows you to specify the type of Chorus effect, or to switch the Chorus processor "Off". See p. 37.
- MFX* (MFX type)
(Default setting: Rotary) This parameter allows you to select the desired MFX type and to switch the MFX processor off. See p. 35 for details about the MFX. Selecting "Off" means that the MFX is off.
Note: MFX type selection can also be linked to Tone selection for the Main part.
Tone MFX°
(On/Off, Default setting: On) This parameter allows you to link the selection of an MFX type to the Tone you assign to the Main part. That way, a Distortion/Overdrive effect will be selected for a rock guitar sound, Rotary for an organ, etc.
Rev MAIN*
(0~127, Default setting: 100) This parameter allows you to set the Reverb Send Level for the Main part (i.e. how much Reverb should be added to the Main notes). Select "0" if the Main part may not be processed by this effect.
Chr MAIN*
(0~127, Default setting: 0) This parameter allows you to set the Chorus Send Level for the Main part (i.e. how much Chorus should be added to the Main notes). If you want this part to be processed by the Chorus effect, you need to select a value different from "0". This parameter is only used when the MFX parameter is set to "Off".
Pan MAIN*
(Rnd, R63~0~L63, Default setting: 0) This parameter allows you to set the stereo position of the Main part (i.e. its placement between the left and right speakers). "Rnd" means that the stereo position changes randomly for each note you play. Values starting with "L" correspond to the left speaker. "0" refers to the center, and values starting with "R" correspond to the right speaker.
RevDUAL\*
(0~127, Default setting: 100) This parameter allows you to set the Reverb Send Level for Dual part (i.e. how much Reverb should be added to the Dual notes). Select "0" if the Dual part may not be processed by this effect.
ChrDUAL\*
(0~127, Default setting: 0) This parameter allows you to set the Chorus Send Level for the Dual part (i.e. how much Chorus should be added to the Dual notes). If you want this part to be processed by the Chorus effect, you need to select a value different from "0".
Pan DUAL*
(Rnd, R63~0~L63, Default setting: 0) This parameter allows you to set the stereo position of the Dual part (i.e. its placement between the left and right speakers). "Rnd" means that the stereo position changes randomly for each note you play. Values starting with "L" correspond to the left speaker. "0" refers to the center, and values starting with "R" correspond to the right speaker.
Rev SPLIT*
(0~127, Default setting: 100) This parameter allows you to set the Reverb Send Level for the Split part. Select "0" if the Split part may not be processed by this effect.
Chr SPLIT*
(0~127, Default setting: 0) This parameter allows you to set the Chorus Send Level for the Split part. If you want this part to be processed by the Chorus effect, you need to select a value different from "0".
Pan SPLIT*
(Rnd, R63~0~L63, Default setting: 0) This parameter allows you to set the stereo position of the Split part (i.e. its placement between the left and right speakers). "Rnd" means that the stereo position changes randomly for each note you play. Values starting with "L" correspond to the left speaker. "0" refers to the center, and values starting with "R" correspond to the right speaker.
KB SCALE parameters
Scale C\*Scale B\* (Scale Tune)
(-64 63, Default setting: 0 for all notes) These parameters allow you to stray away from the usual semitone-interval scale (used in western music) by changing the pitch of the notes so as to accommodate other musical cultures or tuning methods (oriental, baroque music, etc.). These settings are assigned to the ORIENTAL SCALE buttons.
As you will notice, you can change the pitch of every note of one octave (C, C#, D, Eb, E...). The settings you make here apply to all notes of the same name (i.e. to every "C", every "C", etc.). Most of the time, you will probably select the value "50" or "-50" as they correspond exactly to half a semitone up or down (quarter tone). Other settings may also be interesting, though.
Sci Mode*
(MN, ALL, Default setting: MN) This parameter allows you to specify which parts the Scale settings (see above) should apply to: only the Main part ("MN") or all parts ("ALL"). In some cases, choosing "ALL" may produce a more satisfactory result.
MIDI parameters
See page 47.
UTILITY parameters
LockInit
(On/Off, Default setting: On) This function allows you to protect the EXR-46 OR's Flash area from accidentally initializing it (see the next parameter). Select "Off" only before using the "InitFLSH" parameter. For safety reasons, this parameter is reset to "On" when you switch off the EXR-46 OR. If you want to initialize the Flash area without first selecting this FUNCTION parameter, hold down the KEYBOARD TOUCH button while switching the EXR-46 OR on. The display then briefly shows the "UNLCKFLS" message.
InitFLSH (Flash initialization)
This function initializes (interfaces) the EXR-46 OR's Flash memory, which is only necessary if the data in the Flash memory become unreadable.
Note: Executing this function erases all Standard MIDI Files and Music Styles in the EXR-46 OR's Flash area.
Press / + in response to the flashing YES message. The "Sure?" message appears and the YES message starts flashing. Press / + to initialize the Flash area (or NO/- if you changed you mind).
After showing the "Complete" message, the EXR-46 OR leaves this function.
■Resume
Select this function to recall the EXR-46 OR's factory Function settings.
Note: Resume does not reset the MIDI parameters of the FUNC-TION mode (see p. 47).
Press [YES/+] in response to the flashing YES message. After showing the "Complete" message, the EXR-46 OR leaves this function.
Note: There is no "Sure?" question that gives you time to think. Only press / + if you are certain you want to recall ALL factory Function settings.
13. Working with User Programs
The EXR-46 OR is equipped with 200 User Program memories that allow you to store almost all settings (or registrations) you make on the front panel and via the Function menu (see p. 39).
Note: MIDI settings (see p. 47) are not saved to a User Program because the EXR-46 OR memorizes them automatically.
Writing your settings to a User Program
It is a good idea to write your settings frequently, even if you still need to do some editing afterwards. Those intermediary saves allow you to return to the previous stage whenever you do not like your last modifications.
(1) Press and hold the USER PROGRAM/WRITE button.

The EXR-46 OR now displays "-write ?".
(2) Enter the number of the memory where you wish to save your settings using the numeric buttons 0 9 .
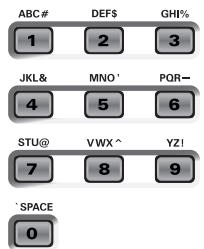
The "YES" message starts flashing.
(3) Press / + to confirm the number.
(4) Now use the numeric buttons 0 9 to name your User Program.
The available characters are:
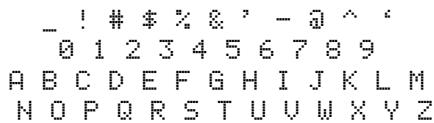
Note: Each time you press another numeric button (for entering characters), the cursor advances automatically to the next position. This works like a mobile phone.
(5) Press the / + button to save your settings to the selected memory. (Press NO/- if you don't want to save them after all.)
The display now responds with the "Complete" message.
Notes about writing User Programs
Leaving the User Program environment
Press any other "big" DATA ENTRY button to leave the User Program environment.
Meaning of the flashing number
At some stage, you may notice that the User Program number flashes.
It means that the last User Program you selected is still in effect but that the current settings no longer correspond to the ones in that memory. Such changes may include the status of the Reverb or Chorus effect, a changed volume value, etc.
Before selecting another User Program or switching off the EXR-46 OR, you should therefore write these settings to the same (or a different) User Program if you want to keep them. Otherwise, you lose these changes.
Mode selection
The mode (Arranger, p. 15, Piano Solo, p. 13, Pianist, p. 27) is also memorized when you write a User Program.
User Programs and the USER STL memory
The last Music Style you selected before writing a User Program is also memorized. This even applies to the USER STL memory that may contain a Style loaded from floppy disk or the Flash memory (see p. 19).
The 200 User Programs can be saved the Flash memory (see p. 49) or a floppy disk as a set (see p. 54).
Selecting a User Program
Though the User Program memory you specified above is already selected, there will be times when you need to select another memory. In that case, here is what you need to do:
(1) Briefly press USER PROGRAM/WRITE (it lights). Do not hold this button down because doing so will start the Write procedure (see above).

The display now shows the number of the User Program you selected last, or "1" if you have not yet selected a User Program since switching on the EXR-46 OR.
The flashing number indicates that the EXR-46 OR is still using the last manual changes you may have made before selecting the User Program function. It only means "this is the last memory you selected".
None of its settings are being used for the time being. By pressing another "big" button in the DATA ENTRY section, you can leave the User Program mode without changing your manual settings. This may be important to remember if
you were about to write your settings and accidentally pressed the wrong button (or didn't press it long enough).
To actually select a User Program...
(2) Use the numeric buttons 0 9 to select the memory (00~ 199).
The settings of the selected User Program will be recalled.
Note: You can also use the FAMILY and SELECT l buttons to select User Programs.
Note: As soon as you modify any setting (on the front panel or in the Function menu), the User Program number starts flashing.
(3) Press any other "big" button in the DATA ENTRY section to leave this mode.
Lock: filtering certain User Program settings
Your EXR-46 OR provides five LOCK buttons with two functions each that allow you to filter certain settings of the User Programs you recall.
These filters (or "locks") will help you use your User Program settings more efficiently, because you can leave out settings that may be fine for one song (the one you prepared the User Program for) but not for another.
Here is an example: suppose you saved a User Program for song "A" with the Main part's "Mode" function set to "Mon". All other settings are just perfect for song "B". Without the LOCK parameter, you would have to use a second User Program (where the "Main Mode" parameter is set to "Pol"). On the EXR-46 OR, however, you just need to switch on the MONO/PORT button to be able to use User Program originally prepared for song "A".
(1) Press the LOCK button that corresponds to the settings you want to ignore.
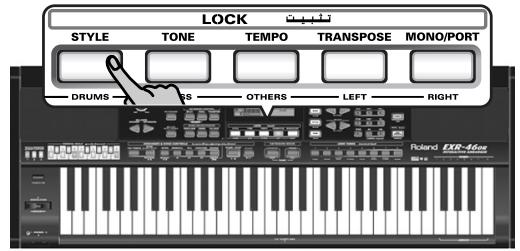
Each button has two functions. Press it either once (it lights) or twice in rapid succession (it flashes) to activate the desired filter:
| Button | Function |
| STYLE (x1) | The Music Style does not change when you select a different User Program. |
| STYLE (x2) | The Music Style and BAND ORCHESTRATOR setting remain as they are. |
| TONE (x1) | The Main and Dual parts do not select the sounds stored in the User Program you select. |
| TONE (x2) | The Main and Dual parts as well as the USER TONES assignments remain unchanged.* |
| Button | Function |
| TEMPO (x1) | The current tempo value remains unchanged. |
| TEMPO (x2) | The current tempo value and the status of the SYNC START function remain as they are. |
| TRANSPOSE (x1) | The "USRTrnsp" setting remains as it is. |
| TRANSPOSE (x2) | The "USRTrnsp" setting and the status of the ORIENTAL SCALE buttons remain unchanged. |
| MONO/PORT (x1) | The "Mode" and "Port" settings of the Main part (see p. 40) remain unchanged. |
| MONO/PORT (x2) | The "Mode" and "Port" settings of the Main and Dual parts (see p. 40) remain unchanged. |
(*) The assignments of the USER TONES buttons (see p. 30) are also saved to a User Program.
You can also activate several buttons at once.
(2) Select the User Program whose registration (with the exception of the unnecessary settings) settings you want to use.
(3) Switch the LOCK buttons off again before recalling yet another User Program if you need all of its settings.
Note: The status of the LOCK buttons is not saved to a User Program.
14. MIDI functions
MIDI is short for "Musical Instrument Digital Interface". The word refers to many things, the most obvious being a connector type that is used by musical instruments and other devices to exchange messages relating to the act of making music.
Each time you play on the EXR-46 OR's keyboard or start the Arranger (or Song), your instrument transmits MIDI data to its MIDI OUT. If you connect the MIDI OUT socket to the MIDI IN socket of another instrument, that instrument may play the same notes as one of the EXR-46 OR's parts, select sounds, etc. MIDI is a universal standard, which means that musical data can be sent to and received by instruments of different types and manufacturers. Furthermore, MIDI allows you to connect your EXR-46 OR to a computer or hardware sequencer.
Connect your EXR-46 OR as shown below.
The EXR-46 OR transmits and receives data
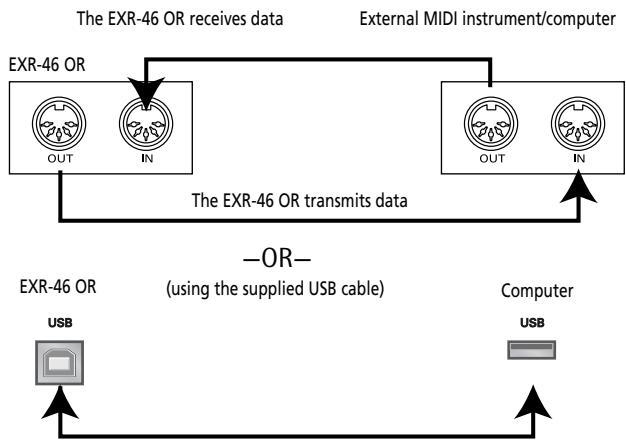
(*) If you connect the EXR-46 OR's USB port to a computer, etc., the MIDI IN and OUT ports are no longer used. This only works when the icon is NOT displayed.
Channels
MIDI can simultaneously transmit and receive messages on 16 channels, so that up to 16 instruments can be controlled. Nowadays, most instruments -like your EXR-46 OR- are multitimbral, which means that they can play several musical parts with different sounds.
Note: All EXR-46 OR parts are set to receive MIDI messages. If they do not seem to respond to the messages you send from the external controller, you should check whether the external controller's MIDI OUT is connected to the MIDI INput of your EXR-46 OR.
The EXR-46 OR's transmit and receive channels of all parts have been set in keeping with a tacit Roland standard and are therefore shared by all recent EM, E, G, and RA series instruments. You cannot change them. They also correspond to the track assignments of the 16-track Recorder:
Accomp1
2 Arranger bass
3Accomp2
4 Main
5Accomp3
6 Dual
7Accomp4
8Accomp5
9Accomp6
10 Arranger drums
11 Split
12 Auto Bass
13 V-Link
14 V-Link
15 Melody Intell. (see p. 27)
16 ( Main^)
(*) If you assign a Drum Kit to the Main part.
MIDI Function parameters
See "Editing parameters (general procedure)" (p. 39) for how to select and set these Function parameters (they belong to the "MIDI" family).
Note: With the exception of "Local", all MIDl parameter settings are saved as soon as you leave the Function mode.
Local
(On/Off, Default setting: On) The Local parameter allows you to establish or remove the connection between the EXR-46 OR's keyboard/Recorder and the internal tone generator.
When set to "ON" (default), playing on the EXR-46 OR's keyboard or playing back a Recorder song will cause the corresponding notes to sound. If you select "OFF", the corresponding
MIDI messages are no longer sent to the internal tone generator - but they are still transmitted to the MIDI OUT or USB port and hence to external MIDI instruments.


Note: The setting of this parameter is not memorized when you switch off the EXR-46 OR.
■ MIDI TxRx° (MIDI transmission and reception)
This parameter allows you to specify which EXR-46 OR parts should transmit and receive MIDI messages:
| Option | Meaning |
| ALL | All parts. |
| KBD | Only the Keyboard parts (see “→” in the table above). |
| STL | Only the Arranger parts (AccDrums~Accomp 6). |
| SNG | Only the Song parts (1~16). |
| OFF | None of the EXR-46 OR's parts transmits/receives MIDI messages. |
Sync Rx° (MIDI synchronization)
Use this parameter to specify how the EXR-46 OR should be synchronized (as slave) to an external MIDI sequencer, computer, drum machine, etc.
"Synchronization" is a learned term for the fact that one device (or function) is set to start and stop at the same time as another device (or function), and to run at the same tempo (BPM).
Please note that synchronization is only possible when you connect the external device's MIDI OUT socket to the EXR-46 OR's MIDI IN socket (though you can also work the other way around; in that case, see the sequencer's manual for details).
Off In this case, the EXR-46 OR is not synchronized with other MIDI devices. It is thus impossible to start/stop it via MIDI.
On Arranger playback and Song recording/playback are synchronized if the EXR-46 OR receives MIDI Start and Stop messages followed by MIDI Clock signals. If the EXR-46 OR receives only a Start message, it will wait a moment to see if there are also MIDI Clock messages coming. If there are, it will synchronize to them. If there are no MIDI Clock messages, it will follow its own tempo. In either case, you can stop playback or recording with a MIDI Stop message.
Style PC^ (Style Select TxRx Channel)
(OFF, 1~16, Default setting: 10) As its name implies, the Style Select channel is used to receive and transmit program changes that cause the EXR-46 OR or the external instrument to select another Music Style.
Lyrics Tx° (Transmit lyrics messages)
(On/Off, Default setting: Off) The EXR-46 OR can transmit Lyrics messages contained in Format 0 Standard MIDI Files you play back. It cannot display them, but it allows you to transmit them to a device capable of displaying Lyrics messages (such as the Roland LVC-1). This filter allows you to enable (On) or disable (Off) the transmission of Lyrics data.
NTA Rx14° (Note-to-Arranger reception on/off)
(On/Off, Default setting: On) NTA is short for "Note-to-Arranger", or the notes you play in the left half of the keyboard to feed the Arranger with chord information. These notes can also be received via MIDI (from an accordion, a digital piano, an organ, for example). If you want to use the Arranger without playing on the EXR-46 OR's keyboard, you must transmit these notes on MIDI channel 14 (from your computer or external MIDI instrument to the EXR-46 OR) and select "On" here.
NTA notes can only be received (they are not transmitted). The notes you play on the EXR-46 OR's keyboard are indeed transmitted to the Arranger, from there to the Arranger parts, and used to play the accompaniment in the right key. Since all Music Style notes are transmitted via MIDI, there is no need to send the NTA notes separately.
PitchBnd° (Pitch Bend)
(On/Off, Default setting: On) This filter allows you to enable (On) or disable (Off) the transmission and reception of Pitch Bend messages. These messages are used to temporarily increase or decrease the pitch of the Keyboard-part notes (Main, Dual, Split).
Modulatn° (Modulation)
(On/Off, Default setting: On) This filter allows you to enable (On) or disable (Off) the transmission and reception of Modulation messages. These messages are used to add vibrato to the notes you play (control change CC01).
ProgChng (Program Change)
(On/Off, Default setting: On) This filter allows you to enable (On) or disable (Off) the transmission and reception of Program Change messages. These messages are used to select Tones, Styles, or User Programs.
Velo Rx^ (Receive Velocity)
(On, 1~127, Default setting: On) This filter allows you to enable (On) or disable the reception of velocity messages. This only applies to note messages received via MIDI. Choose the velocity value to be substituted for the actual values the EXR-46 OR receives (1~127), or select "On" to use the velocity values as is.
Clock Tx° (synchronization)
(On/Off, Default setting: On) This parameter allows you to determine whether (On) or not (Off) the Arranger and Recorder send MIDI Clock messages when you start them. These messages are necessary for synchronizing external MIDI instruments/sequencers/software to the EXR-46 OR.
StartStp° (Start/Stop/Continue)
(On/Off, Default setting: On) This option allows you to specify whether or not the Arranger and Recorder send Start/Stop/Continue messages when you start or stop them. Select "Off" when you wish to control the tone generator of a MIDI organ, etc., without starting or stopping its automatic accompani-ment.
Song PosPo (Song Position Pointer)
(On/Off, Default setting: On) The EXR-46 OR's Recorder also sends and receives Song Position Pointer messages that indicate the exact location of the notes that are being played back. Select "OFF" if you don't want the Recorder to send or receive these messages.
15. Data management
Working with the Flash memory
Let us first have a look at the remaining Function parameters. They allow you to save newly recorded songs and Styles loaded from a floppy disk to the EXR-46 OR's Flash memory, and to remove such files.
Saving songs to a Flash memory
Songs you record or edit with the EXR-46 OR's Recorder can be saved to its Flash memory or floppy disk. See page 54 for how to save them to floppy and page 19 for how to select songs in the Flash memory.
(1) Press FUNCTION.

(2) Use FAMILY to select the "writeSHG" parameter. Wait until the display looks as shown below, then proceed with the following step.
Wt SONG 001-yes
The EXR-46 OR automatically selects a Flash memory that doesn't yet contain data. (The first character, "S", flashes.) Note: If no vacant Flash memory remains or if the memory capacity is exhausted, the display shows the "Mem Full" message when you select this function. In that case, it will be impossible to save your song. You can, however, delete another song ("Remove") and repeat step (2) and following. Note: The "No Song" message means that there are no song data that could be saved.
(3) If necessary, use the SELECT l buttons to move the cursor to another character position (that character flashes).
(4) Use the numeric buttons to assign a character to that position.
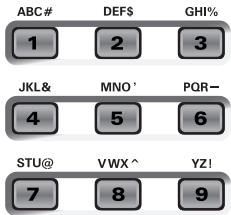

The available characters are:
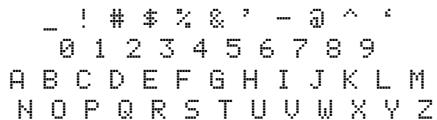
Note: Each time you press another numeric button (for entering characters), the cursor advances automatically to the next position. This works like a mobile phone.
(5) Repeat steps (3) and (4) to assign the desired characters to the remaining positions.
(6) After entering the name, press the / + button to save the song to the EXR-46 OR's Flash memory. The display now counts down:
71 Writing
At the end of the saving operation, the display briefly shows the "Complete" message.
Note: Press NO/- if you do not wish to save the song after all.
(7) Press another "big" button in the DATA ENTRY section to leave this function.
Archiving User Programs in the Flash area
This function allows you to save the contents of the internal User Programs (all 200 of them) to the Flash area. User Programs are always archived as a set.
Use this function if all 200 User Programs contain settings you don't want to overwrite (by saving other registrations) or lose (in the unlikely event of a memory failure). There is also a function that allows you to load archived User Programs (page 50).
Note: The User Program set data also contain the TONE button assignments (page 30).
(1) Press FUNCTION.
(2) Use FAMILY to select the "wr-i.t.eUPG" parameter. Wait until the display looks as follows, then proceed with the next step:
Wt USPR-000JYES
Though you could save the file with the current default name ("USPR_000"), a proper name will help you identify the file at all times. We therefore suggest you take the time to specify a meaningful name.
The first character of the default name ("UserPrg") flashes. Note: If the memory capacity is exhausted, the display shows the "Mem Full 1" message when you select this function. In that case, it will be impossible to archive the User Program set. You can, however, delete another set ("Remove") and repeat steps (2) and following.
(3) If necessary, use the SELECT l buttons to move the cursor to another character position (that character flashes).
(4) Use the numeric buttons to assign a character to that position.
The available characters are:
$$ - \frac {1}{2} \text {单 本} ^ {\prime} = - \frac {1}{2} \text {单} ^ {\prime} $$
$$ 0 1 2 3 4 5 6 7 8 9 $$
$$ A B C D E F G H I J K L M $$
$$ \text {N O P Q R S T U V W X Y Z} $$
(5) Repeat steps (3) and (4) to assign the desired characters to the remaining positions.
Note: Each time you press another numeric button (for entering characters), the cursor advances automatically to the next position. This works like a mobile phone.
(6) After entering the name, press the / + button to save the User Program set to the EXR-46 OR's Flash memory. The display first shows the "writing" message. At the end of the saving operation, the display briefly shows the "Complete" message.
Note: Press NO/- if you do not wish to archive the User Program Set after all.
(7) Press another "big" button in the DATA ENTRY section to leave this function.
Saving Styles to a Flash memory
Music Styles you load from floppy disk (and which are copied to the USER STL memory at that time) can be saved to a Flash memory.
(1) Press FUNCTION.
(2) Use FAMILY to select the "wr-iteSTL" parameter. Wait until the display looks as follows, then proceed with the next step:
Wit
TANGO
TEMPO
J-4ES
The EXR-46 OR automatically selects a Flash destination memory that doesn't yet contain data. (The first character flashes.)
Note: If no vacant Flash memory remains or if the memory capacity is exhausted, the display shows the Mem Full" message when you select this function. In that case, it will be impossible to save the Music Style. You can, however, delete another Style ("Remove") and repeat step (2) and following. Note: The "No Style" message means that there are no Style data that could be saved.
(3) If necessary, use the SELECT l buttons to move the cursor to another character position (that character flashes).
(4) Use the numeric buttons to assign a character to that position.
The available characters are:
$$ ! \text {井 宝} _ {2} ^ {\prime} = 7 - 1 0 \div $$
$$ 0 1 2 3 4 5 6 7 8 9 $$
$$ A B C D E F G H I J K L M $$
$$ \text {N O P Q R S T U V W X Y Z} $$
(5) Repeat steps (3) and (4) to assign the desired characters to the remaining positions.
Note: Each time you press another numeric button (for entering characters), the cursor advances automatically to the next position. This works like a mobile phone.
(6) After entering the name, press the / + button to save the Style to the EXR-46 OR's Flash memory.
The display now counts down:
71 Writing
At the end of the saving operation, the display briefly shows the "Complete" message.
Note: Press [NO/-] if you do not wish to save the Music Style after all.
(7) Press another "big" button in the DATA ENTRY section to leave this function.
Loading a User Program set from the Flash memory
This "ReadUPG" function allows you to transfer a set of 200 User Programs (i.e. for all memories) to the EXR-46 OR's internal memory. This will overwrite the User Programs that currently reside in the internal memories. You cannot load individual User Programs from an archived set.
Note: If you wish to use the User Programs in the internal memory at a later stage, first archive them (page 49) or save them to disk before proceeding. See p. 54.
(1) Press FUNCTION.
(2) Use FAMILY to select the "ReadUPG" parameter.
(3) Wait until the display shows the name of the first User Program set, then proceed with the following step.
(4) Use the SELECT l buttons to select the set you wish to load.
(5) Press the / + button.
The display now shows the "Sure?" message, while YES starts flashing.
(6) Press the / + button again to load the User Program set (or / - if you do not want to load it after all).
While the data are being loaded, the display shows the "Reading" message. Once the file has been loaded, the display briefly shows the "Complete" message.
(7) Press another "big" button in the DATA ENTRY section to leave this function.
Removing songs from the Flash memory
Songs you no longer need can be deleted (which is called "Remov" here) to make room for new songs.
(1) Press FUNCTION.

(2) Use FAMILY to select the "RemovSNG" parameter.
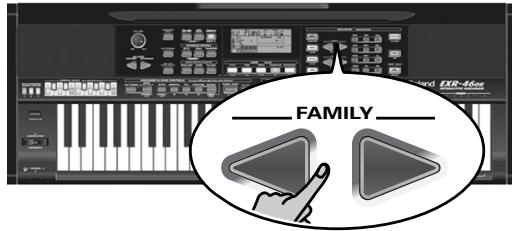
Wait until the display shows the name of the first song memory (101), then proceed with the following step.
Note: The "No Song" message means that there are no song data that could be deleted.
(3) Use the SELECT l buttons to select the song you wish to delete.
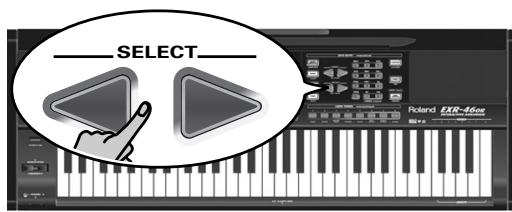
(4) Press the / + button. The display now shows the "Sure?" message, while YES starts flashing.
(5) Press the / + button again to delete the song (or NO/- if you do not want to delete it after all). The display now shows the following message:
Renovating
Once the file has been deleted, the display briefly shows the "Complete" message.
(6) Press another "big" button in the DATA ENTRY section to leave this function.
Removing Styles from the Flash memory
Styles you no longer need can be deleted (which is called "Remov" here) to make room for new Styles.
(1) Press FUNCTION.
(2) Use FAMILY to select the "RemovSTL" parameter. Wait until the display shows the name of the first Style memory (101), then proceed with the following step. Note: The "No Style" message means that there are no Music Style data that could be deleted.
(3) Use the SELECT l buttons to select the Music Style you wish to delete.
(4) Press the / + button. The display now shows the "Sure?" message, while YES starts flashing.
(5) Press the / + button again to delete the Style (or NO/) if you do not want to delete it after all). The display now shows the following message:
Renovating
Once the file has been deleted, the display briefly shows the "Complete" message.
(6) Press another "big" button in the DATA ENTRY section to leave this function.
Removing a User Program set from the Flash memory
The "RemovUPG" function allows you to erase User Program sets from the EXR-46 OR's Flash memory. This may be necessary to make room for new files (e.g. when the "Memory Full" message appears). Be careful, though, to only delete files you are absolutely (positively) sure you will never need again. Once a file has been deleted, it is gone forever.
Note: As a rule, you should first make a backup copy of your disk on your computer. After all, most files really only become indispensable once they are no longer available...
(1) Press FUNCTION.

(2) Use FAMILY to select the "RemovlPG" parameter. Wait until the display shows the name of the first User Program set, then proceed with the following step. Note: The "No Files" message means that there are no set data that could be deleted.
(3) Use the SELECT l buttons to select the User Program set you wish to delete.
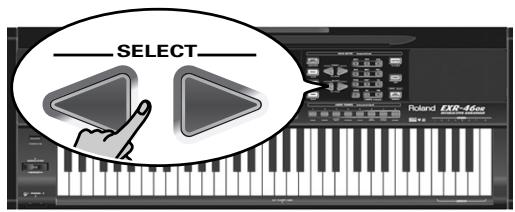
(4) Press the / + button. The display now shows the "Sure?" message, while YES starts flashing.
(5) Press the YES/+ button again to delete the User Program (or NO-) if you do not want to delete it after all).
The display now shows the following message:
Renovating
Once the file has been deleted, the display briefly shows the "Complete" message.
(6) Press another "big" button in the DATA ENTRY section to leave this function.
Archiving data using a computer (USB)
The EXR-46 OR's USB port can be used for two purposes: (a) for transmitting/receiving MIDI data or (b) for exchanging files with a computer.
As long as the USB icon is not displayed, the USB port transmits and receives MIDI data (the MIDI IN and OUT sockets are bypassed if you connect a USB cable to this port).
If the icon is displayed, however, your EXR-46 OR will appear as an external drive on your PC's or Mac's desktop:
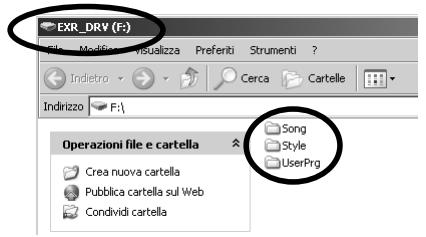
The drive letter ("F:" in the above illustration) depends on the number of drives recognized by Windows (and is of no importance for MacOS).
Note: USB communication (i.e. for MIDI applications) is possible between the EXR-46 OR and Windows Me/XP or later (for Windows users), or between the EXR-46 OR and Mac OS 9.0.4 or later (for Macintosh users). This requires that you install the appropriate drivers from the supplied CD-ROM.
Data transfer, on the other hand, is possible with Windows 2000/ Me/XP or later/Mac OS 9.04 or later. If you encounter problems with your system, please contact your nearest Roland service center for details.
Once recognized, you can copy files to the "Song", "UserPrg" or "Style" folder by dragging and dropping them using the usual routines. The "Style", "UserPrg" and "Song" folders cannot be deleted and must not be renamed. You can empty them by dragging all files they contain to the trash, though.
Proceed as follows (Windows XP):
(1) Restart your PC.
(2) Switch on your EXR-46 OR.
(3) Press the EXR-46 OR's [USB] button.

The display shows the error message "No Cable" to signal that USB communication is impossible.
(4) Connect the EXR-46 OR's USB port to a free USB port of your computer using the supplied cable.
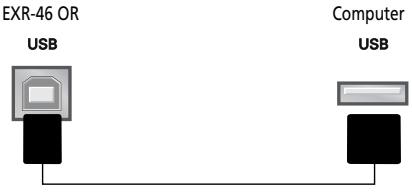
The l -USB icon appears and the display shows "PC<-EXR".
If you prefer to use another cable, choose one with the correct USB jack types: a "square" one ("type B") for the EXR-46 OR and probably a "flat" one (type "A") for your computer)
Note: If you do not connect a USB cable within 15 seconds, the EXR-46 OR returns to its normal mode.
Note: Never switch off the EXR-46 OR while the "writing" message is displayed, because doing so would damage all data in the EXR-46 OR's Flash area. (See "InitFLSH (Flash initialization)" (p. 44) if you need to repair the Flash area after an erroneous operation.)
Note: The "Wait... Connection Proceeding" message may appear when you press the [USB] button. This only happens after using the USB port for MIDI communication. It means that Windows XP is reconfiguring the USB port for data transfer use. This may take a while, so please be patient.
Proceed as follows (other operating systems):
(1) Switch on your Mac or PC if it isn't on already.
(2) Switch on your EXR-46 OR if it isn't on already.
(3) Press the EXR-46 OR's USB button.
The display shows the error message "No Cable" to signal that USB communication is impossible.
Note: If you do not connect a USB cable within 15 seconds, the EXR-46 OR returns to its normal mode.
(4) Connect the EXR-46 OR's USB port to a free USB port of your computer using the supplied cable.
The 0sB icon appears and the display shows "PC<->EXR".
If you prefer to use another cable, choose one with the correct USB jack types: a "square" one ("type B") for the EXR-46 OR and probably a "flat" one (type "A") for your computer).
Note: Do not connect the EXR-46 OR to a USB hub. Always connect it directly to your computer.
Note: Never switch off the EXR-46 OR while the "writing" message is displayed, because doing so would damage all data in the EXR-46 OR's Flash area. (See "InitFLSH (Flash initialization)" (p. 44) if you need to repair the Flash area after an erroneous operation.)
For all operating systems:
Note: If you press the USB button without connecting the USB cable, the display shows the error message "No Cable" to signal that USB communication is impossible. Connect a cable to cause this message to disappear.
(5) Open the "My Computer" window (Windows) and check whether your computer has found an "EXR_DRV" (or just "Removable Disk").
(6) Open that drive by double-clicking on its icon.
(7) Open either the "Style", "UserPrg" or "Song" folder. This depends on whether you want to delete/ rename/add Music Styles or Standard MIDI Files.
(8) Do one of the following:
- Copy the desired Music Styles from the "Style" folder to your computer's hard disk using drag & drop.
- Copy the desired songs from the "Song" folder to your computer's hard disk using drag & drop.
- Copy the desired User Program sets from the "UserPrg" folder to your computer's hard disk using drag & drop.
-
Copy the desired Music Styles from your computer's hard disk to the "Style" folder using drag & drop. (See also the explanation below step (10).)
-
Copy the desired songs from your computer's hard disk to the "Song" folder using drag & drop.
- Copy the desired User Program sets from your computer's hard disk to the "UserPrg" folder using drag & drop.
- Rename the desired files in the "Style", "UserPrg" or "Song" folder.
- Delete the files you no longer need.
Note: While the "PC<->EXR" message is displayed, all of the EXR-46 OR's buttons and keys are blocked.
(9) To disconnect the EXR-46 OR from your computer:
- Macintosh: Drag the "EXR_DRV" (or "Removable Disk") icon to the trash. -OR-
- Windows: Click on the removal icon on the task bar. Wait until a drop-down menu appears and select the entry that says something to the effect of "Stop USB disk EXR_DRV". You should now see a window that says something to the effect of "The USB device XX can now be safely removed from the system". Click on the [OK] button.
-THEN--
- Disconnect the USB cable from your computer and the EXR-46 OR.
(10) Press the USB button again.
The display shows the "Sui" message.
(11) Press / + (the icon disappears).
(Press NO to remain in USB mode.)
If you copied Music Styles from your computer to the Flash area, the display now shows "Wait... Converting Styles" to indicate that files with the extension ".STL" are converted to the EXR-46 OR's Music Style format (.STH').
Note that this conversion is only necessary for Music Styles in the EXR-46 OR's Flash area that do not yet have the ".STH" extension.
Note: This operation adds a few bytes to every converted Music Style. In rare circumstances (when the Flash area is nearly full), this may lead to the impossibility to convert all Styles that still have the extension ".STL". The EXR-46 OR then displays the "MemFull" message to signal that the conversion was aborted before reaching the last ".STL" file. All Styles up to that point have been converted, though, and can be used.
Disk functions
The EXR-46 OR's Disk functions allow you to save the Recorder Song in the USER SNG memory to disk, to save and load your files to and from disk, to delete files on a floppy disk, and to format disks.
Though you can use 2DD or 2HD floppies, 2HD disks have twice the capacity of 2DD disks, so use 2HDs whenever you can.
Whenever the disk drive writes data to or reads data from disk, the Disk icon (Disk) flashes in the display. Do not remove the floppy disk while this icon is displayed as that may damage both the disk drive and the disk (so that it becomes unreadable).
Loading User Programs from disk
This load function is called LOADUPr. It allows you to transfer a set of 200 User Programs (i.e. for all memories) to the EXR-46 OR's internal memory. This will overwrite the User Programs that currently reside in the internal memories.
Note: If you wish to use the User Programs in the internal memory at a later stage, first save them to disk before proceeding. See p. 54.
Note: The User Program set data also contain the TONE button assignments (page 30). After loading a User Program set, the eight TONE buttons may therefore select other sounds than before.
(1) Insert a disk into the drive.
(2) Press DISK to select the Disk mode.
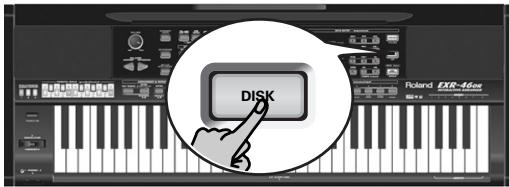
The "LOAD UPr" function is already selected, so there is nothing else you need to do. (Otherwise, use FAMILY to select this parameter.)
(3) Use SELECT to select the User Program Set you wish to load.

The YES message next to it starts flashing.
(4) Press the / + button to load the selected file.
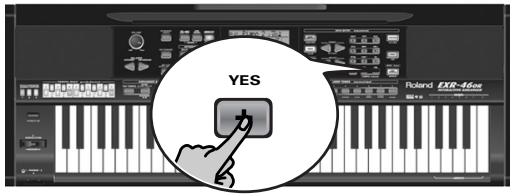
Note: Press NO/- if you do not want to load the selected file after all.
If you pressed / + , the display now shows the message "Loading". Once the data have been loaded, the "Complete" message briefly appears.
(5) Press another "big" button in the DATA ENTRY section to leave this function.
Possible error messages
| No Disk | You forgot to insert a floppy disk into the drive. |
| No Files | The disk you inserted contains no User Program data. |
| NoFormat | The floppy disk is either not formatted or uses a format the EXR-46 OR doesn't recognize. Press YES/+ to format it now (careful: this will erase all data on disk). |
| Disk Err | The disk is probably damaged and cannot be used. |
| File Err | The file you selected is damaged and cannot be loaded. |
Loading songs from disk
LOAD Sng allows you to load a song on floppy disk into the EXR-46 OR's User memory.
(1) Insert a disk into the drive.
(2) Press DISK to select the Disk mode.
(3) Select the "LOAD Sng" function using FAMILY.
(4) Use SELECT to select the song you wish to load. The YES message next to it starts flashing.
(5) Press the / + button to load the selected file. Note: Press NO/- if you do not want to load the selected file after all. If you pressed / + , the display now shows the message "Loading". Once the data have been loaded, the "Complete" message briefly appears.
(6) Press another "big" button in the DATA ENTRY section to leave this function. Note: See also "Possible error messages" above.
Loading Music Styles from disk
LOAD St.1 allows you to load a Music Style on floppy disk into the EXR-46 OR's User memory.
(1) Insert a disk into the drive.
(2) Press DISK to select the Disk mode.
(3) Select the "LOAD St.1" function using FAMILY
(4) Use SELECT to select the Music Style you wish to load. The YES message next to it starts flashing.
(5) Press the / + button to load the selected file. Note: Press NO/- if you do not want to load the selected file after all.
If you pressed / + , the display now shows the message "Loading". Once the data have been loaded, the "Complete" message briefly appears.
(6) Press another "big" button in the DATA ENTRY section to leave this function. Note: See also "Possible error messages" (p. 54).
Saving files to disk
The EXR-46 OR provides the following Save functions:
SAVE UFr: Use this function to save the contents of the internal User Program memories (all 200 of them) to a floppy disk.
Note: The User Program set data also contain the USER TONES button assignments (page 30).
SAVE Sn9: This allows you to save the song in the USERSONG memory to a floppy disk. A song saved to disk becomes a Standard MIDI File.
(1) Insert a disk into the drive. Every floppy contains a square tab that allows you to "close" a little window. With the tab in that position, you can save data to the disk. Do not forget to write-enable the disk by closing this little window prior to inserting the floppy disk.
(2) Press DISK and use FAMILY to select "SAVE UPR" or "SAVE Snrg".
(3) If necessary, use the SELECT l buttons to move the cursor to another character position (that character flashes).
Note: Each time you press another numeric button (for entering characters), the cursor advances automatically to the next position.
(4) Use the numeric buttons to assign a character to that position.
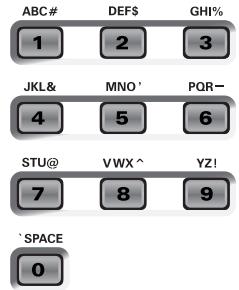
The available characters are:
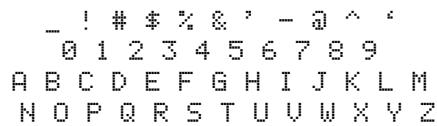
(5) Repeat steps (3) and (4) to assign the desired characters to the remaining positions.
Though you could save the file with the current default name ("SONG_001", or "USPR_000"), a proper name will help you identify the file at all times. We therefore suggest you take the time to specify a meaningful name.
Note: If you select "SPACE" (O button), the display will insert a _. That's because MS-DOS® does not allow you to use spaces.
(6) After entering the name, press the / + button to save the data to floppy disk.

The display now counts down ("Saving").
71 Saving
At the end of the saving operation, the display briefly shows the "Complete" message.
Note: If the message "Protect" appears, you forgot to switch off the disk's Write protection. Press the EJECT button of the disk drive, remove the floppy and close the tab, insert the disk again and press / + .
Note: Press NO/- if you do not want to save the selected file after all.
(7) Press another "big" button in the DATA ENTRY section to leave this function.
Possible error messages
| No Disk | You forgot to insert a floppy disk into the drive. |
| Protect | See above. |
| Disk Full | The remaining disk capacity does not allow to save your data to this disk. |
| NoFormat | The floppy disk is either not formatted or uses a format the EXR-46 OR doesn't recognize. Press YES/+ to format it now (careful: this will erase all data on disk). |
| Disk Err | The disk is probably damaged and cannot be used. |
| OverWrt? | The name you assigned to the data already exists on the floppy disk you inserted. If you press YES/+ to continue, the file on disk will be overwritten (and the corresponding data will be erased). Either insert another floppy disk, or press DISK and enter another name for the data you want to save. |
Deleting files on disk
The Delete functions allow you to erase files from the inserted floppy disk. This may be necessary to make room for new files (e.g. when the "Disk Full" message appears). Be careful, though, to only delete files you are absolutely (positively) sure you will never need again. Once a file has been deleted, it is gone forever.
Note: As a rule, you should first make a backup copy of your disk on your computer. After all, most files really only become indispensable once they are no longer available...
DEL UPr: Use this function to delete a User Program Set from disk. Be aware that by doing so, you actually erase 200 User Program settings.
DEL Sng: This allows you to delete a song file on disk.
(1) Insert the disk with the file you want to delete into the drive.
(2) Press DISK to select the Disk mode.
(3) Use FAMILY to select "DEL UPr" or "DEL Sng".
(4) Use SELECT to select the file you wish to delete (example: "USPR_005"). The YES message starts flashing.
(5) Press the YES/+ button. To be on the safe side, the EXR-46 OR now asks you whether you really want to delete the file ("Sulne").
(6) Press / + to delete the file, or NO/ to abort the operation. If you pressed / + , the display now shows the message "Deleting". Once the data have been deleted, the "Complete" message briefly appears.
(7) Press another "big" button in the DATA ENTRY section to leave this function.
Possible error messages
| No Disk | You forgot to insert a floppy disk into the drive. |
| Protect | You forgot to switch off the disk's Write protection. Press the EJECT button of the disk drive, remove the floppy and close the tab, insert the disk again and press YES/+ . |
| NoFormat | The floppy disk is either not formatted or uses a format the EXR-46 OR doesn't recognize. Press YES/+ to format it now (careful: this will erase all data on disk). |
| Disk Err | The disk is probably damaged and cannot be used. |
| No Files | The disk contains no files of the selected type. Insert another disk. |
Format
Before being able to save files to a disk, you need to prepare a floppy disk. This is called "formatting". If the floppy you are about to use is IBM PC formatted, there is no need to format it, though disk access is faster with disks formatted on the EXR-46 OR. Otherwise proceed as follows:
(1) Insert a disk into the drive.
Every floppy contains a square tab that allows you to "close" a little window. With the tab in that position, you can format the disk. Do not forget to write-enable the disk by closing this little window prior to inserting the floppy disk.
(2) Press DISK to select the Disk mode.
(3) Use FAMILY to select "FORMAT". The "Sure?" message appears and the YES message starts flashing.
(4) Press / + to format the disk.
Note: If you do not want to format your floppy, press [NO/]. Note: By formatting a disk, you erase all files it contains. It would be a good idea to first check what it contains (e.g. on your PC).
The value to the left of the "Formatng" message now counts from "1" to "100" while the disk icon flashes to indicate that the disk is being accessed. When the disk is formatted, the message "Complete" is briefly displayed.
16. Using the outputs and an optional footswitch
If you like, you can also record your performance (or a Recorder songs) to cassette, MD, etc. To this end, you need to connect the EXR-46 OR's OUTPUT sockets to the external device's REC IN jacks.
Use a standard 1/4'' phone cable for doing so. Another use for these outputs is to connect the EXR-46 OR to your HiFi or keyboard amplifier (such as the Roland KC-550/350/150). Using a HiFi amplifier requires the use of an adapter plug (RCA/phono 1/4'' jack). If you like, you can also purchase two Roland PJ-1M cables.
Note: By connecting the OUTPUT jacks, you do not switch off the EXR-46 OR's amplification system.
You can connect an optional DP-2, DP-6, or BOSS FS-5U foot switch to the FOOTSWITCH jack in order to hold the notes even after releasing the keys, or to perform other functions (see p. 40).
Cassette deck, power amplifier, HiFi amplifier, MA series active speakers, etc.
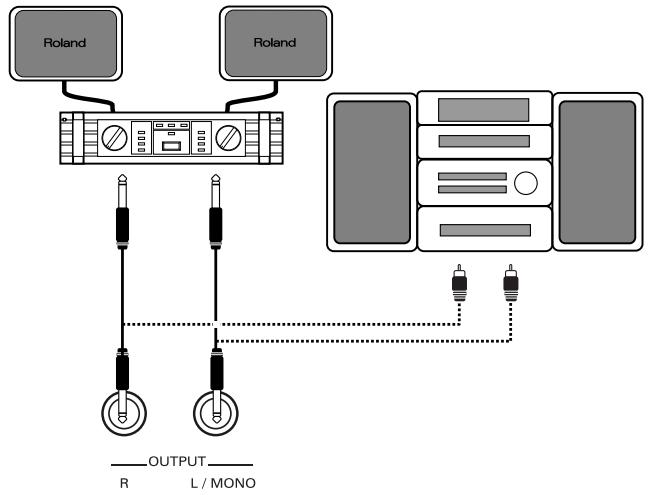
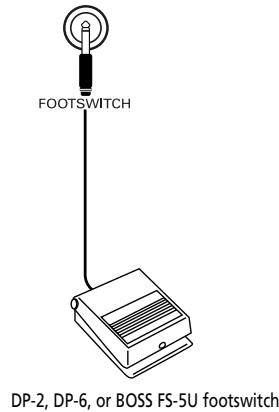
17. Miscellaneous
Functions for educational purposes
The EXR-46 OR provides two functions that may come in handy for music teachers or for those who use the EXR-46 OR in class:
Deactivating or activating the Demo function
The EXR-46 OR's Demo function can be switched off so that pressing [USB] + [ONE TOUCH] will have no effect at all. This may be useful in situations where the EXR-46 OR is used in class. Here is how to deactivate the Demo function:
(1) Switch off the EXR-46 OR.
(2) Hold down the USB, ONE TOUCH and ACOUNSTIC buttons while switching the EXR-46 OR back on again. The display briefly shows "DISABLED".
This setting is remembered, so that next time you want to listen to a demo song, you have to repeat the above procedure.
Deactivating or activating the Arranger
Use the following procedure to ensure that the Arranger cannot be started or stopped:
(1) Switch off the EXR-46 OR.
(2) Hold down the ACOUTIC and ARRANGER BAND buttons while you switch the EXR-46 OR back on again. The display briefly shows "DISABLED". It is now impossible to start/stop the Arranger using the START/STOP button.
Repeat the above procedure when you want to use the Arranger again.
Deactivating or activating the Arranger and Demo functions
A third "educational" option is to switch off both the Demo and the Arranger functions in one go:
(1) Switch off the EXR-46 OR.
(2) Hold down the ACOUTIC and START/STOP buttons while you switch the EXR-46 OR back on again. The display briefly shows "DISABLED". It is now impossible to start/stop the Arranger or demo song playback. Repeat the above procedure when you want to use the Arranger and Demo function again.
Initializing your EXR-46 OR (Factory)
After working extensively with your EXR-46 OR, you may want to recall the original factory settings. Note that the Recorder song will be empty and that the User Programs contain the factory settings after initializing your EXR-46 OR. Here is how to initialize your EXR-46 OR:
(1) Power off your EXR-46 OR.
(2) Hold down the USER PROGRAM/WRITE button while turning your EXR-46 OR back on again. The message "Factor" informs you that the EXR-46 OR has been initialized. Note: This does not affect the data in the EXR-46 OR's Flash memory. See page 44 for how to initialize that area.
18. Specifications
EXR-46 OR Interactive Arranger
Keyboard: 61 keys, velocity sensitive
Sound source: PCM samples
Max polyphony: 64 voices
Tones: 650 panel sounds, of which 107 oriental sounds (542 XG compatible voices/256 GM2 compatible sounds)
Drum Kits: 33 Drum Kits, of which 13 oriental kits (11 XG compatible + 9 GM2 compatible)
Multitimbral parts: 19
Compatibility: GM2, GS, XG Lite
Display type: New large backlit custom display
Panel controls: VOLUME knob, ACCOMP/KEYBOARD BALANCE buttons, TEMPO/DATA buttons, BENDER/MODULATION lever, FAMILY buttons, SELECT buttons, numeric buttons 0 9 , 8 assignable TONE buttons, 12 ORIENTAL SCALE buttons, 3 SCALE MEMORY buttons
Music Styles: 149 Styles in Flash memory (99 factory + 50 changeable)
One Touch: 2 × 99
Orchestrator: 3 levels: Drum&Bass, Combo, Full Band
LOCK functions (setting filters x10): STYLE, TONE, TEMPO, TRANSPOSE, MONO/PORTAMENTO
Songs: Realtime SMF player
16-track Recorder: 4 easy modes (ALL, Keyboard, Single, Punch In/Out)
Flash Memory: For Music Styles, User Program sets and songs
User Programs: 200
Effects:Reverb:8 types,Chorus:8 types,Multi-FX:47 types
Data storage: FDD 3.5" 2HD/2DD (Styles, Songs/SMF, User Programs), File save & load from PC via USB (Styles, Songs, User Programs)
Metronome: Time Signature setting (1/4~9/4, 1/8~9/8), Volume setting
Other functions: 3 easy modes (Piano/Solo, Arranger/Band, Pianist), Drum Pad mode, Music Assistant: 100 settings, Split (2 Tones: Split [L] + Main [R]), Dual (2 Tones: Main + Dual), Melody Intelligence: 18 types, Octave (-4 4) , User Transpose (-12 12)/G|b|
Transpose (-6 5) V-Link
System updates: Yes
Connections: USB: MIDI communication and file transfer, MIDI IN, OUT
Outputs: L/Mono, Right (1/4" phone jacks), Phones 1/2, DC IN (adapter)
Others: Output Power: 10W+10W with "Digital Bass Enhancer",
Stereo Speakers: 2xØ13cm, Bass Reflex
Power supply: 12V/3.5A
Dimensions: 1020 × 355 × 132 ~mm
Weight: 8kg
Supplied accessories: Owner's Manual, PSB-4U adapter, music rest, USB cable, CD-ROM with USB driver files
Note: Specifications are subject to change without prior notice.
Thanks
Roland Corporation wishes to express gratitude and thanks to all persons who have been involved in the preparation of the Oriental Drum Kits, Oriental Music Styles and Demo Songs for the EXR-46 OR Interactive Arranger.
Special thanks go to:
Mr. Cherif Cotta, Mr. Emmanuel G. Chnarakis and
Mr. Mehmet Dogdu
for their important and valuable co-operation and enthusiasm for the development of the EXR-46 OR
Mr. Abdallah George, Mr. Ahmed Mustafa, and
Mr. Alp Selim
for their precious advice and support
Mr. Mohamed Raheem
for authorizing Roland Corporation to use his famous composition "Leh Bey Dari" as demo song in the EXR-46 OR
Mode d'emploi
15 Section BAND ORCHESTRATOR
① Prises OUTPUT R, L/MONO
Bass Inversion (Bass Inv)
Transposition globale ("GLB")
KB SET: KbdTouch, MsterTune, USRTrnsp, GLB Trnsp, TransMod, PB Range, KeySplit, SplitHold, SplitInt, FSW, Port Main, Port Dual, Mode Main, Mode Dual
DRUM PAD: DK1/DrumPad1~DK8/DrumPad8
METRONOM: Mtro TS, MetroVol, Count-In
OCTAVE: MAIN Oct, DUAL Oct, SPLT Oct
■ VOLUME: Main Vol, Dual Vol, SplitVol, Auto Bass, AccDrums, AccBass, Acccomp1~Accomp6, Song1~Song16
ARR SET: ArrChord, Arr Hold, EP Chord, Bass Inv, MI (Melody Intelligence), InEnCHRD, Sync Stop
■ EFFECTS: REV (Reverb), CHR (Chorus), MFX, Tone MFX, Rev MAIN, Chr MAIN, Pan MAIN, Rev DUAL, Chr DUAL, Pan DUAL, RevSPLIT, ChrSPLIT, PanSPLIT
KB SCALE: Scale C/C#/D/Eb/E/F/F#/G/Ab/A/Bb/B, Scale Mode
■ MIDI: Local, MidiTxRx, Sync Rx, Style PC, LyricsTx, NTARx14, PitchBnd, Modulatn, ProgChng, Velo Rx, Clock Tx, StartStp, SongPosP
■ UTILITY: LockInit, InitFLASH, Resume
■ WriteSNG (voyez p. 109)
■ WriteSTL (voyez p. 110)
RemoveSNG (voyez p. 110)
Remove STL (voyez p. 111)
■ WriteUPG (voyez p. 110)
ReadUPG (voyez p. 110)
■RemovUPG (voyez p. 111)
SplitInt* (Split Chord Intelligence)
AccDrums*, AccBass*, Acccomp1~Accomp6*: Volume
ChordInt* (Arranger Chord Intelligence)
ArrHold* (Arranger Hold)
Modulat° (Modulation)
StartStp° (Start/Stop/Continue)
Effets: Réverb: 8 types, Chorus: 8 types, Multi-FX: 47 types
- Lists
Tones selectable via the front panel
| Tone no. | PC | CC00 | CC32 | Name | Family | Tone no. | PC | CC00 | CC32 | Name | Family | Tone no. | PC | CC00 | CC32 | Name | Family | |
| 1 | 1 | 8 | 2 | StPiano1 | PIANO | 82 | 17 | 1 | 2 | Organ101 | ORGAN | 163 | 121 | 6 | 2 | PickScrp | E. GUITAR | |
| 2 | 1 | 16 | 2 | EuronpF | PIANO | 83 | 17 | 7 | 2 | DtdnOr1 | ORGAN | 164 | 33 | 0 | 2 | AcsticB5 | BASS | |
| 3 | 2 | 0 | 2 | Piano 2 | PIANO | 84 | 17 | 8 | 2 | TrmOrgan | ORGAN | 165 | 33 | 1 | 2 | Ac.Bass1 | BASS | |
| 4 | 4 | 0 | 2 | Honkytnk | PIANO | 85 | 17 | 9 | 2 | Organ109 | ORGAN | 166 | 34 | 0 | 2 | FingrdB5 | BASS | |
| 5 | 1 | 0 | 2 | Piano 1 | PIANO | 86 | 17 | 17 | 2 | 60sOrgn2 | ORGAN | 167 | 34 | 2 | 2 | JazzBass | BASS | |
| 6 | 2 | 8 | 2 | StPiano2 | PIANO | 87 | 17 | 18 | 2 | 60sOrgn3 | ORGAN | 168 | 34 | 3 | 2 | FngrdB53 | BASS | |
| 7 | 3 | 0 | 2 | Piano 3 | PIANO | 88 | 17 | 31 | 2 | PopOrgan | ORGAN | 169 | 35 | 0 | 2 | PckdBass | BASS | |
| 8 | 3 | 1 | 2 | MIDI EP1 | PIANO | 89 | 17 | 32 | 2 | RockOrgn | ORGAN | 170 | 36 | 0 | 2 | FrtlssB5 | BASS | |
| 9 | 3 | 2 | 2 | MIDI EP2 | PIANO | 90 | 17 | 33 | 2 | Even Bar | ORGAN | 171 | 37 | 0 | 2 | SlpBass1 | BASS | |
| 10 | 3 | 8 | 2 | StPiano3 | PIANO | 91 | 17 | 40 | 2 | OrganBss | ORGAN | 172 | 39 | 0 | 2 | SynBass1 | BASS | |
| 11 | 4 | 8 | 2 | OldUprgt | PIANO | 92 | 18 | 1 | 2 | Organ201 | ORGAN | 173 | 39 | 16 | 2 | ResoSHBs | BASS | |
| 12 | 5 | 0 | 2 | E.Piano1 | E. PIANO | 93 | 18 | 8 | 2 | ChorsOr2 | ORGAN | 174 | 39 | 22 | 2 | SqrBass | BASS | |
| 13 | 5 | 8 | 2 | StSoftEP | E. PIANO | 94 | 18 | 10 | 2 | Dtdn Or2 | ORGAN | 175 | 33 | 2 | 2 | Ac.Bass2 | BASS | |
| 14 | 5 | 47 | 2 | Pro EP 3 | E. PIANO | 95 | 18 | 32 | 2 | PercOrg2 | ORGAN | 176 | 33 | 3 | 2 | Ac.Bass3 | BASS | |
| 15 | 5 | 48 | 2 | Wurly | E. PIANO | 96 | 20 | 16 | 2 | ChrdOr3 | ORGAN | 177 | 34 | 1 | 2 | FngrdB52 | BASS | |
| 16 | 6 | 10 | 2 | ELEGend | E. PIANO | 97 | 21 | 16 | 2 | PuffOrgn | ORGAN | 178 | 34 | 4 | 2 | FngrdB54 | BASS | |
| 17 | 6 | 24 | 2 | HardFMEP | E. PIANO | 98 | 83 | 112 | 2 | AccrdnC1 | ACCORDION | 179 | 34 | 7 | 2 | FingrlSp | BASS | |
| 18 | 6 | 32 | 2 | EP Phase | E. PIANO | 99 | 83 | 113 | 2 | AccrdnC2 | ACCORDION | 180 | 35 | 3 | 2 | PckD B5 | BASS | |
| 19 | 5 | 16 | 2 | FM+SA E PIANO | E. PIANO | 100 | 83 | 114 | 2 | Accrdn3L | ACCORDION | 181 | 35 | 8 | 2 | Mt PckBs | BASS | |
| 20 | 5 | 24 | 2 | 60sEPno | E. PIANO | 101 | 83 | 115 | 2 | Accrdn4L | ACCORDION | 182 | 36 | 1 | 2 | FrtlsB52 | BASS | |
| 21 | 5 | 25 | 2 | Hard EP | E. PIANO | 102 | 83 | 116 | 2 | Accordn1 | ACCORDION | 183 | 36 | 2 | 2 | FrtlsB53 | BASS | |
| 22 | 5 | 26 | 2 | MellowEP | E. PIANO | 103 | 85 | 116 | 2 | Accordn2 | ACCORDION | 184 | 36 | 3 | 2 | FrtlsB54 | BASS | |
| 23 | 6 | 0 | 2 | E.Piano2 | E. PIANO | 104 | 86 | 116 | 2 | JVAccord | ACCORDION | 185 | 36 | 4 | 2 | SnFrtls | BASS | |
| 24 | 6 | 8 | 2 | Dtdn EP2 | E. PIANO | 105 | 22 | 0 | 2 | AccrdnFr | ACCORDION | 186 | 36 | 5 | 2 | MrSmooth | BASS | |
| 25 | 6 | 16 | 2 | St.FMI EP | E. PIANO | 106 | 22 | 8 | 2 | Accrdnlt | ACCORDION | 187 | 36 | 8 | 2 | FrtlsB55 | BASS | |
| 26 | 100 | 5 | 2 | Nylon+EP | E. PIANO | 107 | 24 | 0 | 2 | Bandneon | ACCORDION | 188 | 36 | 48 | 2 | FtFrtls | BASS | |
| 27 | 7 | 24 | 2 | Harpsi 2 | KEYBOARD | 108 | 23 | 0 | 2 | Harmonic | ACCORDION | 189 | 37 | 8 | 2 | ResoSlap | BASS | |
| 28 | 7 | 16 | 2 | StHarpns | KEYBOARD | 109 | 23 | 1 | 2 | Harmonc2 | ACCORDION | 190 | 38 | 0 | 2 | SlpBass2 | BASS | |
| 29 | 8 | 0 | 2 | Clav. | KEYBOARD | 110 | 22 | 16 | 2 | JV-Acc1 | ACCORDION | 191 | 39 | 1 | 2 | SynB5101 | BASS | |
| 30 | 8 | 8 | 2 | CompClav | KEYBOARD | 111 | 22 | 17 | 2 | JV-Acc2 | ACCORDION | 192 | 39 | 2 | 2 | JunoBass | BASS | |
| 31 | 7 | 0 | 2 | Harpschr | KEYBOARD | 112 | 25 | 0 | 2 | NylStrGt | A. GUITAR | 193 | 39 | 3 | 2 | 106Bass | BASS | |
| 32 | 7 | 8 | 2 | Cpld Hps | KEYBOARD | 113 | 25 | 24 | 2 | VelohHrmx | A. GUITAR | 194 | 39 | 8 | 2 | AcidBass | BASS | |
| 33 | 8 | 39 | 2 | PulsClav | KEYBOARD | 114 | 26 | 9 | 2 | Nyln+Stl | A. GUITAR | 195 | 39 | 9 | 2 | TB303B5 | BASS | |
| 34 | 9 | 0 | 2 | Celesta | CHR PERC | 115 | 25 | 40 | 2 | Reqn Gt | A. GUITAR | 196 | 39 | 10 | 2 | TeknBass | BASS | |
| 35 | 11 | 0 | 2 | MusicBox | CHR PERC | 116 | 25 | 49 | 2 | FmnncGt | A. GUITAR | 197 | 39 | 19 | 2 | ClaviBss | BASS | |
| 36 | 12 | 0 | 2 | Vibraphn | CHR PERC | 117 | 26 | 0 | 2 | StStrGt | A. GUITAR | 198 | 39 | 20 | 2 | Hammer | BASS | |
| 37 | 13 | 0 | 2 | Marimba | CHR PERC | 118 | 26 | 8 | 2 | 12-strGt | A. GUITAR | 199 | 39 | 21 | 2 | Jnglbass | BASS | |
| 38 | 14 | 0 | 2 | Xylphone | CHR PERC | 119 | 26 | 16 | 2 | Mandolin | A. GUITAR | 200 | 39 | 23 | 2 | PopSynBs | BASS | |
| 39 | 15 | 0 | 2 | TubellB | CHR PERC | 120 | 25 | 8 | 2 | Ukulele | A. GUITAR | 201 | 39 | 24 | 2 | LightSnBs | BASS | |
| 40 | 99 | 2 | 2 | SftCryst | CHR PERC | 121 | 25 | 16 | 2 | NylonGto | A. GUITAR | 202 | 39 | 25 | 2 | FatTBBss | BASS | |
| 41 | 99 | 4 | 2 | LoudGlock | CHR PERC | 122 | 25 | 32 | 2 | NylonGt2 | A. GUITAR | 203 | 40 | 0 | 2 | SynBass2 | BASS | |
| 42 | 99 | 16 | 2 | ChrBell | CHR PERC | 123 | 26 | 32 | 2 | SteelGt2 | A. GUITAR | 204 | 40 | 1 | 2 | SynB5201 | BASS | |
| 43 | 113 | 0 | 2 | TnkBell | CHR PERC | 124 | 26 | 33 | 2 | Stl+Body | A. GUITAR | 205 | 40 | 2 | 2 | Mod Bass | BASS | |
| 44 | 100 | 2 | 2 | Glcknspl | CHR PERC | 125 | 32 | 0 | 2 | GthHrmncs | A. GUITAR | 206 | 40 | 3 | 2 | Seq Bass | BASS | |
| 45 | 12 | 1 | 2 | HardVibe | CHR PERC | 126 | 32 | 16 | 2 | AcGthHrxm | A. GUITAR | 207 | 40 | 8 | 2 | BeeffMb5 | BASS | |
| 46 | 12 | 8 | 2 | StVibrap | CHR PERC | 127 | 100 | 0 | 2 | Atmsphar | A. GUITAR | 208 | 40 | 9 | 2 | XwR Bass | BASS | |
| 47 | 13 | 8 | 2 | StMarimb | CHR PERC | 128 | 100 | 2 | 2 | NylInHarp | A. GUITAR | 209 | 40 | 16 | 2 | RubrBss | BASS | |
| 48 | 13 | 16 | 2 | Barafon | CHR PERC | 129 | 121 | 0 | 2 | GtFrtnoz | A. GUITAR | 210 | 40 | 17 | 2 | SH101B51 | BASS | |
| 49 | 13 | 17 | 2 | Barafon2 | CHR PERC | 130 | 27 | 0 | 2 | Jazz Gt. | A. GUITAR | 211 | 40 | 18 | 2 | SH101B52 | BASS | |
| 50 | 13 | 24 | 2 | Log drum | CHR PERC | 131 | 27 | 8 | 2 | PedalStl | A. GUITAR | 212 | 40 | 19 | 2 | SmthBass | BASS | |
| 51 | 15 | 8 | 2 | ChrchBll | CHR PERC | 132 | 28 | 1 | 2 | CleanGt2 | A. GUITAR | 213 | 40 | 20 | 2 | MildBass | BASS | |
| 52 | 15 | 9 | 2 | Carillon | CHR PERC | 133 | 28 | 4 | 2 | JCCInGt. | A. GUITAR | 214 | 40 | 21 | 2 | DetunBss | BASS | |
| 53 | 99 | 0 | 2 | Crystal | CHR PERC | 134 | 28 | 23 | 2 | MidTneGT | A. GUITAR | 215 | 40 | 29 | 2 | AttckPls | BASS | |
| 54 | 99 | 1 | 2 | SynMallt | CHR PERC | 135 | 29 | 0 | 2 | Muted Gt | A. GUITAR | 216 | 121 | 2 | 2 | Str Slap | BASS | |
| 55 | 99 | 3 | 2 | RndGlock | CHR PERC | 136 | 30 | 0 | 2 | OvrdrvGt. | A. GUITAR | 217 | 121 | 5 | 2 | BassSld | BASS | |
| 56 | 99 | 5 | 2 | GlicknChm | CHR PERC | 137 | 31 | 0 | 2 | Dist Gt. | A. GUITAR | 218 | 11 | 116 | 2 | StrngOct | STRING5 | |
| 57 | 99 | 6 | 2 | CrlBells | CHR PERC | 138 | 31 | 16 | 2 | Power Gt. | A. GUITAR | 219 | 49 | 16 | 2 | STStrngs | STRING5 | |
| 58 | 99 | 7 | 2 | XmasBell | CHR PERC | 139 | 27 | 1 | 2 | MellowGt. | A. GUITAR | 220 | 50 | 10 | 2 | StSlwStr | STRING5 | |
| 59 | 99 | 8 | 2 | VbrBells | CHR PERC | 140 | 27 | 2 | 2 | JazzGt.2 | A. GUITAR | 221 | 50 | 8 | 2 | LegtoStr | STRING5 | |
| 60 | 99 | 9 | 2 | DigiBell | CHR PERC | 141 | 28 | 0 | 2 | CleanGt. | A. GUITAR | 222 | 51 | 0 | 2 | SynStrg | STRING5 | |
| 61 | 99 | 17 | 2 | AirBells | CHR PERC | 142 | 28 | 3 | 2 | OpenHrd1 | A. GUITAR | 223 | 45 | 9 | 2 | SuspnStr | STRING5 | |
| 62 | 99 | 18 | 2 | BellHarp | CHR PERC | 143 | 28 | 8 | 2 | ChorusGt.3 | A. GUITAR | 224 | 46 | 0 | 2 | PzccStr | STRING5 | |
| 63 | 99 | 19 | 2 | Gamelimb | CHR PERC | 144 | 28 | 48 | 2 | CleanGt3 | A. GUITAR | 225 | 40 | 116 | 2 | FIViolVB | STRING5 | |
| 64 | 17 | 116 | 2 | OrOrgn1 | ORGAN | 145 | 29 | 1 | 2 | Mt DstBs | A. GUITAR | 226 | 41 | 116 | 2 | FolkViol | STRING5 | |
| 65 | 21 | 116 | 2 | OrOrgn2 | ORGAN | 146 | 29 | 8 | 2 | Funk Pop | A. GUITAR | 227 | 41 | 0 | 2 | Violin | STRING5 | |
| 66 | 180000000000000000000000000000000000000000000000000000000000000000000000000000000000000000000000000000 | |||||||||||||||||
| Tone no. | PC | CC00 | C32 | Name | Family |
| 422 | 103 | 2 | 2 | EchoPan | PAD |
| 423 | 103 | 3 | 2 | EchoPan2 | PAD |
| 424 | 103 | 4 | 2 | BigPannr | PAD |
| 425 | 103 | 6 | 2 | WtrPiano | PAD |
| 426 | 104 | 1 | 2 | StrThme2 | PAD |
| 427 | 106 | 17 | 2 | JV-Bouz1 | ETHNIC1 |
| 428 | 106 | 18 | 2 | JV-Bouz2 | ETHNIC1 |
| 429 | 106 | 19 | 2 | JV-Bouz3 | ETHNIC1 |
| 430 | 106 | 20 | 2 | JV-Bouz4 | ETHNIC1 |
| 431 | 106 | 21 | 2 | BouzBag1 | ETHNIC1 |
| 432 | 106 | 22 | 2 | BouzBag2 | ETHNIC1 |
| 433 | 106 | 16 | 2 | Bouzouki | ETHNIC1 |
| 434 | 107 | 16 | 2 | BzKTrm | ETHNIC1 |
| 435 | 108 | 16 | 2 | BzKTrVm | ETHNIC1 |
| 436 | 16 | 0 | 2 | Santur | ETHNIC1 |
| 437 | 47 | 0 | 2 | Harp | ETHNIC1 |
| 438 | 76 | 8 | 2 | Kawala | ETHNIC1 |
| 439 | 100 | 16 | 2 | Kawala2 | ETHNIC1 |
| 440 | 101 | 16 | 2 | Kawala1 | ETHNIC1 |
| 441 | 102 | 16 | 2 | KawalaOct | ETHNIC1 |
| 442 | 103 | 16 | 2 | KwloOctVm | ETHNIC1 |
| 443 | 111 | 16 | 2 | Rababa | ETHNIC1 |
| 444 | 118 | 16 | 2 | Nay | ETHNIC1 |
| 445 | 119 | 16 | 2 | NayOct | ETHNIC1 |
| 446 | 120 | 16 | 2 | NayOctVm | ETHNIC1 |
| 447 | 122 | 16 | 2 | Mizmar | ETHNIC1 |
| 448 | 123 | 16 | 2 | MizmarOct | ETHNIC1 |
| 449 | 124 | 16 | 2 | MizmarTv | ETHNIC1 |
| 450 | 126 | 16 | 2 | MizmarDu | ETHNIC1 |
| 451 | 127 | 16 | 2 | Rabab | ETHNIC1 |
| 452 | 78 | 0 | 2 | Shakuch | ETHNIC1 |
| 453 | 105 | 0 | 2 | Sitar | ETHNIC1 |
| 454 | 106 | 0 | 2 | Banjo | ETHNIC1 |
| 455 | 106 | 8 | 2 | Rabab | ETHNIC1 |
| 456 | 106 | 24 | 2 | Aud | ETHNIC1 |
| 457 | 110 | 16 | 2 | Oud1Trem | ETHNIC1 |
| 458 | 112 | 16 | 2 | Oud1 | ETHNIC1 |
| 459 | 113 | 16 | 2 | Oud2 | ETHNIC1 |
| 460 | 114 | 16 | 2 | Oud2Trem | ETHNIC1 |
| 461 | 115 | 16 | 2 | Oud1TrVm | ETHNIC1 |
| 462 | 116 | 16 | 2 | Oud2TrVm | ETHNIC1 |
| 463 | 117 | 16 | 2 | OudOct | ETHNIC1 |
| 464 | 107 | 0 | 2 | Shamisen | ETHNIC1 |
| 465 | 108 | 0 | 2 | Koto | ETHNIC1 |
| 466 | 108 | 16 | 2 | Kanoon | ETHNIC1 |
| 467 | 87 | 15 | 2 | Knoun3St | ETHNIC1 |
| 468 | 87 | 15 | 2 | Kanoun3 | ETHNIC1 |
| 470 | 95 | 15 | 2 | Kanoun3 | ETHNIC1 |
| 473 | 95 | 15 | 2 | Kanoun3 | ETHNIC1 |
| 474 | 96 | 15 | 2 | Kanoun3 | ETHNIC1 |
| 475 | 97 | 15 | 2 | KanounTr | ETHNIC1 |
| 476 | 99 | 15 | 2 | Knoun3Oc | ETHNIC1 |
| 477 | 99 | 16 | 2 | KnounOct | ETHNIC1 |
| 478 | 110 | 0 | 2 | Bagpipe | ETHNIC1 |
| 479 | 111 | 0 | 2 | Fiddle | ETHNIC1 |
| 480 | 112 | 1 | 2 | Shani2 | ETHNIC1 |
| 481 | 16 | 1 | 2 | Santar2 | ETHNIC1 |
| 482 | 16 | 8 | 2 | Cimbalom | ETHNIC1 |
| 483 | 47 | 24 | 2 | Yang Qin | ETHNIC1 |
| 484 | 105 | 1 | 2 | Sirat2 | ETHNIC1 |
| 485 | 105 | 2 | 2 | DmsStar | ETHNIC1 |
| 486 | 105 | 8 | 2 | Tambrra | ETHNIC1 |
| 487 | 105 | 16 | 2 | Tamboura | ETHNIC1 |
| 488 | 106 | 1 | 2 | MdBtanjo | ETHNIC1 |
| 489 | 106 | 16 | 2 | Gopichmt | ETHNIC1 |
| 490 | 107 | 1 | 2 | Tsugaru | ETHNIC1 |
| 491 | 108 | 8 | 2 | TashoKt | ETHNIC1 |
| 492 | 109 | 0 | 2 | Kalimba | ETHNIC1 |
| 493 | 112 | 0 | 2 | Shanai | ETHNIC1 |
| 494 | 112 | 8 | 2 | Pungi | ETHNIC1 |
| 495 | 112 | 16 | 2 | Hidrikri | ETHNIC1 |
| 496 | 113 | 8 | 2 | Bonang | ETHNIC1 |
| 497 | 113 | 9 | 2 | Gender | ETHNIC1 |
| 498 | 113 | 10 | 2 | GamirGng | ETHNIC1 |
| 499 | 113 | 11 | 2 | StGameln | ETHNIC1 |
| 500 | 127 | 17 | 2 | Arghool2 | ETHNIC2 |
| 501 | 127 | 18 | 2 | Habban | ETHNIC2 |
| 502 | 112 | 43 | 2 | Jerba | ETHNIC2 |
| 503 | 112 | 2 | 2 | Shermay | ETHNIC2 |
| 504 | 106 | 26 | 2 | OudSadda | ETHNIC2 |
| 505 | 106 | 27 | 2 | OudVerd | ETHNIC2 |
| 506 | 106 | 30 | 2 | OudSdrv | ETHNIC2 |
| 507 | 106 | 42 | 2 | OudSRV | ETHNIC2 |
| 508 | 106 | 32 | 2 | OudSldf | ETHNIC2 |
| 509 | 106 | 29 | 2 | OudTaf | ETHNIC2 |
| 510 | 106 | 31 | 2 | OudSdTaf | ETHNIC2 |
| Tone no. | PC | CC00 | CC32 | Name | Family |
| 333 | 64 | 17 | 2 | VelovBrs2 | SYNBRASS |
| 334 | 63 | 1 | 2 | PolyBrss | SYNBRASS |
| 335 | 63 | 3 | 2 | SynBrss | SYNBRASS |
| 336 | 63 | 4 | 2 | JunoBrss3 | SYNBRASS |
| 337 | 63 | 8 | 2 | SynBrss | SYNBRASS |
| 338 | 63 | 9 | 2 | QuakBrss | SYNBRASS |
| 339 | 63 | 18 | 2 | OctvBrss | SYNBRASS |
| 340 | 64 | 0 | 2 | SynBrss2 | SYN LEAD |
| 341 | 64 | 1 | 2 | SoftBrss4 | SYN LEAD |
| 342 | 64 | 8 | 2 | SynBrss | SYN LEAD |
| 343 | 64 | 16 | 2 | VelovBrs1 | SYNBRASS |
| 344 | 82 | 4 | 2 | Big Lead | SYN LEAD |
| 345 | 81 | 0 | 2 | Sqr Wave | SYN LEAD |
| 346 | 81 | 3 | 2 | MellowFM | SYN LEAD |
| 347 | 81 | 4 | 2 | CC Solo | SYN LEAD |
| 348 | 81 | 17 | 2 | 260 Sync | SYN LEAD |
| 349 | 82 | 0 | 2 | Saw Wave | SYN LEAD |
| 350 | 82 | 2 | 2 | PulsesSaw | SYN LEAD |
| 351 | 82 | 6 | 2 | GR-300 | SYN LEAD |
| 352 | 82 | 16 | 2 | WasySyn | SYN LEAD |
| 353 | 82 | 46 | 2 | SeqpdSw | SYN LEAD |
| 354 | 83 | 0 | 2 | SnCalpe | SYN LEAD |
| 355 | 83 | 2 | 2 | PurPanld | SYN LEAD |
| 356 | 85 | 0 | 2 | Charang | SYN LEAD |
| 357 | 85 | 1 | 2 | WireLead | SYN LEAD |
| 358 | 85 | 8 | 2 | DistLead | SYN LEAD |
| 359 | 81 | 1 | 2 | Square | SYN LEAD |
| 360 | 81 | 2 | 2 | HolliWm | SYN LEAD |
| 361 | 81 | 5 | 2 | Shmoog | SYN LEAD |
| 362 | 81 | 6 | 2 | LMSquare | SYN LEAD |
| 363 | 81 | 8 | 2 | SineWave | SYN LEAD |
| 364 | 81 | 16 | 2 | DistSqure | SYN LEAD |
| 365 | 81 | 1 | 2 | P5 Saw | SYN LEAD |
| 366 | 82 | 3 | 2 | FelineGR | SYN LEAD |
| 367 | 82 | 5 | 2 | VeloLead | SYN LEAD |
| 368 | 82 | 7 | 2 | LA Saw | SYN LEAD |
| 369 | 82 | 8 | 2 | Dr. Solo | SYN LEAD |
| 370 | 82 | 9 | 2 | SawWave2 | SYN LEAD |
| 371 | 82 | 10 | 2 | Saw | SYN LEAD |
| 372 | 82 | 36 | 2 | NatteLead | SYN LEAD |
| 373 | 83 | 1 | 2 | VentSyn | SYN LEAD |
| 374 | 84 | 0 | 2 | Chiffrd | SYN LEAD |
| 375 | 87 | 0 | 2 | SthSawWv | SYN LEAD |
| 376 | 87 | 1 | 2 | BigFives | SYN LEAD |
| 377 | 88 | 0 | 2 | Bs&Lead | SYN LEAD |
| 378 | 88 | 1 | 2 | Big&Raw | SYN LEAD |
| 379 | 88 | 1 | 2 | Fat&PKy | SYN LEAD |
| 380 | 88 | 7 | 2 | DivLead | SYN LEAD |
| 381 | 91 | 0 | 2 | Polysyn | POL SYN |
| 382 | 91 | 1 | 2 | IceRain | POL SYN |
| 383 | 97 | 0 | 2 | WarmAtms | POL SYN |
| 384 | 100 | 1 | 2 | Brightns | POL SYN |
| 385 | 101 | 0 | 2 | Rattlesn | POL SYN |
| 386 | 89 | 0 | 2 | Fantasia | POL SYN |
| 387 | 89 | 1 | 2 | Soft Pad | PAD |
| 388 | 97 | 1 | 2 | SpVoice | PAD |
| 389 | 97 | 1 | 2 | Africwnd | POL SYN |
| 390 | 97 | 8 | 2 | ClaviPad | POL SYN |
| 391 | 98 | 8 | 2 | Rave | POL SYN |
| 392 | 90 | 0 | 2 | Warm Pad | PAD |
| 393 | 90 | 1 | 2 | ThickPad | PAD |
| 394 | 90 | 3 | 2 | RotryStr | PAD |
| 395 | 90 | 4 | 2 | Soft Pad | PAD |
| 396 | 92 | 0 | 2 | SpeVoice | PAD |
| 397 | 92 | 1 | 2 | Heavenll | PAD |
| 398 | 92 | 3 | 2 | Itopia | PAD |
| 399 | 92 | 1 | 2 | TimePad | PAD |
| 400 | 94 | 0 | 2 | PannrPad | PAD |
| 401 | 96 | 0 | 2 | SweepPad | PAD |
| 402 | 96 | 1 | 2 | SinePad | PAD |
| 403 | 96 | 9 | 2 | Shwimmer | PAD |
| 404 | 98 | 0 | 2 | Sndtrack | PAD |
| 405 | 100 | 6 | 2 | AmbontPad | PAD |
| 406 | 102 | 1 | 2 | Goblinsn | PAD |
| 407 | 103 | 5 | 2 | RespPnnr | PAD |
| 408 | 104 | 0 | 2 | StarTime | PAD |
| 409 | 90 | 2 | 2 | Horn Pad | PAD |
| 410 | 90 | 5 | 2 | SinePad | PAD |
| 411 | 93 | 0 | 2 | BowdGss | PAD |
| 412 | 94 | 0 | 2 | MetaPad | PAD |
| 413 | 95 | 0 | 2 | Converge | PAD |
| 414 | 96 | 8 | 2 | Goblin | PAD |
| 415 | 96 | 10 | 2 | ScePrid | PAD |
| 416 | 98 | 1 | 2 | Ancestrl | PAD |
| 417 | 98 | 1 | 2 | Prologue | PAD |
| 418 | 102 | 0 | 2 | Goblin | PAD |
| 419 | 102 | 2 | 2 | SocSciFi | PAD |
| 420 | 103 | 0 | 2 | EchoDrops | PAD |
| 421 | 103 | 1 | 2 | EchoBell | PAD |
| Tone no. | PC | CC00 | CC32 | Name | Family |
| 244 | 49 | 11 | 2 | ChoirStr | STRINGS |
| 245 | 49 | 24 | 2 | VeloStr | STRINGS |
| 246 | 49 | 40 | 2 | 60String | STRINGS |
| 247 | 50 | 0 | 2 | SlyStrong | STRINGS |
| 248 | 50 | 1 | 2 | SlyStrong | STRINGS |
| 249 | 50 | 9 | 2 | WarmStrn | STRINGS |
| 250 | 51 | 1 | 2 | OBStrngs | STRINGS |
| 251 | 51 | 2 | 2 | SynStrm1 | STRINGS |
| 252 | 51 | 8 | 2 | 70Str | STRINGS |
| 253 | 51 | 9 | 2 | 70Str | STRINGS |
| 254 | 52 | 0 | 2 | SynStrn2 | STRINGS |
| 255 | 52 | 1 | 2 | SynStrm3 | STRINGS |
| 256 | 56 | 0 | 2 | Orch Hit | STRINGS |
| 257 | 56 | 1 | 2 | Bass Hit | STRINGS |
| 258 | 56 | 2 | 2 | 6th Hit | STRINGS |
| 259 | 56 | 3 | 2 | Euro Hit | STRINGS |
| 260 | 56 | 4 | 2 | TechHit | STRINGS |
| 261 | 56 | 8 | 2 | ImpHit | STRINGS |
| 262 | 56 | 9 | 2 | PhylHit | STRINGS |
| 263 | 56 | 16 | 2 | LofiRave | STRINGS |
| 264 | 53 | 8 | 2 | St. Choir | VOCAL |
| 265 | 54 | 40 | 2 | Humming | VOCAL |
| 266 | 54 | 0 | 2 | VoiceOoh | VOCAL |
| 267 | 55 | 0 | 2 | SynVox | VOCAL |
| 268 | 86 | 0 | 2 | Solo Vox | VOCAL |
| 269 | 53 | 0 | 2 | ChoirAah | VOCAL |
| 270 | 53 | 9 | 2 | MelloChr | VOCAL |
| 271 | 53 | 32 | 2 | ChrAahs2 | VOCAL |
| 272 | 55 | 8 | 2 | SynVoice | VOCAL |
| 273 | 55 | 19 | 2 | AnaVoice | VOCAL |
| 274 | 100 | 3 | 2 | Harpvox | VOCAL |
| 275 | 100 | 4 | 2 | HilwReis | VOCAL |
| 276 | 66 | 16 | 2 | OrienSax | SAX |
| 277 | 67 | 8 | 2 | BlWTen | SAX |
| 278 | 67 | 7 | 2 | BrTyTrn | SAX |
| 279 | 65 | 0 | 2 | SopmSax | SAX |
| 280 | 66 | 0 | 2 | Alto Sax | SAX |
| 281 | 67 | 0 | 2 | TenSax | SAX |
| 282 | 68 | 0 | 2 | BarSax | SAX |
| 283 | 65 | 8 | 2 | SoprSax2 | SAX |
| 284 | 66 | 1 | 2 | Altosax2 | SAX |
| 285 | 66 | 8 | 2 | HyprAltro | SAX |
| 286 | 67 | 1 | 2 | TenSax2 | SAX |
| 287 | 67 | 9 | 2 | SprTen | SAX |
| 288 | 74 | 48 | 2 | FluteVib | WIND |
| 289 | 73 | 0 | 2 | Picolo | WIND |
| 290 | 69 | 0 | 2 | Oboe | WIND |
| 291 | 71 | 0 | 2 | Bassoon | WIND |
| 292 | 72 | 1 | 2 | Clarinet | WIND |
| 293 | 79 | 0 | 2 | PanFlute | WIND |
| 294 | 79 | 0 | 2 | Whistle | WIND |
| 295 | 70 | 0 | 2 | EngHorn | WIND |
| 296 | 72 | 0 | 2 | JzClint | WIND |
| 297 | 72 | 8 | 2 | BScIant | WIND |
| 298 | 74 | 0 | 2 | Flute | WIND |
| 299 | 75 | 0 | 2 | Recorder | WIND |
| 300 | 77 | 0 | 2 | BottBlv | WIND |
| 301 | 80 | 0 | 2 | Ocarina | WIND |
| 302 | 57 | 0 | 2 | Trumpet | ACBRASS |
| 303 | 57 | 8 | 2 | FglHorn | ACBRASS |
| 304 | 58 | 0 | 2 | Trombone | ACBRASS |
| 305 | 59 | 0 | 2 | Tuba | ACBRASS |
| 306 | 60 | 0 | 2 | MtdTrump | ACBRASS |
| 307 | 61 | 0 | 2 | FrodHrnrs | ACBRASS |
| 308 | 42 | 116 | 2 | BrassOct | ACBRASS |
| 309 | 62 | 0 | 2 | Brass1 | ACBRASS |
| 310 | 62 | 16 | 2 | BrFall | ACBRASS |
| 311 | 62 | 24 | 2 | TwinTmpd | ACBRASS |
| 312 | 62 | 26 | 2 | TrombSe | ACBRASS |
| 313 | 57 | 1 | 2 | Trumpet2 | ACBRASS |
| 314 | 57 | 0 | 2 | Trumpet3 | ACBRASS |
| 315 | 57 | 3 | 2 | DrTmpd | ACBRASS |
| 316 | 57 | 24 | 2 | BrightTp | ACBRASS |
| 317 | 57 | 25 | 2 | Warm To, | ACBRASS |
| 318 | 58 | 1 | 2 | Trombone3 | ACBRASS |
| 319 | 58 | 2 | 2 | Trombone3 | ACBRASS |
| 320 | 58 | 4 | 2 | BrightTb | ACBRASS |
| 321 | 59 | 1 | 2 | Tuba 2 | ACBRASS |
| 322 | 60 | 2 | 2 | MtTmpd2 | ACBRASS |
| 323 | 62 | 8 | 2 | Brass 3 | ACBRASS |
| 324 | 61 | 1 | 2 | TinBons | ACBRASS |
| 325 | 61 | 8 | 2 | TrombSe1 | ACBRASS |
| 326 | 62 | 1 | 2 | TrombSe2 | ACBRASS |
| 327 | 62 | 0 | 2 | SynBrrs1 | SYNBRASS |
| 328 | 62 | 25 | 2 | TinBons1 | SYNBRASS |
| 329 | 62 | 27 | 2 | TrombSe1 | SYNBRASS |
| 330 | 63 | 0 | 2 | JmpBrass | SYNBRASS |
| 331 | 63 | 5 | 2 | OctBnss | SYNBRASS |
| 332 | 63 | 16 | 2 | OctSnss | SYNBRASS |
| Tone no. | PC | CC00 | CC32 | Name | Family |
| 600 | 125 | 0 | 2 | Telphn 1 | SFX |
| 601 | 125 | 2 | 2 | DoorCrk | SFX |
| 602 | 125 | 3 | 2 | Door | SFX |
| 603 | 125 | 4 | 2 | Scratch | SFX |
| 604 | 125 | 5 | 2 | WndChims | SFX |
| 605 | 125 | 7 | 2 | Scratch2 | SFX |
| 606 | 126 | 2 | 2 | Car-Stop | SFX |
| 607 | 126 | 4 | 2 | CarCrash | SFX |
| 608 | 126 | 7 | 2 | Jetplane | SFX |
| 609 | 126 | 8 | 2 | Starship | SFX |
| 610 | 126 | 9 | 2 | BurstNs | SFX |
| 611 | 127 | 3 | 2 | Punch | SFX |
| 612 | 127 | 4 | 2 | HeartBt | SFX |
| 613 | 127 | 5 | 2 | Footsts | SFX |
| 614 | 127 | 6 | 2 | Applaus2 | SFX |
| 615 | 128 | 0 | 2 | Gun Shot | SFX |
| 616 | 128 | 1 | 2 | MachnGun | SFX |
| 617 | 128 | 2 | 2 | Lasergun | SFX |
| 618 | 1 | 0 | 2 | STANDARD1 | DRUMS |
| 619 | 2 | 0 | 2 | STANDARD2 | DRUMS |
| 620 | 9 | 0 | 2 | ROOM | DRUMS |
| 621 | 10 | 0 | 2 | Hip Hop | DRUMS |
| 622 | 11 | 0 | 2 | Drum'Bss | DRUMS |
| 623 | 12 | 0 | 2 | TechHous | DRUMS |
| 624 | 14 | 0 | 2 | R&R | DRUMS |
| 625 | 17 | 0 | 2 | POWER | DRUMS |
| 626 | 26 | 0 | 2 | TR808909 | DRUMS |
| 627 | 27 | 0 | 2 | DANCE | DRUMS |
| 628 | 31 | 0 | 2 | NewTR909 | DRUMS |
| 629 | 33 | 0 | 2 | Jazz Kit | DRUMS |
| 630 | 41 | 0 | 2 | BRUSH | DRUMS |
| 631 | 49 | 0 | 2 | ORCHSTRA | DRUMS |
| 632 | 50 | 0 | 2 | ETHNIC | DRUMS |
| 633 | 117 | 0 | 4 | E-40 | DRUMS |
| 634 | 117 | 0 | 1 | Orient 1 | DRUMS |
| 635 | 117 | 0 | 2 | Orient 2 | DRUMS |
| 636 | 117 | 0 | 3 | Orient 3 | DRUMS |
| 637 | 118 | 0 | 4 | OrMix 1 | DRUMS |
| 638 | 119 | 0 | 4 | OrMix 2 | DRUMS |
| 639 | 120 | 0 | 2 | Khaligi1 | DRUMS |
| 640 | 121 | 0 | 2 | Khaligi2 | DRUMS |
| 641 | 122 | 0 | 2 | Khaligi3 | DRUMS |
| 642 | 123 | 0 | 2 | Mix | DRUMS |
| 643 | 124 | 0 | 2 | TrkOrMix | DRUMS |
| 644 | 125 | 0 | 2 | Turkish 1 | DRUMS |
| 645 | 126 | 0 | 2 | Turkish 2 | DRUMS |
| 646 | 3 | 0 | 2 | STANDARD3 | DRUMS |
| 647 | 25 | 0 | 2 | ELECTRNC | DRUMS |
| 648 | 34 | 0 | 2 | JAZZ | DRUMS |
| 649 | 51 | 0 | 2 | KICK&SNR | DRUMS |
| 650 | 57 | 0 | 2 | SFX | DRUMS |
| (*) See below for details. | |||||
| Tone no. | PC | CC00 | CC32 | Name | Family |
| 511 | 106 | 33 | 2 | Oud SRT | ETHNIC 2 |
| 512 | 106 | 13 | 2 | Baglama | ETHNIC 2 |
| 513 | 106 | 15 | 2 | BgImaGld | ETHNIC 2 |
| 514 | 106 | 14 | 2 | BgImTrm | ETHNIC 2 |
| 515 | 106 | 41 | 2 | Cumbus | ETHNIC 2 |
| 516 | 106 | 34 | 2 | Divan | ETHNIC 2 |
| 517 | 106 | 43 | 2 | DivanGld | ETHNIC 2 |
| 518 | 106 | 35 | 2 | DivnOrn1 | ETHNIC 2 |
| 519 | 106 | 36 | 2 | DivnOrn2 | ETHNIC 2 |
| 520 | 106 | 37 | 2 | DivanTrm | ETHNIC 2 |
| 521 | 106 | 38 | 2 | EleBgIma | ETHNIC 2 |
| 522 | 106 | 39 | 2 | ElBgImTr | ETHNIC 2 |
| 523 | 95 | 117 | 2 | Kanun1TK | ETHNIC 2 |
| 524 | 96 | 117 | 2 | Kanun2TK | ETHNIC 2 |
| 525 | 97 | 117 | 2 | KanTrmTK | ETHNIC 2 |
| 526 | 111 | 118 | 2 | KdzKmnce | ETHNIC 2 |
| 527 | 111 | 117 | 2 | Kemance | ETHNIC 2 |
| 528 | 111 | 119 | 2 | KmncVib | ETHNIC 2 |
| 529 | 111 | 124 | 2 | Kemane | ETHNIC 2 |
| 530 | 111 | 125 | 2 | KmaneVib | ETHNIC 2 |
| 531 | 111 | 122 | 2 | Klarnet | ETHNIC 2 |
| 532 | 111 | 123 | 2 | KlrintvB | ETHNIC 2 |
| 533 | 118 | 117 | 2 | Ney | ETHNIC 2 |
| 534 | 118 | 118 | 2 | NeyVib | ETHNIC 2 |
| 535 | 118 | 119 | 2 | NeyPizz | ETHNIC 2 |
| 536 | 118 | 124 | 2 | NeyLa | ETHNIC 2 |
| 537 | 118 | 125 | 2 | NeyLaVib | ETHNIC 2 |
| 538 | 112 | 117 | 2 | Oud1 TK | ETHNIC 2 |
| 539 | 113 | 117 | 2 | Oud2 TK | ETHNIC 2 |
| 540 | 114 | 117 | 2 | OudTrmTK | ETHNIC 2 |
| 541 | 115 | 117 | 2 | OudOrnTK | ETHNIC 2 |
| 542 | 11 | 117 | 2 | StrSect | ETHNIC 2 |
| 543 | 11 | 118 | 2 | StrSctTr | ETHNIC 2 |
| 544 | 11 | 119 | 2 | StrSctST | ETHNIC 2 |
| 545 | 11 | 124 | 2 | StrSctPZ | ETHNIC 2 |
| 546 | 106 | 40 | 2 | Tambur | ETHNIC 2 |
| 547 | 112 | 3 | 2 | Tulum | ETHNIC 2 |
| 548 | 112 | 42 | 2 | Zurna1 | ETHNIC 2 |
| 549 | 112 | 44 | 2 | Zurna2 | ETHNIC 2 |
| 550 | 112 | 45 | 2 | ZurnaVib | ETHNIC 2 |
| 551 | 48 | 0 | 2 | Timpani | PERCUSSION |
| 552 | 115 | 0 | 2 | StlDrums | PERCUSSION |
| 553 | 116 | 8 | 2 | Castnets | PERCUSSION |
| 554 | 117 | 0 | 2 | Taiko | PERCUSSION |
| 555 | 113 | 16 | 2 | RAMACybl | PERCUSSION |
| 556 | 114 | 0 | 2 | Agogo | PERCUSSION |
| 557 | 114 | 8 | 2 | Atarigan | PERCUSSION |
| 558 | 116 | 0 | 2 | Woodblck | PERCUSSION |
| 559 | 117 | 8 | 2 | ConcrBD | PERCUSSION |
| 560 | 117 | 9 | 2 | CncrBDMt | PERCUSSION |
| 561 | 118 | 0 | 2 | MeloTom1 | PERCUSSION |
| 562 | 118 | 1 | 2 | Real Tom | PERCUSSION |
| 563 | 118 | 8 | 2 | MeloTom2 | PERCUSSION |
| 564 | 118 | 9 | 2 | Rock Tom | PERCUSSION |
| 565 | 119 | 0 | 2 | SyntDrum | PERCUSSION |
| 566 | 119 | 8 | 2 | 808 Tom | PERCUSSION |
| 567 | 119 | 9 | 2 | ElecPerc | PERCUSSION |
| 568 | 120 | 0 | 2 | Rev Cym | PERCUSSION |
| 569 | 120 | 1 | 2 | Rev Cym2 | PERCUSSION |
| 570 | 120 | 8 | 2 | Rev Snr1 | PERCUSSION |
| 571 | 120 | 9 | 2 | RevSnr 2 | PERCUSSION |
| 572 | 120 | 16 | 2 | RevKick1 | PERCUSSION |
| 573 | 120 | 17 | 2 | RevConBD | PERCUSSION |
| 574 | 120 | 24 | 2 | RevTom 1 | PERCUSSION |
| 575 | 120 | 25 | 2 | RevTom 2 | PERCUSSION |
| 576 | 123 | 2 | 2 | Thunder | SFX |
| 577 | 123 | 3 | 2 | Wind | SFX |
| 578 | 124 | 0 | 2 | Bird | SFX |
| 579 | 124 | 2 | 2 | HrseGllp | SFX |
| 580 | 124 | 3 | 2 | Bird 2 | SFX |
| 581 | 125 | 1 | 2 | Telphn 2 | SFX |
| 582 | 126 | 0 | 2 | Helicptr | SFX |
| 583 | 126 | 1 | 2 | CarEngne | SFX |
| 584 | 126 | 3 | 2 | Car-Pass | SFX |
| 585 | 126 | 5 | 2 | Siren | SFX |
| 586 | 126 | 6 | 2 | Train | SFX |
| 587 | 127 | 0 | 2 | Applause | SFX |
| 588 | 127 | 1 | 2 | Laughing | SFX |
| 589 | 127 | 2 | 2 | Screaming | SFX |
| 590 | 128 | 3 | 2 | Xplosion | SFX |
| 591 | 122 | 0 | 2 | BrtNoise | SFX |
| 592 | 122 | 1 | 2 | FIKClick | SFX |
| 593 | 123 | 0 | 2 | Seashore | SFX |
| 594 | 123 | 1 | 2 | Rain | SFX |
| 595 | 123 | 4 | 2 | Stream | SFX |
| 596 | 123 | 5 | 2 | Bubble | SFX |
| 597 | 124 | 1 | 2 | Dog | SFX |
| 598 | 124 | 4 | 2 | Kitty | SFX |
| 599 | 124 | 5 | 2 | Growl | SFX |
Drum Kits
| PC-1 [CC32:2]STANDARD 1 | PC-2 [CC32:2]STANDARD 2 | PC-3 [CC32:2]STANDARD 3 | PC-9 [CC32:2]ROOM | PC-10 [CC32:2]ROOM | PC-11 [CC32:2]DRUMB55 | PC-12 [CC32:2]TECHNOUS | PC-14 [CC32:2]R&B | PC-17 [CC32:2]POWER | PC-25 [CC32:2]ELECTRONIC | |
| C-1 | 0 | 0 | 0 | 0 | 0 | 0 | 0 | 0 | 0 | 0 |
| 1 | 1 | 1 | 1 | 1 | 1 | 1 | 1 | 1 | 1 | |
| 2 | 3 | 3 | 3 | 3 | 3 | 3 | 3 | 3 | 3 | 3 |
| 4 | 6 | 6 | 6 | 6 | 6 | 6 | 6 | 6 | 6 | 6 |
| 5 | 8 | 8 | 8 | 8 | 8 | 8 | 8 | 8 | 8 | 8 |
| 7 | 10 | 10 | 10 | 10 | 10 | 10 | 10 | 10 | 10 | 10 |
| 9 | 11 | 11 | 11 | 11 | 11 | 11 | 11 | 11 | 11 | 11 |
| 10 | 12 | 12 | 12 | 12 | 12 | 12 | 12 | 12 | 12 | 12 |
| 11 | 13 | 13 | 13 | 13 | 13 | 13 | 13 | 13 | 13 | 13 |
| 12 | 14 | 14 | 14 | 14 | 14 | 14 | 14 | 14 | 14 | 14 |
| 13 | 15 | 15 | 15 | 15 | 15 | 15 | 15 | 15 | 15 | 15 |
| 14 | 16 | 16 | 16 | 16 | 16 | 16 | 16 | 16 | 16 | 16 |
| 15 | 17 | 17 | 17 | 17 | 17 | 17 | 17 | 17 | 17 | 17 |
| 16 | 17 | 17 | 17 | 17 | 17 | 17 | 17 | 17 | 17 | 17 |
| 17 | 18 | 18 | 18 | 18 | 18 | 18 | 18 | 18 | 18 | 18 |
| 18 | 19 | 19 | 19 | 19 | 19 | 19 | 19 | 19 | 19 | 19 |
| 19 | 20 | 20 | 20 | 20 | 20 | 20 | 20 | 20 | 20 | 20 |
| 20 | 21 | 21 | 21 | 21 | 21 | 21 | 21 | 21 | 21 | 21 |
| 21 | 22 | 22 | 22 | 22 | 22 | 22 | 22 | 22 | 22 | 22 |
| 22 | 23 | 23 | 23 | 23 | 23 | 23 | 23 | 23 | 23 | 23 |
| C-1 | 24 | 24 | 24 | 24 | 24 | 24 | 24 | 24 | 24 | 24 |
| 25 | 25 | 25 | 25 | 25 | 25 | 25 | 25 | 25 | 25 | 25 |
| 26 | 26 | 26 | 26 | 26 | 26 | 26 | 26 | 26 | 26 | 26 |
| 27 | 27 | 27 | 27 | 27 | 27 | 27 | 27 | 27 | 27 | 27 |
| 28 | 28 | 28 | 28 | 28 | 28 | 28 | 28 | 28 | 28 | 28 |
| 29 | 29 | 29 | 29 | 29 | 29 | 29 | 29 | 29 | 29 | 29 |
| 30 | 30 | 30 | 30 | 30 | 30 | 30 | 30 | 30 | 30 | 30 |
| 31 | 31 | 31 | 31 | 31 | 31 | 31 | 31 | 31 | 31 | 31 |
| 32 | 32 | 32 | 32 | 32 | 32 | 32 | 32 | 32 | 32 | 32 |
| 33 | 33 | 33 | 33 | 33 | 33 | 33 | 33 | 33 | 33 | 33 |
| 34 | 34 | 34 | 34 | 34 | 34 | 34 | 34 | 34 | 34 | 34 |
| 35 | 35 | 35 | 35 | 35 | 35 | 35 | 35 | 35 | 35 | 35 |
| 36 | 36 | 36 | 36 | 36 | 36 | 36 | 36 | 36 | 36 | 36 |
| C-2 | 37 | 37 | 37 | 37 | 37 | 37 | 37 | 37 | 37 | 37 |
| 38 | 38 | 38 | 38 | 38 | 38 | 38 | 38 | 38 | 38 | 38 |
| 39 | 39 | 39 | 39 | 39 | 39 | 39 | 39 | 39 | 39 | 39 |
| 40 | 40 | 40 | 40 | 40 | 40 | 40 | 40 | 40 | 40 | 40 |
| 41 | 41 | 41 | 41 | 41 | 41 | 41 | 41 | 41 | 41 | 41 |
| 42 | 42 | 42 | 42 | 42 | 42 | 42 | 42 | 42 | 42 | 42 |
| 43 | 43 | 43 | 43 | 43 | 43 | 43 | 43 | 43 | 43 | 43 |
| 44 | 44 | 44 | 44 | 44 | 44 | 44 | 44 | 44 | 44 | 44 |
| 45 | 45 | 45 | 45 | 45 | 45 | 45 | 45 | 45 | 45 | 45 |
| 46 | 46 | 46 | 46 | 46 | 46 | 46 | 46 | 46 | 46 | 46 |
| 47 | 47 | 47 | 47 | 47 | 47 | 47 | 47 | 47 | 47 | 47 |
| C-3 | 48 | 48 | 48 | 48 | 48 | 48 | 48 | 48 | 48 | 48 |
| 49 | 49 | 49 | 49 | 49 | 49 | 49 | 49 | 49 | 49 | 49 |
| 50 | 50 | 50 | 50 | 50 | 50 | 50 | 50 | 50 | 50 | 50 |
| 51 | 51 | 51 | 51 | 51 | 51 | 51 | 51 | 51 | 51 | 51 |
| 52 | 52 | 52 | 52 | 52 | 52 | 52 | 52 | 52 | 52 | 52 |
| 53 | 53 | 53 | 53 | 53 | 53 | 53 | 53 | 53 | 53 | 53 |
| 54 | 54 | 54 | 54 | 54 | 54 | 54 | 54 | 54 | 54 | 54 |
| 55 | 55 | 55 | 55 | 55 | 55 | 55 | 55 | 55 | 55 | 55 |
| 56 | 56 | 56 | 56 | 56 | 56 | 56 | 56 | 56 | 56 | 56 |
| 57 | 57 | 57 | 57 | 57 | 57 | 57 | 57 | 57 | 57 | 57 |
| 58 | 58 | 58 | 58 | 58 | 58 | 58 | 58 | 58 | 58 | 58 |
| 59 | 59 | 59 | 59 | 59 | 59 | 59 | 59 | 59 | 59 | 59 |
| 60 | 60 | 60 | 60 | 60 | 60 | 60 | 60 | 60 | 60 | 60 |
| 61 | 61 | 61 | 61 | 61 | 61 | 61 | 61 | 61 | 61 | 61 |
| 62 | 62 | 62 | 62 | 62 | 62 | 62 | 62 | 62 | 62 | 62 |
| 63 | 63 | 63 | 63 | 63 | 63 | 63 | 63 | 63 | 63 | 63 |
| 64 | 64 | 64 | 64 | 64 | 64 | 64 | 64 | 64 | 64 | 64 |
| 65 | 65 | 65 | 65 | 65 | 65 | 65 | 65 | 65 | 65 | 65 |
| 66 | 66 | 66 | 66 | 66 | 66 | 66 | 66 | 66 | 66 | 66 |
| 67 | 67 | 67 | 67 | 67 | 67 | 67 | 67 | 67 | 67 | 67 |
| 68 | 68 | 68 | 68 | 68 | 68 | 68 | 68 | 68 | 68 | 68 |
| 69 | 69 | 69 | 69 | 69 | 69 | 69 | 69 | 69 | 69 | 69 |
| 70 | 70 | 70 | 70 | 70 | 70 | 70 | 70 | 70 | 70 | 70 |
| 71 | 71 | 71 | 71 | 71 | 71 | 71 | 71 | 71 | 71 | 71 |
| 72 | 72 | 72 | 72 | 72 | 72 | 72 | 72 | 72 | 72 | 72 |
| 73 | 73 | 73 | 73 | 73 | 73 | 73 | 73 | 73 | 73 | 73 |
| 74 | 74 | 74 | 74 | 74 | 74 | 74 | 74 | 74 | 74 | 74 |
| 75 | 75 | 75 | 75 | 75 | 75 | 75 | 75 | 75 | 75 | 75 |
| 76 | 76 | 76 | 76 | 76 | 76 | 76 | 76 | 76 | 76 | 76 |
| 77 | 77 | 77 | 77 | 77 | 77 | 77 | 77 | 77 | 77 | 77 |
| 78 | 78 | 78 | 78 | 78 | 78 | 78 | 78 | 78 | 78 | 78 |
| 79 | 79 | 79 | 79 | 79 | 79 | 79 | 79 | 79 | 79 | 79 |
| 80 | 80 | 80 | 80 | 80 | 80 | 80 | 80 | 80 | 80 | 80 |
| 81 | 81 | 81 | 81 | 81 | 81 | 81 | 81 | 81 | 81 | 81 |
| 82 | 82 | 82 | 82 | 82 | 82 | 82 | 82 | 82 | 82 | 82 |
| 83 | 83 | 83 | 83 | 83 | 83 | 83 | 83 | 83 | 83 | 83 |
| C-5 | 84 | 84 | 84 | 84 | 84 | 84 | 84 | 84 | 84 | 84 |
| 85 | 85 | 85 | 85 | 85 | 85 | 85 | 85 | 85 | 85 | 85 |
| 86 | 86 | 86 | 86 | 86 | 86 | 86 | 86 | 86 | 86 | 86 |
| 87 | 87 | 87 | 87 | 87 | 87 | 87 | 87 | 87 | 87 | 87 |
| 88 | 88 | 88 | 88 | 88 | 88 | 88 | 88 | 88 | 88 | 88 |
| 89 | 89 | 89 | 89 | 89 | 89 | 89 | 89 | 89 | 89 | 89 |
| 90 | 90 | 90 | 90 | 90 | 90 | 90 | 90 | 90 | 90 | 90 |
| 91 | 91 | 91 | 91 | 91 | 91 | 91 | 91 | 91 | 91 | 91 |
| 92 | 92 | 92 | 92 | 92 | 92 | 92 | 92 | 92 | 92 | 92 |
| 93 | 93 | 93 | 93 | 93 | 93 | 93 | 93 | 93 | 93 | 93 |
| 94 | 94 | 94 | 94 | 94 | 94 | 94 | 94 | 94 | 94 | 94 |
| PC-26 [CC32:2]TR-808/909 | PC-27 [CC32:2]DANCE | PC-31 [CC32:2]New TR-909 | PC-33 [CC32:2]JAZZ Kit | PC-34 [CC32:2]JAZZ | PC-41 [CC32:2]BRUSH | PC-49 [CC32:2]ORCHESTRA | PC-50 [CC32:2]ETHNIC | PC-51 [CC32:2]KICK & SNAIRE | PC-57 [CC32:2]SFX | |
| C-1 | 0 | 0 | 0 | 0 | 0 | 0 | 0 | 0 | 0 | 0 |
| 1 | 0 | 0 | 0 | 0 | 0 | 0 | 0 | 0 | 0 | |
| 2 | 3 | 0 | 0 | 0 | 0 | 0 | 0 | 0 | 0 | 0 |
| 4 | 6 | 0 | 0 | 0 | 0 | 0 | 0 | 0 | 0 | 0 |
| 5 | 7 | 0 | 0 | 0 | 0 | 0 | 0 | 0 | 0 | 0 |
| 7 | 8 | 0 | 0 | 0 | 0 | 0 | 0 | 0 | 0 | 0 |
| 9 | 10 | 0 | 0 | 0 | 0 | 0 | 0 | 0 | 0 | 0 |
| 11 | 11 | 0 | 0 | 0 | 0 | 0 | 0 | 0 | 0 | 0 |
| 12 | 0 | 0 | 0 | 0 | 0 | 0 | 0 | 0 | 0 | |
| C0 | 13 | 0 | 0 | 0 | 0 | 0 | 0 | 0 | 0 | 0 |
| 14 | 0 | 0 | 0 | 0 | 0 | 0 | 0 | 0 | 0 | |
| 15 | 15 | 0 | 0 | 0 | 0 | 0 | 0 | 0 | 0 | 0 |
| 16 | 0 | 0 | 0 | 0 | 0 | 0 | 0 | 0 | 0 | |
| 17 | 17 | 0 | 0 | 0 | 0 | 0 | 0 | 0 | 0 | 0 |
| 18 | 18 | 0 | 0 | 0 | 0 | 0 | 0 | 0 | 0 | 0 |
| 19 | 20 | 0 | 0 | 0 | 0 | 0 | 0 | 0 | 0 | 0 |
| 21 | 22 | 0 | 0 | 0 | 0 | 0 | 0 | 0 | 0 | 0 |
| 23 | 0 | 0 | 0 | 0 | 0 | 0 | 0 | 0 | 0 | |
| C1 | 24 | 0 | 0 | 0 | 0 | 0 | 0 | 0 | 0 | 0 |
| 25 | 0 | 0 | 0 | 0 | 0 | 0 | 0 | 0 | 0 | |
| 26 | 27 | 0 | 0 | 0 | 0 | 0 | 0 | 0 | 0 | 0 |
| 28 | 0 | 0 | 0 | 0 | 0 | 0 | 0 | 0 | 0 | |
| 29 | 30 | 0 | 0 | 0 | 0 | 0 | 0 | 0 | 0 | 0 |
| 31 | 0 | 0 | 0 | 0 | 0 | 0 | 0 | 0 | 0 | |
| 32 | 32 | 0 | 0 | 0 | 0 | 0 | 0 | 0 | 0 | 0 |
| 33 | 0 | 0 | 0 | 0 | 0 | 0 | 0 | 0 | 0 | |
| 34 | 34 | 0 | 0 | 0 | 0 | 0 | 0 | 0 | 0 | 0 |
| 35 | 0 | 0 | 0 | 0 | 0 | 0 | 0 | 0 | 0 | |
| 36 | 0 | 0 | 0 | 0 | 0 | 0 | 0 | 0 | 0 | |
| 37 | 0 | 0 | 0 | 0 | 0 | 0 | 0 | 0 | 0 | |
| C2 | 38 | 0 | 0 | 0 | 0 | 0 | 0 | 0 | 0 | 0 |
| 39 | 0 | 0 | 0 | 0 | 0 | 0 | 0 | 0 | 0 | |
| 39 | 40 | 0 | 0 | 0 | 0 | 0 | 0 | 0 | 0 | 0 |
| 41 | 0 | 0 | 0 | 0 | 0 | 0 | 0 | 0 | 0 | |
| 42 | 43 | 0 | 0 | 0 | 0 | 0 | 0 | 0 | 0 | 0 |
| 43 | 0 | 0 | 0 | 0 | 0 | 0 | 0 | 0 | 0 | |
| 44 | 44 | 0 | 0 | 0 | 0 | 0 | 0 | 0 | 0 | 0 |
| 45 | 0 | 0 | 0 | 0 | 0 | 0 | 0 | 0 | 0 | |
| 46 | 46 | 0 | 0 | 0 | 0 | 0 | 0 | 0 | 0 | 0 |
| 47 | 0 | 0 | 0 | 0 | 0 | 0 | 0 | 0 | 0 | |
| 48 | 0 | 0 | 0 | 0 | 0 | 0 | 0 | 0 | 0 | |
| 49 | 0 | 0 | 0 | 0 | 0 | 0 | 0 | 0 | 0 | |
| 50 | 0 | 0 | 0 | 0 | 0 | 0 | 0 | 0 | 0 | |
| 51 | 0 | 0 | 0 | 0 | 0 | 0 | 0 | 0 | 0 | |
| 52 | 53 | 0 | 0 | 0 | 0 | 0 | 0 | 0 | 0 | 0 |
| 54 | 0 | 0 | 0 | 0 | 0 | 0 | 0 | 0 | 0 | |
| 55 | 0 | 0 | 0 | 0 | 0 | 0 | 0 | 0 | 0 | |
| 56 | 0 | 0 | 0 | 0 | 0 | 0 | 0 | 0 | 0 | |
| 57 | 0 | 0 | 0 | 0 | 0 | 0 | 0 | 0 | 0 | |
| 58 | 0 | 0 | 0 | 0 | 0 | 0 | 0 | 0 | 0 | |
| 59 | 0 | 0 | 0 | 0 | 0 | 0 | 0 | 0 | 0 | |
| 60 | 0 | 0 | 0 | 0 | 0 | 0 | 0 | 0 | 0 | |
| 61 | 0 | 0 | 0 | 0 | 0 | 0 | 0 | 0 | 0 | |
| 62 | 0 | 0 | 0 | 0 | 0 | 0 | 0 | 0 | 0 | |
| 63 | 0 | 0 | 0 | 0 | 0 | 0 | 0 | 0 | 0 | |
| 64 | 0 | 0 | 0 | 0 | 0 | 0 | 0 | 0 | 0 | |
| 65 | 0 | 0 | 0 | 0 | 0 | 0 | 0 | 0 | 0 | |
| 66 | 0 | 0 | 0 | 0 | 0 | 0 | 0 | 0 | 0 | |
| 67 | 0 | 0 | 0 | 0 | 0 | 0 | 0 | 0 | 0 | |
| 68 | 0 | 0 | 0 | 0 | 0 | 0 | 0 | 0 | 0 | |
| 69 | 0 | 0 | 0 | 0 | 0 | 0 | 0 | 0 | 0 | |
| 70 | 0 | 0 | 0 | 0 | 0 | 0 | 0 | 0 | 0 | |
| 71 | 0 | 0 | 0 | 0 | 0 | 0 | 0 | 0 | 0 | |
| 72 | 0 | 0 | 0 | 0 | 0 | 0 | 0 | 0 | 0 | |
| 73 | 0 | 0 | 0 | 0 | 0 | 0 | 0 | 0 | 0 | |
| 74 | 0 | 0 | 0 | 0 | 0 | 0 | 0 | 0 | 0 | |
| 75 | 0 | 0 | 0 | 0 | 0 | 0 | 0 | 0 | 0 | |
| 76 | 0 | 0 | 0 | 0 | 0 | 0 | 0 | 0 | 0 | |
| 77 | 0 | 0 | 0 | 0 | 0 | 0 | 0 | 0 | 0 | |
| 78 | 0 | 0 | 0 | 0 | 0 | 0 | 0 | 0 | 0 | |
| 79 | 0 | 0 | 0 | 0 | 0 | 0 | 0 | 0 | 0 | |
| 80 | 0 | 0 | 0 | 0 | 0 | 0 | 0 | 0 | 0 | |
| 81 | 0 | 0 | 0 | 0 | 0 | 0 | 0 | 0 | 0 | |
| 82 | 0 | 0 | 0 | 0 | 0 | 0 | 0 | 0 | 0 | |
| 83 | 0 | 0 | 0 | 0 | 0 | 0 | 0 | 0 | 0 | |
| 84 | 0 | 0 | 0 | 0 | 0 | 0 | 0 | 0 | 0 | |
| 85 | 0 | 0 | 0 | 0 | 0 | 0 | 0 | 0 | 0 | |
| 86 | 0 | 0 | 0 | 0 | 0 | 0 | 0 | 0 | 0 | |
| 87 | 0 | 0 | 0 | 0 | 0 | 0 | 0 | 0 | 0 | |
| 88 | 0 | 0 | 0 | 0 | 0 | 0 | 0 | 0 | 0 | |
| 89 | 0 | 0 | 0 | 0 | 0 | 0 | 0 | 0 | 0 | |
| 90 | 0 | 0 | 0 | 0 | 0 | 0 | 0 | 0 | 0 | |
| 91 | 0 | 0 | 0 | 0 | 0 | 0 | 0 | 0 | 0 | |
| 92 | 0 | 0 | 0 | 0 | 0 | 0 | 0 | 0 | 0 | |
| 93 | 0 | 0 | 0 | 0 | 0 | 0 | 0 | 0 | 0 | |
| 94 | 0 | 0 | 0 | 0 | 0 | 0 | 0 | 0 | 0 | |
| 95 | 0 | 0 | 0 | 0 | 0 | 0 | 0 | 0 | 0 | |
| 96 | 0 | 0 | 0 | 0 | 0 | 0 | 0 | 0 | 0 | |
| 97 | 0 | 0 | 0 | 0 | 0 | 0 | 0 | 0 | 0 |
| ORIENTAL | PC: 116 [CC32: 1]E-40 MODIFIED | PC: 116 [CC32: 2]ORIENTAL PERC. 1 | PC: 116 [CC32: 3]ORIENTAL PERC. 2 | PC: 116 [CC32: 4]ORIENTAL 3 | PC: 116 [CC32: 4]ORIENTAL MIX 1 | PC: 116 [CC32: 4]ORIENTAL MIX 2 |
| (96) | Hand Clap 2 Mono (E-40) | Zaghrouta 2 End | Zaghrouta 2 End | Mazhar Dom | Dofs Rim 2 | Sagat Mid |
| 97 | --- | --- | --- | Mazhar Tak | Dofs Dom st. | TablaNurDom1 |
| 98 | --- | --- | --- | Mazhar Sak | TablaNurDom | Sagat Hi |
| 99 | --- | --- | --- | Mazhar Brass | Dofs Sak st. | TablaNurTak1 |
| 100 | --- | --- | --- | Sagat Mid | TablaNurRim | Sagat Sak |
| 101 | --- | --- | --- | Sagat Hi | TablaNurTak | Hager 1 |
| 102 | --- | --- | --- | Sagat Closed | TablaNurSak | Zir 1 |
| 103 | --- | --- | --- | Sagat Sak | BassSlideFX | Nakrazhan 1 |
| 104 | --- | --- | --- | Dofs Tak | BassSlapFX | ZaghroutAm1 |
| 105 | --- | --- | --- | Dofs Dom | ZaghroutaSm2 | Nakrazhan 2 |
| 106 | --- | --- | --- | Dofs Sak | Zir 1 | ZaghroutaEd1 |
| 107 | --- | --- | --- | Dofs Rim 1 | ZaghroutaEd2 | ZaghroutaSm2 |
| 108 | --- | --- | --- | Dofs Rim 2 | NewHiBongo | ZaghroutaEd2 |
| 109 | --- | --- | --- | Dofs Dom st. | NewLoBongo | TR-707 BD |
| 110 | --- | --- | --- | TablaNurDom | NewCongaSlp | TR-909 BD2 |
| 111 | --- | --- | --- | Dofs Sak st. | NewCongaOp | Mix Kiek |
| 112 | --- | --- | --- | TablaNurRim | NewLoConga | 82RmbSdrum1 |
| 113 | --- | --- | --- | TablaNurTak | NewTmbHi | 82StSnare1 |
| 114 | --- | --- | --- | TablaNurSak | NewTmblo | 82JzSnare1 |
| 115 | --- | --- | --- | BassSlideFX | Hager 1 | House SD |
| 116 | --- | --- | --- | BassSlapFX | Rev Snare | |
| 117 | --- | --- | --- | ZaghroutaSm2 | ||
| 118 | --- | --- | --- | Zir 1 | Jingle Bell | |
| 119 | --- | --- | --- | ZaghroutaEd2 | Bell Tree | |
| 120 | --- | --- | --- | NewHiBongo | Bongo High | |
| 121 | --- | --- | --- | NewLoBongo | Bongo Lo | |
| 122 | --- | --- | --- | NewCongaSlp | Mute H.Conga | |
| 123 | --- | --- | --- | NewCongaOp | Conga Hi Opn | |
| 124 | --- | --- | --- | NewLoBongo | Conga Lo Opn | |
| 125 | --- | --- | --- | NewTmbHi | High Timbale | |
| 126 | --- | --- | --- | NewTmblo | Low Timbale | |
| 127 | --- | --- | --- | Hager 1 | Agogo |
| C-1 | PC-120 [CC32:2]Khaligi1 | PC-121 [CC32:2]Khaligi2 | PC-122 [CC32:2]Khaligi3 | PC-123 [CC32:2]Mix | PC-124 [CC32:2]TrkOrMix | PC-125 [CC32:2]Turkish 1 | PC-126 [CC32:2]Turkish 2 |
| 0 | —— | —— | —— | —— | —— | —— | —— |
| 1 | —— | —— | —— | —— | —— | —— | —— |
| 2 | —— | —— | —— | —— | —— | —— | —— |
| 3 | —— | —— | —— | —— | —— | —— | —— |
| 4 | —— | —— | —— | —— | —— | —— | —— |
| 5 | —— | —— | —— | —— | —— | —— | —— |
| 6 | —— | —— | —— | —— | —— | —— | —— |
| 7 | —— | —— | —— | —— | —— | —— | —— |
| 8 | —— | —— | —— | —— | —— | —— | —— |
| 9 | —— | —— | —— | —— | —— | —— | —— |
| 10 | —— | —— | —— | —— | —— | —— | —— |
| 11 | —— | —— | —— | —— | —— | —— | —— |
| C0 | 12 | —— | —— | —— | Djembe_rim | —— | —— |
| 13 | 13 | —— | —— | —— | Tambourine | —— | —— |
| 14 | 14 | —— | —— | —— | ChaChaBell | —— | —— |
| 15 | 15 | —— | —— | —— | Agogo | —— | —— |
| 16 | 16 | —— | —— | —— | Agogo | —— | —— |
| 17 | 17 | —— | —— | Khaligi Clap | 909 HandClap | —— | —— |
| 18 | 18 | —— | —— | Hand Clap 1 | Khaligi Clap | —— | —— |
| 19 | 19 | —— | —— | Hand Clap 2 | Hand Clap 1 | —— | —— |
| 20 | shhh | shhh | Suhh | Sagat Mid | Hand Clap 2 | suhh | —— |
| 21 | havy | havy | havy | Sagat Hi | Manjoor2 | havy | —— |
| 22 | Aashoo | Aashoo | Aashoo | Sagat Closed | Manjoor1 | Aashoo | —— |
| 23 | Ahaa | Ahaa | Ahaa | Sagat Sak | TizBendir Tok | Ahaa | —— |
| 11 | —— | —— | —— | —— | —— | —— | —— |
| C0 | 12 | —— | —— | —— | Djembe_rim | —— | —— |
| 13 | 13 | —— | —— | —— | Tambourine | —— | —— |
| 14 | 14 | —— | —— | —— | ChachaBell | —— | —— |
| 15 | 15 | —— | —— | —— | Agogo | —— | —— |
| 16 | 16 | —— | —— | —— | Agogo | —— | —— |
| 17 | 17 | —— | —— | —— | TizBendir Rakh | —— | —— |
| 18 | 18 | —— | —— | —— | NewShaker2 | halaa boys | Bongo Gum |
| 19 | 19 | —— | —— | —— | NewShaker1 | halaa girls | aashoo |
| 20 | 20 | —— | —— | Hand Clap 2 | Hand Clap 1 | —— | —— |
| 21 | 21 | —— | —— | Hand Clap 2 | Hand Clap 2 | —— | —— |
| 22 | 22 | —— | —— | Hand Clap 2 | Manjoor2 | havy awall2 | —— |
| 23 | 23 | —— | —— | —— | Hajmoglu | —— | —— |
| 24 | 24 | —— | —— | —— | Manjoor2 | havy awall2 | —— |
| 25 | 25 | —— | —— | —— | Manjoor2 | Haiyah | —— |
| 26 | 26 | —— | —— | —— | TizBendir Rakh | —— | —— |
| 27 | 27 | halaa boys | halaa boys | —— | TizBendir Rakh | —— | —— |
| 28 | 28 | halaa girls | halaa girls | —— | NewShaker2 | halaa girls | aashoo |
| 29 | 29 | heya group | heya group | —— | NewShaker1 | heya group | aashoo |
| 30 | 30 | heya group low | heya group low | —— | NewShaker1 | heya group low | —— |
| 31 | 31 | khamoosh | khamoosh | —— | NewShaker 2 | khamoosh | halaa girls |
| 32 | 32 | laughing | laughing | —— | NewShaker 2 | laughing | heya group |
| 33 | 33 | way | way | —— | NewShaker 2 | new Shaker 2 | —— |
| 34 | 34 | yalla | yalla | —— | Elec Kish 2 | yalla | yallah |
| 35 | 35 | yallah | yallah | —— | TR-909 BD2 | yallah | yebab |
| C0 | Drenka Big Dom. Std.2Kick1 | Meraf dom. Std.2 Kick1 | Std.2 Kick1 | Std.2 Kick1 | Kick2 | Kik | |
| 37 | Drenka Big Sak | IbpStck37_1 | Meraf sak | Drenka Big Sak | IbpStck37_1 | Side Stick | Side Stick |
| 38 | Drenka Big Rim | IbpSp38_1 | Meraf taik | Popsnare | IbpSp38_1 | Snare2 | Snare 2 |
| 39 | Drenka Small Sam | HandClap1st | Tarmag dom. | Drenka Small Sak | HandClap1st | 808 Clap | 909 Clap |
| 40 | Drenka Small Dom | HandClap21 | Tarmag dom. | Drenka Small Dom. | Hand Clap 21 | Snare1 | Snare 1 |
| 41 | Drenka Small Rim | TR-707 SD | Tarmag dom. | Drenka Small Rim | TR-707 SD | Real Tom6 | Real Tom 6 |
| 42 | Drenka Small Fx | Jazz Cld. HH | Tar 1 dom. | Jazz Cld HH | Jazz Cld HH | Close Hlat | Close Hi Hat |
| 43 | Drenka Small Tak | Real Tom 6 | Tar 1 sak | Drenka Small Tak | Real Tom 6 | Real Tom 6 | Real Tom 6 |
| 44 | Duff Dih | Pedal Hi Hat | Tar 1 tak | Pedal Hlat | Pedal Hlat | Pedal Hlat | Hi Hat |
| 45 | Duff Dom 1 | Real Tom 4 | Tar 2 dom. | Meraw Dom 1 | Real Tom 4 | Real Tom 4 | Real Tom 4 |
| 46 | Duff Sak 1 | Jazz Open HH | Tar 2 sak | Jazz Open HH | Jazz Open HH | Open Hlat | Open Hi Hat |
| 47 | Duff Tak | Real Tom 4 | Tar 2 tak | Meraw Dom 2 | Real Tom 4 | Real Tom 4 | Real Tom 4 |
| C0 | Duff Dom 2 | IbpToM43 | Duff dom1 | Meraw Tak 2 | IbpToM43 | Real Tom 1 | Real Tom 1 |
| 49 | Duff Sak 2 | Crash Cym 1 | Duff dom2 | Meraw Tak 3 | Crash Cym 1 | Crash Cym 1 | Crash Cym 1 |
| 50 | Tar Low Dom | IbpToM44 | Duff sak 1 | Meraw Dom 3 | IbpToM44 | Real Tom 1 | Real Tom 1 |
| 51 | Tar Low Sak | NewRkDcM1 | Duff sak 2 | Kasoor Sak | NewRkDcM1 | Ride Cymbal | Ride Cymbal |
| 52 | Tar Low Rim | Tabel Bahri Dom 1 | Duff tak | Kasoor Dom 1 | IbpRdL55 | China Cymbal | China Cymbal |
| 53 | Tar Hi Dom | Tabel Bahri Dom 1 | Duff dish | Kasoor Dom 2 | Dhola Dom | Udo Slap | Ride Bell |
| 54 | Tar Hi Dom | Tabel Bahri Dom 1 | Dollhola dem. | Tar Brashim Dom | Dhola Sak 1 | Ceng Ceng | Drenka Big Dom |
| 55 | Tar Hi Rim | Tabel Bahri Dom 2 | Dolhola dem. | Tar Brashim Rlm 1 | Dhola Sak 2 | Udo Short | Drenka Big Rlm |
| 56 | Meraw Finger | Tabel Bahri Sak 2 | Dolhola dem. | Tar Brashim Rlm 1 | Dhola Sak 3 | Udo Long | Drenka Big Sak |
| 57 | Meraw Fimt | Tabel Bahri Sak 2 | Dolhola dem. | Tar Brashim Rlm 2 | Dhola Sak 3 | Timbil Pala | Drenka Small Dom |
| 58 | Meraw Taki 1 | Duff Dom 1 | Kasoor dem. | Tar Brashim Sak 1 | Dhola Raka | Meraw Sak | Drenka Small Fl1 |
| 59 | Meraw Dom 2 | Duff Brass 1 | Kasoor dem. | Tar Brashim Sak 2 | Dhola Sak 1 | Meraw Sak | Drenka Small Fl2 |
| 60 | Meraw Taki 2 | Drenka Big Dom | Tabel11 dom. | Zeer Dom 1 | Dhola Tak 2 | Meraw Tak 2 | Drenka Small Rlm |
| 61 | Meraw Taki 3 | Drenka Big Sak | Tabel11 sak | Zeer Tak 1 | Basbendir Gum | Tar 2 Dom | Drenka Small Sak |
| 62 | Meraw Dom 3 | Drenka Big Rim | Tabel11 tak | Zeer Rlm 1 | Basbendir Tok 2 | Tar 1 Sak | Drenka Small Tak |
| 63 | Kasoor Sak | Drenka Small Sak | Tabel12 dom. | Zeer Tak 2 | Basbendir Gum 2 | Tar 2 Tak | Alkso1 |
| 64 | Kasoor Dom 1 | Drenka Small Dom | Tabel12 sak | Zeer Dom 2 | Basbendir Tek | Tar 2 Sak | Alkso2 |
| 65 | Kasoor Dom 2 | Drenka Small Rim | Tabel12 tak | Zeer Rlm 2 | Basbendir Trm | Surdo 1 | Alkso3 |
| 66 | Tar Sagool Dom 1 | Drenka Small Fx | Meraw dem. | Zeer Fx | Bendir Tek | Surdo 2 | AsmaDa'ul Gum 1 |
| 67 | Tar Sagool Dom 2 | Drenka Small Dem. | Meraw sak 1 | Yehal Dom 1 | Bendir Trak | AsmaDa'ul Gum 1 | AsmaDa'ul Gum 2 |
| 68 | Tar Sagool Sak 1 | Meraw Finger | Meraw sak 2 | Yehal Dom 1 | Bendir Trm | AsmaDa'ul Trm | Asma Kp'Gum 2 |
| 69 | Tar Sagool Dom 2 | Meraw Dem. | Meraw sak 2 | Yehal Dom 1 | Bendir Tek | AsmaDa'ul Tek | AsmaDa'ul Tek |
| 70 | Tar Sagool Sak 2 | Meraw Tak 1 | Meraw Tak 2 | Yehal Dom 2 | Bendir Rak | AsmaDa'ul Gum 3 | AsmaDa'ul Kn |
| 71 | Tar Sagool Sak 2 | Meraw Dem. 2 | Nagroosi 1 dom. | Yehal GroupDom. | Dofs Tak. | AsmaDa'ul Tek | Asma Da'ul Trm |
| 72 | Zeer Dom 1 | Meraw Tak 2 | Nagroosi 1 roll. | Yehal Group Tak.2 | Dofs Dom. | Tabla Dom. | AsmaDa'ul Trm 2 |
| 73 | Zeer Taki 1 | Meraw Tak 3 | Nagroosi 2 dom. | Meraw Sak. | Dofs Sak. | Tabla Tak 2 | AsmaDa'ul Tek 2 |
| 74 | Zeer Rim 1 | Meraw Dem 3 | Nagroosi 2 side. | Meraw Fati 1 | Dofs Ram 1 | Tabla Ram 1 | Basbendir Tok 1 |
| 75 | Zeer Rim 2 | Kasoor Sak | Nagroosi 2 roll. | Meraw Fati 1 | Dofs Ram 2 | Tabla Roll 1 | Basbendir Gum 1 |
| 76 | Zeer Dom 2 | Kasoor Dom 1 | Twasat 1 | Dhola Sak 1 | Dofs Dom st. | DoRim 2 | Basbendir Tek |
| 77 | Zeer Rim 2 | Kasoor Dom 2 | Twasat 2 | Dhola Sak 1 | Dofs Sak st. | Tabla Rime 2 | Basbendir Trm |
| 78 | Zeer Fx | Tar Sagool Dom 1 | Twasat 3 | Dhola Sak 2 | Darbuka-Trm | Tef Gum 1 | Bendir Gum |
| 79 | Yehal Dom 1 | Tar Sagool Sak 1 | Yehal Dom 1 | Dhola Sak 3 | Darbuka-Gum | Tef Crt 1 | Bendir Trm |
| 80 | Yehal Tak 1 | Tar Sagool Sak 1 | Yehal Tak 1 | Dhola Sak 3 | Darbuka-Trak | Tef Crt 2 | Bendir Tak |
| 81 | Yehal Tak 2 | Tar Sagool Dom 2 | OR Conga Lo | Dhola Raka | Darbuka-Tek | Tef Crt 3 | Bendir Tok |
| 82 | Yehal Tak 2 | Tar Sagool Sak 2 OR Conga LoM1 | Dhola Raka, Dhola ToTum 1 | Darbuka-Trdrum | Tef Crt Cts | Bendir Trk | |
| 83 | Yehal GroupDom. Tar Sagool Sak 2 OR Conga FX | OR Conga FX OR Conga FX OR Conga FX OR Conga FX OR Conga FX OR Conga FX OR Conga FX OR Conga FX OR Conga FX OR Conga FX OR Conga FX OR Conga FX OR Conga FX OR Conga FX OR Conga FX OR Conga FX OR Conga FX OR Conga FX OR Conga FX OR Conga FX OR Conga FX OR Conga FX OR Conga FX OR Conga FX OR Conga FX OR Conga FXOR Conga FX OR Conga FX OR Conga FX OR Conga FX OR Conga FX OR Conga FX OR Conga FX OR Conga FX OR Conga FX OR Conga FX OR Conga FX OR Conga FX OR Conga FX OR Conga FX OR Conga FX OR Conga FX OR Conga FX OR Conga FX OR Conga FX OR Conga FX OR Conga FX OR Conga FX OR Conga FX OR Conga FX OR CongaFX OR CongaFX OR CongaFX OR CongaFX OR CongaFX OR CongaFX OR CongaFX OR CongaFX OR CongaFX OR CongaFX OR CongaFX OR CongaFX OR CongaFX OR CongaFX OR CongaFX OR CongaFX OR CongaFX OR CongaFX OR CongaFX OR CongaFX OR CongaFX OR CongaFX OR CongaFX OR CongaFX OR CongaFX OR Conga FX OR CongaFX OR CongaFX OR CongaFX OR CongaFX OR CongaFX OR CongaFX OR CongaFX OR CongaFX OR CongaFX OR CongaFX OR CongaFX OR CongaFX OR CongaFX OR CongaFX OR CongaFX OR CongaFX OR CongaFX OR CongaFX OR CongaFX OR CongaFX OR CongaFX OR CongaFX OR CongaFX OR CongaXOR CongaXOR CongaXOR CongaXOR CongaXOR CongaXOR CongaXOR CongaXOR CongaXOR CongaXOR CongaXOR CongaXOR CongaXOR CongaXOR CongaXOR CongaXOR CongaXOR CongaXOR CongaXOR CongaXOR CongaXOR CongaXOR CongaXOR CongaXOR CongaXOR CongaXorRik 10000000000000000000000000000000000000000000000000000000000000000000000000000000000000000000000000000 |
| PC: 120 [CC32: 2]Khaligi1 | PC: 121 [CC32: 2]Khaligi2 | PC: 122 [CC32: 2]Khaligi3 | PC: 123 [CC32: 2]Mix | PC: 124 [CC32: 2]TrkOrMix | PC: 125 [CC32: 2]Turkish 1 | PC: 126 [CC32: 2]Turkish 2 | |
| (96) | (Yebab Close) | (Yehal Group Tak) | (Tabla Rim2) | (Tabla Sak) | (Kajun Tirak.2) | (Darbuka Taka Trm) | (Comlek Tik.3) |
| 97 | Khaligi Clap | Yebab Open | Tabla Rim3 | Tabla Roll | Kajun Tirak.3 | Darbuka Tak2 | Tef Kpl Gum |
| 98 | Hand Clap 1 | Yebab Close | Tabla Te | Tabla Tak 2 | Mazhar Dom | Darbuka Gum | Tef Crt1 |
| 99 | Hand Clap 2 | Manjoor | Tabla Na | Tabla Raka 2 | Mazhar Tak | Darbuka Tak | Tef Crt2 |
| 100 | Twaisat Close | Tanaka 1 | Tabla Tun | Tabla Rim 1 | Mazhar Sak | Darbuka Tek1 | Tef Srl |
| 101 | Twaisat Open 1 | Tanaka 2 | Yebab | Tabla Toks | Mazhar Brass | Darbuka Tek2 | Tef Sar |
| 102 | Twaisat Open 2 | Twaisat Close | ZaghrutaStop | Tabla RekTraka | BassSlideFX | Darbuka Gum | Tef Krak |
| 103 | Bongo Tak 1 | Twaisat Open 1 | Or Clap | Rek Dom | Zaghrouta | Darbuka Tek1 | Tef Cas |
| 104 | Bongo Dom 1 | Twaisat Open 2 | Sherbaka clap 1 | Rek Trill | BassSlapFX | Darbuka Tek2 | Tef Tis |
| 105 | Bongo Tak 2 | Bongo Tak 1 | Sherbaka clap 2 | Rek Tak 1 | TablaNurDom | Darbuka Trm1 | Tef Tirak.2 |
| 106 | Bongo Sak | Bongo Dom 1 | Sherbaka clap 3 | Rek Bras 1 | TablaNurRim | Darbuka Tak | Tef Tok |
| 107 | Bongo Rim | Bongo Tak 2 | Sherbaka clap 4 | Rek Tok | TablaNurTak | Tef Ting | |
| 108 | Bongo Dom 2 | Bongo Sak | Sherbaka clap 5 | Rek Bras 2 | TablaNurSak | TizBendir Tok | |
| 109 | Tar Brashim Dom | Bongo Rim | Sherbaka clap 6 | Rek Tak 2 | Rek Raka | TizBendir Gum | |
| 110 | Tar Brashim Rim 1 | Bongo Dom 2 | Rek Sak | Rek Dom | TizBendir Rak | ||
| 111 | Tar Brashim Tak | Tar Brashim Dom | Rek Tik | Rek Trill | TizBendir Tirak | ||
| 112 | Tar Brashim Rim 2 | Tar Brashim Rim 1 | Dofs Tak | Rek Tak 1 | TizBendir Trm | ||
| 113 | Tar Brashim Sak 1 | Tar Brashim Tak | Dofs Dom | Rek Rim | Kajun Tak | ||
| 114 | Tar Brashim Sak 2 | Tar Brashim Rim 2 | Dofs Sak | Rek Bras 1 | Kajun Tok | ||
| 115 | Tanaka 1 | Tar Brashim Sak 1 | Dofs Rim 1 | Rek Tok | Kajun Trm | ||
| 116 | Tanaka 2 | Tar Brashim Sak 2 | Dofs Rim 2 | Rek Bras 2 | |||
| 117 | Rek Tak 2 | ||||||
| 118 | Rek Sak | ||||||
| 119 | Rek Tik | ||||||
| 120 | Asma Davul Gum.1 | ||||||
| 121 | Asma Davul Gum.2 | ||||||
| 122 | Asma Davul Gum.3 | ||||||
| 123 | Asma Davul Tm | ||||||
| 124 | Asma Davul Tek.1 | ||||||
| 125 | Asma Davul Tek.2 | ||||||
| 126 | Asma Davul Gum.4 | ||||||
| 127 | Asma Davul Tek.2 |
| Music Styles | ||||||||||
| No. | Name | Tempo | Time Sign. | No. | Name | Tempo | Time Sign. | No. | Name | Tempo |
| MAKSOUUM | KHALIGI | FLASH | ||||||||
| 001 | MaksFast | 130 | 4/4 | 067 | Rumba 1 | 140 | 4/4 | 101 | 6_BPOP | 66 |
| 002 | Maksoumi | 95 | 4/4 | 068 | Rumba 2 | 140 | 4/4 | 102 | 30BIGBND | 120 |
| 003 | Maksoms | 85 | 4/4 | 069 | ShakShak | 145 | 4/4 | 103 | 60RK'N_R | 181 |
| 004 | Maksoum2 | 100 | 4/4 | 070 | Araby | 160 | 4/4 | 104 | 70SDANCE | 108 |
| 005 | Maks-Mlf | 105 | 4/4 | 071 | Thefah | 175 | 4/4 | 105 | 70SDISCO | 126 |
| 006 | Maks!Bal | 180 | 4/4 | 072 | Khatwah | 165 | 4/4 | 106 | 70POP | 112 |
| 007 | Maksoum1 | 120 | 4/4 | 073 | Khebeity | 153 | 4/4 | 107 | ALCAPBL | 80 |
| 008 | ProgMksm | 119 | 4/4 | 074 | Khbty3/4 | 150 | 3/4 | 108 | BACHATA | 128 |
| 075 | Emarati | 155 | 4/4 | 109 | BALLAD | 75 | ||||
| SAIDI | 076 | Mizmar | 200 | 4/4 | 110 | BARRYDC | 132 | |||
| 009 | Saidi-A | 120 | 4/4 | 077 | Bastah | 165 | 4/4 | 111 | BEGUINE | 110 |
| 010 | Saidi-B | 95 | 4/4 | 078 | Dazzah | 190 | 3/4 | 112 | BGBNDMED | 125 |
| 011 | Saidi-Eg | 95 | 4/4 | 079 | Sharh | 155 | 3/4 | 113 | BIGBDSL | 61 |
| 012 | Saidi-M2 | 135 | 4/4 | 080 | Dosary | 160 | 3/4 | 114 | BIGHOUSE | 130 |
| 013 | Masrahi | 98 | 4/4 | 081 | Samri | 95 | 6/8 | 115 | BIGSAMBA | 116 |
| 082 | Mallaya1 | 105 | 4/4 | 116 | BLUES | 61 | ||||
| MASRI | 083 | Mallaya2 | 110 | 4/4 | 117 | BRGHTPOP | 93 | |||
| 014 | Fallaha | 175 | 4/4 | 084 | Liwa | 150 | 3/4 | 118 | BUSY_POP | 98 |
| 015 | Fallahi | 94 | 2/4 | 085 | Sout | 140 | 4/4 | 119 | CHA-CHA | 130 |
| 016 | Baladak | 120 | 4/4 | 086 | Adany | 159 | 4/4 | 120 | COOL_RAP | 94 |
| 017 | BaladiFa | 100 | 4/4 | 087 | Adani | 90 | 4/4 | 121 | CUTE_POP | 108 |
| 018 | Ibrahimi | 95 | 4/4 | 088 | ZaffahKh | 100 | 4/4 | 122 | DJTECHNO | 140 |
| 019 | Ruby | 95 | 4/4 | 123 | EASYHOP | 88 | ||||
| 020 | Samba-Eg | 108 | 4/4 | TURKISH | 124 | ENGWLZ | 91 | |||
| 021 | Guaracha | 120 | 4/4 | 089 | Turk 2/4 | 88 | 2/4 | 125 | FEELGOOD | 98 |
| 022 | Noubi 2 | 140 | 4/4 | 090 | Turk 5/8 | 120 | 5/8 | 126 | GOSPEL | 60 |
| 023 | DareqMsr | 85 | 4/4 | 091 | Turk 6/8 | 70 | 6/8 | 127 | GOSPLPOP | 143 |
| 024 | Conga | 120 | 4/4 | 092 | Turk 7/8 | 135 | 7/8 | 128 | GROOVY_P | 100 |
| 025 | Zaffa | 85 | 4/4 | 093 | Turk 9/8 | 140 | 9/8 | 129 | GUITAR_P | 86 |
| 094 | TurkPop | 130 | 4/4 | 130 | HAPPYBAL | 78 | ||||
| MALFOUF | 095 | Zeybek | 80 | 9/8 | 131 | HAWAJIAN | 109 | |||
| 026 | Malfoufi | 115 | 4/4 | 096 | Krdnz7/8 | 150 | 7/8 | 132 | HIPNHOP | 102 |
| 027 | Malfoufa | 110 | 4/4 | 097 | THM 9/8 | 70 | 9/8 | 133 | IRISH | 131 |
| 028 | Malfouf | 100 | 4/4 | 098 | TSM 9/8 | 70 | 9/8 | 134 | LATINPOP | 92 |
| 099 | Roman9/8 | 100 | 9/8 | 135 | LOVEBEAT | 66 | ||||
| ARABI | 136 | LUVBOSSA | 136 | |||||||
| 029 | Ayoub | 105 | 2/4 | 137 | MAMBO | 102 | ||||
| 030 | Karatshi | 99 | 4/4 | 138 | MERENGE | 124 | ||||
| 031 | Choby | 100 | 4/4 | 139 | MIDBOSSA | 150 | ||||
| 032 | Katkofti | 105 | 4/4 | 140 | MUSETTE | 175 | ||||
| 033 | Laff | 105 | 4/4 | 141 | NEWCENTRY | 113 | ||||
| 034 | Leebi | 100 | 4/4 | 142 | PARTYSLG | 124 | ||||
| 035 | Dabka | 100 | 4/4 | 143 | PASDOBLE | 122 | ||||
| 144 | R&8 | 105 | ||||||||
| TRADITIONAL | 145 | REGGAE | 140 | |||||||
| 036 | WehedaOld | 120 | 4/4 | 146 | RHUMBA | 100 | ||||
| 037 | WehedaNew | 110 | 4/4 | 147 | SALSA | 100 | ||||
| 038 | Vahde 1 | 75 | 4/4 | 148 | SKA | 125 | ||||
| 039 | Vahde 2 | 80 | 4/4 | 149 | TANGO | 120 | ||||
| 040 | SamaiDar | 120 | 3/4 | 150 | TWIST | 162 | ||||
| 041 | SamaiTei | 125 | 5/4 | |||||||
| 042 | Masmoudi | 122 | 8/4 | |||||||
| 043 | Hajaa | 100 | 4/4 | |||||||
| 044 | Fox 1 | 110 | 4/4 | |||||||
| 045 | Walz Or1 | 150 | 3/4 | |||||||
| 046 | Walz Or2 | 145 | 3/4 | |||||||
| 047 | Zar 1 | 90 | 2/4 | |||||||
| 048 | Zekr | 106 | 4/4 | |||||||
| 049 | Sombati | 175 | 8/4 | |||||||
| OR-WORLD | ||||||||||
| 050 | Rai | 145 | 4/4 | |||||||
| 051 | Grigi | 115 | 4/4 | |||||||
| 052 | Yonani | 110 | 4/4 | |||||||
| 053 | Azerie6/8 | 95 | 6/8 | |||||||
| 054 | Iranie6/8 | 95 | 6/8 | |||||||
| 055 | Bayon | 120 | 4/4 | |||||||
| 056 | Ciftelli | 88 | 4/4 | |||||||
| 057 | DupArap | 120 | 4/4 | |||||||
| 058 | Halay 1 | 110 | 4/4 | |||||||
| 059 | Halay 2 | 110 | 4/4 | |||||||
| 060 | Misket | 80 | 2/4 | |||||||
| 061 | Oryantal | 140 | 4/4 | |||||||
| 062 | Sebari | 120 | 4/4 | |||||||
| 063 | TarsusCt | 88 | 4/4 | |||||||
| 064 | GipsyOr1 | 110 | 4/4 | |||||||
| 065 | Funk Or | 100 | 4/4 | |||||||
| 066 | Latin Or | 110 | 4/4 | |||||||
Chord Intelligence ("Md1" setting)


CM7

C7


com

Cm7 (b)
Caug


C7sus4
= Keys you need to press to hear this chord. Constituent notes of this chord.
= Keys you need to press to hear this chord. = Constituent notes of this chord.
MIDI Implementation Chart
[Interactive Arranger]
Date: September 2006
Version: 1.01
| Function... | Transmitted | Recognized | Remarks | |
| Basic Channel | Default | 1~16 | 1~16 | 32 Parts |
| Changed | 1~16, Off | 1~16, Off | 2 Logical Parts | |
| Mode | Default | Mode 3 | Mode 3 | |
| Message | Mode 3, 4 (M=1) | Mode 3, 4 (M=1) | *2 | |
| Altered | **** | |||
| Note Number | True Voice | 0~127**** | 0~127 | |
| 0~127 | ||||
| Velocity | Note ON | O | O | |
| Note OFF | X | X | ||
| After Touch | Key's | X | O | |
| Ch's | X | O | ||
| Pitch Bend | O *1 | O *1 | ||
| Control Change | 0,32 | O *1 | O *1 | Bank Select Modulation Portamento Time Data Entry Volume Panpot Expression V-Link control Hold 1 Portamento Sostenuto Soft Portamento Control Effect 1 Depth Effect 3 Depth NRPN LSB, MSB RPN LSB, MSB |
| 1 | O *1 | O *1 | ||
| 5 | O | O | ||
| 6, 38 | O | O | ||
| 7 | O | O | ||
| 10 | O | O | ||
| 11 | O | O | ||
| 22, 23, 24, 25 | O | X | ||
| 64 | O | O | ||
| 65 | X | O | ||
| 66 | O | O | ||
| 67 | O | O | ||
| 84 | X | O | ||
| 91 | O | O (Reverb) | ||
| 93 | O | O (Chorus) | ||
| 98, 99 | O | O | ||
| 100, 101 | O | O | ||
| Program Change | True # | O *1**** | O *1 | Program Number 1~128 |
| 0~127 | ||||
| System Exclusive | O | O | ||
| System Common | Song Position Pointer | O *1 | X | |
| Song Sel | X | X | ||
| Tune | X | X | ||
| System Real Time | Clock | O *1 | O | |
| Commands | O *1 | O | ||
| Aux Messages | All Sounds Off | X | O (120, 126, 127) | |
| Reset All Controllers | X | O (121) | ||
| Local On/Off | O *1 | O | ||
| All Notes Off | X | O (123-125) | ||
| Active Sense | O | O | ||
| Reset | X | X | ||
| Notes | *1 O X is selectable*2 Recognized as M=1 even if M≠1 | |||
| Mode 1: OMNI ON, POLY | Mode 2: OMNI ON, MONO | O: Yes | ||
| Mode 3: OMNI OFF, POLY | Mode 4: OMNI OFF, MONO | X: No | ||
When you need repair service, call your nearest Roland Service Center or authorized Roland distributor in your country as shown below.
Information
| AFRICA | |||||
| EGYPT | |||||
| Al Fanny Trading Office9, EBN Hagar Al Asalkany Street, ARD El Golf, Heliopolis, Cairo 1341, EGYTTEL: (02) 899 9801 | |||||
| REUNION | |||||
| Maison FO - YAM Marcel25 Rue Jules Hermann, Chaudron - BP79 97 491Ste Clotilde Cedex, REUNION ISLANDTEL: (0262) 218-429 | |||||
| SOUTH AFRICA | |||||
| T.O.M.S. Sound & Music(Pty)Ltd.11 Melle St., Braamfontein, Johannesburg, SOUTH AFRICATE: (011) 403 4105FAX: (011) 403 1234 | |||||
| ASIA | |||||
| CHINA | |||||
| Roland Shanghai Electronics Co., Ltd.5F. No.1500 Pingliang RoadShanghai 200090, CHINATEL: (021) 5580-0800 | |||||
| Roland Shanghai Electronics Co., Ltd.(BEIJING OFFICE)10F. No.183 Section Anhuaxili Chaoyang District Beijing10001 CHINATEL: (010) 6426-5050 | |||||
| HONG KONG | |||||
| Tom Lee Music Co., Ltd. Service Division22-32 Pun Shant, Tsuen Wan, New TerritoriesHONG KONGTEL: (2415) 0911 | |||||
| Parsons Music Ltd.8th Floor, Railway Plaza, 39Chatham Road South, T.S.T.Kowloon, HONG KONGTEL: (2333) 1863 | |||||
| INDIA | |||||
| Rivera Digtec(India) Pvt. Ltd.409, Nirman KendraMahalaxmi Flats Compound Offr. Dr. Edwin Moses Road, Mumbai-400011, INDIATEL: (022) 2493 9051 | |||||
| INDONESIA | |||||
| PIT Citra InitIramaJ1. Cideng Timur No. 15j-150Jakarta PusatINDONESIATEL: (021) 6324170 | |||||
| KOREA | |||||
| Cosmos Corporation1461-9, Secho-Dong,Seocho Ku, Seoul, KOREATEL: (02) 3486-8855 | |||||
| MALAYSIA | |||||
| Roland Asia Pacific Sdn. Bhd.45-1, Block C2, Jalan PJU 1/39, Dataran Prima, 47301 Petaling Java, Selangor, MALAYSIATEL: (03) 7805-3263 |
As of August 1, 2006 (ROLAND)
a_i = a_i - 1 + a_i - 2
Lalilol, Lss Jroland Corporation 2
a 1
gall gall jllg.
.EXR-46 OR 5
:J 15 J 15 J 15 J 15 J 15 J 15 J
JrLi .jIglll,
aall aagg gailgglg dgaal
.EXR-46 OR j12j12j
wlll wlll, gabaa daaal llll jzg
aaiiip
1
"5]1234567890112345678901123456789011234567890
.EXR-46 OR jLg= gds
jz jjjA.(9\~0)aJzjjjj
.
joo 0)aagaaal yslil gge 19:aaalall
()
99X:3a1gll aalll
aLs aJy. yogS. yol yolb: yolgss 4: gaaall
SMF j
cuii j 111
(1)
jlll lccgagaaa aagaaal aalee
15g
1
LgJgill, gLgjLgJg, gLgJg: (1)
gall lll
JgEgVg,ssRgEgIgIgA:UgA
(2HD/2DD) 4.0 1kssdJusu:lagalea jzj
J 1 J 1 J 1 J 1 J 1 J 1 J 1 J 1 J 1 J 1 J 1 J 1 J 1
ll jll sle! 2Lac gann all jg jglg jall
C
cianall gddgdljglal jlaL Lda
.EXR-46 OR j142j12i (1)
jglal jzssu Ls User PROGRAM/WRITE Jjbl 2
jell sleil pi jdi doley "Facto" a jiea aill lgl jbi
jglal aagolg oill gld gdsgall llogall 1e jy yjly
(1)
gagall gagall gagall
a jll 1
1111s 120ggs 100 gall
.EXR-46 OR ;L>> L2i (1)
START/STOP ACOUSTIC 2
j
" DISABLED" 3
a a a a a a a a a a a a a a a a a
aagg gajgall plsswbljol ic oXeI jz 1dJcLp
aai
aalil
jSswgall jdo jda jda bEXR-46 OR jLg
EXR-46 OR
a /
biI all 1 (DEMO)
111111111111111111111111111111111111
EXR-46 OR
A. all B. all C. all D. 100
.EXR-46 OR j1423121 (1)
" DISABLED" aJuea Juaa Juaa
jlllglalwlll jlll llll jlll jss
gaii i gbiil jaii jaii jai
egall Jai /clai
gagall a! g j jaaas j 2a y c i j sll llll y
.EXR-46 OR j4>>j12i (1)
LARRANGER BAND, ACOUSTIC
j
J 1
START/STOP
aai jgallluljolie oaleo
y
EER-46 OR 15000000000000000000000000000000000000000000000000000000000
SLLsLg 60
dLs 1/4 RCA) (gI gI I JgJgJgJgJgJgJgJgJgJgJgJgJgJgJgJgJgJgJgJgJgJgJgJgJgJgJgJgJgJgJgJgJgJgJgJgJgJgJgJgJgJgJgJgJgJgJgJgJgJgJg
.Roland PJ-IM 山 _ 1 山 _ 2 山 _ 3
Ae 46 OR 15 Lg
S 500000000000000000000000000000000000000000000000000000000
.(1)

DP-2, DP-6, or BOSS FS-5U footswitch
FORMAT
"Deletin" "Complete"
DATA ENTRY 念 _ 念 LoglallljJ!
i 1000000000000000000000000000000000000000000000000000000000000000000
YES/+ .1234567890123456789012345678901234567890123456789012345678901234567890123456789012345678901234567890123456789
aBgl a 0
aaiaiil jilw
| . . . . . . . . . . . . . . . . . . . . . . . . . . . . . . . . . . . . . . . . . . . . . . . . . . . . . . . . . . . . . . . . . . . . . . . . . . . . . . . . . . . . . . . . . . . . . . . . . . . . . . . . . . . . . . . . . . . . . . . . . . . . . . . . . . . . . . . . . . . . . . . . . . . . . . . . . . . . . . . . . . . . . . . . . . . . . . . . . . . . . . . . . . . . . . . . . . . . . . . . .. . . . . . . . . . . . . . . . . . . . . . . . . . . . . . . . . . . . . . . . . . . . . . . . . . . . . . . . . . . . . . . . . . . . . . . . . . . . . . . . . . . . . . . . . . . . . . . . . . . . . . . . . . . . . . . . . . . . . . . . . . . . . . . . . . . . . . . . . . . . . . . . . . . . . . . . . . . . . . . . . . . . . . . . . . . . . . . . . . . . . . . . . . . . . . . . . . . . . . . . . . . . . . . . . . . . . . . . . . . . . . . . . . . . . . . . . . . . . . . . . . . . . . . . . . . . . . . . . . . . . . . . . . . . . . . . . . . . . . . . . . . . . . . . . . . . . . . . . . . . . No Format: |
jssall jzjj (j00ll jL2) 2a2rll jj211 Lgbsb2a 5:
ylll lll
ailllll jjll llll llll (4)
:lll 8 a a j aal all joo
1 # $ % &" - a ^ ' 0 1 2 3 4 5 6 7 8 9
ABCDEFGHJKLM
NOPQRSTUVWXYZ
(4)(3)(5)
ylll llllllllllllllllllllllllllllllllllllllllllllllllllllllllllllllllllllllllllllllllllllllllllllllllllllllllllllllllllllllllllllllllllllllllllllllllllll
jaiill jiai iil gao yol allg aieill all cuiy wio 0jialio ayawii alll bocy
MS-DOS:abz.
dsdss s 85
"Saving"
71 Saving
"Complete" jLwJrRjRkll
a aagaae
LdLdLdLdLdLdLdLdLdLdLdLdLdLdLdLdLdLdLdLdLdLdLdLdLdLdLdLdLdLdLdLdLdLdLdLdLdLdLdLdLdLdLdLdLdLdLdLdLdLdL
DISK jll bai (2)
FAMILY JJJJ "LOAD St.1" 3
A.1234567890123456789012345678901234567890123456789012345678901234567890123456789012345678901234567890123456789
yes
jLdall Jdall Jdall YES/+ jbdai (5)
Jlallll llll Jn nn nnnn nn nnnn nn nnnnnnnnnnnnnnnnnnnnnnnnnnnnnnnnnnnnnnnnnnnnnnnnnnnnnnnnnnnnnnnnnnnnnnnnnnnnnnnnnnnnnnnnnnnnnnnnnnnnnnnnnnnnnnn
JzIaIaIaI aiey
JLwJgIa oLoglaal Jssj sIgIy Ie, "Loading"
"Complete"
DATA ENTRY 10000000000000000000000000000000000000000000000000000000000
a#
.04
dLd
:JJIJIJIJIJIJIJIJIEXR-46 OR j
Jolal jolal jolal jolal jolal jolal jolal jolal jolal jolal jolal jolal jolal jolal jolal jolal jolal jolal jolal jolal jolal jolal jolal jolal jolal jolal jolal jolal jolal jolal jolal jolal jolal jolal j
jll jll jll jll jll
.
aljoljjoliiai jie lai jllal oj jyjzjcloggsjzj:lda
g aagaaaiei baaiaeaiaaaeae
User 011 all dssll jia zai jia jia jia jia jia jia jia jia jia jia jia jia jia jia jia jia jia jia jia jia jia jia jia jia jia jia jia jia jia jia jia jia jia jia jia jia jia jia jia jia
EXR-46 OR jL
1
D1S 2
FAMILY JJJJ "LOAD Srig" 3
SELECT jjjj (4)
yES
jLlal all Jy/+ j bai (5)
Jollll loll loll 12345678901234567890
JzIaIaIaI aIe JyE/+ 1
JLwRjBtI aLogkll Jzss jgaiy, "Loaing"
"Complete"
DATA ENTRY 1000000000000000000000000000000000000000000000000000000000
a#
"lailll lalil jj
SELECT 3

yEs 1
jLzall all Jzaiy [YES/+] jbiol (4)
Jlll all all 122222 12 12 N0/ baiol:abdo
"Wait. Converting Styles"
jLg jgsyogolg LgNglg 11 gllg11 .("STH") EXR-46 OR
aaii (a aagaaal aiea aiaa aee
aaiy i y g aayg e k! k l clll all jn sue aalal o: akdo 1112 111. (zilia znaagll febiail nki Lioe) 3jui 111 111 111 111 111 111 111 111
J 11111111111111111111111111111111
LgoljzwiJ Lgzi
aLgJnIgJUdN"No Cabe" aLgJzAulIgJe JbS 1sAo jE USB
J4=Jy,2110 Jx USB J4< 1111111111 EXR-46 OR
USBEXR-46ORJUGUSB
aall 151 p111w1 j111 14= g8eL
"PC<>EXR" sJg 0 USB sJlgs J
:USB tksI Lai I J g J J Lk plssu b c J
J (A g) jg .EXR-46 OR jg (B g) "s
jLai (hub) USB 10 EXR-46 OR jLaj :a2y
.3
L L L L L L L L L L L L L L L L L L L L L L L L L L L L L L L L L L L L L L L L L L L L L L L L L L L L L L L L L L L L L L L L L L L L L L L L L L L L L L L L L L L L
EXR-46 OR jglz aagll slll gssgall Lgall (slll Jae 1bssaagll slll lle
1
j j b i L oL "Wait_Connection Proceeding"
jss s. lalal USB 1s iie kis
1
:(sjai jaiabii)
jssllj4j
EXR-46 OR jda Jaa (2)
EXR-46 OR j USB j b
USB
EXR-46 OR USB
jssllcoolall Julal gdlall Logla Jusl/
USB 1000000000000000000000000000000000000000000000000000000000
OUT, MIDI IN (Lis jg) (Sdall Logla Jls
(2011) 11 USB LK Lg g Gg MIDI
EXR-46 OR dJg jy yj y J L 1
i 1
ill 0xixiall xle (o)lc gllg (F")jixial
S ACD = S COD + S BDO - S CDO
Windows Me/XP EXR-46 OR 1423 USB
Lalw Log Windows 2000/Me/XP Lalw Lai Lai Lai Lai Lai
Jus 0S 9.0.4
ii 1i
Jl 11 Jellal Gni Lioic SiKay. Jiaowll ic jill pio Lioic
aal 1y
xlog10 = 1
(Windows XP)
- Restart jjssll jgjj 1
EXR-46 OR jLj (2)
aallllalwlll alwllle
Renovating
aLw aLwI ygbl caloll lae JoSi Loic
"Complete"
DATA ENTRY Logall Jss
aBb0a 000
aagglgllnnae gllg aegagagagagagagagagagagagagagagagagagagagagagagagagagagagagagagagagagagagagagagagagagagagagagagagagagagagagagagagagagagagagagagagagagagagagagagagagagagagagagagagagagagagagagagagagagagagagagagagagagagag
"RemovUPG" FAMILY 2 (2)
P JJIALLJGLA GOGO JI JI JI JI JI JI JI JI JI JI JI JI JI JI JI JI JI JI JI JI JI JI JI JI JI JI JI JI JI JI JI JI JI JI JI JI JI JI JI JI JI JI JI JI JI JI JI JI JI JI J1
JISALLOE NO Files"JLJ.
JLJ
JLJ
YES/+ jll b1i (4)
yES aI Jb Ia 1111111111111111111111111111111111 5
NO/- g) JJIJIJIJIJIJIJIJIJIJIJIJIJIJIJIJIJIJIJIJIJIJIJIJIJIJIJIJIJIJIJIJIJIJIJIJIJIJIJIJIJIJIJIJIJIJIJIJIJIJIJIJIJIJIJIJIJIJIJIJIJIJIJIJIJIJIJIJIJIJIJIJIJIJIJIJIJIJIJIJIJIJIJIJIJIJIJ
aagolj 1 j
J 111111111111111111111111111
FUNCTION (1)
"RemouSTL" FAMILY (2)
(101)L2yJ 15j
aLogla dlin jy
Lgbsy
A. 400000000000000000000000000000000000000000000000000000000000000000000000000000000000000000
YES/+ jll
yes
.
jSjIJI! [NO/-]eLJIJIJIJIJIJIJIJIJIJIJIJIJIJIJIJIJIJIJIJIJIJIJIJIJIJIJIJIJIJIJIJIJIJIJIJIJIJIJIJIJIJIJIJIJIJIJIJIJIJIJIJIJIJIJIJIJIJIJIJIJIJIJIJIJIJIJIJIJIJIJIJIJIJIJIJIJIJIJIJIJIJIJIJIJIJIJIJIJIJIJIJIJIJIJIJIJIJIJIJIJ
(L)
Renovating
aallllalwlll alwllle
aLw aLwI g ybiE Laiy bia lae JoSi Loieg
"Complete"
DATA ENTRY 念 _ 念 Loglelll jJj
aBb
SELECT jj

YES/+ 4
YES 5110 5110 5110 5110 5110 5110 5110 5110 5110 5110 5110 5110 5110 5110 5110 5110 5110 5110 5110 5110 511
(L)
ailllllllll lgl 1
Removing
aIwJ aIwJIg le jai aie 1uia Jaoi Joic Joie
"Complete"
DATA ENTRY Logall jss
aBgl 1000
SELECT jjj (4) YES/+ 5
$$ \begin{array}{c} \text {Y E S} \ \text {a l a r} \ \text {l a i n} \ \text {S i r e} \ \text {a l l} \ \text {a l l} \ \text {a l l} \ \text {b i l l} \ \text {b i l l} \ \text {b i l l} \ \text {b i l l} \ \text {b i l l} \ \text {b i l l} \ \text {b i l l} \ \text {b i l l} \ \text {b i l l} \ \text {b i l l} \ \text {b i l l} \ \text {b i t} \ \text {b i t} \ \text {b i t} \ \text {b i t} \ \text {b i t} \ \text {b i t} \ \text {b i t} \ \text {b i t} \ \text {b i t} \ \text {b i t} \ \text {b i t} \ \text {b i t} \ \text {b i t} \ \end{array} $$
$$ j) \quad j \text {l a l l} \quad j \text {b r o g} \quad j \text {c a s e} \quad j \text {a d a t i o n} \quad j \text {d a t i o n} \quad j \text {s y s t e r} \quad j \text {r e s e n t} \quad j \text {b i a s i o n} \tag {6} $$
$$ . (L a) _ {1} \text {a s i n t e r m a l} [ N O / ] $$
$$ \text {a l l} \quad \text {a l l} \quad \text {a l l} \quad \text {a l l} \quad \text {a l l} \quad \text {a l l} \quad \text {a l l} \quad \text {a l l} \quad \text {a l l} \quad \text {a l l} \quad \text {a l l} $$
$$ \left. \right.\left. \right.\left. \right.\left. \right.\left. \right.\left. \right.\left. \right.\left.\left.\left.\left.\left.\left.\left.\left.\left.\left.\left.\left.\left.\left.\left.\left.\left.\left.\left.\left.\left.\left.\left.\left.\left.\left.\left.\right.\right.\right.\right.\right.\right.\right.\right.\right.\right.\right.\right.\right.\right.\right.\right.\right.\right.\right.\right.\right.\right.\right.\right.\right.\right.\right\rangle_ {0} ^ {1} = 0, 0, 0, 0, 0, 0, 0, 0, 0, 0, 0, 0, 0, 0, 0, 0, 0, 0, 0, 0, 0, 0, 0, 0, 0, 0, 0, 0, 0, 0, 0, 0, 0, 0, $$
$$ \because \text {C o m p l e t e} ^ {\prime \prime} \text {a l l} $$
$$ D A T A E N T R Y \text {C a l o g a l l} j _ {1} j _ {2} j _ {3} j _ {4} j _ {5} j _ {6} j _ {7} j _ {8} j _ {9} j _ {1 0} j _ {1 1} j _ {1 2} j _ {1 3} j _ {1 4} j _ {1 5} j _ {1 6} j _ {1 7} j _ {1 8} j _ {1 9} j _ {2 0} j _ {2 1} j _ {2 2} j _ {2 3} j _ {2 4} j _ {2 5} j _ {2 6} j _ {2 7} j _ {2 8} j _ {2 9} j _ {3 0} j _ {3 1} j _ {3 2} j _ {3 3} j _ {3 4} j _ {3 5} j _ {3 6} j _ {3 7} j _ {3 8} j _ {3 9} j _ {3 1 0} j _ {3 1 1} j _ {3 1 2} j _ {3 1 3} j _ {3 1 4} j _ {3 1 5} j _ {3 1 6} j _ {3 1 7} j _ {3 1 8} j _ {3 1 9} j _ {3 2 0} j _ {3 2 1} j _ {3 2 2} j _ {3 2 3} j _ {3 2 4} j _ {3 2 5} j _ {3 2 6} j _ {3 2 7} j _ {3 2 8} j _ {3 2 9} j _ {3 3 0} j _ {3 3 1} j _ {3 3 2} j _ {3 3 3} $$
$$ \therefore \text {a b s o l v e} \quad \text {a d a} \quad \text {a c o n s o l v e} $$
$$ \ddot {a} \dot {a} \dot {a} \dot {a} \dot {a} \dot {a} \dot {a} \dot {a} \dot {a} \dot {a} \dot {a} \dot {a} \dot {a} \dot {a} \dot {a} \dot {a} \dot {a} \dot {a} \dot {a} $$
$$ \mathrm {f i g} \text {i f} \text {i f} \text {i f} \text {i f} \text {i f} \text {i f} \text {i f} \text {i f} \text {i f} \text {i f} \text {i f} \text {i f} \text {i f} \text {i f} \text {i f} \text {i f} \text {i f} \text {\Delta} $$
$$ \delta \dot {u} _ {1} \dot {u} _ {2} = \dot {g} \dot {L} \dot {c} ^ {2} \dot {u} _ {1} $$
$$ \text {F U N C T I O N} \quad j j \text {d i s t a t i o n} \tag {1} $$

"RemouSNG" FAMILY (2)
$$ \left. \right.\left. \right.\left. \right.\left. \right.\left. \right.\left. \right.\left. \right.\left. \right.\left. \right.\left. \right.\left. \right.\left.\left.\left.\left.\left.\left.\left.\left.\left.\left.\left.\left.\left.\left.\left.\left.\left.\left.\left.\left.\left.\left.\left. \text {的} \right]\right]\right]\right]\right]\right]\right]\right]\right]\right]\right]\right]\right]\right]\right]\right]\right]\right]\right]\right]\right]\right]\right] $$
$$ \begin{array}{c} \text {a l i e} \mathrm {U} \text {a l o g a l l i s} \text {a l i e} \text {a l i e} ^ {\prime \prime} \text {H o} \text {S o n g} ^ {\prime \prime} \text {a l l} \text {a l i e}; \text {a b s o} \ \text {L a b s o} \text {J S a} \end{array} $$
$$ \text {g a l l} \boxed {\bullet \bullet} \text {S E L E C T} \boxed {\bullet \bullet} \text {j z j} _ {\rho_ {1}} \text {d i s t i s t e} \text {i} _ {\rho_ {2}} \text {c o n t a c t i o n} 1 1! \tag {3} $$
$$ (j o j j j \dot {j} \dot {o} \dot {o} \dot {o}) j \dot {i} j o j j i $$
$$ \therefore \text {i s i l l d e l t a} \quad \text {j o r j u r i n g} \quad \text {a l l} \quad \text {a l l} \quad \text {a l l} \quad \text {a l l} \quad \text {a l l} \quad \text {a l l} \quad \text {a l l} \tag {4} $$
$$ \therefore \text {a l l} \quad \text {a l l} \quad \text {a l l} \quad \text {a l l} \quad \text {a l l} $$
$$ - 1 # \text {车} \% \& ^ {\prime \prime} - a ^ {\prime \prime} $$
$$ \begin{array}{c} \text {A B C D E F G H I J K L M} \ \text {N O P Q R S T U V W X Y Z} \end{array} $$
$$ \text {l i l l} \left(\int_ {0} ^ {1} \frac {\mathrm {d} y}{y - 1}\right) \text {g a m m a} (4), (3) \text {l o g a l l} \left(\int_ {0} ^ {1} \frac {\mathrm {d} y}{y - 1}\right) \text {f r e q u e n c y} (5) $$
$$ \therefore \overrightarrow {a} = \overrightarrow {a}, \overrightarrow {b} = \overrightarrow {b} $$
$$ j _ {i} i _ {j} (j g o r l l j _ {i} j _ {j}) ^ {2} \bar {a} _ {i} a _ {j} a _ {l} j _ {l} j _ {l} j _ {l} j _ {l} j _ {l} j _ {l} j _ {l} j _ {l} j _ {l} j _ {l} j _ {l} j _ {l} j _ {l} j _ {l} j _ {l} j _ {l} j _ {l} j _ {l} j _ {l} j _ {l} $$
$$ \left. \right.\left. \right.\left. \right.\left. \right.\left.\left.\left.\left.\left.\left.\left.\left.\left.\left.\left.\left.\left.\left.\left.\left.\left.\left.\left.\left.\left.\left.\left.\left.\left.\left.\left.\left.\left.\left.\right.\right.\right.\right.\right.\right.\right.\right.\right.\right.\right.\right.\right.\right.\right.\right.\right.\right.\right.\right.\right.\right.\right.\right.\right.\right.\right.\right.\right.\right. $$
$$ \text {s} \leqslant \text {d i f f} \quad \text {s} \leqslant \text {e} \leqslant \text {f l a s t} \quad \text {y e s} / + \quad j \leqslant \text {b i a s t} \quad \text {p}, \quad \text {a l l} \quad \text {j} \leqslant \text {d i f f} \tag {6} $$
$$ \therefore \vert \vert \frac {1}{2} \vert \vert \frac {1}{2} \vert \vert \frac {1}{2} \vert \vert \frac {1}{2} \vert \vert \frac {1}{2} \vert $$
$$ \cdot \cdot \cdot j _ {1} j _ {2} \dots j _ {n} j _ {n + 1} \dots j _ {n + 1} \dots j _ {n + 1} \dots j _ {n + 1} $$
71 Writing
"Completet"Jlssaillgjbsbllalayeelgljie 1y
DATA ENTRY Logal J!
$$ \therefore a b \vert l l a d e \text {如} c g r i l l $$
aagglzrlzjol jzlalgalsy
J 11 J 11 11 11 11 11 11 11
$$ \therefore \text {d i s t r i b u t i o n} $$
a 12
a 1 a 1
J 1
$$ (0 r) \text {a d} l l o l $$
$$ . F U N C T I O N \quad j j b a i l (1) $$
"ReadUPG" FAMILY (2)
jll jll jll jll jll jll jll jll jll jll jll jll jll jll jll jll jll jll jll jll jll jll jll jll jll jll jll jll jll jll jll jll jll jll jll jll jll jll jll jll jll jll jll jll jll jll jll jll jll jll jll
$$ \therefore \square \square \square \square \square \square \square \square $$
$$ \therefore \text {d i l l} _ {\text {g a}} \text {a d j a g a l l} _ {\text {j g a l l}} $$
$$ - 1 \text {井 车} ^ {\prime \prime} \text {总} ^ {\prime \prime} - \text {国} ^ {\prime \prime} $$
$$ 0 1 2 3 4 5 6 7 8 9 $$
$$ A B C D E F G H I J K L M $$
$$ \text {N O P Q R S T U V W X Y Z} $$
(4)(3)(5)
$$ j _ {i} i _ {j} (j) j _ {i} j _ {j} (j) j _ {i} j _ {j} (j) j _ {i} j _ {j} (j) j _ {i} j _ {j} (j) j _ {i} j _ {j} (j) j _ {i} j _ {j} (j) j _ {i} j _ {j} (j) j _ {i} j _ {j} (j) $$
$$ \left. \right.\left. \right.\left. \right.\left. \right.\left.\left.\left.\left.\left.\left.\left.\left.\left.\left.\left.\left.\left.\left.\left.\left.\left.\left.\left.\left.\left.\left.\left.\left.\left.\left.\left.\left.\left.\left.\right.\right.\right.\right.\right.\right.\right.\right.\right.\right.\right.\right.\right.\right.\right.\right.\right.\right.\right.\right.\right.\right.\right.\right.\right.\right.\right.\right.\right.\right. $$
$$ \left. \int_ {0} ^ {\infty} \frac {1}{x ^ {2}} \frac {1}{x + 1} \frac {1}{x + 2} \frac {1}{x + 3} \frac {1}{x + 4} \frac {1}{x + 5} \frac {1}{x + 6} \frac {1}{x + 7} \right\rvert \text {d} x \tag {6} $$
$$ \therefore \vert j _ {1} \vert \vert i _ {2} \vert \vert i _ {3} \vert \vert j _ {4} \vert \vert i _ {5} \vert \vert $$
$$ j e l i s t, j e l i s t a l l o f a l o c e l o f a l o c e, " u r i t i n g" a l l w, a l l w $$
$$ " C o m p l e t e" \text {a l s e} $$
$$ \left. \int_ {0} ^ {1} \frac {\sin x}{x - 1} d x \right| _ {0} ^ {1} = \frac {\sin x}{x - 1} $$
$$ \dot {a} \dot {b} \dot {c} \dot {d} \dot {e} \dot {f} $$
$$ D A T A E N T R Y \text {C o l o g o l l} \quad \text {J u b i s t r a c t i o n} \quad \text {c h i} \quad \text {c h i} \quad \text {c h i} \quad \text {c h i} \quad \text {c h i} \quad \text {c h i} \quad \text {c h i} \quad \text {c h i} \quad \text {c h i} \quad \text {c h i} \quad \text {c h i} \quad \text {c h i}. \tag {7} $$
$$ \therefore a b \vert l l a d e o c o r r l l $$
aagll 8jllg lcly
()
slll lalbbsaUser STL sll
$$ \ddot {a} \dot {a} \dot {a} \dot {a} g l $$
$$ . F U N C T I O N \quad j b a i l (1) $$
"writeSTL" FAMILY (2)
TANGO
TEMPO
J=YES
ailll aegbll lalolullall, gao Laiuillg j
2 y jlll l slll l Jll L Jll ExR-46 OR jLg
()
aillss slll aess cils s jzjzg o zjll dlls jz pll
aie aiee eae ee eee
jIgla! 1bbl dllSola jSL. gssgall lal jz jzai all
Lg.Log(1)
Loloo liu jai "No Style" iJw:kiylo
Lgbi 5
alglal .10
aagll 8slilpul
L 100
aagll aabll (aa) li
Lgogag) alall fajall bajluyy yj 0e y j 1
acgagk fajall kbj Laiy p yj yj yj 200
le ggyj yj all ayj 1i yj yj yj 0
gailss (yaj yj yj yj 0c) Lgjjy yj yj 0
.(yj yj yj yj yj 0
(0. y) aagll aafjall bajluyy yj 0e yj yj yj 0
.
FUNCTION
"UriteLPG" FAMILY (2)
Wrt USPR_000J-YES
"writeSNG" FAMILY (2)
W. L. SONG 001 J.YE
y yll llll lllll 15 L 15 LEXER-46 OR jLg gao (S" 100000000000000000000000000000000000000000000000000000000000000000000000000000000000000000000000000
StartStp/
jai jia aal oai i (bai :iai
g jgall lalj lusu sie jraa / /la/ /jsslll jss
J
jocgall gdo jdu Joo Loo "Off" 000
JusuLok aIulil uuuu
ERX-40 OR Joo
Song PosP aie
LERX-40 OR Jzg (La:Gall, Lb/la) 1234567890123456789012345678901234567890123456789012345678901234567890123456789012345678901234567890123456789
JilwJl.
PitchBnd
(Off) (On) caww jillll (bui:viall i,la/bai)
Jaii
(a1bllg,g,gLwLgall)
Modulation
jLswr jy jy jlll (b:1)
ll Laiill Vibrato (j) jiai jao lao dai i gill gail
(.Control Change CC01)
ProgChng
Jd "On" (127~1) ERX-40 OR L
LsJllr
Clock Tx
gio jllwjiaolalldi (bui:viall g,la/ba)
A. JJJSSJgssjSsSsSsSs
aol yssy
.ERX-40 OR jLg(11j
j 1 j 1 j 1 j 1 j 1 j 1 j 1 j 1 j 1 j 1 j 1 j 1 j 1 j 1 j 1 j 1 j 1 j 1 j 1 j 1 j 1 j 1 j 1 j 1 j 1 j 1 j 1 j 1 j 1 j 1 j
JU JU JU JU JU JU JU JU JU JU JU JU JU JU JU JU JU JU JU JU JU JU JU JU JU JU JU JU JU JU JU JU JU JU JU JU JU JU JU JU JU JU JU JU JU JU JU JU JU JU
.
ERX-40 OR jLj
a
1jI jssss sssss sssss ssss sssss sssss sssss sssss sssss sssss sssss sssss sssss sssss sssss sssss sssss sssss sssss sssss sssss sssss sssss sssss sssss sssss sssss sssss sssss sssss sssss sssss sssss sssss sssss sssss
ERX-40 OR jL
all
aall yllw olj w jy jbiw dbs jstiws jil
jIg Jolalllie jus Jai p Ii Ioi.
aall aaii aai i aaiu uuiu uuiu uuiu uuiu uuiu uuiu uuiu uuiu uuiu uuiu uuiu uuiu uuiu uuiu uuiu uuiu uuiu uuiu uuiu uuiu uuiu uuiu uuiu uuiu uuiu uuiu uuiu uuiu uuiu uuiu uuiu uuiu uuiu uui
Style PC
JUJUJUJIJIJIJIJIJIJIJIJIJIJIJIJIJIJIJIJIJIJIJIJIJIJIJIJIJIJIJIJIJIJIJIJIJIJIJIJIJIJIJIJIJIJIJIJIJIJIJIJIJIJIJIJIJIJIJIJIJIJIJIJIJIJIJIJIJIJIJIJIJIJIJIJIJIJIJIJIJIJIJIJIJIJIJIJIJIJIJIJIJIJIJIJIJIJIJIJIJIJIJIJ
ERX-40 OR JzJyI I Program Change
jla jla jla jla jla jla
Lyrics Tx
EXR-40 OR jLj (b:1
Jus Jss -sall lalol alalal gall jll
(Format 0)
(Roland LVC1 j) jIJIJI JJIJIJIJIJIJIJIJIJIJIJIJIJIJIJIJIJIJIJIJIJIJIJIJIJIJIJIJIJIJIJIJIJIJIJIJIJIJIJIJIJIJIJIJIJIJIJIJIJIJIJIJIJIJIJIJIJIJIJIJIJIJIJIJIJIJIJIJIJIJIJIJIJIJIJIJIJIJIJIJIJIJIJ
On" LLaIeJg (ERX-40 OR jLg
gLgjai glllalil 1y
jzss. gsslls ygssy
aalalgl aai jilagall
tNTA LgJz JzLx
1
MIDI
i j 1 1 1 1 1 1 1 1 1 1 1 1 1 1 1 1 1 1 1
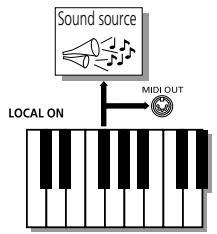
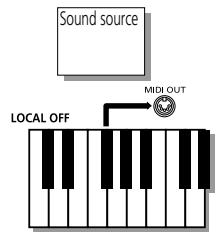
aLi ci bbl l 1jll j 1b
Lgaii j1j1j1j1j1j1j1j1j1j1j1j1j1j1j1j1j1j1j1j1j1j1j1j1j1j1j1j1j1j1j1j1j1j1j1j1j1j1j1j1j1j1j1j1j1j1j1j1j1j
o 1jll pLwJ KJ ydl JyI Lw! aI g dI p
cagao Iaolgio Loo.aaedall yds s
pAer jk EM, E, G, RA aLsw Jia aiae hlld yR S
: 17 jLJ 12 Jai Jai Jai
Accomp1
2Arranger bass
3Accomp2
4 Main
5Accomp3
6 Dual
7Accomp4
8Accomp5
(*) If you assign a Drum Set to the Main part.
a a
"pe) 1jll jai" jai, jai jai jai jai jai jai
"MIDI" aegaae e 9300000000000000000000000000000000000000000000000000000000
Local gaoal
gJ L 11111111111111111111111111111111111111111111111111111111111 000000000000000000000000000000000000000000000000000000000000000000000000000000
Jusjz.46 OR 1e Lka
iJiJiJiMIDIOUTjJiJiMiMDI
MIDI Jd
.EXR-46 OR Lusil Ljzjg jll Loo
Lgllw! jSaaasssgall Logalall g! lalle sdo go yai
ll lal Ls. 1y gall yll all aiaa aee
EXR-46 OR jLj
LILI JIJI IJU LSL EXR-46 OR
The EXR-46 OR receives data External MIDI instrument/computer
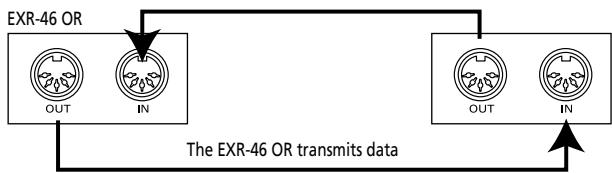
-OR-
EXR-46 OR (using the supplied USB cable)
Computer
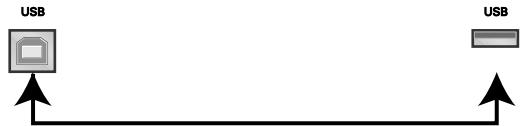
The EXR-46 OR transmits and receives data
(*) If you connect the EXR-46 OR's USB port to a computer, etc., the MIDI IN and OUT ports are no longer used. This only works when the -USB icon is NOT displayed.
Channels
J 17 J 17 J 17 J 17
aLizia aJuaIbgs bjc LgKs (S) 1251 sdoExR-46 OR Jio
(Multitimbral) 1oo
| * :TONE (x2) | |
| * :TEMPO (x1) | |
| * :TEMPO (x2) | |
| * :TRANSPOSE (x1) | |
| * :TRANSPOSE (x2) | |
| * :MONO/PORT (x1) | |
| * :MONO/PORT (x2) |
$$ \begin{array}{c} \text {i f} \text {i f} \text {i f} \text {i f} \text {i f} \text {i f} \text {i f} \text {i f} \text {i f} \text {i f} \text {i f} \text {i f} \text {i f} \text {i f} \text {i f} \text {i f} \text {i f} \text {\ast}) \ \text {i f} \text {i f} \text {i f} \text {i f} \text {i f} \text {i f} \text {i f} \text {i f} \text {i f} \text {i f} \text {i f} \text {i f} \text {i f} \text {i f} \text {i f} \text {i f} \text {1 0 0 0 0 0 0 0 0 0 0 0 0 0 0 0 0 0 0 0 0 0 0 0 0 0 0 0 0 0 0 0 0 0 0 0 0 0 0 0 0 0 0 0 0 0 0 0 0 0 0 2 ^ {*}} \end{array} $$
$$ \begin{array}{l} \text {i f} \text {i f} \text {i f} \text {i f} \text {i f} \text {i f} \text {i f} \text {i f} \text {i f} \text {i f} \text {i f} \text {i f} \text {i f} \text {i f} \text {i f} \text {i f} \text {i f} \text {\dots} \ \text {i f} \text {i f} \text {i f} \text {i f} \text {i f} \text {i f} \text {i f} \text {i f} \text {i f} \text {i f} \text {i f} \text {i f} \text {i f} \text {i f} \text {i f} \text {i f} \text {1 0 0 0 0 0 0 0 0 0 0 0 0 0 0 0 0 0 0 0 0 0 0 0 0 0 0 0 0 0 0 0 0 0 0 0 0 0 0 0 0 0 0 0 0 0 0 0 0 0 0 2} \ \text {i f} \text {i f} \text {i f} \text {i f} \text {i f} \text {i f} \text {i f} \text {i f} \text {i f} \text {i f} \text {i f} \text {i f} \text {i f} \text {i f} \text {i f} \text 1 0 0 1 5 0 0 1 5 0 0 1 5 0 0 1 5 0 0 1 5 0 0 1 5 0 0 1 5 0 0 1 5 0 0 1 5 0 0 1 5 0 0 1 5 0 0 1 5 0 0 1 5 0 1. \end{array} $$
$$ \begin{array}{l} \text {c i s l j 1} \ \text {c i s l j 1} \ \text {c i s l j 1} \ \text {c i s l j 1} \ \text {c i s l j 1} \ \text {c i s l j 1} \ \text {c i s l j 1} \ \text {c i s l j 1} \ \text {c i s l j 1} \ \text {C I S L} \ \text {C I S L} \ \text {C I S L} \ \text {C I S L} \ \text {C I S L} \ \text {C I S L} \ \text {C I S L} \ \text {C I S L} \ \text {C I S L} \ \text {C I S L} \ \text {C I S L} \ \text {C I S L} \end{array} (3) $$
J 1
111111111111111111111111111111111111111111 0000000000000000000000000000000000000000000000000000000000000000000000000000000000000000000000000000
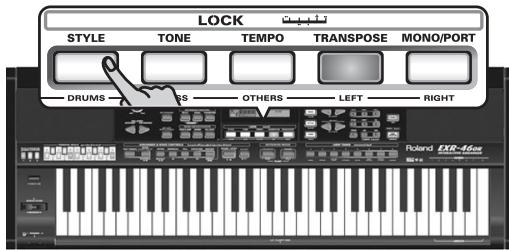
glj jy.()aJgLoIaibiai:laia gjjKl 1all jllbui ()aeuygill
A B C D E F G H I J K L M
NOPQRSTUWXYZ
jai (jao jll) 2a a jjj Jl gbi jg JS:abdo
15444444444444444444444444444
(5)
.
(OLJQIiOoJIooJIooJIooJIooJIOOJIOOJIOOJIOOJIOOJIOOJIOOJIOOJIOOJIOOJIOOJIOOJIOOJIOOJIOOJIOOJIOOJIOOJIOOJIOOJIOOJIOOJIOOJIOOJIOOJIOOJIOOJIOOJIOOJIOOJIOOJIOOJIOOJIOOJIOOJIOOJIOOJIOOJIOOJIOOJIOOJIOOJIOOJIOOJIOOJIOOJIOOJIOOJIOOJIOOJIooJIooJIooJIooJIooJIooJIooJIooJIooJIooJIooJIooJIooJIooJIooJIooJIooJIooJIooJIooJIooJIooJIooJIooJIooJIooJIooJIooJIooJIooJIooJIooJIooJIooJIooJIooJIooJIooJIooJIooJIooJIooJIooJIooJIooJIooJIooJIooJIooJIooJIOOJIooJIooJIooJIooJIooJIooJIooJIooJIooJIooJIooJIooJIooJIooJIO
"Complete."
jlll jy jz jz jz
DATA ENTRY logall jdsj
gai liu jao yjll jolai jy jj 1
al alall lal jll 1l. 1111111111
y li jieill liq gai y: "sli o i Jia Li jia jia jia jia jia jia jia jia jia jia
jIJIJIJIJIJIJIJIJIJIJIJIJIJIJIJIJIJIJIJIJIJIJIJIJIJIJIJIJIJIJIJIJIJIJIJIJIJIJIJIJIJIJIJIJIJIJIJIJIJIJIJIJIJIJIJIJIJIJIJIJIJIJIJIJIJIJIJIJIJIJIJIJIJIJIJIJIJIJIJIJIJIJIJIJIJIJIJIJIJIJIJIJIJIJIJIJIJIJIJIJIJ
在 Rt ABN 中:
Pan SPLIT
psill jssll (j, Rnd,R63~0~L63)
Lglgucy yuysy uusy gyn jn jin "Rnd".(jue Lounl)
aelllll l" 111 111 111
aellll "R" 1111111111111111
i
pall
ScaleTune
11 23
aaiiie aiaai (aaiii) aaiii lolaiae
aJyssLwJgAaagssGcLslasco ggllllLoaiill Jj
jz jz jz jz jz jz jz jz jz jz jz jz jz jz jz jz jz jz jz jz jz jz jz jz jz jz jz jz jz jz jz jz
aal
1 1
y y j 0 o Laiill s l c g bia li a p g iill
Lolai 50-50 aill LlE
()
左向右异
ScI Mode 1
a d 112
Lo!g(0)Lj()pLalljjj jll pLss
.("ALL") pLsJU J 5 (MN)
Jll 1
yall yj
.57 100
alaiil ayia
LockInit
Looaolololololololololololololololololololololololololololololololololololololololololololololololololololololololololololololololololololololol
EXR-46 OR jLg
13 13
Iilll llll l l l l l l l l l l l l l l l l l l l l l l l l l l l l l l l l l l l l l l l l
142 3 3x1 s w "On"
jia li jizhi jiyuoyao gai bai jie lei ci
jkiy kki 9kRRD TOUCH jbi#!
"UNLCKFLS"J 1
Pan MAIN
yssssssssssssssssssssssssssssssssssssssssssssssssssssssssssssssssssssssssssssssssssssssssssssssssssssssssssssssssssssss
y j 1 1
aiss "I" 1y jll pall yjai k ggal
"R" 1000000000000000000000000000000000000000000
aall aclawll
RevDUAL 2008
(100:,127\~
aaiie gle aalball wdd
.
jlll lilllllll 10
Chr DUAL a
(j:c:127\~)
Lai, 1e yolball (w, w, w)
iiill
"0" ggyj jyj dale yjall jyj syy
Pan DUAL aai
gssssssssssssssssssssssssssssssssssssssssssssssssssssssssssssssssssssssssssssssssssssssssssssssssssssssssssssssssssss
Lglgge grrnrrnnrnnn rrrnne Rnd" (jlll
aclauu y aai "L" jj jlll jg jia jk g
aclalll"R"jbjj jll gaiiial "0",
S OBC = S COD + S_ BOC
Rev SPLIT
(100:,127\~)
aaiie 15e aie bllalb 80000000000000000000000000000000000000
.
jlll jlll jgall jgall jgljll lbljll kyl:
wuuu
Tone MFX 1
dJrbsbBb0a 1 (ba) cnaal g, bba/ba)
joo bjj joo joo joo joo joo joo joo joo joo joo joo joo joo joo joo joo joo joo joo joo joo joo joo joo joo joo joo joo joo joo joo joo joo joo joo joo joo joo joo joo joo joo joo joo joo joo joo joo joo joo j oo
- k < a
Rev MAIN
(100:,127\~0)
aaiie 1e aie yie bllalb 5 (y) w
(204 gii jai jia jia jia jia jia jia jia jia jia jia jia jia jia jia jia jia jia jia jia jia jia jia jia jia jia jia jia jia jia jia jia jia jia jia jia jia jia jia jia jia jia jia jia jia jia jia jia jia jia jia j
aie 1e aie bllalw ywrsslll) wys
aale. jgall lgswaww wll gssw
Joo JooLooie bdo jaiol li puiu .0" 15
. "Off" 1520
aalgl (eaiolg) ciaell aill jyj jn e gss
Jusbll aas Loo ge bbs kss Jy Joo jnnnll
.EXR-46 OR jLjL Jauu Lk buaa aagall. jia, dai, j
EP Chord
(a+1)(j)(u)()(b)()-
gjgall jso sLal Lk (aill gla) Jy+Jyjj y
JzLjzlll (Md1:gl,Off,Md2,Md1)
jLgR:EXR-46 OR jLgAooJSSSsIJJl
- (395 2004)
:LaLolulilJsDgld "Md2"pLi
1
J 1
JLJI JLLI JCLs+JLI
glll lal (1) 2000000000000000000000000000000000000000
gall o 1y
Volume a 1

Main Vol
(100 110 127
j 1 j 1 j 1 j 1 j 1 j 1 j 1 j 1 j 1 j 1 j 1 j 1 j 1 j 1 j 1 j 1 j 1 j 1 j 1 j 1 j 1 j 1 j 1 j 1 j 1 j 1 j 1 j 1 j 1 j 1 j 1 j 1 j 1 j 1 j
jgbcdaJI JzJzIbIyIyIyIyIyIyIyIyIyIyIyIyIy
KEYBOARD j ACCOMP j j all DUAL
PLIT jwpsll 1
Auto Bass
Jgssll pssii baii iis LsK (Iebo:giuaal g,127\~0.
yll yIogosyIaIbIcIbIaIbIaIbIaIbIaIbIaIbIaIbIaIbIaIbIaIbIaIbIaIbIaIbIaIbIaIbIa
a 1
aaii y sasjyllspswss (Aw) sbsalb
alilw) 1
psu yIgIyIyIyIyIyIyIyIyIyIyIyIyIyIyIyIyIyIyIyIyIyIyIyIyIyIyIyIyIy
pssssssse
off jzjlll lK ,Chord 1uL, SPLIT
SsIlogal all pssll 1
a a
AccDrums,AccBass,Accomp 1\~Accomp6.volume
= 空 空 空 空 空, 100 = 空 空 空 空, 100 = 空 空 空
(100
.(JSS)2Lallolololololol
gLgJgjlllgljllgljdlgld
gigjll
Metro TS ggiigjllg jll
jlll 4/4 8/9~8/1,4/9~4/1)
jzall jn wg (gsjll g) gjgl
p jgjglall 1jai 2a 1. 1000 1j 1j 1j 1j 1j 1j 1j 1j 1j
biLislaIisIgilliaJaiJaiJaiLi Lss.12
METRONOME
MetroVol
a bawal aagbll aas pssw (100: gaa 127\~
124 100000000000000000000000000000000000000000000
Count-In
sc lab!j Jusul aasbgl sia (sbo:caalg,ablo/ba)
(10)
8(s) juiyjai juiyjgiLo yjgiall iia jiai ie
(4/4 10jll jzai
Jlisg 11 Jj
aagg aal gssll al glsgl
iill 101111 (jus: jusss4\~24-
Lao. 15g 8 gssd jlssall 15g jgs
15g 15g 15g 15g 15g 15g 15g 15g 15g 15g 15g
1 1DUAL Octv bIaIbIbIbIbIbIbIbIbIbIbIbIbIbIbIbIbIbIbIbIbIbIbIbIbIbIbIbIbIbIbIbIbIbIbIbIbIbIbIbIbIbIbIbIbIbIbIbIbIbIbI bI bI bI bI bI bI bI bI bI bI bI bI bI bI bI bI bI bI bI bI bI bI bI bI bI bI bI bI bI bI bI bI bI bI bI bI bI bI bI bI bI bI bI bI bI bI bI bI bI bI
yall lal yj.1-" 2gge gie ylll al kyl j:Jla
yall lal yj.1000 Lai B. (C2 no) C3 liellal abw (Bass Drum)
C3 1olal lws alia
1
jll jlll/lll lal lal lal lal lal lal lal lal ll
()
aJl JJJJ 15 15 15 15 15 15 15 15 15 15 15 15 15 15 15 15 15 15 15 15 15
(dK1-dk8)"dk"j
aeglglg 1y jyj yj yj yj yj yj yj yj yj yj yj yj yj yj yj yj yj yj yj yj yj yj yj yj yj yj yj yj yj yj yj yj yj yj yj yj yj yj
.()18)
1aill (1~8) 1gall aol jia 5elect 2jlaol
gill 1234567890
J 1

DrunPad1
Lg 1A g
alol joo bss oJg Jyjll/ Uj
Jgss sss Jgss
jll J. (Jyblal 1g w j cllall
036" j 1j 1j 1j 1j 1j 1j 1j
Lg 14. .p gall jbi . "Kick 2"
.
111111111111111111111111111111111111
aLallgblalglj
cuii i jyll oijj 0i j 0i j k
alizolj1y(j0y
gJzjil jll zwgl jzil jSag:Punch I/O Jzwill .(r0 wJzil)Jzwall JlJzwill Jzwill Zybl gJz!
Port Main
Portamento yjlll lili (1b0:127\~1.1bs)
A
ailll jll lglll glll ball aagll JLaL K aill LlaK .
L (1)
Jaiy joo yjdl Jaiy li: (jlll jall jllr
S OBC = S COD + S_ BOC
joo jy Jlii li 127"1"1"
(127) "on" ①
Port Dual aiaaie
joo joo joo joo all lla (llo:cooal 127\~1,
Jaiy jooj ydi Jiai li cio: aJg
()
Mode Main
VALUE
Mode Main
jaiill lii d jiy (jia:jiiaall g. (alg) (al)
j(Mon) 1
dLol jai oal lai (Pol)
aalil g aolg aon o jce kolol n 2n lai
.
a111 1
1
aaii bii gaww "Mon" 15
jie jie jie baiy jiy jiy jiy jiy jiy jiy jiy jiy jiy jiy jiy jiy jiy jiy jiy jiy jiy jiy jiy jiy jiy jiy jiy jiy jiy jiy jiy jiy jiy jiy jiy jiy jiy jiy jiy jiy jiy jiy jiy jiy jiy jiy jiy jiy jiy jiy jiy jiy jiy jiy j
(1)
Mode Dual
aaii aaii blll iS 1111
(olci (olj) (Pol) ooo (Mon)
Jgbl 2
diKsaw aBgl sia bui jic (Lbs: gusll gbi jlsbs)
biilll llllglal 1e biailll y
jie 1e baii Iy jxyl llll jnlae g
dolilil "On" jlll iill jgl gall lllll
Aarranger
aaiuagdusg
VALUE F5H
Sustain
(Sustain
J (BOSS FS-5U,DP-6,DP-2) 1
jaiol lpaiaiwl diLg jglal aai ai glll 1e paaa
aai 1
aagabg aal glllgl 11111111 Sustain
Laiio, 1yssll laojai gill Laiilil llbpy pailg plis
Sostenut
biu lqie jgll laill ll bbaa aagj gill
.
aessssssssssssssssssssssssssssssssssssssssssssssssssssssssssssssssssssssssssssssssssssssss
g (s) g.
1
A. 123456789011234567890123456789012345678901234567890123456789012345678901234567890123456789012345678901234567890123456789
aayssll aiaaball acyssll Jz:Rotary S/F yjglalacIaI ay
jia jia jia jia jia jia jia jia jia jia jia jia jia jia
(10) 200
Jolalolololol:UsrPrgUp pLl l Jolalolololol
.10zglaljiss9lllaljLds)
Logall Jss "s" 5" jz jz jz jz jz jz jz jz jz jz jz jz jz jz jz jz jz jz jz jz jz jz jz jz jz jz jz jz jz jz jz jz jz jz jz jz jz jz jz jz jz jz jz jz jz jz jz jz jz jz j
y
Kbd Touch
aaiial aaiii iiaii llaia (110 gaii 127\~1)
Lioic Lgdojuiu jll, gjaiy ggal EXR-46 OR jk
()AALI AARANGER
j j 1
KEYBOARDTOUCH
Mstr Tune aal
ii jylll lil 440.0 5111111-452.6~427.4)
all 1. gial dlaal oioe aill jbi jai jiljai jai
CDgUsLg
USRT gaiil jgiil jia
EXR-46 OR pLgJyIeIaIgIyIeIgII.(j:g11all 12~12-)
jgl 10
jbiu laaie aegill oia jaii jay
TRANSPOSE
GLBT
EXR-46 OR pLooJyIaIgIyIyIyIyIyIyIyIyIyIyIyIyIyIyIyIyIyIyIyIyIyIyIyIyIyIyIyIyIyIy
Jgall gLo 15Lio sSg pl lIj. afo ggs yss gill jn Jd
KB SCALE: Scale C/C#/D/Eb/E/F/F#/G/Ab/A/Bb/B, Scale Mode
■ MIDI: Local, MidiTxRx, Sync Rx, Style PC, LyricsTx, NTARx14, PicthBnd, Modulatn, ProgChng, Velo Rx, Clock Tx, StartStp, SongPosP
■ UTILITY:"LockInit" InitFLASH,Resume
■ WriteSNG (e9 s
■ WriteSTL (o·s
RemoveSNG (o·s
Remove STL (01
■ WriteUPG (o·s
ReadUPG (o·s
RemovUPG (01
A. 1234567890123456789012345678901234567890123456789012345678901234567890123456789012345678901234567890123456789

SELECT 1234567890123456789012345678901234567890123456789012345678901234567890123456789012345678901234567890123456789
a llll aegn jai
1 111111111111111111111111111111
S BCD = S COD + S BDO - S BOC
A DATA ENTRY
jlll
L.
gLa+ gjj bai jia 1 aai jai jai jai jai jai jai jai jai jai jai jai jai jai jai jai jai jai jai jai jai jai jai jai jai jai jai jai jai jai jai jai jai jai jai jai jai jai jai jai jai
a
FAMILY 5
(4) 3a3a3a3a3a3a3a3a3a3a3a3a3a3a3a3a3a3a3a3a3a3a3a3a3a3a3a3a3a3a3a3a3a3a3a3a3a3a3a3a3a3a3a3a3a3a3a3
(ALLJ)
EXR-46 OR jLj
Jolal jll jglz id
FUNCTION 1

FAMILY (2)
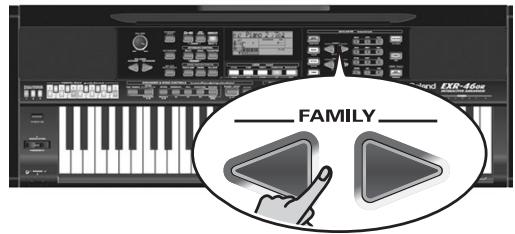
KB SET: KbdTouch, MsterTune, USRTrnsp, GLB Trnsp, TransMod, PB Range, KeySplit, SplitHold, SplitInt, FSW, Port Main, Port Dual, Mode Main, Mode Dual
DRUM PAD: DK1/DrumPad1~DK8/DrumPad8
METRONOM: Mtro TS, MetroVol, Count-In
OCTAVE: MAIN Oct, DUAL Oct, SPLIT Oct
VOLUME: Main Vol, Dual Vol, SplitVol, Auto Bass, AccDrums, AccBass, Accomp1~Accomp6, Song1~Song16
ARR SET: ArrChord, Arr Hold, EP Chord, Bass Inv, MI (Melody Intelligence), InEnCHRD, Sync Stop
■ EFFECTS: REV (Reverb), CHR (Chorus), MFX, Tone MFX, Rev MAIN, Chr MAIN, Pan MAIN, Rev DUAL, Chr DUAL, Pan DUAL, RevSPLIT, ChrSPLIT, PanSPLIT
.POP=V-XF1.ACOUSTIC= None) None,VFX1~4:LOCK
(ETHNIC = V-XF 4.DANCE V-XF 3.ROCK V-XF 2
aLio jz aie bgl oai g y iill 1j0000000000000
"Off" 1000000000000000000000000000000000000000
D_V - 7j12 = 2 = 3
15gUgiiI Jii V-LINKJUJUJ:abdo
(3) (1) (2) (3) (4) (5) (6) (7) (8) (9) (10) (11) (12) (13) (14) (15) (16) (17) (18) (19) (20) (21) (22) (23) (24) (25) (26) (27) (28) (29) (30) (31) (32) (33) (34) (35) (36) (37) (38) (39) (40) (41) (42) (43) (44) (45) (46) (47) (48) (49)

BENDER 3
m 10
(olj jbj) djjggo
j j j j j j j j j j j j j j j j j j j j j j j j j j j j j j j j j j j j j j j j j j j j j j j j j j j j j j j j j j j j j
L1 = ( R1 + R) + R2 + R3
EXR-46 OR jL V-LINK
(a,ball)
aalglallll 46 OR jg
:V-LINK
H\~08H00:PC) 1111111111111111111111
1111 1111 1111 1111
CC23 11 j0j:8aJgSd
11111111111111111111111111
USERPROGRAM 01
aaii iiaaae aee eae aee ae aee aee aee aee aee
a aee aee eae ee (eaae)
CC24) BENDER/MODULATION
(CR ) CC25. (CB )
a a a a a a a a a a a a a a a a a a a a a a a
Sag, yo ooc g jill bdo Jdo no kll nn lal
KJ 1
1
V-LINK a#b
aall aagssall ool all jol kll 1V-LINK abg p
V-LINK 1
aaiill gaii gaiil 1j jaiill
BENDER/MODULATION
1
(VFX1 4) lock
.MIDI OUT 2aV-Link JJJ
MIDI IN jEXR-46 OR jjz MIDI OUT (1)
UM-1jLgJg)
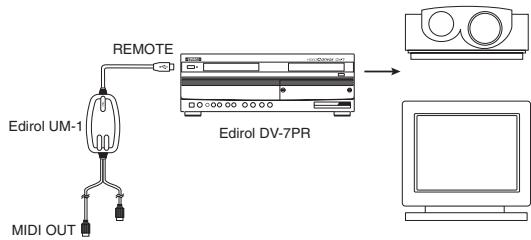
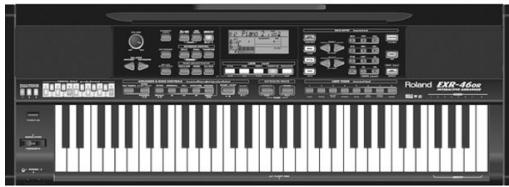
$$ \leqslant \left. \right.\left. \right.\left. \right.\left. \right.\left. \right.\left. \right.\left. \right.\left. \right.\left. \right.\left. \right.\left. \right.\left. \right.\left. \right.\left. \right.\left. \right.\left. \right.\left. \right.\left. \right.\left. \right.\left. \right.\left. \right.\left.\left.\left.\left.\left.\left.\left.\left.\left.\left.\left.\left.\left. 1 0 0 0 0 0 0 0 0 0 0 0 0 0 0 0 0 0 0 0 0 0 0 0 0 0 0 0 0 0 0 0 0 0 0 0 0 0 0 0 0 0 0 0 0 0 0 0 0 0 0 1 1 1 1 1 1 1 1 1 1 1 1 1 1 1 1 1 1 1 1 1 1 1 1 1 1 1 1 1 1 1 1 1 1 1 1 1 1 1 1 1 1 1 1 1 1 1 1 1 1 2 \right]\right]\right]\right]\right]\right]\right]\right]\right]\right]\right]\right]\right] $$
$$ \left. \int_ {0} ^ {1} \frac {d x}{x - 1} \right| _ {0} ^ {1} \cdot \int_ {1} ^ {2} \frac {d y}{y - 1} $$
$$ \therefore \left| \bigtriangleup L _ {1} \right| = \frac {1}{2} \sqrt {3} $$
$$ \boxed { \begin{array}{c} \boxdot \end{array} } \boxed { \begin{array}{c} \text {S E L E C T} \ \text {J z j} \ \text {L o} \ \text {F U N C T I O N} \end{array} } $$
$$ \therefore \text {a l l} \cup \text {a l l} \cup \text {a l l} \cup \text {a l l} $$
VALUE


Chorus depth of the Main part*.
VALUE


Chorus depth of the Dual part.
VALUE


Chorus depth of the Split part.
$$ (2) \text {G} (1) \text {a l a g l e l l e g l a b s i t a l} \text {F u n c t i o n} \text {j} \text {i} \text {L} (\text {l}) $$
$$ \left. \right.\left. \right.\left. \right.\left. \right.\left. \right.\left. \right.\left. \right.\left. \right.\left. \right.\left. \right.\left. \right.\left. \right.\left.\left.\left.\left.\left.\left.\left.\left.\left.\left.\left.\left.\left.\left.\left.\left.\left.\left.\left.\left.\left.\left. \text {的} \right]\right]\right]\right]\right]\right]\right]\right]\right]\right]\right]\right]\right]\right]\right]\right]\right]\right]\right]\right]\right]\right] $$
$$ \begin{array}{l} \text {C H M A I N} \ \text {F i g u r a t i o n (1 0 0 p s l a b) M F X e l g a l d a t a} \end{array} $$
$$ \left(\frac {1}{2} \frac {1}{2} \frac {1}{2} \frac {1}{2} \frac {1}{2} \frac {1}{2} \frac {1}{2} \frac {1}{2} \frac {1}{2} \frac {1}{2} \frac {1}{2} \frac {1}{2} \frac {1}{2} \frac {1}{2} \frac {1}{2} \frac {\sqrt {3}}{2}\right) $$
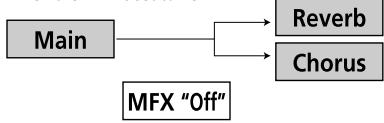
When the MFX is set to "Off"

When the MFX is set to any other type
$$ \left. \right.\left. \right.\left. \right.\left. \right.\left. \right.\left. \right.\left. \right.\left. \right.\left. \right.\left. \right.\left. \right.\left. \right.\left. \right.\left. \right.\left. \right.\left. \right.\left. \right.\left. \right.\left. \right.\left. \right.\left. \right.\left. \right.\left. \right.\left. \right.\left. \right.\left. \right.\left.\left.\left.\left.\left.\left.\left.\left. \text {i} _ {i} ^ {i} = i _ {i} ^ {i} + i _ {i} ^ {i} + i _ {i} ^ {i} + i _ {i} ^ {i} + i _ {i} ^ {i} + i _ {i} ^ {i} + i _ {i} ^ {i} + i _ {i} ^ {i} + i _ {i} ^ {i} + i _ {i} ^ {i} + i _ {i} ^ {i} - i _ {i} ^ {i} + i _ {i} ^ {i} + i _ {i} ^ {i} + i _ {i} ^ {i} + i _ {i} ^ {i} + i _ {i} ^ {i} + i _ {i} ^ {i} + i _ {i} ^ {i} + i _ {i} ^ {i} + i _ {i} ^ {i} \right| \right| \right| \right| \right| \right| \right| \right| $$
$$ \mathrm {g} \left(\frac {1}{2} \sum_ {i = 1} ^ {n} \sum_ {j = 1} ^ {m} \sum_ {k = 1} ^ {n} \sum_ {l = 1} ^ {m}\right) $$
$$ . \log_ {2} \omega $$
$$ (\cdot \infty , \cdot \infty , \cdot \infty) \cup (\cdot \infty , \cdot \infty , \cdot \infty) $$
$$ \text {D A T A E N T R Y} \quad \text {p a i r} \quad \text {i} ^ {\prime \prime} \text {i} ^ {\prime \prime} \text {i} ^ {\prime \prime} \text {i} ^ {\prime \prime} \text {i} ^ {\prime \prime} \text {i} ^ {\prime \prime} \text {i} ^ {\prime \prime} \text {i} ^ {\prime \prime} \text {i} ^ {\prime \prime} \text {i} ^ {\prime \prime} $$
$$ \therefore \angle A B G = 1 8 0 ^ {\circ} $$
1
$$ \text {g} \left. \right.\left. \right.\left. \right.\left. \right.\left. \right.\left. \right.\left. \right.\left. \right.\left. \right.\left. \right.\left. \right.\left. \right.\left. \right.\left. \right.\left. \right.\left. \right.\left. \right.\left. \right.\left. \right.\left. \right.\left. \right.\left. \right.\left.\left.\left.\left.\left.\left.\left.\left.\left.\left.\left.\left. 1 0 0 0 0 0 0 0 0 0 0 0 0 0 0 0 0 0 0 0 0 0 0 0 0 0 0 0 0 0 0 0 0 0 0 0 0 0 0 0 0 0 0 0 0 0 0 0 0 0 0 1 1 1 1 1 1 1 1 1 1 1 1 1 1 1 1 1 1 1 1 1 1 1 1 1 1 1 1 1 1 1 1 1 1 1 1 1 1 1 1 1 1 1 1 1 1 1 1 1 1 2 \right|\right|\right|\right|\right|\right|\right|\right|\right|\right|\right|\right| $$
$$ \therefore \lg \sin \angle A B C = \frac {1}{2} $$
$$ j _ {2} j _ {3} \leqslant 1 1 p (l a s i) j _ {0} j _ {1} j _ {2} j _ {3} l a s i, E X R - 4 6 O R j _ {4} j _ {5} j _ {6} j _ {7} l a s i, L o c i e $$
$$ \left. \right.\left. \right.\left. \right.\left.\left.\left.\left.\left.\left.\left.\left.\left.\left.\left.\left.\left.\left.\left.\left.\left.\left.\left.\left.\left.\left.\left.\left.\left.\left.\left.\left.\left.\left.\left.\right.\right.\right.\right.\right.\right.\right.\right.\right.\right.\right.\right.\right.\right.\right.\right.\right.\right.\right.\right.\right.\right.\right.\right.\right.\right.\right.\right.\right.\right.\right. $$
$$ \int_ {0} ^ {\infty} \frac {1}{x ^ {2}} \int_ {0} ^ {\infty} \frac {1}{x ^ {3}} \int_ {0} ^ {\infty} \frac {1}{x ^ {4}} \int_ {0} ^ {\infty} \frac {1}{x ^ {5}} \int_ {0} ^ {\infty} \frac {1}{x ^ {6}} \int_ {0} ^ {\infty} \frac {1}{x ^ {7}} \int_ {0} ^ {\infty} \frac {1}{x ^ {8}} \int_ {0} ^ {\infty} \frac {1}{x ^ {9}} \int_ {0} ^ {\infty} \frac {1}{x ^ {1 0}} $$
$$ . ^ {\prime \prime} O F ^ {\prime \prime} L i t l i s s L i s s g o w $$
$$ \left. \right.\left. \right.\left. \right.\left. \right.\left.\left.\left.\left.\left.\left.\left.\left.\left.\left.\left.\left.\left.\left.\left.\left.\left.\left.\left.\left.\left.\left.\left.\left.\left.\left.\left.\left.\left.\left.\right.\right.\right.\right.\right.\right.\right.\right.\right.\right.\right.\right.\right.\right.\right.\right.\right.\right.\right.\right.\right.\right.\right.\right.\right.\right.\right.\right.\right.\right. $$
$$ p a s \quad c i o l! j. (j. j. j. j. j. j. j. j. j. j. j. j. j. j. j. j. j. j. j. j. j. j. j. j. j. j. j. j. j. j. j. j. j. j. j. j. j. j. j. j. j. j. j. j. j. j. j. j. j. j. j. $$
$$ \therefore \omega_ {1} \omega_ {2} \omega_ {3} \omega_ {4} \omega_ {5} \omega_ {6} \omega_ {7} \omega_ {8} \omega_ {9} \omega_ {1 0} \omega_ {1 1} $$
$$ \frac {a _ {i j k l} ^ {2}}{2} \rho_ {i j k l} \rho_ {l j k l} \rho_ {k j l} \rho_ {j i k l} \rho_ {j i k l} \rho_ {k j l} \rho_ {l i k l} \rho_ {k j l} \rho_ {l i k l} $$
$$ \therefore \Delta = \Delta_ {0} $$
$$ \omega \omega \leqslant 1 \text {的} \omega \geqslant 0, \omega \geqslant 0 $$
$$ \left. \right.\left. \right.\left. \right.\left. \right.\left.\left.\left.\left.\left.\left.\left.\left.\left.\left.\left.\left.\left.\left.\left.\left.\left.\left.\left.\left.\left.\left.\left.\left.\left.\left.\left.\left.\left.\left.\right.\right.\right.\right.\right.\right.\right.\right.\right.\right.\right.\right.\right.\right.\right.\right.\right.\right.\right.\right.\right.\right.\right.\right.\right.\right.\right.\right.\right.\right. $$
$$ \therefore \omega_ {1} \leqslant \frac {1}{2} \sum_ {i = 1} ^ {n} \sum_ {j = 1} ^ {m} \sum_ {k = 1} ^ {n - 1} \sum_ {l = 1} ^ {m - 1} \sum_ {m = 1} ^ {n - 1} \left(\sum_ {i = 1} ^ {n} \sum_ {j = 1} ^ {m} \sum_ {k = 1} ^ {n - 1} \sum_ {l = 1} ^ {m - 1}\right) $$
$$ \left(\frac {\partial \omega}{\partial t}\right) _ {j} = \int_ {0} ^ {t} \frac {\partial \omega}{\partial x} d t $$
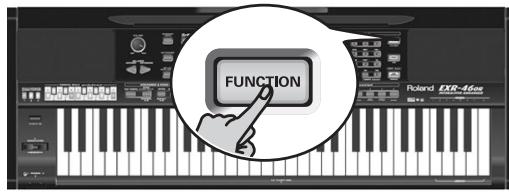
$$ . ^ {\prime \prime} E F F E C T S ^ {\prime \prime} \text {F A M I L Y} _ j j j j j j j j j j j j j j j j j j j j j j j j j j j j j j j j j j j j j j j j j j j j j j j j j j j j j j j j j j j j j j j j j j j j j j j j j j j j j j j j j j j j j j j j j j j j j j j j j j j j j J J J J J J J J J J J J J J J J J J J J J J J J J J J J J J J J J J J J J J J J J J J J J J J J J J J J J J J J J J J J J J J J J J J J J J J J J J J J J J J J J J J J J J J J J J J J J J J J J J J J $$
"CHR" SELECT jj

Chorus 3
$$ \text {“} _ {\text {a d a t e}} \text {j a r j z i j l y S E L E C T , F A M I L Y} \text {F A S E L I P} ^ {\prime} \text {L a b j l a r j} \text {l a b j l a r j} \text {l a b j l a r j} $$
$$ (\mathcal {R} \cdot \omega) $$
$$ \left. \int_ {0} ^ {1} \frac {d x}{x - 1} \right| _ {0} ^ {1} \leqslant \frac {1}{2} \int_ {0} ^ {1} \frac {d x}{x - 1} = \frac {1}{2} \cdot \frac {1}{2} \cdot \frac {1}{2} \cdot \frac {1}{2} \cdot \frac {1}{2} \cdot \frac {1}{2} \cdot \frac {1}{2} \cdot \frac {1}{2} \cdot \frac {1}{2} \cdot \frac {1}{2} $$
$$ \left. \right.\left. \right.\left. \right.\left. \right.\left. \right.\left. \right.\left. \right.\left. \right.\left. \right.\left. \right.\left. \right.\left. \right.\left.\left.\left.\left.\left.\left.\left.\left.\left.\left.\left.\left.\left.\left.\left.\left.\left.\left.\left.\left.\left.\left. \text {a l l} \right]\right]\right]\right]\right]\right]\right]\right]\right]\right]\right]\right]\right]\right]\right]\right]\right]\right]\right]\right]\right]\right] $$
$$ . (o l i, j) $$
Chorus 1
Chorus 4
S-Delay
Chorus 2
FB Chorus
SDelayFb
Chorus 3
Flanger
$$ \text {j} _ {\text {g a l l}} ^ {\prime} \left. \varepsilon \text {L a i s h} \dot {U} \text {d r a g} \leqslant \text {L i e} \text {L a i s h} \dot {u} \text {d r a g} \leqslant \text {j c} \right! \tag {5} $$
$$ \left. \right.\left. \right.\left. \right.\left. \right.\left. \right.\left. \right.\left. \right.\left. \right.\left. \right.\left. \right.\left. \right.\left. \right.\left. \right.\left.\left.\left.\left.\left.\left.\left.\left.\left.\left.\left.\left.\left.\left.\left.\left.\left.\left.\left.\left.\left. \text {的} \right]\right]\right]\right]\right]\right]\right]\right]\right]\right]\right]\right]\right]\right]\right]\right]\right]\right]\right]\right]\right] $$
$$ \therefore \text {a l l} \quad \text {a l l} \quad \text {a l l} \quad \text {a l l} \quad \text {a l l} \quad \text {a l l} \quad \text {a l l} \quad \text {a l l} \quad \text {a l l} \quad \text {a l l} \quad \text {a l l} \quad \text {a l l} $$
$$ \operatorname {R e v} \text {M a i n} _ {\text {i j}} (\text {r o} \text {j}) M F X \left[ \text {j} \text {j} \text {j} \text {j} \text {j} \text {j} \text {j} \text {j} \text {j} \text {j} \text {j} \text {j} \text {j} \text {j} \text {j} \text {j} \text {j} \text {j} \text {j} \text {j} \text {j}\right] $$
$$ . M F X \quad \dot {s} J L \dot {s} J \quad \dot {s} L a l \dot {s} J, \quad \dot {s} \dot {s} J L \dot {s} J \quad \dot {s} L a l \dot {s} J \quad \dot {s} L a l \dot {s} J $$
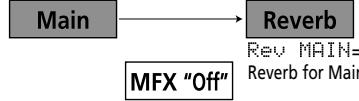
When the MFX is set to "Off"

When the MFX is set to any other type
$$ \text {a} \left. \right. \text {L} \text {L} \text {L} \text {L} \text {L} \text {L} \text {L} \text {L} \text {L} \text {L} \text {L} \text {L} \text {L} \text {L} \text {L} \text {L} \text {L} \text {L} \text {L} \text {L} \text {L} ^ {\prime \prime} R e v M a i n = 1 0 0 ^ {\prime \prime} \text {a l p h a} _ {i j k} $$
$$ \Delta \mathrm {d} \mathrm {e} \quad \mathrm {d} \mathrm {i} \quad \mathrm {p} \quad \mathrm {s} \quad \mathrm {s} \quad \mathrm {s} \quad \mathrm {s} \quad \mathrm {s} \quad \mathrm {s} \quad \mathrm {s} \quad \mathrm {s} \quad \mathrm {s} \quad \mathrm {s} \quad \mathrm {s} \quad \mathrm {s} \quad \mathrm {s} \quad \mathrm {s} \quad \mathrm {s} $$
$$ a c l a w \left[ \right. \text {i} _ {1} \text {i} _ {2} \text {i} _ {3} \text {i} _ {4} \text {i} _ {5} \text {i} _ {6} \text {i} _ {7} \text {i} _ {8} \text {i} _ {9} \text {i} _ {1 0} \text {i} _ {1 1} \text {i} _ {1 2} \text {i} _ {1 3} \text {i} _ {1 4} \text {i} _ {1 5} \text {i} _ {1 6} \text {i} _ {1 7} \text {i} _ {1 8} \text {i} _ {1 9} \text {i} _ {2 0} \text {i} _ {2 1} \text {i} _ {2 2} \text {i} _ {2 3} \text {i} _ {2 4} \text {i} _ {2 5} \text {i} _ {2 6} \text {i} _ {2 7} \text {i} _ {2 8} \text {i} _ {2 9} \text {i} _ {3 0} \text {i} _ {3 1} \text {i} _ {3 2} \text {i} _ {3 3} \text {i} _ {3 4} \text {i} _ {3 5} \text {i} _ {3 6} \text {i} _ {\dots} $$
$$ \cdot \text {C I L} (\text {R E V}) \text {P l a t e} \text {乙} \text {I I I} + (\text {M F X}) \text {s}, $$
$$ \therefore \text {g a l l} \quad \text {g} \quad \text {L a i s h} \quad \text {U} \quad \text {U} \quad \text {U} \quad \text {U} \quad \text {U} \quad \text {U} \quad \text {U} \quad \text {U} \quad \text {U} \quad \text {U} \quad \text {U} \quad \text {U} \quad \text {U} \quad \text {U} \quad \text {U} $$
$$ \text {c} \dot {z} \dot {z} \dot {z} \dot {z} \dot {z} \dot {z} \dot {z} \dot {z} \dot {z} \dot {z} \dot {z} \dot {z} \dot {z} \dot {z} \dot {z} \dot {z} \dot {z} \dot {z} \dot {z} \dot {z} \dot 0 0 0 0 0 0 0 0 0 0 0 0 0 0 0 0 0 0 0 0 0 0 0 0 0 0 0 0 0 0 0 0 0 0 0 0 0 0 0 0 0 0 0 0 0 0 0 0 0 0 0 $$
$$ . L a g a _ {2} \text {d i s t r i b u t i o n} \text {d i s t r i b u t i o n} \text {d i s t r i b u t i o n} \text {d i s t r i b u t i o n} \text {d i s t r i b u t i o n} \text {d i s t r i b u t i o n} \text {d i s t r i b u t i o n} \text {(L a w) L} $$
$$ \therefore (\text {e} \omega , \text {j}, \text {i}) \dot {\omega} j l a l l \text {a} \omega \text {j} \omega j l l \text {i} \text {a} \omega \text {j} \omega j l (\text {k o l}, \text {i} \text {a b}) $$
$$ \therefore \text {d i s t a t e} \quad \text {D A T A E N T R Y} \quad \text {p r o p e r a t i v e} \quad \text {f} ^ {\prime \prime} \text {j} ^ {\prime \prime} \text {s} ^ {\prime \prime} \text {j} ^ {\prime \prime} \text {j} ^ {\prime \prime} \text {j} ^ {\prime \prime} \text {j} ^ {\prime \prime} \tag {9} $$
(4)
Reverb depth of the Main part.
VALUE
100
Rev
DUAL
Reverb depth of the Dual part.
VALUE
100
Rev
sPTIT
Reverb depth of the Split part.
(2) (1) all the elements of F and all the functions of F .
Reverb
gaiyao yie aei jia dily gui bai yi jiyao hao
gJglllalLdI JSLEXR-46 OR jLjus Lioic
J L J 10000000000000000000000000000000000000000000000000000
1 1
ai = bi = 1
y
3UyIgEeRdRdRdRdRdRdRdRdRdRdRdRdRdRdRdRdRdRdRdRdRdRdRdRdRdRdRdRdRdRdRdRdRdRdRdRdRdRdRd
1 1
(1)

.EFFECTS"FAMILY (2)
ExR-46 OR jIJI aIJI bJI all
aagall aegao jaiis y Lao ciinig,aaibio
"REV" SELECT

Hall 2
"select, FAMILY JJJJJJJJJJ
(·ω)
Xk:aaallll aiaaai jilii) gajgill lgee LsK .Cho/Dly
(Lagii:aa)Le Laij jssgall
:FL/Delay
. .Cho/Flgr
(10)
yall jiai li bai yor oj gai gai jia jia jia jia jia jia jia jia jia jia jia jia jia jia jia jia jia jia jia jia jia jia jia jia jia jia jia jia jia jia jia jia jia jia jia jia jia jia jia jia jia jia
aill" 1. jz a 1g c g 11 3y! s y
.(20 1
a
51 56
gall Loo
DATA ENTRY 品 ^ 品 "J" j 6
| :Mod Dly | |
| . | mod y## |
| . | # |
| . | 3Tap Dly |
| . | s# |
| . | |
| . | 4Tap Dly |
| . | s# |
| . | |
| . | |
| . | TmCtrDly |
| . | s# |
| . | |
| . | |
| . | Reverb |
| . | |
| . | |
| . | GteRevNr |
| . | |
| . | |
| . | |
| . | |
| . | |
| . | |
| . | |
| . | |
| . | |
| . | |
| . | |
| . | |
| . | |
| . | |
| . | |
| . | |
| . | |
| . | |
| . | |
| . | |
| . | |
| . | |
| . | |
| . | |
| . | |
| . | |
| . | |
| . | |
| . | |
| . | |
| . | |
| . | |
| . | |
| . | |
| . | |
| . | |
| . | |
| . | |
| . | |
| . | |
| . | |
| . | |
| . | |
| . | |
| . | |
| . | |
| . | |
| . | |
| . | |
| . | |
| . | |
| . | |
| . | |
| . | |
| . | |
| . | |
| . | |
| . | |
| . | |
| . | |
| . | |
| . | |
| . | |
| . | |
| . | |
| . | |
| . | |
| . | |
| . | |
| . | |
| . | |
| . | |
| . | |
| . | |
| . | |
| . | |
| . | |
| . | |
| . | |
| . | |
| Overdry 1~4 Lalalall Lalalall Lalalall Lalalall Lalalall Lalalall Lalalall Lalalall Lalalall Lalalall Lalalall Lalalall Lalalall Lalalall Lalalall Lalalall Lalalall Lalalall Lalalall Lalalall Lalalll Lalalll Lalalll Lalalll Lalalll Lalalll Lalalll Lalalll Lalalll Lalalll Lalalll Lalalll Lalalll Lalalll Lalalll Lalalll Lalalll Lalalll Lalalll Lalalll Lalalill Lalalll Lalalll Lalalll Lalalll Lalalll Lalalll Lalalll Lalalll Lalalll Lalalll Lalalll Lalalll Lalalll Lalalll Lalalll Lalalll Lalalll Lalalll Lalalll Lalalell Lalalll Lalalll Lalalll Lalalll Lalalll Lalalll Lalalll Lalalll Lalalll Lalalll Lalalll Lalalll Lalalll Lalalll Lalalll Lalalll Lalalll Lalalll Lalalll Lalalall Lalalll Lalalll Lalalll Lalalll Lalalll Lalalll Lalalll Lalalll Lalalll Lalalll Lalalll Lalalll Lalalll Lalalll Lalalll Lalalll Lalalll Lalalll Lalalill Lalalill Lalalll Lalalll Lalalll Lalalll Lalalll Lalalll Lalalll Lalalll Lalalll Lalalll Lalalll Lalalll Lalalll Lalalll Lalalll Lalalll Lalalll Lalalll Lalalill Lalalall Lalalll Lalalll Lalalll Lalalll Lalalll Lalalll Lalalll Lalalll Lalalll Lalalll Lalalll Lalalll Lalalll Lalalll Lalalll Lalalll Lalalll Lalalll Lalalall Lalalall Lalalll Lalalll Lalalll Lalalll Lalalll Lalalll Lalalll Lalalll Lalalll Lalalll Lalalll Lalalll Lalalll Lalalll Lalalll Lalalll Lalalll Lalalill Lalalll Lalalill Lalalll Lalalll Lalalll Lalalll Lalalll Lalalll Lalalll Lalalll Lalalll Lalalll Lalalll Lalalll Lalalll Lalalll Lalalll Lalalll Lalalll Lalalill Lalalll Lalalall Lalalll Lalalll Lalalll Lalalll Lalalll Lalalll Lalalll Lalalll Lalalll Lalalll Lalalll Lalalll Lalalll Lalalll Lalalll Lalalll Lalalll Lalalill Lalalill Lalalill Lalalill Lalalill Lalalill Lalalill Lalalill Lalalill Lalalill Lalalill Lalalill Lalalill Lalalill Lalalill Lalalill Lalalill Lalalill Lalalill Lalalill Lalalll Lalalill Lalalill Lalalill Lalalill Lalalill Lalalill Lalalill Lalalill Lalalill Lalalill Lalalill Lalalill Lalalill Lalalill Lalalill Lalalill Lalalill Lalalill Lalalll Lalalll Lalalill Lalalill Lalalill Lalalill Lalalill Lalalill Lalalill Lalalill Lalalill Lalalill Lalalill Lalalill Lalalill Lalalill Lalalill Lalalill Lalalill Lalalll Lalalill Lalalll Lalalill Lalalill Lalalill Lalalill Lalalill Lalalill Lalalill Lalalill Lalalill Lalalill Lalalill Lalalill Lalalill Lalalill Lalalill Lalalill Lalalill Lalalll Lalalll Lalalll Lalalill Lalalill Lalalill Lalalill Lalalill Lalalill Lalalill Lalalill Lalalill Lalalill Lalalill Lalalill Lalalill Lalalill Lalalill Lalalill Lalalll Lalalill Lalalill Lalalll Lalalill Lalalill Lalalill Lalalill Lalalill Lalalill Lalalill Lalalill Lalalill Lalalill Lalalill Lalalill Lalalill Lalalill Lalalill Lalalill Lalalll Lalalill Lalalll Lalalll Lalalill Lalalill Lalalill Lalalill Lalalill Lalalill Lalalill Lalalill Lalalill Lalalill Lalalill Lalalill Lalalill Lalalill Lalalill Lalalill Lalalll Lalalll Lalalill Lalalll Lalalill Lalalill Lalalill Lalalill Lalalill Lalalill Lalalill Lalalill Lalalill Lalalill Lalalill Lalalill Lalalill Lalalill Lalalill Lalalill Lalalll Lalalll Lalalll Lalalll Lalalill Lalalill Lalalill Lalalill Lalalill Lalalill Lalalill Lalalill Lalalill Lalalill Lalalill Lalalill Lalalill Lalalill Lalalill Lalalll Lalalill Lalalill Lalalill Lalalll Lalalill Lalalill Lalalill Lalalill Lalalill Lalalill Lalalill Lalalill Lalalill Lalalill Lalalill Lalalill Lalalill Lalalill Lalalill Lalalll Lalalill Lalalill Lalalll Lalalll Lalalill Lalalill Lalalill Lalalill Lalalill Lalalill Lalalill Lalalill Lalalill Lalalill Lalalill Lalalill Lalalill Lalalill Lalalill Lalalll Lalalill Lalalll Lalalill Lalalll Lalalill Lalalill Lalalill Lalalill Lalalill Lalalill Lalalill Lalalill Lalalill Lalalill Lalalill Lalalill Lalalill Lalalill Lalalill Lalalll Lalalill Lalalll Lalalll Lalalll Lalalill Lalalill Lalalill Lalalill Lalalill Lalalill Lalalill Lalalill Lalalill Lalalill Lalalill Lalalill Lalalill Lalalill Lalalill Lalalll Lalalll Lalalill Lalalill Lalalll Lalalill Lalalill Lalalill Lalalill Lalalill Lalalill Lalalill Lalalill Lalalill Lalalill Lalalill Lalalill Lalalill Lalalill Lalalill Lalalll Lalalll Lalalill Lalalll Lalalll Lalalill Lalalill Lalalill Lalalill Lalalill Lalalill Lalalill Lalalill Lalalill Lalalill Lalalill Lalalill Lalalill Lalalill Lalalill Lalalll Lalalll Lalalll Lalalill Lalalll Lalalill Lalalill Lalalill Lalalill Lalalill Lalalill Lalalill Lalalill Lalalill Lalalill Lalalill Lalalill Lalalill Lalalill Lalalill Lalalll Lalalll Lalalll Lalalll Lalalll Lalalill Lalalill Lalalill Lalalill Lalalill Lalalill Lalalill Lalalill Lalalill Lalalill Lalalill Lalalill Lalalill Lalalill Lalalll Lalalill Lalalill Lalalill Lalalill Lalalll Lalalill Lalalill Lalalill Lalalill Lalalill Lalalill Lalalill Lalalill Lalalill Lalalill Lalalill Lalalill Lalalill Lalalill Lalalll Lalalill Lalalill Lalalill Lalalll Lalalll Lalalill Lalalill Lalalill Lalalill Lalalill Lalalill Lalalill Lalalill Lalalill Lalalill Lalalill Lalalill Lalalill Lalalill Lalalll LALALALL |
a
EXR-46 OR jLgJ
.
.
.
.
.
.
.
.
.
.
.
.
.
.
.
.
.
.
.
.
.
.
.
.
.
.
.
.
.
.
.
.
.
.
.
.
.
.
.
.
.
.
MFX) 1234567890123456789012345678901234567890123456789012345678901234567890123456789012345678901234567890123456789
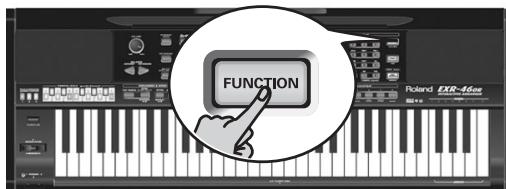
MFX 1J L JF"Uf" UJ L J
V L Jx Jy Jx Jx Jx Jx Jx Jx Jx Jx Jx Jx Jx Jx Jx Jx Jx Jx Jx Jx Jx Jx Jx Jx Jx Jx Jx Jx Jx Jx Jx Jx Jx Jx Jx Jx Jx Jx Jx Jx Jx Jx Jx Jx Jx Jx Jx Jx Jx Jx Jx Jx JX
Loo, aall ooljill gogolll k jull Enhancer woll
jgall no jdlgl jll dkiylll k 3
jblalil yll llll allll allll lallll lallll lallll
.2.PB Range"aaill g i do"
jgal MFX o g jn jns Lioe ciao jdo jao
ae aess mnnnnnnnnnnnnnnnnnnnnnnnnnnnnnnnnnnnnnnnnnnnnnnnnnnnnnnnnnnnnnnnnnnnnnnnnnnnnnnnnnnnnnnnnnnnnnnnnnnnnnnnnnnnnnnnnnnnnnnnnnnnnnnnnnnnnnnnnnnnnnnnnnnnnnnnnnn
paal aomega
jLJ 1 JFOTSWITCH dDPP-6DP-2JUQJXJEXR-46OR .FS-5U BOSS
()
1
(2)
_1 = _2
ab + 2b = 4 (4)
Ciaall jc d yjg jy gla jge gll aaiill aaiill ai i 5
"1V" aall Liuyi. (agawu jg) ayill yjio "1" aall jas
aell piaiwig. (oJyog yoi Lai) oJell g 9e geol
jLg) aull gle gdo gKey TOUCH J go yoj Looie loe
doe sall aall aowu wll aegn prssw gwl lalil
DATA ENTRY 品 ^ 出 "j" j 5
"aaasssssssssssssssssssssssssssssssssssssssssssssssssssssssssssssssssssssssssssssssssssssssssssssssssssssssssssssssssssssssssssssssssssssssssssssssssssssssssssssssssssssss
(0 1 k) jlll jolj l b j: 12 y
12y
12y
12y
12y
aaii iia gao g i
11 11 11 11 11 11 11 11 11 11 11 11 11 11 11 11 11 11 11 11 11 11 11 11 11 11 11 11 11 11 11 1
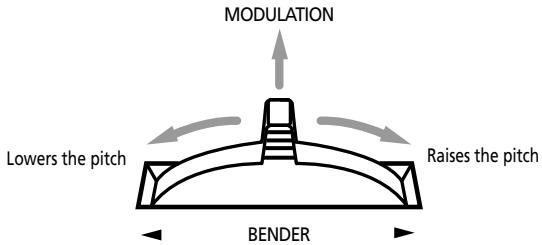
aJglll aclawll jgo aee sssy gill Jgill gill sas y
(2)
1
15 15 15 15
mll
s# 46 OR j42 j
5e 10000000000000000000000000000000000000000000000000
Laaa aallll aalll aalll aalll aalll aalll aalll aalll aalll aalll aalll aalll aalll aalll aalll aalll aalll aalll aalll aalll aalll aalll aalll aalll aalll aalll aalll aalll aalll aalll aalll aalll aalll aalll aalll
j 43 15 j 15 j 15 j 15 j 15 j 15 j 15 j 15 j 15 j 15 j 15 j 15 j 15 j 15 j 15 j 15 j 15 j 15 j 15 j 15 j 15 j 15 j 15 j 15 j 15 j 15
j bla aLl 9EYTOUCH Jyog yI 111 (1) jall s waeew jglw AELA KEYBOARD TOUCH

111111111111111111111111111111111111111111
1.2.11.2.2.2.35
jbi jzll LwJy JyJyJyJyJyJyJyJyJyJyJyJyJyJyJyJyJyJyJyJyJyJyJyJyJyJyJyJyJyJyJyJyJyJyJyJyJyJyJyJyJyJyJyJyJyJyJyJyJyJyJy
VALUE 127 KbdTouch
aLwlll aJzjI ++ jzjI aJzqRll JyJyI (4)
(127~1)
y
Ldlaic diSs. sssll pLwLg jz ggs iLg Lg Lg Lg
sfo
(18.202)
12+ 12- no plalall yds yolal yolal yolal yolal yolal yolal yolal yolal yolal yolal yolal yolal yolal yolal yolal yolal yolal yolal yolal yolal yolal yolal yolal yolal yolal yolal yolal yolal yolal yolal yolal yolal yolal yolal
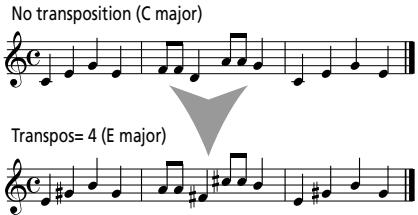
32042WART 1
(2)g(1) 1
"J" a J
(3)
(4)
jUJbIeJgJyJUJbIaJIgJyJUJbIaJIyJUJbIaJIyJUJbIaJIyJUJbIaJIyJUJbIaJIyJUJbIaJIyJUJbIaJIyJUJbIaJIyJUJbIaJIyJUJbIaJIyJUJbIaJIyJUJbIaJIyJUJbIaJIyJUJB1
$$ . \cup \cup \cup \cup \cup \cup \cup \cup \cup \cup \cup \cup \cup \cup \cup \cup \cup \cup \cup \cup \cup \cup \cup \cup \cup \cup \cup \cup \cup \cup \cup \cup \cup \cup \cup \cup \cup \cup \cup \cup \cup \cup \cup \cup \cup \cup \cup \cup \cup \cup \begin{array}{l} S P L I T \ + D U A L \end{array} $$
Transpose (p)
LaiI Laii Iiai Iiai Iiai Iiai Iiai Iiai Iiai Iiai Iiai Iiai Iiai Iiai Iiai Iiai Iiai Iiai Iiai Iiai Iiai Iiai Iiai Iiai Iiai Iiai Iiai Iiai Iiai Iiai Iiai Iiai Iiai Iiai Iiai Iiaii
Laii Liai Liai Liai Liai Liai Liai Liai Liai Liai Liai Liai Liai Liai Liai Liai Liai Liai Liai Liai Liai Liai Liai Liai Liai Liai Liai Liai Liai Liai Liai Liai Liai Liai Liai Liai Liai Liai Liai Liai Liai Liai Liai Liai Liai Liai Liai Liai Liai Liai Liai LiAI LIAI LIAI LIAI LIAI LIAI LIAI LIAI LIAI LIAI LIAI LIAI LIAI LIAI LIAI LIAI LIAI LIAI LIAI LIAI LIAI LIAI LIAI LIAI LIAI LIAI LIAI LIAI LIAI LIAI LIAI LIAI LIAI LIAI LIAI LIAI LIAI LIAI LIAI LIAI LIAI LIAI LIAI LIAI LIAI LIAI LIAI LIAI LIAI LIAI LIAI LALI LALI LALI LALI LALI LALI LALI LALI LALI LALI LALI LALI LALI LALI LALI LALI LALI LALI LALI LALI LALI LALI LALI LALI LALI LALI LALI LALI LALI LALI LALI LALI LALI LALI
TRANSPOSE 1

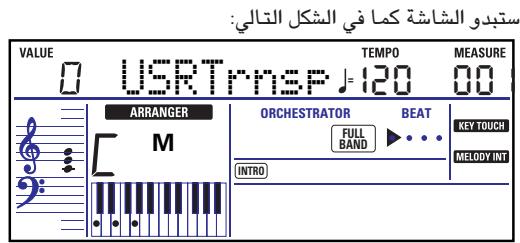
Jgall gol gol
jgl jgl jgl jgl jgl jgl jgl jgl jgl jgl jgl jgl jgl jgl jgl jgl jgl jgl jgl jgl jgl jgl jgl jgl jgl jgl jgl jgl jgl jgl jgl jgl jgl jgl jgl jgl jgl jgl jgl jgl jgl jgl jgl jgl jgl jgl jgl jgl jgl jgl jgl
LgBlll aaglaa gpaia 1 (1)


ylll lal 1j
1000 1000000000000000000000000000000000000000000000000000
kaill laig lalaiil jaiia aaiiaa oaiiaaiiaaiiaaiiaaiiaaiiaaiiaaiiaaiiaaiiaaiiaaiiaaiiaaiiaaiiaaiiaaiiaaiiaaiiaaiiaaiiaaiiaaiiaaiiaaiiaaiiaaiiaaiiaaiiaaiiaaiiaaiiaaiiaaiiaaiiaaiiaaiiaaiiaaiiaaiiaaiiaaiiaaiiaaiiaaiiaaiiaaiiaaiiaaiiaaiiaai
jz: jzall jzall jzal yssll dyl slyw
jglg jglg jlll jll"ov"ll"Vv" jol
wlll lllllllllllll
j0 2000 1000 1000 1000 1000 1000 1000 1000 1000 1000 1000 1000 1000 1000 1000 1000 1000 1000 1000 1000 1000 3
jll llllll C6" (lal) jall jall
C3
oct. 1234567890101123456789010112345678901011234567890101123456789010112345678901011234567890101123456789010112345678
(1) SPLT oct 3 MAIN
g 1
.
jSay 1y. yw wlll oollg y bbl lglbll cegao jSay abdo
lll llll
jay 2 aagaaaagagagagagagagagagagagagagagagagagagagagagagagagagagagagagagagagagagagagagagagagagagagagagagagagagagagagagagagagagagagagagagagagagagagagagag
a 1jg jg aei jgi jai jai jai jai jai jai
(0o jai)jollall bai jajilll lla jy:ably
(SFX)
"Train") Jz 2a z a z y 1E XR-46 OR jz g (617~576) z a z y 1y a z y. (Lzg, "HrseGLLP" , "Kitty"

Split part (sound effect/percussion sound)
Main part (melodic sound)
USER TONES 1JALI JARJARJARJARJARJARJARJARJARJARJARJARJARJARJARJARJARJARJARJARJARJARJARJARJARJARJARJARJARJARJARJARJARJARJARJARJARJARJARJARJARJARJARJARJARJARJARJARJARJARJAR
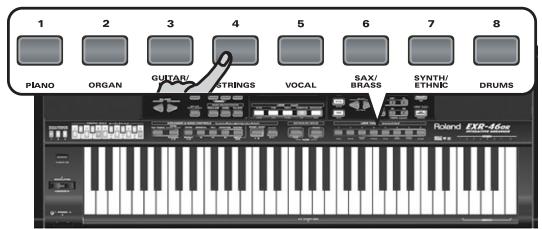
11 11 11 11 11 11 11 11 11 11 11 11 11 11 11 11 11 11 11 11 11 11 11 11 11 11 11 11 11 11 11 11 11 11 000000000000000000000000000000000000000000000000000000000000000000000000000000
JJIJIJIJIJIJIJIJIJIJIJIJIJIJIJIJIJIJIJIJIJIJIJIJIJIJIJIJIJIJIJIJIJIJIJIJIJIJIJIJIJIJIJIJIJIJIJIJIJIJIJIJIJIJIJIJIJIJIJIJIJIJIJIJIJIJIJIJIJIJIJIJIJIJIJIJIJIJIJIJIJIJIJIJIJIJIJIJIJIJIJIJIJIJIJIJIJIJIJIJIJ
aillssrssssssssssssssssssssssssssssssssssssssssssssssssssssssssssssssssssssssssssssssssssssssssssssssssssssssssssssssssssssssssssssssssssssssssssssssss
J 2 JEXR-46 OR jLj jLjLjLjLjLjLjLjLjLjLj
Lai jy 5e jia jia jia jia jia jia jia jia jia jia jia jia jia jia jia jia jia jia jia jia jia jia jia jia jia jia jia jia jia jia jia jia jia jia jia jia jia jia jia jia jia jia jia jia jia jia jia jia jia jia j
$$ \therefore \cup_ {s} \leqslant 1 1 _ {s ^ {2}} b _ {s s} $$
1j 1 j 1 j 1 j 1 j 1 j 1 j 1 j 1 j 1 j 1 j 1 j 1 j 1 j 1 j 1 j 1 j 1 j 1 j 1 j 1 j 1 j 1 j 1 j 1 j 1 j 1 j 1 j 1 j 1 j 1 j 1 j 1 j 1 j 1 j
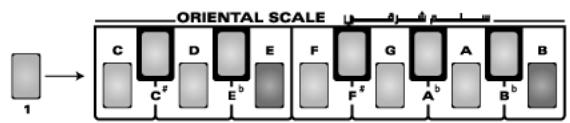


jbi) jzjll pIaill 102g Jzjjy Jzll y g iiaaiy .
jll pluill jdl (14) aijgall lai jbl: abla 1
Jg 1 g j bdo, a lal y gall al
SCALE MEMORY
pall aysl s! g Lg klaa Ls yagllal all ljjgall b 12
:glblldl. .JrLk Lgalejwlg jll g
(0)lej bai) dl glbLs aaiill uji bai (1)
SCALE MEMORY (1 3) "p"
ii jydi jzjzj bdo jzjj
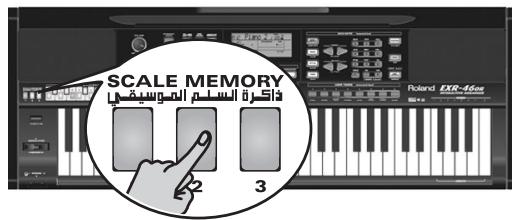
3
biall aylll plal ylsj jg srls jyjnl cjl diL
Lg yolll jll ie (zllb) jilall
a yolla yolll plal yslj j baii. a llyll ayjgdall yolll
aygall cji gssll plal all jk gabgl gbs
Lg jial plao yslj jg wgsw glll o g, ayall
g ydsjgall jIoi pl alll gasrall palaall jn lleo
jg 1 jia aie Lai
1
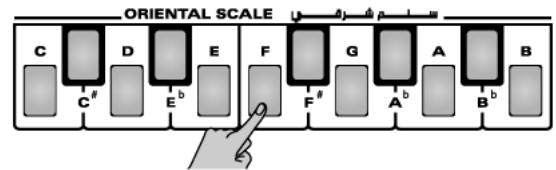
(2)
Liljg pli
lall aill lal jy gdl li jy jll b
eliz yai jay jai di k ay iie ng / Lgai y
aigd all k jy jai all jy jial b 1 (1)
aiill pwl qay jai ll "Scale"
(2)
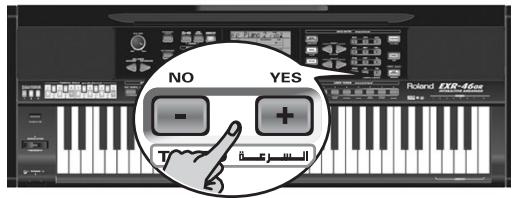
63~64- no b#ll sdo
aLgA
Loll! diKs. lclayy Li gla i g ralb g li Ll lll JLo
:gs 1g y lg bai g ai bsall aasls abswg
Laalglg E Lg y IcIg jg y Bpssil bnnnns aag
.(1w sps)
. (31 sps) aiaa aiaa aiaa aiaa aiaa aiaa aiaa aiaa aiaa aiaa aiaa aiaa aiaa aiaa aiaa aiaa aiaa aiaa aiaa aiaa aiaa aiaa aiaa aiaa aiaa aiaa aiaa aiaa aiaa aiaa aiaa aiaa aiaa aiaa
"Bass Inv" SELECT jj

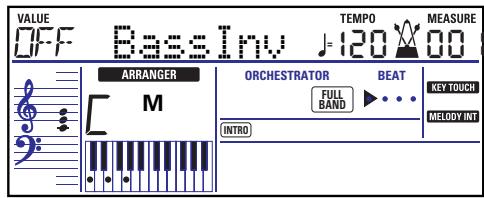
"VALUE" aIaill 10 "ON" JzJzJzJz! (4) SELECT FAMILY aJzJzJzJzJzJzJzJzJzJzJzJzJzJzJzJzJzJzJzJzJzJzJzJzJzJzJzJzJzJzJzJzJzJzJzJzJzJzJzJzJzJzJzJzJzJzJzJzJzJzJZ J. (19,0) "aiai jll DATA ENTRY Logall JcL JcS "jL JcI JcI JcI JcI JcI JcI JcI JcI JcI JcI JcI JcI JcI JcI JcI JcI JcI JcI JcI JcI JcI JcI JcI JcI JcI JcI JcI JcI JcI JcI JcI JcI JcI JcI
Bass Inv
glll lll g jyj yj yj yj yj yj yj yj yj yj yj yj yj yj yj yj yj yj yj yj yj yj yj yj yj yj yj yj yj yj yj yj yj yj yj yj yj yj yj yj yj yj yj yj yj yj yj yj yj yj yj 1
g jy jy jy jy jy jy jy jy jy jy jy jy jy jy jy jy jy jy jy jy jy jy jy jy jy jy jy jy jy jy jy jy jy jy jy jy jy jy jy jy jy jy jy jy jy jy jy jy jy jy j.
"g" "g" "g" "g" "g" "g" "g" "g" "g" "g" "g" "g" "g" "g" "g" "g" "g" "g" "g" "g" "g" "g" "g" "g" "g" "g" "g" "g" "g" "g" "g" "g" "g" "g" "
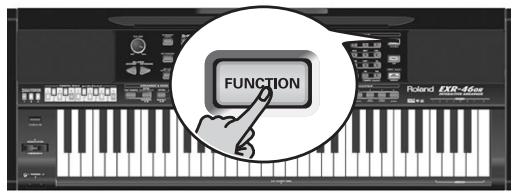
"AR SET"FAMILY (2)

ExR-46 OR jg jg gagagagagagagagagagagagagagagagagagagagagagagagagagagagagagagagagagagagagagagagagagagagagagagagagagagagagagagagagagagagagagagagagagagagagagagag
g
Jn Jn Jn Jn Jn Jn Jn Jn Jn Jn Jn Jn Jn Jn Jn Jn Jn Jn Jn Jn Jn Jn Jn Jn Jn Jn Jn Jn Jn Jn Jn Jn Jn Jn Jn Jn Jn Jn Jn Jn Jn Jn Jn Jn Jn Jn Jn Jn Jn
145 20000000000000000000000000000000000000000000000000000000000000000000000000
aJall jolj 1
j g"g jlll jle"g g g g g g g g g g g g g g g g g g
a 1
ailllll lll
1 1
("a 1111" j j JooLooJooEXR-46 OR j
ARRANGER BAND
j 1
- bN = aN
J 1
jz jz jz jz jz jz jz jz jz jz jz jz jz jz jz jz jz jz
15jll jls (aloeo g) aaiil albl wgl pssu Lioic
1jLac jlll jg- lgl 1c gla jy djl jg j
-1522222222222222222222
PIANO SOLO, ARRANGER BAND (1)
aie aiee eae eee (jnnn nn nnnn
ARRANGER "PianoMod"
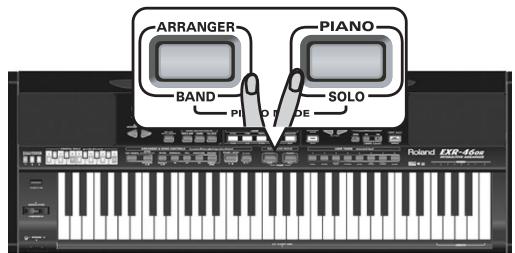
15 15 15 15 15 15 15 15 15 15 15 15 15 15 15 15 15 15 15 15 15 15 15 15 15 15 15 15 15 15 15 15 15 15 20 SELECT jj j j j j j j j j j j j j j j j j j j j j j j j j j j j j j j j j j j j j j j j j j j j j j j j j j j j j j j j j j j j j j
()
SELECT , FAMILY, TONE
L (USER TONES jj)
J 1
aI 111111111111111111111111111111111
BAC = 90^ + ABD = 90^
PIANO SOLO ARRANGER BAND 4
"siililljilee
gaii ci
gill jlll o Laiiio lii Li iia aia "gill ll lsl" aia b
aai 1000000000000000000000000000000000000000000
Lijai jilll
j j
gall
jI 1510101010101010101010101010101010101010101010101010101010101010101010101010101010101010101010101010101
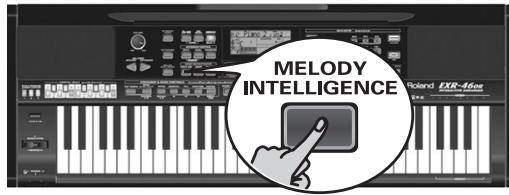
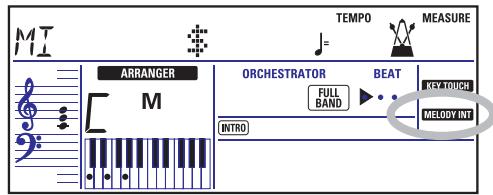
aLgEg
ARRANGER Jyoo AARRANGER BAND jbaa a baaiaiaiaaii IEXR-46 OR jagg gagggagggagggagggag
FAMILY 1
aall aasall aalll
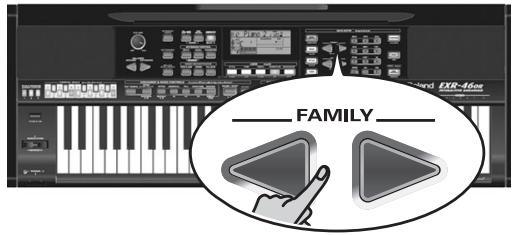
MALFOUF 102
:aiy
.ARABI .MALFOUF.MASRI .SAIDI .MAKSOUM
.TURKISH ,KHALIGI ,OR-WORLD .TRADITIONAL
yall selssj 10 SELECT jjj
aJzaiiaeaoaill Jzaiyballd
ps! 1g 1g SELECT j g all Jx
p 1
"OT2aJzIJIaIbIaIbIaIbIaIbIaIbIaIbIaIbIaIbIaIbIa! (3)
Jt Jt Jt Jt Jt Jt Jt Jt Jt Jt Jt Jt Jt Jt Jt Jt Jt Jt Jt Jt Jt Jt Jt Jt Jt Jt Jt Jt Jt Jt Jt Jt Jt Jt Jt Jt Jt Jt Jt Jt Jt Jt Jt
S OBC = S COD + S_ BOC
.USBgcllalcLaiyIaiaolaoalalalaae:abdo
J 1
juii iie
1
yssll dysipjisi j, jzall dlLk pjsiw diI gji
aaii aaiiaai iie g jg jg jg jg jg jg jg
BOSS FS-5U gDP-6gDP-2 JJ 1
jglll 1
gall FUNCTION

"KB SET"FAMILY
eEEXR-46 OR jgjagaiyallpaaeei ygiillacggalil gll Lgclnigwgsia
a1 + a2 + a3 = 6 又 ai Si ai + aj + ak = 6
.FSW" 15 15 SELECT 15


Sustain
SELECT FAMILY 1234567890123456789012345678901234567890123456789012345678901234567890123456789012345678901234567890123456789
(.)"a+
Punch I/O"Jusssssssssssssssssssssssssssssssssssssssssssssssssssssssssssssssssssssssssssssssssssss
all aas g all sasg SONG jj bai
"Jusill cuao" (1) p, gbljraai!
REC 1j jy ypaall aowd bafl.7) (5) (5)
REC JJJJJJJJ (1)
FAMILY! (2)
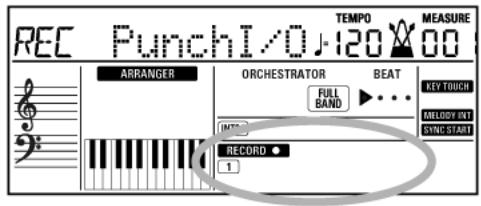
Lgall ggy jgl gall gall ggo daa
A 1000 1000 1000 1000 1000 1000 1000 1000 1000 1000 1000 1000 1000 1000 1000 1000 1000 1000 1000 1000 100
10 × 9 = 64
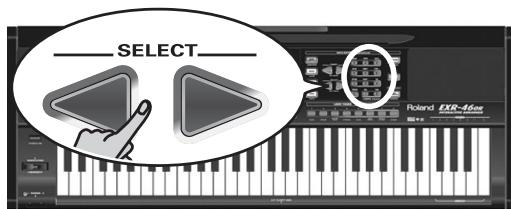
j 15
.(a)a 10
Jnnsone
Juswll 10000000000000000000000000000000000000000000000000000000000000
MINUS ONE
Jain
. 6
Jaa Jaa Jaa Jaa Jaa Jaa Jaa Jaa Jaa Jaa Jaa Jaa Jaa Jaa Jaa Jaa Jaa Jaa Jaa Jaa Jaa Jaa Jaa Jaa Jaa Jaa Jaa Jaa Jaa Jaa Jaa Jaa Jaa Jaa Jaa Jaa Jaa Jaa Jaa Jaa Jaa Jaa Jaa Jaa Jaa Jaa Jaa Jaa Jaa Jaa Jaa
A
a1jI 508oSTRT/STOP
. 1JSSI JSSIJIg LAIUII (9)
(3) a b c d e f g h i j k l
(3)
START/STOP
gssgalln (tJyj) jjjjdo dol ggsaill lll
Jlll jllj j 1 J 1
jSSALLJGJSTo
.(3)abla(7)
PUNCH
(1) (2)
aie 1
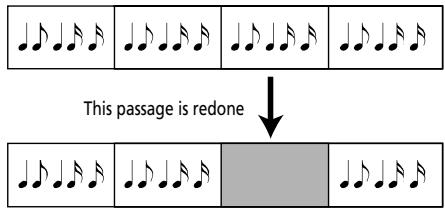
Original track

RE-START
RE-START
a a a a a a a a a a a a a a a a a a a a a a a a a a a a a
JALILIJIJIIGI JIJIJIJIJIJIJIJIJIJIJIJIJIJIJIJIJIJIJIJIJIJIJIJIJIJIJIJIJIJIJIJIJIJIJIJIJIJIJIJIJIJIJIJIJIJIJIJIJIJIJIJIJIJIJIJIJIJIJIJIJIJIJIJIJIJIJIJIJIJIJIJIJIJIJIJIJIJIJIJIJIJIJIJIJIJIJIJIJIJIJIJIJIJIJIJIJIJIJIJIJIJ
sJls Jls Jll "Jus" dlis jLl! J "Jus
J
REC Jusill jbiol! (1)
FAMILY 2
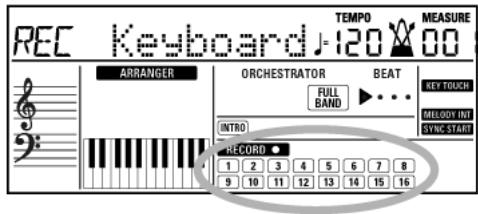
RECORD
SPLIT JJbai,paai bai 3
jJbAabwBgBaaBballgEyLByaCgBssWbBnJ!
-1+ TAP TEMPO
i 1
pwww wawll 11 uab zgga juaa aai iia
1.17 1jllge Jgblal 1j
"Jg J
a 11 a11 11 11 11 11 11 11 11 11 11 11 11 11 11 11 11 11 11 11 11 11 11 11 11 11 11 11 11 11 11 11 11 11 11 0000000000000000000000000000000000000000000000000000
Jg j 1000 REcRD o Jc Jg Jg Ie buiu Looie Ii Ioi gllle dji dji dki aai iia Loo,illldj
1 1111111111111111111111111111
REC Jaaill jbiol 1
aalaa aalaaal alalalalalalalalal
Lis/1sJdJIgcoIgMFX
g aagaaagaaagaaagaaagaaagaaagaaagaaagaaagaaagaaagaaagaaagaaagaaagaaagaaagaaagaaagaaagaaagaaagaaagaaagaaagaaagaaagaaagaaagaaagaaagaaagaaagaaagaaagaaagaaagaaagaaagaaagaaagaa
dsas gllg. gallol sllj j lglw .jlls
m = 311
"1111 1
gjagllg 2g, gglgglgglgglgglgglgglgglgglgglgglgglgglgglgglgglgglgglgglgglgglgglgglgglgglgglgglgglgglgglgglgglgglgglgglgglgglgglgglgglggl
dikaww wuw wu wuu wuu wuu wuu wuu wuu wuu wuu wuu wuu wuu wuu wuu wuu wuu wuu wuu wuu wuu wuu wuu wuu wuu wuu wuu wuu wuu wuu wuu wuu wuu wuu wuu wuu wuu wuu wuu wuu wuu wuu wuu wuu wuu wuu wuu wuu wuu wuu wuu wuu wUUW
4 1
iLglo gao ygill ydsjy jyswll "yjyssll" cagjai! kdo
a 152
g
dsLoljwJdji 140gEXR-46 OR jgs
11 11
Jg
Jusill Jus
EXR-46 OR jj j
jlll lalall
1
Lo afojao Lo Juswai kdo jgll
a
gjgai jaiLoo
uLulUgall) 11 11 11 11
()
jduwbl jduwll dSg e gll 1s:(Jg)ll) Keyboard
"PUNCH I/O" "SINGLE"
- "PUNCH I/O" & "SINGLE"
Lgalee 10
START/STOP
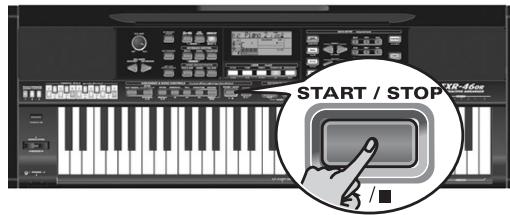
J 1
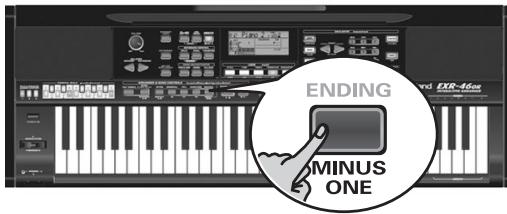
SONG 222222222222222222222222
START/STOP 2
acljla jajl5 START/STOPjjb#i (3)
(4)
jij jil 1y, oji j 10000000000000000000000000000000000000
:REC FILL "REC MODE" FAMILY
11016 1RECORD
gjgoaiaLo aaiwlo J"J11"
Exr-46 OR
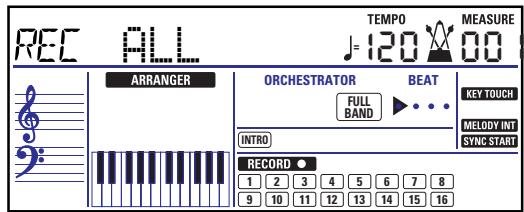
FAMILY "REC ALL" 13:20:20 EXR-46 OR JUSERSONG LALL
jj baii Lioicg. (9 9 o jai) ci jil lal l i k
L131 Single LEXLEXL EXR-46 OR J42 1000 REC
jral 1e jolai) . JALI JIO OLOgloJe GsiaJUSERSONG sli
()
:2yLJyRjLjLjLj! (9)
gjgall sclwsslll llllll yllllllllllllllllll
ARRANGER BAND

aLall pao jssgss gssss
SLALLS JSLJGLLALLLGLLSTYLEJJb
a
jglge baiial abawg yball g jzil (3)
.VARIATION j ORIGINAL j INTRO
START/STOP
aJ+TAPTEMPOJzj
L
Cjgall alz y jd 0o START/STOP b
11 11
SELECT FAMILY jjTONE jjBzJ (·.u) USER TONES
REC JJJJb1 (8)
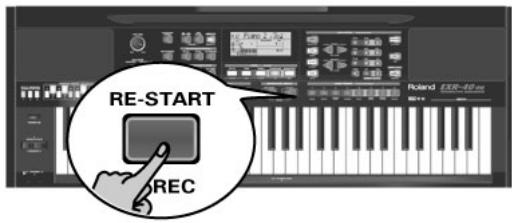
J
(1) G M_ (2) L_ (3) L_ (4)
One Right,LEFT,BASS,DRUM
abii jill jll 2jllball
ENTRY + biziL. RIGHT jj g"1." sdi jd j
DATA
VALUE
10 RIGHT
DATA ENTRY jjj)MINUS ONE 4
Aa
(29) a : a x,y,z MINUS ONE a : a x,y,z
JLJIaIg aIe"Y" dJIJI g
aalg) aalglll oaljly aolal aasssall oLogaal p
(0)
jLgJx! jSx y gill LSLgll aLcLgaa
1.7~19,9~7,1,1 2.2311111111111111111111111111111111111
BASS
S AOB = S AOD + S_ OBC
DRUMS
aJgjzjjzjyI JzJdzj:
a1jy 1 yjgjjbai! (4)
acljIy jgJgJgJgJgJgJgJgJgJgJgJgJgJgJgJgJgJgJgJgJgJgJgJgJgJgJgJgJgJgJgJgJgJgJgJgJgJgJgJgJgJgJgJgJgJgJgJgJgJgJg
DATA ENTRY jjj)MINUS ONE (6)
a
(29) 1000000000000000 MINUS ONE 1000000000000000
FAMILY 15 G biaill di
G Jn Jn Jn Jn Jn Jn Jn Jn Jn Jn Jn Jn Jn Jn Jn Jn Jn Jn Jn Jn Jn Jn Jn Jn Jn Jn Jn Jn Jn Jn Jn Jn Jn Jn Jn Jn Jn Jn Jn Jn Jn Jn Jn Jn Jn Jn Jn Jn Jn Jn J n J n J n J n J n J n J n J n J n J n J n J n J n J n J n J n J n J n J n J n J n J n J n J n J n J n J n J n J n J n J n J n J n J n J n J n J n J n J n J n J n J n J n J n J n J n J n J n J n J n J.
USERSONG 151 jai (""j) "..." jai: abkdo
(duuill ysi slil) 1.1 g (aiaagll) 1.1 a slll l i!
, 131 Jgala bikc oLb y ES aiai Ile oos
pYes/+ le biall diklc oI y ll lgsal
aJai aai llg jy fag gddlll Jy dla Jy abdo .dssd lno no 1s Jia Jia Jia Jia Jia Jia Jia Jia Jia Jia Jia Jia Jia Jia Jia Jia Jia Jia Jia Jia Jia Jia Jia Jia Jia Jia Jia Jia Jia Jia Jia Jia Jia Jia Jia Jia Jia Jia Jia Jia Jia Jia Jia Jia Jia Jia Jia Jia Jia Jia JIAJ
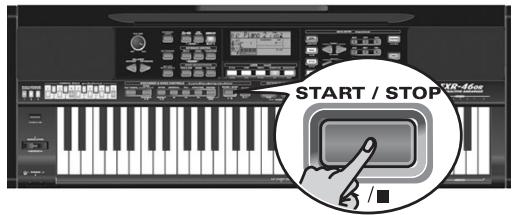
L 150000000000000000000000000000000000000000000000000000000000
1 111111111111111111111111111111111111111111
g j 1
d 154
.(0 format files)
ARRANGER & SONG CONTROLS

SYNC TAP TEMPO START/STOP
TART/STO
INTRO
ORIGINAL
FILL
VARIATION
ENDING

MARKER A-B

REPEAT A-B


MINUS ONE
aie 15 15 aee 15 aee 15 aee 15 aee 15 aee 15 aee 15 aee 15 aee 15 aee 15 aee 15 aee 15 aee 15 aee 15 aee 15 aee 15 aee 15 aee 15 aee 15 aee 15 aee 15 aae
aJzall aegaaol JzIgall

oio o Logeall gao ay. yaiy jaiy jaiy 10
jLJI 1
g jill l jll l jll ll l jll baii laic iiai alle
JSSSONGCONTROLS,ARRANGER
( )
BAND 4A 4A 4A 4A 4A 4A 4A 4A 4A 4A 4A 4A 4A 4A 4A 4A 4A 4A 4A 4A 4A 4A 4A 4A 4A 4A 4A 4A 4A 4A 4A 4A 4A 4A
e 1
aJUeIgulIc Uusbll lji eesjgl cLsI jcls
(ajolil
Egssssssssssssssssssssssssssssssssssssssssssssssssssssssssssssssssssssssssssssssssssssssssssssssssssssssssssssssssss
(2)
17 20
gssssssssssssssssssssssssssssssssssssssssssssssssssssssssssssssssssssssssssssssssssssssssssssssss
()
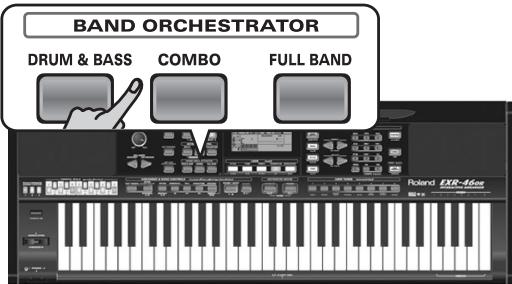
aalaae aee
DRUMS&BASS
a
baa a b
COMBO
i 1
FULL BAND
aagaaagaaagaa
gagll jj 1j210a
ALSSs slll lIy Ie Iy Sgill User STL
.
1,2,3,4 : 1,2,3,4 : j A
Jn Jn nn nnnnnnnnnnnnnnnnnnnnnnnnnnnnnnnnnnnnnnnnnnnnnnnnnnnnnnnnnnnnnnnnnnnnnnnnnnnnnnnnnnnnnnnnnnnnnnnnnnnnnnnnnnnnnnnnnnnnn
E LgAeJxjExR-46 OR jLgJy
. START/STOP jj bi:di Lo:di Jo:di w
a 10 a
USER STL
FAMILY 4
(aaallll jaiil) wlll l
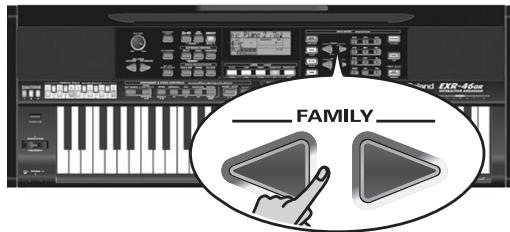
JbIaLio LgLaLyBaIyBaaIyBaaIyBaaIyBaaIyBaaIyBaaIyBaaIyBaaIyBaaIyBaaIyBaaIyBaaIyBaaIyBaaIyBaaIyBaaIyBaaIyBaaIyBaaIyBaaIyBaaIyBaaIyBaaIyBaaIyBaaIyBaaa
USER STL,Flash
aalall aegaaal pwl wlllglg
MALFOUF 73
FLASH 132
.ajlll aegaaal Jal gallgallg (5)

1
1ii yj ciS ljj gill aJrddi pi gill aJrdda cagaa jdu
SELECT jzj biaiialg yjx Jx
l_12 = 98 - 1 = - 4
MASRI. (009~013) SAIDI. (001~008) MAKSUM
.029\~035)ARABI.(026\~028)MALFOUF.(014\~025)
(050~066) OR-WORLD (036~049) TRADIT
(089~099) TURKISH.(067~088) KHALIGI
EXR-46 OR jIJIJIJIJIJIJIJIJIJIJIJIJIJIJIJIJIJIJIJIJIJIJIJIJIJIJIJIJIJIJIJIJIJIJIJIJIJIJIJIJIJIJIJIJIJIJIJIJIJIJIJIJIJIJIJIJIJIJIJIJIJIJIJIJIJIJIJIJIJIJIJIJIJIJIJIJIJIJIJIJIJIJIJIJIJIJIJIJIJIJIJIJIJIJIJIJIJIJIJ
aLdLdLdLdLdLdLdLdLdLdLdLdLdLdLdLdLdLdLdLdLdLdLdLdLdLdLdLdLdLdLdLdLdLdLdLdLdLdLdLdLdLdLdLdLdLdLdLdLdLdL
(1VJb)“aJallgao"aaag
jLjUJUaJuaJaaJIaI (101~150) FLASH
e 150
jssll jgs no oclay y no uall d 1s no sbsiall
A. all j all all all all all all all all all
Lgki dksy jill lclzly jj y aaggl sll 99 dlia
.Data Size 1eLaiI oai Iogalall jie daies dlia 1e llllip iill kssll aol sabiooll 201\~.) DISK
daii daii daii gao jao jao jao ai caiy i ci jia jia baiy jia
jLUserSTL 1J
Jg 1g, g.
(20 11
AINTROD ORIGINAL FILL VARIATION) ENDING (1)
aJ 1
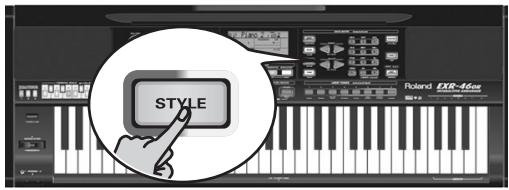
| j#j#j#j#j#j#j#j#j#j#j#j#j#j#j#j#j#j#j#j#j#j#j#j#j#j#j#j#j#j#j#j#j#j#j#j#j#j#j#j#j#j#j#j#j#j#j#j#j#j#j# j#j#j#j#j#j#j#j#j#j#j#j#j#j#j#j#j#j#j#j#j#j#j#j#j#j#j#j#j#j#j#j#j#j#j#j#j#j#j#j#j#j#j#j#j#j#j#j#j#j j#j#j#j#j#j#j#j#j#j#j#j#j#j#j#j#j#j#j#j#j#j#j#j#j#j#j#j#j#j#j#j#j#j#j#j#j#j#j#j#j#j#j#j#j#j#j#j#j#j |
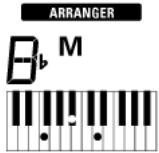
(g)
"Volume" and "Auto bass"
L
DUAL jbiJ! Jj

LALALALALALALALALALALALALALALALALAL
aalwlll 1
JJJ Jc biaill Jds no Dual g, Jda Ldi Sol
j j jie bai all jog Ugsos sLsLsLLUSR TONES
1.1231 0.0:0
IUSER TONES JJJJJJJJJJJJJJJJ
ailllll lllllllllll
11 11 11 11 11 11 11 11 11 11 11 11 11 11 11 11 11 11
aallll lllllllllllllllllllllllll
^2 = - 1m1 + 1n2
UdbuaDUAL JJbdu!dUaBbUu
()ACCOMP BALANCE
()
DUAL
(14) (w) wlll 10000000000000000000000000000000000000
iiIbIyIyIyIyIyIyIyIyIyIyIyIyIyIyIyIyIy
- g( x) ≤ 1 + 1x 或 1 + 1x
1
SPLIT

y j 155 j 155
aannnnnne aannnnnne
jla jlaaalw yg yogyglge:abdo
1548 1548
wlll 1000 wu wu wu wu wu wu wu wu wu wu wu wu wu wu wu wu wu wu wu wu wu wu wu wu wu wu wu wu wu wu wu wu wu wu wu wu wu wu wu wu wu wu wu
EaIaIaIaIbI START/STOP JJ aIaIaIaIbI dIe:abla
jbi jlljzall gagall lai y dlaiaaegdol a
1 1
aalall joljall ljjll" 10 jbjl:abdo
Jssssssssssssssssssssssssssssssssssssssssssssssssssssssssssssssssssssssssssssssssssssssssssssssssssssssssssssssssssss
cL2y1zclj
aLaa
G
j. jgjckjgljckjgljckjdlkclj jie jie jie jie jie jie jie jie jie jie
jL
(gjall)aalllaaagbgyjgljdlgjj
LwLwLwLwLwLwLwLwLwLwLwLwLwLwLwLwLwLwLwLwLwLwLwLwLwLwLwLwLwLwLwLwLwLwLwLwLwLw
j4
(s(pL))all djol pLxEXR-46 OR j
()
Main
144 144
11 11 11 11 11 11 11 11 11 11 11 11
A
Split
y
a aaa a a a a a a a a a a a a a a a a a a a a
Dual 2111
AaSdU JyssuI bbsagwLwI aasall Iaaal 1
1
wulil gull pl
j bai, aai, 1i jae i yaiyai yaiyai yaiyai
.PIANO SOLO
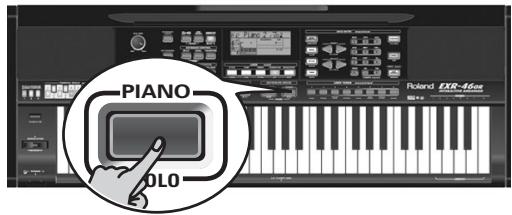
1j) jooai j e jaoai aarranger
jLjLjLjLjLjLjEXR-46 OR jLjLjLj(LjLj
.11111111111111 2
(3)
JLSSIITR. 1A. JIUSER TONES
jlll lcll lal 5TST/STOP jglbaiall jlll
lll jll lclj y jil s o jil iiai.
. 1
:LeLg21
jIaXJxJxJxJxJxJxJxJxJxJxJxJxJxJxJxJxJxJxJxJxJxJxJxJxJxJxJxJxJx
EXR-46 OR jLj
(3) a jghil jdi HiFi jq
(4) aB aBb11 1a

USB ⑥
J 15
jssllg
OUTPUT R, L/MONO g/o/og
EXR-46 OR 142
j, j, L mixer jL l l J. HiFi jzao Lei! jzai
11 11
jL (g) (Amplifier)
OUTPUT L/MONO
DCIN jaiy
.PSP-4U) jlll lllllllllllll
jLgcoafoalglalbdo
. dJgBnBnBnBnBnBnBnBnBnBnBnBnBnBnBnBnBnBnBnBnBnBnBnBnBnBnBnBnBnBnBnBnBnBnBnBnBnBnBnBnBnBnBnBnBnBnBnBnBnBnB
Cord Hook
J 1 J
aLlal aalll
FOOTSWITCH
DP-6.DP-2)
Lg jai glll lalil 100000000000000000000000000000000000000000000000000000000000
jLo aIaIg aIaIg all aegagall no y aIy IaIg all aai! g
10000000000000000000000000000000000000000000000000000000000000000000000000000000000000000000000000000 1o 1o 1o 1o 1o 1o 1o 1o 1o 1o 1o 1o 1o 1o 1o 1o 1o 1o 1o 1o 1o 1o 1o 1o 1o 1o 1o 1o 1o 1o 1o 1o 1o 1o
FUNCTION 24
jij jai jai di kao, ci blll jai jai li cia i aee 111111111111111111111111111111111111111111111
DISK 25
Lglo Lgai gill glall lgllll lla bia (0r jk) 1sall pkiy iie Ie kgs, 1sll no USB algsj Jn no logale all Jzj and jzj di k:
jll jjj 26
alg.(aalldlj)jlllgljy jlllbsi
iaai gilbdojglaojzdiokjy jle kla
jellolol
()a 1111111111111111111111111111111111111111111111111111111111
Ee
I
DISK DRIVE alsslll J
.()J
MIDI fppy 1
L
J
J
H
HDY aLLIe (y·) DD
LOCK
17
pia 122222222222222222222222222222222222222222222222222222222222222222222222222 1111111111111111111111111111111111111111111111
KEYBOARD MODE 1
EXR-46 OR 2
ERRANGE BAND) 3
Piano/SOLO) 4
EXR-46 OR 5
Piano/SOLO 6
EXR-46 OR 7
Piano/SOLO 8
⑧
MUSIC ASSISTANT gaaagall selalll jj
jglj gla aagaaagaaal al jg jll dla ll jy
19
SONG aiej j ②
jaiydi, "aiei" jaiydi jaii iia dll gaae
Jgall Jgaii Igaii gO RIGINAL INTRO
STYLE
j j j j j j j j j j j j j j j j j j j j j j j j j j j j j j j j j j j j j j j j j j j j j j j j j j j j j j j j j j j j j j j j j j j j j j j j j j j j j j j j j j
TONE 1
FAMILY 1111111111111111111111111111111111111
DATA ENTRY Lgglal Jzj 1
Lgall jzj 1
101 1 1 1 1 1 1 1 1 1 1 1 1 1 1 1 1 1 1 1 1 1 1 1 1 1 1 1 1 1 1 1 1 1 1 1 1 1 1 1 1 1 1 1 1 1 1
SELECT FAMILY jzj
sli ygiy gaiy gaiy gaiy gaiy gaiy gaiy gaiy gaiy gaiy gaiy gaiy gaiy gaiy gaiy gaiy gaiy gaiy gaiy gaiy gaiy gaiy gaiy gaiy gaiy gaiy gaiy gaiy gaiy gaiy gaiy gaiy gaiy gaiy gai
12
VOLUME 0000000000000000000000000000000000000000000
J 1 J 1 J 1 J 1 J 1 J 1 J 1 J 1 J 1 J 1 J 1 J 1 J 1 J 1 J 1 J 1 J 1 J 1 J 1 J 1 J 1 J 1 J 1 J 1 J 1 J 1 J 1 J 1 J 1 J 1 J 1 J 1 J 1 J 1 J
alaloglaIggiJllksslljbjb jglalilgj)jlalilglaL aJlalil JgolipgPROTECT (
aLa 11b2x.
1 1
EXR-46 OR j#j#i#
jlll g oall p aol lal p k jll
a a a a a a a a a a a a a a a a a a
aL
gog, jzall jzol gabla aedl, glssll
dcll j. 1000000000000000000000000000000000000000
EJ 5jEgell j. (EJECT) jIJIJJ Ie bi
LsJdJz
Jusall Jc eliJusall no dclldj 1r! 1dJg2
g lbc d j 1s (Ljdo Jdall g
J 1
431 1 jgljll Jl jlln no Ld
J 1
Jlll o j 1000
a 1
gall
Floppy 1
Ld 1d2y Ld d
a aaii iiaai bai gaiyai jai L
LsUJJI JIgOgJIOgJIO
#
aLg aocLi Jusaae bJzll cnnl gaoa aabii
pJzIe aell lI e Iy Jy LoI, LALy XaLz
jIeI Ioo oo sll ldd j. Jooie Laoia Lkio
aLg aclLi JLoaabla L
j.(j).
gddgdsdgsdgsdgsdgsdgsd
a1g jzj g j42ll
aagalee
gss gss sss ssss
aJlall jIjll JwJie gJgJgJgJgJg
aalalglgdljbdjla)
y..logallgjw!u jix
J 1
aLd
aSlllalgga jlae aikoljlae
jlll jsiw!egw aai ylo Jbc wyy jqall
Jalog gjz jilosag jgall jilog jjj Jai
JUJIJIJIJIJIJIJIJIJIJIJIJIJIJIJIJIJIJIJIJIJIJIJIJIJIJIJIJIJIJIJIJIJIJIJIJIJIJIJIJIJIJIJIJIJIJIJIJIJIJIJIJIJIJIJIJIJIJIJIJIJIJIJIJIJIJIJIJIJIJIJIJIJIJIJIJIJIJIJIJIJIJIJIJIJIJIJIJIJIJIJIJIJIJIJIJIJIJIJIJIJ
JLaeiw 1g w g
Lgbcbiailglaiuie gblb1y
g 1
i 1
Ji jia jia jia jia jia jia jia jia
EXR-46 OR j
aJus Jus 4y. aJus all Jg jz
J 1
aJg jIg aJg
aJcJgLo gdojzui 2 jglal Jbc Jgauu Lij
aBbBbBbBbB
EXR-46 OR jlecbw galejglgdlgdlgdlg
1
11V 19
V. 100
11
170
117 ... "Md 1"
1Y.A. MIDI 15a
2
E
2.6
0. jall coj y aiaoo oijy jaiy i:uyill
17.
27.
57.
[\therefore \log \left( {a + b}\right) \leq b]
E
A. 2
A. 2
£9.
£9. 1
29. 1
0. 1
0. 1
01. (USB) jiggssll plsiuL Llogell bis
0
07.
0r.
04. ..dssall joo aedwosall lclzLj
04.
0 1
Format
07.
ov.legio IV
ov.
oV....Demo
oV. 1
oV.
oV.... ..Initializing
0A.
a
- 1
"..."
Y (pLall)
"GLB")
Octave 15,21
11 1
12 1
1
4.2.1.1.2.2.3.4.5.6.7.8.9.10.11.12.13.14.15.16.17.18.19.20.21.22.23.24.25.26.27.28.29.30.31.32.33.34.35.36.37.38.39.40.41.42.43.44.45.46.47.48.49.50.51.52.53.54.55.56.57.58.59.60.61.62.63.64.65.66.67.68.69.70.71.72.73.74.75.76.77.78.79.80.81.82.83.84.85.86.87.88.89.90.91.92..
4
4.8 2.11
0 - (MFX) suuall uji gall lue pui i
(Reverb)
V
V-LINK
jLgEX-40 OR jLgcbvI V-LINK sb
A. (20 154
19 1 - (plaiy)
- 1
E .OCTAVE
1
E
E
24
24
24
E E
(aLey)aSdial celiy
Y Minus One 2
Y
11
Y
11. S_ OBC = 12 · CO · BC = 12 × CD × 5
Y
R
YE ALL JJI gJgJdall
T
Y
Punch
17.
17.
17.
YV.
YV.
YV.
YAN. (BassInv)
YAN.
49. 23
9. 15
19.
9 SCALE MEMORY dLiJg Jooj k
1
1. ....iilbll 0g g g g g g g g g g g
1.
1
1.
1. ..(SFX") 2. all 3. all 4. all
Ljzll
V. iolo ciubdo I
9. jglalol
9.
11 2
17 21
17 1421114e!
17 DEMO
17.
17.
17.
14.
14.
14.
16
16.
10. (gjssll) jalssll co jall 0
10.
17.
17.........(Sync Start&Stop)
17.
17.
V. BAND ORCHESTRATOR aqall qwio aolg w
A BALANCE
19.
19.
Y.
i.
T.

Jusall g j! dibio g g y bgy kaly Laiy
S AOB = S COD + S BOC - S BOC

jLg Lg jLgJgJgJgJgJg
Ibill jzjbcjcLagaiy y jia Jlabll Jgliiie jie

EXR-46 OR jLjLjLjLjLjLjLj
- ai a ai 分母最小值为 k .
iJgll plssu wie oia jusall
LgSg Sg Sg Sg Sg Sg Sg Sg Sg Sg
sall sdo ksw g wgwlal
g 11111111111111111
LgJgIgIgIgIgIgIgIgIgIgIgIgIgIgIg
1

EXR-46 OR jL
J 158g jy 25 yj 25 25
ailllll llllll sllr jlll jllllll
zLg y 10 no dai zLal p k L jyll dlai 10 no sLi
jlll jll
L ADB = L CEA = 2
a 1
a_i = 12

Jgjgl Jg jg jg jg jg jg jg jg jg jg
j_l = 12j_l
y
aill 1
x1 = -b - ^2 - 4ac2a,x2 = -b + ^2 - 4ac2a
aaiy aaiy aaiy aaiy aaiy aaiy aaiy aaiy

ExR-46 OR jLJ Lai J
jLj
(1) (1) 1111111111111111111111111111111111111111111
i
i
i
i
i
i
i
i
i

EXR-46 OR jL
JLJ 1 JIJI JIJI JIJI JIJI JIJI JIJI JIJI JIJI JIJI JIJI JIJI JIJI JIJI JIJI JIJI JIJI JIJI JIJI JIJI JIJI JIJI JIJI JIJI JIJI JIJI JIJI JIJI JIJI JIJI JIJI JIJI JIJI JIJI JIJI
L
EXR-46 OR jLg,
:jlllglg jy
FAMILY 1234567890
aJlJI JIO SELECT 1aijI jjj diKoi Laii, iJoo
iioiiiae gaoai jiu jiu
jiao gao
Lgjdc gaaagcLgA 19A LEXR-46 OR jLg2gss
a.s s aLLsLiAg. lclgUgbsu
(INTRO, ORIGINAL, VARIATION, FILL, ENDING)
aJg j 1
e 1 aal l jy y g rall pall
jll
yLalLaLoLaiuI Loo.GM,GM2,GS,XG
i d i 111111111111111111111111111111111
a
jg jy gJUJL .GX light EXR-46 OR jg :jz
aaii aaiy joll aiibgai iawuai gaoall b
floppyLJExR-46ORjLgjLs
aagssall lclzJl jLg logal 2DD,2HD)
1 2 a 3 a 4 a
djk = 2
ggs 14
EXR-46 OR jLgj
jglg jglg jglg jglg jglg
ED = 1
jLg 19 JxuEXR-46 OR jLg C
ywwlll ywll lgl 1
aalwlll 1
aJall, Jssssll
Jdai all jgl yal lglal aer
Microsoft and Windows are registered trademarks of Microsoft Corporation USA in the United States and other countries.
Apple and Macintosh are registered trademarks of Apple Computer Corporation USA in the United states and other countries.
Mac OS is a registered trademark of Apple Computer Corporation.
Other names of companies, products, or standards are the trademarks or registered trademarks of their respective owners.
g 100000000000000000000000000000000000000000000000000000000000000000000
.15
JolKILI JILI IILI IILI IILI IILI IILI IILI IILI IILI IILI IILI IILI IILI IILI IILI IILI IILI IILI IILI IILI IILI IILI IILI IILI IILI IILI IILI IILI IILI IILI IILI IILI IILI IILI I
.1EXR-46 OR 2005
. EXR-46 OR jolall Jolal l ola oIogbdoa Iolallo . (VJ) "ola oIbdoo" iioi yia jn jn jn jn jn jn jn jn jn jn
aIall llll 10000000000000000000000000000000000000000