RG-3 - Digital piano ROLAND - Free user manual and instructions
Find the device manual for free RG-3 ROLAND in PDF.


User questions about RG-3 ROLAND
0 question about this device. Answer the ones you know or ask your own.
Ask a new question about this device
Download the instructions for your Digital piano in PDF format for free! Find your manual RG-3 - ROLAND and take your electronic device back in hand. On this page are published all the documents necessary for the use of your device. RG-3 by ROLAND.
USER MANUAL RG-3 ROLAND
Before using this unit, carefully read the sections entitled: "IMPORTANT SAFETY INSTRUCTIONS" (p. 2), "USING THE UNIT SAFELY" (p. 3-5), and "IMPORTANT NOTES" (p. 6-8). These sections provide important information concerning the proper operation of the unit. Additionally, in order to feel assured that you have gained a good grasp of every feature provided by your new unit, owner's manual should be read in its entirety. The manual should be saved and kept on hand as a convenient reference.

CAUTION
RISK OF ELECTRIC SHOCK DO NOT OPEN

ATTENTION: RISQUE DE CHOC ELECTRIQUE NE PAS OUVRI
CAUTION: TO REDUCE THE RISK OF ELECTRIC SHOCK,
DO NOT REMOVE COVER (OR BACK).
NO USER-SERVICEABLE PARTS INSIDE.
REFER SERVICING TO QUALIFIED SERVICE PERSONNEL.

The lightning flash with arrowhead symbol, within an equilateral triangle, is intended to alert the user to the presence of uninsulated "dangerous voltage" within the product's enclosure that may be of sufficient magnitude to constitute a risk of electric shock to persons.

The exclamation point within an equilateral triangle is intended to alert the user to the presence of important operating and maintenance (servicing) instructions in the literature accompanying the product.
INSTRUCTIONS PERTAINING TO A RISK OF FIRE, ELECTRIC SHOCK, OR INJURY TO PERSONS.
IMPORTANT SAFETY INSTRUCTIONS SAVE THESE INSTRUCTIONS
WARNING - When using electric products, basic precautions should always be followed, including the following:
- Read these instructions.
- Keep these instructions.
- Heed all warnings.
- Follow all instructions.
- Do not use this apparatus near water.
- Clean only with a dry cloth.
- Do not block any of the ventilation openings. Install in accordance with the manufacturers instructions.
- Do not install near any heat sources such as radiators, heat registers, stoves, or other apparatus (including amplifiers) that produce heat.
-
Do not defeat the safety purpose of the polarized or grounding-type plug. A polarized plug has two blades with one wider than the other. A grounding type plug has two blades and a third grounding prong. The wide blade or the third prong are provided for your safety. If the provided plug does not fit into your outlet, consult an electrician for replacement of the obsolete outlet.
-
Protect the power cord from being walked on or pinched particularly at plugs, convenience receptacles, and the point where they exit from the apparatus.
- Only use attachments/accessories specified by the manufacturer.
- Unplug this apparatus during lightning storms or when unused for long periods of time.
- Refer all servicing to qualified service personnel. Servicing is required when the apparatus has been damaged in any way, such as power-supply cord or plug is damaged, liquid has been spilled or objects have fallen into the apparatus, the apparatus has been exposed to rain or moisture, does not operate normally, or has been dropped.
For the U.K.
WARNING: THIS APPARATUS MUST BE EARTHED
IMPORTANT: THE WIRES IN THIS MAINS LEAD ARE COLOURED IN ACCORDANCE WITH THE FOLLOWING CODE.
GREEN-AND-YELLOW: EARTH, BLUE: NEUTRAL, BROWN: LIVE
As the colours of the wires in the mains lead of this apparatus may not correspond with the coloured markings identifying the terminals in your plug, proceed as follows:
The wire which is coloured GREEN-AND-YELLOW must be connected to the terminal in the plug which is marked by the letter E or by the safety earth symbol 山 or coloured GREEN or GREEN-AND-YELLOW.
The wire which is coloured BLUE must be connected to the terminal which is marked with the letter N or coloured BLACK.
The wire which is coloured BROWN must be connected to the terminal which is marked with the letter L or coloured RED.
USING THE UNIT SAFELY
INSTRUCTIONS FOR THE PREVENTION OF FIRE, ELECTRIC SHOCK, OR INJURY TO PERSONS
About WARNING and CAUTION Notices
| ▲WARNING | Used for instructions intended to alert the user to the risk of death or severe injury should the unit be used improperly. |
| ▲CAUTION | Used for instructions intended to alert the user to the risk of injury or material damage should the unit be used improperly. * Material damage refers to damage or other adverse effects caused with respect to the home and all its furnishings, as well to domestic animals or pets. |
About the Symbols
| ▲ | The △ symbol alerts the user to important instructions or warnings. The specific meaning of the symbol is determined by the design contained within the triangle. In the case of the symbol at left, it is used for general cautions, warnings, or alerts to danger. |
| ◎ | The ⊙ symbol alerts the user to items that must never be carried out (are forbidden). The specific thing that must not be done is indicated by the design contained within the circle. In the case of the symbol at left, it means that the unit must never be disassembled. |
| ◆ | The ● symbol alerts the user to things that must be carried out. The specific thing that must be done is indicated by the design contained within the circle. In the case of the symbol at left, it means that the power-cord plug must be unplugged from the outlet. |
ALWAYS OBSERVE THE FOLLOWING
WARNING
- Before using this unit, make sure to read the instructions below, and the Owner's Manual.

- Connect mains plug of this model to a mains socket outlet with a protective earthing connection.

- Do not open or perform any internal modifications on the unit.

- Do not attempt to repair the unit, or replace parts within it (except when this manual provides specific instructions directing you to do so). Refer all servicing to your retailer, the nearest Roland Service Center, or an authorized Roland distributor, as listed on the "Information" page.

-
Never use or store the unit in places that are:
-
Subject to temperature extremes (e.g., direct sunlight in an enclosed vehicle, near a heating duct, on top of heat-generating equipment); or are
- Damp (e.g., baths, washrooms, on wet floors); or are
- Humid; or are
- Exposed to rain; or are
- Dusty; or are
-
Subject to high levels of vibration.
-
When installing the piano, be sure to fasten the caster using the supplied caster cup.


WARNING
- Make sure you always have the unit placed so it is level and sure to remain stable. Never place it on stands that could wobble, or on inclined surfaces.

- The unit should be connected to a power supply only of the type described in the operating instructions, or as marked on the bottom of unit.

- Use only the attached power-supply cord. Also, the supplied power cord must not be used with any other device.

- Do not excessively twist or bend the power cord, nor place heavy objects on it. Doing so can damage the cord, producing severed elements and short circuits. Damaged cords are fire and shock hazards!

- This unit, either alone or in combination with an amplifier and headphones or speakers, may be capable of producing sound levels that could cause permanent hearing loss. Do not operate for a long period of time at a high volume level, or at a level that is uncomfortable. If you experience any hearing loss or ringing in the ears, you should immediately stop using the unit, and consult an audiologist.

- Do not allow any objects (e.g., flammable material, coins, pins); or liquids of any kind (water, soft drinks, etc.) to penetrate the unit.


WARNING
-
Immediately turn the power off, remove the power cord from the outlet, and request servicing by your retailer, the nearest Roland Service Center, or an authorized Roland distributor, as listed on the "Information" page when:
-
The power-supply cord, or the plug has been damaged; or
- If smoke or unusual odor occurs
- Objects have fallen into, or liquid has been spilled onto the unit; or
- The unit has been exposed to rain (or otherwise has become wet); or
-
The unit does not appear to operate normally or exhibits a marked change in performance.
-
In households with small children, an adult should provide supervision until the child is capable of following all the rules essential for the safe operation of the unit.

- Protect the unit from strong impact. (Do not drop it!)

- Do not force the unit's power-supply cord to share an outlet with an unreasonable number of other devices. Be especially careful when using extension cords—the total power used by all devices you have connected to the extension cord's outlet must never exceed the power rating (watts/amperes) for the extension cord. Excessive loads can cause the insulation on the cord to heat up and eventually melt through.

- Before using the unit in a foreign country, consult with your retailer, the nearest Roland Service Center, or an authorized Roland distributor, as listed on the "Information" page.

- Batteries must never be recharged, heated, taken apart, or thrown into fire or water.


- DO NOT play a CD-ROM disc on a conventional audio CD player. The resulting sound may be of a level that could cause permanent hearing loss. Damage to speakers or other system components may result.

- Do not put anything that contains water (e.g., flower vases) on this unit. Also, avoid the use of insecticides, perfumes, alcohol, nail polish, spray cans, etc., near the unit. Swiftly wipe away any liquid that spills on the unit using a dry, soft cloth.

CAUTION
- The unit should be located so that its location or position does not interfere with its proper ventilation.

- Always grasp only the plug on the power-supply cord when plugging into, or unplugging from, an outlet or this unit.

- At regular intervals, you should unplug the power plug and clean it by using a dry cloth to wipe all dust and other accumulations away from its prongs. Also, disconnect the power plug from the power outlet whenever the unit is to remain unused for an extended period of time. Any accumulation of dust between the power plug and the power outlet can result in poor insulation and lead to fire.

- Try to prevent cords and cables from becoming entangled. Also, all cords and cables should be placed so they are out of the reach of children.

- If the unit could become a hazard if it moves, all caster wheels should be locked or fixed in place once the unit has been placed at the place of installation, or has been loaded onto a vehicle.

- Never climb on top of, nor place heavy objects on the unit.

- Never handle the power cord or its plugs with wet hands when plugging into, or unplugging from, an outlet or this unit.

- If you need to move the instrument, take note of the precautions listed below. Since this product is very heavy, you must make sure that a sufficient number of people are on hand to help, so you can lift and move it safely, without causing strain. Make sure to have a firm grip, to protect yourself from injury and the instrument from damage.

- Check to make sure the bolts securing the unit to the stand have not become loose. Fasten them again securely whenever you notice any loosening.
- Disconnect the power cord.
- Disconnect all cords coming from external devices.
- Close the lid.
- Fold down the music stand.
CAUTION
- Before cleaning the unit, turn off the power and unplug the power cord from the outlet (p. 20).

- Whenever you suspect the possibility of lightning in your area, pull the plug on the power cord out of the outlet.

- If used improperly, batteries may explode or leak and cause damage or injury. In the interest of safety, please read and observe the following precautions (p. 32).

- Carefully follow the installation instructions for batteries, and make sure you observe the correct polarity.

- Avoid using new batteries together with used ones. In addition, avoid mixing different types of batteries.

- Remove the batteries whenever the unit is to remain unused for an extended period of time.
- If a battery has leaked, use a soft piece of cloth or paper towel to wipe all remnants of the discharge from the battery compartment. Then install new batteries. To avoid inflammation of the skin, make sure that none of the battery discharge gets onto your hands or skin. Exercise the utmost caution so that none of the discharge gets near your eyes. Immediately rinse the affected area with running water if any of the discharge has entered the eyes.
-
Never keep batteries together with metallic objects such as ballpoint pens, necklaces, hairpins, etc.
-
Used batteries must be disposed of in compliance with whatever regulations for their safe disposal that may be observed in the region in which you live.

- Be careful so you don't get your fingers pinched when you handle any moving parts such as the following.

Adult supervision is recommended whenever small children use the unit.
Moving Parts
Top (p. 18)
Lid (p. 19)
Music Rest (p. 18)
- Topsticks (p. 18)
- Ext Memory Port Cover (p. 22)
- Lid Lock (p. 19)
CAUTION

- Always keep the following parts including with the RG-3 and small components that may be removed out of the reach of small children to avoid accidental ingestion of these parts.
Included Parts
- Piano leg washers
- Bolts, washers, and springs used in attaching the pedals
- Cord clamps (using double-sided tape) used for securing pedal cords and cord clamp attachment screws
- Pedal stay securing screws
Removable parts
- USB memory anti-theft lock (iron plate), Anti-theft lock securing screw
In addition to the items listed under "IMPORTANT SAFETY INSTRUCTIONS" and "USING THE UNIT SAFELY" on pages 2 and 3-5, please read and observe the following:
Power Supply
- Do not connect this unit to same electrical outlet that is being used by an electrical appliance that is controlled by an inverter (such as a refrigerator, washing machine, microwave oven, or air conditioner), or that contains a motor. Depending on the way in which the electrical appliance is used, power supply noise may cause this unit to malfunction or may produce audible noise. If it is not practical to use a separate electrical outlet, connect a power supply noise filter between this unit and the electrical outlet.
- Batteries are supplied with the unit. The life of these batteries may be limited, however, since their primary purpose was to enable testing.
- Before connecting this unit to other devices, turn off the power to all units. This will help prevent malfunctions and/or damage to speakers or other devices.
- Although the LCD and LEDs are switched off when the POWER switch is switched off, this does not mean that the unit has been completely disconnected from the source of power. If you need to turn off the power completely, first turn off the POWER switch, then unplug the power cord from the power outlet. For this reason, the outlet into which you choose to connect the power cord's plug should be one that is within easy reach and readily accessible.
Placement
- Using the unit near power amplifiers (or other equipment containing large power transformers) may induce hum. To alleviate the problem, change the orientation of this unit; or move it farther away from the source of interference.
- This device may interfere with radio and television reception. Do not use this device in the vicinity of such receivers.
- Noise may be produced if wireless communications devices, such as cell phones, are operated in the vicinity of this unit. Such noise could occur when receiving or initiating a call, or while conversing. Should you experience such problems, you should relocate such wireless devices so they are at a greater distance from this unit, or switch them off.
-
Do not expose the unit to direct sunlight, place it near devices that radiate heat, leave it inside an enclosed vehicle, or otherwise subject it to temperature extremes. Also, do not allow lighting devices that normally are used while their light source is very close to the unit (such as a piano light), or powerful spotlights to shine upon the same area of the unit for extended periods of time. Excessive heat can deform or discolor the unit.
-
When moved from one location to another where the temperature and/or humidity is very different, water droplets (condensation) may form inside the unit. Damage or malfunction may result if you attempt to use the unit in this condition. Therefore, before using the unit, you must allow it to stand for several hours, until the condensation has completely evaporated.
- Do not allow rubber, vinyl, or similar materials to remain on the unit for long periods of time. Such objects can discolor or otherwise harmfully affect the finish.
- Do not allow objects to remain on top of the keyboard. This can be the cause of malfunction, such as keys ceasing to produce sound.
- Do not paste stickers, decals, or the like to this instrument. Peeling such matter off the instrument may damage the exterior finish.
Maintenance
-
Since your piano has a polished finish that is as delicate as that found on finely crafted wooden furniture, it needs careful, periodic care. A few important suggestions concerning the proper care of the unit follow.
-
For dusting, using a soft, clean cloth and/or piano-use feather duster. Be sure to wipe gently. Even the tiniest grains of sand or grit can leave scratches on the surface if too much force is applied while wiping. Do not use any cleaners or detergents, since they might deteriorate the surface of the cabinet, and produce cracks.
-
If the cabinet's surface loses its luster, wipe it thoroughly with a soft cloth dampened with a little of the polishing liquid. Do not use any cleaners or detergents, since they might deteriorate the surface of the cabinet, and produce cracks. Do not use dusting cloths that contain chemicals.
-
Never use benzine, thinners, alcohol or solvents of any kind, to avoid the possibility of discoloration and/or deformation.
- The pedals of this unit are made of brass. Brass eventually darkens as the result of the natural oxidization process. If the brass becomes tarnished, polish it using commercially available metal polisher.
Repairs and Data
- Please be aware that all data contained in the unit's memory may be lost when the unit is sent for repairs. Important data should always be backed up on a USB memory or floppy disk, or written down on paper (when possible). During repairs, due care is taken to avoid the loss of data. However, in certain cases (such as when circuitry related to memory itself is out of order), we regret that it may not be possible to restore the data, and Roland assumes no liability concerning such loss of data.
Additional Precautions
- Please be aware that the contents of memory can be irretrievably lost as a result of a malfunction, or the improper operation of the unit. To protect yourself against the risk of loosing important data, we recommend that you periodically save a backup copy of important data you have stored in the unit's memory on a USB memory or floppy disk.
- Unfortunately, it may be impossible to restore the contents of data that was stored in the unit's memory, on a USB memory, or on a floppy disk once it has been lost. Roland Corporation assumes no liability concerning such loss of data.
- Use a reasonable amount of care when using the unit's buttons, sliders, or other controls; and when using its jacks and connectors. Rough handling can lead to malfunctions.
- Never strike or apply strong pressure to the display.
- When connecting / disconnecting all cables, grasp the connector itself—never pull on the cable. This way you will avoid causing shorts, or damage to the cable's internal elements.
- A small amount of heat will radiate from the unit during normal operation.
- To avoid disturbing your neighbors, try to keep the unit's volume at reasonable levels. You may prefer to use headphones, so you do not need to be concerned about those around you (especially when it is late at night).
- When you need to transport the unit, pack it in shock-absorbent material. Transporting the unit without doing so can cause it to become scratched or damaged, and could lead to malfunction.
- Do not apply undue force to the music stand while it is in use.
- Some connection cables contain resistors. Do not use cables that incorporate resistors for connecting to this unit. The use of such cables can cause the sound level to be extremely low, or impossible to hear. For information on cable specifications, contact the manufacturer of the cable.
- Before opening or closing the keyboard lid, always make sure that no pets or other small animals are located on top of the instrument (in particular, they should be kept away from the keyboard and its lid). Otherwise, due to the structural design of this instrument, small pets or other animals could end up getting trapped inside it. If such a situation is encountered, you must immediately switch off the power and disconnect the power cord from the outlet. You should then consult with the retailer from whom the instrument was purchased, or contact the nearest Roland Service Center.
Handling Floppy Disks (Using Optional Floppy Disk Drive)
-
Floppy disks contain a plastic disk with a thin coating of magnetic storage medium. Microscopic precision is required to enable storage of large amounts of data on such a small surface area. To preserve their integrity, please observe the following when handling Floppy disks:
-
Never touch the magnetic medium inside the disk.
- Do not use or store Floppy disks in dirty or dusty areas.
- Do not subject Floppy disks to temperature extremes (e.g., direct sunlight in an enclosed vehicle). Recommended temperature range: 10 to 50^ (50 to 122^ ).
-
Do not expose Floppy disks to strong magnetic fields, such as those generated by loudspeakers.
-
Floppy disks have a "write protect" tab which can protect the disk from accidental erasure. It is recommended that the tab be kept in the PROTECT position, and moved to the WRITE position only when you wish to write new data onto the disk.
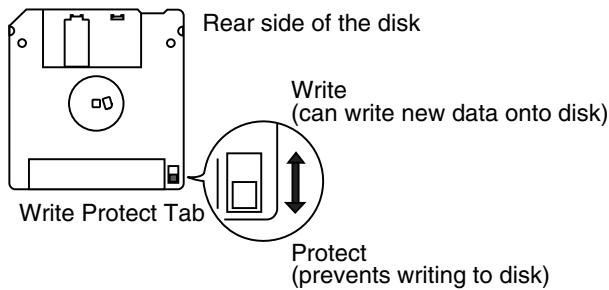
- The identification label should be firmly affixed to the disk. Should the label come loose while the disk is in the drive, it may be difficult to remove the disk.
- Store all disks in a safe place to avoid damaging them, and to protect them from dust, dirt, and other hazards. By using a dirty or dust-ridden disk, you risk damaging the disk, as well as causing the disk drive to malfunction.
- Disks containing performance data for this unit should always be locked (have their write protect tab slid to the "Protect" position) before you insert them into the drive on some other unit (except the PR-300, or a product in the HP-G, MT, KR, or Atelier families), or into a computer's drive. Otherwise (if the write protect tab remains in the "Write" position), when you perform any disk operations using the other device's disk drive (such as checking the contents of the disk, or loading data), you risk rendering the disk unreadable by this unit's disk drive.
Handling the CDs (CD-ROMs)
-
When handling the discs, please observe the following.
-
Do not touch the encoded surface of the disc.
- Do not use in dusty areas.
-
Do not leave the disc in direct sunlight or an enclosed vehicle.
-
Avoid touching or scratching the shiny underside (encoded surface) of the disc. Damaged or dirty CD-ROM discs may not be read properly. Keep your discs clean using a commercially available CD cleaner.
- Keep the disc in the case.
- Do not keep the disc in the CD drive for a long time.
- Do not put a sticker on the label of the disc.
- Wipe the disc with a soft and dry cloth radially from inside to outside. Do not wipe along circumference.
- Do not use benzine, record cleaner spray or solvents of any kind.
- Do not bend the disc. Bending discs may prevent proper reading and writing of data, and may further result in malfunction.
Using USB Memory
- When connecting USB memory, make sure to press it until it is fully inserted.
- Never touch the terminals of the USB memory. Also, avoid getting the terminals dirty.
-
USB memory is constructed using precision components; handle the cards carefully, paying particular note to the following.
-
To prevent damage to the USB memory from static electricity, be sure to discharge any static electricity from your own body before handling the USB memory.
- Do not touch or allow metal to come into contact with the contact portion of the USB memory.
- Do not bend, drop, or subject USB memory to strong shock or vibration.
- Do not keep USB memory in direct sunlight, in closed vehicles, or other such locations (storage temperature: 0 to 50^ ).
- Do not allow USB memory to become wet.
-
Do not disassemble or modify the USB memory.
-
Insert the USB memory in the Ext Memory port evenly and without undue force. Forcing the USB memory may damage the Ext Memory port.
- Do not insert any object other than the USB memory (e.g., wires, coins, other types of disks, etc.) in the Ext Memory port. This may damage the Ext Memory port.
- Do not subject the Ext Memory port cover or connected USB memory to excessive stress.
-
Close the USB memory cover when using the USB memory for extended periods.
-
GS ( Ⓞ ) is a registered trademark of Roland Corporation.
- Microsoft and Windows are registered trademarks of Microsoft Corporation.
- Mac OS is a trademark of Apple Computer, Inc.
- XGlite (XG) is a registered trademark of Yamaha Corporation.
- This device in part makes use of Independent JPEG Group software.
- All product names mentioned in this document are trademarks or registered trademarks of their respective owners.
Introduction
Thank you, and congratulations on your choice of the Roland RG-3 Digital Grand Piano.
The RG-3 is sure to be highly appreciated, not only for the authentic piano performances it offers, but also for its extensive selection of player piano functions.
In order to enjoy reliable performance of your new keyboard for many years to come, please take the time to read through this manual in its entirety.
Main Features
Piano Sounds with Rich Resonance and Wide-Ranging Expressiveness
- The stereo sampling piano sound generator realistically reproduces even the sound of the hammers striking the strings, producing the tones of a high-quality concert grand piano.
Maximum polyphony of 128 notes ensures that you can use the pedal freely without running out of notes.
"Ivory Feel" Keyboard Provides Grand Piano Touch and Feel
- The RG-3 features an "ivory feel" keyboard, which thanks to the latest technology, reproduces the comfortable touch and feel of ivory (used for the white keys) and ebony (used for the black keys), materials reputed to be the best for use for piano keyboards. The white keys are made using a two-piece construction consisting of a surface material added to the basic key material. They have a natural appearance and just the right rigidity and response.
- The RG-3 promises superior performance with features such as Progressive Hammer Action II (PHA II), which reproduces the touch of a grand piano and provides a heavier feel in the lower registers, and lighter, quicker response in the upper registers, while also accurately reproducing the distinctive clicking feel that occurs when the keys are played gently (escapement).
- The instrument has been treated to provide antibacterial protection, so you can enjoy long years of clean, worry-free use.
Roland Digital Grand Brings Refinement to Interior Style
- The RG-3 exhibits elegance in form with a beautiful black, mirror-like surface. With features just like those found on an acoustic grand, such as a lid that opens and closes and retractable music rest, this instrument is a perfect match for lounge or living room.
- The simple, modern, and stylish panel design makes switching tones and making settings a snap.
Full Complement of Player Piano Functions
- The RG-3 comes pre-programmed with internal jazz and classical song data.
You can also connect a commercially available USB CD drive or optional floppy disk drive to play CD-ROMs containing saved SMF files, audio CDs, and a variety of other song data. What's more, you can add to your collection of song data by copying songs stored on USB memory, on floppy disks, and on CD-ROMs to the RG-3's "Favorites." - Also included is a convenient remote control, which you can use for selecting songs, adjusting volume balances, and even for switching the images that appear in external displays—simply and easily.
You can connect an external display or television set to the RG-3 for enlarged displays of the Song Select screen, karaoke screen (lyrics screen), notation, and even slide shows.
Instrument Endowed with Superior Basic Functions
- The RG-3 also is programmed with 20 carefully selected performance tones, including two types of grand piano tones, which you can select according to your own taste. What's more, the settings for the "key touch," "hammer response," and other precision tone adjustment settings that performers demand can be stored in the RG-3 itself.
- On top of this, a newly designed sound system puts the focus on the sound of the piano to achieve a luscious, natural piano sound.
Professional-Level Features and Specifications
- The RG-3 also includes a lid lock feature to prevent tampering during automatic performances and an Ext Memory port lock to prevent theft of the connected USB memory.
- Since the RG-3 is a digital instrument, it has no strings and therefore requires no tuning.
- You can connect an external display or television to the piano to run slide shows using whatever images you prefer and, with a microphone connected, you can add echo and harmonies to microphone vocals and use the Transformer function to change the sound of the vocals.
Conventions Used in This Manual
This manual uses the following conventions in the interest of simpler, more concise instructions.
- Button names are enclosed in square brackets "[ ]", as in [Song] button.
- An asterisk (*) or a at the beginning of a paragraph indicates a note or precaution. These should not be ignored.
(p. **) refers to pages within the manual.
IMPORTANT SAFETY INSTRUCTIONS. 2
USING THE UNIT SAFELY 3
IMPORTANT NOTES 6
Introduction 9
Main Features 9
Conventions Used in This Manual 10
Panel Descriptions 15
Front Panel. 15
Jack Panel (RG-3's Bottom Left Panel) 16
RG-3's Bottom Right Panel 17
Installing the Floppy Disk Drive 17
Before You Start Playing 18
Opening and Closing the Top 18
Opening and Closing the Lid 19
Using the Lid Lock. 19
Connecting the Pedal Cord and the Power Cord 19
Turning the Power On and Off 20
Turning On the Power 20
Turning Off the Power 20
Adjusting the Sound's Volume and Brilliance 20
About the Pedals 20
Connecting Headphones 21
Connecting a Microphone 21
Connecting USB Memory 22
Connecting the Memory 22
About the Screens 23
Main Screens. 23
Adjusting the Contrast of the Screen 23
Chapter 1. Playing Back Songs 24
Look at What You Can Do with the RG-3! 24
Listening to Songs 25
[Song] Button Functions 25
Listening to the Tone Demos 26
Listening to the Internal Songs 26
Listening to Songs on CDs. 28
Listening to Songs on USB Memory and Floppy Disks 31
Using the Remote Control 32
Installing Batteries in the Remote Control 32
How to Use the Remote Control. 33
About the Remote Control 34
Changing the Song Tempo. 36
Using the Karaoke Feature 36
Changing the Key of the Song Being Played (Playback Transpose) 37
Adding Echo to the Mic Vocals (Mic Echo) 39
Copying Songs. 40
Copying Songs Stored on USB Memory, CD-ROMs, and Floppy Disks to the "Favorites". 40
Deleting Songs Saved to the "Favorites," USB Memory, and Floppy Disks. 43
Chapter 2.
Using the RG-3 with an External Display or Television..... 45
Connecting an External Display 45
Making the Connections 45
Changing the Display Settings. 46
Connecting a Television 47
Making the Connections 47
Switching Television Formats 47
Selecting What is To Be Displayed on the External Display or Television. 48
Displaying Favorite Images on an External Display or Television (Slide Show)....49
When Using a USB Memory 49
When Using a VIMA CD-ROM (VIMA TUNES) 51
Changing the Background for the Lyrics Screen 52
Chapter 3. Performance 53
Performing with a Variety of Sounds 53
Changing the Volume Balance of the Layered Tones (Layer Balance) 54
Making Fine Adjustments to the Piano Sound (Piano Customize) 55
Adjusting the Keyboard Touch (Key Touch) 55
Changing the Timing of Sounds
According to the Force Used to Press the Keys (Hammer Response) 56
Playing Sounds When the Keys Are Released (Key Off Resonance) 57
Producing the Resonance of the Strings
When the Keys Are Played (String Resonance) 58
Producing the Resonance of the Strings
When the Keys Are Played (Damper Resonance) 59
Adjusting the Sound to Achieve the Preferred Tone Quality (Equalizer) 60
Changing the Pitch of the Keyboard Sound (Transpose) 61
Tuning to Other Instruments' Pitches (Master Tuning) 63
Setting the Tuning Curve (Stretched Tuning) 64
Changing the Tuning 65
Setting the Tonic 66
Playing Different Tones with the Left and Right Hands (Split Performance) 67
Changing the Keyboard's Split Point. 68
Adding Reverberation to the Sound (Reverb) 69
Assigning Functions to Pedals 70
Changing the Volume Balance of the Accompaniment and the Keyboard. 72
Remembering the Settings
Even When the Power is Turned Off (Memory Backup) 73
Restoring the Factory Settings (Factory Reset) 74
Chapter 4. Recording the Performance 75
Notes Regarding Recording 75
Recording Performances 75
Play Back the Recorded Performance 76
Saving Recorded Performances 77
Deleting Performances Saved to the "Favorites" or USB Memory 78
Chapter 5. User Program Registration 79
Saving Performance Settings (User Program) 80
Calling Up Saved User Programs 81
Saving the User Program Sets. 82
Loading Saved User Program Sets 84
Deleting Saved User Program Sets. 86
Using the Pedal to Switch User Programs 88
Chapter 6. Changing Various Settings 89
Preventing Changes to the Current Settings (Panel Lock) 89
Making Detailed Settings 89
Changing the Remote Control Settings 90
Disabling Use of the Remote Control 90
Changing the Functions of the Remote Control's Buttons 90
Changing the CD Settings 91
Adjusting CD and Audio File Levels 91
Enjoying Karaoke with Commercial CDs (Center Cancel) 92
Switching VIMA CD-ROM Recommended Tones 92
Initializing the User Memory, USB Memory, and Floppy Disks. 93
Using the V-LINK Function 94
Playing the Automatic Demos. 94
Muting or Reducing the Volume of a Specific Part (Minus One/Guide) 95
Changing the Notation Display Settings 96
Changing the Infrared Transmission Function Settings. 97
Switching Infrared Transmissions On and Off (Infrared Function) 97
SettingPlaybackAfter theSongisTransferred(InfraredPlayback) 97
Chapter 7. Connecting External Devices. 98
Connecting to Audio Equipment 98
Connectors 98
Making the Connections 98
Connecting MIDI Devices 99
What'sMIDI? 99
Connectors 99
Making the Connections 99
Connection Examples 99
Making MIDI-related Settings 100
MIDI Transmit Channel Settings 100
Disconnecting the Internal Sound Generator and Keyboard (Local Control) 100
Sending Tone Change Messages (Program Change/Bank Select MSB/Bank Select LSB) 101
Sending Recorded Performance Data to a MIDI Device (Composer MIDI Out) 102
Connecting to the Computer. 103
Making the Settings for the USB Driver 103
Appendices 104
Troubleshooting 104
Error Messages 106
Tone List 107
Internal Song List. 108
Parameters Stored to Internal Memory 109
Parameters Stored in Memory Backup 109
Parameters Stored in the User Program 109
Music Files That the RG-3 Can Use 110
The RG-3 allows you to use the following music files 110
About the RG-3 Sound Generator 110
MIDI Implementation Chart 111
Main Specifications 112
Index 114
Panel Descriptions
Front Panel
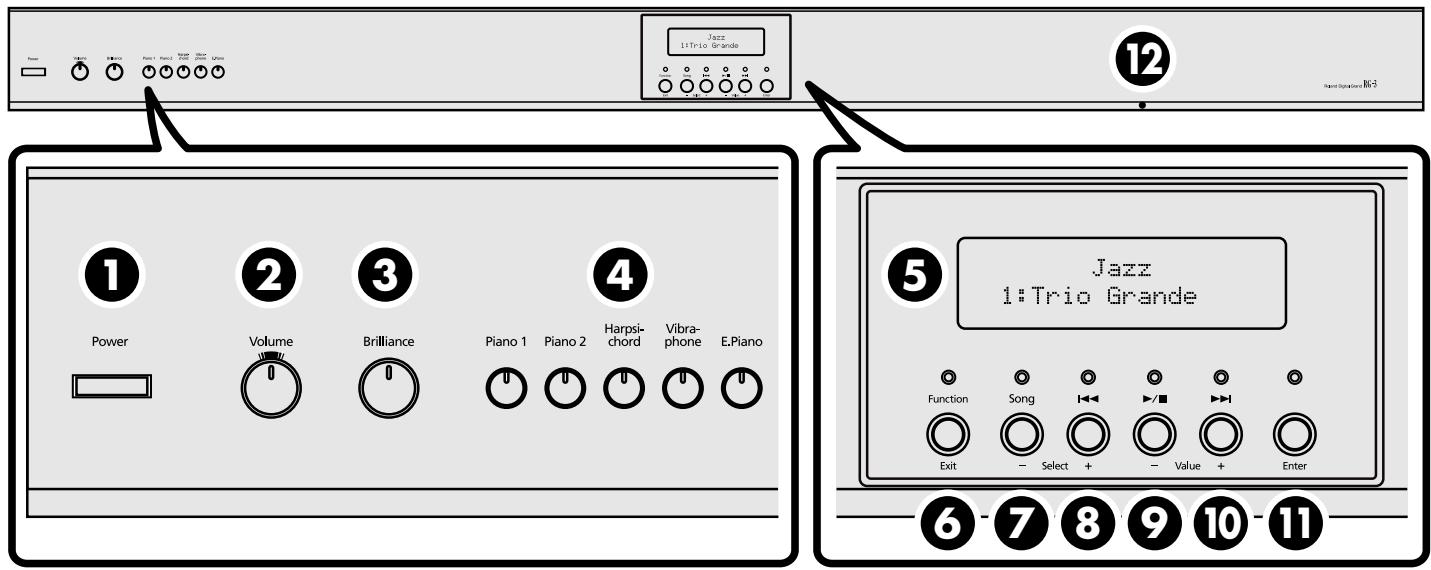
1 [Power] switch
Turns the power on/off (p. 20).
2 [Volume] knob
Adjusts the overall volume level (p. 20).
3 [Brilliance] knob
Adjusts the tone brightness (p. 20).
4 Tone buttons
They are used to choose the kinds of tones (tone groups) played by the keyboard (p. 53).
[Piano 1] button
[Piano 2] button
[Harpsichord] button
[Vibraphone] button
[E.Piano] button
5 Display
Tone and song names and the values of various settings are displayed here (p. 23).
6 [Function] (Exit) button
This switches the RG-3 to the Function screen (p. 23).
You can make various different settings in the Function screen, including settings for the master tuning and temperaments.
7 [Song] (Select-) button
This displays the Song Select screen (p. 23). The song genre is switched each time you press this button while the Song Select screen is displayed (p. 25).
When the Function screen is displayed, this button is used to select the item for which settings are to be made (p. 89).
8 [14] (Select +) button
Press this button while the Song Select screen is displayed to select the previous song (p. 26, p. 30, p. 31).
When the Function screen is displayed, this button is used to select the item for which settings are to be made (p. 89).
9 [▶■] (Value-) button
Press this button while the Song Select screen is displayed to start and stop playback of the song (p. 26, p. 30, p. 31).
Press this button while the Function screen is displayed to change the value of a setting (p. 89).
10 [▶] (Value +) button
Press this button while the Song Select screen is displayed to select the next song (p. 26, p. 30, p. 31). Press this button while the Function screen is displayed to change the value of a setting (p. 89).
11 [Enter] button
Press this button while the Function screen is open to make even more detailed settings.
12 Infrared Receiver
Point the remote control at this sensor when using the remote control to operate the RG-3 (p. 33).
Jack Panel (RG-3's Bottom Left Panel)
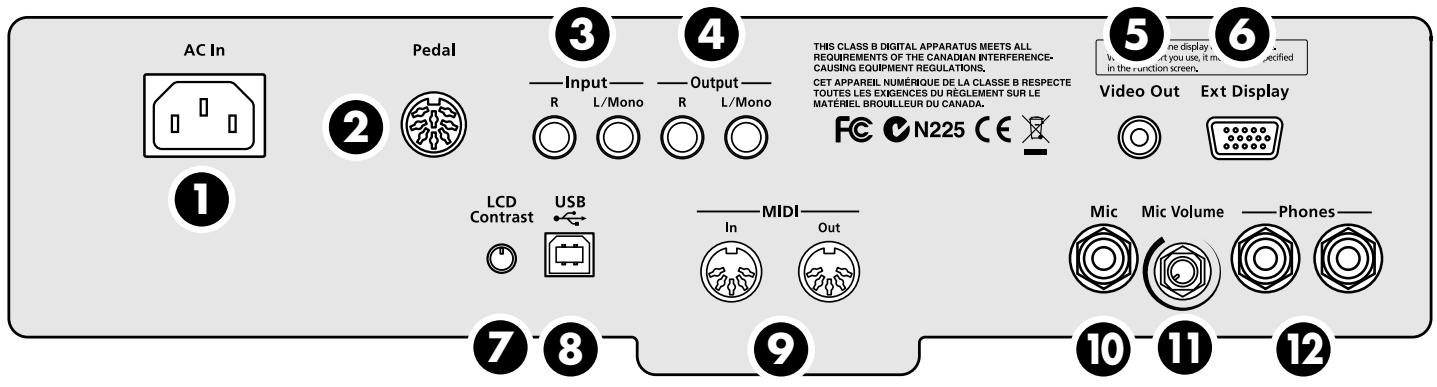
1 AC Inlet
Connect the included power cord to this inlet (p. 19).
2 Pedal connector
Connect the pedal cord here (p. 19).
3 Input jacks
You can connect other sound generating devices or audio equipment here and have their sound be played through the RG-3's speakers (p. 98).
4 Output jacks
These jacks can be connected to your audio system to enjoy more powerful sound (p. 98).
5 Video Out jack
Connect a television here. This allows you to display the Song Select screen, slide show, lyrics, and notations on the connected television set (p. 47).
6 Ext Display connector
Connect a external display here. You can display the Song Select screen, slide show, lyrics, and notations on the external display (p. 45).
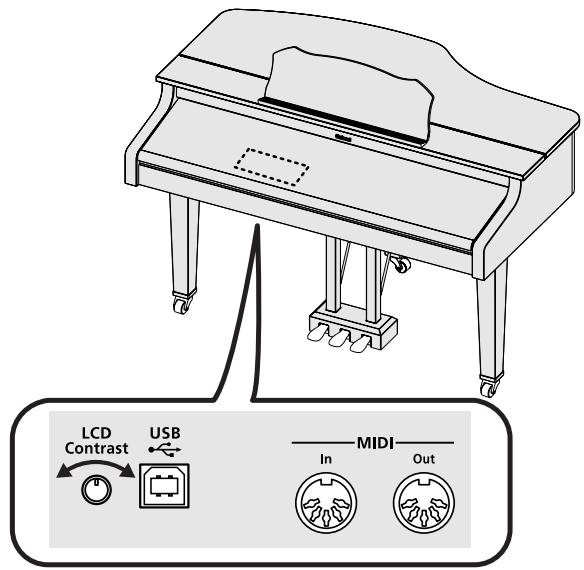
7 LCD Contrast knob
This adjusts the brightness of the front panel display (p. 23).
8 USB connector
You can connect a computer and exchange performance data between the instrument and the computer (p. 103).
9 MIDI In/Out connectors
Connect to external MIDI devices to exchange performance data (p. 99).
10 Mic jack
Used for connecting microphone (p. 21).
11 Mic Volume knob
Adjusts the volume level for the microphone (p. 21).
12 Phones jacks
Connect the headphones here (p. 21).
RG-3's Bottom Right Panel
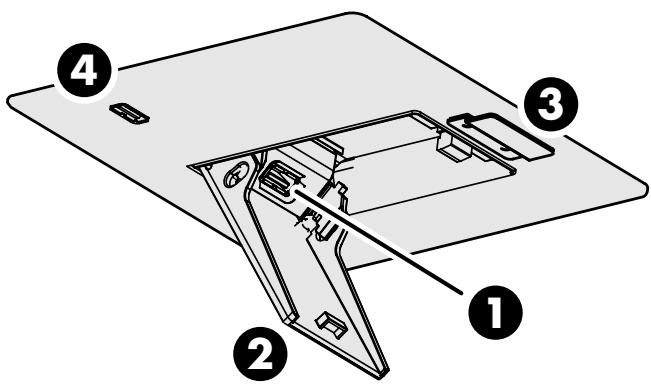
1 Ext Memory port
You can connect USB memory (sold separately) here (p. 22).
2 Ext Memory port cover
You can ensure the cover remains closed when you have USB memory connected (p. 22).
- Be sure to close the cover of the Ext Memory port after connecting USB memory to the Ext Memory port. If the cover is left open, someone could get hurt if their legs bump into it; the cover could be damaged as well.
3 Ext Memory port cover lock
You can lock the Ext Memory port cover to prevent theft of the USB memory connected to the Ext Memory port (p. 22).
4 FDD connector
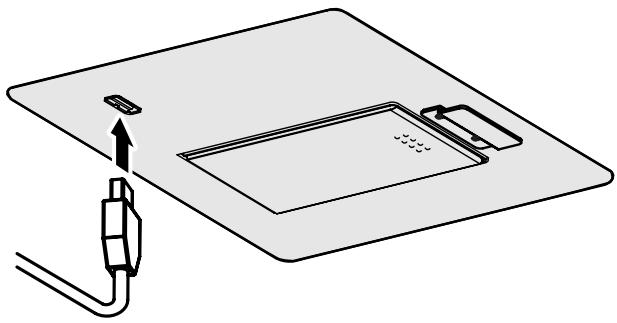
You can connect a commercially available CD drive or optional floppy disk drive here.
NOTE
The RG-3 does not support CD drives that are powered by the USB bus. If you use a USB-bus-powered CD drive, you must use the power supply included with the CD drive so that the drive will operate under its own power.
- Use floppy disk drive available from Roland.
■ Installing the Floppy Disk Drive
Attach the floppy disk drive as shown the figure, using the mounting holes on the RG-3's bottom panel.
- For details of the attachment, refer to the owner's manual of the floppy disk drive.
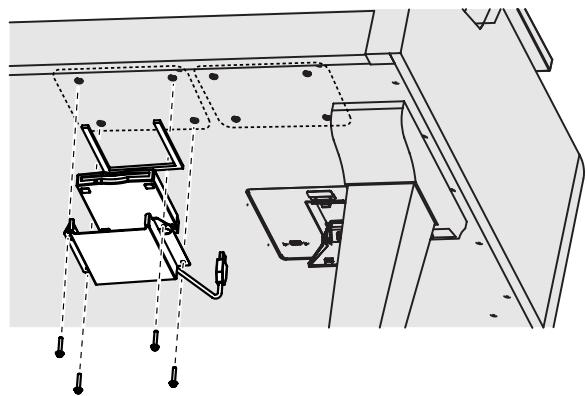
- There are two groups of mounting holes. You can use either group.
Before You Start Playing
Opening and Closing the Top
Raising the Music Rest
CAUTION
Always be sure to raise the music rest in the upright position before opening and raising the piano top. Be sure to fold down the music rest in the upright position after closing the piano top.
- Gently raise the music rest, then secure it in place.
- To collapse the music rest, fold in the metal fittings while supporting the music rest with both hands and gently fold down the music rest.
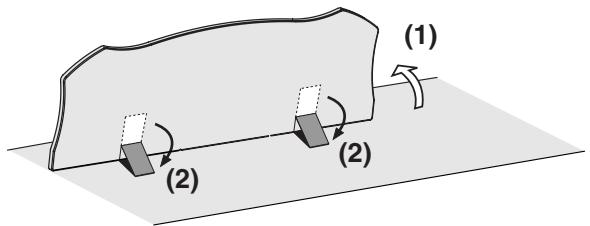
Open the Top board
WARNING
Children must not be permitted to open or close the top on their own—adult supervision is required.
- Lift the right front (the upper note side: A in the figure) of the board with both hands, fold it up.
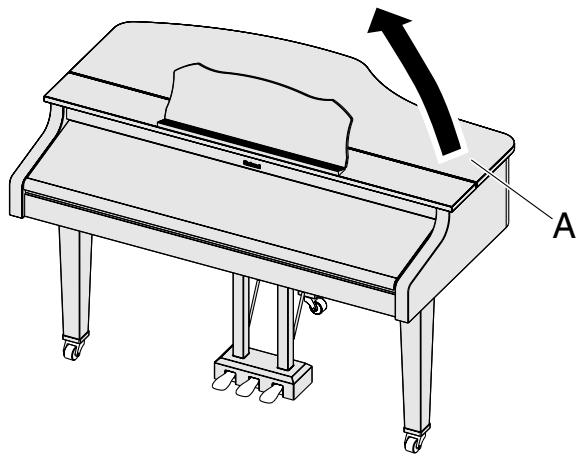
- While holding up the top with one hand, lift up the top stick and insert its end into the appropriate top slip.
WARNING
When opening the top, be careful not to open it too far. Opening the top at an angle in excess of 30 degrees may damage the unit, or cause the top to drop. Also, before opening the top, make sure that no one is in the path of the top as it is opened.
CAUTION
Do not move the piano with the top in the open position. The top stick may disengage from the slip, causing the top to fall.
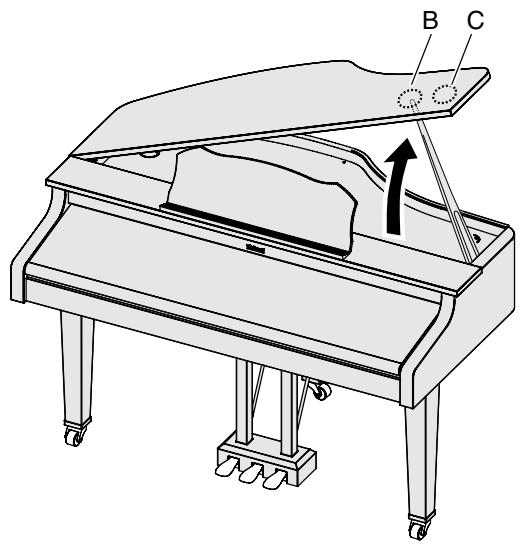
To close the top, reverse the opening procedure.
About the Topsticks and Topslip
The RG-3 has two topsticks, each a different length.
You can use the different topsticks to change the amount the top is left open.
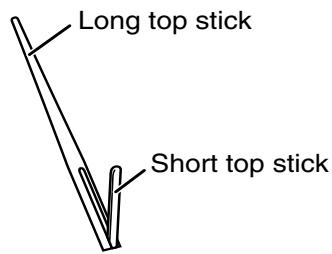
The topsticks and topslip work together as illustrated below.
The long top stick: for inner top slip (B)
The short top stick: for outer top slip (C)
CAUTION
If you use the wrong top slip, the top stick could slip out of the top slip, causing the top to fall. Make sure that the end of the top stick is inserted securely into the top slip.
Opening and Closing the Lid
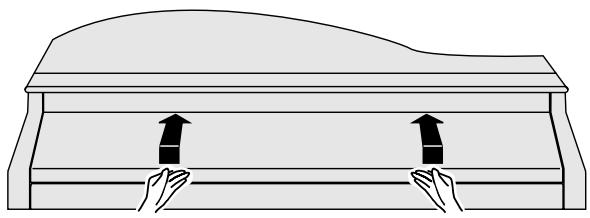
- To open the lid, hold handles with both hands and lift it straight up. Then, slide it to the rear.
- To close the lid, hold handles with both hands and slowly pull it forward until it stops. Then, gently lower it into place.
CAUTION
- When opening and closing the lid, be careful not to let your fingers get caught. Small children should use it only under the supervision of an adult.
- When moving the piano, for safety's sake be sure to close the lid first.
- Make sure you don't have anything (such as sheet music) on the keyboard when you close the lid.
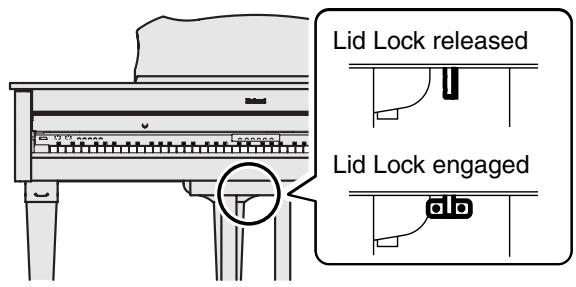
Using the Lid Lock
You can lock the keyboard lid with the lid covering the control panel (front panel) to prevent it from being opened, thus avoiding inadvertent changes during automatic performances.
- Lower the lid until the control panel (the front panel) is covered.
- Turn the lid lock under the piano as shown in the figure below to lock the lid.
NOTE
Using undue force to open the lid when it is locked may damage the lid and/or the lock.
CAUTION
Turning the lid lock when the lid lock is released while the keyboard lid is open may make the keyboard lid prone to closing. Always confirm that the keyboard lid is covering the control panel before locking the lid.
Connecting the Pedal Cord and the Power Cord
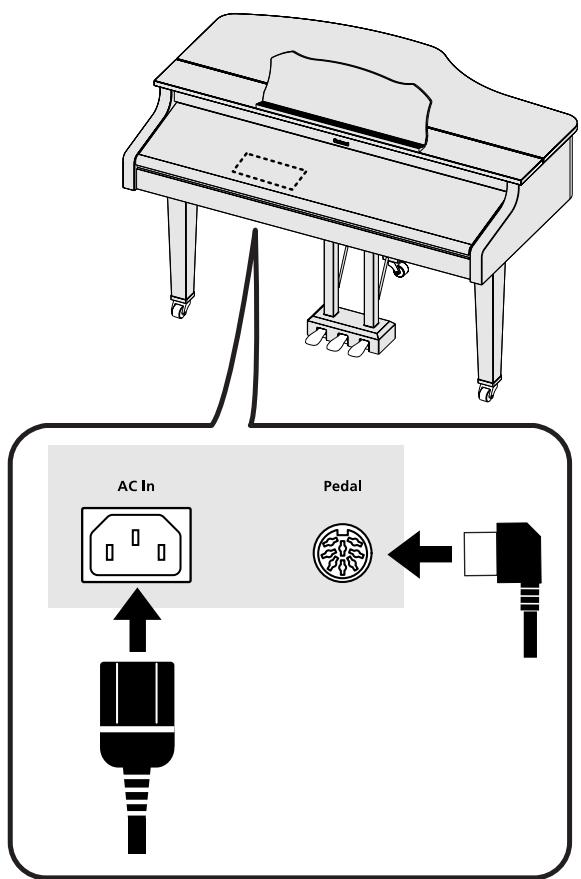
- Plug the pedal cord into the Pedal jack in the jack panel on the RG-3's bottom left panel.
- Connect the supplied power cord to the AC inlet located in the jack panel.
-
Affix the cord clamps to points A, B, and C (recommended) as shown in the figure below, then secure the pedal cord with the clamps.
-
You can secure the power cord together with the pedal cord.

- Plug the power cord into an AC outlet.
Turning the Power On and Off
NOTE
Turn on power to your various devices in the order specified. By turning on devices in the wrong order, you risk causing malfunction and/or damage to speakers and other devices.
■Turning On the Power
- Turn the [Volume] knob all the way down.
- Press the [Power] switch.
When you turn on the power to the RG-3, the front panel display appears as shown below.
Roland Digital Grand RG-3
After a few seconds, you will be able to play the keyboard to produce sound.
Use the [Volume] knob to adjust the volume.
NOTE
This unit is equipped with a protection circuit. A brief interval (a few seconds) after power up is required before the unit will operate normally.
■Turning Off the Power
- Turn the [Volume] knob all the way to the left.
- Press the [Power] switch.
The front panel display goes blank, and the power is turned off.
- If you need to turn off the power completely, first turn off the [POWER] switch, then unplug the power cord from the power outlet. Refer to "Power Supply" (p. 6).
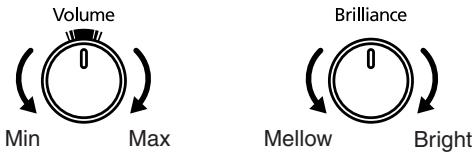
Adjusting the Sound's Volume and Brilliance
- Turn the [Volume] knob to adjust the overall volume.
- Turn the [Brilliance] knob to adjust the brightness of the sound.
MEMO
- The mark at the top of the [Volume] knob indicates the volume level typically produced by an acoustic piano. This is usually the most appropriate volume for your piano performances.
- You can adjust the volume with the remote control. For details, refer to "About the Remote Control" (p. 34).
About the Pedals
The pedals have the following functions, and are used mainly for piano performance.
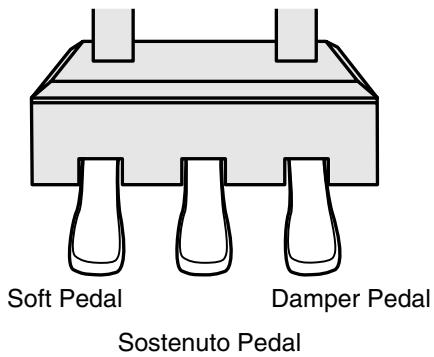
Damper pedal (right pedal)
While this pedal is pressed, notes will be sustained even after you take your fingers off the keys.
The length of the sustain changes subtly according to the extent to which the pedal is depressed.
On an acoustic piano, holding down the damper pedal will allow the remaining strings to resonate in sympathy with the sounds that you played from the keyboard, adding a rich resonance.
The RG-3 simulates this Damper Resonance.
→ You can change the amount of resonance applied with the damper pedal. Please refer to "Producing the Resonance of the Strings When the Keys Are Played (Damper Resonance)" (p. 59).
Sostenuto pedal (center pedal)
This pedal sustains only the sounds of the keys that were already played when you pressed the pedal.
Soft pedal (left pedal)
When you hold down this pedal and play the keyboard, the sound will have a softer tone.
The softness of the tone can be varied subtly by the depth to which you press the pedal.
You can assign functions to the left and center pedals. Refer to "Assigning Functions to Pedals" (p. 70).
Connecting Headphones
The RG-3 has two jacks for plugging in headphones. This allows two people to listen through headphones simultaneously, making it very useful for lessons and performing piano pieces for four hands. Additionally, this allows you to play without bothering others around you, even at night.
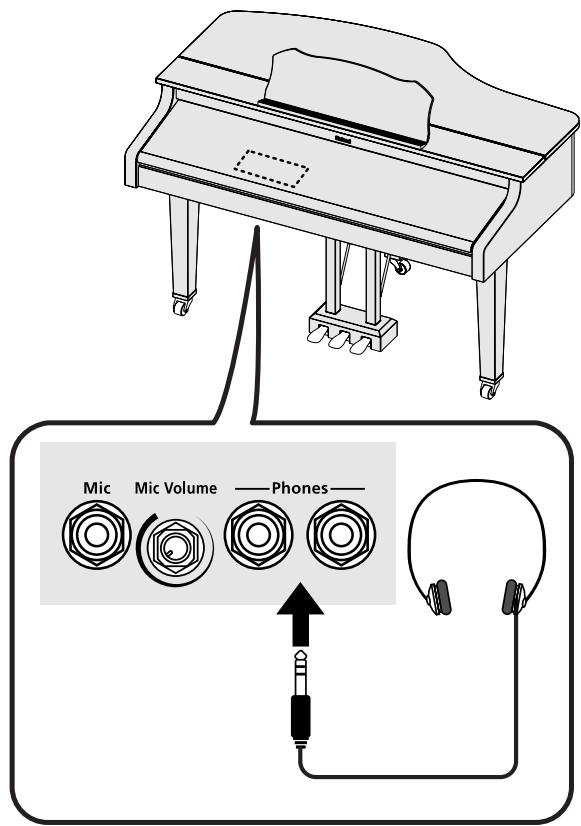
- Plug the headphones into a Phones jack located in the jack panel on the RG-3's bottom left panel.
Connecting headphones will automatically mute the sound from the internal speakers.
The headphone volume is adjusted by the [Volume] knob of the RG-3.
NOTE
Use Stereo headphones.
Some Notes on Using Headphones
- To prevent damage to the cord, handle the headphones only by the headset or the plug.
- Connecting the headphones when the volume of connected equipment is turned up may result in damage to the headphones. Lower the volume on the RG-3 before plugging in the headphones.
- Listening at excessively high volume levels will not only damage the headphones, but may also cause hearing loss. Use the headphones at a moderate volume level.
Connecting a Microphone
You can connect a microphone into the Mic jack, and enjoy karaoke with the RG-3.
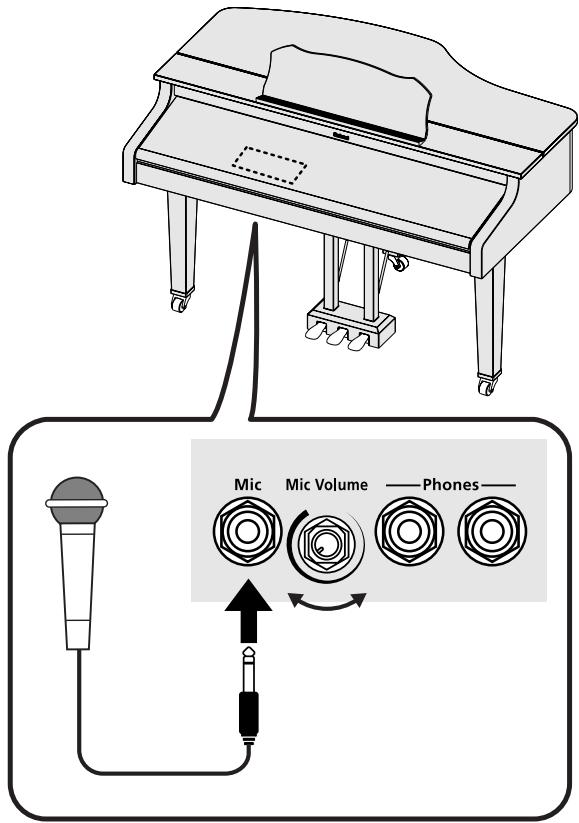
- Connect the microphone to the Mic jack located in the jack panel on the RG-3's bottom left panel.
- Rotate the Mic Volume knob on the right side of the Mic jack to adjust the volume level for the microphone.
- Adjust the mic echo (p. 39).
Some Notes on Using a Microphone
- Be careful of high volume levels when using microphone late at night or early in the morning.
- When connecting a microphone to the RG-3, be sure to lower the volume. If the volume control is too high when the microphone is plugged in, noise may be produced by the speakers.
-
Howling could be produced depending on the location of microphone relative to speakers. This can be remedied by:
-
Changing the orientation of the microphone.
- Relocating microphone at a greater distance from speakers.
- Lowering volume levels.
Connecting USB Memory
You can connect USB memory (sold separately) to the RG-3's Ext Memory port. Connecting external USB memory enables you to do the following:
- Play back songs stored on the USB memory.
- Save songs recorded on the RG-3 to the USB memory.
- Copy songs in the USB memory to the RG-3's User memory, allowing the songs to be called up simply and easily.
- The images saved to the USB memory are displayed as a slide show.
- User Programs registered in the RG-3 saved to the USB memory.
Connecting the Memory
NOTE
Always be sure to use the following procedure when connecting USB memory.
- Press the Ext Memory port cover at the right of the RG-3's bottom panel to open the cover.
Press the front of the cover to open it.
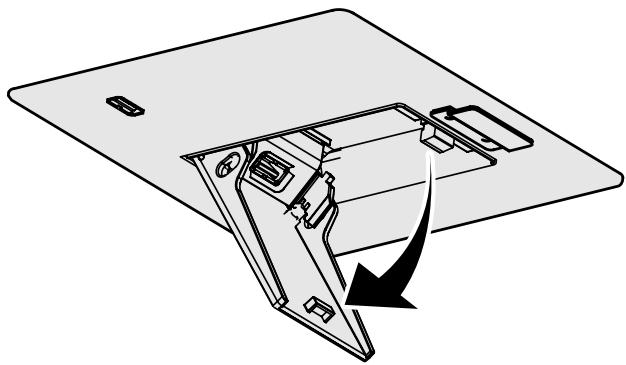
-
Connect the USB memory to Ext Memory port.
-
Carefully insert the USB memory all the way in—until it is firmly in place.
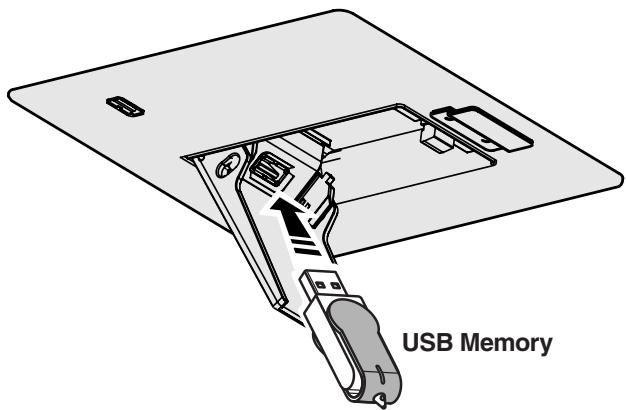
- Press on the front part of the Ext Memory port cover to close the cover.
NOTE
Use USB memory available from Roland. Proper operation cannot be guaranteed if other external memory products are used.
Locking the Ext Memory Port Cover
You can lock the Ext Memory port cover to prevent theft of the USB memory connected to the Ext Memory port.
- Connect the USB memory (refer to previous section).
- Press on the front part of the Ext Memory port cover to close the cover.
- Using a screwdriver, remove the anti-theft lock screws (two screws) to the side of the Ext Memory port.
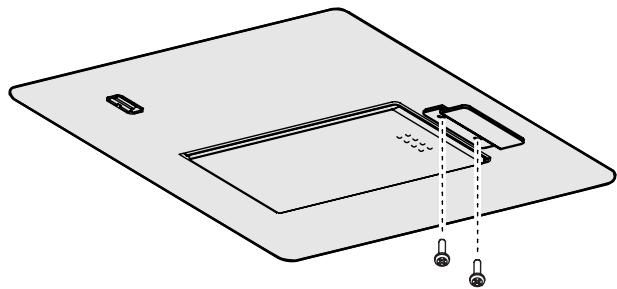
- Turn the anti-theft lock as shown in the figure below so it is oriented in the direction opposite of that when removed, then tighten the screws.
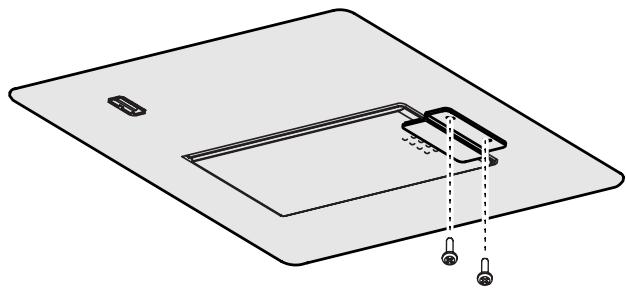
NOTE
Be sure to replace removed screws when securing the anti-theft lock.
About the Screens
Immediately after the power is turned on, the Song Select screen like the one below is displayed.
Main Screens
Song Select Screen
When you press the [Song] button, the following screen is displayed. Each time you press the [Song] button in this screen, the song genre is switched.
Jazz
1: Trio Grande
Function Screen
Press the [Function] (Exit) button; the indicator lights, and the following screen appears.
KEY TOUCH Touch=65
Hammer=Light
Tone Screen
Press the Tone button; the indicator lights, and the following screen appears.
Piano 1 - i
Superior Grand
Adjusting the Contrast of the Screen
- Turn the LCD Contrast knob located in the jack panel on the RG-3's bottom left to adjust the brightness of the display.
Chapter 1. Playing Back Songs
Look at What You Can Do with the RG-3!
Listen to the Internal Songs
The various internal songs programmed in the RG-3 are categorized into "Jazz" and "Classical" genres. You can play back the songs in these genres in a variety of ways, playing all the songs in sequence or randomly, or just playing songs individually.
- Listening to Music from CDs
You can connect a commercially available CD drive and play back CD-ROMs on which SMFs have been saved as well as audio CDs. You can also use VIMA CDs (VIMA TUNES) sold by Roland.
Listen to Songs on Floppy Disks and USB memory
You can connect a commercially available USB memory or floppy disk drive and play back SMF music files saved on USB memory and floppy disks. You can also copy song data recorded with the RG-3.
Store Songs in the "Favorites"
The RG-3's "Favorites" section is programmed at the factory with a tone demo. Listen to the tone demo and check out the various characteristics of the different tones.
You can also store recorded songs to the "Favorites," and you can even copy songs stored on USB memory and floppy disks to the "Favorites."
Songs saved in the "Favorites" remain stored in the instrument even while the power is turned off, making this a convenient place to save songs you listen to frequently.
- Easy-to-Use Remote Control Included
You can use the included remote control to start and stop the current performance and switch songs.
You can also use the remote control to select what is to be displayed on an external screen or television set connected to the RG-3 and assign other functions to the remote control's buttons to make operating the RG-3 even simpler.
Connect a Microphone for Karaoke Performances
Connect a microphone to the RG-3, and you are ready to enjoy karaoke. You can change the key of the song to match the singer's voice and adjust the amount of echo applied to the microphone input.
Show Your Favorite Images on a Connected Display or Television
You can connect an external display or television set to the RG-3 and display the Song Select screen, lyrics and notations, and even slide shows of your favorite images. You can also use the remote control to switch the images appearing in the connected external display or television.
Listening to Songs
The RG-3 features a variety of internal songs. The internal songs are categorized into "Jazz" and "Classical" genres.
Try giving these songs a listen.
You can also play back the following kinds of songs (data).
- SMF music files
(when a USB memory, CD drive, or floppy disk drive is connected)
- Audio Files (when a USB memory or CD drive is connected)
- Audio CDs (when a CD drive is connected)
■ [Song] Button Functions
Each press of the [Song] button selects the next available song genre.
![ROLAND RG-3 - ■ [Song] Button Functions - 1](/content/2025/01/130896/images/71146c95f2658aea4b6ca782e448a95af2c7cb7c3c002dde293a5be0361e300d.jpg)
Jazz
Classical
- Favorites
This appears when songs are contained in the "Favorites."
CD
This appears when you have a CD drive connected and a CD is in the drive.
- Floppy Disk
This appears when you have a floppy disk drive connected and a floppy disk is in the drive.
- Ext Memory (songs in the USB memory connected to the Ext Memory port) This appears when you have a USB memory connected.
![ROLAND RG-3 - ■ [Song] Button Functions - 2](/content/2025/01/130896/images/1037c4e4a1962e158f9c542c4b7b1cba38ef9f0fb8ee28dd5430d4b46253fd35.jpg)
About Audio Files
Audio files in the following format can be played back:
".WAV" extension
16-bit linear
Sampling rate of "44.1 kHz"
- Stereo
You cannot use the following functions in playing back audio files.
- Displaying notations (p. 48)
- Copying "Favorites" (p. 40)
- Changing tempos (p. 36)
- Track Mute (p. 95)
-
Recording (p. 75)
-
Saving or performing other procedures during playback of audio files may cause the song to stop while it is playing.
What are the "Favorites?"
This is the area of memory where you can save copies of performances recorded with the RG-3, songs saved on CD-ROMs, songs stored in the USB memory connected to the RG-3's Ext Memory port, and other songs.
After copying songs to the "Favorites," you can then select the copied songs simply by pressing the [Song] button and selecting "Favorites" as the song genre.
The RG-3 features a User Memory (the RG-3's memory) area where the following types of data are stored.
- Content registered in the "Favorites"
- Content set in User programs (Favorites performance settings) (p. 79)
To delete the content of the User Memory and restore the memory to the default factory settings, refer to "Initializing the User Memory, USB Memory, and Floppy Disks" (p. 93).
You can select and listen to tone demos (p. 26) from the "Favorites" after initializing the User memory.
You can also delete these tone demos and overwrite them with other songs, which can then be saved.
■ Listening to the Tone Demos
The factory settings have tone demos registered in the "Favorites" (p. 25).
- Press the [Song] button one or more times to select "Favorites" as the genre.
Favorites 1: Piano I rio
- Press the [▶■] button to start playback of the tone demos.
You can select the tone demo to play back by pressing the [▶] or [▶] button.
- Press the [▶/■] button once more to stop playback of the tone demos.
You can delete tone demos in the "Favorites" and overwrite them by saving other songs in their place. If you want to play back tone demos after they have been deleted, initialize the User Memory to restore the factory settings (p. 93).
■ Listening to the Internal Songs
- Press the [Song] button one or more times to select the genre you want.
The internal song genres are "Jazz" and "Classical."
Jazz 1: Trio Grande
If using the remote control, press the remote control's [INTERNAL] button. The internal song genre selection can be switched between "Jazz" and "Classical" by pressing the [INTERNAL] button.
"Jazz" "Classical" "Jazz"...
- Press the [▶■] button to start playback of the internal songs.
Songs in the selected genre are played back.
When the RG-3 is set to play back all songs (p. 27), once the song currently being played back is finished, the next song starts playing automatically. After all of the songs in the genre have been played, playback automatically resumes from the first song in the genre. When the RG-3 is set to play back a single song (p. 27), playback stops automatically when the song is finished. You can select the next song by pressing the [▶] button, and return to the beginning of the song or the previous song by pressing the [■] button.
- Press the [▶/■] button once more to stop playback of the internal songs.
NOTE
Songs saved to the "Favorites" are deleted when the User Memory is initialized.
Save any songs you want to retain by copying them to USB memory or Floppy disk (p. 77).
NOTE
If any previously recorded song data is present, the message "Delete User Song OK?" appears in the display.
If you want to delete the existing song data, press the [Enter] button.
If you do not want the song data to be deleted, press the [Function] (Exit) button, and save the song to the "Favorites," USB memory, or Floppy disk (p. 77).
Playing Back One Song
To play a single selected song, use the following procedure.
- Press the [Function] (Exit) button, getting its indicator to light.
- Press the [Song] (Select-) button or [▶] (Select+) button to display the PLAY screen.
PLAY Mode=All Song
Minus One=Off
- Press the [Song] (Select-) button or [▶] (Select+) button to get the value for "Mode" to flash.
PLAY Mode=All Song
MinusUne = U+T
- Press the [▶/■] (Value-) button or [▶▶] (Value+) button to select "One Song."
| Value | Description |
| All Song | All of the songs in the genre are played back in sequence, starting from the selected song. When the final song in the selected genre is finished playing, playback then automatically resumes from the first song in that genre. |
| One Song | Only the selected song is played. Playback stops when the song is finished. |
- Press the [Function] (Exit) button so the indicator goes out.

You can save this setting in the RG-3's memory using the Memory Backup function (p. 73).
■ Listening to Songs on CDs
You can play back audio CDs and CD-ROMs containing saved SMF music files.
- You can also play songs on VIMA CD-ROMs (VIMA TUNES) sold by Roland.
Precautions Concerning Use of the CD
- You cannot play back CD-R/RW disks to which audio tracks have been added or CDs containing both audio tracks and data (CD Extra).
- The RG-3 is capable of playing back only commercial CDs that conform the official standards—those that carry the "COMPACT DISC DIGITAL AUDIO" logo.
- The usability and sound quality of audio discs that incorporate copyright protection technology and other non-standard CDs cannot be guaranteed.
- For more detailed information on audio discs featuring copyright protection technology and other non-standard CDs, please consult the disc vendor.
- You cannot save songs and styles to CDs, and you cannot delete songs or styles recorded to CDs. Furthermore, you cannot format CDs.
Connecting a CD Drive
-
The RG-3 does not support CD drives that are powered by the USB bus. If you use a USB-bus-powered CD drive, you must use the power supply included with the CD drive so that the drive will operate under its own power.
-
Switch off the power to this instrument and the CD drive to be connected.
- Connect the USB cable included with the CD drive to the FDD connector on this instrument.
- Turn on the power to this instrument.
- Turn on the power to the connected CD drive.

What is VIMA?
Presented by Roland, VIMA represents an entirely new concept in keyboards.
It lets you connect LCD televisions, video cameras, portable audio players, and other devices, enabling you to enjoy music and video whether or not you have experience in performing music.

With CD-ROMs for use with VIMA (VIMA TUNES), you can enjoy running Slide Show (p. 49) simultaneously with the playback of songs.

For information on how to perform the following CD-drive operations, refer to the owner's manual for the drive.
- Switching the power on and off
- Inserting and ejecting a CD

A list of the CD drives that have been tested and found to be compatible is available on the Roland website. http://www.roland.com/
Playing Back a Song
1. Place the CD you want to play in the CD drive.
(1) Press the eject button and open a disc tray.
(2) Put a CD on a disc tray.
(3) Press the eject button again to close the disc tray.
- Reading of data from the CD starts when the CD is inserted in the drive. It may take a few moments to complete reading of the data.
2. Press the [Song] button one or more times to select "CD" as the genre.
If using the remote control, press the remote control's [EXTERNAL] button, then select "CD" as the genre.
The following screen appears.
CD 1:Jazz Quartet
When Selecting Songs in a Folder
- Press the [I] button or [▶] button to select a folder.
- Press the [▶/■] button. The first song in the folder is displayed.
- Press the [ ] button or [ ] button to select a song.
- Depending on the number of songs contained in a folder, this may take some time.
If a Folder Contains Further Folders and Song Data
- Press the [ ] button to display "Song No. 1."
- Press the [▶/■] button. The name of the folder appears in the screen.
CD [Winter Songs]
If a folder contains other folders, press the [▶] button to switch the screens.
- Press the [▶/■] button. The first song in the folder is displayed.
To exit a folder:
- Press the [I] button one or more times until "↑Up" appears in the screen.
- Press the [ / ] button.
NOTE
If any previously recorded song data is present, the message "Delete User Song OK?" appears in the display.
If you want to delete the existing song data, press the [Enter] button.
If you do not want the song data to be deleted, press the [Function] (Exit) button, and save the song to the " Favorites," USB memory, or Floppy disk (p. 77).
3. Press the [▶■] button to start playback of the CD's songs.
The songs on the CD are played.
When the RG-3 is set to play back all songs (p. 27), once the song currently being played back is finished, the next song starts playing automatically.
After all of the songs on the CD have been played, playback automatically resumes from the beginning of the CD.
When the RG-3 is set to play back a single song (p. 27), playback stops automatically when the song is finished.
You can select the next song by pressing the [▶▶] button, and return to the beginning of the song or the previous song by pressing the [▶▶] button.
4. Press the [▶■] button once more to stop playback of the songs.
Turning Off the Power (When a CD Drive Is Connected)
1. Stop playback if the CD is being played back.
2. Eject the CD.
(1) Press the eject button and open a disc tray.
(2) Eject a CD on a disc tray.
(3) Press the eject button again to close the disc tray.
- Firmly press the CD drive's Eject button.
- It may take some time for the CD disk to be ejected.
3. Lower the piano's volume all the way, then switch off its power (p. 20).
4. Turn off the power to the CD drive.

You can start and stop playback of songs on CDs with the remote control's [▶/■] button.
You can also use the remote control's [▶] button to advance to the next song and [▶] button to select the previous song.

If you want to playback at each song, refer to "Playing Back One Song" (p. 27).

If you are unable to eject the CD, try the following procedure.
If after these steps you are still unable to get the CD to eject, read the CD drive owner's manual.
-
Turn off the power to all connected devices.
-
Turn on the RG-3.
-
Turn on the CD drive.
-
Wait a few moments after the power is switched on, then firmly press the eject button.

Before detaching the cable for the CD drive, make sure that the power for all equipment has been switched off.
■ Listening to Songs on USB Memory and Floppy Disks
You can connect a USB memory or floppy disk drive and listen to songs saved on USB memory and floppy disks.
Floppy Disk
- Insert the floppy disk containing the songs you want to play to the floppy disk drive.
- Press the [Song] button one or more times to select "Floppy Disk" as the genre.
If using the remote control, press the remote control's [EXTERNAL] button, then select "Floppy Disk" as the genre.
USB Memory
- Connect the USB memory containing the songs you want to play to the Ext Memory port.
- Press the [Song] button one or more times to select "Ext Memory" as the genre.
If using the remote control, press the remote control's [EXTERNAL] button, then select "Ext Memory" as the genre.
The following screen appears.
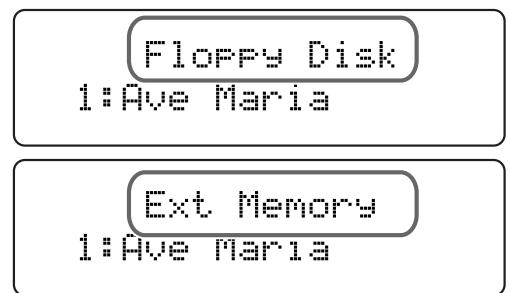
3. Press the [▶■] button.
The song is played back.
When the RG-3 is set to play back all songs (p. 27), once the song currently being played back is finished, the next song starts playing automatically.
After all of the songs on the USB memory or floppy disk have been played, playback automatically resumes from the beginning of the USB memory or floppy disk.
When the RG-3 is set to play back a single song (p. 27), playback stops automatically when the song is finished.
You can select the next song by pressing the [▶▶] button, and return to the beginning of the song or the previous song by pressing the [▶▶] button.
4. Press the [▶■] button once more to stop playback of the songs.
NOTE
Use only USB memory and floppy disk drives sold by Roland. Operation cannot be guaranteed when products other than these are used.
Proper operation cannot be guaranteed if other external memory products are used.
NOTE
If any previously recorded song data is present, the message "Delete User Song OK?" appears in the display.
If you want to delete the existing song data, press the [Enter] button.
If you do not want the song data to be deleted, press the [Function] (Exit) button, and save the song to the "Favorites," USB Memory, or Floppy disk (p. 77).
MEMO
You can start and stop playback of songs saved on USB memory with the remote control's [▶■] button.
You can also use the remote control's [▶▶] button to advance to the next song and [▶▶] button to select the previous song.
MEMO
If you want to playback at each song, refer to "Playing Back One Song" (p. 27).
Using the Remote Control
You can use the included remote control to easily start and stop performances and switch songs. You can also use the remote control to select what is to be displayed on an external screen or television set connected to the RG-3 and assign functions to the buttons used in operating the remote control.
■ Installing Batteries in the Remote Control
Install the batteries provided in the remote control.
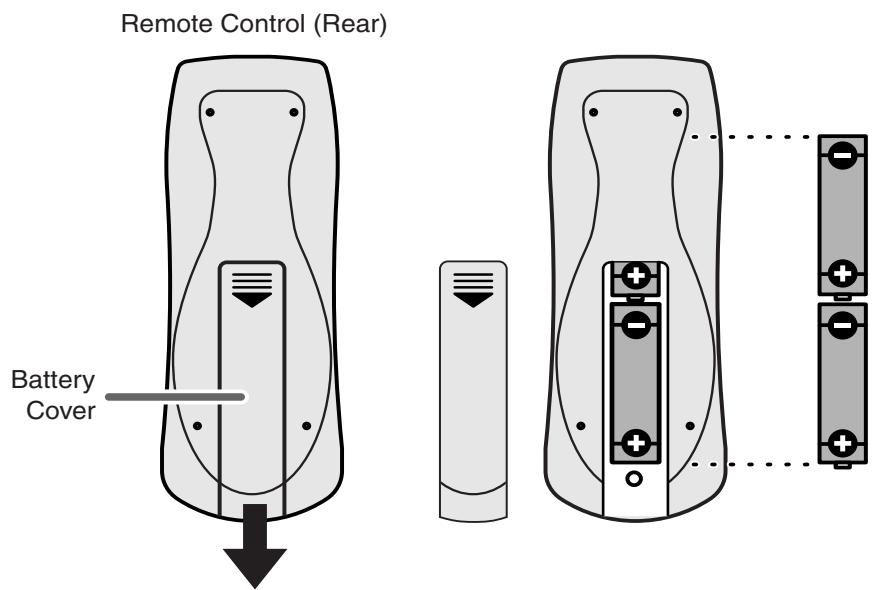
- Open the battery cover on the back of the remote control.
- Insert the supplied AA batteries, as shown in the figure of the remote control.
- Close the battery cover.

For more information on the remote control button functions, refer to "About the Remote Control" (p. 34).

Be careful to observe the correct polarity (+, - direction) when installing the batteries.
How to Use the Remote Control
When using the remote control, aim the remote control at the infrared receiver, keeping in mind the range of operation (below).
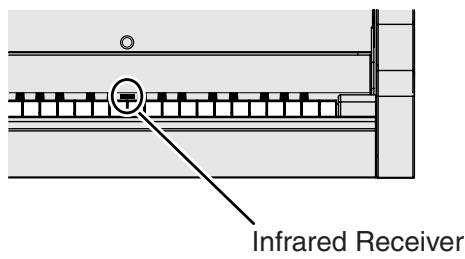
Front View
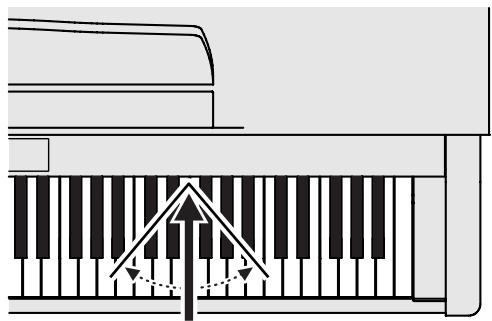
Top View
Remote Control
Range of operation
Distance:
4 m (approximately 13 feet)
Angle:
40 degrees to the left and right of the receiver.
Precautions Concerning Use of the Remote Control
- The remote control is able to transmit only one operation at a time.
- The remote control may not operate even within the range of operation if there is an obstacle between it and the main unit.
- Malfunctions may occur if you use the remote near a device that produces infrared light, or if you use another infrared remote control nearby.
- The life of the battery depends on the amount and conditions of use. If the operational range of the remote control decreases, change the batteries.
- If you will not be using the remote control for a long period of time, remove the batteries.
- The responsiveness of the remote control may suffer if the remote control is within the glare of any spotlights or exposed to other strong light.
About the Remote Control
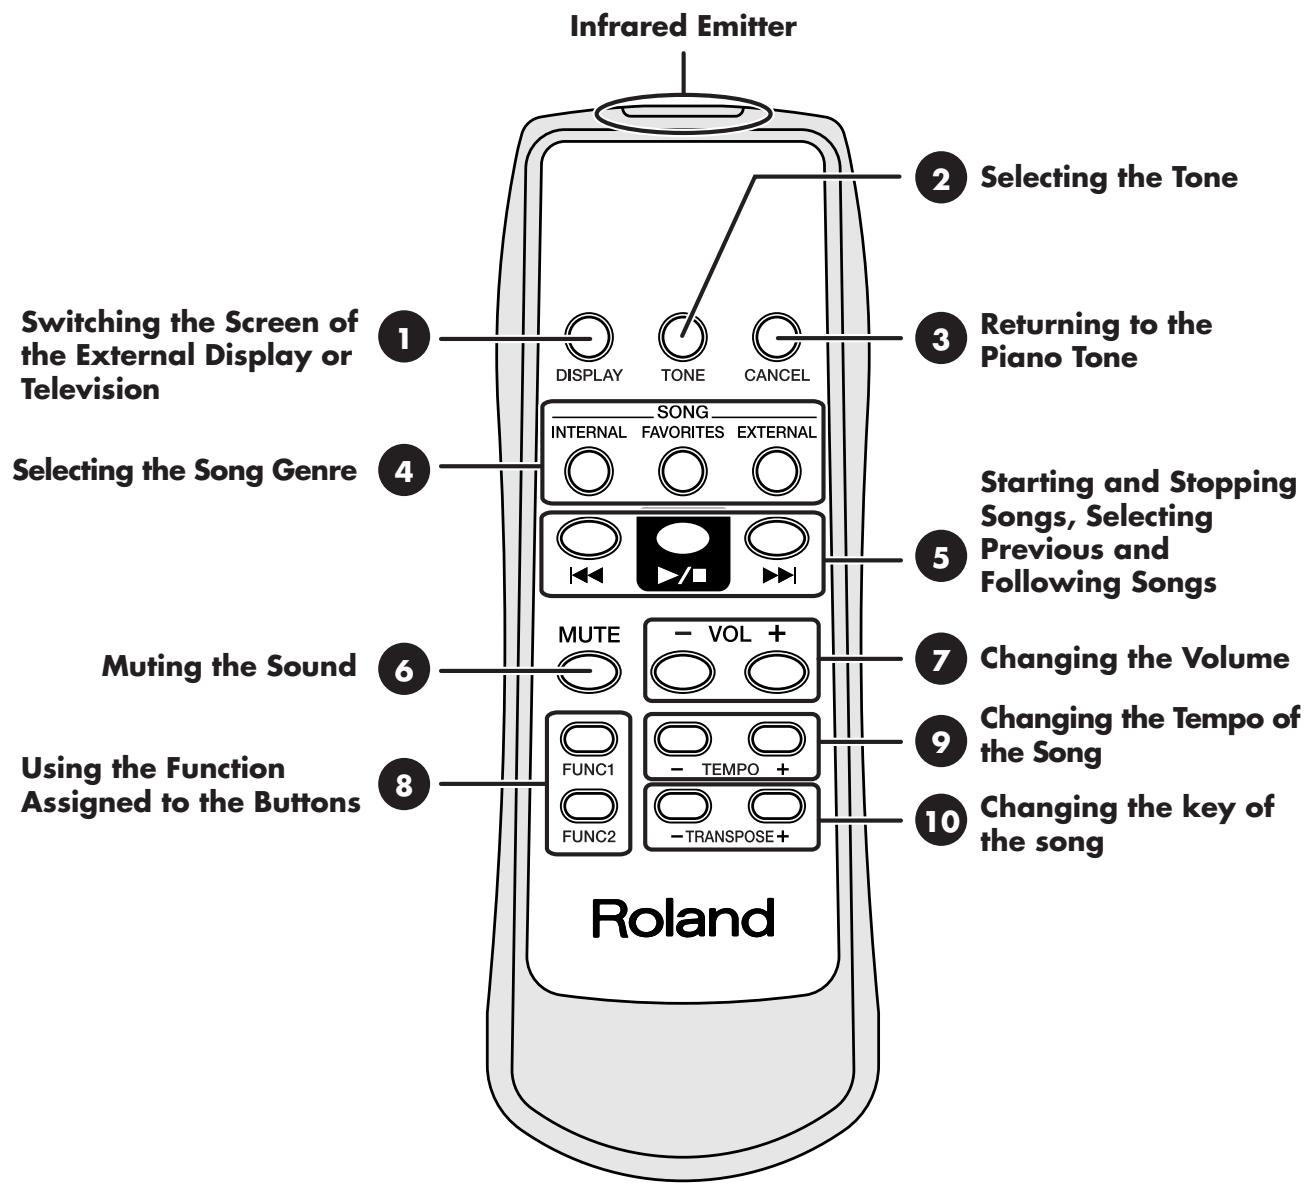
| Button | Explanation | |
| 1 | DISPLAY | Switches the screens appearing in the connected external display or television screen (p. 48).You can display the Song Select screen, lyrics, slide show (p. 49), and notations in the external display or television. |
| 2 | TONE | This switches the tone of the left-hand part, right-hand part, and User part (the part to which performances recorded with the RG-3 are saved). |
| 3 | CANCEL | This returns the [TONE] button to the original settings.The left-hand part, right-hand part, and User part revert to the piano tone. |
| 4 | INTERNAL | Selects the internal song genre. The internal song genre selection changes when the [INTERNAL] button is pressed."Jazz"→"Classical"→"Jazz"... |
| FAVORITES | Selects the "Favorites" genre.* This group cannot be selected if no songs have been saved to the "Favorites." | |
| EXTERNAL | This selects from the "CD," "Floppy Disk," and "Ext Memory" genres.The genre switches with each press of the button, alternating between "CD"/"Floppy Disk" and "Ext Memory."* You cannot select this group when there is no CD drive, floppy disk drive, or USB memory connected. | |
| 5 | I-I-I | When you press the [ I-I-I ] button while the song is stopped, the previous song is selected.Pressing the [ I-I-I ] button while a song is playing returns you to the beginning of that song. |
| I-I-I | This starts and stops playback of the song.Playback alternately starts and stops each time you press the [ I-I-I ] button. | |
| I-I-I | When you press the [ I-I-I ] button, the next song is selected. | |
| 6 | MUTE | This mutes all of the sounds. |
| 7 | VOL [-] [+](Volume) | You can adjust the volume.Press the VOL [-] button to decrease the volume, and press the VOL [+] button to increase the volume. |
| 8 | FUNC 1 | You can use the function assigned to this button.You can also change the function assigned to the button (p. 90).With the factory settings, the Random Playback On/Off is assigned to this but-ton. |
| FUNC 2 | You can use the function assigned to this button.You can also change the function assigned to the button (p. 90).With the factory settings, the Equalizer On/Off is assigned to this button. | |
| 9 | TEMPO [-] [+] | This adjusts the tempo.Press the TEMPO [-] button to slow down the tempo, and press the TEMPO [+] button to quicken the tempo.* You cannot change the tempos for audio CDs. |
| 10 | TRANSPOSE [-] [+] | Transposes the key of the song being played.Press the TRANSPOSE [-] button to lower the key; press the TRANSPOSE [+] button to raise the key.You can also assign functions to these buttons (p. 90). |
Changing the Song Tempo
This changes the song tempo. Changing the tempo has no effect on the pitch of the notes. And you can change the tempo even when the song is in progress.
1. Press the remote control's TEMPO [-] or TEMPO [+] button to adjust the tempo of the song.
The tempo is indicated in the external display.
The tempo can be adjusted in a range of = 10 - 500 .
You can also change the tempo during playback.
Pressing the TEMPO ([+] button once increases the tempo by one unit. Holding down the button increases the tempo continuously.
Pressing the TEMPO [-] button once decreases the tempo by one unit.
Holding down the button makes the tempo change (slow down) continuously.
Using the Karaoke Feature
You can connect a microphone to the RG-3 and enjoy singing along as the music file is played back.
- Connect the USB memory containing the songs you want to play to the Ext Memory port (p. 22).
- Connect a microphone (p. 21).
- Adjust the volume level and the amount of echo applied.
Adjust the microphone echo using the Mic Echo feature (p. 39).
- Select a song (p. 26, p. 28, p. 31).
- Adjust the tempo as required with the remote control Tempo [-] [+] buttons.
- If necessary, change the key of the song (p. 37).
- The song starts to play when you press the [▶■] button.
Now sing along with the song.
- Playback of the song stops when you press the [▶■] button again.
NOTE
You cannot change the tempos for audio CDs.
MEMO
You can connect an external display or television to the RG-3 and have the lyrics of music files containing lyrics be displayed on the screen as the data is played back. Refer to "Connecting an External Display" (p. 45), "Connecting a Television" (p. 47), and "Selecting What is To Be Displayed on the External Display or Television" (p. 48).
Changing the Key of the Song Being Played (Playback Transpose)
You can play back SMF music files and your own recorded performances with the notes transposed.
You can also transpose the playback of songs on audio CDs and audio files.
This function lets you change song keys to suit the singer's own vocal range.
1.
Select a song to play back (p. 26, p. 28, p. 31).
2.
Press the [Function] (Exit) button so the indicator is lit.
3.
Press the [Song] (Select-) button or [1 1] (Select+) button to display the TRANSPOSE screen.
TRANSPOSE Link=On Keyboard/Playback = 0
4.
Press the [Song] (Select-) button or [1 1] (Select+) button to get the value for "Link" to flash.
TRANSPOSE Link=On
Keyboard/Playback = 0
5.
Press the [▶/■] (Value-) button or [▶▶] (Value+) button to switch the Link setting to "On."
When set to "On," the song and keyboard are transposed simultaneously.
6.
Press the [Song] (Select-) button or [1 1] (Select+) button to get the value for "Keyboard/Playback" to flash.
TRANSPOSE Link=On Keyboard/Playback=0
7.
Press the [▶/■] (Value-) button or [▶▶] (Value+) button to change the key of the song and the notes from the keyboard.
Each time you press the [▶/■] (Value-) button or [▶▶] (Value+) button, the song and the notes from the keyboard are transposed by one semitone. Pressing the [▶/■] (Value-) and [▶▶] (Value+) buttons simultaneously restores the original value (0).
Value: -6-0- +5 (in semitones).

You can transpose songs using the remote control's TRANSPOSE [-] and [+ ] buttons.

You may find that using Playback Transpose reduces the tone quality of the selected audio CD song or audio file.

You can set the transposition separately for the song being played back and the sounds from the keyboard by setting Link to "Off" (p. 38).
- Press the [Function] (Exit) button so the indicator goes out.
- Press the [▶■] button to start playing the song.
The song is played in the changed key.
- Playback Transpose is cancelled (switched off) when you switch to a different song.
Transposing the Song and Keyboard Separately
You can transpose the song and keyboard sounds separately by setting Link to "Off."
To accomplish this, carry out Steps 4-7 in the procedure described on p. 37.
- Press the [Song] (Select-) button or [1 1] (Select+) button to get the value for "Link" to flash.
TRANSPOSE Link=On Keyboard/Playback=0
- Press the [▶/■] (Value-) button or [▶▶] (Value+) button to switch the Link setting to "Off."
TRANSPOSE Link=Off Keybrd=0 Playbck=
- Press the [Song] (Select-) button or [1 1] (Select+) button to get the value for "Plybck" (Playback) to flash.
TRANSPOSE Link=Off Keybrd=0 Plubck=0
- Press the [▶/■] (Value-) button or [▶▶] (Value+) button to change the key of the song.
The available transposition range varies with the type of song data used.
| Song Data | Value |
| SMF Music Files | -24–0– +24 (in semitones) |
| Audio CDs/Audio Files | -6–0– +5 (in semitones) |
Adding Echo to the Mic Vocals (Mic Echo)
This adjusts the microphone echo when a microphone is connected to the RG-3.
- Press the [Function] (Exit) button so the indicator is lit.
- Press the [Song] (Select-) button or [1 1] (Select+) button to display the MIC ECHO screen.
MIC ECHO
$$ T y p e = 1 $$
$$ \text {L e v e l} = 5 $$
- Press the [Song] (Select-) button or [1 1] (Select+) button to get the value for "Type" to flash.
MIC ECHO
- Press the [▶■] (Value-) button or [▶▶] (Value+) button to change the echo type.
| Value | Description |
| 1 | Adds basic reverberations. |
| 2 | Adds reverberations for a karaoke-type echo. |
- Press the [Song] (Select-) button or [1 1] (Select+) button to get the value for "Level" to flash.
MIC ECHO
$$ T y p e = 1 $$
$$ \text {L e v e l}: 5 $$
- Press the [▶/■] (Value-) button or [▶+] (Value+) button to change the amount of echo applied to the sound.
| Value | Description |
| 0-9 | More echo is applied as the value is increased. No echo is applied to the microphone vocals when the value is set at “0.” |
- Press the [Function] (Exit) button so the indicator goes out.
Copying Songs
You can copy songs contained in a USB memory connected to the RG-3's Ext Memory port, songs on CD-ROMs, and songs saved to floppy disks to the "Favorites."
By copying songs to the "Favorites," you'll then be able to select the copied songs easily by selecting the "Favorites" genre from the Song Select screen.
■ Copying Songs Stored on USB Memory, CD-ROMs, and Floppy Disks to the "Favorites"
1.
Prepare the CD-ROM, USB memory, or floppy disk containing the song or songs you want to copy.
- Connect the USB memory to the Ext Memory port.
- Insert the CD-ROM in the CD drive or the floppy disk in the floppy disk drive.
2.
Press the [Function] (Exit) button so the indicator is lit.
3.
Press the [Song] (Select-) button or [1 1] (Select+) button to display the FILE screen.
FILESAVEI COPYI DELI FORMAT
4.
Press the [Song] (Select-) button or [1 1] (Select+) button so "COPY" is flashing.
FILE SAVELCOPY DELIFORMAT
5.
Press the [Enter] button.
6.
Press the [Song] (Select-) button or [1 1] (Select+) button so that the "From" setting is flashing.
COPY (From=Ext Memory 1:Love me lender
NOTE
You cannot copy songs on audio CDs and audio files to the "Favorites."
7. Press the [▶■] (Value-) button or [▶▶] (Value+) button to change the "From" setting.
| Value | Description |
| Jazz | Internal songs in the “Jazz” genre are copied to the “Favorites.” |
| Classical | Internal songs in the “Classical” genre are copied to the “Favor-ites.” |
| CD | Songs in the CD-ROM are copied to the “Favorites,” USB memory, or the Floppy disk. |
| Floppy Disk | Songs in the Floppy disk are copied to the “Favorites” or the USB memory. |
| Ext Memory | Songs in the USB memory are copied to the “Favorites” or the Floppy disk. |
| Favorites | Songs in the “Favorites” are copied to the USB memory or the Floppy disk. |
8. Press the [Song] (Select-) button or [▶] (Select+) button so that the "COPY From" song number is flashing.
COPV1FrmneFxt.Mammary
1:Love me Tender
9. Press the [▶■] (Value-) button or [▶▶] (Value +) button to select the number of the song you want to copy.
10. Press the [Song] (Select-) button or [ ] (Select+) button so that the "To" setting is flashing.
COPY|To=Favorite
4:(EMPTy)
11. Press the [▶■] (Value-) button or [▶■] (Value+) button to select the copy destination.
| Value | Description |
| Favorites | Copies the song to the “F favorites.” |
| Floppy Disk | Copies the song to the Floppy disk. |
| Ext Memory | Copies the song to the USB memory. |
- Press the [Song] (Select-) button or [▶] (Select+) button so that the "COPY To" song number is flashing.
COPY TneFsunr itas
4: (Empty)
- Press the [▶/■] (Value-) button or [▶▶] (Value+) button to select the copy-destination number.
- Press the [Enter] button.
A confirmation message appears in the screen.
COPY Are you sure?
4:(Empty)
To return to the original screen without copying the song, press the [Function] (Exit) button.
- Press the [Enter] button once more.
The song is copied.
- Press the [Function] (Exit) button so the indicator goes out.
When there is no song assigned to a number, this is indicated in the display in the following form: "4: (Empty)."
COPY To=Favorites 4: (Empty)
If you select a number to which a song is already saved and then attempt to copy to that number, the following message appears in the display.
COPY Overwrite sure? 3:Yellow Submarine
To delete the saved song and copy the new song to that number, press the [Enter] button.
If you do not want to delete the saved song, press the [Function] (Exit) button.
NOTE
When copying performances saved to USB memory, do not remove the USB memory until copying is finished.
Deleting Songs Saved to the "Favorites," USB Memory, and Floppy Disks
Use this procedure to delete songs saved to the " Favorites," USB memory, and floppy disks.
1.
Prepare the USB memory or floppy disk containing the song or songs you want to delete.
- Connect the USB memory to the Ext Memory port.
- Insert the floppy disk in the floppy disk drive.
2.
Press the [Function] (Exit) button so the indicator is lit.
3.
Press the [Song] (Select-) button or [1 1] (Select+) button to display the FILE screen.
FILESAVEI COPYI DELI FORMAT
4.
Press the [Song] (Select-) button or [1 1] (Select+) button so "DEL" (Delete) is flashing.
FILESAVEI COPY|DELFORMAT
5.
Press the [Enter] button.
The following screen appears.
DELETE Favorites 1:Love me Tender
6.
Press the [Song] (Select-) button or [1 1] (Select+) button so that the "Saved Song to Delete" setting is flashing.
DELETE Favorites 1:Love me tender
- Press the [▶■] (Value-) button or [▶■] (Value+) button to select "Saved Song to Delete."
| Value | Description |
| Favorites | Deletes the songs in the “ Favorites.” |
| Floppy Disk | Deletes the songs in the Floppy disk. |
| Ext Memory | Deletes the songs in the USB memory. |
- Press the [Song] (Select-) button or [1 1] (Select+) button to get the "song number" to flash.
DELETE Fsuonrit.e
1:Love me Tender
- Press the [▶/■] (Value-) button or [▶▶] (Value+) button to select the song to be deleted.
- Press the [Enter] button.
A confirmation message appears in the screen.
DELETE Favorites
Are you sure?
To return to the original screen without deleting the song, press the [Function] (Exit) button.
- Press the [Enter] button once more.
The song is deleted. - Press the [Function] (Exit) button so the indicator goes out.
NOTE
When deleting performances saved to USB memory, do not remove the USB memory until deleting is finished.
Chapter 2. Using the RG-3 with an External Display or Television
You can connect a computer monitor or other external display or a television to the RG-3, enabling you to display the Song Select screen, your favorite images, song lyrics, and notations on a larger screen.
You cannot simultaneously use both an external display and a television with the RG-3. Moreover, neither the external display nor the television will be able to display properly if both are connected at the same time.
When using an external display, connect the display to the Ext Display connector, but do not connect a television to the Video Out connector.
If using a television, connect the television to the Video Out connector, but do not connect any external display to the Ext Display connector.
For more information about external display settings, refer to "Selecting What is To Be Displayed on the External Display or Television" (p. 48).
Connecting an External Display
Displays That Can Be Connected to This Instrument
In general, a great many of the VGA monitors and multiscan monitors that are available on the market are compatible with this instrument.
However, before you connect any monitor, make sure it meets the following specifications:
| Resolution | 640 x 480 pixels |
| Horizontal scan frequency | 31.5 kHz |
| Vertical scan frequency | 60 Hz |
| Connector | 3-row, 15-pin D-Sub type |
| Signal | Analog |
Making the Connections
- To prevent malfunction and/or damage to speakers or other devices, always turn down the volume, and turn off the power on all devices before making any connections.
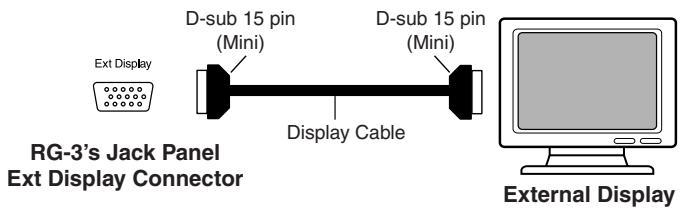
- Turn off the power to the RG-3 and the display to be connected.
- Use display cable (commercially available) to connect the display to the Ext Display connector on the RG-3.
- Switch on the RG-3.
- Switch on the connected display.
NOTE
You can switch screens with the remote control. For details, see "About the Remote Control" (p. 34).
NOTE
Confirm that your display is compatible with the frequencies listed to the left. Using a display that is not compatible with the left frequencies may result in incorrect image output when images move, and in certain cases may even damage the display.
NOTE
You cannot display information or images with an external display when a television is connected to the Video Out jack.
To use an external display, first disconnect the television from the Video Out jack, then connect the external display.
MEMO
For more on handling the external display, refer to your display's owner's manual.
Turning the Power Off
After use, turn off the power using the following procedure.
- Turn the volume all the way down on the RG-3.
- Turn off the RG-3.
- Turn off the connected display.
Changing the Display Settings
- Press the [Function] (Exit) button so the indicator is lit.
- Press the [Song] (Select-) button or [▶] (Select+) button to display the EXT DISPLAY screen.
EXT DISPLAY VGA Slide Interval = 5
- Press the [Song] (Select-) button or [▶] (Select+) button so that the display setting is flashing.
EXT DISPLAY UGA Slide Interval=5
- Press the [▶■] (Value-) button or [▶■] (Value+) button to select "VGA."
Press the [Function] (Exit) button so the indicator goes out.
Images are now displayed in the screen of the connected external display. When you press the [DISPLAY] button on the remote control, the content being displayed switches to the external display.
Song Select screen Lyrics screen Slide show Notation Song Select screen...

You can save this setting in the RG-3's memory using the Memory Backup function (p. 73).

To change the settings indicated in the display, refer to "Selecting What is To Be Displayed on the External Display or Television" (p. 48).
Connecting a Television
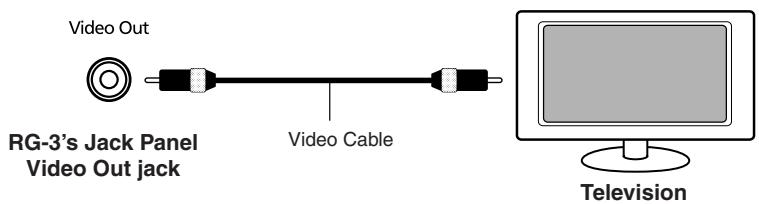
Making the Connections
-
To prevent malfunction and/or damage to speakers or other devices, always turn down the volume, and turn off the power on all devices before making any connections.
-
Turn off the power to the RG-3 and the television to be connected.
- Use a video cable (commercially available) to connect the RG-3's Video Out jack with the television's video input jack.
- Turn on the power to the RG-3.
- Turn on the power to the television.
Switching Television Formats
If you find that the image quality of the television is poor, try switching the television format.
- Press the [Function] (Exit) button so the indicator is lit.
- Press the [Song] (Select-) button or [1 1] (Select+) button to display the EXT DISPLAY screen.
- Press the [▶/■] (Value-) button or [▶▶] (Value+) button to select the television format.
EXT DISPLAY PAL Slide Interval=
Value: PAL, NTSC
- Press the [Function] (Exit) button so the indicator goes out.
When you press the [DISPLAY] button on the remote control, the content being displayed switches to the television.
Song Select screen Lyrics screen Slide show Notation Song Select screen...
NOTE
You cannot display information or images with a television when an external display is connected to the Ext Display connector. To use an television, first disconnect the external display from the Ext Display connector, then connect the television.

You can save this setting in the RG-3's memory using the Memory Backup function (p. 73).
MEMO
To change the settings indicated in the display, refer to "Selecting What is To Be Displayed on the External Display or Television" (p. 48).
Selecting What is To Be Displayed on the External Display or Television
Here's how you can specify what it is that you want to have displayed on the external display or television connected to the RG-3.
1.
Press the remote control's [DISPLAY] button to switch the content displayed in the external display or television.
| Screen Displayed | Description |
| Song Select | Displays the Song Select screen. Selecting songs is made easier when the Song Select screen is displayed on an external display or television set. |
| Lyrics | Displays the Lyrics screen. However, lyrics are displayed only during playback of music files that includes lyrics data. You can also connect USB memory to the Ext Memory port and display “karaoke background images” saved to the USB memory. For more details, refer to “Changing the Background for the Lyrics Screen” (p. 52). |
| Slide Show | You can connect USB memory to the Ext Memory port and display user images saved to the USB memory as slide shows. For more details, refer to “Displaying Favorite Images on an External Display or Television (Slide Show)” (p. 49). |
| Notation | Displays the notation. This allows you to check the music as the song is played back. |
Notes When Switching the Display on External Displays and Televisions
- Notations are not displayed with audio CDs and audio files.
- If no user image is stored in the USB memory connected to the Ext Memory port, you cannot exhibit slide shows on an external display or television screen.
- You cannot display any lyrics screen when playing back music files that does not include lyrics data.
- The internal songs include a number of jazz pieces that are played in an improvised fashion, and you may find notes not conforming to measure lines, odd divisions of the parts played in the left and right hand, and other such features that do not match what is shown in the notation.
Displaying Favorite Images on an External Display or Television (Slide Show)
With the RG-3, you can display desired image data (slide shows) saved to USB memory on a connected external display or television screen.
You can also use VIMA CD-ROMs (VIMA TUNES) sold by Roland.
This allows you to display slide shows contained on CD-ROMs on a display or television at the same time that songs are played back.
When Using a USB Memory
Preparing the Images to be Displayed
Prepare the desired image data on your computer and save the data to the USB memory.
1. Prepare the desired image data with your computer.
| Image Data That Can Be Displayed | |
| Size | 640 x 480 pixels |
| Format | BMP format, JPEG format |
| Extension | “.bmp”,“.jpg” |
2. Connect the USB memory to your computer, then create a folder named "_.PICTURE" in the USB memory.
3. Place the images you want to display in the "_.PICTURE" folder.
Setting the Duration for Displaying Images
When you have data for multiple images saved to the USB memory and want to display these images on a connected display or television set, you can specify the length of time each image appears.
1. Press the [Function] (Exit) button so the indicator is lit.
2. Press the [Song] (Select-) button or [1 1] (Select+) button to display the EXT DISPLAY screen.
3. Press the [Song] (Select-) button or [1 1] (Select+) button to get the value for "Slide Interval" to flash.
EXT DISPLAY POI Slide Interval=5
MEMO
What is VIMA?
Presented by Roland, VIMA represents an entirely new concept in keyboards.
It lets you connect LCD televisions, video cameras, portable audio players, and other devices, enabling you to enjoy music and video whether or not you have experience in performing music.
MEMO
You can have images be displayed in the order you prefer by changing the file names. By adding a number from 001 through 999 to the six- to eight-character file name, you can have the files be displayed according to their numerical order.
NOTE
The folder named "PICTURE" is not shown in the Song Select screen.
- Some images may not be displayed in the slide show if 500 or more files, including images, are contained in a single folder.
MEMO
You can save this setting in the RG-3's memory using the Memory Backup function (p. 73).
- Press the [▶/■] (Value-) button or [▶+] (Value+) button to set the time a single image is to be displayed. Value: 2-60
- Press the [Function] (Exit) button so the indicator goes out.
Running Slide Shows Through a Connected External Display or Television
- Make sure the power to the RG-3 is turned off, then connect the external display or television (p. 45, p. 47).
- Turn on the power to the RG-3 and the external display (or television).
- Make the settings for the display or television format (p. 46, p. 47).
- Connect the USB memory containing the saved images you want to display to the Ext Memory port.
- Pressing the remote control's [DISPLAY] button, make the settings for the slide show to appear in the external display or television.
- Press the [▶/■] (Value-) button to play back the song. The slide show appears in the external display or television screen.
When Using a VIMA CD-ROM (VIMA TUNES)
- Place the VIMA CD-ROM (VIMA TUNES) in the CD drive.
- Press the [Song] button one or more times to select "CD" as the song genre.
If using the remote control, press the remote control's [EXTERNAL] button and select "CD" for the song genre.
- Press the [▶/■] (Value-) button or [▶+] (Value+) button to select the song you want to play back.
- Pressing the remote control's [DISPLAY] button, make the settings for the slide show to appear in the external display or television.
- Press the [▶/■] (Value-) button to play back the song.
The slide show with images suitable for the song is shown on the connected external display or television screen.
Changing the Background for the Lyrics Screen
You can have the background you prefer shown when displaying lyrics on an external display or television screen.
Preparing the Images to be Displayed
Prepare the desired image data on your computer and save the data to the USB memory.
1. Prepare the desired image data with your computer.
| Image Data That Can Be Displayed | |
| Size | 640 x 480 pixels |
| Color | 8 bit (256 colors), 4 bit (16 colors), 1 bit (2 colors) |
| Format | BMP Format * The RG-3 cannot deal with compressed image data. |
| Name | KARAOKE.BMP |
- Connect the USB memory to your computer, then create a folder named “_PICTURE” in the USB memory.
- Copy the image data you have created (KARAOKE.BMP) to the "_.PICTURE" folder.
- Make sure the power to the RG-3 is turned off, then connect the external display or television (p. 45, p. 47).
- Turn on the power to the RG-3 and the external display (or television).
- Connect the USB memory containing the saved image you want to display (KARAOKE.BMP) to the Ext Memory port.
- Pressing the remote control's [DISPLAY] button, set the external display or television to display the lyrics.
The desired background image is shown in the external display or television screen.
NOTE
You cannot display any lyrics screen when playing back music files that does not include lyrics data.
Chapter 3. Performance
Performing with a Variety of Sounds
The RG-3 contains 20 different internal tones. The tones are organized into five tone groups, which are assigned to the Tone buttons.
Piano 1
Piano 2
Harpsi-chord
Vibraphone
E.Piano


Selecting a Tone Group
1.
Press any Tone button.
The indicator of the button you pressed will light.
When you play the keyboard, you will hear a sound in the selected tone group.
Selecting Variation Tones
2.
While holding down the Tone button and the [ / ] (Value-) or [ ] (Value +) button to select the tone.
The tone name appears in the display.
Piano 1 - 1 Superior Grand
The tone you've selected is heard when you finger the keyboard.
| Piano 1 | Piano 2 | Harpsichord | |||
| 1 | Superior Grand | 1 | Natural Grand | 1 | Harpsichord |
| 2 | Superior Grand + Str | 2 | Natural Grand + Str | 2 | Coupled Harpsichord |
| 3 | Superior Grand + Pad | 3 | Natural Grand + Pad | 3 | Harpsichord + Choir |
| 4 | Piano + FM E.Piano | 4 | Piano + Bell | 4 | Harpsichord + Str |
| Vibraphone | E.Piano | ||
| 1 | Vibraphone | 1 | Electric Piano |
| 2 | Bell | 2 | FM E.Piano |
| 3 | Harp | 3 | '60s Electric Piano |
| 4 | Electric Piano + Pad | 4 | Electric Piano + Str |
Some tones are assigned a pair of tones, which allow you to perform with two tones layered together.
MEMO
The factory settings have tone demos registered in the "Favorites" (p. 25).
You can check and confirm the internal tones.
You can delete tone demos in the "Favorites" and overwrite them by saving other songs in their place. If you want to play back tone demos after they have been deleted, initialize the User Memory to restore the factory settings (p. 93).
MEMO
Songs on VIMA CD-ROMs (VIMA TUNES) are programmed with
"recommended tones" suitable for each song.
When you select a song, the recommended tones are assigned to the RG-3's Tone buttons, and those Tone buttons then flash.
When you press a flashing Tone button, the recommended tone is selected, enabling you to perform the selected song using a tone matched to that song as it plays back.
MEMO
You can also switch the Split function (p. 67) on and off by holding down a tone button and pressing the [Song] button.
The Tone screen appears as shown below when the Split function is on.
Piano 1 - 1
A.Bs / SuperiorGrand
Pressing a tone button once more cancels the Split function.
Changing the Volume Balance of the Layered Tones (Layer Balance)
Some tones enable you to perform with two tones layered together. These are called "Layer tones."
When you select a Layer tone, you can also change the balance in the volume of the two Layer tones.
- Press the [Function] (Exit) button so the indicator is lit.
- Press the [Song] (Select-) button or [1 1] (Select+) button to display the BALANCE screen.
BALANCE Key: Acmp=5:5
Layer=7:3
- Press the [Song] (Select-) button or [1 1] (Select+) button to get the value for "Layer" to flash.
BALANCE Key: Acmp=5:5
Layer:7:3
- Press the [▶/■] (Value-) button or [▶▶] (Value+) button to adjust the volume balance.
| Value | description |
| 1: 9–9: 1 | The volume increases as the value is raised. The numeral on the left indicates the tone's original volume lev- el, and the number on the right indicates the volume of the tone as played with the other Layer tone. |
Example: When Natural Grand+Str (Natural Grand Piano + Strings) are selected as the tones
BALANCE Key: Acmp=5:5
Layer=7:3
Volume level of Strings
Volume level of Natural Grand (Natural Grand piano)
- Press the [Function] (Exit) button so the indicator goes out.
Making Fine Adjustments to the Piano Sound (Piano Customize)
You can make fine adjustments to the sound of the piano as desired.
Adjusting the Keyboard Touch (Key Touch)
You can adjust the touch (playing feel) of the keyboard.
- Press the [Function] (Exit) button so the indicator is lit.
- Press the [Song] (Select-) button or [1 1] (Select+) button to display the KEY TOUCH screen.
KEYTOUCH Touch=65 Hammer=Light
- Press the [Song] (Select-) button or [1 1] (Select+) button to get the value for "Touch" to flash.
KEY TOUCH Touch=65 Hammer=Light
- Press the [▶/■] (Value-) button or [▶▶] (Value+) button to change the value.
| Value | Description |
| 1-100 | The keyboard touch gets lighter as the value decreases, with the touch becoming heavier as the value is increased. |
| Fix | The sound plays at a fixed volume, regardless of how forcefully the keys are played. |
- Press the [Function] (Exit) button so the indicator goes out.
Fortissimo (ff) can be played with a lighter touch as the value is decreased, making it feel like the keyboard has a lighter touch. This setting makes it easy to play, even for children.
Increasing the value gives the instrument a heavier key touch. Fortissimo (ff) cannot be produced unless you play more strongly than usual, making the keyboard feel heavier. Dynamic fingering adds even more feeling to what you play.
A value of around 65 provides a standard setting, producing the most natural touch. This is the closest to the touch of an acoustic piano.

You can save this setting in the RG-3's memory using the Memory Backup function (p. 73).
Changing the Timing of Sounds According to the Force Used to Press the Keys (Hammer Response)
This adjusts how your playing strength will affect the timing at which the note sounds. This is called the "Hammer Response" function.
On an acoustic piano, pressing a key moves a hammer, which strikes a string to produce sound. If you press the key softly, the hammer will move slowly, meaning that it will take slightly longer (in comparison to a strongly-played note) from the moment you press the key until the sound is produced.
If the Hammer Response function is turned on, the time between the moment you press a key until the sound is heard will change depending on the strength with which you play. As you play more softly, this time will become longer.
- Press the [Function] (Exit) button, getting its indicator to light.
- Press the [Song] (Select-) button or [1 1] (Select+) button to display the KEY TOUCH screen.
KEYTOUCH Touch=65
Hammer=Light
- Press the [Song] (Select-) button or [1 1] (Select+) button to get the value for "Hammer" to flash.
KEY TOUCH Tourh=65
Hammer=Light
- Press the [▶/■] (Value-) or [▶▶] (Value+) button to change the value.
| Value | Description |
| Light | The response is faster when the keys are pressed gently. |
| Medium | The regular timing is used when the keys are pressed gently. |
| Heavy | The timing of the sounds is delayed when the keys are pressed gently. |
| Off | The Hammer Response function is cancelled. The sound is played immediately, regardless of the force with which the keys are played (velocity). |
- Press the [Function] (Exit) button so the indicator goes out.

You can save this setting in the RG-3's memory using the Memory Backup function (p. 73).
■ Playing Sounds When the Keys Are Released (Key Off Resonance)
You can play the "key off" sound (the subtle sound produced when the keys are released) obtained when playing an acoustic piano.
- Press the [Function] (Exit) button, getting its indicator to light.
- Press the [Song] (Select-) button or [▶] (Select+) button to display the RESONANCE screen.
RESONANCE KeyOff=4
String = 3 Damper = 3
- Press the [Song] (Select-) button or [1 1] (Select+) button to get the value for "KeyOff" to flash.
RESONANCE KeyOff=4
String = 3 Damper = 3
- Press the [▶/■] (Value-) or [▶▶] (Value+) button to change the value.
| Value | Description |
| 0-9 | The volume of the Key Off sound decreases as the value is low-ered, while raising the value increases the volume of the KeyOff sound.The Key Off Resonance function is not active when the value isset to “0.” |
- Press the [Function] (Exit) button so the indicator goes out.

You can save this setting in the RG-3's memory using the Memory Backup function (p. 73).

This setting is enabled only with the piano tones (Superior Grand, Natural Grand) and harpsichord tones (Harpsichord, Coupled Harpsichord).
You cannot set this for other tones.
Producing the Resonance of the Strings When the Keys Are Played (String Resonance)
When you play the keys on an acoustic piano, the strings that are already playing resonate as well. The function that reproduces this effect is called "String Resonance."
- Press the [Function] (Exit) button, getting its indicator to light.
- Press the [Song] (Select-) button or [1 1] (Select +) button to display the RESONANCE screen.
RESONANCE KeyOff=4
String=3 Damper=3
- Press the [Song] (Select-) button or [1 1] (Select+) button to get the value for "String" to flash.
RESONANCE KeyOff=4 String9=3 Damper=3
- Press the [▶/■] (Value-) or [▶+] (Value+) button to change the value.
| Value | Description |
| 0-9 | The resonance level decreases as the value is decreased, while increasing the value increases the amount of resonance. The String Resonance function is not active when the value is set to “0.” |
- Press the [Function] (Exit) button so the indicator goes out.

You can save this setting in the RG-3's memory using the Memory Backup function (p. 73).
NOTE
This setting is enabled only with the piano tones.
You cannot set this for other tones.
Producing the Resonance of the Strings When the Keys Are Played (Damper Resonance)
You can change the volume of the damper pedal resonance.
On an acoustic piano, depressing the damper pedal makes the notes you play resonate with other strings, adding rich reverberations and fatness to the sound. The damper pedal on the RG-3 recreates this resonance (Damper Resonance) when depressed.
1. Press the [Function] (Exit) button, getting its indicator to light.
2. Press the [Song] (Select-) button or [1 1] (Select+) button to display the RESONANCE screen.
RESONANCE KeyOff=4
String = 3 Damper = 3
3. Press the [Song] (Select-) button or [1 1] (Select+) button to get the value for "Damper" to flash.
RESONANCE KeyOff=4
String = 3 Damper = 3
4. Press the [▶/■] (Value-) or [▶▶] (Value+) button to change the value.
| Value | Description |
| 0-9 | The resonance volume decreases as the value is lowered, while raising the value increases the volume of the Damper Resonance. The Damper Resonance function is not active when the value is set to “0.” |
5. Press the [Function] (Exit) button so the indicator goes out.
MEMO
You can save this setting in the RG-3's memory using the Memory Backup function (p. 73).
NOTE
This setting is enabled only with the piano tones.
You cannot set this for other tones.
Adjusting the Sound to Achieve the Preferred Tone Quality (Equalizer)
The RG-3 features a built-in, three-band digital equalizer.
An equalizer boosts or cuts specific sound pitches (frequency ranges) to adjust the sound balance for the overall performance.
For example, you can boost the highs to get a crisper sound, or boost the low end for a more powerful sound.
You can also adjust the sound to compensate for the acoustical characteristics of the performance space.
If raising the values for separate frequencies causes the sound to distort, you can use the "Master Level" (see below) to control such distortion.
1. Press the [Function] (Exit) button, getting its indicator to light.
2. Press the [Song] (Select-) button or [1 1] (Select+) button to display the EQUALIZER screen.
EQUALIZER Master= 0 L= 0 M= 0 H= 0
3. Press the [Song] (Select-) button or [▶] (Select+) button so that the value for the range you want to set is flashing.
EQUALTZER M=er= 0 L= 0 M= 0 H= 0
| Value | Description |
| Master (Master Level) | You can temper the distortion in the sound by lowering the level. Raising the level too much may cause the sound to become distorted. |
| L (Low) | Low-frequency range. This is the range of frequencies for instruments like drums, bass, organ, guitar and strings. |
| M (Middle) | Midrange. This is the range of frequencies where most instrument sounds are concentrated. |
| H (High) | High-frequency range. These frequencies add brilliance to the sound. |
4. Press the [▶/■] (Value-) button or [▶▶] (Value +) button to adjust the range and the overall level.
Value: -60-0--+60
5. Press the [Function] (Exit) button so the indicator goes out.
![ROLAND RG-3 - Press the [Function] (Exit) button so the indicator goes out. - 1](/content/2025/01/130896/images/dbca0a1b59aeef48ece0bf06a447cd9616e78a8a12fa431bbcde038e97df59a4.jpg)
You can save this setting in the RG-3's memory using the Memory Backup function (p. 73).
Changing the Pitch of the Keyboard Sound (Transpose)
By using the "Transpose function," you can transpose your performance without changing the notes you play.
For example, even if the song is in a difficult key with numerous sharps (#) or flats (\b), you can transpose it to a key that is easier for you to play.
When accompanying a vocalist, you can easily transpose the pitch to a range that is comfortable for the singer, while still playing the notes as written (i.e., with the same fingering positions).
- Press the [Function] (Exit) button so the indicator is lit.
- Press the [Song] (Select-) button or [1 1] (Select+) button to display the TRANSPOSE screen.
TRANSPOSE Link=On
Keyboard/Playback = 0
- Press the [Song] (Select-) button or [1 1] (Select+) button to get the value for "Link" to flash.
TRANSPOSE Link=On
Keyboard/Playback=0
- Press the [▶/■] (Value-) button or [▶▶] (Value+) button to switch the Link setting to "On."
When set to "On," the keyboard and song are transposed simultaneously.
- Press the [Song] (Select-) button or [1 1] (Select+) button to get the value for "Keyboard/Playback" to flash.
TRANSPOSE Link=On
Keyboard/Playback=0
- Press the [▶/■] (Value-) button or [▶▶] (Value+) button to select the transposition value.
The keyboard is transposed by a semitone each time you press the [ / ] (Value-) button or [ 1] (Value +) button.
Pressing the [▶/■] (Value-) and [▶■] (Value+) buttons simultaneously returns the setting to the original value (0).
Value: -6-0+5 (semitone steps)
- Press the [Function] (Exit) button so the indicator goes out.

When Link is set to "Off," you can transpose the notes from the keyboard and the song and separately (p. 62).
Example:
Playing a song in E major while playing the keys for C major
In this example, C is the root note in the key of C major.
E, the root of E major, is the third in C major.
It is up four keys, including the black keys, so touch, then enter "4" for the setting.
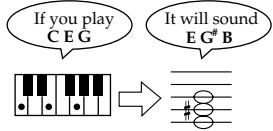
Separately Transposing the Keyboard Sounds and the Song Being Played Back
You can transpose the keyboard sounds separately from the song being played back by setting Link to "Off."
To accomplish this, carry out Steps 3-6 in the procedure described on p. 61.
3.
Press the [Song] (Select-) button or [1 1] (Select+) button to get the value for "Link" to flash.
TRANSPOSE Link=On keyboard/Playback =0
4.
Press the [▶/■] (Value-) button or [▶▶] (Value+) button to switch the Link setting to "Off."
TRANSPOSE Link=0ff Keybrd=0 P1ybck=0
5.
Press the [Song] (Select-) button or [1 1] (Select+) button to get the value for "Keyboard" to flash.
TRANSPose Link=Off Keybrd=0 Playck=0
6.
Press the [▶/■] (Value-) button or [▶▶] (Value+) button to select the transposition value.
Value: -6-0++5 (semitone steps)
Cancelling the Transpose Function
1.
In the TRANSPOSE screen, press the [▶/■] (Value-) and [▶▶1] (Value+) buttons simultaneously to select "0."

For more on the procedure to transpose the song being played back, refer to p. 38.
Tuning to Other Instruments' Pitches (Master Tuning)
In situations such as when playing ensemble with other instruments, you can tune the RG-3's standard pitch to the pitch of another instrument.
The standard pitch generally refers to the pitch of the note that's played when you finger the middle A key.
This tuning of all the instruments to a standard pitch is called "tuning."
- Press the [Function] (Exit) button, getting its indicator to light.
- Press the [Song] (Select-) button or [1 1] (Select+) button to display the TUNE screen.
TUNE 440.0 Stretch=2
Equal Key=C
- Press the [Song] (Select-) button or [▶] (Select+) button to get the value for the Master Tuning setting to flash.
TUNE 440.0 Stretch=2
Eual Key=0
- Press the [▶■] (Value-) button or [▶▶] (Value +) button to change the standard pitch.
| Value | Description |
| 415.3–440.0 – 466.2 (Hz) | This is set to “440.0” when the power to the RG-3 is switched on. |
- Press the [Function] (Exit) button so the indicator goes out.

You can save this setting in the RG-3's memory using the Memory Backup function (p. 73).
Setting the Tuning Curve (Stretched Tuning)
Pianos are generally tuned so that the low range is flatter and the high range is sharper than equal tempered pitches. This method of tuning is unique to the piano, and is known as "stretched tuning."
A graph that shows the changes in pitch of actual tuning compared with the changes in equal temperament pitch is called a tuning curve.
Changing the tuning curve produces subtle variations in the reverberations of the chords you play.
- Press the [Function] (Exit) button, getting its indicator to light.
- Press the [Song] (Select-) button or [1 1] (Select+) button to display the TUNE screen.
TUNE 440.0 Stretch=2
Equal Key=C
- Press the [Song] (Select-) button or [1 1] (Select+) button to get the value for "Stretch" to flash.
TUNE 440.0 Stretch=2
Equal Key=0
- Press the [▶■] (Value-) button or [▶▶] (Value +) button to change the Stretch Tuning setting.
| Value | Description |
| 1 | This is the standard tuning curve. It is suitable when playing in an ensemble with other instru- ments. |
| 2 | This tuning curve expands the bass and treble ends somewhat. It is suitable for performances such as piano solos. |
This is set to "2" when the power to the RG-3 is switched on.
- Press the [Function] (Exit) button so the indicator goes out.

You can save this setting in the RG-3's memory using the Memory Backup function (p. 73).
Changing the Tuning
You can play classical styles such as Baroque using historic temperaments (tuning methods).
Most modern songs are composed for and played in equal temperament, the most common tuning in use today. But at one time, there were a wide variety of other tuning systems in existence.
By playing in the temperament that was in use when a composition was created, you can experience the sonorities of chords originally intended for that song.
- Press the [Function] (Exit) button, getting its indicator to light.
- Press the [Song] (Select-) button or [1 1] (Select+) button to display the TUNE screen.
TUNE 440.8 Stretch=2
Eual Key=C
- Press the [Song] (Select-) button or [1 1] (Select+) button to get the Temperament setting to flash.
TUNF 449.8 Stretch=2
Equa1 Key=C
- Press the [▶■] (Value-) button or [▶▶] (Value +) button to select the temperament.
| Display | Qualities |
| Equal | In this tuning, each octave is divided into twelve equal steps. Every interval produces about the same amount of slight dissonance. |
| Just (Maj) | This tuning eliminates ambiguities in the fifths and thirds. It is unsuited to playing melodies and cannot be transposed, but is capable of beautiful sonorities. |
| Just (min) | The Just tunings differ from major and minor keys. You can get the same effect with the minor scale as with the major scale. |
| Kirnberger | This is an improvement of the Mean Tone and Just tunings that provides a high degree of freedom of modulation. Performances are possible in all keys (III). |
| Pythagorean | This tuning, devised by the philosopher Pythagoras, eliminates dissonance in fourths and fifths. Dissonance is produced by third-interval chords, but melodies are euphonious. |
| Meantone | This scale makes some compromises in just intonation, enabling transposition to other keys. |

You can save this setting in the RG-3's memory using the Memory Backup function (p. 73).
| Display | Qualities |
| Werkmeister | This temperament combines the Mean Tone and Pythagorean tunings. Performances are possible in all keys (first technique, III). |
| Arabic | This tuning is suitable for the music of Arabia. |
When playing with tuning other than equal temperament, you need to specify the tonic note for tuning the song to be performed (that is, the note that corresponds to C for a major key or to A for a minor key).
5. Press the [Function] (Exit) button so the indicator goes out.
Setting the Tonic
When playing with tuning other than equal temperament, you need to specify the tonic note for tuning the song to be performed (that is, the note that corresponds to C for a major key or to A for a minor key).
If you choose an equal temperament, there's no need to select a tonic note.
- Press the [Function] (Exit) button, getting its indicator to light.
- Press the [Song] (Select-) button or [▶] (Select+) button to display the TUNE screen.
TUNE 440.8 Stretch=2
Equal Key=C
- Press the [Song] (Select-) button or [1 1] (Select+) button to get the value for "Key" to flash.
TUNE 440.8 Stretch=2
Equal Key=C
- Press the [▶/■] (Value-) button or [▶▶] (Value+) button to select the tonic.
| Display | C | C# | D | Eb | E | F | F# | G | Ab | A | Bb | B |
| Letter name | C | C# | D | E | E | F | F# | G | A | A | B | B |
- Press the [Function] (Exit) button so the indicator goes out.

You can save this setting in the RG-3's memory using the Memory Backup function (p. 73).

When performing in ensemble with other instruments, be aware that depending on the key, there may be some shifting of the pitch.
Tune the RG-3 to the fundamental pitch of the other instruments.
Playing Different Tones with the Left and Right Hands (Split Performance)
Dividing the keyboard into right-hand and left-hand areas, then playing different sounds in each is called "Split performance."
The boundary key is called the "split point."
The split point key is included in the left-hand keyboard area. Each time power to the keyboard is turned on, the split point is reset to "F#3."
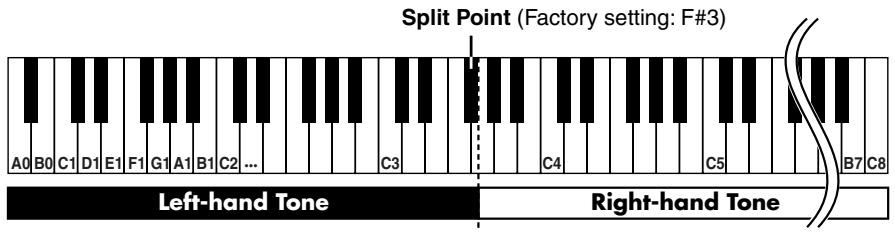
- Select a tone (p. 53).
- Press the [Function] (Exit) button, getting its indicator to light.
- Press the [Song] (Select-) button or [1 1] (Select+) button to display the SPLIT screen.
SPLIT S1it=0ff
Split Point=F#3
- Press the [Song] (Select-) button or [1 1] (Select+) button to get the value for "Split" to flash.
SPLIT S1it=0ff
Split Point=1#3
- Press the [▶/■] (Value-) or [▶▶] (Value+) button to select "On."
The keyboard is divided into right-hand and left-hand areas.
The tone played prior to Split Performance is selected for the right hand, and a suitable tone to match that tone is selected for the left hand automatically.
- To exit Split mode, press the [▶/■] (Value-) button or [▶▶]
(Value +) button to set the "Split" setting to "Off."

You can change the split point; refer to "Changing the Keyboard's Split Point" (p. 68).

You can switch Split function on and off by holding down the tone button and pressing the [Song] button.
The Tone screen appears as shown below when the Split function is on.
Piano 1 - 1 A.Bs / SuperiorGrand
Pressing a tone button once more cancels the Split function.
For more about the tones with which this setting is enabled, refer to the "Tone List" (p. 107).
Changing the Keyboard's Split Point
You can change the location where the keyboard is divided (the split point).
- Press the [Function] (Exit) button, getting its indicator to light.
- Press the [Song] (Select-) button or [1 1] (Select+) button to display the SPLIT screen.
SPLIT S1it=On
Split Point=F#3
- Press the [Song] (Select-) button or [1 1] (Select+) button to get the value for "Split Point" to flash.
SPLIT S1it=An
S1it Point=F#3
- Press the [▶/■] (Value-) or [▶▶] (Value+) button to select the split point.
Value: B1-B6
This is set to "F#3" when the power to the RG-3 is switched on.
- Press the [Function] (Exit) button so the indicator goes out.
Adding Reverberation to the Sound (Reverb)
Apply a reverb effect to the notes you play with the RG-3.
Reverb makes it sound as if you are playing in a concert hall.
- Press the [Function] (Exit) button so the indicator is lit.
- Press the [Song] (Select-) button or [1 1] (Select+) button to display the EFFECT screen.
EFFECT
Reverb= 20
- Press the [Song] (Select-) button or [1 1] (Select+) button to get the value for "Reverb" to flash.
EFFECT
Reverb= 20
- Press the [▶■] (Value-) button or [▶▶] (Value +) button to change the amount of reverb applied.
| Value | Description |
| 0-127 | Increasing the value results in a deeper reverb effect. No reverb is applied when the value is set to “0.” |
- Press the [Function] (Exit) button so the indicator goes out.

You can save this setting in the RG-3's memory using the Memory Backup function (p. 73).
Assigning Functions to Pedals
You can assign a variety of functions to the left and center pedals.
You can call up the assigned functions just by pressing the corresponding pedal.
- Press the [Function] (Exit) button so the indicator is lit.
- Press the [Song] (Select-) button or [1 1] (Select+) button to display the PEDAL screen.
PEDAL Cent=Sostenuto Left=Soft
- Press the [Song] (Select-) button or [1 1] (Select +) button to get the value for "Cent" (Center Pedal) or "Left" (Left Pedal) to flash.
PEDAL Cent=Sostenuto Left=Soft
- Press the [▶■] (Value-) button or [▶▶] (Value +) button to select the function assigned to the pedal.
| Value | Description |
| Sostenuto | The pedal functions as a sostenuto pedal (p. 20). |
| Soft | The pedal functions as a soft pedal (p. 20). |
| LwrDamper (Lower Damper) | When using Split performance (p. 67), the same effect as the damper pedal (p. 20) will be applied to the left-hand keyboard area. |
| Play/Stop | Starts and stops playback of the song. |
| Pedal EX | If you have a Layer tone (p. 54) selected, the original tone is played whenever the pedal is not being pressed as you perform. When you perform while pressing the pedal, an layer tone is played together with the original tone. The volume of the layer tone is adjusted according to how much you press the pedal. Example: When “Harpsichord + Choir” are selected • Playing the keyboard without pressing the pedal Only the harpsichord tone is played. • Playing the keyboard while pressing the pedal When the pedal is not pressed, only the harpsichord tone is played, while the choir tone gradually comes in as the pedal is pressed. The volume of the choir tone is adjusted according to how much you press the pedal. |
NOTE
No effects will be applied with "Pedal EX" function assigned to the pedal if any tone other than the layer tone is selected.
| Value | Description |
| Octave | When you play a key while pressing on the pedal, the note for the key being pressed and the note one octave above it are lay-ered and played together. You can adjust the volume of the sound one octave above the layer tone by changing the pressure used on the pedal. |
- Press the [Function] (Exit) button so the indicator goes out.
Changing the Volume Balance of the Accompaniment and the Keyboard
You can also change the balance in the volume of songs or accompaniment and the volume of the keyboard as you play.
- Press the [Function] (Exit) button so the indicator is lit.
- Press the [Song] (Select-) button or [1 1] (Select+) button to display the BALANCE screen.
BALANCE Key: AcmF=5:5
Layer=7:3
- Press the [Song] (Select-) button or [▶] (Select+) button to get the value for "Key:Acmp" (Keyboard:Accompaniment) to flash.
BALANCE Key: Acmp=5:5
Lader
- Press the [▶■] (Value-) button or [▶■] (Value+) button to adjust the keyboard and the accompaniment volume balance.
| Value | Description |
| 1: 9–9: 1 | The volume increases as the value is raised. The numeral on the left indicates the keyboard volume, and the number on the right indicates the accompaniment volume. |
- Press the [Function] (Exit) button so the indicator goes out.
Remembering the Settings Even When the Power is Turned Off (Memory Backup)
Normally, the various settings revert to their default values when the power is turned off.
However, you can specify that the settings will be remembered even when the power is turned off. This function is called "Memory Backup."
- Press the [Function] (Exit) button so the indicator is lit.
- Press the [Song] (Select-) button or [▶] (Select+) button to display the MEMORY BACKUP screen.
MEMORY BACKUP Press Enter to Exec.
- Press the [Enter] button.
A confirmation message appears in the screen.
MEMORY BACKUP Are you sure?
Pressing the [Function] (Exit) button at this point returns you to the original screen without the settings being saved.
- Press the [Enter] button once more.
Memory Backup is executed.
When Memory Backup is finished, the display and buttons return to their normal appearance.

For more on the settings stored using Memory Backup, refer to "Parameters Stored in Memory Backup" (p. 109).

Never turn off the power while "Executing..." is displayed in the screen. Doing so may corrupt the RG-3's memory and render it unusable.
Restoring the Factory Settings (Factory Reset)
You can return the content stored with "Memory Backup" (refer to the previous page) to their original factory settings.
This operation is referred to as "Factory Reset."
- Press the [Function] (Exit) button so the indicator is lit.
- Press the [Song] (Select-) button or [1 1] (Select+) button to display the FACTORY RESET screen.
FACTORY RESET Press Enter to Exec.
- Press the [Enter] button.
A confirmation message appears in the screen.
FACTORY RESET Are you sure?
Pressing the [Function] (Exit) button at this point returns you to the original screen without Factory Reset being executed.
- Press the [Enter] button once more.
Factory reset is executed.
When the factory reset is complete and the screen shown below appears, switch the power off, then back on.
FACTORY RESET Cycle the power.
NOTE
When you perform a Factory Reset, all settings that have been stored in memory up to then are erased and reset to their factory defaults.
MEMO
When you want to restore the content registered to the RG-3's User memory to the factory condition, refer to "Initializing the User Memory, USB Memory, and Floppy Disks" (p. 93).
NOTE
Never turn off the power while "Executing..." is displayed in the screen. Doing so may corrupt the RG-3's memory and render it unusable.
Chapter 4. Recording the Performance
Notes Regarding Recording
You can store your recorded performances to the "Favorites" (p. 25). If not first saved to the "Favorites," recorded performances are erased when the RG-3's power is turned off.
If you want to retain such performances, be sure to save them to the "Favorites."
In addition, you can record performances to external audio devices (p. 98) and save performance data to USB memory and floppy disks (p. 77).
Recording Performances
- Select the tone you want to perform with (p. 53).
- Press the [Function] (Exit) button, getting its indicator to light.
- Press the [Song] (Select-) button or [▶] (Select+) button to display the RECORD screen.
RECORD
Press Enter
- Press the [Enter] button.
The following screen appears, and the RG-3 goes into recording standby.
RECORD
Press a key to start
Start Recording
- Play the keyboard to begin recording.
Recording starts, and the following screen appears.
The text "Recording..." flashes while recording is in progress.
RECORD Recording.
Press Enter to stop.
NOTE
Use USB memory available from Roland.
Proper operation cannot be guaranteed if other external memory products are used.
Stopping Recording
6.
Press the [Enter] button.
Recording stops.
The following screen appears.
User Song
Play Back the Recorded Performance
1.
Press the [▶/■] button.
You will hear the recorded performance.
Once again press the [ / ] button, and playback will stop.
If you see the following...
If you attempt to select a song when another performance has already been recorded, the following appears in the display.
Delete User Song OK?
No:Exit Yes:Enter
If it is OK to erase the performance, press the [Enter] button.
If you do not want to erase the performance, press the [Function] (Exit) button.

You can save recordings or your performances to the RG-3 itself (p. 77).
Saving Recorded Performances
You can save recorded performances to the RG-3's "Favorites" and to USB memory and floppy disks.
If not first saved to the " Favorites," USB memory, or floppy disks, recorded performances are erased when the RG-3's power is turned off.
If you want to retain such performances, be sure to save them to the "Favorites" or to a USB memory or floppy disk.
- Press the [Function] (Exit) button, getting its indicator to light.
- Press the [Song] (Select-) button or [1 1] (Select+) button to display the FILE screen.
FILESAVEI COPYI DELI FORMAT
- Press the [Song] (Select-) button or [▶] (Select+) button so "SAVE" is flashing.
FILE SAVE) COPYI DELI FORMAT
- Press the [Enter] button.
- Press the [Song] (Select-) button or [1 1] (Select+) button to get the value for "Dest" (Save Destination) to flash.
SAVE Dest=Favorites 4:(Empty)
- Press the [▶/■] (Value-) button or [▶+] (Value+) button to change the "Dest" (Save Destination) setting.
| Display | Description |
| Favorites | The performance data is saved to the “ Favorites.” |
| Floppy Disk | The performance data is saved to the Floppy disk. |
| Ext Memory | The performance data is saved to the USB memory. |

You can copy performances saved in the "Favorites" to USB memory and floppy disks.
You can also copy performances saved on USB memory and floppy disks to the "Favorites" (p. 40).
NOTE
Use USB memory available from Roland.
Proper operation cannot be guaranteed if other external memory products are used.
- Press the [Song] (Select-) button or [1 1] (Select +) button to get "save-destination number" to flash.
SUEF Dext=Fsunri.p
4:(Emphy)
- Press the [▶■] (Value-) button or [▶■] (Value+) button to select the "save-destination number."
When a performance has already been saved to a number, the name of the performance is indicated.
When a number has no performance assigned to it, this is indicated in the display in the following form: "4: (Empty)."
- Press the [Enter] button.
The performance is saved.
- Press the [Function] (Exit) button so the indicator goes out.
When a number has no song assigned to it, this is indicated in the display in the following form: "4: (Empty)."
SAUE Dest=Favorites 4: (Empty)
The following appears in the screen if you attempt to save a song to a number to which a song has already been saved.
SAVE Overwrite sure? 3:Yellow Submarine
To delete the saved song and replace it by saving the current song, press the [Enter] button.
If you do not want to delete the saved song, press the [Function] (Exit) button to cancel saving.
■ Deleting Performances Saved to the "Favorites" or USB Memory
To delete performances saved to the "Favorites" or USB memory, refer to p. 43.
NOTE
When saving performances to the USB memory, do not remove the USB memory from the Ext Memory port until the save is completed.
Chapter 5. User Program Registration
You can register the currently selected tone buttons, transposition and volume balance, and a variety of other settings as "favorite performance settings" (User Program).
This allows you to call up the registered favorite performance settings whenever you need them.
Registering the settings you often use is makes it even more convenient for you.
Panel Settings
1 User Program
Temporary Memory
36 User Programs1 User Program Set
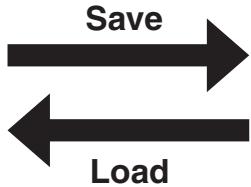
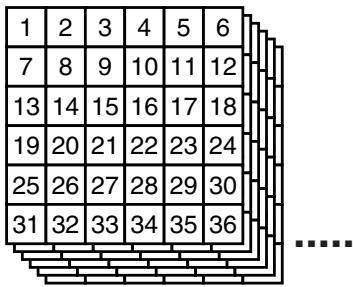
RG-3 User Memory
Max. 99 User Program Sets
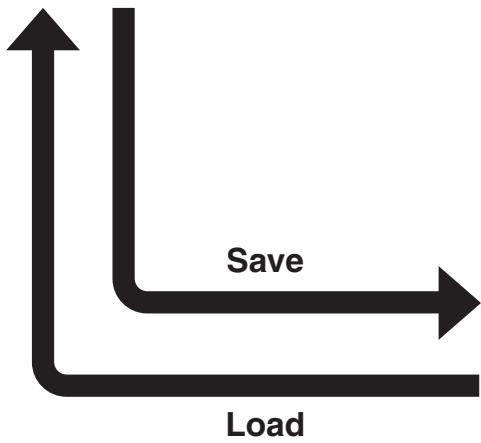
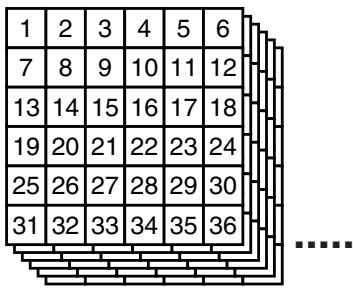
USB Memory
Max. 99 User Program Sets

For more on what can be registered to a User Program, refer to "Parameters Stored in the User Program" (p. 109).
Saving Performance Settings (User Program)
You can register up to 36 User Programs to the RG-3.
- Set the Tone, and other data until the settings are the way you want them.
- Press the [Function] (Exit) button, getting its indicator to light.
- Press the [Song] (Select-) button or [▶] (Select+) button to display the USER PROGRAM screen.
USER PROGRAM
WRITE|SAVE|LOAD|DEL
- Press the [Song] (Select-) button or [1 1] (Select+) button so "WRITE" is flashing.
USER PROGRAM
WRITE SAVEI LOADIDEL
- Press the [Enter] button.
The following screen appears.
USER PROGRAM WRITE Write to UPG 01
- Press the [▶■] (Value-) button or [▶■] (Value+) button to select the write-destination number.
Select a number from UPG 01 to UPG 36 as the performance settings write destination.
USER PROGRAM WRITE Write to UPG01
- Press the [Enter] button.
A confirmation message appears in the screen.
USER PROGRAM WRITE Are you sure?
- Press the [Enter] button.
The currently selected performance settings are registered, and the USER PROGRAM screen returns to the display.
Calling Up Saved User Programs
You can easily call up User Programs.
- Press the [Function] (Exit) button so the indicator goes out.
- Hold down the [Function] (Exit) button and press the [▶■] (Value-) button or [▶■] (Value+) button to select the User Program you want to call up.
User Program 01 Electric Piano + Str
The display changes to indicate the registered buttons and other performance settings. The tone name registered in the User Program appears in the lower row of the screen.
Turning Off the User Program Settings
To turn off the user program settings, proceed as follows.
- Press the [Function] (Exit) button so the indicator goes out.
- Hold down the [Function] (Exit) button and press the [▶/■] (Value-) button to select "User Program 01."
User Program 01 Electric Piano + Str
- While holding down the [Function] (Exit) button and the [▶/■] (Value-) button once again.
The user program settings are turned off.

You can use the Pedal as a dedicated switch for selecting User Programs in order.
For more details, refer to "Using the Pedal to Switch User Programs" (p. 88).
Saving the User Program Sets
The 36 separate configurations of User Programs registered in the RG-3 can be saved as sets in User Memory (p. 25) or to USB memory.
-
When saving the settings to USB memory, connect the USB memory to the Ext Memory port (p. 22).
-
Press the [Function] (Exit) button, getting its indicator to light.
- Press the [Song] (Select-) button or [▶] (Select+) button to display the USER PROGRAM screen.
USER PROGRAM
WRITE|SAVE|LOAD|DEL
- Press the [Song] (Select-) button or [1 1] (Select+) button so "SAVE" is flashing.
USER PROGRAM
WRITE(ISAVE) LOADI DEL
- Press the [Enter] button.
The following screen appears.
SAVE Dest=UserMemory
2: (Empty)
- Press the [Song] (Select-) button or [▶] (Select+) button so that the "User Program save destination" is flashing.
SAVE Dest=UserMemory 2:(Empty)
- Press the [▶■] (Value-) button or [▶■] (Value+) button to select the "User Program save destination."
| Display | Description |
| User Memory | The User Program is saved in User Memory. |
| Ext Memory | The User Program is saved in USB memory. |

You can restore the content in the User Memory to the original default factory settings.
Refer to "Initializing the User Memory, USB Memory, and Floppy Disks" (p. 93).
NOTE
Use USB memory available from Roland.
Proper operation cannot be guaranteed if other external memory products are used.
- Press the [Song] (Select-) button or [▶] (Select+) button so that the "User Program save-destination number" is flashing.
SAPF Post. 110000000000000000000000000000000000000000000000
2: (Empty)
- Press the [▶/■] (Value-) button or [▶+] (Value+) button to select the "User Program save-destination number."
Value: UPG Set 01-UPG Set 99
To return to the original screen without saving the User Program, press the [Function] (Exit) button.
- Press the [Enter] button.
The User Program is saved to the User memory or USB memory.
- Press the [Function] (Exit) button so the indicator goes out.
When there is no User Program assigned to a number, this is indicated in the display in the following form: "2: (Empty)."
SAVE Dest=UserMemory
2: (Empty)
The following appears in the screen if you attempt to save a User Program to a number to which a User Program has already been saved.
SAVE Overwrite sure?
3:UPG Set 03
If you save performance settings to a number that already has User Programs saved to it, the previously saved User Programs are then deleted.
To delete the saved set of User Programs and save the new performance settings to that number, press the [Enter] button.
If you do not want to delete the saved User Programs, press the [Function] (Exit) button to cancel the save.
NOTE
Be sure not to turn off the power as long as
"Executing..." is displayed.
Turning off the power at this time may corrupt the USB memory and/or User
Memory and render them unusable.
MEMO
When deleting the set of saved User Programs, refer to "Deleting Saved User Program Sets" (p. 86).
Loading Saved User Program Sets
You can load sets of User Programs saved in User Memory (p. 25) or to USB memory individually to the RG-3.
- When loading User Programs from USB memory, connect the USB memory to the Ext Memory port (p. 22).
1. Press the [Function] (Exit) button, getting its indicator to light.
2. Press the [Song] (Select-) button or [▶] (Select +) button to display the USER PROGRAM screen.
USER PROGRAM
WRITE|SAVE|LOAD|DEL
3. Press the [Song] (Select-) button or [1 1] (Select+) button so "LOAD" is flashing.
USER PROGRAM
WRITE|SAVE|LOAD DEL
4. Press the [Enter] button.
The following screen appears.
LOAD from UserMemory 1:UPG Set 01
5. Press the [Song] (Select-) button or [▶] (Select+) button so that the "User Program Set to be loaded" is flashing.
LOAD from UserMemory 1:UPG Set UI
6. Press the [▶■] (Value-) button or [▶▶] (Value+) button to select the "User Program set to be loaded."
| Display | Description |
| User Memory | Loads User Programs saved in the User Memory. |
| Ext Memory | Loads User Programs saved in USB memory. |
NOTE
Note that when User Program sets are loaded, all of the performance settings stored in the RG-3 are deleted.
- Press the [Enter] button.
- Press the [Song] (Select-) button or [▶] (Select+) button so that the "load User Program Set number" is flashing.
LODn from UserMemray
1:UPG Set 01
- Press the [▶■] (Value-) button or [▶■] (Value+) button to select the number for the User Program Set to be loaded.
- Press the [Enter] button. A confirmation message appears in the screen.
LOAD from UserMemory
Are you sure?
To return to the original screen without loading the User Program, press the [Function] (Exit) button.
- Press the [Enter] button once more.
The selected User Program Set is loaded to the RG-3.
NOTE
When calling up User Programs saved in USB memory, do not remove the USB memory from the Ext Memory port until the settings have been called up.
Deleting Saved User Program Sets
You can delete individual User Program sets saved to USB memory or in User Memory (p. 25).
-
When deleting User Programs from USB memory, connect the USB memory to the Ext Memory port (p. 22).
-
Press the [Function] (Exit) button, getting its indicator to light.
- Press the [Song] (Select-) button or [▶] (Select+) button to display the USER PROGRAM screen.
USER PROGRAM
WRITE|SAVE|LOAD|DEL
- Press the [Song] (Select-) button or [▶] (Select+) button so that the "DEL" (Delete) is flashing.
USER PROGRAM
WRITE|SAVE|LOAD DEL
- Press the [Enter] button.
The following screen appears.
DEL Dest=UserMemory
1:UPG Set 01
- Press the [Song] (Select-) button or [▶] (Select+) button so that the "save-destination of the User Program Set to be deleted" is flashing.
DEL Dest=UserMemory 1:UPG Set UI
- Press the [▶/■] (Value-) button or [▶■] (Value+) button to select "save-destination of the User Program Set to be deleted."
| Display | Description |
| User Memory | Deletes the User Programs saved in the User Memory. |
| Ext Memory | Deletes the User Programs saved in USB memory. |
- Press the [Song] (Select-) button or [1 1] (Select+) button to get "the number of the User Program Set to be deleted." to flash.
DEI Dae+learHemnru
1:UPG Set 01
- Press the [▶/■] (Value-) button or [▶+] (Value+) button to select the "the number of the User Program Set to be deleted."
- Press the [Enter] button.
A confirmation message appears in the screen.
DEL Dest=UserMemory Are you sure?
To return to the original screen without deleting the User Program, press the [Function] (Exit) button.
- Press the [Enter] button once more.
The selected User Program Set is deleted.
- Press the [Function] (Exit) button so the indicator goes out.
NOTE
When deleting User Programs saved in USB memory, do not remove the USB memory from the Ext Memory port until the delete is completed.
Using the Pedal to Switch User Programs
You can use the Pedal as a dedicated switch for selecting User Programs in order.
The User Programs are switched each time the pedal is pressed.
Each press of the pedal takes you to the next higher numbered User Program until you reach number 36, whereby pressing the pedal again cycles you back to number 1. (In other words, this sequence: 1, 2, 3, ... 36, 1...)
- Press the [Function] (Exit) button, getting its indicator to light.
- Press the [Song] (Select-) button or [▶] (Select+) button to display the USER PROGRAM screen.
USER PROGRAM
WRITE|SAVE|LOAD|DEL
- Press the [Song] (Select-) button or [▶] (Select+) button so that the "Pedal Shift" is flashing.
USER PROGRAM Pedal Shift=Off
- Press the [▶■] (Value-) button or [▶▶] (Value+) button to select the pedal to be used for switching the User Programs.
| Value | Description |
| Left | The left pedal is dedicated to switching User Programs. The function assigned to the left pedal cannot be used. |
| Center | The center pedal is dedicated to switching User Programs. The function assigned to the center pedal cannot be used. |
| Off | You can use a function assigned to the pedal. You cannot use the Pedal as a dedicated switch for selecting User Programs in order. |
- Press the [Function] (Exit) button so the indicator goes out.
The User Programs are switched each time you press the pedal to which the function of switching performance settings is assigned.
Chapter 6. Changing Various Settings
Preventing Changes to the Current Settings (Panel Lock)
When "Panel Lock" is activated, all buttons will no longer function.
Thus, even if you press a button by mistake, the settings remain unchanged.
Making the Setting
- Set the desired tones and other settings.
- Hold down the [Function] (Exit) button and press the [Enter] button.
This activates Panel Lock.
- Pressing buttons during playback or recording of a song stops the playback or recording.
You can perform by playing the keys.
You can adjust the volume with the [Volume] knob and adjust the tone of the sounds with the [Brilliance] knob.
The following screen appears when Panel Lock is in force.
[Panel Lock] Superior grand
Cancelling the Setting
- To cancel Panel Lock, hold down the [Function] (Exit) button again and press the [Enter] button.
Making Detailed Settings
You can set the master tuning, temperament, and other settings that make the RG-3 easier to play.
The screen in which the settings are changed is called the "Function screen."
How to Enter Function Mode
- Press the [Function] (Exit) button, getting its indicator to light.
The following screen appears.
Key Touch Touch=65 Hammer=Light
- Press the [Song] (Select-) button or [▶] (Select +) button to select the settings screen.
RESONANCE KeyOff=4
String=3 Damper=3
- Press the [Song] (Select-) button or [1 1] (Select +) button so the value of the parameter you want to change is flashing.
RESONANCE KeyOff=4 String=3 Damper=3
- Press the [▶/■] (Value-) button or [▶▶] (Value +) button to change the value.
RESONANCE KeyOff=4 String=3 Damper=5
Press the [▶/■] (Value-) and [▶▶1] (Value+) buttons simultaneously to restore the factory-set values.
- If you want to continue making changes to other settings, press the [Song] (Select-) button or [I ] (Select +) button to switch the settings screen.
How to Exit Function Mode
- Press the [Function] (Exit) button so the indicator goes out.
Changing the Remote Control Settings
Disabling Use of the Remote Control
You can prevent the included remote control from controlling the RG-3 by turning the Remote Control function off.
This prevents settings from being altered inadvertently if any buttons on the remote control are pressed by mistake.
The remote control's functions are switched on and off together with the infrared transmission function (p. 97). The remote control's functions are disabled when infrared transmission is turned off.
You can use the Memory Backup function to store these settings to the RG-3 (p. 73).
- Press the [Function] (Exit) button, getting its indicator to light.
- Press the [Song] (Select-) button or [1 1] (Select +) button to display the REMOTE screen.
REMOTE Receive=On Transpose=Transpose
- Press the [Song] (Select-) button or [1 1] (Select +) button to get the value for "Receive" to flash.
REMOTE Receive=On Transpose=Transpose
- Press the [▶/■] (Value-) button or [▶▶1] (Value +) button to switch the Remote Control function on or off.
| Value | Description |
| On | The RG-3 can be controlled using the re-mote control. |
| Off | The remote control is disabled.* The infrared transmission functions used by external devices are also disabled. |
- Press the [Function] (Exit) button so the indicator goes out.
Changing the Functions of the Remote Control's Buttons
You can change the functions assigned to the remote control's buttons.
You can use the Memory Backup function to store these settings to the RG-3 (p. 73).
- Press the [Function] (Exit) button, getting its indicator to light.
- Press the [Song] (Select-) button or [1 1] (Select +) button to display the REMOTE screen.
REMOTE Receive=On Transpose=Transpose
- Press the [Song] (Select-) button or [▶] (Select +) button so that the value for the remote control's button whose function you want to change is flashing.
| Value | Description |
| Transpose | Remote Control TRANSPOSE [-] [+] but-tons |
| F1 | Remote Control [FUNC 1] button |
| F2 | Remote Control [FUNC 2] button |
REMOTE Rereiaue=In Transpose=Transpose
REMOTE F1=Transpose F2=Random
- Press the [▶/■] (Value-) button or [▶▶] (Value +) button to switch the function assigned to the remote control's buttons.
Functions Assigned to the TRANSPOSE [-] and [+] Buttons
| Value | Description |
| Transpose | Transposes the key of the song being played. Press the TRANSPOSE [-] button to lower the key; press the TRANSPOSE [+] button to raise the key. |
| Bwd/Fwd | Fast forwards and rewrites the song. When TRANSPOSE [-] is pressed, the song rewrites; when TRANSPOSE [+] is pressed, the song is fast forwarded. |
| CD Level | Changing the volume of the Song on CDs (p. 91).Press the TRANSPOSE [-] button to decrease the volume, and press the TRANSPOSE [+] button to increase the volume.* This function is valid when a CD drive is connected. |
Functions Assigned to the [FUNC 1] and [FUNC 2] Buttons
| Value | Description |
| Random | Plays back the songs in random order. |
| Equalizer | Switches the equalizer on and off (p. 60). |
| Minus One | SwitchesMinusOne/Guide(p. 95)on and off. |
| Eject/Load | Ejects or loads the CD. *This function is valid when a CD drive is connected. |
| CentrCancel | Switches Center Cancel(p. 92)on and off. |
- Press the [Function] (Exit) button so the indicator goes out.
Changing the CD Settings
Adjusting CD and Audio File Levels
Use this procedure to adjust the volume level of the CD or audio file when playing back a CD or audio file.
You can use the Memory Backup function to store these settings to the RG-3 (p. 73).
- Press the [Function] (Exit) button, getting its indicator to light.
- Press the [Song] (Select-) button or [1 1] (Select +) button to display the CD/AUDIO screen.
CD/AUDIO Level=40
Center Cancel=Off
- Press the [Song] (Select-) button or [1 1] (Select +) button to get the value for "Level" to flash.
CD/AUDIO Level= 40
Center Cancel=U++
- Press the [▶/■] (Value-) button or [▶▶] (Value +) button to adjust the playback volume of the CD or audio file.
| Value | Description |
| 0-127 | Raising the value increases the volume level. |
- Press the [Function] (Exit) button so the indicator goes out.
Enjoying Karaoke with Commercial CDs (Center Cancel)
You can minimize the vocal portions of commercial audio CDs or audio files and sing these parts yourself.
This is a handy way to enjoy karaoke and practice your singing with your favorite audio CDs or audio files.
NOTE
You may find that using Center Cancel reduces the tone quality of some songs.
- Place the CD you want to play back in the CD drive.
- Select the song you want to play (p. 28).
- Press the [Function] (Exit) button so the indicator is lit.
- Press the [Song] (Select-) button or [▶] (Select +) button to display the CD/AUDIO screen.
| CD+AUDIO Level=40 Center Cancel=Off |
- Press the [Song] (Select-) button or [1 1] (Select +) button so the value set for "Center Cancel" begins flashing.
| CD/AUDIO Level=40 Center Cancel=Off |
- Press the [/] (Value-) button or [] (Value +) button to switch Center Cancel on or off.
| Value | description |
| On | The sounds of the melody and vocals are minimized. |
| Off | Center Cancel is disabled. |
- When you have finished making the settings, press the [Function] (Exit) button so the indicator goes out.
- Press the [ / ] button.
The song on the CD plays back.
When the song is played, sounds including the melody and vocals are temporarily minimized.
NOTE
With some songs, the vocals may not be eliminated completely.
- Center Cancel is cancelled (switched off) when you switch to a different song.
- Press the [ / ] button once more to stop playback of the song.
Songs on VIMA CD-ROMs (VIMA TUNES) are programmed with "recommended tones" suitable for each song.
When you select a song, the recommended tones are assigned to the RG-3's Tone buttons, and those Tone buttons then flash.
When you press a flashing Tone button, the recommended tone is then selected, enabling you to perform the selected song using a tone matched to that song as it plays back.
You can set the RG-3 so that the recommended tones are automatically assigned (On) or not assigned (Off).
You can use the Memory Backup function to store these settings to the RG-3 (p. 73). - Press the [Function] (Exit) button, getting its indicator to light.
- Press the [Song] (Select-) button or [1 1] (Select +) button to display the MISC screen.
MISC Recommended Tone=On - Press the [Song] (Select-) button or [1 1] (Select +) button to get the value for "Recommended Tone" to flash.
MISC Recommended Tone=On - Press the [▶/■] (Value-) button or [▶▶] (Value +) button to switch the recommended tone setting on or off.
This is set to "On" at the factory. - Press the [Function] (Exit) button so the indicator goes out.
Switching VIMA CD-ROM Recommended Tones
| Value | Description |
| On | The recommended tones are automatically assigned to the RG-3’s Tone buttons. |
| Off | The recommended tones are not used, and only the RG-3’s internal tones can be selected. |
Initializing the User Memory, USB Memory, and Floppy Disks
You can delete all of the data in the User memory, in USB memory, or on floppy disks and restore (initialize) the data to the original default factory settings.
The RG-3 contains an internal memory area to which you can save recorded performances and other data.
This area is called the "User Memory."
The following content is stored in the User Memory.
- Content registered in the "Favorites" (p. 109)
- Content in saved User Program (favorite performance settings) sets (p. 79)
-
Executing this procedure does not initialize any settings other than the content of the User Memory. To restore the factory defaults for settings other than the User Memory content, carry out Factory Reset (p. 74).
-
To initialize your USB memory, first connect the USB memory to the Ext Memory port. If you want to initialize a floppy disk, insert the floppy disk in the floppy disk drive.
- Press the [Function] (Exit) button, getting its indicator to light.
- Press the [Song] (Select-) button or [1 1] (Select +) button to display the FILE screen.
- Press the [Song] (Select-) button or [1 1] (Select +) button so "FORMAT" is flashing.
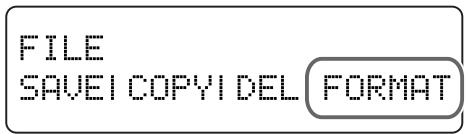
- Press the [Enter] button.
- Press the [▶/■] (Value-) button or [▶▶] (Value +) button to select the memory to be initialized.
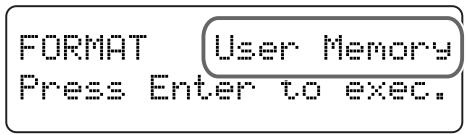
| Value | Description |
| User Memory | Contents of the User Memory |
| Ext Memory | Contents of the USB memory connected to the Ext Memory port |
| Floppy Disk | Contents of the Floppy disk |
- Press the [Enter] button.
A confirmation message appears in the screen.
FORMAT User Memory Are you sure?
If you press the [Function] (Exit) button, none of the data in User memory, USB memory, or on the floppy disk is erased, and you're returned to the original screen.
- Press the [Enter] button once more.
The data in the User memory or USB memory or on the floppy disk is deleted.
- Be sure not to turn off the power as long as "Executing..." is displayed. Turning off the power at this time may corrupt the RG-3's internal memory and render it unusable.
Using the V-LINK Function
Connecting the RG-3 to a V-LINK compatible image device allows you to control the images with the RG-3.
V-LINK
V-LINK ( V-LINK ) is a function that allows music and images to be performed together. By using MIDI to connect two or more V-LINK compatible devices, you can easily enjoy a wide range of visual effects that are linked to the expressive elements of a music performance.
- Press the [Function] (Exit) button, getting its indicator to light.
- Press the [Song] (Select-) button or [▶] (Select +) button to display the MIDI screen.
- Press the [Song] (Select-) button or [1 1] (Select +) button to get the value for "V-LINK" to flash.
| MIDI U-LINK=Off Tx Ch= 1 Local=Un |
- Press the [▶/■] (Value-) button or [▶▶] (Value +) button to switch the V-LINK function on or off.
| Value | Description |
| On | The V-LINK function is switched on. You can control images using the twelve keys at the left end of the keyboard. |
| Off | The V-LINK function is switched off. |
This is set to "Off" when you turn on the power.
NOTE
While V-LINK is switched on, no sound is produced when you press any of the twelve keys at the left end of the keyboard.
When the V-LINK function is on, the V-LINK icon ( ) appears on the Song Select screen and Tone screen.
5. Press the [Function] (Exit) button so the indicator goes out.
Playing the Automatic Demos
You can set the RG-3 so that it automatically starts a demo performance when you turn it on.
You also can have a slide show of your favorite images play simultaneously in the connected external display or television.
NOTE
Use USB memory available from Roland.
Proper operation cannot be guaranteed if other external memory products are used.
Preparing the Songs to Be Played
- After connecting the USB memory to the computer, create a folder named "AUTODEMO" on the USB memory.
- Save the songs (SMF data) you want to have played in the "AUTODEMO" folder.
When Running Slide Shows Through a Connected External Display or Television
- Make sure the power to the RG-3 is turned off (p. 20), then connect the external display or television (p. 45, p. 47).
- You cannot use a television and external display simultaneously.
- Prepare the images you want to have appear in the slide show and save them to the USB memory (p. 49).
- Connect the USB memory to the Ext Memory port of the RG-3 (p. 22).
- Turn on the power to the external display or television.
- Turn on the power to the RG-3.
After you turn on the power, the songs saved in the USB memory's "AUTODEMO" folder are played continuously.
In addition, when you have your preferred images saved in the USB memory's "_.PICTURE" folder, a slide show of the images is displayed on the connected external display or television.
Muting or Reducing the Volume of a Specific Part (Minus One/Guide)
You can temporarily mute any specific part.
This temporary muting of a specified part is called "Minus One."
You can also set a specific part to play at a lower volume.
This allows you to use the sound of that part as a "guide" for your own performance.
- Press the [Function] (Exit) button, getting its indicator to light.
- Press the [Song] (Select-) button or [1 1] (Select +) button to display the PLAY screen.
PLAY Mode=All Song
MinusOne/Guide =Off
- Press the [Song] (Select-) button or [1 1] (Select +) button to get the value for "MinusOne/Guide" to flash.
PLAY Mode=All Song
MinusOne/Guide= Off
- Press the [▶/■] (Value-) button or [▶▶] (Value +) button to switch the Minus One/Guide function on and off.
| Value | Description |
| Guide | The volume of the specified part is reduced. Set the part to be played at the lower volume with the procedure described in “Setting the Part To Be Muted/Guide Part” (p. 95). |
| Mute | The specified part is muted. Set the part to be muted in “Setting the Part To Be Muted/Guide Part” (p. 95). |
| Off | The Minus One/Guide function is switched off. |
- Press the [Function] (Exit) button so the indicator goes out.
Setting the Part To Be Muted/Guide Part
- Press the [Function] (Exit) button, getting its indicator to light.
- Press the [Song] (Select-) button or [ ↑ ↓ ] (Select +) button to display the "MinusOne/Guide Part" screen.
MISC MinusOne/Guide
Part R [1] 2 [3][4]
- Press the [Enter] button.
- Press the [Song] (Select-) button or [1 1] (Select +) button to select the part to be muted.
MISC MinusOne/Guide
Part R [1](2)[3][4]
| Value | Description |
| R | Rhythm Part |
| 1 | User Part (Part to which performance recorded with the RG-3 is saved) |
| 2 | Accompaniment Part |
| 3 | Left-hand Part |
| 4 | Right-hand Part |
- Press the [▶/■] (Value-) button or [▶▶] (Value +) button to switch the mute or guide function on or off.
MISC MinusOne/Guide
Part R [1][2][3][4]
The [ ] indication appears next to the part number of a muted or guide part.
→ Performances recorded on the RG-3 are saved to Part 1. In Split performances, however, the right-hand performance is recorded to Part "4," while the left hand is recorded to Part "3."
6. Repeat steps 4 and 5 as required.
7. After specifying the muted or guide part, press the [Function] (Exit) button.
This confirms selection of the muted or guide part.
- Press the [Function] (Exit) button so the indicator goes out.
Changing the Notation Display Settings
When displaying notations on a connected external display or television, you can change the parts that appear in the notation and the way the score is displayed.
- Press the [Function] (Exit) button, getting its indicator to light.
- Press the [Song] (Select-) button or [1 1] (Select +) button to display the NOTATION screen.
NOTATION Staff L+R Clef L=Auto R=Auto
- Press the [Song] (Select-) button or [1 1] (Select +) button to select the parameter whose settings you want to change.
NOTATION Staff L+R Clef L=Auto R=Auto
NOTATION Key=Auto Part L=Auto R=Auto
| Menu | Value | Description |
| Staff | L+R | Display the right and left hand parts notation. |
| R | Display the right hand part notation. | |
| L | Display the left hand part notation. | |
| User | The notation for the performance recorded on the RG-3 is displayed. | |
| * The following occurs when the recording contains Split performances. · When “L+R” is selected The notations for the left-hand and right-hand performances are displayed. · When “L” is selected The notation for the left-hand performance is displayed. · When “R” is selected The notation for the right-hand performance is displayed. · When “User” is selected No notation is displayed. | ||
| Menu | Value | Description |
| Clef L | Auto | Display is switched automat- cally. |
| G | The left-hand part appears in the G (treble) clef staff. | |
| F | The left-hand part appears in the F (bass) clef staff. | |
| Clef R | Auto | Display is switched automat- cally. |
| G | The right-hand part appears in the G (treble) clef staff. | |
| F | The right-hand part appears in the F (bass) clef staff. | |
| Key | Auto | Key is switched automatically. |
| #x6, #x5, #x4, #x3, #x2,#,0,b, bx2,bx3, bx4,bx5 | Display the notation in the se- lected key. | |
| Part L | 1-16 | Select the part to be displayed as the left hand part. |
| Auto | Part is switched automatically. | |
| Part R | 1-16 | Select the part to be displayed as the right hand part. |
| Auto | Part is switched automatically. |
- Press the [▶/■] (Value-) button or [▶▶] (Value +) button to change the setting.
- Press the [Function] (Exit) button so the indicator goes out.
Changing the Infrared Transmission Function Settings
Some digital devices equipped with an IrDA (infrared) port are able to transfer song data in SMF format to the RG-3. For more detailed information, refer to the owner's manual for the digital device.
NOTE
Users are responsible for learning how to use infrared transmissions. The RG-3 is not necessarily compatible with all devices equipped with an IrDA port. Roland cannot answer questions regarding infrared transmissions.
Switching Infrared Transmissions On and Off (Infrared Function)
You can set whether to have the song data infrared transmission function on (active) or off (disabled).
The infrared transmission function is switched on and off together with the remote control's functions (p. 90). The infrared transmission function is disabled when remote control's function is turned off.
You can use the Memory Backup function to store these settings to the RG-3 (p. 73).
- Press the [Function] (Exit) button, getting its indicator to light.
- Press the [Song] (Select-) button or [1 1] (Select +) button to display the REMOTE screen.
REMOTE Receive=On Transpose=Transpose
- Press the [Song] (Select-) button or [1 1] (Select +) button to get the value for "Receive" to flash.
REMOTE Receive=On Transpose=Transpose
- Press the [ / ] (Value-) button or [ ] (Value +) button to switch infrared transmission on or off.
| Value | Description |
| On | The song data infrared transmission function is enabled. |
| Off | The song data infrared transmission function is disabled. Song data cannot be transferred. * The included remote control unit is also disabled. |
- Press the [Function] (Exit) button so the indicator goes out.
Setting Playback After the Song is Transferred (Infrared Playback)
This sets the RG-3 to play back a song automatically following transfer of the song from the digital device.
You can also set this so that songs are not played back automatically after the song is transferred.
- Press the [Function] (Exit) button, getting its indicator to light.
- Press the [Song] (Select-) button or [1 1] (Select +) button to display the iR screen.
iR iR Play=Auto
- Press the [Song] (Select-) button or [1 1] (Select +) button to get the value for "iR Play" to flash.
iR iR Play=Auto
- Press the [▶/■] (Value-) button or [▶■] (Value+) button to switch the infrared playback function setting.
| Value | Description |
| Auto | The song is played back automatically after the song is transferred. |
| Standby | Following transfer of the song, the song is ready to play but not played back. |
- Press the [Function] (Exit) button so the indicator goes out.
Chapter 7. Connecting External Devices
Connecting to Audio Equipment
You can connect audio devices to play the sound of the RG-3 through the speakers of your audio system, or to record your performance on a recording device.
Connectors
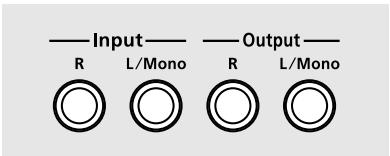
Jack Panel
Output Jacks
You can connect audio equipment using audio cables (sold separately) and play the sounds from the RG-3 through the speakers on the connected equipment, or record your performances on a recording device. If the input of the connected device is monaural, you must use the L (Mono) jack.
Input Jacks
You can connect another sound generator, such as audio equipment or an electronic instrument, using audio cables (sold separately). Play the sounds from the connected device through the speakers on the RG-3. If the output of the connected device is monaural, you must use the L (Mono) jack.
- You cannot use the RG-3 to adjust the volume of the connected sound generating device.
Making the Connections
NOTE
To prevent malfunction and/or damage to speakers or other devices, always turn down the volume, and turn off the power on all devices before making any connections.
Playing Sounds from the RG-3 Through the Speakers on Audio Equipment or Recording Your Performances on a Recording Device
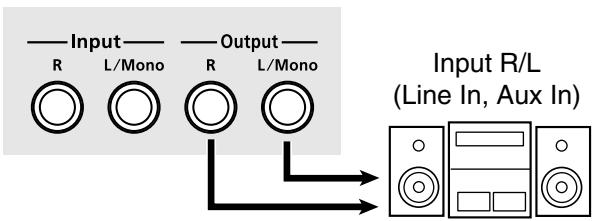
Jack Panel
- Turn the volume all the way down on the RG-3 and on the device you're about to connect.
- Turn off the power to the RG-3 and other connected equipment.
-
Use audio cables (sold separately) to make the connection.
-
Switch on the RG-3.
- Switch on the connected device.
- Adjust the volume level on the RG-3 and the connected device.
You can adjust the volume of a connected sound module with the RG-3.
Recording RG-3 Performances on a Recording Device
- Start recording with the connected device.
- Play the keyboard.
- When the performance ends, stop recording on the connected equipment.
Turning off the power
- Set the volume of the RG-3 and of the connected devices to the minimum position.
- Turn off the connected equipment.
- Turn off the power to the RG-3.
- Disconnect the audio cables connected to the RG-3.
Playing Audio Equipment Sounds Through the Speakers on the RG-3
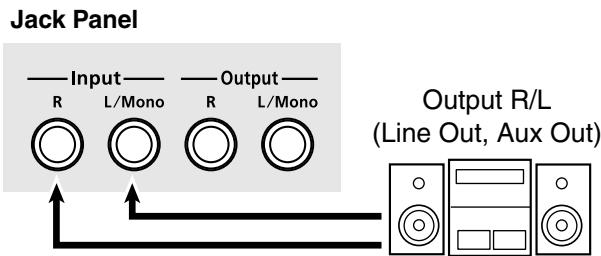
- Turn the volume all the way down on the RG-3 and on the device you're about to connect.
- Turn off the power to the RG-3 and other connected equipment.
- Use audio cables (sold separately) to make the connection.
- Turn on the connected equipment.
- Turn on the RG-3.
-
Adjust the volume level on the RG-3 and the connected device.
-
You cannot use the RG-3 to adjust the volume of the connected sound generating device.
Turning off the power
- Set the volume of the RG-3 and of the connected devices to the minimum position.
- Turn off the power to the RG-3.
- Turn off the connected equipment.
- Disconnect the audio cables connected to the RG-3.
Connecting MIDI Devices
By connecting an external MIDI device and exchanging performance data, you can control one device from the other.
For instance, you can output sound from the other instrument or switch Tones on the other instrument.
What's MIDI?
MIDI, short for "Musical Instrument Digital Interface," was developed as a universal standard for the exchange of performance data between electronic instruments and computers.
The RG-3 is equipped with MIDI connectors to let it exchange performance data with external devices. These connectors can be used to connect the RG-3 to an external device for even greater versatility.
Connectors
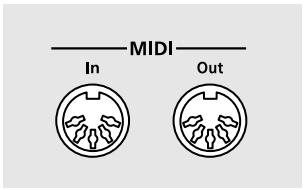
Jack Panel
MIDI Out Connector
Connect this to the MIDI In connector on an external MIDI device using a MIDI cable (sold separately).
Performance data when you play the keyboard or depress a pedal is sent from this connector to the external MIDI connector.
MIDI In Connector
Connect this to the MIDI Out connector on an external MIDI device using a MIDI cable (sold separately).
This receives MIDI messages that are sent from external MIDI devices.
The RG-3 receiving MIDI messages can output sounds, exchange tones and perform other operations.
- External MIDI devices can't be used for remotely changing the Tones played by the RG-3's keyboard.
Making the Connections
NOTE
To prevent malfunction and/or damage to speakers or other devices, always turn down the volume, and turn off the power on all devices before making any connections.
-
Turn the volume all the way down on the RG-3 and on the device you're about to connect.
-
Switch off the power to the RG-3 and the device you're about to connect.
- Use a MIDI cable (sold separately) to connect the MIDI connectors to each other.
Please refer to the connection examples below.
- Switch on the power to the RG-3 and the connected device.
- Adjust the volume level on the RG-3 and the connected device.
- You should also set the MIDI settings as needed.
For details on the MIDI-related settings, refer to previous section.
Connection Examples
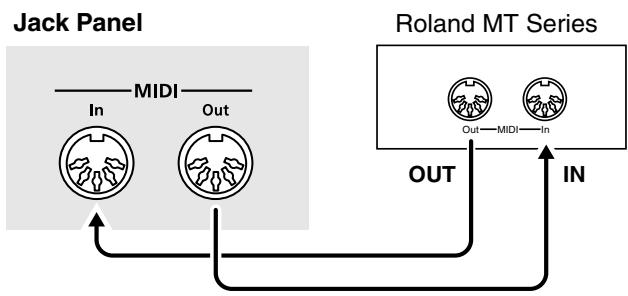
Setup with a MIDI Sequencer
- When the RG-3 is connected to a MIDI sequencer, set it to Local OFF. Refer to "Disconnecting the Internal Sound Generator and Keyboard (Local Control)" (p. 100). In addition, turn the MIDI sequencer's Thru function ON. The sequencer takes the performance data received at the MIDI IN connector and outputs the data unchanged from the MIDI OUT connector. To determine whether or not your sequencer features a MIDI Thru function and for instructions on making the Thru function setting, refer to the owner's manual for your sequencer.
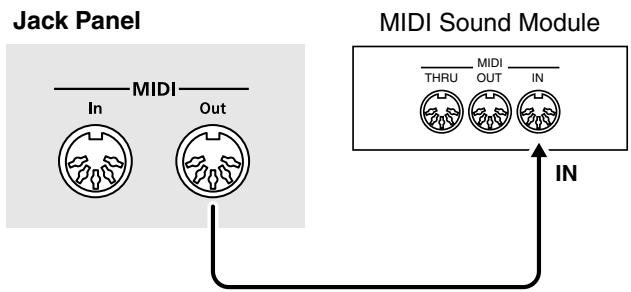
Connecting with a MIDI Sound Module
Making MIDI-related Settings
Here's how you can set the transmit channel and other MIDI related settings.
■ MIDI Transmit Channel Settings
MIDI features sixteen MIDI channels, numbered 1-16.
Simply connecting a cable is not enough for communication to take place. The connected devices must be set to use the same MIDI channels. Otherwise, no sound will be produced, and no sounds can be selected.
The RG-3 receives all channels 1-16.
- Press the [Function] (Exit) button, getting its indicator to light.
- Press the [Song] (Select-) button or [1 1] (Select +) button to display the MIDI screen.
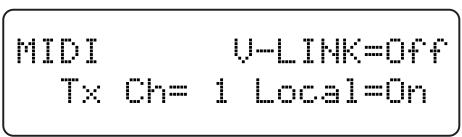
- Press the [Song] (Select-) button or [1 1] (Select +) button to get the value for "Tx Ch" (Transmit channel) to flash.
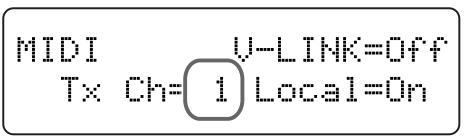
- Press the [▶/■] (Value-) button or [▶▶] (Value +) button to set the MIDI Transmit channel.
Value: 1-16 - Press the [Function] (Exit) button so the indicator goes out.
- Disconnecting the Internal Sound Generator and Keyboard (Local Control)
When connecting a MIDI sequencer, set Local Control to "OFF." The setting is at "Local Control ON" when the RG-3 is powered up.
As illustrated, information describing what has been played on the keyboard is passed to the sound module over two different routes, (1) and (2).
As a result, you hear overlapping or intermittent sounds.
To prevent this from happening, route (1) must be disabled, by setting the unit to what is known as "Local Off."
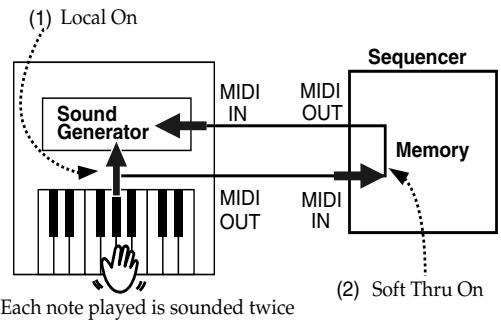
Local On:
The keyboard and internal sound generator are connected.
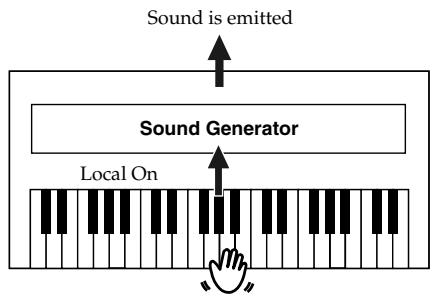
Local Off:
The keyboard and internal sound generator are separated. No sound will be produced by the keyboard when it is played.
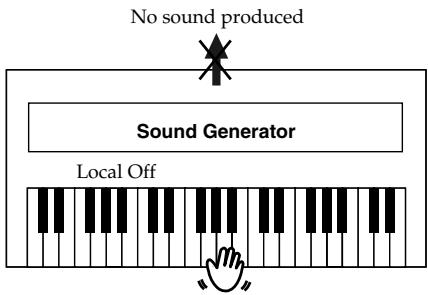
When connecting a unit in the Roland MT series, you don't need to switch off Local Control. MT units transmit Local Off messages when their power is switched on. If you first switch on the RG-3, then the MT-series device, Local Control is automatically switched off on the RG-3.
- Press the [Function] (Exit) button, getting its indicator to light.
- Press the [Song] (Select-) button or [1 1] (Select +) button to display the MIDI screen.
MIDI U-LINK=Off Tx Ch= 1 Local=On
- Press the [Song] (Select-) button or [1 1] (Select +) button to get the value for "Local" (Local Control) to flash.
MIDI U-LINK=NFF Tx Ch= 1 Local=On
- Press the [▶/■] (Value-) button or [▶▶] (Value +) button to switch Local Control on or off.
| Value | Description |
| On | Local Control is switched on. |
| Off | Local Control is switched off. |
- Press the [Function] (Exit) button so the indicator goes out.
Sending Tone Change Messages (Program Change/Bank Select MSB/Bank Select LSB)
A Program Change is a message that means "change to the Tone of the specified number." The device that receives this changes to the Tone of the corresponding number.
When you choose a Program Change message (Program Number), the Program Number will be transmitted to the MIDI device connected to the RG-3.
The MIDI device that receives the Program Number changes the tone to the corresponding Program Number.
Normally, the Tone is selected from the 128 Tones available. Some MIDI devices, however, have more than 128 Tones.
With such devices, the Tone is selected through a combination of Program Change messages and Bank Select messages. There are two parts of a Bank Select message: the MSB (Controller 0, with a value of 0-127) and the LSB (Controller 32, with a value of 0-127).
-
Some MIDI instruments can't handle Bank Select messages. Others can handle Bank Selects, but do not recognize the LSB part.
-
Press the [Function] (Exit) button, getting its indicator to light.
- Press the [Song] (Select-) button or [1 1] (Select +) button to display the MIDI screen.
MIDI U-LINK=Off Tx Ch= 1 Local=On
- Press the [Song] (Select-) button or [▶] (Select+) button so that the value set for "PC," "Bank Select MSB," or "Bank Select LSB" is flashing.
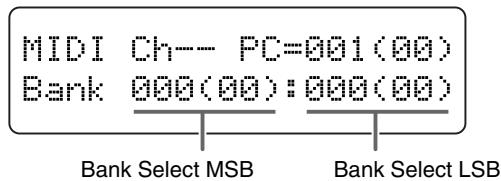
Ch: Setting the MIDI Channel Used for Transmitting Program Numbers When Switching User Programs
PC: Program Number
Bank (Left): Bank Select MSB
Bank (Right): Bank Select LSB
- Press the [▶/■] (Value-) button or [▶+] (Value +) button to set the Program Change number, Bank Select MSB, or Bank Select LSB.
| Menu | Value |
| Ch (User Program Transmit Channel) | -- (Off), 1-16 * When set to -- (Off), no Program Change Number is transmitted, even when User programs are switched. |
| PC | 1-128 |
| Bank Select MSB | 0-127 |
| Bank Select LSB | 0-127 |
- Press the [Function] (Exit) button so the indicator goes out.
Sending Recorded Performance Data to a MIDI Device (Composer MIDI Out)
When Composer MIDI Out is active, you can send performance data recorded with the RG-3 to a connected MIDI device or computer.
When you turn on the power, this is set to "Off" (data is not sent).
If you want to transmit a performance recorded on the RG-3 to an external MIDI device or computer, turn this setting "On." If this is "Off," the data will not be transmitted.
- Press the [Function] (Exit) button, getting its indicator to light.
- Press the [Song] (Select-) button or [1 1] (Select +) button to display the MIDI screen.
| MIDI U-LINK=Off Tx Ch= 1 Local=0n |
- Press the [Song] (Select-) button or [1 1] (Select +) button to get the value for "Composer MIDIOut" to flash.
| MIDI Composer | MIDIOut=Off |
- Press the [▶/■] (Value-) button or [▶▶] (Value +) button to switch the song's MIDI Out setting on or off.
| Value | Description |
| On | The performance data recorded with the RG-3 can be sent to the connected MIDI device or computer. |
| Off | The performance data recorded with the RG-3 cannot be sent to the connected MIDI device or computer. |
5. Press the [Function] (Exit) button so the indicator goes out.
If you wish to save the performance recorded on the RG-3, use the following procedure.
In this situation, your external sequencer is set its MIDI Thru feature to be OFF.
For details, refer to the owner's manual of your MIDI sequencer.
- Connect a MIDI sequencer such as the MT series (p. 99).
- Record the performance on the RG-3 (p. 75).
- Set this setting to "On."
- Start recording with the connected MIDI sequencer.
- Start playback of the recorded song on the RG-3.
- When playback ends, stop recording with the connected MIDI sequencer.
- Use a connected MIDI sequencer to save the data on a floppy disk or other media.
Connecting to the Computer
You can use a USB connector to connect the RG-3 to your computer.
For more details, refer to the separate "USB Installation Guide."
NOTE
- Connecting your computer to the RG-3 for the first time requires installation of the "USB Driver" (on the included CD-ROM) to the computer.
- Only MIDI data can be transmitted using USB.
- To prevent malfunction and/or damage to speakers or other devices, always turn down the volume, and turn off the power on all devices before making any connections.
- USB cables are not included. Consult your Roland dealer if you need to purchase.
- Turn on the power to the RG-3 before starting up MIDI applications on the computer. Do not turn the RG-3 on or off while any MIDI application is running.
- If not using USB, disconnect the USB cable from the RG-3.
- If during the transmission/reception of data, the computer switches to energy-saving mode or suspended mode, or if the RG-3's power is switched on or off, the computer may freeze, or the RG-3's operation may become unstable.
For more on system requirements, refer to the "USB Installation Guide."
However, note that the RG-3 is not compatible with Mac OS 9.
Making the Settings for the USB Driver
If you intend to connect to a computer using the USB connector, you need to make the following setting before you make the connection.
In the factory settings, "Original" is selected. Normally, there is no need to change the USB driver settings.
- Press the [Function] (Exit) button, getting its indicator to light.
- Press the [Song] (Select-) button or [1 1] (Select +) button to display the MIDI screen.
MIDI USB Driver=Original
- Press the [Song] (Select-) button or [1 1] (Select +) button to get the value for "USB Driver" to flash.
MIDI USB Driver=Original
- Press the [▶/■] (Value-) button or [▶▶] (Value +) button to select the USB driver.
| Indication | Description |
| Generic | Select this when using a generic USB driver included with the OS with a USB connection. |
| Original | Select this when using the supplied driver with a USB connection. Under ordinary circumstances, use this mode. |
| Original2 | This is an auxiliary mode. It is not normally used. |
-
Press the [Function] (Exit) button so the indicator goes out.
-
In order to have the USB driver you've selected be placed into effect, you need to switch off the power, then turn it back on again.
Troubleshooting
| Case | Cause/Remedy |
| The power doesn’t come on | Is the power cord connected and plugged in correctly? (p. 19) |
| Depressing a pedal has no effect, or the pedal effect doesn’t stop | Is the pedal connected correctly? Make sure the pedal cord is securely connected to the pedal connector (p. 19). |
| Has a different function been assigned to the pedal? See “Assigning Functions to Pedals” (p. 70). | |
| The volume level of the instrument connected to Input jacks is too low | Could you be using a connection cable that contains a resistor? Use a connection cable that does not contain a resistor. |
| Low hum coming from external device | Do you have different external devices plugged into different power outlets? When connecting external devices, always draw power from the same outlet. |
| Unable to load properly with USB memory | Is the USB memory you are using one that was produced by Roland? Performance is not guaranteed when other types of USB memory are used. |
| Unable to eject the CD | Try the following procedure. If after these steps you are still unable to get the CD to eject, read the CD drive owner’s manual. 1. Turn off the power to all connected devices. 2. Turn on the RG-3. 3. Turn on the CD drive. 4. Wait a few moments after the power is switched on, then firmly press the eject button. |
| Connected Television or External Display Screen Looks Odd | |
| Images not shown on external display or television when external display or television is connected | Is the external display or television properly connected? (p. 45, p. 47) |
| Is the external display's power turned on? | |
| Are you using a display that is compatible with the RG-3? Refer to “Displays That Can Be Connected to This Instrument” (p. 45). | |
| Is the television format or display setting correct? (p. 46, p. 47) | |
| Thin horizontal lines visible in the television screen | While narrow horizontal lines may be visible in the television screen, this is a particular characteristic of the television set and does not indicate any problem with the RG-3. |
| Poor-quality of images displayed in television | Even when all recommended settings are used, images may still not be displayed well with the television set you are using (images may not match the screen size, and may be clustered towards the center of the screen). |
| No sound is heard | |
| No sound is heard | Is the volume level of the RG-3 (p. 20) or connected device turned all the way down? |
| Are headphones plugged in? (p. 21) Has a plug remained connected to the Phones jack? When headphones or plugs are connected, the keyboard's speaker stops playing. | |
| Could the keyboard volume be turned down completely in the volume balance settings? (p. 72) | |
| Could the levels of all frequency ranges be turned down completely in the equalizer settings? (p. 60) | |
| Is V-LINK switched on? While V-LINK is switched on, no sound is produced when you press any of the twelve keys at the left end of the keyboard (p. 94). | |
| No sound is heard (when a MIDI instrument is connected) | Have all devices been switched on? |
| Are the MIDI cables connected correctly? (p. 99) | |
| Does the MIDI channel match the connected instrument? (p. 100) | |
| No sound is heard when the keyboard is played | Has Local Control been set to “Off”? When Local Control is set to Off, no sound is produced by playing the keyboard. Set Local Control to On (p. 100). |
| Not all played notes are sounded | The maximum number of notes can play simultaneously is 128. Frequent use of the damper pedal during playing along with a song may result in perfor- mance data with too many notes, causing some notes to drop out. |
| The sound is strange | |
| Sounds are heard twice (dou- bled) when the keyboard is played | Do you have the Layer tone selected? (p. 54) |
| When the RG-3 is connected to an external sequencer, set it to the Local Off mode (p. 100). Alternatively, the sequencer could be set so its Soft Thru feature is Off. | |
| Case | Cause/Remedy |
| The tuning or pitch of the keyboard or song is off | Have you set transpose? (p. 37, p. 61) |
| Are the settings for the "Temperament" and "Stretch Tuning" correct? (p. 65, p. 64) | |
| Is the setting for the "Master Tune" correct? (p. 63) | |
| Reverberation still audible even with Reverb turned off | Since the RG-3's piano sounds accurately reproduce the depth and reverberation of the original acoustic piano, you may find that reverberation is audible when the Key Off Resonance function is enabled. If you want to eliminate the reverberation, turn off the Key Off Resonance function (p. 57). |
| In the upper range, the sound changes abruptly beyond a certain key | On an acoustic piano, notes in the upper one and a half octaves of the keyboard continue to sound until they decay naturally, regardless of the damper pedal. There is a difference in the timbre as well. Roland pianos faithfully simulate such characteristics of the acoustic piano. On the RG-3, the range that is unaffected by the damper pedal will change depending on the Key Transpose setting. |
| A High-pitched whine is produced | When listening through headphones: Some of the more flamboyant and effervescent piano tones feature an ample high-end component, which may make the sound appear to have metallic reverberation added. Since this reverberation becomes particularly audible when supplemented by heavy reverb, you may be able to diminish the problem by reducing the amount of reverb applied to the sound. When listening through speakers: Here, a different cause (such as resonance produced by the RG-3) would be suspect. Consult your Roland dealer or nearest Roland Service Center. |
| The bass range sounds odd, or there is a vibrating resonance | When listening through speakers: Playing at loud volumes may cause instruments near the RG-3 to resonate. Resonation can also occur with fluorescent light tubes, glass doors, and other objects. In particular, this problem occurs more easily when the bass component is increased, and when the sound is played at higher volumes. Use the following measures to suppress such resonance. • Place speakers so they are 10–15 cm from walls and other surfaces. • Reduce the volume. • Move the speakers away from any resonating objects. When listening through headphones: Here, a different cause (such as resonance produced by the RG-3) would be suspect. Consult your Roland dealer or nearest Roland Service Center. |
| Song doesn't play back correctly | |
| Song doesn't play back | Does the screen indicate message, like "Delete User Song OK?" (p. 76). The internal songs cannot be played back while recorded performance data remains in the RG-3's memory. Erase the performance data or play back the song after saving to the "Favorites" or to your USB memory. |
| Pressing the [▶] button doesn't return to the beginning of the song | Some music files may contain settings that stop play at a point partway through the song. Press the [▶] button several times more to return to the beginning of the song. |
| The [▶] and [▶] buttons don't work | If you attempt to play back performance data that contains more data than the entire capacity of the RG-3's memory, you may find that operations other than playback (such as rewind or fast forward) become unavailable. |
| Accompaniment not playing | Is the accompaniment volume turned down in the volume balance settings? (p. 72) |
| Can't record/Can't play back | |
| The recorded performance has disappeared | Any performance that has been recorded is deleted when the power to the RG-3 is turned off or a song is selected. A performance cannot be restored once it's been deleted. Be sure to save it on a USB memory or User Memory before you turn off the power (p. 77). |
| Unable to play back songs | Could you have pressed the remote control's [MUTE] button and muted the sound? Press the [MUTE] button to cancel the mute (p. 35). |
| Can't play back a song from CD | Reading of data from the CD starts when the CD is inserted in the drive. It may take a few moments to complete reading of the data. |
Error Messages
| Indication | Meaning |
| Error 01: | You can only read the music file. It can not be saved. |
| Error 02: | An error occurred during writing. The storage media's protect tab may be in the “Protect” (writing prohibited) position, or the storage media may not yet be initialized. |
| Error 10: | No storage media is inserted. Insert the storage media and try again. |
| Error 11: | There is not sufficient free memory in the save destination. Either insert other storage media or delete unneeded files and try again. |
| Error 14: | An error occurred during writing. The storage media may be corrupted. Insert other storage media and try again. Alternatively, you can initialize the storage media. |
| Error 15: | The file is unreadable. The data format is not compatible with the RG-3. |
| Error 16: | Data was not called up in time for playback of the song. After waiting several seconds, you may be able to play back the song by pressing the [▶/■] button again. |
| Error 17: | The selected image data cannot be displayed. Prepare image data that can be used with the RG-3 (p. 49). |
| Error 30: | The internal memory capacity of the RG-3 is full. |
| Error 40: | The RG-3 cannot deal with the excessive MIDI data sent from the external MIDI device. Reduce the amount of MIDI data sent to the RG-3. |
| Error 41: | A MIDI cable has been disconnected. Connect it properly and securely. |
| Error 43: | A MIDI transmission error has occurred. Check the MIDI cable and connected MIDI device. |
| Error 51: | There may be a problem with the system. Repeat the procedure from the beginning. If it is not solved after you have tried several times, contact the Roland service center. |
| Error 65: | The Ext Memory port was subjected to excessive current. Check the storage media to confirm that no damage has occurred to it. |
Piano 1
Piano 2
Harpsi-chord
Vibraphone
E.Piano





| Piano 1 | |
| 1 | Superior Grand |
| 2 | Superior Grand + Str |
| 3 | Superior Grand + Pad |
| 4 | Piano + FM E.Piano |
| Piano 2 | |
| 1 | Natural Grand |
| 2 | Natural Grand + Str |
| 3 | Natural Grand + Pad |
| 4 | Piano + Bell |
| Harpsichord | |
| 1 | Harpsichord |
| 2 | Coupled Harpsichord |
| 3 | Harpsichord + Choir |
| 4 | Harpsichord + Str |
| Vibraphone | |
| 1 | Vibraphone |
| 2 | Bell |
| 3 | Harp |
| 4 | Electric Piano + Pad |
| E.Piano | |
| 1 | Electric Piano |
| 2 | FM E.Piano |
| 3 | ‘60s Electric Piano |
| 4 | Electric Piano + Str |
Tone Settings When Using the Split Function (p. 67) (Tone Number Left-Hand Tone / Right-Hand Tone)
| Piano 1 | |
| 1 | A.Bs / SuperiorGrand |
| 2 | A.Bs/SuperiorGnd+Str |
| 3 | A.Bs/SuperiorGnd+Pad |
| 4 | Choir/Piano+FM E.Pno |
| Piano 2 | |
| 1 | Bs+Ride/NaturalGrand |
| 2 | Bs+Ride/Natural+Str |
| 3 | Bs+Ride/Natural+Pad |
| 4 | Choir / Piano + Bell |
| Harpsichord | |
| 1 | Strings/Harpsichord |
| 2 | Strings/Coupled Hrps |
| 3 | Strings/Harpsi+Choir |
| 4 | Choir/Harpsichrd+Str |
| Vibraphone | |
| 1 | A.Bs+Ride/Vibraphone |
| 2 | Choir / Bell |
| 3 | Strings / Harp |
| 4 | Choir/E.Piano + Pad |
| E.Piano | |
| 1 | E.Bass / Electric Piano |
| 2 | E.Bass / FM E.Piano |
| 3 | E.Bass/'60s E.Piano |
| 4 | Choir / E.Piano + Str |
Internal Song List
| Jazz |
| Trio Grande |
| Scrambled Egg |
| Blue Sky Rag |
| One Down And Easy |
| Bop On The Rock |
| Fly Free |
| Late Night Chopin |
| Wedding Song |
| Yesterday's Dream |
| Sun Daze |
| Keepers Tale |
| Kismet's Salsa |
| Roll Over Ludwig |
| A Prelude To ... |
| From Matthew's Passion |
| Hungarian Rag |
| Paganini Boogie |
| Classical |
| Liebestraume 3 |
| Etude op10-3 |
| Je te veux |
| Valse op64-1 |
| Golliwog's Cakewalk |
| Fantaisie Impromptu |
| Arabesque 1 |
| Nocturne No.2 |
| Gymnopedie 1 |
| Clair De Lune |
| Blauen Donau |
| Auf Flugeln des Gesanges |
| Mazurka No.5 |
| Etude op25-1 |
| Etude op10-5 |
| Grande Valse Brillante |
| Course en Troika |
| Valse op64-2 |
| Traumerei |
| Fruhlingslied |
| Dr. Gradus Ad Parnassum |
| Radetzky Marsch |
| Moments Musicaux 3 |
| Prelude op28-15 |
| Ungarische Tanze 5 |
| La priere d'une Vierge |
| To The Spring |
| Humoreske |
| Blumenlied |
| Gavotte |
- All rights reserved. Unauthorized use of this material for purposes other than private, personal enjoyment is a violation of applicable laws.
- No data for the music that is played will be output from MIDI OUT.
Parameters Stored to Internal Memory
Parameters Stored in Memory Backup
| Screen | Display | Description | Page |
| KEY TOUCH | Touch | Key Touch | p. 55 |
| Hammer | Hummer Response | p. 56 | |
| RESONANCE | KeyOff | Key Off Resonance | p. 57 |
| String | String Resonance | p. 58 | |
| Damper | Damper Resonance | p. 59 | |
| EQUALIZER | Master | Master Level | p. 60 |
| L | Low-frequency Range Level | ||
| M | Midrange Level | ||
| H | High-frequency Range Level | ||
| TUNE | (Master Tune setting) | Master Tune | p. 63 |
| Stretch | Stretch Tune | p. 64 | |
| (Tuning Method) | Temperament | p. 65 | |
| Key | Tonic Note | p. 66 | |
| EFFECT | Reverb | Reverb Level | p. 69 |
| REMOTE | Receive | Remote Control Function On/Off, Infrared Transmission Function On/Off | p. 90, p. 97 |
| Transpose | The Function Assigned to the Remote Control's [TRANSPOSE] Button | p. 90 | |
| F1 | The Function Assigned to the Remote Control's [F1] Button | ||
| F2 | The Function Assigned to the Remote Control's [F2] Button | ||
| EXT DISPLAY | VGA, NTSC, PAL | External Display Setting and Television Format | p. 46, p. 47 |
| Slide Interval | The Duration for Displaying Slide Show Images | p. 49 | |
| PLAY | Mode | Song Playback Method | p. 27 |
| CD/AUDIO | Level | Audio CD/Audio File Playback Volume Level | p. 91 |
| MISC | Recommended Tone | Recommended Tone Function On/Off | p. 92 |
Parameters Stored in the User Program
| Screen | Display | Description | Page |
| -------- | -------- | Selected Tone and Variation | p. 53 |
| EFFECT | Reverb | Reverb Setting | p. 69 |
| BALANCE | Key:Acmp | Volume Balance | p. 72 |
| Layer | Layer Balance | p. 54 | |
| SPLIT | Split | Split function On/Off | p. 67 |
| Split Point | Split Point | p. 68 | |
| TRANSPOSE | Link | On/off switch for linked transposition of keyboard and playback | p. 38, p. 62 |
| Keybrd | Keyboard Transpose (When the Link is set to Off) | p. 61 | |
| Keyboard/Playback | Keyboard and Playback Transpose (When the Link is set to On) | p. 37, p. 61 | |
| PEDAL | Cent | The Function Assigned to the Center Pedal | p. 70 |
| Left | The Function Assigned to the Left Pedal | ||
| MIC ECHO | Type | Mic Echo Type | p. 39 |
| Level | Mic Echo Level | ||
| MIDI | Ch | MIDI Channel used for transmitting Program numbers when switching User Programs | p. 101 |
| PC | Program Change Number | ||
| Bank (L) | Bank Select MSB | ||
| Bank (R) | Bank Select LSB |
Music Files That the RG-3 Can Use
What Are Music Files?
Music files contains musical information such as how long the key for a corresponding pitch is played, the force applied to the key played, and other such information. Performance data is transmitted to the RG-3 from music files saved in USB memory and played back without change as songs. This is different than a audio CD, since the music file does not contain a recording of the sound itself. This makes it possible to erase certain parts, or to change instruments, tempos and keys freely, allowing you to use it in many different ways.
Regarding Copyright
Use of the song data supplied with the Data Disk attached to this product for any purpose other than private, personal enjoyment without the permission of the copyright holder is prohibited by law. Additionally, this data must not be copied, nor used in a secondary copyrighted work without the permission of the copyright holder.
The RG-3 allows you to use the following music files
SMF with Lyrics

"SMF with Lyrics" refers to SMF (Standard MIDI File) that contains the lyrics. When Music Files carrying the "SMF with Lyrics" logo are played back on a compatible device (one bearing the same logo), the lyrics will appear in its display. The RG-3 come equipped with GM 2/GS sound generators.
About the RG-3 Sound Generator
The RG-3 come equipped with GM 2/GS sound generators.
General MIDI

The General MIDI is a set of recommendations which seeks to provide a way to go beyond the limitations of proprietary designs, and standardize the MIDI capabilities of sound generating devices. Sound generating devices and music files that meets the General MIDI standard bears the General MIDI logo. Music files bearing the General MIDI logo can be played back using any General MIDI sound generating unit to produce essentially the same musical performance.
General MlDI 2

The upwardly compatible General MIDI 2 recommendations pick up where the original General MIDI left off, offering enhanced expressive capabilities, and even greater compatibility. Issues that were not covered by the original General MIDI recommendations, such as how sounds are to be edited, and how effects should be handled, have now been precisely defined. Moreover, the available sounds have been expanded. General MIDI 2 compliant sound generators are capable of reliably playing back music files that carry either the General MIDI or General MIDI 2 logo.
In some cases, the conventional form of General MIDI, which does not include the new enhancements, is referred to as "General MIDI 1" as a way of distinguishing it from General MIDI 2.
GS Format

The GS Format is Roland's set of specifications for standardizing the performance of sound generating devices.
In addition to including support for everything defined by the General MIDI, the highly compatible GS Format additionally offers an expanded number of sounds, provides for the editing of sounds, and spells out many details for a wide range of extra features, including effects such as reverb and chorus. Designed with the future in mind, the GS Format can readily include new sounds and support new hardware features when they arrive. Since it is upwardly compatible with the General MIDI, Roland's GS Format is capable of reliably playing back GM Scores equally as well as it performs GS music files (music files that have been created with the GS Format in mind). This product supports both the General MIDI 2 and the GS Format, and can be used to play back music files carrying either of these logos.
XGlite

XG is a tone generator format of YAMAHA Corporation, that defines the ways in which voices are expanded or edited and the structure and type of effects, in addition to the General MIDI 1 specification. XGlite is a simplified version of XG tone generation format. You can play back any XG music files using an XGlite tone generator. However, keep in mind that some music files may play back differently compared to the original files, due to the reduced set of control parameters and effects.
| Function... | Transmitted | Recognized | Remarks | |
| Basic Channel | Default Changed | 1 1-16 | 1-16 1-16 | |
| Mode | Default Messages Altered | Mode 3 x ***** | Mode 3 Mode 3, 4 (M=1) | *2 |
| Note Number: | True Voice | 15-113 ***** | 0-127 0-127 | |
| Velocity | Note ON Note OFF | O O | O O | |
| After Touch | Key's Ch's | x x | O *1 O *1 | |
| Pitch Bend | x | O | ||
| Control Change | 0, 32 1 5 6, 38 7 10 11 64 65 66 67 84 91 93 98, 99 100, 101 | O x x x x x x x x x x x x x x x x x x x x x x x x x x x x x x x x x x x x x x x x x x x x x x x x x x x x x x x x x x x x x x x x x x x x x x x x x x x x x x x x x x x x x x x x x x x x x x x x x x x x | O *1 O *1 O *1 O *1 O *1 O *1 O *1 O *1 O *1 O *1 O *1 O (Reverb) *1 O (Chorus) *1 O *1 O *1 | Bank select Modulation Portamento time Data entry Volume Panpot Expression Hold 1 Portamento Sostenuto Soft Portamento control Effect depth Effect depth NRPN LSB, MSB RPN LSB, MSB |
| Prog Change : True # | 0-127 ***** | O 0-127 | Program number 1-128 | |
| System Exclusive | O | O | ||
| System Common | x x x x x x x x x x x x x x x x x x x x x x x x x x x x x x x x x x x x x x x x x x x x x x x x x x x x x x x x x x x x x x x x x x x x x x x x x x x x x x x x x x x x x x x x x x x x x x x x x x x x | |||
| System Real Time | O x | x x x x x x x x x x x x x x x x x x x x x x x x x x x x x x x x x x x x x x x x x x x x x x x x x x x x x x x x x x x x x x x x x x x x x x x x x x x x x x x x x x x x x x x x x x x x x x x x x x | ||
Mode 1: OMNI ON, POLY
Mode 2: OMNI ON, MONO
O:Yes
Mode 3: OMNI OFF, POLY
Mode 4: OMNI OFF, MONO
X:No
Main Specifications
RG-3
| <Keyboard> | |
| Keyboard | 88 keys (PHA II ivory feel Keyboard with Escapement) |
| Touch Sensitivity | Touch: 100 levels |
| Hammer Response: Light, Medium, Heavy, Off | |
| Keyboard Mode | Whole, Layer (as layer tones. volume balance adjustable), Split (split point adjustable) |
| <Sound Generator> GM2 system, GS format, XG lite compatible | |
| Max. Polyphony | 128 voices |
| Tones | 20 tones (5 groups 4 variations) for manual performance600 internal tones for SMF playback (including 15 drum sets, SFX set) |
| Temperament | 8 types, selectable tonic |
| Stretched Tuning | 2 types |
| Master Tuning | 415.3–466.2 Hz (adjustable in increments of 0.1 Hz) |
| Key Transpose | -6+5 (in semitones) |
| Playback Transpose | SMF Music Files: -24+24 (in semitones)Audio CD/Audio File: -6+5 (in semitones) |
| Effects | Reverb (127 levels), Key Off Resonance (only for piano tones, 9 levels),String Resonance (only for piano tones, 9 levels), Damper Resonance (only for piano tones, 9 levels),3-band Digital Equalizer |
| Vocal Effects | Mic Echo (9 levels) |
| <User Programs> | |
| Internal | 36 |
| User Memory | Max. 99 User Program Sets |
| USB Memory | Max. 99 User Program Sets |
| <Recorder> | |
| Track | 1 track |
| Song | Max. 199 songs |
| Note Storage | Approx. 30,000 notes |
| Controls | Song Select, Play/Stop, Rec, Tempo, All Song Play, Random Play, Minus One/Guide |
| <Media> | |
| CD | Read Only, Playable Discs: Audio CDs (CD-DA), CD-R (SMF) |
| USB Memory | SMF |
| Floppy Disk | SMF |
| <Internal Memory> | |
| Internal Songs | Over 50 (including the Tone Demos) |
| User Memory | Favorites Songs, User Programs |
| <Others> | |
| Rated Power Output | 40 W x 2 |
| Speakers | 20 cm x 2, 5 cm x 2 |
| Display | 20 characters, 2 lines LCD |
| RG-3 | |
| External Display | VGA, NTSC, PAL Song Select, Slide Show, Lyrics, DigiScore |
| Controls | Volume, Brilliance, LCD Contrast, Mic Volume |
| Pedals | Damper (half-pedal recognition), Soft (half-pedal recognition, function assignable), Sostenuto (function assignable) |
| Other Function | Lid Lock |
| Connectors | AC inlet, Pedal connector, Input jacks (L/Mono, R), Output jacks (L/Mono, R), Video Out jack, Ext Display connector, USB connector, MIDI connectors (IN, OUT), Mic jack, Phones jack (Stereo) x 2, FDD connector (USB), Ext Memory port (USB) |
| Power Supply | AC 115 V, AC 117 V, AC 220 V, AC 230 V, AC 240 V (50/60 Hz) |
| Power Consumption | 70 W |
| Dimensions | 1,480 (W) x 950 (D) x 1,440 (H) mm (top opened) 58-5/16 (W) x 37-7/16 (D) x 56-3/4 (H) inches |
| 1,480 (W) x 950 (D) x 930 (H) mm (top closed) 58-5/16 (W) x 37-7/16 (D) x 36-5/8 (H) inches | |
| Weight | 110 kg / 242 lbs 9 oz |
| Accessories | Owner's Manual, USB Installation Guide, Power Cord, Maintenance Kit, Key Cover, Remote Control, Dry-cell Batteries, Caster Caps |
| Option | USB Memory, Floppy Disk Drive |
- In the interest of product improvement, the specifications and/or appearance of this unit are subject to change without prior notice.
A
AC Inlet 16, 19
All Song 27
Arabic 66
Audio Equipment 98
Audio File 25
Auto 97
Automatic Demo 94
B
BALANCE 54,72
Bank 101-102
Bank Select LSB 101-102
Bank Select MSB 101-102
Baroque 65
[Brilliance] Knob 15, 20
Bwd/Fwd 90
C
CD 25,41
CD Drive 24
CD Level 91
CD/AUDIO 91-92
CD-ROM 40
Cent 70
Center 88
Center Cancel 92
Center Pedal 20,70
CentrCancl 91
Ch 101-102
Classical 25,41
Clef L 96
Clef R 96
Composer MIDI Out 102
Computer 103
Connecting Audio Equipment 98
Computer 103
External Display 45
Headphones 21
Microphone 21
MIDI Device 99
Pedal Cord 19
Power Cord 19
Television 47
USB Memory 22
Contrast 23
COPY 40
Copying Songs 40
Cord Clamp 19
D
Damper 59
Damper Pedal 20,59
Damper Resonance 59
DEL 43,86
Delete User Song OK? 26, 29, 31, 76
Deleting Songs 43
User Program 86
Dest 77
Display 15
Display Setting 46
E
[E.Piano]Button 15,53
Echo 24,39
EFFECT 69
Eject/Load 91
[Enter] Button 15
Equal 65
EQUALIZER 60
Equalizer 60, 91
EXT DISPLAY 46-47, 49
Ext Display Connector 16,45
Ext Memory 25, 41, 44, 77, 82, 84, 86, 93
Ext Memory Port 17, 22
Ext Memory Port Cover 17, 22
Ext Memory Port Cover Lock 17
External Display 45, 48
F
F1 90
F2 90
FACTORY RESET 74
Factory Reset 74
Factory Setting 74
Favorites 24-26, 40-41, 44, 77
FDD Connector 17
[▶] (Value +) Button 15
FILE 40, 43, 77, 93
Fix 55
Floppy Disk 25, 31, 40-41, 44, 77, 93
Floppy Disk Drive 17, 24
Folder 29
FORMAT 93
[Function] (Exit) Button 15, 23
G
GeneralMIDI 110
GeneralMIDI2 110
Generic 103
GS Format 110
Guide 95
H
H 60
Hammer 56
Hammer Response 56
[Harpsichord]Button 15,53
Headphones 21
Heavy 56
Historic Temperament 65
1
Infrared 97
Infrared Function 97
InfraredPlayback 97
Infrared Receiver 15, 33
Infrared Transmission Function 97
Initializing 93
Input Jack 16,98
iR 97
iR Play 97
J
Jazz 25,41
Just (Maj) 65
Just (min) 65
K
Karaoke 24,36,92
Key 37,66,96
Key Off Resonance 57
KEY TOUCH 55-56
Key Touch 55
Key:Acmp 72
Keyboard/Playback 37
KeyOff 57
Kimberger 65
L
L 60
Layer 54
Layer Balance 54
LCD Contrast Knob 16,23
Left 70,88
Left Pedal 20, 70
Level 39, 91
Lid 19
Lid Lock 19
Light 56
Link 37-38,61-62
LOAD 84
Local Control 100
Local Off 100
Local On 100
Locking Current Settings 89
Ext Memory Port Cover 22
Lid 19
LwrDamper 70
Lyrics 48
M
M 60
Master 60
Master Tuning 63
Meantone 65
Medium 56
MEMORY BACKUP 73
Memory Backup 73
MIC ECHO 39
Mic Echo 39
Mic Jack 16, 21
Mic Volume Knob 16, 21
Microphone 21
MIDI 94,100-103
MIDI Device 99
MIDI In Connector 16
MIDI Out Connector 16,99
MIDI Transmit Channel 100
Minus One 91, 95
Minus One/Guide 95
MinusOne/Guide Part 95
MISC 92
Mode 27
Multiscan Monitor 45
Music Files 24-25, 110
Music Rest 18
Mute 95
Muting 95
N
Notation 48
Notation Display 96
NTSC 47
0
Octave 71
One Song 27
Original 103
Original2 103
Output Jack 16,98
P
PAL 47
Panel Lock 89
Part L 96
Part R 96
PC 101-102
PEDAL 70
Pedal 20,70
Pedal Connector 16
Pedal Cord 19
Pedal EX 70
Pedal Shift 88
Phones Jack 16, 21
[Piano 1] Button 15, 53
[Piano 2] Button 15, 53
Piano Customize 55
Pitch 61, 63
PLAY 27
Play/Stop 70
[▶/■] (Value-) Button 15
Playback Transpose 37
Playing Back Internal Song 26
One Song 27
Songs on CDs 28
Songs on Floppy Disks 31
Songs on USB Memory 31
Tone Demos 26
Plybck 38
Power Cord 19
[Power] Switch 15, 20
Program Change 101
Program Number 101
Pythagorean 65
R
Random 91
Receive 97
Recommended Tone 92
RECORD 75
Recording 75
REMOTE 97
Remote Control [CANCEL] Button 35
[DISPLAY]Button 35,48
[EXTERNAL]Button 35
[FAVORITES]Button 35
[ ] Button 35
[FUNC 1] Button 35, 91
[FUNC 2]Button 35,91
[INTERNAL]Button 35
[▶/■] Button 35
[REW]Button 35
[TONE]Button 35
Battery 32
Function Assigned to the Button 90
Infrared Receiver 33
Receive On/Off 90
TEMPO[-][+] Buttons 35-36
TRANSPOSE[-] [+ ]Button 90
TRANSPOSE[-] [+ ] Buttons 35
VOL[-] [+ ] Buttons 35
RESONANCE 57-59
Resonance 58-59
Reverb 69
[Select +)Button 15
Right Pedal 20
s
SAVE 77,82
Saving Performance Settings 80
Recorded Performances 77
User Program 82
Various Settings 73
Screens
BALANCE Screen 54, 72
CD/AUDIO Screen 91-92
EFFECT Screen 69
EQUALIZER Screen 60
EXT DISPLAY Screen 46-47, 49
FACTORY RESET Screen 74
FILE Screen 40, 43, 77, 93
Function Screen 23,89
iR Screen 97
KEY TOUCH Screen 55-56
Lyrics Screen 52
MEMORY BACKUP Screen 73
MIC ECHO Screen 39
MIDI Screen 94, 100-103
MinusOne/Guide Part Screen 95
MISC Screen 92
NOTATION Screen 96
PEDAL Screen 70
PLAY Screen 27, 95
RECORD Screen 75
REMOTE Screen 90, 97
RESONANCE Screen 57-59
Song Select Screen 23
SPLIT Screen 67-68
Tone Screen 23
TRANSPOSE Screen 37,61
TUNE Screen 63-66
USER PROGRAM Screen 80, 82, 84, 86, 88
Slide Interval 49
Slide Show 48-49, 94
SMF Music Files 24-25
SMF with Lyrics 110
Soft 70
Soft Pedal 20
[Song] (Select-) Button 15,25
Song Select 48
Song Tempo 36
Sostenuto 70
Sostenuto Pedal 20
SPLIT 67-68
Split 67
Split Performance 67, 107
Split Point 67-68
Staff 96
Standard Pitch 63
Standby 97
Stretch 64
Stretched Tuning 64
String 58
String Resonance 58
T
Television 47-48
Television Format 47
Tempo 36
Tone Button 15,23,53,107
Tone Demo 26
Tone Group 53
Tone Quality 60
Tonic 66
Top board 18
Topslip 18
Topstick 18
Touch 55
TRANSPOSE 37,61
Transpose 37-38,61-62,90
TUNE 63-66
Tuning Curve 64
Tuning Method 65
Tx Ch 100
Type 39
U
USB Connector 16
USB Driver 103
USB Memory 22, 24, 31, 40
UserMemory 25,82,84,86,93
USER PROGRAM 80, 82, 84, 86, 88
User Program 25,80
Calling Up 81
Deleting 86
Loading 84
Pedal Shift 88
Saving 80, 82
Transmit Channel 101
Transmit Program Number 101
V
Variation Tone 53
VGA 46
VGA Monitor 45
[Vibraphone]Button 15,53
Video Out Jack 16,47
VIMA 49
VIMA CD-ROM 49, 51, 53, 92
VIMA TUNES 49,51,53,92
V-LINK 94
Volume
CD and Audio File 91
Master Volume 20
Microphone 21
Volume Balance
Keyboard: Accompaniment 72
Layer Balance 54
[Volume] Knob 15, 20
W
When you need repair service, call your nearest Roland Service Center or authorized Roland distributor in your country as shown below.
AFRICA
EGYPT
Al Fanny Trading Office 9, EBN Hagar Al Askalany Street, ARD E1 Golf, Heliopolis, Cairo 11341, Egypt TEL: (022)418-5531
REUNION
Maison FO -YAM Marcel
25 Rue Jules Hermann,
Chaudron -BP79 97491
Ste Clotilde Cedex,
REUNION ISLAND
TEL: (0262) 218-429
SOUTH AFRICA
T.O.M.S. Sound & Music
(Pty)Ltd.
2 ASTRON ROAD DENVER
JOHANNESBURG ZA 2195, SOUTH AFRICA
TEL: (011)4173400
Paul Bothner(PTY)Ltd.
Royal Cape Park, Unit 24
Londonderry Road, Ottery 7800
Cape Town, SOUTH AFRICA
TEL: (021) 799 4900
ASIA
CHINA
Roland Shanghai Electronics Co.,Ltd. 5F.No.1500 Pingliang Road Shanghai 200090,CHINA TEL: (021) 5580-0800
Roland Shanghai Electronics Co., Ltd. (BEIJING OFFICE) 10F.No.183 Section Anhuaxil Chaoyang District Beijing
100011 CHINA
TEL: (010) 6426-5050
HONG KONG
Tom Lee Music Co., Ltd.
Service Division
22-32 Pun Shan Street, Tsuen Wan, New Territories, HONG KONG
TEL: 2415 0911
Parsons Music Ltd.
8th Floor, Railway Plaza, 39 Chatham Road South, T.S.T, Kowloon, HONG KONG
TEL: 2333 1863
INDIA
Rivera Digitec (India) Pvt. Ltd. 411, Nirman Kendra Mahalaxmi Flats Compound Off. Dr. Edwin Moses Road, Mumbai-400011, INDIA TEL: (022) 2493 9051
INDONESIA
PT Citra IntiRama
JL. Cideng Timur No. 15J-15O
Jakarta Pusat
INDONESIA
TEL: (021) 6324170
KOREA
Cosmos Corporation 1461-9, Seocho-Dong, Seocho Ku, Seoul, KOREA TEL: (02) 3486-8855
MALAYSIA
Roland Asia Pacific Sdn. Bhd. 45-1, Block C2, Jalan PJU 1/39, Dataran Prima, 47301 Petaling Jaya, Selangor, MALAYSIA TEL: (03) 7805-3263
VIET NAM
Suoi Nhac Company, Ltd
370 Cach Mang Thang Tam St.
Dist.3, Ho Chi Minh City,
VIET NAM
TEL: 9316540
PHILIPPINES
G.A. Yupangco & Co. Inc. 339 Gil J. Puyat Avenue Makati, Metro Manila 1200, PHILIPPINES TEL: (02) 899 9801
SINGAPORE
SWEE LEE MUSIC COMPANY PTE. LTD. 150 Sims Drive, SINGAPORE 387381 TEL:6846-3676
TAIWAN
ROLAND TAIWAN ENTERPRISE CO., LTD. Room 5,9fI.No.112 Chung Shan N.Road Sec.2,Taipei, TAIWAN,R.O.C. TEL: (02) 2561 3339
THAILAND
Theera Music Co., Ltd.
100-108 Soi Verng
Nakornkasem, New
Road,Sumpantawongse,
Bangkok 10100 THAILAND
TEL: (02) 224-8821
AUSTRALIA/ NEW ZEALAND
AUSTRALIA/
NEW ZEALAND
Roland Corporation Australia Pty., Ltd. 38 Campbell Avenue Dee Why West. NSW 2099 AUSTRIA
For Australia
Tel: (02) 9982 8266
For New Zealand
Tel: (09) 3098 715
CENTRAL/LATIN AMERICA
ARGENTINA
Instrumentos Musicales S.A.
Av.Santa Fe 2055
(1123) Buenos Aires
ARGENTINA
TEL: (011) 4508-2700
BARBADOS
A&B Music Supplies LTD
12 Webster Industrial Park
Wildey, St.Michael, Barbados
TEL: (246)430-1100
BRAZIL
Roland Brasil Ltda.
Rua San Jose, 780 Sala B
Parque Industrial San Jose
Cotia - Sao Paulo - SP, BRAZIL
TEL: (011) 4615 5666
CHILE
Comercial Fancy II S.A.
Rut.: 96,919,420-1
Nataniel Cox #739, 4th Floor
Santiago - Centro, CHILE
TEL: (02) 688-9540
COLOMBIA
Centro Musical Ltda.
Cra 43 B No 25 A 41 Bododega 9
Medellin, Colombia
TFL: (574)3812529
COSTA RICA
JUAN Bansbach Instrumentos
Musicales
Ave.1. Calle 11, Apartado
10237,
San Jose, COSTA RICA
TEL: 258-0211
CURACAO
Zeelandia Music Center Inc.
Orionweg 30
Curacao, Netherland Antilles
TEL: (305) 5926868
DOMINICAN REPUBLIC
Instruments Fernando Gira
Calle Proyecto Central No.3
Ens.La Esperilla
Santo Domingo, Dominican Republic
TEL: (809) 683 0305
ECUADOR
Mas Musika Rumichacha 822 y Zaruma Guayaquil - Ecuador TEL:(593-4)2302364
EL SALVADOR
OMNI MUSIC
75 Avenida Norte y Final
Alameda Juan Pablo II, Edificio No.4010 San Salvador, EL SALVADOR
TEL: 262-0788
GUATEMA
Casa Instrumental
Calzada Roosevelt 34-01, zona 11
Ciudad de Guatemala
Guatemala
TEL: (502) 599-2888
HONDURAS
Almacen Pajaro Azul S.A. de C.V.
BO.Paz Barahona
3 Ave.11 Calle S.O
San Pedro Sula, Honduras
TEL: (504) 553-2029
MARTINIQUE
G2 Calmount Park, Calmout Avenue, Dublin 12
Republic of IRELAND
TEL: (01) 4294444
ITALY
Roland Italy S. p. A.
Viale delle Industrie 8, 20020 Arese, Milano, ITALY
TEL: (02) 937-78300
NORWAY
Roland Scandinavia Avd.
Kontor Norge
Lilleakerveien 2 Postboks 95
Lilleaker N-0216 Oslo
NORWAY
TEL: 2273 0074
POLAND
ROLAND POLSKA SP. Z O.O.
UL. Gibraltarska 4.
PL-03 664 Warsaw
POLAND
TEL: (022) 679 4419
PORTUGAL
Roland Iberia, S.L.
Portugal Office
Cais das Pedras, 8
4050-465, Porto, Portugal
TEL: 22 608 00 60
ROMANIA
FBS LINES
Piata Libertatii 1, 535500 Gheorghen
ROMANIA
TEL: (266) 364 609
RUSSIA
MuTek Dorozhnaya ul3.korp.6 117545 Moscow, RUSSIA TEL: (095) 981-4967 SLOVAKIA
DAN Acoustics r.o.
Povazska 18.
SK-940 01 Nové Zámky
TEL: (035) 6244 330
SPAIN Roland Iberia, S.L. Paseo Garcia Faria, 33-35 08005 Barcelona SPAIN TEL:934939100
SWEDEN
Roland Scandinavia A/S SWEDISH SALES OFFICE Danvik Center 28, 2 tr. S-131 30 Nacka SWEDEN TEL: (0)87020020
SWITZERLAND
Roland (Switzerland) AG
Landstrasse 5, Postfach, CH-4452 Ittingen, SWITZERLAND
TEL: (061) 927-8383
UKRAINE
EURHYTHMICS Ltd. P.O.Box:37-a.Nedecey Str. 30 UA-89600 Mukachevo UKRAINE TEL:(03131)414-40
UNITED KINGDOM
Roland (U.K.) Ltd.
Atlantic Close, Swansea
Enterprise Park, SWANSEA
SA7 9FJ,
UNITED KINGDOM
TEL: (01792) 702701
MIDDLE EAST
BAHRAIN
Moon Stores
No.1231&1249 Rumaytha
Building Road 3931, Manama
339 BAHRAIN
TEL: 17 813 942
IRAN
MOCO INC.
No.41 Nike St., Dr.Shariyati Ave.,
Roberoye Cerahe Mirdamad
Tehran, IRAN
TEL: (021)-2285-4169
ISRAEL
Halilit P. Greenspoon & Sons Ltd.
8 Retzif Ha'alia Hashnia St.
Tel-Aviv-Yafo ISRAEL
TEL: (03) 6823666
JORDAN
MUSIC HOUSE CO. LTD.
FREDDY FOR MUSIC
P. O. Box 922846
Amman 111192 JORDAN
TEL: (06) 5692696
KUWAIT
EASA HUSAIN AL-YOUSIFI & SONS CO.
Al-Yousifi Service Center
P.O.Box 126 (Safat) 13002
KUWAIT
TEL: 00 965 802929
LEBANON
Chahine S.A.L.
George Zeidan St., Chahine
Bldg., Achrafieh, P.O.Box: 16-5857
Beirut, LEBANON
TEL: (01) 20-1441
OMAN
TALENTZ CENTRE LLC
Malatan House No.1
Al Noor Street, Ruwi
SULTANATE OF OMAN
TEL: 2478 3443
QATAR
Al Emadi Co. (Badie Studio & Stores)
P.O. Box 62, Doha, QATAR
TEL: 4423-554
SAUDI ARABIA
aDawliah Universal Electronics APL Behind Pizza Inn Prince Turkey Street aDawliah Building, PO Box 2154, Alkhobar 31952
SAUDI ARABIA TEL. (03) 86436
SYRIA
Technical Light & Sound Center
Rawda, Abdul Qader Jazairi St
Bldg. No. 21, P.O. BOX 13520, Damascus, SYRIA
TEL: (011) 223-5384
TURKEY
ZUHAL DIS TICARET A.S.
Galip Dede Cad. No.37
Beyoglu - Istanbul / TURKEY
TEL: (0212) 249 85 10
U.A.E.
Zak Electronics & Musical Instruments Co. L.L.C.
Zabeel Road, Al Sherooq Bldg.
No. 14, Ground Floor, Dubai, U.A.E.
TEL: (04) 3360715
NORTH AMERICA
CANADA
Roland Canada Ltd.
(Head Office)
5480 Parkwood Way
Richmond B.C., V6V 2M4
CANADA
TEL: (604) 270 6626
Roland Canada Ltd.
(Toronto Office)
170 Admiral Boulevard
Mississauga On L5T 2N6
CANADA
TEL: (905) 362 9707
U.S.A.
Roland Corporation U.S. 5100 S. Eastern Avenue Los Angeles, CA 90040-2938, U.S.A.
TEL: (323) 890 3700
For the USA
FEDERAL COMMUNICATIONS COMMISSION RADIO FREQUENCY INTERFERENCE STATEMENT
This equipment has been tested and found to comply with the limits for a Class B digital device, pursuant to Part 15 of the FCC Rules. These limits are designed to provide reasonable protection against harmful interference in a residential installation. This equipment generates, uses, and can radiate radio frequency energy and, if not installed and used in accordance with the instructions, may cause harmful interference to radio communications. However, there is no guarantee that interference will not occur in a particular installation. If this equipment does cause harmful interference to radio or television reception, which can be determined by turning the equipment off and on, the user is encouraged to try to correct the interference by one or more of the following measures:
Reorient or relocate the receiving antenna.
Increase the separation between the equipment and receiver.
Connect the equipment into an outlet on a circuit different from that to which the receiver is connected.
— Consult the dealer or an experienced radio/TV technician for help.
This device complies with Part 15 of the FCC Rules. Operation is subject to the following two conditions:
(1) This device may not cause harmful interference, and
(2) This device must accept any interference received, including interference that may cause undesired operation.
Unauthorized changes or modification to this system can void the users authority to operate this equipment.
This equipment requires shielded interface cables in order to meet FCC class B Limit.
For Canada
NOTICE
This Class B digital apparatus meets all requirements of the Canadian Interference-Caising Equipment Regulations.
AVIS
DECLARATION OF CONFORMITY Compliance Information Statement
Model Name: RG-3
Type of Equipment : Digital Piano
Responsible Party: Roland Corporation U.S.
Address: 5100 S.Eastern Avenue, Los Angeles, CA 90040-2938
Telephone: (323) 890-3700
For EU Countries


This symbol indicates that in EU countries, this product must be collected separately from household waste, as defined in each region. Products bearing this symbol must not be discarded together with household waste.