R7150 - Electric razor REMINGTON - Free user manual and instructions
Find the device manual for free R7150 REMINGTON in PDF.
| Product Type | Rotary Electric Shaver |
| Brand | REMINGTON |
| Model | R7150 |
| Power Source | Mains (100-240 V), 50/60 Hz |
| Usage | Wired only, no battery |
| Shaver Heads | 3 floating pivoting heads |
| Built-in Trimmer | Yes, sliding button to deploy |
| Cleaning | Rinse heads under hot water (device not submersible), brush included |
| Monthly Maintenance | Disassemble blades, brush, rinse |
| Trimmer Lubrication | Every 6 months with one drop of sewing machine oil |
| Blade Replacement | Consumable parts, not covered by warranty |
| Safety | Do not submerge, do not use with damaged cord, keep out of reach of children |
| Operating Temperature | 0°C to 32°C |
| Warranty | 2 years (excluding heads and blades) |
| Included Accessories | Cleaning brush, protective cover |
| Dimensions (approx.) | 15 x 5 x 4 cm |
| Weight (approx.) | 200 g |
| Country of Origin | Not specified in the manual |
Frequently Asked Questions - R7150 REMINGTON
User questions about R7150 REMINGTON
0 question about this device. Answer the ones you know or ask your own.
Ask a new question about this device
Download the instructions for your Electric razor in PDF format for free! Find your manual R7150 - REMINGTON and take your electronic device back in hand. On this page are published all the documents necessary for the use of your device. R7150 by REMINGTON.
USER MANUAL R7150 REMINGTON
11/INT/R3150 Version 03/11 Part No. T22-32312
Remington® is a Registered Trademark of Spectrum Brands, Inc., or one of its subsidiaries
VARTA Consumer Batteries GmbH & Co. KGaA
Alfred-Krupp-Str. 9
73479 Ellwangen
Germany
www.remington-europe.com
© 2011 SBI


REmInGtOn
ROTARY SHAYER
FLEX AND PIVOT TECHNOLOGY


R3150
REMINGTON
6.

7.

INTERNATIONAL SERVICE CENTRE
| GERMANY | Central Europe |
| BENELUX | 00800 / 821 700 821 |
| FRANCE | |
| DENMARK | |
| ITALY | |
| SCANDINAVIA | Mo.-Fr. 9 a.m. - 5 p.m. Central European Time (free call) |
| AUSTRIA | E-Mail: service@remington-europe.com |
| SWITZERLAND | www.remington-europe.com |
| SPAIN | +34 902 10 45 17; 08.00 - 13.00; lunes - viernes (Posventa) |
| +34 932 070 166 (Información al consumidor final) | |
| PORTUGAL | +351 299 942 915; renase@presat.net |
▶ UNITED KINGDOM 3 Tel. +44 0800 212 438 (free call) Spectrum Brands (UK) Limited, Fir Street, Failsworth, Manchester, M35 OHS, UNITED KINGDOM, www.remington.co.uk
CESKA REPUBLIKA Tel. +420 487 754 605 SLOVAKIA VARTA Baterie spel. s.r.o., Jindrifa z Lipé 108, 470 01 Česká Lipa, CESKA REPUBLIKA, www.cz.remington-europe.com
IRELAND Tel. +353 (0) 1460 4711 Remington Consumer Products, Unit 7C, Riverview Business Park, New Nangor Road, Dublin 22, IRELAND, www.remington.co.uk
MAGYARORSZAG Tel.+36 13300 404 Kozponti Ugfelszolgatal: 1138 Budapest, Vaci ut 136/a, www.remington.hu
POLSKA Tel. +48 22 328 11 50 Varta Baterie Sp. z o.o., ul. Fabryczna 5, 00-446 Warszawa, POLSKA, Fax +48 22 328 11 61, www.plremington-europe.com
POCCNRA TeA.8-800-100-801! OOO «I'pOdpCepBnC».Pocnna.115201,MockBa, 1-ⅠBapuAsckn npoezd,1.a,ctp.3www.remington-europe.com
TÜRKIYE
Tel. +90 212 659 01 24
Varta Pilleri Ticaret Ltd. Şi., İstoc 25Ada Sonu Kuzey Plaza Kat I D4, 34217, Mahmut-leyl/Istanbul, TURKİYE, Fax +90 212 659 48 40, www.tr.remington-europe.com
U.A.E. Tel.+9714 355 5474 V.R.R trading (L.L.C), Al Jawhara Bldg 504, Dubai, U.A.E., www/remington-europe.com
CROATIA Tel. +385 12481111 Alca Zagreb d.o.o., Zitnjak bb, 10000 Zagreb, Croatia, www.remington-europe.com
CYPRUS Tel. +357 24-532220 Thetaco Traders Ltd, Eletherias Ave 75, 7100 Aradippou, Cyprus, www.remington-europe.com
ROMANIA Tel. +40 21 411 92 23 BEST EXPERT SERVICE JAK SRL, 4th, Drumul Taberei St., sector 6, Bucharest, Romania, www.remington-europe.com
SLOVENIA Tel.+386 (0) 1561 66 30 Ježek Trgovina Servis d.o.o., Cesta 24.Junija 21, 1231 LJUBLJANA - Čruče. Republika Slovenija, www.remington-europe.com
GREECE 8 Tel.+302109410699
D. & J. DAMKALIDIS S.A., Import Agencies, 44 Zefyrou str., www.remington-europe.com
▶ MALTA Tel. +356 21 664488 Miller Distributors Ltd, Miller House - Airport Way, tarxien Road, Luqa LQA 1814, www.millermalta.com


ENGLISH
Thank you for choosing Remington. Our products are designed to meet the highest standard of quality, functionality and design. We hope you enjoy using your new Remington product. Please read the instructions for use carefully and keep them in a safe place for future reference.

CAUTION
Use this appliance only for its intended use as described in this manual.
Do not use this product if it is not working correctly, if it has been dropped or damaged, or dropped into water.

DESCRIPTION
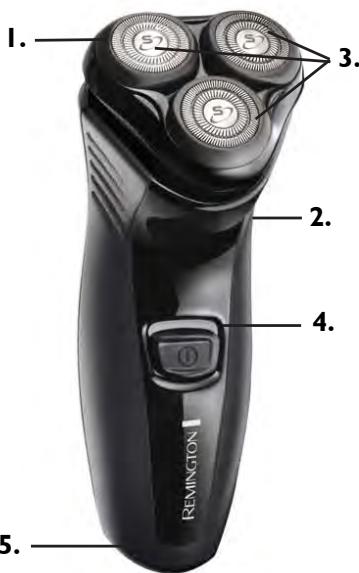
- Pivoting Head & cutter assembly
- Head release button
- Individual flexing heads
- On/Off Push button
5 Power port - Trimmer button
- Power cord

GETTING STARTED
For best shaving performance, it is recommended that you use your new shaver daily for up to four weeks to allow time for your beard and skin to become accustomed to the new shaving system.
ENGLISH
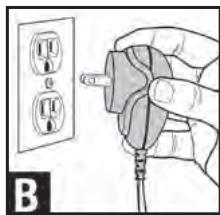
CORDEDUSE
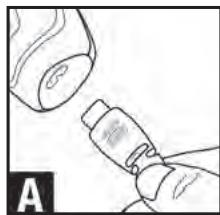
Plug power cord into shaver (Fig. A).
Plug power cord into wall outlet (Fig. B).
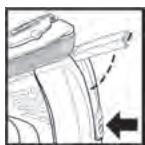
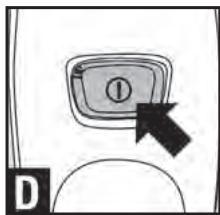
Slide power switch up to turn on (Fig. D).
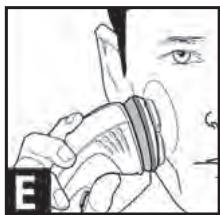
Shave face and neck using short, circular strokes (Fig. E).
Slide power switch down to turn off (Fig. D).
The shaver adapts automatically to a mains voltage between 100V and 240V.

HOW TO USE
SHAVING
Switch the shaver on (Fig. D).
Use the trimmer to remove long hair first.
Hold the shaving head so all three heads touch your face simultaneously (Fig. D). The independently floating heads will automatically adjust to the contours of your face.
Stretch the skin with your free hand so the hairs stand upright.
Only apply light pressure on the shaving head while shaving (pressing too hard can damage the heads and make them vulnerable to breakage).
Use short, circular strokes.
TRIMMING
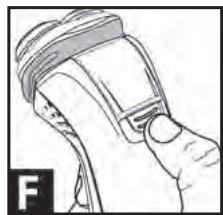
Push the trimmer button down (Fig. E).
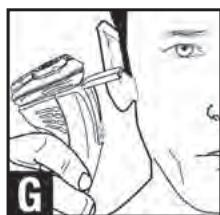
Place trimmer at desired trim line for a quick, easy, professional trim. Hold the shaver as shown in the illustration (Fig. F).
To retract and switch off the trimmer, push the trimmer lock button in and downwards (Fig. G).

TIPS FOR BEST RESULTS
Ensure your skin is dry. Always hold the shaver at right angles to the skin so that all three heads are touching the skin with equal pressure. Use moderate to slow stroking movements. The use of short circular motions in stubborn areas may obtain a closer shave, especially along the neck and chin line. DO NOT press hard against the skin in order to avoid damage to the rotary heads.

Care for your product to ensure a long lasting performance. We recommend you clean your shaver after each use. Using the brush supplied clean the internal parts of the head assembly and shaver body. Always keep the protective cap on the shaving head and keep the trimmer in the "off" position when the shaver is not in use.
ENGLISH
CLEANING DAILY
Ensure the shaver is switched off and unplugged from the mains.
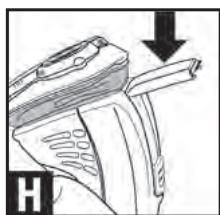
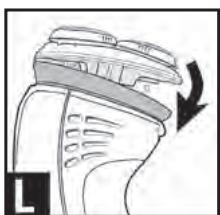
Open the shaver head by pressing the release button on the front of the shaver (Fig. H).
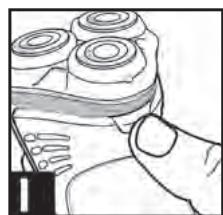
Tape out excess hair shavings (Fig. 1).
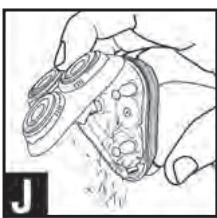
Close head assembly (Fig. J).
CLEANING MONTHLY
Perform the daily cleaning steps first
Open the shaver head by pressing the release button on the front of the shaver (Fig. 1) and flipping open the head away from the body of the shaver (Fig. 1).
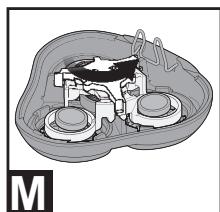
Release the inner cutter carrier by rotating the locking arms counter-clockwise (Fig. M).
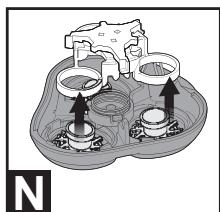
Pull the inner cutter carrier away from inner cutters (Fig. N).
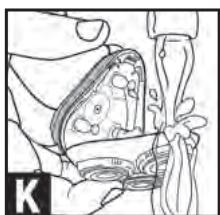
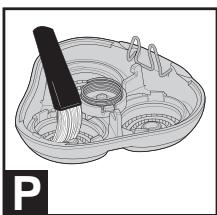
Thoroughly brush hairs from the inner and outer cutters (Fig. P) and rinse out remaining debris.
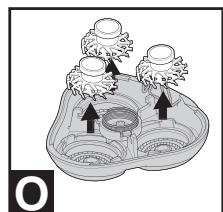
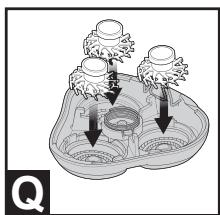
Replace inner cutter (Fig. O)
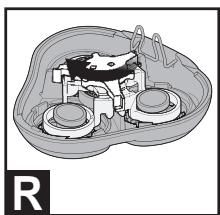
Place the inner cutter carrier back onto the upper hairpocket and lock in place by rotating the locking arms clockwise until the arms 'click' into playe (Fig. Q-R).
CAUTION:
Never submerge your shaver in water.
CLEANING TRIMMER
Lubricate the teeth of the trimmer every six months with one drop of sewing machine oil.
Replacement Part No. SP-SFD2

IMPORTANT SAFETY INSTRUCTIONS
WARNING - TO REDUCE THE RISK OF BURNS, ELECTROCUTION, FIRE, OR INJURY TO PERSONS:
An appliance should never be left unattended when plugged in to a power outlet, except when charging.
Keep the power plug and cord away from heated surfaces.
Make sure the power plug and cord do not get wet.
Do not plug or unplug the shaver with wet hands.
Do not use the product with a damaged cord. A replacement can be obtained via the Remington Service Center.
use and store the product at a temperature between 0^ and 32^ .
Only use the parts supplied with this appliance. Use of non Remington® parts with this product may give rise to a hazardous condition.
Do not submerge or place under running water.
- Keep this product out of reach of children. The use of this appliance by persons with reduced physical, sensory or mental capabilities or lack of experience and knowledge can give cause to hazards. Persons responsible for their safety should give explicit instructions or supervise the use of the appliance.
ENGLISH

PROTECT THE ENVIRONMENT
Do not dispose the shaver in household waste at the end of its useful life. Disposal can take place at the Remington® Service Center or appropriate collection sites.

For further information on recycling see www.remington-europe.com

SERVICE AND WARRANTY
This product has been checked and is free of defects. We warrant this product against any defects that are due to faulty material or workmanship for a 2 year period from the original date of consumer purchase. If the product should become defective within the warranty period, we will repair any such defect or elect to replace the product or any part of it without charge provided there is proof of purchase.
This does not mean an extension of the warranty period. In the case of a warranty simply call the Remington® Service Center in your region.
This warranty is offered over and above your normal statutory rights. The warranty shall apply in all countries in which our product was sold via an authorised dealer.
This warranty does not include shaving heads / foils and cutters which are consumable parts. Also not covered is damage to the product by accident or misuse, abuse, alteration to the product or use inconsistent with the technical and/or safety instructions required. This warranty shall not apply if the product has been dismantled or repaired by a person not authorised by us.
DEUTSCH
Push the trimmer button down (Fig. E).
Place trimmer at desired trim line for a quick, easy, professional trim. Hold the shaver as shown in the illustration (Fig. F).
To retract and switch off the trimmer, push the trimmer lock button in and downwards (Fig. G).

DICAS PARA MELHORES RESULTADOS
HnKOrda He norpyykaTe 6pntby B BOy.
EXEHEDEbHAR OYNCTKA
McBbIepeKyuHneHOKNTPMHMePa 3nIOA OAOH KANAE MACA AAR WBEHO MauHHN.
STOP
INHCTPyKUINIIOBE3OPIACHOCTN
BHIMAHHEI DIA CHIXKEHIN PNUCKA OXKOTOB, YDAPA 3ANKTPNUECKM TOKOM, BO3ROPAHIN NITPABMBI:
He octabai Te BkHIOeHHb B cTeByo po3eKy np6Op 6e3 npncMOtpa, 3a HCKIoUOeHHem BpemeHN, Heo6xOAMOrO AIA erO 3apAKN.
He KlaaHTe WTeNceAByIO BnAky N Hpy Ha TropaHne NOBepxHOCTN.
He no3BOAaIe wTeNceAbHOB BnAke HnHypy HaMOKHytb.
He BCTaBAAIte H He BbIHMaIte ITeTceAHyIO Bnky I3 PO3eTKMOKpbIMpyKaAMH.
He NcnoABye IaHAEJe, cEAH uHpy NOBpeKdEHN. B cepBNCHOM cHTpe Remington MoHNO pNo6pe3n 3aONHO.
3apkaite,ncnoa3yute xpahtepnp6op npn Tempepatype 0^ - 32^.
Icnoa3yIbeNCKAOKHTBEbHO BxOaRJIeB C KOMPAAEKT DETAAH REMINGTON, Icnoa3b0aBHMeDEtaAeHINbX PNOHBAOTBeAe MOKET OCo3AaT OAOJH YA 3AOpOBY CHITAYUAC.
He norpykaTe n3deAne B BOy, He nOmeaTe ero nOa npOTouHyo BOy.
XpaHnB b HeIOCTyNHOM dAeTei MeCe. NcIOb3OBaHHe 3TOr pN6Opa HuaMn C yMeHbUeHHbIMM FmNtueCckHM, YCbTBTEAebbIMn MAn YMCTBEHNbHMn cIOco6HOCTAMn mHEbAaTko ObIta n 3HaHm MoKet 6bTb OApChbIM. Anu, OTBeTcBEHhIe 3a Ix 6EoanchoCTb, DOJXbHb DaTb YeTKne HnCTpyKuHn nn KOnTHPOANpOBaTb NcIOaB3OBaHHe annapata.

3AUHTA OKPYXKAIOUCEI CPEAbI
He BvB6pAcB8aTe 6PHTB NO ICTeueHHn cpoKa CAYKbI B 6BIToBle OTXOaJIy TYNAM3HPOBaTb 6PHTB MOKHO B cepBnCHOM CEHTpe Remington MAn B COOTBETCTByOuXn PnPHMhBX nYHKtax.

3a 0AnoHHTBeAHNO IHΦOpMAuENe IO NTOBOPHM HcNoAusbOBAHN MATEPbAAOB 6ObpaTaeBc, NoXaYbCTa, hCaT WmErgton- Europe.com

CEPBNUCHOE OBCAYKUBAHNE I TAPAHTN
Пгббпь пошл поверку и НЕ мійет Deфстов. Мь раразніру'mе OTCYCTBNEВ B пібборe Deфстов, Вздзканоши x3-3a HekaecTeBHHbMATEРИАО ИИн HekaecTeBHHOJ CБСКИ,В.TechЕУ Раган'tHINORO cPOKA COДН NOKUPYNI pRbSOb. ECSN B.TechЕУ Раган'tHINOROT cPcKa BaWpnpb6ув bIyIET n STCPOR, Mь -пгн HANUH Nue Ka -бeСпЛТоН OТРМОТЧИРУЕ erO ИИN ZAMEHIM HA HOB'IL.CPOK RA附NTN TEM CAMBIM NOPDJIЯТСВ. B CNYaE NOLOMON KpRbSOpa CBXInTEcNo TEFOchNY C cepBCHbIM YeHTPOM Remington B BaWem PernoHe. AAdpeu N TeFEObHb CepBvHbCy CEHTPOB MOKHO y3HbT no 6eCnPlTHOMY TeLEFOHy ropayen mINHN 8-800-100-8011* (*3BOHKn 6eCnPlaTHbIne No TeprntOpm PΦ)
AaHnaHa rapaTnIpeOCTABAEETCBAOANHEINK BauHM 3AKOHbIM npabam notpe6nteA. TaPapTnI AeCTBNTeAbHO BCex CTpaHax, B KOTOpbIX Bi pno6peM pn6Op y hawero abTOPTOBAHORHO AHaepa.
IpaanTnHne IepaonpOCTpaHAEETc Hb6peoUHNE RoAOBKN/CEtKINHOXKN, NOKOABky OHH npeAcbTBAHOT cOboi h3NaHsinBaIOHecEaTeAH. Kpome TOrO, paapAnTHne IpaacPocPTaHaeTc H aDeEeKbTH, BO3NKnUHe H3-3a HENpaBbAHOH KcKPyATAuHN pNb6opa, HcNoA3OBaHnra ERO He NO h3NaHauChEnIO, M3MeHeneNO KOCHTpYkCmN HnHEco6AoedHen HnCTpyKmN no TeXnHueCKoEhKcNApTaauN HnNAmppeoOCTPOXHOctTN. IpaanTHn HcTeKaET, eCa npiOp6op 6bI pa3o6paHn AOn oTePMoHTnpOBaHn He ABTOHP3OBaHbIM HAMn AHUMO.
3neKtpo6pntBaR3150
EN IYI SONUCLAR ICIN IPUCLARI
VAŽNE SIGURNOSNE UPUTE
UPOZORENJE - KAKO BISTE SMANJILI RIZIK OD OPEKLINA, UDARA STRUJE, POZARA ILI OZLJEDA OSOBA:
Ure'daj nikada ne smijete ostaviti bez nadzora kada je uključen u strujnu uticnicu, osim prilikom punjenja.
Kabel i utika drzite podalje od grijanih povrsina.
Kabel i utiak se ne smiju smočiti.
Neuključujte iisključujte urežaj mokrim rukama.
Urdaj se smije koristiti akoo mu je ostecen kabel. Mozte zatraziti zamjenu u Remington servinom centru.
Urejd se puni, koristi i cuva na temperaturi izmedu 0^ i 32^
Rabite samo dijelove koji si esporučeni s ovm kompletom. Dijelovima koji nisu Remingtonovi možete ošteiti proizvod.
Ne uranjaje ga u vodu i ne ispirite mlawom vode.
Prozvod drzte izvan dosegae djece. Ako ovaj aparat koriste osobe sa smanjenim fizickim, senzornim ili mentalnim sposobnostima te osobe bez iskustva i znanja, mogle bi se izlozi t aspousti. Osobe odgovorne za njihovu sigurnost moraju im dati jasne upute ili nadzirati uporabu urendaja..

ZASTITA OKOLISA
Nakon zavrěska radnog vijeka brijáča nemojte ga bacati u kuci odpat. To možete Žeinitu u nasim servisin centrima Remington® ili u odgovarajućim skupjalistima.

Daljnje informacije o reciklaranju vidjeti na: www.remington-europe.com
OPREZ: Ne stavljaje u vatru i ne unistavajte pakiranja baterija jer ona mogu izazvati plamen ili ispustiti štete tvari.
HRVATSKI JEZIK / SRPSK JEZIK

SERVIS I JAMSTVO
aaiiiaaijll jaii iiaii lgljil gaii
1 1
aalaaal aalaaal 5loayaiyaaai jgall cLs1
aJyJI aI JI Icog, haoJI yIg. gJyJI gJbIIO
a
pLai wJ 5e yj aill aaii jai iay aii ayal algbl acilaiw glao 2013
yj aill slliy jui z g aai t all aai jiaai g axaall ayai j
aic Jglal j eail aai ll gial g wl lcl laol ellal Igean.
lgai wip
A
JgJgJgJgJgJgJgJgJgJgJgJgJgJgJgJgJgJgJgJgJgJgJgJgJgJgJgJgJgJgJgJgJgJgJgJgJgJgJgJgJgJgJgJgJgJgJgJgJgJgJ

aic yagaiill gijgla jiaJgLai
ailll lglg jyj 1 g a JgJg Jg aJg
plaii 15 g a 1111 g jlll 1000 g jlll l 1000g 1000g 1000g 1000g 1000g 1000g 1000g 1000g 1000g 1000g 1000g 1000g 1000g 1000g 1000g 1000g 1000g 10
Lil