
MD11836 - Sewing machine MEDION - Free user manual and instructions
Find the device manual for free MD11836 MEDION in PDF.


| Product Type | Sewing machine |
| Brand | Medion |
| Model | MD11836 |
| Dimensions (approx.) | 40 x 20 x 30 cm |
| Weight | 7 kg |
| Power Supply | 230 V, 50 Hz |
| Power Consumption | 100 W |
| Number of Stitches | 20 built-in stitches |
| Stitch Length | Adjustable, up to 5 mm |
| Stitch Width | Adjustable, up to 6 mm |
| Automatic Needle Threader | Yes |
| Reverse Sewing | Yes, with lever |
| Bobbin Winding | Automatic, with stop |
| Speed Control | Foot pedal |
| Extra Accessories | Includes needles, bobbins, seam ripper, screwdriver |
| Cleaning | Remove lint from bobbin area after each project |
| Lubrication | Oil moving parts every 4 hours of use |
| Safety Features | Automatic shut-off after 30 min idle; keep away from children |
| Spare Parts Availability | Standard needles, bobbins, foot pedal replaceable |
| Repairability | Modular design; user-replaceable drive belt and light bulb |
| Application | Home sewing, light to medium fabrics |
Frequently Asked Questions - MD11836 MEDION
User questions about MD11836 MEDION
0 question about this device. Answer the ones you know or ask your own.
Ask a new question about this device
Download the instructions for your Sewing machine in PDF format for free! Find your manual MD11836 - MEDION and take your electronic device back in hand. On this page are published all the documents necessary for the use of your device. MD11836 by MEDION.
USER MANUAL MD11836 MEDION
natural_image
Line drawing of a sewing machine connected to a power cord (no text or symbols)natural_image
Hand holding a mechanical component with a rotating arrow indicating rotation (no text or symbols)natural_image
Line drawing of a foot wearing a shoe with a screwdriver inserted (no text or symbols)natural_image
Line drawing of a sewing machine needle and base (no text or symbols)natural_image
Technical line drawing of a mechanical assembly with arrows indicating motion (no text or symbols)natural_image
Technical line drawing of a sewing machine component with no visible text or symbols
natural_image
Simple line drawing of a mechanical component with a circular dial and directional arrows (no text or symbols)natural_image
Simple line drawing of a mechanical setup with a cylindrical component and two circular components (no text or symbols)
natural_image
Simple line drawing of a mechanical device with no text or symbolsnatural_image
Simple line drawing of a mechanical device with a shaft and base, no text or symbols presentnatural_image
Simple line drawing of a mechanical component with a circular dial and directional arrows (no text or symbols)
natural_image
Hand holding a mechanical component, possibly a gear or spring, with no visible text or symbols.natural_image
Simple line drawing of a mechanical component with arrows indicating direction (no text or symbols)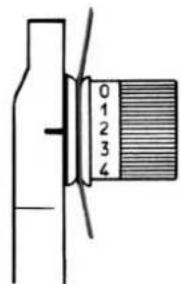
CONSEJO
natural_image
Technical line drawing of a mechanical assembly with no visible text or symbolsnatural_image
Simple line drawing of a mechanical tool or device with a pointed tip and lever (no text or symbols)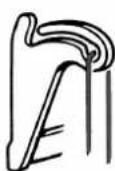
natural_image
Line drawing of a sewing machine needle and foot (no text or symbols)natural_image
Diagram of a mechanical device with rotating components and a hand holding a tool (no text or symbols)

natural_image
Illustration of a sewing machine needle with a spool attached (no text or symbols)Costura correcta
natural_image
Line drawing of a mechanical component with no visible text or symbols
Costuras irregulares
natural_image
Line drawing of a closed notebook with a loop handle (no text or symbols)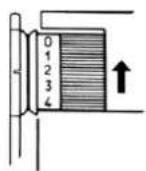
natural_image
Line drawing of a sewing machine needle and foot (no text or symbols)

natural_image
Diagram of a sewing machine needle and foot, showing measurement setup with no text or symbolsnatural_image
Line drawing of a sewing machine needle and base (no text or symbols)natural_image
Line drawing of a car interior showing a seatbelt with an arrow pointing to the seat area (no text or symbols)natural_image
Mechanical sewing machine diagram showing needle insertion and cutting tool path (no text or labels)natural_image
Technical line drawing of a sewing machine with a foot and base, showing mechanical components and motion indicators (no text or symbols)natural_image
Illustration of two hands tying a knot around a small object (no text or symbols present)

Puntada zig-zag
m = 311

flowchart
graph TD
    A["Start"] --> B["Folded to form a folded sheet"]
    B --> C["Cut into a single sheet"]
    C --> D["End"]
Puntada elástica:
Triple puntada recta elástica, puntada zig-zag triple
natural_image
Diagram of two hands holding a curved surface with dashed lines and arrows indicating direction (no text or symbols)natural_image
Line drawing of a person on a boat with a ladder and gear (no text or symbols)natural_image
Technical line drawing of a mechanical assembly with no visible text or symbols
Puntada de rombo
natural_image
Technical line drawing of a sewing machine with no visible text or symbolsProcedimiento
natural_image
Mechanical device diagram showing a lever mechanism with a spring and screw base (no text or symbols)
natural_image
Technical line drawing of a sewing machine with no visible text or symbols
natural_image
Mechanical device diagram showing a turning mechanism with no visible text or symbols
natural_image
Technical line drawing of a mechanical device with a slide and lever mechanism (no text or symbols)
Coser botones y ojetes
natural_image
Technical line drawing of a mechanical clamp or clamping device with no visible text or symbolsnatural_image
Line drawing of a sewing machine needle stitching a base plate (no text or symbols)
natural_image
Line drawing of a sewing machine needle stitching fabric (no text or symbols)
natural_image
Illustration of a surgical procedure with forceps and a circular component (no text or symbols)Colocar la placa de zurcir
natural_image
Illustration of a flower climbing a tree branch with leaves and roots (no text or symbols)natural_image
Technical line drawing of a sewing machine with spools and clamps (no text or symbols)
natural_image
Line drawing of a sewing machine needle stitching a piece of material (no text or symbols)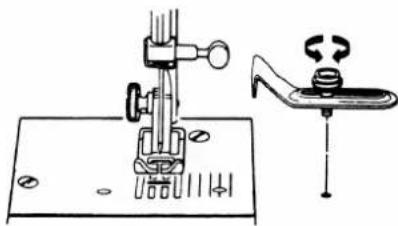
natural_image
Technical line drawing of a sewing machine with base plate and clamping mechanism (no text or symbols)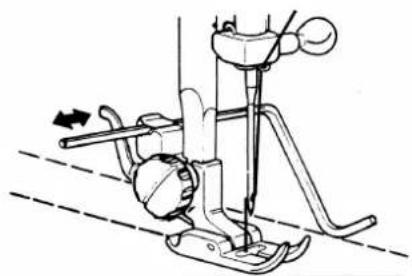
natural_image
Technical line drawing of a sewing machine needle and foot (no text or symbols)
natural_image
Technical line drawing of a sewing machine on a grid background (no text or symbols)MANTENIMIENTO, CUIDADO Y LIMPIEZA

natural_image
Mechanical assembly diagram showing a motor and gear mechanism with rotational arrows (no text or labels)natural_image
Line drawing of a sewing machine needle and foot (no text or symbols)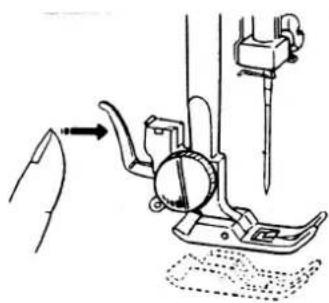
natural_image
Technical line drawing of a sewing machine with a needle inserted, showing no text or symbolsInsertar
natural_image
Technical line drawing of a sewing machine and foot assembly (no text or symbols)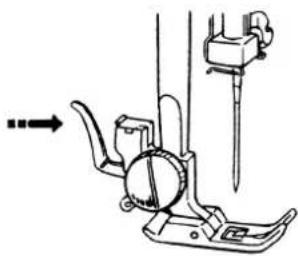
natural_image
Mechanical assembly diagram showing a sewing machine with a needle inserted, no text or symbols presentnatural_image
Technical line drawing showing two mechanical assembly steps with no visible text or symbolsInsertar
natural_image
Technical line drawing showing two mechanical assembly steps: one with a tool and the other with a tool inserted into a pipe (no text or symbols present)natural_image
Line drawing of a sewing machine needle stitching fabric (no text or symbols)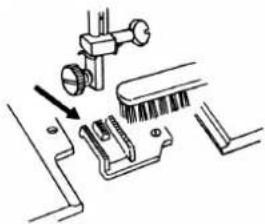
natural_image
Technical line drawing of a mechanical assembly with no visible text or symbols
natural_image
Line drawing of a hand using a tool to adjust or install a mechanical component (no text or symbols present)
flowchart
graph TD
    A["Component 1"] --> B["Component 2"]
    B --> C["Component 3"]
    C --> D["End"]
Lubricar la máquina
ADVERTENCIA
natural_image
Technical line drawing of a mechanical assembly with no visible text or symbolsADVERTENCIA

natural_image
Technical line drawing of a mechanical component with mounting holes and internal structure (no text or symbols)CONSEJO
natural_image
Line drawing of a hairdryer with a power cord and plug, no text or symbols presentnatural_image
Illustration of a hand using a sewing machine to lift a block, showing motion arrows (no text or symbols)natural_image
Simple line drawing of a foot wearing a seatbelt with a tool inserted (no text or symbols)natural_image
Line drawing of a sewing machine needle and base (no text or symbols)natural_image
Diagram of a mechanical assembly with arrows indicating motion, showing a component being inserted into a housing (no text or symbols present)natural_image
Technical line drawing of a sewing machine component with no visible text or symbolsnatural_image
Simple line drawing of a mechanical component with a circular dial and directional arrows (no text or symbols)
natural_image
Simple line drawing of a mechanical setup with a cylindrical component and two parts (no text or symbols)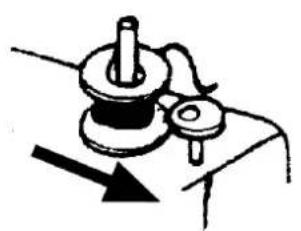
natural_image
Simple line drawing of a mechanical device with no text or symbolsnatural_image
Simple line drawing of a mechanical device with pulleys and a lever (no text or symbols)natural_image
Simple line drawing of a device with a circular dial and directional arrows (no text or symbols)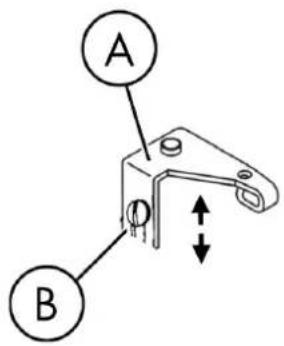
natural_image
Mechanical diagram showing a sewing machine with rotating arm and directional arrows (no text or labels)alavanca basculante

natural_image
Illustration of a hand holding a mechanical component with an arrow indicating direction (no text or symbols)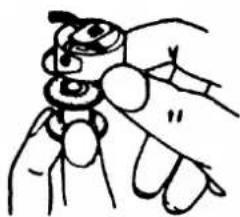
natural_image
Hand holding a mechanical component, no text or symbols visiblecápsula da bobina

ranhura

natural_image
Illustration of two hands holding a small object with a pointed tip, no text or symbols presentmola tensora
natural_image
Line drawing of a hand holding a small object with a dashed line indicating a measurement or alignment (no text or symbols)natural_image
Simple line drawing of a mechanical clamp or bracket with directional arrows indicating force or movement (no text or symbols)
DICA
natural_image
Pure mechanical diagram showing a linkage mechanism without any text, numbers, or symbolsnatural_image
Simple line drawing of a mechanical tool or device with a handle and base (no text or symbols)
natural_image
Line drawing of a sewing machine needle with a hand operating the base (no text or symbols)
natural_image
Diagram of a mechanical device with rotating components and a tool, no text or symbols present

natural_image
Diagram of a sewing machine needle with a spool attached, showing no text or symbolsCostura correcta
natural_image
Line drawing of a mechanical component with no visible text or symbols
natural_image
Line drawing of a mechanical component with no visible text or symbols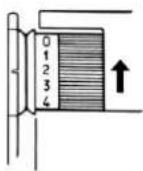
natural_image
Line drawing of a sewing machine needle and foot (no text or symbols)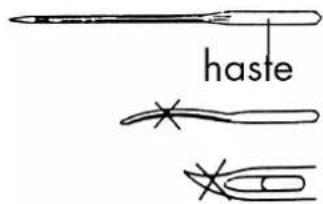

natural_image
Diagram of a sewing machine needle and foot, showing measurement setup with no text or symbolsP
natural_image
Line drawing of a sewing machine needle and base mechanism (no text or symbols)natural_image
Line drawing of a car interior showing a seatbelt with an arrow pointing to a component (no text or symbols)natural_image
Technical line drawing of a sewing machine needle and foot (no text or symbols)natural_image
Technical line drawing of a sewing machine with a foot and base, showing mechanical components and a side view (no text or symbols)natural_image
Line drawing of hands operating a sewing machine needle (no text or symbols)


Ponto ziguezague
flowchart
graph TD
    A["Fold folding"] --> B["Cut"]
    B --> C["Final folding"]
Ponto elástico:
natural_image
Diagram of a hand holding a rectangular object with internal dashed lines and arrows indicating direction (no text or symbols)natural_image
Line drawing of a sewing machine needle and base (no text or symbols)natural_image
Technical line drawing of a mechanical assembly with no visible text or symbols
Ponto em losango
natural_image
Technical line drawing of a sewing machine with no visible text or symbols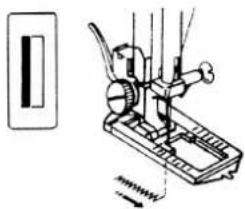
natural_image
Mechanical device diagram showing a lever mechanism with a spring and pulley (no text or symbols)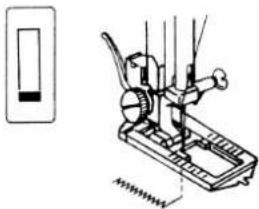
natural_image
Technical line drawing of a sewing machine with a spring mechanism (no text or symbols)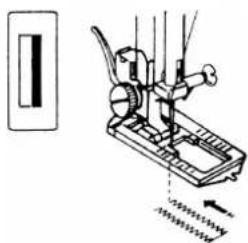
natural_image
Technical line drawing of a mechanical device with spring and lever mechanism (no text or symbols)
natural_image
Technical line drawing of a mechanical device with a slide and lever mechanism (no text or symbols)
natural_image
Technical line drawing of a mechanical clamp or lever assembly (no text or symbols)natural_image
Technical line drawing of two mechanical clamping or bracket assembly components (no text or symbols)natural_image
Line drawing of a sewing machine needle and foot (no text or symbols)natural_image
Illustration of a flower climbing a tree branch with leaves and roots (no text or symbols)natural_image
Line drawing of a sewing machine needle stitching a fabric block (no text or symbols)
natural_image
Technical line drawing of a sewing machine with a clamping tool and base plate (no text or symbols)
natural_image
Technical line drawing of a sewing machine needle and foot (no text or symbols)
natural_image
Technical line drawing of a sewing machine on a grid background (no text or symbols)natural_image
Mechanical assembly diagram showing a motor and gear mechanism with rotation arrows (no text or labels)natural_image
Technical line drawing of a sewing machine with a hand operating the base (no text or symbols present)Colocação
natural_image
Technical illustration of a sewing machine tool, showing the base and side views (no text or symbols)natural_image
Mechanical assembly diagram showing a lever mechanism with a curved handle and rotating arm (no text or symbols)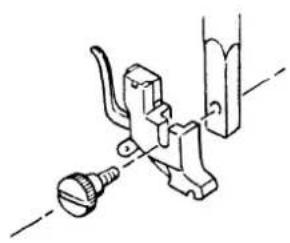
natural_image
Technical line drawing of a mechanical clamp or bracket assembly (no text or symbols)Colocação
natural_image
Technical line drawing of a mechanical clamp or bracket assembly (no text or symbols)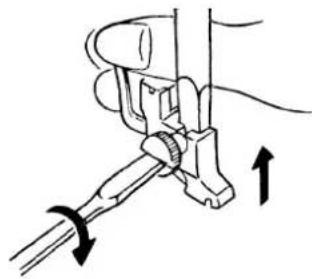
natural_image
Diagram of a mechanical tool interacting with a rod, showing rotational motion (no text or symbols)natural_image
Line drawing of a sewing machine needle stitching on a workbench (no text or symbols)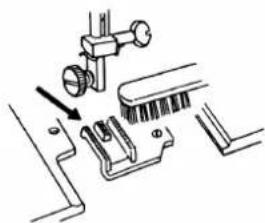
natural_image
Technical diagram showing mechanical assembly with no visible text or symbols


natural_image
Line drawing of a hand using a tool to adjust or install a mechanical component (no text or symbols present)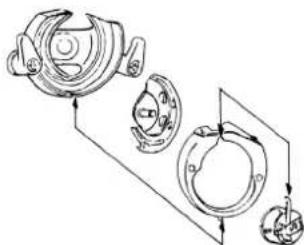
flowchart
graph TD
    A["Component 1"] --> B["Component 2"]
    B --> C["Component 3"]
    C --> D["Component 4"]
natural_image
Technical line drawing of a mechanical assembly with no visible text or symbolsNOTA

natural_image
Pure technical diagram of a mechanical or electrical component with no visible text, numbers, or symbolsnatural_image
Technical diagram of a mechanical device showing internal components and directional arrows (no text or labels)lado interior

DICA
Calcador padrão 7, 19, 20, 21, 22
Pedal 6, 8, 10, 17, 18, 37, 41
Placa de cerzidura 7, 24, 26, 27
Ponto a direito 19
Safety instructions 4
About these instructions 4
Keep electrical equipment out of reach of children .....4
Mains cable and mains connection ....4
Never undertake your own repairs 4
Basic information 5
Handling the appliance safely 5
Cleaning and storage 5
Getting to know your appliance 6
Contents of package 6
Contents of the accessories box 7
Electrical connections 8
Stability of the sewing machine 8
Controlling the sewing speed 8
Attaching and removing the table extension 8
Accessories box 8
Preparatory work 9
Winding thread on to the bobbin 9
Removing the bobbin case 11
Threading the bobbin case 11
Inserting the bobbin case 12
Threading the upper thread 12
Bringing up the lower thread 14
Settings 15
Setting the thread tension 15
Checking the thread tension....16
Sewing 17
General information 17
Selecting the right needle 17
Raising and lowering the sewing foot 17
Finger protector 18
Reverse stitching....18
Removing fabric from the sewing machine 18
Changing the sewing direction 18
Cutting the thread 18
Programme selection dial 19
Setting the stitch length 19
Setting the stitch width 19
Stitch types (programmes) 19
Buttonhole 23
Sewing on buttons and hooks and eyes 24
Sewing in zips 25
Hems 25
Darning 26
Embroidering 27
Sewing with a twin needle 28
Sewing with the free arm 29
Seam guide 29
Quilting guide 29
Maintenance and cleaning 30
Replacing the sewing light bulb 30
Replacing the needle 30
Removing and attaching the sewing foot .... 31
Removing and attaching the sewing foot holder ..... 32
Maintaining the sewing machine 32
Oiling the machine 34
Faults 38
Fabric, thread and needle table 40
Disposal 41
Technical data 41
Index 42
SAFETY INSTRUCTIONS

About these instructions
Please read these operating instructions thoroughly and follow them, paying special attention to the safety instructions, before using the appliance for the first time.
This device may only be used as described in the operating instructions.
If you pass on the appliance to another party it is essential that you also provide the operating instructions.
Keep electrical equipment out of reach of children
Children are not aware of the dangers posed by electrical equipment.
Never allow children to use the sewing machine unsupervised. Remember that needles can also cause injury even when the machine has been turned off.
Keep the packaging out of the reach of children. There is a risk of suffocation.
This device is not intended to be used by individuals with restricted physical, sensory or intellectual abilities or lacking experience and/or lacking knowledge (including children), unless they are being supervised an individual responsible for their safety or receive instructions about how the device is used from such an individual.
Mains cable and mains connection
Only connect the appliance to a power socket (230 V \~ 50 Hz) that is easy to reach and is close to the place where you have set up the appliance. The power socket must be freely accessible so that you can unplug the appliance quickly, if necessary.
When you unplug the appliance, always take hold of the plug itself, not the cable.
Fully unwind the cable during operation of the appliance.
The mains cable and extension cable must be positioned so that no-one can trip over them.
The cable must not come into contact with hot surfaces.
When you perform the following activities, switch off and unplug the sewing machine: Threading, changing the needle, setting the sewing foot, replacing the light bulb, cleaning and maintenance work, when you have finished sewing, and if your work is interrupted.
Never undertake your own repairs

If the plug, cable or appliance is damaged, pull the mains plug immediately.
If the sewing machine or mains cable has visible damage, the appliance must not be used, in order to avoid risks.
Never try to open and/or repair the appliance yourself. There is a risk of electric shock! If there is a fault contact our Service Centre or other suitable specialist workshop.
Basic information
The sewing machine should never be allowed to get wet – there is the danger of electric shocks!
When the sewing machine is on, never leave it unattended.
Do not use the machine out of doors.
The appliance can only be operated using the supplied foot pedal model KD 2902.
Handling the appliance safely
Place the sewing machine on a sturdy, level work surface.
During operation, the air vents must not be blocked: Do not allow any objects (e.g. dust, threads, etc.) to enter the vents.
Only use the accessories supplied.
Only use special sewing machine oil to oil the appliance. Do not use any other liquids.
Be careful when using the moving parts of the machine, in particular the needle. There is the risk of injury even when the machine has been turned off.
When sewing, make sure that your fingers are never underneath the needle holding screw.
Do not use bent or blunt needles.
When sewing, do not hold the fabric tight or pull the fabric. The needles could break.
When you have finished sewing, always move the needle to its highest position.
Cleaning and storage
Before cleaning, remove the plug from the mains socket. Use a dry, soft cloth to clean the appliance. Avoid the use of chemical solutions and cleaning products because these may damage the appliance surface or markings.
Always store the sewing machine using the cover hood provided to protect the machine from dust.
GETTING TO KNOW YOUR APPLIANCE
Contents of package
When unpacking, ensure that the following parts are included:
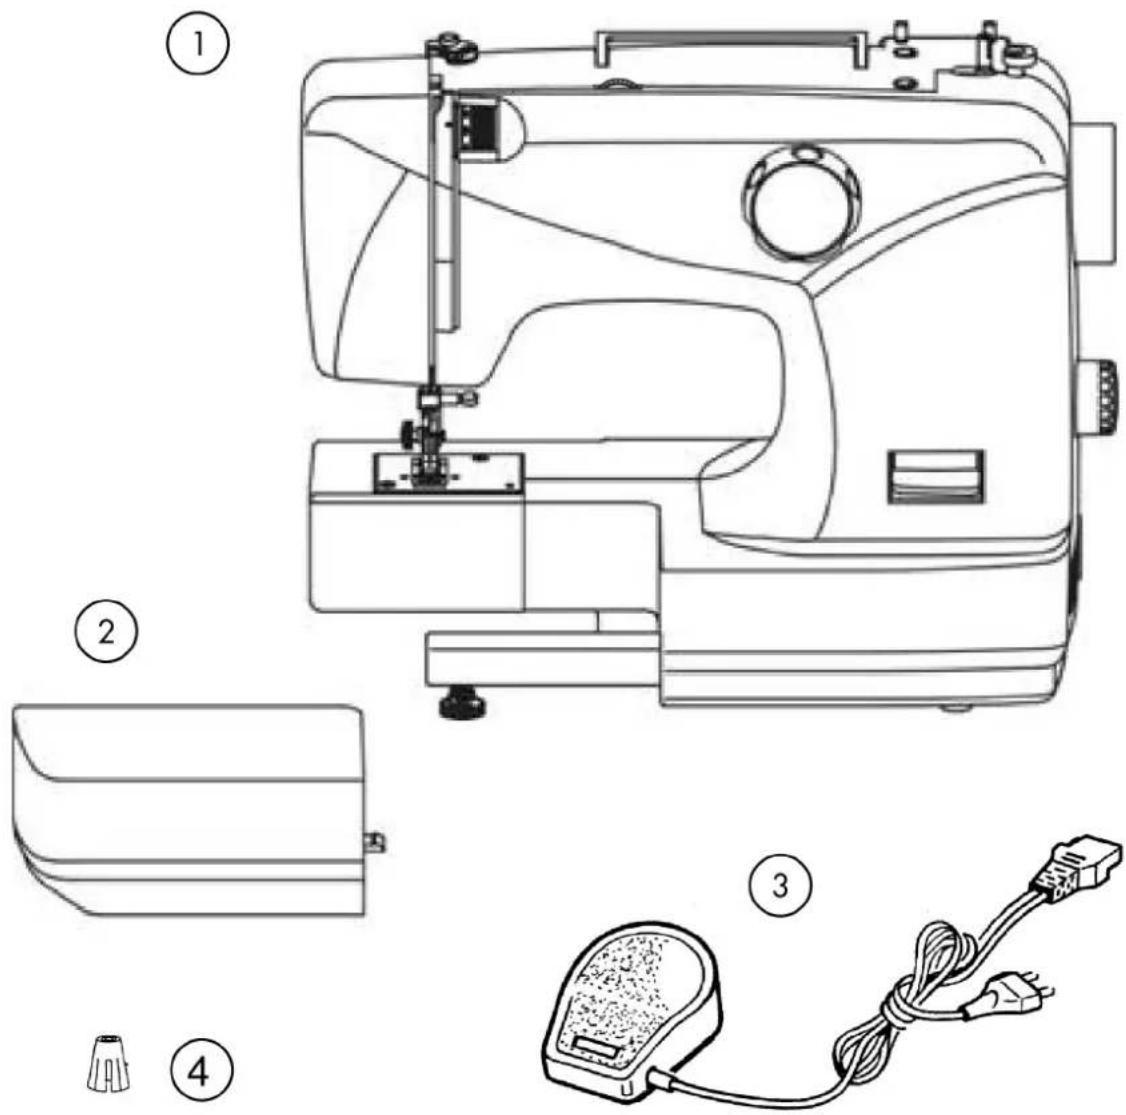
1) Sewing machine
2) Table extension with accessories box
3) Foot pedal
4) Bobbin holder for overlock threads
The following parts not shown in the diagram:
- Cover hood
- Operating instructions and guarantee documents
Contents of the accessories box

1) Standard foot (straight stitch/zigzag stitch) (already attached)
2) Hemming foot
3) Buttonhole sewing foot
4) Zip sewing foot
5) Button sewing foot
6) Seam guide
7) Quilting guide
8) Darning plate
9) Spare bobbin (3)
10) Finger protector (already attached)
11) Felt for cotton reel holder (2)
12) Selection of needles
13) Oilcan
14) Screwdriver (large)
15) Screwdriver (small)
16) Knife
Electrical connections
natural_image
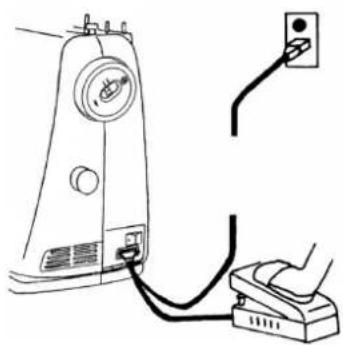
Line drawing of a sewing machine connected to a power cord (no text or symbols)The power switch turns both the machine and the sewing light on.
- Put the coupler plug of the supplied foot pedal into the connector housing on the machine and then put the mains plug into the socket.
Only used the supplied foot pedal model KD 2902.
Once you have finished working or before you start maintenance, always turn off and unplug the machine.
Stability of the sewing machine

natural_image
Illustration of a hand operating a mechanical device with a rotating arrow indicating rotation (no text or symbols present)You can use the adjustment foot (17) to adjust the stability of the sewing machine.
- Turn the adjustment foot to the right to move it down or to the left to move it up.
- Adjust the foot so that the sewing machine is level on the work surface and does not wobble.
Controlling the sewing speed

natural_image
Simple line drawing of a foot wearing a shoe with a screwdriver (no text or symbols)The sewing speed is controlled by the foot pedal. The sewing speed can be changed by applying more or less pressure to the foot pedal.
Attaching and removing the table extension

natural_image
Line drawing of a sewing machine needle and base (no text or symbols)The machine is supplied with an attached work table.
- The table extension is removed by pushing it carefully to the left.
- To attach the table extension, carefully place the table extension on to the machine and push it to the right until it audibly clicks into place.
Accessories box

natural_image
Diagram of hands assembling a mechanical component with arrows indicating motion (no text or symbols)The accessories box is integrated in the table extension.
- To open it, simply lift the lid of the table extension towards you, giving you access to the accessories.
PREPARATORY WORK
Winding thread on to the bobbin
You can use the sewing machine to wind thread on to the bobbins easily.
To do so, take the thread from the cotton reel through the thread guide to the bobbin.
The exact procedure for winding thread on to the bobbin is described in the following points:
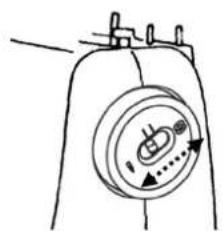
- Set the switch in the hand wheel (10) to the bobbin symbol to prevent the needle from moving while you wind thread on to the bobbin.
- Pull one of the cotton reel holders (7) completely out and place a cotton reel on it..

natural_image
Technical line drawing of a sewing machine component with no visible text or symbols- Now guide the thread from the cotton reel through the thread guide as illustrated.
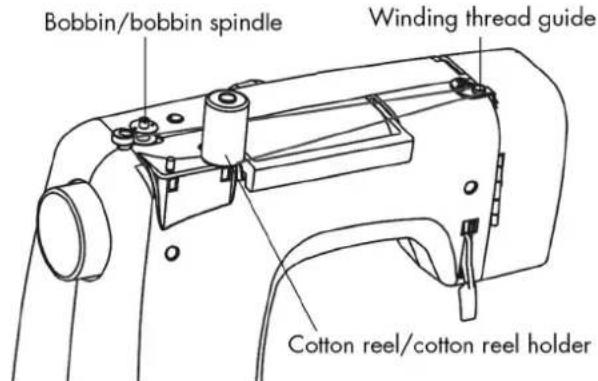
- Put the end of the thread through the bobbin hole as illustrated and wind the thread around the bobbin a few times by hand.

natural_image
Simple line drawing of a mechanical component with a circular dial and directional arrows (no text or symbols)
natural_image
Simple line drawing of a mechanical setup with a cylindrical component and two circular components (no text or symbols)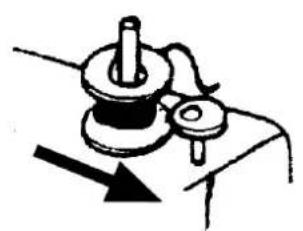
natural_image
Simple line drawing of a mechanical device with no text or symbols- Place the bobbin on the bobbin spindle (8), with the side of the bobbin containing the end of the thread facing upwards. Move the bobbin spindle (8) to the right towards the winding stop (9) until it audibly clicks into place.
natural_image
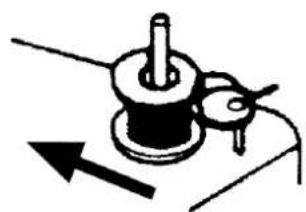
Pure mechanical diagram showing a pulley and lever assembly without any text or symbols- Hold on to the end of the thread and press the foot pedal. Once some thread has been wound on to the bobbin, let go of the end of the thread. Wind thread on to the bobbin until the bobbin spindle (8) automatically stops.
- Move the bobbin spindle (8) to the left and remove the bobbin.
- Cut the thread.
natural_image
Simple line drawing of a mechanical component with a circular dial and directional arrows (no text or symbols)- Set the switch in the hand wheel (10) back to the needle symbol. The needle will now move again when you press the foot pedal.
If the thread is wound unevenly on the bobbin, you can adjust the height of the thread guide:
- Open the front flap (21).
- Loosen screw (B) to adjust the height of the thread guide (A).
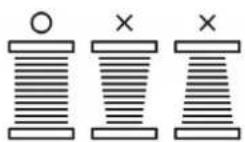

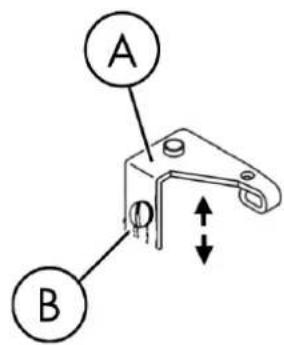
Removing the bobbin case
- Remove the table extension.
- Turn the hand wheel (10) to move the needle to its highest position, move the sewing foot to its highest position and open the bobbin case cover (18) as illustrated.
- Open the rocking arm of the bobbin case and remove this from the machine.
- When you let go of the rocking arm, the bobbin falls out of the bobbin case.
Threading the bobbin case
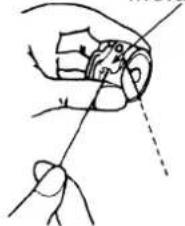
- Hold the bobbin between the thumb and index finger of your right hand and leave about 15 ~cm of the thread hanging out.
- Hold the bobbin case in your left hand and put the bobbin in the bobbin case.
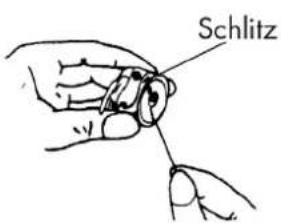
- Put the end of the thread into the slit on the edge of the bobbin case.
- Now pass the thread through the tension spring and into the thread hole. Make sure that around 15 cm of the thread is hanging out of the bobbin.

natural_image
Mechanical assembly diagram showing a presser pressing a component with directional arrows indicating motion (no text or labels)
natural_image
Illustration of a hand holding a small mechanical component with an arrow indicating direction (no text or symbols)
natural_image
Hand holding a mechanical component, no visible text or symbols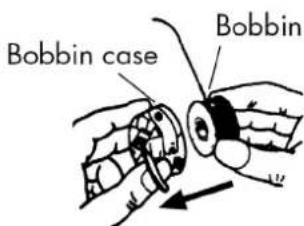

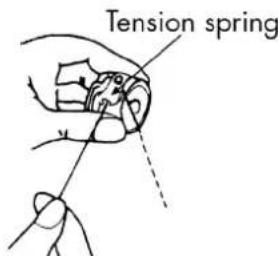
Inserting the bobbin case
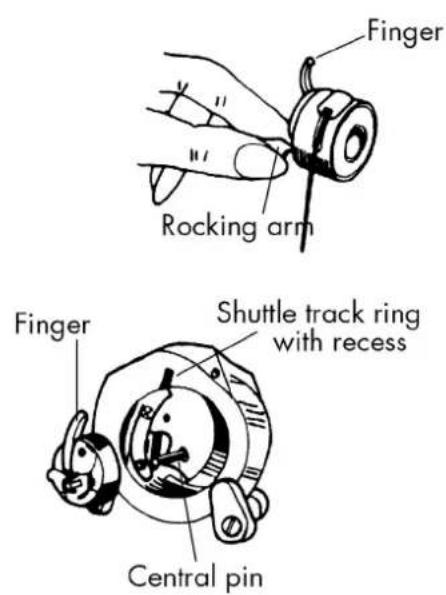
- Hold the bobbin case so that the finger of the case is pointing upwards. Open the rocking arm of the bobbin case.
- Put the bobbin case on the central pin and press the case in carefully until the finger of the bobbin case enters the shuttle track ring.
- Let go of the flap and press on the bobbin case.
- Close the bobbin case cover (18).
Threading the upper thread
Please read the following instructions carefully as an incorrect sequence or thread guiding can lead to broken threads, missed stitches and gathered fabric.
A diagram of how to guide the thread is provided on the front flap (21); you can also use this drawing as a guideline.
- Before threading the needle, raise the needle to its highest position by turning the hand wheel (10) and raise the sewing foot lever (15) to its highest position.
- Place a cotton reel on one of the cotton reel holders (7), making sure the thread comes from behind the cotton reel.
- Hold the cotton reel with your right hand.
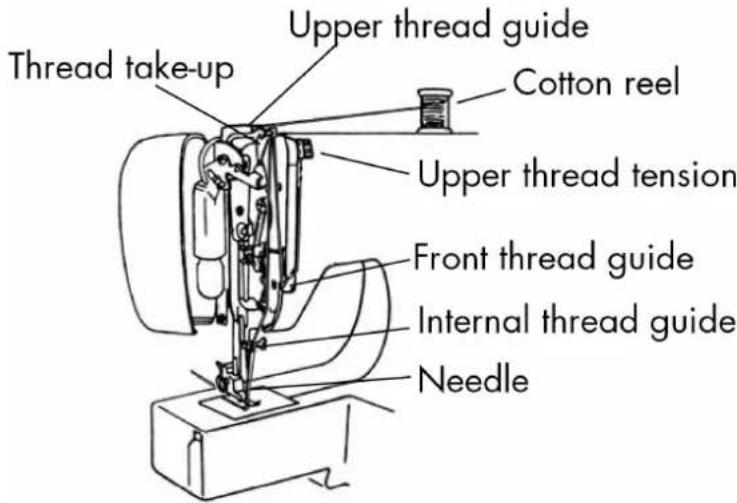
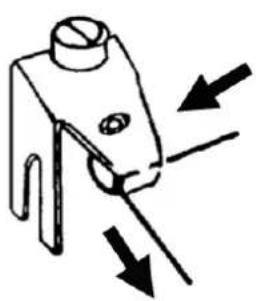
- Now pass the thread through the upper thread guide (3) as illustrated.
natural_image
Simple line drawing of a mechanical component with arrows indicating direction (no text or symbols)
TIP
An upper thread tension of 3 is ideal for most applications.
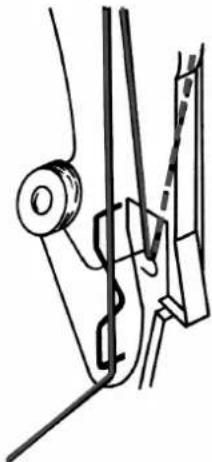
• Pass the thread under the front thread guide and upwards, which automatically pushes up the inner guide spring.
natural_image
Technical line drawing of a mechanical assembly with no visible text or symbols- Then insert the thread from right to left into the hook of the thread take-up (1).
NOTE
If necessary, turn the hand wheel (10) to raise the thread take-up.
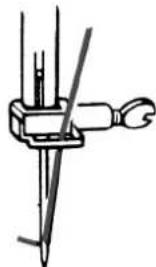
- Now guide the thread down towards the needle. It is thus channelled through the internal thread guide and thread guide of the needle holder.
- Now pass the thread through the eye of the needle from the front to the back and leave a thread end of around 10 cm.
natural_image
Simple line drawing of a mechanical tool or device with a pointed tip and handle (no text or symbols)
Bringing up the lower thread
- Move the sewing foot (26) to the upper position. Turn the hand wheel (10) with your right hand towards you until the needle moves down and back up again. Stop turning the hand wheel (10) as soon as the needle has reached its highest position. Hold the end of the upper thread with your left hand. Pull the upper thread upwards slightly so that the lower thread forms a loop.

- Pull around 10 ~cm of both threads out from under the sewing foot (26).

SETTINGS
Setting the thread tension
If the thread tears while you are sewing, the thread tension is too high.
If small loops are formed when you are sewing, the thread tension is too low.
In both cases, you need to set the thread tension.
The tensions of the upper and lower threads must be in the correct proportion to each other.
Adjusting the upper thread tension
The tension is created by the discs through which the thread is guided. The pressure on these discs is controlled by the upper tension thread regulator (2).
The higher the number, the higher the tension.

NOTE
Upper thread tension of 3 is ideal for most sewing work.
The upper thread tension is not activated until the sewing foot is lowered.
There are a number of reasons why you might need to adjust the tension. For example, different tensions are required for different fabrics.
The tension you require depends on the strength and thickness of the fabric, the number of layers of fabric you want to sew and the type of stitch you choose.
Please make sure that the tensions of the upper and lower threads match, as otherwise the fabric may gather.
We recommend that you carry out a test on a scrap of fabric before starting work.

natural_image
Diagram of a sewing machine needle with a hand operating the base and a finger inserted, showing no text or symbols.Adjusting the lower thread tension
The lower thread tension rarely needs to be adjusted as this has been set by the manufacturer for general sewing work.
The lower thread tension is correct if you can pull the thread out of the bobbin easily but with a slight resistance.
However, the lower thread does need to be adjusted for particularly lightweight or heavy fabrics.
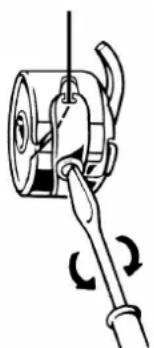
You set the lower thread tension by using the regulating screw on the bobbin case. Adjust the screw using the small screwdriver provided.
Remove the bobbin case:
Low tension:
Turn the screw anticlockwise
Higher tension:
Turn the screw clockwise.
natural_image
Diagram of a mechanical device with a wrench and rotating arm (no text or symbols)Uneven stitches

Even stitches

Checking the lower thread tension
The easiest way of checking the lower thread tension is by sewing a medium zigzag stitch on the fabric in question.
Use the appropriate needle and threads.
You can get a clearer picture by using different colours for the upper and lower threads.
Sew a few zigzag stitches.
The thread tension is correct if the lower threads are not visible on the top surface of the fabric.
Make sure that you always sew even stitches (see diagram on the left).
Checking the thread tension

natural_image
Illustration of a sewing machine needle with a spool attached (no text or symbols)Correct stitches
The tension of the upper and lower thread should be sufficient to ensure that the threads interlace in the middle of the fabric.
The fabric remains smooth and does not pucker.

natural_image
Line drawing of a mechanical clamping device with no text or symbols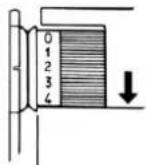
Incorrect stitches
Upper thread is too tight and pulls the lower thread up. The lower thread is visible on the upper fabric layer.
Solution:
Reduce the upper thread tension by turning the upper thread tension regulator (2) to a lower number.

natural_image
Line drawing of a mechanical device with spring-like connectors and a flat top (no text or symbols)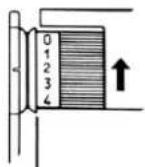
Upper thread is too loose. The lower thread pulls the upper thread down. The upper thread is visible on the underside of the fabric layer.
Solution:
Increase the upper thread tension by turning the upper thread tension regulator (2) to a higher number.
In both cases in which the stitching is incorrect, you may also need to adjust the lower thread tension.
SEWING
General information
Switch the main switch (13) on.
When changing the stitch type, always move the needle to its highest position. Push the fabric sufficiently far under the sewing foot (26). Make sure there is a length of around 10 cm of the upper and lower thread behind the needle.
Lower the sewing foot lever (15). While holding the thread with your left hand, turn the hand wheel (10) towards you and lower the needle to the point on the fabric where you want to start sewing.
Press the foot pedal – the more pressure you apply to the foot pedal, the faster the machine runs. While sewing, guide the fabric gently by hand. Sew a few reverse stitches by actuating the reverse lever (12), to fix the first stitches in place.
TIP
If you are not sure whether the thread tension or stitch type, for example, is correct, test the settings on a swatch.
The fabric automatically runs under the sewing foot (26): It should not be held fast or pulled by hand, but should only be gently guided so that the stitches go in the desired direction.
Selecting the right needle
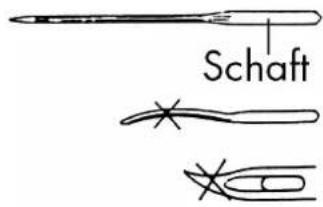
The number indicating the needle thickness is written on the shaft. The higher the number, the thicker the needle.
NOTE
Never use a needle that is bent or blunt.
Raising and lowering the sewing foot
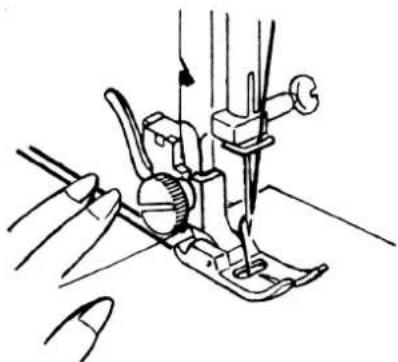
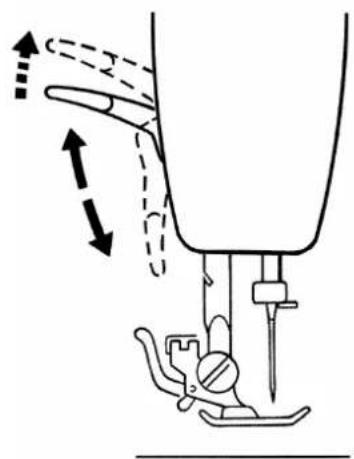
You raise and lower the sewing foot lever (15) to raise and lower the sewing foot (26).
The sewing foot (26) can be raised slightly to provide extra room when sewing thick fabrics.
natural_image
Line drawing of a sewing machine needle and foot (no text or symbols)EN


natural_image
Diagram of a sewing machine needle and foot, showing measurement setup with no text or symbolsFinger protector
natural_image
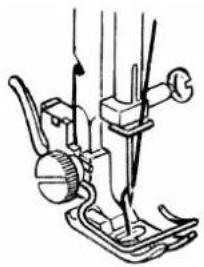
Technical line drawing of a sewing machine needle and foot (no text or symbols)This accessory prevents your hand from accidentally getting under the needle.
Reverse stitching

natural_image
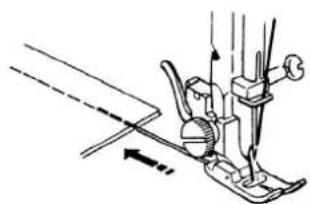
Line drawing of a mechanical component with an arrow pointing to a rectangular slot (no text or symbols)Use reverse stitches to reinforce the first and last stitches.
- Press the reverse lever (12) and hold it down.
- Press the foot pedal – the more pressure you apply to the foot pedal, the faster the machine runs.
- When you want to change to forward stitching, simple release the reverse lever (12).
natural_image
Technical line drawing of a sewing machine needle and foot (no text or symbols)Removing fabric from the sewing machine
When you finish sewing, make sure that the needle is at its highest position. To remove the fabric, raise the sewing foot (26) and pull out the fabric from the back of the machine.
Changing the sewing direction
natural_image
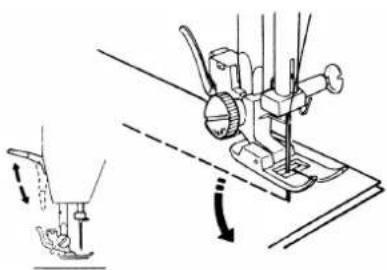
Technical line drawing of a sewing machine with a foot and base, showing mechanical components and motion indicators (no text or symbols)To change the sewing direction at the corner of the material, proceed as follows:
- Stop the machine and turn the hand wheel (10) towards you until the needle is in the fabric.
- Raise the sewing foot (26).
- Turn the fabric around the needle to change the direction as desired.
- Lower the sewing foot (26) and continue sewing.
Cutting the thread

natural_image
Line drawing of two hands manipulating a small object with wires (no text or symbols)Cut the thread using the thread cutter behind the sewing foot (26) or with a pair of scissors. Leave around 15 cm of the thread hanging from the eye of the needle.
Programme selection dial
On this sewing machine, you can select a number of different functional and decorative stitches. You can use the programme selection dial (6) to easily select the stitch setting you want.
- Before changing the stitch, always make sure that the needle is at its highest position.
The letters on the programme selection dial correspond to the letters above the stitch setting illustrations.
- Turn the programme selection dial so that the arrow marker points to the stitch type you want to use.
The width of the zigzag stitch is automatically set by turning the programme selection dial (6).
TIP
If the machine does not create the selected stitch, turn the programme selection dial (6) one full rotation and then reset the stitch you require.
Setting the stitch length
You use the stitch length regulator (11) to select the length of the stitch type you selected.
- Turn the stitch length regulator so that the marker points to the stitch length number you want to use.
- The numbers indicate the approximate stitch length in millimetres.
The lower the number, the shorter the stitch.
Setting the stitch width
You use the stitch width regulator (4) to select the width of the zizzag stitch or the stitch type.
- Setting 0: straight stitch.
- Settings 1-5: Different widths of zigzag and decorative stitches.
NOTE
If you use the twin needle, set the stitch width to setting 3 max.
A higher position could break the needles.
Stitch types (programmes)
You set the stitch types using the programme selection dial (6). Make sure that the needle is at its highest position before changing the stitch type.
Test the stitching on a swatch before using a stitch programme for your actual work.
NOTE
For information on attaching and removing the sewing foot, please see page 31.
Straight stitch
Suitable for general sewing and for top-stitching.
Sewing foot: Standard foot
Programme: A
Stitch length: 1 to 4
Stitch width 0


Zigzag stitch
The zigzag stitch is one of the most commonly used stitches. It can be used for many different things, for example hemming, appliqué, and monograms.
Before you use the zigzag stitch, sew a few straight stitches to reinforce the stitching.

Sewing foot: .....Standard foot
Programme:....A
Stitch length: 0.5 to 4
Stitch width: 1 to 5
If you use a twin needle, only use programmes B and C.

TIPS FOR ZIGZAG STITCHES
For a better zigzag stitch, the upper thread tension must be lower than for straight stitches.
The upper thread should be slightly visible on the underside of the fabric.
Satin stitch
Satin stitch, a zigzag stitch in which the stitches are very close together, is particularly suitable for appliqué, monograms, and various decorative stitches.
Programme selection as for the normal zigzag stitch.
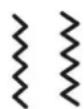
Sewing foot: .....Standard foot
Programme:....A
Stitch length: 0.5 to 2
Stitch width: 1 to 2
TIP
Whenever you use this stitch, reduce the upper thread tension slightly. The wider the stitch, the lower the upper thread tension should be. If you are sewing very thin or soft fabrics, you should place a thin piece of paper under the fabric and sew this too. This prevents stitches being missed and the material gathering.
Zigzag with three stitches
Used for sewing over rough edges.
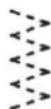
Sewing foot: .... Standard foot
Programme: B
Stitch length:.... 1 to 3
Stitch width: 3 to 5
Reversed blind hem
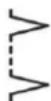
Sewing foot: .....Standard foot
Programme: C
Stitch length:.... 1 to 3
Stitch width: 3 to 5
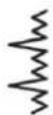
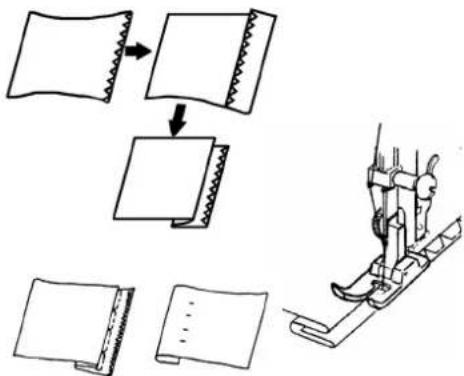
Blind stitch
For blind hemming.
Sewing foot: Standard foot
Programme: D
Stitch length: 1 to
Stitch width: 5
Use a thread colour that exactly matches the fabric.
If you are sewing very light or transparent fabrics, use a transparent nylon thread.
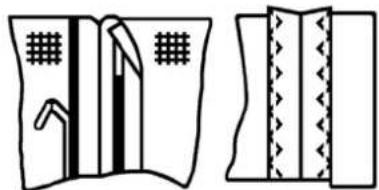
- Fold the fabric as illustrated.
- Sew on the fold, as illustrated. The straight stitches should be on the hem, and only the points of the zigzag stitches should extend into the upper fold of the fabric.
- Remove the fabric from the machine and straighten it out.
The folded-out fabric now has a blind hem stitch.
EN
flowchart
graph TD
    A["Fold folding"] --> B["Stacking"]
    B --> C["Rolling"]
    C --> D["Stacking"]
    D --> E["Rolling"]
Elastic stitch: Triple straight and triple zigzag stitch
These stitches are particularly suitable for sewing of elastic material or knitwear, application of elastic bands etc.
It can also be used to reinforce elastic materials and to sew on fabric pieces. It is also suitable for sewing on elastic. A seam with this stitch is three times as strong as a normal seam and is also far more elastic. The seam therefore stretches with the fabric without the thread breaking.
Sewing foot: Standard foot
Programme: E
Stitch length: 4
Stitch width: 0 to 5

natural_image
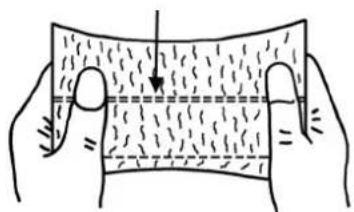
Diagram of a curved surface with dashed lines indicating internal patterns, held by two hands (no text or symbols)Sewing all kinds of elastic fabrics
Use a synthetic thread, as this makes the stitches practically invisible.
Sewing together two pieces of fabric
You can use the elastic stitch to join two pieces of fabric.
- Place the two fabric edges under the sewing foot. Make sure that the two edges remain together and that the needle enters the fabric right and left at the same distance from the centre.

natural_image
Line drawing of a person using a tool on a platform, no text or symbols presentSewing on elastic bands
- Position the elastic band as required.
- Sew on the elastic band using the elastic stitch, using your hands to stretch out the band in front of and behind the sewing foot. The more you stretch it, the more it will gather.

natural_image
Technical line drawing of a mechanical assembly or mounting bracket (no text or symbols)Smocking stitch
The smocking stitch can be used in many different ways and is decorative, e.g. for attaching lace or elastic bands, or for sewing on stretch and other elastic materials.
Sewing foot: .... Standard foot
Programme: F
Stitch length: 4
Stitch width: 5
For smocking work, please note the following:
Gather the material evenly.
Place a narrow strip of fabric under the gathers and sew over them using the smocking stitch.
Finish the smocking work before you insert this decorative piece in the garment.
In the case of very lightweight fabrics, the same effect can be achieved by using an elastic thread on the bobbin.
Overlock-overcast stitch
This stitch is particularly suitable for sewing and patching jersey and track suits. The stitch is both decorative and functional. It consists of smooth side lines with cross-connections and is completely elastic.
Sewing foot:....Standard foot
Programme: G
Stitch length: 4
Stitch width: 5

natural_image
Diagram of hands holding a spring-loaded object with no visible text or symbols
natural_image
Two abstract line drawings of folded or patterned surfaces with geometric patterns (no text or symbols)
natural_image
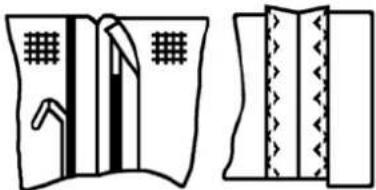
Line drawing of a person climbing a staircase with ropes and equipment (no text or symbols)Position the edge of the fabric under the sewing foot so that the needle sews straight stitches with the right deflection and just touches the edge of the fabric, so that a zigzag stitch is sewn with the left deflection.
natural_image
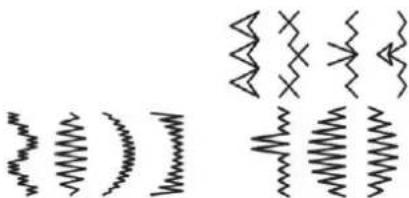
Abstract line patterns with zigzag and wavy lines, no text or symbols presentDecorative embroidery stitches
The programmes H to R offer a great number of decorative stitches.
Sewing foot: .... Standard foot
Stitch length programmes H to K : 4
Stitch length programmes L to R: 0.25 to 1
Stitch width: 5
The scallop stitch (programme N), for example, is ideal for sewing decorative patterns on tablecloths, napkins, collars, cuffs, and so on.

natural_image
Line drawing of a sewing machine needle stitching fabric (no text or symbols)Buttonhole
TIP
To determine the correct stitch length, we recommend you sew a test buttonhole on a scrap of fabric.
Sewing foot: . . . . . . . . . . . . . . . . . . . . . . . . . . . . . . . . . Buttonhole sewing foott
Programme: S to U
Stitch length: 0.25 to 1
Stitch width: 5
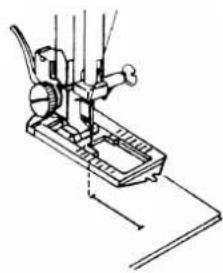
- Set the foot and needle to their highest position. Replace the foot with the buttonhole sewing foot.
- On the fabric, mark where you want to sew the buttonhole and its length. Use a pencil or tailor's chalk.
How to proceed
- Use the programme selection dial (6) to select programme S to sew the left bar.
- Pass the upper thread through the opening on the buttonhole sewing foot and pull both the upper and lower thread to the left-hand side. Lower the foot and sew slowly until you have achieved the desired length for the side bar.
- Raise the needle to its highest position and change to programme S for the bottom bar.
-
Sew a few stitches of the bottom bar.
-
Raise the needle to its highest position again and change to programme U for the right-hand bar.
- Now sew the right-hand bar with exactly the same length as the left-hand side.
- Raise the needle to its highest position and select programme T again for the top bar.
- Then sew a few stitches for the top bar, like you did for the bottom bar.
- At the end, you are advised to set the stitch length to "0" and sew a few more stitches so that the threads are better connected and the buttonhole does not fray so quickly.
- Then use the knife provided to cut the fabric between the stitches. Do this carefully to ensure you do not damage any of the bars.
TIP
Pin a safety pin in front of the top bar to stop you cutting through it.

natural_image
Technical line drawing of a sewing machine (no text or symbols)
natural_image
Mechanical device diagram showing a lever mechanism with spring and screw base (no text or symbols)
natural_image
Technical line drawing of a sewing machine with a spring, showing no text or symbols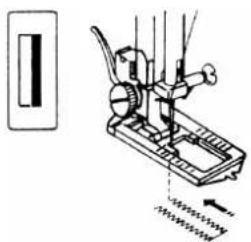
natural_image
Technical line drawing of a mechanical device with no visible text or symbols
natural_image
Technical line drawing of a mechanical device with lever and base, no visible text or symbols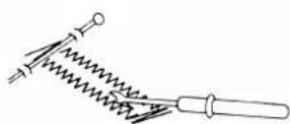
Sewing on buttons and hooks and eyes

natural_image
Technical line drawing of a mechanical clamp or lever assembly (no text or symbols)
You can use the transparent blue sewing foot to sew on buttons, hooks and eyes easily.
Use the programme selection dial (6) to select a zigzag stitch width that corresponds to the distance between the holes.
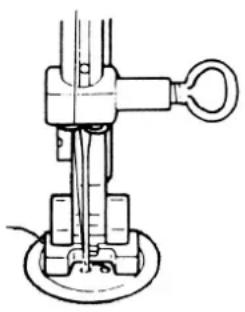
- For this step, attach the darning plate to stop the fabric from slipping. For information on attaching the darning plate, see page 26
- Lower the sewing foot and place the button between the fabric and sewing foot so that the zigzag stitch enters the holes of the button, as illustrated.
- Check the button is positioned correctly by turning the hand wheel (10) manually. The needle must exactly enter the holes of the button, otherwise the needle may be damaged. If necessary, change the width of the zigzag stitch.
- At a low speed, sew about 6 to 7 stitches per hole.
If the button has four holes, move the fabric and button: then sew 6 to 7 stitches in the other two holes. Once you have removed the fabric, pass a generous length of the upper thread to the underside of the fabric and knot it to the lower thread there.
Sewing buttons with a shank
In the case of heavy fabrics, a button shank is often needed.
- Place a needle or, for a thicker shank, a matchstick on the button and then proceed to sew as for a normal button.
• After about 10 stitches, remove the material from the machine. - Remove the needle or matchstick.
- Leave a longer length of upper thread, pass it through the button and wind it around the threads to create a shank, then pass it through to the underside of the fabric and knot it to the lower thread.
Sewing in zips
Use the zip sewing foot.
Depending on which side of the zip band you are sewing, the sewing foot must always be on the fabric.
For this reason, the sewing foot is attached on either the left-hand or right-hand side, and not in the middle like all other sewing feet.
- Raise the sewing foot and needle to its highest position to switch the sewing foot.
- Place the zip on the fabric and place the workpiece in position under the foot.
• To sew the right-hand side of the zip, attach the zip sewing foot so that the needle sews on the left-hand side (1). - Sew the right-hand side of the zip, creating the stitches as close as possible to the teeth. (1)
- Sew the zip in with a bridge around 0.5 centimetres below the teeth.
• To sew the left-hand side of the zip, change the foot position on the sewing foot holder.
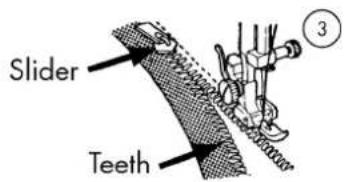
• Proceed in the same way as for the right-hand side of the zip (2). - Before the foot reaches the slider on the zip band, lift the foot up and open the zip, keeping the needle in the material. (3)
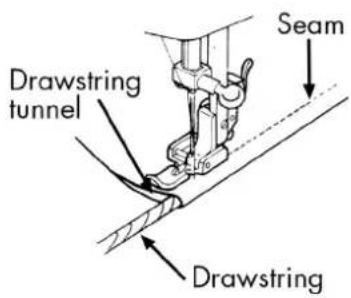
Sewing in a drawstring
You can also use the zip sewing foot to sew in drawstrings, as illustrated.
- Fold the fabric over once to create a drawstring tunnel and then sew along the drawstring, making sure the zip sewing foot is behind the drawstring.
Hems
You can use the roll hem/hemming sewing foot to easily hem fine to medium materials, e.g. blouses, silk scarves and flounces. Hemming using the roll hemmer stops the edges from fraying and creates a clean, durable edge.
- Raise the sewing foot and needle to its highest position and replace the existing foot with the hemming foot.
- Fold the start of the hem around 2mm in with a double fold.
- Insert this folded hem into the coil of the roll hemming foot.
- Carefully and slowly sew a few stitches, preferably by turning the hand wheel (10).
- If the start of the hem was pulled into the foot, carefully start sewing the hem.
• Always hold the edge of the fabric somewhat over the left-hand side of the sewing foot, to stop the fabric slipping out of the coil.
• Make sure that the fabric does not slip under the right-hand side of the sewing foot.

natural_image
Technical line drawing of two mechanical clamping or bracketing device components (no text or symbols)


natural_image
Technical line drawing of a sewing machine needle and foot (no text or symbols)TIP
The hem can be inserted in the hemming foot more easily if you hold the end of the fabric at a slight angle.
Before you start sewing, fix the hem with safety pins or iron down the start of the hem.
For this work, you need to use suitable materials and have some experience in order to obtain the best results.
Darning


natural_image
Line drawing of a sewing machine needle stitching a textured surface (no text or symbols)
natural_image
Illustration of a medical procedure with surgical tools and a circular component (no text or symbols)Attaching the darning plate
For some sewing work, e.g. sewing on buttons, hooks and eyes, as well as darning and embroidering, the material must not be fed automatically and you must be able to control the feeding of the material yourself.
In these cases, you must attach the darning plate included in the accessories.
- Raise the sewing foot lever (15) and turn the hand wheel (10) to raise the needle to its highest position.
- Now push both pins of the darning plate into the openings on the needle plate (19) until they click into place, as shown in figures 1 and 2.
• To remove the darning plate again, you simply need to lift up one of the corners.
Darning
- Remove the sewing foot holder and select the normal lower thread tension.
The upper thread tension should be somewhat lower than usual. If necessary, you can place a piece of fabric under the damaged area. - Place the material under the needle and lower the sewing foot lever (15) to apply the thread tension.
- Begin sewing by pushing moving the fabric forwards and backwards by hand.
- Repeat until the damaged area has been completely filled with parallel stitches.
- If necessary, you can darn over these stitches with stitches at right angles to them, as you do when darning by hand.
TIP
During darning, the fabric must be taut. If the damaged area is large, it is advisable to use an embroidery frame (available from specialist retailers) to keep the material taut.
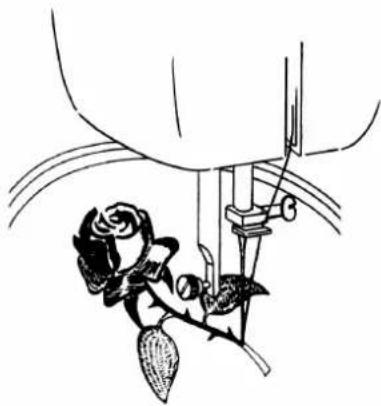
Embroidering
General information
Remove the sewing foot holder, attach the darning plate and select the normal lower thread tension.
The upper thread tension must be low enough that the lower thread is not pulled to the upper side of the fabric.
- Stretch the fabric taut in an embroidery frame (available from specialist retailers).
- Lower the sewing foot to apply the thread tension.
- Hold the embroidery frame by hand while you sew the desired pattern. Do not move the fabric itself, only the embroidery frame.
NOTE
Do not let your fingers get too close to the needle.
TIP
We recommend drawing the desired embroidery pattern on the upper side of the fabric in pencil or tailor's chalk (available from specialist retailers).
natural_image
Black-and-white line drawing of a flower climbing a tree branch (no text or symbols)Sewing with a twin needle
The twin needle is available from well-stocked specialist retailers. When buying a twin needle, make sure that the distance between the two needles is no more than 2.5mm .
The twin needle can be used to create attractive, two-coloured patterns if you use different coloured threads when sewing.
TIP
Only use the straight stitch or the zigzag stitch with the twin needle.
Set the stitch width to a maximum position of 3.
Applying other stitch types or using a higher stitch width could cause the needles to bend or break.

natural_image
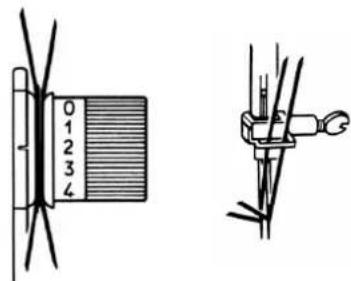
Technical line drawing of a sewing machine with spools and clamps (no text or symbols)- Attach the twin needle in the same way as you would a single needle (see page 30).
- Place two equally full cotton reels on the removable cotton reel holders (7).
- Make sure that the two felt discs included in the accessories are in place on the two cotton reel holders (7).
- Pass the two threads through the thread holder in the same way as for a single thread.
- Guide both threads through the upper thread tension discs making sure that one thread goes to the right of the central disc and the second thread goes to the left of the disc.
- Insert both threads in the thread guide.
- Insert one thread through the eye of the needle on the right-hand side, and one thread on the left-hand side.
NOTE
To sew a corner using the twin needle, take the needle out of the fabric, as otherwise the twin needle may bend or break.
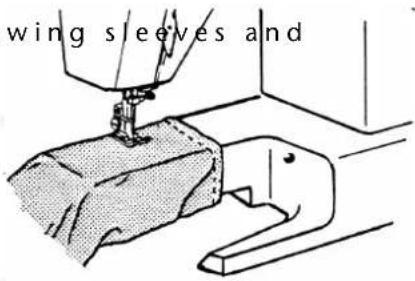
Sewing with the free arm
The free arm (16) enables you to sew tube-shaped pieces more easily. This function is very useful e.g. when sewing sleeves and trouser legs.
You can easily turn your sewing machine into a free-arm machine by removing the table extension and accessories box from the sewing machine
The free arm (16) is particularly useful for the following work:
-- Repairing elbows and knees in garments
-- Sewing sleeves, in particular on smaller garments
-- Appliqué, embroidery or hemming edges, cuffs or trouser legs.
-- Sewing elasticated waistbands on skirts or trousers.
Seam guide
The seam guide helps you to create straight and parallel seams along the edge of the fabric.
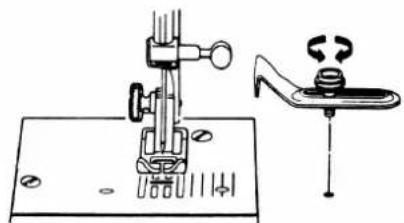
- Slightly turn the knurled screw of the guide into the threaded hole to the right of the needle plate (19).
- Adjust the guide to the required distance and then tighten the screw.
The needle plate (19) contains a number of guide lines to help you.
natural_image
Technical line drawing of a sewing machine with a clamping mechanism (no text or symbols)Quilting guide
- Push the quilting guide underneath the clamp spring to the intended depth.
• Mark the first seam with tailor's chalk and sew it. - You use the quilting guide to sew the second seam parallel to the first.
- The distance between the seams can be adjusted by moving the bar in the direction of the arrow.

natural_image
Technical line drawing of a sewing machine with no visible text or symbols
natural_image
Technical line drawing of a sewing machine on a grid background (no text or symbols)MAINTENANCE AND CLEANING

Before carrying out any maintenance, cleaning or replacement work, please always turn off and unplug the machine.
Replacing the sewing light bulb
natural_image
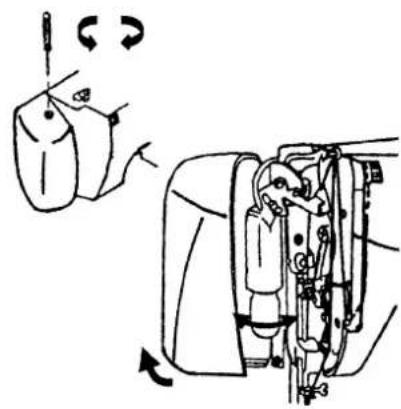
Mechanical assembly diagram showing a motor and gear mechanism with rotation arrows (no text or labels)You switch the sewing light on and off using the main switch (13).
• For information on opening the front flap (21) see page 15.
- You can now swing the front flap (21) out to the left.
- Replace the bulb.
- Close the front flap (21) and screw it tight.
NOTE
The maximum permitted light bulb power rating in 15W. Light bulbs are available from specialist retailers.
Replacing the needle
- Turn the hand wheel (10) towards you until the needle has reached its highest position.
- Loosen the needle holding screw by turning it towards you.
- Remove the needle from the needle holder.
- Insert a new needle with the flat side facing backwards. Push the needle upwards until it can go no further.
- Tighten the needle holding screw again.

NOTE
Needles are available from specialist retailers.
For information on types and thickness, please see the table for fabric, thread and needle data on page 40.
Removing and attaching the sewing foot
Removing
- Turn the hand wheel (10) towards you until the needle has reached its highest position.
- Raise the sewing foot by pushing up the sewing foot lever (15).
- If you push up the sewing foot release lever behind the sewing foot holder, the sewing foot drops out.

natural_image
Line drawing of a sewing machine needle and foot (no text or symbols)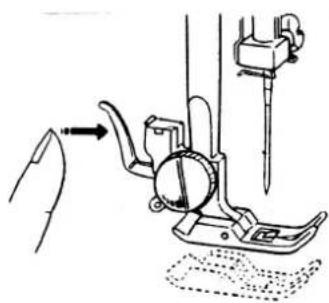
natural_image
Technical line drawing of a sewing machine with a needle inserted, showing no text or symbolsAttaching
- Attach the sewing foot so that the pin on the foot is directly under the groove of the foot holder. Lower the sewing foot lever (15).
- Now push the sewing foot release lever upwards. The sewing foot automatically clicks into place.

natural_image
Technical line drawing of a sewing machine and foot base (no text or symbols)
natural_image
Mechanical assembly diagram showing a sewing machine with a needle inserted, no text or symbols presentRemoving and attaching the sewing foot holder
The sewing foot holder does not need to be removed unless you want to darn or embroider, or make space to clean the fabric feeder (27).
Removing
- Move the needle to its highest position by turning the hand wheel (10) towards you and raise the sewing foot lever (15).
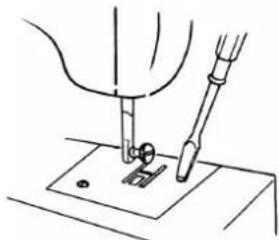
- Remove the foot from the sewing foot holder and loosen the sewing foot holder screw using the screwdriver provided.

natural_image
Technical line drawing showing two mechanical assembly steps with no visible text or symbolsAttaching
- Move the needle to its highest position by turning the hand wheel (10) towards you and raise the sewing foot lever (15).
- When you attach the sewing foot holder, push it upwards as far as possible and tighten the sewing foot holder screw using the screwdriver provided.

natural_image
Technical line drawing showing two mechanical assembly steps: one with a tool and the other with a tool inserted into a pipe (no text or symbols present)Maintaining the sewing machine
The sewing machine is a sensitive mechanical product and requires regular maintenance to ensure it always functions perfectly.
You can carry out this maintenance yourself.
Above all, maintenance means cleaning and oiling.
NOTE
Only use high-quality sewing machine oils. Other oils are not suitable.
Please note that after oiling, there may be oil residue in the machine. To get rid of this residue, sew a few stitches on a swatch or scrap of fabric. This will stop your actual fabric from getting soiled.
Cleaning the housing and foot pedal
Before cleaning, remove the plug from the mains socket.
Use a dry, soft cloth to clean the housing and foot pedal. Avoid the use of chemical solutions and cleaning products because these may damage the appliance surface or markings.
Cleaning the feeder
It is necessary to keep the fabric feeder teeth clean at all times to ensure perfect stitching.
- Remove the needle and sewing foot (see page 30 f.).
- Remove the screws on the needle plate (19) to remove the needle plate from the machine.
- Use a brush to remove dust and loose threads from the feeder teeth.
- Replace the needle plate (19).
natural_image
Line drawing of a sewing machine needle stitching fabric (no text or symbols)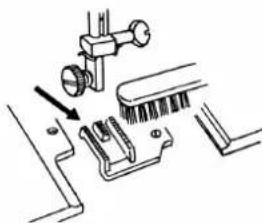
natural_image
Technical line drawing of a mechanical assembly with no visible text or symbolsCleaning and oiling the bobbin housing
- Move the needle to its highest position, otherwise the shuttle cannot be removed.
- Remove the bobbin case.

- Turn the snap lever outwards as illustrated and remove the shuttle track ring.

- Remove the shuttle by holding the pin in the centre of the shuttle.
- Remove all dirt from the shuttle track's ring and oil the parts using a cloth.

- Put one or two drops of oil on the bobbin shuttle track, as illustrated.

natural_image
Technical line drawing of a mechanical assembly with a tool interacting with a component (no text or symbols present)- Now reassemble all the components following the instructions in the reverse order.

flowchart
graph TD
    A["Top Component"] --> B["Left Ring"]
    B --> C["Right Ring"]
    C --> D["Bottom Ring"]
    D --> E["Bottom Segment"]
    E --> F["Bottom End"]
Oiling the machine
NOTE
Your sewing machine is delivered oiled and ready for use.
Oiling the machine behind the front flap
The places that need to be oiled are marked with an arrow on the illustration. You should clean these areas before oiling them. Put one or two drops of a good sewing machine oil on these areas.

natural_image
Technical diagram of a mechanical assembly with no visible text or symbolsIf the machine does not run perfectly if it was out of use for a long period of time, run the oiled machine at high speed for about a minute with the front flap (21) closed.
Do not forget to first sew on a fabric scrap to absorb any leaked oil.
TIP
These parts of the machine may need to be oiled more frequently, depending on how often you use the machine.
Dismantling the rear housing cover
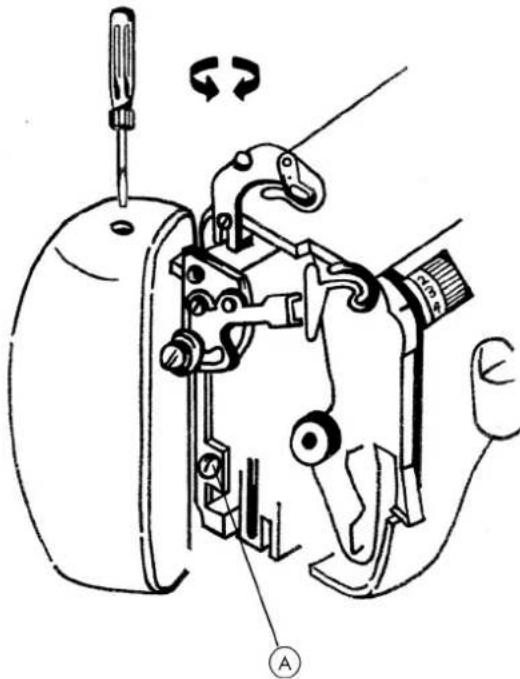
- Raise the sewing foot lever (15), open the front flap (21) and loosen the screw (A).
NOTE
As screws A, B and C are different, always keep them separate from each other.
- Remove the table extension and open the bobbin case cover (18).
- Turn the machine so that the rear side is facing upwards and remove the four screws (B) and two screws (C) on the base, as illustrated.


natural_image
Pure technical diagram of a mechanical or electrical component with no visible text, numbers, or symbols- Put the machine upright again.
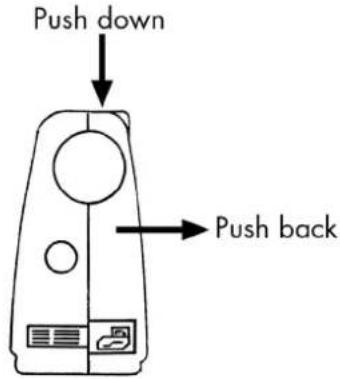
- Only small, internal plastic hooks now hold the rear cover, as illustrated.

- Carefully push the upper edge of the rear cover (where the hooks are located) down with one hand.
- Now pull out the rear cover.
Oiling the top and bottom of the machine
The places that need to be oiled are marked with an arrow on the illustration. You should clean these areas before oiling them. Put one or two drops of a good sewing machine oil on these areas.


TIP
The places marked with arrows do not need to be oiled often, only every two to three months or so, depending on how often you use the machine.
Attaching the rear housing cover
- Replace the rear cover and make sure that it locks into place.
- Lay the machine back on its front side and tighten screws A; B and C.
- Close the bobbin case cover (18) and front flap (21).
- Finally, replace the housing cover for the foot pedal and push this until it locks into place.
NOTE
To simplify assembly, always make sure that the sewing foot lever (15) is raised and the bobbin case cover (18) is open.
The housing cover for the foot pedal plug just snaps on.

FAULTS
If faults occur, please read the operating instructions to determine whether you have followed all the instructions correctly.
Please only contact our customer services if none of the solutions provided is successful.
| Fault Cause Page | ||
| Machine does not run smoothly Machine | needs to be oiled page 34 | |
| Dust and threads in shuttle track page 34 | ||
| Foreign objects on the teeth of the fabric feeder | page 34 | |
| Wrong oil was used and has blocked the machine | page 34 | |
| Upper thread breaks Machine not threaded | ed correctly page 12 | |
| Thread tension too high page 15 | ||
| Needle bent or blunt page 17 | ||
| Thread thickness not right for the needle | page 17 | |
| Needle not inserted correctly | page 30 | |
| Fabric not pulled through from back at end of seam | page 18 | |
| Needle plate, bobbin or sewing foot damaged | ||
| Lower thread breaks Lower thread tangles | es because thread wound on to bobbin incorrectly | page 9 |
| Lower thread not under tension spring in bobbin case | page 9 | |
| Needle breaks | Needle inserted incorrectly | page 30 |
| Needle is bent | page 17 | |
| Needle is too fine | page 17 | |
| Fabric pulled while sewing page 18 | ||
| Knot in the thread | page 12 | |
| Needle threaded incorrectly | page 15 | |
| With twin needles: The stitch width is higher than 3 or a ornament programme was used. | page 28 | |
| Machine misses stitches | Needle inserted incorrectly | page 30 |
| Needle threaded incorrectly | page 15 | |
| Needle and/or thread not suitable for fabric | page 40 | |
| Fabric too heavy or hard | page 40 | |
| Sewing foot pressure too low | page 15 | |
| Fabric pulled while sewing page 18 | ||
| Puckering or gathering of seam Upper th | read tension too high page 15 | |
| Machine threaded incorrectly page 12 | ||
| Needle too large for the fabric page 40 | ||
| Thread makes loops Thread tension not | adjusted page 15 | |
| Upper thread not threaded correctly and/or lower thread not wound on to bobbin correctly | page 9 | |
| Thread thickness not suitable for the fabric page 40 | ||
| Fabric feed irregular Stitch length is "0" | page 19 | |
| Thread ends in shuttle track page 33 | ||
| Machine does not run Sewing machine | not connected correctly or there is no power from the socket | page 8 |
| Thread ends in shuttle track page 33 | ||
| The switch in the handwheel is set to the bobbin symbol | page 9 | |
FABRIC, THREAD AND NEEDLE TABLE
As a general rule, fine threads and needles are used to sew thin fabrics, thicker threads and needles are used for heavier fabrics. Always test the thread and needle thickness on a scrap of the fabric you intend to use. Use the same thread for needle and bobbin. If you sew stretch stitches on fine fabrics or synthetics, use a needle with a blue shaft (available from specialist retailers). These prevent stitches from being missed.
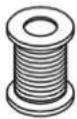
| Fabric thicknees | Fabric type | Thread Needle | Stitch length | Upper thread tension | ||
 |  | Straight stitch | Zigzag |  | ||
 | ||||||
Fine fabrics  | Nylon Batiste Voile | 80 Cotton | 65 1 - 3 1 | -4 | 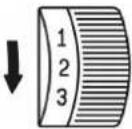 | |
| Jersey 60 | Synthetics | |||||
| Silk 50 | Silk | |||||
| Wool Silk | 50 Synthetic silk | 75 | ||||
Medium fabrics  | Percale Piqué Linen | 60 - 80 Cotton | 75 - 90 0.5 | -3 0.5 - 4 | 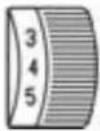 | |
| Jersey 60 | Synthetics | 75 | ||||
| Gabardine 50 | Silk | |||||
Heavy fabrics  | Denim Coat fabric | 50 Cotton | 75 - 90 0.5 | -3 0.5 - 4 | 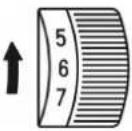 | |
| Jersey 50 | Synthetics | |||||
| Wool Tweed | 50 Silk | |||||
DISPOSAL

Packaging
Your sewing machine is wrapped in packaging to protect it against transportation damage. Packaging is raw material and can be re-used or added to the recycling system.

Device
At the end of its useful life, the sewing machine should not be disposed of with the household rubbish. Seek the advice of your local authority on correct, environmentally friendly disposal.
TECHNICAL DATA
Sewing machine
Nominal voltage: 230 V \~ 50 Hz
Nominal consumption: total 75 W
Motor: 60 W
Light: 15 W
Socket: E14
Foot pedal
Model: MD 2902
Nominal voltage: 230 V \~ 50 Hz
Safety class II


Subject to technical changes.
INDEX
A
Accessories box 7, 8
B
Blind stitch 20, 21
Bobbin 9
Bobbin case 33
Bobbin housing 33
Bringing up the lower thread 14
Button sewing foot 7
Buttonhole 23
Buttonhole sewing foot 7, 23
Buttons and hooks and eyes, sewing on 24
Buttons, sewing with a shank 24
C
Cleaning 33
Contents of package 6
Controlling the sewing speed 8
Cotton reel holder 9
D
Darning 26
Darning plate 7, 24, 26, 27
Decorative embroidery stitches 22
Disposal 41
Drawstring, sewing in 25
E
Elastic bands, sewing on 21
Elastic stitch 21
Embroidery 27
F
Fabric pieces, sew together 21
Faults 38
Feeder 33
Finger protector 7, 18
Foot pedal 6, 8, 10, 17, 18, 37, 41
Free arm 29
H
Hand wheel 9
Hemming foot 7, 25, 26
Hems 25
|
Inserting the bobbin case 12
L
Lace, sewing on 27
Lower thread tension 15, 16
M
Maintenance 30
N
Needle 17, 30
Needle table 40
0
Oiling 33, 34, 35
Overlock-overcast stitch 22
P
Programme selection dial 19
Q
Quilting guide 7, 29
R
Removing the bobbin case 11
Reverse stitching 18
S
Satin stitch 20
Seam guide 7, 29
Sewing direction change 18
Sewing elastic fabrics 21
Sewing foot 17, 31
Sewing foot holder 32
Sewing foot holder, attach 32
Sewing foot holder, remove 32
Sewing foot, attach 31
Sewing foot, remove 31
Sewing light 30
Shuttle 33
Shuttle track 33
Shuttle track ring 33
Smocking stitch 22
Standard foot 7, 19, 20, 21, 22
Standardfuß 20
Stitch length setting 19
Stitch type table 41
Stitch width 19
Straight stitch 19
T
Table extension 8, 11, 29, 35
Thread take-up 13
Thread tension 15, 16
Thread, cutting 18
Threading the bobbin case 11
Threading the upper thread 12
Twin needle 28
U
Upper thread tension 15
W
Winding thread on to the bobbin 9
Z
Zigzag stitch 20
Zip sewing foot 7, 25
Zips 25
ÜBERSICHT
Hauptkomponenten
natural_image
Line drawing of a sewing machine connected to a power cord (no text or symbols)natural_image
Illustration of a hand using a tool to interact with a mechanical component, showing rotational motion (no text or symbols)natural_image
Illustration of a hand holding a medical device with a catheter, showing no text or symbols.natural_image
Line drawing of a sewing machine needle and base (no text or symbols)natural_image
Technical line drawing of a mechanical assembly with arrows indicating motion (no text or symbols)natural_image
Technical line drawing of a sewing machine component with no visible text or symbolsnatural_image
Simple line drawing of a device with a circular dial and directional arrows (no text or symbols)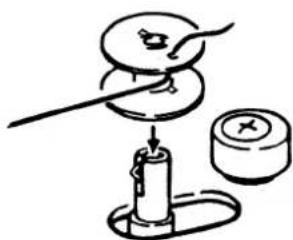
natural_image
Simple line drawing of a mechanical setup with a cylindrical component and two circular components (no text or symbols)
natural_image
Simple line drawing of a mechanical device with no text or symbolsnatural_image
Pure mechanical diagram showing a pulley and lever assembly without any text or symbolsnatural_image
Simple line drawing of a mechanical component with a circular dial and directional arrows (no text or symbols)
natural_image
Mechanical assembly diagram showing a lathe machine with rotating components and directional arrows (no text or labels)

natural_image
Hand holding a mechanical component, no text or symbols visible

natural_image
Technical line drawing of a mechanical assembly with no visible text or symbolsnatural_image
Simple line drawing of a mechanical device with a lever and handle (no text or symbols)
natural_image
Line drawing of a sewing machine needle with a hand operating the base and a finger inserted (no text or symbols)
natural_image
Diagram of a mechanical device with a wrench and rotating arm (no text or symbols)
natural_image
Diagram of a cable being inserted into a spool, showing mechanical components and wiring (no text or symbols)Richtige Naht
Lösung:
natural_image
Line drawing of a sewing machine needle and foot (no text or symbols)D
natural_image
Diagram of a sewing machine needle and foot, showing measurement setup with no text or symbolsFingerschutz

natural_image
Line drawing of a sewing machine needle and base (no text or symbols)natural_image
Line drawing of a mechanical device with an arrow pointing to a component (no text or symbols)natural_image
Mechanical sewing machine diagram showing needle insertion and cutting tool path (no text or labels)natural_image
Technical illustration of a sewing machine with a foot and base, showing mechanical components and alignment (no text or symbols)natural_image
Illustration of two hands manipulating a small object with wires, no text or symbols present

Zickzackstich
flowchart
graph TD
    A["Start"] --> B["Fold folding"]
    B --> C["Cut down"]
    C --> D["Final folding with sewing machine sketch"]
natural_image
Diagram of a hand holding a folded paper or sheet with dashed lines indicating internal texture (no text or symbols)natural_image
Technical line drawing of a mechanical assembly or sewing machine (no text or symbols visible)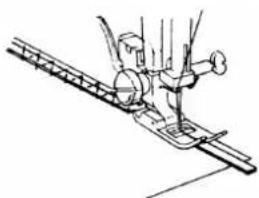
natural_image
Technical line drawing of a sewing machine needle and base (no text or symbols)Rautenstich
natural_image
Diagram of a hand holding a coiled spring or rope, with no visible text or symbols
natural_image
Two abstract line drawings of fabric or paper patterns with geometric and patterned sections (no text or symbols)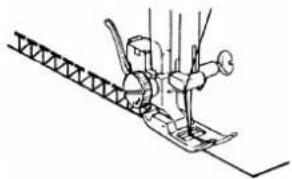
natural_image
Line drawing of a person climbing a staircase with ropes and equipment (no text or symbols)natural_image
Abstract line patterns with zigzag and wavy lines, no text or symbols presentnatural_image
Line drawing of a sewing machine needle stitching fabric (no text or symbols)Knopflöcher
TIPP
natural_image
Technical line drawing of a sewing machine (no text or symbols)
natural_image
Technical line drawing of a mechanical device with no visible text or symbols
natural_image
Technical line drawing of a sewing machine with no visible text or symbols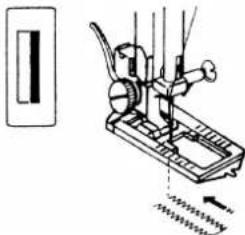
natural_image
Technical line drawing of a mechanical device with no visible text or symbols
natural_image
Technical line drawing of a mechanical device with lever and base components (no text or symbols)
natural_image
Technical line drawing of a mechanical clamp or clamping device with no visible text or symbols
natural_image
Technical line drawing of two mechanical clamping or bracketing device components (no text or symbols)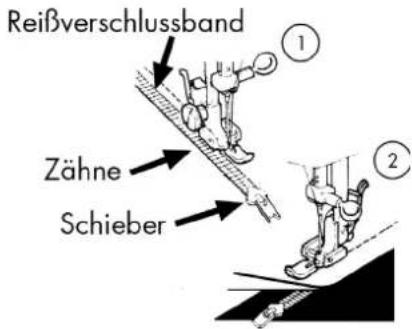
natural_image
Line drawing of a sewing machine needle and foot (no text or symbols)natural_image
Line drawing of a sewing machine needle stitching a textured surface (no text or symbols)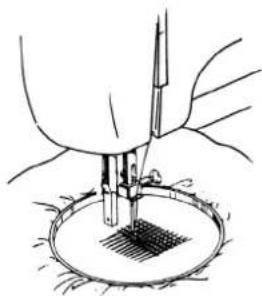
natural_image
Illustration of a medical procedure with surgical tools and a circular component (no text or symbols)natural_image
Illustration of a flower with leaves and stems, no text or symbols presentD
natural_image
Technical line drawing of a sewing machine with spools and a scale ruler (no text or symbols)natural_image
Line drawing of a sewing machine stitching a piece of material (no text or symbols)D

natural_image
Technical line drawing of a sewing machine with base plate and clasp (no text or symbols)
natural_image
Technical line drawing of a sewing machine needle and foot (no text or symbols)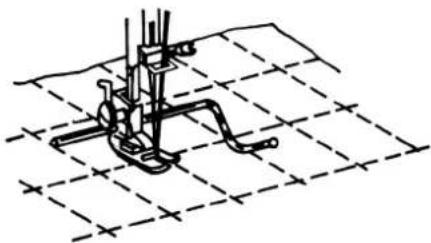
natural_image
Technical line drawing of a sewing machine on a grid background (no text or symbols)natural_image
Mechanical assembly diagram showing a motor and gear mechanism with no visible text or symbolsnatural_image
Line drawing of a sewing machine needle and foot (no text or symbols)
natural_image
Technical line drawing of a sewing machine with needle insertion and base mount (no text or symbols)Einsetzen
natural_image
Line drawing of a sewing machine needle and foot assembly (no text or symbols)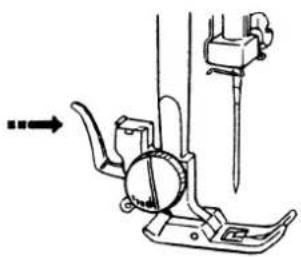
natural_image
Technical line drawing of a sewing machine tool with no visible text or symbolsnatural_image
Technical line drawing showing two mechanical assembly steps with no visible text or symbolsEinsetzen
natural_image
Technical line drawings of mechanical components, showing a lever mechanism and a tool with directional arrows (no text or symbols)natural_image
Line drawing of a sewing machine needle stitching fabric (no text or symbols)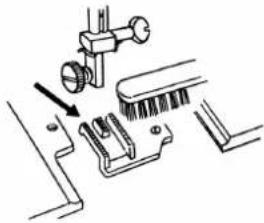
natural_image
Technical line drawing of a mechanical assembly with no visible text or symbolsnatural_image
Technical line drawing of a mechanical assembly with a tool interacting with a component (no text or symbols)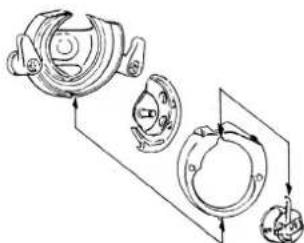
flowchart
graph TD
    A["Component 1"] --> B["Component 2"]
    B --> C["Component 3"]
    C --> D["Component 4"]
Ölen der Maschine
HINWEIS
natural_image
Mechanical assembly diagram showing internal components with no visible text or symbolsHINWEIS

natural_image
Pure technical diagram of a mechanical or electrical component with no visible text, numbers, or symbolsnatural_image
Technical diagram of a mechanical device showing internal components and directional arrows (no text or labels)Unterseite
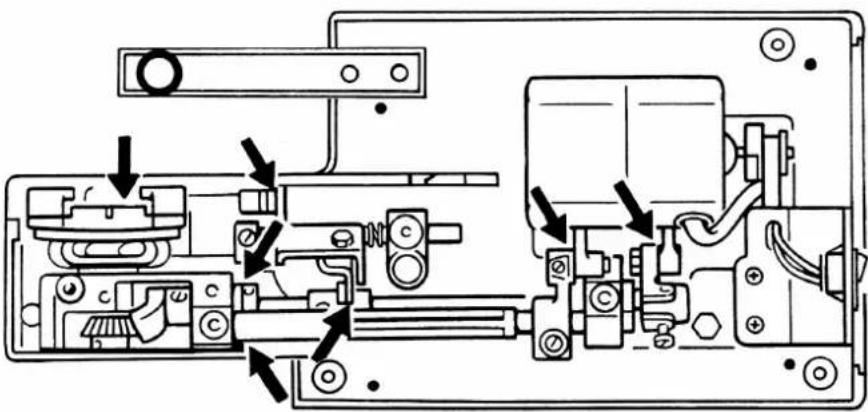
TIPP
Fußanlasser 6, 8, 10, 17, 18, 37, 41
G
Garnrollenhalter 9
Geradstich 19
Greifer 33
Greiferbahn 33
Greiferbahnring 33
Standardfuß 7, 19, 20, 21, 22
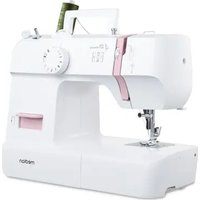
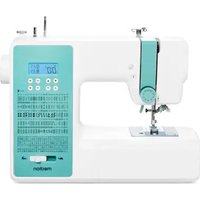
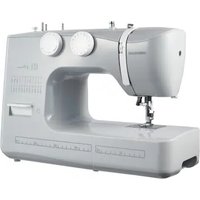
- CONSEJO
- Costura correcta
- Costuras irregulares
- Puntada zig-zag
- Puntada elástica:
- Triple puntada recta elástica, puntada zig-zag triple
- Puntada de rombo
- Procedimiento
- Coser botones y ojetes
- Colocar la placa de zurcir
- MANTENIMIENTO, CUIDADO Y LIMPIEZA
- Insertar
- Lubricar la máquina
- ADVERTENCIA
- DICA
- Ponto ziguezague
- Ponto elástico:
- Ponto em losango
- Colocação
- NOTA
- Safety instructions 4
- Getting to know your appliance 6
- Preparatory work 9
- Settings 15
- Sewing 17
- Maintenance and cleaning 30
- Faults 38
- Fabric, thread and needle table 40
- Disposal 41
- Technical data 41
- Index 42
- SAFETY INSTRUCTIONS
- About these instructions
- Keep electrical equipment out of reach of children
- Mains cable and mains connection
- Never undertake your own repairs
- Basic information
- Handling the appliance safely
- Cleaning and storage
- GETTING TO KNOW YOUR APPLIANCE
- Contents of package
- Contents of the accessories box
- Electrical connections
- Stability of the sewing machine
- Controlling the sewing speed
- Attaching and removing the table extension
- Accessories box
- PREPARATORY WORK
- Winding thread on to the bobbin
- Removing the bobbin case
- Threading the bobbin case
- Inserting the bobbin case
- Threading the upper thread
- TIP
- NOTE
- Bringing up the lower thread
- SETTINGS
- Setting the thread tension
- Adjusting the upper thread tension
- Adjusting the lower thread tension
- Low tension:
- Higher tension:
- Checking the lower thread tension
- Checking the thread tension
- Correct stitches
- Incorrect stitches
- Solution:
- SEWING
- General information
- Selecting the right needle
- Raising and lowering the sewing foot
- Finger protector
- Reverse stitching
- Removing fabric from the sewing machine
- Changing the sewing direction
- Cutting the thread
- Programme selection dial
- Setting the stitch length
- Setting the stitch width
- Stitch types (programmes)
- Straight stitch
- Zigzag stitch
- TIPS FOR ZIGZAG STITCHES
- Satin stitch
- Zigzag with three stitches
- Reversed blind hem
- Blind stitch
- Elastic stitch: Triple straight and triple zigzag stitch
- Sewing all kinds of elastic fabrics
- Sewing together two pieces of fabric
- Sewing on elastic bands
- Smocking stitch
- Overlock-overcast stitch
- Decorative embroidery stitches
- Buttonhole
- How to proceed
- Sewing on buttons and hooks and eyes
- Sewing buttons with a shank
- Sewing in zips
- Sewing in a drawstring
- Hems
- Darning
- Attaching the darning plate
- Embroidering
- Sewing with a twin needle
- Sewing with the free arm
- Seam guide
- Quilting guide
- MAINTENANCE AND CLEANING
- Replacing the sewing light bulb
- Replacing the needle
- Removing and attaching the sewing foot
- Removing
- Attaching
- Removing and attaching the sewing foot holder
- Maintaining the sewing machine
- Cleaning the housing and foot pedal
- Cleaning the feeder
- Cleaning and oiling the bobbin housing
- Oiling the machine
- Oiling the machine behind the front flap
- Dismantling the rear housing cover
- Oiling the top and bottom of the machine
- Attaching the rear housing cover
- FAULTS
- FABRIC, THREAD AND NEEDLE TABLE
- DISPOSAL
- Packaging
- Device
- TECHNICAL DATA
- Sewing machine
- Foot pedal
- INDEX
- A
- B
- C
- D
- E
- F
- H
- |
- L
- M
- N
- 0
- P
- Q
- R
- S
- T
- U
- W
- Z
- ÜBERSICHT
- Hauptkomponenten
- Richtige Naht
- Lösung:
- Fingerschutz
- Zickzackstich
- Rautenstich
- Knopflöcher
- TIPP
- Einsetzen
- Ölen der Maschine
- HINWEIS
- G
Brand : MEDION
Model : MD11836
Category : Sewing machine