
DWK096652 - Range hood BOSCH - Free user manual and instructions
Find the device manual for free DWK096652 BOSCH in PDF.


| Brand | Bosch |
| Model | DWK096652 |
| Product type | Decorative kitchen hood |
| Width | 90 cm |
| Depth | 50 cm |
| Height (min - max) | 62 - 112 cm |
| Net weight | 14.5 kg |
| Power supply | 220-240 V ~ 50 Hz |
| Total power | 265 W |
| Energy class | A+ |
| Airflow (max) | 720 m³/h |
| Noise level (max) | 65 dB(A) |
| Extraction mode | Recirculation or external extraction |
| Filters | Washable metal grease filter (x2) |
| Lighting | LED, 2 x 3 W |
| Controls | 3 speeds + intensive |
| Special function | Automatic shut-off, timer |
| Mounting type | Built-in or wall-mounted |
| Outlet diameter | 150 mm |
| Maintenance | Dishwasher-safe grease filters |
| Safety | Automatic shut-off in case of overheating |
| Spare parts | Available via Bosch after-sales service |
| Repairability | Repairability index: 8.3/10 |
Frequently Asked Questions - DWK096652 BOSCH
User questions about DWK096652 BOSCH
0 question about this device. Answer the ones you know or ask your own.
Ask a new question about this device
Download the instructions for your Range hood in PDF format for free! Find your manual DWK096652 - BOSCH and take your electronic device back in hand. On this page are published all the documents necessary for the use of your device. DWK096652 by BOSCH.
USER MANUAL DWK096652 BOSCH

Household Appliances

Cleaning:
Removal:
Operating Instructions
Appliance description

Operating modes
Exhaust-air mode:
☐The extractor-hood fan extracts the kitchen vapours and conveys them through the grease filter into the atmosphere. ☐The grease filter absorbs the solid particles in the kitchen vapours. ☐The kitchen is kept almost free of grease and odours.
Circulating-air mode:
☐An activated carbon filter must be fitted for this operating mode (see Filters and maintenance).
The complete installation set and replacement filters can be obtained from specialist outlets.
The corresponding accessory numbers can be found at the end of these operating instructions.
☐The extractor-hood fan extracts the kitchen vapours which are purified in the grease filter and activated carbon filter and then conveyed back into the kitchen. ☐The grease filter absorbs the grease particles in the kitchen vapours. ☐The activated carbon filter binds the odorous substances.
⚠️If no activated carbon filter is installed, it is not possible to bind the odorous substances in the cooking vapours.
Before using for the first time
Important notes:
The Instructions for Use apply to several versions of this appliance. Accordingly, you may find descriptions of individual features that do not apply to your specific appliance.
This extractor hood complies with all relevant safety regulations.
Repairs should be carried out by qualified technicians only.
Improper repairs may put the user at considerable risk.
Before using your appliance for the first time, please read these Instructions for Use carefully. They contain important information concerning your personal safety as well as on use and care of the appliance.
Please retain the operating and installation instructions for a subsequent owner.
Dispose of packaging materials properly (see Installation instructions).
This extractor hood is designed for domestic use only.
Before any cleaning or maintenance operation, disconnect the hood from the mains by removing the plug or disconnecting the home mains switch.
The appliance is not intended for use by children or persons with impaired physical, sensorial or mental faculties, or if lacking in experience or know-how, unless they are under supervision or have been trained in the use of the appliance by a person responsible for their safety.
Children should be monitored to ensure that they do not play with the appliance.
Never use the hood without effectively mounted grating.
The hood must NEVER be used as a support surface unless specifically indicated.
The premises must be sufficiently ventilated, when the kitchen hood is used together with other gas combustion devices or other fuels.
The suctioned air must not be conveyed into a conduit used for the disposal of the fumes generated by appliances that combust gases or other fuels.
The flaming of foods beneath the hood itself is severely prohibited.
The use of exposed flames is detrimental to the filters and may cause a fire risk, and must therefore be avoided in all circumstances.
⚠️ Any frying must be done with care in order to make sure that the oil does not overheat and burst into flames.
As regards the technical and safety measures to be adopted for fume discharging it is important to closely follow the relations provided by the competent authorities.
The hood must be regularly cleaned on both the inside and outside (AT LEAST ONCE A MONTH, it is in any event necessary to proceed in accordance with the maintenance instructions provided in this manual).
⚠️ Failure to follow the instructions as concerns hood and filter cleaning will lead to the risk of fires.
⚠ Do not use or leave the hood without the lamp correctly mounted because of the possible risk of electric shocks.
⚠️ We decline any responsibility for any problems, damage or fires caused to the appliance as the result of the non-observance of the instructions included in this manual.
Operating procedure
The most effective method of removing vapours produced during cooking is to:
☐Switch the ventilator ON as soon as you begin cooking.
☐Switch the ventilator OFF a few minutes after you have finished cooking.

Switch ON/OFF Pilot-lights: press
to switch on/off lights.

Switch OFF suction / ON speed (rating) of suction speed 1: press this switch once to turn off the speed (rating) of the suction function that has been selected, or (if no speed rating of suction function is selected) select the speed (rating) of suction speed 1. Press again and keep pressed to activate the timer function for 20 minutes (blinking light), after which the cooker hood will switch off.

Speed selecting button suction
Speed 2: press this switch once to select the speed rating of suction speed 2. Press again and keep pressed to activate the timer function for 15 minutes (blinking light), after which the cooker hood will switch off.

Speed selecting button suction
Speed 3: press this switch once to select the speed rating of suction speed 3. Press again and keep pressed to activate the timer function for 10 minutes (blinking light), after which the cooker hood will switch off.

Speed selecting button (speed rating) for intensive suction (with timer): press to select the suction speed (rating). The functioning time is 5 minutes (blinking push-button), after which the suction function will either turn off or return to the suction speed that had previously been selected.

Note: It is possible to
keep a check of this function so that the hood switches off 5 minutes after it has worked (even though another function had been selected prior to this one). After having pressed the button, press again and keep pressed; the pilot light will start blinking indicating that the selected function has been set.

Reset Button for saturation of
filters: the hood will warn the user that it is time to do maintenance work on the filters by giving out a light signal.
Red-light Button blinking: carry out the maintenance of the greasy filters. Following this, press the button for over 3 seconds and the button will turn off.
Red-light Button: carry out maintenance on carbon filters. Following this, press the button for more than 3 seconds; the button will switch off.
Attention: the hood is provided only with a warning signal for greasy filters.
To put into function the greasy-filter signal: Set the cooker hood off, press switch button

for more than 3 seconds (the switch will turn on red signalling that the function has been set).
To deactivate the carbon filter signal, repeat the entire procedure again.
Filters and maintenance
ATTENTION! Before performing any maintenance operation, isolate the hood from the electrical supply by switching off at the connector and removing the connector fuse.
Or if the appliance has been connected through a plug and socket, then the plug must be removed from the socket.
Maintenance of the panel
Dismantling:
Extract with decision (LOWER SIDE) and rotate upwards.
Unscrew the knobs which fix the panel to the hood by using a coin and unhook it from the upper fastening points.

Cleaning:
The panel must be cleaned as often as the grease filter, wash by hand with non-abrasive detergents.
Do not wash in dishwasher. Use the drainpipes placed near the corners at the back to make the water left inside flow.
DO NOT USE ALCOHOL!
Montage:
Proceed in the reverse direction for dismantling.
Firmly screw in the fastening pawls by using a coin.
Attention! Always check that the panel is fixed in its place well.
Grease filters:
Metal filters are used to trap the greasy element of the vapours that develop during cooking.
The filter mats are made from noncombustible metal.
Caution:
As the filter becomes more and more saturated with grease, not only does the risk of it catching fire increase but the efficiency of the extractor hood can also be adversely affected.
Important:
By cleaning the metal grease filters at appropriate intervals, the possibility of them catching fire as a result of a build-up of heat such as occurs when deep-fat frying or roasting is taking place, is reduced.
Cleaning the metal grease filters:
These must be cleaned once a month (or when the filter saturation indication system – if envisaged on the model in possession – indicates this necessity). The filters can be cleaned in a dishwasher. It is however possible that they will become slightly discoloured. The filter must be placed loosely, and NOT wedged, in the dishwasher. Important: Metal filters that are saturated with grease should not be washed together with other dishes etc. When cleaning the filters by hand, soak them in hot soapy water first of all. Then brush the filters clean, rinse them thoroughly and leave the water to drain off.
Filters and maintenance
Removing and inserting the metal grease filters:
- Remove the panels completely (see previous paragraph).
- Press the catch on the grease filters inwards and fold the filters down.
Remove the grease filter carefully, making sure that it does not fall.

- Clean the filters.
- Insert the clean filters back into the hood.
- Reinstall the panels.
Activated carbon filter:
For neutralizing odours in recirculating mode.
Caution:
As the filter becomes more and more saturated with grease, there is an increased risk of fire and the function of the extractor hood may be impaired.
- Remove the panels completely (see previous paragraph).
- Remove the metal filters (see "Removing and inserting the metal grease filters").
⚠️ Remove the grease filter carefully, making sure that it does not fall.
- Install the carbon filter on the back of the grease filter and fix with two rods. Attention! The rods are included in the carbon filter packing and not on the hood.
- Insert the grease filters (see removal and installation of the metal-mesh grease filters).
- Reinstall the panels.

Removing the filter:
The filters are removed in reverse sequence.
Maintenance of the carbon filter:
The charcoal filter can be washed once every two months (or when the filter saturation indication system – if envisaged on the model in possession – indicates this necessity) using hot water and a suitable detergent, or in a dishwasher at 65°C (if the dishwasher is used, select the full cycle function and leave dishes out).
Eliminate excess water without damaging the filter, then put it in the oven for 10 minutes at 100°C to dry completely. Replace the mattress every 3 years and when the cloth is damaged.
The activated carbon filters are available from specialist outlets (see Optional accessories). Use only original filters. The appliance is then guaranteed to function perfectly.
Disposal of old activated carbon filters:
Activated carbon filters do NOT contain any harmful substances. They can therefore be disposed of as household waste.
Cleaning and care
Disconnect the extractor hood from the electricity supply by pulling out the mains plug or switching it off at the fuse box.
At the same time as you clean the grease filters, clean off any grease from all accessible parts of the housing. This significantly reduces the fire hazard and ensures that the extractor hood performs as effectively as possible. Use a hot detergent solution or a mild window cleaner to clean the canopy of the extractor hood. Do not scrape off any dirt that has dried on but loosen it up with a damp cloth. Do not use abrasive cleaning agents or sponges that could cause scratches. Note: Do not use alcohol (spirit) on plastic parts, otherwise the surface may become matt in appearance.
Caution: Ensure that the kitchen is adequately ventilated. Avoid naked flames!
Clean the sliding switch with a soft, damp cloth (mild detergent solution) only.
Do not use stainless steel polish on the sliding switch.
Stainless steel surfaces:
Use a mild non-abrasive stainless steel cleaner. Clean the surface in the same direction as it has been ground and polished.
Do not use any of the following to clean stainless steel surfaces: abrasive sponges, cleaning agents containing sand, soda, acid or chloride!
Aluminium and plastic surfaces:
Use a soft, non-linting window cloth or micro-fibre cloth. Do not use dry cloths. Use a mild window cleaning agent. Do not use aggressive, acidic or caustic cleaners. Do not use abrasive agents.
Replacing the light bulbs
Warning! Prior to touching the light bulbs ensure they are cooled down.
- Switch off the extractor hood and pull out the mains plug or switch off the electricity supply at the fuse box.
- Remove the lamp cover, use a flat bladed screw driver as a lever.
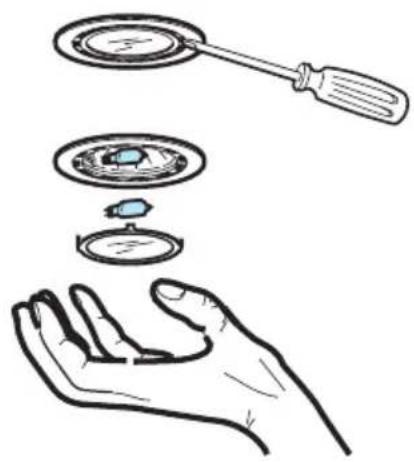
- Replace the bulb (use only Halogenlamp max. 20 Watt - G4).
- Attach the lamp cover again.
- Plug the appliance into the mains or switch it on at the fuse box.
If you encounter a problem
If you have any questions or if a fault occurs, please call Customer Service. (See list of Customer Service representatives).
When you call, please quote the following:
E-Nr. FD
Enter the relevant numbers into the box above.
The E-Nr. (product no.) and FD (production date) are shown on the name plate which can be seen inside the extractor hood after the filter frame has been detached.

Cleaning:
Disassembly:

Cleaning:
Cleaning:
Disassembly:
Cleaning:
ON/OFF button Lights: press to turn the lights on and off.

Filter and maintenance
Cleaning:
Removal:
Cleaning:
Cleaning:

Cleaning:

Filter saturation reset button:
Cleaning:
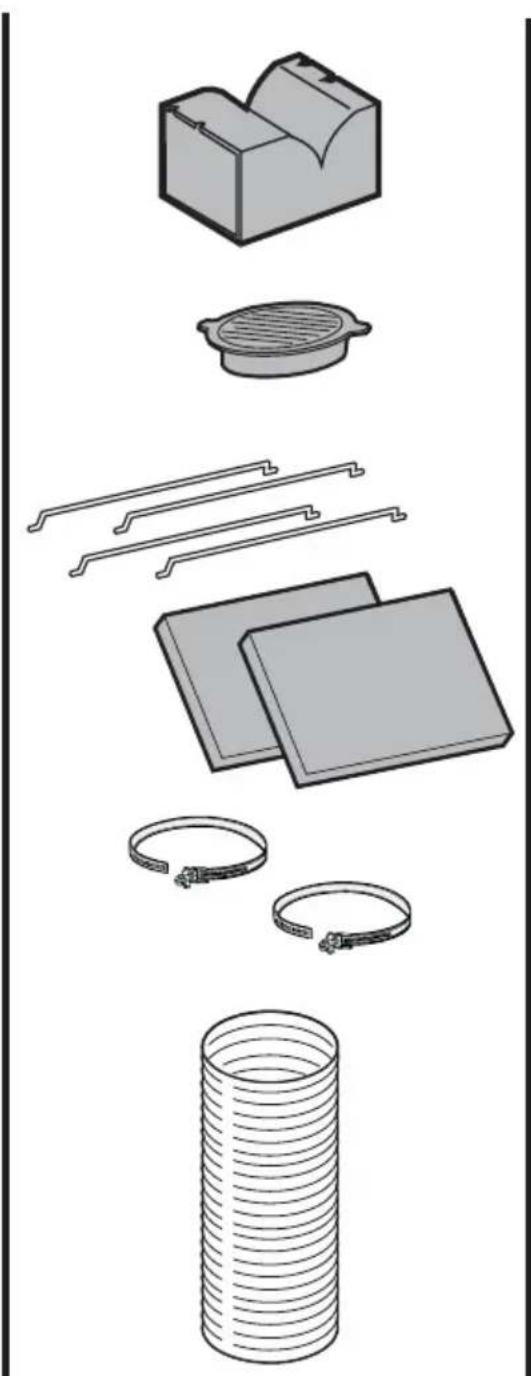
DHZ5485
EAN 4242 002 498 249
Circulating-air mode - complete installation set
- HOUSEHOLD APPLIANCES
- CLEANING
- REMOVAL
- OPERATING INSTRUCTIONS
- APPLIANCE DESCRIPTION
- OPERATING MODES
- EXHAUST-AIR MODE
- CIRCULATING-AIR MODE
- BEFORE USING FOR THE FIRST TIME
- IMPORTANT NOTES
- OPERATING PROCEDURE
- FILTERS AND MAINTENANCE
- MAINTENANCE OF THE PANEL
- DISMANTLING
- DO NOT USE ALCOHOL
- MONTAGE
- GREASE FILTERS
- CAUTION
- IMPORTANT
- CLEANING THE METAL GREASE FILTERS
- REMOVING AND INSERTING THE METAL GREASE FILTERS
- ACTIVATED CARBON FILTER
- REMOVING THE FILTER
- MAINTENANCE OF THE CARBON FILTER
- DISPOSAL OF OLD ACTIVATED CARBON FILTERS
- CLEANING AND CARE
- STAINLESS STEEL SURFACES
- ALUMINIUM AND PLASTIC SURFACES
- REPLACING THE LIGHT BULBS
- IF YOU ENCOUNTER A PROBLEM
- DISASSEMBLY
- FILTER AND MAINTENANCE
- FILTER SATURATION RESET BUTTON
Brand : BOSCH
Model : DWK096652
Category : Range hood