
VS04G2301 - Vacuum Cleaner SIEMENS - Free user manual and instructions
Find the device manual for free VS04G2301 SIEMENS in PDF.


| Product type | Canister vacuum cleaner |
| Brand | Siemens |
| Model | VS04G2301 |
| Maximum power | 700 W |
| Tank capacity | 4 L (dust bag) |
| Suction type | With bag |
| Filter | Washable HEPA |
| Power cord length | 6 m |
| Operating radius | 9 m |
| Net weight | 5 kg |
| Dimensions (W x D x H) | 400 x 300 x 200 mm |
| Noise level | 76 dB(A) |
| Color | Red and black |
| Included accessories | Floor nozzle, crevice tool, upholstery brush |
| Maintenance and cleaning | Replace the bag when full, clean the filter regularly |
| Safety | Overheating protection |
| Spare parts and repairability | Filter bags and filters available in stores or online |
Frequently Asked Questions - VS04G2301 SIEMENS
User questions about VS04G2301 SIEMENS
0 question about this device. Answer the ones you know or ask your own.
Ask a new question about this device
Download the instructions for your Vacuum Cleaner in PDF format for free! Find your manual VS04G2301 - SIEMENS and take your electronic device back in hand. On this page are published all the documents necessary for the use of your device. VS04G2301 by SIEMENS.
USER MANUAL VS04G2301 SIEMENS
natural_image
Line drawing of a vacuum cleaner with coiled hose and handle (no text or symbols)VS5.A./VS5.B./VS5.C.
natural_image
Technical illustration of a Siemens plastic bag and its packaging (no text or symbols on the diagram itself)
natural_image
Illustration of a mechanical component with a central circular feature and a rectangular opening (no text or symbols)
natural_image
Simple line drawing of a rectangular grid structure with no text or symbols
natural_image
3D illustration of a mechanical component with two cylindrical parts and a flat section, labeled 'D' in the top-left corner (no text or symbols on the object itself)
natural_image
3D rendered image of a handheld vacuum cleaner (no text or symbols visible)
natural_image
Illustration of a cleaning brush with a handle and textured base (no text or symbols)
natural_image
Illustration of a pen tip being inserted into a cylindrical object (no text or symbols)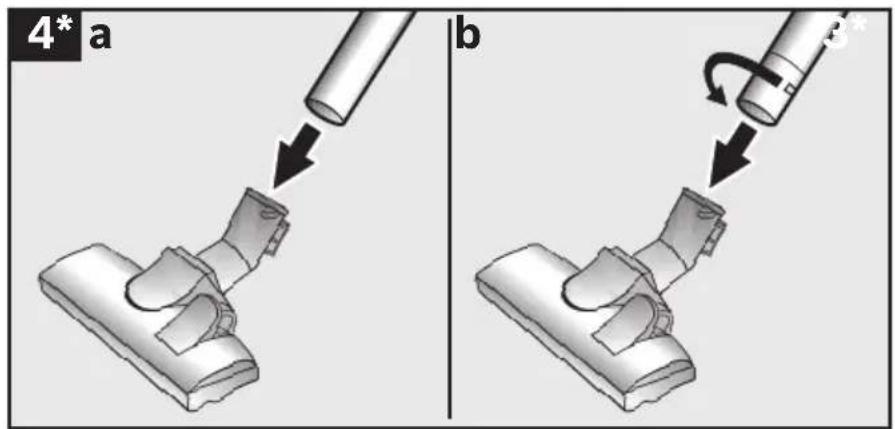

natural_image
Close-up of a mechanical device with a tool inserted, showing internal components and an arrow indicating direction (no text or symbols)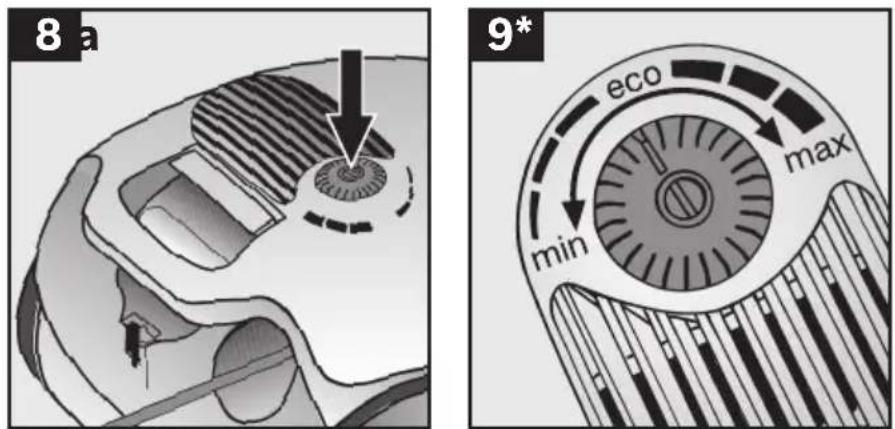

natural_image
Diagram of a vacuum cleaner with a downward arrow indicating motion, no text or symbols present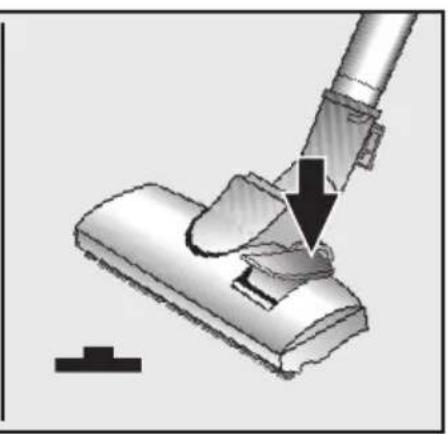
natural_image
Mechanical assembly diagram showing a hand operating a vacuum cleaner with a downward arrow indicating motion (no text or symbols present)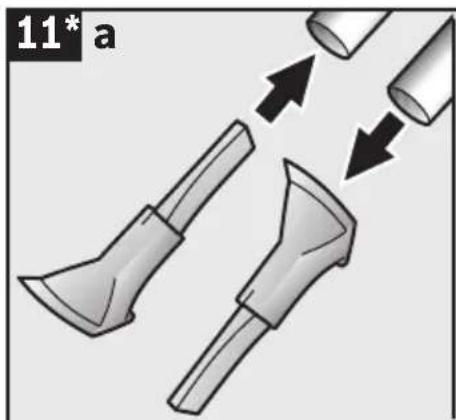
natural_image
Illustration of two axles with arrows indicating movement or assembly (no text or symbols)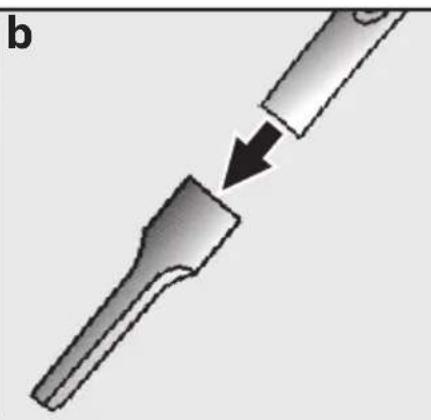
natural_image
Diagram showing a mechanical component being inserted into a housing, with no visible text or symbols.
natural_image
Diagram showing a pipe being inserted into a T-shaped object, with an arrow indicating the insertion direction (no text or symbols present)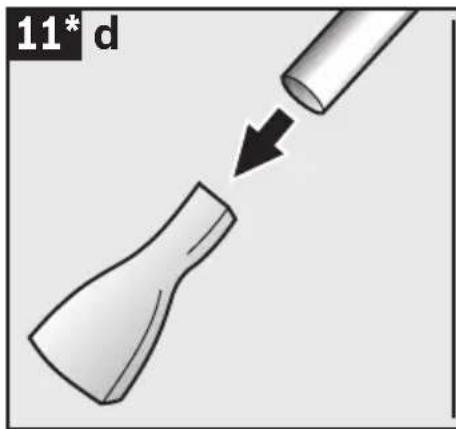
natural_image
Diagram showing a tool interacting with a conical object, labeled '11* d' (no text or symbols on the diagram itself)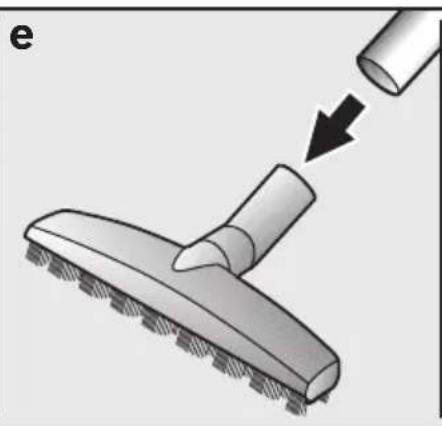
natural_image
Diagram showing a tool interacting with a textured surface, with an arrow indicating motion (no text or symbols present)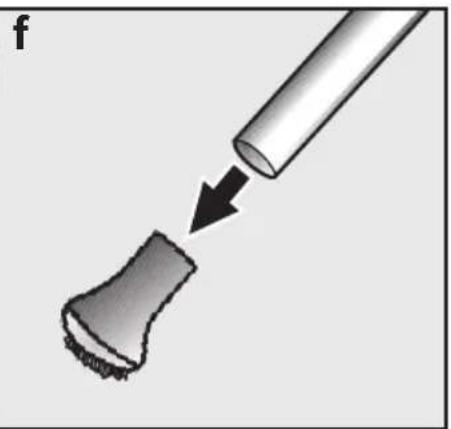
natural_image
Diagram showing a tool interacting with a textured surface, no text or symbols present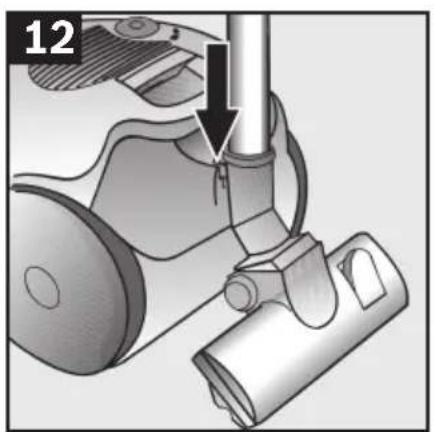
natural_image
Mechanical assembly diagram showing a tool interacting with a component, labeled with number 12 (no text or symbols on the diagram itself)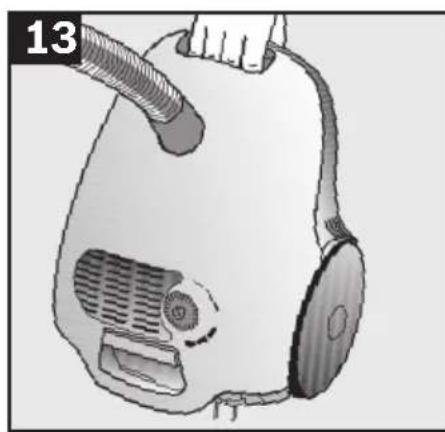
natural_image
Illustration of a hand holding a vacuum cleaner with attached hose and ventilation slots (no text or symbols)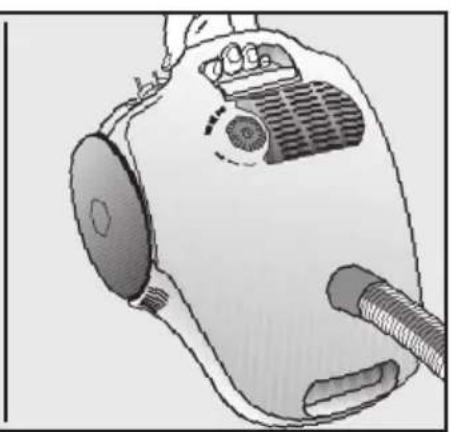
natural_image
Illustration of a handheld device with a circular head and coiled cable (no text or symbols)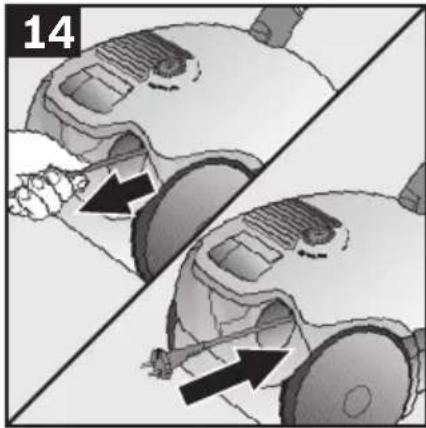
natural_image
Diagram showing two mechanical components with arrows indicating motion or movement, no visible text or symbols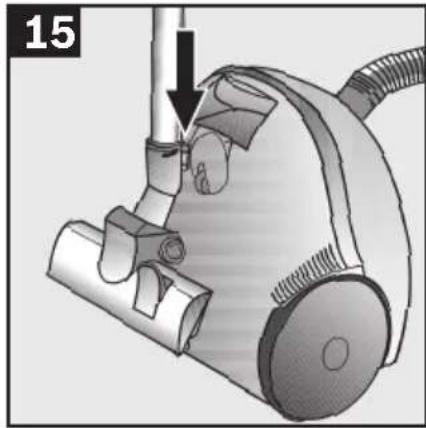
natural_image
Mechanical device with a downward arrow indicating a process or operation, no visible text or symbols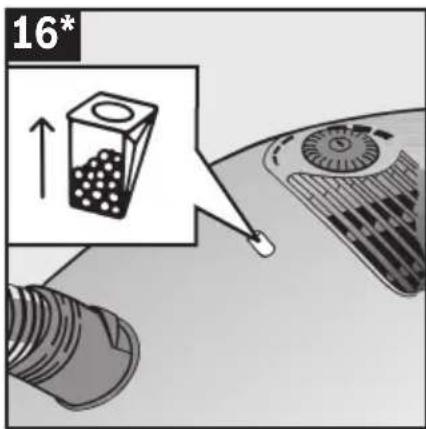
natural_image
Illustration of a hand using a tool to press down a mechanical component, no text or symbols present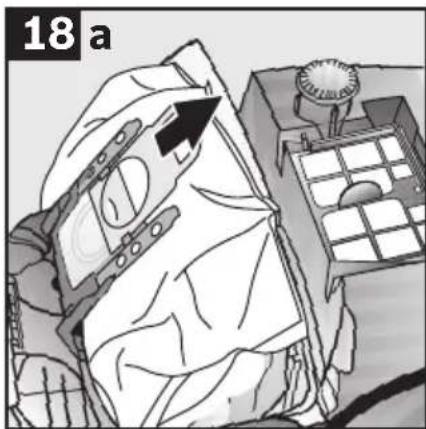
natural_image
Illustration of a person in bed with a computer monitor and a device, no text or symbols present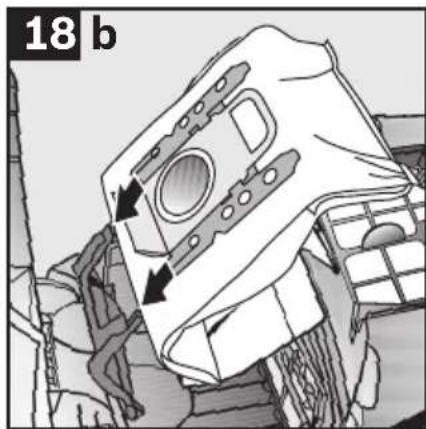
natural_image
Illustration of a hand placing a grid-like object into a container with an arrow indicating upward motion (no text or symbols)
natural_image
Illustration of a hand holding a grid-like object with scattered dots, no text or symbols present
natural_image
Line drawing of a hand pouring liquid into a container with a circular icon (no text or symbols)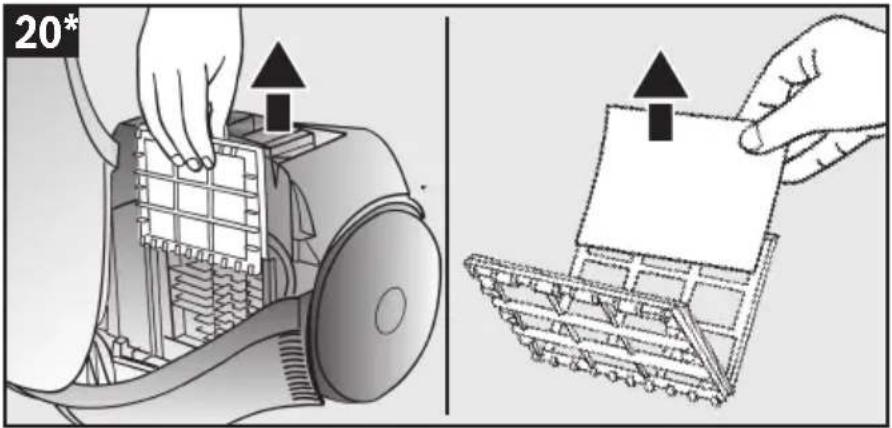

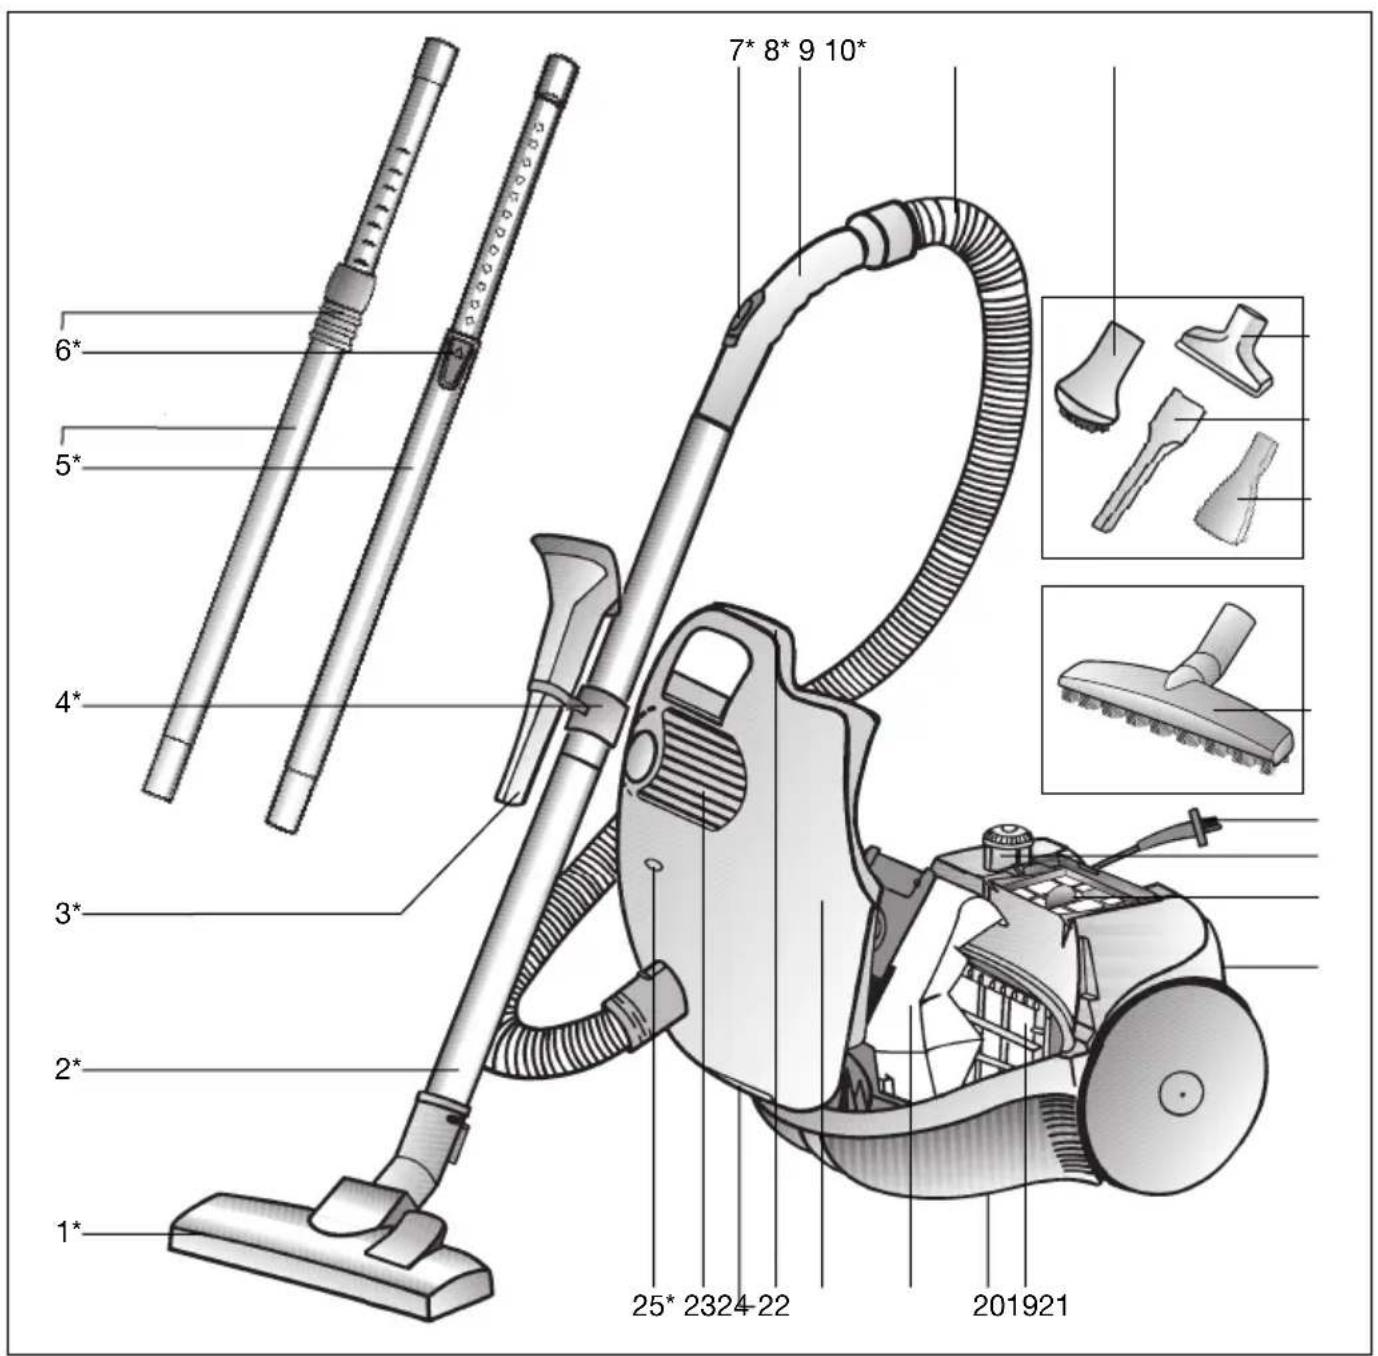
Gerätebeschreibung
natural_image
Technical illustration of a vacuum cleaner component with labeled parts (1 and 2), showing internal structure without any text or symbols.natural_image
Simple line drawing of an open book with a right-pointing arrow indicating the page direction (no text or symbols)1 Adjustable floor nozzle*
2 Suction pipe*
3 Combination nozzle*
4 Attachment support for the combination nozzle*
5 Telescopic pipe*
6 Locking button / sliding sleeve*
7 Secondary air regulator*
8 Hose grip*
9 Suction hose
10 Furniture brush*
11 Upholstery nozzle*
12 Corner nozzle*
13 Mattress nozzle*
14 Hard floor nozzle*
15 Mains cable
16 On / off switch with electronic suction regulator*
17 Exhaust filter*
18 Parking aid
19 Motor protection filter
20 Storing aid
21 Paper filter
22 Lid
23 Handle
24 Exhaust grid
25 Filter change display*
*Depending on version
Spare parts and accessories
natural_image
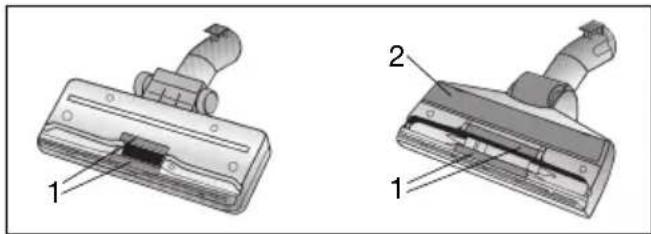
Technical illustration of two different vacuum cleaner components with labeled parts (no text or symbols present)Filament lever (1) and polishing strips (2) can be obtained from the customer services and can also be replaced there
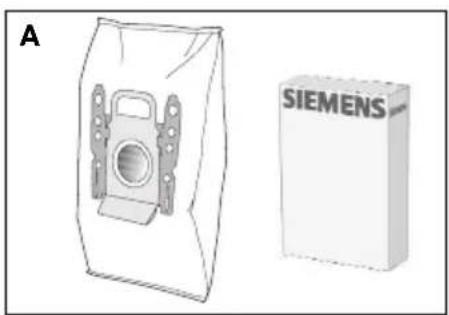
A Replacement filter pack
■ Filter type G (VZ41AFG)
■ For best performance: Gplus (VZ41GPLUS)
Contents:
4 filter bags with seal
1 micro-hygiene filter
http://www.siemens.com/dust-bag
B Textile filter (long-term filter) VZ10TFG
Reusable filter with Velcro fastening.
C HEPA Filter VZ54000
additional filter for pure exhaust air.
Recommended for those with allergies.
Replace every year.
D TURBO-UNIVERSAL®-upholstery brush VZ46001
Simultaneously brush and vacuum upholstered furniture, mattresses, car seats, etc..
Particularly suitable for vacuuming animal hair and fur.
The brush roller is driven by the suction force of the vacuum cleaner.
No electrical connection required.
E TURBO-UNIVERSAL® - floor brush VZ102TBB
Simultaneously brush and vacuum short-pile carpets and fitted carpets or any kind of covers. Particularly suitable for vacuuming animal hair and fur. The brush roller is driven by the suction force of the vacuum cleaner.
No electrical connection required.
F Hard floor nozzle VZ123HD
To vacuum smooth flooring (parquet, tiles, terracotta...).
en
Congratulations on your purchase of a Siemens VS5 vacuum cleaner.
This instruction manual describes various VS5 models, which means that some of the equipment features and functions described may not be available on your model.
You should only use original Siemens accessories, which have been specially developed for your vacuum cleaner to achieve the best possible vacuuming results.
Please keep this instruction manual in a safe place. If you pass the vacuum cleaner on to someone else, please also pass on this instruction manual.
Intended use
This vacuum cleaner is intended for domestic use only, not for commercial use.
Only use this vacuum cleaner in accordance with the instructions in this instruction manual.
The manufacturer will not accept any responsibility for damage caused by improper use or incorrect operation.
Therefore, you must note the following points.
The vacuum cleaner must only be operated with:
■ Manufacturer's original dust bags
■ Manufacturer's original replacement parts, accessories or special accessories
Safety information
This vacuum cleaner complies with the generally accepted standards of technology and relevant safety regulations.
■ Always observe the information on the rating plate when using the vacuum cleaner and connecting to the power supply.
■ Never use the vacuum cleaner without a dust bag fitted. => This can damage the appliance.
■ Only allow children to use the vacuum cleaner under supervision.
■ This appliance must not be used by children or persons with limited physical, sensory or mental abilities or with a lack of experience and knowledge (including children) unless they have been instructed in the use of the appliance by a responsible person.
The vacuum cleaner may not be used for:
■ cleaning persons or animals
■ vacuuming up:
- hazardous, sharp-edged, hot or red hot substances.
- damp or liquid substances
– highly flammable or explosive substances and gases - ash, soot from tiled stoves and central heating systems
-
toner dust from printers and copiers.
-
Keep suction away from your head when using the handle, nozzles or pipe.
=> Risk of injury.
■ Stand the appliance on a firm, secure surface when vacuuming.
■ When vacuuming stairs, the appliance must always be lower down than you.
■ In the following cases, stop using the appliance immediately and contact the after-sales service:
- if the mains connection cable is damaged.
- if you have accidentally vacuumed up some liquid or liquid has entered the inside of the appliance - if the appliance has been dropped.
■ Do not use the power cord to carry the vacuum cleaner.
■ Fully extend the power cord when using the vacuum cleaner continuously for several hours.
■ When disconnecting the appliance from the mains, pull on the plug, not the power cord.
■ Do not pull the power cord around sharp corners or allow it to become trapped.
■ Unplug the power cord from the mains before carrying out any work on the vacuum cleaner or its accessories.
■ Do not use the vacuum cleaner if it is damaged. Unplug the power cord from the mains if a fault is detected.
■ For safety reasons, only authorised after-sales service personnel are permitted to carry out repairs and fit replacement parts to the vacuum cleaner.
■ Protect the vacuum cleaner from outside weather conditions, moisture and sources of heat.
■ The vacuum cleaner is not suitable for use on building sites.
=>Vacuuming up building rubble could damage the appliance.
■ Switch off the appliance when it is not in use.
■ At the end of its life, the appliance should be rendered unusable, then disposed of in an appropriate manner.
■ Plastic bags and films must be kept out of the reach of children before disposal (risk of suffocation).
■ do not pour any flammable substances or substances containing alcohol onto the filters (filter bag, motor protective filter, exhaust filter, etc.).
Disposal information
■ Packaging
The packaging is designed to protect the vacuum cleaner from being damaged during transportation. It is made of environmentally friendly materials and can be recycled.
Dispose of packaging that is no longer required at an appropriate recycling point.
en
■ Used vacuum cleaners
Used vacuum cleaners still contain many valuable materials. Therefore, please take your used vacuum cleaner to your retailer or recycling centre to be recycled. For current disposal methods, please enquire at your retailer or your local council.
■ Disposal of filters and dust bags
Filters and dust bags are made from environmentally friendly materials.
As long as they do not contain substances that are not permitted to be disposed of in the household rubbish, you can dispose of them with your normal household rubbish.
Please note
- The mains socket must be protected by at least a 16 amp fuse.
If a fuse should blow when you switch on the appliance, this may be because other electrical appliances which have a high current draw are connected to the same power circuit.
To prevent the fuse from blowing, select the lowest power setting before switching the appliance on, and increase the power only once it is running.
Please fold out the picture page

natural_image
Simple line drawing of an open book with a right-pointing arrow indicating the page (no text or symbols present)Before using for the first time
Illustration 1\*
Push the handle onto the flexible tube and until it engages.
Starting up
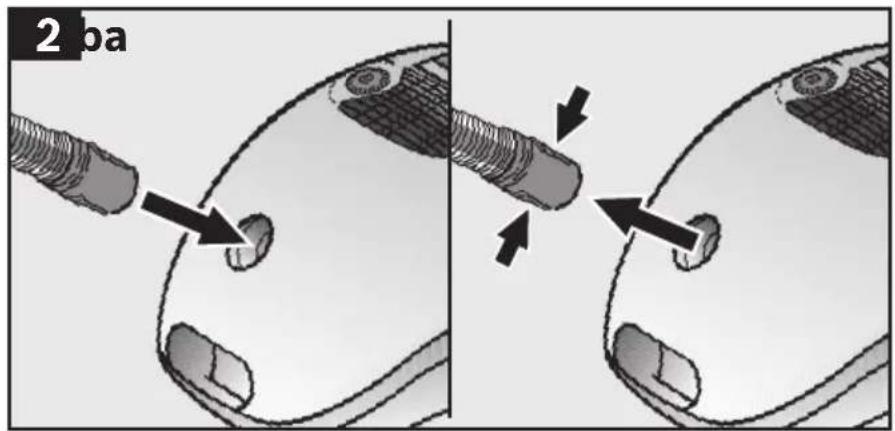
Illustration 2
a) Lock the suction hose supports into the suction opening.
b) When removing the suction hose, press together both latches and pull out the hose.
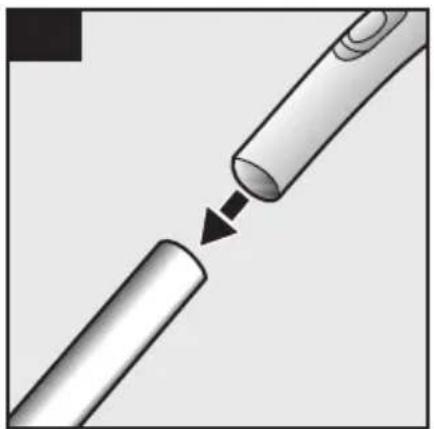
Illustration 3\*
Connect the handle and the suction hose.
Illustration 4\*
a) Connect the floor nozzle and the suction hose.
b) Insert the telescopic pipe into the supports of the floor nozzle and secure by turning.
*Depending on version
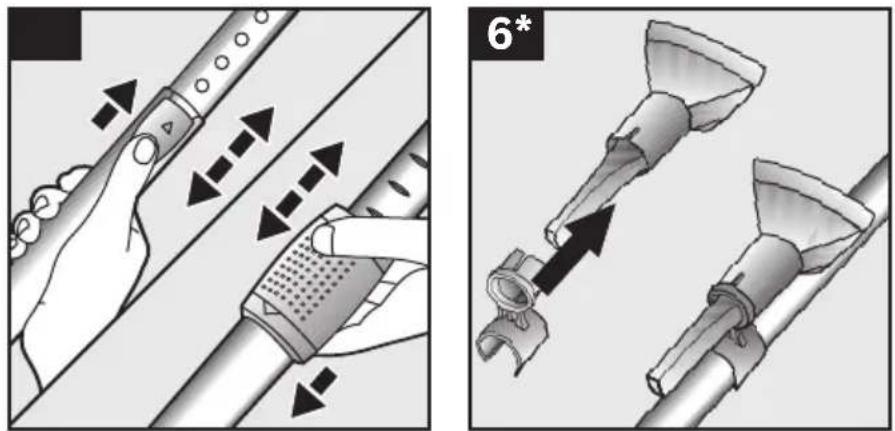
Illustration 5\*
a) Connect the suction hoses.
b) Unlock the telescopic pipe and adjust to the desired length by moving the adjusting button / sliding sleeve in the direction of the arrow.
Illustration 6\*
Slide the attachment support on to the combination nozzle and clip on to the suction / telescopic pipe
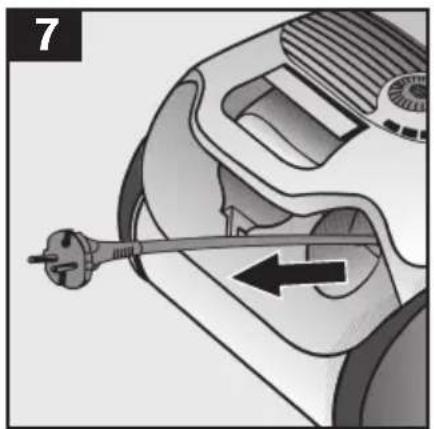
Illustration 7
Take the mains cable by the plug and pull out the desired length and then plug in to the mains socket.
Illustration 8
Switch on / off the vacuum cleaner by pressing the on / off button in the direction of the arrow.
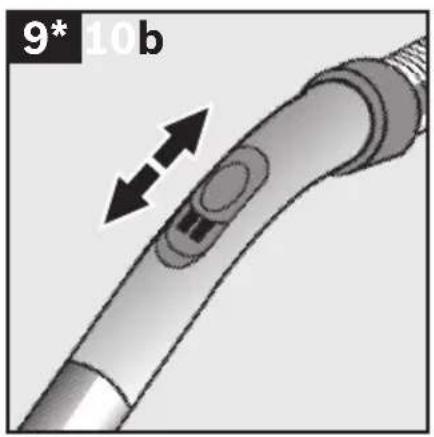
Illustration 9\*
a) Set the level of suction by turning the on / off button in the direction of the arrow.
b) The suction performance can also be regulated by turning the secondary air regulator in the direction of the arrow.
■ Secondary air opening open ➤ Suction reduced
■ Secondary air opening closed ▶ Maximum suction
Suction
Illustration 10
Setting the floor nozzle:
■ fitted carpets and carpets
■ smooth floors


Illustration 11\*
Vacuuming with accessories
(connect to the handle or the suction hose as required)
a) Combination nozzle
For vacuuming in corners, joins, upholstery, curtains etc.
b) Corner nozzle
For vacuuming in corners and joins
c) Upholstery nozzle
For vacuuming upholstery, curtains etc.
d) Mattress nozzle
For vacuuming mattresses, upholstery etc.
e) Hard floor nozzle
For vacuuming hard floor surfaces (tiles, parquet etc.)
f) Furniture brush
To vacuum window frames, cupboards, sections etc..
Illustration 12
When taking brief vacuuming pauses, you can use the parking aid on the back of the appliance. Push the hook on the floor nozzle in to the recess on the back of the appliance.
Illustration 13
When vacuuming, e.g. stairs, the appliance can also be carried using the two grips.
After work
Illustration 14
Pull out the mains plug.
Pull briefly on the mains cable and then let go (the cable rolls up automatically).
Illustration 15
To store / transport the appliance, you can use the storing aid on the underside of the appliance. Stand the appliance up straight. Push the hook on the floor nozzle in to the recess on the underside of the appliance.
Changing the filter
Replace the dust bag
Illustration 16\*
The filter change display on the lid turns yellow.
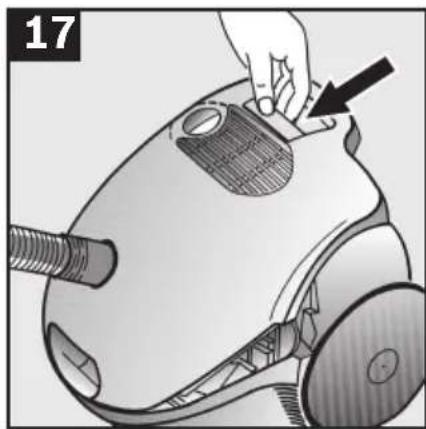
Illustration 17
Open the covering by pressing the adjusting lever in the direction of the arrow.
Illustration 18
a) Close and remove the dust bag by pulling on the cover clips.
b) Insert the new dust bag in the holding fixture, up to the stop.
Attention: Cover will only close if a paper filter is inserted!
- After vacuuming fine dust particles (e.g. cement, plaster, etc.), clean the motor filter and replace the microfilter if necessary.
Cleaning the motor protection filter
The motor protection filter should be cleaned regularly by knocking out the dirt and rinsing.
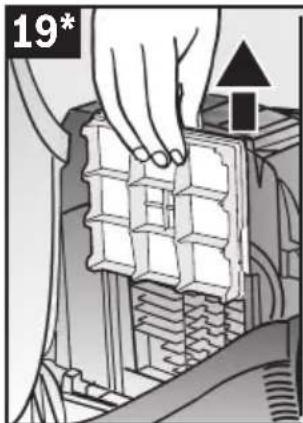
Illustration 19\*
■ Open the dust bag compartment lid (see Figure 17).
■ Pull out the motor protection filter in the direction of the arrow.
■ Clean the motor protection filter by tapping it.
■ If it is very dirty, the motor protection filter should be rinsed.
The filter must then be left to dry for at least 24 hours.
■ After cleaning, slide the motor protection filter into the vacuum cleaner and close the dust bag compartment lid.
Replacing the hygiene microfilter
(Omitted on vacuum cleaners which have a HEPA filter). When should I change the filter? Each time a new paper filter pack is fitted.
Illustration 20\*
■ Open the covering.
■ Pull out the filter holding fixture and open up.
■ Dispose of the old hygiene microfilter and insert a new hygiene microfilter.
■ Slide the filter holding fixture in and close the covering.
Cleaning the exhaust filter
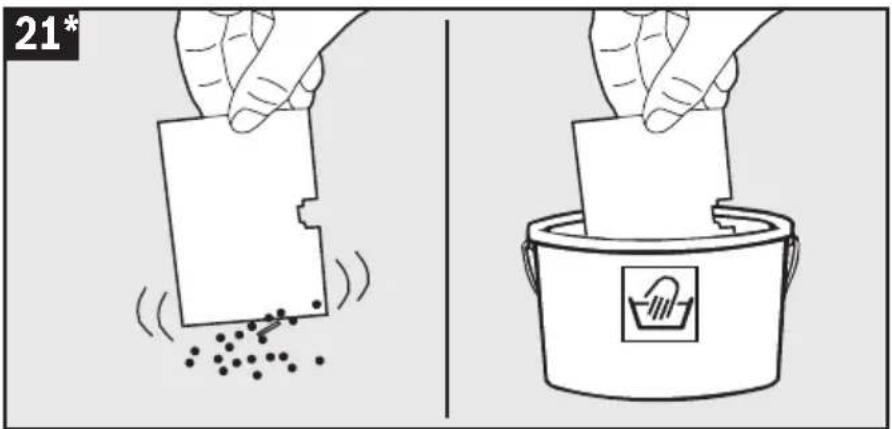
The exhaust filter should be cleaned regularly by tapping out and rinsing.
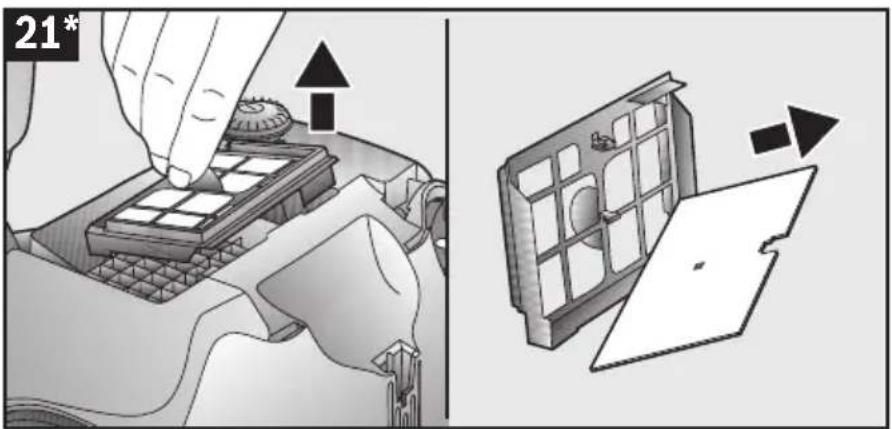
Illustration 21\*
■ Open the dust compartment lid (see Fig. 17).
■ Pull out the filter frame in the direction of the arrow.
■ Tap the dirt out of the exhaust filter.
■ If it is very dirty, the exhaust filter should be rinsed. The filter must then be left to dry for at least 24 hours.
■ Slide the filter frame under the two retaining ribs and push in the direction of the arrow until it engages.
■ Close the dust compartment lid.
Maintenance
■ Before the appliance is cleaned, ensure that it has been switched off and the mains plug removed.
■ Vacuum cleaners and accessories made of plastic can be cleaned using a general commercial plastic cleaner.
Do not use scouring agents, glass or all-purpose
cleaners.
Never immerse the vacuum cleaner in water!
■ If necessary, the dust section can be cleaned using another vacuum cleaner, or simply cleaned out using a dry dust cloth / dust brush.
Subject to technical change without notice.
natural_image
Technical illustration of a vacuum cleaner component with labeled parts (1 and 2), showing internal structure without any text or symbols.natural_image
Simple line drawing of an open book with a right-pointing arrow indicating the page direction (no text or symbols)natural_image
Technical illustration of a vacuum cleaner component with labeled parts (1 and 2), showing internal structure without any text or symbols.natural_image
Simple line drawing of an open book with a right-pointing arrow indicating the page (no text or symbols present)natural_image
Technical illustration of a vacuum cleaner component with labeled parts (1 and 2), showing internal structure without any text or symbols.natural_image
Simple line drawing of an open book with a right-pointing arrow indicating the page direction (no text or symbols)natural_image
Technical illustration of two mechanical components with labeled parts (1 and 2), no text or symbols present.B TEKSTIL-FILTER (Permanent filter)
VZ10TFG
natural_image
Simple line drawing of an open book with a right-pointing arrow indicating the page direction (no text or symbols)natural_image
Technical illustration of two mechanical components with labeled parts (1 and 2), no text or symbols present.natural_image
Simple line drawing of an open book with a right-pointing arrow indicating rotation (no text or symbols)natural_image
Technical illustration of two mechanical components with numbered parts, no visible text or symbolsnatural_image
Simple line drawing of an open book with a right-pointing arrow indicating rotation (no text or symbols)natural_image
Technical illustration of two different vacuum cleaner components with labeled parts (no text or symbols present)natural_image
Simple line drawing of an open book with a right-pointing arrow indicating the page direction (no text or symbols)natural_image
Technical illustration of a vacuum cleaner component with labeled parts (1 and 2), showing internal structure without any text or symbols.natural_image
Simple line drawing of an open book with a right-pointing arrow indicating the page direction (no text or symbols)Primera utilización
Imagen 1\*
natural_image
Technical illustration of two mechanical components with numbered parts, no visible text or symbolsnatural_image
Simple line drawing of an open book with a right-pointing arrow indicating the page direction (no text or symbols)natural_image
Technical illustration of a vacuum cleaner component with labeled parts (1 and 2), showing internal structure without any text or symbols.natural_image
Simple line drawing of an open book with a right-pointing arrow indicating rotation (no text or symbols)natural_image
Technical illustration of a vacuum cleaner component with labeled parts (1 and 2), showing internal structure without any text or symbols.natural_image
Simple line drawing of an open book with a right-pointing arrow indicating rotation (no text or symbols)natural_image
Technical illustration of two mechanical components with labeled parts (1 and 2), no text or symbols present.natural_image
Simple line drawing of an open book with a right-pointing arrow indicating the page (no text or symbols present)natural_image
Technical illustration of a vacuum cleaner component with labeled parts (1 and 2), showing internal structure without any text or symbols.natural_image
Simple line drawing of an open book with a right-pointing arrow indicating rotation (no text or symbols)natural_image
Technical illustration of a vacuum cleaner component with labeled parts (1 and 2), showing internal structure without any text or symbols.natural_image
Simple line drawing of an open book with a right-pointing arrow on the page (no text or symbols)natural_image
Technical illustration of a vacuum cleaner component with labeled parts (1 and 2), showing internal structure without any text or symbols.natural_image
Simple line drawing of an open book with a right-pointing arrow indicating the page (no text or symbols present)natural_image
Technical illustration of two different vacuum cleaner components with labeled parts (no text or symbols present)natural_image
Simple line drawing of an open book with a right-pointing arrow indicating the page direction (no text or symbols)natural_image
Simple line drawing of an open book with a right-pointing arrow indicating the page (no text or symbols present)natural_image
Mechanical component diagram showing a connector with a handle and labeled part (no text or symbols present)
AE United Arab Emirates,
HEATHERTON, Victoria 3202
Tel.: 1300 368 339
Fax: 1300 306 818
valid only in AUS
mailto:bshau-as@bshg.com
www.siemens-home.com.au
BA Bosnia-Herzegovina, Bosna i Hercegovina
"HIGH" d.o.o.
Odobašina 57
71000 Sarajewo
Info-Line: 061 10 09 05
Fax: 033 21 35 13
mailto:delicnanda@hotmail.com
To arrange an engineer visit, to order spare parts and accessories or for product advice please visit: www.siemens-home.cu.uk or call
Tel.: 0844 892 8999*
*Calls from a BT landline will be charged at up to 3 pence per minute. A call set-up fee of up to 6 pence may apply.
GR Greece, Ελλάς
BSH Ikiakes Siskeves A. B. E.
Central Branch Service
17 km E.O. Athinon-Lamias &
Potamou 20
145 64 Kifisia
Greece – Athens
Tel.:2104 277 701
Fax: 2104 277 669
North-Greece – Thessaloniki
Tel.:2310 497 200
Fax: 2310 497 220
South-Greece – Heraklion/Kreta
Tel.:2810 325 403
Fax: 2810 324 585
Central-Greece – Patras
Tel.: 2610 330 478
Fax: 2610 331 832
mailto:cs_gr_helpdesk@bshg.com
www.siemens-home.com
HK Hong Kong, 香港
BSH Home Appliances Limited
Unit 1 & 2, 3rd Floor
North Block, Skyway House
3 Sham Mong Road
Tai Kok Tsui, Kowloon
Hong Kong
Tel.:2565 6151
Fax: 2565 6252
mailto:service.siemens@
bshg.com
www.siemens-home.com.hk
HR Hrvatska, Croatia
Andabaka d.o.o.
Gunduliceva 10
21000 Split
Info-Line: 021 481 403
Info-Fax: 021 481 402
mailto:servis@andabaka.hr
IE Republic of Ireland
BSH Home Appliances Ltd.
Unit F4, Ballymount Drive
Ballymount Industrial Estate
Walkinstown
Dublin 12
Service Requests, Spares and
Accessories
Tel.: 01450 2655
Fax: 01450 2520
www.siemens-home.com
IL Israel,
C/S/B Home Appliance Ltd.
Uliel Building
2, Hamelacha St.
Industrial Park North
71293 Lod
Tel.: 08 9777 222
Fax: 08 9777 245
mailto:csb-serv@zahav.net.il
www.siemens-home.com
IS Iceland
Smith & Norland hf.
Noatuni 4
105 Reykjavik
Tel.: 0520 3000
Fax: 0520 3011
www.sminor.is
IT Italia, Italy
LT Lietuva, Lithuania
Baltic Continent Ltd.
Lukšio g. 23
09132 Vilnius
Tel.: 05 274 1788
Fax: 05 274 1765
mailto:info@balticcontinent.lt
www.balticcontinent.lt
LU Luxembourg
Unit F 2, 4 Orbit Drive
Mairangi Bay
Auckland 0632
Tel.: 09 477 0492
Fax: 09 477 2647
mailto:bshnz-cs@bshg.com
PL Polska, Poland
Union Industrial Building
Block A, #01-03
577177 Singapore
Tel.: 6751 5000
Fax: 6751 5050
mailto:bshsgp.service@bshg.com
SI Slovenija, Slovenia
BSH Hišni aparati d.o.o.
Litostrojska 48
1000 Ljubljana
Tel.: 01 583 08 87
Fax: 01 583 08 89
15th Road Randjespark
Private Bag X36, Randjespark
1685 Midrand – Johannesburg
Tel.: 086 002 6724
Fax: 0866 171 780
mailto:applianceserviceza@
bshg.com
www.siemens-home.com
DE Garantie
GB Conditions of guarantee
For this appliance the guarantee conditions as set out by our representatives in the country of sale apply. Details regarding same may be obtained from the dealer from whom the appliance was purchased. For claims under guarantee the sales receipt must be produced.
FR Conditions de garantie
natural_image
Symbol of a trash bin crossed with two crossed lines, representing waste or discharge (no text or labels)
de
"This appliance is labelled in accordance with the European directive 2002/96/EG concerning waste electrical and electronic equipment – WEEE."
The directive provides the framework for the return and recycling of used appliances as applicable throughout the EU."
fr
natural_image
Symbol of a trash bin crossed with two crossed lines, representing waste or discharge (no text or labels)pt
Участие Evonite of operations in acceptance and practice no you only gain Betan biotobin техники в Intermediate: http://www.stems-eshop.ru
family-line@bshg.com




- Gerätebeschreibung
- Spare parts and accessories
- A Replacement filter pack
- B Textile filter (long-term filter) VZ10TFG
- C HEPA Filter VZ54000
- D TURBO-UNIVERSAL®-upholstery brush VZ46001
- E TURBO-UNIVERSAL® - floor brush VZ102TBB
- F Hard floor nozzle VZ123HD
- en
- Intended use
- The vacuum cleaner must only be operated with:
- Safety information
- The vacuum cleaner may not be used for:
- Disposal information
- ■ Packaging
- ■ Used vacuum cleaners
- ■ Disposal of filters and dust bags
- Please note
- Before using for the first time
- Illustration 1\*
- Starting up
- Illustration 2
- Illustration 3\*
- Illustration 4\*
- Illustration 5\*
- Illustration 6\*
- Illustration 7
- Illustration 8
- Illustration 9\*
- Suction
- Illustration 10
- Illustration 11\*
- Illustration 12
- Illustration 13
- After work
- Illustration 14
- Illustration 15
- Changing the filter
- Replace the dust bag
- Illustration 16\*
- Illustration 17
- Illustration 18
- Cleaning the motor protection filter
- Illustration 19\*
- Replacing the hygiene microfilter
- Illustration 20\*
- Cleaning the exhaust filter
- Illustration 21\*
- Maintenance
- B TEKSTIL-FILTER (Permanent filter)
- Primera utilización
- Imagen 1\*
- AE United Arab Emirates,
- BA Bosnia-Herzegovina, Bosna i Hercegovina
- GR Greece, Ελλάς
- HK Hong Kong, 香港
- HR Hrvatska, Croatia
- IE Republic of Ireland
- IL Israel,
- IS Iceland
- IT Italia, Italy
- LT Lietuva, Lithuania
- LU Luxembourg
- PL Polska, Poland
- SI Slovenija, Slovenia
- DE Garantie
- GB Conditions of guarantee
- FR Conditions de garantie
- de
- fr
- pt
Brand : SIEMENS
Model : VS04G2301
Category : Vacuum Cleaner