
BT-PG 3100/1 - Generator EINHELL - Free user manual and instructions
Find the device manual for free BT-PG 3100/1 EINHELL in PDF.


| Product type | Electric generator |
| Brand | Einhell |
| Model | BT-PG 3100/1 |
| Maximum power (peak) | 3100 W |
| Rated power (continuous) | 2800 W |
| Output voltage | 230 V / 50 Hz |
| Engine type | 4-stroke, single cylinder |
| Fuel tank capacity | 6.5 L |
| Runtime at 50% load | Approximately 6 hours |
| Starting system | Manual (recoil) |
| Power outlets | 2 x 230 V outlets (Schuko) |
| Noise level | 95 dB(A) |
| Dimensions (L x W x H) | 60 x 45 x 50 cm |
| Weight | 40 kg |
| Fuel | Unleaded petrol |
| Recommended engine oil | SAE 10W-30 |
| Alternator type | Synchronous |
| Protection | Thermal circuit breaker |
| Safety | Low oil level detector with automatic shutdown |
| Maintenance | Oil change, air filter cleaning, spark plug replacement |
| Spare parts and repairability | Air filter, spark plug, starter grip available |
| General information | Portable generator, ideal for construction sites and leisure |
Frequently Asked Questions - BT-PG 3100/1 EINHELL
User questions about BT-PG 3100/1 EINHELL
0 question about this device. Answer the ones you know or ask your own.
Ask a new question about this device
Download the instructions for your Generator in PDF format for free! Find your manual BT-PG 3100/1 - EINHELL and take your electronic device back in hand. On this page are published all the documents necessary for the use of your device. BT-PG 3100/1 by EINHELL.
USER MANUAL BT-PG 3100/1 EINHELL


natural_image
Close-up of a hand placing a black foam block onto a mechanical device (no visible text or symbols)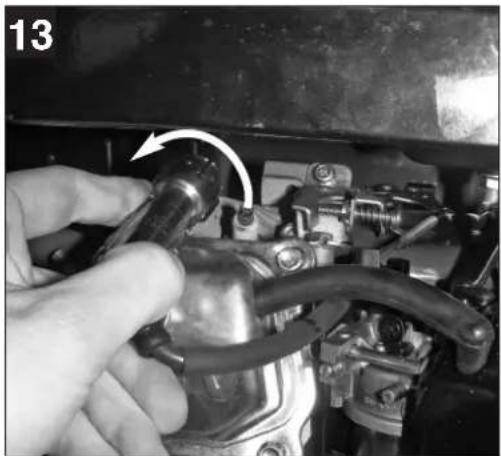
natural_image
Close-up of a hand adjusting a mechanical component with a tool, no visible text or symbols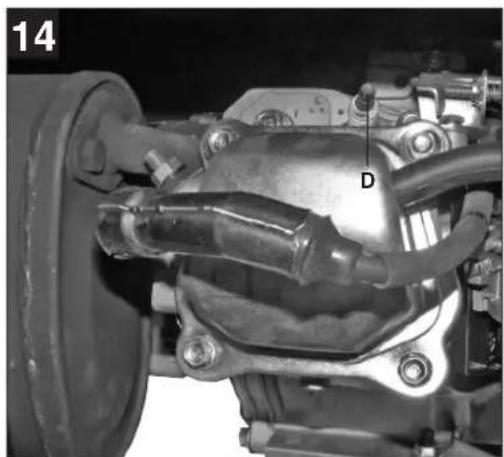
natural_image
Mechanical assembly diagram showing a valve and housing component (no text or symbols visible)15

1

2
3

4

D

Achtung!
When using the equipment, a few safety precautions must be observed to avoid injuries and damage. Please read the complete operating instructions and safety regulations with due care. Keep this manual in a safe place, so that the information is available at all times. If you give the equipment to any other person, hand over these operating instructions and safety regulations as well. We cannot accept any liability for damage or accidents which arise due to a failure to follow these instructions and the safety instructions.
Explanation of the warning signs on the machine (Fig. 15)
- Important. Read the operating instructions.
- Important. Hot parts. Keep your distance.
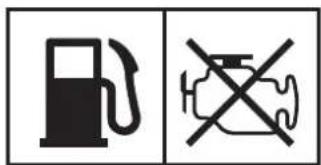
- Important. Switch off the engine before refueling.
- Important. Never operate in non-ventilated rooms.
1. General safety instructions:
●No changes may be made to the generator.
●Only original parts may be used for maintenance and accessories.
● Important: Danger of poisoning, do not inhale emissions.
●Children are to be kept away from the generator.
● Important: Risk of burns. Do not touch the exhaust system or drive unit.
●Wear suitable ear protection when in the vicinity of the equipment.
●Important: Petrol and petrol fumes are highly combustible or explosive.
●Never operate the generator in non-ventilated rooms or in easily inflammable adjacency. When operating the generator in rooms with good ventilation, the exhaust gases must be channeled directly outdoors through an exhaust hose.
Important: Toxic exhaust gases can escape despite the exhaust hose. Due to the fire hazard, never direct the exhaust hose towards inflammable materials.
●Risk of explosion: Never operate the generator in rooms with combustible materials.
●The speed preset by the manufacturer is not allowed to be changed. The generator or connected equipment may be damaged.
- Secure the generator against shifting and toppling during transport.
●Place the generator at least 1m away from buildings and the equipment connected to it.
- Place the generator in a secure, level position. Do not turn, tip or change the generator's position while it is working.
●Always switch off the engine when transporting and refueling the generator.
●Make sure that when you refuel the generator no fuel is spilt on the engine or exhaust pipe.
●Never operate the generator in rain or snow.
●Never touch the generator with wet hands.
●Guard against electric danger. When working outdoors, use only extension cables that are approved for outdoor use and which are marked accordingly (H07RN..).
●The overall length of the extension cables used may not exceed 50 m for 1.5 mm ^2 and 100 m for 2.5 m ^2 .
●No changes may be made to the settings of the motor or generator.
●Repairs and adjustment work may only be carried out by authorized trained personnel.
●Do not refuel or empty the tank near open lights, fire or sparks. Do not smoke!
- Do not touch any mechanically driven or hot parts. Do not remove the safety guards.
- Do not expose the tools to damp or dust.
Permissible ambient temperature – 10 to +40 °C, max. altitude above sea level 1000 m, relative humidity: 90 % (non-condensing)
●The generator is driven by a combustion engine, which produces heat in the area of the exhaust (on the opposite side of the sockets) and the exhaust outlet. You should therefore keep clear of these surfaces because of risk of skin burns.
●The values quoted in the technical data for sound power level (LWA) and sound pressure level (LWM) are emission values and not necessarily reliable workplace values. As there is a correlation between emission and immission levels, the values are not a reliable basis for deciding on any additional precautions which may be needed. Factors influencing the actual user immission level include the properties of the work area, other sound sources etc., the number of machines and other processes in the vicinity, as well as the time span in which the operator is subjected to the noise. Also, the permitted immission level can vary from country to country. Nevertheless, with this information the user is able to make a better assessment of the dangers and risks involved.
●Never use a faulty or damaged electrical equipment (this also applies to extension cables and plug connections).

CAUTION!
Read all safety regulations and instructions.
Any errors made in following the safety regulations and instructions may result in an electric shock, fire and/or serious injury.
Keep all safety regulations and instructions in a safe place for future use.
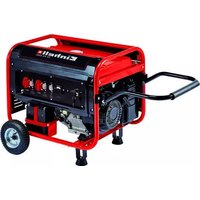
2. Layout (Fig. 1-5)
1 Tank indicator
2 Tank cover
3 2 x 230 V\~ socket-outlets
4 Earth connection
5 Overload cut-out
6 Voltmeter
7 Oil filler plug
8 Oil drain plug
9 Oil shortage cut-out
10 On/Off switch
11 Choke lever
12 Reversing starter
13 Petrol cock
14 Wheels
15 Axle
16 Foot
17 Push bar holder
18 Push bar
19 Screws size M8 x 40
20 Screws size M8 x 16
21 Washers for wheels
22 Securing split pins for wheels
23 Nuts M8
3. Proper use
The device is designed for applications operated with a 230 V alternating current source. Be sure to observe the restrictions in the safety instructions.
The generator is intended to provide electric tools and light sources with electricity.
When using the device with household appliances, please check their suitability in accordance with the relevant manufacturer's instructions. In case of doubt, ask an authorized dealer of the respective appliance.
The machine is to be used only for its prescribed purpose. Any other use is deemed to be a case of misuse. The user / operator and not the manufacturer will be liable for any damage or injuries of any kind caused as a result of this.
Please note that our equipment has not been designed for use in commercial, trade or industrial applications. Our warranty will be voided if the machine is used in commercial, trade or industrial businesses or for equivalent purposes.
4. Technical data
Generator Synchronous
| Protection type: IP23 M | |
| Continuous rated power P_rated (S1): 2600 W | |
| Maximum power P_max (S2 2 min): 3100 W | |
| Rated voltage U_rated : 2 x 230V~ | |
| Rated current I_rated : 11.3 A | |
| Frequency F_rated : 50 Hz | |
| Drive engine design: 4-stroke, air-cooled | |
| Displacement: | 208 cm ^3 |
| Max. power: | 4.1 kW / 5.6 hp |
| Fuel: | petrol |
| Tank capacity: | 15 l |
| Engine oil: | approx. 0.6 l (15W40) |
| Consumption at 2/3 load: | approx. 1,36 l/h |
| Weight: | 42.5 kg |
| Sound pressure level L_pA : | 76 dB(A) |
| Sound power level L_WA /Uncertainty K: | |
| 96 dB (A)/1.4 dB(A) | |
| Power factor cos φ: | 1 |
| Power class: | G1 |
| Max. temperature: 40°C | |
| Max. altitude (above mean sea level): | 1000 m |
| Spark plug: | F7 RTC |
Operating mode S1 (continuous operation)
The machine can be continuously operated with the quoted power output.
Operating mode S2 (temporary operation)
The machine may be temporarily operated with the quoted power output. Afterwards the machine must be stopped for a while to prevent it from overheating.
GB
5. Before putting the machine into operation
5.1 Assembly
●Assemble the foot, wheels and push bar as shown in Figures 6-8.
●Assemble all parts before filling in fuel and oil in order to prevent the fluids from leaking out.
●To mount the wheels, first slide the axle through the mountings on the bottom of the generator and fit the wheels as shown on Figure 7. Make sure that the sides of the wheels with the more protruding wheel hubs are facing towards the generator, as the wheels will otherwise drag against the frame.
5.2 Electrical safety:
●Electric supply cables and connected equipment must be in perfect condition.
●The generator is to be operated only with equipment whose voltage specifications conform with the generator's output voltage.
●Never connect the generator to the power supply (socket-outlet).
- Keep the cable length to the consumer as short as possible.
5.3 Environmental protection
●Dispose of soiled maintenance material and operating materials at the appropriate collection point.
●Recycle packaging material, metal and plastics.
5.4 Connecting to earth
The housing is allowed to be connected to earth in order to discharge static electricity. To do this, connect one end of a cable to the earth connection on the generator (Fig. 4) and the other end to an external earth (for example an earthing rod).
6. Operation
Important! You must fill up with engine oil (approx. 0.6 l) and fuel before you can start the engine.
- Check the fuel level and top it up if necessary
●Make sure that the generator has sufficient ventilation
●Make sure that the ignition cable is secured to the spark plug
●Inspect the immediate vicinity of the generator
●Disconnect any electrical equipment which may already be connected to the generator
6.1 Starting the engine
●Open the petrol cock (13) by turning it down
- Move the ON/OFF switch (10) to position "ON" with the key.
●Move the choke lever (11) to position I∅I.
- Start the engine with the reversing starter (12) by pulling the handle forcefully. If the engine does not start, pull the handle again.
●Push the choke lever (11) back again after the engine has started.
Important!
When starting with the reserve starter, the motor may recoil suddenly as it starts up, resulting in hand injuries. Wear protective gloves when starting the equipment.
6.2 Connecting consumers to the generator
- Connect the equipment you want to use to the 230 V\~sockets (3)
Important: These sockets may be loaded continuously (S1) with 2600W and temporarily (S2) for a maximum of 2 minutes with 2800W.
●The generator is suitable for 230 V\~ AC appliances.
- Do not connect the generator to the domestic power network as this may result in damage to the generator itself or to other electrical appliances in your home.
Note: Some electrical appliances (power jigsaws, drills, etc.) may have a higher level of power consumption when used in difficult conditions.
6.3 Switching off the engine
●Before you switch off the generator, allow it to run briefly with no consumers so that it can "cool down"
- Move the ON/OFF switch (10) to position "OFF" with the key.
- Close the petrol cock
6.4 Overload cut-out 2 x 230 V socket-outlets
Important! The generator is fitted with an overload cut-out.
This shuts down the sockets (3). You can restart the sockets (3) by pressing the overload cut-out (5).
Important! If this happens, reduce the electric power you are taking from the generator or remove any defective connected appliances.
GB
Important! Defective overload cut-outs must be replaced only by overload cut-outs of identical design and with the same performance data. If repairs are necessary, please contact your customer service center.
7. Cleaning, maintenance, storage and ordering of spare parts
Switch off the motor and pull the spark plug boot from the spark plug before doing any cleaning and maintenance work on the equipment.
Important: Switch off the machine immediately and contact your service station:
●In the event of unusual vibrations or noise
- If the engine appears to be overloaded or misfires
7.1 Cleaning
- Keep all safety devices, air vents and the motor housing free of dirt and dust as far as possible. Wipe the equipment with a clean cloth or blow it with compressed air at low pressure.
- We recommend that you clean the device immediately each time you have finished using it.
- Clean the equipment regularly with a moist cloth and some soft soap. Do not use cleaning agents or solvents; these could attack the plastic parts of the equipment. Ensure that no water can seep into the device.
7.2 Air filter
In this connection, please also read the service information.
●Clean the air filter at regular intervals, and replace it if necessary.
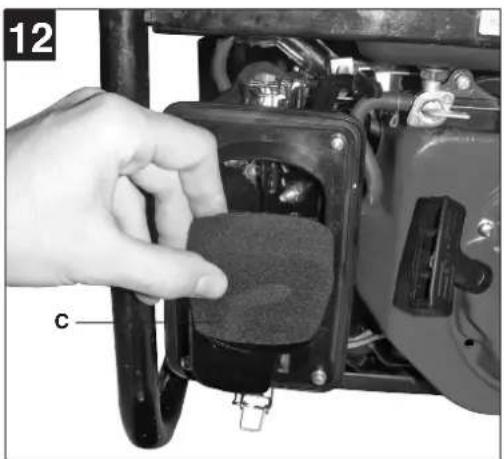
- Open both clips (Fig. 11/A) and remove the air filter cover (Fig. 11/B).
- Remove the filter elements (Fig. 12/C)
- Do not use abrasive cleaning agents or petrol to clean the elements.
●Clean the elements by tapping them on a flat surface. In cases of stubborn dirt first clean with soapy water, then rinse with clear water and air-dry.
●Assemble in reverse order
7.3. Spark plug (Fig. 13-14)
Check the spark plug for dirt and grime after 20 hours of operation and if necessary clean with a copper wire brush. Thereafter service the spark plug after every 50 hours of operation.
●Pull off the spark plug boot with a twist.
- Remove the spark plug with the supplied spark plug wrench.
●Assemble in reverse order
7.4 Changing the oil and checking the oil level (before using the machine)
The motor oil is best changed when the motor is at working temperature.
●Only use motor oil (15W40).
●Place the generator on a slightly inclined surface so that the oil drain plug is at the lower end.
- Open the oil filler plug.
- Open the oil drain plug and let the hot engine oil drain out into a drip tray.
●After the old oil has drained out, close the oil drain plug and place the generator on a level surface again
●Fill in engine oil up to the top mark on the oil dip stick (approx. 0.6 liters).
●Important: Do not screw the dipstick in to check the oil level, simply insert it up to the thread.
●Dispose of the waste oil properly.
7.5 Automatic oil cut-out
The automatic oil cut-out responds if there is too little oil in the engine. In this case it will not be possible to start the engine or it will cut out automatically after a short period of time. It cannot be started again until the engine oil has been topped up (see point 7.4).
7.6 Ordering replacement parts:
Please quote the following data when ordering replacement parts:
- Type of machine
● Article number of the machine
● Identification number of the machine
● Replacement part number of the part required For our latest prices and information please go to www.isc-gmbh.info
8. Disposal and recycling
The unit is supplied in packaging to prevent its being damaged in transit. This packaging is raw material and can therefore be reused or can be returned to the raw material system.
The unit and its accessories are made of various types of material, such as metal and plastic.
Defective components must be disposed of as special waste. Ask your dealer or your local council.

GB
9. Troubleshooting
| Fault Cause Remedy | ||
| Engine does not start Automatic oil out-out has not responded | Spark plug fouled | Check oil level, top up engine oilClean or replace spark plug (electrode spacing 0.6 mm)Refuel / have the petrol cock checked |
| No fuel | ||
| Generator has too little or no voltage | Controller or capacitor defective | Contact your dealer |
| Overcurrent circuit-breaker has triggered | Actuate the circuit-breaker and reduce the consumers | |
| Air filter dirty | Clean or replace the filter |
F
Attention!
6.4 Protection anti-surcharge 2 prises de courant 230 V
Noise: measured L_WA = 94 dB (A); guaranteed L_WA = 96 dB (A)
P = 4,1 KW; L/∅ = cm
Notified Body: TÜV SÜD Industrie Service GmbH, Westendstrasse 199,
80686 München, Deutschland (Notifed Body 0036)
x 2004/26/EC
Emission No.: e11*97/68SA*2004/26*1338*00
Standard references: EN 12601; EN 55012; EN 61000-6-1
Subject to change without notice Wiesenweg 22, D-94405 Landau/Isar
Documents registrar: Markus Jehl

natural_image
Symbol of a trash bin crossed out by two diagonal lines (no text or numbers present)©Nur für EU-Länder
Never place any electric tools in your household refuse.
To comply with European Directive 2002/96/EC concerning old electric and electronic equipment and its implementation in national laws, old electric tools have to be separated from other waste and disposed of in an environment-friendly fashion, e.g. by taking to a recycling depot.
Recycling alternative to the demand to return electrical devices:
As an alternative to returning the electrical device, the owner is obliged to cooperate in ensuring that the device is properly recycled if ownership is relinquished. This can also be done by handing over the used device to a returns center, which will dispose of it in accordance with national commercial and industrial waste management legislation. This does not apply to the accessories and auxiliary equipment without any electrical components which are included with the used device.
The reprinting or reproduction by any other means, in whole or in part, of documentation and papers accompanying products is permitted only with the express consent of ISC GmbH.
F
All of our products undergo strict quality checks to ensure that they reach you in perfect condition. In the unlikely event that your device develops a fault, please contact our service department at the address shown on this guarantee card. Of course, if you would prefer to call us then we are also happy to offer our assistance under the service number printed below. Please note the following terms under which guarantee claims can be made:
- These guarantee terms cover additional guarantee rights and do not affect your statutory warranty rights. We do not charge you for this guarantee.
- Our guarantee only covers problems caused by material or manufacturing defects, and it is restricted to the rectification of these defects or replacement of the device. Please note that our devices have not been designed for use in commercial, trade or industrial applications. Consequently, the guarantee is invalidated if the equipment is used in commercial, trade or industrial applications or for other equivalent activities. The following are also excluded from our guarantee: compensation for transport damage, damage caused by failure to comply with the installation/assembly instructions or damage caused by unprofessional installation, failure to comply with the operating instructions (e.g. connection to the wrong mains voltage or current type), misuse or inappropriate use (such as overloading of the device or use of non-approved tools or accessories), failure to comply with the maintenance and safety regulations, ingress of foreign bodies into the device (e.g. sand, stones or dust), effects of force or external influences (e.g. damage caused by the device being dropped) and normal wear resulting from proper operation of the device. This applies in particular to rechargeable batteries for which we nevertheless issue a guarantee period of 12 months.
The guarantee is rendered null and void if any attempt is made to tamper with the device.
-
The guarantee is valid for a period of 2 years starting from the purchase date of the device. Guarantee claims should be submitted before the end of the guarantee period within two weeks of the defect being noticed. No guarantee claims will be accepted after the end of the guarantee period. The original guarantee period remains applicable to the device even if repairs are carried out or parts are replaced. In such cases, the work performed or parts fitted will not result in an extension of the guarantee period, and no new guarantee will become active for the work performed or parts fitted. This also applies when an on-site service is used.
-
In order to assert your guarantee claim, please send your defective device postage-free to the address shown below. Please enclose either the original or a copy of your sales receipt or another dated proof of purchase. Please keep your sales receipt in a safe place, as it is your proof of purchase. It would help us if you could describe the nature of the problem in as much detail as possible. If the defect is covered by our guarantee then your device will either be repaired immediately and returned to you, or we will send you a new device.
Of course, we are also happy offer a chargeable repair service for any defects which are not covered by the scope of this guarantee or for units which are no longer covered. To take advantage of this service, please send the device to our service address.
F BULLETIN DE GARANTIE
Chère Cliente, Cher Client,


- D
- Achtung!
- Explanation of the warning signs on the machine (Fig. 15)
- General safety instructions:
- CAUTION!
- Layout (Fig. 1-5)
- Proper use
- Technical data
- Operating mode S1 (continuous operation)
- Operating mode S2 (temporary operation)
- GB
- Before putting the machine into operation
- Assembly
- Electrical safety:
- Environmental protection
- Connecting to earth
- Operation
- Starting the engine
- Important!
- Connecting consumers to the generator
- Switching off the engine
- Overload cut-out 2 x 230 V socket-outlets
- Cleaning, maintenance, storage and ordering of spare parts
- Important: Switch off the machine immediately and contact your service station:
- Cleaning
- Air filter
- Spark plug (Fig. 13-14)
- Changing the oil and checking the oil level (before using the machine)
- Automatic oil cut-out
- Ordering replacement parts:
- Disposal and recycling
- Troubleshooting
- F
- Attention!
- Protection anti-surcharge 2 prises de courant 230 V
- Standard references: EN 12601; EN 55012; EN 61000-6-1
- ©Nur für EU-Länder
- F BULLETIN DE GARANTIE
- Chère Cliente, Cher Client,
Brand : EINHELL
Model : BT-PG 3100/1
Category : Generator