
M9204 - Sander MAKITA - Free user manual and instructions
Find the device manual for free M9204 MAKITA in PDF.


| Product type | Orbital sander |
| Brand | Makita |
| Model | M9204 |
| Dimensions (L x W x H) | 350 x 120 x 150 mm |
| Weight | 2.3 kg |
| Power supply | Electric, 230 V ~ 50 Hz |
| Power | 500 W |
| No-load speed | 10,000 - 18,000 rpm |
| Speed control | Yes, adjustment wheel |
| Sanding type | Random orbital |
| Sanding surface | 150 x 100 mm |
| Paper attachment system | Velcro (self-adhesive) |
| Paper format | 1/4 sheets of standard size |
| Dust extraction | With integrated dust bag or external vacuum |
| Sound level | 82 dB(A) |
| Vibration | 5.0 m/s² |
| Handle | Ergonomic with rubber coating |
| Power cord | 2.5 m |
| Maintenance | Regular cleaning of ventilation slots and dust bag |
| Spare parts | Sanding pads, switches, carbon brushes available |
| Repairability | Repairability index 8.2/10 |
| Warranty | 2 years |
Frequently Asked Questions - M9204 MAKITA
User questions about M9204 MAKITA
0 question about this device. Answer the ones you know or ask your own.
Ask a new question about this device
Download the instructions for your Sander in PDF format for free! Find your manual M9204 - MAKITA and take your electronic device back in hand. On this page are published all the documents necessary for the use of your device. M9204 by MAKITA.
USER MANUAL M9204 MAKITA
natural_image
Line drawing of a mechanical power tool with lever and base (no text or symbols)

natural_image
Line drawing of a hand using a power tool to lift a motor on water (no text or symbols)
natural_image
Line drawing of a hand holding a circular object with holes, placed on a cylindrical base (no text or symbols)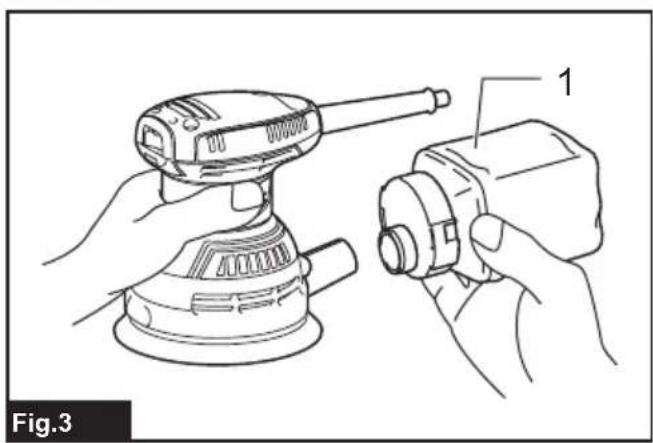
natural_image
Line drawing of hands operating a power tool and a mechanical device (no text or symbols)
SPECIFICATIONS
| Model: M9204 | |
| Abrasive disc diameter 125 mm | |
| Orbits per minute 12,000 min | -1 |
| Dimensions (L x W x H) 153 mm x 123 mm x 144 mm | |
| Net weight 1.2 kg | |
| Safety class | ☐/II |
- Due to our continuing program of research and development, the specifications herein are subject to change without notice.
• Specifications may differ from country to country.
• Weight according to EPTA-Procedure 01/2014
Intended use
The tool is intended for the sanding of large surface of wood, plastic and metal materials as well as painted surfaces.
Power supply
The tool should be connected only to a power supply of the same voltage as indicated on the nameplate, and can only be operated on single-phase AC supply. They are double-insulated and can, therefore, also be used from sockets without earth wire.
Noise
The typical A-weighted noise level determined according to EN62841:
Sound pressure level ( L_pA ): 84 dB(A)
Sound power level ( L_WA ): 92 dB (A)
Uncertainty (K) : 3 dB(A)
NOTE: The declared noise emission value(s) has been measured in accordance with a standard test method and may be used for comparing one tool with another.
NOTE: The declared noise emission value(s) may also be used in a preliminary assessment of exposure.

WARNING: Wear ear protection.
⚠ WARNING: The noise emission during actual use of the power tool can differ from the declared value(s) depending on the ways in which the tool is used especially what kind of workpiece is processed.
⚠ WARNING: Be sure to identify safety measures to protect the operator that are based on an estimation of exposure in the actual conditions of use (taking account of all parts of the operating cycle such as the times when the tool is switched off and when it is running idle in addition to the trigger time).
Vibration
The vibration total value (tri-axial vector sum) determined according to EN62841:
Work mode: sanding metal plate
Vibration emission ( a_h ): 3.0 m/s ^2
Uncertainty (K) : 1.5 m/s ^2
NOTE: The declared vibration total value(s) has been measured in accordance with a standard test method and may be used for comparing one tool with another.
NOTE: The declared vibration total value(s) may also be used in a preliminary assessment of exposure.

WARNING: The vibration emission during actual use of the power tool can differ from the declared value(s) depending on the ways in which the tool is used especially what kind of workpiece processed.

WARNING: Be sure to identify safety measures to protect the operator that are based on animation of exposure in the actual conditions of the (taking account of all parts of the operating cycle such as the times when the tool is switched and when it is running idle in addition to the bigger time).
Declarations of Conformity
For European countries only
The Declarations of conformity are included in Annex A to this instruction manual.
General power tool safety warnings

WARNING: Read all safety warnings, instructions, illustrations and specifications provided with this power tool. Failure to follow all instructions ed below may result in electric shock, fire and/orious injury.
Save all warnings and instructions for future reference.
The term "power tool" in the warnings refers to your mains-operated (corded) power tool or battery-operated (cordless) power tool.
Sander safety warnings
- Always use safety glasses or goggles. Ordinary eye or sun glasses are NOT safety glasses.
- Hold the tool firmly.
- Do not leave the tool running. Operate the tool only when hand-held.
- This tool has not been waterproofed, so do not use water on the workpiece surface.
- Ventilate your work area adequately when you perform sanding operations.
- Some material contains chemicals which may be toxic. Take caution to prevent dust inhalation and skin contact. Follow material supplier safety data.
- Use of this tool to sand some products, paints and wood could expose user to dust containing hazardous substances. Use appropriate respiratory protection.
- Be sure that there are no cracks or breakage on the pad before use. Cracks or breakage may cause a personal injury.
SAVE THESE INSTRUCTIONS.
⚠ WARNING: DO NOT let comfort or familiarity with product (gained from repeated use) replace strict adherence to safety rules for the subject product. MISUSE or failure to follow the safety rules stated in this instruction manual may cause serious personal injury.
FUNCTIONAL DESCRIPTION
CAUTION: Always be sure that the tool is switched off and unplugged before adjusting or checking function on the tool.
Switch action
⚠️ CAUTION: Before plugging in the tool, always be sure that the tool is switched off.
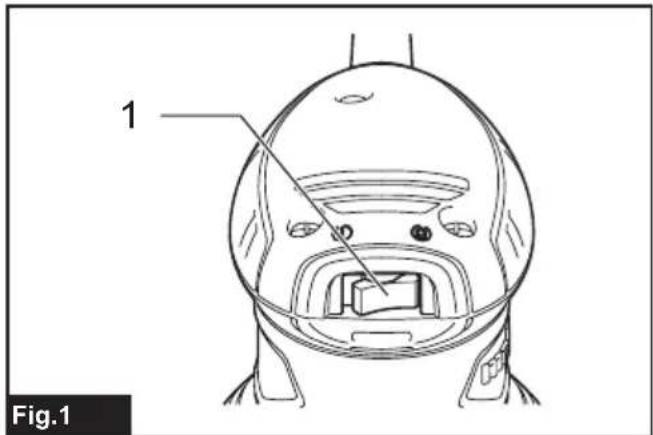
▶ Fig.1: 1. Switch
To start the tool, press the "I (ON)" side of the switch. To stop the tool, press the "O (OFF)" side of the switch.
ASSEMBLY
CAUTION: Always be sure that the tool is switched off and unplugged before carrying out any work on the tool.
Installing or removing abrasive disc
▶ Fig.2
To install the abrasive disc, first remove all dirt or foreign matter from the pad. Then peel off the backing paper from the abrasive disc and attach the abrasive disc to the pad.
Be careful to align the holes in the abrasive disc with those in the pad.
CAUTION: If you peel off the abrasive disc from the pad, its adhesion will become poor. Never attempt to stick it onto the pad for further use.
Installing dust bag
▶ Fig.3: 1. Dust bag
Install the dust bag on the tool so that the logo on the dust bag will be upright (not upside down).
Emptying dust bag
▶ Fig.4: 1. Dust nozzle 2. Dust bag
When the dust bag is about half full, switch off and unplug the tool. Remove the dust bag from the tool.
Then remove the dust nozzle from the dust bag after unlocking the dust nozzle by turning it slightly counterclockwise.
Empty the dust bag by tapping it lightly.
After emptying the dust bag, install the dust nozzle on the dust bag. Turn the dust nozzle slightly clockwise to lock it in place. Then install the dust bag on the tool as described in "Installing dust bag".
OPERATION
Sanding operation
⚠️CAUTION: Never switch on the tool when it is in contact with the workpiece, it may cause an injury to operator.
NOTICE: Never run the tool without the abrasive disc. You may seriously damage the pad.
NOTICE: Never force the tool. Excessive pressure may decrease the sanding efficiency, damage the abrasive disc or shorten tool life.
NOTICE: Using the tool with the pad edge contacting the workpiece may damage the pad.
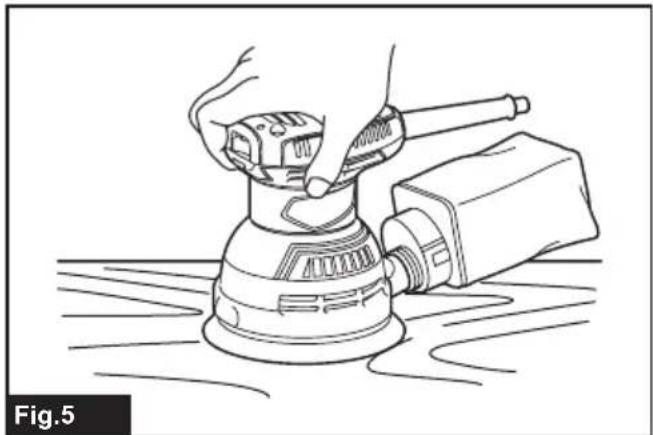
▶ Fig.5
Hold the tool firmly. Turn the tool on and wait until it attains full speed. Then gently place the tool on the workpiece surface. Keep the pad flush with the workpiece and apply slight pressure on the tool.
NOTE: The sanding pad rotates clockwise during the loaded operation, but it may rotate counterclockwise during the no-load operation.
MAINTENANCE
⚠️CAUTION: Always be sure that the tool is switched off and unplugged before attempting to perform inspection or maintenance.
NOTICE: Never use gasoline, benzine, thinner, alcohol or the like. Discoloration, deformation or cracks may result.
To maintain product SAFETY and RELIABILITY, repairs, carbon brush inspection and replacement, any other maintenance or adjustment should be performed by Makita Authorized or Factory Service Centers, always using Makita replacement parts.
SPÉCIFICATIONS
▶ Abb.3: 1. Staubsack
▶ Fig.1: 1. Afbryder


- Intended use
- Power supply
- Noise
- WARNING: Wear ear protection.
- Vibration
- Declarations of Conformity
- General power tool safety warnings
- Save all warnings and instructions for future reference.
- Sander safety warnings
- SAVE THESE INSTRUCTIONS.
- FUNCTIONAL DESCRIPTION
- Switch action
- ASSEMBLY
- Installing or removing abrasive disc
- Installing dust bag
- Emptying dust bag
- OPERATION
- Sanding operation
- ▶ Fig.5
- MAINTENANCE
Brand : MAKITA
Model : M9204
Category : Sander