
9920J - Sander MAKITA - Free user manual and instructions
Find the device manual for free 9920J MAKITA in PDF.


| Brand | Makita |
| Model | 9920J |
| Product type | Sander |
| Sanding type | Pad sander |
| Abrasive paper format | 1/4 sheet (115 x 140 mm) |
| Power consumption | 200 W |
| No-load speed | 12,000 rpm |
| Oscillation amplitude | 2 mm |
| Power supply | 230 V ~ 50 Hz |
| Cord length | 2.5 m |
| Net weight | 1.6 kg |
| Dimensions (L x W x H) | 250 x 120 x 150 mm |
| Sound pressure level | 78 dB(A) |
| Sound power level | 89 dB(A) |
| Vibration level | 7.5 m/s² |
| Paper fastening system | Clamps |
| Dust collector | Integrated dust bag |
| Main functions | Dry sanding of flat surfaces: wood, metal, plastic |
| Maintenance and cleaning | Regularly clean the dust bag and ventilation openings |
| Safety | Wear safety goggles, dust mask, unplug before maintenance |
| Spare parts and repairability | Available through Makita after-sales service, repairable by a professional |
| Warranty | 1 year (according to local legislation) |
Frequently Asked Questions - 9920J MAKITA
User questions about 9920J MAKITA
0 question about this device. Answer the ones you know or ask your own.
Ask a new question about this device
Download the instructions for your Sander in PDF format for free! Find your manual 9920J - MAKITA and take your electronic device back in hand. On this page are published all the documents necessary for the use of your device. 9920J by MAKITA.
USER MANUAL 9920J MAKITA


1

2
3

4

5

6

7
8
9

003391 003
11 12
003396001145
Explanation of general view
| 1 Lock button | 7 More than 6 mm | 12 Hose of vacuum cleaner |
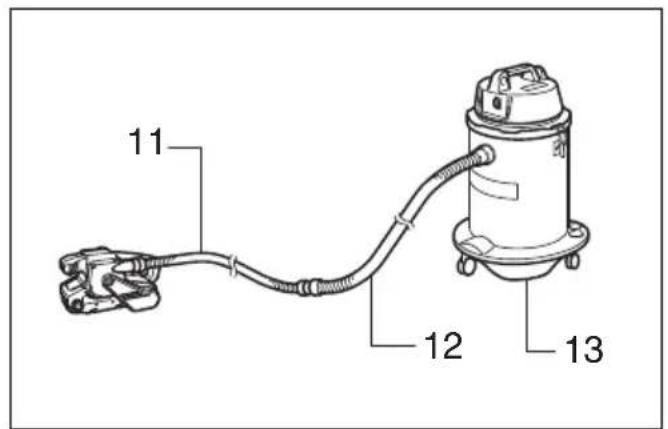
| 2 Switch trigger | 8 Dust bag | 13 Vacuum cleaner |
| 3 Speed adjusting dial | 9 Dust spout | 14 Sanding shoe |
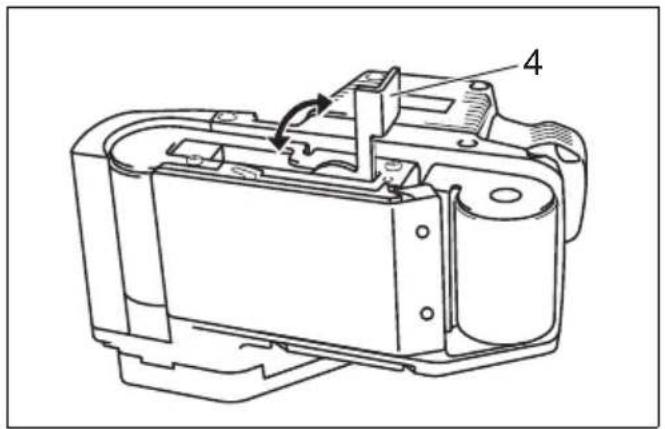
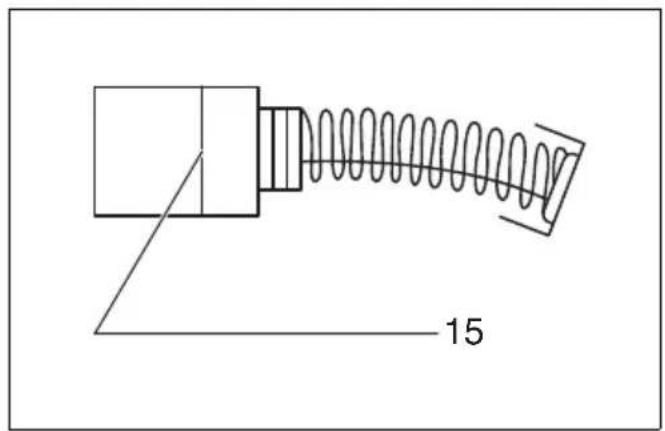
| 4 L e v e r | 10 Fastener | 15 Limit mark |
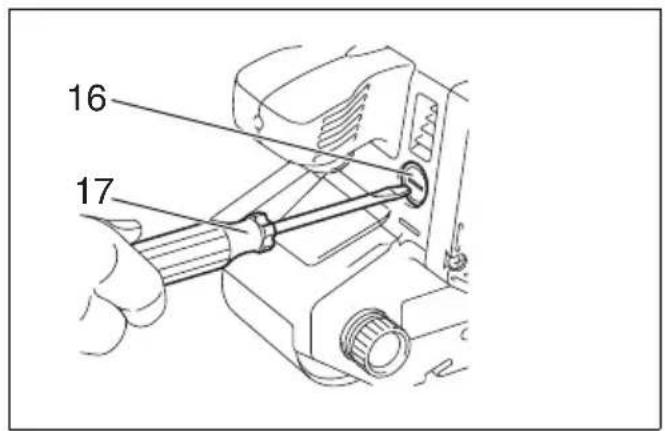
| 5 Steel plate | 11 Optional hose 28 mm in inner diameter | 16 Brush holder cap |
| 6 Adjusting knob | 17 Screwdriver |
SPECIFICATIONS
Model 9902 9903 9920 9404
Belt size ....76 mm x 533 mm 76 mm x 533 mm 76 mm x 610 mm 100 mm x 610 mm
Belt speed 440 m/min. 210 – 440 m/min. 210 – 440 m/min. 210 – 440 m/min.
Overall length ......296 mm 296 mm 334 mm 334 mm
Net weight 4.3 kg 4.3 kg 4.5 kg 4.8 kg
Safety class ....☐/II ☐/II ☐/II ☐/II
- Due to our continuing program of research and development, the specifications herein are subject to change without notice.
- Specifications may differ from country to country.
• Weight according to EPTA-Procedure 01/2003
ENE052-1
Intended use
The tool is intended for the sanding of large surface of wood, plastics and metal materials as well as painted surfaces.
ENF002-2
Power supply
The tool should be connected only to a power supply of the same voltage as indicated on the nameplate, and can only be operated on single-phase AC supply. They are double-insulated and can, therefore, also be used from sockets without earth wire.
GEA010-1
General Power Tool Safety Warnings
⚠ WARNING Read all safety warnings and all instructions. Failure to follow the warnings and instructions may result in electric shock, fire and/or serious injury.
Save all warnings and instructions for future reference.
GEB015-3
BELT SANDER SAFETY WARNINGS
- Hold power tool by insulated gripping surfaces, because the belt may contact its own cord. Cutting a "live" wire may make exposed metal parts of the power tool "live" and could give the operator an electric shock.
- Ventilate your work area adequately when you perform sanding operations.
- Some material contains chemicals which may be toxic. Take caution to prevent dust inhalation and skin contact. Follow material supplier safety data.
- Always use the correct dust mask/respirator for the material and application you are working with.
- Always use safety glasses or goggles. Ordinary eye or sun glasses are NOT safety glasses.
-
Hold the tool firmly with both hands.
-
Make sure the belt is not contacting the workpiece before the switch is turned on.
- Keep hands away from rotating parts.
- Do not leave the tool running. Operate the tool only when hand-held.
- This tool has not been waterproofed, so do not use water on the workpiece surface.
SAVE THESE INSTRUCTIONS.
WARNING:
DO NOT let comfort or familiarity with product (gained from repeated use) replace strict adherence to safety rules for the subject product. MISUSE or failure to follow the safety rules stated in this instruction manual may cause serious personal injury.
FUNCTIONAL DESCRIPTION
CAUTION:
- Always be sure that the tool is switched off and unplugged before adjusting or checking function on the tool.
Switch action (Fig.1)
CAUTION:
- Before plugging in the tool, always check to see that the switch trigger actuates properly and returns to the "OFF" position when released.
To start the tool, simply pull the switch trigger. Release the switch trigger to stop.
For continuous operation, pull the switch trigger and then push in the lock button.
To stop the tool from the locked position, pull the switch trigger fully, then release it.
Speed adjusting dial (Fig. 2)
For 9903, 9920 and 9404
The belt speed can be infinitely adjusted between 210 m and 440 m per minute by turning the speed adjusting dial to a given number setting from 1 to 5. Higher speed is obtained when the dial is turned in the direction of number 5; lower speed is obtained when it is turned in the direction of number 1.
Select the proper speed for the workpiece to be sanded.
CAUTION:
- If the tool is operated continuously at low speeds for a long time, the motor will get overloaded, resulting in tool malfunction.
- The speed adjusting dial can be turned only as far as 5 and back to 1. Do not force it past 5 or 1, or the speed adjusting function may no longer work.
ASSEMBLY
CAUTION:
- Always be sure that the tool is switched off and unplugged before carrying out any work on the tool.
Installing or removing abrasive belt (Fig. 3)
Pull the lever all the way out and install the belt over the rollers, then return the lever to the original position.
CAUTION:
- When installing the belt, make sure that the direction of the arrow on the back of the belt corresponds to the one on the tool itself. (Fig. 4)
Adjusting belt tracking (Fig. 5)
Switch on the tool and make sure that the belt is aligned properly. If the edge of the belt extends beyond the edge of the base or the edge of the belt retracts more than 6 mm away from the edge of the base, use the adjusting knob to adjust the belt tracking.
Dust bag (Fig. 6 & 7)
Attach the dust bag onto the dust spout. The dust spout is tapered. When attaching the dust bag, push it onto the dust spout firmly as far as it will go to prevent it from coming off during operation.
When the dust bag is about half full, remove the dust bag from the tool and pull the fastener out. Empty the dust bag of its contents, tapping it lightly so as to remove particles adhering to the insides which might hamper further collection.
NOTE:
- If you connect a Makita vacuum cleaner to this tool, more efficient and cleaner operations can be performed.
Connecting to Makita vacuum cleaner (Fig. 8)
Cleaner sanding operations can be performed by connecting the belt sander to Makita vacuum cleaner.
When connecting to Makita vacuum cleaner, an optional hose 28 mm in inner diameter is necessary.
OPERATION
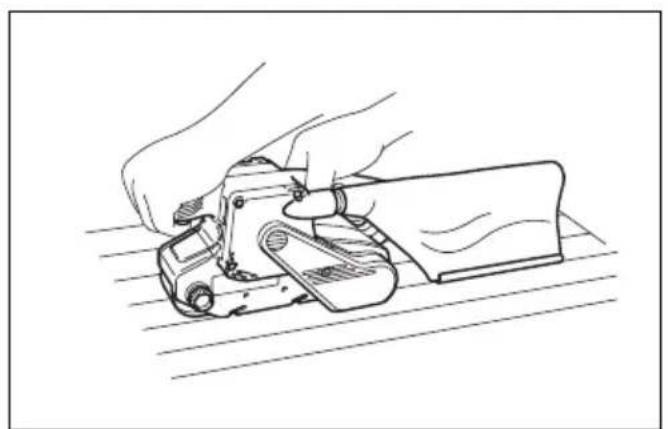
Sanding operation (Fig. 9)
CAUTION:
- The tool should not be in contact with the workpiece surface when you turn the tool on or off. Otherwise a poor sanding finish or damage of the belt may result.
Hold the tool firmly with both hands. Turn the tool on and wait until it attains full speed. Then gently place the tool on the workpiece surface. Keep the belt flush with the workpiece at all times and move the tool back and forth. Never force the tool. The weight of the tool applies adequate pressure. Excessive pressure may cause stalling, overheating of the motor, burning of the workpiece and possible kickback.
Sanding shoe (optional accessory) (Fig. 10)
The sanding shoe readily allows you to sand workpieces more evenly.
MAINTENANCE
CAUTION:
- Always be sure that the tool is switched off and unplugged before attempting to perform inspection or maintenance.
- Never use gasoline, benzine, thinner, alcohol or the like. Discoloration, deformation or cracks may result.
Replacing carbon brushes
Remove and check the carbon brushes regularly. Replace when they are worn down to the limit mark. Keep the carbon brushes clean and free to slip in the holders. Both carbon brushes should be replaced at the same time. Use only identical carbon brushes. (Fig. 11)
Use a screwdriver to remove the brush holder caps. Take out the worn carbon brushes, insert the new ones and secure the brush holder caps. (Fig. 12)
To maintain product SAFETY and RELIABILITY, repairs, any other maintenance or adjustment should be performed by Makita Authorized Service Centres, always using Makita replacement parts.
OPTIONAL ACCESSORIES
CAUTION:
- These accessories or attachments are recommended for use with your Makita tool specified in this manual. The use of any other accessories or attachments might present a risk of injury to persons. Only use accessory or attachment for its stated purpose.
If you need any assistance for more details regarding these accessories, ask your local Makita service center.
- Abrasive belts
- Sanding shoe
- Dust bag
- Hose 28 mm in inner diameter
- Belt sander stand
NOTE:
- Some items in the list may be included in the tool package as standard accessories. They may differ from country to country.
Noise
The typical A-weighted noise level determined according to EN60745:
Sound pressure level ( LpA ): 85 dB (A)
Sound power level ( LWA ): 96 dB (A)
Uncertainty (K): 3 dB (A)
Wear ear protection
ENG900-1
Vibration
The vibration total value (tri-axial vector sum) determined according to EN60745:
Work mode: sanding metal plate
Vibration emission (ah): 2.5 m/s 2 or less
Uncertainty (K): 1.5 m/s 2
ENG901-1
- The declared vibration emission value has been measured in accordance with the standard test method and may be used for comparing one tool with another.
- The declared vibration emission value may also be used in a preliminary assessment of exposure.
WARNING:
- The vibration emission during actual use of the power tool can differ from the declared emission value depending on the ways in which the tool is used.
- Be sure to identify safety measures to protect the operator that are based on an estimation of exposure in the actual conditions of use (taking account of all parts of the operating cycle such as the times when the tool is switched off and when it is running idle in addition to the trigger time).
ENH101-18
For European countries only
EC Declaration of Conformity
Makita declares that the following Machine(s):
Designation of Machine:
Belt Sander
Model No./ Type: 9902, 9903, 9920, 9404
Conforms to the following European Directives:
2006/42/EC
They are manufactured in accordance with the following
Standard or standardized documents:
EN60745
The technical file in accordance with 2006/42/EC is available from:
Makita, Jan-Baptist Vinkstraat 2, 3070, Belgium
2.3.2015

Yasushi Fukaya
Director
Makita, Jan-Baptist Vinkstraat 2, 3070, Belgium
Descriptif
OPTIONELE ACCESSOIRES
LET OP:


- SPECIFICATIONS
- INTENDED USE
- POWER SUPPLY
- GENERAL POWER TOOL SAFETY WARNINGS
- BELT SANDER SAFETY WARNINGS
- SAVE THESE INSTRUCTIONS
- WARNING
- FUNCTIONAL DESCRIPTION
- CAUTION
- SWITCH ACTION (FIG.1)
- SPEED ADJUSTING DIAL (FIG. 2)
- FOR 9903, 9920 AND 9404
- ASSEMBLY
- INSTALLING OR REMOVING ABRASIVE BELT (FIG. 3)
- ADJUSTING BELT TRACKING (FIG. 5)
- DUST BAG (FIG. 6 & 7)
- NOTE
- CONNECTING TO MAKITA VACUUM CLEANER (FIG. 8)
- OPERATION
- SANDING OPERATION (FIG. 9)
- SANDING SHOE (OPTIONAL ACCESSORY) (FIG. 10)
- MAINTENANCE
- REPLACING CARBON BRUSHES
- OPTIONAL ACCESSORIES
- NOISE
- WEAR EAR PROTECTION
- VIBRATION
- FOR EUROPEAN COUNTRIES ONLY
- EC DECLARATION OF CONFORMITY
- MAKITA DECLARES THAT THE FOLLOWING MACHINE(S)
- CONFORMS TO THE FOLLOWING EUROPEAN DIRECTIVES
- OPTIONELE ACCESSOIRES
- LET OP
Brand : MAKITA
Model : 9920J
Category : Sander