
FH 637 0 - Built-in oven HOTPOINT - Free user manual and instructions
Find the device manual for free FH 637 0 HOTPOINT in PDF.
| Product type | Built-in oven |
| Brand | Hotpoint |
| Model | FH 637 0 |
| Dimensions (W x H x D) | 43.5 x 32.4 x 41.5 cm (volume 59 L) or 45.5 x 32.4 x 41.5 cm (volume 62 L) depending on the type of slides |
| Weight | Approximately 35 kg |
| Power supply | 220-240 V ~ 50/60 Hz |
| Maximum power consumption | 2800 W |
| Cooking programs | Traditional, Multi-cooking, Pizza, Grill, Gratin, Pastry |
| Special functions | Rotisserie (optional), electronic programmer, timer, interior light |
| Cooling system | Integrated cooling fan |
| Safety | Automatic shut-off at end of cooking, double-glazed door, child lock not specified |
| Cleaning and maintenance | Manual cleaning, removable door for cleaning, replaceable bulb (25 W, E14 socket) |
| Available spare parts | Bulb, slides, door seals |
| Repairability | Hotpoint approved technical assistance, original parts |
| Energy class | Not specified (compliant with EU directives) |
| Capacity | 59 or 62 liters |
| Cooking levels | 5 levels |
| Control type | Rotary knobs and electronic programmer |
Frequently Asked Questions - FH 637 0 HOTPOINT
User questions about FH 637 0 HOTPOINT
0 question about this device. Answer the ones you know or ask your own.
Ask a new question about this device
Download the instructions for your Built-in oven in PDF format for free! Find your manual FH 637 0 - HOTPOINT and take your electronic device back in hand. On this page are published all the documents necessary for the use of your device. FH 637 0 by HOTPOINT.
USER MANUAL FH 637 0 HOTPOINT
Operating Instructions
OVEN
Contents
Operating Instructions,1
Warnings,3
Assistance,6
Description of the appliance,8
Description of the appliance, 10
Installation, 18
Start-up and use,20
The electronic programmer,20
Cooking modes,21
Precautions and tips,23
Maintenance and care,24
ES
Espanol
WARNING: The appliance and its accessible parts become hot during use. Care should be taken to avoid touching heating elements. Children less than 8 years of age shall be kept away unless continuously supervised. This appliance can be used by children aged from 8 years and above and persons with
reduced physical, sensory or mental capabilities or lack of experience and knowledge if they have been given supervision or instruction concerning use of the appliance in a safe way and understand the hazards involved. Children shall not play with the appliance. Cleaning and user maintenance shall not be made by children without supervision.
Do not use harsh abrasive cleaners or sharp metal scrapers to clean the oven door glass since they can scratch the surface, which may result in shattering of the glass.
Never use steam cleaners or pressure cleaners on the appliance.
WARNING: Ensure that the appliance is switched off before replacing the lamp to avoid the possibility of electric shock.
! When you place the rack inside, make sure that the stop is directed upwards and in the back of the cavity.
FR
Avertissements
! Never use the services of an unauthorised technician.
Please have the following information to hand:
the type of problem encountered.
the appliance model (Mod.).
the serial number (S/N).
The latter two pieces of information can be found on the data plate located on the appliance.
FR
Assistance
I He 3eptaTeTcA no DOnOMOry Do He yNOBHOBXeHOro nepcoHaNy.
TIOBIDOMITN:
TNHecnpabHOCTI;
Modèleb pprila(y Mod.)
cepHnHOMep (S/N)
Lidani3haxoJb8cHaTaBnui3 daHMMHa camomy npina.i
IT
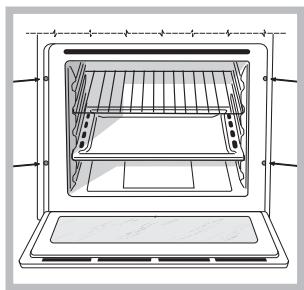
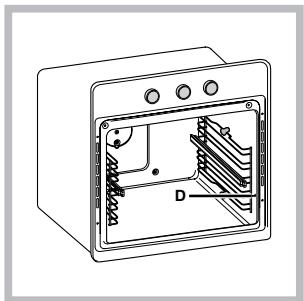
Description of the appliance
Overall view
1 POSITION 1
2 POSITION 2
3 POSITION 3
4 POSITION 4
5 POSITION 5
6 GUIDES for the sliding racks
7 DRIPPING PAN
8 GRILL
9 Control panel
FR
Description of the appliance
Control panel
1 THERMOSTAT indicator light
2 SELECTOR knob
3 ELECTRONIC programmer
4 THERMOSTAT knob
FR
! Please keep this instruction booklet in a safe place for future reference. If the appliance is sold, given away or moved, please make sure the booklet is also passed on to the new owners so that they may benefit from the advice contained within it.
! Please read this instruction manual carefully: it contains important information concerning the safe operation, installation and maintenance of the appliance.
Positioning
! Do not let children play with the packaging material; it should be disposed of in accordance with local separated waste collection standards (see Precautions and tips).
! The appliance must be installed by a qualified professional in accordance with the instructions provided. Incorrect installation may damage property or cause harm to people or animals.
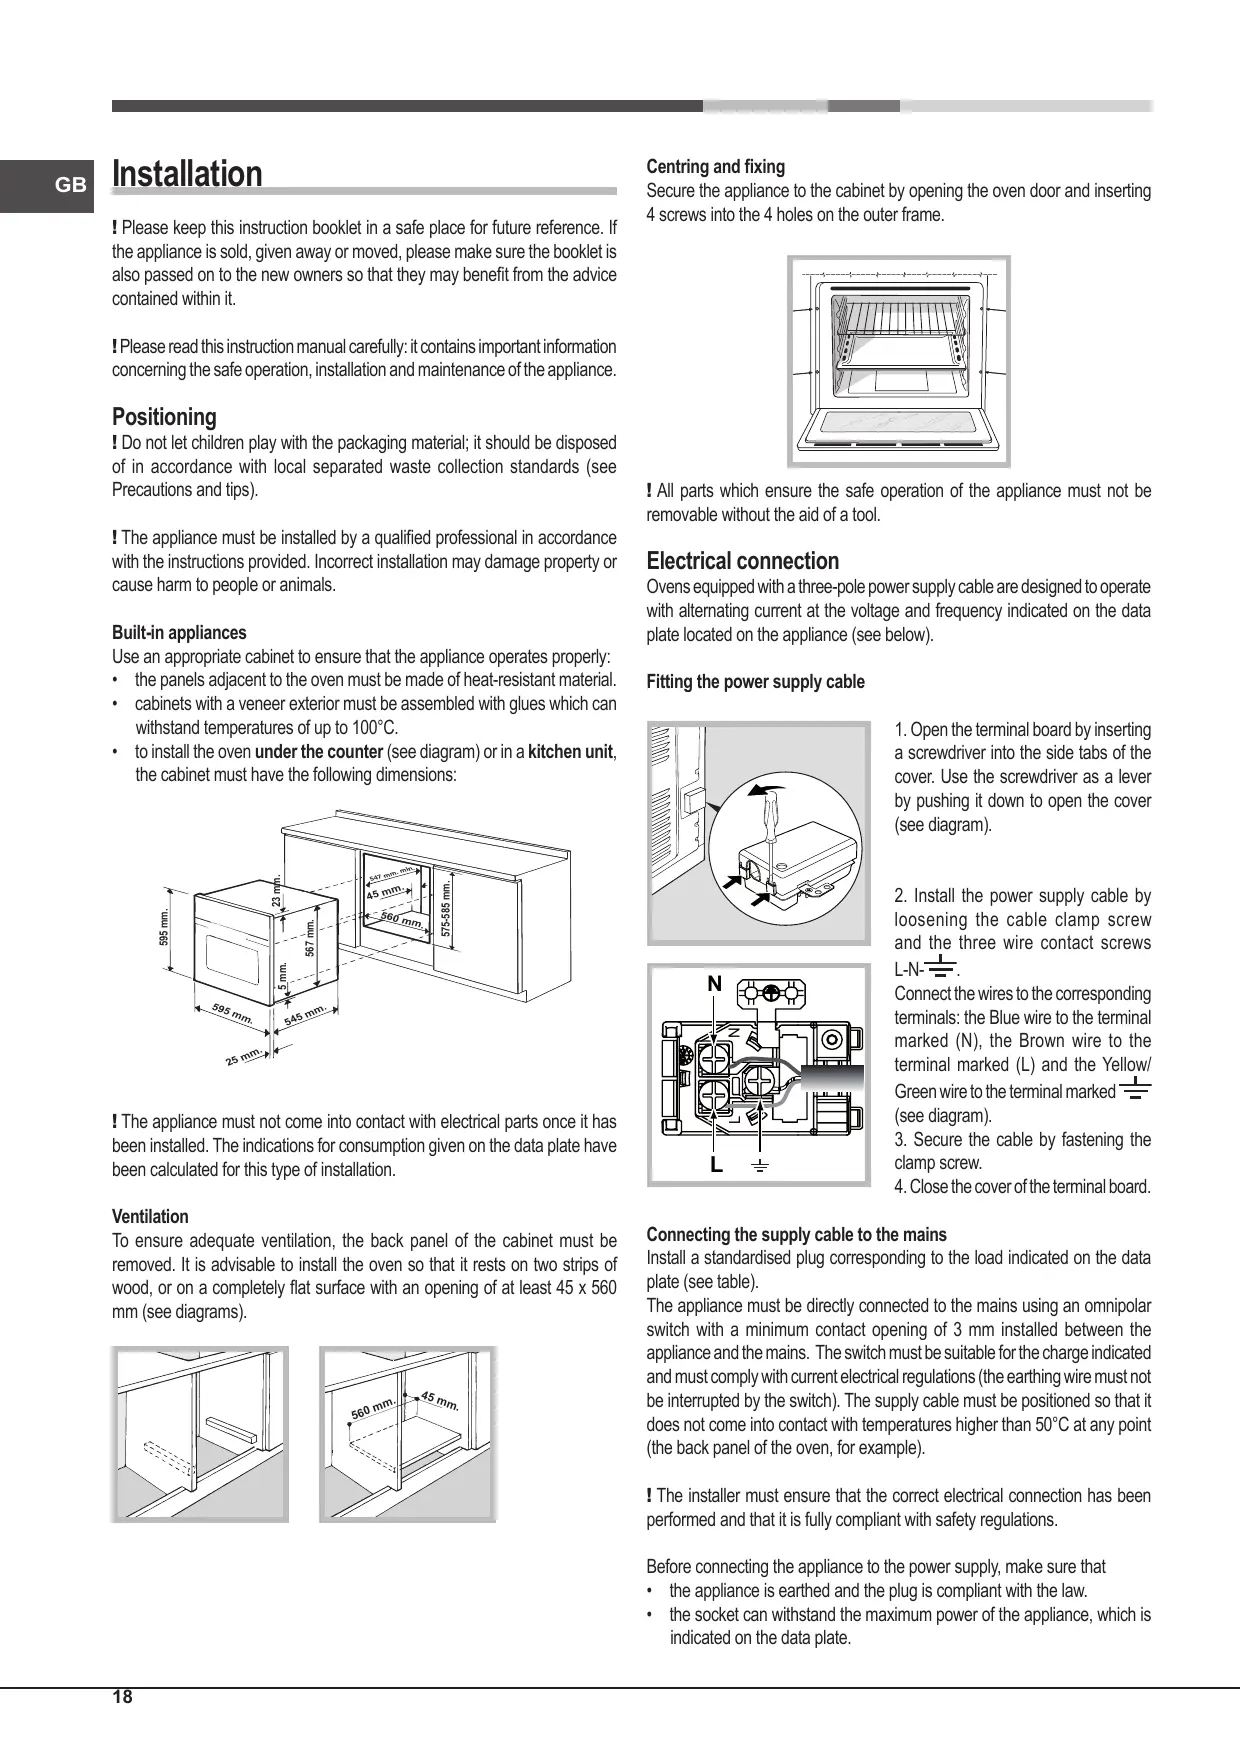
Built-in appliances
Use an appropriate cabinet to ensure that the appliance operates properly:
- the panels adjacent to the oven must be made of heat-resistant material.
- cabinets with a veneer exterior must be assembled with glues which can withstand temperatures of up to 100^ .
- to install the oven under the counter (see diagram) or in a kitchen unit, the cabinet must have the following dimensions:
! The appliance must not come into contact with electrical parts once it has been installed. The indications for consumption given on the data plate have been calculated for this type of installation.
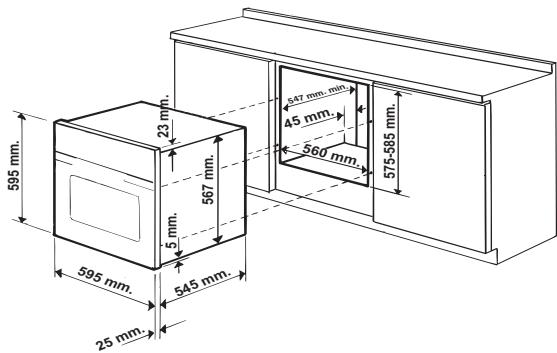
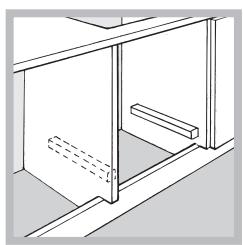
Ventilation
To ensure adequate ventilation, the back panel of the cabinet must be removed. It is advisable to install the oven so that it rests on two strips of wood, or on a completely flat surface with an opening of at least 45 × 560 mm (see diagrams).
Centring and fixing
Secure the appliance to the cabinet by opening the oven door and inserting 4 screws into the 4 holes on the outer frame.
! All parts which ensure the safe operation of the appliance must not be removable without the aid of a tool.
Electrical connection
Ovens equipped with a three-pole power supply cable are designed to operate with alternating current at the voltage and frequency indicated on the data plate located on the appliance (see below).
Fitting the power supply cable

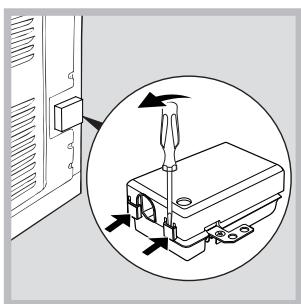
- Open the terminal board by inserting a screwdriver into the side tabs of the cover. Use the screwdriver as a lever by pushing it down to open the cover (see diagram).
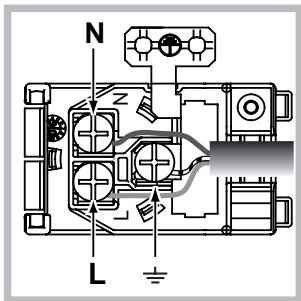
- Install the power supply cable by loosening the cable clamp screw and the three wire contact screws L-N-
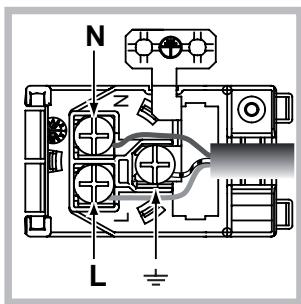
Connect the wires to the corresponding terminals: the Blue wire to the terminal marked (N), the Brown wire to the terminal marked (L) and the Yellow/ Green wire to the terminal marked (see diagram).
- Secure the cable by fastening the clamp screw.
- Close the cover of the terminal board.
Connecting the supply cable to the mains
Install a standardised plug corresponding to the load indicated on the data plate (see table).
The appliance must be directly connected to the mains using an omnipolar switch with a minimum contact opening of 3mm installed between the appliance and the mains. The switch must be suitable for the charge indicated and must comply with current electrical regulations (the earthing wire must not be interrupted by the switch). The supply cable must be positioned so that it does not come into contact with temperatures higher than 50^ at any point (the back panel of the oven, for example).
! The installer must ensure that the correct electrical connection has been performed and that it is fully compliant with safety regulations.
Before connecting the appliance to the power supply, make sure that
- the appliance is earthed and the plug is compliant with the law.
-
the socket can withstand the maximum power of the appliance, which is indicated on the data plate.
-
the voltage is in the range between the values indicated on the data plate.
- the socket is compatible with the plug of the appliance. If the socket is incompatible with the plug, ask an authorised technician to replace it. Do not use extension cords or multiple sockets.
! Once the appliance has been installed, the power supply cable and the electrical socket must be easily accessible.
! The cable must not be bent or compressed.
! The cable must be checked regularly and replaced by authorised technicians only (see Assistance).
! The manufacturer declines any liability should these safety measures not be observed.
| APPLIANCE SPECIFICATIONS | |
| Dimensions* | width 43.5 cm height 32,4 cm depth 41.5 cm |
| Volume* | 59 l |
| Dimensions** | width 45.5 cm height 32,4 cm depth 41.5 cm |
| Volume** | 62 l |
| Electrical connections | vvoltage: 220-240V~ 50/60 Hz or 50Hz (see data plate) maximum power absorbed 2800 W |
| Energy Label e Ecodesign | EU Directive no 65/2014 supplementing Directive 2010/30/EU. EU Regulation no 66/2014 implementing Directive 2009/125/EC. Standard EN 60350-1 Standard EN 50564 Energy consumption for Natural convection – heating mode: Traditional mode Declared energy consumption for Forced convection Class mode: Fan assisted. |
| CE | This appliance conforms to the following European Economic Community directives: - 2006/95/EC dated 12/12/06 (Low Voltage) and subsequent amendments. - 2004/108/EC dated 03/05/89 (Electromagnetic Compatibility) and subsequent amendments. - 93/68/EEC dated 22/07/93 and subsequent amendments. - 2012/19/EU and subsequent amendments. - 1275/2008 standby/off mode. |
- Only for models with drawn rails.
** Only for models with wire rails.
Start-up and use
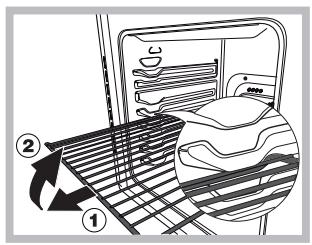
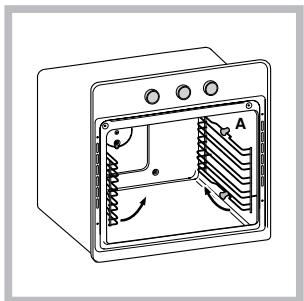
WARNING! The oven is provided with a stop system to extract the racks and prevent them from coming out of the oven (1).
As shown in the drawing, to extract them completely, simply lift the racks, holding them on the front part, and pull (2).
! The first time you use your appliance, heat the empty oven with its door closed at its maximum temperature for at least half an hour. Ensure that the room is well ventilated before switching the oven off and opening the oven door. The appliance may emit a slightly unpleasant odour caused by protective substances used during the manufacturing process burning away.
Starting the oven
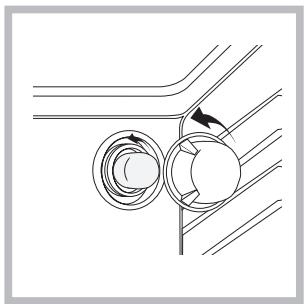
- Select the desired cooking mode by turning the SELECTOR knob.
- Select the desired temperature with the THERMOSTAT knob. See the Cooking advice table for cooking modes and the suggested cooking temperatures (see Cooking Modes).
- When lit, the THERMOSTAT indicator light indicates that the oven is heating up to the temperature set.
-
You may do the following during cooking:
-
change the cooking mode by turning the SELECTOR knob.
- change the temperature by turning the THERMOSTAT knob.
- stop cooking by turning the SELECTOR knob to the "0" position.
! Never put objects directly on the bottom of the oven; this will avoid the enamel coating being damaged.
! Always place cookware on the rack(s) provided.
Cooling ventilation
In order to cool down the external temperature of the oven, some models are fitted with a cooling fan that blows out air between the control panel and the oven door.
! Once cooking has been completed, the cooling fan continues to operate until the oven has cooled down sufficiently.
Oven light
It goes on when selecting with the SELECTOR knob. It stays on when a cooking mode is selected.
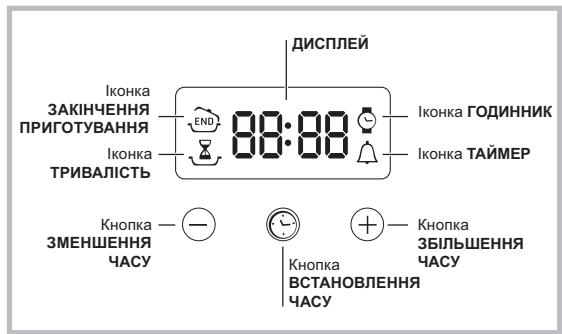
The electronic programmer
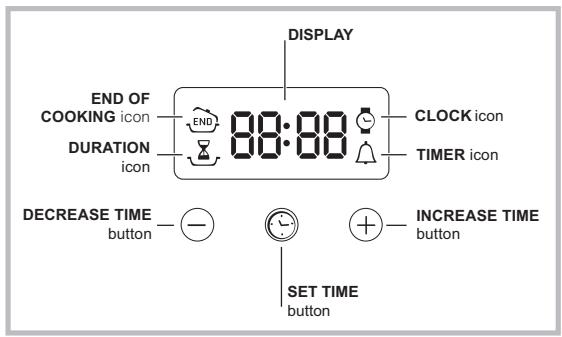
Setting the clock
! The clock may be set when the oven is switched off or when it is switched on, provided that a the end time of a cooking cycle has not been programmed previously.
After the appliance has been connected to the mains, or after a blackout, the icon and the four numerical digits on the DISPLAY will begin to flash.
- Press the button several times until the icon and the four digits on the display begin to flash.
- Use the "+" and "-" buttons to adjust the time; if you press and hold either button, the display will scroll through the values more quickly, making it quicker and easier to set the desired value.
- Wait for 10 seconds or press the button again to finalise the setting.
Setting the timer
! This function does not interrupt cooking and does not affect the oven; it is simply used to activate the buzzer when the set amount of time has elapsed.
- Press the button several times until the icon and the three digits on the display begin to flash.
- Use the "+" and "-" buttons to set the desired time; if you press and hold either button, the display will scroll through the values more quickly, making it quicker and easier to set the value.
- Wait for 10 seconds or press the button again to finalise the setting. The display will then show the time as it counts down. When this period of time has elapsed the buzzer will be activated.
Programming cooking
!A cooking mode must be selected before programming can take place.
Programming the cooking duration
- Press the button several times until the icon and the three digits on the DISPLAY begin to flash.
- Use the "+" and "-" buttons to set the desired duration; if you press and hold either button, the display will scroll through the values more quickly, making it quicker and easier to set the value.
- Wait for 10 seconds or press the button again to finalise the setting.
- When the set time has elapsed, the text END appears on the DISPLAY, the oven will stop cooking and a buzzer sounds. Press any button to stop it.
- For example: it is 9:00 a.m. and a time of 1 hour and 15 minutes is programmed. The programme will stop automatically at 10:15 a.m.
Setting the end time for a cooking mode
! A cooking duration must be set before the cooking end time can be scheduled.
- Follow steps 1 to 3 to set the duration as detailed above.
- Next, press the button until the END icon and the four digits on the DISPLAY begin to flash.
- Use the “+” and “-” buttons to adjust the cooking end time; if you press and hold either button, the display will scroll through the values more quickly, making it quicker and easier to set the desired value.
- Wait for 10 seconds or press the button again to finalise the setting.
-
When the set time has elapsed, the text END appears on the DISPLAY, the oven will stop cooking and a buzzer sounds. Press any button to stop it. Programming has been set when the × and buttons are illuminated. The DISPLAY shows the cooking end time and the cooking duration alternately.
-
For example: It is 9:00 a.m. and a duration of 1 hour has been programmed. 12:30 is scheduled as the end time. The programme will start automatically at 11:30 a.m.
Cancelling a programme
To cancel a programme:
- press the button until the icon corresponding to the setting you wish to cancel and the digits on the display are no longer flashing. Press the " -" button until the digits 00:00 appear on the display.
- press and hold the "+" and "-" buttons; this will cancel all the settings selected previously, including timer settings.
Cooking modes
! A temperature value between 60^ and MAX can be set for all cooking modes except the following:
- GRILL (recommended: set only to MAX power level)
- GRATIN (recommended: do not exceed 200^ ).
TRADITIONAL OVEN mode
Both the top and bottom heating elements will come on. When using this traditional cooking mode, it is best to use one cooking rack only. If more than one rack is used, the heat will be distributed unevenly.
MULTILEVELmode
All the heating elements (top, bottom and circular) switch on and the fan begins to operate. Since the heat remains constant throughout the oven, the air cooks and browns food in a uniform manner. A maximum of two racks may be used at the same time.
PIZZAOVENmode
The circular heating elements and the elements at the bottom of the oven are switched on and the fan is activated. This combination heats the oven rapidly by producing a considerable amount of heat, particularly from the element at the bottom. If you use more than one rack at a time, switch the position of the dishes halfway through the cooking process.
GRILL mode
The top heating element and the rotisserie (where present) come on.
The high and direct temperature of the grill is recommended for food which requires a high surface temperature. Always cook in this mode with the oven door closed.
GRATIN mode
The top heating element and the rotisserie (where present) are activated and the fan begins to operate. This combination of features increases the effectiveness of the unidirectional thermal radiation provided by the heating elements through forced circulation of the air throughout the oven. This helps prevent food from burning on the surface and allows the heat to penetrate right into the food. Always cook in this mode with the oven door closed.
BAKING mode
The rear heating element and the fan are switched on, thus guaranteeing the distribution of heat in a delicate and uniform manner throughout the entire oven. This mode is ideal for baking temperature sensitive foods (such as cakes, which need to rise) and for the preparation of "bitesize pastries" on 3 shelves simultaneously.
Practical cooking advice
! Do not place racks in position 1 or 5 during fan-assisted cooking. Excessive direct heat can burn temperature sensitive foods.
! In the GRILL and GRATIN cooking modes, place the dripping pan in position 1 to collect cooking residues (sauce and/or grease).
MULTILEVEL
- Use positions 2 and 4, placing the food which requires more heat on the rack in position 2.
- Place the dripping pan on the bottom and the rack on top.
GRILL
- Place the rack in position 3 or 4. Make sure the food is in the centre of the rack.
- We recommend that the power level is set to maximum. The top heating element is regulated by a thermostat and may not always operate constantly.
PIZZAOVENMODE
- Use a lightweight aluminium pizza pan. Place it on the rack provided. For a crispy crust, do not use the dripping pan as this extends the total cooking duration and prevents the crust from forming.
- If the pizza has a lot of toppings, we recommend adding the mozzarella cheese to the top of the pizza halfway through the cooking process.
Cooking advice table
| Modes | Foods | Weight (in kg) | Rack position | Preheating time (minutes) | Recommended temperature | Cooking duration (minutes) |
| Traditional | Duck | 1 | 3 | 15 | 200 | 65-75 |
| Roast veal or beef | 1 | 3 | 15 | 200 | 70-75 | |
| Roast pork | 1 | 3 | 15 | 200 | 70-80 | |
| Biscuits (shortcrust pastry) | - | 3 | 15 | 180 | 15-20 | |
| Tarts | 1 | 3 | 15 | 180 | 30-35 | |
| Multilevel | Pizza (on 2 racks) | 1 | 2 and 4 | 15 | 230 | 15-20 |
| Lasagne | 1 | 3 | 10 | 180 | 30-35 | |
| Lamb | 1 | 2 | 10 | 180 | 40-45 | |
| Roast chicken + potatoes | 1+1 | 2 and 4 | 15 | 200 | 60-70 | |
| Mackerel | 1 | 2 | 10 | 170-180 | 30-35 | |
| Sponge cake made with yoghurt | 1 | 2 | 10 | 170 | 40-50 | |
| Cream puffs (on 2 racks) | 0.5 | 2 and 4 | 10 | 190 | 20-25 | |
| Biscuits (on 2 racks) | 0.5 | 2 and 4 | 10 | 180 | 10-15 | |
| Sponge cake (on 1 rack) | 0.5 | 2 | 10 | 170 | 15-20 | |
| Sponge cake (on 2 racks) | 1 | 2 and 4 | 10 | 170 | 20-25 | |
| Savoury pies | 1.5 | 3 | 15 | 200 | 30-40 | |
| Pizza | Pizza | 0.5 | 3 | 15 | 220 | 15-20 |
| Focaccia bread | 1 | 2 or 3 | 10 | 200 | 15-20 | |
| Grill | Sole | 1 | 4 | 5 | MAX | 8-10 |
| Squid and prawn kebabs | 1 | 4 | 5 | MAX | 6-8 | |
| Cod fillet | 1 | 4 | 5 | MAX | 10 | |
| Grilled vegetables | 1 | 3 or 4 | 5 | MAX | 10-15 | |
| Veal steak | 1 | 4 | 5 | MAX | 15-20 | |
| Cutlets | 1 | 4 | 5 | MAX | 15-20 | |
| Hamburgers | 1 | 4 | 5 | MAX | 7-10 | |
| Mackerel | 1 | 4 | 5 | MAX | 15-20 | |
| Toast | no. 4 | 4 | 5 | MAX | 2-3 | |
| With rotisserie spit (where present) | ||||||
| Spit-roast veal | 1.0 | - | - | 100% | 80-90 | |
| Spit-roast chicken | 1.5 | - | - | 100% | 70-80 | |
| Spit-roast lamb | 1.0 | - | - | 100% | 70-80 | |
| Gratin | Grilled chicken | 1.5 | 2 | 5 | 200 | 55-60 |
| Cuttlefish | 1.5 | 2 | 5 | 200 | 30-35 | |
| With rotisserie spit (where present) | ||||||
| Spit-roast veal | 1.5 | - | 10 | 200 | 70-80 | |
| Spit-roast lamb | 1.5 | - | 10 | 200 | 70-80 | |
| Chicken (on the spit) + potatoes (on the dripping pan) | - | 2 | 10 | 200 | 70-75 | |
| Baking | Tarts | 0.5 | 3 | 15 | 180 | 20-30 |
| Fruit cakes | 1 | 2 or 3 | 15 | 180 | 40-45 | |
| Sponge cake made with yoghurt | 0.7 | 3 | 15 | 180 | 40-50 | |
| Sponge cake | 0.5 | 3 | 15 | 160 | 25-35 | |
| Stuffed pancakes (on 2 racks) | 1.2 | 2 and 4 | 15 | 200 | 30-35 | |
| Small cakes (on 2 racks) | 0.6 | 2 and 4 | 15 | 180-190 | 20-25 | |
| Cheese puffs (on 2 racks) | 0.4 | 2 and 4 | 15 | 200-210 | 15-20 | |
| Cream puffs (on 3 racks) | 0.7 | 1, 3 and 5 | 15 | 180 | 20-25 | |
| Biscuits (on 3 racks) | 0.7 | 1, 3 and 5 | 15 | 180 | 20-25 | |
| Meringues (on 3 racks) | 0.5 | 1, 3 and 5 | 15 | 90 | 180 |
! The cooking times listed above are intended as guidelines only and may be modified according to personal tastes.
Precautions and tips
! This appliance has been designed and manufactured in compliance with international safety standards. The following warnings are provided for safety reasons and must be read carefully.
General safety
- The appliance was designed for domestic use inside the home and is not intended for commercial or industrial use.
- The appliance must not be installed outdoors, even in covered areas. It is extremely dangerous to leave the appliance exposed to rain and storms.
- When moving or positioning the appliance, always use the handles provided on the sides of the oven.
- Do not touch the appliance while barefoot or with wet or damp hands and feet.
- The appliance must be used by adults only for the preparation of food, in accordance with the instructions provided in this booklet. Any other use of the appliance (e.g. for heating the room) constitutes improper use and is dangerous. The manufacturer may not be held responsible for any damage caused as a result of improper, incorrect and unreasonable use of the appliance.
- Do not touch the heating elements or certain parts of the oven door when the appliance is in use; these parts become extremely hot. Keep children well away from the appliance.
- Make sure that the power supply cables of other electrical appliances do not come into contact with the hot parts of the oven.
- The ventilation and heat dispersal openings must never be obstructed.
Always grip the oven door handle in the centre: the ends may be hot. - Always use oven gloves when placing cookware in the oven or when removing it.
- Do not use aluminium foil to line the bottom of the oven.
- Do not place flammable materials in the oven: if the appliance is switched on accidentally, the materials could catch fire.
- Always make sure the knobs are in the "●"/“○” position when the appliance is not in use.
- When unplugging the appliance, always pull the plug from the mains socket; do not pull on the cable.
- Do not perform any cleaning or maintenance work without having disconnected the appliance from the electricity mains.
- If the event of malfunctions, under no circumstances should you attempt to perform the repairs yourself. Contact an authorised Service Centre (see Assistance).
- Do not rest objects on the open oven door.
- Do not let children play with the appliance.
- The appliance should not be operated by people (including children) with reduced physical, sensory or mental capacities, by inexperienced individuals or by anyone who is not familiar with the product. These individuals should, at the very least, be supervised by someone who assumes responsibility for their safety or receive preliminary instructions relating to the operation of the appliance.
- The appliance is not intended to be operated by means of an external timer or separate remote-control system.
Disposal
- When disposing of packaging material: observe local legislation so that the packaging may be reused.
- The European Directive 2012/19/EU on Waste Electrical and Electronic Equipment (WEEE), requires that old household electrical appliances must not be disposed of in the normal unsorted municipal waste stream. Old appliances must be collected separately in order to optimise the recovery and recycling of the materials they contain and reduce the impact on human health and the environment.
The crossed out "wheeled bin" symbol on the product reminds you of your obligation, that when you dispose of the appliance it must be separately collected.
Consumers should contact their local authority or retailer for information concerning the correct disposal of their old appliance.
Respecting and conserving the environment
- Whenever possible, avoid pre-heating the oven and always try to fill it. Open the oven door as little as possible because heat is lost every time it is opened. To save a substantial amount of energy, simply switch off the oven 5 to 10 minutes before the end of your planned cooking time and use the heat the oven continues to generate.
Automatic programmes are based on standard food product. - Keep gaskets clean and tidy to prevent any door energy losses
- If you have a timed tariff electricity contract, the "delay cooking" option will make it easier to save money by moving operation to cheaper time periods.
! This product complies with the requirements of the latest European Directive on the limitation of power consumption of the standby mode.
Maintenance and care
Switching the appliance off
Disconnect your appliance from the electricity supply before carrying out any work on it.
Cleaning the appliance
- The stainless steel or enamel-coated external parts and the rubber seals may be cleaned using a sponge that has been soaked in lukewarm water and neutral soap. Use specialised products for the removal of stubborn stains. After cleaning, rinse and dry thoroughly. Do not use abrasive powders or corrosive substances.
- The inside of the oven should ideally be cleaned after each use, while it is still lukewarm. Use hot water and detergent, then rinse well and dry with a soft cloth. Do not use abrasive products.
- All accessories - with the exception of the sliding racks - can be washed like everyday crockery, and are even dishwasher safe.
! Never use steam cleaners or pressure cleaners on the appliance.
Cleaning the oven door
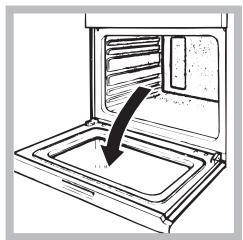
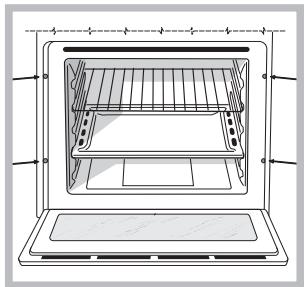
Clean the glass part of the oven door using a sponge and a non-abrasive cleaning product, then dry thoroughly with a soft cloth. Do not use rough abrasive material or sharp metal scrapers as these could scratch the surface and cause the glass to crack. For more thorough cleaning purposes, the oven door may be removed:
- Open the oven door fully (see diagram);
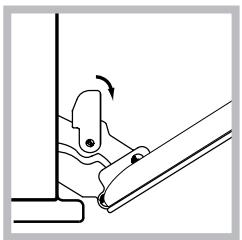
- Lift up and turn the small levers located on the two hinges (see diagram);
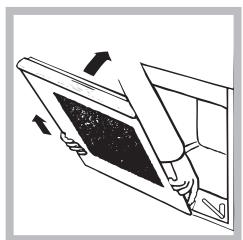
Grip the door on the two external sides and close it approximately half way.Pull the door towards you lifting it out of its seat (see diagram).
To replace the door, reverse this sequence.
Inspecting the seals
Check the door seals around the oven regularly. If the seals are damaged, please contact your nearest Service Centre (see Assistance). We recommend that the oven is not used until the seals have been replaced.
Replacing the light bulb
To replace the oven light bulb:
- Remove the glass cover of the lamp-holder.
- Remove the light bulb and replace it with a similar one: Wattage 25 W, cap E 14.
- Replace the glass cover (see diagram).
! Do not use the oven lamp as/for ambient lighting.
Sliding rack kit assembly
To assemble the sliding racks:
- Remove the two frames, lifting them away from the spacers A (see figure).
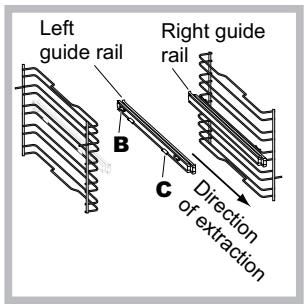
- Choose which shelf to use with the sliding rack. Paying attention to the direction in which the sliding rack is to be extracted, position joint B and then joint C on the frame.
-
Secure the two frames with the guide rails using the holes provided on the oven walls (see diagram). The holes for the left frame are situated at the top, while the holes for the right frame are at the bottom.
-
Finally, fit the frames on the spacers A.
! Do not place the sliding racks in position 5.
Installation
Para montar as guias corredicas:
ZeHTpyBaHHi 3akpinJIenHH
Lio6 3akpiinTu npnauI do Me6ni: BiKpnTu DbepuTa dYxOBk i 3aRbnuHTtu 4 depeB'hi rBnuHTu y 4 OTbOpu, kki 3haxoJrbcHa nepimetpaIbnPi pAmci.
!Bci yactinny, kzi 3a6e3neyuToB 6e3neky, mIoTb 3akpInIIOBaTmCra TAK, uOb yhemoxJINBNTn iX BnTgAHHa 6e3 CneuaiahNix IHCTpyMeHtIB.
EneKtpnHi nIDKJIIOUeHn
DyXOBK OCHaUeH I TpIPOJIIOCHM UHypOM XNBLENH Ta I npaIIOJb Bi3MIHHORO CTPMy, pOboa Happyra i cAtracto BAkazyIOBcRa Ha TAbmuci 3 DaHMM, 3akpinJeHa npnlaDi (DNB.HIXue).
BctaHOBHeHHH uHpy XMBHeHH
- BīdkpniTe KJIemHy Kopo6ky, CKopnCTabWncb BnKpyTKOIO JAK BaxKeM, HATNCKUOn HeO Ha 6iHi J3uKKn KpIuKn: NotTnHt Ta BīdkpniTe KpIuKy (ДИВ.MaJIHOK).
2.ПлгOTуYe Ta BCTaHOBITb
UHyp JxNIBeHHa: 3HIMiTb TBIHTn 3
3aTNCKyBaay a I Trn TBIHTn 3 KOHTaKTiB
L-N- ,notim 3akpinitb JxNII niD
roINiBkamn TBIHTiB, D0TpmyOuChcB
KoIbOpiB CnHi (N) KopuHneBn (L) KOBtni-3eJIeHn () -ДИВ.
MaJIIOHOK.
3. 3aφikcyte shypr BiinobiHMM 3atnckaHem.
4.3akpiITe KpIuKIOU KIeMHy KOp6Ky.
PiiKlHueHHa Hpy JKBHeHHdo eJekTpHuOi Mepexi
3a6e3neuTe shnyp BnIkoIO, npndaTHOIO dny Bkazahoro Ha ta6nuci 3 daHMM HabaHTaxKeHHra (DINB.nopy).Y pa3i 6e3nocepedhboro niknoucenH NO MepeXi Heo6xIDHO nepeJbauHTm MIX npnaTOM i MepeXeO BCEoNIOCHNI BIMnKa4 3 MHimJIbHO IO BiCTaHHIO MIX KOHTAKTAMU y 3 MM, JIK BVtPmMy E HabaHTaxKeHHra i BiNDOBlae CHHHM HopMaM (dpIT 3a3emJIeHHra He MaC nepeepBaTcRA BIMNKaueM).
Pnpo3aunybaHHi shhpyxmbneHn cniiknyTe,io6 temepaTy a npimiuuHHe nepeBnuBaHa 50^ B hiaki Toci.
!MOnTaXKnK E BiIDNoBiDaJIbHnM 3a npaBnJIbHe eNEKtpNHyHe NiIknIoueHnT a TdoTPMaHnH HOpM Be3NeKn.
Iepi Hix BnKohyBaTu NiikJIOueHHe, IpeKoHaITecB TOMY, 10:
-
p03eTka MaE 3a3emJIeHHy y BiIDIOBIDHOCTI DO BCTAHOBJIeHIX HOpM;
p03eTka po3paXOBaHa Ha MaKcImaIbHe HabaHTaKeHnY Mexax notyXhOCTi npnaIy, 3a3NaueHe y TaBInci 3 xapaKtePncTikamn (INB. HIXKye); -
Hnpyra JxNIBJIeHJ3HxAOJITbC8 BMeKax 3HaYeHb, BKA3aHnx Ha TaBJIuCi3 XapaKTeprIcTNIkAMn (ДИВ.HIXKHe);
p03eTKa cymicha 3 BnIkoOp npnnay. BiHoumy BnIaKy 3aMIHiTb po3eTkky a6o BnIky; He BNKOpICTOByte NOIOBxyBaHi TpiHmKn.
!Y BCTaHOBJIeHOMy npnIaI MaC 6ytN 3a6e3neHn IerKn Doctyn do eNEKTPNHOrO uHpy i po3eKn.
!Hyp He noBHeH MaTn 3rHnHb a6o yTnckHb.
!Hyp macnepiouHNO nepeBipTnci 3amHOBaTnc TJIbKn BNOHOBaKeHMnФaxibZm(INB.Donomora).
! Kompani 3 himac 3 c6e BiinobiaJbHicTb y pa3i HeDOrpmaHHa Bkazahnix HOpM.
EJIeKtpoHnI npOpaMaTOp roTyBaHHa
UA
JaHaJauTyBaTn roDHHNK
!ToHHNK MoJHa HalaU TyBaTn PnI yBIMKHeH aO bVIMKHeH dyXOBJI, JAKUo He 3anporpamBoHaNO KHeCb npriOTyBaHHa.
PicnpiiknueHndo eNeKtpuHoiMepexi a6o BnpybaHnCbitna 6bnmaTmYtb iKoHka pa3om 3 yOtnpMa uOppaMn Ha DNCJIPEI.
- HatncHItb dekiIbka pa3IB Ha KhoNky ,doKN He noUHe 6nImaTn IKOHka pa3OM 3 YoTnpMa uqppamn Ha IINCJIPEI;
- KhoNkamn “+” i —“ hanaUtynTe Yac; npu ytpmByaHHi KhoNOK MoXHa 3NaHNo IwBnIe nepeRJIyHuTn UOpnpi IeIeSe 3aDAtn Yac.
- 3auekaite 10 cek. a6o noBTOpHOn HaTnCHiTB Ha KhoNky , o6 niD TBepdntn 3aHaHm Yac.
Jk 3aatau taHmep
!LZfpyHKUHe nepeepnBaE rOtyBaHHa,BOHa3aJIeKNTbBID BVKOpNCtAHN dyXOBKn;3aBdAknI npOrpaMyEc3ByKObN CnHAn IIO 3aKiHcHHi 3aDaHOr Oacy.
- HatnciB dekiIbKa pa3IB ha KhoNky ,doKn He noHHe 6nIMaTn IKOHka pa3OM 3 Tpboma UnppaMn Ha NUCJIPE;
2.KHONKAMn“+”i"3aadte baxaHmYac; npuYTPMByBaHHi KHOJOKMOXHa 3NaHNo WbUdIe nepeRJaHyTuLcPru IJeIeSe 3aDaTn Yac. - 3auekaite 10 cek. a6o noBTOpHOn HaTnCHiTB Ha KHONky , o6 niD TBepdntn 3aHaHm Yac.
BvBoDntbCz 3BopOTHI BIDNIK, npo Ioro 3aKiHHeHH CnOBCNTb 3ByKOBI CNHAn.
Jk 3anporpamyBaTu roTyBaHHr iXi
!IporpamyBaHnMoKmIbeTijbKnnicBnB6OpnynporpaMn npirotoBaHn.
Yak 3anporpamyBaNtpnBnJIcIb npnroTyBaHn
- HataChiB TeKJIbKa pa3iB Ha KhoIky ,DOKn He NoUHe 6NIMaTn IKOHka pa3om 3 Tpboma UcPpAm Ha DCNCJIPE;
2.KhONkAMn“+”i“—3aadTbe 6axaHny TpnuBaniCTb; npu yTPmUyBaHHi KhoNOK MoXHa3NaH0 5WbUdne nepeRTHyTu cnpri n Inerue 3aDATn napametp. -
3auekaite 10 cek. a6o noBtOpHo HaTnCiHb Ha KhoNky, iO6 niDTEBPdHTn 3aDaHm npaMeTp.
4.Псль Виерпаннч acу ha ДИСПЛЕI 3'Яьгься habис END, npo 3aBepseHnroTGYBaHHN CNoBICTNt b 3ByKOBm CmHaJ. -
Hanpknlaad: noToOnHn yac: 9:00, 3aJaTbC TpBAnicTb 1 roHa 15 xBNiHn. Iporpama aBTOMaTuHNo 3ynHnRe pOboTy y 10:15.
Jk 3anporpamyBaN KHeu npiroTybaHn
!3anporpamybTaN3akIHueHHn npiroTyBaHnMoXHaIinwe nicra 3aDaHHn TprBaJIoCTi roTyBaHH.
- Binkohai Te npocedupy 1-3 dansaHntrpuaoncti roTybaHnra;
- HATNCHTb DekjIbKa pa3iB Ha KhoNky ,DOKn He NOUHe 6NIMaTH iKOHKa pa3OM 3 ChTINPMA UINPhiMn Ha NICPTJIeI;
- Khonkamn “+” i “—” Hanaa Tu Te Yac 3akihueHH npriroTuBaHH; npi UtpmByaHHi KhoNOK MOxHa 3HaHuO 5BnDle neperTn CuPp n IeRwe 3aDatu Yac.
- 3auekaite 10 cek. abo noBtOpHo haTnCHiB Ha KhoNky 念 , uO6 nIqTBepDHTn 3aDaHm npaMeTp.
5.Пись Виерпаннч acу на ДИСПЛЕI 3'ЯВЯТбя habис END, npo 3aBepseHnroTGYBaHHN CNoBICTNt b 3ByKOBm CmHaJ.
Yb IMKHeH iIKOHKn CNOBiauTo bnpo3iueche nporpaMyBaHHa. Ha IINCPJIe no cep3i 3'ABnEcTbCya cac 3akihueHH nprirotyBaHHa tPbBAJicTb.
KcacybattnporpaBHH
Lio6 ckacybAtn nporpaMyBaHHa:
- HATNCKaIte Ha KHOJIky ,DOKI He NOUHe 6nIMaTI IKOHka napaMeTpY, AKNi CnIc CKacyBaTn,pa3OM 3 UcPpAMn Ha DInCnJIe. HATNCKaIte Ha KHOJIky “-,DOKI Ha DInCnJIe He 3'ABNTbC 00:00.
- yTpMMyTe OJNoHAcHo KHOKNI “+” i “—”; cKacOByIObCBy BcI BnKOHaHi npOrpaMbAHn, BkIINoHaOu Taimep.
Прогамn
! Temnepatypa 3aandaetbca B iIntepbani mix 60^ i MAX dIy Bcxipnporpa, OKpim:
- PUNJIb (peKomeHdyeTbcBcNtcbnTn Tijbn Ha MAX);
KOHBEKLIIHNI TPNIb (pekomeHnyeTbcr He nepeBnUyBaTN TemnepaIpy B 200°C).
Ta6nuc npiroToyBaHna
Oxopoha i 6aJInBE BiHooHenrdoDobKijIJa
- YbIMKHeHHa DYXOBKn B pOMiKky 3 ni3HbOro nicIy6biHbOro yacy do paHHbOra paHKy DO3BOJInTb 3MeHUnTI HabaHTaXeHHraHa NiDpNcMCTBaBvrop6nki eNeKTPOeHepri. Haadi Hi MoxJIbOcTI zuo OPiAnHyBaHNr nporpa, 3OKPema "BiCDtropeHe roTyBaHN" (INB. IporpaM) i "BiCDtropeHe ABTOMaTHUne OOnuEHHa" (INB. TexHiue ObcIyRObyAHNa Ta DOrJaI) DOONOMaIOTb opraH3YBaTcN 3aJIexHo BiD yacy.
- Pπριστυνανηγ y pεχμmax BAPβEKIO i KOHBEKLιHΠ ΓΡΙΝΙν
notpεδύγθιb ḣακριθιχ ἀνερζιγ ἀχονβίν: ζε ΦιδΟβινιθ ΕΤρμματιν κραις pe3yιβται i 3aοιαΔιπι έλεκτροεηρερίου (πριδπιδε 10%).
-Пдгиму Te Bpoobomy cTahi i MmTe yuJIbHOBaHi TaK, uO6 BOHn do6pe npinraJIo Do dBepaI t He BnKInKaN 6 BtpaN TeIIa.
I Lcien npooyk BiDIOBIAe BIMOrAM HOBOI DnpeKTHNB CBpOeNcbKoro npo o6mExeHn CNOXINBaHH eHeprT B pexMIO OikyBaHH.
Texhichne obcnyroByBaHHaT a DOrJIa
JiK BiDkIIOuHTn eJeKtpuHn cTpym
Ipeep npoBeeHnM 0yDb-koI onepaui BNTrHiB BNky 3 eNeKtpuHoi pO3eTKN.
Yk ouhctntn npnna
3ObHIshI eMaJIbObaHI a6o HeipKaxaIOHcI dTeani I rymObi yuINbHOBaI MoXHa MNTn 3BOJoxeHOU y TePiN BODi rY6KOIO i HeITpaJIbHM MmON. IyBVeDeHNr CTiKnx PnIM BVOKOpNCTOByTe CneCiAlbHi 3ac0b. D6pe OboNOnOCHt BDOIO i BVCuYiTb NcIe NMTT. He BVOKOpNCTOByTe abpa3nBHI nopoShk a6o iDki peObHIn.
- PekomeHnyeTcB MaNtI dyXOBky BCEpeuHi KoXhoro pa3y niCnBa BnKOpNCtAHn, KOJIb BOHa E Ie TeNIO. MIIte rApauHO BOIO i MInOUM 3acobom, NotIM oBnOLOCHITb i BcUaITb M'koHO raHupKOHO. YHkaTe a6paunBnHX 3ac0ib.
- Akcecyapu MOKyTb MHTNcRA JK 3BvuaHnI NocUd, TAKOX B NOCyDOMnHi MaUNHi, 3A BVHRTKOM KOB3HxH HAnpRMHNX.
!3a6bOpHЯETbcBvKOpuCTaHHa anapatIB nIy OunIeHHn npoIO aBO BVCOKIM TIVCKOM.
Yk Ouchntn DBeprTa
MnIte CKnIO DBePcT LyXOBKn rY6KOTo Ta Hea6pa3NBHMn 3ac0bAmn BnInpauTe M'KIO TKaHINHO; He BnKOpNCtOByTe UepWabi abpa3NBHi MaTepiAIn a6o 3aOCTpeHi MeTaNeBi cKpe6Kn, kI MoKyTb NopPranT nOBepxHi a6o BnKlNkATn TpICKAHNcKJa.
- Operating Instructions
- OVEN
- Contents
- ES
- Espanol
- FR
- Avertissements
- Assistance
- IT
- Description of the appliance
- Overall view
- Control panel
- Positioning
- Built-in appliances
- Ventilation
- Centring and fixing
- Electrical connection
- Fitting the power supply cable
- Connecting the supply cable to the mains
- Start-up and use
- Starting the oven
- Cooling ventilation
- Oven light
- The electronic programmer
- Setting the clock
- Setting the timer
- Programming cooking
- Programming the cooking duration
- Setting the end time for a cooking mode
- Cancelling a programme
- Cooking modes
- TRADITIONAL OVEN mode
- MULTILEVELmode
- PIZZAOVENmode
- GRILL mode
- GRATIN mode
- BAKING mode
- Practical cooking advice
- MULTILEVEL
- GRILL
- Precautions and tips
- General safety
- Disposal
- Respecting and conserving the environment
- Maintenance and care
- Switching the appliance off
- Cleaning the appliance
- Cleaning the oven door
- Inspecting the seals
- Replacing the light bulb
- Sliding rack kit assembly
- Installation
- ZeHTpyBaHHi 3akpinJIenHH
- EneKtpnHi nIDKJIIOUeHn
- BctaHOBHeHHH uHpy XMBHeHH
- PiiKlHueHHa Hpy JKBHeHHdo eJekTpHuOi Mepexi
- EJIeKtpoHnI npOpaMaTOp roTyBaHHa
- JaHaJauTyBaTn roDHHNK
- Jk 3aatau taHmep
- Jk 3anporpamyBaTu roTyBaHHr iXi
- Yak 3anporpamyBaNtpnBnJIcIb npnroTyBaHn
- Jk 3anporpamyBaN KHeu npiroTybaHn
- KcacybattnporpaBHH
- Прогамn
- Oxopoha i 6aJInBE BiHooHenrdoDobKijIJa
- Texhichne obcnyroByBaHHaT a DOrJIa
- JiK BiDkIIOuHTn eJeKtpuHn cTpym
- Yk ouhctntn npnna
- Yk Ouchntn DBeprTa
Brand : HOTPOINT
Model : FH 637 0
Category : Built-in oven