USER MANUAL FA2 540 P BL HA HOTPOINT
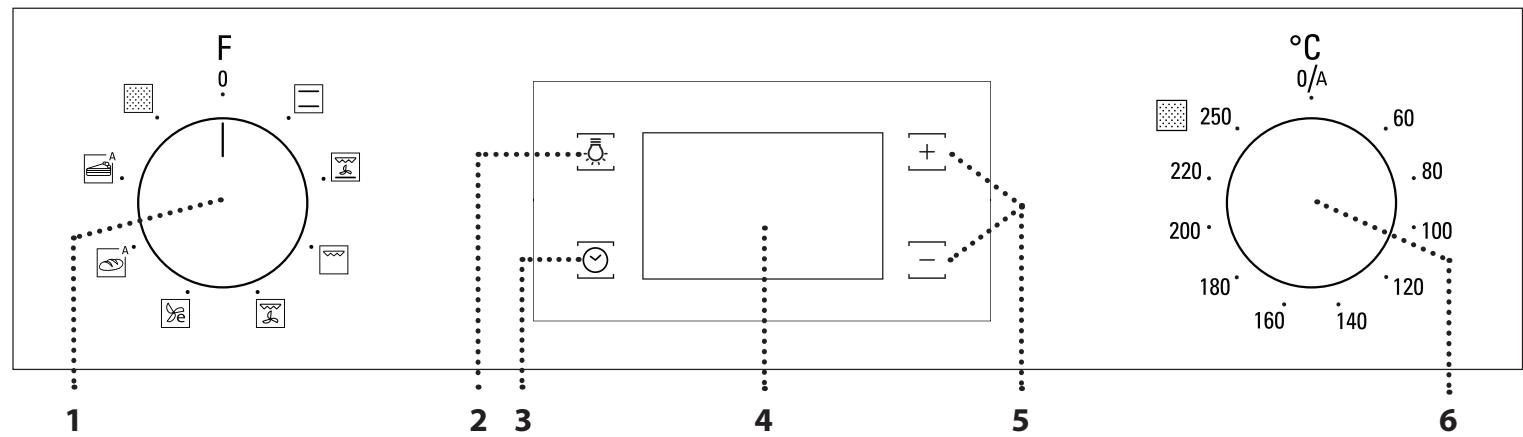
For switching the oven on by selecting a function.
Turn to the 0 position to switch the oven off.
2. LIGHT
With the oven switched on, press to turn the oven compartment lamp on or off.
3. SETTING THE TIME
For accessing the cooking time settings, delayed start and timer.
For displaying the time when the oven is off.
- DISPLAY
For changing the cooking time settings
6. THERMOSTAT KNOB
Turn to select the temperature you require when activating manual functions.
For automatic functions keep on 0/A.
FIRST TIME USE
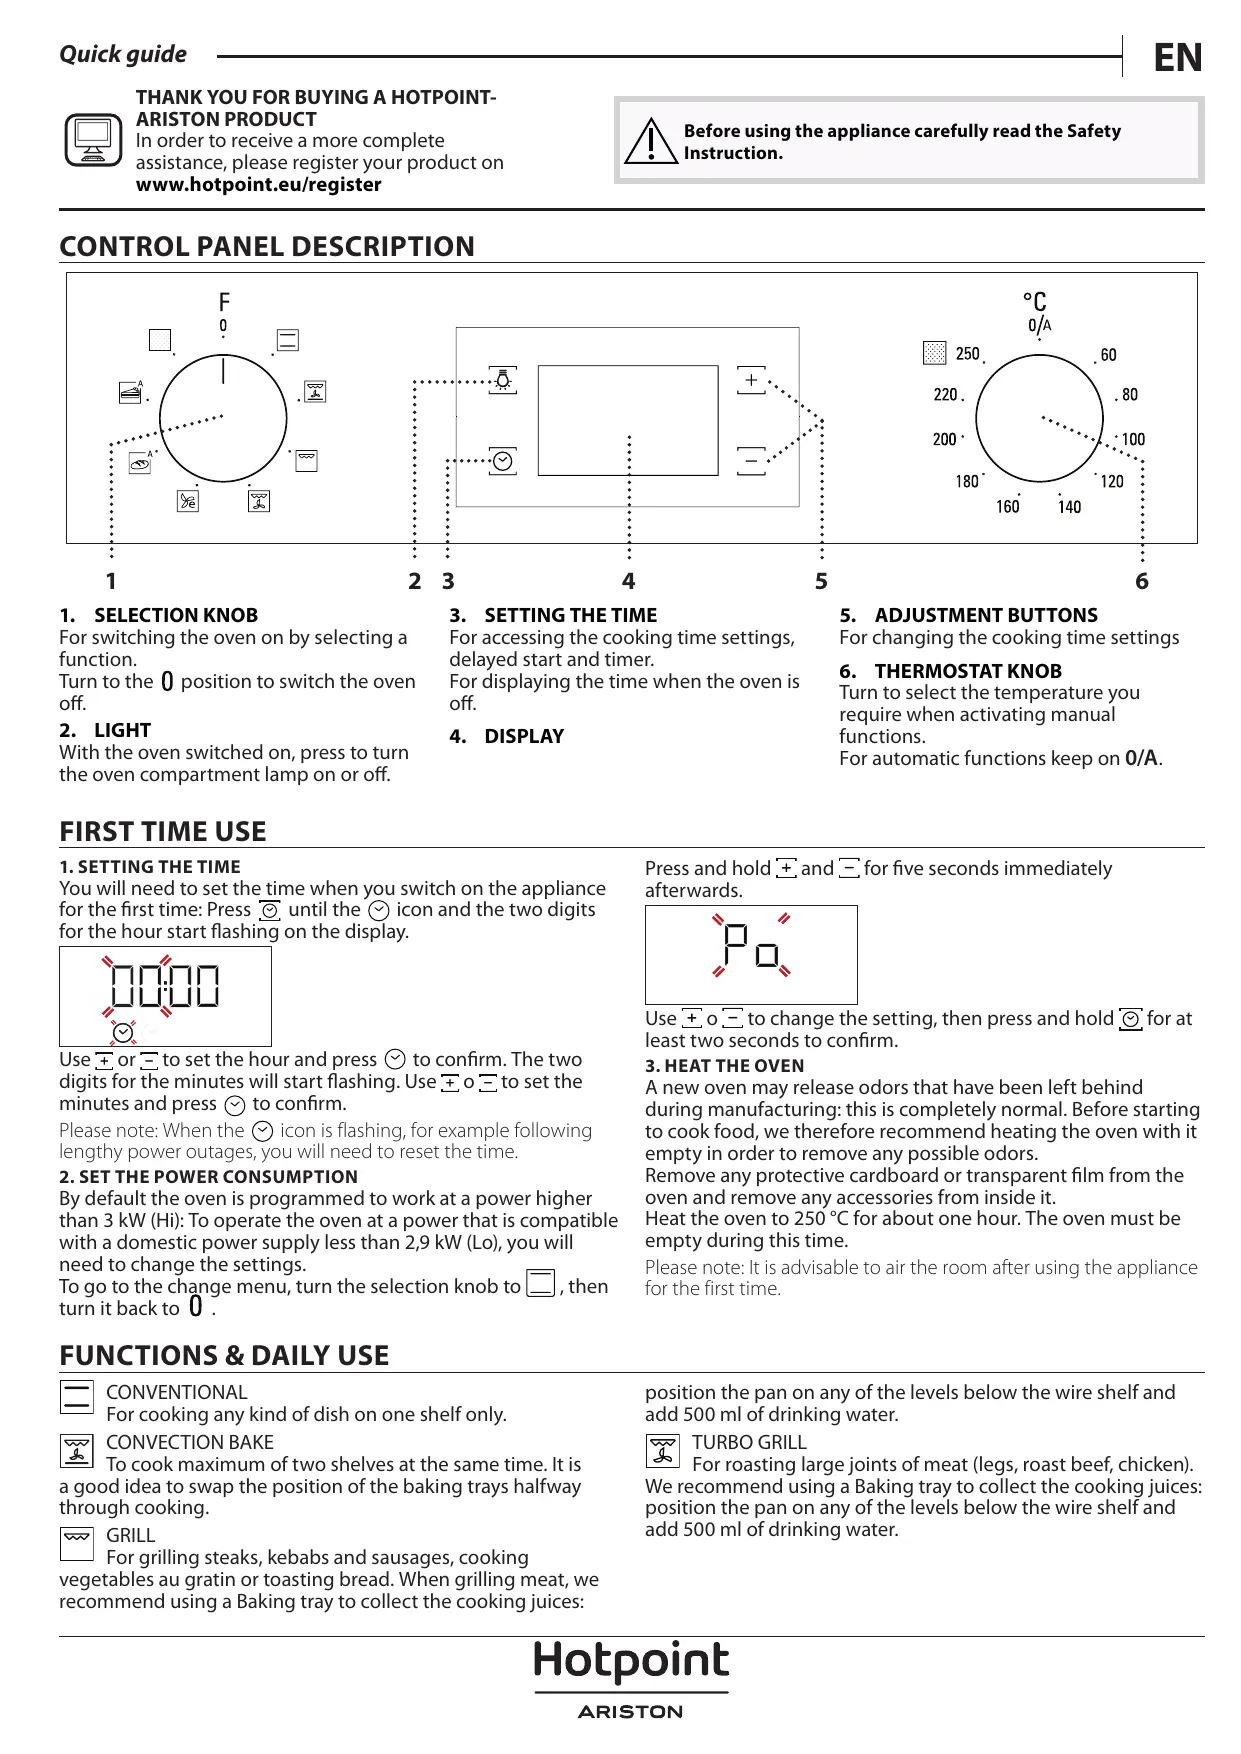
1. SETTING THE TIME
You will need to set the time when you switch on the appliance for the first time: Press until the icon and the two digits for the hour start flashing on the display.
Use ± or to set the hour and press to confirm. The two digits for the minutes will start flashing. Use ± o to set the minutes and press to confirm.
Please note: When the icon is flashing, for example following lengthy power outages, you will need to reset the time.
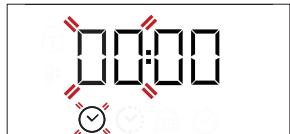
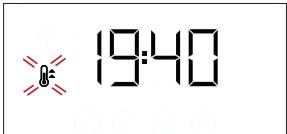
2. SET THE POWER CONSUMPTION
By default the oven is programmed to work at a power higher than 3 ~kW (Hi): To operate the oven at a power that is compatible with a domestic power supply less than 2,9 ~kW (Lo), you will need to change the settings.
To go to the change menu, turn the selection knob to , then turn it back to 0.
FUNCTIONS & DAILY USE

CONVENTIONAL
For cooking any kind of dish on one shelf only.

CONVECTION BAKE
To cook maximum of two shelves at the same time. It is a good idea to swap the position of the baking trays halfway through cooking.

GRILL
For grilling steaks, kebabs and sausages, cooking vegetables au gratin or toasting bread. When grilling meat, we recommend using a Baking tray to collect the cooking juices:
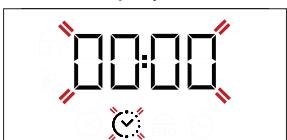
Press and hold + and - for five seconds immediately afterwards.

Use + o - to change the setting, then press and hold for at least two seconds to confirm.
3. HEAT THE OVEN
A new oven may release odors that have been left behind during manufacturing: this is completely normal. Before starting to cook food, we therefore recommend heating the oven with it empty in order to remove any possible odors.
Remove any protective cardboard or transparent film from the oven and remove any accessories from inside it.
Heat the oven to 250^ for about one hour. The oven must be empty during this time.
Please note: It is advisable to air the room after using the appliance for the first time.
position the pan on any of the levels below the wire shelf and add 500ml of drinking water.

TURBO GRILL
For roasting large joints of meat (legs, roast beef, chicken).
We recommend using a Baking tray to collect the cooking juices: position the pan on any of the levels below the wire shelf and add 500ml of drinking water.

ECO FORCED AIR
For cooking roasts and stuffed roasting joints on a single shelf. Food is prevented from drying out excessively by gentle, intermittent air circulation. When this ECO function is in use, the light will remain switched off during cooking but can be switched on again by pressing

BREAD AUTO
This function automatically selects the ideal temperature and baking time for bread. For best results, carefully follow the recipe. Activate the function when the oven is cold.
1. SELECT A FUNCTION
To select a function, turn the selection knob to the symbol for the function you require: the display will light up and an audible signal will sound.
2. ACTIVATE A FUNCTION
To start the function you have selected, turn the thermostat knob to set the temperature you require.
To interrupt the function at any time, switch off the oven, turn the selection knob and the thermostat knob to 0.
Please note: During cooking you can change the function by turning the selection knob or adjust the temperature by turning the thermostat knob.
The function will not start if the thermostat knob is on 0^ . You can set the cooking time, cooking end time (only if you set a cooking time) and a timer.
AUTOMATIC
To start the automatic function you have selected ("Bread" or "Pastry"), keep the thermostat knob at the position for automatic functions (0/A).
To finish cooking, turn the selection knob to position 0.
Please note: You can set the cooking end time and timer.
3. PREHEATING AND RESIDUAL HEAT
Once the function starts, an audible signal and a flashing icon on the display indicate that the preheating phase has been activated. At the end of this phase, an audible signal and the fixed icon on the display will indicate that the oven has reached the set temperature: at this point, place the food inside and proceed with cooking.
Please note: Placing the food in the oven before preheating has finished may have an adverse effect on the final cooking result.
After cooking and with the function deactivated, the icon may continue to remain visible on the display even after the cooling fan has switched off to indicate that there is residual heat in the compartment.
Please note: The time after which the icon switches off varies because it depends on a series of factors such as ambient temperature and function used. In any case, the product should be considered to be off when the pointer on the selection knob is at "0".
. PROGRAMMING COOKING
You will need to select a function before you can start programming cooking.
DURATION
Keep pressing until the icon and "00:00" start flashing on the display.
Use ± or to set the cooking time you require, then press to confirm.
Activate the function by turning the thermostat knob to the

PASTRY AUTO
This function automatically selects the ideal temperature for baking time for cakes. Activate the function when the oven is hot.

AUTOMATIC OVEN CLEANING - PYRO
For eliminating cooking spatters using a cycle at very high erature.
temperature you require: an audible signal will sound and the display will indicate that cooking is complete.
Notes: To cancel the cooking time you have set, keep pressing until the icon starts flashing on the display, then use to reset the cooking time to "00:00". This cooking time includes a preheating phase.
PROGRAMMING THE END COOKING TIME/DELAYED START After a cooking time has been set, starting the function can be delayed by programming its end time: press until the END icon and the current time start flashing on the display.
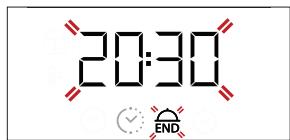
Use + or - to set the time you want cooking to end and press to confirm.
Activate the function by turning the thermostat knob to the temperature you require: the function will remain paused until it starts automatically after the period of time that has been calculated in order for cooking to finish at the time you have set.
Notes: To cancel the setting, switch the oven off by turning the selection knob to the 0 position.
Notes: Delay to start functionality is not available for Grill and Turbo Grill functions.
END OF COOKING
An audible signal will sound and the display will indicate that the function has finished.

Turn the selection knob to select a different function or to position “0” to switch the oven off.
Please note: If the timer is active, the display will show "END" alternately with the remaining time.
. SETTING THE TIMER
This option does not interrupt or program cooking but allows you to use the display as a timer, either during while a function is active or when the oven is off.
Keep pressing until the icon and "00:00" start flashing on the display.
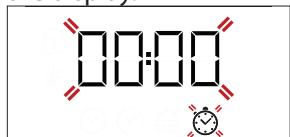
Use + or - to set the time you require and press to confirm. An audible signal will sound once the timer has finished counting down the selected time.
Notes: To cancel the timer, keep pressing until the icon starts flashing, then use to reset the time to "00:00".
. AUTOMATIC CLEANING FUNCTION - PYRO
Do not touch the oven during the Pyro cycle.
Keep children and animals away from the oven during and after (until the room has finished airing) running the Pyro cycle.
Remove all accessories - including shelf guides - from the oven before activating the function. If the oven is installed below a hob, make sure that all the burners or electric hotplates are switched off while running the self cleaning cycle.
For optimum cleaning results, remove excessive residuals inside the cavity and clean the inner door glass before using the pyrolytic function. We recommend only running the Pyro function if the appliance contains heavy soiling or gives off bad
odors during cooking.
To activate the automatic cleaning function, turn the selection knob and the thermostat knob to the icon. The function will be activated automatically, the door locked and the light inside the oven switched off: The display will show the time remaining to the end, alternating with "PYRO".
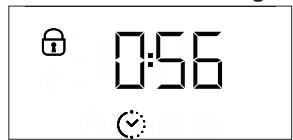

Once the cycle has been completed, the door remains locked until the temperature inside the oven has returned to a safe level. Air the room during and after running the Pyro cycle.
COOKING TABLE
| RECIPE | FUNCTION | PREHEAT | TEMPERATURE (°C) | DURATION (MIN) | LEVEL AND ACCESSORIES |
| Leavened cakes | | Yes | 170 | 30 - 50 | 2 |
| Yes | 160 | 30 - 50 | 2 |
| Yes | 160 | 40 - 60 * | 4 1 |
| Biscuits/tartlets | | Yes | 160 | 25 - 35 | 3 |
| Yes | 160 | 25 - 35 | 3 |
| Yes | 160 | 20 - 35 * | 4 2 |
| Pizza / Focaccia | | Yes | 190 - 250 | 15 - 50 | 1/2 |
| Yes | 190 - 250 | 20 - 50 * | 4 2 |
| Lasagne / baked pasta / cannelloni / flans | | Yes | 190 - 200 | 45 - 65 | 2 |
| Lamb / veal / beef /pork 1 kg | | Yes | 190 - 200 | 80 - 110 | 3 |
| Chicken/rabbit/duck 1 kg | | Yes | 200 - 230 | 50 - 100 | 2 |
| Baked fish/en papillote 0,5 kg (fillets, whole) | | Yes | 170 - 190 | 30 - 45 | 2 |
| Toasted bread | | 5' | 250 | 2 - 6 | 5 |
| Roast potatoes | | Yes | 200 - 210 | 35 - 55 ** | 3 |
- Switch levels halfway through cooking.
**Turn food two thirds of the way through cooking (if necessary).
The time indicated does not include the preheating phase: we recommend placing the food in the oven and setting the cooking time only after the required temperature has been reached.
Download the complete Use and Care Guide from docs hotpoint.eu for the table of tested recipes, compiled for the certification authorities in accordance with the standard IEC 60350-1.
| ACCESSORIES | ......
Wire shelf | Baking dish or cake tin on the wire shelf | Baking tray/Drip tray or Baking dish on the wire shelf | Drip tray / Baking tray | Drip tray / Baking tray with 200 ml of water |
Make sure that the oven has cooled down before carrying out any maintenance or cleaning.
Do not use steam cleaners.
Do not use wire wool, abrasive scourers or abrasive/corrosive cleaning agents, as these could damage the surfaces of the appliance.
Wear protective gloves.
The oven must be disconnected from the mains before carrying out any kind of maintenance work.
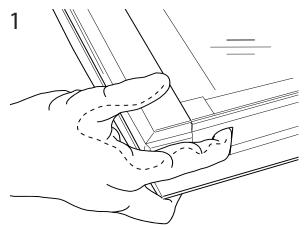
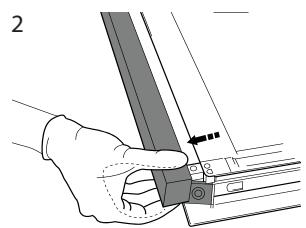
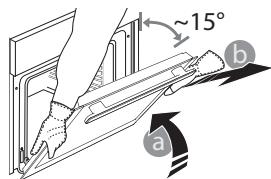
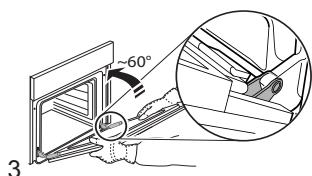
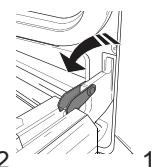
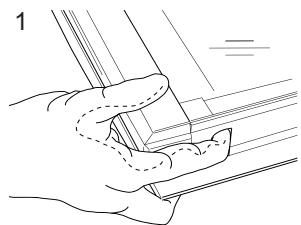
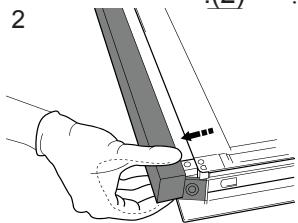
REMOVING AND REFITTING THE DOOR
To remove the door, open it fully and lower the catches until they are in the unlock position (1). Close the door as much as you can (2). Take a firm hold of the door with both hands - do not hold it by the handle. Simply remove the door (3) by continuing to close it while pulling it upwards (a) at the same time until it is released from its seating (b).
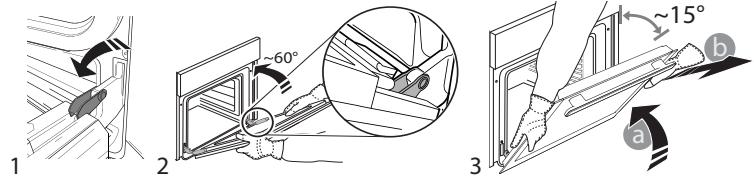
Put the door to one side, resting it on a soft surface. Refit the door by moving it towards the oven, aligning the hooks of the hinges with their seating and securing the upper part onto its seating. Lower the door and then open it fully. Lower the catches into their original position: make sure that you lower them down completely. Try closing the door and check to make sure that it lines up with the control panel. If it does not, repeat the steps above.
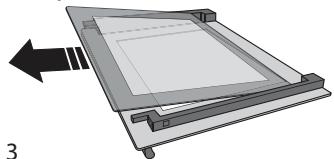
CLICK & CLEAN - CLEANING THE GLASS
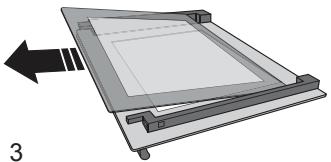
After removing the door and resting it on a soft surface with the handle downwards, simultaneously press the two retaining clips (1) and remove the upper edge of the door by pulling it towards you (2).
Lift and firmly hold the inner glass with both hands, remove it and place it on a soft surface before cleaning it (3).
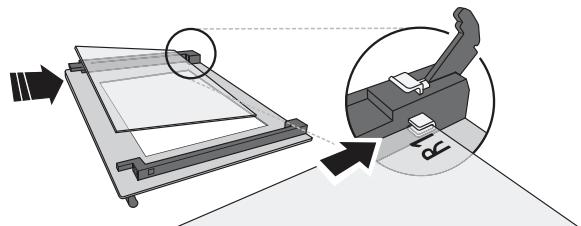
Refit the intermediate pane (marked with "R") before refitting the inside pane: To position the panes of glass correctly, make sure that the "R" mark can be seen in the left-hand corner. First insert the long side of the glass indicated by "1R" into the support seats (a), then lower it into position (b). Repeat this procedure for both panes of glass.
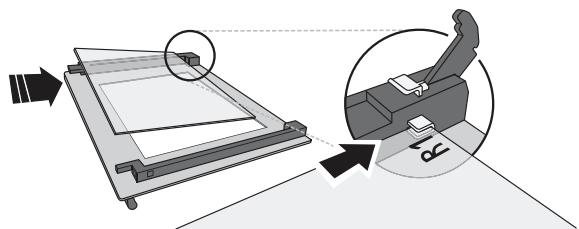
Refit the upper edge: a click will indicate correct positioning.
Make sure the seal is secure before refitting the door.
TROUBLESHOOTING
| Problem | Possible cause | Solution |
| The oven does not work. | Power cut.
Disconnection from the mains. | Check for the presence of mains electrical power and whether the oven is connected to the electricity supply.
Turn off the oven and restart it to see if the fault persists. |
| The display shows the letter “F” followed by a number. | Software problem. | Contact you nearest After-sales Service Centre and state the letter or number that follows the letter “F”. |
Download the complete Use and Care Guide from docs.hotpoint.eu for more informations about your product

Policies, standard documentation and additional product information can be found by:
- Visiting our website docs.hotpoint.eu
Using QR Code
- Alternatively, contact our After-sales Service (See phone number in the warranty booklet). When contacting our After-sales Service, please state the codes provided on your product's identification plate.
DESCRIPTION DU PANNEAU DE COMMANDE
1. BOUTON DE SÉLECTION
REMOVER E REPOR A PORTA
sul
. 1000000000000000000000000000000000000000000000000000000000000000000000000000000000000000000000000
0
aaii g aialg aiilg aiia iie jiaaii iiaaii iiaai
aeg aee

"0" 154 154 154 154 154 154 154 154 154 154 154 154 154 154 154 154 154 154 154 154 154 154 154
gaiu bua
100000000000000000000000000000000000000000000000000000000

100000000000000000000000000000000000000000000
Lao:ayeg yall ayaggl yalal jorll jyj
a a a a a a a a a a a a a a
a
aalall aal alalalalalalalalalal

19:40
i i 1
.0
J 1 J 1 J 1 J 1 J 1 J 1 J 1 J 1 J 1 J 1 J 1 J 1 J 1 J 1
gJ 1- gJagjg j
J 1 J 1 J 1 J 1 J 1 J 1 J 1 J 1 J 1 J 1 J 1 J 1 J 1 J 1 J 1 J 1 J 1 J 1 J 1 J 1 J 1 J 1 J 1 J 1 J 1 J 1 J 1 J 1 J 1 J 1 J 1 J 1 J 1 J 1 J
- a 1234567890123456789012345678901234567890123456789012345678901234567890123456789012345678901234567890123456789
aag aagll jld jil jabby lgl al jgs aagill aie gilg Jgall
alisiuyi caiii .jrll jll aagb g hiaiw jdl gl iial jll qyii
gaiiae gaii g i kcalw 1jgl jnl jlrll
aalgall 8 glll l 10 aayblll o jlll c
.IEC 60350-1
a bll aaiiaal
jill jic) 120
jlll plalil ggi:clg y 1y jlll lll
aag aeg aol o jall aag aol gaaag aal aag
| الله��
الله��/الله��/الله��/الله��
الله��/الله��/الله��/الله��
الله��/الله��/الله��/الله��
الله��/الله��/الله��/الله��
الله��/الله��/الله��/الله��
الله��/الله��/الله��/الله��
الله��/الله��/الله��/الله�� | الله��
الله��/الله��/الله��/الله��
الله��/الله��/الله��/الله��
الله��/الله��/الله��/الله��
الله��/الله��/الله��/الله��
الله��/الله��/الله��/الله��
الله��/الله��/الله��/الله雄
الله��/الله��/الله��/الله��
الله��/الله��/الله��/الله��
الله��/الله��/الله��/الله��
الله��/الله��/الله��/الله��
الله��/الله��/الله��/الله��
الله��/الله��/الله��/الله��
الله雄
الله��
الله��
الله��
الله��
الله��
الله��
الله��
الله��
الله��
الله��
الله��
الله��
الله��
الله��
الله��
الله��
الله��
الله��
الله��
الله��
الله��
الله��
الله��
الله��
الله��
الله雄
الله��
الله��
الله��
الله��
الله��
الله��
الله��
الله��
الله��
الله��
الله��
الله��
الله��
الله��
الله��
الله��
الله��
الله��
الله��
الله��
الله��
الله��
الله�� | ...... | الله��
الله��
الله��
الله��
الله��
الله��
الله��
الله��
الله��
الله��
الله��
الله��
الله��
الله��
الله��
الله��
الله��
الله��
الله��
الله��
الله��
الله��
الله��
الله��
الله�� |
aaiiie
j 1g j abuts g a 1 g a s u c y j 1 g 1 g 1 g 1 g 1 g 1 g 1 g 1 g 1 g 1 g 1 g 1 g 1 g 1 g 1 g 1 g 1 g 1 g 1 g 1 g 1 g 1 g 1 g 1 g 1 g 1 g 1 g 1 g 1 g 1 g 1 g 1 g 1 g 1 g
aia 1 aai iai aiai
Jusly Joo joo
jci hcuie aaiy aaii i 1111111111
g:glall jj 1 (R" fajl jaa) gll jy j 1
. jll "R" aal al l jk 1 1
(a) pall jls rall "1R" fajl jaaal j j 1 j 1
. jll gaoaal o0 . (b)
sli. jaiill ci aaball g s yg w ay glal alal l k jx 1
4.5 j 0e1g
Jll Jn Jn Jn Jn Jn Jn Jn Jn Jn Jn Jn Jn Jn Jn Jn Jn Jn Jn Jn Jn Jn Jn Jn Jn Jn Jn Jn Jn Jn Jn Jn Jn Jn Jn Jn Jn Jn Jn Jn Jn Jn Jn Jn Jn Jn Jn Jn Jn Jn Jn Jnn Jnn Jnn Jnn Jnn Jnn Jnn Jnn Jnn Jnn Jnn Jnn Jnn Jnn Jnn Jnn Jnn Jnn Jnn Jnn Jnn Jnn Jnn Jnn Jnn Jnn Jnn Jnn Jnn Jnn Jnn Jnn Jnn Jnn
clll l j cpi 1000000000000000000000000000000000000000000000000000000000000000000000000000000
CL-CLICK&CLEAN
J 1