
KM 040 AX0 - Cooker HOTPOINT - Free user manual and instructions
Find the device manual for free KM 040 AX0 HOTPOINT in PDF.
| Product type | Stand mixer |
| Model | KM 040 AX0 |
| Brand | HOTPOINT |
| Power supply | 220-240 V ~ 50/60 Hz |
| Power | 1600 W |
| Number of speeds | 10 speeds (1-10) |
| Bowl material | Stainless steel |
| Included accessories | Whisk, dough hook, flat beater, splash guard |
| Functions | Mix, knead, whisk, whip |
| Lighting | Service light under the motor head (stays on for 3 minutes after turning off) |
| Locking system | Motor head lockable/unlockable with lever |
| Bowl locking base | Bowl locks by turning to the right |
| Safety | Stops in case of power failure, unplug before cleaning or changing accessories |
| Cleaning | Exterior: damp soft cloth; bowl, flat beater, hook: hot water and detergent; whisk: hand wash |
| Repairability | Use of original spare parts, authorized after-sales service |
| Use | Household use only |
Frequently Asked Questions - KM 040 AX0 HOTPOINT
User questions about KM 040 AX0 HOTPOINT
0 question about this device. Answer the ones you know or ask your own.
Ask a new question about this device
Download the instructions for your Cooker in PDF format for free! Find your manual KM 040 AX0 - HOTPOINT and take your electronic device back in hand. On this page are published all the documents necessary for the use of your device. KM 040 AX0 by HOTPOINT.
USER MANUAL KM 040 AX0 HOTPOINT
natural_image
Line drawing of a kitchen mixer with control panel and side arm (no text or symbols)EN Operating instructions
FR Mode d'emploi
natural_image
Illustration of hands operating a mechanical device with a bowl nearby (no text or symbols)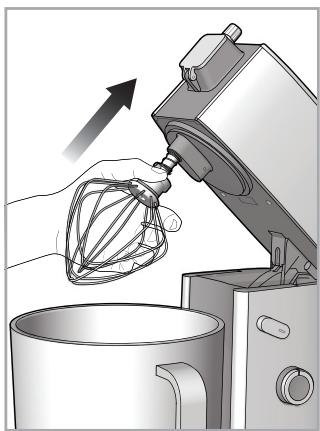
natural_image
Illustration of a hand mixing ingredients into a kitchen mixer (no text or symbols visible)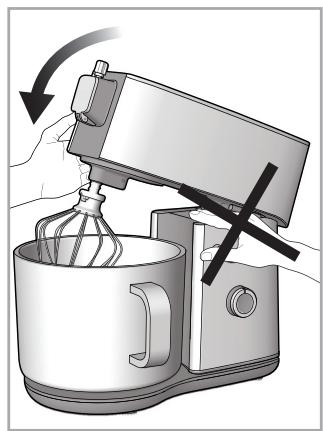
natural_image
Illustration of a kitchen mixer being combined with a hand using a whisk (no text or symbols present)B
natural_image
Illustration of a hand using a microwave oven to open a cup, with no visible text or symbolsC
natural_image
Illustration of a robotic arm pouring liquid into a container (no text or symbols visible)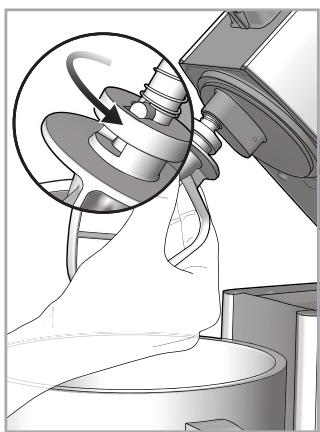
natural_image
Illustration of a person using a microscope with an inset showing the lens mechanism (no text or symbols)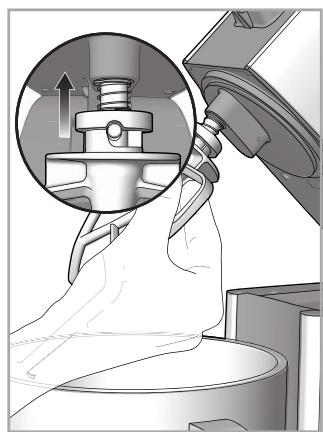
natural_image
Illustration of a person using a mechanical device with a magnified inset showing internal components (no text or symbols)D
natural_image
Illustration of a kitchen mixer with a bowl and handle, showing airflow direction (no text or symbols)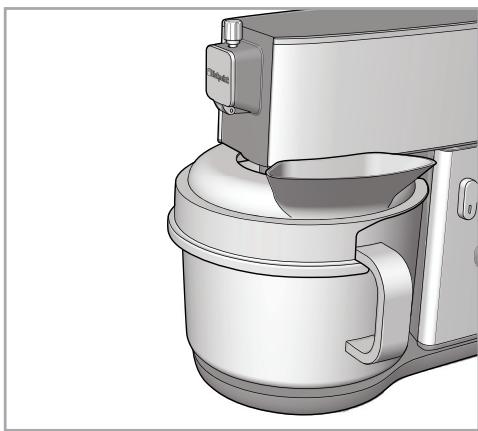
natural_image
3D rendering of a kitchen mixer with handle and side panel (no text or symbols visible)PARTI E FUNZIONI
natural_image
Line drawing of a mechanical component with internal channels (no text or symbols)natural_image
Line drawing of a kitchen mixer with six blades (no text or symbols)- Machine body
1.1. Bowl locking plate
1.2. Air vents - Motor head
2.1. Connection shaft - Knob
-
Releasing lever
-
Bowl
- Splash-guard cover
- Utensils
7.1. Wire whisk
7.2. Dough hook
7.3. Flat beater - Attachment connection
8.1. Clamp screw
8.2. Connection lid
The machine was designed to be able to use further sets of attachments (e.g. chopper, slicer, meat mincer, pasta set), which are available at the same shops and authorised facilities.
INTRODUCTION
Thank you for purchasing our product. In doing so you have opted for an efficient high-performance appliance.
If the instructions on the correct use of this appliance are not followed, the manufacturer will not be responsible for any resulting damage.
The operating instructions may refer to different models. Any difference is clearly identified.
IMPORTANT SAFETY INFORMATION
When using electrical appliances, basic safety precautions should always be followed, including the following.
- This appliance shall not be used by children.
- Keep the appliance and its cord out of reach of children.
- This appliance can be used by children aged from 8 years and above and persons with reduced physical, sensory or mental capabilities or lack of experience and knowledge if they have been given supervision or instruction concerning use of the appliance in a safe way and understand the hazards involved.
- The equipment was designed for household and similar uses such as in:
- staff kitchen areas in shops, offices and other work environments;
- farm houses;
- hotels, motels and other residential environments by the guests;
- bed&breakfast-type environments.
- Supervise children to prevent them from playing with the appliance.
- Turn unit off and unplug from outlet when not in use, before putting on or taking off parts, and before cleaning. To disconnect, turn unit off, grasp plug, and pull out from wall outlet. Never yank on cord.
- Do not operate any appliance with a damaged cord or plug or after the appliance malfunctions or has been damaged in any manner. Return the appliance to an authorized service facility for
examination, repair, or electrical or mechanical adjustment.
- Do not leave the appliance unattended while it is running.
- Connect and operate the appliance only in accordance with the specifications on the rating plate.
- Read all instructions. Keep these instructions for future use.
- To protect against risk of electrical shock, do not immerse base, cord, or plug in water or other liquid.
- If the power is interrupted, the appliance remains switched on and restarts when the power is restored.
- Avoid contacting moving parts and keep fingers out of discharge opening.
- To prevent injury, repairs such as replacing a damaged cord should only be carried out by our customer service.
- The use of attachments not recommended or sold by the appliance manufacturer may cause fire, electric shock, or injury.
- Remove the bowl and any utensils from the appliance before washing them.
• Do not use outdoors. - Do not let cord hang over edge of table or counter or touch hot surfaces.
- Do not operate this appliance in the presence of explosive and/or flammable fumes.
- This appliance is intended for household use only, not for commercial or industrial use. Use for anything other than the intended purpose will void the warranty.
- To reduce the risk of electric shock, do not attempt to remove the bottom cover. There are no user serviceable parts inside. Repair should be done only by authorized personnel.
BEFORE FIRST USE
Before the first use, wash the flat beater, dough hook and steel bowl using warm water and detergent. Rinse and dry thoroughly.

Handwash the wire whisk.
- Clean the outside of the machine with a soft damp cloth, then wipe it dry.
- Place the machine on a dry steady flat surface such as a counter or table. Keep it away from the edge of the work surface.

Do not use abrasive detergents or wire wool to clean the machine.

Do not immerse the body of the machine in water or any other liquid.
USING THE APPLIANCE
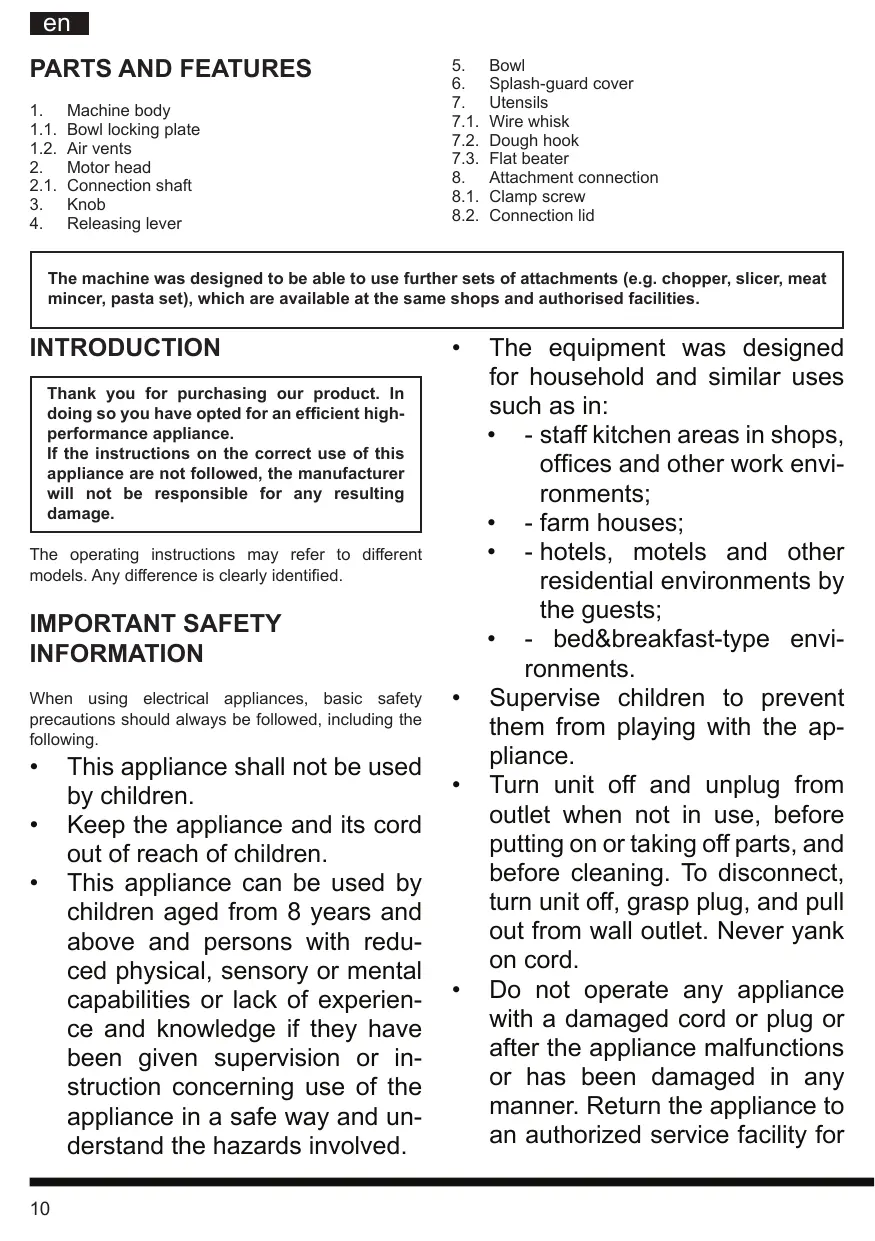
Locking and releasing the motor head (A)
To insert and remove any utensils and bowls, you will need to lift the motor head first. Perform the following operations:
- Rotate the releasing lever anticlockwise
- Use your other hand to gently lift the motor head until it stops
- Let go of the releasing lever and rotate it clockwise towards its starting position.
Having inserted the utensils, lower the motor head again. Perform the following operations:
- Rotate the releasing lever anticlockwise
- Use your other hand to gently rotate the motor head downwards until it stops
- Let go of the releasing lever and rotate it clockwise towards its starting position.

Never let go of either the motor head or lever until the operation is complete - both in the g and lowering steps.

In the motor-head locking and releasing steps, make sure your fingers do not get to the articulated joint to avoid injuries.

Never switch on the appliance with inserted utensils unless the bowl is properly in place.
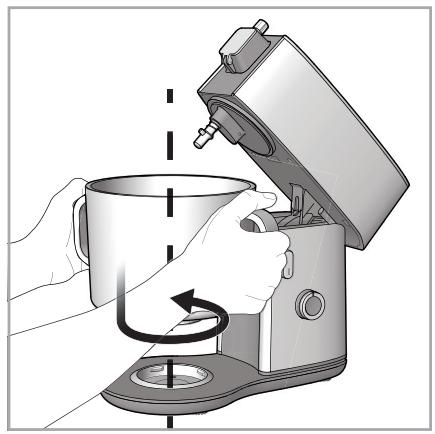
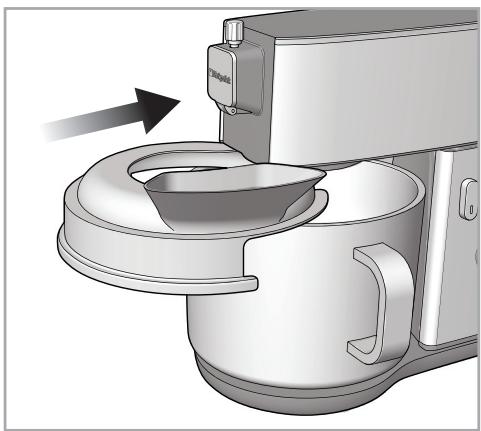
Fitting and removing the bowl (B)
Fit the bowl through the following operations:
- Make sure the appliance is off.
- Unplug it.
- Release and lift the motor head.
- Place the bowl on the locking plate.
- Slightly rotate the bowl clockwise until it locks in place completely.
To remove it:
- Make sure the appliance is off.
- Unplug it.
-
Release and lift the motor head.
-
Rotate the bowl anticlockwise until it is released.
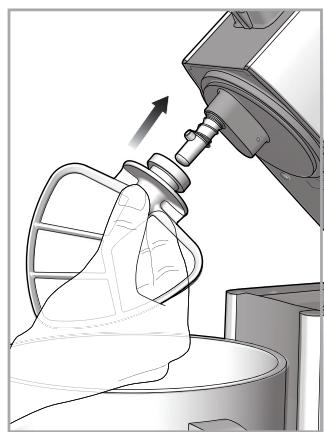
Assembling and disassembling the utensils (C)
Assembling:
- Make sure the appliance is off.
- Unplug it.
- Release and lift the motor head.
- Fit the utensil to the connection shaft.
- Rotate it anticlockwise until the pin on the shaft gets into the relevant seat on the utensil.
- Push upwards all the way by compressing the spring on the shaft and keep rotating the utensil until it stops.
Disassembling:
- Make sure the appliance is off.
- Unplug it.
- Release and lift the motor head.
- Slightly push the utensil upwards and rotate it clockwise until it stops.
- Pull the utensil downwards to remove it.
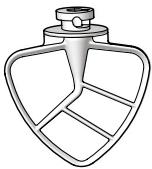 | Normal to hard mixtures:• Biscuits• Pastry• Cakes• Meat balls• Stuffing• Mashed potatoes• Icing |
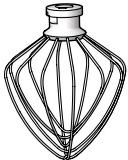 | Soft mixtures that need to incorporate air:• Eggs• Egg whites• Mayonnaise• Sponge cake• Whipped cream |
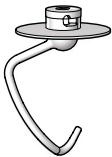 | • Bread• Pizza• Pasta• Focaccia |
Speed control
- Rotate the knob clockwise to start mixing.
Always start the machine at the lowest possible speed to prevent the ingredients from splashing out of the bowl.
- When the ingredients begin to mix, turn the knob clockwise until you reach the desired speed.
- When the preparation is complete, turn the knob to OFF and unplug the machine for safety reasons.
To avoid spoiling the mixture, we recommend operating the machine for a short time and frequently checking the consistency of the preparation.
Should you need to scrape away any residual mixture from the inside surface of the bowl using a utensil, turn the knob to OFF and unplug the appliance first.
Guide on the use of different speeds
| Speed | Operation | Description |
| 1 | Blending | To slowly blend the ingredients at the beginning of all preparations |
| 2-3 | Mixing | To mix hard dough for pizza, bread, focaccia.To mix mashed potatoes or other vegetables, or shortening with flour to make cakes. |
| 4-5 | Stirring | To make rather thick batters, biscuits, pastry |
| 6-7 | Beating | For medium-speed beating.To complete the preparation of cakes, doughnuts and other soft batters. |
| 8-9 | High-speed beating | To beat egg whites, creams and icing. |
| 9-10 | Whipping | To whip cream, egg whites and small quantities of cream/custard |
The operation of the machine may slow down as the mixture gets harder. This is normal.
Operating light
Whenever the machine is operating, the bowl is illuminated by a light located below the motor head. After the machine has been switched off, the light will stay on for 3 minutes.
If the knob is already set to an operating speed before the machine is powered, the light will start flashing as soon as the machine is powered, but the motor will not start. First turn the knob to OFF and then set the speed.
Tips and operating techniques

We recommend using the lid to add the ingredients through the special spout, thus ing any splashes from liquid mixtures.

Always insert and remove the lid with the motor head in working position (D).
• To determine the ideal duration of each preparation, monitor the mixture and keep mixing only until it looks just like in your recipe.
• We recommend adding the ingredients as close as possible to the bowl side and not directly into the moving utensil. Always use the inlet on the splash-guard spout.
- Solid ingredients such as walnuts, raisins or candied fruit are usually added during the last seconds of mixing at speed 1.
- The mixture should be thick enough to prevent such ingredients from sinking to the bottom of the saucepan while you are cooking.
- Mixtures comprising large quantities of liquid ingredients should be blended at low speeds to avoid splashes. Increase the speed only after the mixture has thickened.
CLEANING AND MAINTENANCE

Danger of injuries: disconnect the appliance before you touch the whisks/beaters or other attachments. Failure to follow this instruction may result in fractures, cuts or bruises.
- Clean the outside of the machine with a soft damp cloth.
- Remove any utensils before cleaning the machine.
- Wash the flat beater, dough hook and steel bowl using warm water and detergent. Rinse and dry thoroughly.

Handwash the wire whisk.
- Utensils and bowls should be washed as soon as possible after use to prevent any food from drying up on the surface.

Do not use abrasive detergents or wire wool to clean the machine.
DISPOSAL OF OLD ELECTRICAL APPLIANCES

The European Directive 2002/96/EC on Waste Electrical and Electronic Equipment (WEEE), requires that old household electrical appliances must not be disposed of in the normal unsorted municipal waste stream.

Old appliances must be collected separately in order to optimise the recovery and of the materials they contain and reduce the human health and the environment.
The crossed out “wheeled bin” symbol on the product reminds you of your obligation, that when you dispose of the appliance it must be separately collected. Consumers should contact their local authority or retailer for information concerning the correct disposal of their old appliance.
PIÈCES ET FONCTIONS
natural_image
Simple black-and-white line drawing of a smiling face with curved lines (no text or symbols)Üretici Firma:
Indesit Company Spa
Viale Aristide Merloni, 47
60044 Fabriano Italy
İthalatçı Firma:
Indesit Company Beyaz Eşya PAZARLAMA A.Ş.
Balmumcu Cad. Karahasan Sok.
No: 11, 34349 – Balmumcu Beşiktaş – İstanbul
Tel: (0212) 355 53 00
Faks: (0212) 212 95 59
IMHA ETME

- PARTI E FUNZIONI
- INTRODUCTION
- IMPORTANT SAFETY INFORMATION
- BEFORE FIRST USE
- Handwash the wire whisk.
- USING THE APPLIANCE
- Locking and releasing the motor head (A)
- Fitting and removing the bowl (B)
- Assembling and disassembling the utensils (C)
- Assembling:
- Disassembling:
- Speed control
- Operating light
- Tips and operating techniques
- CLEANING AND MAINTENANCE
- DISPOSAL OF OLD ELECTRICAL APPLIANCES
- PIÈCES ET FONCTIONS
- Üretici Firma:
- İthalatçı Firma:
- IMHA ETME
Brand : HOTPOINT
Model : KM 040 AX0
Category : Cooker