
HS B16 AA0 - Vacuum Cleaner HOTPOINT - Free user manual and instructions
Find the device manual for free HS B16 AA0 HOTPOINT in PDF.
| Product type | Stick vacuum cleaner |
| Brand | Hotpoint |
| Model | HS B16 AA0 / SL B16 AA0 |
| Power supply | 220-240 V ~ 50/60 Hz |
| Maximum power | 1600 W |
| Bag type | Pure Clean fabric bag |
| Filter | Pure Clean Hepa 13 (washable, filtration efficiency > 99.95%) |
| Cord length | 6.3 meters |
| Bag full indicator | Yes, red indicator light |
| Power regulator | Electronic, variable |
| Storage position | Vertical with dedicated brush; can be wall-mounted |
| Included accessories | Brush for storage position, parquet brush, turbo brush, crevice tool, upholstery tool |
| Main brush | Adjustable (pedal) for hard floors / carpets and rugs |
| Safety device | Motor thermal protection (automatic shutdown in case of overheating) |
| Filter maintenance | Clean every 4 months, annual replacement recommended |
| Bag replacement | When the indicator lights up or at least once a year |
| Intended use | Domestic, hard floors, carpets, rugs, upholstered furniture |
| Number of manual pages | 56 |
Frequently Asked Questions - HS B16 AA0 HOTPOINT
User questions about HS B16 AA0 HOTPOINT
0 question about this device. Answer the ones you know or ask your own.
Ask a new question about this device
Download the instructions for your Vacuum Cleaner in PDF format for free! Find your manual HS B16 AA0 - HOTPOINT and take your electronic device back in hand. On this page are published all the documents necessary for the use of your device. HS B16 AA0 by HOTPOINT.
USER MANUAL HS B16 AA0 HOTPOINT
natural_image
Line drawing of a white handheld vacuum cleaner with control panel and base mount (no text or symbols)Hotpoint
Hotpoint
ARISTON
EN Operating instructions
FR Mode d'emploi
A
natural_image
Illustration of a medical or surgical tool with a curved tip and arrow indicating motion (no text or symbols)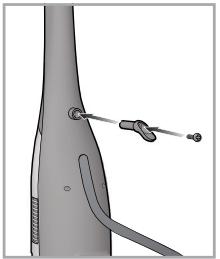
natural_image
Medical illustration of a surgical instrument with attached tubing (no text or symbols)B
natural_image
Illustration of a hand holding a circular button on a bottle-like object (no text or symbols visible)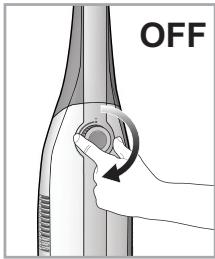
C
natural_image
Illustration of hands installing or adjusting a door panel (no text or symbols visible)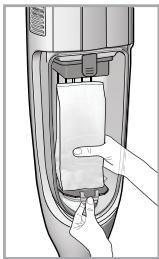
natural_image
Diagram of a hand inserting a component into a device inside a container (no text or symbols visible)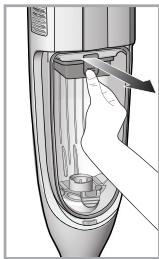
natural_image
Diagram of a hand inserting a plug into a container with liquid, showing internal components (no text or symbols)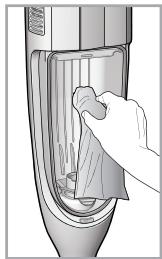
natural_image
Illustration of a hand cleaning a device with a cloth (no text or symbols visible)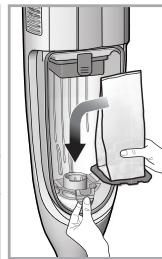
natural_image
Illustration of a hand pressing down on a mechanical component with a paper clip and arrow indicating motion (no text or symbols)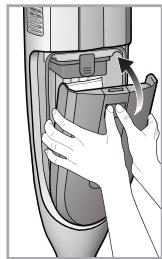
natural_image
Illustration of a hand inserting a device into a container with an arrow indicating rotation (no text or symbols present)D
natural_image
Illustration of a hand inserting a component into a device, showing a curved arrow indicating rotation (no text or symbols present)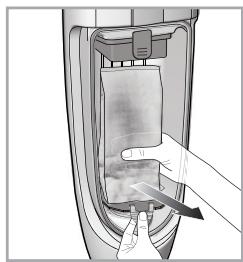
natural_image
Illustration of a hand inserting a plug into a device inside a container (no text or symbols visible)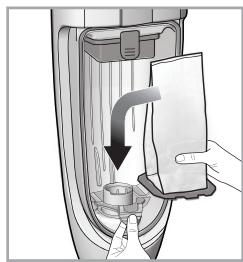
natural_image
Diagram of a device with a hand inserting a card into a container, showing internal components and a downward arrow (no text or symbols)
natural_image
Illustration of hands inserting a device into a device casing (no text or symbols visible)E
natural_image
Illustration of hands installing or adjusting a mechanical component with an arrow indicating rotation (no text or symbols present)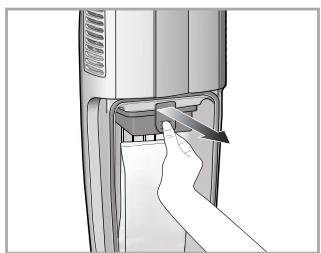
natural_image
Hand inserting a plug into a device (no text or symbols visible)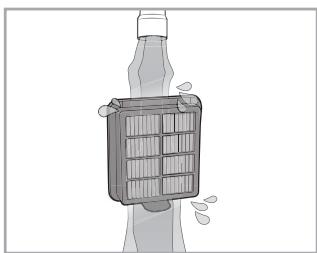
natural_image
Illustration of a bottle with a plastic bag attached to a glass (no text or symbols)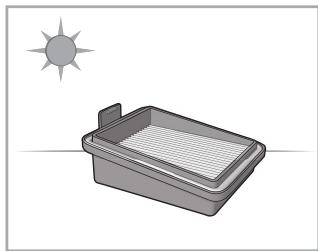
natural_image
Illustration of a rectangular saltwater bath with a sun symbol above it (no text or symbols present)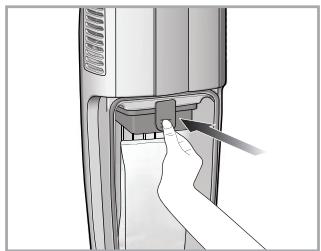
natural_image
Hand inserting a plug into a device (no text or symbols visible)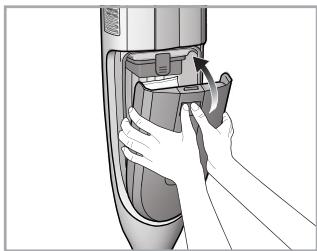
natural_image
Illustration of a hand inserting a device into a container (no text or symbols visible)F
natural_image
Two technical illustrations of a mechanical component with a grid-patterned background (no text or symbols)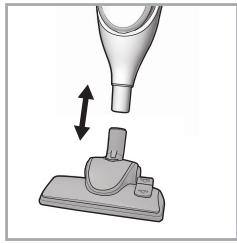
natural_image
Illustration of a vacuum cleaner performing a valve lift operation (no text or symbols)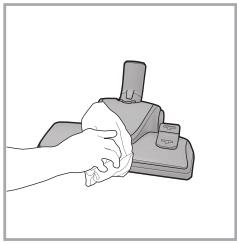
natural_image
Hand cleaning a small electronic device with a cloth (no text or symbols visible)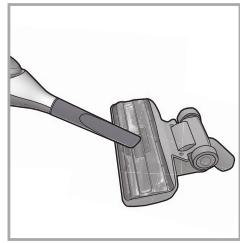
natural_image
Illustration of a mechanical tool interacting with a component (no text or symbols visible)G
natural_image
Illustration of a hand cleaning a tiled floor with a vacuum cleaner (no text or symbols)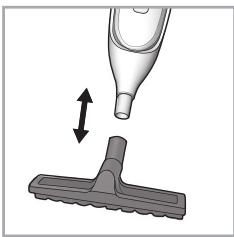
natural_image
Illustration of a hand holding a small object with an arrow indicating upward motion (no text or symbols)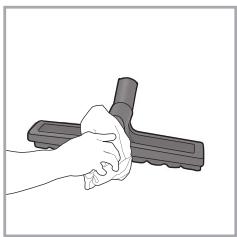
natural_image
Hand cleaning a mechanical component (no text or symbols visible)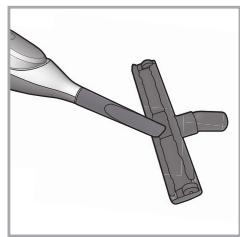
natural_image
Illustration of a tool interacting with a mechanical component (no text or symbols visible)H

natural_image
Illustration of a robotic arm gripping a small object on a flat surface (no text or symbols)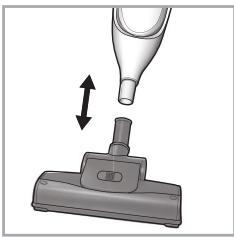
natural_image
Illustration of a pipette dispensing liquid onto a mechanical component (no text or symbols)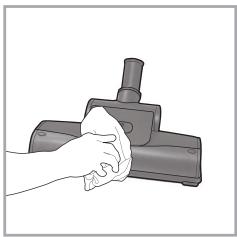
natural_image
Hand cleaning a mechanical component with a cloth (no text or symbols visible)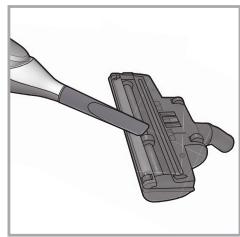
natural_image
Mechanical component with a tool inserted into a housing (no visible text or symbols)I
natural_image
Illustration of a pipette dispensing liquid into a container with tubes (no text or symbols)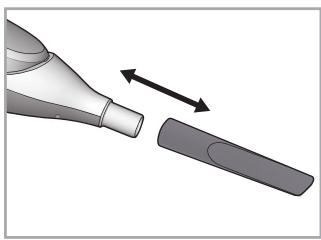
natural_image
Illustration of a tool interacting with a mechanical component, showing an arrow indicating direction (no text or symbols present)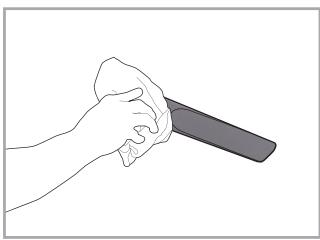
natural_image
Line drawing of a hand holding a tool, no text or symbols presentJ
natural_image
Illustration of a sewing machine needle striking the fabric on a sofa (no text or symbols visible)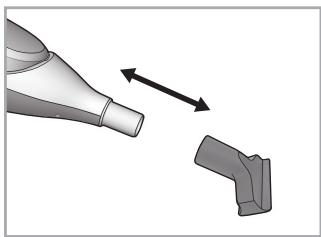
natural_image
Diagram showing a hairdryer emitting powder into a small mechanical component (no text or symbols present)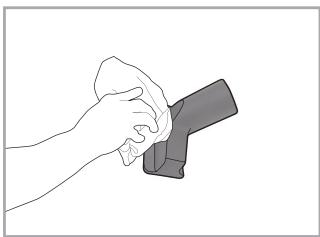
natural_image
Line drawing of a hand holding a small object, possibly a tool or device (no text or symbols present)DESCRIZIONE DELL'APPARECCHIO
DESCRIPTION OF THE APPLIANCE
- Turbo brush
- Parquet brush
- Parking brush
- Bristle-adjustment pedal
- Suction inlet
- Dust compartment lid
- Full dust-bag indicator
- Dust compartment opening button
- Air grille
- Body of upright vacuum cleaner
- Switch-on/power electronic control
- Hand grip
INTRODUCTION
Welcome to Hotpoint-Ariston's Floor Care. Thank you for purchasing our upright vacuum cleaner Compact Power. We recommend registering this product on www.hotpoint.eu to make sure you are entitled to all the benefits made available by Hotpoint-Ariston's Customer Service.
The upright vacuum cleaner Compact Power was designed to ensure both optimum performance and ease of use. It is very handy and so lightweight and compact that you can easily park it in a vertical position using its convenient parking brush.
Before you begin using the appliance, it is important that you thoroughly read these instructions and carefully keep them for further reference.
GENERAL SAFETY RULES
The safety features of your upright vacuum cleaner comply with the technical specifications and regulations in force. Do not use the appliance for any use other than its intended use. Any improper use could cause damage to persons and/or property.
The mains voltage must match the voltage of the upright vacuum cleaner (220-240 V). Any connection error could cause irreversible damage to the appliance and void its warranty.
- This appliance shall not be used by children.
-
Keep the appliance and its cord out of reach of children.
-
Wall support hole
- Upper cord-rewinding support
- Lower cord-rewinding support
- Power cord
- Pure Clean Hepa 13 filter
- Dust compartment
- Pure Clean dust bag
- Intake valve
- Dust bag support
Not shown:
Precision nozzle
Upholstery nozzle
Clamp screw
- This appliance can be used by children aged from 8 years and above and persons with reduced physical, sensory or mental capabilities or lack of experience and knowledge if they have been given supervision or instruction concerning use of the appliance in a safe way and understand the hazards involved.
- The equipment was designed for household and similar uses such as in:
- staff kitchen areas in shops, offices and other work environments;
- farm houses;
- hotels, motels and other residential environments by the guests;
- bed&breakfast-type environments.
- Supervise children to prevent them from playing with the appliance.
- Turn unit off and unplug from
outlet when not in use, before putting on or taking off parts, and before cleaning. To disconnect, turn unit off, grasp plug, and pull out from wall outlet. Never yank on cord.
- Do not operate any appliance with a damaged cord or plug or after the appliance malfunctions or has been damaged in any manner. Return the appliance to an authorized service facility for examination, repair, or electrical or mechanical adjustment.
- Do not leave the appliance unattended while it is running.
• After use, get hold of the plug to disconnect it from the electrical outlet and wind the power cord. - Do not bend the power cord and keep it away from sharp edges to avoid any damage.
- Never leave or use the appliance over or close to flames, ovens, flammable materials or other sources of heat.
- Do not use the upright vacuum cleaner on persons or animals. Keep the suction ends away from your body while it is in operation.
- Should you suspect a failure, immediately unplug it from the electrical outlet.
- Never immerse the upright vacuum cleaner in water or any other liquid. Never spray any liquid substances onto the appliance.
- Do not leave the appliance in the open air and exposed to inclement weather conditions.
- Never suck up any liquid or humid substances as this could affect the operation of the appliance.
- Never suck up any flammable materials or incandescent objects such as ash, cigarette ends etc. Some parts of the upright vacuum cleaner could catch fire.
- Never suck up any sharp or cutting objects as this could damage the appliance.
- For your safety, all repairs or maintenance operations on the appliance must be carried out exclusively by Hotpoint-Ariston's authorised staff.
- The manufacturer shall assume no responsibility in case of damage resulting from any improper use of the appliance.
BEFORE USE
Remove all adhesives, protective plastic materials and cardboard packaging. Make sure all adhesive parts are removed with a soft damp cloth.
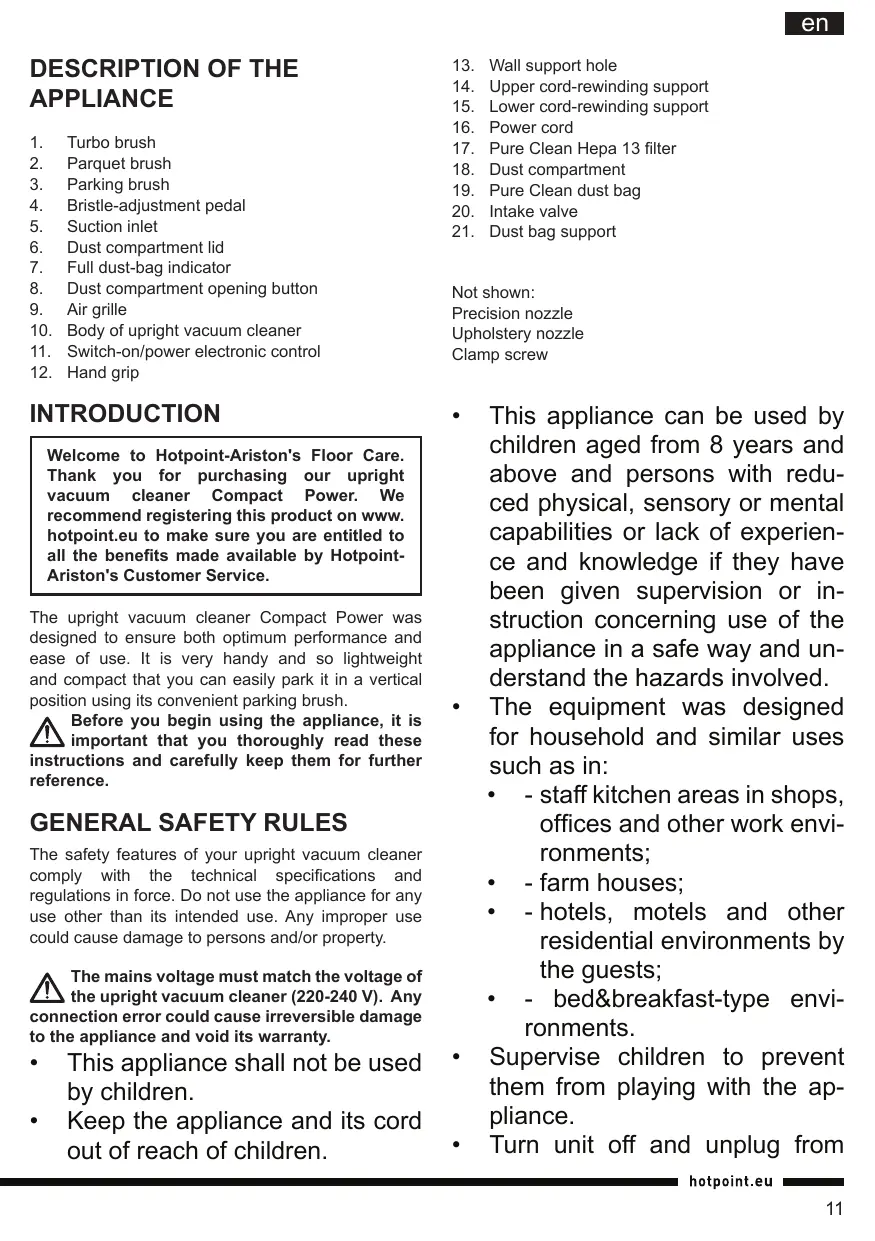
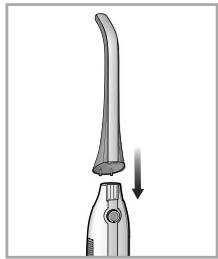
Assembling (A)
Assemble the Compact Power as follows:
- Fit the hand grip (12) to the body of the upright vacuum cleaner (10).
- Place the lower cord-rewinding support (15) into its housing, making sure its insertion is complete.
- Insert the clamp screw and fasten it securely.
- Fit the parking brush (3) or the attachment you need (see chapter "Attachments") into the end of the suction inlet (5) until it locks into place.
USING THE UPRIGHT VACUUM CLEANER (B)
Do not use the upright vacuum cleaner without filter or dust bag because the appliance could get damaged.
- Unwind the power cord (16) and plug the appliance into an electrical outlet (220-240V).
Before you plug the appliance into an electrical outlet, we recommend unwinding the entire power cord (6,3 m) to avoid any overheating and damage.
- Rotate the switch-on/power electronic control (11) clockwise to start the appliance.
- To select the desired suction intensity, rotate the switch-on/power electronic control as far as position +.
We recommend using a low suction power on delicate surfaces to avoid any damage (e.g. curtains, fabrics, cushions etc).
- To switch off the appliance rotate the switch-on/power electronic control to the Off position.
- Unplug it from the electrical outlet and rewind the cord around the lower (15) and upper (14) supports.
- Park the upright vacuum cleaner in a vertical position or secure it to a wall using the special
hole for wall support (13).

An ordinary wall plug will be enough to secure the upright vacuum cleaner to the
CLEANING AND MAINTENANCE

Before cleaning or maintaining the vacuum cleaner, make sure it has been unplugged the electrical outlet. Do not use aggressive finances or abrasive materials to clean the stance, its internal parts and attachments.
Cleaning the appliance
Use a dry or slightly damp soft cloth to clean the plastic parts (body, dust compartment etc), making sure that all parts have been thoroughly wiped dry.
Cleaning the attachments
Before cleaning the attachments refer to the chapter "Attachments".
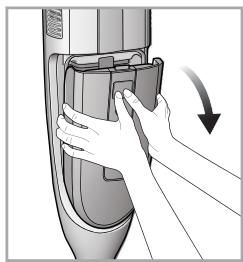
Cleaning the dust compartment (C)
For the routine cleaning of the dust compartment:
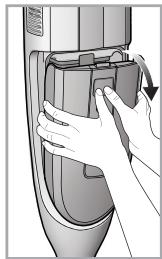
- Press the dust-compartment opening button (8) to open the dust compartment lid (6).
- Remove the Pure Clean dust bag (19) by lightly pressing the dust bag support (21) and remove the Pure Clean Hepa 13 filter (17) by releasing the opening tab.
- Clean the dust compartment by removing any residual dirt with a small brush. If needed, use a damp soft cloth, taking care to wipe all its parts entirely dry.
- Properly re-place the Pure Clean Hepa 13 filter, paying attention to the positions of the notches.
- Re-place the Pure Clean dust bag on the intake valve (20) until it fits into the dust bag support. Then close the dust compartment lid until it clicks into place.
Replacing the dust bag Pure Clean (D)
We recommend always using Hotpoint-Ariston's original Pure Clean dust bags, because their special fabric allows optimum air filtration, maximum dust/powder retention, high performances and a long motor life.
As the Pure Clean dust bags (19) are made of fabric, they are more resistant than conventional paper bags and can retain very fine dust/powder particles more effectively, thus ensuring maximum hygiene.

We recommend replacing the Pure Clean bag when the full-bag red indicator lights for any case change it at least once a year to be sure of the best efficiency of your chance. The pores of a bag clogged with dust/other particles reduce the motor's suction rate and can even damage it.
- Make sure the appliance is disconnected from the electrical outlet.
- Press the dust-compartment opening button (8) to open the dust compartment lid (6).
- Remove the Pure Clean dust bag by lightly pressing the dust bag support (21).

Dispose of the dust bag in compliance with all local regulations on waste disposal.
- Fit a new Pure Clean dust bag to the intake valve (20), making sure it locks into the dust bag support.
- Close the dust compartment lid (6) until it clicks into place.

Make sure the dust bag is properly coupled to the relevant support to prevent it from losing loose during use.
Cleaning the Pure Clean Hepa 13 filter (E)
The Pure Clean Hepa 13 filter ensures maximum protection against allergens and high air quality, because the air given back by the appliance is entirely free from dust/powder residues (filtering power >99.95 %).

We recommend cleaning the filter at least every 4 months to restore its filtering power. By case we recommend replacing the filter at every year to ensure maximum performance.
To clean the Pure Clean Hepa 13 filter:
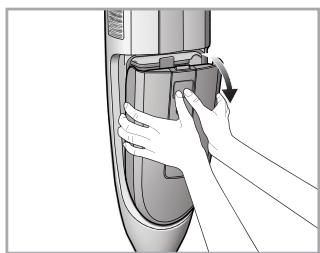
- Make sure the appliance is disconnected from the electrical outlet.
- Press the dust-compartment opening button (8) to open the dust compartment lid (6).
- Remove the Pure Clean Hepa 13 filter (17) by releasing the opening tab.
- Wash the filter under running water, taking care
that the jet of water is not too strong.
- Hold it so that the water flows parallel to its folds.
- Let it dry at room temperature until all its parts are thoroughly dry.
- Re-place the Pure Clean Hepa 13 filter (17), paying attention to the positions of the notches.
- Close the dust compartment lid until it clicks into place.
ATTACHMENTS
The attachments can either be supplied as standard features (based on the model) or be purchased separately from Hotpoint-Ariston's authorised centres.
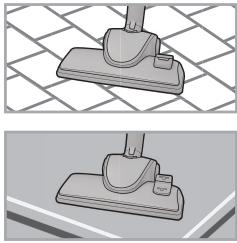
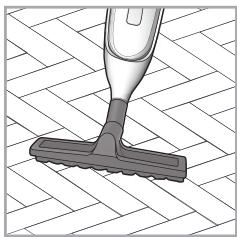
Parking brush (F)
The brush for the parking position (3) is suitable for vacuuming hard and smooth floors as well as carpets and moquette on a daily basis. The Compact Power upright vacuum cleaner was specially designed to be able to easily stand in a vertical position both during and at the end of any cleaning work.
Use the bristle-adjustment pedal (4) to clean:

Hard floors

Carpets and moquette
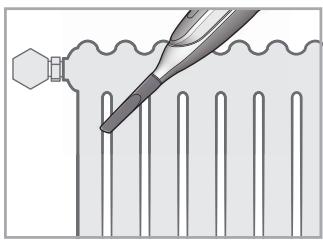
Parquet brush (G)
The Parquet brush (2) is suitable for vacuuming very delicate surfaces such as wooden floors. The special natural bristles enable you to use it on very delicate surfaces without any harm.
Turbo brush (H)
The Turbo brush (1) is especially suitable for the in-depth vacuuming of short-pile carpets and moquette as well as sucking up your pet's fur. The rotation of the brush is operated by the upright vacuum cleaner's suction power.
Precision nozzle (I)
The precision nozzle will help you vacuum corners, crevices and other difficult-to-reach spots.
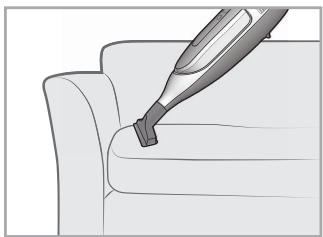
Upholstery nozzle (J)
The upholstery nozzle is suitable for vacuuming surfaces such as sofas, mattresses, blankets, cushions etc.
ELECTRICAL APPLIANCES

The European Directive 2012/19/UE on Waste Electrical and Electronic Equipment (WEEE), requires that old household electrical appliances must not be disposed of in the normal unsorted municipal waste stream.

Old appliances must be collected separately in order to optimise the recovery and of the materials they contain and reduce the human health and the environment.
The crossed out “wheeled bin” symbol on the product reminds you of your obligation, that when you dispose of the appliance it must be separately collected. Consumers should contact their local authority or retailer for information concerning the correct disposal of their old appliance.
TROUBLESHOOTING
Problem
The upright vacuum cleaner cannot be switched on.
The upright vacuum cleaner has switched off during use.
The full dust bag red indicator lights up although the bag is not full yet.
Low suction power.
The upright vacuum cleaner whistles or vibrates when in use.
The brush can be hardly moved.
Possible causes / Solutions
• The plug was not inserted or is not making contact.
• The power control is in Off position.
- The upright vacuum cleaner comes equipped with a thermal protection device for the motor that will switch off the appliance in the event of overheating. Make sure the suction inlet, accessory and filter are not clogged up. Wait for the motor to cool down, then switch on the upright vacuum cleaner.
• Make sure the brush is not clogged up.
- Change the dust bag. If large quantities of very fine dust/powder are sucked up (e.g. chalk, flour etc), the full dust bag red indicator may light up although the bag is not full yet. The reason is that the Pure Clean dust bag is able to retain very fine dust/powder particles.
• Clean the Pure Clean Hepa 13 filter and replace it, if needed.
• Make sure the switch-on/power electronic control is in the desired position.
• Make sure the brush is not clogged up or that the Pure Clean dust bag and/or Pure Clean Hepa 13 filter were properly fitted.
- Change the dust bag. If large quantities of very fine dust/powder are sucked up (e.g. chalk, flour etc), the Pure Clean dust bag may become clogged up.
• Clean the Pure Clean Hepa 13 filter and replace it, if needed.
-
One or more attachments were assembled incorrectly. Make sure the filter, brushes and dust bag were assembled according to these instructions.
• Make sure the suction inlet is not clogged up.
• The dust compartment lid was not closed properly.
• The dust bag is full. Replace the dust bag.
• Clean the Pure Clean Hepa 13 filter and replace it, if needed. -
Reduce the suction power, especially on carpets and fabrics in general.
- Make sure the bristle-adjustment pedal is in the correct position based on the surface to be cleaned.
DESCRIPTION DE L'APPAREIL
Causes possibles / Solutions
- DESCRIZIONE DELL'APPARECCHIO
- DESCRIPTION OF THE APPLIANCE
- INTRODUCTION
- GENERAL SAFETY RULES
- BEFORE USE
- Assembling (A)
- USING THE UPRIGHT VACUUM CLEANER (B)
- CLEANING AND MAINTENANCE
- Cleaning the appliance
- Cleaning the attachments
- Cleaning the dust compartment (C)
- Replacing the dust bag Pure Clean (D)
- Cleaning the Pure Clean Hepa 13 filter (E)
- ATTACHMENTS
- Parking brush (F)
- Parquet brush (G)
- Turbo brush (H)
- Precision nozzle (I)
- Upholstery nozzle (J)
- ELECTRICAL APPLIANCES
- TROUBLESHOOTING
- Problem
- Possible causes / Solutions
- DESCRIPTION DE L'APPAREIL
- Causes possibles / Solutions
Brand : HOTPOINT
Model : HS B16 AA0
Category : Vacuum Cleaner